С помощью командной строки можно выполнять любые операции с файлами и папками. Например, их можно редактировать, копировать, перемещать или переименовывать. В данной статье мы рассмотрим именно переименования. Здесь вы узнаете, как переименовать файл или папку в командной строке Windows 10 или Windows 7.
Команда RENAME (REN)
Для переименования файлов и папок в командной строке Windows 10 или Windows 7 нужно использовать команду REN (или ее синоним RENAME). Данная команда принимает путь к файлу, который нужно переименовать, и новое название. Синтаксис команды выглядит следующим образом:
rename [<drive>:][<path>]<filename1> <filename2>

ren [<drive>:][<path>]<filename1> <filename2>
| [<drive>:] | Диск, на котором расположен файл или каталог, который нужно переименовать. |
| [<path>] | Путь к файлу. |
| <filename1> | Имя файла |
| <filename2> | Новое имя для файла. |
Важные замечания:
- Команда rename позволяет использовать подстановочные знаки (* и ?). С их помощью можно переименовать сразу несколько файлов. Замененные подстановочными знаками символы будут идентичными символам из исходного имени.
- Новое имя (<filename2>) должно быть уникальным. Если такое имя уже занято, то будет выведена ошибка.
- Команду rename нельзя использовать для перемещения файлов в другую папку или на другой диск.
Примеры переименования
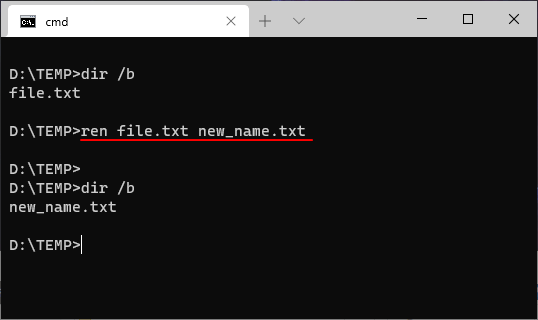
Для того чтобы переименовать файл в текущей папке достаточно ввести команду «ren» и указать старое и новое название. Например:
ren file.txt new_name.txt
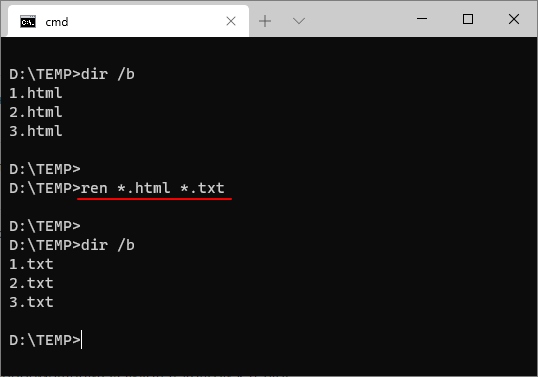
Для переименования сразу нескольких файлов можно использовать подстановочные знаки (* и ?). Например, для того чтобы изменить расширение всех файлов с html на txt нужно выполнить следующую команду:
ren *.html *.txt
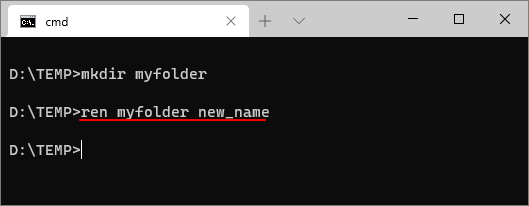
Таким же образом переименовываются и папки.
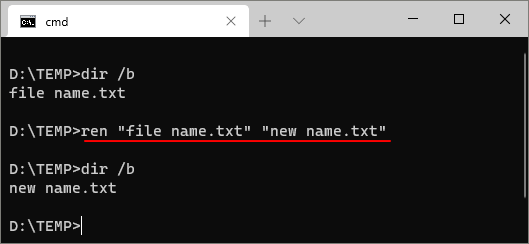
Если в названии файла или папки имеются пробелы, то такие названия нужно заключать в двойные кавычки. Например:
ren "file name.txt" "new name.txt"
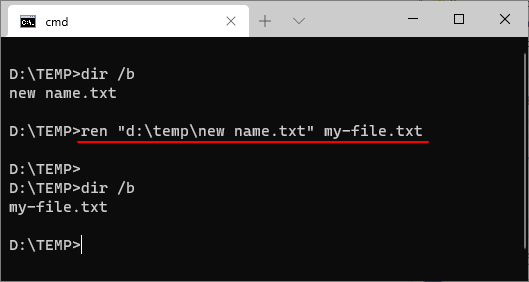
При необходимости можно указать полный путь к исходному файлу, который нужно переименовать. Например, для того чтобы переименовать документ «new name.txt» в папке «d:\temp\» нужно выполнить следующую команду:
ren "d:\temp\new name.txt" my-file.txt
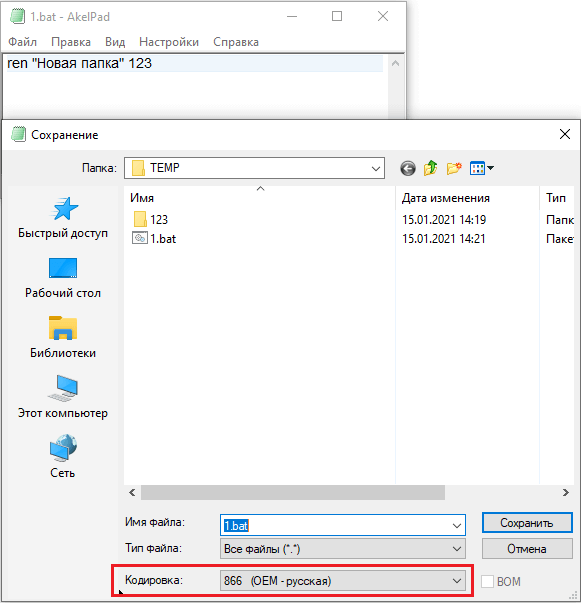
Обратите внимание, если вы создаете командный файл (*.bat, *.cmd), то для корректного переименования файлов или папок с кирилличными символами, текст команд должен быть сохранен в DOS-кодировке (CP866).
Сохранить в такой кодировке можно с помощью текстового редактора Akelpad (скачать).
Посмотрите также:
- Как изменить расширение файла в Windows 7
- Как передать файл большого размера через Интернет
- Как закрепить BAT-файл на панели задач или в меню «Пуск»
- Как быстро выделить сразу все файлы в папке
- Как изменить дату создания (изменения) файла в его свойствах
Автор
Александр Степушин
Создатель сайта comp-security.net, автор более 2000 статей о ремонте компьютеров, работе с программами, настройке операционных систем.
Остались вопросы?
Задайте вопрос в комментариях под статьей или на странице
«Задать вопрос»
и вы обязательно получите ответ.
The ren (or rename) command can be used to rename files and folders in the Window command prompt (CMD).
The syntax of the rename command is as follows:
rename file-name new-file-nameExamples
Rename file1.txt to file2.txt:
ren file1.txt file2.txtRename the name of a directory from Pictures to Documents:
ren Pictures DocumentsUse quotation marks if the file or folder name contains spaces:
ren "New folder" "Documents"The ren command supports wildcards to rename multiple files at once. For example, the following command renames the extension of all files in a folder (from .txt to .doc):
ren *.txt *.docNote that you can’t move files from one directory to another with the ren command. For that, use the move command.
A file name is described as the title of the file and the file extension. When you rename a file, only the first part of the file name is changed. The file extension remains the same and usually, is not to be changed. In case, you need to change the file extension as well, select the entire file and change the name and the extension as desired. In this post, we will learn how to rename a file or a folder in Windows 11 and Windows 10 and the various ways to do so.
There are multiple ways to rename a file or folder in Windows 10. They are as mentioned below:
- Using Context Menu – Right-clicking on the item
- Using Properties
- Using Keyboard Shortcut – Alt+Enter
- Using Keyboard Shortcut – F2
- Using Home Menu in File Explorer
- By Two Single Clicks
- Using Command Prompt
- Using PowerShell.
1] Using Context Menu – Right-clicking on the item
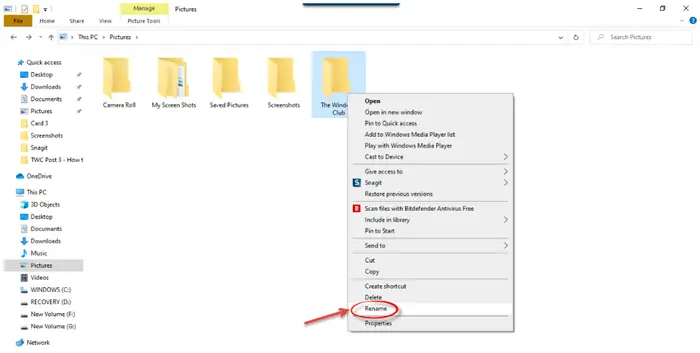
Select the file or folder you want to rename and right-click on that item. The Context Menu will open.
Click on the ‘Rename’ option and enter the new name of the file or folder, and then hit Enter or click anywhere else on the screen.
In Windows 11, you will have to click on the Rename icon or select Show more options and then click on Rename.
2] Using Properties
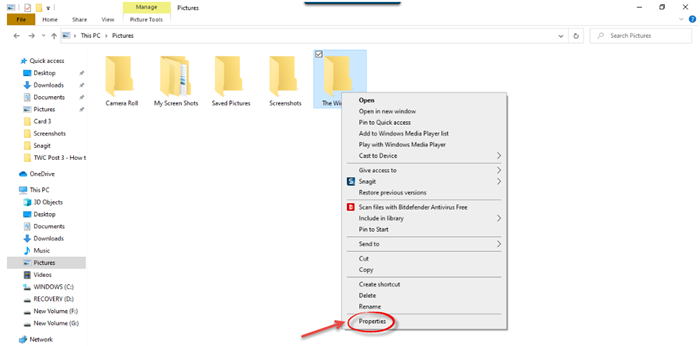
Right-click on the file or folder and select ‘Properties’.
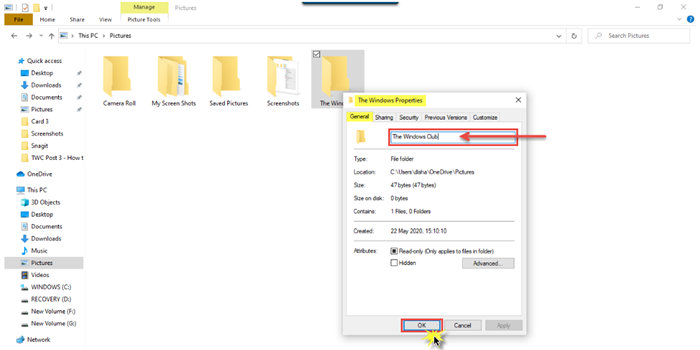
The Properties window will open. In the General tab, enter the new file name and then click OK.
3] Using Keyboard Shortcut – Alt+Enter
Select the file you want to rename and simply press Alt+Enter.
The File Properties pop-up will open. Type in the new name of the file and click OK.
4] Using Keyboard Shortcut – F2
Select the file or folder and simply press F2 to rename the item.
TIP: How to batch rename files and file extensions.
5] Using Home Menu in File Explorer
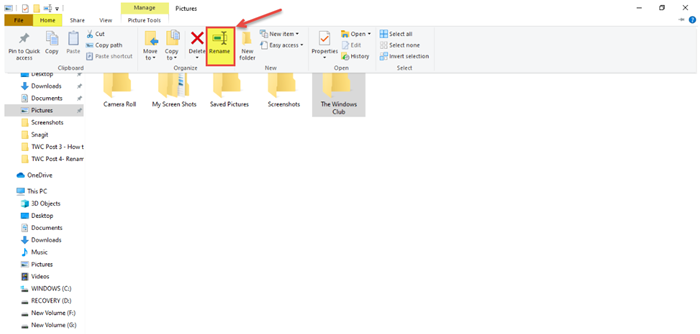
To rename using File Explorer, select the item and click on ‘Home’.
Further, click on the ‘Rename’ option and follow the same steps.
Read: Trick to Rename folders, files in serial order instantly.
6] By Two Single Clicks
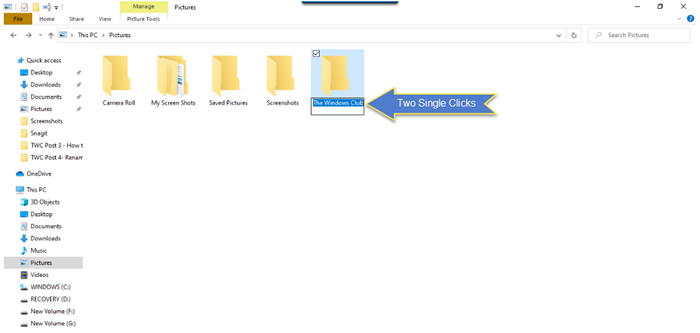
Click on the file or folder two single times. The file or folder name will get highlighted.
Enter the new name for the file and press the Enter key to save it.
Read: Best free Bulk File Renamer software to Mass Rename files.
7] Using Command Prompt
Command Prompt allows you to rename the files or folders using the ren command. Open the File Explorer and go to the destination file or folder. Next, click on the address bar and type “cmd”, and then press Enter. Use the following syntax:
ren file_path new_name
For example, this will rename the document named fileA located on D drive to fileB.
ren d:\fileA.doc fileB.doc
8] Using PowerShell
Open the file or folder location and open a PowerShell window there
Use the rename-item command:
rename-item –path d:fileA –newname d:fileB
The command below renames the folder fileA to fileB on Drive.
TIP: In Windows, now, it’s even easier to rename multiple files or folders. If you want to rename multiple files, after renaming the first file, just tap the TAB button, and you’ll be moved on to the next in-line file or folder. You can thus immediately rename the following file.
Moreover, Windows also has one more nice feature. Even if you have the ‘show file extension’ feature enabled, it does not highlight the file type extension while renaming. So you are safer, as while renaming, you will not change or delete the extension by mistake.
These are the various ways in which we can rename a file or a folder in Windows 11/10.
Now read: 7 ways to move Files and Folders in Windows 11/10.
The rename command is used to rename a single file or folder from the Command Prompt.
Rename and ren can be used interchangeably. They’re the exact same command.
Rename Command Availability
The rename command is available from within Command Prompt in most versions of Windows, including Windows 11, Windows 10, Windows 8, Windows 7, Windows Vista, Windows XP, Windows Server operating systems, and some older versions of Windows, too.
This is also a Recovery Console command available from within the Recovery Console in Windows 2000 and Windows XP.
Rename Command Syntax
rename [drive:][path] filename1 filename2
| Rename Command Options | |
|---|---|
| Item | Explanation |
| drive: | This is the drive containing the file you want to rename. |
| path | This is the folder or folder/subfolders located on the drive:, containing filename1 that you want to rename. |
| filename1 | This is the name of the file you want to rename. |
| filename2 | This is the name you want to rename filename1 to. You can not specify a new drive or path for the renamed file. |
Rename Command Examples
Below are several examples showing how you can use the rename command.
Rename File in Specified Folder
rename c:\windows\win.ini win.old
In the above command, we’re renaming win.ini, located in the C:\Windows folder, to win.old.
Rename File in the Same Folder
rename boot.new boot.ini
In this one, the rename command has no drive: or path information specified, so the boot.new file is renamed to boot.ini, all within the directory you typed the rename command from.
For example, if you type rename boot.new boot.ini from the C:\> prompt, the boot.new file located in C:\ will be renamed to boot.ini.
Rename File Extension and Name
ren file.bak regfile.reg
In this example, the rename command (shortened here to ren) is used to rename just the file extension, similar to the two example above.
We’re renaming a backup with the bak file extension to a file with the REG file extension so that we can restore it to the Windows Registry (something you can only do if it ends in .reg).
However, we’re also changing the name of the file to regfile, something we can do inside the same command so that we don’t have to run two separate commands.
Changing the file extension doesn’t actually change the file’s format. Unlike a file converter tool which formats the actual file itself, the ren command can only adjust the suffix. In most situations, like in the example above, this results in Windows treating it differently (e.g., now it can open in Windows Registry).
Rename a Folder
ren pictures "vacation pics"
In this last sample, we’re using the rename command to rename a folder instead of a file. The pictures folder will become vacation pics. Quotes are used around the folder name since it contains a space.
Rename Related Commands
This command is often used with the dir command so that you can see the list of filenames within Command Prompt before choosing which one to rename.
The ren command can’t specify a different drive or path when renaming files. Instead, the cd command can be used with the rename command to change the working directory in Command Prompt to wherever the file or folder is located.
Thanks for letting us know!
Get the Latest Tech News Delivered Every Day
Subscribe
Программистам часто приходится работать в консоли — например, чтобы запустить тестирование проекта, закоммитить новый код на Github или отредактировать документ в vim. Всё это происходит так часто, что все основные действия с файлами становится быстрее и привычнее выполнять в консоли. Рассказываем и показываем основные команды, которые помогут ускорить работу в терминале под OS Windows.
Для начала нужно установить терминал или запустить командную строку, встроенную в Windows — для этого нажмите Win+R и введите cmd. Терминал часто встречается и прямо в редакторах кода, например, в Visual Studio Code.
Чтобы ввести команду в консоль, нужно напечатать её и нажать клавишу Enter.
Содержимое текущей папки — dir
Выводит список файлов и папок в текущей папке.
C:\content-server>dir
 Том в устройстве C имеет метку SYSTEM
 Серийный номер тома: 2C89-ED9D

 Содержимое папки C:\content-server

06.10.2020  00:41    <DIR>          .
06.10.2020  00:37    <DIR>          .circleci
16.07.2020  16:04               268 .editorconfig
16.07.2020  16:04                10 .eslintignore
16.07.2020  16:04               482 .eslintrc
06.10.2020  00:37    <DIR>          .github
16.07.2020  16:04                77 .gitignore
06.10.2020  00:41    <DIR>          assets
06.10.2020  00:41    <DIR>          gulp
16.07.2020  16:10               379 gulpfile.js
16.07.2020  16:10           296 320 package-lock.json
16.07.2020  16:10               751 package.json
16.07.2020  16:04               509 README.md
Открыть файл
Чтобы открыть файл в текущей папке, введите его полное имя с расширением. Например, blog.txt или setup.exe.
Перейти в другую папку — cd
Команда cd без аргументов выводит название текущей папки.
Перейти в папку внутри текущего каталога:
C:\content-server>cd assets
C:\content-server\assets>
Перейти на одну папку вверх:
C:\content-server\assets>cd ..
C:\content-server>
Перейти в папку на другом диске:
c:\content-server>cd /d d:/
d:\>
Чтобы просто изменить диск, введите c: или d:.
Создать папку — mkdir или md
Создаём пустую папку code внутри папки html:
d:\html>mkdir coded:\html>dir

 Содержимое папки d:\html

03.11.2020  19:23    <DIR>           .
03.11.2020  19:23    <DIR>           ..
03.11.2020  19:25    <DIR>           code
               0 файлов              0 байт
               3 папок  253 389 438 976 байт свободно
Создаём несколько пустых вложенных папок — для этого записываем их через косую черту:
d:\html>mkdir css\js
d:\html>dir
 Том в устройстве D имеет метку DATA
 Серийный номер тома: 0000-0000

 Содержимое папки d:\html

03.11.2020  19:23    <DIR>           .
03.11.2020  19:23    <DIR>           ..
03.11.2020  19:25    <DIR>           code
03.11.2020  19:29    <DIR>           css
Создаётся папка css, внутри которой находится папка js. Чтобы проверить это, используем команду tree. Она показывает дерево папок.
Удалить папку — rmdir или rd
Чтобы удалить конкретную папку в текущей, введите команду rmdir:
d:\html\css>rmdir js
При этом удалить можно только пустую папку. Если попытаться удалить папку, в которой что-то есть, увидим ошибку:
d:\html\css>d:\html>rmdir css
Папка не пуста.
Чтобы удалить дерево папок, используйте ключ /s. Тогда командная строка запросит подтверждение перед тем, как удалить всё.
d:\html>rmdir css /s
css, вы уверены [Y(да)/N(нет)]? y
Показать дерево папок — tree
В любом момент мы можем увидеть структуру папок. Для этого используется команда tree.
d:\html>tree
Структура папок тома DATA
Серийный номер тома: 0000-0000
D:.
├───code
└───css
    └───js
Если вы хотите посмотреть содержимое всего диска, введите tree в корне нужного диска. Получится красивая анимация, а если файлов много, то ещё и немного медитативная.
Удаление файла — del или erase
Команда для удаления одного или нескольких файлов.
d:\html>del blog.txt
Переименование файла — ren или rename
Последовательно вводим ren, старое и новое имя файла.
d:\html>dir
 Содержимое папки d:\html

03.11.2020  19:23    <DIR>            .
03.11.2020  19:23    <DIR>            ..
03.11.2020  19:59                 0 blag.txt

d:\html>ren blag.txt blog.txt

d:\html>dir
 Содержимое папки d:\html

03.11.2020  19:23    <DIR>            .
03.11.2020  19:23    <DIR>            ..
03.11.2020  19:59                 0 blog.txt
Команды одной строкой
Очистить консоль — cls.
Информация о системе — systeminfo.
d:\html>systeminfo

Имя узла:                         DESKTOP-6MHURG5
Название ОС:                      Майкрософт Windows 10 Pro
Версия ОС:                        10.0.20246 Н/Д построение 20246
Изготовитель ОС:                  Microsoft Corporation
Параметры ОС:                     Изолированная рабочая станция
Сборка ОС:                        Multiprocessor Free
Информация о сетевых настройках — ipconfig.
d:\html>ipconfig
Настройка протокола IP для Windows
Адаптер Ethernet Ethernet 2:

   Состояние среды. . . . . . . . : Среда передачи недоступна.
   DNS-суффикс подключения . . . . . :
Список запущенных процессов — tasklist.
c:\>tasklist

Имя образа                     PID Имя сессии          № сеанса       Память
========================= ======== ================ =========== ============
System Idle Process              0 Services                   0         8 КБ
System                           4 Services                   0     2 688 КБ
Secure System                   72 Services                   0    23 332 КБ
…
Справка по командам — help
Команда help без аргументов выводит список всех возможных команд. help вместе с именем команды выведет справку по этой команде.
d:\html>help tree
Графическое представление структуры папок или пути.

TREE [диск:][путь] [/F] [/A]

   /F   Вывод имён файлов в каждой папке.
   /A   Использовать символы ASCII вместо символов национальных алфавитов.
В этой статье приведены не все команды и не все их возможности, но вы всегда можете воспользоваться командой help и узнать о том, что ещё может командная строка.
👉🏻 Больше статей о фронтенде и работе в айти в телеграм-канале.
Подписаться
Материалы по теме
- 10 горячих клавиш VS Code, которые ускорят вашу работу
- Полезные команды для работы с Git
- Полезные команды для работы с Node. js
«Доктайп» — журнал о фронтенде. Читайте, слушайте и учитесь с нами.
ТелеграмПодкастБесплатные учебники
