Set a new download location if you don’t have enough disk space
by Ivan Jenic
Passionate about all elements related to Windows and combined with his innate curiosity, Ivan has delved deep into understanding this operating system, with a specialization in drivers and… read more
Updated on
- The default download location in Windows 10 is stored in the C drive.
- However, your system files and other programs are also installed in that drive, so you don’t have a lot of space left for downloads.
- Changing the default location of the Windows 10 download folder is straightforward, and you have two different options for doing this.
You must have found this guide because you need to know how to change the download location on Windows 10.
In the tutorial below, you’ll learn how easy it is to change the default download location on your Windows 10 PC in only five minutes of your time.
How to change the default download location on Windows 10?
You may use a few methods to change the default download location on Windows 10. These two are the top recommendations, however:
- Using the Download settings of File Explorer
- Using the Windows Settings app
Also, note that individual browsers may have their default download location settings. And these will override the operating systems’ defaults.
However, regardless of what you opt for, you should get the same results.
What is the default download location for files on Windows?
The default download location for files on Windows is the Downloads folder, typically in the user’s profile folder.
How we test, review and rate?
We have worked for the past 6 months on building a new review system on how we produce content. Using it, we have subsequently redone most of our articles to provide actual hands-on expertise on the guides we made.
For more details you can read how we test, review, and rate at WindowsReport.
The full path to the folder is usually the path mentioned below, where [username] is the user account’s name.
C:\Users[username]\Downloads
However, the user or software installations can change the location of the Downloads folder.
So, without wasting more time, let’s begin the tutorial and create a new directory for our downloaded items.
How can I change where downloads go on Windows 10?
1. Change the download location via Downloads Properties
- Press Windows + E to open File Explorer.
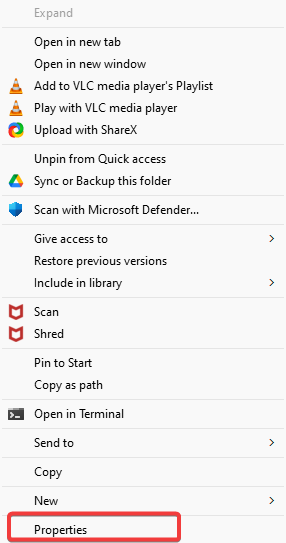
- Right-click on Downloads.
- Click on Properties.
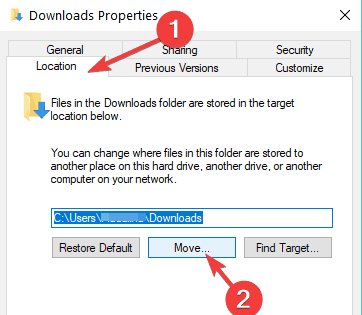
- Press on the Location tab presented on the upper side of that window. Now you should be able to edit the download path. So, click Move to select a new location.
- Write the drive where you want your items downloaded and in which folder. Note: If the folder doesn’t exist, after you click on Apply, you will be asked if you want to create that download folder and click OK.
- Another Move folder window will appear where you will have to click Yes.
- Now, you must click the OK button in the Download Properties window.
- Go to the location where you selected to download files and check if Windows has made a Downloads folder there.
Note: Restart your PC if it hasn’t created the Downloads folder, and check again after powering up.
- How to Change the Icon Size on Windows 10
- How to Use Steam Deck’s Keyboard in Desktop Mode
- How to Format an NVMe SSD on Windows 11
- How to Download & Install New Microsoft Office Fonts
- Offline Files on Windows 11: How to Enable or Disable
2. Change the download location via Settings
If Windows 10 is your OS of choice, you can also change the download folder save location from the Settings page, from the dedicated Storage section.
1. Press the Windows key on your keyboard to open the Windows search box.
2. Type settings and click on the result.
2. In the Settings app, click on System.
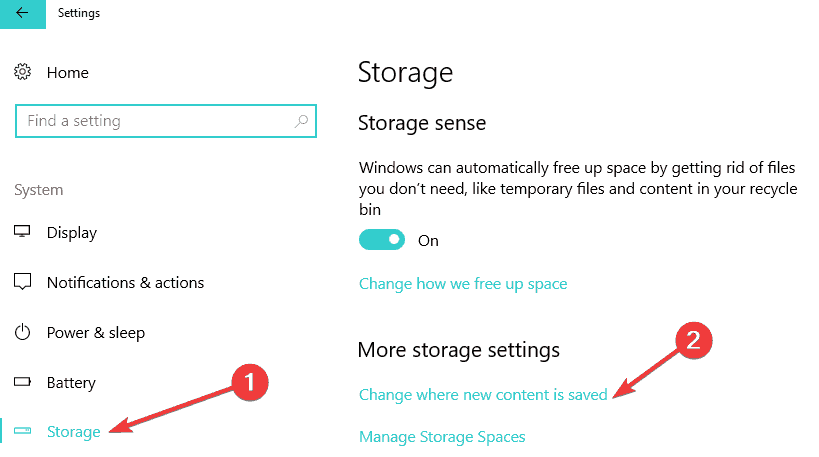
3. Select Storage.
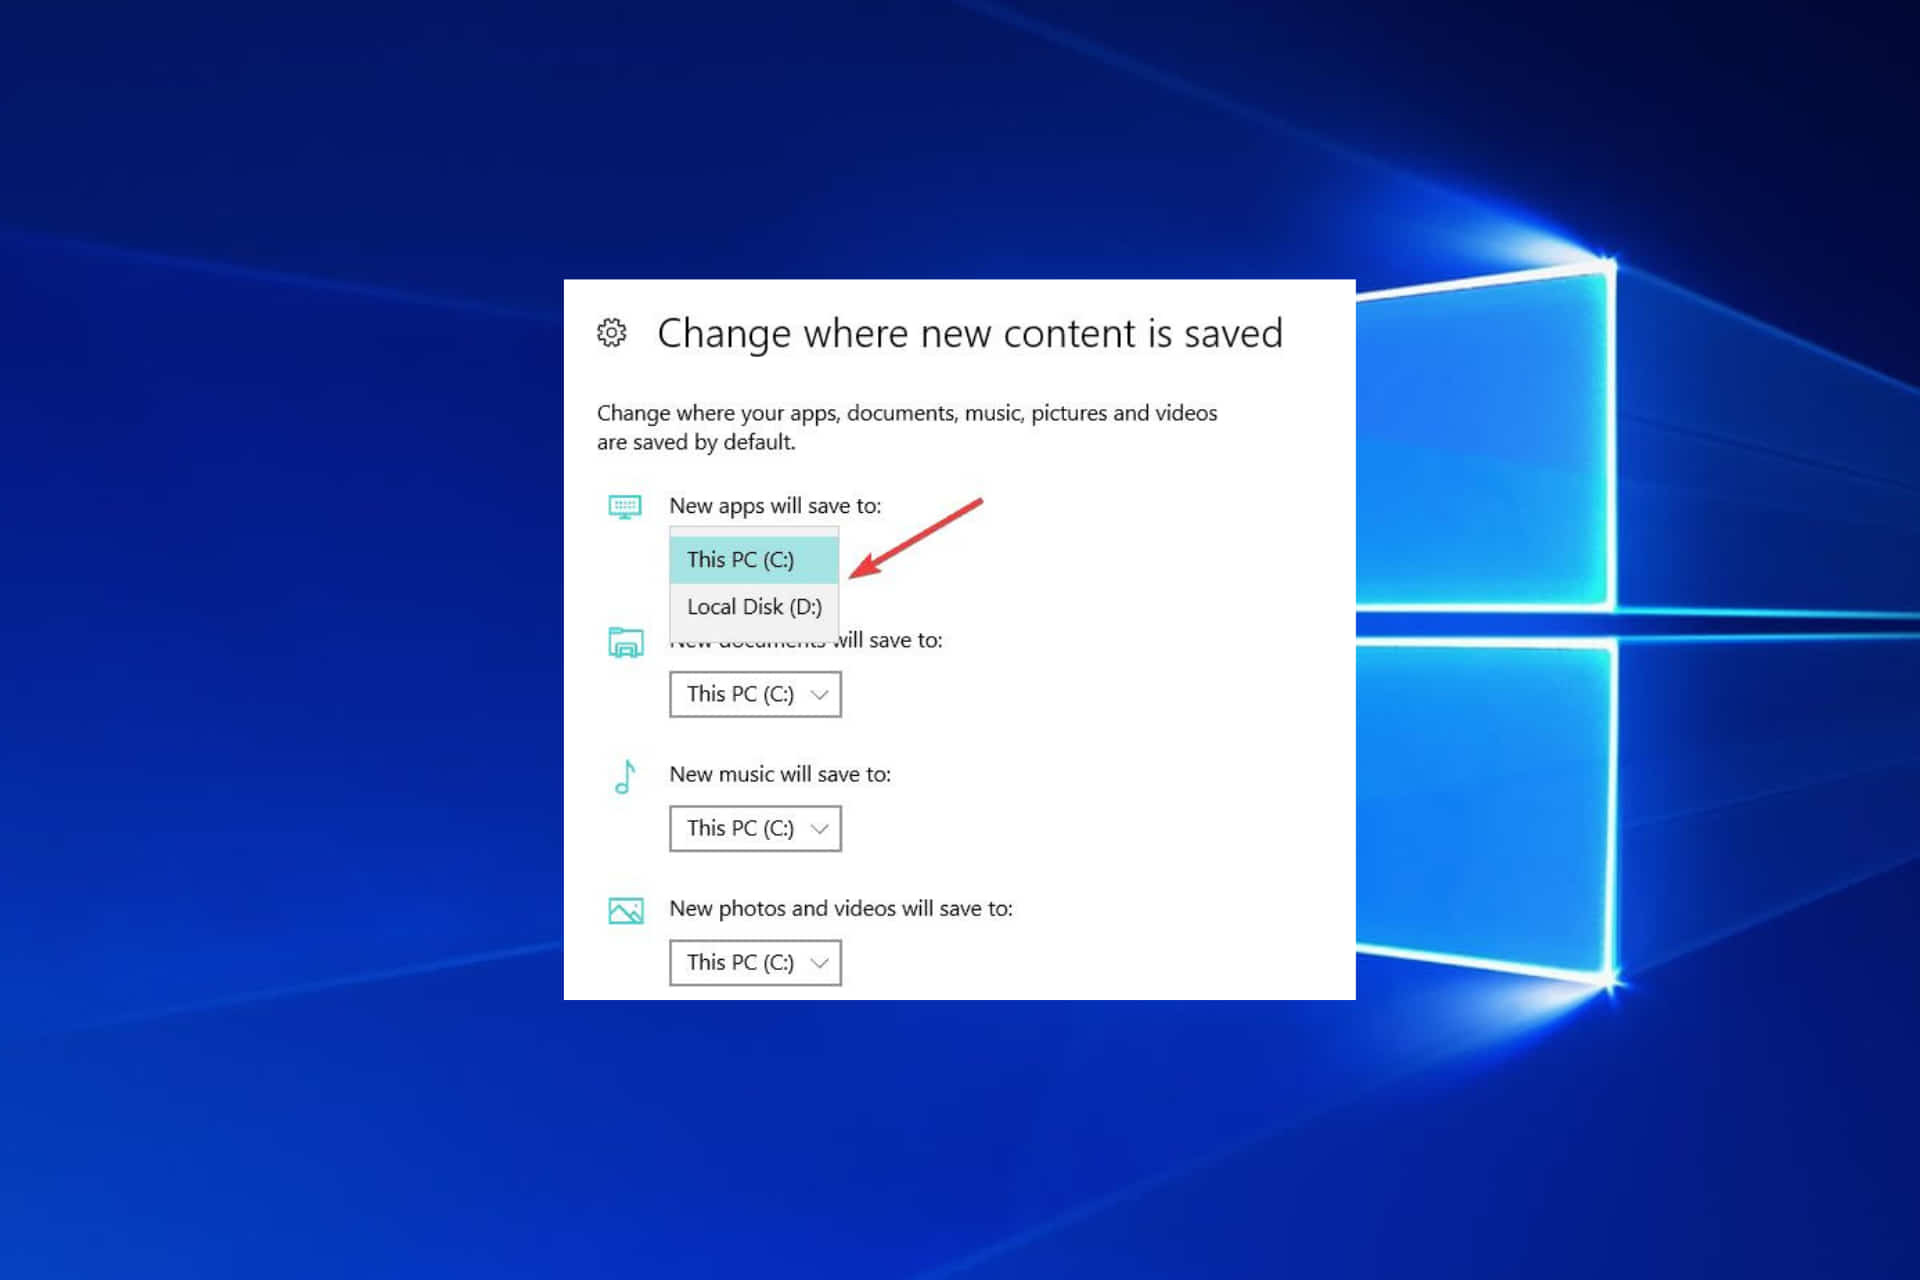
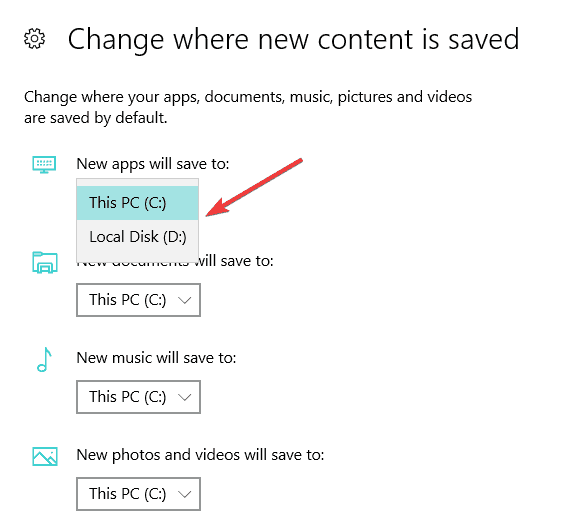
4. Now, click on the option Change where new content is saved.
5. Set your preferred download location for each item category.
Also, you can change the default download location folder where downloads go when the message says you don’t have enough free disk space on the partition.
Now you can download your files or programs in Windows 10 without worrying about the download location. Share your thoughts on this article in the comments below.
Moreover, the location where a Windows 10 update is saved on your computer is tricky, but for that, you can check this guide on where’s the default download folder for the Windows 10 versions.
Finally, feel free to list your suggestions on what we can do to help you further with your Windows 7 or Windows 10 computer.
When we download a file using any Web Browser (Internet Explorer, Microsoft Edge, Mozilla Firefox, Google Chrome, Opera, Safari etc.). It will be automatically downloaded into default Downloads folder in Windows 7, 8.1, 10. Default Downloads folder doesn’t create any problem and Works well without any issue for all web browsers and downloading softwares such as IDM (Internet Download Manager).
However, we can change download folder location individually by changing download file location in any browser and software-app. But What if you want to change default file download path for all Web browsers, softwares and apps in Windows 10.
Yes, we can change default download folder at the system level. So all Internet Web Browsers, Softwares, and apps will automatically follow system level settings and will automatically change download folder location according to your System Download folder location settings.
If you want to change default downloads folder location in Windows 10 at the system level follow the steps below:
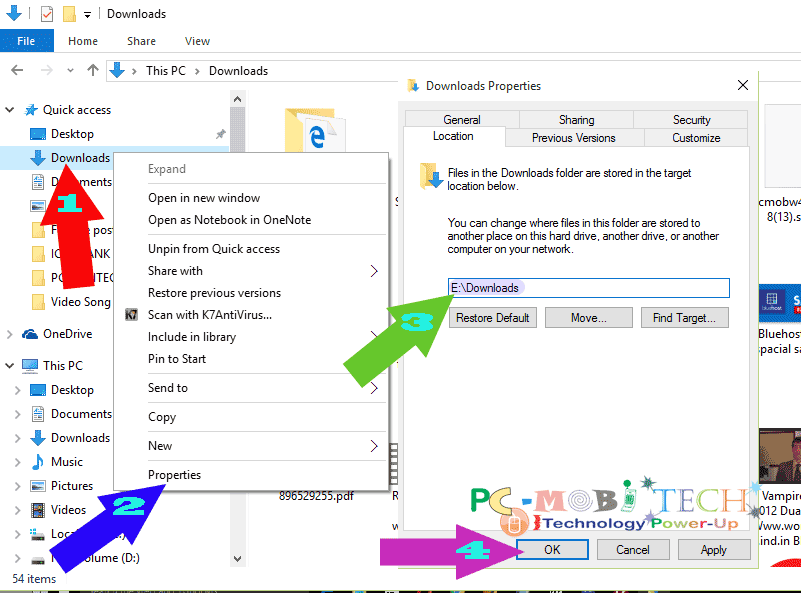
- Open Windows File Explorer and right-click on Download available in the left tree.
- Now context menu will appear to choose Properties from the menu.
- Downloads Properties dialog box will appear, Change the Downloads folder location according to your need. By default it is set to C:\Users\username\Downloads and you can easily change it by entering a location eg C:\Downloads or other drive folder location E:\Downloads etc. If you want to select folder manually then you can use Move.. button. After clicking on Move.. you can choose the choose location where you want to save default download files. And here it is not necessary to give name Downloads you give other alternate names as you wish.
- After changing folder name or location click on OK button.
Now you have been successfully changed Downloads folder name or file store location in Windows 10.
Also See:
- Howto enable Windows 8.1 Full-screen Start menu in Windows 10.
- Windows 10 App Store not showing apps relevant to my country.
- 5 Simple battery saving tips for Windows 10 Laptop.
- How to make and change Defaults app on Windows 10
I am Pramod Yadav, the visionary Owner and dedicated Editor-in-Chief at PCMobitech. My passion for technology and in-depth understanding of the digital realm drive me to curate compelling content. With a focus on Windows, Android, iOS, VPNs, and cybersecurity, I craft insightful articles, guides, and tips & tricks to empower my readers.
Changing the default download folder on Windows 10 can help you better organize and manage your downloaded files. By specifying a specific folder for downloads, you can easily locate and access your files without having to search through various directories. In this tutorial, we will guide you through the steps to change the default download folder on Windows 10.
Step 1: Open the File Explorer by clicking on the folder icon in the taskbar or pressing the Windows key + E on your keyboard.
Step 2: In the File Explorer window, click on «This PC» in the left-hand sidebar.
Step 3: Under «Devices and drives,» locate and right-click on the drive where you want to change the default download folder. Select «Properties» from the context menu.
Step 4: In the Properties window, navigate to the «Location» tab.
Step 5: Click on the «Move…» button.
Step 6: Choose the desired folder where you want your downloads to be saved. You can either select an existing folder or create a new one by clicking the «New Folder» button.
Step 7: Once you’ve selected the folder, click on the «Apply» button, and then click «OK» to save the changes.
| Pros | Cons |
|---|---|
| 1. Allows you to easily organize and locate downloaded files. | 1. Changing the default download folder may require administrative privileges. |
| 2. Reduces clutter in the default download folder. | 2. Moving the default download folder may cause issues for certain applications. |
| 3. Ensures that files are saved in a location of your choice. | 3. Moving the default download folder may require updating settings in some applications. |
By following these simple steps, you can easily change the default download folder on Windows 10 and have more control over where your downloaded files are stored. Keep in mind that changing the default download folder may affect certain applications, so it’s essential to update any necessary settings accordingly. Enjoy a more organized file management experience on your Windows 10 device!
Video Tutorial: How do I change how a download file opens?
How to change the default installation path of apps and programs on Windows 10?
Changing the default installation path of apps and programs on Windows 10 involves modifying the settings within the operating system. Here’s a step-by-step guide on how to accomplish this:
1. Open the Settings app: Press the Windows key + I on your keyboard to open the Settings app or search for «Settings» in the Windows search bar and click on the corresponding result.
2. Go to the System settings: Within the Settings app, locate and click on the «System» option.
3. Select the «Storage» tab: Inside the System settings, click on the «Storage» tab located on the left-hand side menu.
4. Change the default installation drive: Scroll down on the Storage page until you find the «More storage settings» section. Under this section, click on the «Change where new content is saved» option.
5. Choose the new installation drive: You will see a series of drop-down menus where you can select new default locations for certain file types. Look for the «New apps will save to» drop-down menu and select the desired drive where you want the apps and programs to be installed by default.
6. Apply the changes: Once you have chosen the new installation drive, close the Settings app. The changes will take effect immediately, and any future installations will occur in the specified location.
It’s worth noting that not all apps provide an option to choose the installation path during setup, so this method might not work for all applications. In such cases, you may need to manually select the installation path during the application installation process itself.
Remember to exercise caution when modifying system settings, as any incorrect changes may affect the functionality of your Windows 10 operating system.
To change the default download folder on your device, follow these steps:
1. On iOS devices (iPhone 14, iPhone 14 Pro, iPhone 14 Plus) with iOS 16:
– Open the Settings app.
– Scroll down and tap on «Safari» (the default web browser).
– Look for the «Downloads» section.
– Tap on «Downloads» and select «On My iPhone» or «On My iPad.«
– Choose a desired folder or create a new one by tapping the «New Folder» option.
– Your new selection will become the default download folder for Safari.
2. On Android devices (assumption as iPhone mentioned in your question):
– Open your preferred web browser (e.g., Chrome, Firefox).
– Tap the menu icon (usually represented by three vertical dots) in the top right corner of the browser.
– Look for «Settings» or a similar option and tap on it.
– Scroll down until you find the «Downloads» section.
– Tap on «Downloads» and choose «Download location.«
– You’ll be presented with different storage options or a file manager app to browse and select a new default download folder.
– Once you’ve made your selection, your web browser will start saving future downloads to the chosen folder.
By following these steps, you can easily change the default download folder on your device according to your preferences.
How do I change the automatic download settings in Windows 10?
To change the automatic download settings in Windows 10, follow these steps:
1. Open the Start menu by clicking on the Windows icon in the bottom left corner of the screen.
2. Click on the Settings icon, which looks like a gear.
3. In the Settings window, click on «Update & Security,» which is represented by an icon with two curved arrows.
4. In the left sidebar of the Update & Security window, click on «Windows Update.«
5. On the Windows Update page, click on the «Advanced options» link.
6. Under the «Choose how updates are installed» section, click on the drop-down menu and select your preferred option:
– Automatic (recommended): This option automatically downloads and installs updates as they become available.
– Notify to schedule restart: This option will notify you when updates are ready to be installed and will allow you to choose the most convenient time for the installation and restart.
– Only notify for download and notify for install: This option will only notify you when updates are available for download and install, but it won’t automatically download or install them.
7. Once you’ve selected the desired option, close the Settings window.
By following these steps, you can easily change the automatic download settings in Windows 10 to suit your preferences.
How do I stop Windows 10 from automatically downloading?
To disable automatic downloads in Windows 10, you can follow these steps:
1. Open the «Settings» app by clicking on the Start menu and selecting the gear icon.
2. In the Settings menu, click on «Update & Security.«
3. From the left-hand navigation pane, click on «Windows Update.«
4. On the right side of the Windows Update settings window, click on «Advanced options.«
5. In the Advanced options, you will find the «Automatic Updates» section.
6. By default, Windows 10 has automatic updates enabled under the «Choose when updates are installed» section. To stop automatic downloads, click on the drop-down menu and select «Notify to schedule restart.«
Following these steps will prevent Windows 10 from automatically downloading and installing updates. Instead, you will receive notifications about available updates, allowing you to schedule and install them according to your preference.
It’s worth noting that while disabling automatic updates may provide more control over when updates are installed, it is important to keep your system up-to-date for security and performance reasons. Therefore, it is recommended to manually install updates regularly or set a reminder to check for updates frequently.
Additionally, it’s important to stay informed about the latest updates and security patches released by Microsoft. Keeping track of news and information regarding Windows updates can help you make informed decisions about when and which updates to install.
What is the default internal Storage download folder?
The default internal storage download folder on iPhones running iOS 16, including the latest models like the iPhone 14, iPhone 14 Pro, and iPhone 14 Plus, is the «Downloads» folder. This folder is a system predefined location where files downloaded from the internet or received through various applications are stored.
To access the default download folder on iOS 16, you can follow these steps:
1. Unlock your iPhone and navigate to the home screen.
2. Locate the «Files» app, which is a preinstalled application on iOS devices.
3. Tap on the «Files» app icon to launch it.
4. Once the app opens, you will see the different storage locations available. Tap on «On My iPhone» or «On My [Device Name]» to access the local device storage.
5. Within the local storage section, you should find the «Downloads» folder. Tap on it to open the folder and view the downloaded files.
Please note that the exact steps to access the download folder may vary slightly depending on your iOS version, but generally, the «Files» app is the go-to option for managing files and accessing the default download location on iPhones.

В этой инструкции для начинающих о том, как изменить папку «Загрузки» в Windows 10 (а точнее — её расположение по умолчанию, т.е. переместить папку, в том числе и на другой диск), а также некоторая дополнительная информация, которая может оказаться полезной при действиях с этой папкой. Также может быть интересно: Как переместить папку загрузки обновлений в Windows 10, Как изменить папку загрузок в Google Chrome.
- Как переместить папку «Загрузки» в Windows 10
- Изменение папки загрузок в браузерах и программах
- Отключение группировки по дате в загрузках Windows 10
- Видео инструкция
Изменение расположения папки «Загрузки»
Для того, чтобы переместить папку «Загрузки» в Windows 10 достаточно выполнить следующие простые шаги:
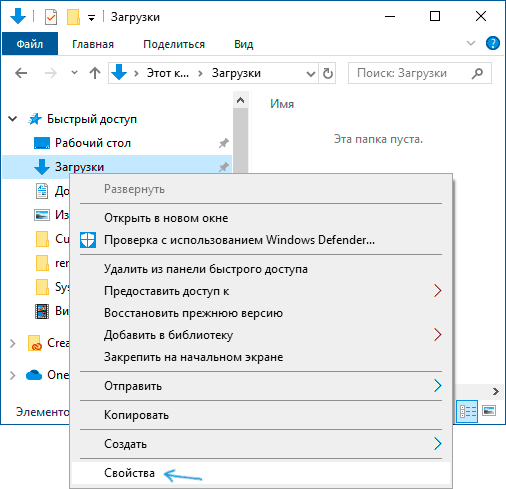
- В проводнике Windows 10 нажмите правой кнопкой мыши по папке «Загрузки» и откройте её свойства.
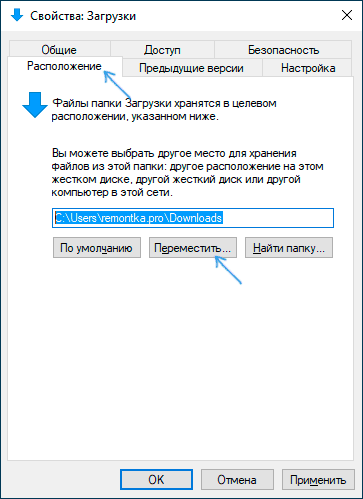
- На вкладке «Расположение» нажмите «Переместить» и выберите другую папку на компьютере, где вы хотите расположить папку загрузок.
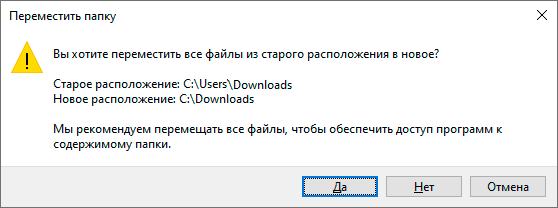
- Нажмите кнопку «Применить» и в диалоговом окне ответьте, требуется ли переместить в новую папку уже имеющиеся в папке «Загрузки» файлы (это может занять время) или не нужно.
- Дождитесь окончания перемещения файлов (если вы выбрали этот вариант) в новую папку.
На этом процесс будет завершен: браузеры и другие программы, которые скачивают файлы в системную папку «Загрузки» теперь будут скачивать их в новую, указанную вами папку.
Изменение папки загрузок в браузерах и программах
Большинство браузеров и многие другие программы, скачивающие файлы из Интернета, имеют собственные настройки, позволяющие указать, куда именно их следует загружать по умолчанию. Обычно, используется заданная системой папка, но не всегда.
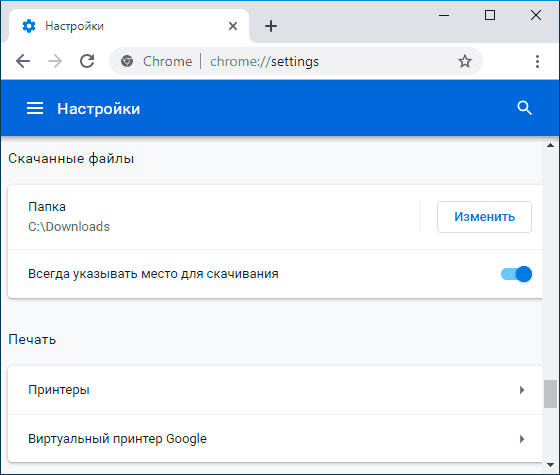
В разных программах это реализовано по-разному, но почти всегда нужные параметры можно найти в настройках. Например, в Google Chrome потребуется открыть настройки, открыть дополнительные параметры и указать папку в разделе «Скачанные файлы», как на скриншоте выше (а можно включить параметр, чтобы всякий раз при скачивании запрашивалось расположение, куда нужно размещать файл).
Отключение группировки по дате в папке «Загрузки»
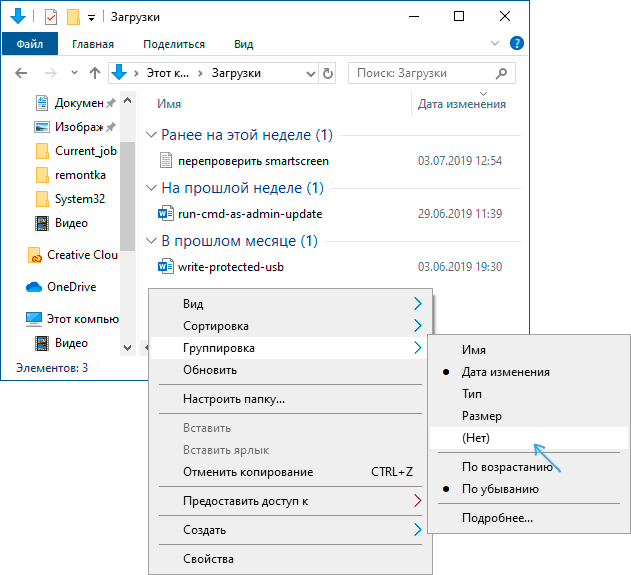
В последней версии Windows 10 файлы в папке «Загрузки» по умолчанию группируются по дате, что не всегда удобно для использования.
Чтобы включить стандартный вид, находясь в этой папке нажмите в пустом месте проводника правой кнопкой мыши, выберите пункт «Группировка», а затем — пункт «Нет».
Видео инструкция
В завершение — видео, в котором всё описанное выше показано наглядно. Возможно, для кого-то из вас так будет удобнее.
Are you fed up with your Windows 10 downloads always going to the same location? Do you wish you could change the default download location in Windows 10? If so, this article is for you! Here, we’ll show you simple yet effective steps to help you take control of your downloads by changing the default download location in Windows 10. So grab your mouse and keyboard and let’s get started!
Changing the Default Download Location in Windows 10
To change the default download location in Windows 10,
- Open File Explorer and select Documents.
- Right-click on the Downloads folder and select Properties.
- In the Properties window, select the Location tab.
- Click the Move button and browse to the new destination.
- Click Select Folder.
- Click Apply and then click OK.
The default download location on Windows 10 will now be changed to the new destination.
Changing Default Download Location in Windows 10
Downloading files to a specific location is important for keeping track of important documents and programs. Windows 10 offers users the ability to change the default download location to best suit their needs. This guide explains how to change the default download location in Windows 10.
Steps to Modify Download Location
There are a few steps to take in order to change the default download location in Windows 10. The first step is to open the Settings menu by clicking the Start menu and selecting Settings. In the Settings menu, choose the System option and then select the Storage tab from the left-hand side. This will open a list of available storage options, including the default download location.
The next step is to click on the Change location button and select a new download location from the list, or enter a custom location in the box provided. Once a new download location has been selected, click the Apply button to save the changes.
The last step is to open the File Explorer and confirm that the new download location is the default. To do this, open the File Explorer and look in the left-hand side panel and click on the Downloads folder. This should open the new default download location.
Changing the Download Location for Specific Programs
In addition to changing the default download location, it is also possible to change the download location for specific programs. To do this, open the File Explorer and select the program for which the download location needs to be changed. In the program’s folder, look for the Downloads folder and select Change location from the drop-down menu.
The next step is to select the new download location from the list or enter a custom location in the box provided. Once the new location has been selected, click the Apply button to save the changes. The new download location will now be the default for that specific program.
Using a Different Drive for Downloading Files
In some cases, users may wish to download files to a different drive than the default. To do this, open the File Explorer and select the drive which will be used for downloading. Right click on the drive and select Properties from the context menu. In the Properties window, select the Security tab and click the Advanced button.
In the Advanced Security Settings window, select the Owner tab and click the Edit button. This will open the Permissions window where users can add a new user or group to have access to the drive. Once the new user or group has been added, click the Apply button to save the changes.
Using a Different User Account for Downloading
The last option is to create a new user account on the computer and use it to download files. To do this, open the Settings menu and select the Accounts option. In the Accounts menu, select the Family & other users tab and click the Add someone else to this PC button. This will open the Add a user window where users can create a new user account.
Once the new user account has been created, users can log in with the new account and set the default download location for that account. This will allow users to download files to a different location than the default location.
Managing File Downloads
Once the download location has been changed, users can manage their downloads in a number of ways. Users can view their downloads in the File Explorer by selecting the Downloads folder from the left-hand side panel. This will open a list of all the files that have been downloaded to the computer.
Users can also use the search bar in the File Explorer to search for specific files that have been downloaded. This can be useful for finding files that have been downloaded to a different location. Additionally, users can use the Task Manager to view and manage all the active downloads on the computer.
Using Third-Party Applications
Lastly, users can use third-party applications to manage their downloads. There are a number of applications available which can help users manage their downloads, such as Download Manager and Free Download Manager. These applications allow users to manage their downloads in a more efficient way, as well as giving users access to advanced features such as scheduling downloads.
Conclusion
Changing the default download location in Windows 10 is a simple process which can be completed in a few steps. Additionally, users can change the download location for specific programs and use different drives or user accounts for downloading. Furthermore, users can manage their downloads in the File Explorer or use third-party applications for more advanced features.
Few Frequently Asked Questions
How do I change the default download location in Windows 10?
Answer: Changing the default download location in Windows 10 is easy. First, open File Explorer on your computer and find the folder you would like to make the new default download location. Then, right-click on the folder, select Properties, and click on the Location tab. From here, you can change the default download location to the folder you selected. Finally, click Apply, then OK, and the changes will be saved.
How do I create a new folder to use as a default download location?
Answer: To create a new folder to use as a default download location in Windows 10, open File Explorer and select the folder you would like to create the new folder in. Then, click on the New Folder button in the top menu bar, and name the folder. Once the folder is created, you can follow the same steps above to set it as the default download location.
What are the advantages of changing my default download location?
Answer: Changing your default download location in Windows 10 can be beneficial for several reasons. First, it can help to keep your files organized and make them easier to find. Additionally, it can save you time when you need to download a file, as you won’t have to navigate to the same folder each time. Finally, it can help to free up space on your computer, as you can choose to put your downloads in a folder on an external drive or other storage device.
Can I change the default download location for specific programs?
Answer: Yes, you can change the default download location for specific programs. To do this, open the program’s settings and look for an option to change the download location. If the program doesn’t have an option to change the download location, you can instead use the File Explorer to create a shortcut to the program’s download folder and make that the default download location.
How do I set a default download location for all users?
Answer: To set a default download location for all users in Windows 10, first open File Explorer and select the folder you would like to make the default download location. Then, right-click on the folder and select Properties. Under the Security tab, click on the Advanced button, then select the Everyone user group, and click on the Change Permissions button. From here, you can set the folder to be the default download location for all users.
Can I change the default download location back to the original location?
Answer: Yes, you can change the default download location back to the original location in Windows 10. To do this, simply open File Explorer and select the folder you want to make the default download location. Then, right-click on the folder, select Properties, and click on the Location tab. From here, you can choose the option to restore the default download location, and the changes will be saved.
How to Change Default Download Location Windows 10 (2021)
Changing the default download location in Windows 10 is a simple process that will help keep your computer organized and running smoothly. By following the instructions above, you can easily change the download location to a folder of your choice. Doing this will help you save time and effort in the long run. So if you’re looking for a way to organize your computer better, changing the default download location in Windows 10 is a great place to start!
