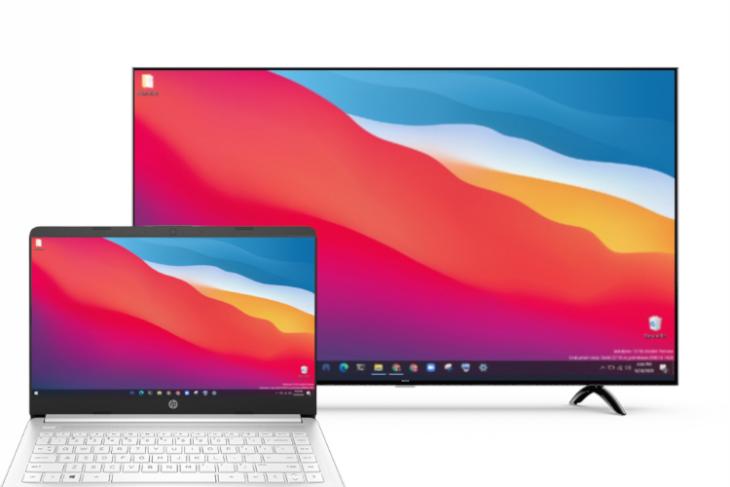
While Chromecast works remarkably well within the Android – Chrome ecosystem, the moment you step out of Google’s hallowed garden, you realize there is little choice for Windows users. You can’t cast local media stored on your Windows 10 computer to Android TV. Neither you can cast any program other than Chrome. So if you are looking for a solution to cast Windows 10 in its entirety to Android TV then you have come to the right place. Here, we show you how to set up screen mirroring from Windows 10 to Android TV or for that matter, any other smart TV using Miracast. So without any delay, let’s go through the guide.
Here, we have mentioned all the methods so that you can follow the instructions step-by-step. Before you proceed, go through the requirements and check if your device has support for Miracast. You can click on the link below to seamlessly jump to the section.
- Requirements
- Find Miracast Support on Windows 10
- Find Miracast Support on Android TV
- Cast Windows 10 to Android TV
Project Windows 10 Screen to Android TV
Requirements
- Miracast-compliant TV
- Miracast-compliant Windows PC or Laptop
- Both your Android TV and Windows 10 computer should be connected to a common WiFi network.
Find Miracast Support on Windows 10
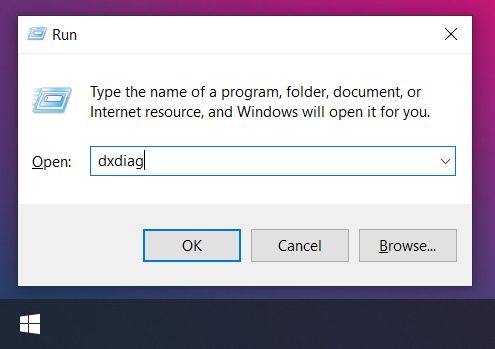
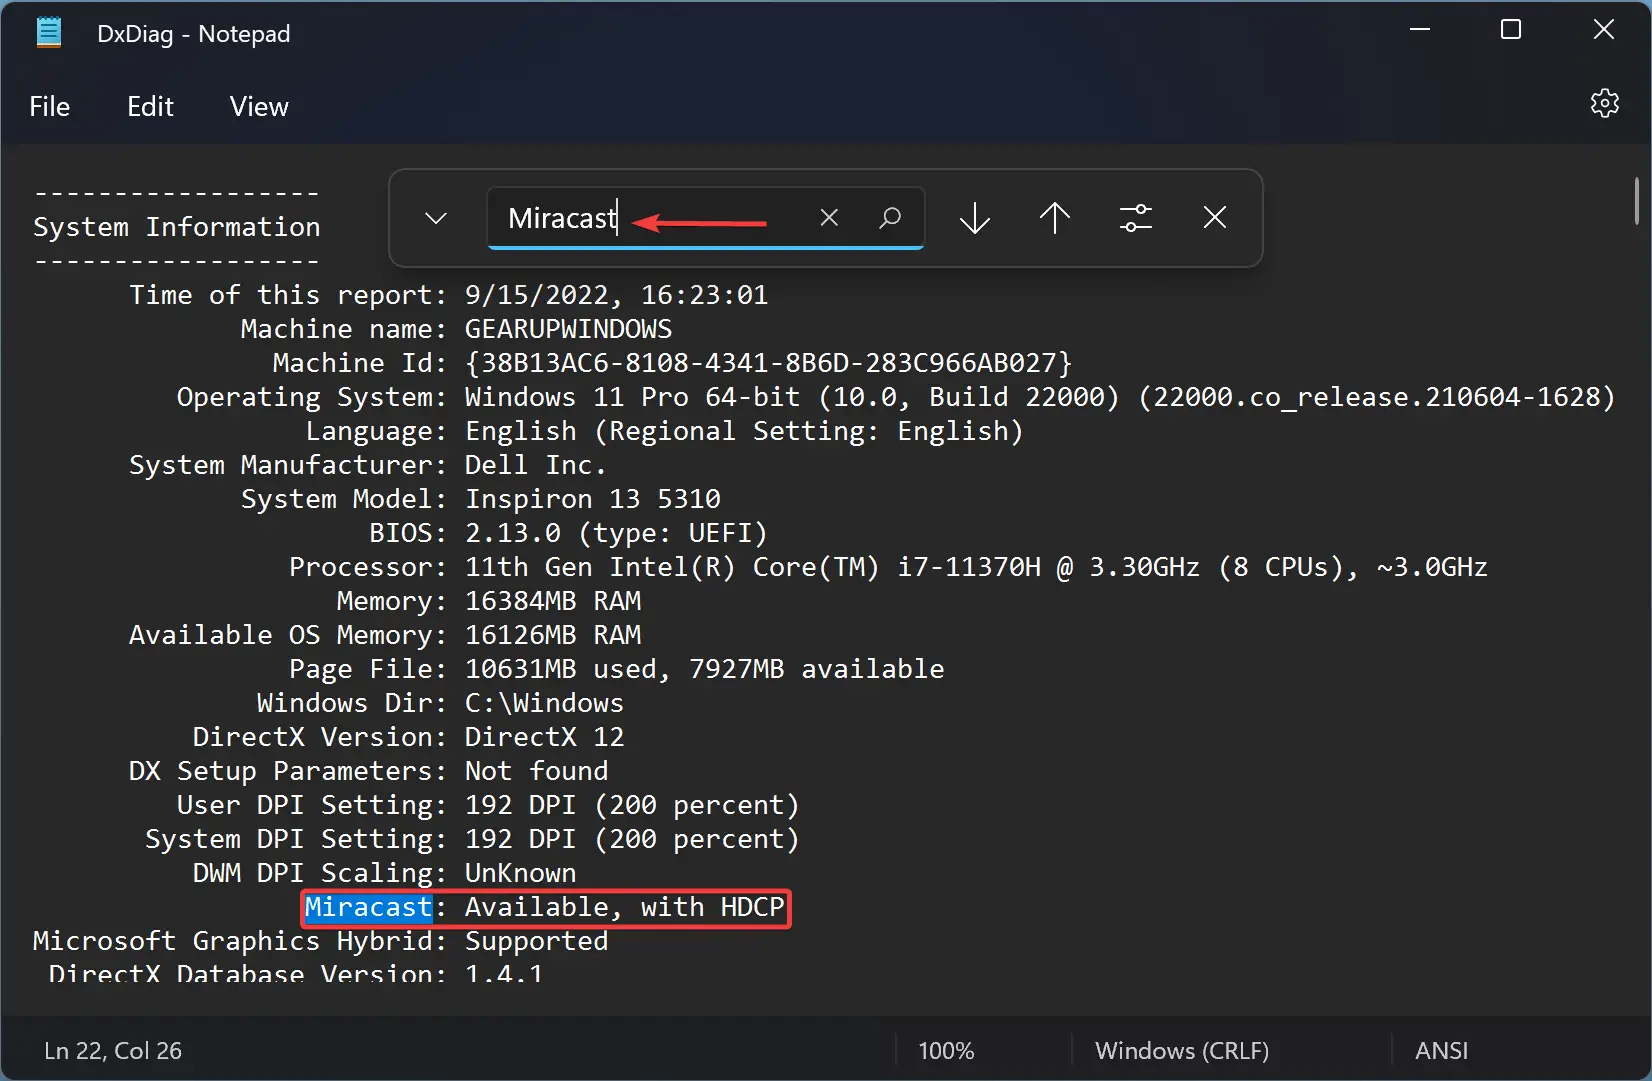
1. Press Win + R to open the Run window. Here, enter dxdiag and hit enter.
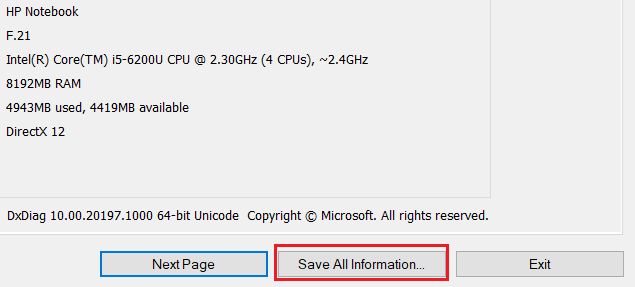
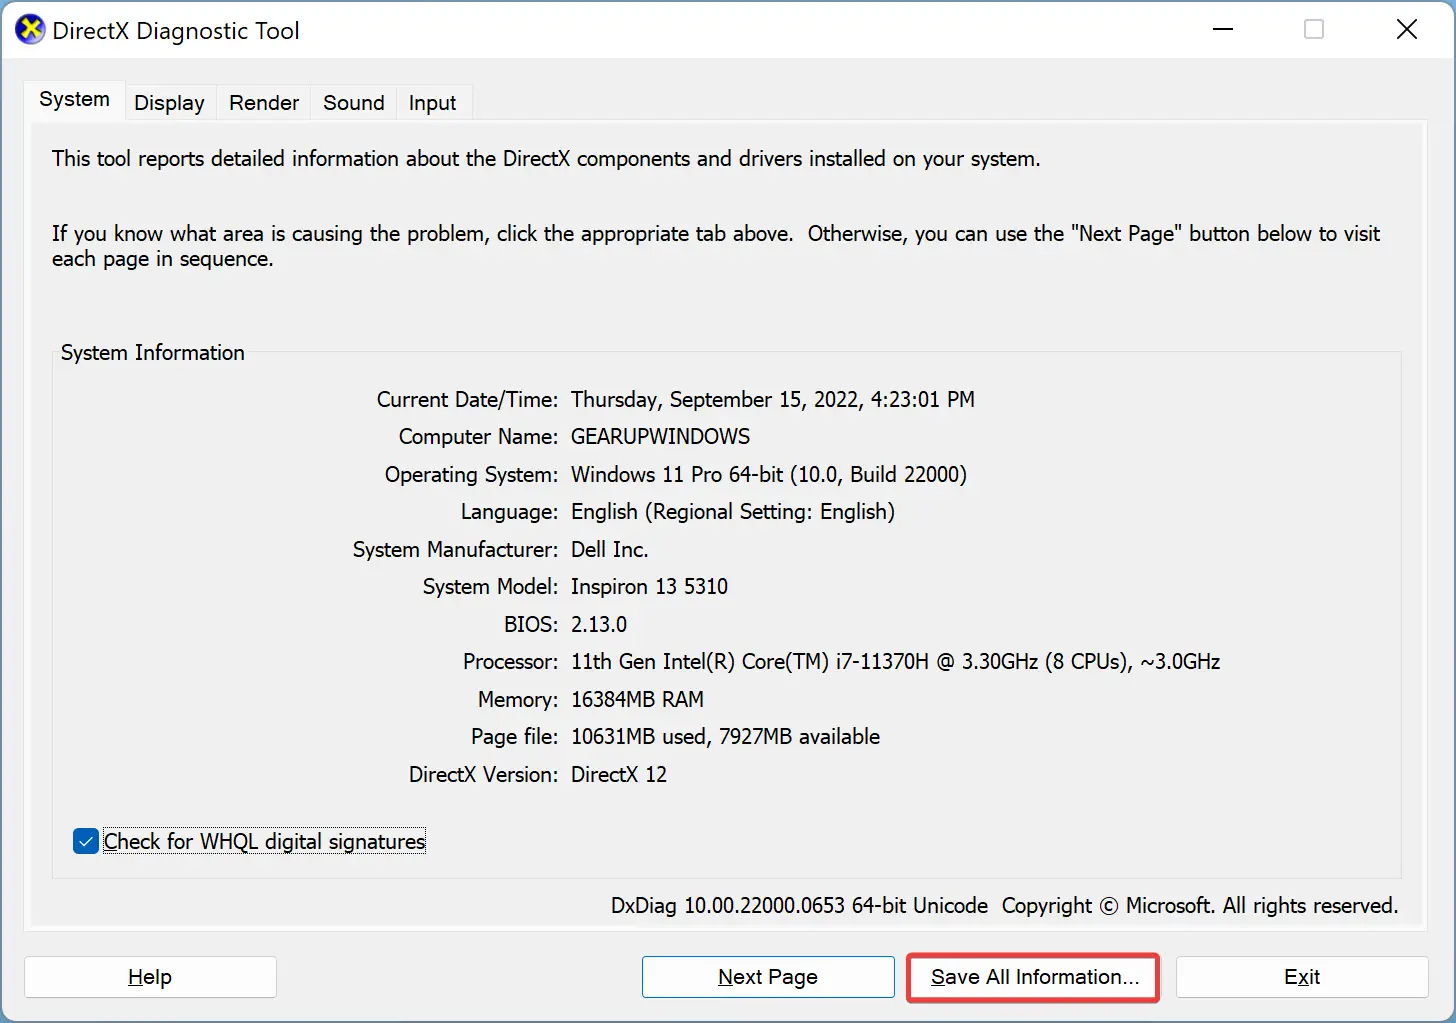
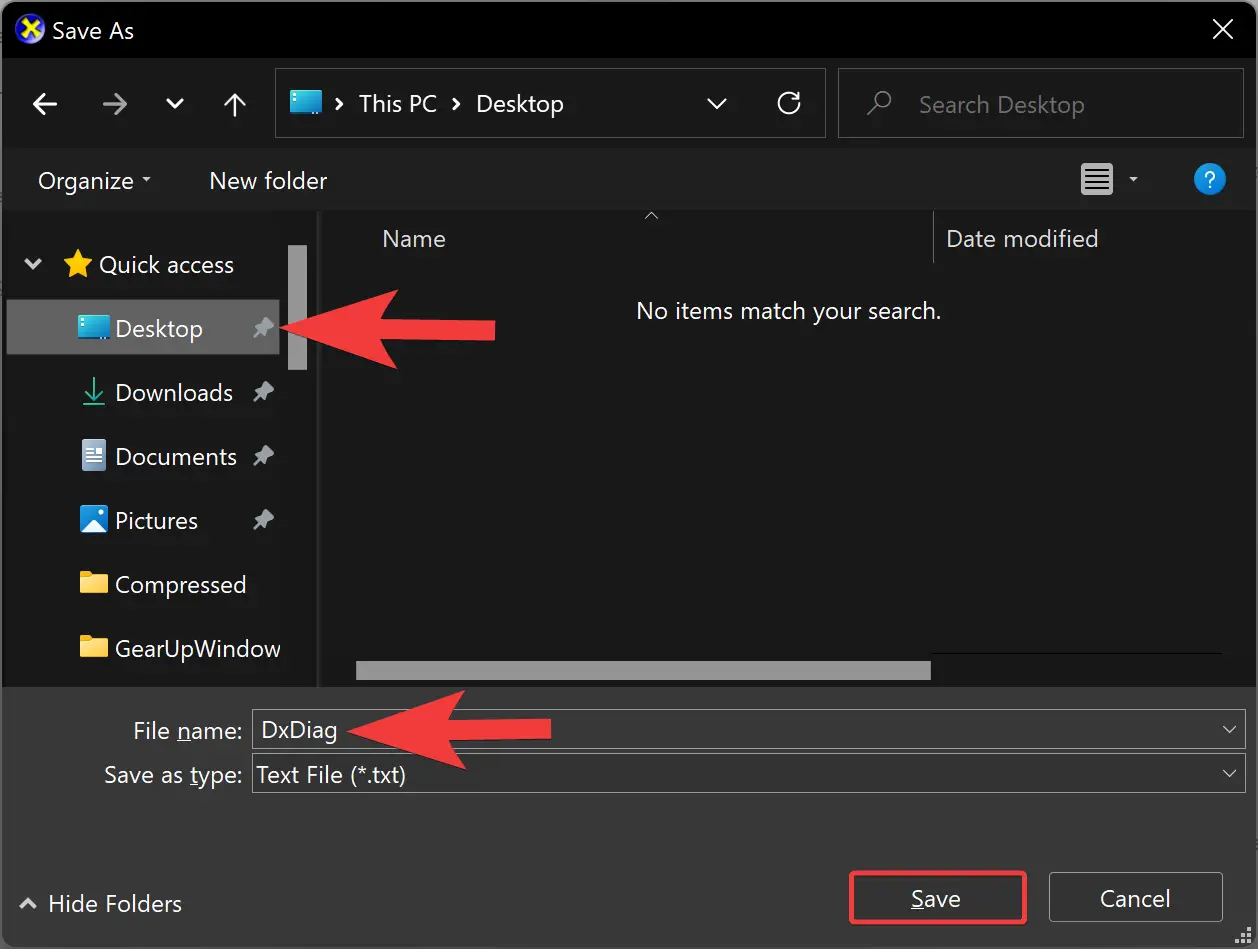
2. Now, click on “Save All Information” and save the file on the desktop. It will be saved in a text file.
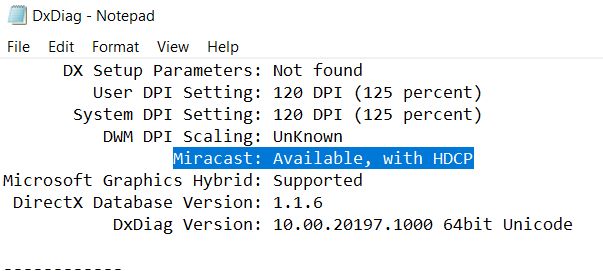
3. Open the text file and look for “Miracast“. If it shows “Available” then you are good to go.
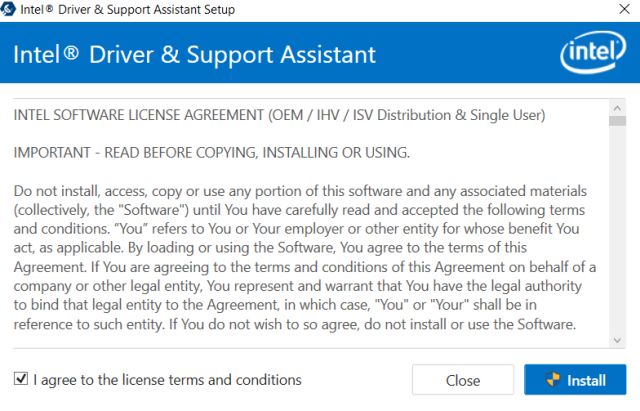
4. In case, it shows “Not supported by Graphics driver” then download Intel Driver Assistant (Free) and update all drivers. It might be the case that your computer has the right hardware, but due to the lack of a proper driver, Miracast might not be available on your device. So go ahead and give it a try through the Intel Driver Assistant. Keep in mind, for Miracast to work, both hardware and software support is needed.
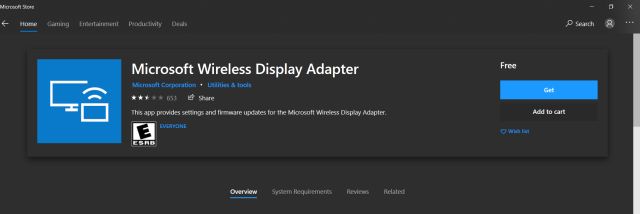
5. You can also try updating the Microsoft Wireless Display Adapter (Free) from the Microsoft Store.
Find Miracast Support on Android TV
Before we begin, let me tell you I am using Mi TV 4X running the latest Android 9. Xiaomi recently added support for Miracast on Mi TV so I am able to use the Miracast feature now. Xiaomi has added a separate Miracast app to connect with wireless displays.
For Android TVs manufactured by other vendors such as Sony, Samsung, LG et al, you may have to dig into settings and find the “Miracast” menu. This is applicable for not just Android TV but all smart TVs. Make sure Miracast is enabled and discoverable. I would also recommend you to go through Settings -> Apps -> See All Apps.
If need be, go through all the System Apps (located at the bottom) and find the Miracast menu. You can also go through all the Settings menu and find the Miracast option. As for this guide, I am going to show how you can find Miracast support on Mi TVs.
1. On the Android TV interface, move to the “+” button which is available along the “Apps” section.
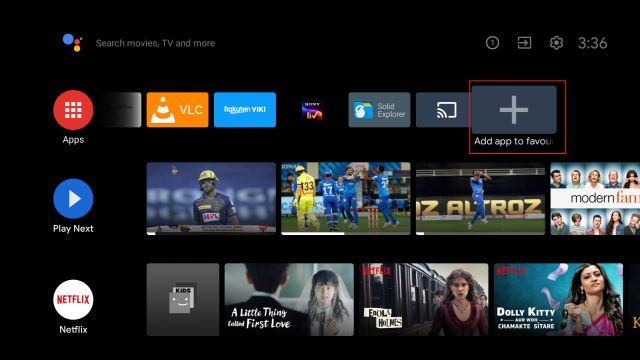
2. Here, you will find the “Miracast” app. Simply select it and the app will be added to your favorite apps section. If Miracast is not available here then search it under Settings -> Apps -> See All Apps.
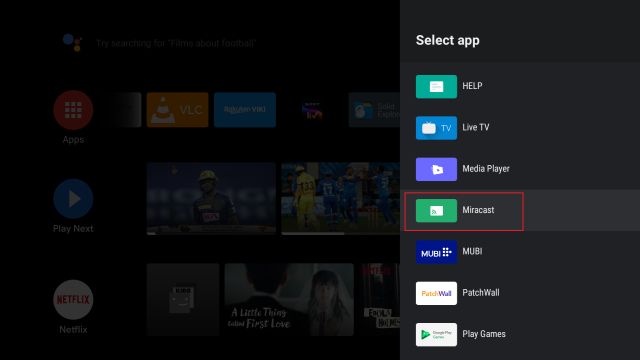
3. Now open the Miracast app and the wireless display feature will be enabled. You should stick to this screen while casting Windows 10 to Android TV.
Cast Windows 10 to Android TV
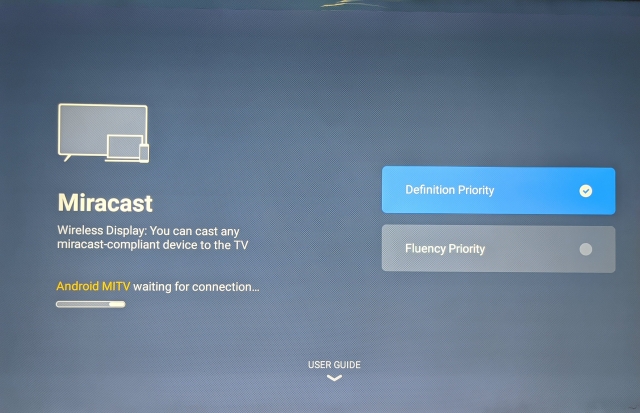
1. Open the Miracast app on your Android TV and stay on that screen. For your information, Definition Priority means the highest clarity possible, but real-time syncing will take a back seat. Fluency Priority means a stable connection with real-time syncing but in low-res quality (better for low-end devices). I like to keep Definition Priority as default.
2. Now, move back to your Windows 10 computer and press the “Win + K” keyboard shortcut. It will open a “Connect” window on the right pane.

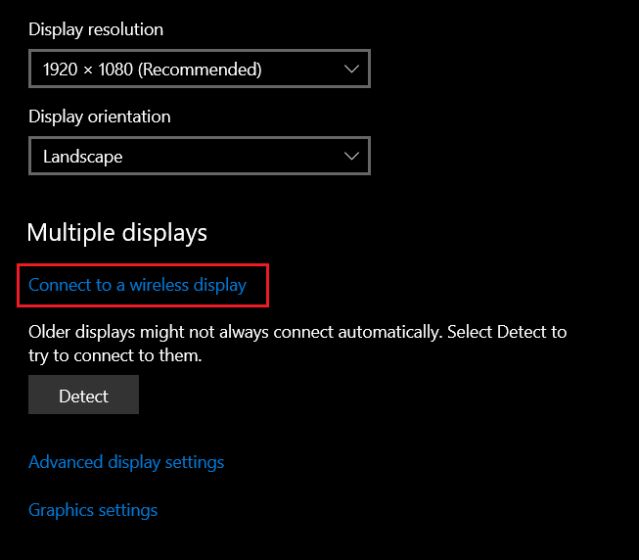
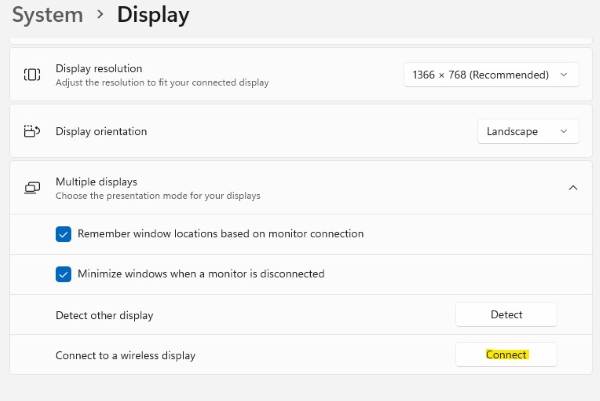
3. If the “Connect” window does not pop up then open Settings -> System -> Display. Here, scroll down and click on “Connect to a wireless display”.
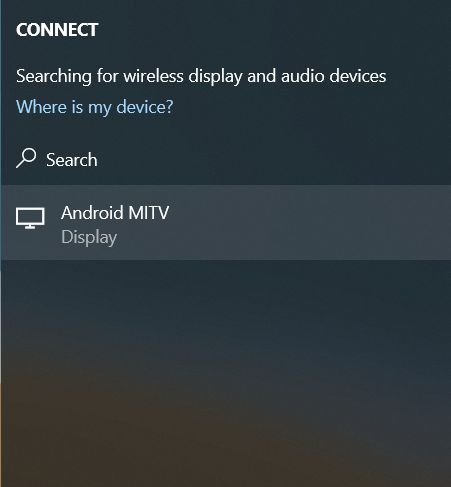
4. Now, it will start the search and within a few seconds, your Android TV will show up. Make sure the Miracast app is open on your Android TV and both your devices are connected to the common WiFi network. Next, click on your Android TV.
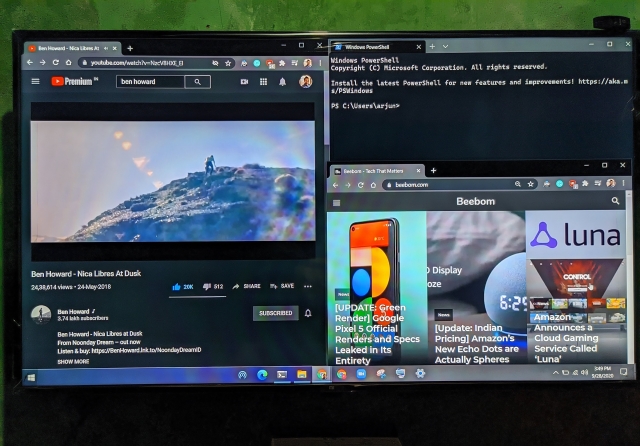
5. Finally, Windows 10 will cast its screen on your Android TV. Just like Chromecast, you can play music and it will be routed through your TV’s speaker. You can browse the internet, open any app (not just limited to Chrome), play games, and a lot more.
6. In case, you want to extend your display or make the setup second screen only then press “Win +P ” and change the projection mode.
Screen Mirroring from Windows 10 to Android TV Using Miracast
So that is how you can cast Windows 10 to Android TV and play any media or games. If you have a powerful computer, router, and Android TV then you can very well make your Android TV as a second screen. Anyway, that is all from us. If you want to learn more such Mi TV tips and tricks then go through our linked guide. And if you are facing any issue then comment down below and let us know. We will surely try to help you out.
Nowadays, almost all houses are equipped with Android TV. Everybody wants to watch movies or videos or play games on a large screen rather than a 13-inch small laptop screen.
It is pretty easy to connect your laptop screen to an Android TV. Earlier, we were using an HDMI cable to connect the laptop to the normal TV. Now, each laptop and Android TV is lashed with Wi-Fi. So, we can use this built-in Wi-Fi to connect to Android TV with our laptops. There is no need to purchase a separate HDMI cable to join the PC with the TV.
In this gearupwindows article, you will learn to cast or share Windows 11 or 10 device screens to Android TV.
Requirements to Cast Windows 11 Screen to Android TV
To cast the screen, both your Windows 11/10 computer and Android TV must have the following:-
- Android TV should be compatible with Miracast.
- Windows 11 machine should be compatible with Miracast.
- Android TV and Windows PC should be connected to the same Wi-Fi network.
Check whether Windows 11/10 and Android TV Cast are Compatible
For Windows 11 and 10 PCs
Step 1. First, open DirectX Diagnostic Tool.
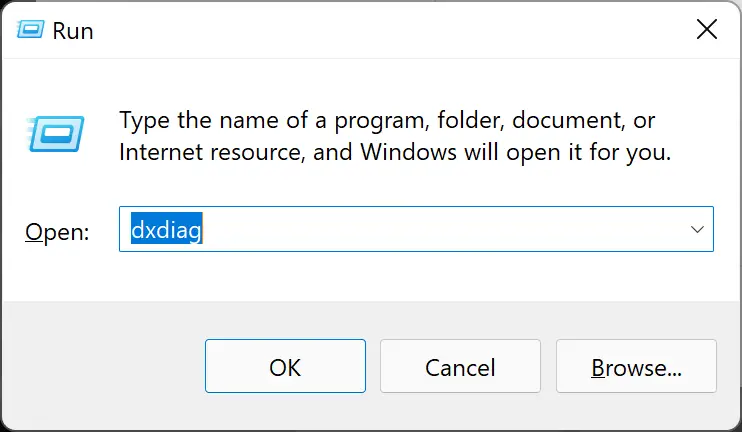
To do that, use the Windows + R hotkey to open the Run dialog box. Then, type dxdiag and hit the Enter key on the keyboard to launch DirectX Diagnostic Tool.
Step 2. When the “DirectX Diagnostic Tool” appears on your computer, click on the Save All Information button at the bottom.
Step 3. Select Desktop to save the file, name the file as DxDiag and click the Save button.
Step 4. Now, double-click on the DxDiag.txt file to open it. Press Ctrl + F and type Miracast. Then, hit the Enter key on the keyboard.
If beside the Miracast, you see “Available, with HDCP,” it means you can easily cast Windows 11/10 to Android TV.
However, if besides the Miracast, you see “Not supported by Graphics driver,” that means your computer is missing important drivers or your PC is not compatible with Miracast.
You should check with your computer manufacturer whether it supports Miracast. If yes, then update the drivers of your computer to make the Miracast work.
For Android TV
Once you have a Miracast-compatible computer, now you should know whether your Android TV supports the same. Depending on the manufacturer and model of the TV, Miracast settings may be available in different menus. You need to find out and enable the same if required. Please note that on some Android TVs, you may need to install the Miracast application to make it work.
How to Cast Windows 11 Screen to your Android TV?
Once you note that your Android TV and Windows 11 are equipped with Miracast technology, use these steps to cast Windows 11 screen to Android TV:-
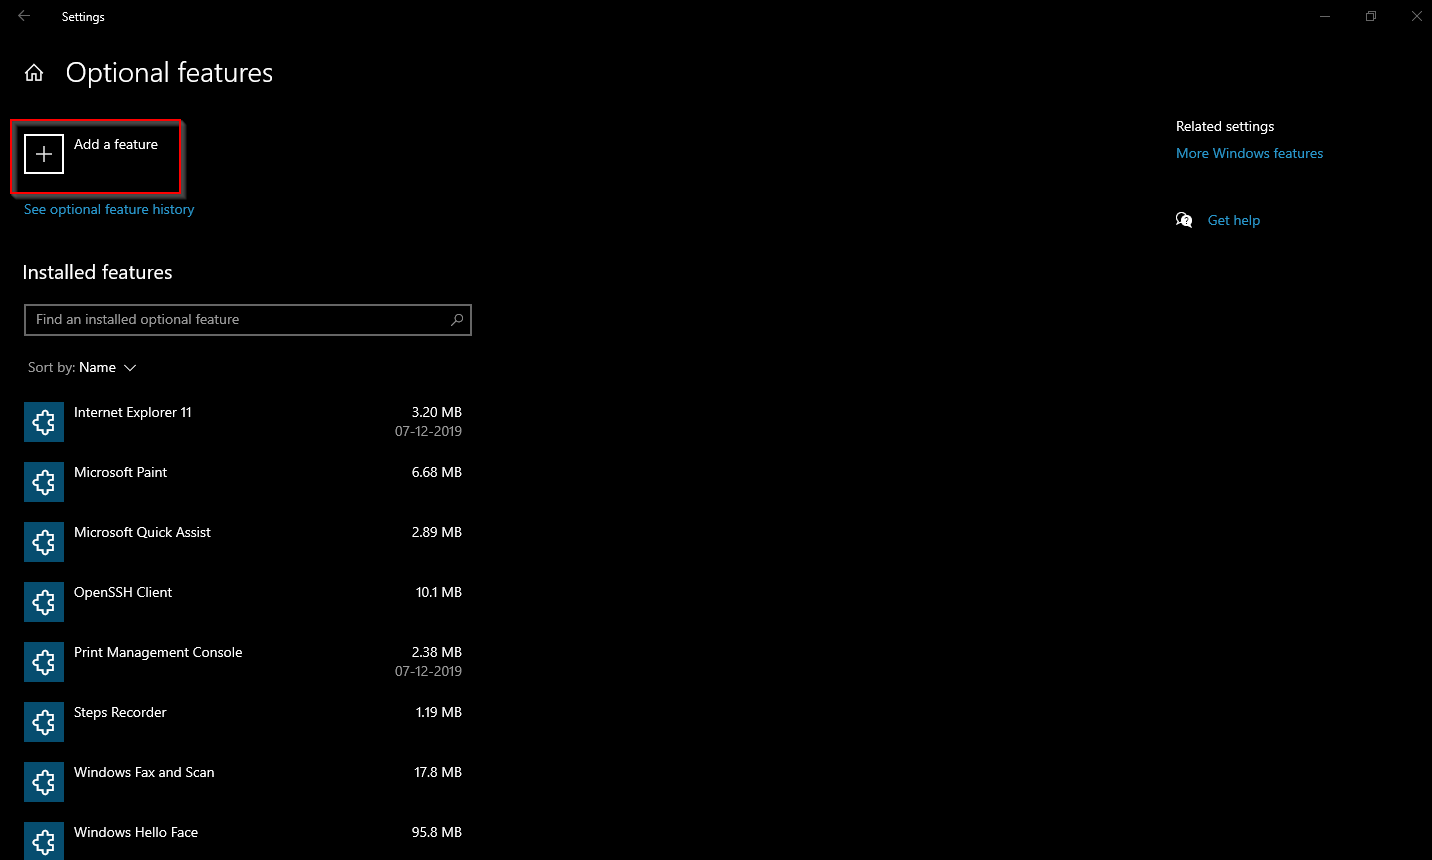
Step 1. Open Windows 11 Settings.
To do that, you can use the Windows + I keyboard shortcut. Or, right-click on the Start button and select Settings in the menu.
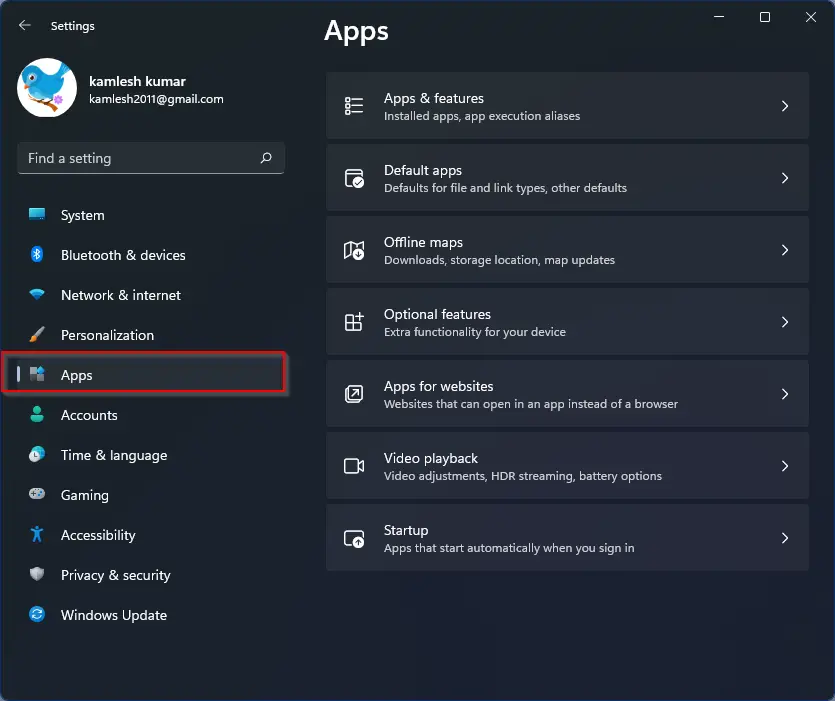
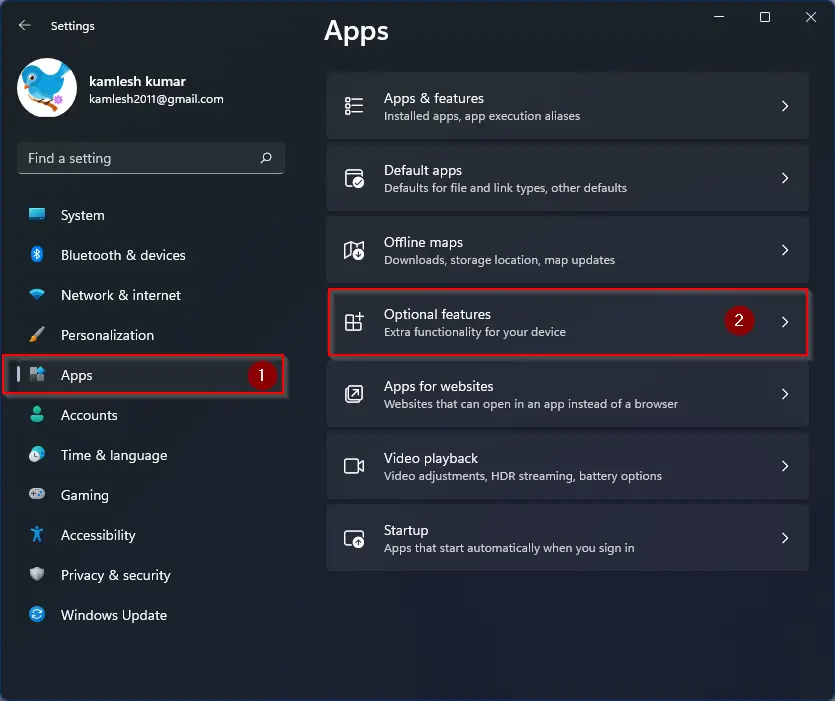
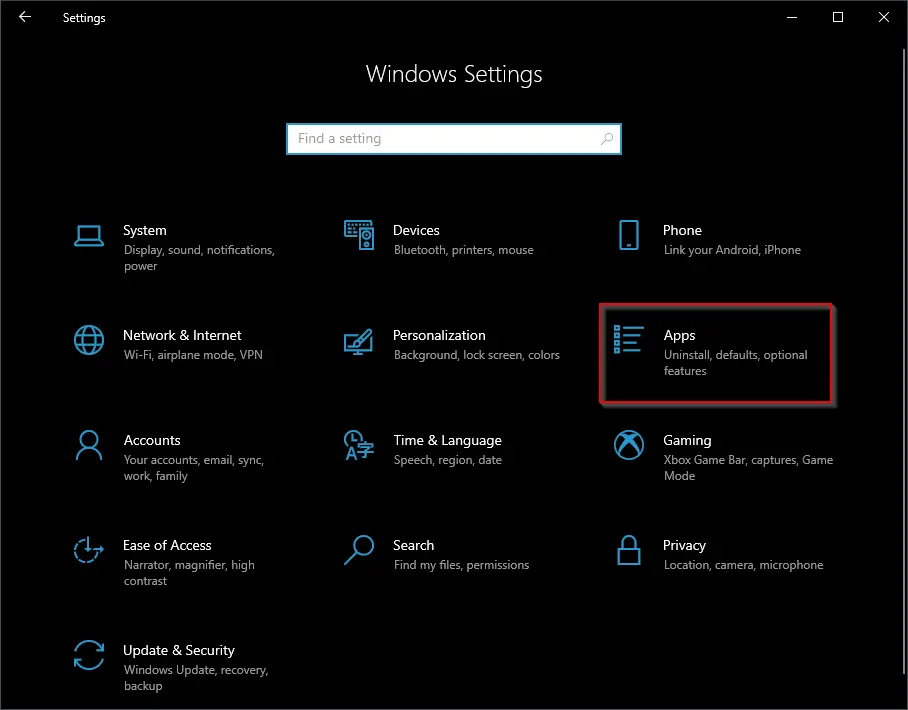
Step 2. When the Settings window appears on the screen, select Apps in the left panel.
Step 3. Then, click on the Optional features tile on the right sidebar.
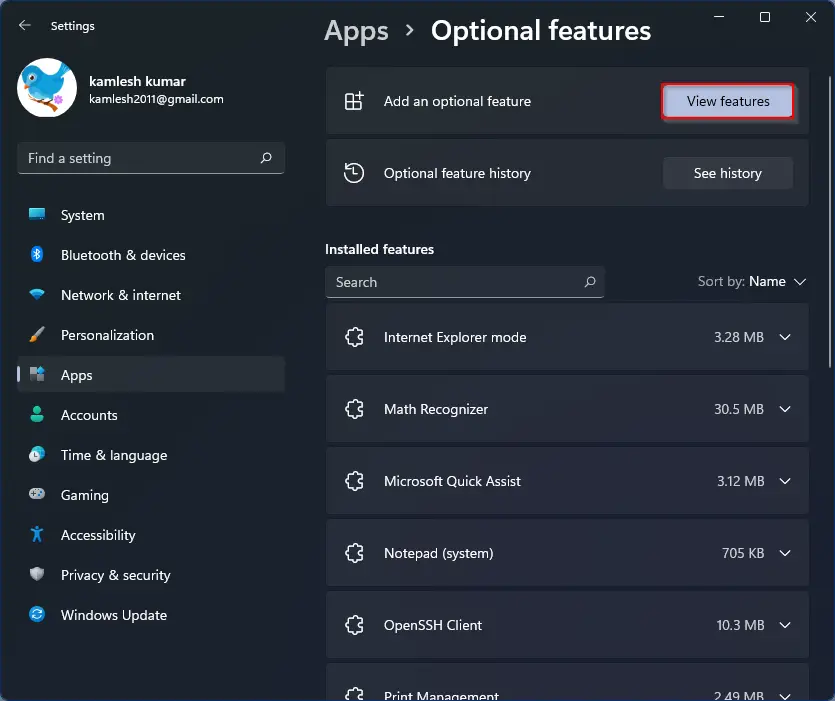
Step 4. Next, click on the View features button beside the “Add an optional feature” option.
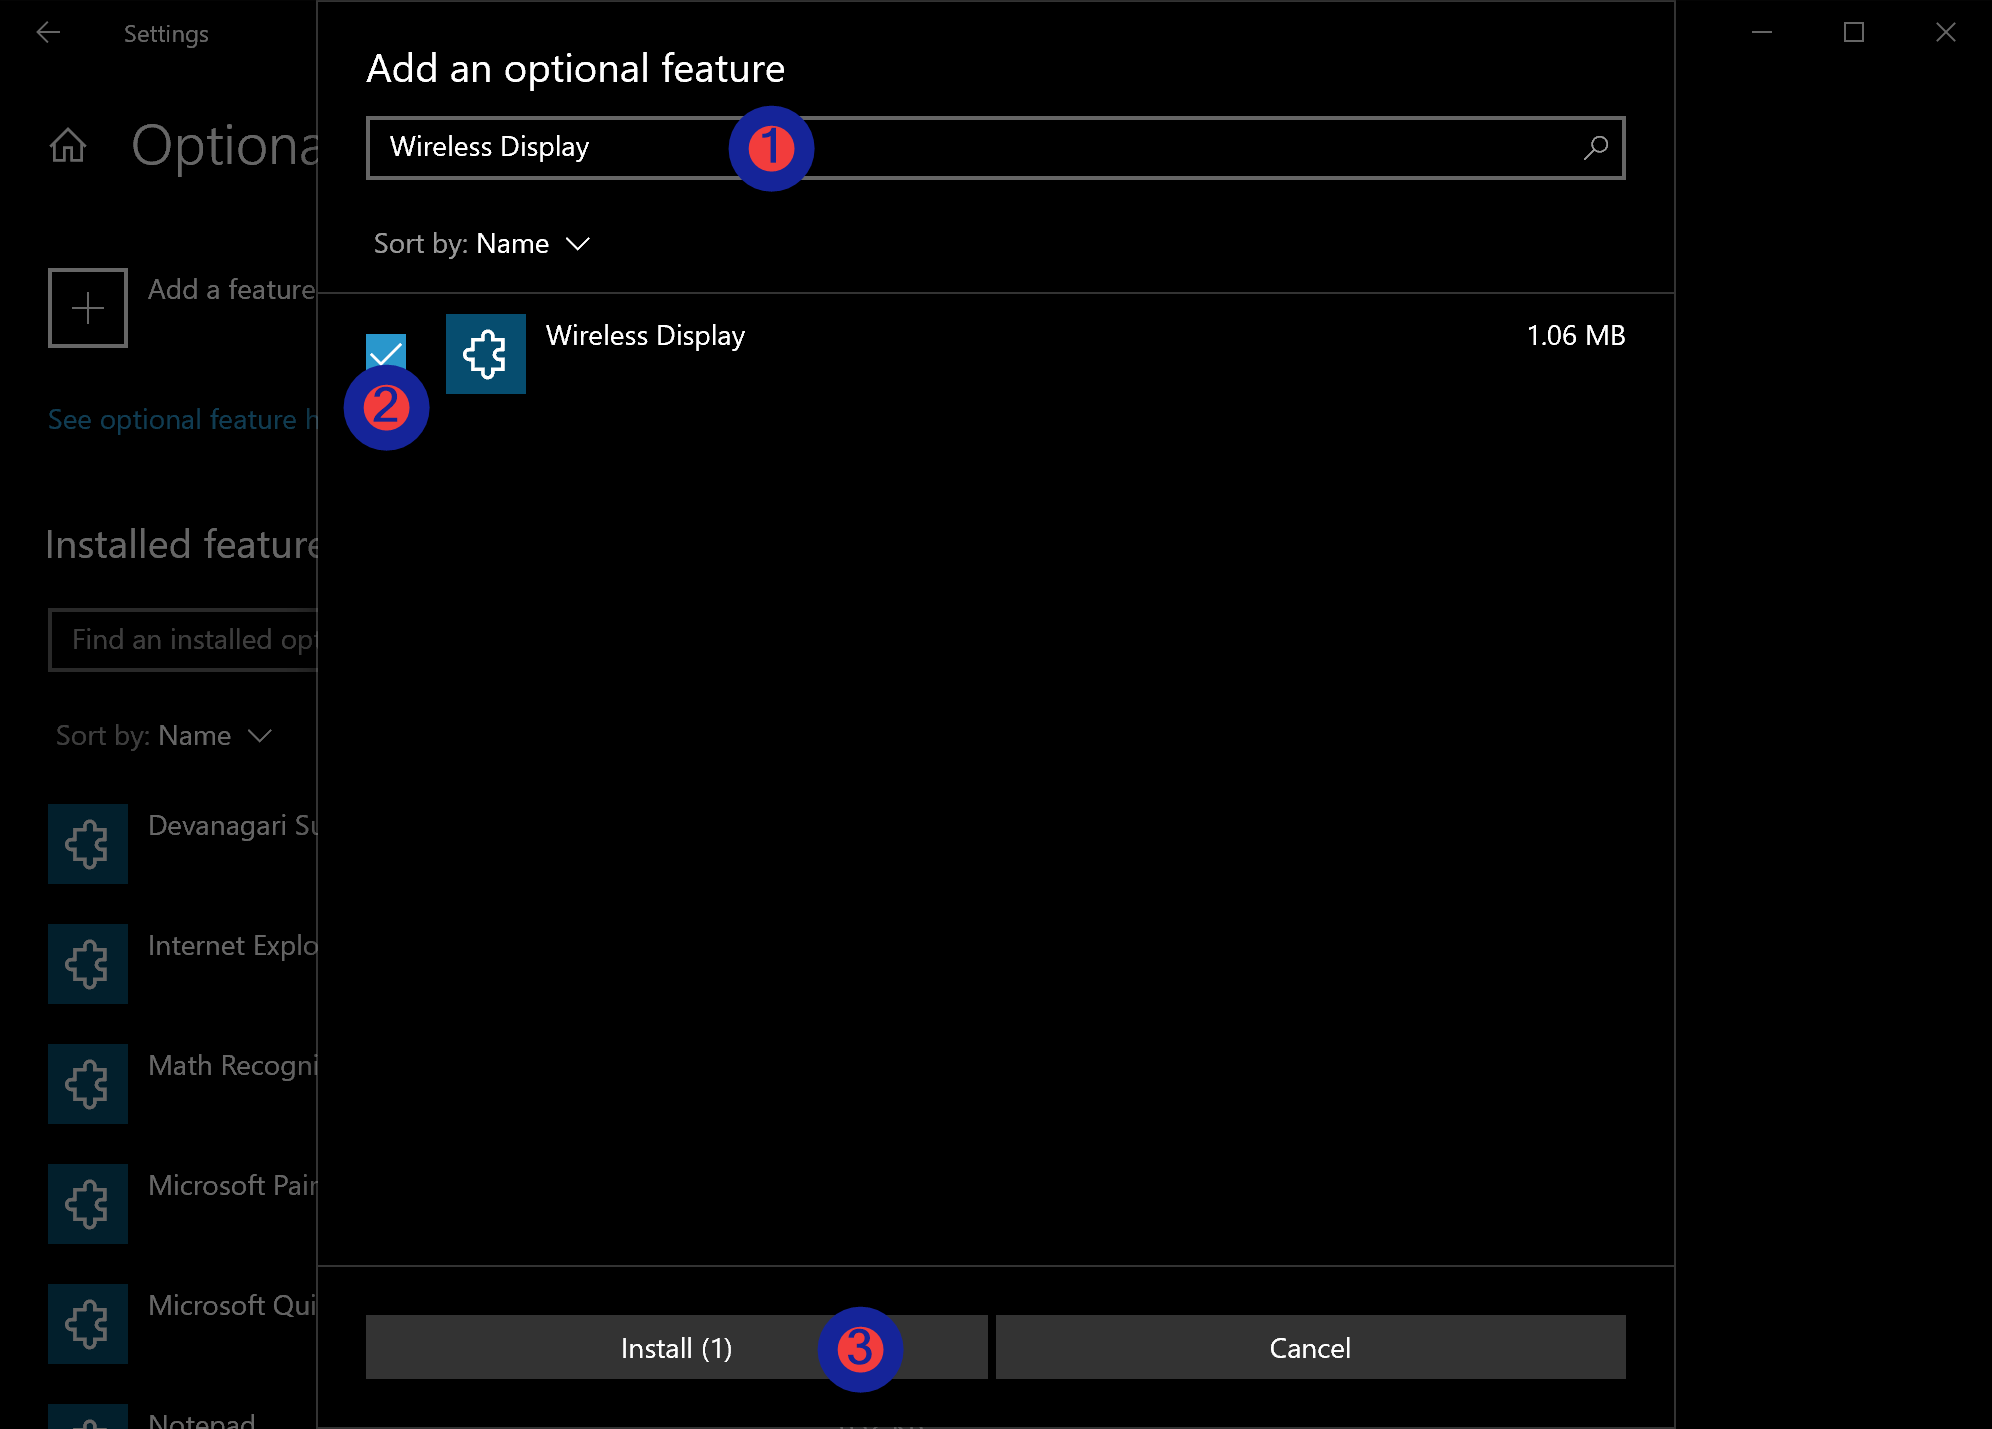
Step 5. On the “Add an optional feature” dialog box, click on the search bar and type Wireless Display.
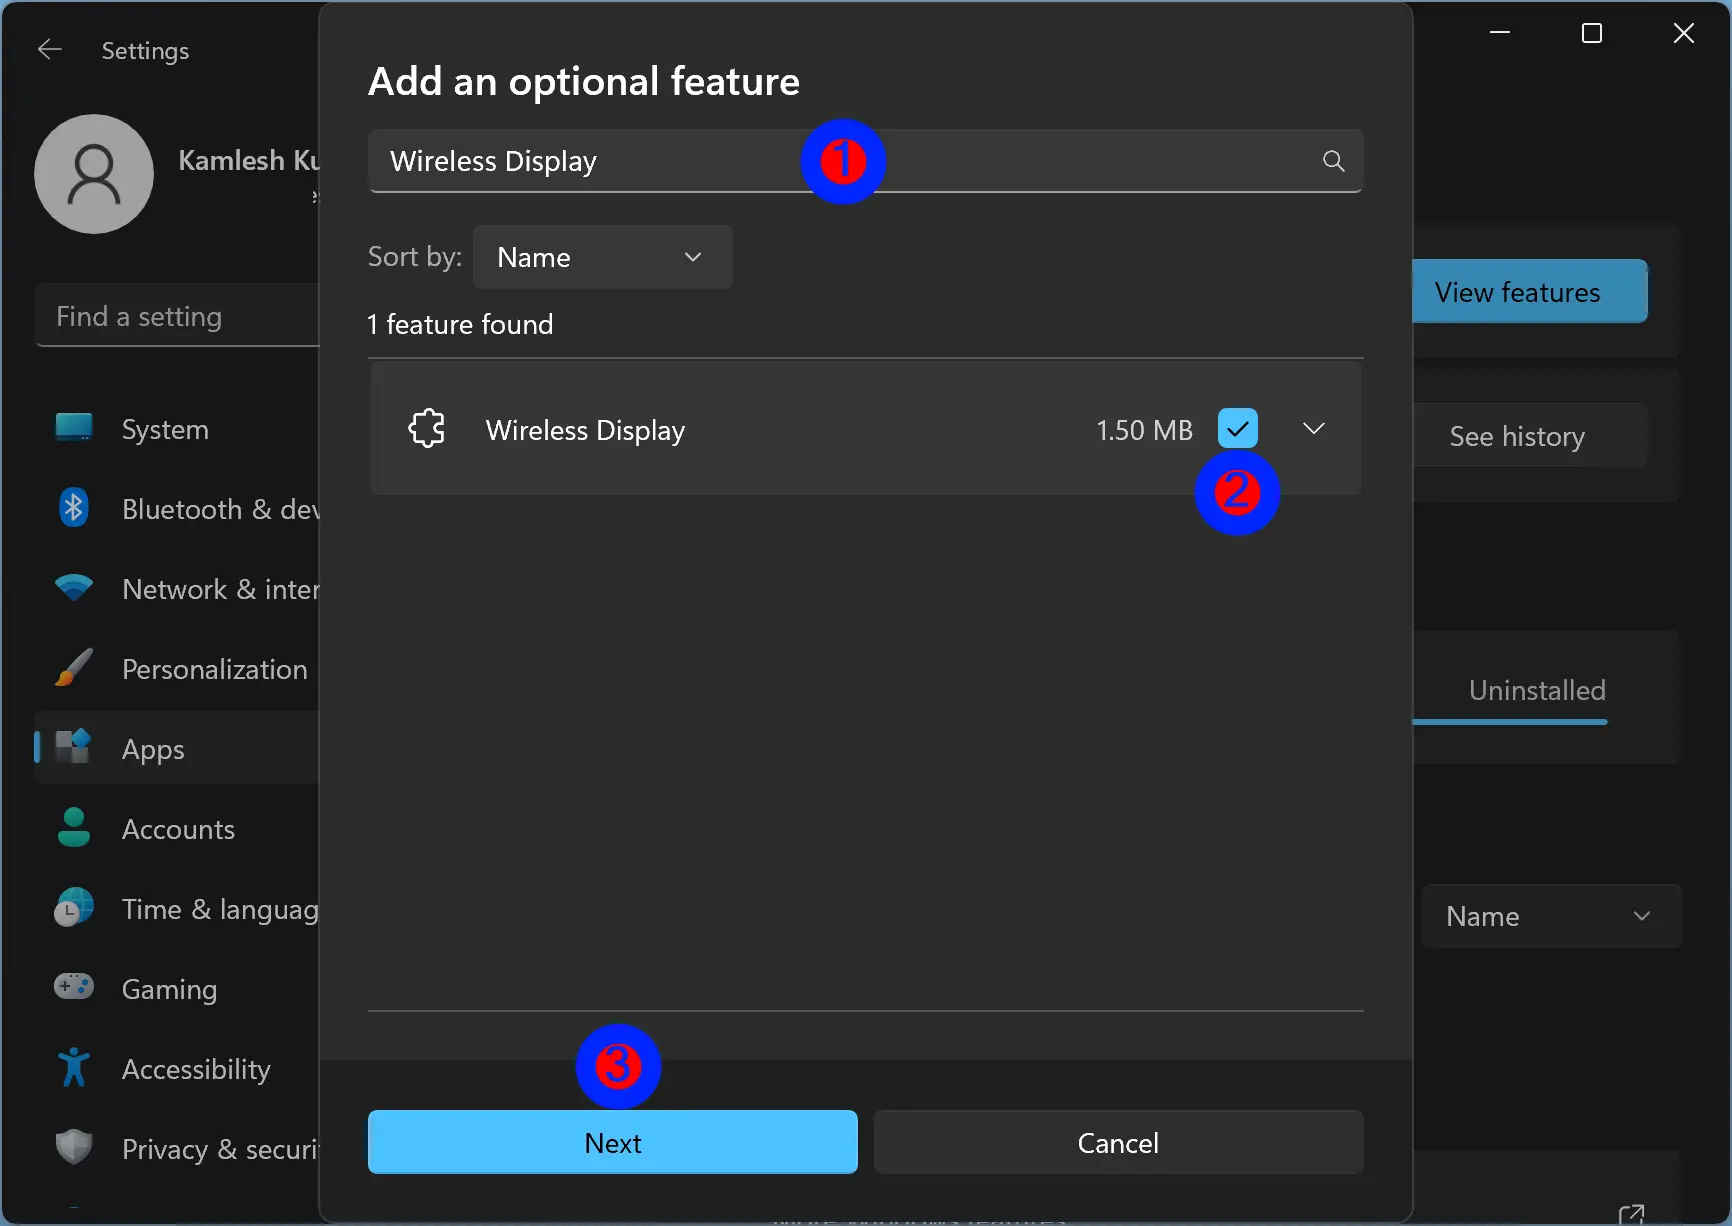
Step 6. Next, check the checkbox beside Wireless Display.
Step 7. After that, click the Next button.
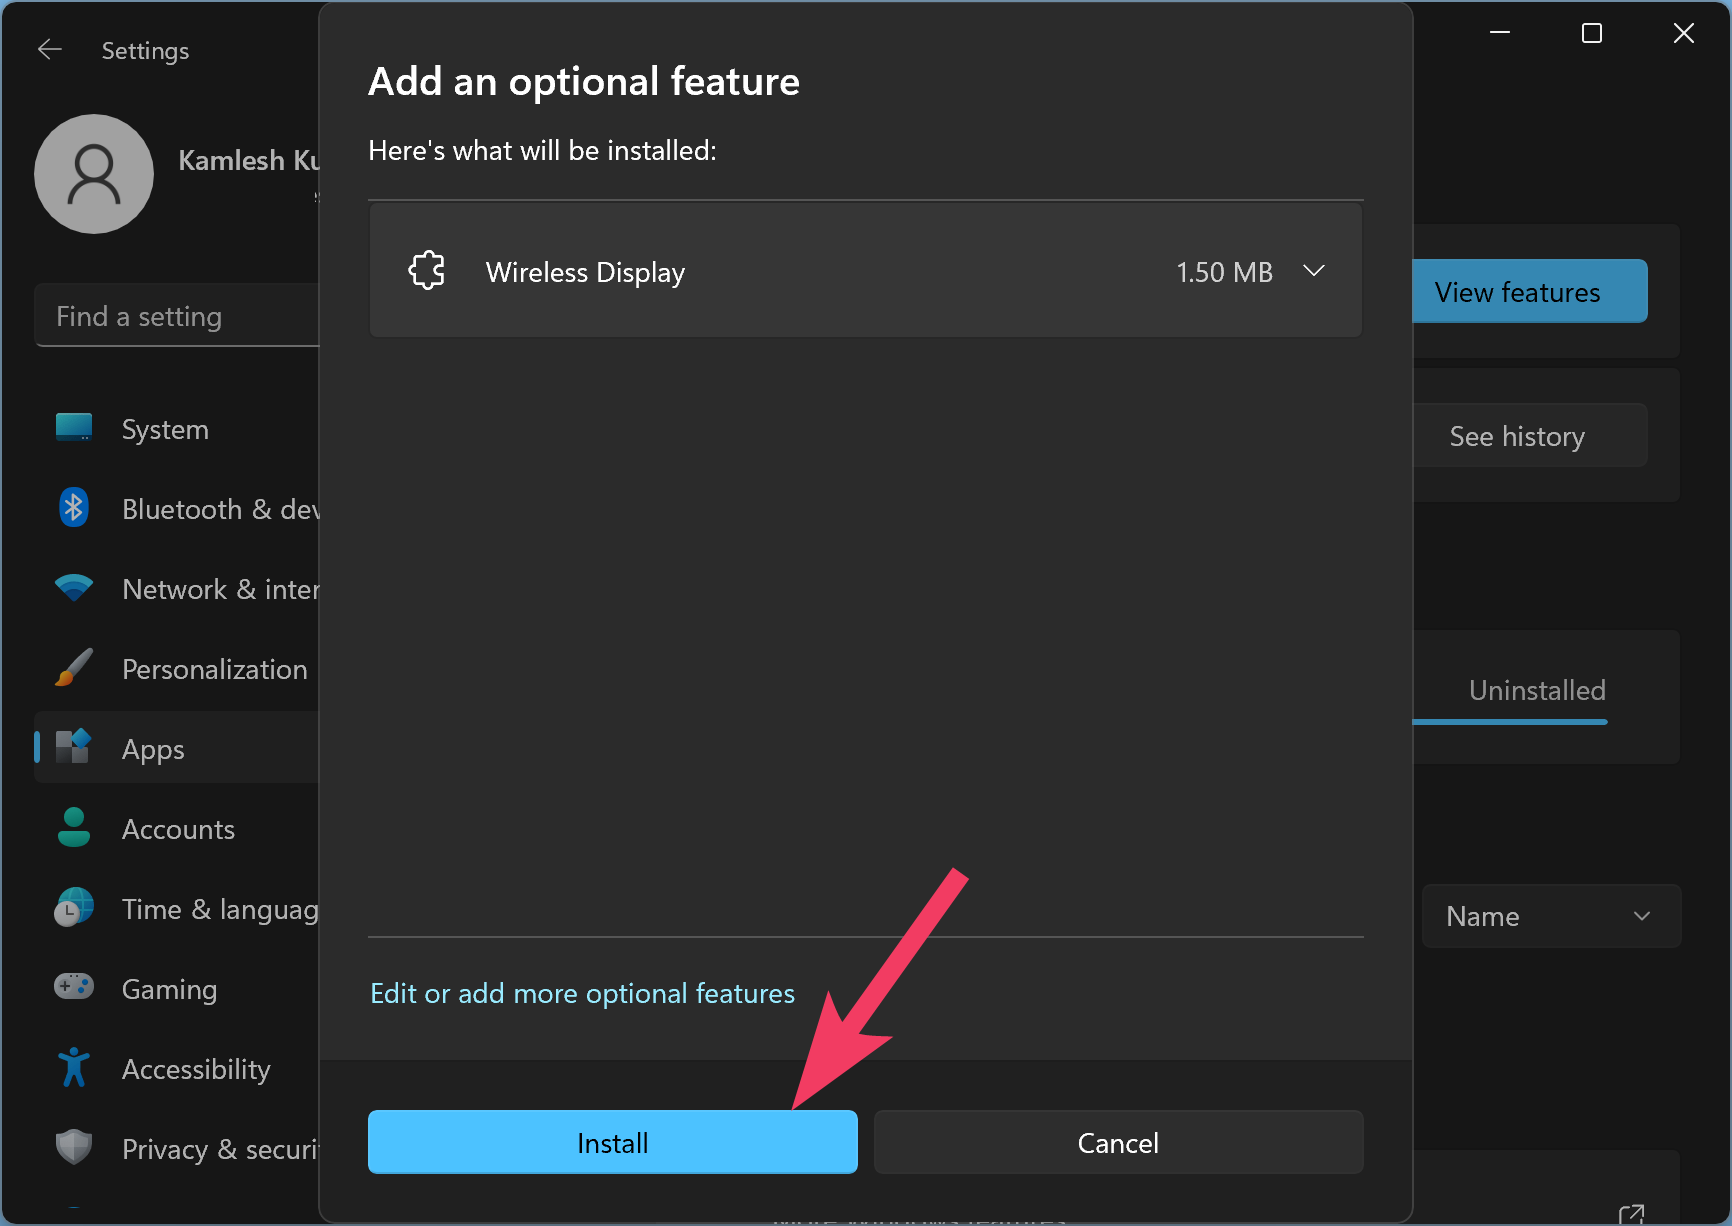
Step 8. Then, click the Install button.
Step 9. Now, turn on your Android TV and connect to the same WiFi you are using for your PC.
Step 10. On your Windows 11 PC, turn on Wi-Fi.
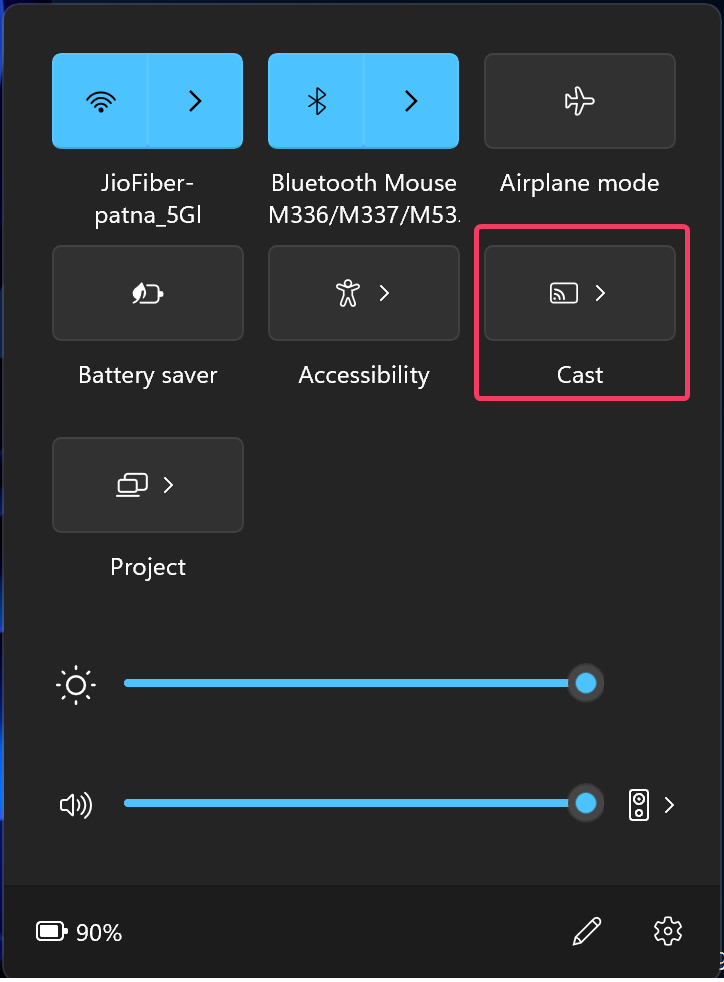
Step 11. Next, press the Windows + K to open the Cast screen. Alternatively, open the Quick Settings menu using Windows + A hotkey and select Cast tile.
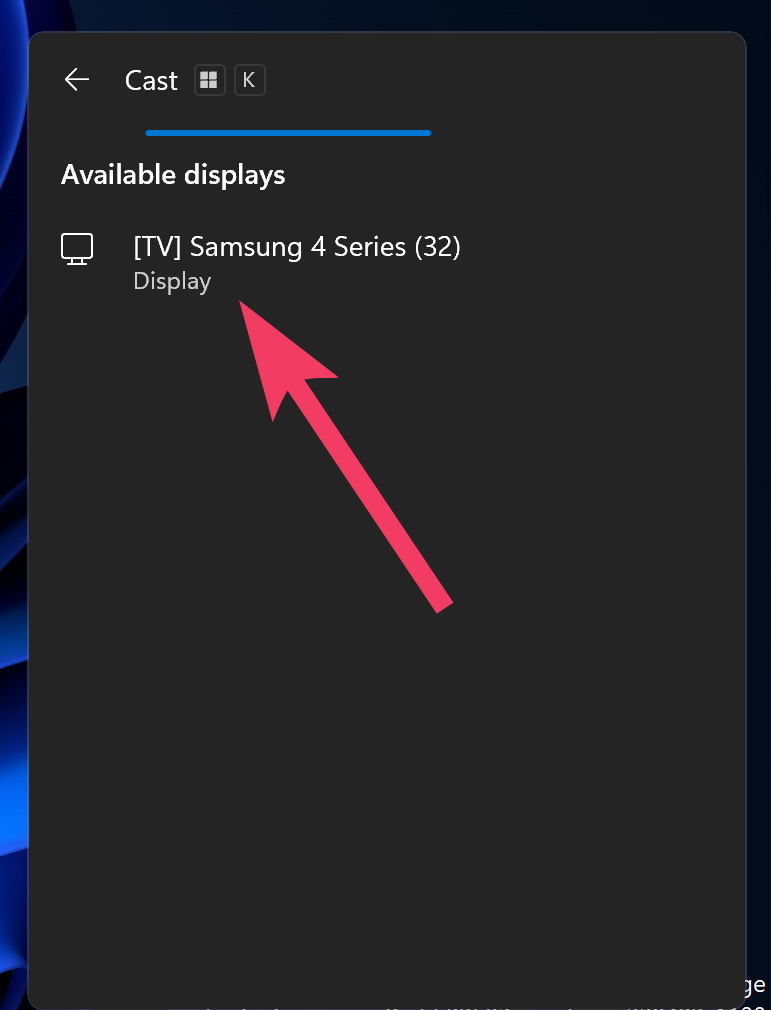
Step 12. Once done, available devices will appear. Click on the device in the list you want to connect.
Step 13. If prompted by your TV, allow the connection.
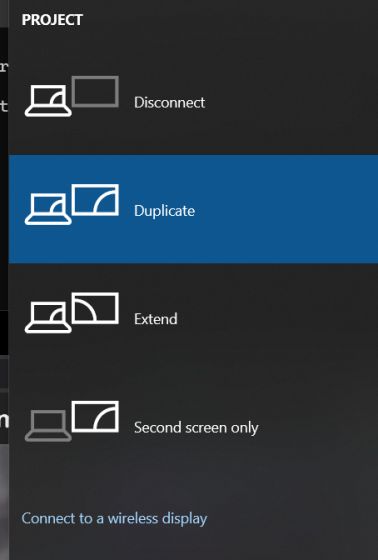
Optionally, you can check or uncheck the “Allow mouse, keyboard, touch, and pen input from this device” option on your PC. Here, you can choose “Duplicate,” “Extend,” or “Second screen only” for how you want to project the display.
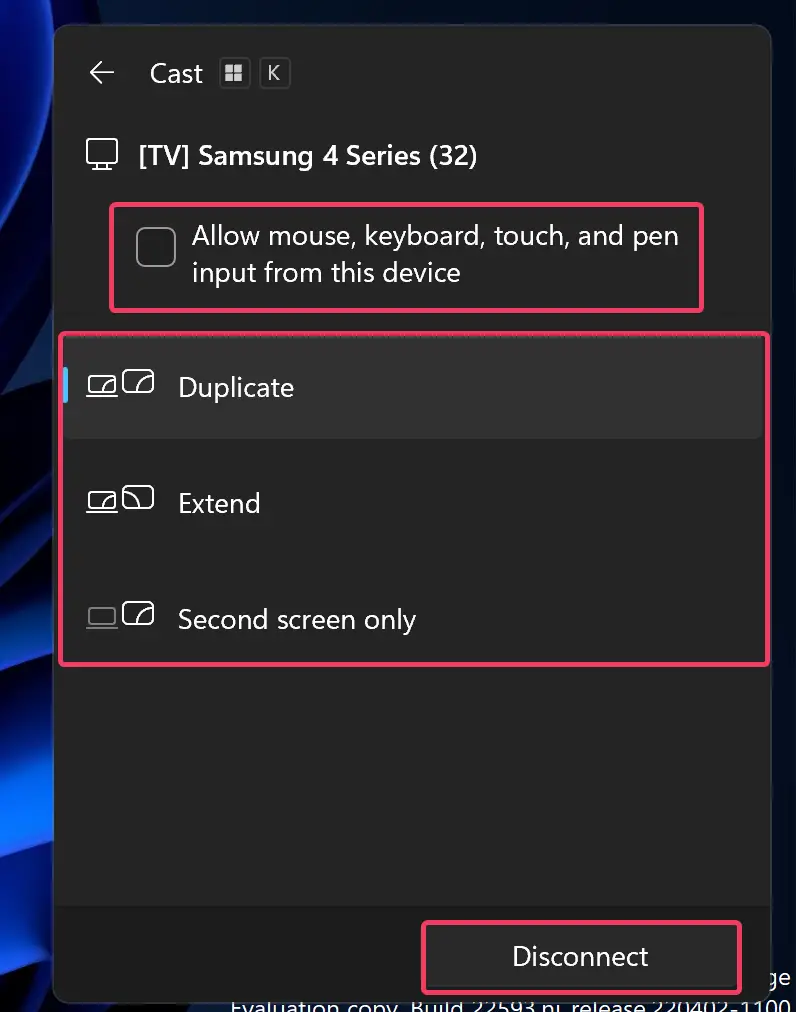
Just click the Disconnect button if you want to terminate the connection.
How to Duplicate Windows 10 Screen to your Android TV?
To share your Windows 11 Screen with your Android TV, use these steps:-
Step 1. Very first, open Windows 10 Settings.
Step 2. Then, click on Apps.
Step 3. After that, select Apps & features on the left side.
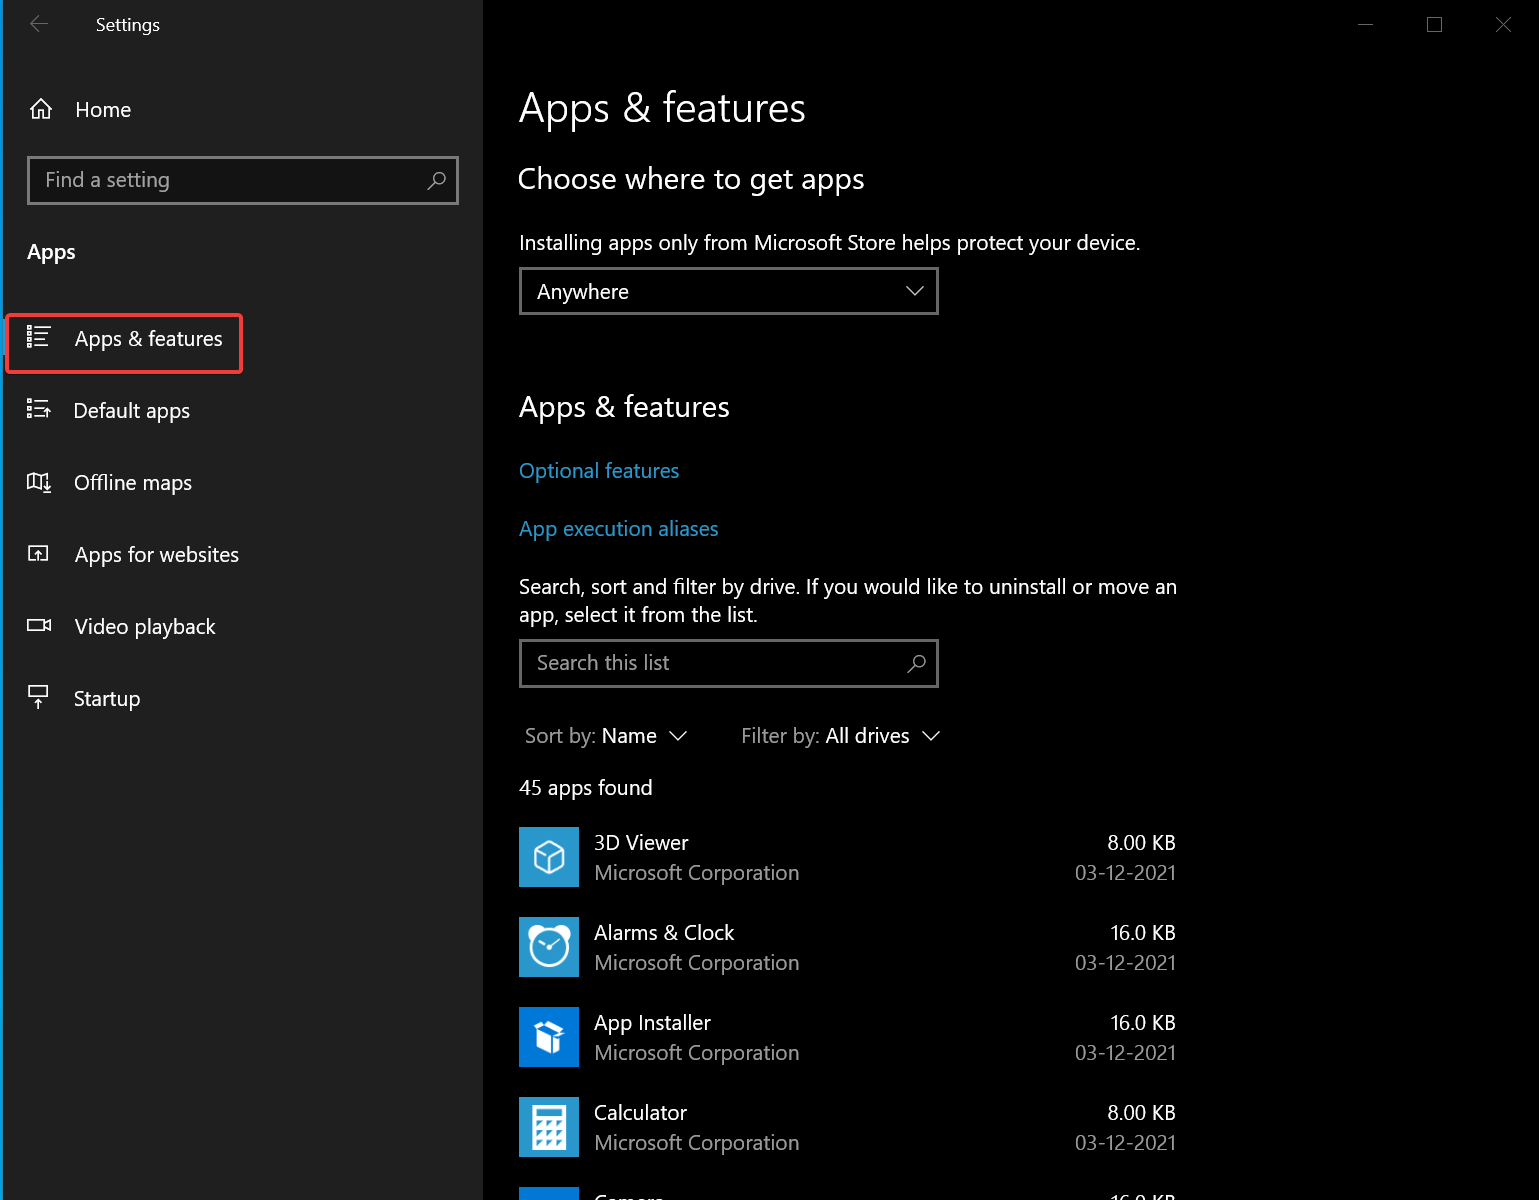
Step 4. Next, click the Optional features link on the right sidebar.
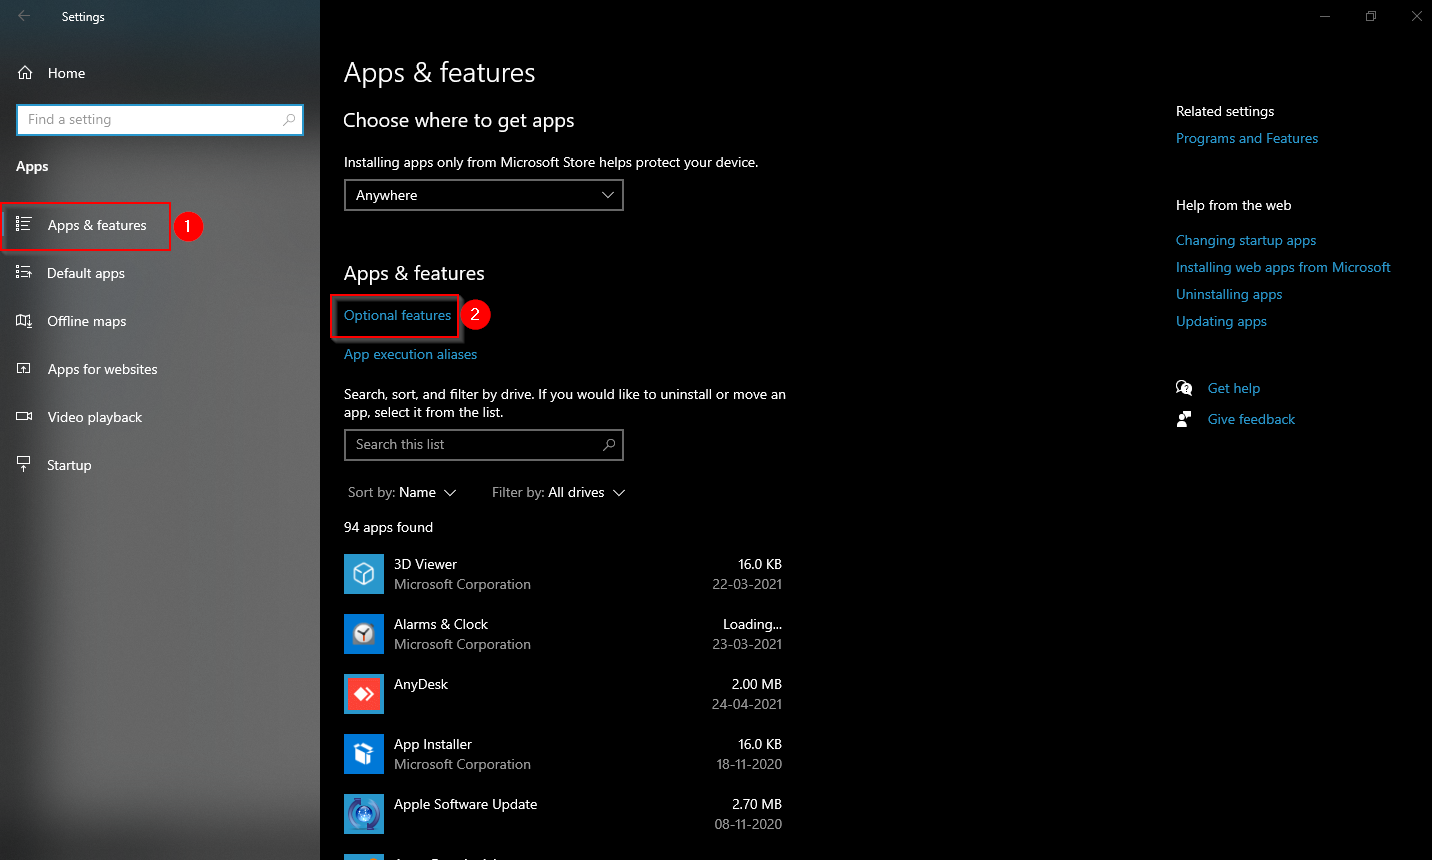
Step 5. On the following screen, click the Add a feature button.
Step 6. Then, type Wireless Display in the search bar.
Step 7. After that, check the checkbox before “Wireless Display.”
Step 8. Then, click the Install button to install it on your Windows 10 PC.
Step 9. Now, turn on your Android TV and connect to the same WiFi you are using for your PC.
Step 10. On your Windows 10 PC, turn on Wi-Fi.
Step 11. Next, press Windows + K to open the Connect screen.

Step 12. Once done, available devices will appear. Click on the device in the list you want to connect.
Step 13. If prompted by your Android TV, allow the connection.
In case you want to remove screen sharing, press Windows + K to open Connect window and click the Disconnect button.
Conclusion
In conclusion, connecting a Windows 11 or 10 device screen to an Android TV has become an easy task due to the built-in Wi-Fi feature on both devices. To cast the screen, both devices must be compatible with Miracast and connected to the same Wi-Fi network. Users can check for Miracast compatibility using the DirectX Diagnostic Tool for their Windows PC and enable the setting on their Android TV. Once both devices are compatible, users can follow the steps outlined in this gearupwindows article to connect their Windows 11 or 10 PC to an Android TV and project their display. Users can choose to duplicate, extend, or project their display as a second screen and can disconnect the connection at any time.
 Не все знают, но в Windows 10 присутствуют встроенные возможности приема трансляции изображения по Wi-Fi, то есть вы можете передать изображение с Android телефона или планшета на экран ноутбука или компьютера с WIndows 10, а при желании — и с другого ноутбука или компьютера. Основное требование для того, чтобы вы могли использовать рассматриваемую возможность: наличие включенного Wi-Fi адаптера на всех соединяемых устройствах, желательно также, чтобы они были современными. Подключение не требует, чтобы все устройства были подключены к одному Wi-Fi роутеру, не требуется также его наличие: устанавливается прямое соединение между ними.
В этой инструкции подробно о возможностях трансляции на компьютер в Windows 10 в текущей реализации, о том, как передать изображение на компьютер с Android телефона или с другого компьютера/ноутбука и об ограничениях и проблемах, с которыми при этом можно столкнуться. Также в контексте может быть интересно: Как подключить ноутбук к телевизору по Wi-Fi для передачи изображения, Трансляция изображения с Android на компьютер с возможностью управления в программе ApowerMirror, Как передать изображение с iPhone на компьютер.
- Настройка возможности передачи изображения по Wi-Fi в Windows 10
- Как передать изображение с Android на ноутбук или компьютер с Windows 10
- Сенсорный ввод при подключении к беспроводному дисплею
- Видео инструкция
- Возможные проблемы при подключении
Настройка возможности передачи изображения на компьютер или ноутбук с Windows 10
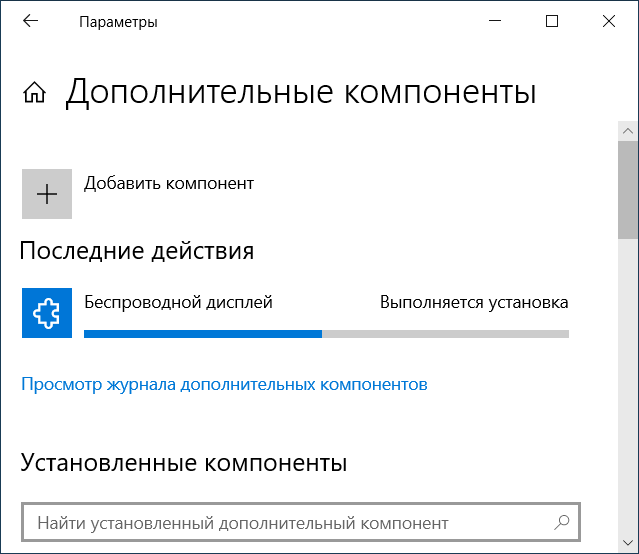
Для того, чтобы включить возможность использования компьютера с Windows 10 в качестве беспроводного монитора для других устройств можно выполнить некоторые настройки (можно и не выполнять, о чем также будет упомянуто далее), а в некоторых случаях — установить дополнительные системные компоненты, включающие функции трансляции (проецирования на компьютер):
- В случае, если на вашем компьютере установлена Windows 10 версии 2004 или новее (в предыдущих версиях этого делать не нужно), зайдите в Параметры — Приложения — Дополнительные компоненты — Добавить компонент и установите компонент «Беспроводный монитор».

- Зайдите в Пуск — Параметры — Система — Проецирование на этот компьютер.
- Укажите, когда возможно проецирование изображения — «Доступно везде» или «Доступно везде в защищенных сетях». В моем случае удачная работа функции происходила лишь в случае выбора первого пункта: мне так и осталось не вполне ясным, что здесь подразумевается под защищенными сетями (но речь не о профиле сети частная/общественная и защищенности Wi-Fi сети).

- Дополнительно вы можете настроить параметры запроса на подключение (отображается на устройстве, к которому подключаются) и пин-кода (запрос отображается на устройстве, с которого производится подключение, а сам пин-код — на устройстве, к которому подключаются).
- Если оставить в параметрах проецирования на компьютер пункт «Всегда отключено», но вам потребуется однократный запуск трансляции, вы можете её выполнить. Просто запустите встроенное приложение «Подключить» (можно найти в поиске на панели задач или в меню Пуск), а затем, с другого устройства, подключитесь следуя инструкции Приложение «Подключить» в Windows 10 или шаги, описанные ниже.

Если в окне настроек параметров «Проецирование на этот компьютер» вы видите текст «На этом устройстве могут быть проблемы с отображением содержимого, так как его аппаратная часть не была специально разработана для беспроводного проецирования», обычно это говорит об одном из:
- Установленный Wi-Fi адаптер не поддерживает технологию Miracast или делает это не так, как ожидает Windows 10 (на некоторых старых ноутбуках или ПК с Wi-Fi).
- Не установлены правильные драйверы беспроводного адаптера (рекомендую вручную устанавливать их с сайта производителя ноутбука, моноблока или, если это ПК с вручную установленным Wi-Fi адаптером — с сайта производителя этого адаптера).
Что интересно, даже при отсутствии заявленной производителем поддержки Miracast со стороны Wi-Fi адаптера, встроенные функции трансляции изображения Windows 10 иногда могут исправно работать: возможно, задействованы какие-то дополнительные механизмы.
Передача изображения с Android на компьютер Windows 10 (подключение к беспроводному монитору)
Вы можете передать изображение на компьютер или ноутбук с Windows 10 с другого аналогичного устройства (в том числе с Windows 8.1) или с Android телефона/планшета.
Для трансляции с Android обычно достаточно выполнить следующие шаги:
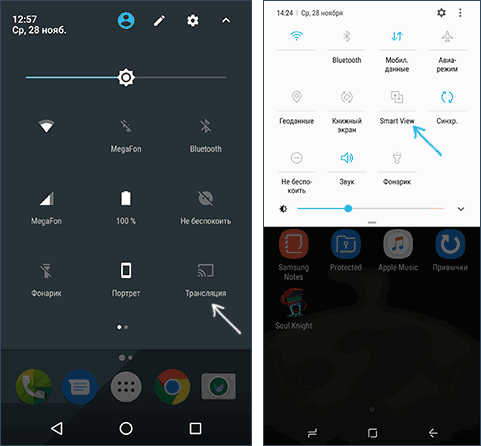
- Если на телефоне (планшете) выключен Wi-Fi, включите его.
- Откройте шторку уведомлений, а затем «потяните» её ещё раз, чтобы открыть кнопки быстрых действий.
- Нажмите по кнопке «Трансляция» или, для телефонов Samsung Galaxy — «Smart View» (на Galaxy может также потребоваться пролистать кнопки быстрых действий вправо, если они занимают два экрана). Если вы не можете найти нужный пункт, рекомендую ознакомиться с инструкцией Как передать изображение с Android на ТВ, там эта часть описана более подробно, а суть та же самая..

- Подождите некоторое время, пока в списке не отобразится имя вашего компьютера, нажмите по нему.
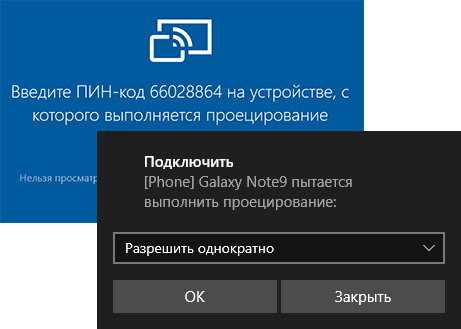
- Если в параметрах проецирования включены запросы на подключение или ПИН-код, дайте соответствующее разрешение на компьютере, к которому выполняется подключение или предоставьте пин-код.

- Дождитесь подключения — изображение с вашего Android будет отображаться на компьютере.


Здесь вы можете столкнуться со следующими нюансами:
- Если пункт «Трансляция» или аналогичный отсутствует среди кнопок, попробуйте действия из первой части инструкции Передача изображения с Android на телевизор. Возможно, опция находится еще где-то в параметрах вашего смартфона (можно попробовать использовать поиск по настройкам).
- Если на «чистом» Android после нажатия кнопки трансляции доступных устройств не отображается, попробуйте нажать «Настройки» — в следующем окне они могут инициализироваться уже без проблем (замечено на Android 6 и 7).
Для подключения с другого устройства с Windows 10 возможны несколько методов, самый простой из которых:
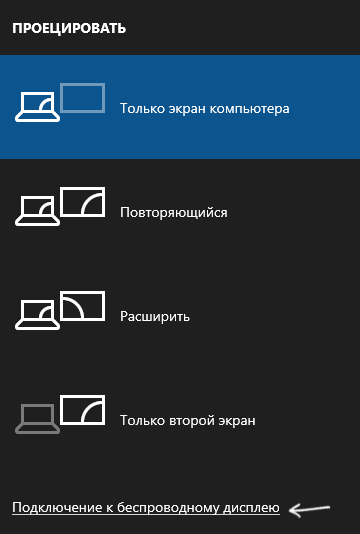
- Нажмите клавиши Win+P (латинская) на клавиатуре компьютера, с которого выполняется подключение. Второй вариант: нажать кнопку «Соединиться» или «Передавать на экран» в центре уведомлений (предварительно, если у вас отображается только 4 кнопки, нажать «Развернуть»).
- В открывшемся справа меню выберите «Подключение к беспроводному дисплею». Если пункт не отображается, ваш Wi-Fi адаптер или его драйвер не поддерживает функцию.

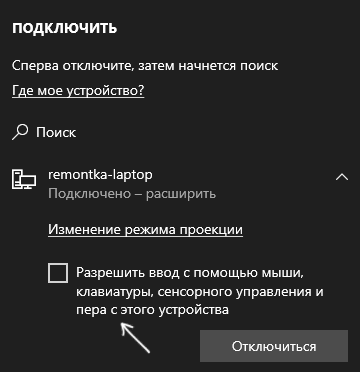
- Когда в списке отобразится компьютер, к которому подключаемся — нажмите по нему и дождитесь завершения подключения, может потребоваться подтвердить подключение на компьютере, к которому подключаемся. После этого начнется трансляция.
- При трансляции между компьютерами и ноутбуками Windows 10 можно также выбрать оптимизированный режим подключения для разных типов контента — просмотр видео, работа или игры (однако, играть вероятнее всего не получится, разве что в настольные игры — скорость недостаточная).


Если при подключении что-то не получается, обратите внимание на последний раздел инструкции, некоторые наблюдения из него могут оказаться полезны.
Сенсорный ввод при подключении к беспроводному дисплею Windows 10
Если вы начали передачу изображения на ваш компьютер с другого устройства, логичным будет желание управлять этим устройством на этом компьютере. Это возможно, но не всегда:
- Судя по всему, функция поддерживается не для всех Android устройств и не в любой версии Windows 10. В моем случае (Samsung Galaxy Note 9 и последняя Windows 10) работает, но на предыдущей версии системы — нет.
- Иногда ввод с клавиатуры и мыши задействуется сразу после любых нажатий, а иногда его нужно включить в уведомлениях (заходим на компьютере с которого подключаемся в центр уведомлений — соединить — видим подключенное устройство и отметку), но лишь при условии, что на устройстве, к которому подключаемся — беспроблемный Wi-Fi адаптер с полной поддержкой Miracast.

- Для некоторых Android телефонов при трансляции автоматически доступен ввод с клавиатуры компьютера (правда поле для ввода приходится выбирать на экране самого телефона), но недоступно управление мышью.
Примечание: для сенсорного ввода при трансляции необходима «Служба сенсорной клавиатуры и панели рукописного ввода», она должна быть включена: если вы отключали «ненужные» службы, проверьте.
Видео инструкция
Возможные проблемы при использовании передачи изображения на Windows 10
Помимо уже указанных проблем с возможностью ввода, во время тестов заметил следующие нюансы:
- Иногда первое подключение работает исправно, затем, после отключения, повторное становится невозможным: беспроводный монитор не отображается и не ищется. Помогает: иногда — ручной запуск приложения «Подключить» или отключение возможности трансляции в параметрах и повторное её включение. Иногда — только перезагрузка. Ну и обязательно убедитесь, что на обоих устройствах включен Wi-Fi модуль.
- Если подключение не удается установить никаким способом (не происходит подключение, не виден беспроводный монитор), большая вероятность, что дело в Wi-Fi адаптере: причем, судя по отзывам, порой это происходит и для полностью поддерживающих Miracast Wi-Fi адаптеров с оригинальными драйверами. В любом случае, попробуйте ручную установку оригинальных драйверов, предоставленных производителем оборудования.
Как итог: функция работает, но не всегда и не для всех сценариев использования. Тем не менее, быть в курсе такой возможности, думаю, будет полезно. Для написания материала использовались устройства:
- ПК Windows 10 2004 Pro, i7-4770, Wi-Fi адаптер TP-Link на Atheros AR9287
- Ноутбук Dell Vostro 5568, Windows 10 Pro, i5-7250, Wi-Fi адаптер Intel AC3165
- Смартфоны Moto X Play (Android 7.1.1), Nokia 4.2 (Android 10) и Samsung Galaxy Note 9 (Android 10)
Here, we have mentioned all the methods so that you can follow the instructions step-by-step. Before you proceed, go through the requirements and check if your device has support for Miracast. You can click on the link below to seamlessly jump to the section.
Project Windows 10 Screen to Android TV
Requirements
Find Miracast Support on Windows 10
-
Press Win + R to open the Run window. Here, enter dxdiag and hit enter.
-
Now, click on “Save All Information” and save the file on the desktop. It will be saved in a text file.
-
Open the text file and look for “Miracast“. If it shows “Available” then you are good to go.
-
In case, it shows “Not supported by Graphics driver” then download Intel Driver Assistant (Free) and update all drivers. It might be the case that your computer has the right hardware, but due to the lack of a proper driver, Miracast might not be available on your device. So go ahead and give it a try through the Intel Driver Assistant. Keep in mind, for Miracast to work, both hardware and software support is needed.
-
You can also try updating the Microsoft Wireless Display Adapter (Free) from the Microsoft Store.
Find Miracast Support on Android TV
Before we begin, let me tell you I am using Mi TV 4X running the latest Android 9. Xiaomi recently added support for Miracast on Mi TV so I am able to use the Miracast feature now. Xiaomi has added a separate Miracast app to connect with wireless displays.
For Android TVs manufactured by other vendors such as Sony, Samsung, LG et al, you may have to dig into settings and find the “Miracast” menu. This is applicable for not just Android TV but all smart TVs. Make sure Miracast is enabled and discoverable. I would also recommend you to go through Settings -> Apps -> See All Apps.
If need be, go through all the System Apps (located at the bottom) and find the Miracast menu. You can also go through all the Settings menu and find the Miracast option. As for this guide, I am going to show how you can find Miracast support on Mi TVs.
-
On the Android TV interface, move to the “+” button which is available along the “Apps” section.
-
Here, you will find the “Miracast” app. Simply select it and the app will be added to your favorite apps section. If Miracast is not available here then search it under Settings -> Apps -> See All Apps.
-
Now open the Miracast app and the wireless display feature will be enabled. You should stick to this screen while casting Windows 10 to Android TV.
Cast Windows 10 to Android TV
-
Open the Miracast app on your Android TV and stay on that screen. For your information, Definition Priority means the highest clarity possible, but real-time syncing will take a back seat. Fluency Priority means a stable connection with real-time syncing but in low-res quality (better for low-end devices). I like to keep Definition Priority as default.
-
Now, move back to your Windows 10 computer and press the “Win + K” keyboard shortcut. It will open a “Connect” window on the right pane.
-
If the “Connect” window does not pop up then open Settings -> System -> Display. Here, scroll down and click on “Connect to a wireless display”.
-
Now, it will start the search and within a few seconds, your Android TV will show up. Make sure the Miracast app is open on your Android TV and both your devices are connected to the common WiFi network. Next, click on your Android TV.
-
Finally, Windows 10 will cast its screen on your Android TV. Just like Chromecast, you can play music and it will be routed through your TV’s speaker. You can browse the internet, open any app (not just limited to Chrome), play games, and a lot more.
-
In case, you want to extend your display or make the setup second screen only then press “Win +P ” and change the projection mode.
Screen Mirroring from Windows 10 to Android TV Using Miracast
So that is how you can cast Windows 10 to Android TV and play any media or games. If you have a powerful computer, router, and Android TV then you can very well make your Android TV as a second screen. Anyway, that is all from us. If you want to learn more such Mi TV tips and tricks then go through our linked guide. And if you are facing any issue then comment down below and let us know. We will surely try to help you out.
- AirDroid Cast Screen Mirroring App
- Cast Windows and MacOS screens to a computer wirelessly.
- You can cast the screen of your device to any browser without installation.
Although mirroring screens on other devices is increasingly common and convenient today, some people still have trouble connecting devices. Many Windows users have trouble casting from Windows 10 frequently. So I thought that it was important to know what are some solutions and alternatives to cast from Windows 10 to other screens.
Below, I’ll explain more about the casting issue and how to fix it so that you can use your devices to cast anything at any time.

- 1 :Cast from Windows 10 to TV
- 2 :Cast from Windows 10 to Another PC/Mac

- 3 :Cast from Windows 10 to iPhone/Android
- 4 :Tips: How to Cast Phone Screen to Windows 10?
1 Cast from Windows 10 to TV
Way 1. Miracast
Miracast is independent of existing networks and does not require a wireless access point, but it can benefit from them if linked. First of all, you should check that a Wi-Fi router is connected to both your computer and TV and that your TV supports Miracast, or has a Miracast adapter.
It’s time to Miracast PC to TV once your gear has been configured appropriately. This is how you do it:
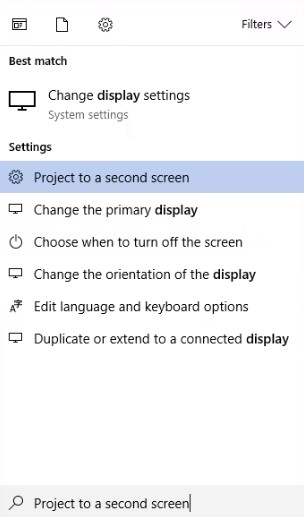
Step 1. Open the Start Menu, or use Cortana’s search bar.
Step 2. When the Settings result appears, type “Project” to a second screen and click it.
Step 3. Select the projection method you wish to use by clicking on one of the choices in the right sidebar: Extend, Duplicate, or Second Screen Only.
Step 4. Click Connect to a Wireless Display once you’ve made your decision.
Step 5. Windows will now look for Miracast-capable devices and display them here. To start your projection, double-click the appropriate device. This is how to miracast PC to TV.
Way 2. Enable Casting on «Network and Sharing Center»
Another way to cast Windows 10 to TV is — the ”Network and Sharing Center”. Windows 10 has a Wireless Casting feature that enables you to cast your screen to an additional display.
This feature can be very helpful if you want to show content on a different screen or simply want to share your screen with someone else. By doing the following, you can cast Windows 10 to TV:
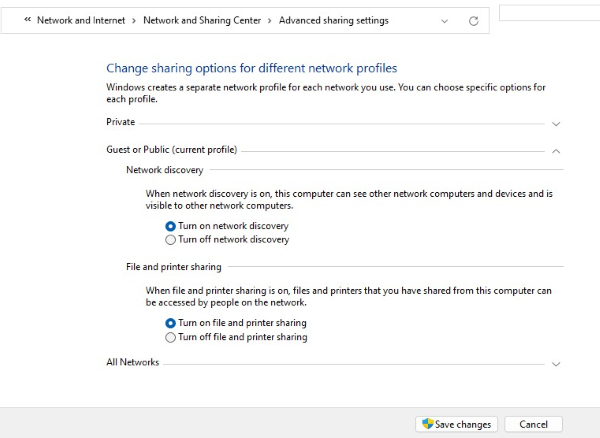
Step 1. Open the Control Panel, Go to the Network and Sharing Center. Change advanced sharing settings by clicking on it.
Step 2. Make sure the Turn on network discovery and Turn on file and printer sharing check boxes are selected when you expand the Private profile.
Step 3. Make sure the Turn on network discovery and Turn on file and printer sharing options are chosen by expanding the Guest or Public profile.
Step 4. Then select Save changes.
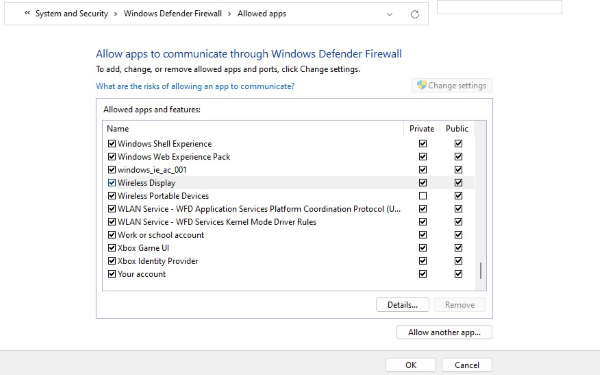
Step 5. Go to Allow an app or feature through Windows Firewall and Select the Wireless Casting checkbox by swiping it down. Select OK.
Way 3. HDMI
Using an HDMI connection is one of the easiest ways to Screen cast Windows 10. Don’t forget that you can still use a cable if you don’t have a Smart TV with WiFi. All you need to do is use an HDMI cable to connect your laptop to the TV.
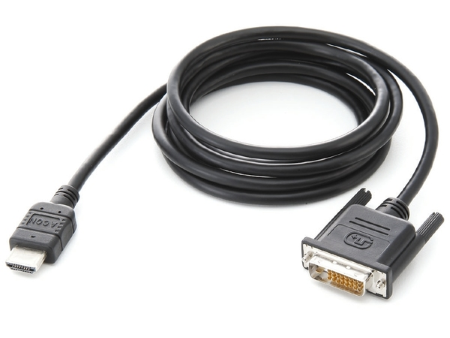
For a quick, reliable connection, just splice an HDMI cable into the HDMI port on your computer and connect the other end to your TV. Although it seems quite simple, make sure your PC has an HDMI connector. While many more recent laptops lack an HDMI port, many older computers often have one. An adapter can be used to fix this.
Way 4. Google Chromecast Device
A special gadget called Google Chromecast lets you stream entertainment from your phone or computer to any TV or monitor with an HDMI connector. Although you won’t be charged a membership price to utilize a Chromecast, you will still be charged to access services like Netflix and Hulu.
To cast Windows 10 to Chromecast, follow these instructions:
Step 1. Open Chrome. At the top right, click More and choose “Cast”.
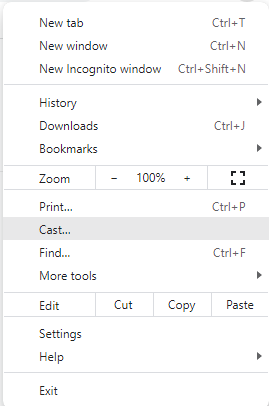
Step 2. Click Sources. There you can choose to either cast the whole screen or only one tab. This allows sharing just one tab and keeps working on others. After that, choose the Chromecast TV that you wish to cast to.
Step 3. Click on the device itself and the casting will start automatically.

2 Cast from Windows 10 to Another PC/Mac
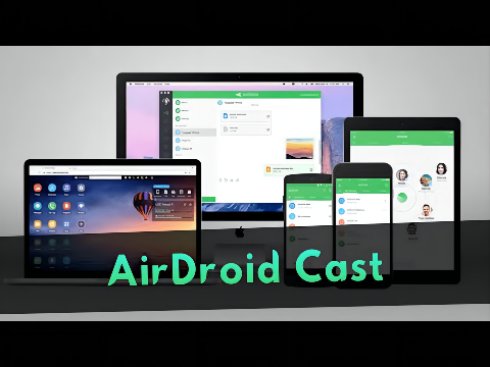
Way 1. Our Recommend — AirDroid Cast
After some research and tries, I found the one that is much less complicated and easy to use. Additionally, it came with features that were beneficial for me. That is why I recommend it — AirDroid Cast.
How to Mirror Windows 10 to Another PC/Mac via AirDroid Cast?
Screen cast Windows 10 to another PC is possible. For this, Download and install AirDroid Cast by clicking “Try It Free” button below or from AirDroid official website on both(casting/receiving) devices.
After downloading and installing software on both devices follow the steps shown below.
Step 1. Open the AirDroid Cast on sending and receiving computers. You will be able to see the “Share this computer screen” option on the interface. Click it on the sending computer. Then you will see the guide.
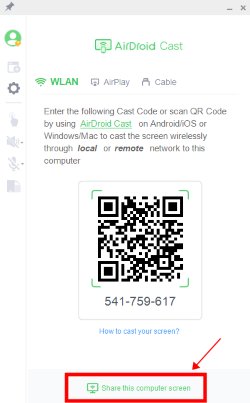
Step 2. On the receiving computer, you will see a QR code and a 9-digit Cast Code.
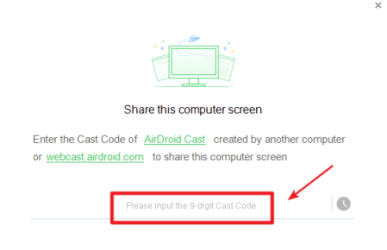
Step 3. Enter the cast code shown on the AirDroid Cast Desktop Client of receiving computer.
Step 4. Click «Allow» to start receiving the screen. If you don’t want the request to appear every time you receive a screen, please check the «Trust this device and never ask me again» option.
For Windows 10 users, If fail to receive sound from the remote computer, please open:
-
Start
-
Settings
-
Sound
-
Advanced sound options
-
Find AirDroid Cast
-
Change both Input/Output as your current used monitor device name
Cross Platforms
With AirDroid Cast, you can cast Android/iOS/PC/Mac to another PC or any device’s browser. Meet your needs for entertainment, remote working, and remote instruction. This effective screen-sharing and control tool closes the gap between computers and mobile devices.
User’s Review
As I searched through the user reviews, found out that the vast majority of comments were positive and the users were very satisfied with the tool. According to user reviews, AirDroid is a wonderful option if you want to mirror your phone or find a different way to transfer data between your computer and mobile device without a wire.
Speed & Definition
Sharing with AirDroid Cast only can take up to one minute if the tool is already installed. It is very quick and reliable.
Way 2. Built-in Screen Mirroring Method
Many individuals and businesses find screen mirroring to another monitor, particularly PC to TV mirroring, to be handy. Some programs may even reflect numerous devices at once, which is extremely useful if you need to resolve problems on two different PCs.
Some devices have built-in screen mirroring features. For example, you can simply share your PC screen with the TV, PC, or other mobile devices by following those simple instructions.
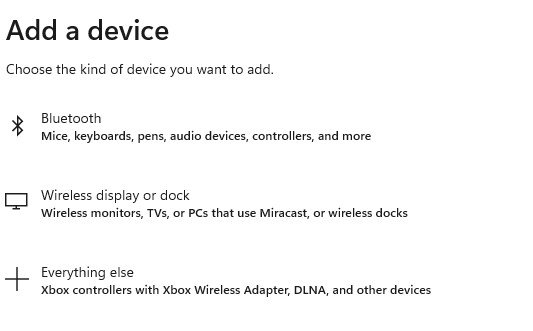
Step 1. Go to the “control panel”, then move to the “Bluetooth & Devices”.
Step 2. Click on “Add device”.
Step 3. Choose the “ wireless display or dock”. After this, you will be able to see the list of available devices. Click on the preferred one and the PC will start to pair.
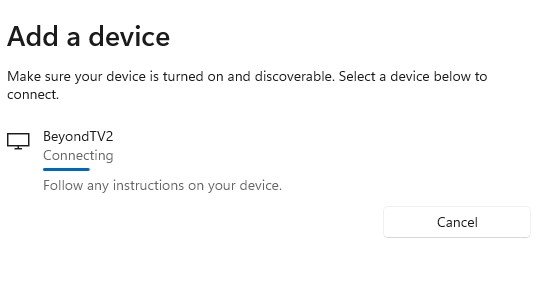
Step 4. On your receiving device, in this case, the TV, you will see the permission button which has to be “accepted”.
After permitting the TV, your Windows 10 PC screen will appear on the TV and you can watch your movies and videos comfortably on the large screen.
3 Cast from Windows 10 to iPhone/Android
Way 1. AirDroid Cast Web
Anytime, wherever, cast your screen to a phone, tablet, computer, or smart TV! All you need for receiving screens is a device with a web browser and an internet connection. Here is a manual for you:
Step 1. Download AirDroid Cast on your Windows 10 PC. You don’t need to download anything on your iPhone/Android.
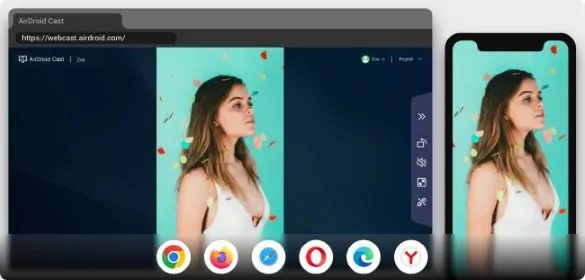
Step 2. On your iPhone or Android mobile phone, go to the web browser and type webcast.airdroid.com. You will see a large QR code with a 9-digit cast code underneath it.
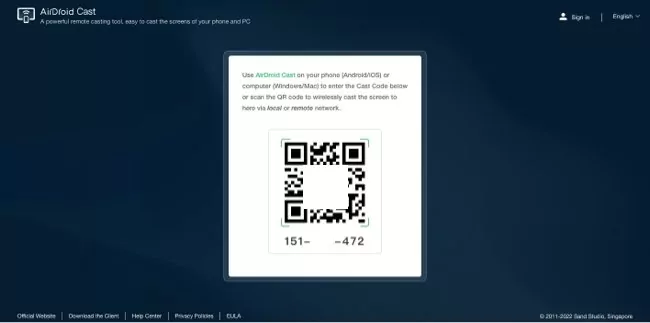
Step 3. Open the AirDroid Cast desktop, you will be able to see “Share this computer screen” right in the bottom part of the app. Click on it.
Step 4. Type the cast code that is shown on your mobile phone browser screen in the AirDroid Cast Desktop client.
Step 5. Allow the casting request on your phone and you will be able to see the screencast Windows 10 on your iPhone or Android mobile phone.
Convenience — Cast Phone/Tablet/PC Screen to Any Browser
AirDroid Cast is a straightforward yet effective solution that you can use if projecting the screens of your PC devices onto an iPhone or Android is all you require.
-
There is no need for cable or installation.
-
There’s no need to sign up for new networks.
-
You don’t have to tell anyone your network password.
Time Needed
It only requires the installation of the application on the sending device. As long as the receiving device has browser support, all is good. As for the time, it is very quick and only can take up to 2 minutes to establish the connection.
Platforms
AirDroid Cast Web offers the unique opportunity to share the screen on multi-platforms. The tool is available for any device that has a browser including Android, iOS, Mac, Windows, and others.
Way 2. Chrome Remote Desktop
Chrome Remote Desktop connects you to your devices utilizing the most recent web technologies, whether you need to access your work computer from home, view a file from your home computer while traveling, or share your screen with friends or coworkers.
Convenience
You can remotely access your computer at any time, from any location, to view files or run programs. You may connect to your devices or share your screen with confidence thanks to the use of the most up-to-date open web technologies, such as WebRTC, which are built on Google’s secure infrastructure.
Time Needed
Once it’s set up is done and the tool is ready to use. It is very fast and can be opened in just under a minute.
Platforms
Use a computer, an Android, or an iOS smartphone to connect however you like. You can count on having quick access to all of your machines and files whenever you need them, regardless of the route you take.
Download Link
Download and installation of Chrome Remote Desktop are merely easy and can be done by following this link: https://remotedesktop.google.com
4 Tips: How to Cast Phone Screen to Windows 10?
Your gadget can be effortlessly cast to Windows 10 with the AirDroid Cast or Miracast. To use the AirDroid Cast, you can scan the QR code or the Cast code that will be appeared on the Windows 10 screen after opening the application
As for the Miracast, on your phone, go to the settings and turn the screen sharing on. Choose the Miracast-adapted large-screen device from the list and complete the connecting process.
5 Conclusion — Cast from Windows 10
There are several ways to cast from Windows 10 and cast to Windows 10. Above, I introduced and discussed several options for sharing. You may link your computer to your TV screen using a variety of software and applications. Several techniques can be used to cast from Windows 10 to PC, TV, or mobile phone. Each of them comes with several steps. Yet, after good research, I recommend using the AirDroid Cast tool. It is easy, free, and one of the most convenient methods of the cast from Windows 10.
People Also Ask
Does Windows 10 have Casting?
Yes, Windows 10 have a casting feature that was built into the update of 2019. It’s also called Wireless Display. The feature can be accessed from the settings menu.
How Do I Cast from Windows 10 to My TV?
A few simple methods exist for screen cast Windows 10 to your TV. Simply choose «devices» from the Windows settings menu, click «Add Bluetooth or another device,» then choose «Wireless display or dock» to activate the built-in casting feature.
How to Cast from Windows 10 to Chromecast?
First, open the Chrome browser on your PC. Click «More» or the three dots in the top right corner, followed by «cast.» The search for discoverable devices, Click Sources, and Cast desktop. Choose the Chromecast device where you wish to view the content as the last step.
How Do I Setup Chromecast on Windows 10?
First, make sure you have the most recent Chrome browser version installed. Choose the Chrome menu option. Choose Chromecast as your casting device by selecting «Cast» from the menu.
Can I Cast Windows 10 to Apple TV?
You can, but you’ll need a 3rd Party program installed on your Windows PC to mirror its screen. Currently, the only way to share material from anything offered by Apple or Microsoft to your Apple TV from a Windows device is through iTunes.