 Безопасный режим Windows 10 может быть полезен при решении самых различных проблем с компьютером: для удаления вирусов, исправления ошибок драйверов, в том числе вызывающих синий экран смерти, сброса пароля Windows 10 или активации учетной записи администратора, запуска восстановления системы из точки восстановления. Отдельная инструкция: Как зайти в безопасный режим Windows 11.
В этой инструкции — несколько способов зайти в безопасный режим Windows 10 в тех случаях, когда система запускается и вы можете в нее зайти, а также когда запуск или вход в ОС по тем или иным причинам невозможен. К сожалению, знакомый многим путь запуска безопасного режима через F8 больше не работает (но вы можете сделать, чтобы работала: Как включить вход в безопасный режим клавишей F8 в Windows 10), а потому придется пользоваться иными методами. В конце руководства имеется видео, в котором наглядно показаны способы входа в безопасный режим.
- Как запустить безопасный режим Windows 10 через msconfig
- Вход в безопасный режим через особые варианты загрузки
- Добавление пункта «Безопасный режим» в меню загрузки
- Как зайти в безопасный режим Windows 10 с использованием загрузочной флешки
- Другие способы запуска безопасного режима
- Видео инструкция
Вход в безопасный режим через конфигурацию системы msconfig
Первый, и, наверное, многим знакомый способ запустить безопасный режим Windows 10 (он работает и в предыдущих версиях ОС) — использовать встроенную утилиту конфигурации системы. Минус метода — невозможность попасть в безопасный режим, если система не запускается. Необходимые шаги:
- Нажмите клавиши Win+R на клавиатуре (Win — клавиша с эмблемой Windows), введите msconfig в окно «Выполнить» и нажмите Enter.
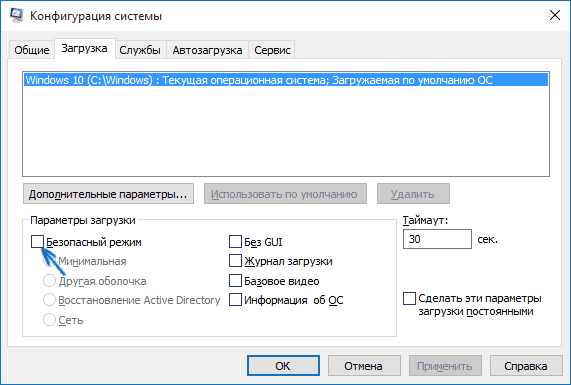
- В открывавшемся окне «Конфигурация системы» перейдите на вкладку «Загрузка», выберите ту ОС (обычно присутствует лишь один пункт меню и выбирать не требуется), которая должна запускаться в безопасном режиме и отметьте пункт «Безопасный режим».
- При этом, для него существуют несколько вариантов безопасного режима загрузки: минимальная — запуск «обычного» безопасного режима, с рабочим столом и минимальным набором драйверов и служб; другая оболочка — безопасный режим с поддержкой командной строки; сеть — запуск с поддержкой сети.
По завершении, нажмите «Ок» и перезагрузите компьютер, Windows 10 запустится в безопасном режиме.
Затем, чтобы вернуть обычный режим запуска, тем же методом снова используйте msconfig, но в этот раз снимите установленную ранее отметку запуска безопасного режима, примените настройки и перезагрузите ПК или ноутбук.
Запуск безопасного режима через особые варианты загрузки
Данный способ запуска безопасного режима Windows 10 в общем случае также требует, чтобы ОС на компьютере запускалась. Однако, есть две вариации этого способа, позволяющие зайти в безопасный режим, даже если вход в систему или ее запуск невозможен, которые я также опишу.
В общем случае способ подразумевает выполнение следующих простых шагов:
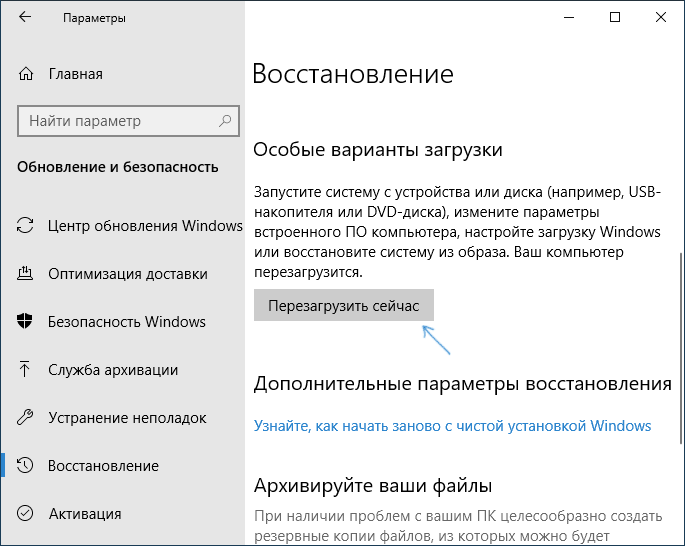
- Открыть Параметры (значок шестеренки в меню Пуск или клавиши Win+I), зайти в пункт «Обновление и безопасность», выбрать «Восстановление» и в пункте «Особые варианты загрузки» нажать «Перезагрузить сейчас». (В некоторых системах данный пункт может отсутствовать. В этом случае, для входа в безопасный режим используйте следующий способ).

- На экране особых вариантов загрузки выбрать «Поиск и устранение неисправностей» — «Дополнительные параметры» — «Параметры загрузки». Если пункт «Параметры загрузки» отсутствует, нажмите «Дополнительные параметры восстановления». На более ранних версиях Windows 10 путь такой: «Диагностика» — «Дополнительные параметры» — «Параметры загрузки». И нажать кнопку «Перезагрузить».

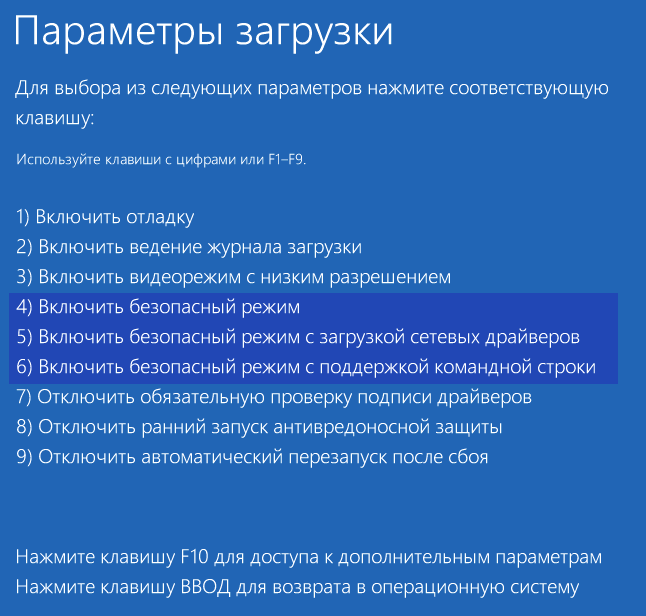
- На экране параметров загрузки, которые появятся после перезапуска системы, нажать клавиши от 4 (или F4) до 6 (или F6) для запуска соответствующего варианта безопасного режима.


Как добавить пункт «Безопасный режим» в меню загрузки Windows 10
При необходимости обезопасить себя от возможных проблем или если вы часто используете безопасный режим Windows 10, вы можете добавить его в меню загрузки вашего компьютера или ноутбука:
- Запустите командную строку от имени администратора и используйте следующие команды, нажимая Enter после каждой из них. После выполнения первой команды отобразится идентификатор GUID, который нужно будет использовать во второй команде.
-
bcdedit /copy {default} /d "Безопасный режим"
bcdedit /set {отобразившийся_GUID} safeboot minimal
- Готово, теперь при включении компьютера у вас будет отображаться меню, в котором, помимо простого запуска Windows 10 можно будет запустить и безопасный режим.


При необходимости, вы можете изменить время ожидания в меню загрузки (то есть то время, по истечении которого произойдет автоматическая загрузка Windows 10 в обычном режиме). Для этого используйте команду
bcdedit /timeout Время_в_секундах
Как зайти в безопасный режим Windows 10 с помощью загрузочной флешки или диска восстановления
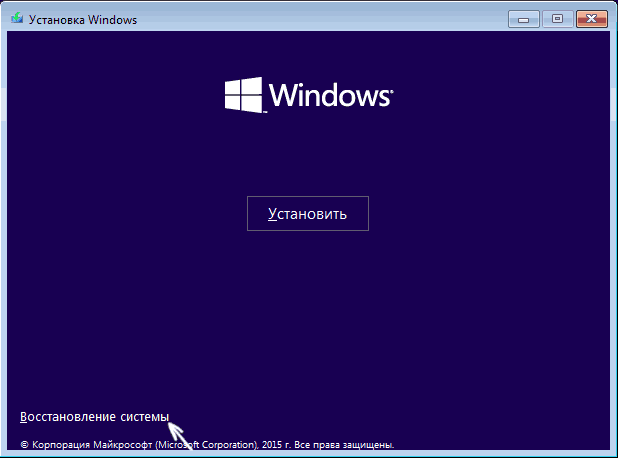
И, наконец, если не удается попасть даже на экран входа в систему, то есть и еще один способ, но вам потребуется загрузочная флешка или диск с Windows 10 (которые можно легко создать на другом компьютере). Загрузитесь с такого накопителя, а затем либо нажмите клавиши Shift + F10 (это откроет командную строку), либо после выбора языка, в окне с кнопкой «Установить» нажмите «Восстановление системы», затем Диагностика — Дополнительные параметры — Командная строка. Также для этих целей можно использовать не дистрибутив, а диск восстановления Windows 10, который легко делается через панель управления в пункте «Восстановление».
В командной строке введите (безопасный режим будет применен к ОС, загружаемой на вашем компьютере по умолчанию, на случай, если таких систем несколько):
- bcdedit /set {default} safeboot minimal — для следующей загрузки в безопасном режиме.
- bcdedit /set {default} safeboot network — для безопасного режима с поддержкой сети.
Если требуется запуск безопасного режима с поддержкой командной строки, используйте сначала первую из перечисленных выше команд, а затем: bcdedit /set {default} safebootalternateshell yes

После выполнения команд, закройте командную строку и перезагрузите компьютер, он автоматически загрузится в безопасном режиме.
В дальнейшем, чтобы включить обычный запуск компьютера, используйте в командной строке, запущенной от имени администратора (или же способом, описанным выше) команду:
bcdedit /deletevalue {default} safeboot
Еще один вариант почти же способа, но запускающий не сразу безопасный режим, а различные варианты загрузки, из которых можно выбрать, при этом применяет это ко всем совместимым ОС, установленным на компьютере. Запустите командную строку с диска восстановления или загрузочной флешки Windows 10, как это уже было описано, затем введите команду:
bcdedit /set {globalsettings} advancedoptions true
И после успешного ее выполнения, закройте командную строку и перезагрузите систему (можно нажать «Продолжить. Выход и использование Windows 10». Система загрузится с предложением нескольких вариантов загрузки, как и в способе, описанном выше, и вы сможете войти в безопасный режим.
В дальнейшем, чтобы отключить особые варианты загрузки, используйте команду (можно из самой системы, используя командную строку от имени администратора):
bcdedit /deletevalue {globalsettings} advancedoptions
Дополнительные способы запустить безопасный режим
В дополнение к вышеизложенным методам, ещё два способа, позволяющих запустить Windows 10 в безопасном режиме, оба также показаны в видео ниже:
- Если вы можете попасть на экран блокировки, но не можете зайти в систему, нажмите по изображению кнопки питания справа внизу экрана блокировки, а затем, удерживая Shift, нажмите «Перезагрузка». Компьютер выполнит перезагрузку в среде восстановления, где как и в способе с особыми вариантами загрузки вы сможете попасть в безопасный режим.
- Этот метод я не могу рекомендовать, так как он потенциально может привести к проблемам с накопителями, но: если при начале загрузки Windows 10 дважды неправильно выключить компьютер или ноутбук (долгим удержанием кнопки питания), то вы попадете в окно «Автоматическое восстановление», где, нажав кнопку «Дополнительные параметры» и перейдя к пункту «Параметры загрузки» вы также сможете зайти в безопасный режим.
Безопасный режим Windows 10 — видео
И в завершение видео руководство, в котором наглядно показаны способы зайти в безопасный режим различными способами.
Думаю, какой-то из описанных способов вам непременно подойдет. Также в данном контексте может оказаться полезным руководство Восстановление Windows 10.
Nowadays, having a laptop is essential for most of us. But have you ever encountered a problem with your Dell laptop? Does it take too long to start or get stuck at a certain point? If so, you might need to start it in Safe Mode. In this article, we will show you how to start your Dell laptop in Safe Mode Windows 10. We’ll discuss the importance of Safe Mode and the different ways you can access it. After reading this article, you will be able to know how to get your Dell laptop working again in no time. So, let’s begin!
How to Start Dell Laptop in Safe Mode Windows 10?
- Press the Windows key + R to open the Run dialog box.
- Type “msconfig” into the Run dialog box and press Enter.
- On the System Configuration pop-up window, click on the Boot tab.
- In the Boot options section, select the Safe boot check box.
- Click on the radio button next to “Minimal”.
- Click Apply, then click OK.
- The System Configuration pop-up will close and you will be prompted to restart your computer. Click Restart.
- Your computer will now restart in Safe mode.

How to Boot Dell Laptop into Safe Mode on Windows 10?
Starting your Dell laptop in safe mode is a great way to troubleshoot potential software problems. Safe mode allows you to boot into a limited version of Windows 10 with only essential services running, which can help you identify and fix issues that may be preventing your laptop from booting normally. Here’s how to start your Dell laptop in safe mode on Windows 10.
Restart into Safe Mode
The easiest way to start your Dell laptop in safe mode is to restart it while pressing the F8 key (on some laptops, it may be F5 or F7). This will bring up the Advanced Boot Options menu, which will allow you to select the option to start your laptop in safe mode. You can also start your laptop in safe mode using the Windows Recovery Environment (WinRE). This can be accessed by pressing the F11 key while your laptop is booting.
Using System Configuration
If you don’t want to restart your laptop to get into safe mode, you can use the System Configuration tool to enable safe mode. To do this, press the Windows + R keys to open the Run dialog, type “msconfig” and press Enter. This will open the System Configuration window. Go to the Boot tab, select the “Safe boot” checkbox and click OK. This will enable safe mode, and your laptop will restart in safe mode the next time it boots.
Using Command Prompt
You can also use the Command Prompt to enable safe mode. To do this, press the Windows + X keys to open the Power User menu, select “Command Prompt (Admin)” and press Enter. This will open an elevated Command Prompt window. Type “bcdedit /set {default} safeboot minimal” and press Enter. This will enable safe mode, and your laptop will restart in safe mode the next time it boots.
Using Advanced Startup
You can also use the Advanced Startup feature to enable safe mode. To do this, press the Windows + I keys to open the Settings window, go to “Update & Security”, select “Recovery” and click “Restart now” under Advanced startup. This will restart your laptop and open the Advanced startup menu. Select “Troubleshoot”, then “Advanced options”, then “Startup Settings”, then “Restart”. This will restart your laptop and open the Startup Settings menu. Select the option to enable safe mode and your laptop will restart in safe mode.
Using System Restore
If you want to start your laptop in safe mode to perform a system restore, you can use the Windows Recovery Environment (WinRE). This can be accessed by pressing the F11 key while your laptop is booting. This will open the Windows Recovery Environment, which will allow you to select the option to perform a system restore. This will start your laptop in safe mode and allow you to restore your system to a previous state.
Using Windows Update
If you want to start your laptop in safe mode to install a Windows update, you can use the Windows Update tool. To do this, press the Windows + I keys to open the Settings window, go to “Update & Security”, select “Windows Update” and click “Check for updates”. This will check for available updates and allow you to install them. If an update requires a restart, you can select the option to restart in safe mode. This will start your laptop in safe mode and allow you to install the update.
Few Frequently Asked Questions
1. What is Safe Mode?
Safe Mode is a diagnostic startup mode in Windows 10 that is used to help troubleshoot issues. It starts up with minimal system services, so it can be used to identify and fix problems that may prevent Windows from loading normally. It also allows you to run diagnostic and repair programs that can help you solve problems with your computer.
2. How do I start my Dell laptop in Safe Mode?
To start your Dell laptop in Safe Mode, you will need to press and hold the F8 key while the computer is booting up. This will bring up the Advanced Boot Options menu, where you can select the “Safe Mode” option. Once in Safe Mode, you will be able to run diagnostics and repair programs.
3. What should I do if I can’t boot into Safe Mode?
If you are unable to boot into Safe Mode, then you will need to try to access the Advanced Boot Options menu by pressing and holding the F8 key while the computer is booting up. If this does not work, then you will need to try using the System Recovery Options menu, which can be accessed by pressing and holding the F10 key while the computer is booting up.
4. What are the benefits of using Safe Mode?
Using Safe Mode can be beneficial in many ways. It can help you troubleshoot and identify problems with your computer that may prevent Windows from loading normally, and it can also allow you to run diagnostic and repair programs that can help you solve those problems. It can also help you uninstall and reinstall drivers, software, and hardware that may be causing problems with your computer.
5. Is it safe to use Safe Mode?
Yes, it is safe to use Safe Mode. It does not contain any malicious software and only runs the essential components of Windows, so it is a safe environment to use for troubleshooting and repair.
6. What should I do if I can’t access the Advanced Boot Options menu?
If you are unable to access the Advanced Boot Options menu, then you will need to try using the System Recovery Options menu, which can be accessed by pressing and holding the F10 key while the computer is booting up. This menu will allow you to access a variety of recovery options, including the ability to repair the operating system, restore the system to a previous restore point, and access a command prompt.
How to start Windows 10 in Safe Mode
As a professional writer, I can confidently say that following the instructions outlined in this article will help you start your Dell laptop in safe mode on Windows 10. This mode can be an invaluable tool for troubleshooting and resolving issues with your laptop. With the help of the steps outlined in this article, you can easily and safely start your Dell laptop in safe mode on Windows 10.
Is your Dell computer crashing, freezing, or slowing down lately and you have no idea what the problem might be? The reason for your Dell computer woes could be anything. It could be that some of your hardware is faulty, or maybe a driver isn’t working, or there’s a rogue application messing everything up in there.
One of the best ways to solve this issue is to boot your Windows 10 in Safe Mode on your Dell computer. This is a special boot mode that launches your operating system in a barebones, pristine, and clean state so that certain features of your system and drivers will not run.
Working Well in Safe Mode
If you notice that your Dell computer is working just fine when booted in Safe Mode, then the most likely source of the issue is a service in the system, a feature that won’t load, or a bad driver.
The idea behind launching your Dell computer in safe mode is that it helps with diagnosis. When you launch your computer in safe mode you might be able to get at the heart of the performance issues it is having and sort them out yourself before you have to call in a professional.
Windows 10 Safe Mode for Your Computer
If your Dell computer is running Windows 10, the simplest way to start in Safe Mode is by heading over to the search field at the bottom of your monitor, on the taskbar.
Once you locate the search bar type “msconfig” into it, a list of search results will be populated as you type the term into the search field. At the very top of this list, pick on the entry labeled “System Configuration.”
Finishing Up With System Configuration
The System Configuration window will appear on your monitor. There are a few tabs in this window, namely the General tab, the Boot tab, the Services tab, the Startup tab, and the Tools tab. In the General tab, you will find that you are most likely to be on Normal Startup or Selective Startup. In order to load only the basic services and drivers, click on the radio button next to Diagnostic Startup. Click OK, close the System Configuration Window, and reboot your Dell computer.
Your Dell will soon boot in Safe Mode. When it does, you should aim to reproduce the specific issue that your computer was suffering before the Safe Mode reboot. The trouble may or may not have disappeared with the reboot. However, whatever the case, you will probably still need to test things further to determine the specific issue at hand.
Determining the Specific Issue
To do that, go once more to the search bar and type i_n msconfig in order to locate the _System Configuration tool and launch it. Once on the System Configuration window, look for the Boot tab and click on it. There you will find plenty of check boxes. Look for the one labeled “Safe Boot.” Click on that check box.
Under the Safe boot check box, you will find a bunch of options with radio buttons next to them. There is Minimal, Alternate shell, and Networ_k. You should try each of these options, with a reboot after you select each. If you notice the problem going away with any of these reboots, then try going back into _Normal startup to see if the problem has actually disappeared.
Trial and Error
In case the problem persists, try the next option. You have to be systematic and patient with this in order to properly get to the heart of the issues you may be experiencing with your system.
You will notice that there are further check boxes in the Safe boot section. These are No GUI boot, Boot log, Base video, and OS Boot information. They give you even more room to play around with the system and figure out what really is the problem. Reboot your computer with each checkbox checked until you find the one where the problem goes away, and then reboot in safe mode.
Using the Services Tab
Another tab you might want to check out on the System Configuration Window is the services tab. Here you will most likely find a long list of listed services. You can check or uncheck the services that you want to investigate further. To help you narrow down even more efficiently, go through each service one by one to see to which service the problem in your system might be related.
After this long exercise, you might be lucky enough to have narrowed the issue down to a specific service or driver. If you have managed to do this, you can search Bing or Google, to see if there are others, such as yourself who might have run into the problem and who have found a way to solve that problem.
Other Methods for Windows 10 and 8.1
If your Dell computer is running Windows 10 or Windows 8.1, there are other ways you can boot your computer in Safe Mode. For example, you could click on the Start button, head on to the Settings button, click on Update & Security, and then click on the option labeled Recovery. You will be taken to the Recover window. While there, look for the Advanced Startup section and click on the button there to Restart your computer.
If your Dell computer runs Windows 8.1, then you should follow the following procedure:
- Launch the Charms bar.
- While you’re there click on Settings
- Click on the option labeled “Change PC Settings.”
- Click on “Update & Recovery”
- Click on “Recovery.”
You should look for the section labeled Advanced Startup. While you are there, click on the button labeled “Restart now” and your Dell computer will restart in Safe Mode.
Choose an Option
No matter which system you’re running, you will be taken to another screen where you will be prompted to “Choose an option.” There are three options: the Continue option, the Troubleshoot option, and the “Turn off your PC” option. Click on the button labeled “Troubleshoot.”
Once you click on “Troubleshoot,” you will be taken to the Troubleshoot section. There you will be given a choice to either “Reset this PC” or head on to “Advanced options.” Click on the button labeled “Advanced options.”
Advanced Options Screen
You will be taken to yet another screen: the “Advanced options” screen. There you will see a lot of different buttons, including Systems Restore, System Image Recovery, Startup Repair, Command Prompt, Startup Settings, and Go back t_o the previous build. Click on the button labeled “Startup Settings.”_
When you click on the “Startup Settings” button, you will be taken to the Startup Settings screen, where you will be given the option to restart your Dell computer. Click on the Restart button.
Startup Settings Screen
Once you click on Restart, you will be taken to yet another Startup Settings screen where you will be given a number of options. These are: Enable debugging, Enable boot logging, Enable low-resolution video, Enable Sage Mode, Enable Safe Mode with Networking, Enable Safe Mode with Command Prompt, Disable driver signature enforcement, Disable early launch anti-malware protection, Disable automatic restart after a failure. They are labeled 1 to 9 in order. Click the number of the option you would like to select on your keyboard.
Your Dell computer will now reboot under the boot type that you picked. You should do the same thing as earlier and try to reproduce the issue you were going through to see if it is possible to narrow it down.
To start your Dell laptop in safe mode on Windows 10, please follow these steps:
1. On the sign-in screen, press and hold the Shift key on your keyboard while clicking the Power button > Restart.
2. After restarting, you will see a list of options. Select Troubleshoot > Advanced options > Startup Settings > Restart.
3. Once your laptop restarts again, press 4 or F4 to enter Safe Mode or press 5 or F5 to enter Safe Mode with Networking.
4. Your laptop should now be in Safe Mode and you can use it as needed for troubleshooting purposes.
It may also help to run a virus scan using updated antivirus software before attempting to start in Safe Mode, as this may help identify if any malicious software is preventing the normal startup process of your laptop.
How do I force my laptop into Safe Mode Windows 10?
How do I force my computer to start in Safe Mode?
It depends on what operating system you are using, but generally the steps to force your computer to start in Safe Mode are as follows:
1. Start or restart your computer.
2. When you see the logo for the manufacturer of your computer (Dell, Acer, etc.) press and hold down either the ‘F8’ key or ‘Shift + F8’ key until a menu appears.
3. Use the arrow keys to navigate to «Safe Mode» and then hit enter/return.
4. Your computer should now boot into Safe Mode where you can troubleshoot any issues that you may be having with it.
If these steps do not work for your particular operating system, please consult a user manual or search online for instructions specific to your OS version and laptop/computer model.
What is the Safe Mode key in Dell Windows 10?
The Safe Mode key in Dell Windows 10 is the F8 key. To start your computer in Safe Mode, press and hold the F8 key while it’s booting up. This will bring up a menu with a number of options; select “Safe Mode” from this list to start the computer in Safe Mode. For additional information on using Safe Mode in Windows 10, please refer to Microsoft’s support page at https://support.microsoft.com/en-us/help/12376/windows-10-start-your-pc-in-safe-mode
How do I start my computer in Safe Mode when F8 doesn t work?
If F8 does not work to start your computer in Safe Mode, you can try the following steps:
1. Restart your computer and press and hold the «Shift» key as soon as it begins to boot up. This will enable a menu with an option for “Safe Mode”.
2. If that doesn’t work, try restarting your computer again and pressing and holding any of the F keys (F1 through F12). There should be an option for “Safe Mode” on one of them.
3. If you are still unable to get into Safe Mode, you may need to access your BIOS settings by pressing a key like Delete or F2 as soon as your computer begins to boot up. Look for an option related to «Boot Options» or «Advanced Boot Options«. You should then be able to select Safe Mode from there.
4. If all else fails, consider restoring the system defaults in the BIOS settings which should allow you access in Safe Mode without any additional steps required.
I hope this advice helps!
Does Windows 10 have F8 Safe Mode?
Yes, Windows 10 has F8 Safe Mode. To access it, restart your computer and press the F8 key repeatedly when you see the Windows logo during startup. This will bring up a menu with various options for starting Windows in different modes. Select Safe Mode from this menu to boot into a minimal version of Windows with only essential drivers and services running. You can then troubleshoot any problems that may be causing your computer to run slowly or not start correctly.
Is Safe Mode f2 or F8?
It depends on the version of Windows you are using. Generally, F8 is used to access Safe Mode in Windows 7 and earlier versions, while F2 is used for Windows 8 and later. To access Safe Mode, restart your computer and press either F2 or F8 when prompted. You may have to try both keys if you are unsure which one works for your version of Windows. Once you are in Safe Mode, you will be able to troubleshoot any issues that may be preventing your computer from starting up normally.
Is Safe Mode f5 or F8?
No, Safe Mode is typically accessed with the F8 key on most PCs. However, some newer computers may use the F5 key to access Safe Mode. To determine which key you should use to access Safe Mode on your computer, please follow these steps:
1. Hold down the Windows Key and R together at the same time
2. Type “msconfig” in the box that appears and hit Enter
3. In System Configuration window, click on Boot tab
4. Look for an option labeled “Safe boot” or «Enable Safe Boot«. If it is present, then press F5 to enter safe mode when restarting your PC; if not present then press F8 to enter safe mode when restarting your PC.
How do I enable F8 Safe Mode in Windows 10?
To enable F8 Safe Mode in Windows 10, you can follow these steps:
1. Open the Run dialog box by pressing the Windows key + R on your keyboard.
2. In the Run dialog box, type «msconfig» and press Enter.
3. This will open up the System Configuration window.
4. Select ‘Boot’ from the tabs at the top of this window and then tick ‘Safe Boot’ under Boot options section and click OK button to save changes.
5. A pop-up window will appear asking how do you want to restart your computer; select ‘Restart’ option and click OK button to restart your computer in safe mode with F8 key enabled now.
6. When you restart your PC, keep pressing F8 until a list of startup menus appear on screen; choose Safe Mode option from this menu and press enter to boot in safe mode with F8 key enabled now!
I hope this advice helps!
Starting your Dell computer in Safe Mode can be a useful troubleshooting tool when experiencing issues with your system. Safe Mode allows you to load only essential drivers and services, which can help isolate the cause of any problems you may be facing. Whether you need to remove a stubborn virus, diagnose a software conflict, or fix a driver issue, Safe Mode is often the first step in finding a solution. In this blog post, we will guide you through the process of starting your Dell computer in Safe Mode on Windows 10.
Video Tutorial:
The Challenge of Starting in Safe Mode on Windows 10 Dell
Despite the benefits, starting in Safe Mode on Windows 10 Dell computers can be a bit tricky, especially if you are unfamiliar with the process. Without proper guidance, it’s easy to get stuck in a loop or accidentally enter a different booting option, which might further complicate the issue at hand. However, with the right knowledge and steps, you can easily start your Dell computer in Safe Mode and begin troubleshooting with confidence.
Things You Should Prepare for
Before starting the process of booting into Safe Mode on your Dell computer, there are a few things you should prepare for:
1. Backup your important data: While starting in Safe Mode is generally safe, it’s always a good idea to backup any important files before performing any system changes. This will help ensure that even if something goes wrong during troubleshooting, your valuable data remains secure.
2. Understand your specific Dell model: Different Dell models may have slightly different steps for accessing Safe Mode. It’s important to know your specific model and research any model-specific instructions that may be required.
3. Familiarize yourself with the keyboard shortcuts: In some cases, you will need to use specific keyboard shortcuts to access Safe Mode. By knowing these shortcuts beforehand, you can easily navigate through the booting options.
Method 1: How to Start in Safe Mode via System Configuration
Starting in Safe Mode via the System Configuration utility is one of the most common and straightforward methods. Here’s how you can do it:
Step 1: Press the Windows key + R on your keyboard to open the Run dialog box.
Step 2: Type «msconfig» in the Run dialog box and press Enter. This will open the System Configuration utility.
Step 3: In the System Configuration window, navigate to the «Boot» tab.
Step 4: Under the «Boot options» section, check the box next to «Safe boot» and select the «Minimal» option.
Step 5: Click on «Apply» and then «OK.«
Pros:
1. Easy to access via the System Configuration utility.
2. Allows a smooth transition into Safe Mode.
3. No need for advanced technical knowledge.
Cons:
1. Requires a computer restart, which may interrupt your current work.
2. May disable certain drivers or services, which can temporarily limit functionality.
Method 2: How to Start in Safe Mode via Shift + Restart
Another way to start in Safe Mode on your Dell computer is by using the Shift + Restart combination. This method is useful when your computer is unable to boot into the operating system properly. Follow these steps to initiate Safe Mode using this method:
Step 1: Click on the Start menu and select the Power button while holding down the Shift key on your keyboard.
Step 2: From the options that appear, select «Restart.» This will restart your computer and present you with the Advanced Startup Options menu.
Step 3: In the Advanced Startup Options menu, select «Troubleshoot.«
Step 4: Select «Advanced options» and then «Startup Settings.«
Step 5: Click on the «Restart» button to proceed.
Step 6: Once the computer restarts, a list of startup settings will be presented. Press the corresponding number key for the option labeled «Enable Safe Mode» or «Enable Safe Mode with Networking,» depending on your needs.
Pros:
1. Useful when your computer is unable to boot normally.
2. Provides access to Safe Mode even when Windows is not functioning correctly.
3. Options for both Safe Mode and Safe Mode with Networking are available.
Cons:
1. Requires advanced knowledge of keyboard shortcuts.
2. Can be a bit time-consuming compared to other methods.
3. Not suitable for situations where immediate access to Safe Mode is required.
Method 3: How to Start in Safe Mode via Recovery Settings
If the previous methods didn’t work on your Dell computer, you can try accessing Safe Mode through the Recovery Settings. Here’s how you can do it:
Step 1: Press the Windows key + I on your keyboard to open the Settings app.
Step 2: Click on the «Update & Security» option.
Step 3: In the left sidebar, select «Recovery.«
Step 4: Under the «Advanced startup» section, click on the «Restart now» button.
Step 5: Your computer will now restart and present you with the Advanced Startup Options menu.
Step 6: Follow the same steps mentioned in Method 2 to select Safe Mode or Safe Mode with Networking.
Pros:
1. Provides an alternative method of accessing Safe Mode.
2. Doesn’t require technical expertise.
3. Accessible through the Windows Settings app.
Cons:
1. Requires a computer restart.
2. May not be available on older versions of Windows 10.
Method 4: How to Start in Safe Mode via Command Prompt
If you prefer using command-line tools, you can start in Safe Mode on your Dell computer using the Command Prompt. Here are the steps to follow:
Step 1: Press the Windows key + X on your keyboard to open the Power User menu.
Step 2: Select «Command Prompt (Admin)» or «Windows PowerShell (Admin).«
Step 3: In the command prompt window, type the following command and press Enter: «bcdedit /set {default} safeboot minimal«
Step 4: Close the command prompt window and restart your computer.
Step 5: During the restart process, your computer will boot into Safe Mode automatically.
Pros:
1. Suitable for users who are comfortable using command-line tools.
2. Allows precise control over system configurations.
3. Does not require additional software installations.
Cons:
1. Requires administrative privileges.
2. Incorrect usage of commands can lead to system instability.
3. Not recommended for novice users without technical knowledge.
Why Can’t I Start in Safe Mode on My Dell?
There could be several reasons why you might encounter difficulties when starting in Safe Mode on your Dell computer. Let’s explore some common issues and their potential fixes:
1. Problem: Incompatible drivers or software conflicts.
– Fix: Boot into Safe Mode and update your drivers or uninstall conflicting software.
2. Problem: Corrupted system files.
– Fix: Use the System File Checker tool to repair corrupted files.
3. Problem: Hardware issues.
– Fix: Inspect your hardware components for any visible damage or consult a professional for further troubleshooting.
Additional Tips
Here are some additional tips to help you make the most out of your Safe Mode experience:
1. Restart your computer before attempting to start in Safe Mode. Sometimes, a simple restart can resolve minor software conflicts.
2. If you are unable to enter Safe Mode using one method, try another. Some Dell models may have specific requirements for accessing Safe Mode.
3. Use Safe Mode with Networking if you need internet connectivity to troubleshoot or download updates.
5 FAQs about Starting in Safe Mode on Windows 10 Dell
Q1: Can I access the internet in Safe Mode?
A: Yes, you can access the internet by selecting the «Safe Mode with Networking» option.
Q2: Will starting in Safe Mode delete my files?
A: No, starting in Safe Mode does not delete your files. However, it’s always recommended to back up your important data before making any system changes.
Q3: How do I know if my Dell computer supports Safe Mode?
A: Most Dell computers support Safe Mode. However, specific model variations may affect the accessibility of Safe Mode. It’s best to consult the Dell support website or your computer’s user manual for accurate information.
Q4: Can I update drivers in Safe Mode?
A: Yes, you can update drivers in Safe Mode. It is a recommended troubleshooting step to resolve driver-related issues.
Q5: How do I exit Safe Mode?
A: To exit Safe Mode, simply restart your computer. It will boot back into the normal operating mode.
In Conclusion
Starting your Dell computer in Safe Mode on Windows 10 can be a valuable troubleshooting tool. Whether you’re facing software conflicts, driver issues, or malicious software, Safe Mode provides a controlled environment for resolving these problems. By following the methods outlined in this blog post, you can easily access Safe Mode on your Dell computer and begin troubleshooting with confidence. Remember to always backup your data before making any system changes and utilize the additional tips provided to enhance your Safe Mode experience.