BSOD ATTEMPTED_TO_WRITE_TO_READONLY_MEMORY в Windows 11, 10
Снова разбираемся с очередной ошибкой, на этот раз затронем BSOD с кодом ATTEMPTED TO WRITE TO READONLY MEMORY. Неполадка затронула Windows 11, 10 и Server 2019, 2022. В самой проблеме уже зашита подсказка, что попытка записи или чтения памяти оказалась безуспешной. Конечно, это очень расплывчатое представление о проблеме, да и подобные сведения часто оказываются неприменимыми к реалиям. В этот раз сбой тоже может носить разные причины, да и проявляется различными способами.
Ошибка ATTEMPTED TO WRITE TO READONLY MEMORY может быть связана с различными кодами, а также ссылаться на некоторые файлы. Порой дополнительно могут фигурировать в сообщениях: 0x000000be, win32kbase.sys, ntfs.sys, ntoskrnl.exe. Если же заглянуть сейчас в системный отчет, то с большой долей вероятности можно найти следующее сообщение: «Операция ввода-вывода, инициированная реестром, завершилась неустранимым сбоем. Реестру не удалось очистить куст (файл)».
Почему появился BSOD:
- перегрев процессора и других комплектующих;
- повреждение оперативной памяти;
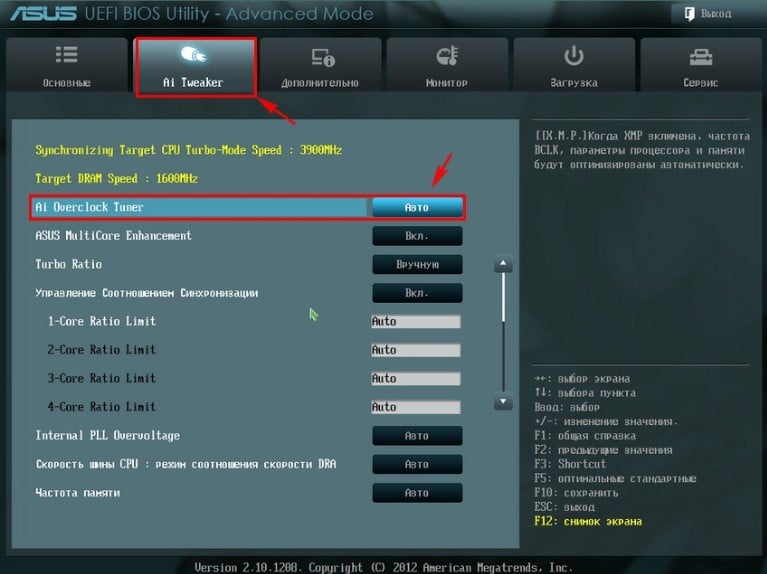
- неправильно настроенный XMP-профиль памяти;
- устаревшая версия BIOS;
- неисправность значений и ключей в реестре;
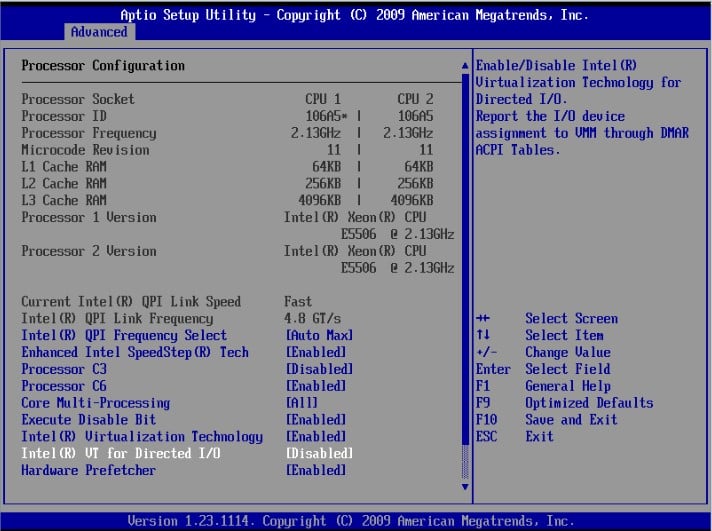
- проблема с виртуальным пространство и технологией Intel VT-d;
- несовместимость драйвера.
Как исправить ATTEMPTED TO WRITE TO READONLY MEMORY?
Исправлением для данного BSOD послужит устранение первопричины ошибки. Главная проблема в том, что мы не знаем, по какой именно причине произошел сбой в конкретном случае. Остается только пробовать решения в порядке от самых простых до более сложных. Что-то из перечисленного имеет хорошие шансы на успех.
Руководство по устранению BSOD:
- Проверить датчики. Следует провести стресс-тест через любую доступную утилиту, чтобы определить, не подвержена ли ваша система перегреву одной из комплектующих. Речь может идти о процессоре или видеокарте, как самых мощных источниках тепла. Важно обращать внимание на пиковую температуру. Если она достигает 80+ градусов, следует задуматься о дополнительном охлаждении.
- Восстановить реестр. С помощью специальных утилит можно в автоматическом режиме выполнить восстановление. Одна из самых популярных программ – CCleaner. На самом деле лучше было бы использовать резервный куст с этого же компьютера, но обычно его никто не создает заблаговременно.
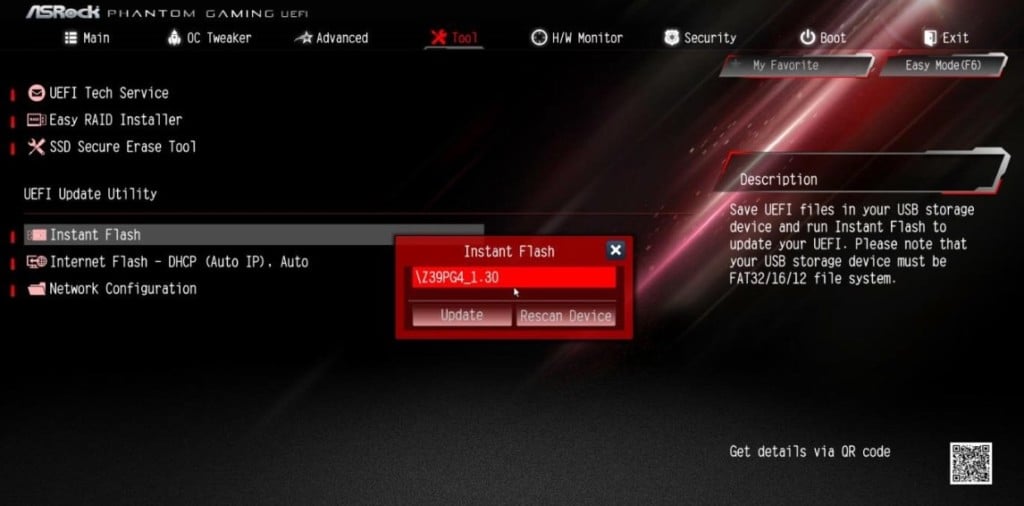
- Обновить BIOS. Особенно актуально для тех, у кого синий экран смерти появляется при попытке обновить Windows 11 или 10. Устаревшая версия BIOS является частым виновником. Процедура довольно простая: скачать прошивку с официального сайта разработчиков, загрузить на флешку, зайти в BIOS или UEFI и выбрать соответствующий пункт. Обычно он так и называется Update BIOS.
- Отключить Intel VT-d. По каким-то причинам, технология виртуального пространства порой выдает сбои и ее выключение помогло части пользователей. Предлагаем перейти в UEFI и выключить систему Intel VT-d, установив для нее значение Disable.
- Проверить оперативную память. С помощью Memtest86 следует просканировать ОЗУ. Еще более важный момент для тех, у кого в журнале событий числятся какие-то ошибки по видеокарте, так как ГПУ тянет часть ОЗУ, в последней может быть проблема.
- Настроить профиль XMP. Очень часто неполадка заключается в неправильных таймингах, а также в завышенной тактовой частоте. Следует опытным путем снижать скорость работу ОЗУ в поисках более стабильного режима. Также следует подобрать оптимальные тайминги для всех планок оперативной памяти. Все перечисленное выполняется через интерфейс BIOS.
- Отключить посторонние драйвера. Известно, что некоторые версии драйверов Kaspersky мешают обновить Windows 10, а также перейти к Windows 11 и Server 2022. И это далеко не единственный драйвер, который был замечен в подобных неполадках. Разумно на время отключить дополнительное оборудование, а также выключить вспомогательное программное обеспечение.
Как показывает практика, указанные выше решения должны повергнуть BSOD ATTEMPTED TO WRITE TO READONLY MEMORY в Windows 11, 10. В большинстве случаев мы предполагаем появление положительного эффекта. Однако мы нуждаемся в ваших комментариях, которые подтверждают или опровергают эффективность методов.
Updated by
Sherly on Jul 20, 2023
Top 8 Ways to Fix Windows 11/10 Attempted Write to Readonly Memory BSOD Error
Windows 11/10 BSOD error is no longer new to many Windows users. The «Attempted Write to Readonly Memory» BSOD error is still a troublesome issue for most ordinary Windows users to fix. Right here below, you’ll find X reliable solutions, and you can follow anyone to resolve the Windows 11/10 Attempted_Write_to_Readonly_Memory BSOD error.
A quick overview of all four troubleshooting methods of attempted write to readonly memory BSOD error:
| Workable Solutions | Step-by-step Troubleshooting |
|---|---|
| Fix 1. Rebuild MBR | Download and launch EaseUS Partition Master on a new PC which runs the same system as yours…Full steps |
| Fix 2. Enter Safe Mode | Restart your PC by pressing the Power button. Once the related options show up, hold the «Shift» key…Full steps |
| Fix 3. Check RAM | Press Win + R to open the Run dialog box. Type mdsched.exe in the blank area…Full steps |
| Fix 4. Run CHKDSK | Press the Windows key and type cmd. Right-click «Command Prompt»…Full steps |
| Other Useful Fixes | Update Device Driver > Uninstall Recent Software > Check for Windows 10 Update > Restore System…Full steps |
«Hi guys, do you know how to restore Windows 10 from BSOD issue with the error message ‘Your PC ran into a problem and needs to restart. We are just connecting some error info, and then we’ll restart for you. If you’d like to know more, you can search online for this error ATTEMPTED_WRITEN_TO_READONLY_MEMORY? I got this message this morning when I tried to open my PC. I waited for the PC to restart, but nothing changed. Then I reboot the PC, and this message popped up once again. Does anyone know how to fix the BSOD error with Attempted Write to Readonly Memory? I don’t even know what the error message means. Please do help me if you just know the solution. Thanks.»
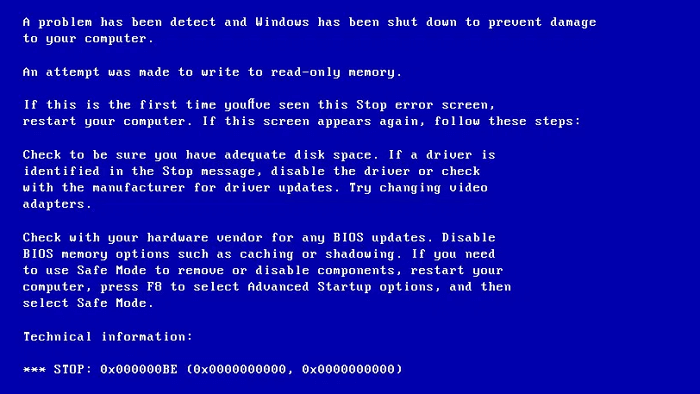
The error 0x000000BE (ATTEMPTED WRITE TO READONLY MEMORY) occurs when a driver tries to write on a read-only segment of your computer’s memory. If the system manages to identify the driver that caused the error, that driver is going to be mentioned near the STOP message on the Blue Screen of Death screen.
The following things could cause 0x000000BE error:
- Faulty or corrupt device driver
- Incompatible firmware software
- Corrupt system services
You can watch this video first to fix the BSOD error:
Let’s see how to fix this BSOD issue and make your Windows 10 Computer back to work normally again now.
Fix 1. Rebuild MBR to Fix Windows 11/10 Attempted Write to Readonly Memory BSOD
Let the best partition manager software — EaseUS Partition Master to help you boot PC and follow the below tips to solve this BSOD issue in Windows 11/10 now. This disk management tool enables you to create a WinPE bootable disk and enter your computer to make it bootable. Besides, it has many highlights:
- Combine partitions to enrich partition space
- Replace an old hard drive with a new one
- Convert basic disk to dynamic or dynamic to basic with ease
- Resize, format, create or delete a partition
Steps to rebuild MBR in Windows 11/10:
— EaseUS Partition Master —
Your Smart Windows 11 Update Disk Manager
- MBR to GPT Converter, Make Disk Ready for Windows 11.
- Migrate Windows 11 to New SSD in 1-Click.
- Handy to Extend or Combine Partitions in Windows 11.
- Clone and Upgrade Disks without Data Loss.
Step 1. Create a WinPE bootable disk
- Launch EaseUS Partition Master, and click «Bootable Media» on the toolbar. Select «Create bootable media».
- Click «Next» to finish the process.

Step 2. Boot EaseUS Partition Master Bootable USB
- Connect the bootable USB or CD/DVD to your PC.
- Press F2 or Del when you restart the computer to enter the BIOS screen. Set and boot your computer from «Removable Devices» or «CD-ROM Drive». And then EaseUS Partition Master will run automatically.
Step 3. Rebuild MBR
- Click «Toolkit» and choose «Rebuild MBR».

- Select the disk and the type of MBR. Then, click «Rebuild».

- After that, you can see «MBR has been successfully rebuilt on Disk X».

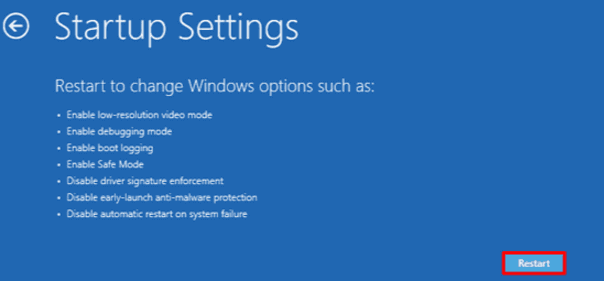
Fix 2. Enter Safe Mode to Fix Attempted Write to Readonly Memory error
Windows 11/10 receives «Attempted Write to Readonly Memory» BSOD error and needs to restart, how to fix? All you need to do is enter the safe mode to fix 0x000000BE if you are unable to enter Windows.
Step 1. Restart your PC by pressing the Power button.
Step 2. Once the related options show up, hold the «Shift» key and press «Restart» simultaneously.
Step 3. Select «Troubleshoot > Advanced options > Startup Settings > Restart». After your computer restart, press 4 or F4 on the keyboard to start your PC in Safe Mode.
Fix 3. Check Computer’s Memory (RAM) to Fix Windows 11/10 BSOD Error
The error — attempted write to readonly memory is related to the computer’s memory. The lack of storage space on your computer leads to the BSOD. This solution is of vital importance. Follow the steps below to identify whether your PC’s memory is working properly or not.
Step 1. Press Win + R to open the Run dialog box.
Step 2. Type mdsched.exe in the blank area and click OK to proceed.
Step 3. Select the option «Restart now and check for problems» to detect the trouble in the memory immediately.
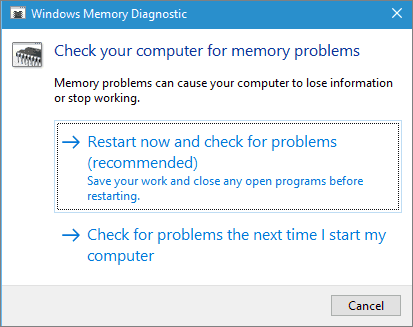
Then, the Memory Diagnostic Tool will automatically scan your PC. If errors are detected, change the current device with a new one to get rid of BSOD with ATTEMPTED_WRITE_TO_READONLY_MEMORY.
Do you know how to check RAM now? By clicking the buttons below, you can share this guide to let more users know about this method.
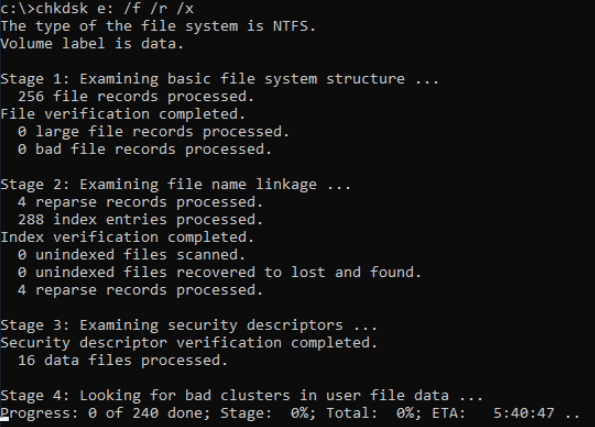
Fix 4. Remove Attempted Write to Readonly Memory BSOD with CHKDSK
System file error and bad sector error could result in this ATTEMPTED_WRITE_TO_READONLY_MEMORY. If the above solutions do not bring any relief, then stay into Safe Mode and run SFC and CHKDSK to repair the bad sectors and faulty system files. You can enter safe mode in Fix 1.
Step 1. Press the Windows key and type cmd.
Step 2. Right-click «Command Prompt» and choose «Run as administrator».
Step 3. Enter the following command:
sfc /scannow
Step 4. Once the scan gets over, run this command
chkdsk E: /f /r /x
«E» means the drive letter of the partition you want to repair.
Also read: Fix SFC/SCANNOW Cannot Repair Error.
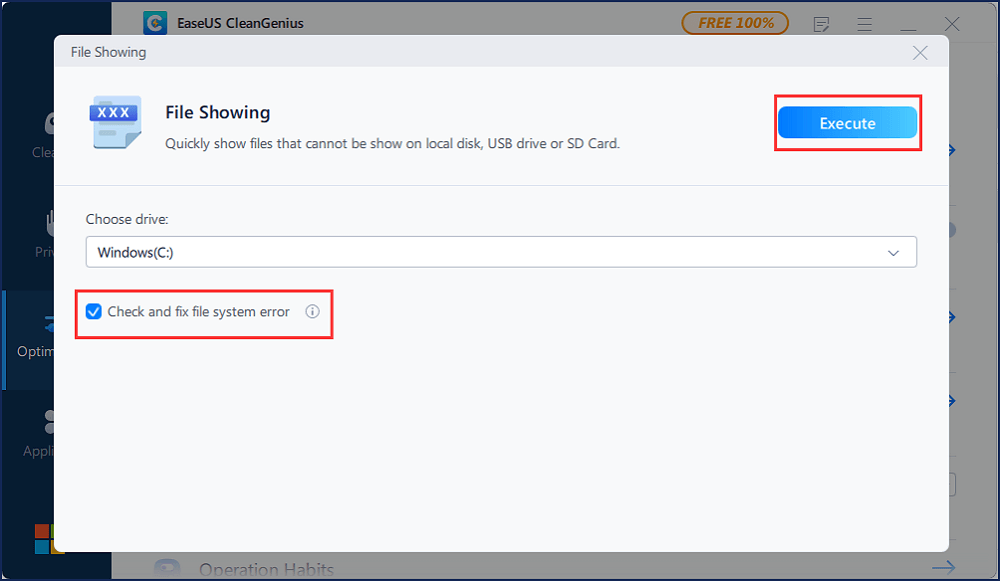
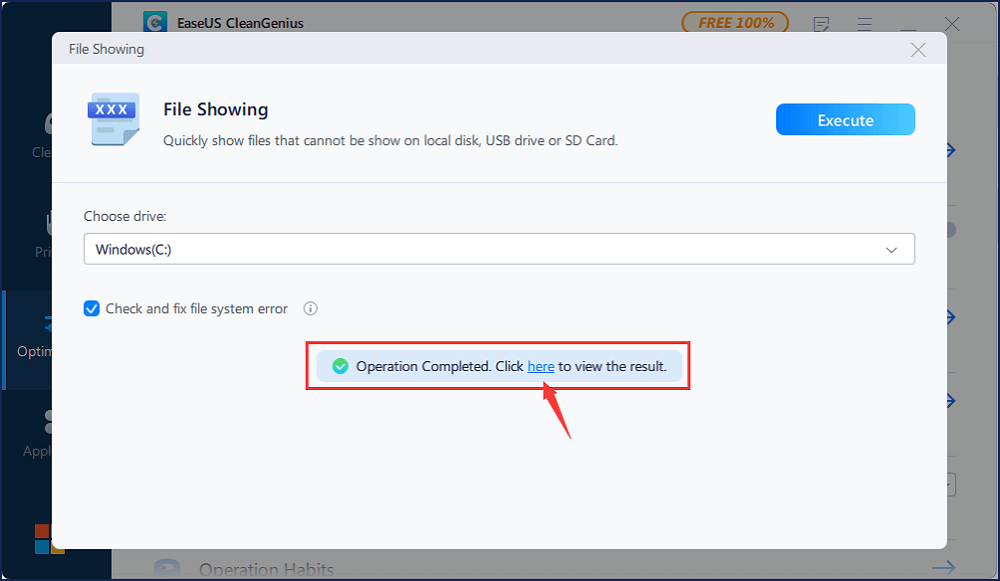
Use CHKDSK Alternative Tool
Download EaseUS CleanGenius and install it on your computer. Let’s start checking and refixing file system error on your device now.
Step 1. Click «File Showing» to enter the next step.
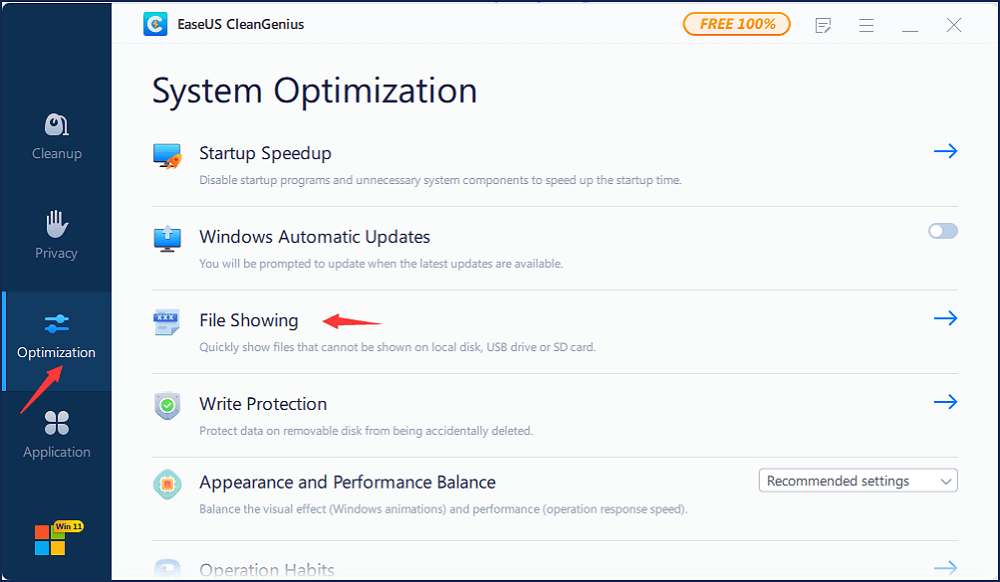
Step 2. Choose the target device and tick the box of «Check and fix file system error». Click «Execute» to start fixing the problematic device.
Step 3. When the fixing process completes, click «here» to open and use your device.
Fix 5. Update Device Driver to Fix Attempted Write to Readonly Memory
You need to update the driver after you have entered the safe mode in Fix 1. A faulty or corrupt device driver can cause ATTEMPTED_WRITE_TO_READONLY_MEMORY error. You need to update your device driver to get rid of attempted write to readonly memory in Windows 10.
Steps to update the device driver:
Step 1. Right-click on the Windows icon at the left corner and select «Device Manager».
Step 2. On the Device Manager, check for the problematic driver. Usually, the driver will display a yellow triangle next to the faulty driver.
Step 3. Right-click on the driver and click «update driver».
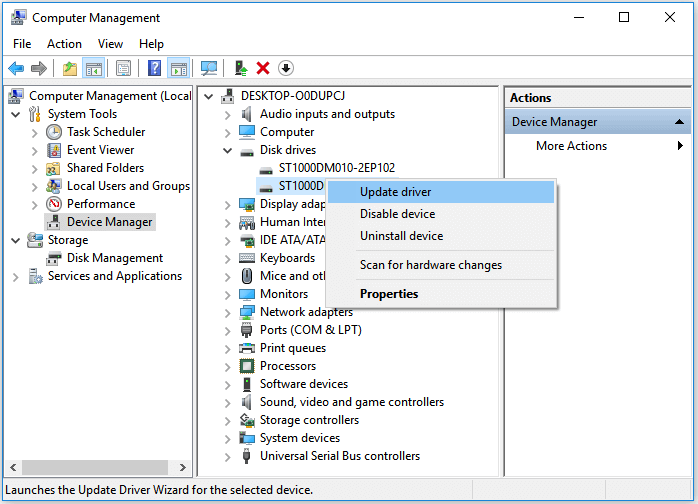
Step 4. Select «Search automatically for updated driver software».
- If Windows doesn’t find a new driver, try to download a new one from the device manufacturers’ website.
- If the update step doesn’t work, right-click each device driver and select «Uninstall».
After this, reboot the PC, and Windows 10 will update or reinstall the drive drivers for you.
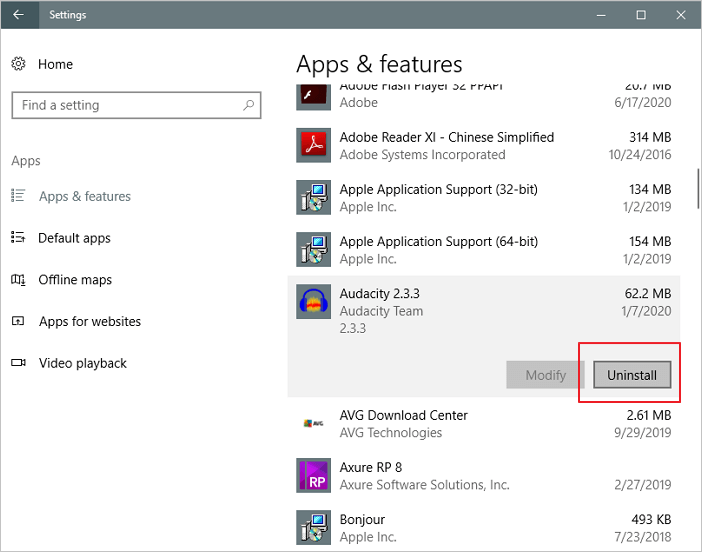
Fix 6. Uninstall Recent Software to Resolve the BSOD Error
The installation of new software on the system may be the possible reason for attempted write to readonly memory. You can resolve Windows 10 attempted write to readonly memory by uninstalling recent software.
Step 1. Open «Settings > Apps > Apps & features».
Step 2. Select the app or game that you want to remove and click the «Uninstall» button.
Fix 7. Check for Windows 11/10 Update to Fix 0x000000BE
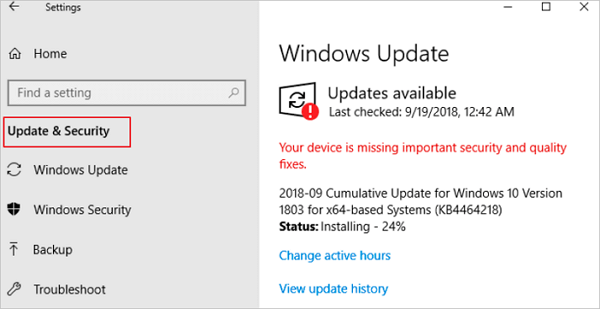
Another way to fix Windows 10 attempted to write to readonly memory error is by updating Windows. Steps to get the latest Windows update.
Step 1. Click the «Start» icon.
Step 2. Go to «Settings > Update & Security settings > Windows Update».
Fix 8. Remove Attempted Write to Readonly Memory BSOD by System Restore
The last solution that can help you get rid of Attempted Write to Readonly Memory BSOD by System Restore is to perform System Restore.
Also read: How to back up system
Step 1. Turn on Windows and press F8/Shift and click «Repair Your Computer».
Step 2. When Windows repair mode is ready, click OK if it asks you to choose keyboard; Choose your account and click OK if it asks you to choose the account and enter a password if you have one.
Step 3. Choose «System Restore» under System Recovery Options, and you can see all Windows restore points.
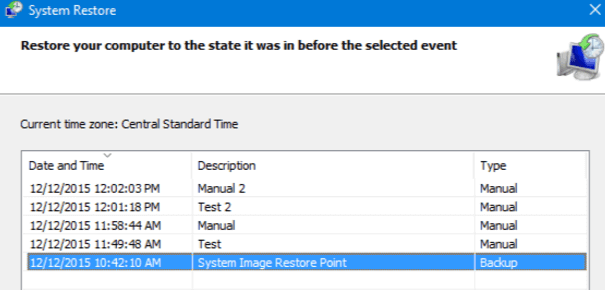
Step 4. Select the right restore point which was created when your computer is safe and sound, and check Show more restore points if you don’t see all restore points.
Step 5. Click «Next». Then all you need is to wait patiently to let it restore all your Windows to the point that you’ve selected.
Conclusion
These eight solutions above can fix the stop code attempted write to readonly memory error perfectly. You can try any one of these solutions to get help. If you still have a problem, you can contact us to get additional help.
Question
“Hi there! I’ve had my system since forever, but about a month ago, I started to get BSOD crashes. The error I get all the time says ATTEMPTED WRITE TO READONLY MEMORY.
I think it is related to the RAM, but I’m not entirely sure, so I’ve uploaded the MEMORY.DMP to be sure if it gets better but no use. I didn’t have any minidumps and MSinfo32 as well. I am writing in the hope that someone might help me with this.”
The case you just read is related to the error called attempted write to readonly memory. This error is not common but is most likely to occur. If you are a Windows user and see this problem, then this article is for you.
The article will discuss ways to remove the error attempted to write to readonly memory and explain the step-by-step explanation of the methods.

- Part 1: What Is «Stop Code Attempted Write to Readonly Memory.»
-
Part 2: Tips to Fix Attempted Write to Readonly Memory Windows 11/10/8/7
- Tip 1: Run Windows Memory Diagnostic
- Tip 2: Update or Reinstall Drivers in Windows
- Tip 3: Uninstall Recently Installed Software
- Tip 4: Check for Windows Update
- Tip 5: Blue Screen Troubleshooter
- Part 3: How to Recover Data from Windows with «Attempted Write to Readonly Memory» Error?HOT
Part 1: What Is «Stop Code Attempted Write to Readonly Memory.»
This error is called 0x000000BE and appears on a blue screen of death. When you get redirected to the stop error code «Attempted to Write to Read-Only Memory» at times, a BSOD (Blue Screen of Death) error usually occurs on Windows 7/8/10. When any of the device drivers try to write to a read-only memory segment, you end up with this error «Attempted Write to Read-Only Memory» with the code 0x000000BE, as you can see below screenshot.
What exactly causes the “Attempted to Write to Read-Only Memory” error? The “Attempted to Write to Read-Only Memory” error can emerge due to multiple reasons of device driver issues.
One of the primary reasons or causes of the attempted Complications in the device driver is mainly dangerous and causes an instant to write to read only memory error. The main reasons causing the error 0x000000BE are:
- The device driver is faulty or corrupt
- Discordant software firmware
- The system services have gone corrupt
Operating system services: an un-updated operating system or any corrupted operating system problems on your Windows can bring the 0x000000BE error.
Firmware or Malware: Recently updated firmware or malware is another liable reason for getting a read-only memory error. It means if Windows file system falls under any virus attack. It will end up with an error message.
Before attempt to write to read only memory solutions, the user must boot the PC into safe mode. The reason is the moment you get the stop code, your PC will fail to boot to the desktop.
Tip 1: Run Windows Memory Diagnostic
The first fix for attempt to write to read only memory or 0x000000BE error is to run a memory check.
Step 1: Open the Run utility OR Press Win + R
Step 2: Type mdsched.exe.
Step 3: Press Enter to open the Windows Memory Diagnostic Tool.
Step 4: The option «Restart now and check for problems» appears before you, and it is recommended to select it.
Note: It will immediately detect the attempted_write_to_readonly_memory windows 10 trouble in the memory. You should take action to fix issues based on the diagnosis.
Tip 2: Update or Reinstall Drivers in Windows
Attempted_write_to_readonly_memory issues arise when the device drivers are not compatible with the Windows operating system. Outdated or corrupted drivers are also responsible for the same problem.
You can choose back to back three options of updating, rolling back, or uninstalling drivers on your computer.
To Update Drivers Follow The Steps:
Step 1: Click on the start button and choose Device Manager.
Step 2: Select each driver by clicking right and choosing Update Driver.
Step 3: For the safe side, click Search automatically for updated driver software. It will lead you to the manufacturer’s website to download and install a driver for your PC.
To Rollback or Uninstall Drivers Follow The Steps:
Step 1: Go to Device Manager.
Step 2: Double-click each driver one by one; you will see options.
Step 3: Select Roll Back Driver or Uninstall Device, whatever seems feasible.
Step 4: Follow the on-screen instructions to finish your operations.
Tip 3: Uninstall Recently Installed Software
If the error occurs when you recently installed new software. It means the installed software is creating a problem. The only method is to uninstall the program and check if it is the cause behind the stop code attempted to write to read only memory.
Follow the steps:
Step 1: Open Control Panel.
Step 2: Select the software.
Step 3: Click Uninstall a program.
Tip 4: Check for Windows Update
Updating Windows is a reasonable key to fix the stop code attempted write to readonly memory.
Step 1: Check for Window Updates.
Step 2: If it is not updated, boot the PC to the desktop update Windows using blue screen attempted write to readonly memory.
Step 3: Restart your PC.
Tip 5: Blue Screen Troubleshooter
The last resort to resolve attempted to write readonly memory error is to use the Blue Screen Troubleshooter option. Ensure the Windows 10 is on in safe mode.
Step 1: Go to Advanced Startup Settings and enter safe mode.
Step 2: Restart the PC.
Step 3: Go to settings and open Update & security.
Step 4: Select Troubleshoot and then blue screen.
Step 5: Run the troubleshooter.
Part 3: How to Recover Data from Windows with «Attempted Write to Readonly Memory» Error?
If you are trying the above method, be sure to prepare a backup of your data to avoid errors that could cause data loss. Also, because of the error «attempted write to readonly memory», you may be at risk of losing valuable data. If you are really experiencing this risk and are deeply troubled by data loss, Tenorshare 4DDiG is a good choice. It can help you get back your lost data quickly and effectively. Besides, it has many valuable features that help in data recovery, and these useful features make 4DDiG stand out among other recovery tools. Download Tenorshare 4DDiG and get back your lost data.
To make full use of 4DDiG data recovery software to ensure your successful data recovery, please follow these steps.
- Erased Files Recovery
- Organized Drive Recovery
- Lost Partition Recovery
- External Device Recovery
- Crashed Computer Recovery
- Raw File Recovery
- Open the Tenorshare 4DDiG data recovery software and on the homepage, select a location from a list of options like Devices and Drives, Partitions, and Advanced Repair. Then, select the file types that are missing and click «Start» to scan the folder/location.
- Start a scan to fully find missing files, and you can choose to pause at any time during the process.
- After the scan is complete, you can preview the files and select the data you need to recover.
Summary
In the hope, you get all your answers regarding attempted to write read only memory, here is another remedy for recovering the lost data in the process. It is a fact that all the fixes given above have equal chances of either rescuing the situation or crashing the system.
This recovery tool is for the second option when you want your photos, files, documents, videos, and others back.
The Tenorshare 4DDiG is the most recent and technically packed for the reliable, safe, and complete recovery of the data lost in the process.
Tenorshare 4DDiG Data Recovery
4DDiG is your second to none choice to recover all lost data on Windows/Mac computer from various loss scenarios like deletion, formatting, RAW, etc. with a higher success rate.
Free Download
Free Download
BUY NOW
BUY NOW
If you need the instructions on how to fix attempted write to readonly memory blue screen error, go through this article.
The most common nightmare for a Windows 10 user is the blue screen of death. There are many types of BSOD errors. The ATTEMPTED WRITE TO READONLY MEMORY is one of them.
If your PC shows you this BSOD, it also may show you a stop code like 0x000000BE. This blue screen of death may come suddenly while you are working or playing games. It also may appear before Windows starts up completely. Depending on the situation, you can take your troubleshooting steps. This article is all about how to fix attempted write to readonly memory BSOD on Windows.

What Causes Attempted Write to ReadOnly Memory Blue Screen?
Most blue screen error occurs due to any of the faulty drivers on your computer. This BSOD is not different. Sometimes, Windows may itself indicate the faulty driver’s name on the BSOD screen. Sometimes, you may not see it. But, In most cases, the ntkrnlpa.exe, vhdmp.sys, win32k.sys, tcpip.sys, iusb3hub.sys, ntoskrnl.exe, ntfs.sys, dxgkrnl.sys, or atikmdag.sys, etc. causes attempted write to readonly memory error.
There may be other drivers work behind this problem. But, these are the most common among them. However, this blue screen of death only occurs when a faulty driver tries to write on a memory segment, but that is read-only and not writeable.
There may be other reasons that make this conflict on your PC. But, In almost every case, you will be able to get rid of this blue screen of death.
Here are the best methods you can try to fix this problem.
1. Update/Roll Back Driver
To fix attempted write to readonly memory blue screen, you may need to update or roll back specific driver(s). It totally depends on the situation. If you have recently updated a driver and after that, the BSOD starts appearing, rollback is the option to go. If not, you can consider updating the driver.

To update drivers, you can use Driver Booster or Driver Easy, or Outbyte Driver Updater. These tools can easily update any drivers you want with just a single click. However, If you want to update manually, you can read this article: How to Update Drivers
Note: You should update all drivers especially NVIDIA/AMD/Intel graphics card as well as the network adapter.
To roll back a driver to its previous version, the tools I have mentioned above are sufficient. But, If you want to do it manually, follow these instructions.

- At first, Open the Windows Device Manager.
- Then, Right-click on a driver and go to its properties.
- Now, Go to the Driver tab and click on Roll Back Driver.
- Go ahead and finish the task.
I hope doing these things are sufficient to fix ATTEMPTED WRITE TO READONLY MEMORY.
2. System Restore
Performing system restoration can be a swift solution for this BSOD. If you are unsure about what mess you have made in your PC, a system restore can relieve you. If you are lucky, it may fix attempted_write_to_readonly_memory.
However, If you don’t know about system restore, read: How to perform System Restore on Windows.
3. Update BIOS
In your PC, BIOS firmware is the thing you don’t bother to update frequently. In fact, You don’t need to update it most of the time. Sometimes, Updating the BIOS/UEFI can help you resolve BSODs like attempted write to readonly memory and other security-related issues.
However, If you don’t know how to do it, read: How to Update BIOS/UEFI of Your Motherboard
4. Reset BIOS
Have you recently made some changes to your BIOS settings? It might be a reason why you are encountering attempted_write_to_readonly_memory.
In this case, You can undo the changes or reset the BIOS settings. You can find proper instructions for your PC/Motherboard manufacturer’s website.
5. Use CHKDSK
This blue screen of death may appear due to disk-related problems. So, It is better to run the chkdsk command to resolve common hard disk/SSD issues. It also may fix attempted write to readonly memory.
Read: How to Use CHKDSK Command
6. Run Memory Diagnostic Tool
Memory-related problems cause many BSODs. This ATTEMPTED WRITE TO READONLY MEMORY also can be a result of memory issues on your computer. So, I suggest you take care of a few things to ensure there are no memory problems. It also can fix this BSOD.
Read: How to Find and Troubleshoot Memory Problems
7. Analyze Dump File
I believe you won’t have to come to this method. But, If none other methods mentioned above help, this one is a great way to fix attempted write to readonly memory stope code.
If you configure, your computer can create a memory dump file where all information related to the BSODs can be found. By analyzing that information, you can easily find out the corrupted driver or service that is causing the problem. After that, you can update/rollback/reinstall/uninstall the driver and also take other necessary steps to fix blue screen of death.
To get all instructions, Read: How to Create and Analyze Small Memory Dump File
These are the best ways to fix attempted write to readonly memory blue screen error. I hope any of these methods will help you. But, If you know any other methods that may help others, you can mention it in the comment box.
3) Re — plugged hardware components to make sure everything’s as it should be.
Microsoft (R) Windows Debugger Version 10.0.16299.15 AMD64
Copyright (c) Microsoft Corporation. All rights reserved.
Loading Dump File [C:\Windows\MEMORY.DMP]
Kernel Bitmap Dump File: Full address space is available
Symbol search path is: srv*
Executable search path is:
Windows 10 Kernel Version 15063 MP (8 procs) Free x64
Product: WinNt, suite: TerminalServer SingleUserTS
Built by: 15063.0.amd64fre.rs2_release.170317-1834
Machine Name:
Kernel base = 0xfffff802`09697000 PsLoadedModuleList = 0xfffff802`099e3660
Debug session time: Sat Nov 18 16:39:52.882 2017 (UTC + 2:00)
System Uptime: 0 days 0:16:02.522
Loading Kernel Symbols
………………………………………………………
……………………………………………………….
…………………………….
Loading User Symbols
……………………………………………………….
………….
Loading unloaded module list
…………………………………………..
*******************************************************************************
*
*
* Bugcheck Analysis
*
*
*
*******************************************************************************
Use !analyze -v to get detailed debugging information.
BugCheck BE, {ffffe706647b5e88, 8a00000001200121, ffffac00c7765d10, a}
Probably caused by : memory_corruption ( nt!MiRaisedIrqlFault+a9f15 )
Followup: MachineOwner
———
4: kd> !analyze -v
*******************************************************************************
*
*
* Bugcheck Analysis
*
*
*
*******************************************************************************
ATTEMPTED_WRITE_TO_READONLY_MEMORY (be)
An attempt was made to write to readonly memory. The guilty driver is on the
stack trace (and is typically the current instruction pointer).
When possible, the guilty driver’s name (Unicode string) is printed on
the bugcheck screen and saved in KiBugCheckDriver.
Arguments:
Arg1: ffffe706647b5e88, Virtual address for the attempted write.
Arg2: 8a00000001200121, PTE contents.
Arg3: ffffac00c7765d10, (reserved)
Arg4: 000000000000000a, (reserved)
Debugging Details:
——————
DUMP_CLASS: 1
DUMP_QUALIFIER: 402
BUILD_VERSION_STRING: 15063.0.amd64fre.rs2_release.170317-1834
SYSTEM_MANUFACTURER: Gigabyte Technology Co., Ltd.
SYSTEM_PRODUCT_NAME: Z68AP-D3
BIOS_VENDOR: Award Software International, Inc.
BIOS_VERSION: F8
BIOS_DATE: 03/21/2012
BASEBOARD_MANUFACTURER: Gigabyte Technology Co., Ltd.
BASEBOARD_PRODUCT: Z68AP-D3
BASEBOARD_VERSION: x.x
DUMP_TYPE: 0
BUGCHECK_P1: ffffe706647b5e88
BUGCHECK_P2: 8a00000001200121
BUGCHECK_P3: ffffac00c7765d10
BUGCHECK_P4: a
CPU_COUNT: 8
CPU_MHZ: d52
CPU_VENDOR: GenuineIntel
CPU_FAMILY: 6
CPU_MODEL: 2a
CPU_STEPPING: 7
CPU_MICROCODE: 6,2a,7,0 (F,M,S,R) SIG: 29’00000000 (cache) 29’00000000 (init)
DEFAULT_BUCKET_ID: WIN8_DRIVER_FAULT
BUGCHECK_STR: 0xBE
PROCESS_NAME: lsass.exe
CURRENT_IRQL: 2
ANALYSIS_SESSION_HOST: DESKTOP-6OSTBPS
ANALYSIS_SESSION_TIME: 11-18-2017 17:18:57.0667
ANALYSIS_VERSION: 10.0.16299.15 amd64fre
TRAP_FRAME: ffffac00c7765d10 — (.trap 0xffffac00c7765d10)
NOTE: The trap frame does not contain all registers.
Some register values may be zeroed or incorrect.
rax=0000000000000200 rbx=0000000000000000 rcx=ffffe706647b5e70
rdx=ffff800c1194d080 rsi=0000000000000000 rdi=0000000000000000
rip=fffff802096de141 rsp=ffffac00c7765ea0 rbp=0000000000000200
r8=ffffea0000007000 r9=fffff80209a150b0 r10=fffff80209a14140
r11=0000000000000000 r12=0000000000000000 r13=0000000000000000
r14=0000000000000000 r15=0000000000000000
iopl=0 nv up ei ng nz na po nc
nt!MiLockPageAtDpcInline+0x11:
fffff802`096de141 f0480fba69183f lock bts qword ptr [rcx+18h],3Fh ds:ffffe706`647b5e88=0000000000000000
Resetting default scope
LAST_CONTROL_TRANSFER: from fffff80209860b5d to fffff80209803580
STACK_TEXT:
ffffac00`c7765ac8 fffff802`09860b5d : 00000000`000000be ffffe706`647b5e88 8a000000`01200121 ffffac00`c7765d10 : nt!KeBugCheckEx
ffffac00`c7765ad0 fffff802`09724d26 : fffff280`00000000 ffffac00`c7765c20 00000000`00000003 3fffffff`ffffffff : nt!MiRaisedIrqlFault+0xa9f15
ffffac00`c7765b20 fffff802`0980cd72 : ffffe700`04da11d0 fffff802`09a14140 00000000`00140014 00000000`00000040 : nt!MmAccessFault+0x1146
ffffac00`c7765d10 fffff802`096de141 : ffffac00`c7766148 00000000`00000005 ffffe700`04da11d0 00000000`00000005 : nt!KiPageFault+0x132
ffffac00`c7765ea0 fffff802`0983cd0f : ffffd488`00000000 00010101`011fffff ffffac00`c7765f80 00000000`00020000 : nt!MiLockPageAtDpcInline+0x11
ffffac00`c7765ed0 fffff802`0971b2c4 : 00000000`00000200 fffff280`891b6998 00000000`00000000 ffffd488`99300000 : nt!MiDeletePteList+0x10dedf
ffffac00`c7766090 fffff802`09b4cf2b : 00000000`00000000 ffffac00`c7766b80 00000000`00008000 00000112`36d2c000 : nt!MiDecommitPages+0x5e4
ffffac00`c77669b0 fffff802`0980e413 : ffff800c`119e7080 ffff800c`119d5200 00000000`00000000 00000000`00000000 : nt!NtFreeVirtualMemory+0x2ab
ffffac00`c7766b00 00007ff8`fc665764 : 00007ff8`fc5e6ec0 00000000`00015450 00000000`00000000 00000112`36d00000 : nt!KiSystemServiceCopyEnd+0x13
0000000e`f1aff098 00007ff8`fc5e6ec0 : 00000000`00015450 00000000`00000000 00000112`36d00000 00007ff8`fc5e6dcc : ntdll!NtFreeVirtualMemory+0x14
0000000e`f1aff0a0 00007ff8`fc5f6476 : 00000000`00000002 00000000`00008000 00000000`00008000 00000112`36d24000 : ntdll!RtlpHpSegPageRangeDecommit+0xb0
0000000e`f1aff0f0 00007ff8`fc5f0a5c : 00000112`36d00480 00000000`00000000 00000000`00000002 00000000`00000002 : ntdll!RtlpHpLfhSubsegmentDecommitPages+0x102
0000000e`f1aff160 00007ff8`fc5f156e : 00000000`0000000b 00000112`36016ad0 00000000`00000001 00000000`00000000 : ntdll!RtlpFreeHeapInternal+0x49c
0000000e`f1aff230 00007ff8`fc5f1028 : 00000112`36016ad0 00000000`00000000 00000000`00000000 00000000`00000000 : ntdll!RtlpHpFreeWithExceptionProtection+0x16e
0000000e`f1aff3c0 00007ff8`fb06097e : 00000000`00000000 00000000`00000000 00000000`7ffe0386 00007ff8`fb06a248 : ntdll!RtlFreeHeap+0x258
0000000e`f1aff480 00007ff8`fb05507c : 00000000`00000001 0000000e`f1aff6e8 00000000`00000000 00000000`00000000 : RPCRT4!BCACHE::Flush+0xaa
0000000e`f1aff4e0 00007ff8`fc600e49 : 00000112`36cf2440 00000112`36cf2508 0000000e`f1aff6e8 00000112`36cf2508 : RPCRT4!PerformGarbageCollection+0x10c
0000000e`f1aff510 00007ff8`fc6019a4 : 00000112`36002458 00000112`36042df0 00000000`00000000 00000000`00000000 : ntdll!TppTimerpExecuteCallback+0xa9
0000000e`f1aff560 00007ff8`fb1e2774 : 00000000`00000000 00000000`00000000 00000000`00000000 00000000`00000000 : ntdll!TppWorkerThread+0x6e4
0000000e`f1aff870 00007ff8`fc630d51 : 00000000`00000000 00000000`00000000 00000000`00000000 00000000`00000000 : KERNEL32!BaseThreadInitThunk+0x14
0000000e`f1aff8a0 00000000`00000000 : 00000000`00000000 00000000`00000000 00000000`00000000 00000000`00000000 : ntdll!RtlUserThreadStart+0x21
THREAD_SHA1_HASH_MOD_FUNC: 858260afe0c4b33eac4168d280abdc8638814bf5
THREAD_SHA1_HASH_MOD_FUNC_OFFSET: 5cdc7155de557bc4df2b55d79bfbde9168e1f884
THREAD_SHA1_HASH_MOD: c93e6958ec049ac61b9ccb599beeca475e72a538
FOLLOWUP_IP:
nt!MiRaisedIrqlFault+a9f15
fffff802`09860b5d cc int 3
FAULT_INSTR_CODE: 3c8348cc
SYMBOL_STACK_INDEX: 1
SYMBOL_NAME: nt!MiRaisedIrqlFault+a9f15
FOLLOWUP_NAME: MachineOwner
MODULE_NAME: nt
DEBUG_FLR_IMAGE_TIMESTAMP: 59fa9d38
STACK_COMMAND: .thread ; .cxr ; kb
IMAGE_NAME: memory_corruption
BUCKET_ID_FUNC_OFFSET: a9f15
FAILURE_BUCKET_ID: 0xBE_nt!MiRaisedIrqlFault
BUCKET_ID: 0xBE_nt!MiRaisedIrqlFault
PRIMARY_PROBLEM_CLASS: 0xBE_nt!MiRaisedIrqlFault
TARGET_TIME: 2017-11-18T14:39:52.000Z
OSBUILD: 15063
OSSERVICEPACK: 0
SERVICEPACK_NUMBER: 0
OS_REVISION: 0
SUITE_MASK: 272
PRODUCT_TYPE: 1
OSPLATFORM_TYPE: x64
OSNAME: Windows 10
OSEDITION: Windows 10 WinNt TerminalServer SingleUserTS
OS_LOCALE:
USER_LCID: 0
OSBUILD_TIMESTAMP: 2017-11-02 06:21:12
BUILDDATESTAMP_STR: 170317-1834
BUILDLAB_STR: rs2_release
BUILDOSVER_STR: 10.0.15063.0.amd64fre.rs2_release.170317-1834
ANALYSIS_SESSION_ELAPSED_TIME: d36
ANALYSIS_SOURCE: KM
FAILURE_ID_HASH_STRING: km:0xbe_nt!miraisedirqlfault
FAILURE_ID_HASH: {1c5b4d11-09e0-def3-d2d0-70a11d69b92d}
Followup: MachineOwner