
The Raspberry Pi is usually associated with Linux operating systems like Raspberry Pi OS (formerly known as Raspbian), Ubuntu, etc. But what about running Windows 10 on your Raspberry Pi? Well, it would be great for sure. However, Windows 10 is still not officially supported for Raspberry Pi. Microsoft’s only OS for Pi is the old Windows 10 IoT Core that just lets you execute Visual Studio codes but cannot work as a standalone OS with its GUI.
Though it is so, it didn’t stop some passionate developers to find a way to run a full desktop version of Windows 10 on Raspberry Pi. They have made it possible with the WoR project. With that, they developed a tool to flash an ARM image of Windows 10 on an SD Card (or an SDD), that can boot on a Raspberry Pi.
In this guide, I’ll walk you through the exact steps to install Raspberry Pi Windows 10.
Contents
- Requirements
- Steps to Install Windows 10 on Raspberry Pi 4/3/2
- Step 1: Download the Required Files
- Step 2: Update Raspberry Pi Firmware
- Step 3: Build Windows 10 ISO File on your PC
- Step 4: Flash the ISO File with WoR Tool
- The First Boot
- Overclock the Raspberry Pi
- How Does Raspberry Pi Windows 10 Perform?
- Now it’s your turn..
Requirements
- Raspberry Pi 4/3/2
- MicroSD Card (Faster is better, so a class A2 card is recommended)
- Ethernet Cable or Wi-Fi dongle
- Keyboard, Mouse, and Monitor
Step 1: Download the Required Files
In order to get started with the installation, you have 2 things to download.
1. The WoR Tool [https://www.worproject.ml/downloads]
When you download this you will get a zip file with everything inside it. Keep it for now. We’ll use it later.
2. UUP file for Windows 10 ARM
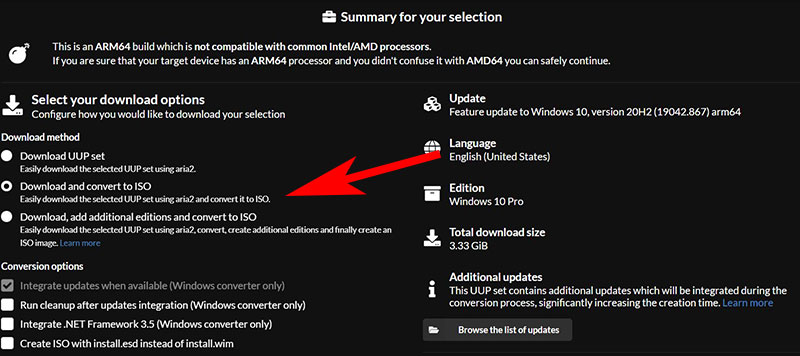
For downloading a UUP file you can use any one of the following websites. Each of them works a bit differently. On these websites, you only have to choose a Windows version, build number, language, and edition like Pro, Home, Ultimate, etc.
- https://uupdump.net/ (for Linux or Mac PC)
Download the file from this website only if your computer is not running on Windows OS. While on the website, I recommend selecting only one edition to keep the file size smaller and make the installation faster. Only check the required edition and leave others unchecked. Now choose the Download and convert to ISO option.
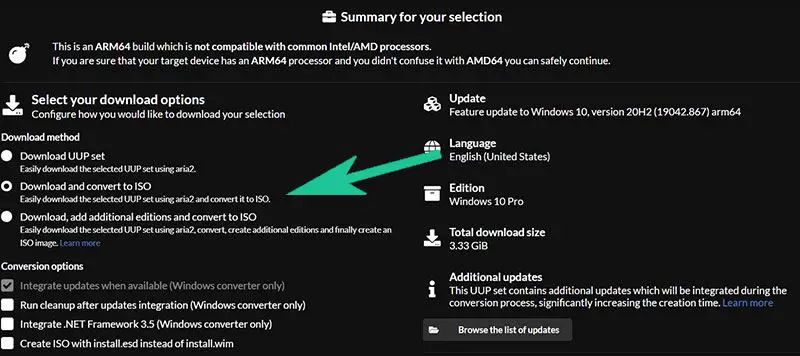
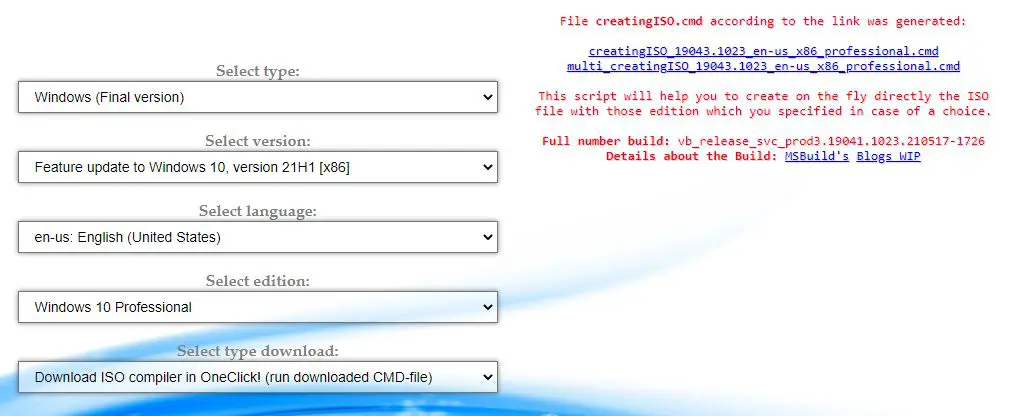
- https://uup.rg-adguard.net/ (for Windows PC only)
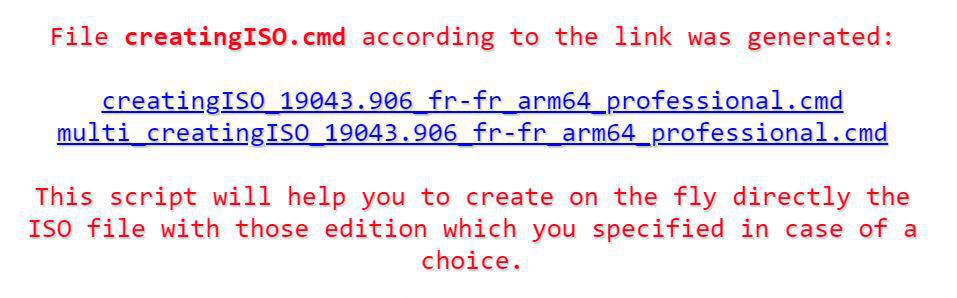
This site has got a much more intuitive interface where you can easily download the file. Use the drop-down arrows to choose the required version number, edition, build number, etc. Then click on the Download ISO compiler in One click! option in the download type. Download the cmd file by clicking on the link appearing on the right side. This will look something like this:
Step 2: Update Raspberry Pi Firmware
As usual, before doing something big, we have to update the firmware of our Raspberry Pi. To do the same, open a terminal and type the following command.
sudo apt update
sudo apt full-upgrade
Once done with that, stop your device and you don’t need the Raspberry Pi OS (Raspbian) anymore.
Step 3: Build Windows 10 ISO File on your PC
The next step is to build the Windows 10 ISO image file using the cmd file that we’ve download in step 1. If you downloaded the file from the second website you will get the direct cmd file whereas if you have downloaded it from the first website (uupdump.net) then you need to extract the zip file to see a file named “uudp_download_windows.cmd“.
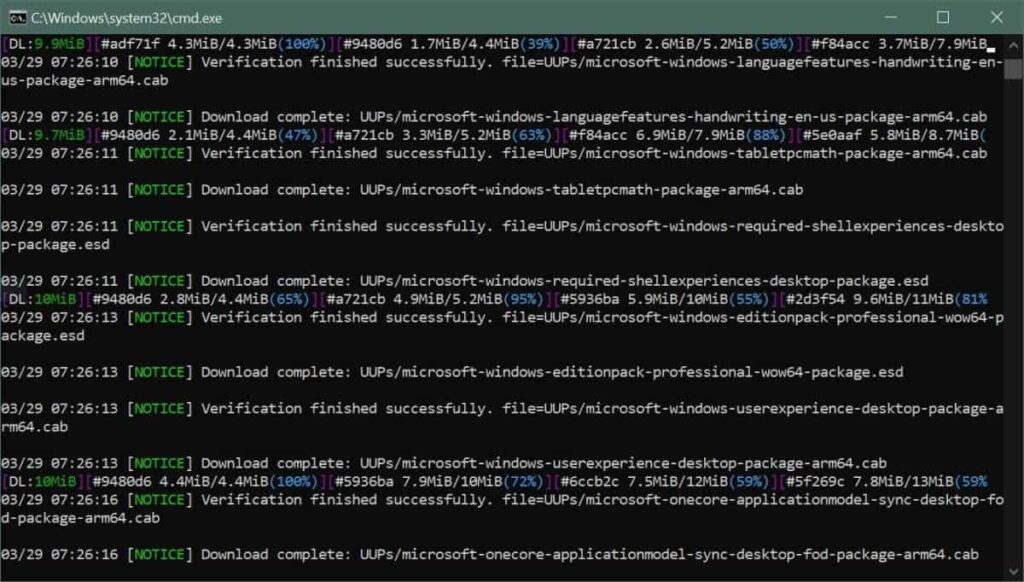
- Double click on the cmd file and you will see a terminal window. Press 0 when asked. It will immediately start to download some files for the process. This will be of a few gigabytes and take a lot of time if your internet connection is slow.

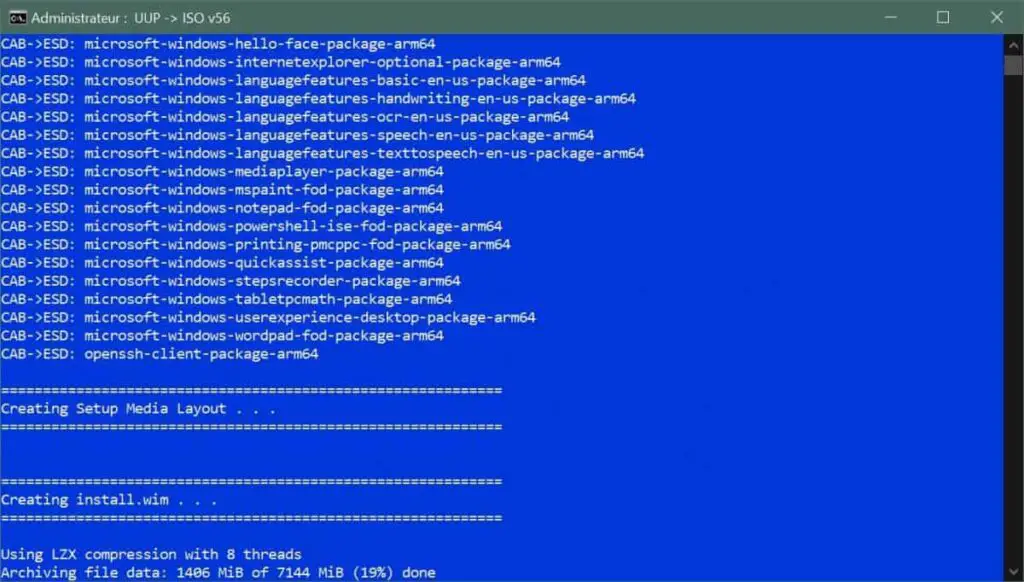
- Once the downloads are complete it will automatically start to build the ISO image file.
- This also will take some time. If you encounter any stuck somewhere in the process just press the Enter.


Step 4: Flash the ISO File with WoR Tool
Now it’s time to flash the ISO file that we build just now. Here comes the use of the WoR tool. It is a simple and easy-to-use flashing tool. To flash the ISO, follow the below steps.
- Firstly, extract the WoR_Release_….zip archive to a new folder on your computer.
- Find the wor.exe file and double-click on it.
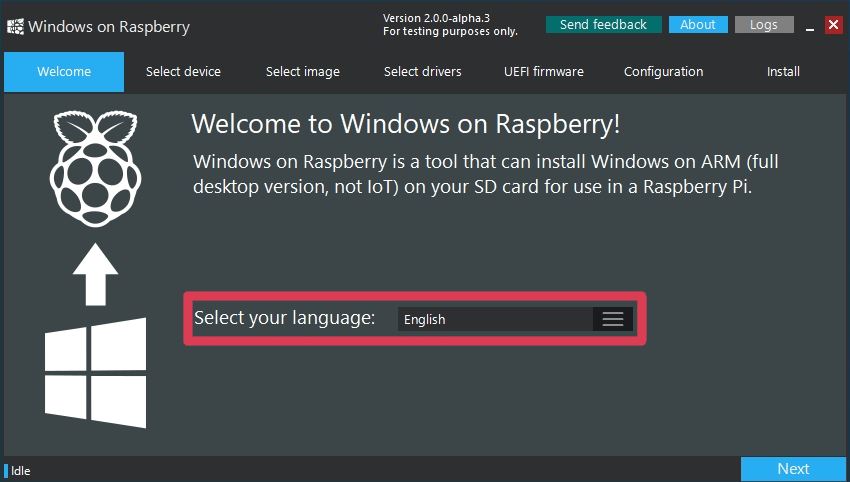
- Select your preferred language from the drop-down list.
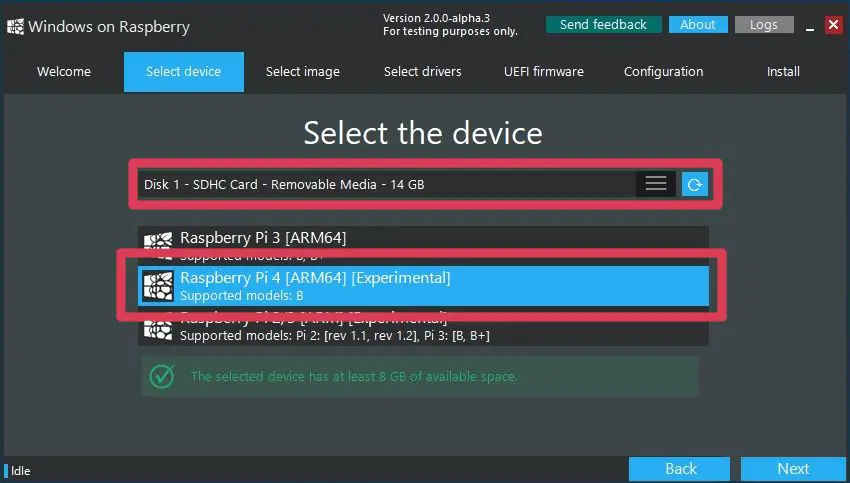
- Choose the target drive (your SD Card or SSD drive) and the model of your Raspberry Pi board.
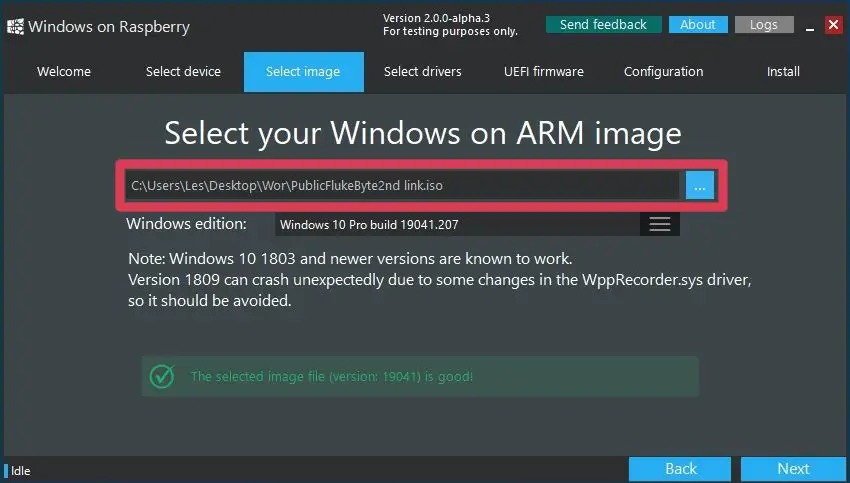
- Once all those selected, now navigate and choose the ISO file that we’ve built.
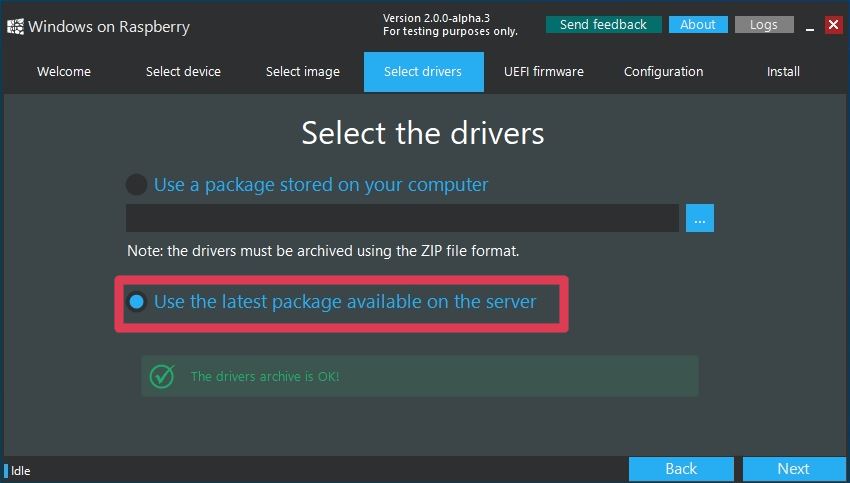
- The next step is to select the driver package from the server. Simply select the latest package.
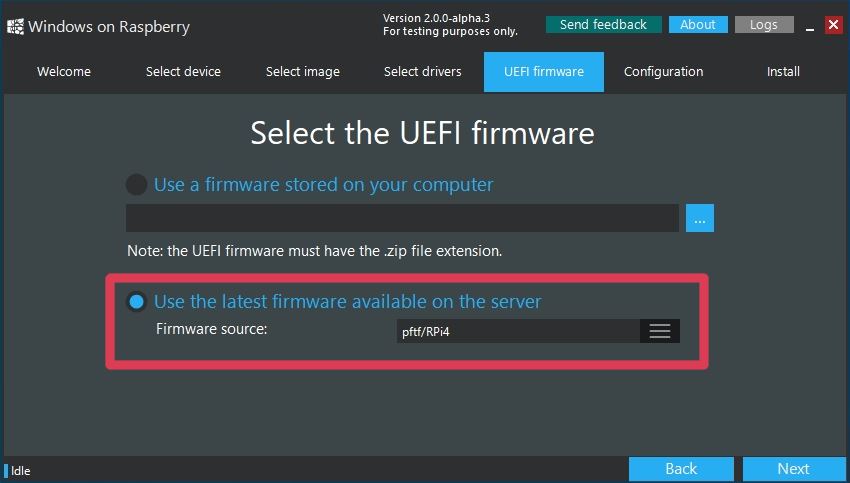
- Then select the UEFI firmware to flash. Here also select the latest version available.
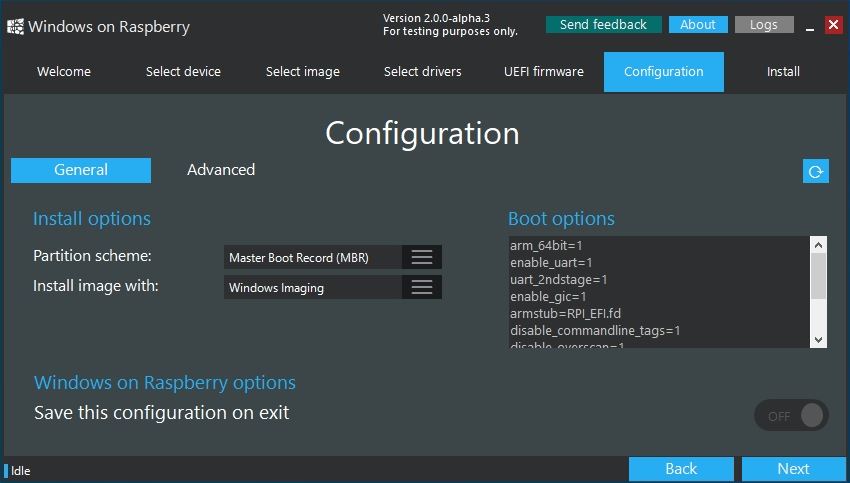
- Check the configuration and click Next.
- So you have selected all the things to get started with the install. Just double-check everything and click Install.
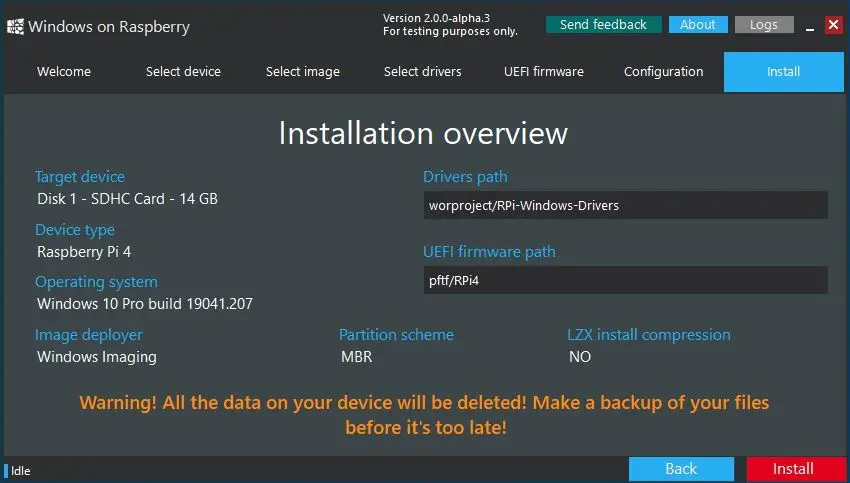
The installation may take as long as 1.5 to 2 hours, depending on the write speed of your SD Card. This is why I recommend getting an A1 or A2 class SD Card or else an SSD drive to get the job done much faster. On an SSD drive, it may take only about 15 minutes or so.
The First Boot
And now once the Raspberry Pi Windows 10 installation is completed and your device is ready, you can directly plug it (if you have an SSD) into the Pi or insert it if you have an SD card. Then boot it up.
Since it is the first boot, it will take some time to completely initialize and configure things according to your device and boot up. However, from the second boot onwards everything will be fine and will work as normal. If you are a beginner and don’t know how to set up a remote desktop on your Raspberry Pi, just relax – I’ve got that covered for you. Head over to this link: How to Setup Raspberry Pi Remote Desktop on Windows/ Linux/ Mac (5 Methods)
As usual with a typical Windows installation, you will need to configure some things manually: for example Cortana and the privacy policies that Windows normally tries to disable for you.
Once done with that, you will enter into a full-fledged Windows 10 on your cute little Raspberry Pi.
Overclock the Raspberry Pi
Now that you have successfully completed the Raspberry Pi Windows 10 installation, and thinking to boost the performance?
Well. That’s indeed a right thought. Overclocking a Raspberry Pi will help you get the most out of your SBC and take your projects to the next level. For this purpose, I have written a comprehensive article on how to overclock Raspberry Pi board. You can click on the link and refer to the article.
How Does Raspberry Pi Windows 10 Perform?
In my testing, the overall performance is pretty much decent and it’s smoothly usable. However, it has the following limitations.
- Resource limits will be reached quickly with some usage.
- CPU usage is almost 100% while streaming YouTube in Google Chrome.
- Bluetooth support is also limited as the RTS/CTS lines are not exposed.
- Problems with HDMI audio out.
Though it is having some limitations, you will get a nice Windows 10 experience on your tiny computer. You can get partially get rid of the resource exhausting problem by providing an A2 class 32/64 GB SD card or a super-fast SSD drive.
Now it’s your turn..
It’s now your turn to try the Raspberry Pi Windows 10 installation and share your experience. I’ve tried to make this tutorial as simple as possible and still if you have any queries just drop them in the comment section below.
Found an issue with this article? Report it here, so that I can resolve it.
Время на прочтение
4 мин
Количество просмотров 76K
В середине июля 2020 года эксперты портала Tom’s Hardware опубликовали инструкцию по установке Windows 10 на Raspberry Pi 4. Вдобавок они проверили, как работают некоторые сторонние программы (GIMP Photo Editor, Arduino IDE и Python 3.8) в этой связке микрокомпьютера на ARM и последней версии Windows.
Вопрос «зачем» тут не особо уместен, так как экспериментаторам был важен сам факт того, что это можно сделать и все будет работать. Да, медленно и с тормозами и проблемами, но будет.
Официально, единственная операционная система Microsoft для Raspberry Pi — это устаревшая на текущий момент версия Windows 10 IoT Core, которая, например, позволяет выполнять код Visual Studio на микрокомпьютере, но там даже нет графического интерфейса. Тем не менее, разработчики (например, проект «Windows on Raspberry Pi» в Discord) своими силами сделали необходимы программы и нашли способ по установке и запуску полноценной версии Windows 10 на Raspberry Pi 4.
Эксперты портала Tom’s Hardware дополнительно уведомили, что они не могут ручаться за безопасность или законность любых пользовательских файлов, созданных сообществом «Windows on Raspberry Pi», поэтому все действия далее они делали на свой страх и риск.
В 2019 году эксперты портала Tom’s Hardware уже попытались установить Windows 10 на Raspberry Pi 3, но тогда этот трудный процесс у них закончился по большей части проблемами, ошибками и тормозами после установки.
В настоящее время даже после всех стараний команды проекта «Windows on Raspberry», после установки Windows 10 на Raspberry Pi 4 не работают встроенные в микрокомпьютер порт Ethernet, модули Wi-Fi, Bluetooth и GPIO, аудио через HDMI также недоступно. Для сетевого подключения нужно использовать Wi-Fi USB-адаптер, а для вывода звука Bluetooth через USB-адаптер.
Для установки Windows 10 на Raspberry Pi 4 понадобятся:
- последняя версия Raspberry Pi 4 с 4GB или 8GB ОЗУ;
- карта памяти microSD на 16 GB или больше;
- ПК с Windows 10 и доступом в сеть интернет для создания нужной загрузочной сборки;
- адаптер USB to Ethernet или WiFi dongle;
- Bluetooth dongle (если нужен Bluetooth).
Инструкция по установке Windows 10 на Raspberry Pi 4:
- нужно скачать и распаковать на ПК последнюю версию инструмента WoR 2.0.0 alpha 3, там будет архив на 4.7G;
- зайти на Windows on Raspberry Pi Discord server в разделе Downloads channel скачать последнюю стабильную версию Windows on ARM (0.2.1), ссылка на этот файл PublicFlukeByte.iso;
- запустить WoR Alpha tool и выбрать язык установки;
- вставить в ПК карту памяти и выбрать ее в WoR Alpha tool в разделе «Select device», там же выбрать режим «Raspberry Pi 4 experimental mode»;
- далее в разделе «Select image» указать место расположения на ПК ранее скаченного файла PublicFlukeByte.iso;
- далее в разделе «Select drivers» выбрать опцию «Use the latest package available on the server.»;
- далее в разделе «UEFI firmware» выбрать опцию «Use the latest firmware available on the server.»;
- потом нужно проверить конфигурацию загрузочной сборки и начат ее записать на карту памяти, причем запись может продолжаться более двух часов, в зависимости от параметров карты памяти;
- скачать и распаковать на ПК патч для Raspberry Pi 4 по активации USB-портов и 3 ГБ ОЗУ в Windows 10, скопировать файл winpatch.exe в корень диска C: на ПК;
- пропатчить сборку на карте памяти: в командной строке на ПК выполнить
«winpatch X:\Windows\System32\drivers\USBXHCI.SYS 910063E8370000EA 910063E8360000EA 3700010AD5033F9F 3600010AD5033F9F», где Х — буква диска с картой памяти; - рекомендуется также «разогнать» в настройках Raspberry Pi, но тогда лучше заранее обеспокоиться установкой на микрокомпьютер системы охлаждения, для этого необходимо в файле config.txt на загрузочном карте памяти выставить параметры: «over_voltage=6» и «arm_freq=2000»;
- теперь можно извлечь загрузочную карту памяти из ПК, вставить ее в Raspberry Pi 4 и начать стандартную установку ОС Windows 10;
- после окончания процесса установки Windows 10 на Raspberry Pi 4 необходимо активировать в ОС возможность полноценно использовать 3 ГБ ОЗУ, для этого нужно под администратором в командной строке запустить: «bcdedit /deletevalue {default} truncatememory», далее необходимо перезагрузить микрокомпьютер;
- далее можно подключить сетевые USB-адаптеры, настроить их и скачивать и устанавливать из интернета необходимые для работы приложения, включая браузеры и другое ПО.
Эксперты портала Tom’s Hardware установили на Raspberry Pi 4 с Windows 10 браузер Microsoft Edge, программы GIMP Photo Editor, Arduino IDE и Python 3.8 с оболочкой Python REPL. Все программы запускались и работали нормально. По скорости работы с этой ОС микрокомпьютер оказался на уровне Intel Celeron или Atom начального уровня. Время загрузки ОС Windows 10 составило 2 минуты 12 секунд. Просмотр видео в YouTube возможен, но со средними настройками разрешения роликов. Из проблем — на эту сборку не удалось установить редактор кода Visual Studio Code. Также не работал модуль Python под названием GPIO Zero, который используется для взаимодействия с GPIO Raspberry Pi. Возможно, что в будущем эти моменты будут доработаны разработчиками проекта «Windows on Raspberry Pi».
Ранее в феврале 2020 года Raspberry Pi Foundation выпустил обновленную версию (v1.2) Raspberry Pi 4, в которой было исправлено несколько проблем, включая совместимость с различными USB-C кабелями. Тогда микрокомпьютер не распознавал некоторые кабели как источник питания из-за проблем со схемой питания.
В конце мая 2020 года в продажу поступила 8-гигабайтная модель Raspberry Pi 4. Она доступна по цене в $75. Вдобавок создатели портативного ПК сняли с продажи версию с 1 ГБ оперативной памяти, теперь за $35 можно приобрести Raspberry Pi 4 с 2 ГБ ОЗУ.
См. также:
- «Raspberry Pi Foundation захостила свой сайт на Raspberry Pi 4. Теперь этот хостинг доступен всем»
- «Протокол UASP ускоряет передачу файлов на Raspberry Pi 4 в полтора раза»
- «Любитель подключил PCIe к Raspberry Pi без контроллера USB»
Windows and Raspberry Pi is a long story. After having only the IoT version available to play with, Microsoft is now working on an ARM version of the full Windows 10 system. Windows still doesn’t officially support the Raspberry Pi, but with a few tools and a good tutorial, you can find a way to make it work on your device. That’s the goal of this post.
The WoR project (Windows on Raspberry Pi) develops a tool to flash an ARM image of Windows 10 to an SD card (or SSD drive), that can boot on Raspberry Pi. So, it’s now possible to use Windows 10 full version on Raspberry Pi.
In this step-by-step tutorial, I’ll guide you through the installation process. The theory might be simple, but the entire procedure is pretty long.
By the way, there are already plenty of articles on this topic (mostly news type in fact), but when I tried it myself, I struggled to understand the whole process and put it into practice. That’s why I’m writing it here for you.
Note: Windows 11 is now available, the process is even simpler than the one explained in this tutorial. I highly recommend reading this other article if you are interested.
The theory: Windows 10 on ARM
If you are new to this, there is a lot to unpack here before flashing your SD card. We’ll start by looking at the big picture and see why the installation process is not the same as usual.
Microsoft and ARM
All Raspberry Pi models are running on the ARM architecture, so there’s nothing new there. Microsoft had minor projects for us (Windows 10 IoT) but never released a full Windows 10 on this platform.
Recently things have changed. The ARM processor is more and more popular, due to its low-power consumption and decent performances. It makes a solid competitor for many usages, not only the IoT niche.
In 2020, Apple even announced the M1 chip, also based on ARM.
Software editors can’t ignore this trend, and so Microsoft had to make progress on this architecture too.
This is not really a new project for them (the first Windows 10 ARM version is from 2017), but recent builds are beginning to include more and more features.
There is still no way to install it directly on Raspberry Pi, but we are not so far, and another project help us for this.
The WoR project
The goal of the WoR project was to deal with the last missing steps in the Microsoft project to make it work on Raspberry Pi.
We’re talking about complicated things here, like firmware, driver support and the installation process in general.
Download Your Essential Linux Commands Guide!
It’s a free PDF guide containing every Raspberry Pi Linux command you should know!
Download now
Basically, they transform a painful process in something we are used to:
- Download the system image.
- Download and install the tool.
- Flash the system on your storage.
Pretty familiar, isn’t it?
I’ll explain the details later, as it’s not as straightforward as it might look.
But basically, this tool is what made the whole experience possible for all of us recently.
Windows 10 images
Just one last detail before moving on to practice:
There is no legal way to download ISO files for Windows 10 ARM. We are not playing with Linux systems here, so there are a bit more rules to follow.
So, if you can’t download the ISO file, how can you install Windows 10?
You’ll download something else: a UUP dump.
UUP stands for “Unified Update Plateform” and is a way for Microsoft to share its latest advancements inside its “Insider Preview” program. It works like Windows Update, by downloading and updating only what is required (or what has been changed in this case).
In short, the process will be to download the UUP file, build a full ISO image from it on your computer and then flash this ISO to boot on Raspberry Pi.
It’ll take much more time than to install another Linux system, but that’s the only way for now.
And I’m sure you are excited to try this :).
Now that you have all the pieces of the puzzle, let’s put them in order and finally install Windows 10 on your Raspberry Pi. Here is the step-by-step procedure to do this.
Update the Raspberry Pi firmware
Before doing anything else, make sure the Raspberry Pi firmware is up-to-date.
The easiest way to do this is to start it on Raspberry Pi and run the following commands:sudo apt update
sudo apt full-upgrade
Once done, you can stop your device, we don’t need Raspberry Pi OS anymore.
The following will be on your computer.
Prerequisites
In theory, Windows 10 and WoR should work with almost any Raspberry Pi model (2, 3 or 4).
In reality, I would recommend a Raspberry Pi 4 with 4 or 8 GB if possible.
Windows 10 is a fairly heavy system, so more RAM will be helpful.
I tried on my Raspberry Pi 4 with 4 GB and it was nice. I didn’t try on other models.
I also highly recommend using an SSD drive.
It’s not mandatory, so you can try with a fast SD card (this is the best currently). However, the process is very long.
Using an SSD while speeding everything up. Installing the system and booting it for the first time will be a lot faster, as well as normal usage after that.
So, I definitely think using an SSD is worth it (fast external SSD drives are cheap now), but you do have the choice available.
Aside from the SSD drive, you will only need the basic accessories, as with any other operating system, and a bit of time to prepare everything :).
Downloads
As previously explained, you have two things to download before going any further:
- The WoR tool: https://worproject.com/downloads
You’ll get a zip file with everything in it, we’ll use it later. - A UUP file for Windows 10 ARM. There are two websites you can use for this.
Each one works a bit differently, but the interface is pretty intuitive.
In short, you need to choose a Windows version, a build number, the language and the edition (Home / Pro).- https://www.uupdump.net/
I recommend choosing only one edition to keep the files smaller and save some time.
Uncheck the edition you don’t need, then choose the “Download and convert to ISO” method:
You’ll also get a zip file. I’ll explain what to do with this file in the next step.
If your computer isn’t running on Windows, this is the only solution you have. The website below won’t give you compatible files.
- https://uup.rg-adguard.net/
The interface on this one is a bit more intuitive, so it should be a little easier.
Use the dropdown menus to create your download file (version, language, edition).
Choose “Download ISO compiler in One click!” for the download type.
Then download the cmd file by clicking on the first link on the right:
- https://www.uupdump.net/
By the way, I did have to test several versions to find one that works the best for me.
Unfortunately, I don’t know if there is a rule to make sure your download is working well. If you are reading this in two years, it might be useless, but for your information, the version that worked well for me was: 19041.330.
Download Your Essential Linux Commands Guide!
It’s a free PDF guide containing every Raspberry Pi Linux command you should know!
Download now
I lost so much time by trying different versions from both websites until finding this one…
Here is the direct link if it helps.
Build the Windows 10 ISO file on your computer
The next step is to use the cmd file we got to download the Windows 10 files to build the ISO image.
If you used the first website (uudump.net), you need to extract the zip files. You’ll find a file in it named “uudp_download_windows.cmd”.
That’s the equivalent of the cmd file you get with the second website.
Flash the ISO with WoR
The WoR tool is easy to use. Follow this procedure once downloaded:
That’s it, check the settings seems fine and click “Install” to start the process.
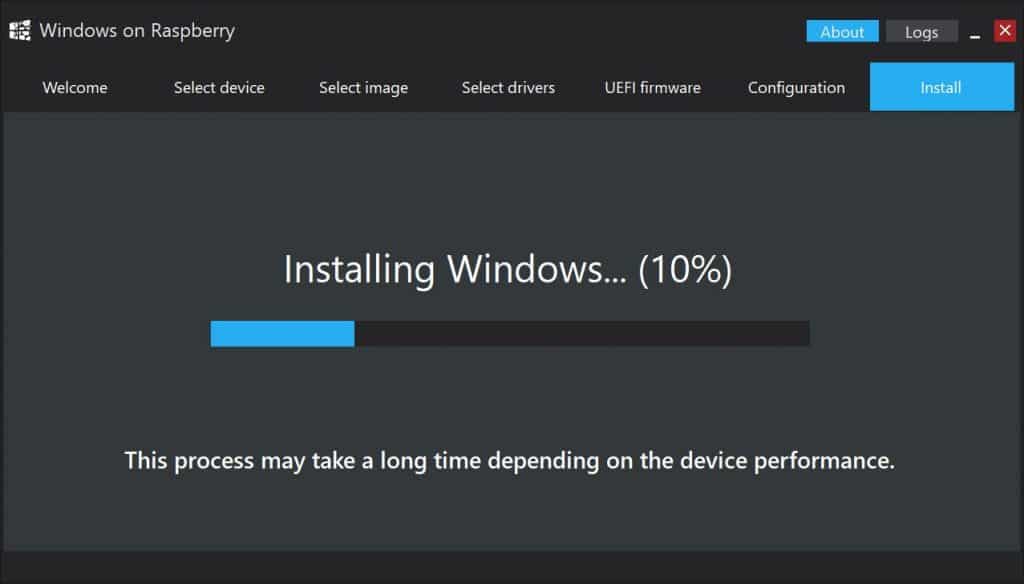
This step will still be longer than we are used to with Linux systems, but not that much.
On a SSD drive, it should be something like 15 minutes. On a SD card it can be really long, probably over an hour.
First boot
Once your drive is ready, you can plug it into your Raspberry Pi (or insert the SD card) and boot it up.
This step also is pretty long, as there is an installation process running in the background to configure everything for your specific device.
By the way, the second boot will be faster – it’s only the first boot that is a little long.
And that’s another step that is really faster with an SSD drive instead of an SD card.
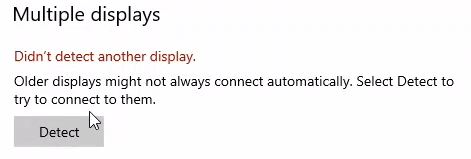
As with any Windows 10 installation, there are a few things to configure in the first boot, like Cortana and all the privacy policies that Microsoft tries to disable for you:

Once done, you should get access to the Windows 10 desktop interface.
Nothing surprising here, but it’s nice to see it finally works in full version on a small Raspberry Pi.
Windows 10 overview

Yeah, Windows 10 is now running on our Raspberry Pi, but how does it actually work? Is it a good system for desktop usage?
Default apps
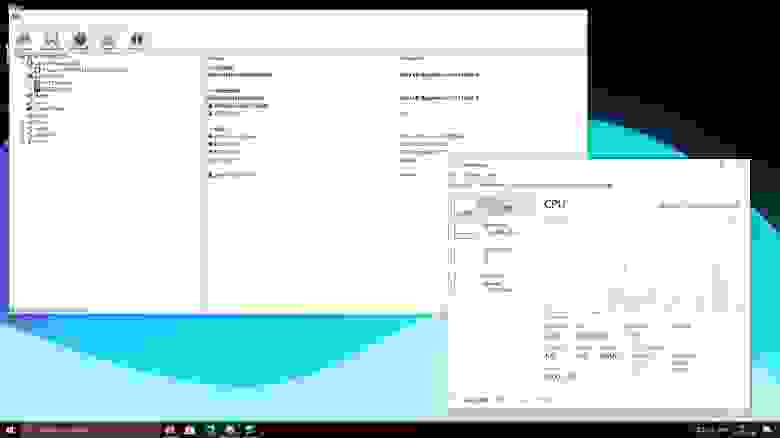
Overall, the system is pretty responsive.
You can browse in the settings or file explorer without any lag, and the default apps work pretty well.
Watch the video at the end of this tutorial to get a better idea of how it runs.
The default apps on my edition were basic ones (Accessories, Paint 3D, Office, etc.), but I was pretty impressed by the results.
It’s maybe not as responsive as my laptop, but it’s worth considering, given the price of the hardware.
Hardware support
After digging a bit into the system configuration, I found that not everything was working perfectly.
For example, there is no sound card detected (no audio output) and it doesn’t detect my second screen.
I didn’t spend time looking for drivers or workaround, so there may be some solutions out there.
Just don’t expect to work perfectly out-of-the-box.
As you have seen for the installation part, the Raspberry Pi is not supported by Microsoft, so this installation is more of an experiment than a perfect solution.
Installing new apps
After the configuration issues, I also tried installing other random apps.
I picked some I often use on my computer, like VLC, Audacity and Raspberry Pi Imager.
I didn’t have any issue installing them, and they worked really well:
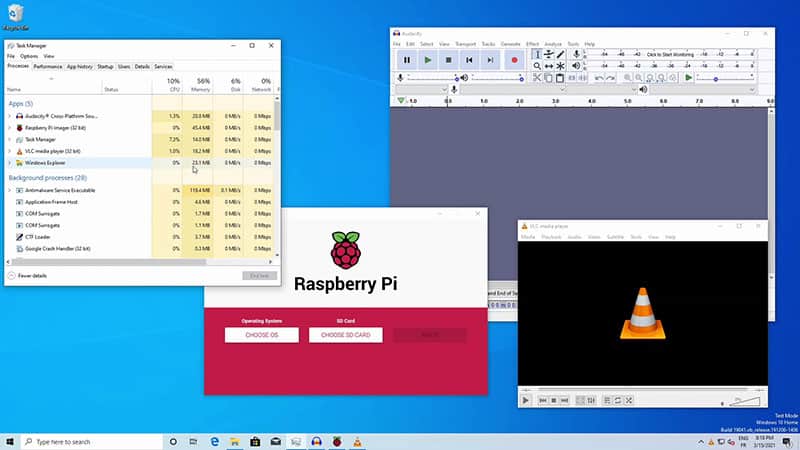
This is the most exciting part with an official Windows 10 running on Raspberry Pi in the future.
With around 80% of desktop users running Windows on their computers, we can expect them to easily switch to Raspberry Pi if they can stay on the same operating system.
Install it on a Raspberry Pi 400, and they won’t even see the difference with a standard computer :).
Yeah, we are pretty far from the original vision and the license system will probably be an issue.
Performance limits
A little warning however about the performances of this operating system.
As there is no optimization for the Raspberry Pi, you will reach the limits pretty quickly with some usage.
For example, watching YouTube on Google Chrome will be complicated. And if you want 1080p in full screen it’s almost impossible. Check the video below to see the results I got.
The memory and CPU were close to 100%, and I had nothing else running at the same time.
Download Your Essential Linux Commands Guide!
It’s a free PDF guide containing every Raspberry Pi Linux command you should know!
Download now
Want to chat with other Raspberry Pi enthusiasts? Join the community, share your current projects and ask for help directly in the forums.
Video: Install Windows 10 on Raspberry Pi
To conclude, Windows 10 on Raspberry Pi is now pretty to do, but the process is very long and everything isn’t fully supported yet.
It can be a decent solution for basic usage if you absolutely need to run Windows, but if you have the choice a distribution like Twister OS would probably be a better alternative.
Download Your Essential Linux Commands Guide!
It’s a free PDF guide containing every Raspberry Pi Linux command you should know!
Download now
Do you need help to get started?
By the way, maybe you are new on Raspberry Pi and were looking for an easy way to stay on Windows because you are used to it on the PC. I’m sorry, but as you have seen, it’s not yet ready.
The Raspberry Pi world might be overwhelming for beginners, you may be lost among the different models, the operating systems and the thing you can do with it or not.
That’s why I have put together a mini-course to help you for the first steps.
By watching a few videos and following my tips, you can jumpstart your journey with a Raspberry Pi, avoid all the obstacles and start having fun with this exciting device.
Sounds interesting? Learn more on this page.

I’m the lead author and owner of RaspberryTips.com.
My goal is to help you with your Raspberry Pi problems using detailed guides and tutorials.
In real life, I’m a Linux system administrator with web developer experience.
Currently, there are 2 tools that will help you with this task.
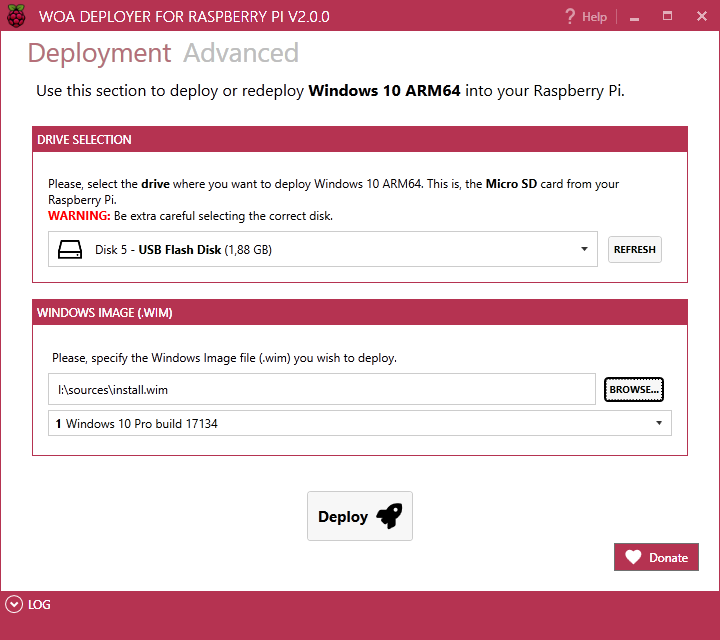
WOA Deployer for Raspberry Pi
This tool has been designed with simplicity in mind. It just works®
Recommended if you don’t want to worry about drivers, UEFI and other advanced options. It will do everything for you. You just only have to select the driver where you SD Card is located, select the .wim file of your Windows Image and click Deploy. Nothing more. Simple, isn’t it?
Windows on Raspberry imager
This tool offers different configuration options, it’s multi-language and allows you to customize the deployment, selecting drivers, and UEFI, and it allows to use .iso files directly. Recommended for advanced users.

Before you proceed to download the software below, see our official installation guide.
Chances are that you’re coming from an outdated tutorial, so it’s recommended to follow the guide above to prevent any issues with the installation.
Windows on Raspberry imager
Download version 2.3.1
See the changelog
Customization options
Requirements:
- a computer with Windows 10 version 1703 or later. (Wine is not supported — see the PE-based installer for other OSes)
- a Raspberry Pi 2 rev 1.2, 3, 4 or 400. (minimum RAM requirement is 1 GB, but it will generally result in poor performance, especially on boards older than Raspberry Pi 4)
-
a good/reliable drive that has at least 8 GB of available space. It can be:
- an SD card (A1 rating is highly recommended; non-A1 rated cards may be too slow)
- an USB device (preferably SSD, or any drive that has decent random I/O speeds).
A slow drive can also cause other issues, besides being a bottleneck.
- a Windows 10 ARM64 build 19041 or newer image (up to Windows 11 version 2022 / build 22621): WIM/ESD, ISO or FFU
Windows on Raspberry PE-based installer
This is not a straightforward wizard tool like the Windows-only imager, so please follow the appropriate guide for it: How to install from other OSes.
Download package version 1.1.0
See the changelog
Customization options
Requirements:
Same as for the Windows-only version, with some exceptions:
- no specific OS required, as long as the tools needed to create the PE-based installer are available or can be compiled for it.
- the Windows ARM64 image can only have the ISO format. The reason for this is that some required files from the ISO cannot be found in the WIM/ESD.
- storage-wise, you need either:
- a drive that has at least 32 GB, for self-installation
- a drive that has at least 8 GB for the installation media, and another destination drive that has at least 16 GB for the OS (e.g.: an USB drive and an SD card)
Boot partition mount utility
Easily mount the boot partition of your Windows on Raspberry installation. Works directly on the Raspberry Pi or another computer.
Download version 1.1.0
PiMon
A simple hardware monitor for your Raspberry Pi running Windows. (https://github.com/driver1998/PiMon)
Download the latest version
See the changelog
Windows images
See the Getting Windows Images guide.
What about FFU images?
FFU images can speed up the deployment process significantly, especially on slow devices. They are not available for download due to legal reasons, but you can safely generate them yourself: How to generate FFU images?