This is the write up for the room Windows Fundamentals 2 on Tryhackme and it is part of the complete beginners path
Make a connection with VPN or use the attack box on Tryhackme site to connect to the Tryhackme lab environment.
Task 1
Start the machine attached to this room. To connect to it from Kali Linux we are using the program Remmina. If you do not have it you can install it by typing the following command
apt install remmina
Once Remmina is started press the plus sign in the upper left corner and fill in the information as below ( Do change the IP )
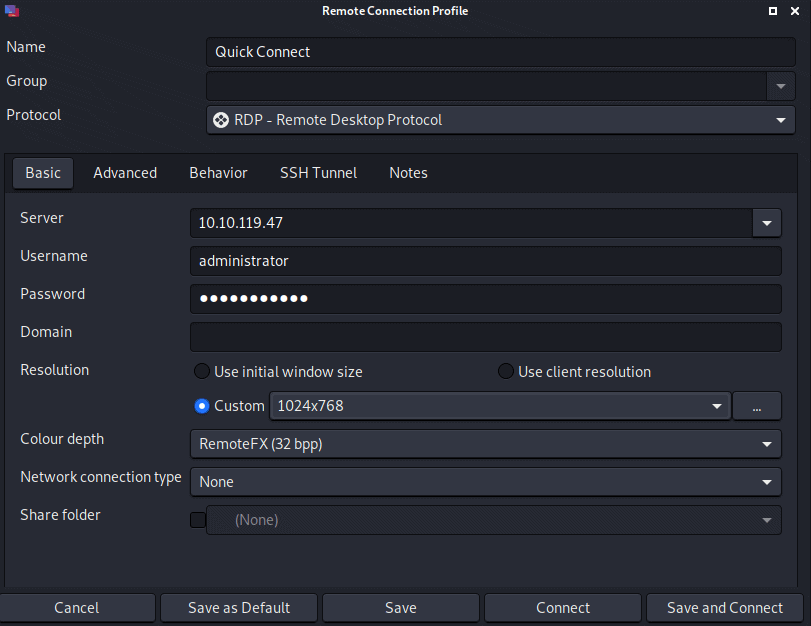
Accept the certificate when asked for it
Task 2
2.1 What is the name of the service that lists Systems Internals as the manufacturer?
Open System configuration as explained in the task. Press tab Service and click on manufacture
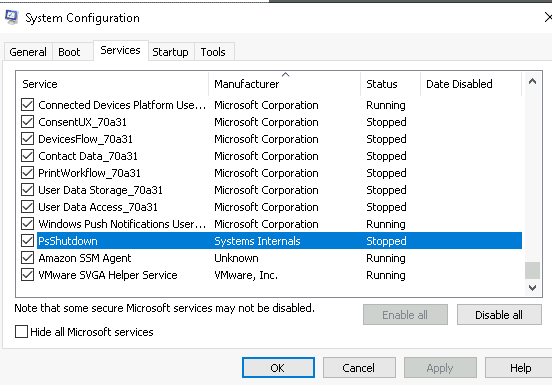
Answer: psshutdown
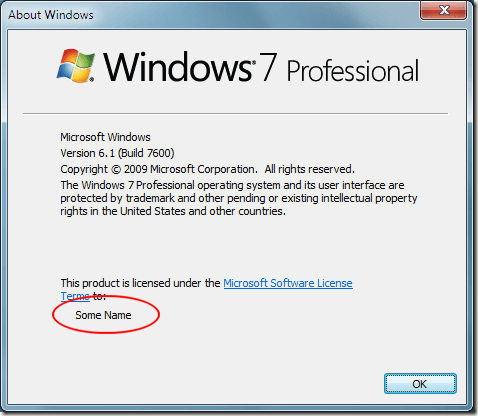
2.2 Whom is the Windows license registered to?
Now press the tools tab and select about windows. Press launch
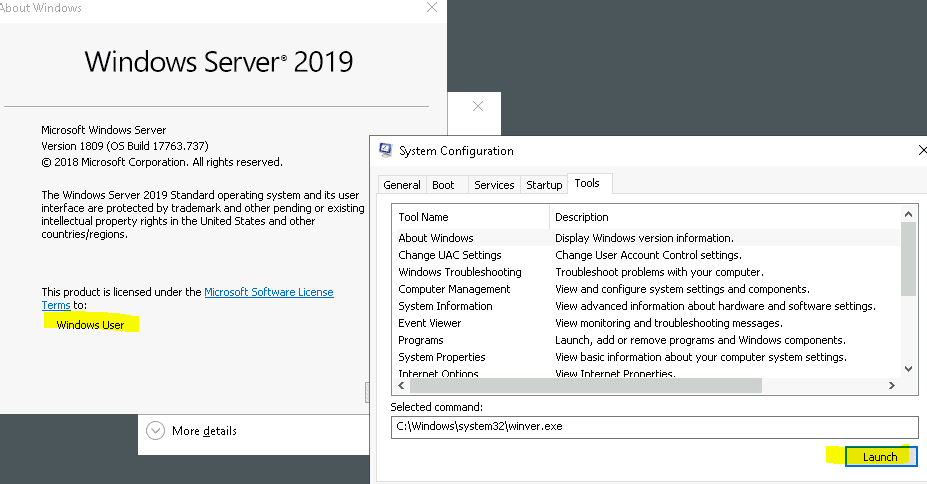
Answer: Windows user
2.3 What is the command for Windows Troubleshooting?
Now select windows troubleshooting from the list and see the command
Answer: C:\Windows\System32\control.exe /name Microsoft.Troubleshooting
2.4 What command will open the Control Panel? (The answer is the name of .exe, not the full path)
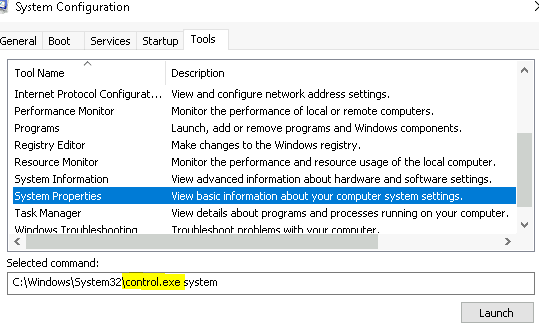
Answer: control.exe
Task 3
3.1 What is the command to open User Account Control Settings? (The answer is the name of the .exe file, not the full path)
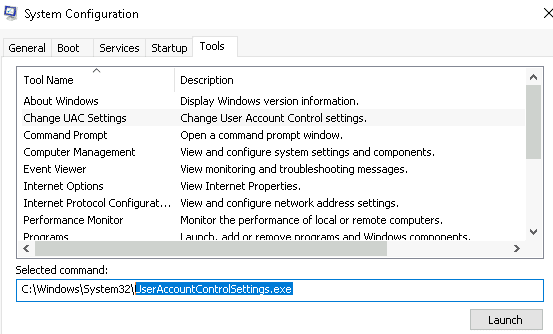
Answer: UserAccountControlSettings.exe
Task 4
4.1 What is the command to open Computer Management? (The answer is the name of the .msc file, not the full path)

Answer: compmgmt.msc
4.2 At what time every day is the GoogleUpdateTaskMachineUA task configured to run?
Open computer management. If you still have the screen open from the previous question you can press launch to open computer management. Once open press task schedule
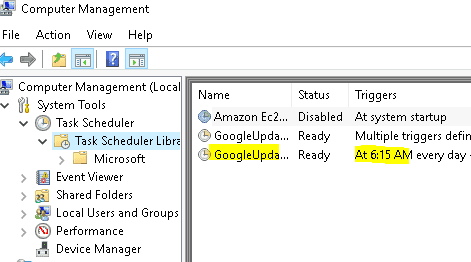
Answer 6:15 AM
4.3 What is the name of the hidden share?
Open shares and you will see the hidden share. Hidden shares always end with $. So this is a normal share but it is the answer to the question
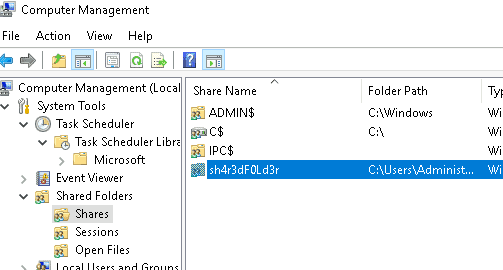
Answer: sh4r3dF0Ld3r
Task 5
5.1 What is the command to open System Information? (The answer is the name of the .exe file, not the full path)
Answer: msinfo32
5.2 What is listed under System Name?
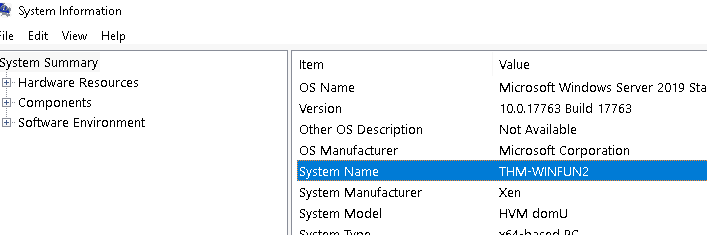
Answer THM-WINFUN2
5.3 Under Environment Variables, what is the value for ComSpec?
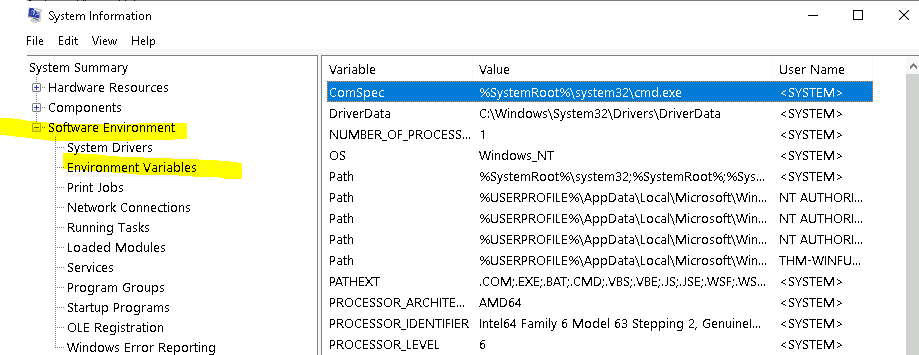
Answer: %systemroot%\system32\cmd.exe
Task 6
6.1 What is the command to open Resource Monitor? (The answer is the name of the .exe file, not the full path)
Answer: resmon.exe
Task 7
7.1 In System Configuration, what is the full command for Internet Protocol Configuration?

Answer: C:\Windows\System32\cmd.exe /k %windir%\system32\ipconfig.exe
7.2 For the ipconfig command, how do you show detailed information?
Answer: ipconfig /all
Task 8
8.1 What is the command to open the Registry Editor? (The answer is the name of the .exe file, not the full path)
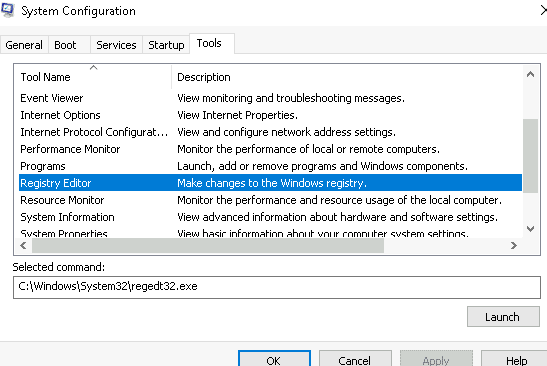
Answer: regedt32.exe
Task 9
Read all that is in this task then press complete to finish this room
Great designs and products for your hacker’s cave
You can get these designs on more than 70 products ranging from
- T-shirt
- mugs
- mousepad
- baseball caps
- Metal prints
- Art Board
And much more.
Содержание
- Where is the Windows license key on Windows 10?
- 4 Answers 4
- How to Find Your Original Windows 10 Product Key
- Hint: You might not have to.
- Article Index
- Windows OEM keys vs. retail vs. free upgrade
- Do I have a digital license?
- Find your key from inside Windows
- Third-party tools that find Windows keys
- Find your key from outside Windows
- Additional resources
- Find your Windows product key
- Locate your product key for Windows 10
- Locate your product key for Windows 7 or Windows 8.1
- Related links
- Sign-in FAQ
- Signing into the VLSC
- Who can access the Volume License Service Center (VLSC)
- How do I register to use the VLSC
- What is a work or school account needed to sign into VLSC
- How do I link my existing Microsoft Account with my work account
- VLSC Sign In Errors
- Error Code E06 «We are unable to complete your action»
- Error Code E03 «Sorry, we cannot finish signing you up. Your IT Department has turned off signup for Volume Licensing Service Center»
- Error Code E02 «We are sorry. We are unable to complete your sign up to VLSC as the email domain you have provided is restricted for automatic sign up.»
- Error E05 «We are sorry. We are unable to complete your sign up to VLSC as the email domain you have provided is restricted for automatic sign up.»
- Contact Assisted Support
- Product Keys FAQ
- What are Product Keys
- How to locate Product Keys in VLSC
- How to locate SQL Server Product Keys in VLSC
- I can’t find a key for Volume Licensing purchase
- What is a Setup Key
- What determines which Product Keys are associated with my agreements
- What is Volume Activation
- What is the Key Management Service (KMS)
- What is a KMS Host Key
- No KMS (Key Management Service) key displayed on VLSC for Open License customers
- Additional KMS Hosts
- What is a Multiple Activation Key (MAK)
- The number of Multiple Activation Keys (MAK) activations provided does not match the number of licenses that we have purchased
- Requests to increase MAK activation limits should
- How to activate using a Multiple Activation Key
- What is the Volume Activation Management Tool (VAMT)
- Where can I find more information on the Volume Activation Management Tool (VAMT)
- Can I use both MAK and KMS for deployment across my organization
- How do I determine which key to use for a particular product
- Volume Activation for Windows and Windows Server
- Volume Activation for Office, Project and Visio
- Activate Windows Terminal Server and Remote Desktop Service (RDS)
- Can organizations within the same ownership structure use the same key to deploy a product.
- Can I use my Volume License Keys to exercise my re-imaging rights
- How do I download my keys to a local file
- Where can I find more information about the topics covered in these FAQs
- Contact Assisted Support
Where is the Windows license key on Windows 10?
and afterwards move my current partitions to the new machine. What followed was a medium-sized nightmare. The new machine would boot, but the wireless network drivers were not recognized and later found out (to the best of my knowledge) they couldn’t be installed. I tried:
booting from the console and running:
both seemed to have completed successfully, but now the machine would get stuck in a startup repair loop.
I tried resetting the machine (whilst keeping my files), but this failed halfway through.
now the machine’s still stuck in the loop and decided to try and repair it externally using a bootable Windows 10 image. It’s likely that I’ll need the new machine’s Windows 10 key. I’m not sure if it’s stored in the BIOS (it came with Windows 10 preinstalled) or somewhere on the partitions.
How can I get the key from the partitions (if it’s there at all) while booting from a Linux image?
4 Answers 4
If Windows 10 was ever activated on this computer, then it is now remembered by the Microsoft activation servers using its hardware fingerprint.
There will be no problem installing Windows 10 again on this computer, and activation will be automatic. You do not need to search for the key.

It’s likely that I’ll need the new machine’s Windows 10 key.
You won’t need need to manually enter the license key. The OEM license key is embedded in your BIOS and will be detected automatically by Windows.
I would personally just do a completely clean install of Windows 10 and then manually reinstall the applications and import the data from your backup. This will be a very quick process and will guarantee a stable system.
After performing a clean install using a 4+ GB flash drive, Windows will automatically activate itself online almost immediately.
OEM PC manufacturers, such as the one that made the OP’s computer, work with Microsoft to embed the license key in the BIOS, which is how Windows is able to activate itself even if you wiped your new PC to do a clean install of Windows before connecting it to the Internet. After activation, Microsoft’s activation servers will then know the hardware fingerprint of the computer but not before. They do, however, recognize the OEM license key.

Here’s what happens when I run this tool on my PC, which does not have an embedded Windows 10 license key in the BIOS as I built the PC myself and used a regular retail key:
Источник
How to Find Your Original Windows 10 Product Key
Hint: You might not have to.
Article Index
In brief For the longest time Windows PCs came with a product key sticker that was placed outside of the machine or with your computer’s manuals. But in recent years manufacturers started storing this license within the machine’s UEFI/BIOS and the information is automatically retrieved and applied when reinstalling the operating system. Certainly a better approach overall. In other instances, for example if you built and installed your OS, your key is associated with your Microsoft account, so there is no way to «lose it» anymore. Read on for more details.
Microsoft has been changing and improving the way it handles Windows licenses. We’ll cover all you need to know in this article, from old school ways to retrieve keys, to the more modern approaches to make good use of your licenses and what restrictions may apply depending on your type of license.
Windows 10 introduced a «Digital Entitlement» element to Microsoft’s license which links your Windows key to an ID generated based on your PC’s hardware. But because your hardware can significantly change if you upgrade your hardware, this entitlement was expanded to become a «Digital License» when 2016’s Anniversary Update (1607) arrived.
This means your Windows 10 license now ties Windows keys to Microsoft accounts, letting you activate a copy of the operating system simply by logging in with valid online credentials. So, if you have a newer Windows PC or you already log in using your Microsoft account, you generally shouldn’t have to search for your original Windows 10 key. We will explain that in better detail in a minute.

There may be other scenarios where you may still want to manually find a Windows key stored in your UEFI/BIOS, or prevent this key from automatically being applied during installation. Not to mention that different conditions apply for non-OEM retail keys, as well as those given to people who upgraded to Windows 10 for free. And in a worst case scenario, you might be trying to find the license for a copy of Windows that no longer boots.
Editor’s Note: This feature was originally published on December 2018. It’s just as relevant today, so we’ve bumped it as part of our #ThrowbackThursday initiative.
Windows OEM keys vs. retail vs. free upgrade
There are many types of Windows licenses with varying terms of use. As a general rule of thumb:
Do I have a digital license?
The Windows 10 Settings app has a page for displaying your activation information, including whether you have a digital license, though your key isn’t shown here:
Go to: Settings > Update & Security > Activation

If you have a digital license, you should see «Windows is activated with a digital license» or «Windows is activated with a digital license linked to your Microsoft account.»
You can also link a Microsoft account to a Windows license by clicking «add a Microsoft Account» on the bottom of the same page and providing your login information.
Find your key from inside Windows
Entering the following lines into an admin Command Prompt or PowerShell worked to display the OEM key embedded in our system’s UEFI/BIOS. However, these commands didn’t return any keys on other two machines we used for testing despite Windows 10 being activated.
wmic path softwarelicensingservice get OA3xOriginalProductKey


We downloaded a variety of utilities that can retrieve retail keys from the Windows registry as well as those that are UEFI/BIOS-bound. In testing, some of the applications found both the registry and UEFI/BIOS keys, while others only worked for one or the other:

Find your key from outside Windows
If you can’t boot into Windows and want to retrieve that key, you can still access this data from an external environment such as a Windows To Go drive, or by attaching your non-booting Windows drive to another machine.
Note that if you’re recovering the key from a Windows To Go workspace, the non-booting drive with your Windows key is offline by default and will have to be enabled in Disk Management (diskmgmt.msc). Right-click the drive and set it as «online.» As mentioned above, several of the third-party tools that we already listed will let you load the registry hive file from another Windows installation.

You can also navigate to your license directly from the Windows registry (regedit via Start) though the key is not in plain text. Go to HKEY_LOCAL_MACHINESOFTWAREMicrosoftWindows NTCurrentVersion and look for «DigitalProductId» in the right panel.

In testing, both ProduKey and ShowKey Plus loaded the SOFTWARE hive file and displayed the key for an external Windows installation via Windows To Go. Also note that ProduKey can search for Windows keys on computers at remote domains among other locations, and that the Windows Registry Editor can load hive files from other installations:
Retrieving the UEFI/BIOS-bound Windows key via Linux was as simple as entering the following line in a terminal, though we couldn’t find any GUI applications like ProduKey or ShowKey Plus that would retrieve the license from a registry hive file:

The command-line tool Chntpw can be installed on Linux and is able to load Windows registry files. This software didn’t return a valid key when decoding the product ID within the tool, though if you had to you could extract the hex data and decode that elsewhere.
If you have a boot disc around, Chntpw (also known as Offline NT Password & Registry Editor) is part of many all-in-one recovery solutions such as Ultimate Boot CD and Hiren’s Boot CD.
Here’s how to load a Windows registry file in Chntpw from a Linux terminal and then display the hex value for the key in that hive (use dpi instead of hex to decode the key within chntpw, though again, this didn’t give us a valid key):
hex MicrosoftWindows NTCurrentVersionDigitalProductId

Additional resources
Although it’s convenient to have your Windows key automatically detected from the UEFI/BIOS, you’ll have to tweak the Windows installation media if you want to use another license.
Open the installation media in File Explorer, browse to the Sources folder and create a new text file named PID.txt in the Sources folder. In PID.txt, you want the following text, where the Xs correspond to your license key.
Uninstalling a retail key from a given machine is also possible and while this doesn’t automatically update the information on Microsoft’s servers, it will prevent future conflicts from multiple machines using the same key.

Enter the following line in an administrator Command Prompt to uninstall the currently active product license and clear that key from the Windows registry (here are more slmgr commands):

As a final anecdote from testing, when we uninstalled and cleared the key from our Windows installation, we were able to reactivate that copy of Windows simply by clicking «Troubleshoot» on the activation page.

One click and that wizard retrieved our digital license, despite not being linked to a Microsoft account. And again, this was for a retail key that was originally used on a desktop which was cloned as a Windows To Go drive and plugged into another machine with a different hardware profile. In other words, with luck, Microsoft’s activation is forgiving enough and you should have no issues validating your OS license on a new machine or after several hardware changes.
Источник
Find your Windows product key
A Windows product key is a 25-character code used to activate Windows. It looks like this:
PRODUCT KEY: XXXXX-XXXXX-XXXXX-XXXXX-XXXXX
Locate your product key for Windows 10
Depending on how you got your copy of Windows 10, you’ll need either a 25-character product key or a digital license to activate it. A digital license (called a digital entitlement in Windows 10, Version 1511) is a method of activation in Windows 10 that doesn’t require you to enter a product key. Without one of these, you won’t be able to activate your device.
Where to find your product key depends on how you got your copy of Windows.
Select any of the following to see more information:
The product key is preinstalled on your PC, included with the packaging the PC came in, or included on the Certificate of Authenticity (COA) attached to the PC. For more info, contact your hardware manufacturer, and for pictures of authentic product keys and COA labels, see How to tell your hardware is genuine.
The product key is on a label or card inside the box that Windows came in. For more info, contact the retailer that sold you Windows 10. How to tell your software is genuine.
Find your product key in the confirmation email you received after buying Windows 10 or in a digital locker accessible through the retailer’s website.
The product key is in the confirmation email you received after buying your digital copy of Windows. Microsoft only keeps a record of product keys if you purchased from the Microsoft online store. You can find out if you purchased from Microsoft in your Microsoft account Order history.
If you upgraded to Windows 10 for free from Windows 7 or Windows 8.1, you should have a digital license instead of a product key.
If you bought Windows 10 Home, Professional, or Upgrade to Pro in the Windows 10 Store app, you’ll receive a digital license instead of a product key. You can use the digital license for activation.
If your product key is scratched, blurred, or otherwise unusable, contact the retailer who sold you the product. If you aren’t able to get help from your retailer or have already tried and couldn’t get a working key, call Microsoft Support.
For more information about digital licenses and product keys in Windows 10, see the “Methods of Activation” section in Activate Windows 10.
Locate your product key for Windows 7 or Windows 8.1
A product key is usually required when uninstalling or reinstalling Windows 7 or Windows 8.1. Generally, if you bought a physical copy of Windows, the product key should be on a label or card inside the box that Windows came in. If Windows came preinstalled on your PC, the product key should appear on a sticker on your device. If you’ve lost or can’t find the product key, contact the manufacturer. To ensure your product key is genuine, see How to tell your software is genuine and How to tell your hardware is genuine.
For info about how to tell if your copy of Windows is genuine Microsoft software, see the How to tell page.
For more Windows 10 download info, see Download Windows 10.
If you need installation media to install or reinstall Windows, see Create installation media for Windows to learn how to create your own installation media using either a USB flash drive or a DVD.
If you need more help with activation, see Activate Windows 10.
If you’re getting an activation error, see Get help with Windows activation errors.
If you’re reinstalling Windows 10, you might not need a Windows product key. See Activation in Windows 10 for more info.
If you’re reinstalling Windows 10 due to a motherboard problem or some other hardware issue, see Reactivating Windows 10 after a hardware change.
If you’re looking for product keys for Office, apps, games, and more, see Find your Microsoft downloads and product keys
Источник
Sign-in FAQ
Signing into the VLSC
See the following FAQ about signing.
Who can access the Volume License Service Center (VLSC)
Individuals who are granted access to the VLSC are notified of their permission assignment in a welcome email from Microsoft. The notification invites them to register as a VLSC user and immediately access and manage their agreements. Permission to access the VLSC is granted in one of two ways:
How do I register to use the VLSC
Managing your volume licensing agreements in the VLSC is possible only if you are a registered user of the site. Registration requires a valid business (work) email address. This is the email address provided on your Volume License Agreement or Open License Order.
To register for the first time as a VLSC user:
What is a work or school account needed to sign into VLSC
A work or school account typically takes the form of username@orgname.com or username@orgname.onmicrosoft.com (where orgname is their employer’s email domain name). This helps customers and Microsoft alike to validate the user’s assigned permissions are accurately and securely affiliated with the licensed organization.
The requirement for a Work Account is for the purpose of authenticating a user’s relationship with an organization and does not require that user or organization to consume Microsoft Services such as Office 365. However, if you do use one of those services you already have a work account. Sign in with the same account you use to access that service.
Microsoft Accounts linked to individuals rather than to organizations are intended to access personal services from Microsoft, such as Outlook.com email, Xbox or Windows 10 on a home PC. Because these accounts are personal to the user rather than to an organization, they are not appropriate for use on the VLSC. (It is no longer possible to register a business email address using a Microsoft Account).
How do I link my existing Microsoft Account with my work account
If you previously signed in to the VLSC using a Microsoft account, the VLSC will prompt you to sign in instead with a work account. The process of converting your VLSC user ID to a Work Account is quick and achieved by following these steps in the screen that opens:
Enter your name and work email address.
Microsoft will send a verification code (signup code) to this work email address. Check your email and enter that code in the box titled Signup code.
Confirm the country or region for your organization and change this if necessary. You cannot change this after you finish the signup process.
In the future, sign in to the VLSC using this work account. This will ensure you are using agreements associated with your organization.
VLSC Sign In Errors
See the following FAQ about the sign-in errors.
Error Code E06 «We are unable to complete your action»
If you have used a work account to sign in to the VLSC and then try to sign in using a Microsoft account, the VLSC will display this error message. Sign in using the work account displayed in the error message:
Error Code E03 «Sorry, we cannot finish signing you up. Your IT Department has turned off signup for Volume Licensing Service Center»
If you see this error message, an administrator of your organization’s Microsoft services has restricted users with your domain name from signing up to new subscriptions such as Power BI. Unfortunately, this restriction also prevents users from signing up for the VLSC.
Contact your Network Administrator (the person who administers your domain) and ask them to adjust permissions so that you can register to use the VLSC. Note, this does not require that you have a subscription. For more information about how admins can turn on and turn off this feature that prevents you from signing up for the VLSC, see the help topic titled How can I prevent users from joining my existing Office 365 tenant?
Error Code E02 «We are sorry. We are unable to complete your sign up to VLSC as the email domain you have provided is restricted for automatic sign up.»
Some IT Administrators specifically restrict users from being able to sign up for online service subscriptions independently of an IT Administrator. Because the VLSC uses the same work account sign up solution as these services, signing up to VSLC is also blocked and will require the IT administrator to adjust the domain settings to allow users sign up to the VLSC. These changes don’t need to be permanent. The administrator can change the settings back immediately after VSLC registration has been completed. Technical instructions are available here. You may also contact us for further assistance.
Error E05 «We are sorry. We are unable to complete your sign up to VLSC as the email domain you have provided is restricted for automatic sign up.»
We cannot create a work account with the domain name you used if that account does not exist in your organization’s Active Directory. Your organization’s IT administrator should be able to guide you on what account to use, or can create a new account in your organization’s Active Directory.
VLSC customers may also Contact Us by phone or by Web Form. Microsoft will respond to Web Form submissions within 24 hours.
Источник
Product Keys FAQ
What are Product Keys
A Product Key enables use of a software product you have licensed under a specific Volume Licensing program. The Product Keys listed in the VLSC should be used with only Volume License products and are intended for use by your organization only.
An Online Service Activation (OSA) Key is a type of Product Key. It is a single-use redemption key used to activate subscriptions to Microsoft Online Services.
How to locate Product Keys in VLSC
You will find product key information for each product, the type of licensing (Volume Licensing Key, KMS, and MAK) and the number of used and available Multiple Activation Key (MAK) activations.
You can also select the Download all product keys link to download the keys displayed for an entitlement to a local drive.
You can also locate product keys in VLSC for individual products on the Downloads and Keys tab in VLSC.
How to locate SQL Server Product Keys in VLSC
I can’t find a key for Volume Licensing purchase
If your agreement authorizes you access to a product that requires a key, those keys will be displayed in the «Downloads and Keys» section. However, some products do not require a product key. This will be stated in special instructions listed in the product description in the «Downloads and Keys» catalog.
To see if your product requires a key, go to Product Activation and Key Information. Under the Find Products section, choose a product, or search for your product name.
What is a Setup Key
A Setup Key is used for each product/version combination to bypass activation (that is, unlock the product). You can obtain a Setup Key in one of the following ways:
What determines which Product Keys are associated with my agreements
Volume License Product Keys are provided for each Licensing ID listed in your Microsoft Relationship Summary. You may have several Licensing IDs:
All customers have the right to use Product Keys for re-imaging and downgrade purposes. Select Plus, Enterprise Agreement (EA), and Select customers are provided limited evaluation rights for training and back-up.
What is Volume Activation
Volume activation is a configurable solution that helps automate and manage the product activation process on computers running Windows operating systems that have been licensed under a volume licensing program. Volume activation is also used with other software from Microsoft (most notably the Office suites) that are sold under volume licensing agreements and that support volume activation
Volume Activation applies only to systems that are covered under a Volume Licensing program and is used strictly as a tool for activation. It is not tied to license invoicing or billing.
Volume Activation provides two different models for completing volume activations. Either or both key types may be used by customers to activate systems in their organization:
As part of your installation, it is important to plan and manage deployment of any product using Volume Activation.
What is the Key Management Service (KMS)
The Key Management Service (KMS) is an activation service that allows organizations to activate systems within their own network, eliminating the need for individual computers to connect to Microsoft for product activation. It does not require a dedicated system and can be easily co-hosted on a system that provides other services.
KMS requires a minimum number of either physical or virtual computers in a network environment. These minimums, called activation thresholds, are set so that they are easily met by Enterprise customers.
For more information about activation thresholds, see the Volume Activation Planning Guide.
What is a KMS Host Key
A KMS Key is used to activate the KMS host computer with a Microsoft activation server and can activate up to six KMS hosts with 10 activations per host. Each KMS host can activate an unlimited number of computers.
No KMS (Key Management Service) key displayed on VLSC for Open License customers
KMS keys are no longer pre-assigned to Open agreements as use of MAK (Multiple Activation Key) keys is the preferred method for activation.
KSM keys can be assigned, by exception, to Open customers who meet the minimum KMS activation threshold for Windows Server, OS, and Office. To request such an exception, please submit a Web Form request to VLSC Support.
To do this, you must have VLSC Administrator, Key Administrator, or Key Viewer permissions and provide the following information:
Additional KMS Hosts
if you require additional KMS activations for activating more than six (6) KMS hosts, submit a Web Form request to VLSC Support.
To do this, you must have VLSC Administrator, Key Administrator, or Key Viewer permissions and provide the following information:
What is a Multiple Activation Key (MAK)
A Multiple Activation Key (MAK) activates systems on a one-time basis, using Microsoft’s hosted activation services (which requires connection with a Microsoft activation server). Once computers are activated, no further communication with Microsoft is required.
Each MAK has a predetermined number of allowed activations, based on your Volume Licensing agreement.
The number of Multiple Activation Keys (MAK) activations provided does not match the number of licenses that we have purchased
We recommend customers use Key Management Service (KMS) to activate Multiple Activation Keys (MAK). KMS is the preferred activation method for large scale deployments. Many factors determine the number of activations associated with each MAK, including licenses purchased, the customer purchase pricing level, and their Volume Licensing program.
The number of activations available for a product may not always match the number of licenses purchased. Usually you will receive a higher number of activations in case you need to reinstall and activate some of your products. Please check the Licensing Summary section of your agreement to see your number of licenses.
Requests to increase MAK activation limits should
Increases to MAK Activation quantity can be requested via Web Form and may be granted by exception. For Canada and USA, use N.America MAK ADD Web Form
To do this you must have VLSC Administrator, Key Administrator, or Key Viewer permissions and provide the following information:
How to activate using a Multiple Activation Key
You can activate licenses in one of two ways using MAK:
What is the Volume Activation Management Tool (VAMT)
The Volume Activation Management Tool (VAMT) enables network administrators and other IT professionals to automate and centrally manage the volume and retail-activation process for Windows, Microsoft Office, and select other Microsoft products. VAMT can manage volume activation using Multiple Activation Keys (MAKs) or the Windows Key Management Service (KMS). VAMT is a standard Microsoft Management Console (MMC) snap-in that requires the Microsoft Management Console (MMC) 3.0.
Where can I find more information on the Volume Activation Management Tool (VAMT)
Refer to the following resources for information on VAMT:
Can I use both MAK and KMS for deployment across my organization
Yes. Volume Licensing customers can use KMS, MAK, or a combination of each to activate systems in their organization. Customers are free to use a combination of activation methods as desired.
How do I determine which key to use for a particular product
Refer to the following resources for assistance in determining which key to use when activating a Microsoft Volume License product:
Volume Activation for Windows and Windows Server
If you deploy Windows using Key Management Service (KMS) as the activation method, note that:
If you are using Windows Server as a KMS host, your alternatives are:
Volume Activation for Office, Project and Visio
Yes, the following Volume Activation changes are related to Office, Project and Visio:
If you deploy Office using Key Management Service (KMS) as the activation method, note that:
If you are using Windows Server 2008 as a KMS host, your alternatives are:
Activate Windows Terminal Server and Remote Desktop Service (RDS)
After you download your Server media from the VLSC you can active it via the product’s activation wizard and don’t need to locate a volume license key or product set up key in the VLSC. Completing all the activation wizard steps will prompt the Server to connect with Microsoft’s Clearing House via the internet in order to validate the information inputted. Alternatively, for Offline Servers the activation wizard offers Phone or Web Activation as alternatives.
To begin the process, you must first assign a Remote Desktop Licensing role for the server, (from your “Start” menu, go to “Administrative Tools”, then “Server Manager”) and then activate the RDS Service (from your Remote Desktop License Manager, click on your Start button, select “Administrative Tools”, select “Remote Desktop Services” and then select “Remote Desktop/Terminal License Manager).
During activation, you are requested to select the License Program and Agreement Number. Note for Open License customers, you should enter your Authorization Number. For MPSA, enter your Purchase Account Number (not the MPSA Agreement number). If you are unsure of the program type for the License ID under which your CAL licenses were purchased, go to the VLSC Relationship Summary and see the Parent Program column.
Can organizations within the same ownership structure use the same key to deploy a product.
License compliance and Asset Management are independent of key activation. Customers do not have to use the keys provided under a specific Licensing ID (agreement, enrollment, affiliate, or license) for use only with the licenses specified under that Licensing ID. If a parent organization (which owns a chlld organization) has an individual agreement, it can use the same key to deploy a product across both parent and child organizations. This flexibility allows customers to centrally manage their deployment image by either using keys specific to agreements / licenses, or one set of keys for all.
Can I use my Volume License Keys to exercise my re-imaging rights
Yes. Re-imaging rights are granted to all Microsoft Volume Licensing customers. Under these rights, customers may re-image Original Equipment Manufacturer (OEM) or Full Packaged Product (FPP) licensed copies using media provided under their agreement as long as copies made from the Volume Licensing media are identical to the originally licensed product. As a Volume Licensing customer, the Volume License Keys you need can be found on the Product Key page. You can also request your keys through a Microsoft Activation Center.
If you are an Open License customer, you must purchase at least one unit of the product that you want to re-image to obtain access to the product media and receive a key.
For more information on Re-imaging Rights, see article on this page about reimaging rights.
How do I download my keys to a local file
The VLSC offers an option to download your Product Keys to a local file for later use. When downloaded from the Downloads and Keys page, the file contains all Volume License Keys associated with agreements in your VLSC profile. However, if you download keys from the Licensing ID specific view on the Relationship Summary page, the file contains only the keys associated with the Licensing ID you are viewing.
A downloadable Product Key file is in a tab-delimited format and can be opened in Excel to sort and view keys. You may also view the file using any text editor. The columns included in the file are: Licensing ID, Parent Program, Organization, Product, Product Key, Type, and MAK Activations-Used/Available. To open a downloaded file in Excel, complete the following steps:
Where can I find more information about the topics covered in these FAQs
VLSC customers may also Contact Us by phone or by Web Form. Microsoft will respond to Web Form submissions within 24 hours.
Источник
Содержание
- Change the Registered Owner Name in Windows 7/8/10
- Windows 7/8/10 License
- Change the Name of the Registered Owner
- Windows registry information for advanced users
- Description of the registry
- Back up the registry
- Edit the registry
- Use the Windows user interface
- Use Registry Editor
- Use Group Policy
- Use a Registration Entries (.reg) file
- Use Windows Script Host
- Use Windows Management Instrumentation
- Use Console Registry Tool for Windows
- Restore the registry
- Method 1: Restore the registry keys
- Method 2: Restore the whole registry
- References
Change the Registered Owner Name in Windows 7/8/10
When buying or donating a PC
When Windows is first installed, Microsoft asks you a series of questions about the owner of the computer upon which the operating system is being loaded. Once you choose the name of the owner, Microsoft uses this information as the person to whom Windows is licensed.
If you bought your computer with Windows pre-installed, the manufacturer may have included this information for you. If you bought your computer second hand, the operating system will show the original owner as the person to whom the operating system is licensed. Either way, using a quick registry edit, you can change the name of the registered owner to anyone you want.
Windows 7/8/10 License
To see the name of the person to whom your copy of Windows is licensed, click on Start and type
into the search box. Press the Enter key and Windows brings up the About Windows window. Here you will find all kinds of information including the edition of Windows you are using, the current version of the operating system, and the person who holds the license to use Windows.

Notice that this particular owner simply identified him/herself as “user” for the licensing information. Using a quite registry edit, you can change this name to anything you want.
However, be advised that changes to the registry can cause your computer to become unstable if you make an incorrect entry or delete a particularly important registry key. It is advised that you always make a backup of your registry before you make any changes.
Change the Name of the Registered Owner
To change the name of the registered owner of the Windows license, begin by click on Start and typing
into the search box. This will bring up the Windows registry. Depending on your settings, you may have to verify that you want to run the registry editor.
Locate the registry key located at:
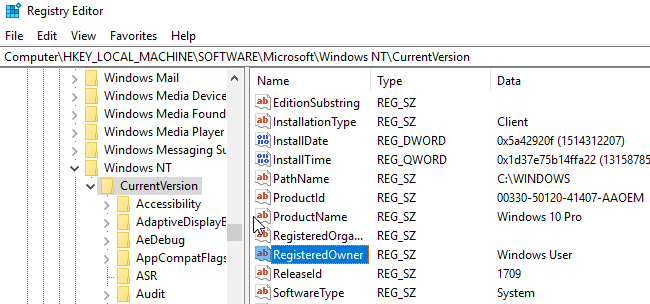
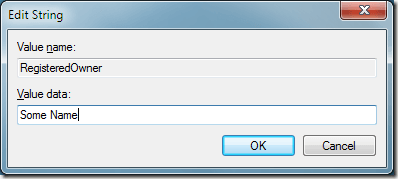
Double click on RegisteredOwner and change the key’s string value to whatever name you want.
Now when you check the name of the owner by clicking on Start and typing winver into the Search Programs And Files box, your new name should appear instead of the old one.
Keep in mind that this trick is cosmetic only; it does not change the actual owner of the Windows license in the legal sense. It also does not change the licensing relationship you or anyone else has with Microsoft.
It is, however, a way that you can take ownership of a computer purchased second hand or change the name of the owner to something other than what the original manufacturer entered when Windows was first loaded onto the computer.
This trick is particularly useful when a name changes because of a marriage. A woman who changes her name after marriage can update the owner of the machine to reflect her new name. Enjoy!
Founder of Help Desk Geek and managing editor. He began blogging in 2007 and quit his job in 2010 to blog full-time. He has over 15 years of industry experience in IT and holds several technical certifications. Read Aseem’s Full Bio
Windows registry information for advanced users
This article describes the Windows registry and provides information about how to edit and back up it.
Original product version: В Windows 10 — all editions, Windows Server 2012 R2
Original KB number: В 256986
Description of the registry
The Microsoft Computer Dictionary, Fifth Edition, defines the registry as:
A central hierarchical database used in Windows 98, Windows CE, Windows NT, and Windows 2000 used to store information that is necessary to configure the system for one or more users, applications, and hardware devices.
The Registry contains information that Windows continually references during operation, such as profiles for each user, the applications installed on the computer and the types of documents that each can create, property sheet settings for folders and application icons, what hardware exists on the system, and the ports that are being used.
The Registry replaces most of the text-based .ini files that are used in Windows 3.x and MS-DOS configuration files, such as the Autoexec.bat and Config.sys. Although the Registry is common to several Windows operating systems, there are some differences among them. A registry hive is a group of keys, subkeys, and values in the registry that has a set of supporting files that contain backups of its data. The supporting files for all hives except HKEY_CURRENT_USER are in the % SystemRoot%System32Config folder on Windows NT 4.0, Windows 2000, Windows XP, Windows Server 2003, and Windows Vista. The supporting files for HKEY_CURRENT_USER are in the %SystemRoot%ProfilesUsername folder. The file name extensions of the files in these folders indicate the type of data that they contain. Also, the lack of an extension may sometimes indicate the type of data that they contain.
| Registry hive | Supporting files |
|---|---|
| HKEY_LOCAL_MACHINESAM | Sam, Sam.log, Sam.sav |
| HKEY_LOCAL_MACHINESecurity | Security, Security.log, Security.sav |
| HKEY_LOCAL_MACHINESoftware | Software, Software.log, Software.sav |
| HKEY_LOCAL_MACHINESystem | System, System.alt, System.log, System.sav |
| HKEY_CURRENT_CONFIG | System, System.alt, System.log, System.sav, Ntuser.dat, Ntuser.dat.log |
| HKEY_USERSDEFAULT | Default, Default.log, Default.sav |
In Windows 98, the registry files are named User.dat and System.dat. In Windows Millennium Edition, the registry files are named Classes.dat, User.dat, and System.dat.
Security features in Windows let an administrator control access to registry keys.
The following table lists the predefined keys that are used by the system. The maximum size of a key name is 255 characters.
| Folder/predefined key | Description |
|---|---|
| HKEY_CURRENT_USER | Contains the root of the configuration information for the user who is currently logged on. The user’s folders, screen colors, and Control Panel settings are stored here. This information is associated with the user’s profile. This key is sometimes abbreviated as HKCU. |
| HKEY_USERS | Contains all the actively loaded user profiles on the computer. HKEY_CURRENT_USER is a subkey of HKEY_USERS. HKEY_USERS is sometimes abbreviated as HKU. |
| HKEY_LOCAL_MACHINE | Contains configuration information particular to the computer (for any user). This key is sometimes abbreviated as HKLM. |
| HKEY_CLASSES_ROOT | Is a subkey of HKEY_LOCAL_MACHINESoftware . The information that is stored here makes sure that the correct program opens when you open a file by using Windows Explorer. This key is sometimes abbreviated as HKCR. Starting with Windows 2000, this information is stored under both the HKEY_LOCAL_MACHINE and HKEY_CURRENT_USER keys. The HKEY_LOCAL_MACHINESoftwareClasses key contains default settings that can apply to all users on the local computer. The HKEY_CURRENT_USERSoftwareClasses key contains settings that override the default settings and apply only to the interactive user. The HKEY_CLASSES_ROOT key provides a view of the registry that merges the information from these two sources. HKEY_CLASSES_ROOT also provides this merged view for programs that are designed for earlier versions of Windows. To change the settings for the interactive user, changes must be made under HKEY_CURRENT_USERSoftwareClasses instead of under HKEY_CLASSES_ROOT. To change the default settings, changes must be made under HKEY_LOCAL_MACHINESoftwareClasses . If you write keys to a key under HKEY_CLASSES_ROOT, the system stores the information under HKEY_LOCAL_MACHINESoftwareClasses . If you write values to a key under HKEY_CLASSES_ROOT, and the key already exists under HKEY_CURRENT_USERSoftwareClasses , the system will store the information there instead of under HKEY_LOCAL_MACHINESoftwareClasses . |
| HKEY_CURRENT_CONFIG | Contains information about the hardware profile that is used by the local computer at system startup. |
The registry in 64-bit versions of Windows XP, Windows Server 2003, and Windows Vista is divided into 32-bit and 64-bit keys. Many of the 32-bit keys have the same names as their 64-bit counterparts, and vice versa. The default 64-bit version of Registry Editor that is included with 64-bit versions of Windows XP, Windows Server 2003, and Windows Vista displays the 32-bit keys under the node HKEY_LOCAL_MACHINESoftwareWOW6432Node . For more information about how to view the registry on 64-Bit versions of Windows, see How to view the system registry by using 64-bit versions of Windows.
The following table lists the data types that are currently defined and that are used by Windows. The maximum size of a value name is as follows:
- Windows Server 2003, Windows XP, and Windows Vista: 16,383 characters
- Windows 2000: 260 ANSI characters or 16,383 Unicode characters
- Windows Millennium Edition/Windows 98/Windows 95: 255 characters
Long values (more than 2,048 bytes) must be stored as files with the file names stored in the registry. This helps the registry perform efficiently. The maximum size of a value is as follows:
- Windows NT 4.0/Windows 2000/Windows XP/Windows Server 2003/Windows Vista: Available memory
- Windows Millennium Edition/Windows 98/Windows 95: 16,300 bytes
There is a 64K limit for the total size of all values of a key.
| Name | Data type | Description |
|---|---|---|
| Binary Value | REG_BINARY | Raw binary data. Most hardware component information is stored as binary data and is displayed in Registry Editor in hexadecimal format. |
| DWORD Value | REG_DWORD | Data represented by a number that is 4 bytes long (a 32-bit integer). Many parameters for device drivers and services are this type and are displayed in Registry Editor in binary, hexadecimal, or decimal format. Related values are DWORD_LITTLE_ENDIAN (least significant byte is at the lowest address) and REG_DWORD_BIG_ENDIAN (least significant byte is at the highest address). |
| Expandable String Value | REG_EXPAND_SZ | A variable-length data string. This data type includes variables that are resolved when a program or service uses the data. |
| Multi-String Value | REG_MULTI_SZ | A multiple string. Values that contain lists or multiple values in a form that people can read are generally this type. Entries are separated by spaces, commas, or other marks. |
| String Value | REG_SZ | A fixed-length text string. |
| Binary Value | REG_RESOURCE_LIST | A series of nested arrays that is designed to store a resource list that is used by a hardware device driver or one of the physical devices it controls. This data is detected and written in the ResourceMap tree by the system and is displayed in Registry Editor in hexadecimal format as a Binary Value. |
| Binary Value | REG_RESOURCE_REQUIREMENTS_LIST | A series of nested arrays that is designed to store a device driver’s list of possible hardware resources the driver or one of the physical devices it controls can use. The system writes a subset of this list in the ResourceMap tree. This data is detected by the system and is displayed in Registry Editor in hexadecimal format as a Binary Value. |
| Binary Value | REG_FULL_RESOURCE_DESCRIPTOR | A series of nested arrays that is designed to store a resource list that is used by a physical hardware device. This data is detected and written in the HardwareDescription tree by the system and is displayed in Registry Editor in hexadecimal format as a Binary Value. |
| None | REG_NONE | Data without any particular type. This data is written to the registry by the system or applications and is displayed in Registry Editor in hexadecimal format as a Binary Value |
| Link | REG_LINK | A Unicode string naming a symbolic link. |
| QWORD Value | REG_QWORD | Data represented by a number that is a 64-bit integer. This data is displayed in Registry Editor as a Binary Value and was introduced in Windows 2000. |
Back up the registry
Before you edit the registry, export the keys in the registry that you plan to edit, or back up the whole registry. If a problem occurs, you can then follow the steps in the Restore the registry section to restore the registry to its previous state. To back up the whole registry, use the Backup utility to back up the system state. The system state includes the registry, the COM+ Class Registration Database, and your boot files. For more information about how to use the Backup utility to back up the system state, see the following articles:
Edit the registry
To modify registry data, a program must use the registry functions that are defined in Registry Functions.
Administrators can modify the registry by using Registry Editor (Regedit.exe or Regedt32.exe), Group Policy, System Policy, Registry (.reg) files, or by running scripts such as VisualBasic script files.
Use the Windows user interface
We recommend that you use the Windows user interface to change your system settings instead of manually editing the registry. However, editing the registry may sometimes be the best method to resolve a product issue. If the issue is documented in the Microsoft Knowledge Base, an article with step-by-step instructions to edit the registry for that issue will be available. We recommend that you follow those instructions exactly.
Use Registry Editor
Serious problems might occur if you modify the registry incorrectly by using Registry Editor or by using another method. These problems might require that you reinstall the operating system. Microsoft cannot guarantee that these problems can be solved. Modify the registry at your own risk.
You can use Registry Editor to do the following actions:
- Locate a subtree, key, subkey, or value
- Add a subkey or a value
- Change a value
- Delete a subkey or a value
- Rename a subkey or a value
The navigation area of Registry Editor displays folders. Each folder represents a predefined key on the local computer. When you access the registry of a remote computer, only two predefined keys appear: HKEY_USERS and HKEY_LOCAL_MACHINE.
Use Group Policy
Microsoft Management Console (MMC) hosts administrative tools that you can use to administer networks, computers, services, and other system components. The Group Policy MMC snap-in lets administrators define policy settings that are applied to computers or users. You can implement Group Policy on local computers by using the local Group Policy MMC snap-in, Gpedit.msc. You can implement Group Policy in Active Directory by using the Active Directory Users and Computers MMC snap-in. For more information about how to use Group Policy, see the Help topics in the appropriate Group Policy MMC snap-in.
Use a Registration Entries (.reg) file
Create a Registration Entries (.reg) file that contains the registry changes, and then run the .reg file on the computer where you want to make the changes. You can run the .reg file manually or by using a logon script. For more information, see How to add, modify, or delete registry subkeys and values by using a Registration Entries (.reg) file.
Use Windows Script Host
The Windows Script Host lets you run VBScript and JScript scripts directly in the operating system. You can create VBScript and JScript files that use Windows Script Host methods to delete, to read, and to write registry keys and values. For more information about these methods, visit the following Microsoft Web sites:
Use Windows Management Instrumentation
Windows Management Instrumentation (WMI) is a component of the Microsoft Windows operating system and is the Microsoft implementation of Web-Based Enterprise Management (WBEM). WBEM is an industry initiative to develop a standard technology for accessing management information in an enterprise environment. You can use WMI to automate administrative tasks (such as editing the registry) in an enterprise environment. You can use WMI in scripting languages that have an engine on Windows and that handle Microsoft ActiveX objects. You can also use the WMI Command-Line utility (Wmic.exe) to modify the Windows registry.
Use Console Registry Tool for Windows
You can use the Console Registry Tool for Windows (Reg.exe) to edit the registry. For help with the Reg.exe tool, type reg /? at the Command Prompt, and then click OK.
Restore the registry
To restore the registry, use the appropriate method.
Method 1: Restore the registry keys
To restore registry subkeys that you exported, double-click the Registration Entries (.reg) file that you saved in the Export registry subkeys section. Or, you can restore the whole registry from a backup. For more information about how to restore the whole registry, see the Method 2: Restore the whole registry section later in this article.
Method 2: Restore the whole registry
To restore the whole registry, restore the system state from a backup. For more information about how to restore the system state from a backup, see How to use Backup to protect data and restore files and folders on your computer in Windows XP and Windows Vista.
Backing up the system state also creates updated copies of the registry files in the %SystemRoot%Repair folder.
References
For more information, visit the following Web sites:
The Windows Server Catalog of Tested Products is a reference for products that have been tested for Windows Server compatibility.
Data Protection Manager (DPM) is a key member of the Microsoft System Center family of management products and is designed to help IT professionals manage their Windows environment. DPM is the new standard for Windows backup and recovery and delivers continuous data protection for Microsoft application and file servers that use seamlessly integrated disk and tape media. For more information about how to back up and restore the registry, see How to back up and restore the registry in Windows XP and Windows Vista.
Содержание
- Where is the Windows license key on Windows 10?
- 4 Answers 4
- How to Find Your Original Windows 10 Product Key
- Hint: You might not have to.
- Article Index
- Windows OEM keys vs. retail vs. free upgrade
- Do I have a digital license?
- Find your key from inside Windows
- Third-party tools that find Windows keys
- Find your key from outside Windows
- Additional resources
- Find your Windows product key
- Locate your product key for Windows 10
- Locate your product key for Windows 7 or Windows 8.1
- Related links
- Sign-in FAQ
- Signing into the VLSC
- Who can access the Volume License Service Center (VLSC)
- How do I register to use the VLSC
- What is a work or school account needed to sign into VLSC
- How do I link my existing Microsoft Account with my work account
- VLSC Sign In Errors
- Error Code E06 «We are unable to complete your action»
- Error Code E03 «Sorry, we cannot finish signing you up. Your IT Department has turned off signup for Volume Licensing Service Center»
- Error Code E02 «We are sorry. We are unable to complete your sign up to VLSC as the email domain you have provided is restricted for automatic sign up.»
- Error E05 «We are sorry. We are unable to complete your sign up to VLSC as the email domain you have provided is restricted for automatic sign up.»
- Contact Assisted Support
- Product Keys FAQ
- What are Product Keys
- How to locate Product Keys in VLSC
- How to locate SQL Server Product Keys in VLSC
- I can’t find a key for Volume Licensing purchase
- What is a Setup Key
- What determines which Product Keys are associated with my agreements
- What is Volume Activation
- What is the Key Management Service (KMS)
- What is a KMS Host Key
- No KMS (Key Management Service) key displayed on VLSC for Open License customers
- Additional KMS Hosts
- What is a Multiple Activation Key (MAK)
- The number of Multiple Activation Keys (MAK) activations provided does not match the number of licenses that we have purchased
- Requests to increase MAK activation limits should
- How to activate using a Multiple Activation Key
- What is the Volume Activation Management Tool (VAMT)
- Where can I find more information on the Volume Activation Management Tool (VAMT)
- Can I use both MAK and KMS for deployment across my organization
- How do I determine which key to use for a particular product
- Volume Activation for Windows and Windows Server
- Volume Activation for Office, Project and Visio
- Activate Windows Terminal Server and Remote Desktop Service (RDS)
- Can organizations within the same ownership structure use the same key to deploy a product.
- Can I use my Volume License Keys to exercise my re-imaging rights
- How do I download my keys to a local file
- Where can I find more information about the topics covered in these FAQs
- Contact Assisted Support
Where is the Windows license key on Windows 10?
and afterwards move my current partitions to the new machine. What followed was a medium-sized nightmare. The new machine would boot, but the wireless network drivers were not recognized and later found out (to the best of my knowledge) they couldn’t be installed. I tried:
booting from the console and running:
both seemed to have completed successfully, but now the machine would get stuck in a startup repair loop.
I tried resetting the machine (whilst keeping my files), but this failed halfway through.
now the machine’s still stuck in the loop and decided to try and repair it externally using a bootable Windows 10 image. It’s likely that I’ll need the new machine’s Windows 10 key. I’m not sure if it’s stored in the BIOS (it came with Windows 10 preinstalled) or somewhere on the partitions.
How can I get the key from the partitions (if it’s there at all) while booting from a Linux image?
4 Answers 4
If Windows 10 was ever activated on this computer, then it is now remembered by the Microsoft activation servers using its hardware fingerprint.
There will be no problem installing Windows 10 again on this computer, and activation will be automatic. You do not need to search for the key.
It’s likely that I’ll need the new machine’s Windows 10 key.
You won’t need need to manually enter the license key. The OEM license key is embedded in your BIOS and will be detected automatically by Windows.
I would personally just do a completely clean install of Windows 10 and then manually reinstall the applications and import the data from your backup. This will be a very quick process and will guarantee a stable system.
After performing a clean install using a 4+ GB flash drive, Windows will automatically activate itself online almost immediately.
OEM PC manufacturers, such as the one that made the OP’s computer, work with Microsoft to embed the license key in the BIOS, which is how Windows is able to activate itself even if you wiped your new PC to do a clean install of Windows before connecting it to the Internet. After activation, Microsoft’s activation servers will then know the hardware fingerprint of the computer but not before. They do, however, recognize the OEM license key.
Here’s what happens when I run this tool on my PC, which does not have an embedded Windows 10 license key in the BIOS as I built the PC myself and used a regular retail key:
Источник
How to Find Your Original Windows 10 Product Key
Hint: You might not have to.
Article Index
In brief For the longest time Windows PCs came with a product key sticker that was placed outside of the machine or with your computer’s manuals. But in recent years manufacturers started storing this license within the machine’s UEFI/BIOS and the information is automatically retrieved and applied when reinstalling the operating system. Certainly a better approach overall. In other instances, for example if you built and installed your OS, your key is associated with your Microsoft account, so there is no way to «lose it» anymore. Read on for more details.
Microsoft has been changing and improving the way it handles Windows licenses. We’ll cover all you need to know in this article, from old school ways to retrieve keys, to the more modern approaches to make good use of your licenses and what restrictions may apply depending on your type of license.
Windows 10 introduced a «Digital Entitlement» element to Microsoft’s license which links your Windows key to an ID generated based on your PC’s hardware. But because your hardware can significantly change if you upgrade your hardware, this entitlement was expanded to become a «Digital License» when 2016’s Anniversary Update (1607) arrived.
This means your Windows 10 license now ties Windows keys to Microsoft accounts, letting you activate a copy of the operating system simply by logging in with valid online credentials. So, if you have a newer Windows PC or you already log in using your Microsoft account, you generally shouldn’t have to search for your original Windows 10 key. We will explain that in better detail in a minute.
There may be other scenarios where you may still want to manually find a Windows key stored in your UEFI/BIOS, or prevent this key from automatically being applied during installation. Not to mention that different conditions apply for non-OEM retail keys, as well as those given to people who upgraded to Windows 10 for free. And in a worst case scenario, you might be trying to find the license for a copy of Windows that no longer boots.
Editor’s Note: This feature was originally published on December 2018. It’s just as relevant today, so we’ve bumped it as part of our #ThrowbackThursday initiative.
Windows OEM keys vs. retail vs. free upgrade
There are many types of Windows licenses with varying terms of use. As a general rule of thumb:
Do I have a digital license?
The Windows 10 Settings app has a page for displaying your activation information, including whether you have a digital license, though your key isn’t shown here:
Go to: Settings > Update & Security > Activation
If you have a digital license, you should see «Windows is activated with a digital license» or «Windows is activated with a digital license linked to your Microsoft account.»
You can also link a Microsoft account to a Windows license by clicking «add a Microsoft Account» on the bottom of the same page and providing your login information.
Find your key from inside Windows
Entering the following lines into an admin Command Prompt or PowerShell worked to display the OEM key embedded in our system’s UEFI/BIOS. However, these commands didn’t return any keys on other two machines we used for testing despite Windows 10 being activated.
wmic path softwarelicensingservice get OA3xOriginalProductKey
We downloaded a variety of utilities that can retrieve retail keys from the Windows registry as well as those that are UEFI/BIOS-bound. In testing, some of the applications found both the registry and UEFI/BIOS keys, while others only worked for one or the other:
Find your key from outside Windows
If you can’t boot into Windows and want to retrieve that key, you can still access this data from an external environment such as a Windows To Go drive, or by attaching your non-booting Windows drive to another machine.
Note that if you’re recovering the key from a Windows To Go workspace, the non-booting drive with your Windows key is offline by default and will have to be enabled in Disk Management (diskmgmt.msc). Right-click the drive and set it as «online.» As mentioned above, several of the third-party tools that we already listed will let you load the registry hive file from another Windows installation.
You can also navigate to your license directly from the Windows registry (regedit via Start) though the key is not in plain text. Go to HKEY_LOCAL_MACHINESOFTWAREMicrosoftWindows NTCurrentVersion and look for «DigitalProductId» in the right panel.
In testing, both ProduKey and ShowKey Plus loaded the SOFTWARE hive file and displayed the key for an external Windows installation via Windows To Go. Also note that ProduKey can search for Windows keys on computers at remote domains among other locations, and that the Windows Registry Editor can load hive files from other installations:
Retrieving the UEFI/BIOS-bound Windows key via Linux was as simple as entering the following line in a terminal, though we couldn’t find any GUI applications like ProduKey or ShowKey Plus that would retrieve the license from a registry hive file:
The command-line tool Chntpw can be installed on Linux and is able to load Windows registry files. This software didn’t return a valid key when decoding the product ID within the tool, though if you had to you could extract the hex data and decode that elsewhere.
If you have a boot disc around, Chntpw (also known as Offline NT Password & Registry Editor) is part of many all-in-one recovery solutions such as Ultimate Boot CD and Hiren’s Boot CD.
Here’s how to load a Windows registry file in Chntpw from a Linux terminal and then display the hex value for the key in that hive (use dpi instead of hex to decode the key within chntpw, though again, this didn’t give us a valid key):
hex MicrosoftWindows NTCurrentVersionDigitalProductId
Additional resources
Although it’s convenient to have your Windows key automatically detected from the UEFI/BIOS, you’ll have to tweak the Windows installation media if you want to use another license.
Open the installation media in File Explorer, browse to the Sources folder and create a new text file named PID.txt in the Sources folder. In PID.txt, you want the following text, where the Xs correspond to your license key.
Uninstalling a retail key from a given machine is also possible and while this doesn’t automatically update the information on Microsoft’s servers, it will prevent future conflicts from multiple machines using the same key.
Enter the following line in an administrator Command Prompt to uninstall the currently active product license and clear that key from the Windows registry (here are more slmgr commands):
As a final anecdote from testing, when we uninstalled and cleared the key from our Windows installation, we were able to reactivate that copy of Windows simply by clicking «Troubleshoot» on the activation page.
One click and that wizard retrieved our digital license, despite not being linked to a Microsoft account. And again, this was for a retail key that was originally used on a desktop which was cloned as a Windows To Go drive and plugged into another machine with a different hardware profile. In other words, with luck, Microsoft’s activation is forgiving enough and you should have no issues validating your OS license on a new machine or after several hardware changes.
Источник
Find your Windows product key
A Windows product key is a 25-character code used to activate Windows. It looks like this:
PRODUCT KEY: XXXXX-XXXXX-XXXXX-XXXXX-XXXXX
Locate your product key for Windows 10
Depending on how you got your copy of Windows 10, you’ll need either a 25-character product key or a digital license to activate it. A digital license (called a digital entitlement in Windows 10, Version 1511) is a method of activation in Windows 10 that doesn’t require you to enter a product key. Without one of these, you won’t be able to activate your device.
Where to find your product key depends on how you got your copy of Windows.
Select any of the following to see more information:
The product key is preinstalled on your PC, included with the packaging the PC came in, or included on the Certificate of Authenticity (COA) attached to the PC. For more info, contact your hardware manufacturer, and for pictures of authentic product keys and COA labels, see How to tell your hardware is genuine.
The product key is on a label or card inside the box that Windows came in. For more info, contact the retailer that sold you Windows 10. How to tell your software is genuine.
Find your product key in the confirmation email you received after buying Windows 10 or in a digital locker accessible through the retailer’s website.
The product key is in the confirmation email you received after buying your digital copy of Windows. Microsoft only keeps a record of product keys if you purchased from the Microsoft online store. You can find out if you purchased from Microsoft in your Microsoft account Order history.
If you upgraded to Windows 10 for free from Windows 7 or Windows 8.1, you should have a digital license instead of a product key.
If you bought Windows 10 Home, Professional, or Upgrade to Pro in the Windows 10 Store app, you’ll receive a digital license instead of a product key. You can use the digital license for activation.
If your product key is scratched, blurred, or otherwise unusable, contact the retailer who sold you the product. If you aren’t able to get help from your retailer or have already tried and couldn’t get a working key, call Microsoft Support.
For more information about digital licenses and product keys in Windows 10, see the “Methods of Activation” section in Activate Windows 10.
Locate your product key for Windows 7 or Windows 8.1
A product key is usually required when uninstalling or reinstalling Windows 7 or Windows 8.1. Generally, if you bought a physical copy of Windows, the product key should be on a label or card inside the box that Windows came in. If Windows came preinstalled on your PC, the product key should appear on a sticker on your device. If you’ve lost or can’t find the product key, contact the manufacturer. To ensure your product key is genuine, see How to tell your software is genuine and How to tell your hardware is genuine.
For info about how to tell if your copy of Windows is genuine Microsoft software, see the How to tell page.
For more Windows 10 download info, see Download Windows 10.
If you need installation media to install or reinstall Windows, see Create installation media for Windows to learn how to create your own installation media using either a USB flash drive or a DVD.
If you need more help with activation, see Activate Windows 10.
If you’re getting an activation error, see Get help with Windows activation errors.
If you’re reinstalling Windows 10, you might not need a Windows product key. See Activation in Windows 10 for more info.
If you’re reinstalling Windows 10 due to a motherboard problem or some other hardware issue, see Reactivating Windows 10 after a hardware change.
If you’re looking for product keys for Office, apps, games, and more, see Find your Microsoft downloads and product keys
Источник
Sign-in FAQ
Signing into the VLSC
See the following FAQ about signing.
Who can access the Volume License Service Center (VLSC)
Individuals who are granted access to the VLSC are notified of their permission assignment in a welcome email from Microsoft. The notification invites them to register as a VLSC user and immediately access and manage their agreements. Permission to access the VLSC is granted in one of two ways:
How do I register to use the VLSC
Managing your volume licensing agreements in the VLSC is possible only if you are a registered user of the site. Registration requires a valid business (work) email address. This is the email address provided on your Volume License Agreement or Open License Order.
To register for the first time as a VLSC user:
What is a work or school account needed to sign into VLSC
A work or school account typically takes the form of username@orgname.com or username@orgname.onmicrosoft.com (where orgname is their employer’s email domain name). This helps customers and Microsoft alike to validate the user’s assigned permissions are accurately and securely affiliated with the licensed organization.
The requirement for a Work Account is for the purpose of authenticating a user’s relationship with an organization and does not require that user or organization to consume Microsoft Services such as Office 365. However, if you do use one of those services you already have a work account. Sign in with the same account you use to access that service.
Microsoft Accounts linked to individuals rather than to organizations are intended to access personal services from Microsoft, such as Outlook.com email, Xbox or Windows 10 on a home PC. Because these accounts are personal to the user rather than to an organization, they are not appropriate for use on the VLSC. (It is no longer possible to register a business email address using a Microsoft Account).
How do I link my existing Microsoft Account with my work account
If you previously signed in to the VLSC using a Microsoft account, the VLSC will prompt you to sign in instead with a work account. The process of converting your VLSC user ID to a Work Account is quick and achieved by following these steps in the screen that opens:
Enter your name and work email address.
Microsoft will send a verification code (signup code) to this work email address. Check your email and enter that code in the box titled Signup code.
Confirm the country or region for your organization and change this if necessary. You cannot change this after you finish the signup process.
In the future, sign in to the VLSC using this work account. This will ensure you are using agreements associated with your organization.
VLSC Sign In Errors
See the following FAQ about the sign-in errors.
Error Code E06 «We are unable to complete your action»
If you have used a work account to sign in to the VLSC and then try to sign in using a Microsoft account, the VLSC will display this error message. Sign in using the work account displayed in the error message:
Error Code E03 «Sorry, we cannot finish signing you up. Your IT Department has turned off signup for Volume Licensing Service Center»
If you see this error message, an administrator of your organization’s Microsoft services has restricted users with your domain name from signing up to new subscriptions such as Power BI. Unfortunately, this restriction also prevents users from signing up for the VLSC.
Contact your Network Administrator (the person who administers your domain) and ask them to adjust permissions so that you can register to use the VLSC. Note, this does not require that you have a subscription. For more information about how admins can turn on and turn off this feature that prevents you from signing up for the VLSC, see the help topic titled How can I prevent users from joining my existing Office 365 tenant?
Error Code E02 «We are sorry. We are unable to complete your sign up to VLSC as the email domain you have provided is restricted for automatic sign up.»
Some IT Administrators specifically restrict users from being able to sign up for online service subscriptions independently of an IT Administrator. Because the VLSC uses the same work account sign up solution as these services, signing up to VSLC is also blocked and will require the IT administrator to adjust the domain settings to allow users sign up to the VLSC. These changes don’t need to be permanent. The administrator can change the settings back immediately after VSLC registration has been completed. Technical instructions are available here. You may also contact us for further assistance.
Error E05 «We are sorry. We are unable to complete your sign up to VLSC as the email domain you have provided is restricted for automatic sign up.»
We cannot create a work account with the domain name you used if that account does not exist in your organization’s Active Directory. Your organization’s IT administrator should be able to guide you on what account to use, or can create a new account in your organization’s Active Directory.
VLSC customers may also Contact Us by phone or by Web Form. Microsoft will respond to Web Form submissions within 24 hours.
Источник
Product Keys FAQ
What are Product Keys
A Product Key enables use of a software product you have licensed under a specific Volume Licensing program. The Product Keys listed in the VLSC should be used with only Volume License products and are intended for use by your organization only.
An Online Service Activation (OSA) Key is a type of Product Key. It is a single-use redemption key used to activate subscriptions to Microsoft Online Services.
How to locate Product Keys in VLSC
You will find product key information for each product, the type of licensing (Volume Licensing Key, KMS, and MAK) and the number of used and available Multiple Activation Key (MAK) activations.
You can also select the Download all product keys link to download the keys displayed for an entitlement to a local drive.
You can also locate product keys in VLSC for individual products on the Downloads and Keys tab in VLSC.
How to locate SQL Server Product Keys in VLSC
I can’t find a key for Volume Licensing purchase
If your agreement authorizes you access to a product that requires a key, those keys will be displayed in the «Downloads and Keys» section. However, some products do not require a product key. This will be stated in special instructions listed in the product description in the «Downloads and Keys» catalog.
To see if your product requires a key, go to Product Activation and Key Information. Under the Find Products section, choose a product, or search for your product name.
What is a Setup Key
A Setup Key is used for each product/version combination to bypass activation (that is, unlock the product). You can obtain a Setup Key in one of the following ways:
What determines which Product Keys are associated with my agreements
Volume License Product Keys are provided for each Licensing ID listed in your Microsoft Relationship Summary. You may have several Licensing IDs:
All customers have the right to use Product Keys for re-imaging and downgrade purposes. Select Plus, Enterprise Agreement (EA), and Select customers are provided limited evaluation rights for training and back-up.
What is Volume Activation
Volume activation is a configurable solution that helps automate and manage the product activation process on computers running Windows operating systems that have been licensed under a volume licensing program. Volume activation is also used with other software from Microsoft (most notably the Office suites) that are sold under volume licensing agreements and that support volume activation
Volume Activation applies only to systems that are covered under a Volume Licensing program and is used strictly as a tool for activation. It is not tied to license invoicing or billing.
Volume Activation provides two different models for completing volume activations. Either or both key types may be used by customers to activate systems in their organization:
As part of your installation, it is important to plan and manage deployment of any product using Volume Activation.
What is the Key Management Service (KMS)
The Key Management Service (KMS) is an activation service that allows organizations to activate systems within their own network, eliminating the need for individual computers to connect to Microsoft for product activation. It does not require a dedicated system and can be easily co-hosted on a system that provides other services.
KMS requires a minimum number of either physical or virtual computers in a network environment. These minimums, called activation thresholds, are set so that they are easily met by Enterprise customers.
For more information about activation thresholds, see the Volume Activation Planning Guide.
What is a KMS Host Key
A KMS Key is used to activate the KMS host computer with a Microsoft activation server and can activate up to six KMS hosts with 10 activations per host. Each KMS host can activate an unlimited number of computers.
No KMS (Key Management Service) key displayed on VLSC for Open License customers
KMS keys are no longer pre-assigned to Open agreements as use of MAK (Multiple Activation Key) keys is the preferred method for activation.
KSM keys can be assigned, by exception, to Open customers who meet the minimum KMS activation threshold for Windows Server, OS, and Office. To request such an exception, please submit a Web Form request to VLSC Support.
To do this, you must have VLSC Administrator, Key Administrator, or Key Viewer permissions and provide the following information:
Additional KMS Hosts
if you require additional KMS activations for activating more than six (6) KMS hosts, submit a Web Form request to VLSC Support.
To do this, you must have VLSC Administrator, Key Administrator, or Key Viewer permissions and provide the following information:
What is a Multiple Activation Key (MAK)
A Multiple Activation Key (MAK) activates systems on a one-time basis, using Microsoft’s hosted activation services (which requires connection with a Microsoft activation server). Once computers are activated, no further communication with Microsoft is required.
Each MAK has a predetermined number of allowed activations, based on your Volume Licensing agreement.
The number of Multiple Activation Keys (MAK) activations provided does not match the number of licenses that we have purchased
We recommend customers use Key Management Service (KMS) to activate Multiple Activation Keys (MAK). KMS is the preferred activation method for large scale deployments. Many factors determine the number of activations associated with each MAK, including licenses purchased, the customer purchase pricing level, and their Volume Licensing program.
The number of activations available for a product may not always match the number of licenses purchased. Usually you will receive a higher number of activations in case you need to reinstall and activate some of your products. Please check the Licensing Summary section of your agreement to see your number of licenses.
Requests to increase MAK activation limits should
Increases to MAK Activation quantity can be requested via Web Form and may be granted by exception. For Canada and USA, use N.America MAK ADD Web Form
To do this you must have VLSC Administrator, Key Administrator, or Key Viewer permissions and provide the following information:
How to activate using a Multiple Activation Key
You can activate licenses in one of two ways using MAK:
What is the Volume Activation Management Tool (VAMT)
The Volume Activation Management Tool (VAMT) enables network administrators and other IT professionals to automate and centrally manage the volume and retail-activation process for Windows, Microsoft Office, and select other Microsoft products. VAMT can manage volume activation using Multiple Activation Keys (MAKs) or the Windows Key Management Service (KMS). VAMT is a standard Microsoft Management Console (MMC) snap-in that requires the Microsoft Management Console (MMC) 3.0.
Where can I find more information on the Volume Activation Management Tool (VAMT)
Refer to the following resources for information on VAMT:
Can I use both MAK and KMS for deployment across my organization
Yes. Volume Licensing customers can use KMS, MAK, or a combination of each to activate systems in their organization. Customers are free to use a combination of activation methods as desired.
How do I determine which key to use for a particular product
Refer to the following resources for assistance in determining which key to use when activating a Microsoft Volume License product:
Volume Activation for Windows and Windows Server
If you deploy Windows using Key Management Service (KMS) as the activation method, note that:
If you are using Windows Server as a KMS host, your alternatives are:
Volume Activation for Office, Project and Visio
Yes, the following Volume Activation changes are related to Office, Project and Visio:
If you deploy Office using Key Management Service (KMS) as the activation method, note that:
If you are using Windows Server 2008 as a KMS host, your alternatives are:
Activate Windows Terminal Server and Remote Desktop Service (RDS)
After you download your Server media from the VLSC you can active it via the product’s activation wizard and don’t need to locate a volume license key or product set up key in the VLSC. Completing all the activation wizard steps will prompt the Server to connect with Microsoft’s Clearing House via the internet in order to validate the information inputted. Alternatively, for Offline Servers the activation wizard offers Phone or Web Activation as alternatives.
To begin the process, you must first assign a Remote Desktop Licensing role for the server, (from your “Start” menu, go to “Administrative Tools”, then “Server Manager”) and then activate the RDS Service (from your Remote Desktop License Manager, click on your Start button, select “Administrative Tools”, select “Remote Desktop Services” and then select “Remote Desktop/Terminal License Manager).
During activation, you are requested to select the License Program and Agreement Number. Note for Open License customers, you should enter your Authorization Number. For MPSA, enter your Purchase Account Number (not the MPSA Agreement number). If you are unsure of the program type for the License ID under which your CAL licenses were purchased, go to the VLSC Relationship Summary and see the Parent Program column.
Can organizations within the same ownership structure use the same key to deploy a product.
License compliance and Asset Management are independent of key activation. Customers do not have to use the keys provided under a specific Licensing ID (agreement, enrollment, affiliate, or license) for use only with the licenses specified under that Licensing ID. If a parent organization (which owns a chlld organization) has an individual agreement, it can use the same key to deploy a product across both parent and child organizations. This flexibility allows customers to centrally manage their deployment image by either using keys specific to agreements / licenses, or one set of keys for all.
Can I use my Volume License Keys to exercise my re-imaging rights
Yes. Re-imaging rights are granted to all Microsoft Volume Licensing customers. Under these rights, customers may re-image Original Equipment Manufacturer (OEM) or Full Packaged Product (FPP) licensed copies using media provided under their agreement as long as copies made from the Volume Licensing media are identical to the originally licensed product. As a Volume Licensing customer, the Volume License Keys you need can be found on the Product Key page. You can also request your keys through a Microsoft Activation Center.
If you are an Open License customer, you must purchase at least one unit of the product that you want to re-image to obtain access to the product media and receive a key.
For more information on Re-imaging Rights, see article on this page about reimaging rights.
How do I download my keys to a local file
The VLSC offers an option to download your Product Keys to a local file for later use. When downloaded from the Downloads and Keys page, the file contains all Volume License Keys associated with agreements in your VLSC profile. However, if you download keys from the Licensing ID specific view on the Relationship Summary page, the file contains only the keys associated with the Licensing ID you are viewing.
A downloadable Product Key file is in a tab-delimited format and can be opened in Excel to sort and view keys. You may also view the file using any text editor. The columns included in the file are: Licensing ID, Parent Program, Organization, Product, Product Key, Type, and MAK Activations-Used/Available. To open a downloaded file in Excel, complete the following steps:
Where can I find more information about the topics covered in these FAQs
VLSC customers may also Contact Us by phone or by Web Form. Microsoft will respond to Web Form submissions within 24 hours.
Источник
Содержание
- Change the Registered Owner Name in Windows 7/8/10
- Windows 7/8/10 License
- Change the Name of the Registered Owner
- Windows registry information for advanced users
- Description of the registry
- Back up the registry
- Edit the registry
- Use the Windows user interface
- Use Registry Editor
- Use Group Policy
- Use a Registration Entries (.reg) file
- Use Windows Script Host
- Use Windows Management Instrumentation
- Use Console Registry Tool for Windows
- Restore the registry
- Method 1: Restore the registry keys
- Method 2: Restore the whole registry
- References
Change the Registered Owner Name in Windows 7/8/10
When buying or donating a PC
When Windows is first installed, Microsoft asks you a series of questions about the owner of the computer upon which the operating system is being loaded. Once you choose the name of the owner, Microsoft uses this information as the person to whom Windows is licensed.
If you bought your computer with Windows pre-installed, the manufacturer may have included this information for you. If you bought your computer second hand, the operating system will show the original owner as the person to whom the operating system is licensed. Either way, using a quick registry edit, you can change the name of the registered owner to anyone you want.
Windows 7/8/10 License
To see the name of the person to whom your copy of Windows is licensed, click on Start and type
into the search box. Press the Enter key and Windows brings up the About Windows window. Here you will find all kinds of information including the edition of Windows you are using, the current version of the operating system, and the person who holds the license to use Windows.
Notice that this particular owner simply identified him/herself as “user” for the licensing information. Using a quite registry edit, you can change this name to anything you want.
However, be advised that changes to the registry can cause your computer to become unstable if you make an incorrect entry or delete a particularly important registry key. It is advised that you always make a backup of your registry before you make any changes.
Change the Name of the Registered Owner
To change the name of the registered owner of the Windows license, begin by click on Start and typing
into the search box. This will bring up the Windows registry. Depending on your settings, you may have to verify that you want to run the registry editor.
Locate the registry key located at:
Double click on RegisteredOwner and change the key’s string value to whatever name you want.
Now when you check the name of the owner by clicking on Start and typing winver into the Search Programs And Files box, your new name should appear instead of the old one.
Keep in mind that this trick is cosmetic only; it does not change the actual owner of the Windows license in the legal sense. It also does not change the licensing relationship you or anyone else has with Microsoft.
It is, however, a way that you can take ownership of a computer purchased second hand or change the name of the owner to something other than what the original manufacturer entered when Windows was first loaded onto the computer.
This trick is particularly useful when a name changes because of a marriage. A woman who changes her name after marriage can update the owner of the machine to reflect her new name. Enjoy!
Founder of Help Desk Geek and managing editor. He began blogging in 2007 and quit his job in 2010 to blog full-time. He has over 15 years of industry experience in IT and holds several technical certifications. Read Aseem’s Full Bio
Windows registry information for advanced users
This article describes the Windows registry and provides information about how to edit and back up it.
Original product version: В Windows 10 — all editions, Windows Server 2012 R2
Original KB number: В 256986
Description of the registry
The Microsoft Computer Dictionary, Fifth Edition, defines the registry as:
A central hierarchical database used in Windows 98, Windows CE, Windows NT, and Windows 2000 used to store information that is necessary to configure the system for one or more users, applications, and hardware devices.
The Registry contains information that Windows continually references during operation, such as profiles for each user, the applications installed on the computer and the types of documents that each can create, property sheet settings for folders and application icons, what hardware exists on the system, and the ports that are being used.
The Registry replaces most of the text-based .ini files that are used in Windows 3.x and MS-DOS configuration files, such as the Autoexec.bat and Config.sys. Although the Registry is common to several Windows operating systems, there are some differences among them. A registry hive is a group of keys, subkeys, and values in the registry that has a set of supporting files that contain backups of its data. The supporting files for all hives except HKEY_CURRENT_USER are in the % SystemRoot%System32Config folder on Windows NT 4.0, Windows 2000, Windows XP, Windows Server 2003, and Windows Vista. The supporting files for HKEY_CURRENT_USER are in the %SystemRoot%ProfilesUsername folder. The file name extensions of the files in these folders indicate the type of data that they contain. Also, the lack of an extension may sometimes indicate the type of data that they contain.
| Registry hive | Supporting files |
|---|---|
| HKEY_LOCAL_MACHINESAM | Sam, Sam.log, Sam.sav |
| HKEY_LOCAL_MACHINESecurity | Security, Security.log, Security.sav |
| HKEY_LOCAL_MACHINESoftware | Software, Software.log, Software.sav |
| HKEY_LOCAL_MACHINESystem | System, System.alt, System.log, System.sav |
| HKEY_CURRENT_CONFIG | System, System.alt, System.log, System.sav, Ntuser.dat, Ntuser.dat.log |
| HKEY_USERSDEFAULT | Default, Default.log, Default.sav |
In Windows 98, the registry files are named User.dat and System.dat. In Windows Millennium Edition, the registry files are named Classes.dat, User.dat, and System.dat.
Security features in Windows let an administrator control access to registry keys.
The following table lists the predefined keys that are used by the system. The maximum size of a key name is 255 characters.
| Folder/predefined key | Description |
|---|---|
| HKEY_CURRENT_USER | Contains the root of the configuration information for the user who is currently logged on. The user’s folders, screen colors, and Control Panel settings are stored here. This information is associated with the user’s profile. This key is sometimes abbreviated as HKCU. |
| HKEY_USERS | Contains all the actively loaded user profiles on the computer. HKEY_CURRENT_USER is a subkey of HKEY_USERS. HKEY_USERS is sometimes abbreviated as HKU. |
| HKEY_LOCAL_MACHINE | Contains configuration information particular to the computer (for any user). This key is sometimes abbreviated as HKLM. |
| HKEY_CLASSES_ROOT | Is a subkey of HKEY_LOCAL_MACHINESoftware . The information that is stored here makes sure that the correct program opens when you open a file by using Windows Explorer. This key is sometimes abbreviated as HKCR. Starting with Windows 2000, this information is stored under both the HKEY_LOCAL_MACHINE and HKEY_CURRENT_USER keys. The HKEY_LOCAL_MACHINESoftwareClasses key contains default settings that can apply to all users on the local computer. The HKEY_CURRENT_USERSoftwareClasses key contains settings that override the default settings and apply only to the interactive user. The HKEY_CLASSES_ROOT key provides a view of the registry that merges the information from these two sources. HKEY_CLASSES_ROOT also provides this merged view for programs that are designed for earlier versions of Windows. To change the settings for the interactive user, changes must be made under HKEY_CURRENT_USERSoftwareClasses instead of under HKEY_CLASSES_ROOT. To change the default settings, changes must be made under HKEY_LOCAL_MACHINESoftwareClasses . If you write keys to a key under HKEY_CLASSES_ROOT, the system stores the information under HKEY_LOCAL_MACHINESoftwareClasses . If you write values to a key under HKEY_CLASSES_ROOT, and the key already exists under HKEY_CURRENT_USERSoftwareClasses , the system will store the information there instead of under HKEY_LOCAL_MACHINESoftwareClasses . |
| HKEY_CURRENT_CONFIG | Contains information about the hardware profile that is used by the local computer at system startup. |
The registry in 64-bit versions of Windows XP, Windows Server 2003, and Windows Vista is divided into 32-bit and 64-bit keys. Many of the 32-bit keys have the same names as their 64-bit counterparts, and vice versa. The default 64-bit version of Registry Editor that is included with 64-bit versions of Windows XP, Windows Server 2003, and Windows Vista displays the 32-bit keys under the node HKEY_LOCAL_MACHINESoftwareWOW6432Node . For more information about how to view the registry on 64-Bit versions of Windows, see How to view the system registry by using 64-bit versions of Windows.
The following table lists the data types that are currently defined and that are used by Windows. The maximum size of a value name is as follows:
- Windows Server 2003, Windows XP, and Windows Vista: 16,383 characters
- Windows 2000: 260 ANSI characters or 16,383 Unicode characters
- Windows Millennium Edition/Windows 98/Windows 95: 255 characters
Long values (more than 2,048 bytes) must be stored as files with the file names stored in the registry. This helps the registry perform efficiently. The maximum size of a value is as follows:
- Windows NT 4.0/Windows 2000/Windows XP/Windows Server 2003/Windows Vista: Available memory
- Windows Millennium Edition/Windows 98/Windows 95: 16,300 bytes
There is a 64K limit for the total size of all values of a key.
| Name | Data type | Description |
|---|---|---|
| Binary Value | REG_BINARY | Raw binary data. Most hardware component information is stored as binary data and is displayed in Registry Editor in hexadecimal format. |
| DWORD Value | REG_DWORD | Data represented by a number that is 4 bytes long (a 32-bit integer). Many parameters for device drivers and services are this type and are displayed in Registry Editor in binary, hexadecimal, or decimal format. Related values are DWORD_LITTLE_ENDIAN (least significant byte is at the lowest address) and REG_DWORD_BIG_ENDIAN (least significant byte is at the highest address). |
| Expandable String Value | REG_EXPAND_SZ | A variable-length data string. This data type includes variables that are resolved when a program or service uses the data. |
| Multi-String Value | REG_MULTI_SZ | A multiple string. Values that contain lists or multiple values in a form that people can read are generally this type. Entries are separated by spaces, commas, or other marks. |
| String Value | REG_SZ | A fixed-length text string. |
| Binary Value | REG_RESOURCE_LIST | A series of nested arrays that is designed to store a resource list that is used by a hardware device driver or one of the physical devices it controls. This data is detected and written in the ResourceMap tree by the system and is displayed in Registry Editor in hexadecimal format as a Binary Value. |
| Binary Value | REG_RESOURCE_REQUIREMENTS_LIST | A series of nested arrays that is designed to store a device driver’s list of possible hardware resources the driver or one of the physical devices it controls can use. The system writes a subset of this list in the ResourceMap tree. This data is detected by the system and is displayed in Registry Editor in hexadecimal format as a Binary Value. |
| Binary Value | REG_FULL_RESOURCE_DESCRIPTOR | A series of nested arrays that is designed to store a resource list that is used by a physical hardware device. This data is detected and written in the HardwareDescription tree by the system and is displayed in Registry Editor in hexadecimal format as a Binary Value. |
| None | REG_NONE | Data without any particular type. This data is written to the registry by the system or applications and is displayed in Registry Editor in hexadecimal format as a Binary Value |
| Link | REG_LINK | A Unicode string naming a symbolic link. |
| QWORD Value | REG_QWORD | Data represented by a number that is a 64-bit integer. This data is displayed in Registry Editor as a Binary Value and was introduced in Windows 2000. |
Back up the registry
Before you edit the registry, export the keys in the registry that you plan to edit, or back up the whole registry. If a problem occurs, you can then follow the steps in the Restore the registry section to restore the registry to its previous state. To back up the whole registry, use the Backup utility to back up the system state. The system state includes the registry, the COM+ Class Registration Database, and your boot files. For more information about how to use the Backup utility to back up the system state, see the following articles:
Edit the registry
To modify registry data, a program must use the registry functions that are defined in Registry Functions.
Administrators can modify the registry by using Registry Editor (Regedit.exe or Regedt32.exe), Group Policy, System Policy, Registry (.reg) files, or by running scripts such as VisualBasic script files.
Use the Windows user interface
We recommend that you use the Windows user interface to change your system settings instead of manually editing the registry. However, editing the registry may sometimes be the best method to resolve a product issue. If the issue is documented in the Microsoft Knowledge Base, an article with step-by-step instructions to edit the registry for that issue will be available. We recommend that you follow those instructions exactly.
Use Registry Editor
Serious problems might occur if you modify the registry incorrectly by using Registry Editor or by using another method. These problems might require that you reinstall the operating system. Microsoft cannot guarantee that these problems can be solved. Modify the registry at your own risk.
You can use Registry Editor to do the following actions:
- Locate a subtree, key, subkey, or value
- Add a subkey or a value
- Change a value
- Delete a subkey or a value
- Rename a subkey or a value
The navigation area of Registry Editor displays folders. Each folder represents a predefined key on the local computer. When you access the registry of a remote computer, only two predefined keys appear: HKEY_USERS and HKEY_LOCAL_MACHINE.
Use Group Policy
Microsoft Management Console (MMC) hosts administrative tools that you can use to administer networks, computers, services, and other system components. The Group Policy MMC snap-in lets administrators define policy settings that are applied to computers or users. You can implement Group Policy on local computers by using the local Group Policy MMC snap-in, Gpedit.msc. You can implement Group Policy in Active Directory by using the Active Directory Users and Computers MMC snap-in. For more information about how to use Group Policy, see the Help topics in the appropriate Group Policy MMC snap-in.
Use a Registration Entries (.reg) file
Create a Registration Entries (.reg) file that contains the registry changes, and then run the .reg file on the computer where you want to make the changes. You can run the .reg file manually or by using a logon script. For more information, see How to add, modify, or delete registry subkeys and values by using a Registration Entries (.reg) file.
Use Windows Script Host
The Windows Script Host lets you run VBScript and JScript scripts directly in the operating system. You can create VBScript and JScript files that use Windows Script Host methods to delete, to read, and to write registry keys and values. For more information about these methods, visit the following Microsoft Web sites:
Use Windows Management Instrumentation
Windows Management Instrumentation (WMI) is a component of the Microsoft Windows operating system and is the Microsoft implementation of Web-Based Enterprise Management (WBEM). WBEM is an industry initiative to develop a standard technology for accessing management information in an enterprise environment. You can use WMI to automate administrative tasks (such as editing the registry) in an enterprise environment. You can use WMI in scripting languages that have an engine on Windows and that handle Microsoft ActiveX objects. You can also use the WMI Command-Line utility (Wmic.exe) to modify the Windows registry.
Use Console Registry Tool for Windows
You can use the Console Registry Tool for Windows (Reg.exe) to edit the registry. For help with the Reg.exe tool, type reg /? at the Command Prompt, and then click OK.
Restore the registry
To restore the registry, use the appropriate method.
Method 1: Restore the registry keys
To restore registry subkeys that you exported, double-click the Registration Entries (.reg) file that you saved in the Export registry subkeys section. Or, you can restore the whole registry from a backup. For more information about how to restore the whole registry, see the Method 2: Restore the whole registry section later in this article.
Method 2: Restore the whole registry
To restore the whole registry, restore the system state from a backup. For more information about how to restore the system state from a backup, see How to use Backup to protect data and restore files and folders on your computer in Windows XP and Windows Vista.
Backing up the system state also creates updated copies of the registry files in the %SystemRoot%Repair folder.
References
For more information, visit the following Web sites:
The Windows Server Catalog of Tested Products is a reference for products that have been tested for Windows Server compatibility.
Data Protection Manager (DPM) is a key member of the Microsoft System Center family of management products and is designed to help IT professionals manage their Windows environment. DPM is the new standard for Windows backup and recovery and delivers continuous data protection for Microsoft application and file servers that use seamlessly integrated disk and tape media. For more information about how to back up and restore the registry, see How to back up and restore the registry in Windows XP and Windows Vista.

The Windows Fundamentals 2 room at TryHackMe is the second in a three-part series on Windows and covers a lot of basics about the Windows OS. Topics include an introduction to System Configuration and using it to access a variety of tools including UAC management, Computer Management, System Information, Resource Monitor, Command Prompt, and Registry Editor.
About This Walkthrough:
In my walkthroughs I try to provide a unique perspective into the topics covered by the room. I don’t just give you the answers or copy what is already on TryHackMe. Sometimes I will also review a topic that isn’t covered in the TryHackMe room because I feel it may be a useful supplement.
I try to prevent spoilers by making finding the solutions a manual action, similar to how you might watch a video of a walkthrough; they can be found in the walkthrough but require an intentional action to obtain. Always try to work as hard as you can through every problem and only use the solutions as a last resort.
This room can be found at: https://tryhackme.com/room/windowsfundamentals2x0x
Walkthrough
Task 1 – Introduction
Launch the virtual machine (VM) at the top of the Task using the green ‘Start Machine’ button. Note that this is the Windows VM needed to follow along with the tasks in the room; if you launch the AttackBox (from the blue button at the top of the page), you will access a Linux machine instead.
Question 1
Read above and start the virtual machine.
Answer:
No answer needed
Task 2 – System Configuration
Windows has a System Configuration utility called MSConfig that can be very useful for troubleshooting as well as navigating other Windows utilities if you’re having trouble finding the right one.
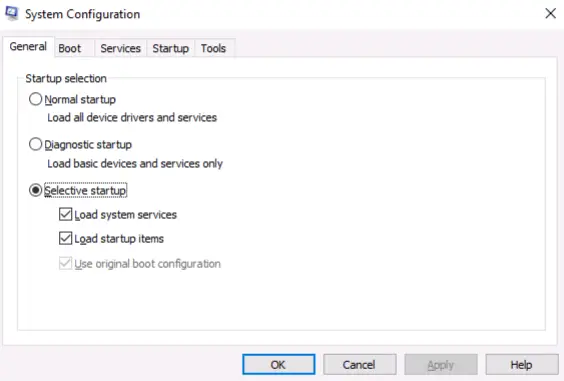
The easiest way to access it is to start typing ‘MSConfig’ or ‘System Configuration’ into the Start Menu search function.
There are five tabs in MSConfig: General, Boot, Services, Startup, and Tools.
General: gives a variety of startup options.
Boot: has different options for booting the OS.
Services: shows us all services and allows us to enable or disable them.
Startup: directs the user to the Task Manager in order to manage startup items. This will take you to the ‘Startup’ tab in the Task Manager.
Tools: contains a list of utilities that can be helpful in further configuring the OS.
Question 1
What is the name of the service that lists Systems Internals as the manufacturer?
Walkthrough:
Navigate to the Services tab and click ‘Manufacturer’ to sort alphabetically by the service manufacturer. Look for the service manufactured by ‘Systems Internals’.
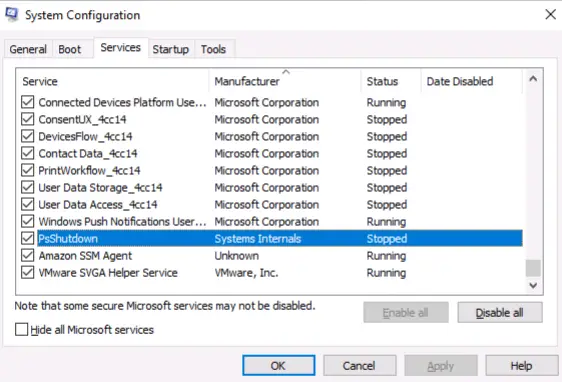
Answer:
(Highlight below to see the answer):
PsShutdown
Question 2
Whom is the Windows license registered to?
Walkthrough:
Navigate to the Tools tab and select the ‘About Windows’ tool.
Click the ‘Launch’ button to start the tool. You will see information about the OS including who the license is registered to.
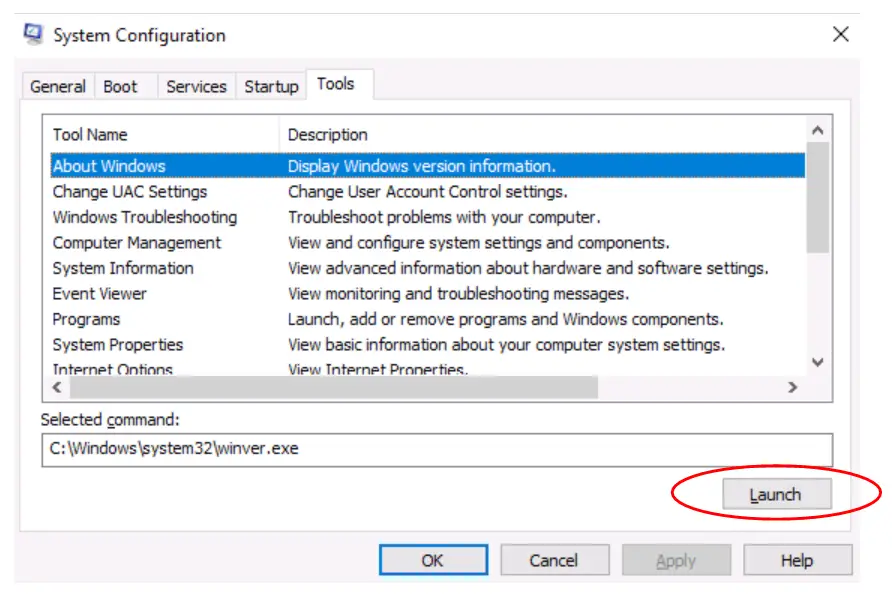
Answer:
Windows User
Question 3
What is the command for Windows Troubleshooting?
Walkthrough:
Stay in the Tools tab (we’ll be working quite a bit in this tab).
Select the Windows Troubleshooting tool. Notice the
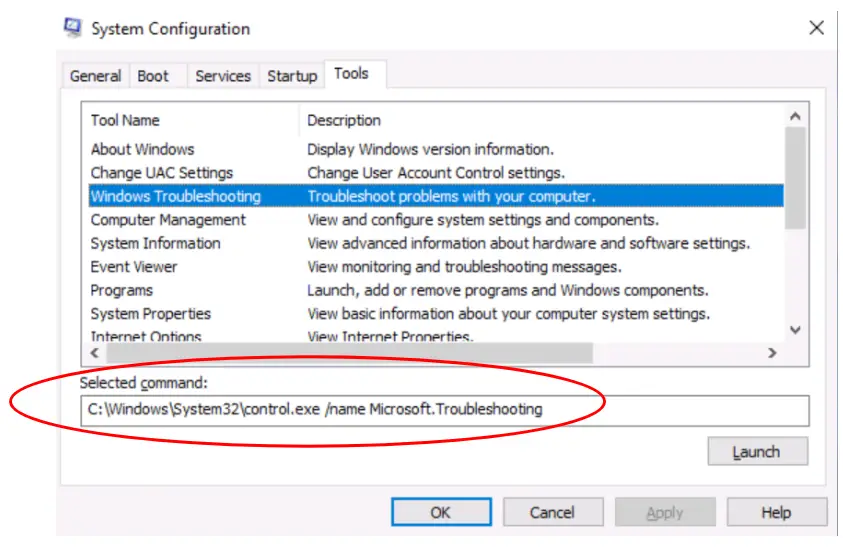
Notice the section immediately below called ‘Selected command’. This is an alternate way of launching the tool. You can use this command in the Windows command prompt (cmd.exe) or Powershell, or even just paste it into the Start Menu search box.
Answer:
C:\Windows\System32\control.exe /name Microsoft.Troubleshooting
Question 4
What command will open the Control Panel? (The answer is the name of .exe, not the full path)
Walkthrough:
This one isn’t quite as obvious, but we can see that multiple tools reference the same .exe file. These include System Properties as well as Windows Troubleshooting. What is the .exe file used by both of these?
Answer:
control.exe
Task 3 – Change UAC Settings
User Account Control (UAC) was covered in Windows Fundamentals 1. In essence, it maintains a lower level of privilege for user accounts with administrative access during daily use and temporary elevates the privilege level when admin access is actually needed.
UAC settings can be changed via the Tools tab in the MSConfig System Configuration utility.
There are four options that can be accessed using a slider:
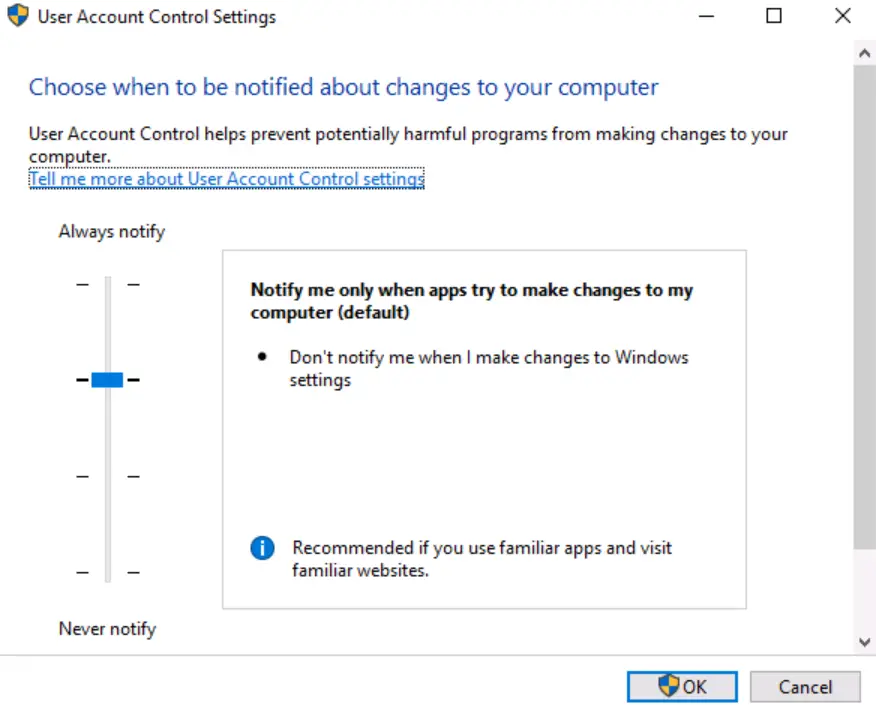
Question 1
What is the command to open User Account Control Settings? (The answer is the name of the .exe file, not the full path)
Walkthrough:
Click the ‘Change UAC Settings’ tool in the Tools tab of MSConfig. The answer can be found in the ‘Selected command’ section.
Answer:
UserAccountControlSettings.exe
Task 4 – Computer Management
This Task covers the Computer Management tool that is accessible via the ‘Tools’ tab in the System Configuration utility.
Computer Management has three main sections: System Tools, Storage, and Services and Applications.
System Tools: Contains Task Scheduler, Event Viewer, Shared Folders, Performance, and Device Manager
Storage: Contains Windows Server Backup (on servers) and Disk Management.
Services and Applications: Contains Routing and Remote Access, Services, and Windows Management Instrumentation (WMI) Control.
Question 1
What is the command to open Computer Management? (The answer is the name of the .msc file, not the full path)
Walkthrough:
Click the ‘Computer Management’ tool in the Tools tab of MSConfig. The answer can be found in the ‘Selected command’ section.
Answer:
compmgmt.msc
Question 2
At what time every day is the GoogleUpdateTaskMachineUA task configured to run?
Walkthrough:
Launch the Computer Management tool and navigate to the ‘Task Scheduler’ utility:
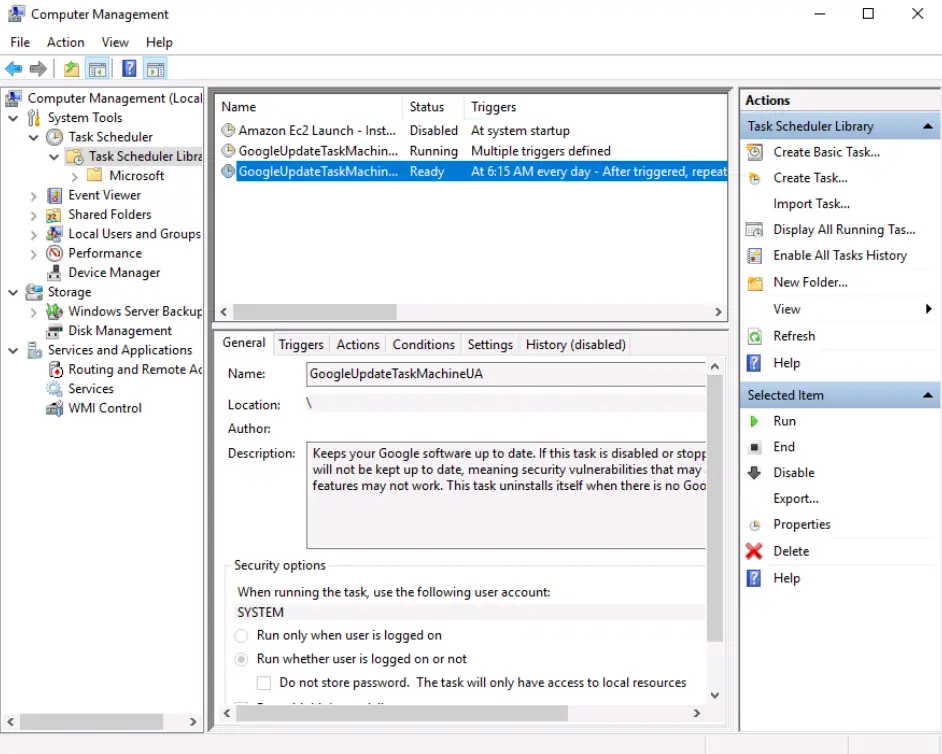
In the list of scheduled tasks, you will see ‘GoogleUpdateTaskMachineUA’. The timing can be found under the ‘Triggers’ column.
Answer:
6:15 AM
Question 3
What is the name of the hidden share?
Walkthrough:
To answer this question, we’ll need to navigate to the ‘Shared Folders’ utility under System Tools.
Open the folder containing the Shares. There is one share that should stand out to you.
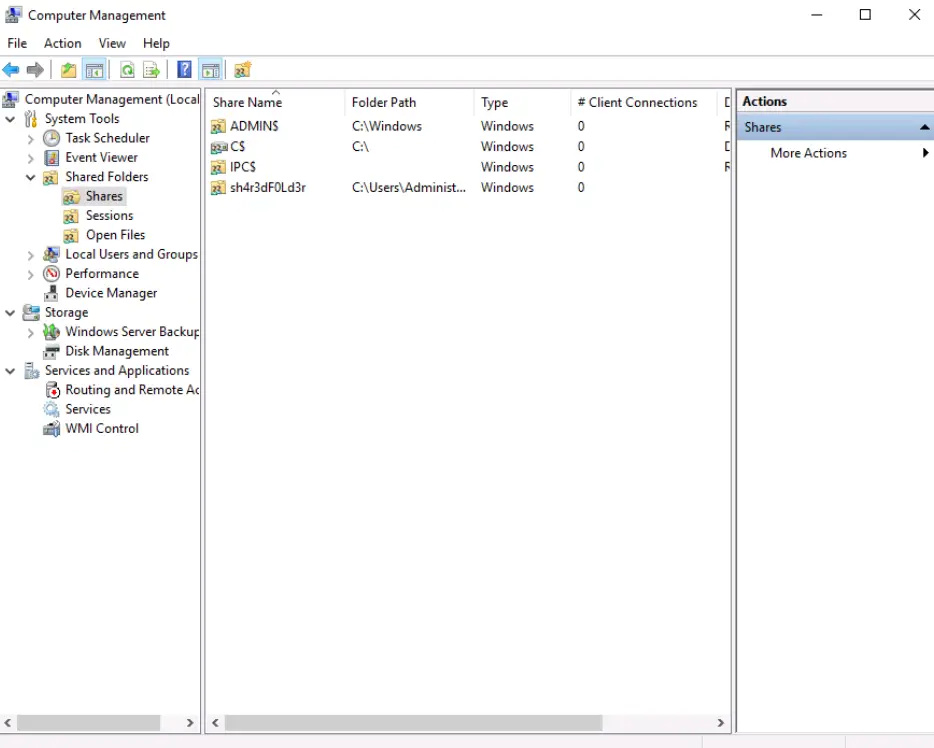
Answer:
sh4r3dF0Ld3r
Task 5 – System Information
This Task covers the System Information tool that is accessible via the ‘Tools’ tab in the System Configuration utility. Noticing a pattern here? THM is trying to signify to us how System Configuration (MSConfig) can be used as a springboard for all of these other useful tools.
So, what’s System Information?
Basically, it’s a tool that shows lots of information about the system’s hardware, components, and software.
The main window is the System Summary, which provides lots of information about the operating system, system, processor, BIOS, memory, etc.
In addition to the System Summary there are three primary categories: Hardware Resources, Components, and Software Environment.
Hardware Resources: Advanced information about the system’s hardware. You probably won’t use this much.
Components: Information about the different devices installed on the computer, like storage, display, keyboard, mouse, printer, etc.
Software Environment: Provides detailed information about software installed on the system including drivers, services, tasks, and startup programs. There’s also a section called Environment Variables, which are used to store details about the OS. We saw these in Windows Fundamentals 1.
Question 1
What is the command to open System Information? (The answer is the name of the .exe file, not the full path)
Walkthrough:
Click the ‘System Information’ tool in the Tools tab of MSConfig. The answer can be found in the ‘Selected command’ section.
Answer:
msinfo32.exe
Question 2
What is listed under System Name?
Walkthrough:
Launch the System Information tool. The tool should open to the ‘System Summary’. Look for the ‘System Name’ entry.
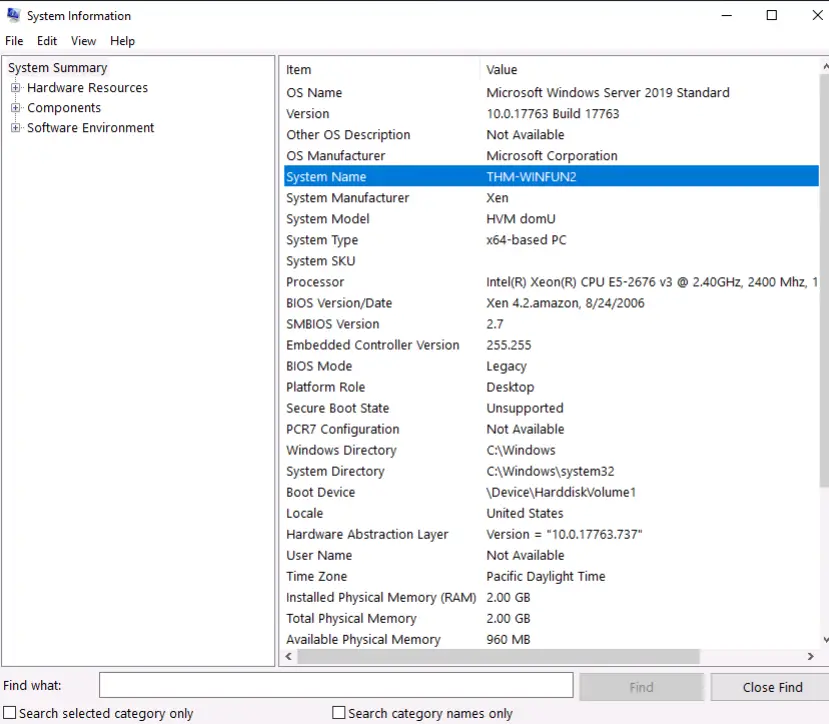
Answer:
THM-WINFUN2
Question 3
Under Environment Variables, what is the value for ComSpec?
Walkthrough:
The ComSpec environment variable points to the command line interpreter, which is cmd.exe.
Navigate to the Environment Variables page, which is in the ‘Software Environment’ category.
Find the ComSpec entry and corresponding environment variable.
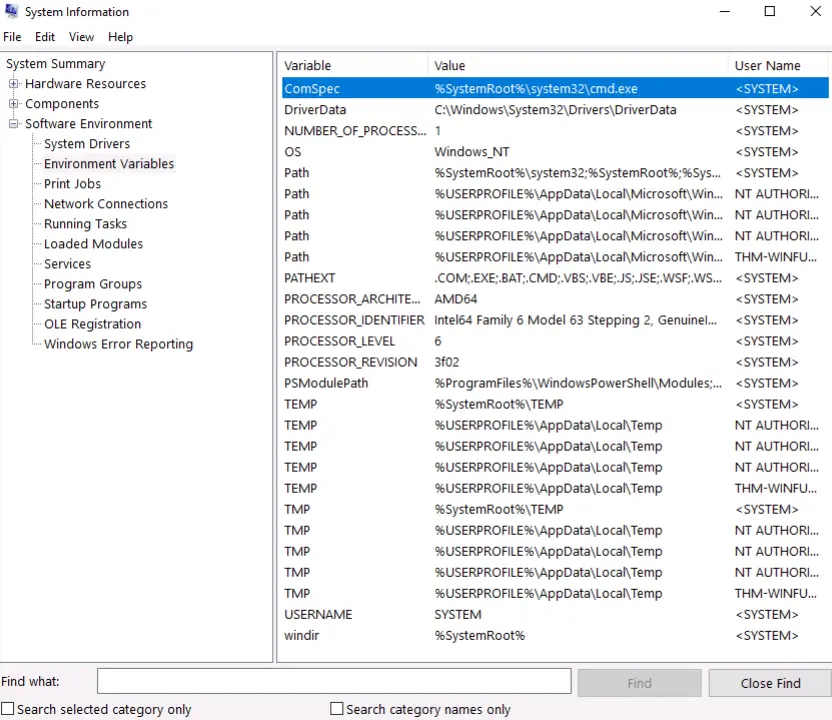
Answer:
(Highlight below to see the answer):
%SystemRoot%\system32\cmd.exe
Task 6 – Resource Monitor
This task goes over the Resource Monitor tool, which is similar to the ‘Performance’ tab in Task Manager but goes into more detail.
In the Resource Monitor, you’ll see individual sections for CPU, Disk, Network, and Memory, as well as plots for each.
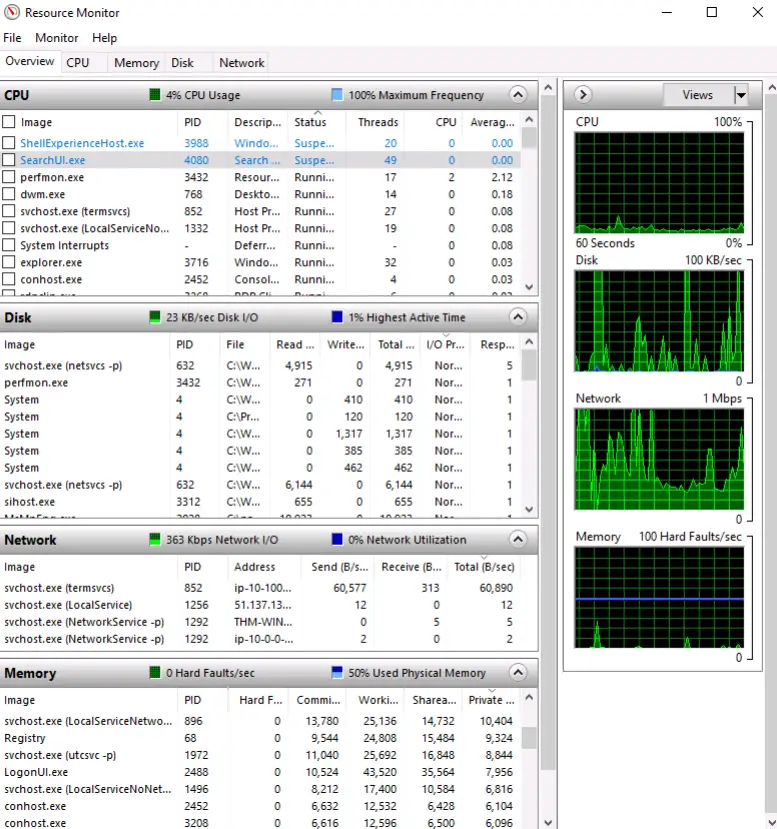
CPU: Shows processes using CPU resources, the Process ID (PID), how many threads are being used, and CPU resource consumption.
Disk: Also shows processes, but looks at disk utilization rather than CPU. Displays the process name and PID, whether a process is reading or writing data and response time in milliseconds.
Network: Covers processes from the perspective of network utilization. In addition to process name and PID it also shows the address that the process is connected to as well as data being send and received in bytes per second (B/sec).
Memory: Details the memory utilization of running processes. Includes the amount of ‘committed’ memory that has been dedicated to the process, how much memory the process is actually using (called ‘working set’), how much memory can be shared with other processes and how much can’t be shared.
Note that while Resource Monitor goes into much more detail, the ‘Performance’ tab in Task Manager splits up the Network utilization into Ethernet and Wifi and also has an additional GPU utilization section. Note that a good GPU can speed up tasks like password cracking, so this is something to keep in mind when assessing performance for ethical hacking.
Question 1
What is the command to open Resource Monitor? (The answer is the name of the .exe file, not the full path)
Walkthrough:
Click the ‘Resource Monitor’ tool in the Tools tab of MSConfig. The answer can be found in the ‘Selected command’ section.
Answer:
resmon.exe
Task 7 – Command Prompt
Like Linux, Windows also has a command prompt that we can interact to perform commands. Even though the command prompt might seem daunting at first, it can be an ally and we can easily learn to do some cool things with it. For many tasks, the command prompt is actually easier and faster to use than it would be to use the graphical user interface (GUI).
Before going further, I will point out that cmd.exe is technically deprecated and has been largely replaced by Windows Powershell. Powershell is much more powerful and includes support for piping commands (like Linux), scripting, and even supports Linux commands. The basic Windows command prompt may not do these things but Microsoft will continue to support it for the time being (its’ included in Windows 11).
There are two ways to get help in the Windows command prompt. One is to type the name of a command followed by ‘help’, i.e.:
<command> help
The other is to type /? after the command:
<command> /?
Sometimes the /? option won’t work so try both.
Here are some common commands:
whoami – outputs the name of the user.
hostname – outputs the name of the host.
ipconfig – provides network information like IP address, subnet mask, and gateway.
cls – clears the screen.
netstat – shows protocol stats and TCP/IP connections.
net – allows management of network resources.
Question 1
In System Configuration, what is the full command for Internet Protocol Configuration?
Walkthrough:
Click the ‘Internet Protocol Configuration’ tool in the Tools tab of MSConfig. The answer can be found in the ‘Selected command’ section.
If we launch the tool, we will see that it actually executes in the Windows command prompt. In other words, the outcome is the same as typing ‘ipconfig’ into the command prompt.
Answer:
C:\Windows\System32\cmd.exe /k %windir%\system32\ipconfig.exe
Question 2
For the ipconfig command, how do you show detailed information?
Walkthrough:
We should check for help anytime we’re unsure of how to use a command.
In this case, we can use:
ipconfig help
or
ipconfig /?
Inside the help manual, we are given the following helpful options:
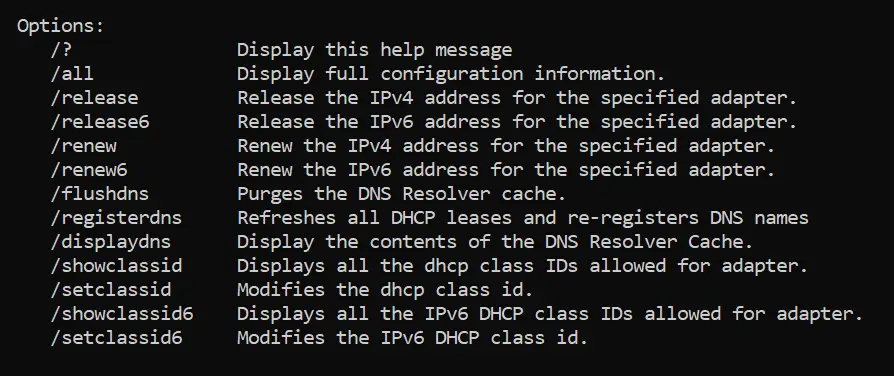
Look through this list and try to determine which option will display detailed information. If we continue reading the help manual, we will also see examples:
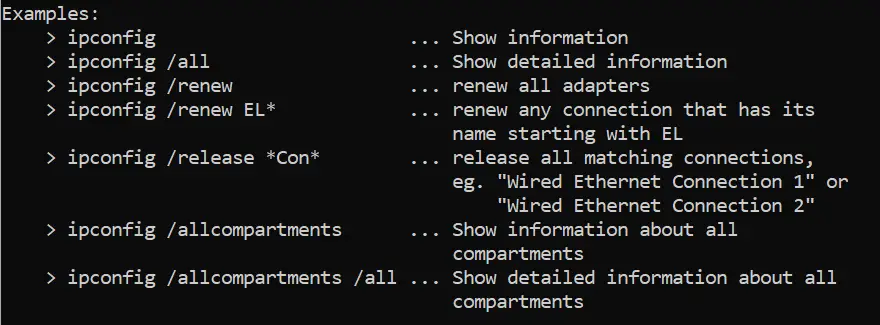
Answer:
ipconfig /all
Task 8 – Registry Editor
The Windows Registry is a database where low-level settings for the Windows OS and applications are stored. Basically, the Registry stores a lot of critical information and should only be edited with care.
When we do need to edit the Registry, we can use the Registry Editor (regedit).
Question 1
What is the command to open the Registry Editor? (The answer is the name of the .exe file, not the full path)
Walkthrough:
Click the ‘Internet Protocol Configuration’ tool in the Tools tab of MSConfig. The answer can be found in the ‘Selected command’ section.
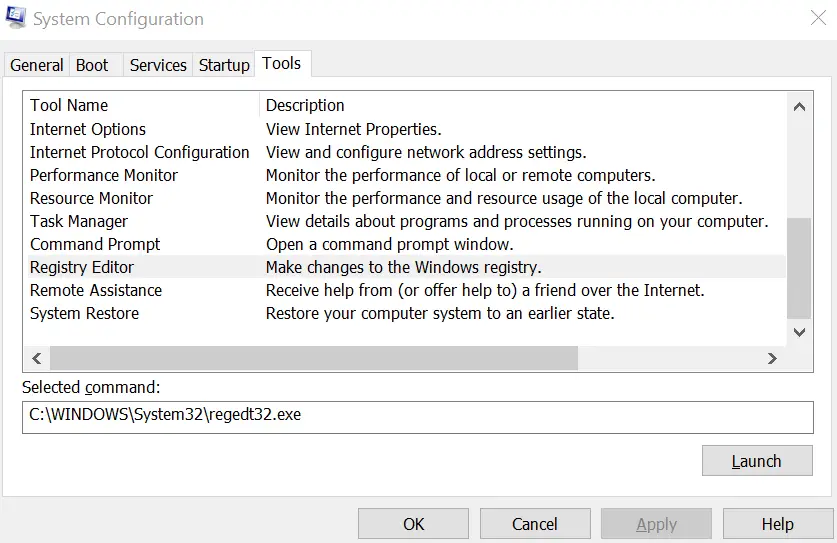
Answer:
regedt32.exe
Task 9 – Conclusion
This room has explored some of the tools that can be launched from the System Configuration (MSConfig) utility. MSConfig is great to use as a launching point for all of these different tools; instead of remembering each tool individually, you can just remember MSConfig instead.
Question 1
Read above.
Answer:
No answer needed
Conclusion
This room dives deep into MSConfig and some of the many tools that can be accessed with it. We covered UAC, Computer Management (compmgmt), System Information (msinfo32), Resource Monitor (resmon), Command Prompt (cmd), and Registry Editor (regedit).
While this room has less interactive components than many other rooms on THM, it does include a lot of helpful information for the Windows OS. It’s a good accompaniment to Windows Fundamentals 1 lesson although you may leave the room itching for some action.
Overall, I enjoyed this room and found it to be helpful and informative. A huge thanks to tryhackme and heavenraiza for putting this room together!
That is a pre-installed licence and as such that licence is tied to the motherboard on that PC, and while the licence may appear on either of your Microsoft Accounts, that does not matter, because it is an OEM licence and can never be transferred to another PC, it will always belong with that PC . ..
How do you change the owner name on a PC?
Click on the “regedit” program in the search result section. Select “HKEY_Local_Machine,” and then select “Software.”. Choose “Microsoft,” and then choose “Windows NT,” then “Current Version.”. Right-click the entry labeled “Registered Owner,” select “Modify.”. Change the name in the “Value Data” field to your own.
How to change user name of account in Windows 10?
Open Control Panel.
How do you change ownership?
There are several ways in which you can change the ownership of property. You can give the property away, sell it or leave it for someone upon your death. Changing the ownership of a property is legally binding and should not be taken lightly. Property ownership changes can be done only through the use of the deed to the property.
Do you need to change your registered owner in Windows 10?
Since many apps you install will reference and use the registered owner and organization of the PC, you may need to change the registered owner and organization to correct or update them. This tutorial will show you how to change the registered owner and organization of your Windows 10 PC.
Where do I Find my registered owner in Windows 10?
Windows 10 by default no longer lets users set their registered owner and organization information during installation. Instead, the operating system uses default information, such as your email address if you’re using a Microsoft account, “user name”…
How to change registered owner and organization name?
Open About dialog now by typing winver.exe in Start menu or the taskbar search box to see the change. Many third-party Windows tweaking utilities enable you to change registered owner and organization name. The free Windows Tweaker is one such tool. Here is how to use Windows Tweaker to change registered owner and organization name in Windows 10:
Where do I change the name of my organization in Windows 10?
Change Registered Owner And Organization Name In Windows 10. Windows 10 displays organization name as well as owner name to which it’s registered to in the About dialog. As you likely know, one can launch the About dialog by typing winver.exe in Start menu or taskbar search box or in the Run command box.