The Hosts file in Windows 11/10, is used to map hostnames to IP addresses. This Hosts file is located deep down in the Windows folder. It is a plain text file, and the size of the original default Hosts file is around 824 bytes.

The HOSTS file is used by Microsoft TCP/IP for Windows. This file contains the mappings of IP addresses to host names. Each entry should be kept on an individual line. The IP address should be placed in the first column, followed by the corresponding host name. Moreover, the IP address and the host name should be separated by at least one space.
In this post, we will see its location and also how to manage, lock, or edit the Hosts file in Windows 11/10. We will discuss the following:
- Host file location
- Lock Hosts file to prevent hijacking
- Block website using the Hosts file
- How to edit the Hosts file
- Using free Hosts File Editor software.
Let us take a look at them.
Host file location in Windows
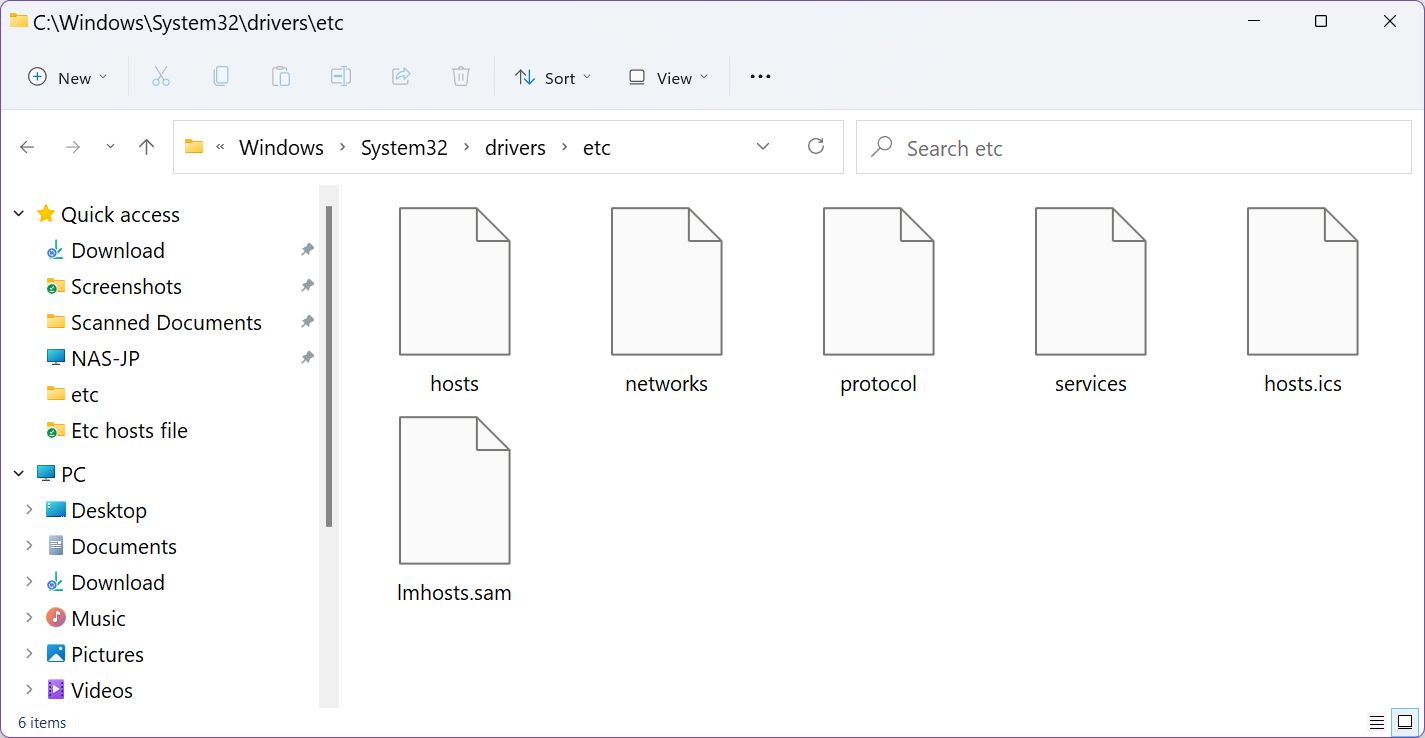
The Hosts file in Windows is located at the following location:
C:\Windows\System32\drivers\etc
Lock Hosts file to prevent hijacking
Imagine clicking on www.thewindowsclub.com and seeing a completely different website load in your browser. Malware can redirect Web addresses on your computer by altering your Hosts file. This is referred to as the Host File Hijack.
To prevent Host file hijacks, you may navigate to it, right-click on it, select Properties and make it a Read-only file. This will lock down your Hosts file and prevent anyone or any malware from writing to it.
Block website using the Hosts file
To block a website using the Hosts File, simply add the following entry:
127.0.0.1 blocksite.com
Although I do not do it, many users like to manually add entries to it in order to block the opening of one or more particular websites. Others, like to download and use List from well-known sources like mvps.org, to add entries that block malware sites from opening.
How to edit Hosts file in Windows 11/10
To edit the Hosts file in Windows 11/10:
- Open Explorer
- Navigate to \System32\drivers\etc\ location
- Locate Hosts file
- Right-click on it and select Notepad
- Make the changes and Save.
Now let us go into a detailed explanation.
To edit the Hosts file, navigate to the following folder location:
C:\Windows\System32\drivers\etc\
Here you will see the Hosts file. Right-click on it and select Notepad. Make the changes and Save.
But sometimes, even when you are logged on with administrative credentials, you may receive the following error message:
Access to C:\Windows\System32\drivers\etc\ hosts was denied
Or
Cannot create the C:\Windows\System32\drivers\etc\hosts file. Make sure that the path and file name are correct.
In this case, type Notepad in Start search and right-click on the Notepad result. Select Run as administrator.
Open the Hosts file, make the necessary changes, and then click Save.
Using free Hosts File Editor software
If you are looking for an easier way, you can use a free Hosts file Editor software.
1] Using HostsMan
While you can always manually manage or edit Hosts file manually, I would like to suggest that you use a third-party freeware tool like HostsMan to do it.
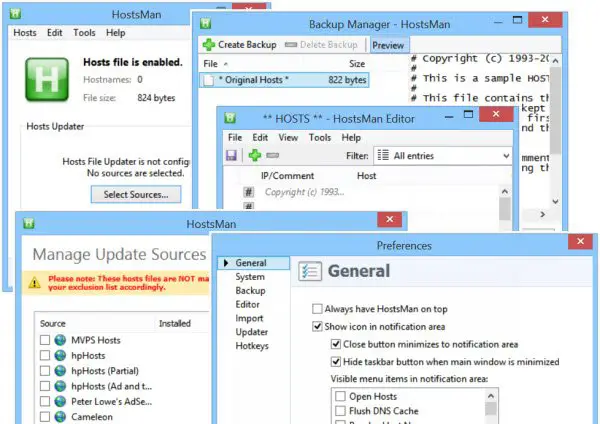
HostsMan is a feature-rich tool that lets you add, remove, edit entries in the Hosts file. It also lets you easily add third-party Hosts lists that help in blocking malware sites and lets you easily enable or disable the Hosts file. It includes a built-in hosts file updater & a hosts editor. It lets you scan the hosts file for errors, duplicates, and possible hijacks – and also lets you create an Exclusion list. One more useful feature it offers is the Hosts file backup manager. Backup your Hosts file to a safe place and use it to restore it, should the need arise.
Hostman also lets you Flush DNS cache, open Hosts with a text editor, count the number of hosts, find duplicates, replace IP, scan hosts for malicious entries, rearrange hosts, manage DNS Client Service and more. In short, it’s the only Hosts Manager that you will even need. You can download it from its home page.
2] Using SysMate Hosts File Manager

SysMate Hosts File Manager and is another tool that lets you do so. With Host File Walker you can add as many records to the system hosts file. It even lets you backup and restore the Hosts File.
3] Using Host File Editor tool
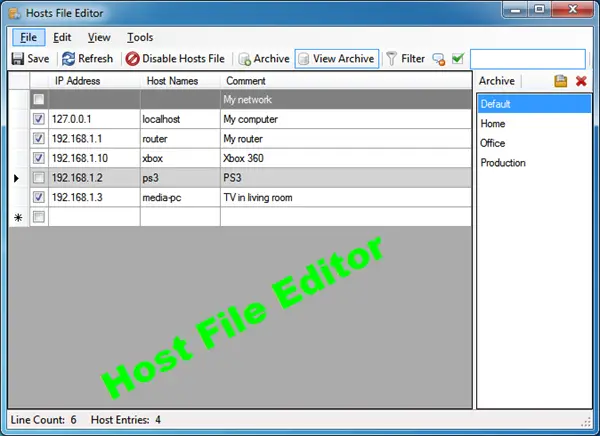
Host File Editor is another good tool that you can use. It has the following features:
- Enable and disable hosts file from the system tray
- Cut, copy, paste, duplicate, enable, disable and move entries
- Filter and sort host entries
- Backup and restore various hosts file configurations when switching between environments
- Ping endpoints to check availability.
You can download it from here. It offers a portable version too.
4] HostsDock

HostsDock is another useful software to edit the hosts file on Windows 11/10 computers. This is an open-source hosts file editor software that also lets you create new local hosts files and save them. You can also connect to a remote hosts file which is an important option. Some other interesting features are also available which are as follows:
- Syntax Highlighter that can automatically highlight IP addresses, comments, domains, etc., present in the hosts file. It detects all these items by itself and then highlights them
- Basic editing options like undo/redo, search and replace, cut, paste, etc.
- Create folding block
- Test IP addresses in the hosts file with the ping command
- A navigation pane to quickly switch to local and remote hosts files, check system hosts info, etc.
You can download this tool from eshengsky.github.io. Launch the tool after installation and it will show the system hosts file. After that, you can use the available options to add or create a new hosts file, use editing options, export the hosts file, and more.
5] Hosts File Editor PowerToy

The Hosts File Editor PowerToy also lets you edit the Hosts file.
How do I grant permission to edit the Hosts file in Windows 11/10?
If you want to grant permission to edit the hosts file in Windows 11/10 using Notepad, then you need to run Notepad as an administrator. You should also sign in to your Windows 11/10 system with an administrator account to edit hosts file so that you won’t get any errors while saving the hosts file.
Read: What is LMHOSTS file in Windows?
Do not have permission to edit the Hosts file?
If you are unable to edit the hosts file on Windows 11/10 or you do not have permission to edit the hosts file, then you can use the following solutions:
- Use Notepad with administrative privileges and then open a hosts file to edit it
- Copy the hosts file from the original location to the desktop or some other location, edit that file, and then copy the edited file and paste it into the original location to overwrite the hosts file
- Use some third-party hosts file editing tools, etc.
TIP: See this post if Hosts File is not working in Windows. How to manually reset the Hosts file back to default in Windows may also interest you.
If your browser has been hijacked, you might find this post on Browser Hijacking and Free Browser Hijacker Removal Tools helpful.
- Find out what the hosts file does, where is the etc folder in Windows, and how you can edit its contents.
- There are tons of old tools buried deep inside Windows.
- The ETC Hosts file is one of these remnants, dating back to 1984.
Operating systems are complex “creatures”, even if on the outside they look friendly. OSes are among the most complex pieces of software out there. It’s a miracle they’re friendly enough to get things done by non-technical people.
Windows is no different, and even if we’re talking about the fresh new version of Windows 11, underneath not every bit is new. For legacy and compatibility reasons Microsoft can’t start from the beginning with Windows, no matter how hard we wish they did.
In this article, we’ll be talking about the etc/hosts file, which dates back to something like 1984, the year, not the book. Funny enough, the etc/hosts file can be used to control people’s behavior, but let’s not spoil things from the beginning.
What is the ETC/Hosts File?
The etc/hosts file is a text document stored inside the Windows folder. It acts as a local DNS server, where you can manually specify which domain names load from which IPs. The hosts file entries will override DNS settings coming from the Internet servers.
CONTENTS
- 1 What’s the Location of the Hosts File? Where Is The etc Folder in Windows?
- 2 How to View the Contents of the Hosts File?
- 3 How Can You Edit the Hosts File in Windows?
- 4 How to Add Info to the Hosts file?
- 5 What Can You Use the Hosts File For?
The hosts file is located in the etc directory in the Windows folder:
C:\Windows\System32\drivers\etcNow you understand why it’s called etc/hosts, right?
How to View the Contents of the Hosts File?
Now, to view the hosts file contents do the following:
- Copy the path above.
- Open Windows Explorer (Win + E).
- Click on the address bar (or press Alt + D).
- Paste the path (Ctrl + V), then hit enter to open the hosts file location.
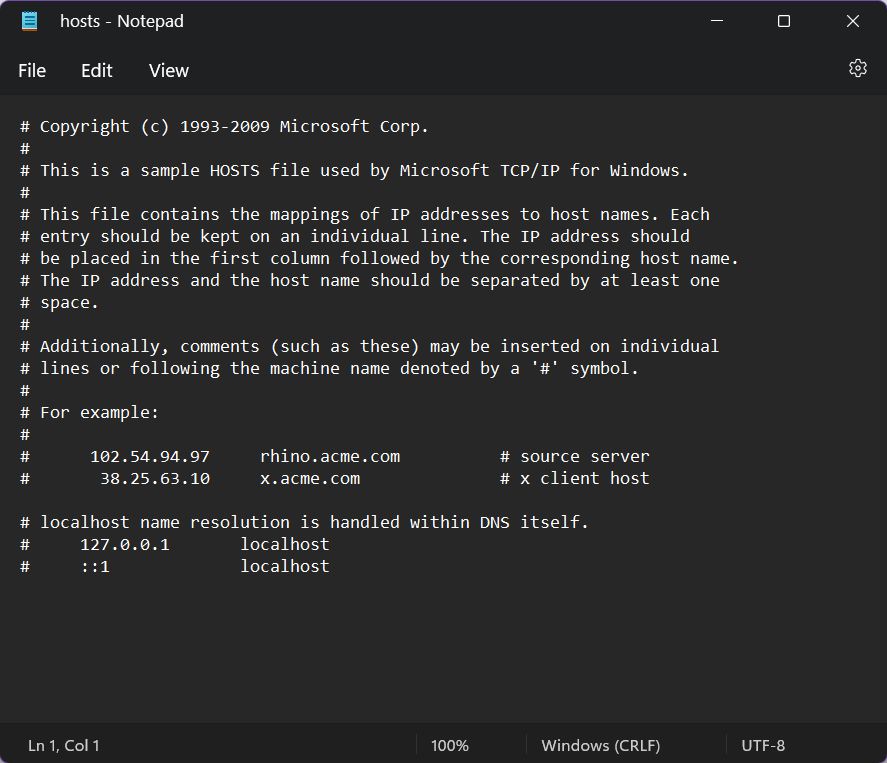
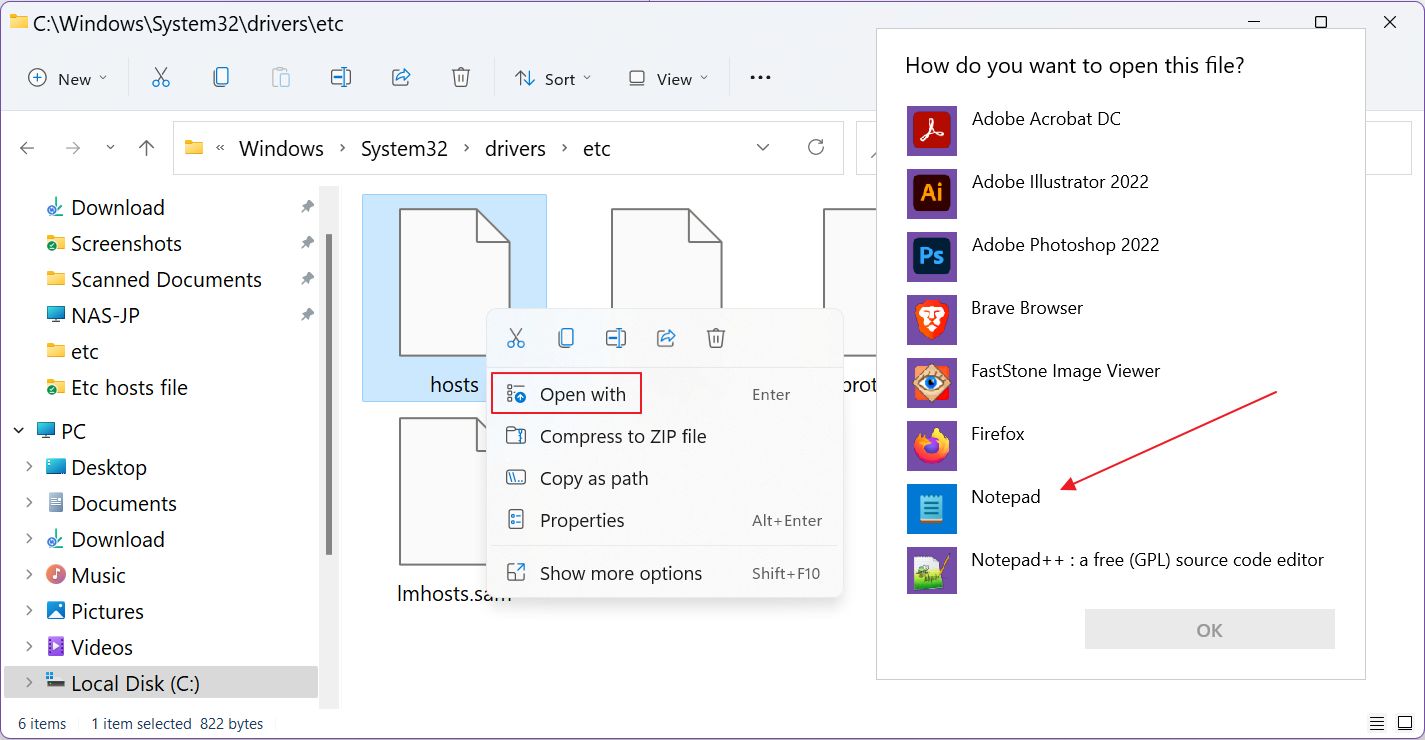
Since the hosts file is in text format you can use any text editor. And by any, I mean any program, even Notepad, which we’ll use for demo purposes.
- In the Windows Explorer window, right-click on the hosts file icon.
- Choose Open with.
- From the new popup click on Notepad and hit OK.
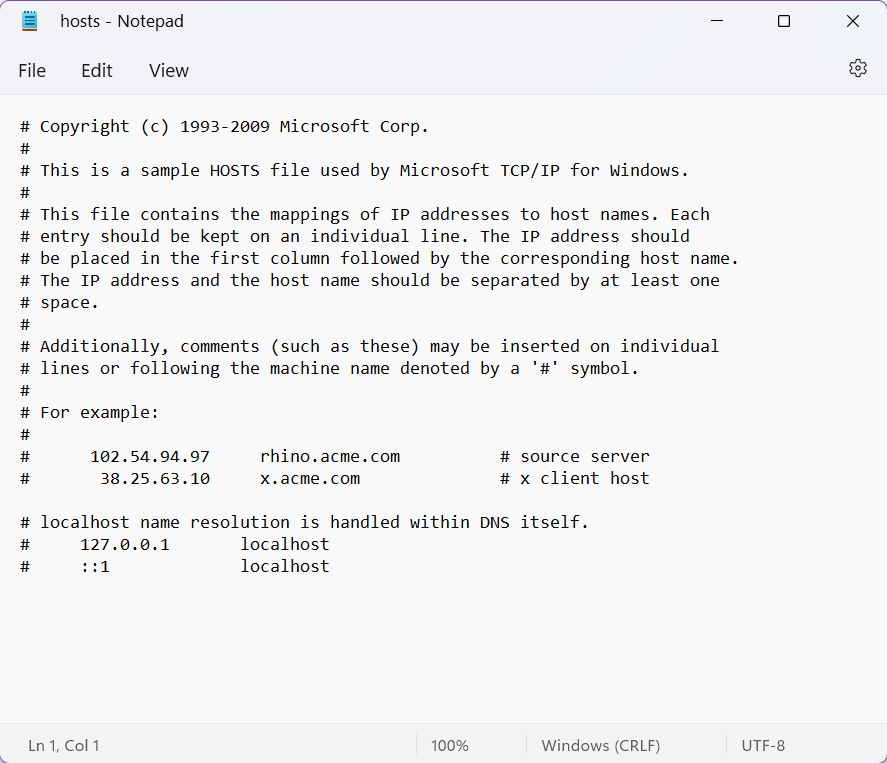
The file looks something like this. Below I’ve added the default version that comes with Windows 11. It’s surprisingly legible and has tons of useful info already laid out.
How Can You Edit the Hosts File in Windows?
Now, at this point, if you try and save the file, after modifying it (Ctrl + S), you’ll see the popup below, followed by a small error window that appears after you click Save.
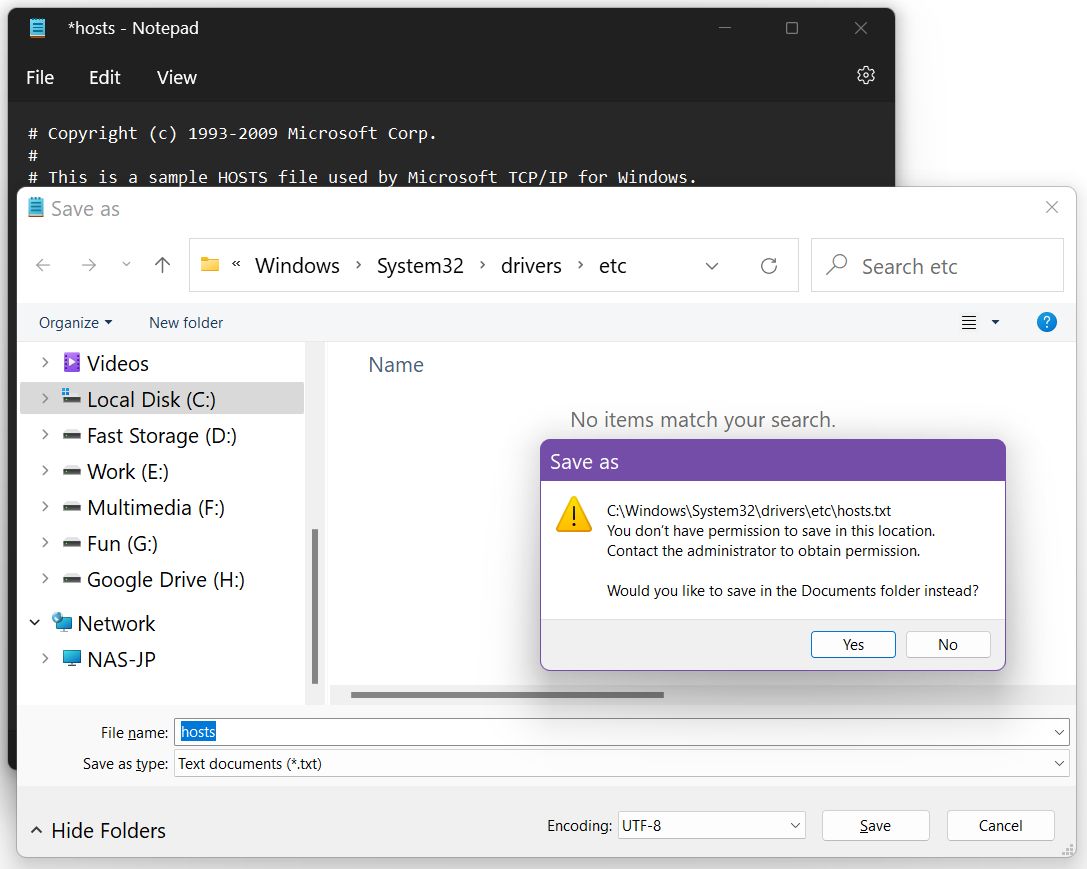
That’s because you didn’t open Notepad with administrator privileges. The etc hosts file is a system file and can’t be modified by everyone. So, close the Notepad window, and let’s try again, but this time we’ll do things a bit differently.
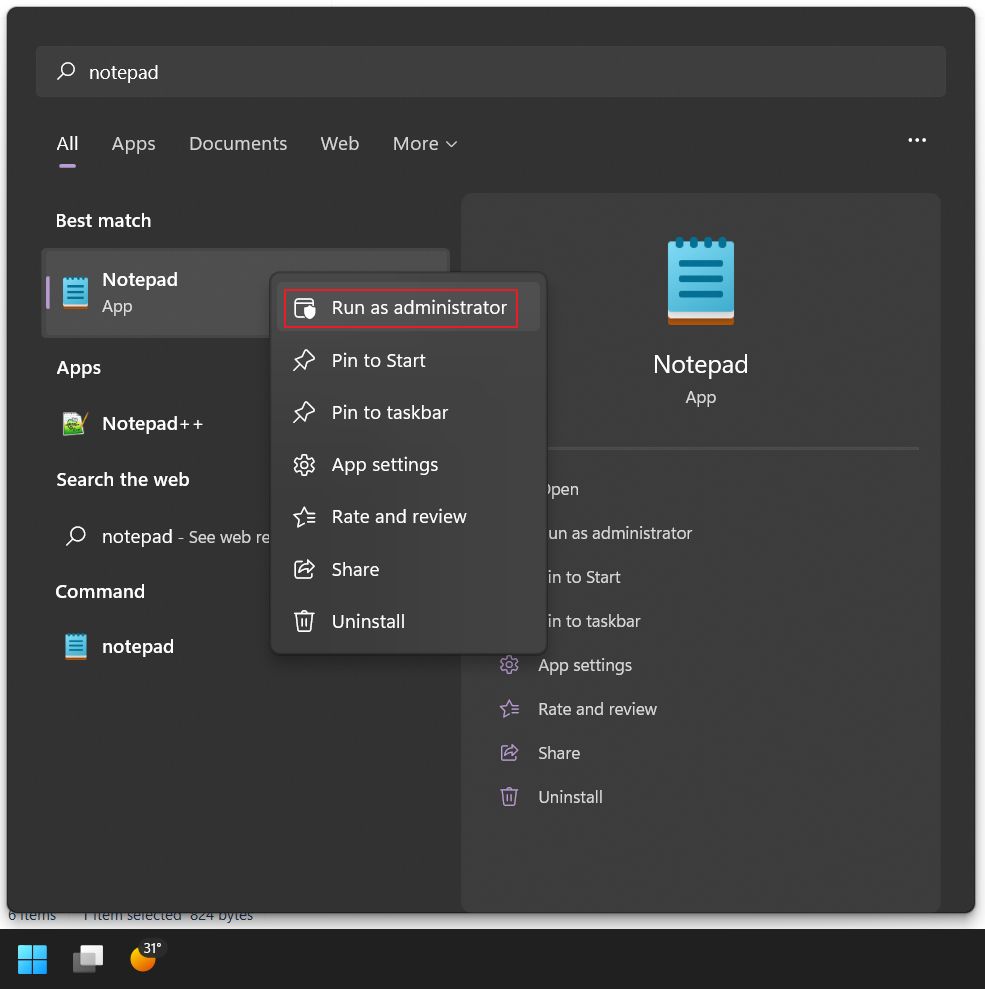
1. Open the Start menu (press the Win key).
2. Type Notepad.
3. Right-click on the first result to open the contextual menu.
4. Click on Run as administrator.
5. Select File > Open (or press Ctrl + O).
6. Navigate to the hosts file location.
7. If the folder appears empty it’s because in the open dialog window system files are hidden by default. Select All files (*.*) in the lower right dropdown menu.

8. Select and open the hosts file.
9. Edit as you please then save with Ctrl + S.
That’s it, you’ve now modified the hosts file.
It would be a good idea to save a backup of the hosts file first, before editing. You can mess up quite a few things by mistake.
How to Add Info to the Hosts file?
The hosts file works like a table with two columns and an infinite number of rows.
You only need two bits of info on each row.
| IP | Host name |
| 192.168.1.200 | binaryfork.com |
The line above will try and load my site from a different IP. It won’t work with this particular IP.
The IP and the host name must be separated by at least a space. You can use more spaces for formatting purposes.
Anything that starts with a # on a row is a comment and will be ignored. You can add a comment after a pair of IP-hostname on the same row to ensure you remember what that line does. You’ll definitely forget.
What Can You Use the Hosts File For?
I’m not going to lie to you: the first time I heard about the hosts file I only saw the prank possibilities opening up. If you can edit the hosts file on a friend’s computer you can for example point google.com to the IP of bing.com. Some friend, right?
Anyway, that’s not what the hosts file is used for. Developers need to test apps and websites locally, and the hosts file is a great way to point the browser to the domain name of the website you’re working on, but make sure it loads from your computer, not from the Internet.
So, IT professionals are the types of people who use this old Windows functionality.
As with any tool, even the etc/hosts file can be used for malicious purposes. Some malware and viruses are using this file to point your browser to copies of the websites you’re using, just to steal your information. Be careful and if anything looks weird when browsing the web it could be a good idea to double-check the hosts file contents by using the guide above.
Frequently Asked Questions About the Hosts File
What is the 127.0.0.1 IP address?
This number is known as localhost or loopback address and is the IP that when used will open the browser pointing to the local computer. Imagine you need to call yourself on the phone, to see if the speaker is working. On a normal phone, you can’t do that. With computers, you can.
Web developers are the kind of people who need to use the localhost functionality. Localhost works even on a PC not connected to the Internet.

I’m passionate about technology, science, and movies. I write about tech since 2003.
The Windows hosts file is a plain text file on your Windows PC that can be manually maintained by you as an administrator. Although optional, the hosts file has been retained in Windows 11 and 10 to help manage any website, server network address, ad trackers, spyware, and Trojans. This easy-to-understand guide details what the Windows hosts file is and how to open and edit it.
Content
- What Is the Windows Hosts File?
- Where Is the Hosts File on Windows?
- How to Open the Hosts File in Windows as Administrator
- How to Edit My Hosts File in Windows
- Applications of the Windows Hosts File
- Frequently Asked Questions
Also read: How to Be More Productive with Hot Corners in Windows
If you’ve ever used a phone company’s directory, you’d know how it maps any phone record to a unique person, business or residence. In the same manner, the hosts file in any operating system matches IP addresses with unique domain-based hostnames (or websites), server names, proxies, and more.
In Windows systems, as with Linux or Mac, the hosts file’s main purpose is to enable simple IP address mapping of hostnames and servers. Therefore, it is similar to the Domain Name System (DNS).

Each hosts file entry follows the default localhost entry in a separate line. Each line is preceded by a hash (#) symbol that allows you to insert comments. The real applications of the Windows hosts file requires you to omit the # sign.

Also read: How to Capture a Scrolling Screenshot in Windows
Where Is the Hosts File on Windows?
The Windows hosts file is always found at «C:\Windows\System32\Drivers\etc.» It’s a text file that is not associated with any program. You can easily open it with Notepad though.

Note: If you try adding another file with the name «hosts» to the «etc» folder, it will have negligible impact on the original hosts file process, as you’re simply renaming it as another duplicate file.
How to Open the Hosts File in Windows as Administrator
The only way to open the hosts file in Windows as the administrator is to use Notepad. The reason you need Admin access is that the hosts file’s internal entries can only be managed by users with the highest admin privileges.
- Go to the Search menu in Windows and open Notepad as administrator. If the admin option is not visible to you, click the down arrow symbol. Also, If you’ve saved the Notepad shortcut in another PC location, you can open it by right-clicking on the app symbol and selecting «Run as administrator.»

- Once the blank Notepad file is open, go to «File -> Open» to search for files on your PC that work with Notepad in Admin mode.

- Navigate to the folder «C:\Windows\System32\Drivers\etc.» You may not see anything at first. Click on a tiny text document’s menu item to reveal more options.

- Select «All files» in the menu option chosen above. Now the hosts file is clearly visible along with any other files. Choose the correct hosts file in Notepad Admin mode while avoiding any duplicates.

- The hosts file will populate Notepad in Admin mode. You can freely edit this document and save it without encountering errors.

- If you only wish to check the hosts file and not edit it, you can directly open it with Notepad from a simple right-click.

Also read: How to Boot to Safe Mode in Windows
How to Edit My Hosts File in Windows
Here we will learn how to modify the hosts file in Windows, which is how the end use applications are served.
- Open the hosts file in Notepad in Admin mode.
- The hosts file’s horizontal entries are separated by a space or tab. To ensure there are no errors due to syntax issues, select the entire block of text including 127.0.0.1 and localhost but not the hash (#) symbol.

- Copy-paste the IP address and localhost in a new line. You can add it next to the default previous entry. To keep the hosts file clean, it’s best to add some paragraph spacing.

- To start adding entries in the hosts file, simply paste a new domain name instead of localhost. You can also modify the IP address.
- Press Enter to add a new line.

- Once you’re done editing the hosts file in Notepad admin mode, be sure to save the entries.

Note: if you forget to edit the hosts file as an admin user in Windows, you will encounter a «You don’t have permission to save in this location. Contact the administrator to obtain permission» message.

Also read: Can (and Should) You Continue to Use Windows 8 or 8.1?
Applications of the Windows Hosts File
As the hosts file can override the DNS server, it can achieve advanced objectives, such as blocking or redirecting any website or URL of your choice.
1. Edit Windows Hosts File to Block Websites
You can use the Windows hosts file to remove time-wasting URLs, entertainment sites, and other websites you don’t want to visit. Don’t want to spend time on Netflix? Simply block it entirely at a system level.
- Open the hosts file in Notepad as an admin user.
- Populate the list of websites you want to block in the format
127.0.0.1 domain. Follow it by saving and exiting the Notepad file.

There may be a time you need to block multiple domains of the same service as individual entries in the hosts file. For example, it treats «twitter.com» and «m.twitter.com» as two separate entries.
After you save the list of blocked websites in Notepad, you won’t be able to access it on a browser again unless you edit the hosts file to regain access. This blocking method is supported on Google Chrome, Microsoft Edge, Firefox, Opera and many other browsers. It is very important to delete the browser cache after blocking the website in the hosts file, otherwise, it will keep loading again.

Apart from the major browsers, you can also block websites on less-used alternative browsers such as SlimBrowser.
Also read: How to Block Websites on Chrome, Firefox, Edge, Safari, Android, and iOS
2. Edit Windows Hosts File to Redirect Websites
You can use the Windows hosts file to redirect any website to another URL. This may not always be supported due to security certificate conflicts.
- Open the Windows hosts file in Notepad in Admin mode.
- Insert the name of the website you want to redirect elsewhere. Our example will replace «nytimes.com» with «bbc.com.»

- Open Windows Command Prompt and enter the following text in the window.
- The above command will generate a series of replies from the end website while revealing its IP address. Sometimes you may see an IPv6 address instead of IPv4 as shown in the below example.

- Once the IP address is found, go back to the hosts file and change the 127.0.0.1 entry for the website you want redirected, replacing it with the IP address generated in the Command Prompt.
- Save the hosts file and go back to a browser for testing.

- After setting the redirection property for any website, you will see a redirection message. Sometimes it’s an error, as the security certificates of the two sites do not match. This is why its main purpose is to redirect an entertainment or non-productive site to a company homepage or your own server address.

Also read: 15 Safe Websites for Downloading Windows Software
3. Spam and Malware Protection with Hosts File
The Windows hosts file can also be used to manage multiple spam user links, third party sites, cookies, ad trackers, and surveillance bots. It can be used to keep malware sites at bay. Browsers such as Firefox give you a complete list of trackers and bots on any webpage. If you want to frequent a website while avoiding its spammy links, simply add them as blocked entries in a host file.

Also read: What is Antimalware Service Executable? Why is CPU and Memory Usage High?
Frequently Asked Questions
1. Why is my hosts file not working?
Is Windows not able to read the hosts file on your computer? You may encounter this error when you don’t set the line endings properly in Notepad as an admin user. It really boils down to syntax errors in saving the entries. The good thing is these problems are very easy to fix.
To avoid possible errors in entries saved using the Windows hosts file, make sure you copy-paste the entire first sentence containing «127.0.0.1» and «localhost» in the default entry. Use it to modify each and every line below.
2. How can I clear my hosts file in Windows?
Clearing the hosts file is very easy. This allows you to reuse the hosts file document just as it was in a previous state.
- Open the hosts file in Notepad in Admin mode.
- Select all the non-default entries, which are the remainder text below the localhost lines.
- Delete the entries and save the hosts file. It is now cleared for reuse.

3. How can I reset the Windows hosts file back to the default?
Sometimes you may face errors in the Windows hosts file configuration, especially after it was changed several times. To undo these errors, it’s a good idea to reset the Windows hosts file back to its default state.
- Open any Notepad document in Admin mode and copy-paste the following text below.
# Copyright (c) 1993-2006 Microsoft Corp. # # This is a sample HOSTS file used by Microsoft TCP/IP for Windows. # # This file contains the mappings of IP addresses to host names. Each # entry should be kept on an individual line. The IP address should # be placed in the first column followed by the corresponding host name.
# The IP address and the host name should be separated by at least one # space.
#
# Additionally, comments (such as these) may be inserted on individual
# lines or following the machine name denoted by a '#' symbol. #
# For example:
#
# 102.54.94.97 rhino.acme.com
# source server
# 38.25.63.10 x.acme.com
# x client host
# localhost name resolution is handle within DNS itself.
# 127.0.0.1 localhost
# ::1 localhost
- Save the above entry on the Desktop or any other PC location apart from the «etc» folder in System32. Name the document as «hosts.»

- Go back to the hosts file in the «etc» folder and rename it as «hosts.old.»
- Transfer the newly created hosts file into the «etc» folder to make it the default hosts file again.

4. Can I delete the Windows hosts file?
While the hosts file has a very powerful function in blocking websites, interestingly, it’s just an optional system resource in Windows 11/10. You can easily delete the hosts file from your PC without it affecting the PC operations in any way. You can always recreate a new hosts file by resetting it as a default in Notepad using the method shown above.
5. Can malware affect the hosts file?
As the hosts file has a powerful role to play in blocking and redirecting websites in Windows, it is a favorite attacking point for malware authors. Sometimes even Windows Defender may incorrectly determine that the hosts file was changed by malware or spyware. In this case, you can exclude the hosts file from being scanned by Windows Defender while you correct the malware links inserted inside the file. Yet, in other cases, malware authors may name their malware after hosts and try to place it in the etc folder.
Image credit: Pixabay

Sayak Boral is a technology writer with over eleven years of experience working in different industries including semiconductors, IoT, enterprise IT, telecommunications OSS/BSS, and network security. He has been writing for MakeTechEasier on a wide range of technical topics including Windows, Android, Internet, Hardware Guides, Browsers, Software Tools, and Product Reviews.
Subscribe to our newsletter!
Our latest tutorials delivered straight to your inbox
- What’s My DNS?
- Hosts File — How and why to edit your DNS Hosts File
The hosts file is a file on your computer or other device that is used as the first step in the DNS lookup process for DNS hostname resolution.
This is the process of converting a domain name like www.example.com into an IP address like 192.168.2.1 which computers and network devices use to communicate with each other.
Making changes to your systems hosts file lets you intercept the normal DNS lookup process and set any IP address for any domain name you like which can be useful for many reasons, but also potentially harmful in some circumstances.
The hosts file can be found in the following locations depending on your operating system:
- Windows:
C:\Windows\System32\Drivers\etc\hosts - Linux:
/etc/hosts - MacOS:
/etc/hosts
There are several reasons why you may be interested in viewing or editing your hosts file which include:
Testing DNS changes — A common use for making changes to the hosts file is to test changes to DNS records before making them live on the internet. This allows you to make sure a new server setup is behaving as expected before making the changes to your DNS setup and having them live for everyone.
Forcing DNS changes — Often when having made changes to your domain names DNS settings, you will need to wait for DNS propagation as you may have locally cached DNS records and are not seeing the expected updated results. You can flush your DNS cache, or modify your hosts file to temporarily force changes which are not updating fast enough.
Local development — Often setting up custom hostnames for local testing and development can be quite useful. This allows you to configure your system to respond to your local web server on https://www.mysite.test and have your real site live on https://www.mysite.com.
Ad & content blocking — As the hosts file lets you override DNS entries for any domain name, people often create hosts file entries for common tracking, spyware, malware domains as well as product activation servers to assist with software piracy. There are lists of common ad networks and tracking servers available online which you can use to keep an up-to-date list of sites to block. Blocking is achieved by setting the IP address of the ad networks to a loopback address like 127.0.0.1 which will not return anything.
Checking for compromise — Often if your device is infected with malware, then your hosts file may be compromised to included entries which could cause you harm. For example, if your hosts file had been unknowingly changed to point your banks domain name to the IP address of a hacker. This type of DNS attack is known as DNS pharming, and checking your hosts file can uncover potential infection.
Where is the hosts file located?
The most common question that many people have around the host file is how do you find it? What is the path and location of the hosts file?
Depending on your operating system, the hosts file is located in different locations and requires different methods for editing as it is a protected system file.
Windows host file location
The hosts file for all recent versions of Windows including Windows 7, 8, 10, 11 & Windows Server is located in C:\Windows\System32\Drivers\etc\hosts.
There are a few important notes to remember when opening the hosts file on Windows:
- You will need to use a plain text editor like Notepad, not a word processor like Microsoft Word.
- You will need to open the file as the local system administrator. This can be done by right clicking on for example Notepad and choosing «Run as administrator».
- When navigating to the directory containing the hosts file, they may be hidden depending on your setup. Additionally you may need to select to show «All Files (*.*)» instead of the default «Text Documents (*.txt)».
Linux host file location
The hosts file for Unix, Linux and other Unix like operating systems is located in /etc/hosts
As this is a protected system file, you will need to make sure that you edit it as the root user. This can be done using sudo for example sudo vim /etc/hosts from the terminal.
Apple MacOS host file location
The hosts file for MacOS is located in /etc/hosts as MacOS is a Unix based system and follows many of the common file location conventions.
As this is a protected system file, you will need to make sure that you edit it as the root user. This can be done using sudo for example sudo vim /etc/hosts from the terminal.
How do you edit your hosts file?
Once you’ve found the location of your hosts file for your specific operating system, all you need to edit it is a simple plaintext text editor. You can use Windows Notepad, TextEdit on the Mac, as well as command line text editors like vim or nano on Unix based systems.
You will need to make sure that when you’re editing this file that you do so with an account which has administrator privileges as this is a protected system file.
Hosts file format
Once you have located the hosts file, the format is very simple. On a new blank line you need to enter the desired IP address followed by one or more spaces (or tabs) and then the hostname you would like to assign to this. You can add additional hostnames separated by one or more spaces (or tabs) as well.
IP address considerations:
You can use either IPv4 A Records or IPv6 AAAA Records for the IP address which you would like to assign.
If using an IPv6 address, you may want to consider using either the IPv6 expanded format or IPv6 compressed format for all IPv6 entries to ensure consistency and making searching for entries easier if you have large number of them.
Hostname considerations:
When specifying the host name for a hosts file entry, make sure to only include the domain name itself. Do not enter the protocol (http://), or document path (/some-page.html). For example for the webpage http://www.example.com/some-page.html the hostname would be simply www.example.com. If you would also like to include both example.com and www.example.com then you will need to specify both individually.
If using an International Domain Name (IDN), then it will first need to be converted to Punycode format as the host file is plain text and does not accept UTF-8 characters.
Wildcard domains (*.example.com) are not supported in the hosts file.
It is important to make sure that you use a plain text editor like Notepad rather than a word processor like Microsoft Word to edit the hosts file as advanced word processors can introduce unrecognized data like font information.
Example hosts file:
An example hosts file entry may look like the following:
127.0.0.1 example.comor with multiple entries:
127.0.0.1 example.com
127.0.0.1 www.example.com
or multiple entries on a single line
127.0.0.1 example.com www.example.comHosts file comments:
It can sometimes be useful to add comments to your hosts file, especially if you have many entries or entries that you switch between from time to time.
To add a comment, you simply need to use the # character, and anything after this will be ignored.
# this entire line is a comment
127.0.0.1 example.com # this text at the end of a host file entry is a comment
# 127.0.0.2 example.com this entire line a comment and not a valid hosts file entry
The above only includes a single valid hosts file entry for example.com pointing to 127.0.0.1.
How to test changes made to the hosts file?
When you have made changes to your hosts file, you will not be able to use any of the Online DNS Tools to check your changes, instead you will need to rely on your local device for testing.
Using built in DNS tools like nslookup on Windows or dig on Linux and MacOS will query your devices locally configured nameservers directly, skipping reading the hosts file so is not an ideal way of testing changes.
One of the best methods is to use the ping command-line tool, simply run ping example.com and observe which IP address is resolved for the given hostname.
Which hosts file to edit when using Windows Subsystem for Linux (WSL)?
You may wonder which hosts file you need to edit when running multiple operating systems on Windows by taking advantage of WSL.
Making changes to the Linux guest operating systems hosts file at /etc/hosts file will only have changes reflected within the Linux instance.
Editing the Windows hosts file at C:\Windows\System32\Drivers\etc\hosts will have the changes reflected on both Windows and within the Linux instance.
Файл hosts — текстовый документ, который содержит в себе информацию о домене и IP-адресе, который ему соответствует. Файл hosts появился во времена зарождения Интернета (ARPANET) и служил неким маршрутизатором, пока на замену ему не пришла служба DNS. Но до сих пор он не утратил важности и по-прежнему используется как инструмент, который обладает приоритетом перед обращением к DNS-серверам.
Зачем нужен файл hosts
Предположим: вы зарегистрировали домен и привязали его к Hosting Linux. Но чтобы увидеть сайт, вам нужно дождаться делегирования домена на DNS-серверы. В файле hosts вы можете указать ваш домен и IP-адрес хостинга, а затем открыть браузер и зайти на ваш сайт, не дожидаясь делегирования домена. Также с его помощью вы можете заблокировать на локальном компьютере доступ к определённому сайту, указав соответствующую запись.
Где находится файл hosts
Путь к папке, где лежит файл hosts, зависит от операционной системы, которая установлена на вашем компьютере:
- Windows XP, 2003, Vista, 7, 8, 10 — c:\windows\system32\drivers\etc\hosts
- Linux, Ubuntu, Unix, BSD — /etc/hosts
- macOS — /private/etc/hosts
Редактировать файл etc hosts нужно от имени администратора, иначе вы не сможете сохранить внесённые изменения.
Как внести изменения в файл hosts
Ниже мы рассмотрим, как редактировать и как сохранить изменения в файле hosts. Важно открыть файл с правами администратора, иначе система не даст вам его сохранить. Выберите вашу операционную систему и следуйте инструкции или посмотрите видеоинструкцию:
Редактирование файла hosts в Windows 7
-
1.
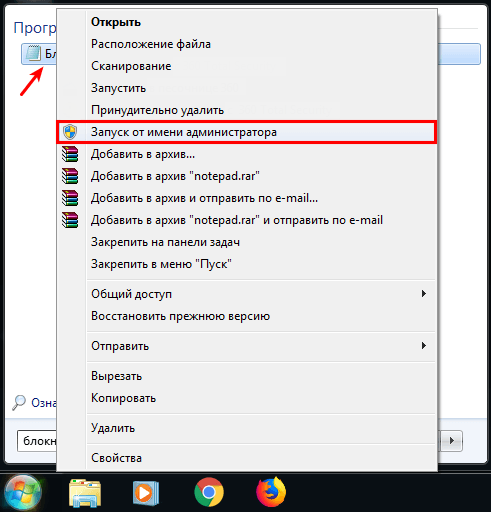
Запустите Блокнот или любой другой редактор от имени администратора. Откройте Пуск, найдите нужный редактор, нажмите по нему правой кнопкой мыши и выберите Запуск от имени администратора:

Как отредактировать файл hosts -
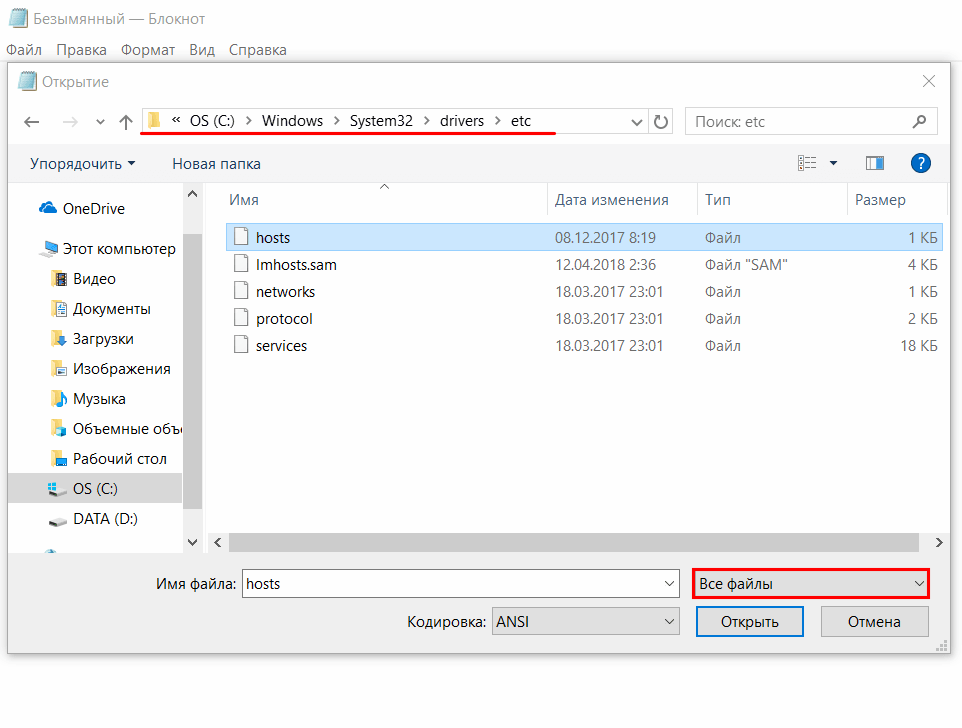
2.
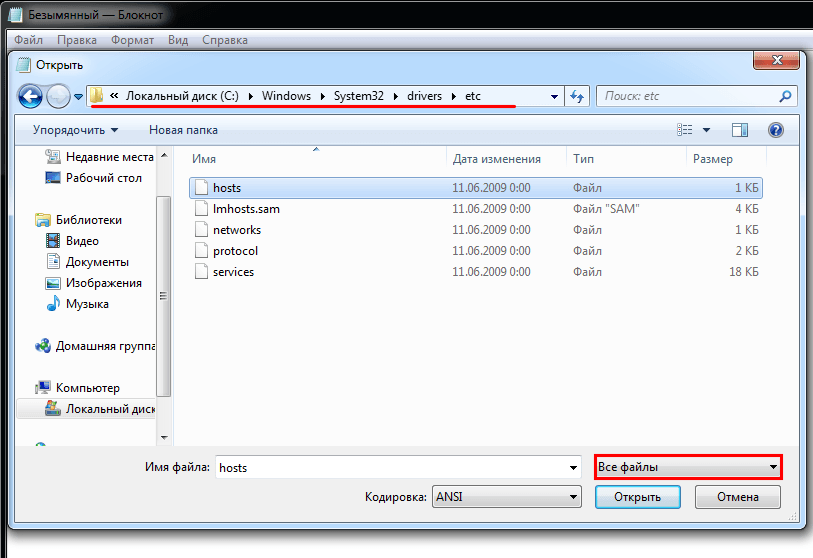
В меню «Файл» нажмите Открыть и перейдите в каталог, в котором расположен файл hosts. Измените тип файла на «Все файлы»:
-
3.
Выберите файл hosts и откройте его.
-
4.
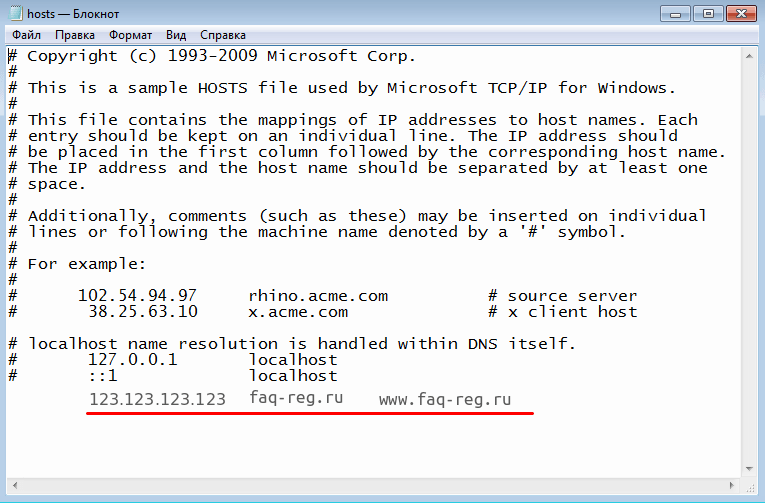
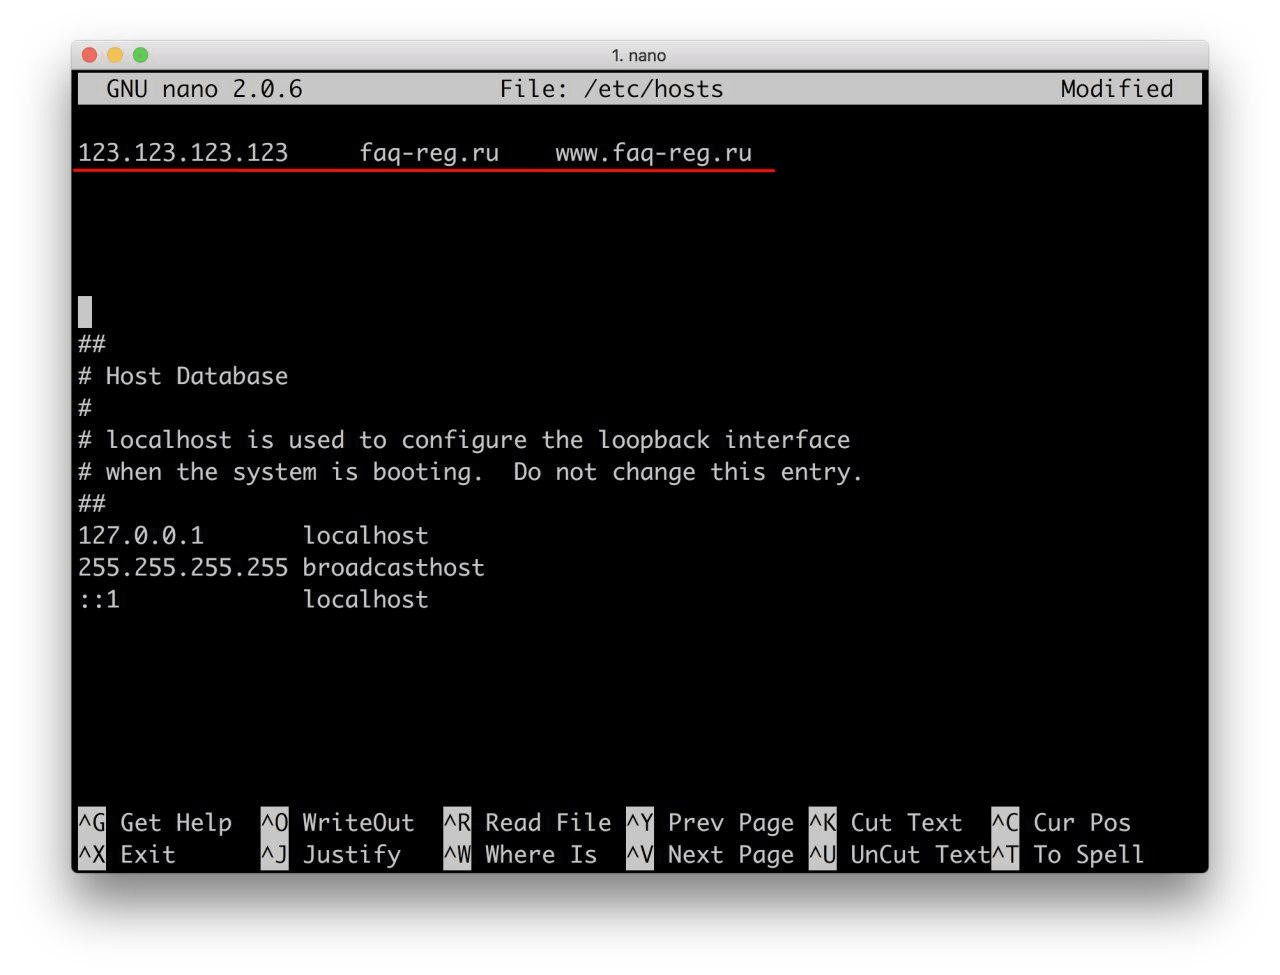
Добавьте в конце файла необходимую запись в формате:
123.123.123.123 faq-reg.ru www.faq-reg.ruГде:
- 123.123.123.123 — IP-адрес вашего сервера или хостинга,
- faq-reg.ru — имя вашего домена.
-
5.
Сохраните изменения в файле.
Теперь вы можете открыть ваш сайт в браузере, не дожидаясь обновления DNS-серверов.
Редактирование файла hosts в Windows 8, 10
Чтобы изменить файл hosts в виндовс 10 (8), выполните следующие действия:
-
1.
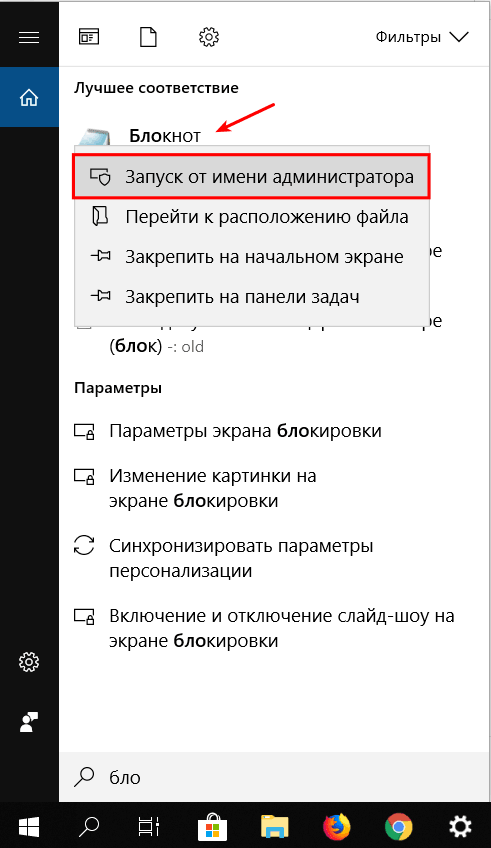
Запустите Блокнот или любой другой редактор от имени администратора. Для этого найдите его в Пуске, нажмите по нему правой кнопкой мыши и выберите Запуск от имени администратора:
-
2.
В меню «Файл» нажмите Открыть и перейдите в каталог, где находится файл hosts. Измените тип файла на «Все файлы»:
-
3.
Выберите файл hosts и откройте его.
-
4.
Добавьте в конце файла необходимую запись в формате:
123.123.123.123 faq-reg.ru www.faq-reg.ruГде:
-
123.123.123.123 — IP-адрес вашего сервера или хостинга,
-
faq-reg.ru — имя вашего домена.
-
-
5.
Сохраните изменения в файле.

Теперь вы можете открыть ваш сайт в браузере, не дожидаясь обновления DNS-серверов.
Редактирование файла hosts в Linux, Unix
В Linux файл hosts находится в папке etc. Чтобы отредактировать его:
-
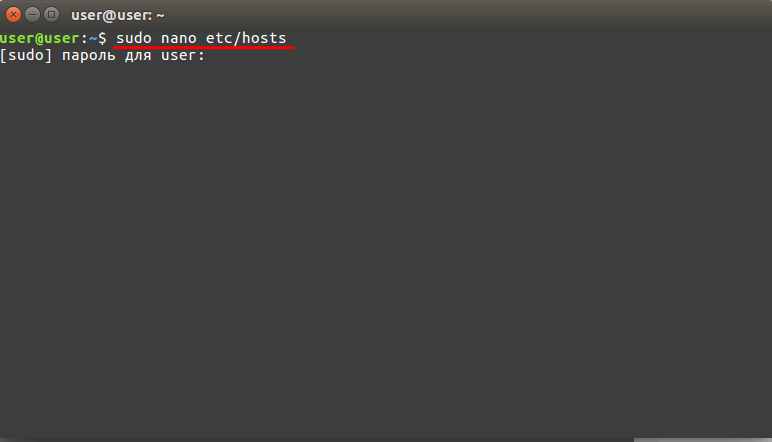
1.
Введите в терминал linux команду hosts:
-
2.
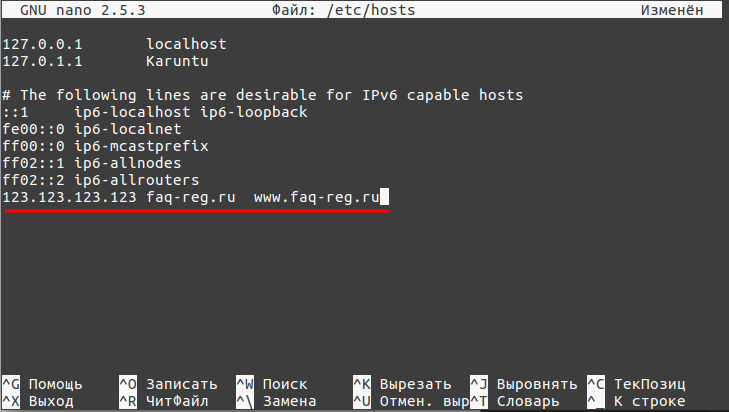
Добавьте в конце файла необходимую запись в формате:
123.123.123.123 faq-reg.ru www.faq-reg.ruГде:
-
123.123.123.123 — IP-адрес вашего сервера или хостинга,
-
faq-reg.ru — имя вашего домена.
-
-
3.
Сохраните изменения в файле.
Теперь вы можете открыть ваш сайт в браузере, не дожидаясь обновления DNS-серверов.
Файл hosts в Ubuntu редактируется так же, как и во всех Unix-системах.
Редактирование файла hosts в MacOS
Файл hosts в Mac OS расположен в каталоге: /private/etc/hosts. Чтобы изменить его:
-
1.
Запустите терминал с помощью горячих клавиш: Command (⌘) + T или через Spotlight.
-
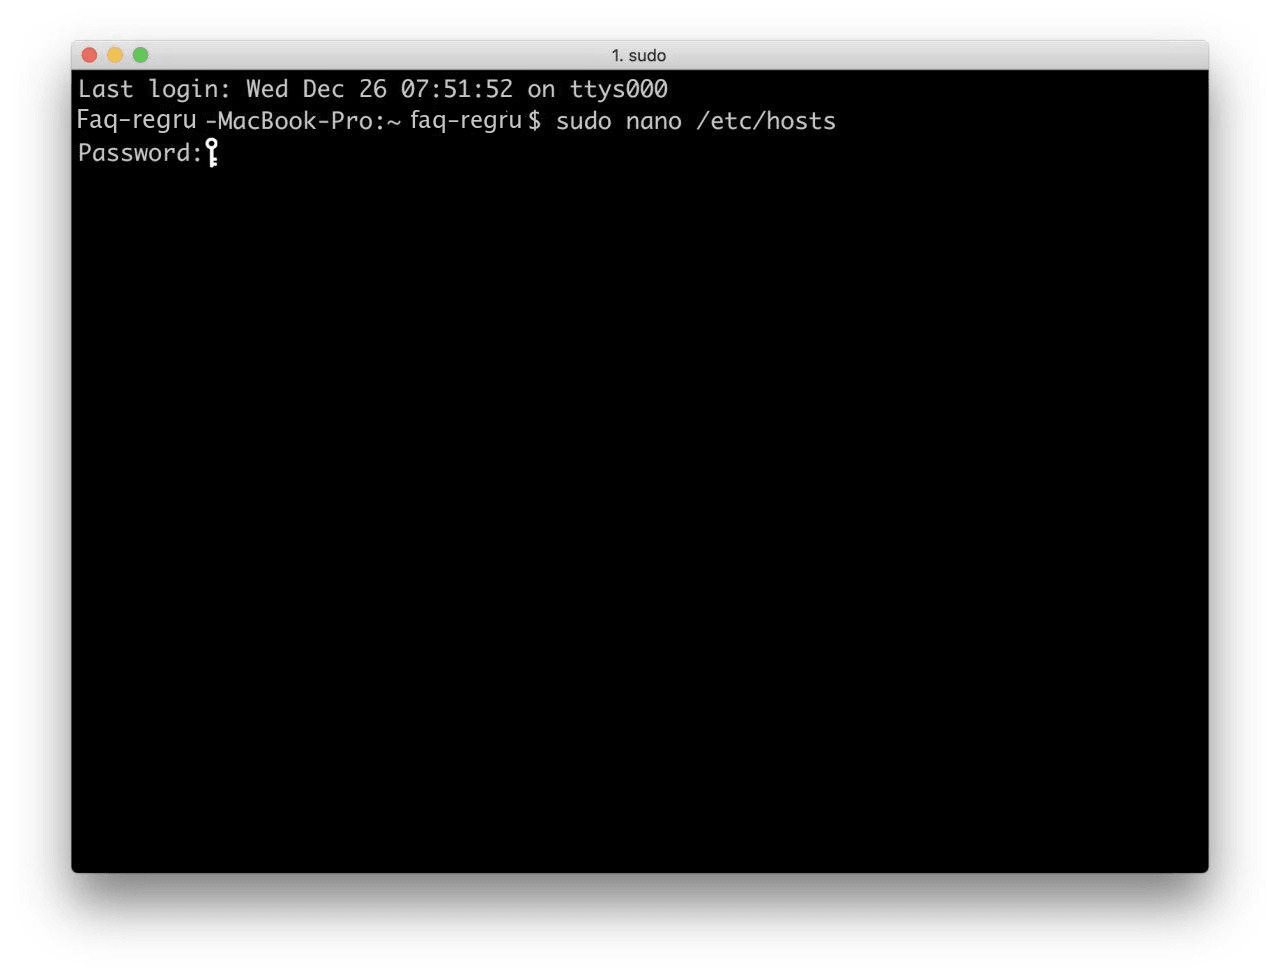
2.
Введите команду:
Нажмите Enter:
-
3.
Добавьте в конце файла необходимую запись в формате:
123.123.123.123 faq-reg.ru www.faq-reg.ruГде:
-
123.123.123.123 — IP-адрес вашего сервера или хостинга,
-
faq-reg.ru — имя вашего домена.
-
-
4.
Сохраните изменения в файле.
Теперь вы можете открыть ваш сайт в браузере, не дожидаясь обновления DNS-серверов.
Видеосправка. Как изменить файл hosts
Также вы можете заблокировать определенный сайт через файл hosts, воспользовавшись инструкцией ниже:
Блокировка доступа к сайту через файл hosts
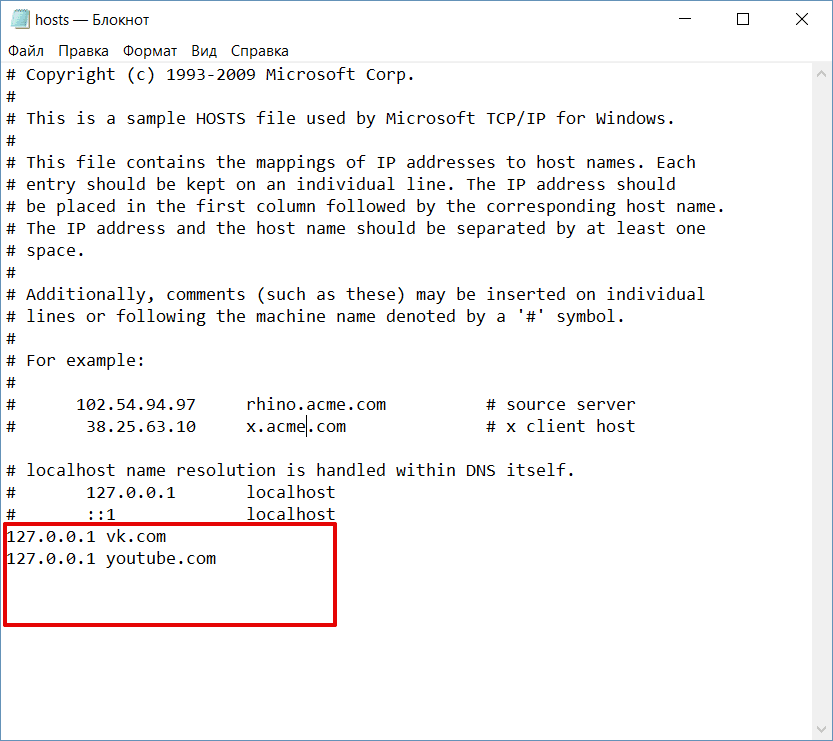
Доступ к сайту также можно ограничить для локального компьютера. Для этого укажите адрес страницы (домен) в файле hosts. Заблокировать IP нежелательного сайта не требуется. Блокировка осуществляется по локальному хосту с фиксированным IP (127.0.0.1):
-
1.
Откройте файл hosts от имени администратора на своём ПК.
-
2.
В указанной на скриншоте строке укажите IP-адрес 127.0.0.1 и через пробел адрес нежелательного сайта. Чтобы заблокировать несколько сайтов, повторите действие в следующей строке. В примере ниже в файле hosts отказано в доступе (заблокирован доступ) к сайтам «vk.com» и «youtube.com»:
-
3.
Сохраните изменения.
Готово! Доступ к сайтам будет ограничен на определенном ПК.
Оригинальный файл hosts и как его восстановить
Скачать содержимое файла hosts можно на разных ресурсах. Но мы не рекомендуем делать это, так как файл может быть заражен.
Файл hosts по умолчанию есть в каждой операционной системе, но он может быть скрыт для просмотра. Следуя инструкциям выше, вы сможете его открыть и отредактировать. Если вы удалили его, то просто создайте текстовый файл без расширения в нужной папке.
По умолчанию файл hosts выглядит следующим образом:
Для Windows
# Copyright (c) 1993-2006 Microsoft Corp.

#

# This is a sample HOSTS file used by Microsoft TCP/IP for Windows.
#
# This file contains the mappings of IP addresses to host names. Each
# entry should be kept on an individual line. The IP address should
# be placed in the first column followed by the corresponding host name.
# The IP address and the host name should be separated by at least one
# space.
#
# Additionally, comments (such as these) may be inserted on individual
# lines or following the machine name denoted by a '#' symbol.
#
# For example:
#
#      102.54.94.97     rhino.acme.com          # source server
#       38.25.63.10     x.acme.com              # x client host
# localhost name resolution is handle within DNS itself.
#       127.0.0.1       localhost
#       ::1             localhost
Для Linux
127.0.0.1       localhost

127.0.1.1      user

# The following lines are desirable for IPv6 capable hosts
::1     ip6-localhost ip6-loopback
fe00::0 ip6-localnet
ff00::0 ip6-mcastprefix
ff02::1 ip6-allnodes
ff02::2 ip6-allrouters
где user (во второй строке) — это имя вашего компьютера.
Для MacOS
##

# Host Database

#

# localhost is used to configure the loopback interface
# when the system is booting.  Do not change this entry.
##
127.0.0.1  localhost
255.255.255.255  broadcasthost
::1             localhost
Удалите текущее содержимое из файла hosts, вставьте текст по умолчанию и сохраните изменения.
Теперь вы знаете, как должен выглядеть файл hosts и как с ним работать.
Помогла ли вам статья?
Спасибо за оценку. Рады помочь 😊
👍