User Case:
While reinstalling Windows, the Windows Setup asks me where I want to install Windows. I have many drives, such as drive 0 partitions 1, 2, 3, and 4. Which drive should I choose? — From Quora
It is a real case from Quora, and many users have the same doubts. Where do you want to install Windows? This question doesn’t completely depend on your preference. In this article, the editor from EaseUS will focus on this question and help you figure out where you should install Windows and why. Now, let’s dive into learning.
Where Do You Want to Install Windows
Ensuring your Windows 11/10/8/7 operating system is installed and running on the correct storage drive has always been important. Still, this has become an even bigger problem with the creation of high-speed solid-state drives. So how to tell if the drive you selected is correct? For this problem, there are two main factors you need to take into account: sufficient capacity and fast enough startup speed.
We all know that SSD is usually faster than HDD. But generally speaking, the capacity of SSD is not as good as that of HDD. So what’s the answer when you are asked where do you want to install Windows? The best solution is to install the Windows system to the SSD and install or store other large files such as videos, photos, and games on the HDD. Windows PC builds typically set expensive high-performance storage drives for the Windows operating system and cheaper options for mass storage. Windows can also be installed on Windows VPS, which has gained more and more popularity over the last few years, as it’s easy to use. Most of the users are already familiar with the user interface and the operating system in general due to its popularity with a vast majority of personal computers running on Windows.
You may also like the following:
However, how to make sure you are choosing the right drive to install Windows? The following means can help:
Unplug all but the target drive: This ensures that you install the OS onto the target hard drive without risk, as there is only one option.
Use drives with different capacities: Windows may not be able to distinguish every drive for you, but it always tells you the storage capacity of the drive you are looking at. So all you need to do is find the drive corresponding to the SSD’s capacity.
Check drive orders in BIOS: This option is risky, so choose the safer option if your storage hard drive is full of files you want to keep. Because formatting and partitioning to install an operating system require you to erase all data on the drive.
Check the physical order of drives: Disks 0, 1, and 2 all refer to the physical connections of the storage drives on the motherboard, which may depend on your motherboard. Computer motherboards have one port designed for more modern high-end drives and several ports designed for general-purpose storage.
Click the buttons below to share this article and let more users know how to select the target drive to install Windows.
How to Install Windows on an SSD
Just now we’ve discussed where to install Windows (the answer is without a doubt a solid SSD). Next, I’ll show you how to install Windows properly. If you don’t have much experience, be sure to follow the steps below carefully:
Step 1. First, determine the Windows system you want to install, Windows 10 or Windows 11, or others. Visit the Microsoft Online Store to download the system you want to install and purchase a key. (If you don’t buy the key, you can only use it for free for 30 days)
Step 2. Create Windows 10 installation media. Download the Windows ISO file, burn it to a USB with a third-party Windows ISO burner, and install Windows from the USB. Click the links below to learn how to burn ISO to a USB and other issues you may meet during the procedure.
Step 3. Install Windows on an SSD:
- Insert the USB drive into the PC or laptop where Windows is to be installed. Then turn on the computer and let the computer boot from the USB. Before that, go into BIOS and set the bootable USB as Boot Drive.
- When the computer boots successfully from the USB drive, you’ll see the Windows icon and then you’ll need to choose your language. Confirm options such as Language, Time and Currency Format, and Keyboard or Input Method to install. Then click Next and then «Install.»
- You will be asked to enter your license key and proceed with activation as required. But if you haven’t purchased a Windows key, click «I don’t have a product key» to skip this step.

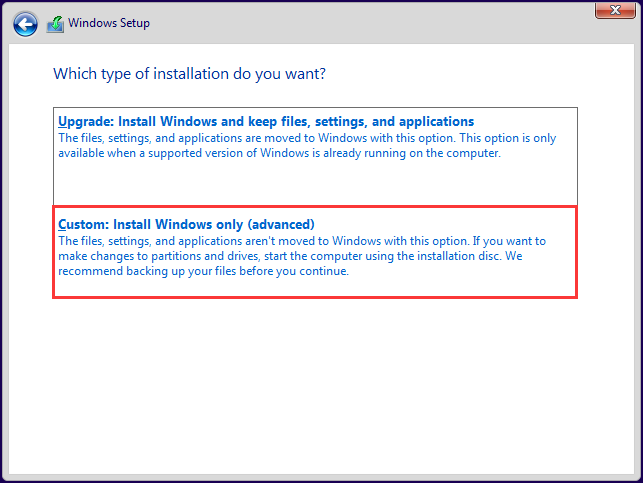
- Accept the license terms and click Next. Then select [Custom: Install Windows only (Advanced)]: this will delete all your files, system settings, and applications and settings and give you a clean install of Windows. If you have important files, it is recommended that you back them up in advance.
- Windows will then automatically start the installation process. Most of the time, the process will be smooth, but please pay close attention and answer any questions asked.
However, what if you misplaced your Windows on the wrong drive? When multiple hard drives are connected to your computer, users may accidentally put the Windows system on the wrong drive. You can choose to reinstall the OS (usually on an SSD). However, it’s not easy for everyone. So, how do you move your operating system to another hard drive without losing data on the old disk? Continue to read and learn what to do under this circumstance.
What to Do If I Installed Windows on the Wrong Drive
To get a better and smoother experience, you need to transfer Windows to the proper drive. Windows doesn’t have an OS transfer tool, so you should turn to a professional third-party tool, EaseUS Partition Master. It can help you migrate Windows (including Windows 11/10/8/7/XP/Vista) to the target drive (SSD is recommended). And your Windows can boot successfully on the target drive without reinstalling. Download EaseUS Partition Master and follow the tutorial to try.
Before we start, read the notice below to make the OS migration successful and smooth.
- Notice:
-
Ensure the target drive (SSD or HDD) has enough storage space for your Windows system.
If any important data is on the target drive, back it up in advance because the partition and data on the target hard drive will be deleted.
Now, let’s migrate Windows to the correct drive by EaseUS Partition Master.
Steps to migrate OS to HDD/SSD:
- Run EaseUS Partition Master, and select «Clone» from the left menu.
- Check «Migrate OS» and click «Next».
- Select the SSD or HDD as the destination disk and click «Next».
- Check Warning: the data and partitions on the target disk will be deleted. Make sure that you’ve backed up important data in advance. If not, do it now.
- Then click «Yes».
- Preview the layout of your target disk. Then click «Start» to start migrating your OS to a new disk.
- After this, click «Reboot Now» or «Done» to determine if you want to reboot the computer from the new disk immediately.
«Reboot Now» means to keep the changes instantly, while «Done» means you need to restart the computer later manually.

Note: The operation of migrating OS to SSD or HDD will delete and remove existing partitions and data on your target disk when there is not enough unallocated space on the target disk. If you saved important data there, back up them to an external hard drive in advance.
If you don’t have enough space on the target hard drive, click the link to learn how to free up hard drive space on a Windows PC.
Besides, EaseUS Partition Master can do a lot to help you manage Windows, such as:
- Clone HDD to SSD
- Clone Windows 10 to a larger SSD
- Burn ISO to USB on Windows 10
- Extend the target drive to install Windows
- Extend the drive where the OS is installed
- Upgrade Windows 7/8/10 to Windows 11 for free
Hence, download EaseUS Partition Master now. It will be a great helper when you install/reinstall/upgrade Windows.
Conclusion
SSDs are much faster than HDDs, but SSDs still cost more to store than older HDs. This results in a common setup of a smaller SSD with the OS and a larger HDD for file and program storage. And if you accidentally install Windows to the wrong drive, don’t worry; EaseUS Partition Master can help you migrate the operating system without reinstalling the system. During this process, you may encounter some startup-related issues. Click on the link below to learn more details.
Where Do You Want to Install Windows FAQs
Do you know where you should install Windows now? If you still have further questions, the next part will enlighten you. Check them now:
1. Which drive should I install Windows on?
SSD is a nice destination for Windows since Windows can boot faster on SSDs than on HDDs. However, there is one thing you need to pay attention to; SSDs typically have less storage capacity. Hence, before installing Windows on the target SSD, ensure it has enough space and back up the important data in advance to avoid data loss.
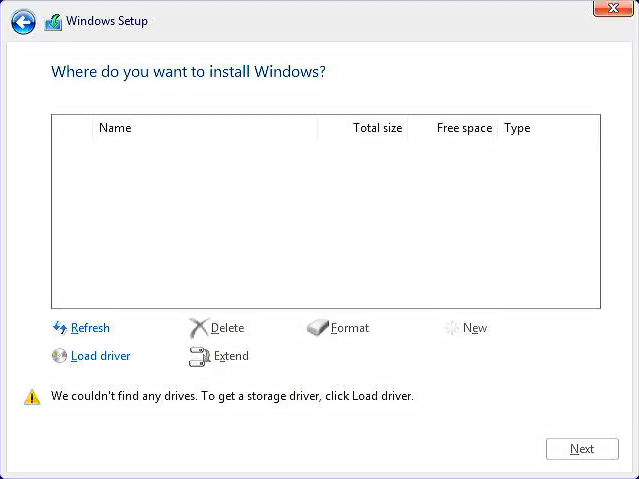
2. What to do when no drives are found during Windows 10 installation?
The drive cannot be found because the Media Creation Tool does not provide a storage driver. You can fix the problem by manually locating and installing the missing storage drivers by creating installation media:
- Create the Windows 10 installation media.
- Extract the corresponding drivers to the USB flash drive
- Install Windows 10 from the target USB flash drive
3. How to solve Windows can’t be installed to this disk error?
If you receive the ‘Windows cannot be installed to this disk and the selected disk has a GPT partition style’ error, it is because your PC boots in UEFI mode, but your hard drive is not configured for UEFI mode. You have two options:
- Convert MBR to GPT partition to accommodate the PC’s UEFI firmware capabilities.
- Keep the existing MBR partition, but restart the PC in legacy BIOS mode.
FAQ
Продукт
E420, E520, MINIPC PB50, MINIPC PB60V, MINIPC PB61V, MINIPC PB62, MINIPC PN52, MINIPC PN80, PA90, PB40, PB40-B, PB50, PB50-B, PB60, PB60-B, PB60G, PB60S, PB60S-B, PB60V, PB61S, PB61V, PB61V-B, PB61V-H, PB62, PB62-B, PB63, PB63-B, PL63, PL63-A, PL63-B, PL64, PL64-B, PL64-D1, PL64-D1-B, PN30, PN40, PN40Q, PN41, PN41-A, PN41-B, PN41-S1, PN41-S1-B, PN41-S1-M, PN41-S1-MI, PN42, PN42-B, PN42-S, PN42-S-B, PN50, PN50-B, PN50-E1, PN50-E1-B, PN50-F, PN50F2, PN50-S1, PN51, PN51-B, PN51-E1, PN51E1-B, PN51-S1, PN51-S1-B, PN52, PN52-B, PN53, PN53-B, PN53-S1, PN53-S1-B, PN60, PN60-B, PN60-R, PN61, PN61-B, PN61S, PN61T, PN62, PN62-B, PN62S, PN63, PN63-B, PN63-S1, PN63-S1-B, PN64, PN64-B, PN64-E1, PN64-E1-B, PN65, PN65-B, PN80, PN865, UN42, UN45, UN45H, UN62, UN62V, UN65, UN65H, UN65U, UN66, UN66S, UN68U, VC60, VC60DGT, VC60V, VC62B, VC65, VC65-C, VC65-C1, VC65R, VC66, VC66-C, VC66-C2, VC66D, VC66R, VC68R, VC68V, VM40B, VM42, VM45, VM60, VM62, VM62B, VM62N, VM65, VM65-K, VM65N, VM65N-K
[Ноутбук/AIO] Устранение неполадок — Как решить проблему отсутствия дисков при установке Windows 11/10
В этой статье представлено руководство по устранению неполадок, связанных с невозможностью найти диск во время установки Windows 11/10 на ноутбуке или моноблоке (AIO). Решение состоит в том, чтобы загрузить соответствующий драйвер в процессе установки.
Для получения дополнительной информации по проблеме отсутствия дисков при установке Windows 11/10 Вы можете нажать на ссылку ниже на ASUS Youtube:
Для платформ Intel CPU, вам необходимо установить драйвер Intel Rapid Storage Technology (IRST) во время процесса установки Windows. Вы также можете перейти по ссылке: конфигурация RAID или Intel® Optane™ памяти с Intel® RST на платформе с Intel® VMD возможностью.
Примечание: Следующие изображения носят информативный характер, они могут отличаться в зависимости от разных версий.
Установите вручную драйвер Rapid Storage Technology (IRST)
Загрузка и распаковка Rapid Storage Technology (IRST)
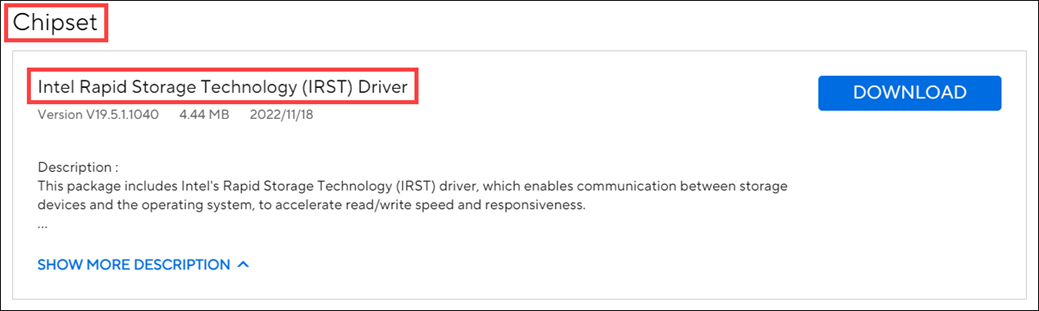
- Пожалуйста, обратитесь к этой статье: Как найти и скачать драйверы, утилиты, BIOS и руководства пользователя. После этого посетите страницу поддержки вашей модели и загрузите Intel Rapid Storage Technology (IRST) из раздела Chipset.
Примечание: В следующих шагах в качестве примера используется версия V19.5.1.1040, а изображения приведены только для справки. Вам следует скачать последнюю версию для вашей модели компьютера.
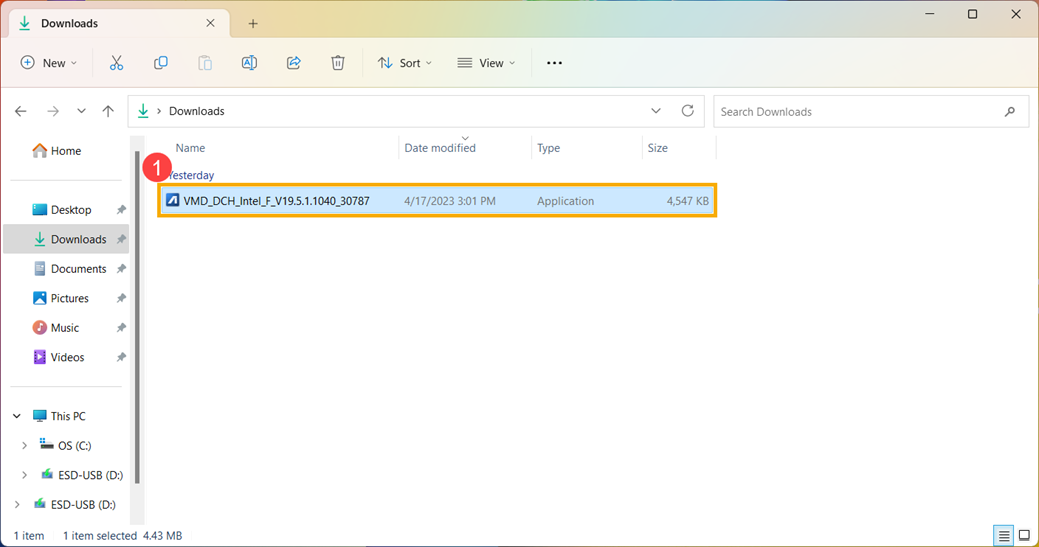
- После завершения загрузки дважды щелкните загруженный файл [VMD_DCH_Intel_F_V19.5.1.1040_30787]①.
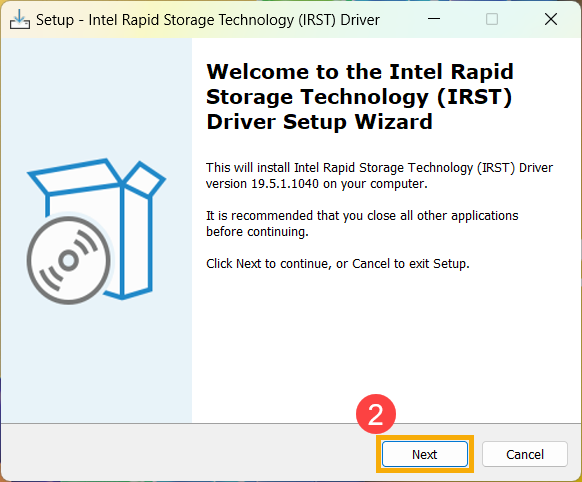
- Когда откроется IRST Setup Wizard нажмите [Next]②.
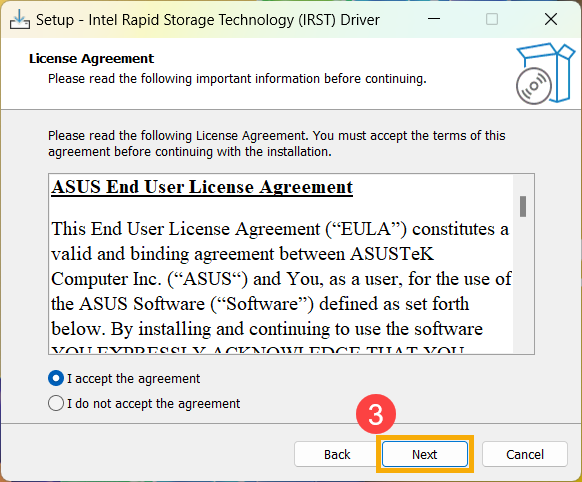
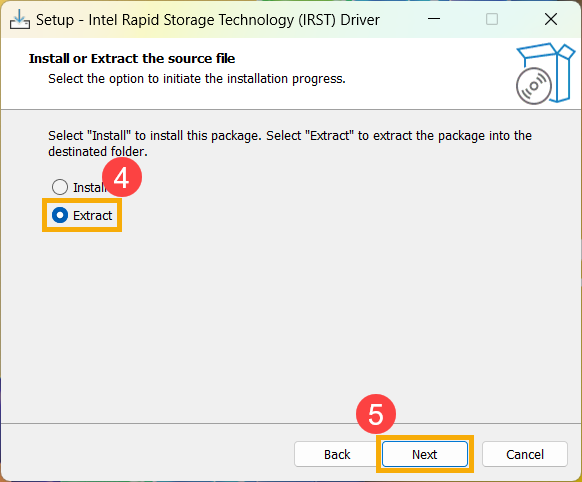
- Прочтите и примите лицензионное соглашение на программное обеспечение Asus, а затем нажмите [Next]③.
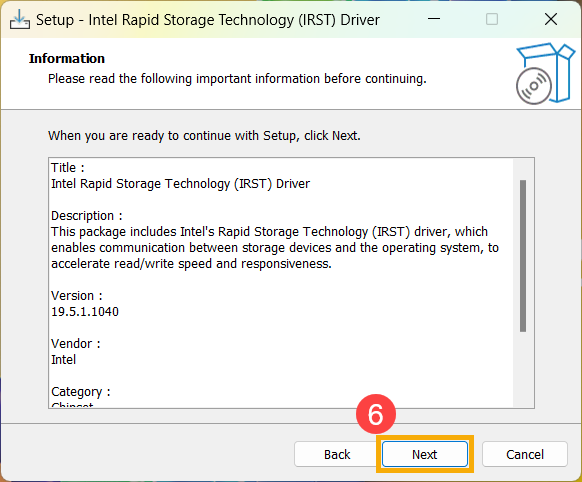
- Выберите [Extract]④ и нажмите [Next]⑤.
- Прочитайте важную информацию, а затем нажмите [Next]⑥.
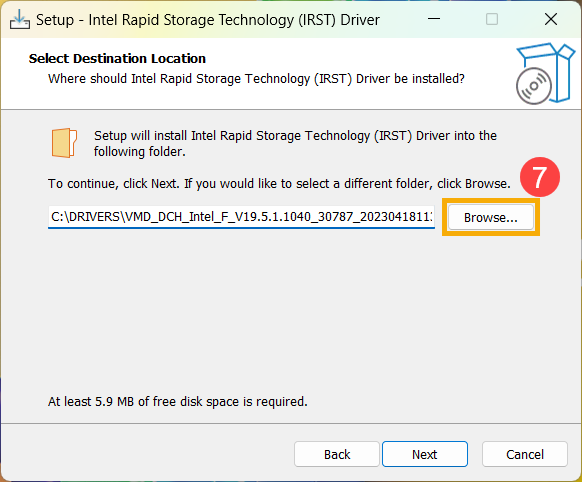
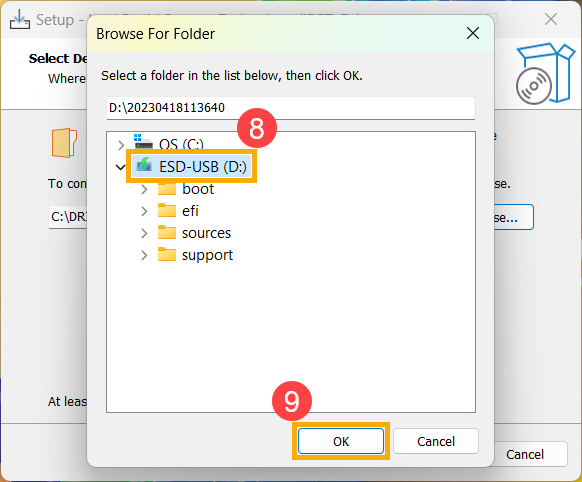
- При выборе папки назначения подключите USB флешку к компьютеру и нажмите [Browse]⑦.
Примечание: Если Ваш установочный носитель Windows 11/10 также использует USB флешку, то Вы можете извлечь драйвер на этот же накопитель. - Выберите корневой каталог USB-накопителя ⑧ и нажмите [OK]⑨.
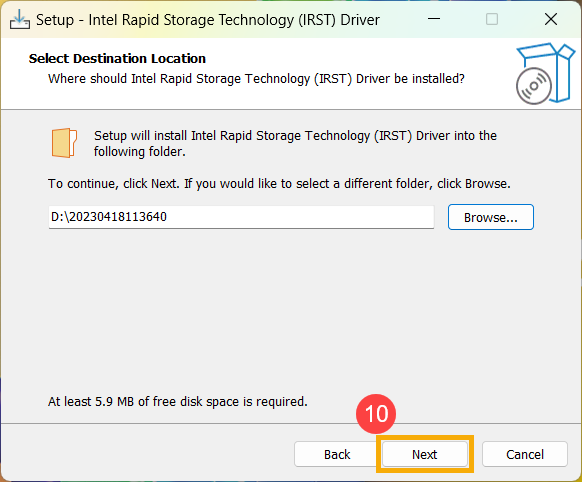
- После выбора папки назначения нажмите [Next]⑩.
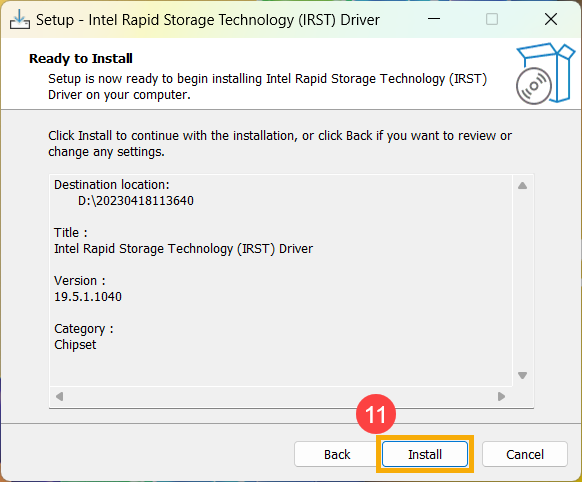
- Нажмите [Install]⑪, драйвер IRST будет извлечен на USB накопитель.
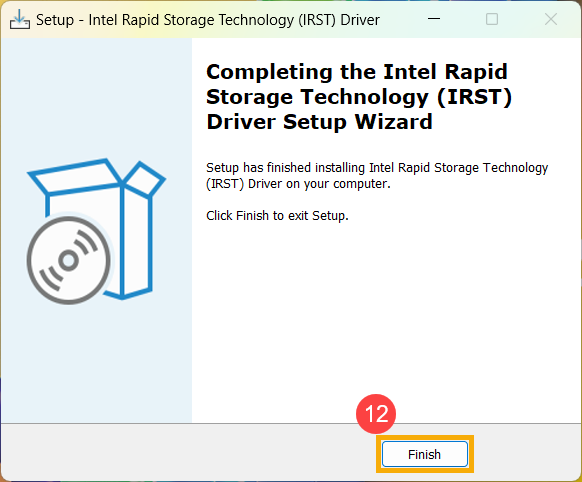
- Когда извлечение драйвера завершится нажмите [Finish]⑫, чтобы закрыть программу установки.
- Перейти к следующему разделу, “Установка драйвера Intel Rapid Storage Technology (IRST)”.
Установка драйвера Intel Rapid Storage Technology (IRST)
- Подключите USB накопитель с установочным носителем Windows 11/10 и извлеченным драйвером Intel Rapid Storage Technology (IRST) (VMD_DCH_Intel_F_V19.5.1.1040_30787) к компьютеру. (Если Вы устанавливаете с помощью компакт-диска Windows 11/10, вставьте компакт-диск вместе с упомянутым выше USB-накопителем.)
Примечание: Номера версий и изображения ниже приведены только для справки. Пожалуйста, загрузите последнюю версию со страницы поддержки Вашей модели компьютера. - Повторите процесс установки Windows 11/10. Если Вам нужна информация, как установить Windows 11/10 с помощью USB флешки, пожалуйста, обратитесь к этой статье: как создать и использовать установочный USB-накопитель для переустановки Windows 11/10.
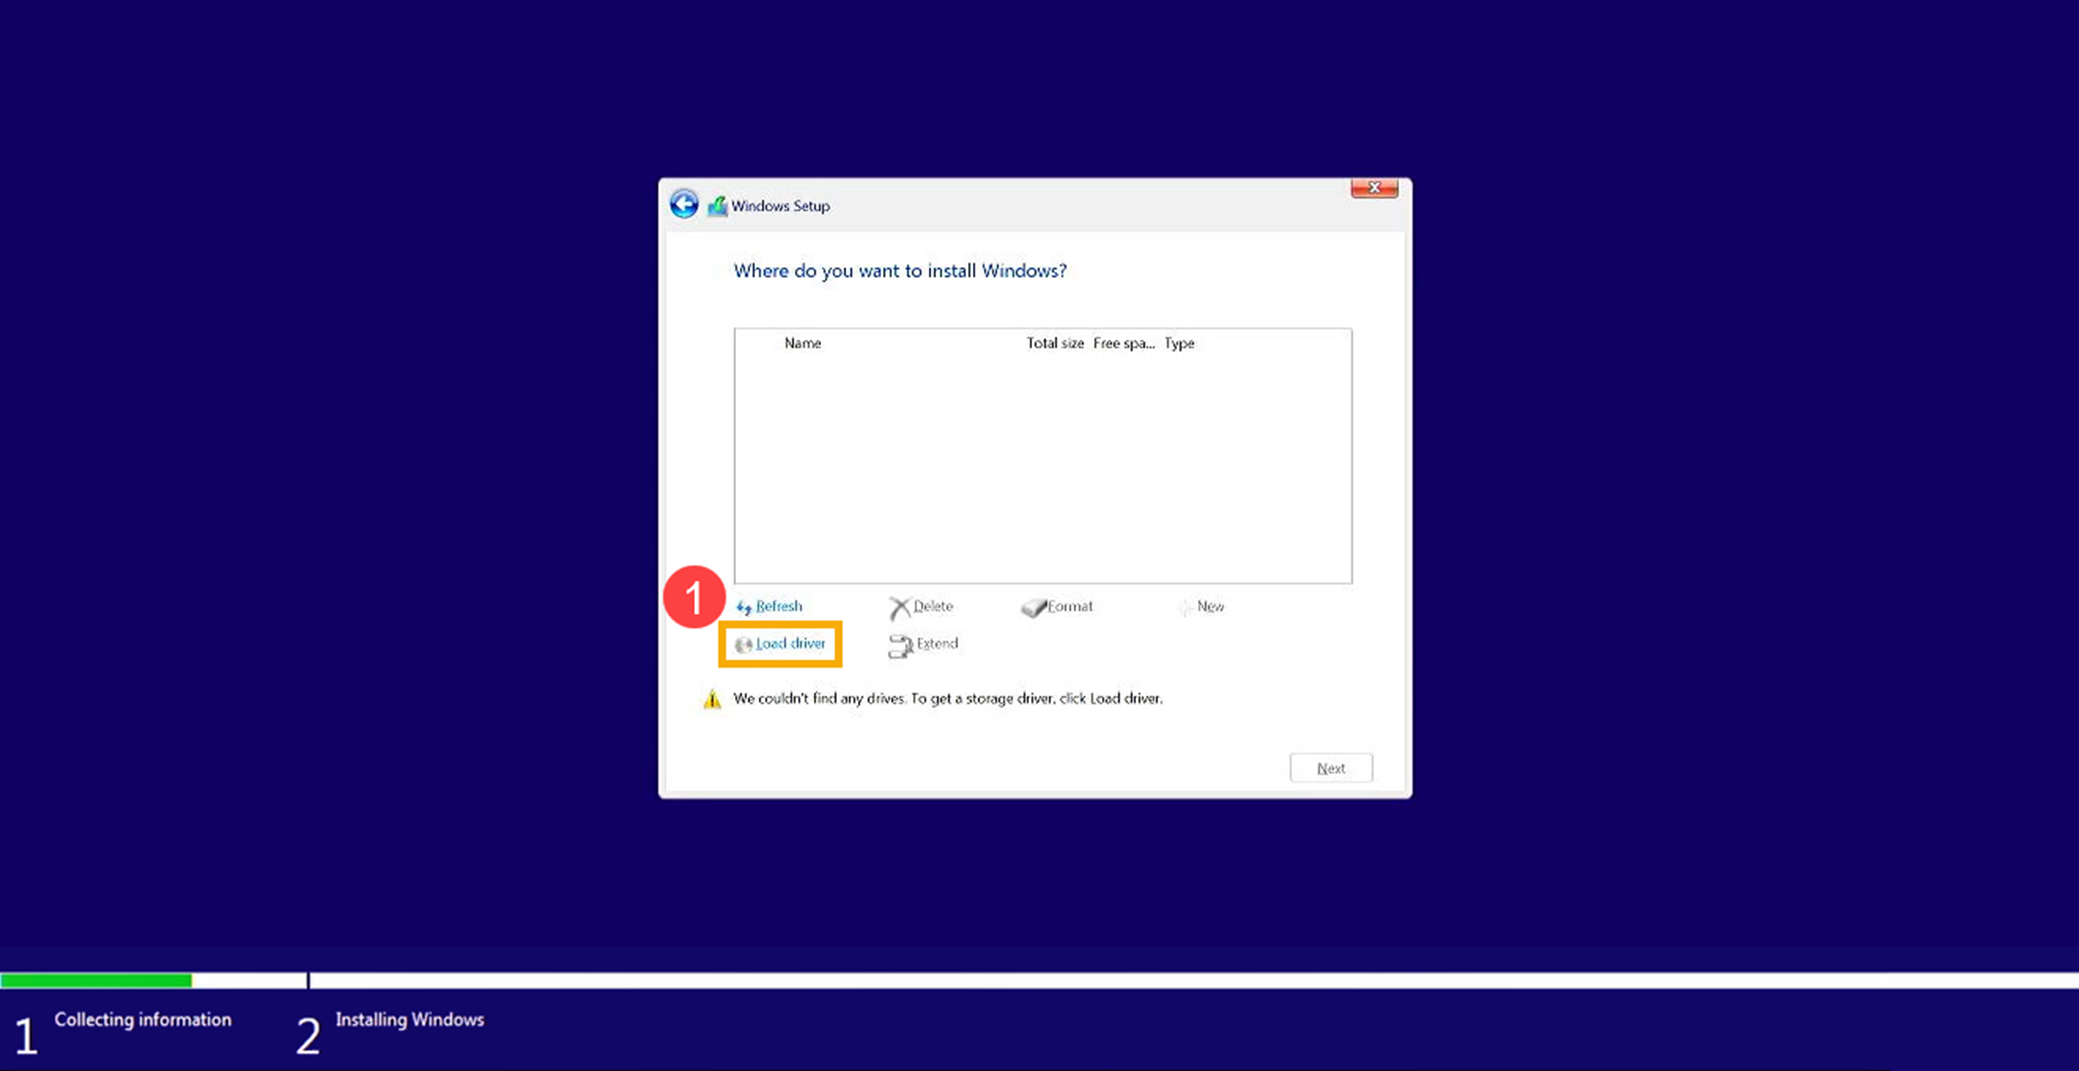
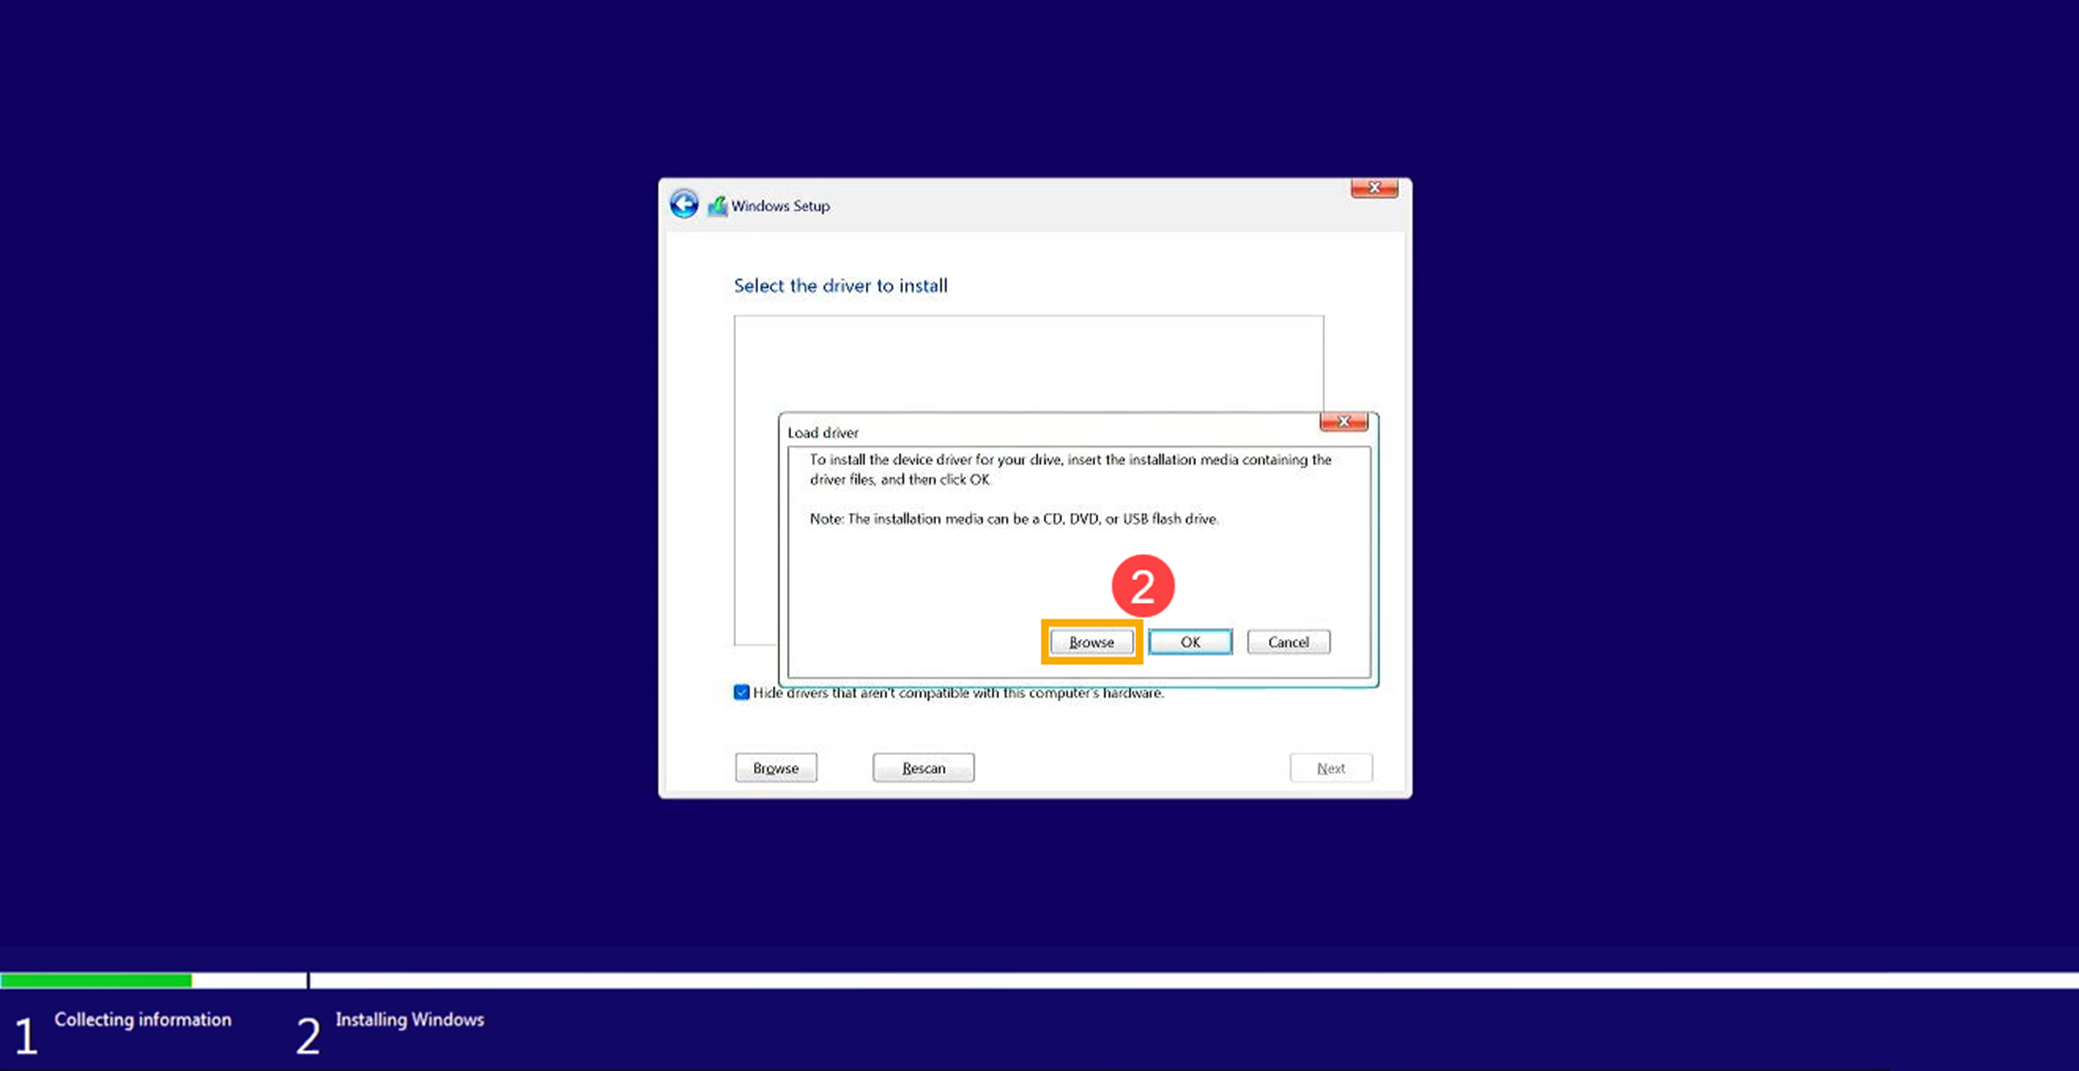
- Когда Вы увидите экран “Where do you want to install Windows” и Windows не видит диски нажмите [Load driver]①.
- Выберите [Browse]②.
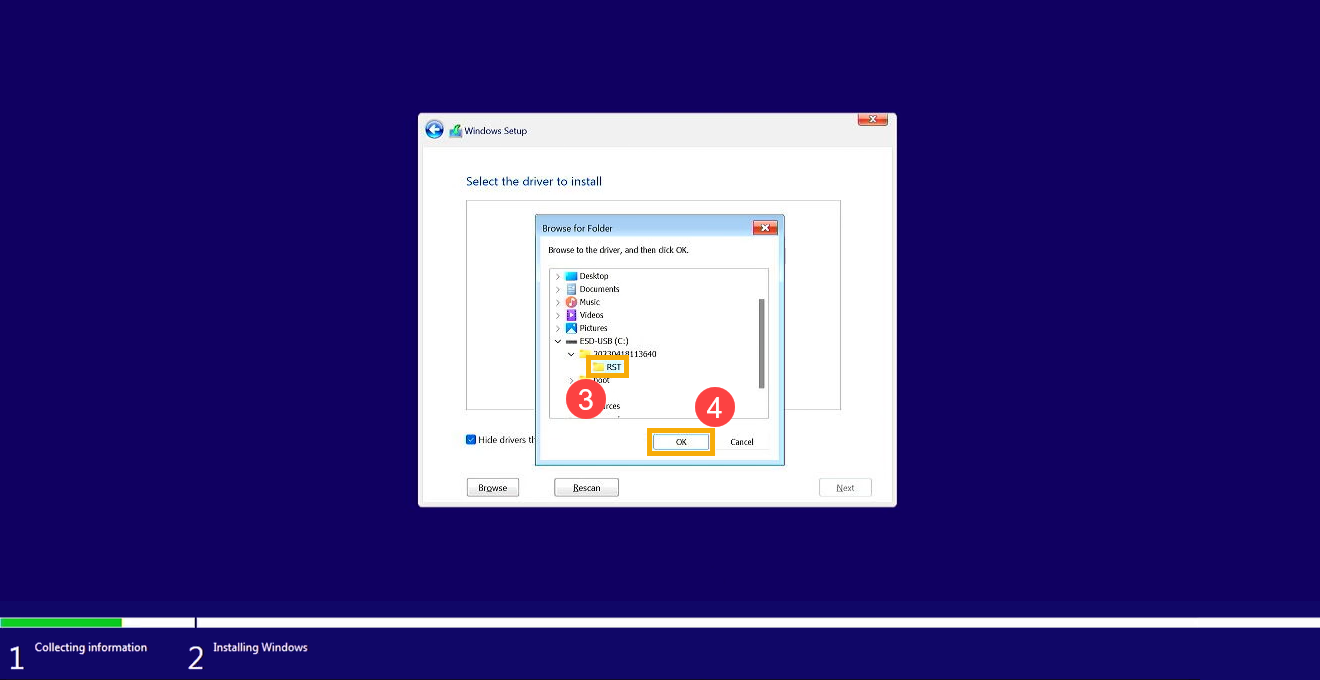
- Найдите папку, в которую Вы ранее извлекли драйвер IRST, выберите папку [RST]③ и нажмите [OK]④.
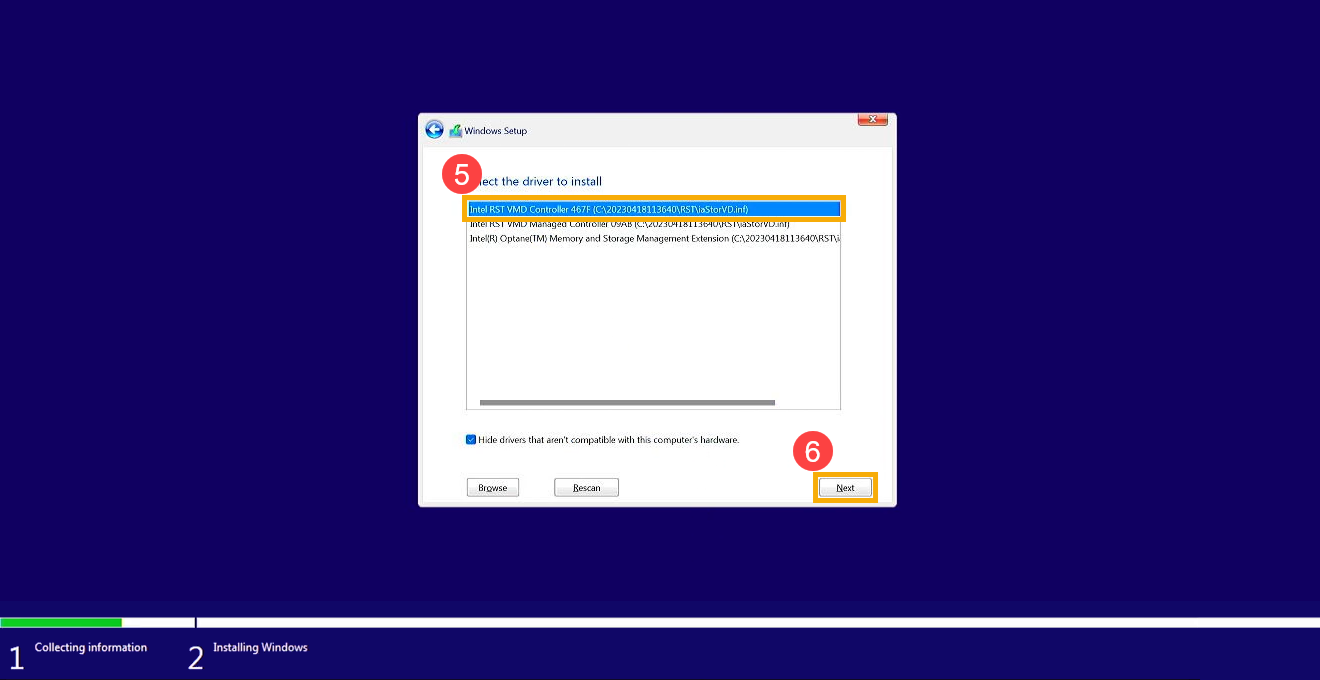
- Выберите [Intel RST VMD Controller]⑤, затем нажмите [Next]⑥, для запуска установки драйвера.
- После завершения установки драйвера диск будет отображаться нормально.
Если Вы по-прежнему не видите диск во время установки Windows, пожалуйста, обратитесь к этому разделу: Отключение технологии Intel Volume Management Device (VMD) для продолжения установки Windows.
Отключение технологии Intel Volume Management Device (VMD)
Примечание: Отключение технологии VMD приведет к тому, что Ваш компьютер не сможет использовать массив RAID.
- Сперва, зайдите в параметры BIOS. Пока компьютер не включился, нажмите и удерживайте клавишу F2 на клавиатуре, затем нажмите кнопку включения для входа в BIOS. Узнать больше можно по ссылке: Как войти в настройки BIOS
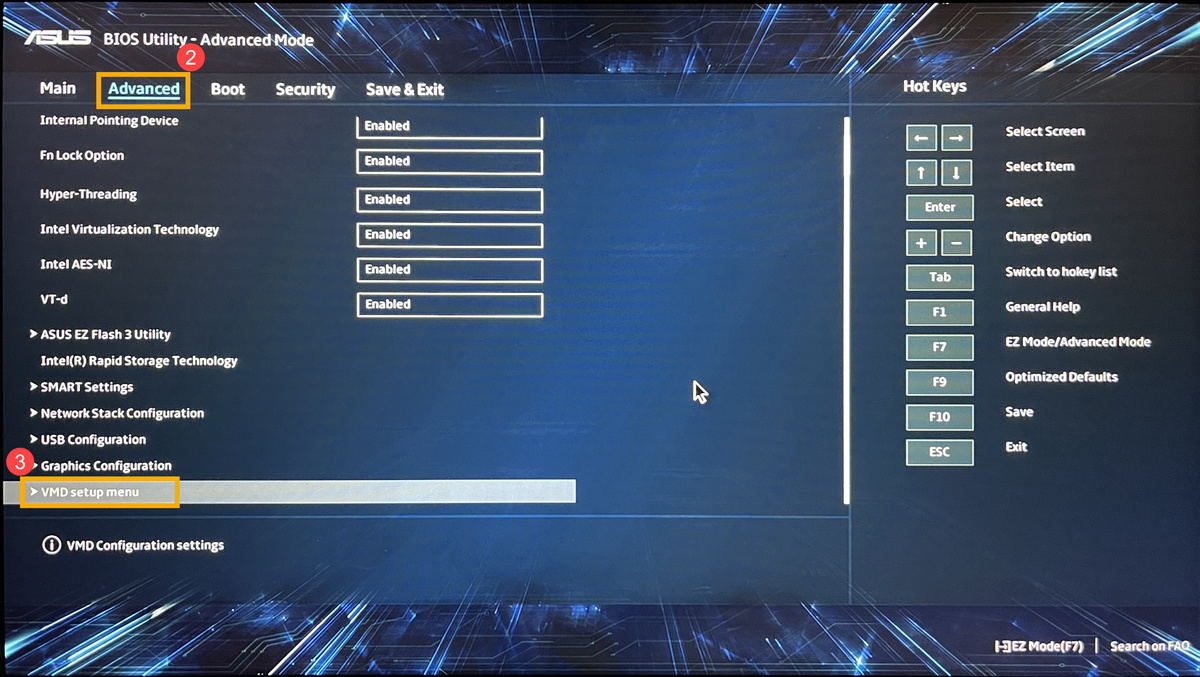
- После входа в BIOS нажмите клавишу [F7] или используя курсор кликните на [Advanced Mode]①.
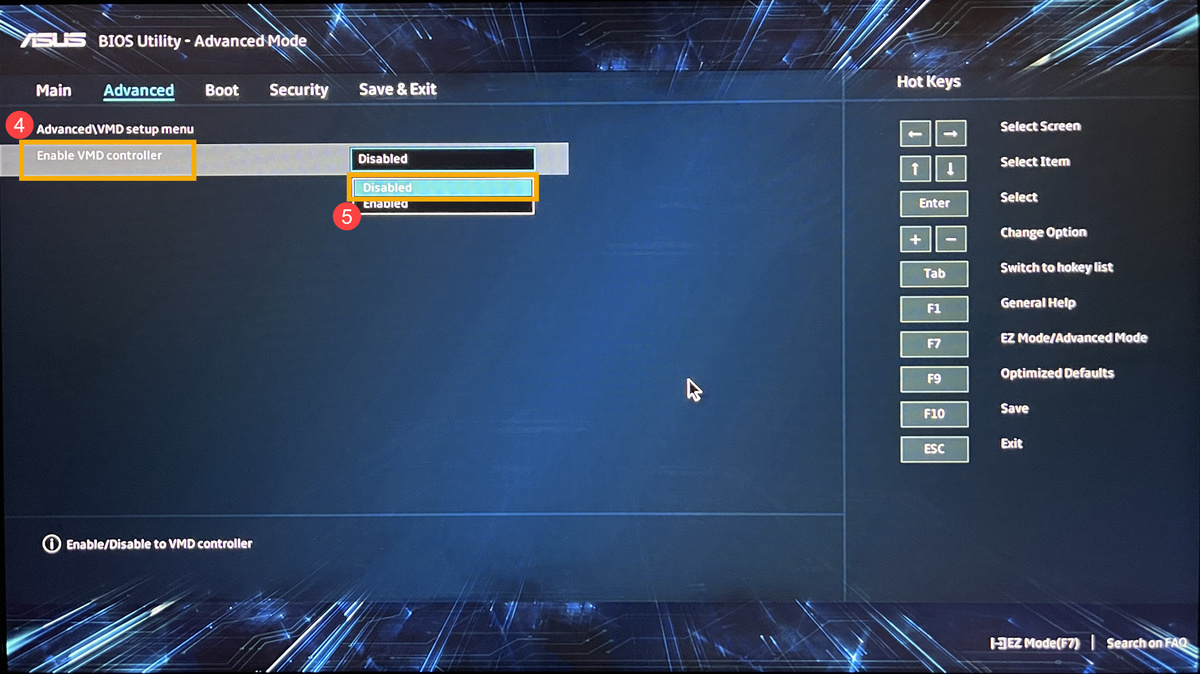
- Перейдите в меню [Advanced]② и выберите [VMD setup menu]③.
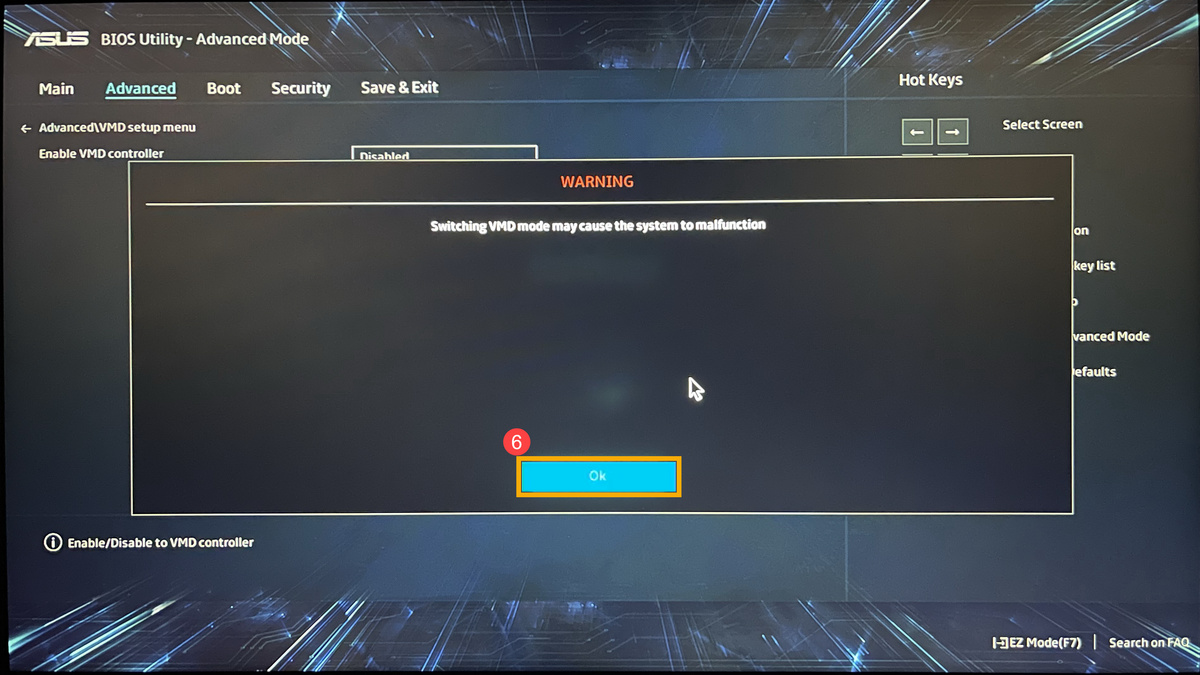
- Выберите [Enable VMD controller]④, а затем установите [Disabled]⑤.
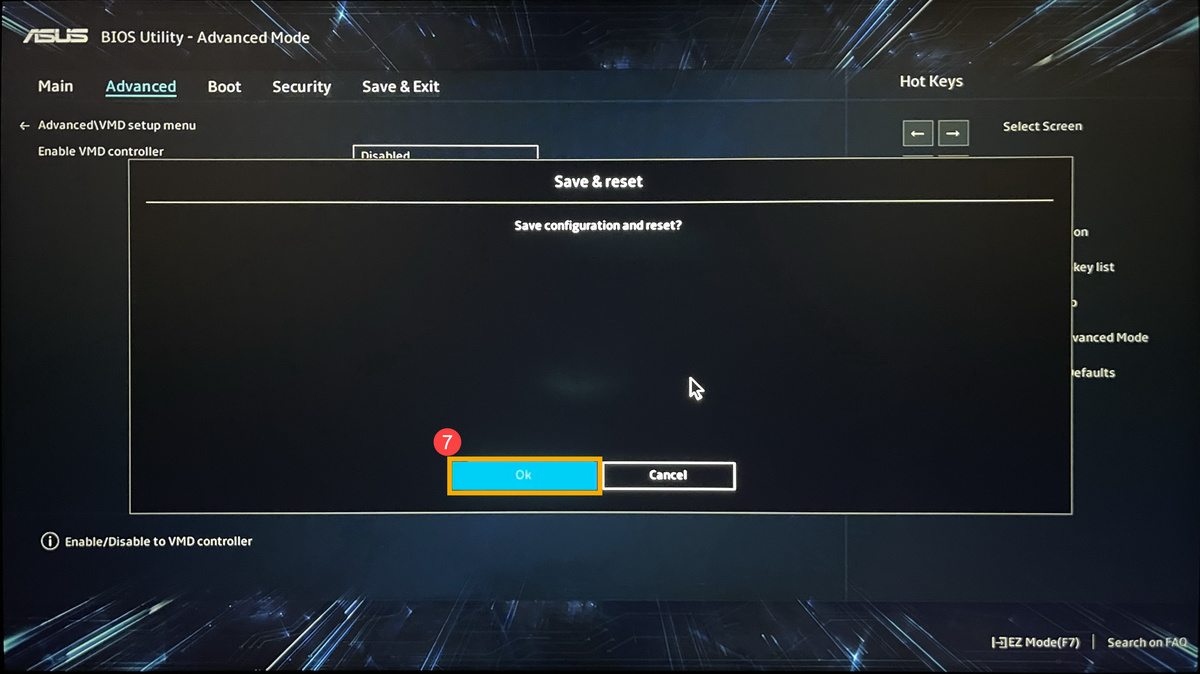
- Нажмите [Ok]⑥, чтобы отключить технологию Intel Volume Management Device (VMD).
- Сохраните и выйдите из настроек. Нажмите [F10] и затем [Ok]⑦, компьютер перезагрузится. После этого Вы сможете видеть диски при установке Windows 11/10. Здесь Вы можете узнать больше о том, Как создать и использовать установочный USB-накопитель для переустановки Windows 10.
 на клавиатуре, затем нажмите кнопку включения
 для входа в BIOS. Узнать больше можно по ссылке:
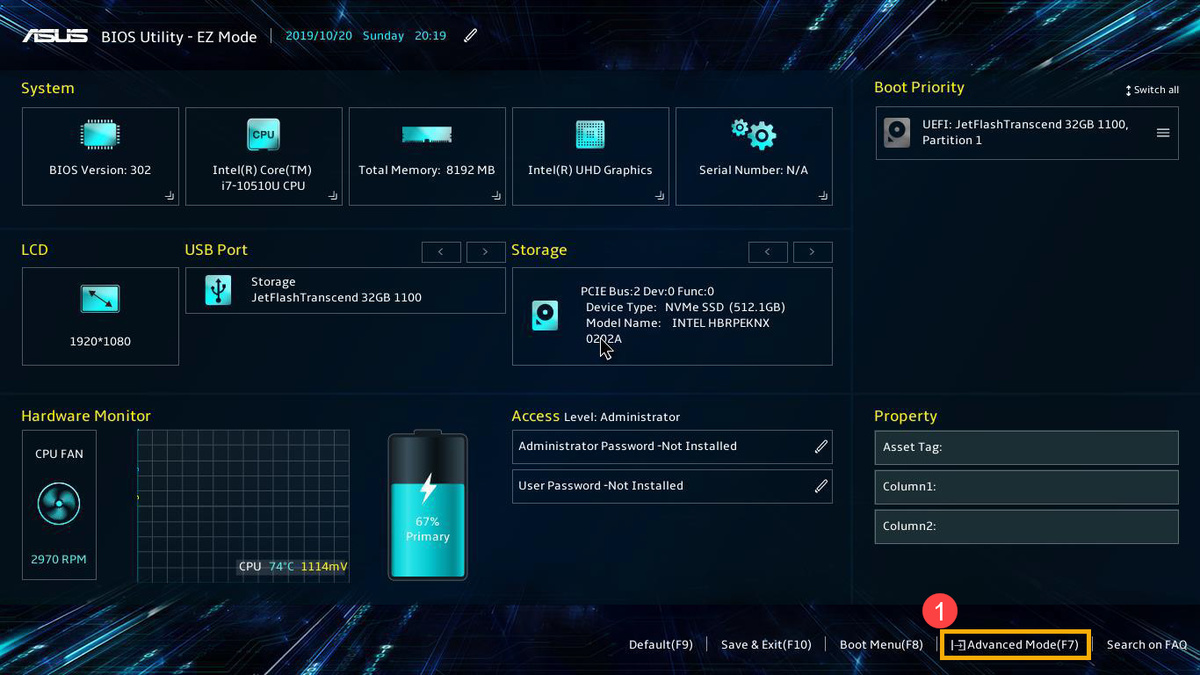
Если проблема не решена с помощью информации в статье, пожалуйста, обратитесь в центр поддержки ASUS для получения дополнительной информации.
Эта информация была полезной?
Yes
No
- Приведенная выше информация может быть частично или полностью процитирована с внешних веб-сайтов или источников. Пожалуйста, обратитесь к информации на основе источника, который мы отметили. Пожалуйста, свяжитесь напрямую или спросите у источников, если есть какие-либо дополнительные вопросы, и обратите внимание, что ASUS не имеет отношения к данному контенту / услуге и не несет ответственности за него.
- Эта информация может не подходить для всех продуктов из той же категории / серии. Некоторые снимки экрана и операции могут отличаться от версий программного обеспечения.
- ASUS предоставляет вышеуказанную информацию только для справки. Если у вас есть какие-либо вопросы о содержании, пожалуйста, свяжитесь напрямую с поставщиком вышеуказанного продукта. Обратите внимание, что ASUS не несет ответственности за контент или услуги, предоставляемые вышеуказанным поставщиком продукта.
Установочный диск Windows 7 является загрузочным, поэтому можно включить компьютер, и процесс установки начнется автоматически.
Если компьютер отказывается загружаться с установочного диска, необходимо выполнить следующее:
О Настройка BIOS
Войдите в BIOS, перейдите к разделу Boot и измените приоритеты загрузки (boot device priority) или последовательность загрузки (boot sequence) таким образом, чтобы DVD появился в очереди перед жестким диском. Сохраните сделанные изменения и выйдите из настройки BIOS.
О Меню загрузки
Некоторые компьютеры предлагают «меню загрузки», которое позволяет выбрать загрузочный диск. Поищите сообщение над или под экраном загрузки; как правило, достаточно нажать F12 (до звукового сигнала), выбрать CD/DVD-ROM и нажать Enter.
При обнаружении загрузочного диска на экране появляется на три-четыре секунды следующее сообщение:
Нажмите любую клавишу, чтобы запуститься с CD или DVD . . .
(Press any key to boot from CD or DVD . . .)
Нажмите любую кнопку, и через несколько мгновений начнется установка. (Если не удается воспользоваться установочным диском Windows, читайте раздел «Загрузка без загрузочного диска».)
В первом окне нажмите на кнопку Далее (Next), чтобы появилось окно Установка Windows (Install Windows), показанное на рис. 1.1. Чтобы продолжить, в появившемся окне нажмите Установить (Install now).
В следующем окне программа установки попросит вас ввести ключ продукта, который находится на коробке DVD или наклейке на корпусе компьютера. К счастью, Microsoft позволяет пропустить этот шаг — оставьте поле незаполненным и нажмите Далее (Next), после чего ответьте Нет (No) — чтобы не тратить время понапрасну, разыскивая наклейку, и мучительно вводить длинный (25 цифр) ключ (не надейтесь, что у вас получится это сделать без ошибок с первого раза). Такой прием значительно сэкономит время в случае временной установки для тестирования программы или восстановления данных.
Через несколько окон у вас поинтересуются: Какой тип установки выбрать? (Which type of installation do you want?). На этом этапе выберите Обновление (Upgrade) или Полная установка (дополнительные параметры) (Custom (advanced)). Опция Обновление (Upgrade) предназначена для установки новой системы только поверх Windows Vista, если вы попробуете сделать это с более ранней версией, например ХР, программа установки выдаст ошибку и запустит процесс заново.
«^v I При установке без ввода ключа убедитесь, что вы выбрали версию Windows 7,
1 для К0Т0Р°й У вас есть к-™04- Ошибка на этом этапе заставит переустанавливать систему еще раз. После загрузки Windows, как правило, будет работать в полно* ч* функциональном «демонстрационном» режиме 30 дней. Если в течение этого времени вы не ввели ключ для выбранной версии, Windows перейдет в режим блокировки. (Как увеличить демонстрационный период, рассказано в подразделе «Чистая установка с лиска обновления»). Не следует откладывать ввод ключа продукта, иначе головная боль вам обеспечена.
Выберите Полная установка (дополнительные параметры) (Custom (advanced)); появится окно Выберите раздел для установки Windows (Where do you want to install Windows?). Перейдите по ссылке Параметры диска (Drive options), чтобы вызвать Мастер разбивки, показанный на рис. 1.2.
Если жесткий диск не содержит нужных вам данных и вы хотите использовать его для установки, просто нажмите Далее (Next). В противном случе воспользуйтесь кнопкой Удалить (Delete), чтобы стереть существующие разделы, а также данные, содержащиеся на них (удаленные данные вернуть невозможно), затем нажмите кнопку Новый (New), чтобы создать новый раздел диска.
При установке на пустом жесткий диск программа установки Windows 7 создаст Системный резерв (System Reserved) размером 100 Мбайт (версия Professional или выше). Как сделать пак, чтобы этого не происходило, и использовать все пространство жесткого диска для установки Windows, читайте в подразделе «Как предотвратить создание дополнительных разделов при установке Windows» на с. 26.
Следуйте указаниям для завершения установки. Если процесс будет приостановлен или Windows не будет запускаться после завершения установки, обратитесь к разделу «Устранение проблем при установке Windows».
Чистая установка с диска обновления
Итак, вы решили сэкономить деньги, купив версию «обновления» Windows, и попали впросак. Может быть, жесткий диск поврежден, нет полного резервного копирования, и придется полностью восстанавливать систему. Или вы решили не делать установку поверх Vista, чтобы избежать сохранения всего мусора, который накопился в течение пары лет ее использования. Как бы то ни было, вы уже обнаружили, что с диска невозможно установить обновление Windows, если у вас не та версия операционной системы, поверх которой можно это сделать.
В этом случае Microsoft предлагает вам установить Vista, а уже поверх нее — Windows 7. Вряд ли такое решение кого-то устроит. Вместо этого проделайте следующие шаги, чтобы провести новую установку Windows 7 с диска обновления:
1. Используйте диск с Windows 7 для загрузки ПК, как описано в разделе «Установка Windows на пустой жесткий диск».
2. При появлении окна программы установки выберите Установить (Install now) и продолжайте, следуя подсказкам программы.
3. Когда программа запросит ключ продукта, оставьте поле незаполненным и просто нажмите Далее (Next). Так как вы не ввели ключ, программа спросит, какую версию Windows 7 следует установить; убедитесь, что вы правильно указали вашу версию.
4. По завершении установки у вас будет 30 дней, но вы не сможете активировать Windows 7 без ключа.
Чтобы ввести ключ, откройте командную строку в режиме администратора, как
описано в разделе «Управление UAO и затем введите команду:
cscriptwindowssystem32slmgr.vbs -ipkxxxxx-xxxxx-xxxxx-xxxxx-xxxxx
где ххххх-ххххх-ххххх-ххххх-ххххх — ключ вашей версии Windows 7, взятый с обложки DVD-диска или с наклейки на корпусе ПК. Нажмите Enter, чтобы продолжить.
Vr-
Если это не сработает, то потребуется отключить контроль учетных записей пользователей (UAC), как описано в главе 7, и затем попытаться еще раз. После
{ ? завершения включите UAC (если вам, конечно, этого захочется).
1. Следующим шагом активируйте Windows:
cscript windowssystem32slmgr.vbs -ato и нажмите Enter. Чтобы проверить, прошла ли активация, введите команду: cscript windowssystem32slmgr.vbs -dlv
2. Введите exit или закройте окно командной строки.
Используя так функцию «перевооружения» (rearming), вы можете увеличить демонстрационный период в два или три раза, что составит 120 дней. Просто выполните сценарий slmgr.vbs с параметром -rearm. Понадобится 15-30 секунд на внесение изменений, после чего необходимо перезагрузить Windows.
Как предотвратить создание дополнительных разделов при установке Windows
При установке Windows 7 (версии Professional, Ultimate или Enterprise) на пустой жесткий диск программа установки создает дополнительный скрытый раздел объемом 100 Мбайт. Он используется для шифрования диска при помощи Bit Locker, хотя BitLocker прекрасно работает и без него. В этом разделе содержится копия Инструментов восстановления Windows (Windows Recovery Environment), необходимых для исправления Windows без установочного диска, как описано в разделе «Что делать, если Windows не запускается».
*2*
* . При установке на жесткий диск с уже имеющимися разделами и хранящимися
там данными версии Ноше Premium (или если вы не против создания еще одного { ? раздела, ведь 100 Мбайт не так уже много по сегодняшним меркам) можно нро-‘* пустить этот раздел.
Так как эти 100 Мбайт вы никогда не сможете использовать для хранения данных, можно избежать создания этого раздела, выполнив следующие шаги:
1. В окне Выберите раздел для установки Windows (Where do you want to install Windows?) (см. рис. 1.2) создания раздела программы установки Windows 7 нажмите Параметры диска (расширенные) (Drive options (advanced)). Удалите существующие разделы (если они есть) и создайте новый раздел диска.
2. При появлении предупреждения Чтобы убедиться, что все функции Windows работают корректно, Windows может создать дополнительный раздел для системных файлов (То ensure that all Windows features work correctly, Windows might create additional partitions for system files) нажмите OK.
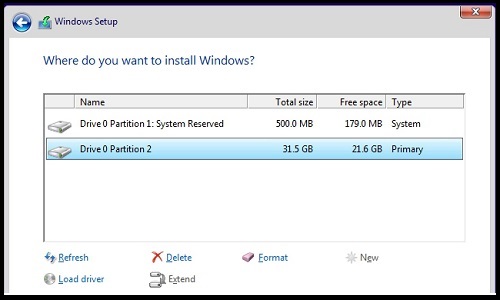
На этом этапе вы увидите два раздела:
• Диск 0 Раздел 1: Системный резерв (Система) (Disk 0 Partition 1: System Reserved (System));
• Диск 0 Раздел 2: (Основной) (Disk 0 Partition 2: (Primary)).
3. Выберите раздел Основной (Primary) и нажмите Удалить (Delete).
4. Далее выберите раздел Системный резерв (System Reserved) и нажмите Расширить (Extend). Введите максимальный доступный размер и нажмите Применить (Apply).
5. Снова выберите новый расширенный раздел Системный резерв (System Reserved) и нажмите Форматировать (Format).
6. По окончании форматирования продолжайте установку Windows в этом разделе.
- How do I choose where to install Windows 10?
- Which drive do you install Windows on?
- How do I find my Windows key?
- Can I install Windows 10 on D drive?
- Does Windows have to be on the C drive?
- How big is a fresh install of Windows 10?
- Where do we typically install the operating system?
- Why would Windows 10 install fail?
- How can I install Windows 11 for free?
- Which type of installation do you want Windows 10?
- What is reinstall Windows from this device?
- How do I do a clean install of Windows 10 home?
How do I choose where to install Windows 10?
If you want to choose the partition, you will need to create bootable installation media on DVD or USB and boot from it then select the partition. Once your computer is set to boot from the DVD, you should see this option.
Which drive do you install Windows on?
You can install Windows 10 by downloading a copy of the installation files onto a USB flash drive. Your USB flash drive will need to be 8GB or larger, and preferably should have no other files on it. To install Windows 10, your PC will need at least a 1 GHz CPU, 1 GB of RAM, and 16 GB of hard drive space.
How do I find my Windows key?
Generally, if you bought a physical copy of Windows, the product key should be on a label or card inside the box that Windows came in. If Windows came preinstalled on your PC, the product key should appear on a sticker on your device. If you’ve lost or can’t find the product key, contact the manufacturer.
Can I install Windows 10 on D drive?
It will work on any drive you select but it will matter which one you select. One drive is faster than the other so you want your Windows to be installed on the fastest drive.
Does Windows have to be on the C drive?
Yes, it’s true! Windows’ location could be on any drive letter. Even because you can have more than one OS installed on the same computer. You also could have a computer without a C: drive letter.
How big is a fresh install of Windows 10?
A fresh install of Windows 10 takes up about 15 GB of storage space. Most of that is made up of system and reserved files while 1 GB is taken up by default apps and games that come with Windows 10.
Where do we typically install the operating system?
Hard Drive Partitioning
The installation and initial booting of the OS is called the operating system setup. Although it is possible to install an OS over a network from a server or from a local hard drive, the most common installation method for a home or small business is with CDs or DVDs.
Why would Windows 10 install fail?
A file might have an improper extension and you should try changing it in order to resolve the problem. Issues with Boot Manager may cause the problem so try resetting it. A service or a program may cause the problem to appear. Try booting in clean boot and running the installation.
How can I install Windows 11 for free?
Open the Download Windows 11 page and click the Download now button under the Windows 11 Installation Assistant section. Run the downloaded Windows11InstallationAssistant.exe file. Click the Accept and install button and your Windows 11 installation will upgrade to Windows 11.
Which type of installation do you want Windows 10?
Be sure to select the language, edition, and architecture you want to install of Windows 10. If you’re installing it on a PC with a 64-bit CPU, you probably want the 64-bit version. If you’re installing it on a PC with a 32-bit CPU, you’ll need the 32-bit version.
What is reinstall Windows from this device?
The “Reset This PC” feature reinstalls the Windows operating system on your computer. You also have the option to keep your personal files or erase them—or even wipe your entire drive. But, whatever you do, Windows will replace your system files with fresh ones.
How do I do a clean install of Windows 10 home?
To reset your Windows 10 PC, open the Settings app, select Update & security, select Recovery, and click the “Get started” button under Reset this PC. Select “Remove everything.” This will wipe all your files, so be sure you have backups.
Windows 10 is a great operating system, but where do you want to install it? There are many different ways to install Windows 10, and each has its own pros and cons. Here are four different ways to install Windows 10:
Planning Your Windows Installation
Alright, so you’ve decided to go ahead and install Windows on your computer. Great choice! Here are a few tips to help make the process as smooth as possible.
1. Get organized
Before anything else, make sure you have a clear idea of where you’re planning to put your new installation. Make a map of your room, take into account where your computer and other electrical equipment will be, and figure out how much space you’ll have on your hard drive.
2. Choose your installation type
There are a few different ways to get Windows installed on your computer. You can download a pre-loaded version of Windows, install Windows using an installation disc or USB drive, or use a bootable flash drive to install Windows.
3. Choose your installation media
Once you have a good idea of where you’re going to install Windows, you’ll need to choose the installation media. Windows comes pre-loaded on many computers, but you can also find a variety of installation discs and USB drives at most retailers. You can also install Windows using a bootable flash drive.
4. Prep your computer
Before you begin the installation process, make sure your computer is properly prepared. Make sure your computer has the latest updates and software installed, and that your hardware is up to date. You’ll also need to disable any anti-virus software or other security measures that you might be using.
5. Start the installation
Choosing the Right Location for Your Windows Installation
There are a few things you need to consider when choosing the best location for your Windows installation. First and foremost, you need to make sure that the location is reliable and secure. Second, you will want to consider the size and layout of your computer room. Finally, you will want to make sure that your installation will have enough space for your hardware and software.
The best place to install your Windows system is on an exterior wall of your building. This is because it will be secure and reliable. It is also a good idea to install your Windows system in a room that is separate from your computer users. This is because you want to keep your system free from contamination.
The best layout for a computer room is one that is long and narrow. This is because it is easier to upgrade and maintain your hardware. You will also want to make sure that your system has enough space to accommodate your hardware and software.
Preparing Your Windows Installation Site
To ensure a seamless Windows installation process, your computer should be set up and prepared in advance. Here are a few things you should do before you install Windows:
1. To optimize your Windows experience, create a restore point before performing any major changes. This will help you revert to a previous version of Windows if something goes wrong during installation.
2. Verify that your computer meets the minimum system requirements for Windows. You can find this information in the Windows Requirements document.
3. Back up your files and data. This will help you restore your computer if something goes wrong during installation.
4. Create a recovery drive. This is a USB drive that contains all your important files and data. You can use it to reinstall Windows if your computer fails during installation.
5. Set up an Internet connection. This is required for some Windows features, such as online services and updates.
Creating a restore point and verifying your computer’s system requirements are important steps in preparing your Windows installation site. You should also back up your files and data, create a recovery drive, and set up an Internet connection.
Installing Windows
I want to install Windows 10 on my computer. In order to do this, I will need to first download the Windows 10 installer from the Microsoft website. Once I have downloaded the installer, I will need to unzip the file. Next, I will need to open the installer. Once I have opened the installer, I will need to choose my language.
Next, I will need to choose my edition of Windows 10. I can choose to install Windows 10 Home, Windows 10 Pro, or Windows 10 Enterprise. I will also need to decide whether or not I want toupgrade to Windows 10 Pro or Windows 10 Enterprise.
After I have chosen my edition, language, and upgrade path, I will need to choose my country. I will also need to choose my keyboard layout.
Next, I will need to choose my installation location. I can choose to install Windows 10 on my computer, or I can choose to install Windows 10 on a USB drive.
After I have chosen my installation location, I will need to choose my installation type. I can choose to install Windows 10 using a USB drive, or I can choose to install Windows 10 using the DVD.
Next, I will need to choose my device connection type. I can choose to install Windows 10 using a USB drive, or I can choose to install Windows 10 using a DVD.
After I have chosen my device connection type, I will need
Finalizing Your Windows Installation
If you’re anything like me, you probably have a few different installs of Windows around your place. Maybe you have a standard install of Windows 10, a Home version of Windows 8.1, an old Windows 7 install, and a few other versions of Windows scattered around too.
Installing Windows is a bit of a pain, especially if you want to use different versions of Windows on different devices. In this article, I’m going to show you how to install Windows in the simplest way possible. I’m going to assume you have a copy of Windows 10 handy.
First, open up the Start menu and search for “settings.” You’ll see a settings screen come up.
Click on the “Windows Update” link in the left column.
On the next screen, click on the “Windows Update” button in the bottom left corner.
A window will open that says “Check for updates.”
Click on the “Install updates” button.
Windows will start downloading the latest updates and installing them.
Once the updates are done installing, Windows will show you a screen that says “Windows is ready to start.”
Click on the “Start” button to start your new Windows install.
On the first screen of the install, you’ll see a choice to install Windows or not. If you’re installing Windows on a new drive, you can choose to install
Troubleshooting Your Windows Installation
If you are having problems installing or using Windows, there are a few things you can do to troubleshoot the problem. First, check for any software or hardware incompatibilities. Make sure all of your devices are compatible with Windows and that the drivers for them are up-to-date. Also, be sure that you have the correct installation disk or ISO file for your edition of Windows. If you are using a bootable media, make sure that the BIOS is configured to boot from that media. If you are using a USB drive, make sure that the drive is properly formatted and that the correct driver is installed for the USB port.
If you are still having problems, you can try the following troubleshooting tips:
1. Try to run the Windows installation in safe mode. This will disable some of the features of Windows, which may help you troubleshoot the problem.
2. Check for any error messages during the installation process. If you are getting errors that prevent the installation from completing, try to find the source of the problem and fix it.
3. Try to use different installation disks or ISO files. If you are using a bootable media, try using a different disk or ISO file. If you are using a USB drive, try using a different USB drive.
4. If you are using a CD or DVD, make sure that the disc is properly installed in your computer and that the CD or DVD is not damaged
Conclusion
Windows 10 is the best operating system for desktop PCs. It has a lot of features that make it the best choice for most people. However, if you want to install it on a laptop, you should consider installing it on a USB drive.