Windows Desktop – это интерфейс операционной системы Windows, который позволяет пользователям работать с компьютером, выполнять различные задачи и управлять файлами и программами. Desktop (рабочий стол) представляет собой основную часть интерфейса Windows и является первым, что пользователь видит после запуска компьютера.
Рабочий стол Windows предлагает множество удобных функций и инструментов, которые позволяют пользователю организовать свою работу и настройки. На десктопе можно разместить ярлыки для доступа к часто используемым программам и файлам, а также установить рабочий стол по своему вкусу, изменить фоновое изображение, размер и расположение значков и т. д.
Windows Desktop также предоставляет возможность управления окнами приложений. Пользователь может запускать несколько программ одновременно и свободно перемещаться между активными окнами. Кроме того, на рабочем столе можно размещать виджеты и гаджеты, которые отображают полезную информацию, такую как погода, календарь, часы и другие.
Использование Windows Desktop позволяет пользователю эффективно организовать свою работу, улучшить производительность и удобство использования компьютера. Благодаря простому и интуитивно понятному интерфейсу Desktop, даже начинающие пользователи могут быстро освоить работу с операционной системой Windows и насладиться ее функциональными возможностями.
Содержание
- Windows Desktop: работа на рабочем столе
- Что такое Windows Desktop?
- Рабочий стол Windows: как использовать?
- Функциональные возможности Windows Desktop
- Полезные советы по работе на рабочем столе
Windows Desktop: работа на рабочем столе
Основной элемент рабочего стола — это обои или заставка, которые являются фоном экрана. Пользователь может выбрать из предустановленных обоев или установить собственное изображение. Обои могут быть статичными или анимированными.
Окна приложений открываются на рабочем столе и могут быть размещены и изменены в зависимости от предпочтений пользователя. Для переключения между открытыми окнами можно использовать кнопки на панели задач или сочетания клавиш.
Рабочий стол также содержит панель задач, которая находится внизу экрана и предоставляет быстрый доступ к запущенным приложениям, системным уведомлениям и часам. Панель задач также содержит кнопку «Пуск», с помощью которой можно открыть меню «Пуск» и получить доступ к программам, настройкам и файлам.
Кроме того, на рабочем столе можно размещать виджеты или гаджеты, которые предоставляют информацию о погоде, календаре, новостях и т. д. Виджеты могут быть перемещены и изменены в размере для максимального удобства пользователя.
Для удобства организации файлов и папок на рабочем столе можно создавать различные группы или категории. Другие возможности работы на рабочем столе включают перемещение, копирование и удаление файлов и ярлыков, изменение настроек отображения и многое другое.
| Функция | Описание |
| Размещение ярлыков | Позволяет быстро получать доступ к часто используемым приложениям, папкам и файлам |
| Обои или заставка | Определяют фон рабочего стола и могут быть статичными или анимированными |
| Открытие окон приложений | Окна открываются на рабочем столе и могут быть размещены пользователем |
| Панель задач | Предоставляет быстрый доступ к запущенным приложениям, системным уведомлениям и часам |
| Виджеты или гаджеты | Предоставляют дополнительную информацию и удобство работы на рабочем столе |
| Организация файлов и папок | Возможность создания групп и категорий для удобства использования |
Рабочий стол в операционной системе Windows предоставляет множество возможностей для удобства работы с файлами, приложениями и другими объектами. Знание основных функций рабочего стола поможет повысить эффективность работы и улучшить пользовательский опыт.
Что такое Windows Desktop?
Windows Desktop предоставляет пользователю удобный способ доступа к файлам, папкам, программам и системным настройкам. С его помощью можно запускать приложения, открывать документы, перетаскивать иконки, изменять обои рабочего стола и настраивать отображение системных уведомлений.
В Windows Desktop также есть панель задач, которая располагается внизу экрана и позволяет быстро переключаться между открытыми приложениями, отображает уведомления, а также содержит кнопку «Пуск», где находится основное меню с доступом ко всем функциям операционной системы.
Windows Desktop может быть настроен и персонализирован по желанию пользователя. Он поддерживает различные темы оформления, которые меняют внешний вид компьютера, а также возможность размещения ярлыков, папок и файлов на рабочем столе в удобном порядке.
Использование Windows Desktop является основой работы с операционной системой Windows, так как он предоставляет множество функций и удобств для организации и выполнения задач на компьютере.
Рабочий стол Windows: как использовать?
Основная задача рабочего стола состоит в том, чтобы обеспечить удобство и быстрый доступ к вашим наиболее используемым приложениям и файлам. Когда вы включаете компьютер, рабочий стол появляется первым, предлагая вам начать свою работу.
Чтобы использовать рабочий стол Windows, вы можете выполнить следующие действия:
- Разместить ярлыки на рабочем столе: чтобы разместить ярлык на рабочем столе, откройте папку или программу, щелкните на ней правой кнопкой мыши и выберите «Отправить» -> «На рабочий стол». Ярлык появится на рабочем столе и вы сможете быстро открывать его в дальнейшем.
- Создать папку на рабочем столе: чтобы создать папку на рабочем столе, щелкните правой кнопкой мыши на пустой области рабочего стола, выберите «Новый» -> «Папка» и введите имя папки. Это позволит вам организовать файлы и ярлыки на рабочем столе в определенные категории.
- Перемещать и удалять элементы: чтобы переместить ярлык или файл на рабочем столе, просто перетащите его на желаемое место. Чтобы удалить элемент, выберите его и нажмите клавишу Delete на клавиатуре.
- Изменять фон рабочего стола: чтобы изменить фон рабочего стола, щелкните правой кнопкой мыши на пустой области рабочего стола и выберите «Персонализация» -> «Фон рабочего стола». Здесь вы можете выбрать изображение или цвет фона, которые подходят вам больше всего.
- Работать с виджетами: Windows позволяет добавлять различные виджеты на рабочий стол для удобства. Чтобы добавить виджет, щелкните правой кнопкой мыши на пустой области рабочего стола, выберите «Виджеты» и выберите необходимый виджет из списка.
Использование рабочего стола Windows может значительно упростить вашу работу и сделать ее более организованной. Настройте рабочий стол так, чтобы он наиболее соответствовал вашим потребностям и предпочтениям.
Функциональные возможности Windows Desktop
Windows Desktop предлагает пользователю множество функциональных возможностей, которые делают работу на компьютере удобной и продуктивной. Вот некоторые из них:
- Рабочий стол: центральная область экрана, где размещаются ярлыки приложений, папок и файлов. Пользователи могут организовывать ярлыки по своему усмотрению и удобно получать доступ к необходимым материалам.
- Панель задач: расположена внизу экрана и содержит ярлыки открытых приложений и окон. Пользователь может быстро переключаться между ними, а также использовать кнопки «Пуск», «Поиск» и «Уведомления».
- Окна приложений: пользователь может открыть несколько приложений одновременно и управлять их размещением на рабочем столе. Окна можно сворачивать, разворачивать и изменять размеры для оптимального использования рабочего пространства.
- Поиск: с помощью интегрированного поиска пользователь может быстро найти файлы, папки и приложения на компьютере. Поиск также может быть расширен до интернета, чтобы получить дополнительные результаты.
- Управление файлами: Windows Desktop предлагает различные инструменты для копирования, перемещения, переименования и удаления файлов и папок. Пользователь также может создавать новые папки, сортировать файлы и задавать им атрибуты.
Это только некоторые из функциональных возможностей Windows Desktop. Платформа возможностей постоянно расширяется и обновляется, чтобы удовлетворить потребности пользователей в современном мире информационных технологий.
Полезные советы по работе на рабочем столе
- Организуйте ярлыки по категориям. Чтобы облегчить поиск нужных файлов и программ, можно создать на рабочем столе отдельные папки для различных категорий – работа, личное, развлечения и т.д. Разместите соответствующие ярлыки в каждой папке для более быстрого доступа.
- Используйте док-станцию. Если у вас есть задачи, которые вы выполняете ежедневно, то стоит рассмотреть возможность использования док-станции на рабочем столе. Док-станция позволяет одновременно подключать множество периферийных устройств, таких как мониторы, клавиатура, мышь и т.д., облегчая тем самым ваши повседневные рабочие процессы.
- Очистите рабочий стол. Периодически регулярно убирайте ярлыки, файлы и папки, которые больше не нужны. Чем меньше мусора на рабочем столе, тем проще будет находить нужные элементы и работать с компьютером в целом.
- Используйте функцию «Показать рабочий стол». Если вам нужен быстрый доступ к рабочему столу без закрытия всех окон, вы можете воспользоваться функцией «Показать рабочий стол». Для этого достаточно кликнуть на соответствующую кнопку в панели задач внизу экрана или воспользоваться сочетанием клавиш Win + D.
- Пользовательский фон рабочего стола. Если вы хотите добавить немного стиля на свой рабочий стол, можете изменить фоновое изображение или цвет. Просто щелкните правой кнопкой мыши на свободном месте рабочего стола, выберите «Персонализация» и затем «Фон рабочего стола». Выберите изображение или цвет, который вам нравится, и сохраните настройки.
Беря на вооружение эти советы, вы сможете значительно улучшить свой опыт работы на рабочем столе Windows Desktop и быть более продуктивными.
The desktop in Windows 10 is the graphical user interface (GUI) that serves as the main working area for the operating system. It provides a visual representation of the file system and allows users to interact with various elements on their computer. Here are the key aspects and functionalities of the desktop in Windows 10:
1. Icons: The desktop displays icons representing files, folders, shortcuts, and applications. These icons allow users to quickly access and launch their desired items or programs.
2. Taskbar: Located at the bottom of the screen, the taskbar provides shortcuts to frequently used applications, the Start menu, and the system tray. It enables easy multitasking by allowing users to switch between open programs and monitor system status.
3. Wallpaper and Personalization: Users can customize the desktop’s appearance by setting a wallpaper, choosing different themes, and adjusting visual settings like colors, transparency, and font sizes.
4. Start Menu: Clicking the Start button on the taskbar opens the Start menu, which provides a centralized location for accessing programs, settings, and system functionalities. It offers a range of options, including recently used applications, a search bar, and quick access to power options.
5. File Explorer: Accessible from the taskbar or through desktop shortcuts, File Explorer enables users to navigate and manage their files and folders. It allows for tasks such as copying, moving, renaming, and deleting items, as well as accessing network drives and external storage devices.
6. Desktop Gadgets and Widgets: Windows 10 offers the ability to add desktop gadgets and widgets to enhance usability and provide quick access to information like weather updates, news feeds, or system monitoring.
7. Snap Assist: A feature called Snap Assist allows users to organize open windows by snapping them to specific areas of the screen. This functionality helps with multitasking and improves productivity by enabling side-by-side viewing or arranging windows in a particular way.
8. Virtual Desktops: Windows 10 provides the ability to create and manage multiple virtual desktops. This feature allows users to group related windows or tasks on separate desktops, improving organization and reducing clutter.
9. Notifications and Action Center: Notifications for various events and system updates are displayed on the desktop, ensuring users stay informed. The Action Center, accessible from the system tray, consolidates notifications and provides quick access to system settings and toggles.
Overall, the desktop in Windows 10 serves as a visual hub, providing quick access to essential files, applications, and system functions. It offers customization options for personalization and effective multitasking features to enhance productivity.
Video Tutorial:What is desktop in Windows?
How do I find desktop on Windows 10?
To find the desktop on Windows 10, you can follow these steps:
1. Look for the «Start» button on the lower-left corner of your screen. It’s usually represented by the Windows logo.
2. Click the «Start» button to open the Start menu.
3. In the Start menu, locate the «File Explorer» icon. It usually looks like a folder and is commonly pinned to the taskbar by default. You can also search for «File Explorer» in the search bar located next to the Start button.
4. Click on the «File Explorer» icon to open the File Explorer window.
5. In the left-hand pane of the File Explorer window, you’ll find a list of shortcuts called the navigation pane. Look for «This PC» or «Computer«; the exact label may vary depending on your version of Windows 10.
6. Click on «This PC» or «Computer» to expand the section.
7. Inside «This PC» or «Computer,» you’ll find various icons representing different drives and libraries. Scroll down if needed and locate the «Desktop» icon.
Once you locate the «Desktop» icon, you can double-click it to access your Windows 10 desktop. Additionally, you can right-click the «Desktop» icon to reveal a context menu with various options related to the desktop, such as creating a new shortcut or changing desktop settings.
Remember that these instructions are specifically for Windows 10, and the steps may differ slightly for older versions of Windows.
Where do I find the desktop icon?
As a tech blogger, if you’re looking for the desktop icon on a computer, here are the steps to locate it:
Step 1: Look for the desktop background – The desktop background is usually a visible area behind all the open windows and applications. It often displays images or wallpapers. Start by closing or minimizing any open windows or applications to see the underlying desktop.
Step 2: Scan the desktop area – Once you have a clear view of the desktop, scan the entire area for icons. These icons typically represent shortcuts to files, folders, or applications. They are generally small graphical images with labels underneath.
Step 3: Identify the desired icon – Look for the specific icon you’re searching for. If you’re unsure of its appearance, you can hover your mouse cursor over different icons to see if a tooltip appears with a label indicating its name.
Step 4: Move or organize icons – If the icon is not immediately visible, it’s possible that it may be hidden or located in a different position. In such cases, you can try rearranging the icons on your desktop. Right-click on an empty space on the desktop, select «View» or «Sort by,» and choose an appropriate option like «Auto Arrange» or «Align to grid» to automatically rearrange the icons. Alternatively, you can also try dragging your mouse cursor across the desktop area, which will create a selection box and highlight any icons it encompasses.
Step 5: Use the search function – If you’re still unable to find the desktop icon despite rearranging or searching manually, you can utilize the search function on your computer. On Windows, click the Start button, and in the search bar type the name of the icon you’re looking for. On macOS, you can use the Spotlight Search located at the top right corner of the screen.
By following these steps, you should be able to find the desktop icon you’re searching for.
What do you mean by desktop?
In the context of personal computing, a desktop typically refers to a computer system comprising a computer case (or chassis) that holds various hardware components such as the motherboard, processor, RAM, storage drives, and a power supply. It is designed to be placed on a desk or a dedicated workspace and provides a fixed, non-portable computing platform.
Here are the steps or reasons to consider when understanding what a desktop means:
1. Hardware Configuration: A desktop computer is usually a tower or mini-tower form factor that includes a CPU, monitor, keyboard, and mouse. It provides more flexibility in terms of hardware upgrades and customization compared to laptops or all-in-one computers.
2. Power and Performance: Desktops tend to offer superior performance capabilities due to their larger size, power supply, and cooling systems. They often house more powerful processors, higher amounts of RAM, and larger storage capacities, which makes them suitable for resource-intensive tasks such as gaming, video editing, and software development.
3. Expandability: One of the key advantages of desktop computers is their expandability. Users can easily add or upgrade components such as graphics cards, sound cards, additional hard drives, and more, to meet specific usage requirements. This expandability ensures that desktops can adapt to changing needs and technological advancements.
4. Customizability and DIY Build: Unlike laptops, desktop computers provide a higher level of customizability and allow users to build their own systems. This ability is beneficial for tech enthusiasts or professionals who prefer specific hardware configurations tailored to their needs, budget, or preferences.
5. Ergonomics and Comfort: Desktop computers can be paired with larger monitors, ergonomic keyboards, and mice, offering a more comfortable computing experience. The larger screen real estate allows for improved multitasking and detailed work, while ergonomic peripherals can enhance productivity and reduce strain on hands and wrists.
6. Cost-Effectiveness: Desktop computers tend to offer better value for money compared to certain laptops or high-end mobile devices. They provide more horsepower for a given budget, making them a suitable choice for users who require powerful computing capabilities without the need for portability.
Overall, a desktop refers to a stationary, non-portable computing system that can be customized, upgraded, and offers higher performance capabilities compared to laptops or other portable devices. Its form factor and expandability provide users with flexibility, power, and potential cost savings.
What is considered a desktop?
A desktop is a type of computer that is designed to be used in a fixed location, typically sitting on top of a desk or workstation. It consists of several key components, including a computer case or tower, a monitor, a keyboard, a mouse, and various other peripheral devices such as speakers or printers. Here are the reasons why a computer is considered a desktop:
1. Form factor: Desktop computers are known for their larger form factor compared to laptops or tablets. They often feature a separate computer case or tower that houses the internal components, allowing for more powerful hardware configurations and easier expandability.
2. Power and performance: Desktops are typically more powerful and capable of handling resource-intensive tasks, thanks to their larger size and the ability to accommodate high-performance components such as powerful processors, dedicated graphics cards, and higher RAM capacities. This makes them ideal for tasks like video editing, gaming, or running resource-demanding software.
3. Upgradeability: One of the key advantages of desktop computers is their upgradeability. Unlike laptops or tablets, where hardware components are often integrated and non-replaceable, desktops allow users to easily upgrade or replace individual components like the processor, graphics card, storage, or memory modules, as technology advances and their needs change.
4. Connectivity and expansion: Desktop computers typically offer a wider range of connectivity options and expansion slots, allowing users to connect peripherals and expand their system capabilities. This includes multiple USB ports, audio ports, Ethernet ports for wired network connections, and expansion slots for additional graphics cards, sound cards, or other peripherals.
5. Multitasking and productivity: With their more powerful hardware, larger screens, and full-sized keyboards, desktop computers are generally better suited for multitasking and productivity-oriented tasks. They offer a comfortable working environment for activities such as office productivity, content creation, programming, or any task that benefits from a larger display and physical keyboard.
6. Cost-effectiveness: While desktop computers can vary in price, they generally offer more value for money in terms of performance compared to laptops or tablets. They also tend to be more cost-effective in the long run due to their upgradeability and the ability to replace individual components instead of replacing the entire system.
Overall, a desktop computer provides a stationary computing solution with enhanced power, performance, upgradeability, and multitasking capabilities, making it a preferred choice for users who require high-performance computing or need a workstation-like environment.
The desktop version of Windows is a popular operating system developed by Microsoft. Currently, the latest version of Windows is Windows 11. Below are some key points regarding the availability and usage of desktop Windows:
1. Availability: Windows 11 is available for purchase and installation from Microsoft. Users can either buy a new computer pre-installed with Windows 11 or upgrade their existing Windows systems to Windows 11 if their hardware meets the minimum requirements set by Microsoft.
2. Licensing: Windows 11 requires a valid license to activate and use. Users can acquire licenses through various channels, such as purchasing a standalone copy or obtaining it through volume licensing agreements for organizations.
3. Hardware Requirements: To install and run Windows 11 smoothly, users need to ensure that their computers meet the minimum system requirements specified by Microsoft. These include factors such as processor type, RAM, storage space, graphics capabilities, and secure boot capability.
4. Installation Process: The installation process for Windows 11 involves creating a bootable installation media, such as a USB drive, and following the on-screen instructions provided by Microsoft. Users should back up their data before initiating the installation process.
5. User Interface and Features: Windows 11 introduces a redesigned user interface with a centered Start menu, revamped taskbar, and rounded corners. It also introduces new features like Snap Layouts for multitasking, Virtual Desktops, and improved gaming capabilities, among others.
6. Productivity and Security Enhancements: Windows 11 brings productivity enhancements with features like Microsoft Teams integration, enhanced Microsoft Store, and improved support for touch and stylus input. Moreover, it offers advanced security features, including Windows Hello for facial recognition and hardware-based security enhancements.
7. Updates and Support: Windows 11 receives regular updates from Microsoft to deliver security patches, bug fixes, and new features. It is crucial for users to keep their systems up-to-date to ensure optimal performance and security.
That covers the basics of where to find and how to use the desktop version of Windows. It’s a widely used operating system that provides a user-friendly interface, extensive software compatibility, and a range of features to enhance productivity and security.
Why is there no desktop on Windows 10?
Windows 10 does have a traditional desktop interface, and it is one of the key features of the operating system. However, I believe you are referring to the absence of a separate desktop version of Windows 10, like how Microsoft released Windows 8 as a desktop and tablet version.
There are a few reasons why Microsoft made this decision:
1. Unified User Experience: Microsoft aimed to create a unified experience across multiple devices, including PCs, tablets, and smartphones. By having a single operating system that works on various device form factors, they intended to provide a consistent user experience and simplify development for app developers.
2. Touch-Friendly Interface: Windows 10 was designed with touch screens in mind, as touchscreen devices were becoming more prevalent in the market. The Start screen in Windows 8, which was primarily touch-focused, received mixed feedback from users. In response, Windows 10 reintroduced the familiar desktop interface with improvements while incorporating touch-friendly features. This way, users could seamlessly switch between touch input and traditional mouse and keyboard interaction.
3. Evolving User Habits: Over the years, the usage patterns of technology users have changed. Many people now primarily use laptops or convertibles that offer the flexibility of using both touch and traditional input methods. By combining the desktop and tablet experiences, Windows 10 accommodated this trend and provided a more versatile operating system.
4. App Ecosystem: For both developers and users, having a common code base and compatibility across devices streamlines development and ensures a consistent user experience. By unifying Windows across devices, developers can create Universal Windows Platform (UWP) apps that work on different devices, including desktops, tablets, and even Xbox consoles. This approach encourages app developers to target a broader audience and widens the selection of available applications for users.
Windows 10’s approach of combining the desktop and tablet experiences was a conscious decision by Microsoft to provide a versatile operating system that meets the needs of modern technology users on various device form factors.
На чтение 9 мин Просмотров 11.9к. Обновлено
Всем привет! Продолжаю вести рубрику о компьютерной грамотности. Мы с вами уже разобрали, из чего состоит компьютер, и какие операционные системы устанавливаются на него. Сегодня мы приступим к тому, как работать за компьютером и разберем важную тему — что представляет собой рабочий стол Windows.
Тема выбрана неслучайно, так как рабочий стол это первое что вы видите после полной загрузки ПК. С помощью него можно производить множество действий во время работы за компьютером.
Содержание
- Что такое рабочий стол
- Из чего состоит
- Настройка параметров
- Для виндовс 7
- 1 область
- 2 область
- 3 область
- 4 область
- Для виндовс 10
- Параметры экрана
- Персонализация
- Панель задач
- Для виндовс 7
- Для виндовс 10
- Заключение
Что такое рабочий стол
Что же понимается под термином рабочий стол (англ. desktop) компьютера — основное окно графической среды пользователя вместе с элементами, добавляемыми в него этой средой.
Но, а если говорить простым языком, то это системная папка виндовс с названием «desktop», содержимое которой выводится после загрузки операционной системы, на экран монитора, образуя область для работы.
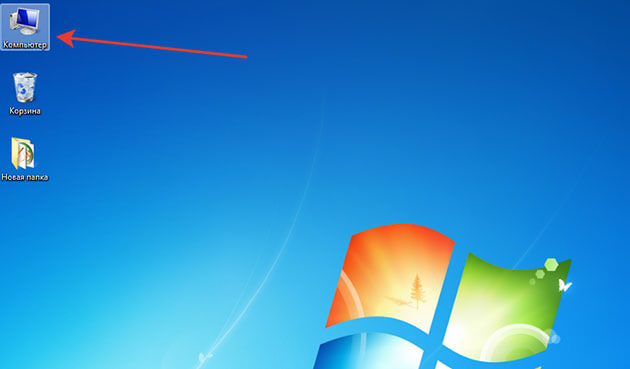
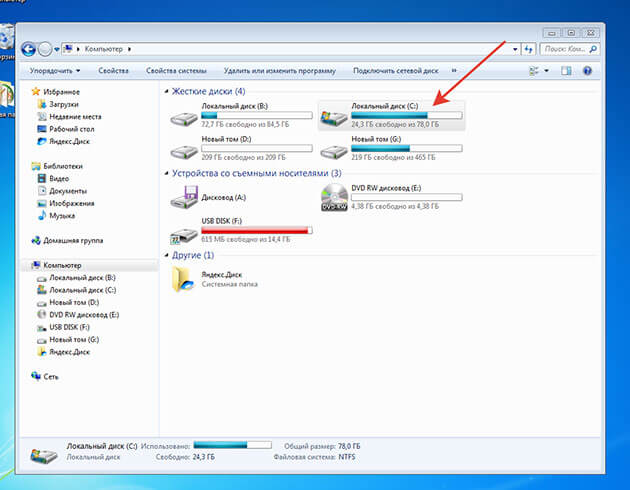
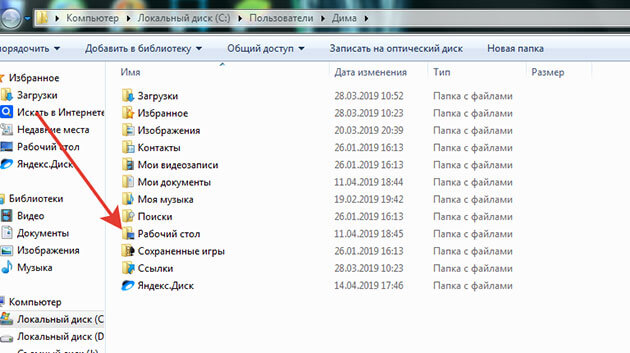
Находится эта папка на диске, где установлена операционная система (по умолчанию это диск «С»), а также он отмечен значком компании Microsoft.
Кликаем два раза на иконку «Мой компьютер»
Далее два раза на диск с операционной системой
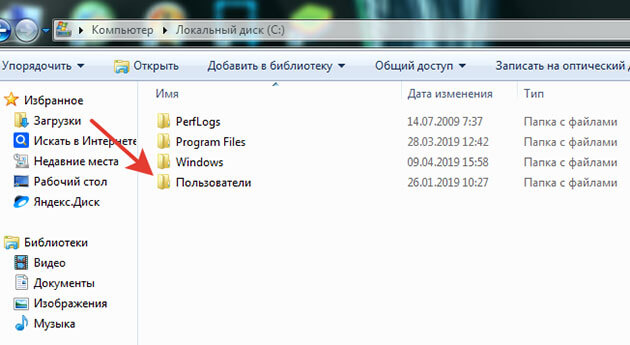
Открываем папку «Пользователи»
Здесь будут располагаться папки с именами пользователей. Выбираем паку с вашим именем. В моем случае эта папка «Дима»
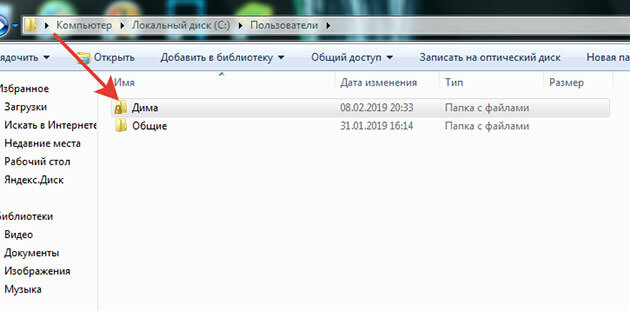
Здесь и располагается папка «Рабочий стол» или «Desktop»
Из чего состоит
Сам же рабочий стол можно разделить на области, в которых располагаются элементы управления компьютером и вашими файлами:
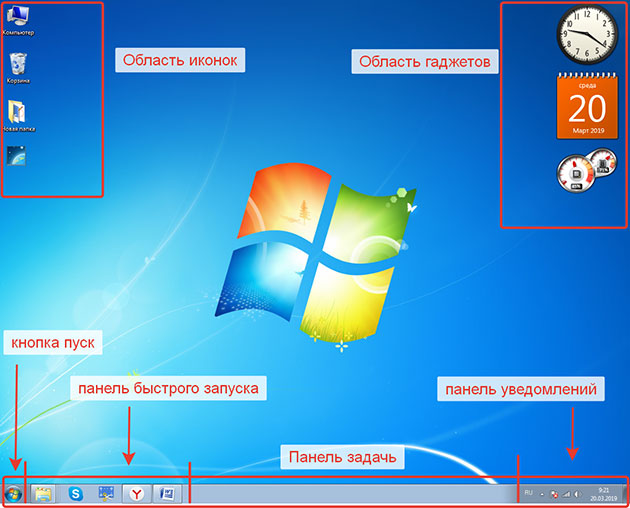
1. Область, где располагаются иконки, с помощью которых можно получить быстрый доступ к файлам и установленным программам.
Во всех ОС после установки на рабочем столе могут отображаться несколько иконок таких папок как корзина, мой компьютер, сетевое окружение. Это зависит от установленной версии виндовс.
Помимо этих иконок так же здесь могут находиться различные ярлыки, файлы и папки, созданные вами или системой автоматически в процессе пользования ПК, например, при установке программ.
2. Панель задач — это область по умолчанию она располагается в низу экрана, но при желании ей можно задать разные положения справа, слева или вверху.
3. Область гаджетов – данная функция операционной системы доступна только для тех, у кого установлена виндовс 7.
Для вывода в таких ОС как виндовс 8 и 10 придется установить специальные программы такие как:
- 8GadgetPack
- Windows Desktop Gadgets
- MFI10.
Я считаю, что данная функция ни к чему гаджеты только отвлекают от работы за компьютером.
Не зря же разработчики отказались от них и в виндовс 8 их заменили на так называемые «живые плитки», которые работали почти как гаджеты, но вызвали негативную реакцию у пользователей.
В итоге в виндовс 10 от них разработчики отказались, но не полностью, оставив их только в меню пуск с возможностью удаления.
Внимание: Если у вас слабенький компьютер (процессор, оперативная память) то установка гаджетов может существенно замедлить работу вашего ПК.
Настройка параметров
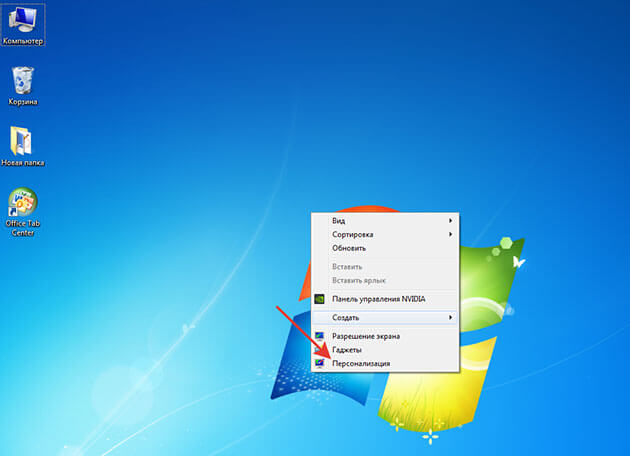
Первое действие для всех ОС одинаковое это надо навести курсор мыши на свободную часть рабочего стола, и нажать правую кнопку и через появившееся меню мы сможем настроить такие параметры как:
- разрешение экрана – размер выводимого изображения на монитор
- персонализацию – здесь мы сможем настроить фон, размер шрифтов и.т.д.
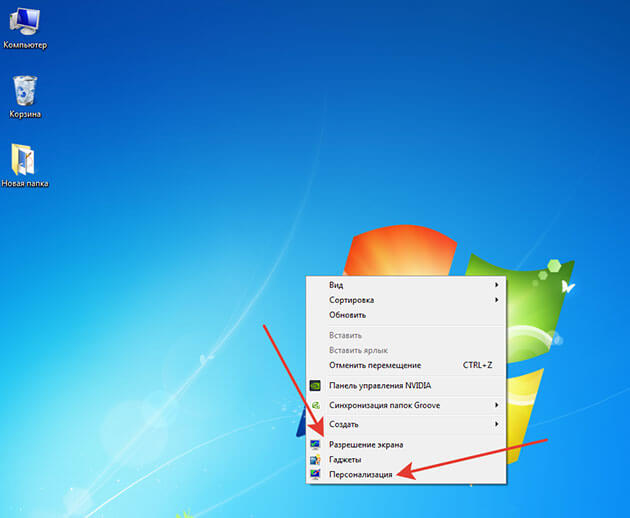
В каждой операционной системе настройки немного отличаются, поэтому мы рассмотрим настройку для каждой отдельно.
Если вы еще не знаете, какая операционная система у вас установлена, рекомендую прочитать вот эту статью.
Для виндовс 7
В открывшемся меню выбираем «Разрешение экрана»
Далее напротив «Разрешение» нажимаем мышкой, раскрывая список доступных значений, и выбираем наиболее подходящее для вас разрешение и нажимаем «ок»
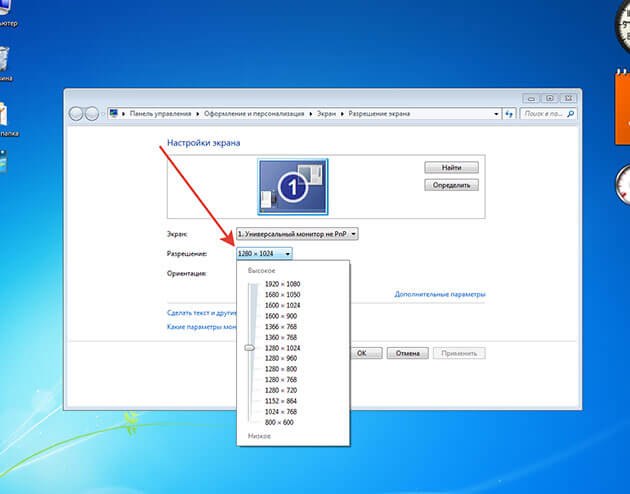
Если выбранное вами разрешение вам не подойдет, вы можете этим способом выбрать другое.
Персонализация
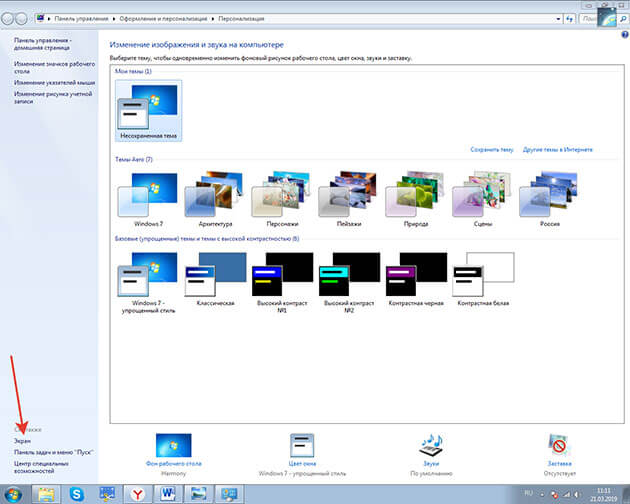
В меню нажимаем «Персонализация»
В открывшемся окне мы сможем настроить интерфейс ОС
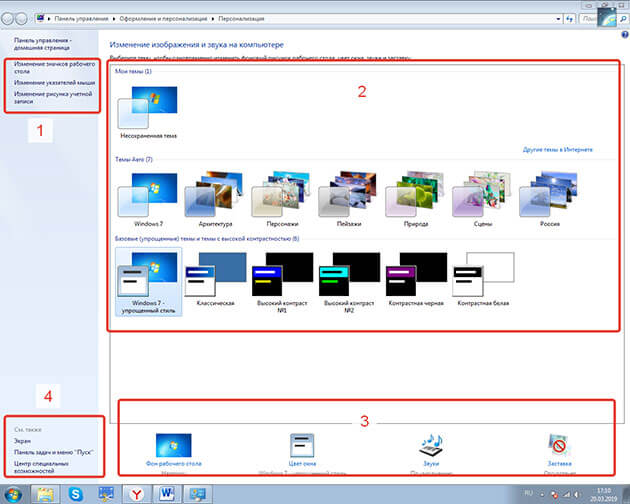
Как видно на скриншоте я специально разделил окно персонализации на области для удобства изучения.
1 область
Здесь располагается небольшое меню, с помощью которого мы сможем настроить следующие элементы:
Изменение значков
Нажав на «Изменение значков рабочего стола» появится окошко параметров где, поставив галочки, мы сможем вывести данные папки на рабочий стол.
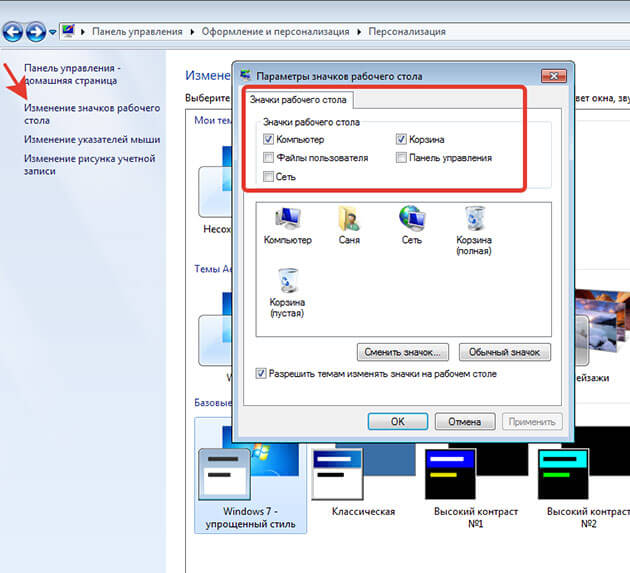
В моем случае это «мой компьютер» и «корзина» остальные папки мне ненужный.
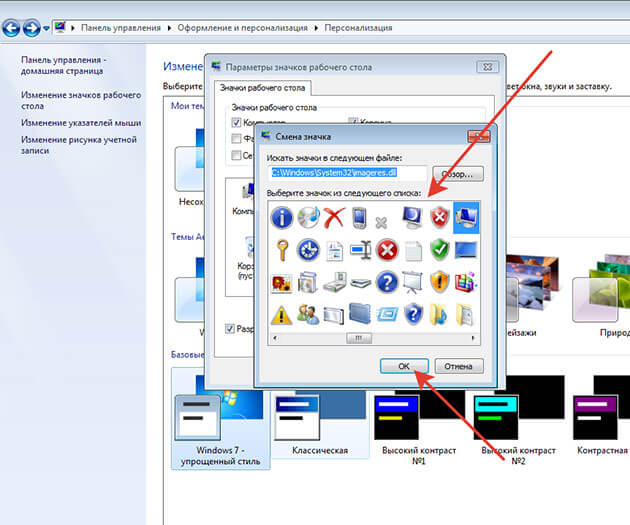
Так же здесь для каждой папки вы сможете сменить значок. Выделяем значок, жмем «сменить значок»
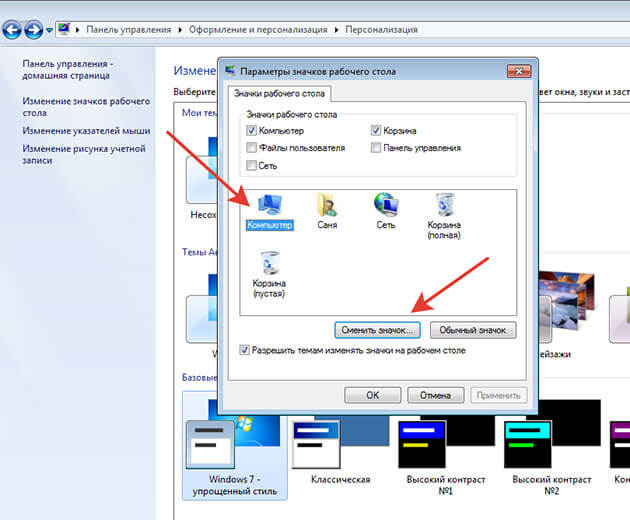
Выбираем и жмем «ок»
Изменение указателей мыши
Нажав «изменить указатели мыши» откроется окошко, в котором вы сможете выбрать указатель по своему вкусу.
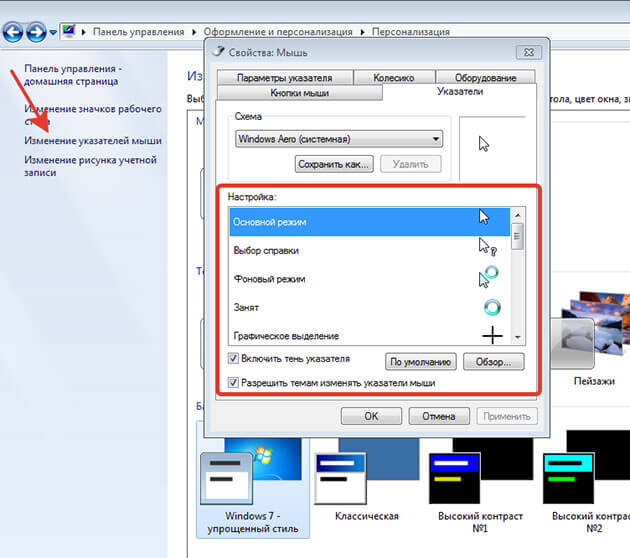
После выбора настроек не забываем нажать «применить»
Изменение рисунка учетной записи
После нажатия на «Изменение рисунка учетной записи» откроется новое окно, где вы сможете выбрать уже из готовых рисунков или загрузить свой.
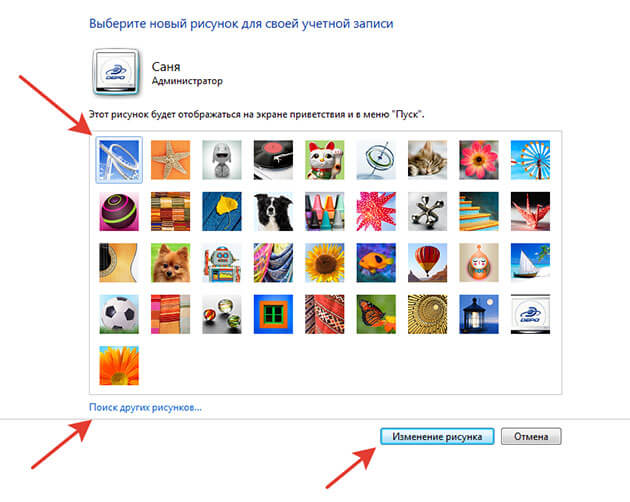
После выбора жмем «изменить рисунок»
2 область
Во второй области нам представлены различные темы оформления. При нажатии на любой значок темы она применяется системой автоматически.
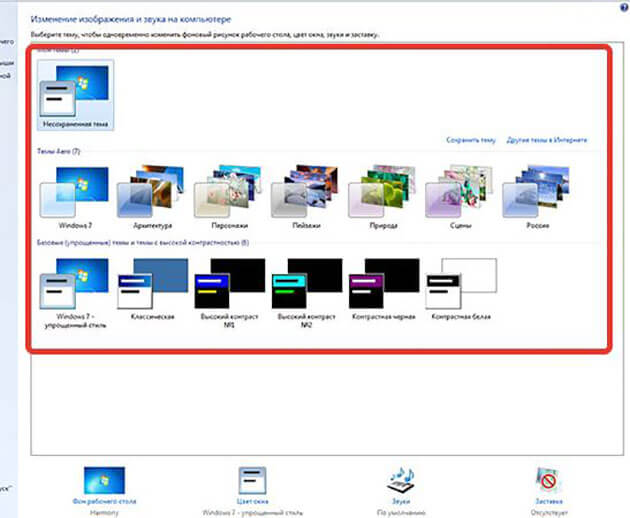
Вам остается только нажать, смотреть и выбрать наиболее понравившеюся.
3 область
Здесь вы сможете настроить фон, цвет окон, звуки и заставку во время простоя компьютера.
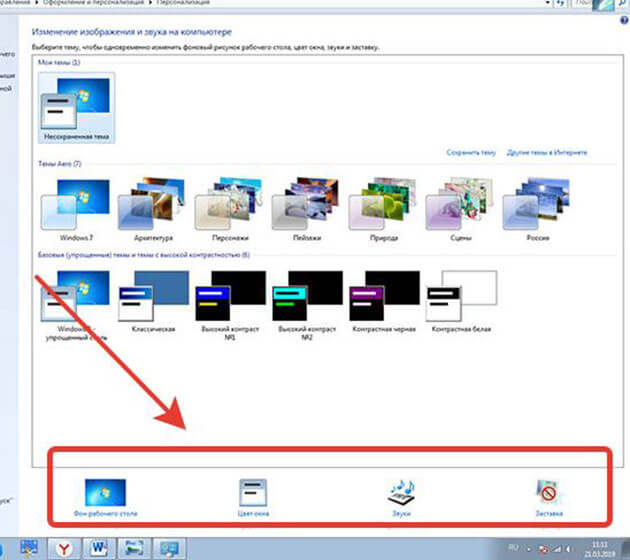
Здесь все просто: выбираем параметр в открывшемся окне, вносим изменения и незабываем, нажимать сохранить или применить.
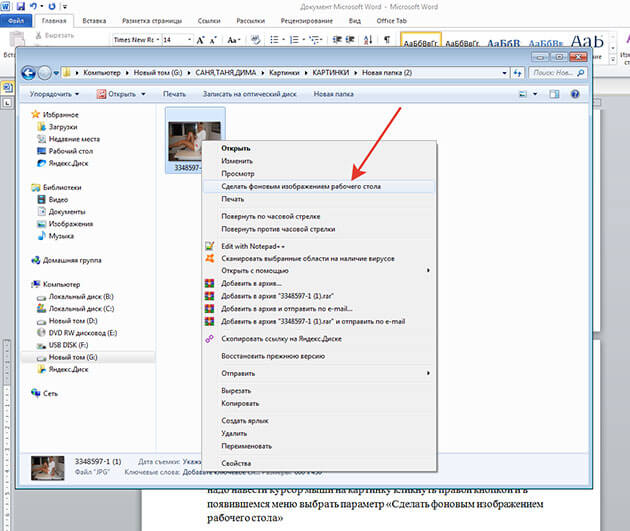
Кстати фоном вы можете сделать любой рисунок или фото. Надо навести курсор мыши на картинку кликнуть правой кнопкой и в появившемся меню выбрать параметр «Сделать фоновым изображением рабочего стола»
Вот так все просто.
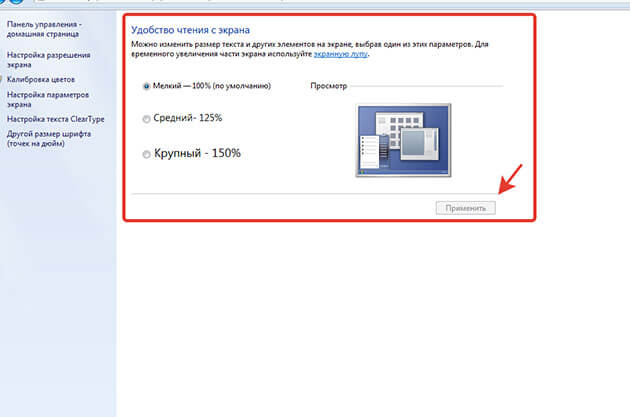
4 область
Экран
После нажатия «экран» откроется окно, где вы сможете настроить размер элементов и текста на экране. После выбора параметров сохраняем изменения, нажав на «применить»
Следующий параметр «Панель задач и меню Пуск» мы оставляем пока без изменений его мы рассмотрим чуть позже.
Центр специальных возможностей предназначен для упрощения работы с компьютером. Лично я их не использую, но вы конечно можете поэкспериментировать.
Для виндовс 10
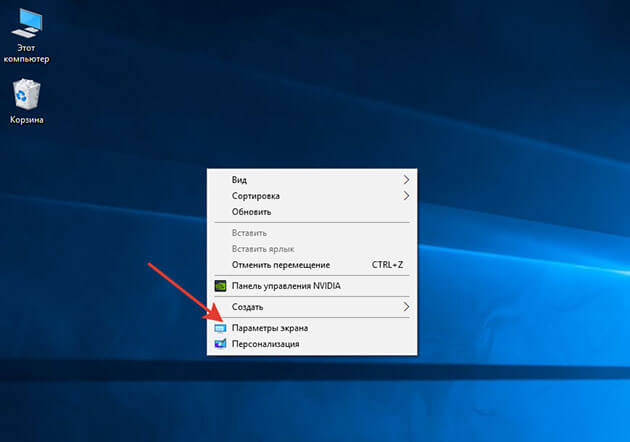
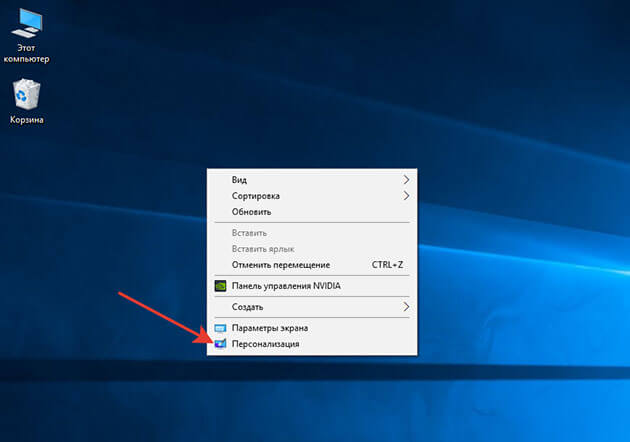
Наводим мышь на свободную часть рабочего стола и жмем правую кнопку.

Параметры экрана
В высветившемся меню выбираем параметры экрана
В открывшемся окне нас больше интересует масштаб отображения текстов картинок и других элементов. А так же разрешение экрана.
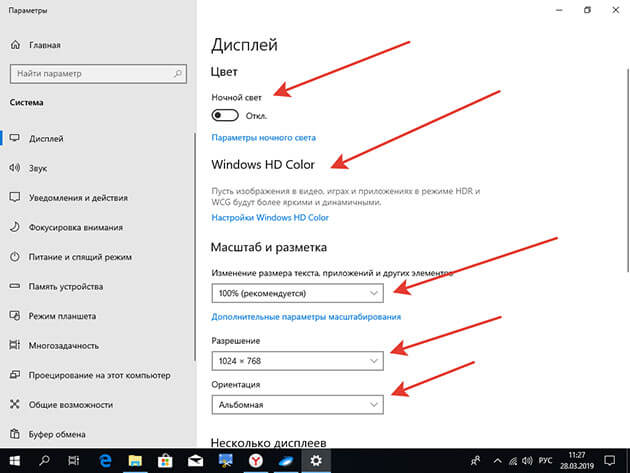
Настройки «Ночного света» и «Windows HD Color» лично я оставляю без изменений. Так как в ночное время я практически не работаю за компьютером, а функцию HD Color мой монитор не поддерживает.
Вы, конечно же, можете поэкспериментировать. И я буду вам признателен, если вы оставите отзыв о работе этих функций в комментариях к этой статье.
Продолжим.
Прокрутив экран вниз, вы сможете настроить несколько дисплеев, если вы решите их установить. И сможете попасть в настройки «дополнительные параметров дисплея» и «графики». Мой дисплей этих параметров не поддерживает.
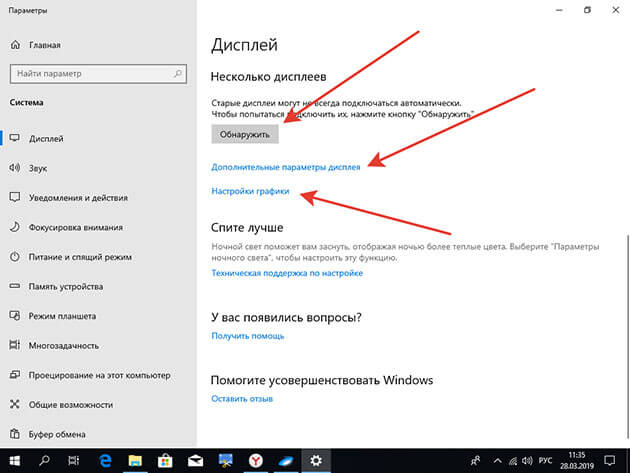
В этом же окне с лева вам также доступны многие настройки, мы их будем разбирать в других статьях. Так что подписывайтесь на обновления и не пропустите выхода новых статей.
Персонализация
Повторяем первое действие и выбираем в меню «Персонализация»
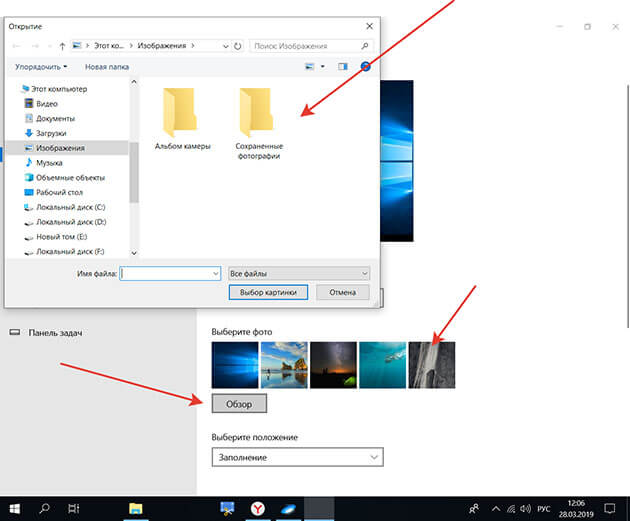
В открывшемся окне настроек первым делом настраиваем фон.

Вы можете выбрать из предложенных самой системой или загрузить свой.
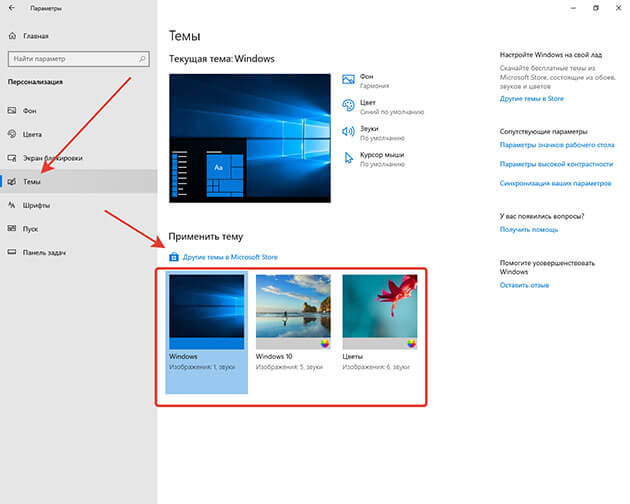
Далее в левом меню выбираем пункт «Тема». Здесь также представлены системные варианты, можно выбрать и загрузить из приложения «Microsoft Store». Прошу обратить внимание на то, что здесь за многие темы придется заплатить.
Еще один способ добавления фона, используя любые картинки на вашем ПК я описывал в этой статье для Windows 7, можете пролистать статью чуть выше и посмотреть.
Панель задач
Панель задач после установки ОС располагается в низу экрана. Разделить ее можно на три части:
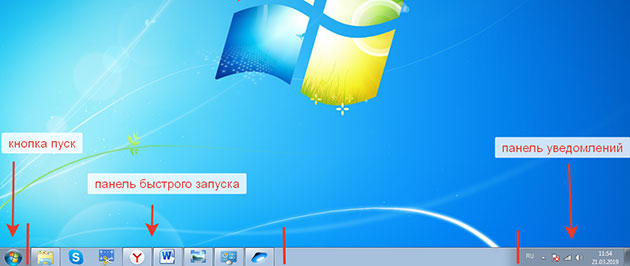
1 Кнопка пуск – при нажатии левой кнопкой мыши открывается меню, которое дает доступ к элементам управления компьютером.
Доступ к этому меню можно получить нажатием клавиш Windows7 (Win) Windows8 (Win + I) Windows10 (Win)
2 Панель быстрого запуска – область, где располагаются значки запущенных программ и открытых документов. Сюда также можно поместить значок любой программы.
3 Панель уведомлений – область, где располагаются значки панели задач, такие как громкость динамиков, языковая панель, значки программ запускаемых системой при ее загрузке, а также сами уведомления системы.
Данный инструмент можно закрепить внизу, вверху, или по бокам.
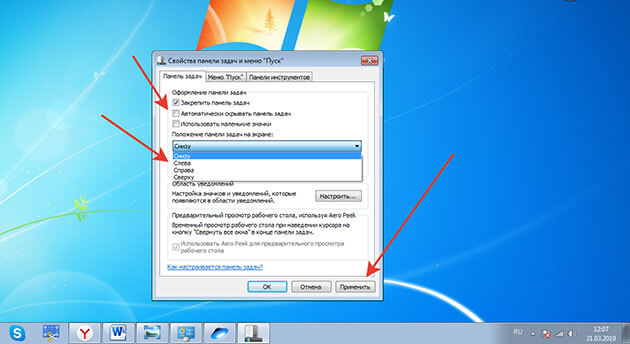
Для виндовс 7
Для этого наводим мышь на панель задач и жмем правую кнопку, нажимаем «свойства»

Ставим галочки, выбираем месторасположение панели и жмем «применить»
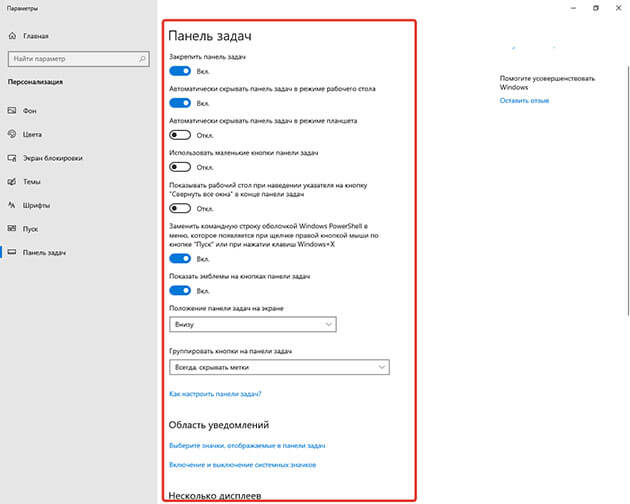
Для виндовс 10
Наводим свою мышь на расположенную по умолчанию внизу панель задач и нажимаем правую кнопку. В открывшемся меню жмем «Параметры панели задач»

В открывшемся окне настроек выставляем нужные для вас.
Вообще с помощью панели задач можно проводить множество операций, о них я рассказываю в статье: Что такое панель задач.
Заключение
И так друзья мы с вами подробно разобрали, что такое рабочий стол в компьютере что он из себя представляет и как его настроить под свои потребности.
Многие конечно могут возмутиться, почему ты, мол, не написал про виндовс 8? Отвечу честно просто у меня дома всего два компьютера и на них установлены только десятая версия и седьмая.
Но как только у меня появиться доступ к ПК с восьмой версией я обязательно дополню статью.
Кстати настройки рабочего стола в виндовс 7 и 8 не сильно отличаются и у тех, у кого стоит восьмерка могут воспользоваться инструкцией от семерки.
Как вам статья? Понравилась? Если да то поделитесь ей в социальных сетях. Возникли вопросы? Задайте их в комментариях.
P/S Установил себе Windows 10. И приобрел к ней лицензионный ключ, стоимость которого составила всего 222 рубля.
Если вы хотите узнать, как я это сделал, то подписывайтесь на обновления блога и следите за выходом новых статей. Я об этом обязательно напишу в ближайшее время.
С уважением, автор блога.
The Windows Desktop is an interface that was designed to be used by all users of Windows operating systems in an organized, easy and fast way. In this interface you can find everything you need to work on a computer and have access to what is most important and relevant for each user, so you should not miss out on knowing everything about the Windows Desktop and its functions.

The operating system Windows presents a graphical interface that was the prototype of most of the windows that we can find. Its name Windows means window. Each of its windows can execute its own menu, each with its controls that can be used by the user to make modifications. Also called Desktop, it is the place where a user can find everything necessary to do their work from the moment they sit in front of their computer, because it has all the folders, programs and files they need specified by icons.
Its introduction many years ago was made in various operating systems, and since then its success has been total, because users quickly identified with its use. In other words, it is the tool through which a user can work frequently because it has access to it and its functionalities defined by the operating system. It is the main screen where we can start the system with each of its program icons that are frequently used by a user.
Your wallpaper can be chosen by each person and the most relevant icons of their usual tasks will be displayed on it. In the same way it has a task bar, which is usually located at the bottom, in its configuration and development Microsoft offered various desktop styles that were improved over time and evolved over the decades, adding new features and options that would be easy for one person to use while giving you more benefits.
This desktop is the starting point for all users. In it, a display of many windows and application dialog boxes is made that are used to interact with the computer and do our work, we get from the start menu, documents and toolbars that have been designed and improved so that the flow work more comfortable.
Although most people know how to work with it, the truth is that much is still unknown about how all these tools work, because we only know how to use part of them, which are the ones that are used on a daily basis, and it is also unknown because its location has been strategically arranged in a computer’s operating system. Since its first versions, this desktop has been the main screen that appears in an operating system and we can see the icons of the trash can, my PC and other information accesses.

A user from that location can interact with all the storage units and with most of the functions and applications that have been installed, whether they come with the computer already installed or those that users have installed separately. Each of these applications has an icon that identifies them, taskbars, the start menu and other tools that we will explain later.
The elements of the Windows desktop If you are in a new installation of Windows, the first thing you should see when you turn on your computer is the desktop login screen, it can have a couple of familiar icons and representations that are executed with a single click on it. Of them, the most important are the programs, after which you can get wallpapers. The desktop is designed with a lot of organization for ease of use by all users.
At the bottom of the screen is the Taskbar where you will get notifications and the start menu, all the programs you have installed and the applications ready to run. You can also find many options provided by the Windows operating system so that you can do your own desktop customization. The first thing to look at is its fundamental appearance, which is pretty much the same on all different operating systems.
It should be noted that many efforts were made to change it, but this version is the most comfortable for users and the most familiar to work with, so it is still used and handled by millions of users around the world.
History of the Windows Desktop
In 1985 it was when Microsoft Windows was released, and it came to prevail in this market thanks to good leadership, and above all because they were always looking for ways to make substantial changes so that their teams could evolve permanently. It was Bill Gates who personally supervised those developments of the first stage of the company, and many years have passed, and many changes have occurred, not only structural but also in its exterior design, to be modern and at the height of new technology. Let them surge.
But the oversight for teams to stay ahead in computing has never changed. Windows has a rich history in its evolution and in each of its versions there were changes that marked a path that was followed by the brands of the competition. Let’s see what these changes were since the appearance of Windows 1.0 until the last one we have on the market in this operating system.
Windows 1.0
The first version emerged in 1985, it had a 16-bit graphical interface, whose use and management was done through the mouse, the most innovative thing at that time. In order for users to get used to using the mouse, they had to develop a game for them called Reversi. This version was running for more than 16 years and it was not until 2001 that it was considered obsolete since it worked with 256 kilobytes, two double-sided floppy drives and a graphics card and only 512 kilobytes of memory to make the execution of programs in DIS version 3.0 or versions earlier than this.
It had a cost of 99 dollars and the RAM memory had to be 320 KB, the project was initially called Interfaces Manager, in which Bill Gates himself worked based on a Visi On graphical interface, the name seemed very unattractive to him. being marketed by what replaced it with Microsoft Windows, its intended release in six months actually took more than two years to complete. This new environment worked on the basis of bitmaps and a mouse, which freed users from the mess of MS-DOS where everything had to be typed through commands.
Although better than MS-DOS, this version did not have icons for executables or programs, nor did it have real multitasking support. Over time, Windows versions 1.01, 1.02, 1.03 and 1.04 came out, with which various functionalities were implemented, until it was replaced.

Windows 2
In 1987 the second version of the system appears, with new features in its capabilities on the desktop and a new management through the use of windows, where they could be maximized or minimized, instead of using «Iconoring» or the “Zooming” that the previous version had. This version had the Control Panel and some icons on your desktop, shortcuts on your keyboard with the ability to overlay windows in extended memory. With this version the first versions of Word for Windows and Excel appeared.
This new version allowed the user to open several windows, overlapping one on top of the other and keyboard shortcuts, it had graphics in 16-color VGA format, use of floppy disks, and its video card supported VGA, EGA and the so-called Tandy drivers, to have color graphics. He made the elimination of the task bar which took away the accessibility of the icons to the users, and that later in the 95 version it was added again.
Windows 3
It emerged in May 1991 and from this version it can be said that the Windows operating system began to be successful among users and became the competition of Apple and Commodore Amiga. The interface of this version and its desktop ran in the MS-DOS program, directly in Windows and had a palette of 256 colors, so that its desktop and all its interface tools were more pleasing to the eye with a more modern result.
This version was developed by David Weise and Murray Sargent independently as an experiment, its development was such that the company decided to make its official launch. It had the Program Manager, the File Manager and the Print Manager, and the games of Solitaire, Hearts and Minesweeper, which are still maintained in all its operating systems to this day. Later they released the Windows 3.1 version where the most important changes were the graphical interface, the desktop and the system functions, with the incorporation of TrueType fonts.

It made better use of Intel’s 286 and 386 processors, with Text mode programs running through a window, a notable improvement for multitasking in legacy programs, but home use was very limited, with a number of applications included. simple to what they called accessories, including the Write text Notepad, a Macro recorder, Paintbrush bit program and a calculator.
Its graphic icons could support 16 color palette in EGA and VGA mode, it had three memory modes: real, standard and enhanced mode. It also had improved versions in 3.0a, which had the ability to move data larger than 64 KB and more stability to reduce Fatal Application Errors. Then it had the extended version of multimedia with a Creative Labs sound card and new CD-ROM drives. The multimedia version had audio inputs and outputs, and Media Streamer, CD Player, clock, format help, and screen saver programs.
Windows 95
This is the version with the most changes that has been introduced to the market, especially in graphic elements and on the desktop, which today are still used in some parts of the interface in modern versions, such as the start menu and the toolbar. tasks and the buttons to maximize, minimize and close windows. It brought built-in «Plug and Play» technology, Internet Explorer and a new 32-bit operating environment. The best thing about it was the huge million-dollar advertising campaign that, with its start button, was accompanied by the song “Star me up” by the Rolling Stones.
This version that had the name of Chicago is considered the most personal and accessible computer for users. More than 7 million of these kits were sold in just five weeks. It was compatible with the internet, had a dial-up network connection and a 32-bit operating system. It was through her that the use of letter e as a synonym for entering the web, since it meant Internet Explorer, the first browser that really worked, was good and better than any other competition.

The user interface in this version was simpler and more powerful than the previous ones, this being one of the company’s greatest successes, in one of its updates it included Internet Explorer 4.0, from this system came the Windows 95 SP1 versions , OSR 1, OSR 2, OSR 2.1 and OSR 2.5C.
Windows 98
With few changes to the desktop, Windows 98 was released in 1998, and had the Internet Explorer 4 application, an Outlook Express mail client, Windows Address Book, Microsoft Chat and Windows Media Player. It incorporated two navigation buttons to go forward or back and an address bar in the Windows explorer. It also brought the quick start bar and with this machine litigation began in the United States due to the company’s practices of having a monopoly and wanting to eliminate competition. In it he was found guilty, and had to stop using the MS-DOS operating system.
This version was a hybrid of 16 and 32 bits, with notable improvements such as system support for FAT32, AGP, and improved support for USB, FireWire, and ACPI. It had a second edition or update where Internet Explorer 5 was incorporated, a shared Internet connection where LAN computers could make use of the Internet connection through NAT and integrated DVD-ROM media.
Windows ME
It was called Windows Millennium Edition and it was brought to the computer market in the year 2000, the year of the new millennium, its advertising campaign was for those consumers of the year 2000, and it was intended to be offered to large companies. In itself, it had no news on its desktop or in the interface, but only in its exterior design. It was called the successor to Windows 98, and included Internet Explorer 5.5, Windows Media Player 7, and the new Windows Movie Maker application.
This version was not designed under the core of Windows NT since it was only used in professional operating systems, it was executed in restricted real time, so that its system startup was faster, its life and utility cycle was short and it was replaced by Windows XP.

Windows 2000
It comes out in the same year as the previous version and became the minor version of it, it did not bring new features neither in its graphic aspect nor in the desktop and it was also intended to be used in the business world and to connect network servers or file servers, the tasks that could be performed on it were the creation of user accounts, allocation of resources and privileges, serving as a web server, FTP, print server, DNS or domain server, in addition to can be used as a workstation.
Its point of strength was the Active Directory (Active Directory) where you could have a complete administration of an entire organization or company. It had several later versions such as Professional, Server, Advanced Server and Datacenter Server.
Professional: It was the successor to Windows NT 4.0 WorkStation, and was intended to be a secure client and corporate-type workstation, it supported up to two processors and was an autonomous system, with high performance in its graphic design, its operating system was designed to be used In business settings, it is still used by many companies around the world as a production base that links to automated control systems.
Windows 2000 Server: It was a file and print, web, FTP server for small and medium-sized companies, it was useful if it was used in certain areas or departments and to keep all the information centralized in a single server where it could support up to 4 processors.
AdvanceServer: This system was oriented to medium to large companies, where there should be a greater demand from clients or users in a network, to execute actions of online business and electronic commerce, it had eight-way multiprocessors and memories of up to 8 GB with physical extensions from Intel.

Data Center Server: It was a 32-way, top-tier data center server with up to 64 GB of physical memory. It was designed to perform spatial simulations, complex mathematical calculations and engineering simulators. It is used to handle large volumes of data, online transactions, and many other business-like features.
Windows XP
It was released on the market in 2001 and this version brought more novelties to the desktop and its visual aspect. Its start menu was more complete and the taskbar came with new work options, themes, visual effects, shadows and wallpapers that are now considered mythical Windows. The truth is that adjustments had to be made in three servipacks so that it stopped being criticized for the initial failures of its first operational machines.
The feature that most caught the attention of users and that was enjoyed was its Clear Type, a system of screen fonts that improved the vision of fonts on LCD screens. It had versions for different computing environments, including home, business, laptops, netbooks, tablets, and even media centers. It was the first consumer operating system, with a core and architecture of Windows NT on 32-bit and 64-bit platforms.
Its improvements in stability and performance were better, with a redesigned graphical user interface that was called Luna, with software management capabilities in order to avoid DLL Hell, which previous versions had. The start menu and its ability to index directories have been reworked and more visual effects have been added with brighter colors, transparencies and a new video card. The default wallpaper was a landscape image of Napa Valley in California, it had the blue Energy system.
Their system or life cycle ended in September 2005, and their sale ended in 2008, after Windows Vista was released. Even so, there was a version called Home edition that continued to be distributed on laptops where it was already pre-installed. Although it is no longer distributed and there are no new supports to be updated, there are still users who work with this system.

It continues to be criticized because it is very susceptible to being affected by malware or viruses, so you need an administrator account to access the system, although in general all Windows operating systems are the target of attack by Malware developers. , because these can get holes in your security systems.
Windows Vista
The successor to Windows XP went on sale in 2007, and what the company intended to be a total success ended up being a total failure because it had many security, performance and compatibility problems. The visual aspect and its desktop had many new features such as transparencies and an improvement in the rendering of the visual aspect because it had a technology called DirectX 10. It also brought the famous widgets, Gadget applications where a user could have any kind of information such as the weather on your own computer.
This new introduction of Microsoft comes out five years since Windows XP and its launch campaign was much more expensive. Its improvements were that it had recording and viewing of music, images, videos and even recorded television. They could be obtained in two versions, the Home Premium and the Ultimate. Internet Explorer 7 was incorporated in the same way, allowing browsing through tabs and the pages that were opened were shown in miniature.
They incorporated security improvements such as antiphishing and a protected mode in view, which did not allow web sites to run without a user permission code. It was a program designed to be compatible with the EFI (Extensible Firmware Interface), with windows drawn in vector graphics with XAML and DirectX. It brought an inserted capacity to burn DVD, restoration systems, unified communications system, antispyware system (Windows defender) and added the Firewall.
It also had its own versions in Windows Vista Starter, Home Basic, Business and Enterprise, all of them available for use by large companies; in addition to various update servipacks to keep various functionalities active over time. Its biggest weaknesses were flaws in security and in the voice recognition system.

Windows 7
In 2009 this new version came out and the operating system became more popular, so much so that it is still used today, because it maintained the stability and performance of the computer. Graphically, it had new theme elements, a better start menu, and some other features that could be pasted into windows at different screen angles, allowing for more flexible and dynamic working.
Its taskbar was redesigned with a wider version, and its buttons did not have text accompaniment like previous versions, as they were tuned to touch technology. A button was added to the far right of the taskbar so that the desktop would be displayed without any distraction when the mouse was hovered over it. Currently it is the operating system of these versions that remains stable, is fast and continues to be the most used version worldwide.
Windows 8
Windows 8 began to be seen in 2012, and this version brought radical changes in the interface, in which the start button was eliminated, so it had to be replaced by a screen that had a design more in line with the touchscreens. The new interface was divided into tiles that were different images of the applications that a user used, it had a desktop but it was not known how it could be used. Added support for the use of ARM microprocessors in addition to the traditional x86 (Intel) and AMD.
Since these changes were so disastrous, users did not use this version, so it was changed to the version that we will talk about next. The interface was modified to be used on touch screens and for the use of Mouse and keyboard. Its home screen had more color on a basic desktop, to make opening Apps, websites and information about social media. The desktop could be opened by clicking on her icon. The Apps occupy the entire screen and up to 4 could be docked in one place.

The lock screen was user-customizable and provided notifications for computer protection when unauthorized use was made. The taskbar was moved to the upper right corner and drivers for reading and writing data Blue-ray discs were added to it. Gadgets were removed because they were very vulnerable.
Additionally, it had compatibility with USB 3.0 and the Windows DVD Maker, the file synchronization briefcase and the Chess Titans, Mahjong Titans, Purble Place, Minesweeper and Hearts games were removed.
Windows 8.1
With the failure of its previous model, due to the fact that users never accepted it, Microsoft went back to re-incorporate elements, including the start menu. The desktop takes the image it had in previous versions, and with these changes and its new performance, Windows 8.1 became very popular with users, with few complaints reported.
Windows 10
The most modern version came out in 2014 and with it came back options and features that Windows users requested, because it was easier for them to handle them, including the flexibility of the start menu, and some others that were improved for greater benefit of users and which will be mentioned below. In order for it to be accepted by users, it was offered as a free download for one year so that it could be tested by everyone.
Its new architecture was designed with the Continuum interface and later with the Fluent Design interface, which could be run on all Microsoft products (tablets, PCs, phones, embedded systems, Xbox One, Surface Hub and Hololens). For the company, this system could be updated in various environments, and allowed to reduce fragmentation throughout its platform.

Reviews of the system have been mostly positive for removing the user interface that came from Windows 8, its improvements to the software and functionality of Cortana, the replacement of Internet Explorer with Microsoft Edge. But even so, the criticism fell on the limitations that users had to have control in some operations. Updates are made through Windows Update automatically.
Its security system was enhanced by incorporating multi-factor authentication technology. Windows 10 is available in four editions: Home for home use, Pro for small businesses and hobbyists, Enterprise and Education, the latter aimed at large companies and can only be activated through a product authentication key.
Windows Desktop Items or Tools
There are many tools that we can see on the Windows desktop, the latest version of Windows 10 has elements from previous versions and innovations in this version, which is why users liked it a lot. It may look like the big box at the top of the screen, but for many, the desktop is the entire monitor screen that you can see with its icons when you boot into the Windows operating system.
On this desktop should be kept all the icons of shortcuts or diversions that help a user to work in a more efficient way. It can be said that the desktop is a folder within the Windows folder and that any application in other identified folders can be kept in it.

Start Menu Bar
This bar contains the menus that can be executed through Word commands, in this application only the commands that are most important to users are displayed. It is the main window where we get all the programs that are installed, folders and documents in addition to the configurations that the computer may have, with this bar we can access all the system tools.
It is located in the lower left corner of the monitor, and in it we also get the function of shutting down, restarting or making changes to the computer that the user wishes to make. It has a wide list of options on all the components of the computer’s hardware and access to different Microsoft programs. It is usually divided into three parts:
- Large left panel: where we can see a list of the programs that the computer has installed and those that already come with the operating system itself. This may vary depending on its manufacturer, but it is the most used option to access the programs that are used most frequently.
- Lower left corner: it is where we get the program and file browser, just by typing the name of
- What you want to achieve in it is that it will find all the matches that are registered.
- Right panel: it is where the user has the option to access the folders and files that he uses the most with their respective buttons to log out, shut down or restart the computer.

Standard toolbar
In this bar you will find the icons to quickly execute the most common contents such as saving, copying, pasting and moving. The User has the option of being able to execute his work, adding options to it, with these we can enter applications from web pages or FTP directly by simply enabling the Address option on the toolbar.
In the same way you can create your own toolbar with those shortcuts and applications that you want to have nearby, its creation is simple with just pressing the right mouse button and selecting the Menu and pressing on Toolbar > New toolbar.
format bar
This bar contains the most common operations of Word formats such as placing words in bold, italics, choosing the writing font, etc. They occupy two bars occupying a single line.
The Windows
Each window that opens is a quadrangular type graphic structure where you can see the events or properties to perform certain functions or operations of the applications or programs. All of these have the same window structure which is presented in a control box, the title bar and the name of the application. Most Windows windows have three buttons located in the upper right corner:

- Minimize: shrinking the screen without actually closing it just makes it smaller with an icon that is placed at the bottom of the screen in the taskbar.
- Maximize: is a button that allows the window to be made larger or expanded to screen size, it may appear afterwards with a double box indicating to a user that the window can be restored to its original format.
- Close: This button terminates the session in the application or program and closes it definitively and closes the taskbar.
The Icons
The icons are the direct accesses that take us to the programs and the other elements, this is represented with small graphic figures and they help all the users to work daily in the operating system. We can also have some references of their characteristics from them. In the same way these can be removed, reset or put some new ones. In fact, a computer will always tare some of them previously installed and it is the user who determines whether to leave them or delete them.
Windows desktop taskbar
This is one of the first layouts we got on the desktop and it has been one of the most fundamental parts of the operating system for many years. With this bar you can execute various actions that help users to do their jobs, no matter how difficult they may be. It is located as a horizontal strip at the bottom of the desktop, in it there is a start button, and some device icons.

In this bar we can anchor the applications to have them closer when we need them. It also allows us to change the applications that we have open, enter the start menu to execute other programs, and also access the start menu to execute other programs that we cannot have on the taskbar.
Make inquiries about other information that is important for the work we are doing, including checking the network status, the current time and date, volume, sound, keyboard language, antivirus news, battery status (if is a laptop). You can get this data in the notification area that is on the right side of the taskbar and also in the notification center.
In the bar you can also get tools to see the tasks that are running through the Task View, where you can have different views and desktops, with the possibility of closing them or creating a new desktop that suits your needs. There you will find the Search button in the same way.
Each one of the applications that are opened has its icon that shows the program and the document that it has present, these are adjusted in size so that they can be shown in the bar, so that if there are several programs open or running, many are seen within this same bar. Among other functions we have that this bar is used to organize each of the windows.
Pinning a shortcut to the taskbar
This refers to the fact that you can fix a direct access to a folder or program, web site, file that has been opened recently to be able to access it in a faster and easier way by simply pressing its icon on the taskbar. This pinning can be done from the start menu as well as from the list of shortcuts, by pressing the right mouse button and selecting “Pin to Taskbar”.

Taskbar Customization
The taskbar can be customized to the user’s taste, the first way to do it is by pressing the right mouse button on any empty place on the desktop and then pressing the Personalize option and then pressing Taskbar. Once you make your configuration, you can scroll through different options to adapt it to your needs or preferences, such as the size of the buttons, more space on the screen, where you want to place it (top, bottom, right or left margin).
You can customize the notification area, whether you want to keep the taskbar locked, hide it when you’re in another app, control how documents or apps preview when you hover over the bar, or group them into one. site.
quick launch bar
This bar was added in versions of Internet Explorer 4 and Windows 8, it is known as Quick Launch and it is located next to the start menu button. In the mass you can find the shortcuts of the most frequent programs, so we can have the task bar displayed all the time. Every shortcut found on the desktop can be hidden by applications that are downloaded by opening or running.
Windows notification area
This is one of the parts of the Windows desktop that you look at the most while you work, not only because of its clock, but also because it is where the information center of everything that is happening inside the computer is located. In it there are some application icons that give indications to users: network status, print queues, such as volume control, Spotify, hardware control, and virus threat warnings.
There is also the Microsoft notification center. This notification area can also be modified by the user about which icons he wants to have in it, and it is done the same as it was done with the toolbar but the Notification Area selection is made.

Internet and Windows search button
Windows 10 has a voice assistant called Cortana available with which various actions can be carried out to search for files, music, images and any type of document, but most users continue to use the traditional technique, which is by pressing the icon and writing the keywords to identify what we are looking for, either where they are stored or directly online through the browser that is installed.
In the first versions of Windows 10, the searches were related to the use of the Cortana application, but it was a very difficult method compared to the traditional one, the system developers noticed this problem, and decided to separate the search from Cortana and make a so-called Immersive Search , which summarized Windows built-in search in a more improved way, which was quickly accepted by users.
Over time, this feature has been the most distinctive of the entire system, because it allowed all users to search for any file, document, application or program on the desktop in a faster and easier way, and even search for those that are found. stored using OneDrive via Online.
Notification Center
With Windows 10, many more functions were introduced, many of them well received by users, such as the Notification Center, which is a space on the desktop where you can see all the notifications of the applications and programs of Windows 10 and also of some direct accesses where functions can be activated in a faster way, that if we used the traditional way we would have to open several screens to reach them such as Bluetooth, WiFi, activate the tablet mode, the concentration assistant, etc. .
The center also gives us the option of receiving alert notifications when an email arrives. To enter this notification center we must press the icon that is located on the far right of the Windows taskbar. And to make changes to it, we just have to follow the instructions and advice that it tells us.

Turn notification center on and off
When notifications are received, the user is attentive to what is happening on the computer, and although the service that is most used is email, these will not be all the notifications that are received, so the time may come when that for the user it is annoying to hear this notification call constantly, and stop paying attention to it, so in some situation something important can happen and ignore the message.
That’s why you need to separate what’s really important from what’s not, and you can turn notifications on or off in a simple way, so you don’t miss out on important notifications. You must proceed to open the “Windows settings” menu, in the start menu in the icon that has the shape of a gear. Then you must press the “System” > “Notifications and Actions” > ”Notifications” option.
There you will find a series of options for you to make the modifications you want, among which are the display of lock screen notifications, applications and reminders. But if you go to the section that says «Get notifications from other senders», where there is a list where you can activate or deactivate the notifications that you want, it is done in an easy way by sliding the mouse to each of them and press the disable button.
In the event that a user does not want to receive any notifications, they can deactivate them in that same section, or also deactivate them for a certain period of time where it says «Concentration assistant configuration».
Customize the Desktop
The Windows operating system does not have many options to be customized, and although most users choose to change the theme, which consists of the wallpaper, the color of the windows and an accent color, for many people these features they are not enough. For a long time, system users have been looking for a way to customize the desktop to have a better aesthetic, and it can be done in two ways: through Windows tools or with tools that come from third parties.
With Windows tools
To make the customization with the tools provided by Windows, you just have to click the right mouse button in any empty area of the desktop and select the «Personalize» option, there a new window will open in whose left margin you will have a series of options :
- Background: It allows you to change wallpapers either with the Wallpapers that the operating system has stored or with some personal photo that you have saved in the files. In addition, you can also position the screen the way you want by pressing where it says “Choose a setting”.
- Colors: In this option you can select the color of your preference for the theme, windows and the default Windows mode, if you want them lighter or darker, transparency, accent color and many more options. The colors come in a palette provided by the Windows operating system or you can select another shade of your choice.
- Lock screen: this can also be customized to the user’s taste, so when you unlock or start a session in Windows, you will have the possibility to make changes to this wallpaper, the notifications you want to be displayed on it and for how long waiting will have this screen to appear.
- Themes: In this option you can make the changes of visual adjustments of the Windows desktop. The options you can modify are the system cursor, sound, color and themes of the wallpapers, you can also make modifications to the settings of the desktop icons, adjust the contrast. In the same way you can create your own theme using the various elements that you will get and then save it and use it when you need it.
- Fonts: This option does not allow you to make personal changes to it, but only use the fonts that are already installed by the operating system.
- Home: here you can find all the options to modify the appearance and functions of the start menu according to your taste, which can include the part of the icons, the size of the menu that can occupy a small part of the screen or the whole it, as well as items you have recently opened.
- Taskbar: You can also make changes to its appearance and behavior.

Customize the Desktop with external software
Previously, changes to the appearance of the Windows desktop always involved modifications to registry files, which could cause system changes. Today it is a simpler task to perform with the tools that the system provides, some of them are so complex that it is necessary to make additional modifiers to improve not only the appearance but also the functionality of the desktop.
How to receive a fax by email.
If you want to do the latter, we can tell you that when you customize a desktop a lot, you may lose certain aspects of functionality, but you may have some simple and free tools that you can use in an easy way. You get these tools on the Internet and they are Apps that are very popular and stable to get what you want.
FolderPainter: It is an application designed to give a better appearance in the use of the Windows file explorer, which allows us to change the color of the folders and order them in a better way. It is free to download and is easy to install and use. Its best feature is that it allows you to change the color and icons of one or more folders at the same time from the context menu.
Ultimate Windows Tweaker 4: It is another tool that you can get for free on the internet, a little more complex than the previous one, but that allows you to make more changes to the Windows desktop, settings in user accounts, context menu items, and the possibility of making a configuration in some options that have to do with the general performance of a computer, and to customize the security features of the Windows system.
winaero tweaker: Also an application to enhance the appearance of Windows, including your desktop. The parameters you have to make changes are many and have to do with the graphical interface of the system you have configured, security and performance.

7+ Taskbar Tweaker: this tool was developed to customize the appearance and behavior of the Windows taskbar, including the option of changing the way the buttons are distributed on the bar and anchoring shortcuts to it, hide or show various elements. It is a good free tool, easy and safe to use.
Rainmeter: This tool can give you a totally different look from Windows desktop, if you want to flaunt it, this application which you can download for free and has open source that allows you to make modifications in an unimaginable and easy way because it contains a very interesting set of widgets, you must try them for you to check it out. What we can tell you is that you should remember that when a desktop is highly customized and is different from its original, it can lose its performance.
Add Icons to the Windows Desktop
To many people who are Windows users, the icons that come installed are really few, just as there are some who think they are too many. In order for there to be conformity between both groups of users, the developers of the Microsoft system included the way to make changes in the way of placing or removing icons on the desktop. This procedure is very easy to do by anyone and it takes little time to achieve it, so you must follow these steps so that you do not make mistakes.
- Execute the «Configure» command from the gear icon found in the start menu and look for the «Items» section.
- When it opens, scroll down and check the “Desktop Icon Settings” option.
- A new window will open and you must select the icons you want to appear on the Windows desktop.
- Click next to each of the boxes and to finish click where it says “Apply” and then “OK”.
- The icons of each of them can also be modified if you apply the “Change icon” option.

Windows Virtual Desktops
In older versions of Windows you could have the possibility of using a virtual desktop, the way to do it previously was using the “ALT + TAB” keys simultaneously and it did not allow you to create or manage desktops, through some external applications. But in Windows 10 this function was added to its applications, an option that users liked a lot.
Basically, these virtual desktops offer the possibility of having several desktops, without having to see them on real monitors. Its operation is through a single monitor that can be changed according to what a user needs by using several keys or with a button on the task bar. If your system has a multi-monitor hardware setup, the virtual keyboard system may also work well and may even be more beneficial to use.
The main feature of this system is to establish a separation of the tasks of each desktop, that is to say that while in one of them we can work on a web page, in another we can make a spreadsheet, use a calculator, or do explorations of the files. In short, it is a very flexible tool when it comes to carrying out highly complex tasks and with different applications. Another of its advantages is that those applications that you open on one monitor will not appear on the other, so you will not lose concentration on the work you are doing.
How to create virtual desktops in Windows?
The way to process or manage a virtual desktop in Windows is very simple, you just have to click on the «Task View» icon found on the taskbar and the desktop you have at that moment will appear there and it will show you how to do it. change the form at the top, there will be different desktops that have been created and at the bottom you will find several windows and applications that can be contained in each one.
The way to create it is also very easy, just press where it says «New desktop», you can do this every time you want to make a change, to move from one virtual desktop to another you just have to click on the one you want to use and it will be will open immediately. If what you want is to change a virtual application to another desktop, go back to “Task View” and then drag that thumbnail from the program window to the virtual desktop where you want to have it.

Delete a Windows virtual desktop
When you want to delete one of the virtual desktops you have created, you must go to the «Task View» button and click where the X is, on the desktop you want to delete, this X is located in the upper right corner, if it has windows or open applications on that virtual desktop that you want to remove, they will not be closed or removed but will be automatically moved to another desktop.
Shortcuts used on a virtual keyboard
If you as a user do not want to always be checking the «Task View» button every time you want to move from one virtual desktop to another, you can do it in an easier way by making combinations with some keys: Windows + Control + Left Arrow ( Switch to previous virtual desktop) and Windows + Control + Right Arrow (Switch to next virtual desktop).
How is the mouse handled on the desktop?
The mouse is the signaling element to perform various functions and actions on the objects that are on the Windows desktop and that is handled through the sliding and pressure of its buttons. It is a pointer in the shape of an arrow although this can be changed to other shapes:
- Hourglass: tells us that an operation is being executed and that the person or user must wait for it to finish to continue their work.
- Arrow and Hourglass: An action is running, but the user can do other actions without being interrupted.
- Slash – Indicates to a user that they can type text from that point.
The mouse works by clicking on its buttons and releasing them immediately, when you double-click in a row an action is chosen, when you press the right button the context menu or quick menu appears, and when you drag or slide somewhere without doing the release of its buttons we can then select an object, folder or file and take it to another point on the desktop.

Windows Explorer Elements
Windows Explorer was first used in 1995 with the Windows 95 release as a replacement for the Windows 3x file manager. Today it is used through the MY PC icon found in the start menu or by key combinations to access it, such as Windows + E. Each application has an icon that describes or corresponds to it in its bar of tasks and in the control panel. Since the version of Windows 98, some of the functions of this Internet Explorer were added to the browser, such as the address bar to view web pages.
Since the versions of Windows Vista, Windows 7 and Windows Server 2008 it was used with a new design, where the original was replaced, and now showing the programs in seven different ways: mosaic, list, details, content, medium icons, icons large and extra large icons. In the same way, the address bar was modified only so that it is shown in the folder where the user is working at a certain moment.
All the elements that make up the Windows desktop are considered to be extended by their different versions, but each one of them has its own characteristics and functionalities. It is the users themselves who determine which of them are decisive or important in future versions. The Microsoft company has always been attentive to the requests of the users and to leave some elements that are functional, removing those that what they did was involute the systems, and try to make improvements that make work easier over time.
Other topics that we can recommend that you read are those that we mention in these links:
Virtual Storage
Remove Excel Password
Remove Trojans
You may also be interested in this related content:
- How to Install a FileZilla FTP Server and Configure It
- Wifi without Internet Access, Possible Causes
- What are MRP 1? What are they for? and Types
The desktop is the onscreen work area provided by Microsoft Windows, analogous to a physical desktop. It consists of a work area and taskbar. The work area may span multiple monitors.
What is the Windows 10 desktop?
The Windows 10 desktop lets you run several apps and programs simultaneously, each living within its own little window. When the Start menu appears, click the name or tile for the app or program you want to run. For easy access to your favorite programs, place them on your desktop’s taskbar (described next).
Does Windows 10 have desktop?
Show the desktop The Show Desktop button on a typical Windows 10 Desktop is in an odd position. So much so, that many users may not know it is there. Drag your mouse all the way down to the very bottom right corner of the Taskbar–all the way to end (Figure A).
Is Desktop Window Manager a virus?
Is dwm.exe a virus? No, it is not. The true dwm.exe file is a safe Microsoft Windows system process, called “Desktop Window Manager”. However, writers of malware programs, such as viruses, worms, and Trojans deliberately give their processes the same file name to escape detection.
Can you end Desktop Window Manager?
Can I Turn Desktop Window Manager Off? No, you can’t. Back in the Vista days, Desktop Window Manager was controlled through a service that you could turn off—and in turn disable all the visual effects.
What are the basic component of Windows desktop?
Basic Components Of windows The screen you see at the start of the computer is known as Desktop screen. The screen has the “start” icon at the left bottom of the window which is the entry point for all the window operations. You have desktop shortcuts and files and folders along with “My computer”, “My Documents”, “Recycle Bin”, “My Network Places” etc.
What are the different parts of the Windows desktop?
The basic parts of a desktop computer are the computer case, monitor, keyboard, mouse, and power cord. Each part plays an important role whenever you use a computer.
How do I get my original desktop?
3 methods to quickly get back to the desktop in Windows 10. Method 1: using Win + D keyboard shortcut. Hold the Windows key, and press the D key on your physical keyboard so that Windows 10 will minimize everything at once and show the desktop. When you press Win + D again, you can go back to where you were original.
How does the Windows 10 desktop work?
The Windows 10 desktop lets you run several apps and programs simultaneously, each living within its own little window. That separation lets you spread several programs across the screen, sharing bits of information among them. When first installed, Windows starts with the freshly scrubbed, nearly empty desktop shown here.