v1.21.4
Merge pull request #14 from KnugiHK/merging

Update wget and its dependencies
v1.21.3.june.19.2022
GNU Wget 1.21.3 for Windows
| library | GnuTLS based version | OpenSSL based version |
|---|---|---|
| gnutls | 3.7.6 | n/a |
| openssl | n/a | 1.1.1o |
| gmp | 6.2.1 | n/a |
| nettle | 3.8 | n/a |
| libtasn1 | 4.18 | n/a |
| libidn2 | 2.3.0 | 2.3.0 |
| libunistring | 1.0 | 1.0 |
| cares | 1.17.2 | 1.17.2 |
| libpsl | 0.21.1 | 0.21.1 |
| libiconv | 1.17 | 1.17 |
| pcre2 | 10.40 | 10.40 |
| libgpg-error | 1.45 | 1.45 |
| libassuan | 2.5.5 | 2.5.5 |
| gpgme | 1.17.1 | 1.17.1 |
| expat | 2.4.8 | 2.4.8 |
| libmetalink | 0.1.3 | 0.1.3 |
| zlib | 1.2.12 | 1.2.12 |
v1.21.3.june.21.2022
GNU Wget 1.21.3 for Windows
| library | GnuTLS based version | OpenSSL based version |
|---|---|---|
| gnutls | 3.7.2 | n/a |
| openssl | n/a | 1.1.1o |
| gmp | 6.2.1 | n/a |
| nettle | 3.7.1 | n/a |
| libtasn1 | 4.18 | n/a |
| libidn2 | 2.3.0 | 2.3.0 |
| libunistring | 0.9.10 | 0.9.10 |
| cares | 1.17.2 | 1.17.2 |
| libpsl | 0.21.1 | 0.21.1 |
| libiconv | 1.16 | 1.16 |
| pcre2 | 10.40 | 10.40 |
| libgpg-error | 1.43 | 1.43 |
| libassuan | 2.5.5 | 2.5.5 |
| gpgme | 1.16.0 | 1.16.0 |
| expat | 2.4.8 | 2.4.8 |
| libmetalink | 0.1.3 | 0.1.3 |
| zlib | 1.2.12 | 1.2.12 |
wget windows 1.21.3
wget windows 1.21.2
Update wget-x86.yml

[build wget x86]
wget x64 windows 1.21.2
Both of the builds are for only 64 bit OS (Windows 7/Windows 8/Windows 10)
File checksums for wget-1.21.1-64bit-GnuTLS.zip:
SHA1: 61d31ee82bec32dc0919c2c25b1e5efb4b7e095a
MD5: 8d475d03913a6548e7f59acbbb22552e
File checksums for wget-1.21.1-64bit-OpenSSL.zip:
SHA1: 29487581ac03dd2272ee996e6fd2851fa529795b
MD5: 0c6bd2e48ce07418bd486b403713f3bb
wget x64 windows 1.21.1
Both of the builds are for only 64 bit OS (Windows 7/Windows 8/Windows 10)
File checksums for wget-1.21.1-64bit-GnuTLS.zip:
SHA1: 5debe6203fe3fca72835b858f56e60b84a71792c
MD5: c446e2114567f9e30806213a24700b6e
File checksums for wget-1.21.1-64bit-OpenSSL.zip:
SHA1: 7cacbe3a6cb14a6feeeaf28fa257ee3bf6c63178
MD5: 7214a5a91aa04ac7cc5886995f240cfb
wget x64 windows 1.20.3
wget x64 windows 1.19.5
Wget – Самая популярный менеджер загрузок, работающих из командной строки, лицензии GPL (бесплатно). Первоначально утилита была написана для Linux, но позже выпустили версию и для windows.
Wget не имеет графического интерфейса, и работает только из командной строки, для управления потребуется немного изучить ключи и параметры. При этом утилита предлагает огромное количество опций чем не могут похвастаться GUI версии.
Для windows, программа распространяется как скомпилированный исполняемый файл и не требует установки в систему, для того что бы запустить ее необходимо скачать с нашего сайт архив, в зависимости от разрядности windows на выбор 32 или 64 бит, и распаковать в папку с помощью архиватора, например, winRAR.
После чего открываем консоль использую сочетания клавиш R+WIN, на клавиатуре и ввести cmd в окно «Выполнить». И затем нажать ОК.

Далее в открывшемся окне консоли переходим в папку с утилитой, если необходимо сменить диск, то вводим букву диска и двоеточие C: или D: в зависимости от диска и жмем Enter, нас перебросит в корень диска. (все в английской раскладке)

Меняем папку командой
cd C:\\ПУТЬ К ПАПКЕ
и жмем Enter, если все сделали правильно проверяем что утилита wget лежит именно в той папке, введите команду dir, и получим список файлов и папок в текущей директории.

Существует более быстрый способ:
Переходим в папку с программой с помощью проводника windows, внутри окна зажимаем и держим клавишу “shift” и одновременно правую кнопку мыши, в меню выбираем “Открыть окно команд”, к сожалению, у меня по умолчанию установлен PowerShell и выглядит немного по-другому.

Все далее переходим непосредственно к параметры командной строки программы:
Наберите в консоли wget –help и программа отобразит все доступные параметры.
Они распределены по категориям в удобном формате, думаю разобраться не составит труда.

Возможности утилиты wget:
-
Позволяет возобновлять загрузку файлов при обрыве соединения.
-
Позволяет использовать куки и авторизацию для скачивания с сайтов где это необходимо.
-
Поддерживает работу через HTTP прокси.
-
Поддерживает работу в фоне.
What does WGET Do?
Once installed, the WGET command allows you to download files over the TCP/IP protocols: FTP, HTTP and HTTPS.
If you’re a Linux or Mac user, WGET is either already included in the package you’re running or it’s a trivial case of installing from whatever repository you prefer with a single command.
Unfortunately, it’s not quite that simple in Windows (although it’s still very easy!).
To run WGET you need to download, unzip and install manually.
Install WGET in Windows 10
Download the classic 32 bit version 1.14 here or, go to this Windows binaries collection at Eternally Bored here for the later versions and the faster 64 bit builds.
Here is the downloadable zip file for version 1.2 64 bit.
If you want to be able to run WGET from any directory inside the command terminal, you’ll need to learn about path variables in Windows to work out where to copy your new executable. If you follow these steps, you’ll be able to make WGET a command you can run from any directory in Command Prompt.
Run WGET from anywhere
Firstly, we need to determine where to copy WGET.exe.
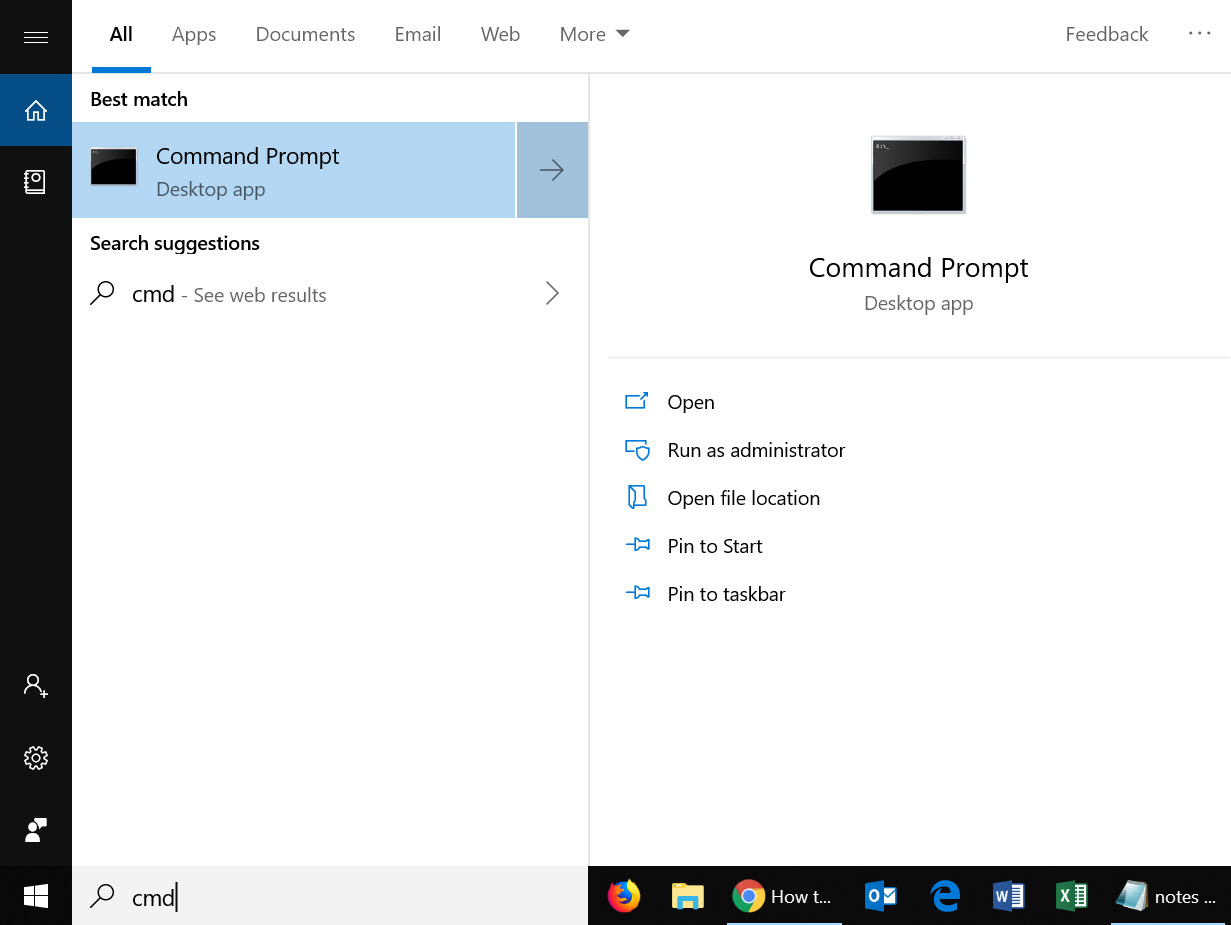
After you’d downloaded wget.exe (or unpacked the associated distribution zip files) open a command terminal by typing “cmd” in the search menu:
We’re going to move wget.exe into a Windows directory that will allow WGET to be run from anywhere.
First, we need to find out which directory that should be. Type:
path
You should see something like this:
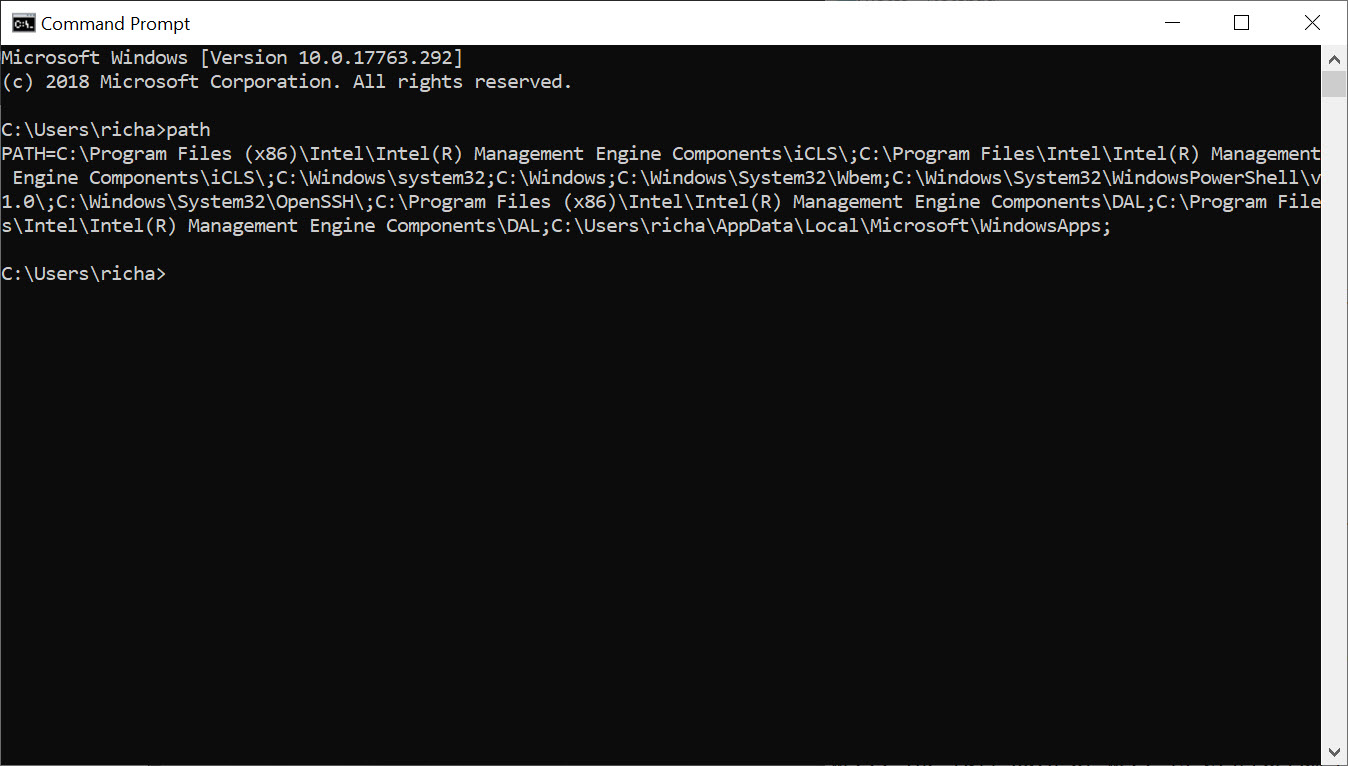
Thanks to the “Path” environment variable, we know that we need to copy wget.exe to the c:\Windows\System32 folder location.
Go ahead and copy WGET.exe to the System32 directory and restart your Command Prompt.
Restart command terminal and test WGET
If you want to test WGET is working properly, restart your terminal and type:
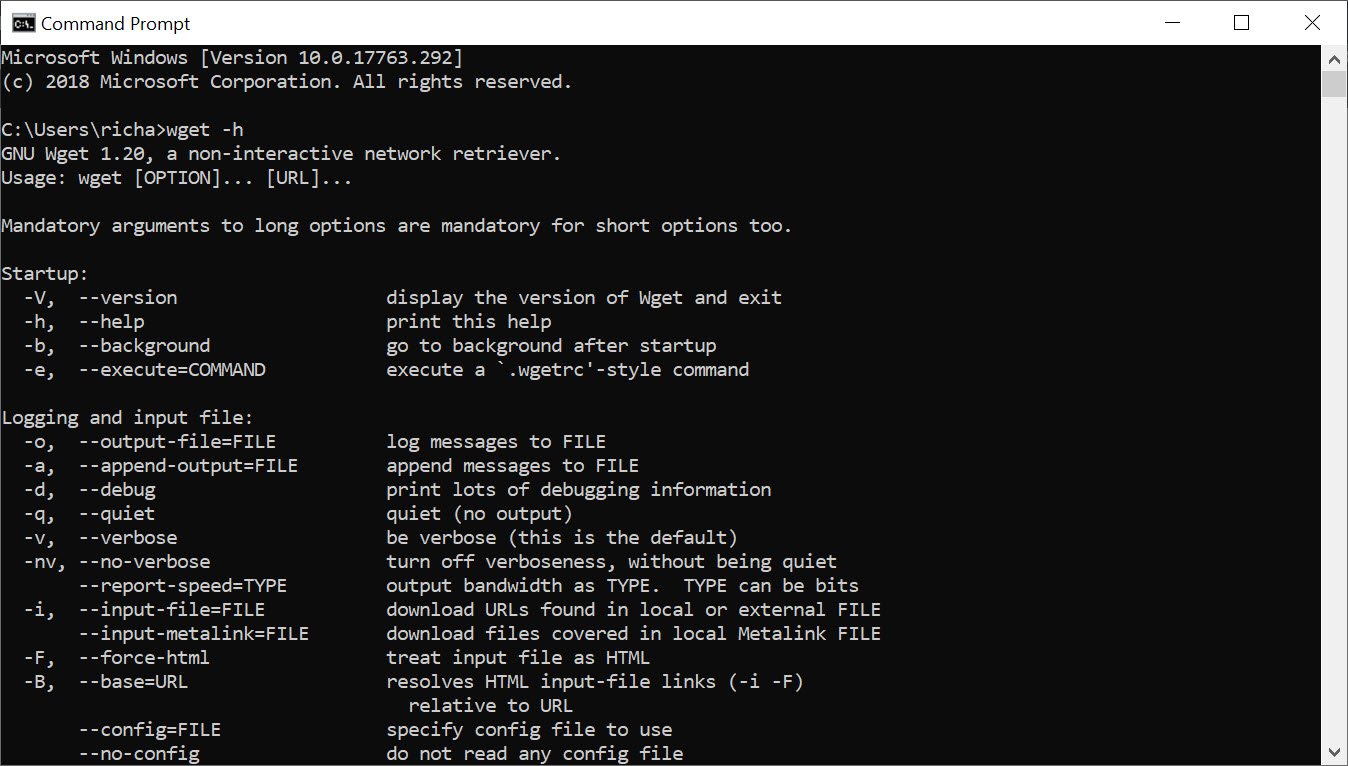
wget -h
If you’ve copied the file to the right place, you’ll see a help file appear with all of the available commands.
So, you should see something like this:
Now it’s time to get started.
Get started with WGET
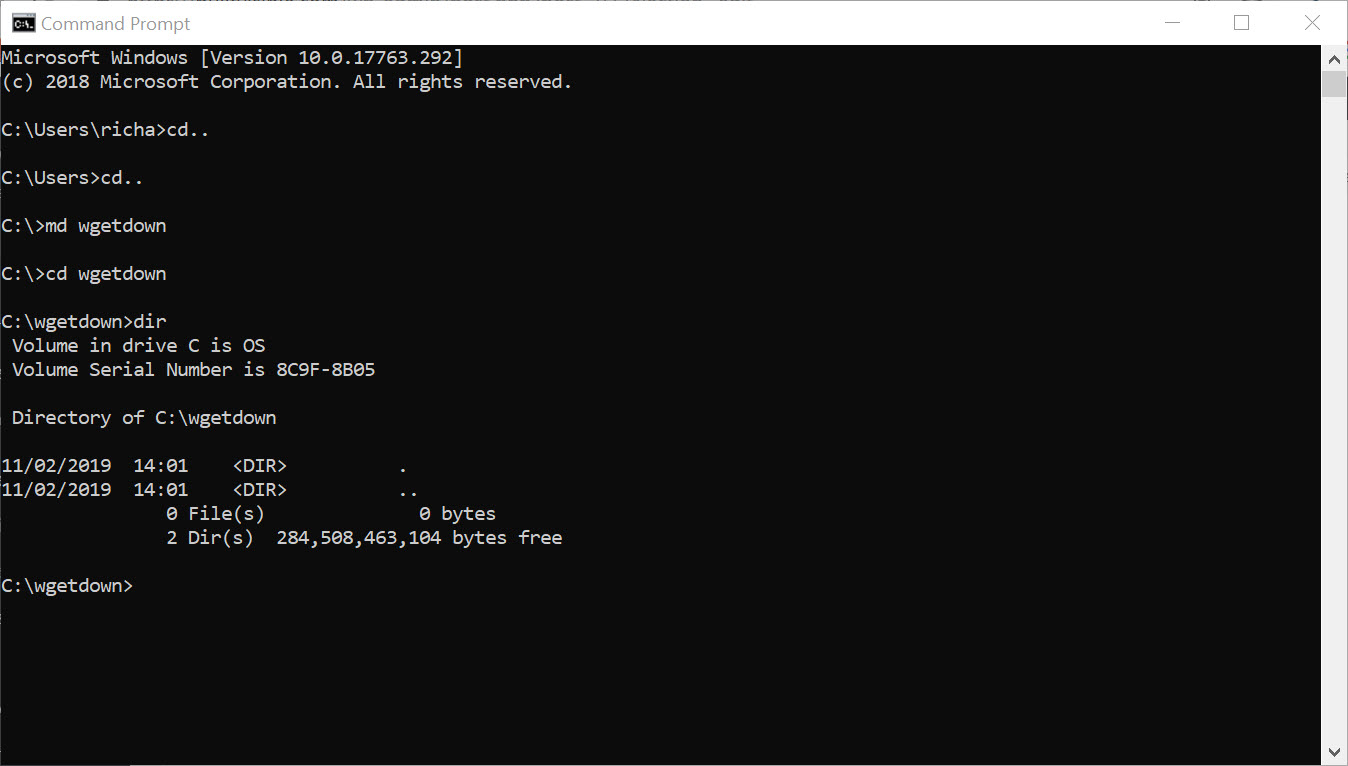
Seeing that we’ll be working in Command Prompt, let’s create a download directory just for WGET downloads.
To create a directory, we’ll use the command md (“make directory”).
Change to the c:/ prompt and type:
md wgetdown
Then, change to your new directory and type “dir” to see the (blank) contents.
Now, you’re ready to do some downloading.
Example commands
Once you’ve got WGET installed and you’ve created a new directory, all you have to do is learn some of the finer points of WGET arguments to make sure you get what you need.
The Gnu.org WGET manual is a particularly useful resource for those inclined to really learn the details.
If you want some quick commands though, read on. I’ve listed a set of instructions to WGET to recursively mirror your site, download all the images, CSS and JavaScript, localise all of the URLs (so the site works on your local machine), and save all the pages as a .html file.
To mirror your site execute this command:
wget -r https://www.yoursite.com
To mirror the site and localise all of the urls:
wget --convert-links -r https://www.yoursite.com
To make a full offline mirror of a site:
wget --mirror --convert-links --adjust-extension --page-requisites --no-parent https://www.yoursite.com
To mirror the site and save the files as .html:
wget --html-extension -r https://www.yoursite.com
To download all jpg images from a site:
wget -A "*.jpg" -r https://www.yoursite.com
For more filetype-specific operations, check out this useful thread on Stack.
Set a different user agent:
Some web servers are set up to deny WGET’s default user agent – for obvious, bandwidth saving reasons. You could try changing your user agent to get round this. For example, by pretending to be Googlebot:
wget --user-agent="Googlebot/2.1 (+https://www.googlebot.com/bot.html)" -r https://www.yoursite.com
Wget “spider” mode:
Wget can fetch pages without saving them which can be a useful feature in case you’re looking for broken links on a website. Remember to enable recursive mode, which allows wget to scan through the document and look for links to traverse.
wget --spider -r https://www.yoursite.com
You can also save this to a log file by adding this option:
wget --spider -r https://www.yoursite.com -o wget.log
Enjoy using this powerful tool, and I hope you’ve enjoyed my tutorial. Comments welcome!
Windows binaries of GNU Wget 1.21.4
![]()
This is a command-line tool that can be used to retrieve files via the HTTP, HTTPS, and FTP protocols.
GNU Wget is a free software package that allows users to retrieve files through the most commonly used Internet protocols,
including HTTP, HTTPS, FTP, and FTPS. As a non-interactive command-line tool,
it can be easily integrated into scripts, cron jobs, and terminals.
How to use wget
To learn how to use Wget, please refer to the official GNU Wget manual by clicking the link below.
https://www.gnu.org/software/wget/manual/wget.html
Build Environment
Wget has been built using GitHub Actions and cross-compiled with mingw64 on Ubuntu, using GNU/gcc 9.3.
It is completely safe to use and free from viruses.
All the necessary libraries have been statically linked, so there is no need to use any third-party DLL.
Wget features
The Windows version of Wget includes all features of Wget except for NLS (the multi-language version).
GnuTLS version:
+cares +digest +gpgme +https +ipv6 +iri +large-file +metalink -nls +ntlm +opie +psl +ssl/gnutls
OpenSSL version:
+cares +digest +gpgme +https +ipv6 +iri +large-file +metalink -nls +ntlm +opie +psl +ssl/openssl
Local Build
To build Wget for Windows on WSL 1 or 2 (Debian/Ubuntu), please follow these steps.
sudo apt-get install -y mingw-w64 mingw-w64-tools mingw-w64-i686-dev gcc
sudo apt-get install -y make m4 pkg-config automake gettext
cd /tmp
git clone https://github.com/webfolderio/wget-windows.git
cd wget-windows
./build.sh
Notes
Project sponsored by WebFolder
Have you ever lost an essential asset at a crucial moment on your website? It is frightening to even think about it, isn’t it? Perhaps if you have used Linux, then you might have heard of WGET. Yay! WGET is also available for Windows. Thank GNU for coming up with a compatible version of WGET for Windows 10. From the starting of this article, you will understand how to download and install WGET for Windows 10. Also, you will learn how to use WGET command with examples provided for improving your understanding. Keep on reading to gain comprehensive knowledge about WGET.

Table of Contents
WGET has been available for Linux users for a long time. Learners can even refer to the different articles and guides available on the web to better their comprehension. But when it comes to the Windows version, even the scarce amount of articles cannot give you the information you need. However, do not lose hope. From this point on, you will know things about WGET on Windows that you’ve never heard or read. So why not start with answering the most asked question: What is WGET?
What is WGET?
WGET is a free tool to download files and crawl websites using the command line. Before learning to download WGET and how to use WGET command with examples, check out the points given below to know more about its features:
- WGET can retrieve contents from web pages.
- It even allows you to download from any web pages (FTP, HTTP) in any format (PDF, XML).
- It’s known to provide operational anonymity to keep users’ location or activities a secret.
- WGET works perfectly in bad network conditions too.
- Apart from these features, WGET can overwrite correct domain name in links.
- Moreover, it can perform recursive downloads, where the link present in the downloading document gets automatically downloaded further.
Also Read: What is a Command Line Interpreter?
How to Install WGET for Windows 10
Using WGET for Windows 10 will seamlessly download and extract information from any webpage by using commands. Implement the steps below to download GnuWin first to create a Windows environment and use WGET.
1. Download GnuWin WGET from here. The download process will start and finish automatically in a few seconds.
2. Click the downloaded WGET setup.exe folder to open it, as shown below.

3. Click Yes when prompted.
Note: Make sure to close already running applications before starting WGET installation.
4. To install WGET for Windows, click on Next, as depicted below.

5. Select the I accept the agreement radio button and click the Next option as highlighted below to continue the installation process.

6. Click on Browse to select the Destination Location. Choose a folder where you want to set up WGET and click on Next as shown.
Note: It is recommended to use default path: C:\Program Files (x86)\GnuWin32\bin

7. Select the components you want to install among Binaries and Documentation. Click Next to proceed further.

8. Here, click on Browse and select a Destination Folder to create the program shortcut in the start menu. Then, click on Next.
Note: If you don’t want to create a shortcut, select the checkbox Don’t create a Start Menu folder.

9. Select the Additional icons you need and click Next as illustrated below:
- Create document shortcuts in Start Menu folder
- Download Sources
![]()
10. Scroll down the review tab and check if all the desired options are present. Click Install to begin installing WGET on your system.
Note: You can select Back to change any setting you need to modify.

11. Wait for the WGET installation process to complete in your Windows 10 desktop/laptop and click Finish to exit the setup.

Also Read: Fix error 1500 Another Installation is in Progress
How to Use WGET for Windows 10
There are two ways to use WGET on your system.
- First, it is accessed directly via Command Prompt using a single path.
- Second, you need to manually go to the directory page where the app is present, and then proceed to the command prompt procedure.
You can implement any of these methods to use WGET on your system at your convenience. So, now you will see both methods in action below:
Method 1: Add CD to WGET Path
Once you install WGET for Windows 10, ensure that the wget.exe folder exists in the path given in this method.
Note: If not, copy and paste the respective folder in the location shown in the below File Explorer navigation, as you are about to use only this path.
1. Press Windows + E keys simultaneously to open File Explorer.
2. Navigate to C:\Program Files (x86)\GnuWin32\bin and copy the location.

3. Type Command Prompt in the Windows search bar and click Open to launch it, as shown below.

4. Type cd C:\Program Files (x86)\GnuWin32\bin and press Enter.
5. Then type wget and hit Enter. If the command is executed, it shows that WGET is running properly.

6A. Type the required WGET for Windows 10 command to download any file in the given format:
wget [OPTION] … [URL]…
6B. Or, view help from WGET by typing ‘wget –help’
Also Read: Fix File Explorer Not Responding in Windows 10
Method 2: Add Environment Variable
Once you download WGET for Windows 10, you must change the environmental variable set in the system settings. This is a long process. Follow the steps below carefully to set up WGET for Windows 10:
1. Press the Windows key from the keyboard and type Control Panel. Click the Open option to launch it.

2. Choose View by: Large icons from the top right corner. Click on the System option.
![]()
3. Scroll down and click on the Advanced system settings as illustrated below.

4. In the Advanced tab, click the Environment Variables button as shown.

5. Environmental Variables pop-up window will appear. Select the Path under the User variables for GREEN category and click on Edit as depicted below.

6. In the Edit environmental variable window, select the Browse option.

7. Select C:\Program Files (x86)\GnuWin32\bin path and click OK as shown.

8. Then, click OK as shown.

9. Again, click OK in the System Properties window.

10. Now, open Command Prompt as explained in Method 1.
11. Type wget and press Enter on the keyboard. Once the Environment Variable is set, you will be able to run WGET regardless of any folder you are currently in.

Also Read: How to Fix Git Merge Error
How to Check the Functioning of WGET App and Commands
To check if you can access WGET for Windows 10 regardless of any folder or directory that is present, follow the steps given below:
1. Type Command Prompt on the start menu search bar and click Open to launch it.

2. Type wget and press Enter to check whether the application runs.
Note: If you receive unrecognized command error, you have downloaded the WGET Setup from the wrong source. So, ensure to use only the link given above for the download process and try again.

3A. If the test worked, then it’s great. You have done a good job!
3B. If it is not working, do not worry. Check if you have followed the steps in an orderly manner, from downloading GnuWin, installing WGET Setup, then adding WGET environment variable. Try once again and restart the command line.
Also Read: Fix ERR_EMPTY_RESPONSE in Google Chrome
How to Use WGET Command with Examples
There are thousands of WGET commands to perform specific tasks. Run WGET for Windows 10 using any of the methods given above and type any of the commands listed below in Command Prompt.
Note: You need to enter the command correctly to obtain desired results.
1. To get list of commands, use the command wget -h.

2. To download a single file, use the command wget [URL]. For instance, enter the command wget https://wordpress.org/latest.zip. Here, WordPress is chosen as an example.
3. To download to a specific folder, use the command wget ‐P [wanted directory] [URL]. For instance, wget -P /temp https://github.com/git/git/archive/master.zip.
4. To resume an interrupted download, use the command wget ‐c [URL]. For instance, wget -c https://wordpress.org/latest.zip.
5. To set the download speed, use the command wget ‐‐limit-rate [wanted speed] [URL]. For instance, wget –limit-rate 1m https://wordpress.org/latest.zip.
6. To mirror a single webpage, use the command wget -m [URL]. For instance, wget -m https://cereal.guru/.
7. To know the version of installed WGET, then use the command wget -V.

8. To download and save under a specific name, use the command wget -o [file name] [URL]. For instance, wget -o file.docx https://cereal.guru/.
9. To download a web page in the background, use the command wget -b [URL]. For instance, wget -b https://cereal.guru/.
10. To download multiple URLs, use the command wget -i [File name]. For instance, wget -i URL.txt. Before executing this command, place all the URLs in one file and include that file name in the command.
11. To download via FTP, use the command wget –ftp-user=[ftp_username] –ftp-password=[ftp_password] ftp://… For instance, wget –ftp-user=sofiftp –ftp-password=TopSecretPassword ftp://123.456.7890.
12. To change the number of retry attempts, use the command wget –tries=[number_of_tries] [URL]. For instance, wget –tries=inf https://cereal.guru/. In this example, inf denotes infinity. The default number of retries is 20.
This is how to use WGET command with examples. Click here to know about more commands and their uses.
Recommended:
- Fix Windows 10 Update Error 0x80070103
- How to Enable Telnet in Windows 10
- Complete List of Windows 11 Run Commands
- Discord Commands List
We hope that this guide was helpful and you could learn how to download, install & use WGET for Windows 10. If you have any queries or suggestions, feel free to drop them in the comments section below.