No matter which version of Windows you’re using, this article gives you a complete and step-by-step guideline on how to install IIS on Windows 10 and other platforms such as Windows server 2019, 2012, and 2012.
Microsoft has hit the tech market with its excellent IIS service, which has topped all the rivals and been the most popular web server for Windows. You can make sure of your web application and website’s high performance after installing IIS on your Windows server. As the name gives us a hint, IIS works best on Windows OS. However, you could use it on other platforms like Linux, but it won’t give you reliable performance.
What is IIS?
Internet Information Services (IIS) is a flexible and standard web server from Microsoft that runs on Windows systems to serve the requested pages or HTML files. The IIS server runs on the Microsoft .NET platform on Windows OS.
Also Read: Install and Update .NET Framework on Windows 10
The IIS server receives requests from remote computers and, in return, responds with the correct response. That allows web servers to share and transmit data to all local and online networks.
Information sent to users is displayed in many ways, such as static web pages, through file exchanges such as downloads and uploads, and text, images, and more.
Windows 10 VPS Hosting
Get yourself an efficient Windows 10 VPS for remote desktop, at the cheapest price out there. FREE Windows 10 running on NVMe SSD storage and high-speed internet.
Check Out Windows 10 VPS Plans
How Does IIS Work?
IIS operates with the help of standard protocols and programming languages. For things like text, buttons, image insertion, direct link/character, and hyperlinks, IIS uses HTML. HTTP is used to exchange information between a web server and a user.
HTTPS – HTTP over Secure Sockets Layer (SSL) uses Transport Layer Security or SSL to encrypt additional data security communications. File Transfer Protocol (FTP), or its secure alternative, FTPS, can transfer files. Additional supported agreements include Simple Mail Transfer Protocol (SMTP), sending and receiving email. The processes mentioned above and other languages and conventions together form an appropriate IIS package.
Also Read: Best Windows 10 VPS
How To Install IIS on Windows 10?
If you are using virtual machines such as Windows VPS, you must connect to Windows via Remote Desktop. The following steps are also helpful if you’re looking for how to install IIS on Windows 8, or Windows 8.1.
Step 1: open the launch section
Press the Windows + R key to open the launch section.
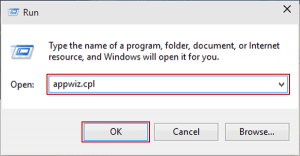
Step 2: Type appwiz.cpl
Now type appwiz.cpl in that section and hit Enter. That opens Programs and Features in Windows 10.
Step 3: Turn off Windows features
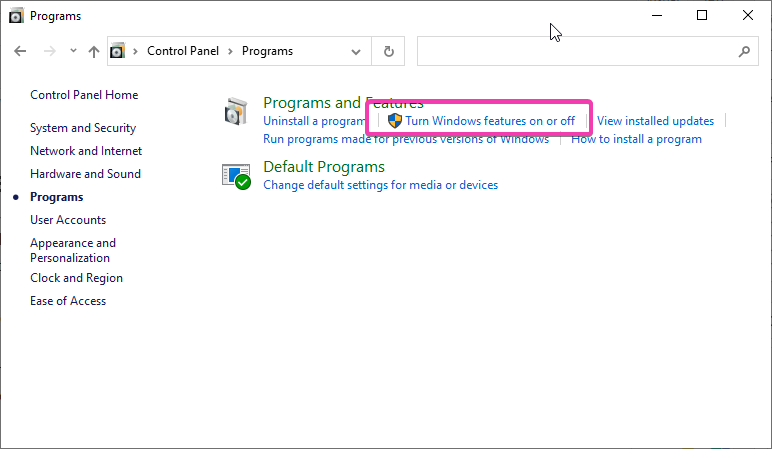
On the Apps and Features page, click Close or turn off Windows features.
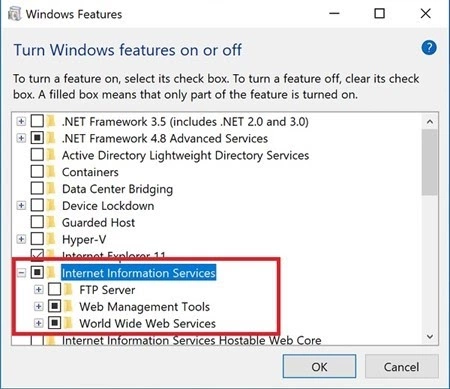
Step 4: Check the IIS services
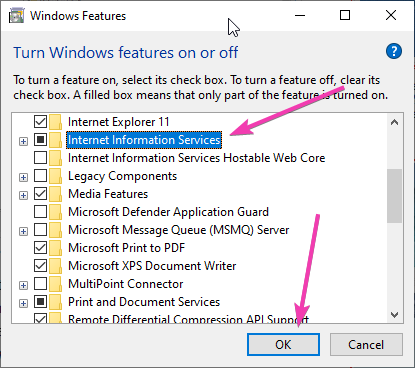
In the list of features, search the Internet Information Service (IIS), check the IIS services according to your needs, and press OK.
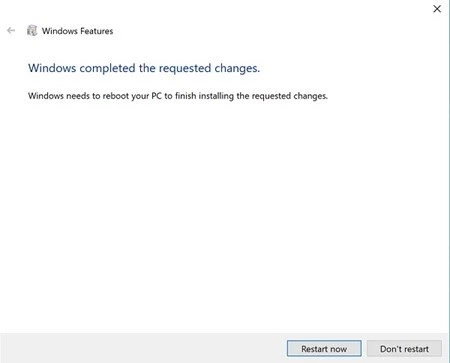
Step 5: Restart the computer
After the installation, restart your computer to complete the installation.
You can now access IIS in your browser by entering the 127.0.01 address on the local network. Moreover, you can have access to your IIS web server remotely by entering your server’s IP address in your browser. It looks like this: 185.156.x.x
Please note: Your IIS directory on your device is: C: \ inetpub \ wwwroot. You can copy this directory and have access to your website files or other files via an IIS web server using your browser.
Note: These steps are almost the same if you’re looking for how to install IIS on Windows 7.
Unquestionable Stability
Get a free Windows 7 operating system on a Windows 7 VPS plan from Cloudzy — equipped with the latest hardware, including NVMe storage.
Get a Windows 7 VPS
How To Install IIS on Windows Server 2012
The process is almost the same for other versions of the Windows server. The following steps are also helpful if you’re looking for how to install iis on Windows Server 2016.
Also Read: How to install Linux Bash on Windows 10?
Step 1: open the launch section
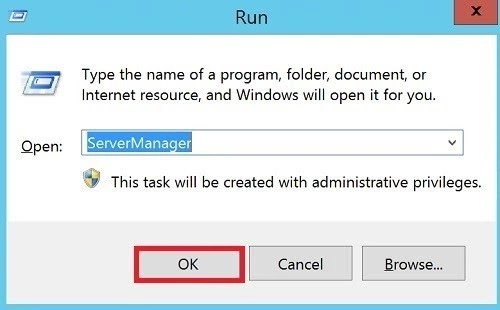
To install IIS on Windows Server, press the Windows + R keys to open Run.
Step 2: open the launch section
Type ServerManager in the launch box and click OK. That opens the Programs and Features box on Windows Server 2012. [ or any other version you’re using.]
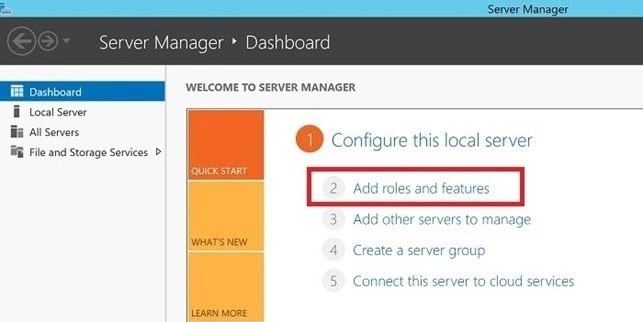
Step 3: Add roles and features
Click on the “Add roles and features” in the newly opened window.
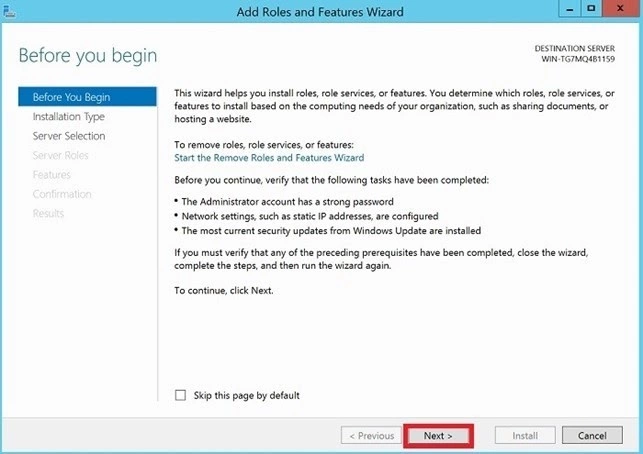
Step 4: Installation Wizard
Now, the Installation Wizard will appear Click Next.
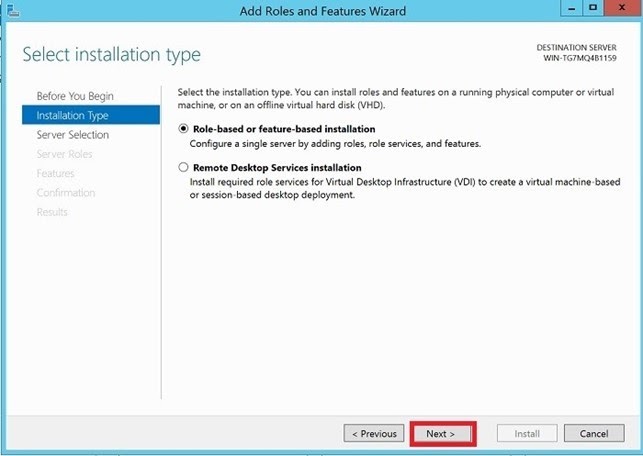
Step 5: Select role-based
Look for roles based on a role or based on a feature and click Next.
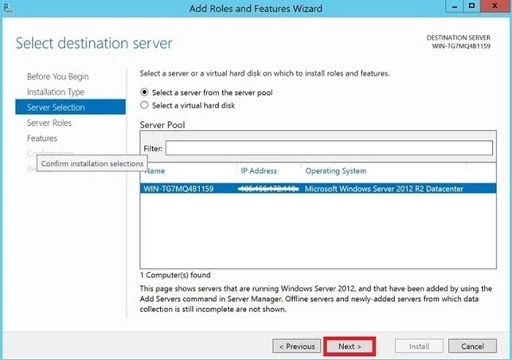
Step 6: Select a server from the server pool
Now, click on the “Select a server from the server pool” from the window, then select Server and click Next.
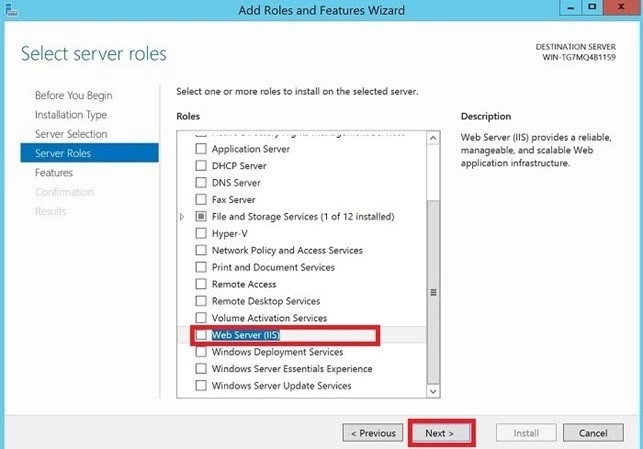
Step 7: Check the Web Server (IIS) section
When you get to the Series Roles section, scroll down to the list, then check the Web Server (IIS) section and hit Next.
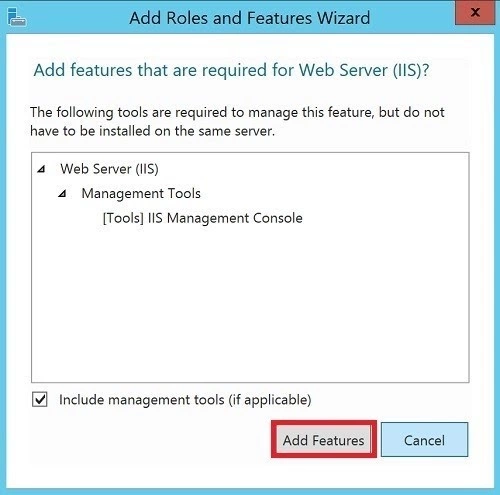
Step 8: Click on Add Features
Click on Add Features, do not forget that the checkbox click “Install management tool (if available)”
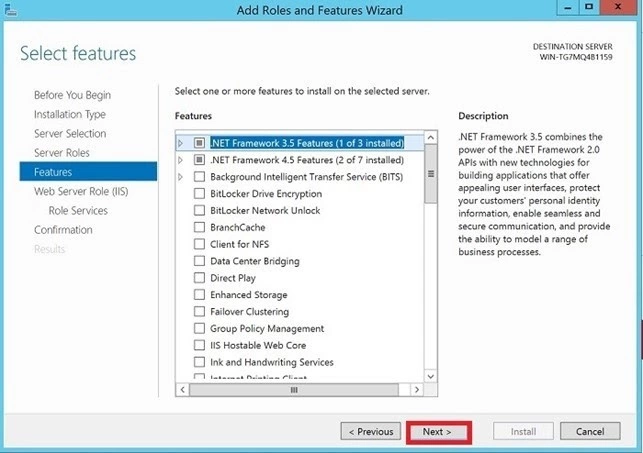
Step 9: Click on the Next
Keep the default features as they already are, then click on the Next.
Step 10: Click on the Next
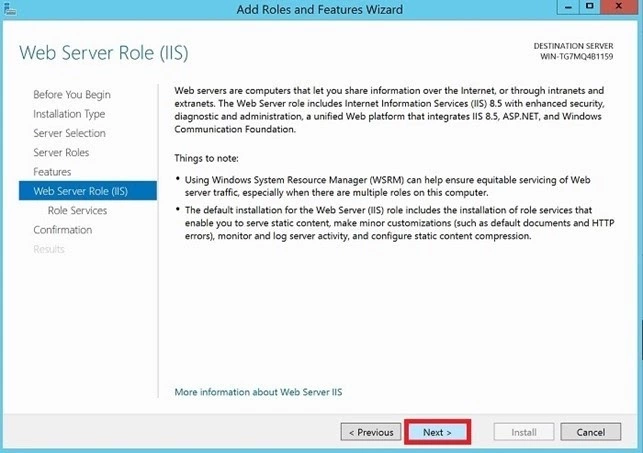
Click on the “Next” when you’re done with the Web Server Roles (IIS) text.
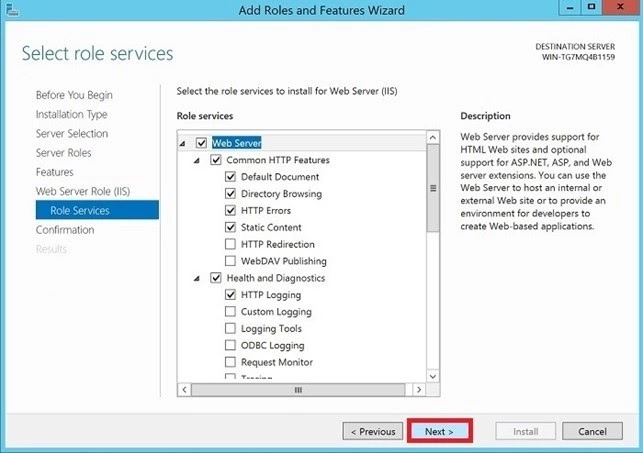
Step 11: Select web Server roles and Click Next
Click on the “Next” after selecting the Web Server roles as shown in the following image.
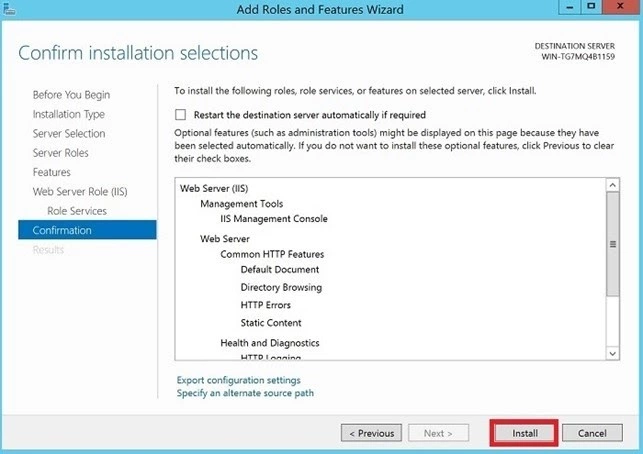
Step 12: Install selections
Click on the “Install.”
When the installation is finished, close the installation wizard. You will see the main Internet Information Services (IIS) interface similar to the one shown below.
Please note: Your IIS directory on your device is C: \ inetpub \ wwwroot. Now you can copy and access your website files or other files via an IIS web server using your browser.
Note: All the procedures mentioned above will also help you on how to install IIS on Windows Server 2019.
Windows 10 VPS Hosting
Get yourself an efficient Windows 10 VPS for remote desktop, at the cheapest price out there. FREE Windows 10 running on NVMe SSD storage and high-speed internet.
Check Out Windows 10 VPS Plans
Conclusion
You just did it! Now that article has helped you on how to install IIS on Windows 10 and it’s running nice and smooth on your server; it’s time to ensure that your website is 100% functioning correctly, you’ll need a secure and cost-effective server.
Cloudzy proudly offers you its top-performing and budget-friendly cheap Windows Virtual Private Server and Remote desktop VPS services to help you have a 100% safe, smooth and reliable online presence.
If you start working with Cloudzy today, you’ll join a big club of happy customers who enjoyed having budget-friendly VPS servers with cutting-edge technology, worldwide locations, and 24/7 committed customer support. If you need more info on our service or no-obligation quotes, we’re just one simple call away!
If you want to learn more about web design and development, installing Internet Information Services (IIS) on your Windows 10 computer is a good method. IIS is a free Windows Feature included in Windows 10, so why not use it?
IIS is a full-featured web and FTP server with some powerful admin tools, strong security features, and can be used to host ASP.NET and PHP applications on the same server. You can even host WordPress sites on IIS.
There are three ways to install and set up a website in IIS on Windows 10; using the Graphical User Interface (GUI), PowerShell, or Windows CMD. We’ll be using each method to do a basic installation of IIS.
Install IIS Using The GUI
This is the point-and-click method to set up a website in IIS. It’s the ideal method if you haven’t learned PowerShell or Windows commands.
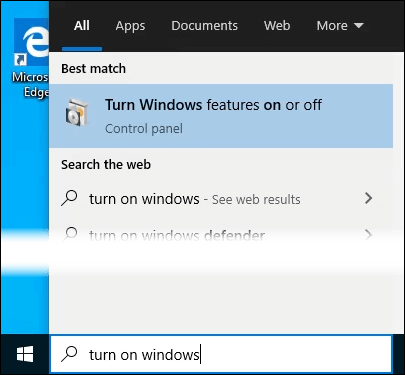
- Start typing “turn on windows” in the Search bar. The Turn Windows features on or off utility will show as a result. Click on it.
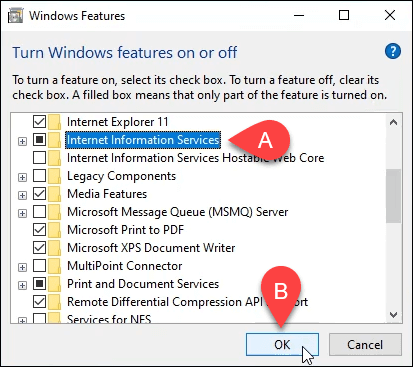
- The Windows Features window will open. It may take a bit for the different features to load. Once it does, click on the checkbox next to Internet Information Services and then click the OK button.
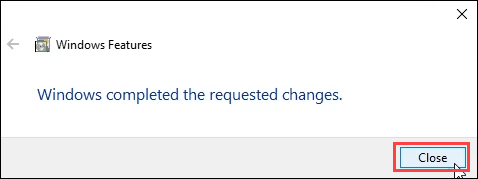
- The installation will begin and can take several minutes. Once it’s completed, click on the Close button.
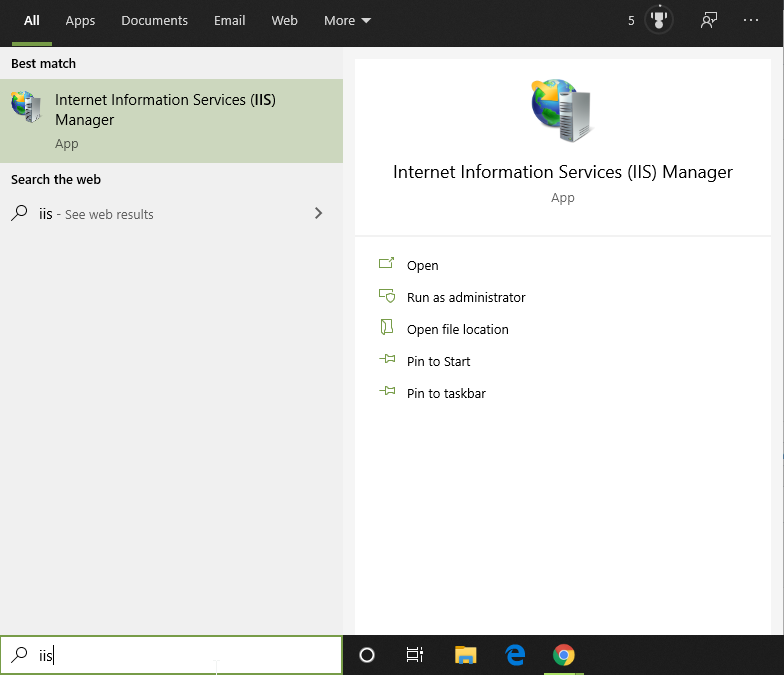
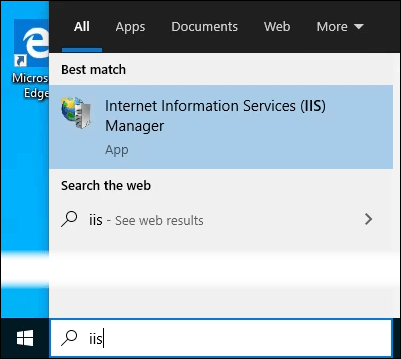
- To ensure that IIS is installed and working, type IIS in the Search bar near the Start button. You’ll see the Internet Information Services Manager as a result. Click on that to open it.
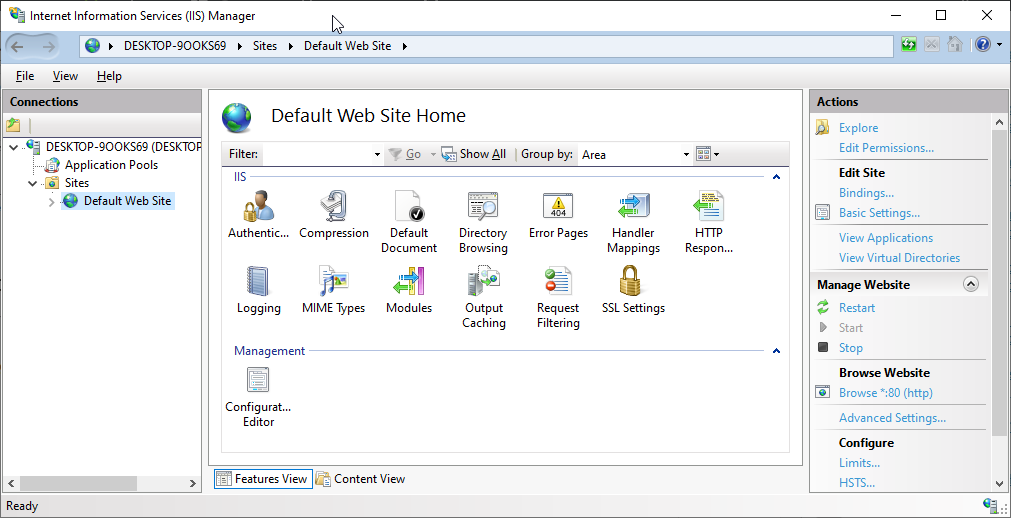
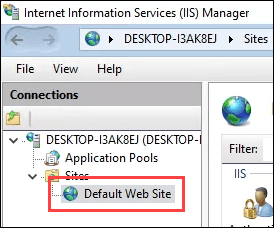
- When IIS Manager opens, look in the left pane of the window under Connections. Expand the tree menu until you see Default Web Site. That’s a placeholder site that is installed with IIS. Click on it to select it.
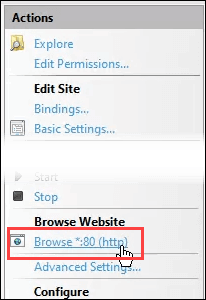
- On the right side of the IIS Manager look under the Browse Website section. Click on Browse *:80 (http). That will open the default web site in your default web browser.
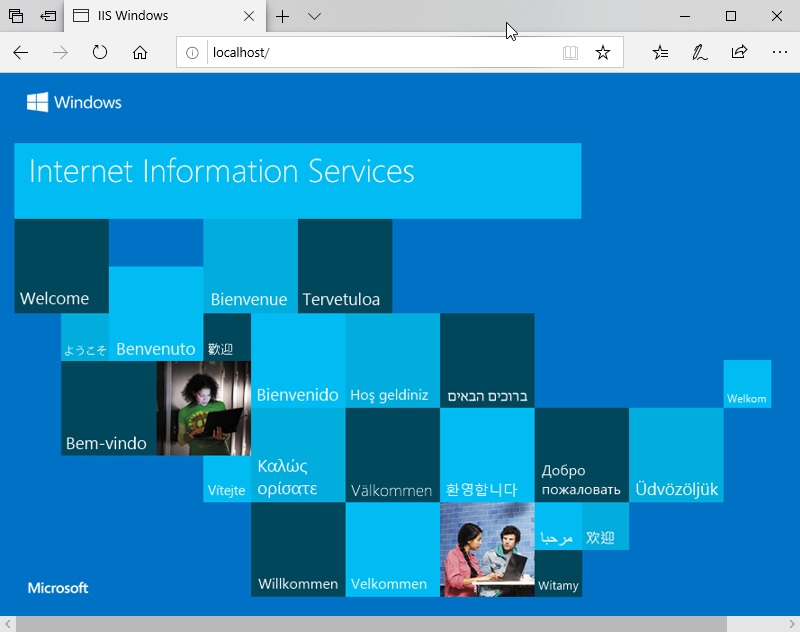
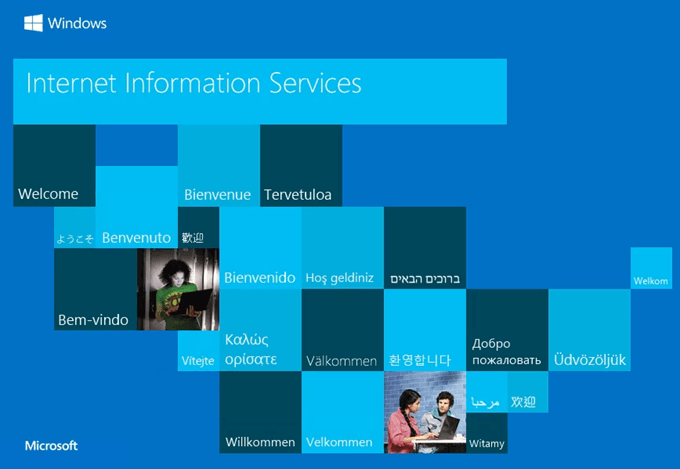
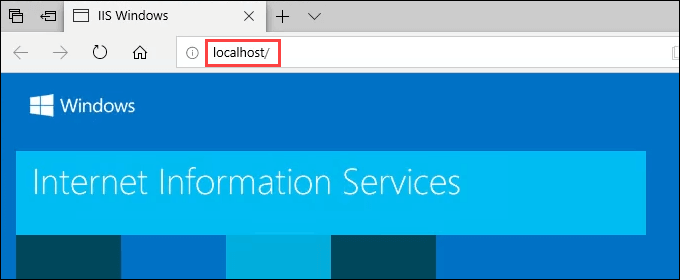
- You’ll see a web page like the following. Notice in the address bar that it says localhost. That’s the address to type in to go to your new website.
Create Your First Web Page for IIS
Before we go into the other two methods of installing IIS, let’s see where the files that make your website are stored. We’ll also make a very basic web page. Once you know how to do this, you’ll know the basics to jump into learning web design and development.
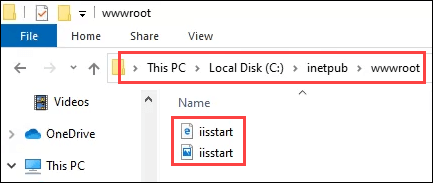
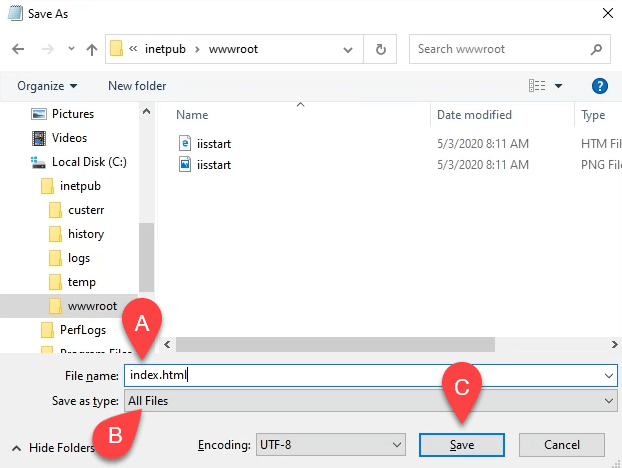
- After IIS is installed, open File Explorer. Navigate to C:\intepub\wwwroot. That’s where the files that make up the website need to be stored. You’ll see the default IIS web page file, iisstart.html, and the image shown on the page, iisstart.png. This is where you’ll save your first web page.
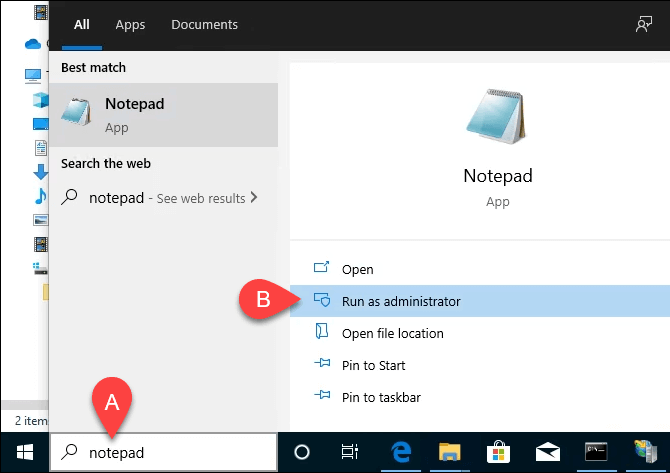
- Open Notepad as administrator. To save to the wwwroot location, you must be an administrator.
- Save the file to the wwwroot location. Name it index.html and change the Save as type: to All Files. Then click the Save button.
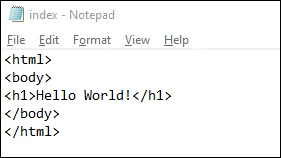
- Now that it’s saved as the right filetype, let’s put some content in it. Enter the following HTML code for a very basic web page and save it:
<html>
<body>
<h1>Hello World!</h1>
</body>
</html>
- Go back to the web browser that has the default IIS web page. Click on the refresh button. You will now see your first web page.
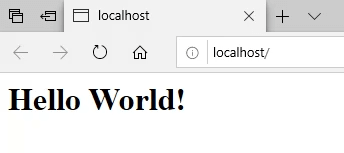
That’s it! You’ve just created and published your first website on IIS.
Install IIS Using Windows Commands
We can reduce the process of installing IIS to a one-line command. It can be done in either Windows Command Prompt or using PowerShell. We’ll show you how to do it with Windows command first, but learning PowerShell would be of great benefit in the future.
- Type cmd in the search bar and the top result should be Command Prompt. Click on Run as administrator.
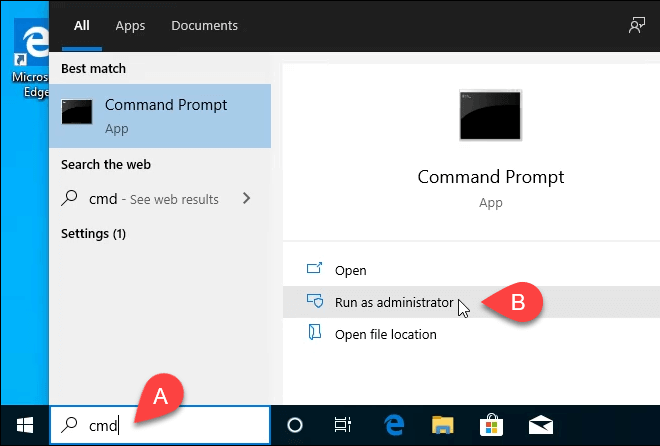
- Type in the command DISM /online /enable-feature /featureName:IIS-DefaultDocument /All and press Enter.

- You’ll see a progress bar appear. Once it reaches 100.0% and you see the message, “The operation completed successfully.” you can close the Command Prompt. IIS is installed.
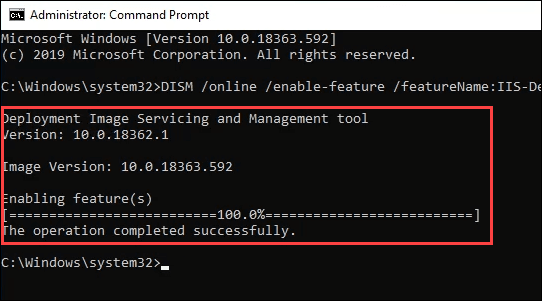
- Check to ensure you can open the IIS Manager and that the installation worked, using steps 4-7 from the Install IIS Using The GUI section.
Install IIS Using PowerShell
Learning to do things like installing IIS in PowerShell is a huge benefit for two reasons. One, it’s the easiest and fastest way to do most administrative tasks in Windows. Two, you can save your PowerShell commands, known as cmdlets, as a script and run them anytime on any Windows computer or server.
- Type powershell in the search bar and one of the results should be PowerShell ISE. Click on Run as administrator.
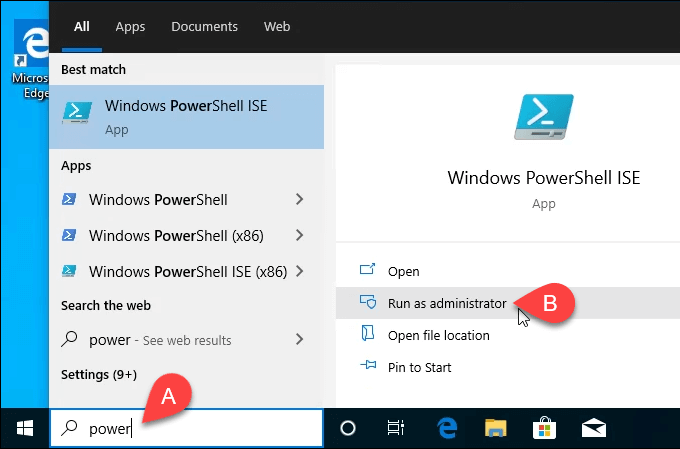
- Type the cmdlet Enable-WindowsOptionalFeature -Online -FeatureName IIS-WebServerRole -NoRestart and run it. You’ll see a progress bar start. Once it’s complete, check to make sure IIS is installed and working.
- This step is optional, but you can save this as a PowerShell script and then run it anytime. Work with the script and add different parameters. Eventually, you’ll have an IIS install script that sets things up exactly as you want it, every time, with a single click.
You’re The Web Now!
This is just the beginning of what you can do with making your own website in IIS. Look into using IIS for FTP file transfer or media hosting as well. Also, look into Microsoft’s Web Platform Installer for simplified ways to install and learn things like WordPress, PHP, Python, and more.
Служба IIS (Internet Information Services) необходима для работы ASP.NET серверной части СпрутМонитор.
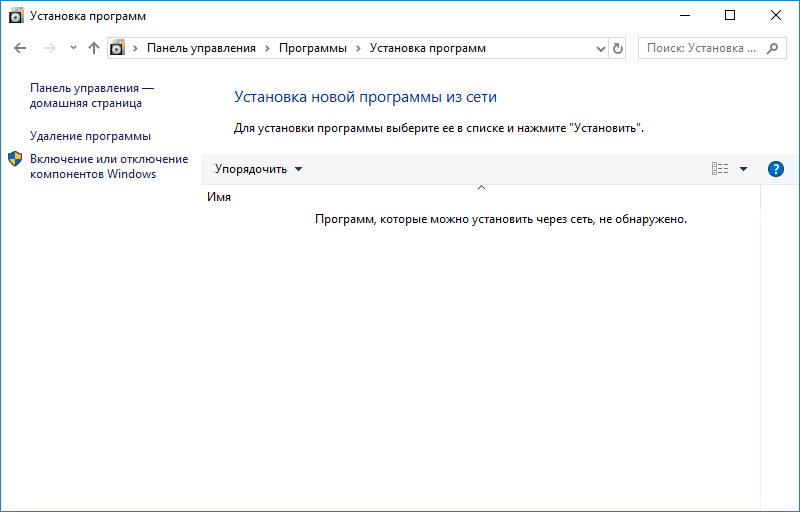
1. Перейдите в Панель Управления -> Программы -> Установка программ. Щелкните на пункт меню (слева) Включение и отключение компонентов Windows.
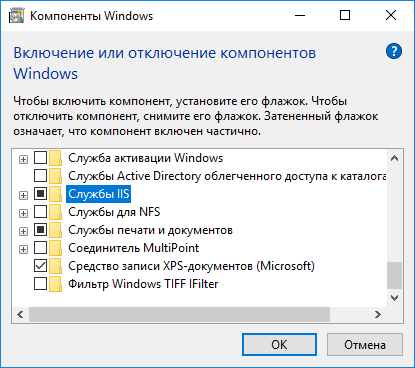
2. Отметьте пункт Службы IIS, и нажмите кнопку ОК:
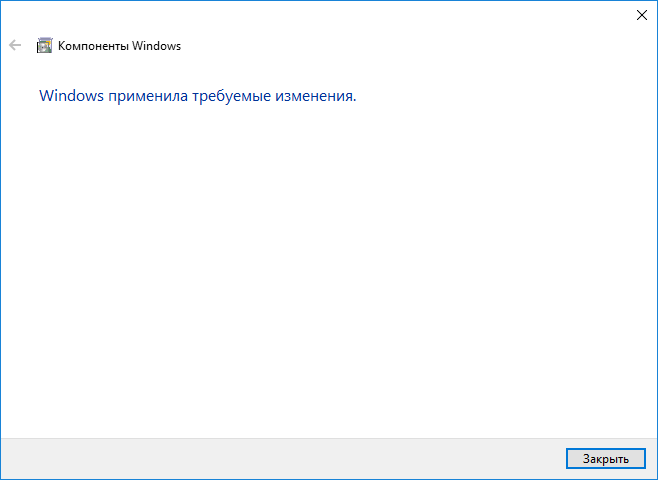
3. Дождитесь окончания установки всех необходимых компонентов:
4. После завершения установки, рекомендуется перезагрузить компьютер.
5. Запустите браузер и перейдите по адресу http://localhost/. Если открылась тестовая страница IIS, значит установка произведена успешно.
См. также: Установка серверной версии СпрутМонитор.
In this article, I will explain how to install an IIS web server on a computer with Windows 10.
IIS is a Web server developed by Microsoft that is also available on servers.
The version installed on the client is called IIS Express, it is perfect for testing locally.
Installation IIS on Windows 10
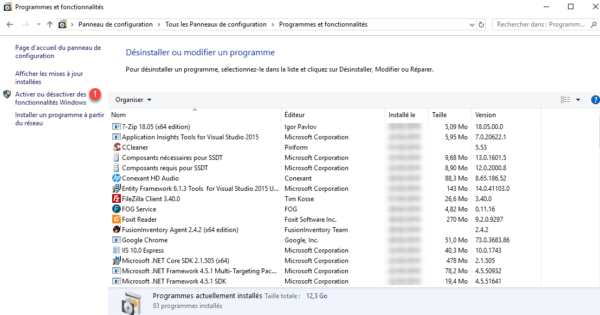
1. Open the Control Panel and go to Programs and Features and then click Enable or Disable Windows Features 1 .
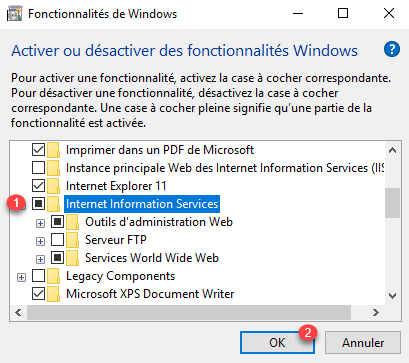
2. Search Internet Information Services and check the box 1 and click OK 2 .
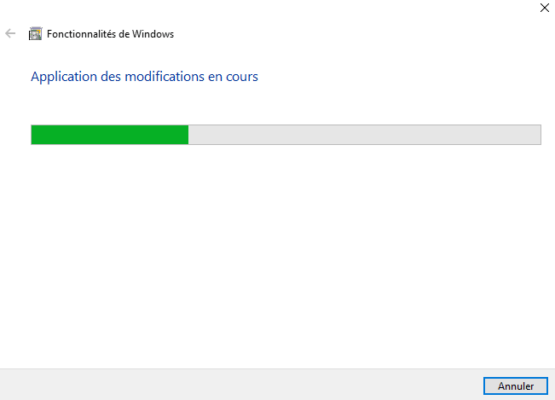
3. Wait during the installation …
4. When the installation is complete, close the window.
Manage IIS
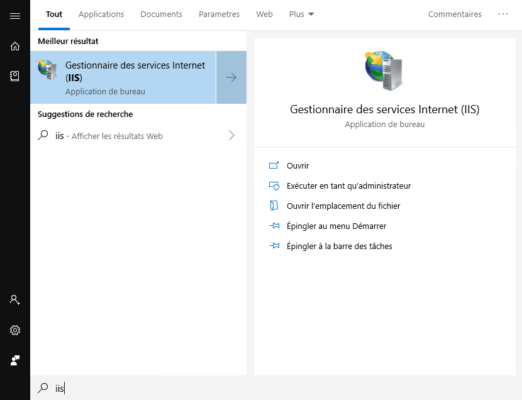
1. To access the Administration Console, look for IIS in the Start menu and click Internet Services Management.
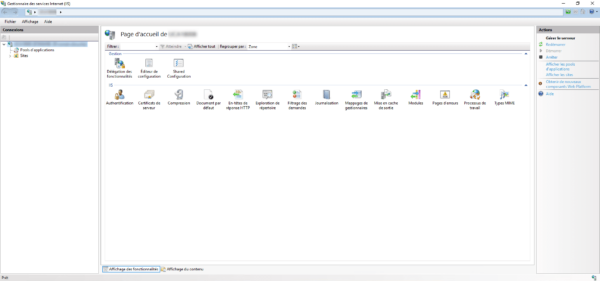
2. The console is the same as for the Windows Server version.
For administration, release articles can be applied to IIS with Windows 10.
Use IIS
Copy your pages in the folder C: \ inetpub \ wwwroot
Launch a browser and enter the address http://127.0.0.1 to display your site.
IIS (internet information services manager) on Windows 10/7 Desktop or server is basically a flexible and secure Web server provided by Microsoft on its desktop and server operating systems. Just like Apache and Nginx in Linux Distros on WIndows we have IIS.
Install and configure the webserver (IIS) in Windows 10
Microsoft didn’t integrate only the desktop version of Windows with IIS- Internet Information Services instead with this even Windows 10 Home can be turned in to a web server with the help of this feature.
However, as compared free and open-source server such as Apache, the configuration and the dealing with IIS web server could be a little complex, yet if you are a Windows Desktop or server user, the usage of IIS would be best because of better integration into the system.
The IIS, which also contain an FTP server, is not intended on the client to provide company websites or heavily used web applications. The Windows 10 desktop IIS is mainly for developing or for the demonstration of web applications.
So, if you want to set up and run some application on Windows 10 PC using IIS, for example, WordPress, then here is the step by step guide to install and configure this web server.
Step 1: Enable Internet Information Services -IIS on Windows 10
So, to install the Windows 10 web server feature, we don’t have to download some special packages, it is already in our system and just we need to activate.
Go to Control panel-> Select Program-> Turn Windows features on and off.
Now, scroll down and select “Internet Information Services” and press OK button to get it installed. Later restart the PC to make changes into effect.
The installation of it is very easy, by default when we select the IIS management console the Web Management Tools and Word Wide services along with HTTP features, performance features, security, system status and diagnostics are automatically going to be install. If you want FTP server as well then click on the + icon given in front of Internet information services and select FTP server option too.
Step 2: Start Internet information service (IIS) Manager
Go to Windows 10 Search box and simply type IIS and you will get installed webserver Manager application, click on it to start.
Finally, you will see the IIS manager with so many options to operate and handle different Web server application tasks.
Step 3: Test IIS Webserver
After the installation of IIS, Windows will automatically start the webserver services on default port number 80. Thus, to check whether it is functioning properly or not, open your system browser and type http://localhost to see.
By default, the IIS shows the local HTML page to show everything is working fine. In case not then check whether the HTTP server (localhost) is listening on port 80. Run the following command in command prompt.
netstat -a -p tcp -n
However, for newly installed IIS webserver such problem would not appear.
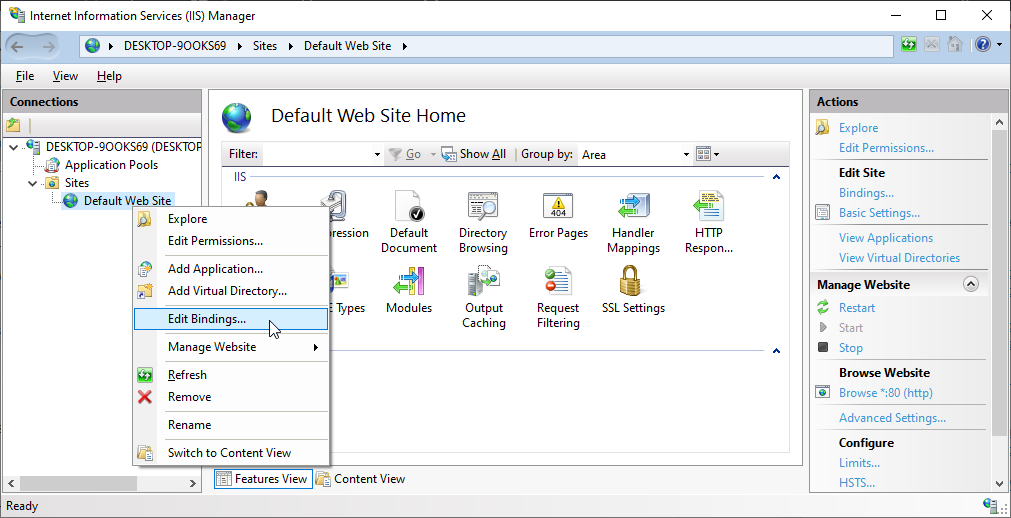
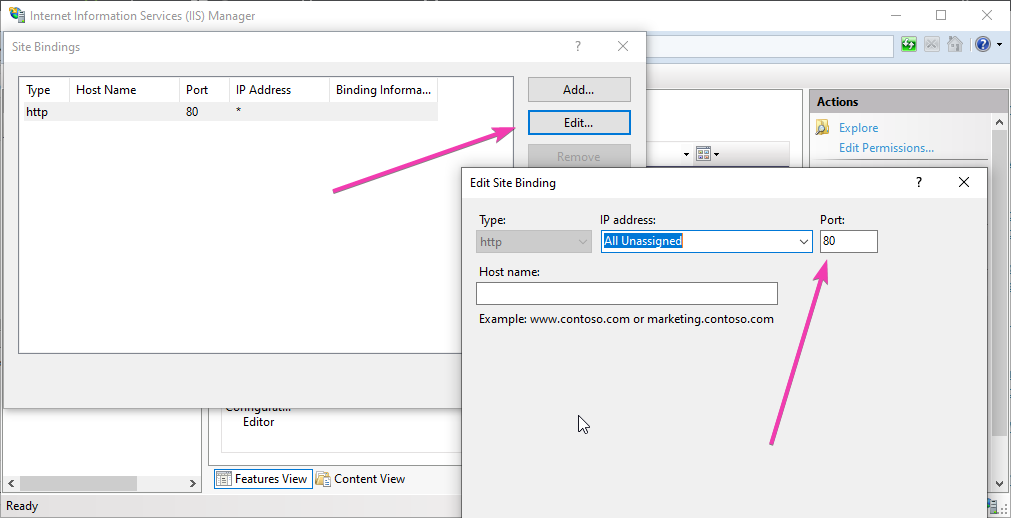
In case, your port 80 is already bound to some other application then you can change the default website or Http listening port on IIS.
Right-click on Default web site option given under the Sites and select Edit Bindings.
Now Click on Edit button and change the port number to one which you want to use. You can also specify any particular IP-address you want to use that port number.
Step 4: Configure and install WordPress with IIS Manager
So, to give you an idea of how to host an HTML website or web application like WordPress on IIS, we are going to configure it.
However, hosting a website on IIS, the steps will be the same for both WordPress or just a simple HTML one. Yet being a web application WordPress needs PHP support too.
Right-click on the default website and select Explore.
The root directory at %SystemDrive% \inetpub\wwwroot will open. Now simply extract all your WordPress file there. If it asks for permission give it.
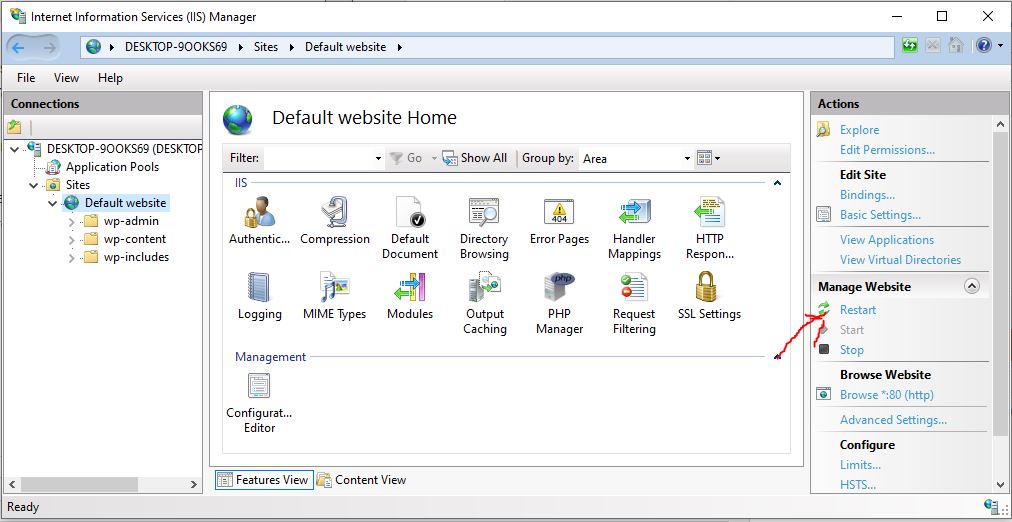
Now, Select your newly created website and click on the restart option given in the right-side panel.
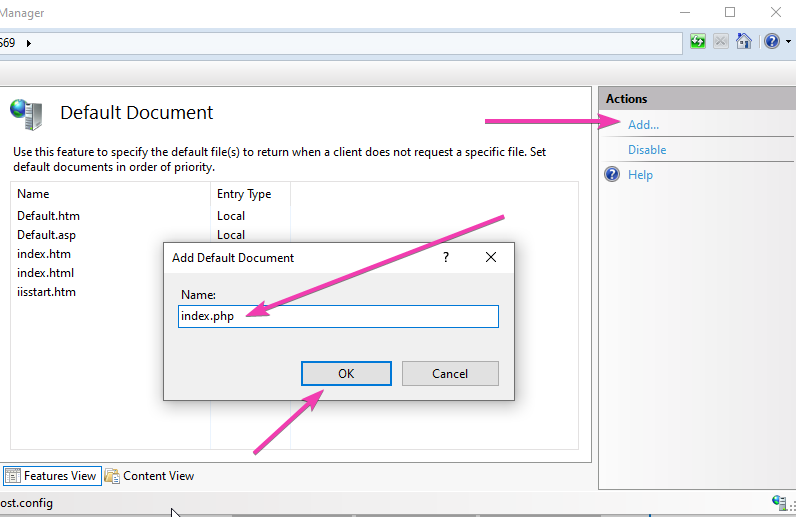
Add index.php to the Default Document.
Select Default website and double click on Default Document icon then Add link given on the right-side panel. Type index.php and save it.
Open the browser and point it to http://localhost, this time it will show the hosted website. However, in case of WordPress, it gives an error because we haven’t yet configured its Wp-config file.
Again right-click on the Default website ->Explore and then rename wp-config-sample.php to wp-config.php.
Now edit the wp-config.php file and change the following things given in red colour… In short, add the database details.
// ** MySQL settings - You can get this info from your web host ** //
/** The name of the database for WordPress */
define( 'DB_NAME', 'database_name_here' );

/** MySQL database username */
define( 'DB_USER', 'username_here' );

/** MySQL database password */
define( 'DB_PASSWORD', 'password_here' );

/** MySQL hostname */
define( 'DB_HOST', 'localhost' );
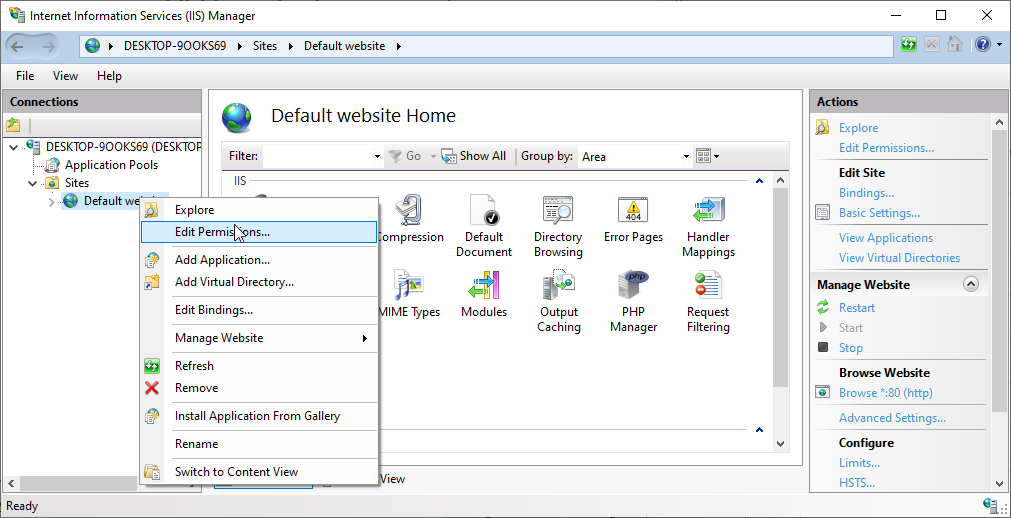
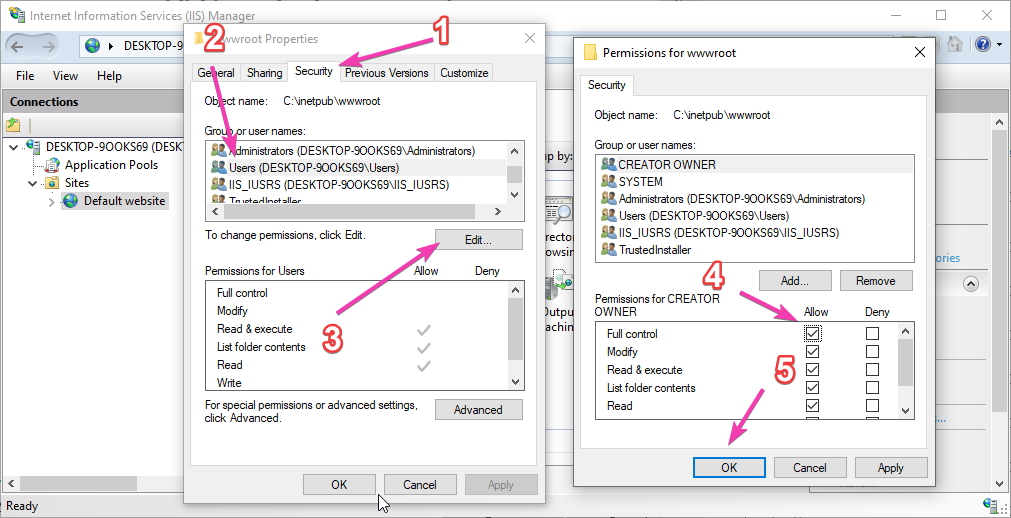
In case, it will say you don’t have permission to write a wp-config file, then simply right click on the Default website in IIS manager and select Edit Permissions.
Go to Security Tab and select your Windows system user. Then Edit button-> Give all permissions to it and then press OK button.
Now, type http://localhost/index.php and you would be able to access your WordPress installation.
In the same way, if you have hosted some HTML based website file for development in the root directory of Default website you will get to see that.
How to Disable IIS web server on Windows 10
In case you don’t require IIS Manager and want to disable it. Again open “Turn Windows feature On or OFF” and unselect the option “Internet Information Services“. This will remove the IIS web server from your Windows 10 or Windows 7 PC, laptop or server.
Other Articles:
- How to install Kali Linux with GUI on WSL Windows 10
- How to install Apache web server on CentOS 8 or Stream
- Install Apache Cassandra on Windows 10/8/7 without datastax
- How to install Apache, MySQL, PHP & PhpmyAdmin on Windows 10 WSL

