Последнее обновление: 26.02.2021
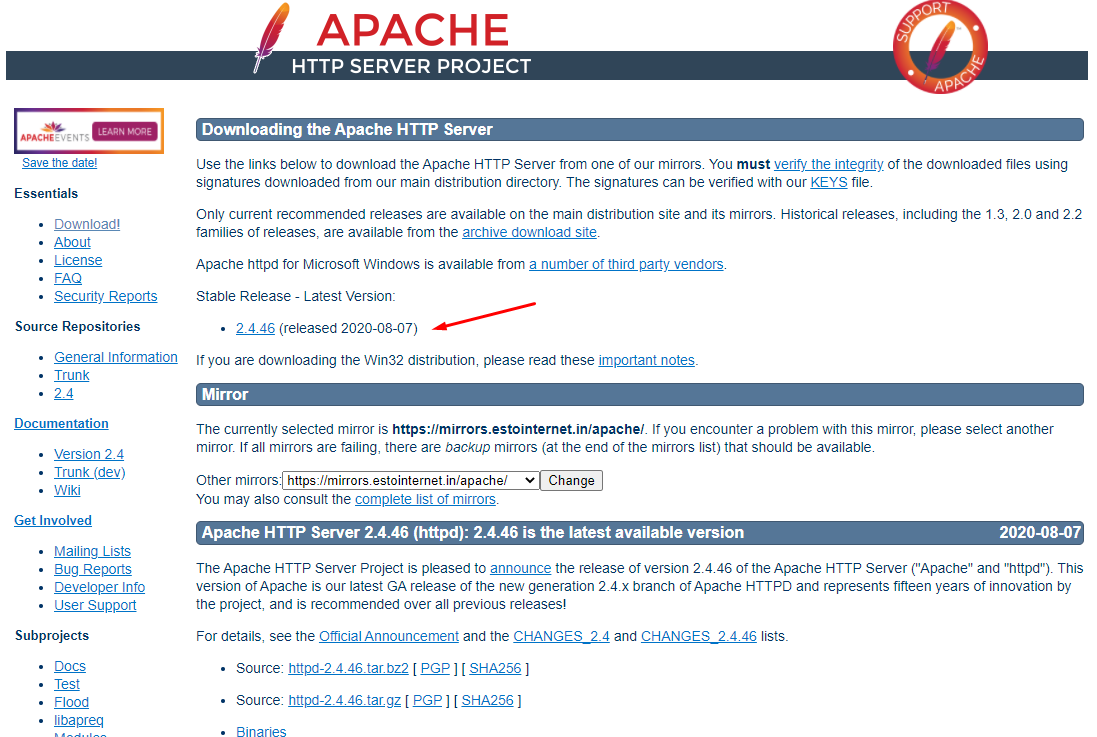
Для работы с PHP нам потребуется веб-сервер. Обычно в связке с PHP применяется веб-сервер Apache. Официальный
сайт проекта — https://httpd.apache.org/. Там же можно найти всю подробную информацию о релизах, скачать исходный код.
Однако официальный сайт не предоставляет готовых сборок для ОС Windows.
Перед установкой Apache следует отметить, что если наша ОС Windows, то в системе должны быть установлен пакет для C++, который можно найти по адресу
для 64-битной и для 32-битной.
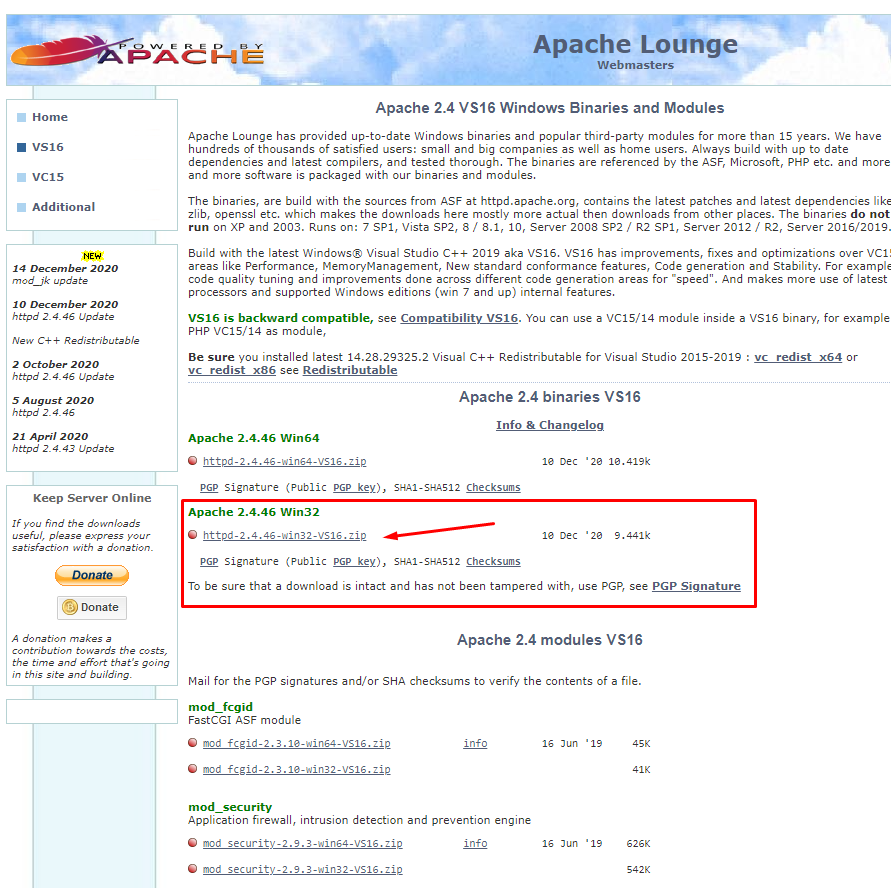
Итак, если нашей ОС является Windows, перейдем на сайт http://www.apachelounge.com/, который предоставляет дистрибутивы Apache для Windows:
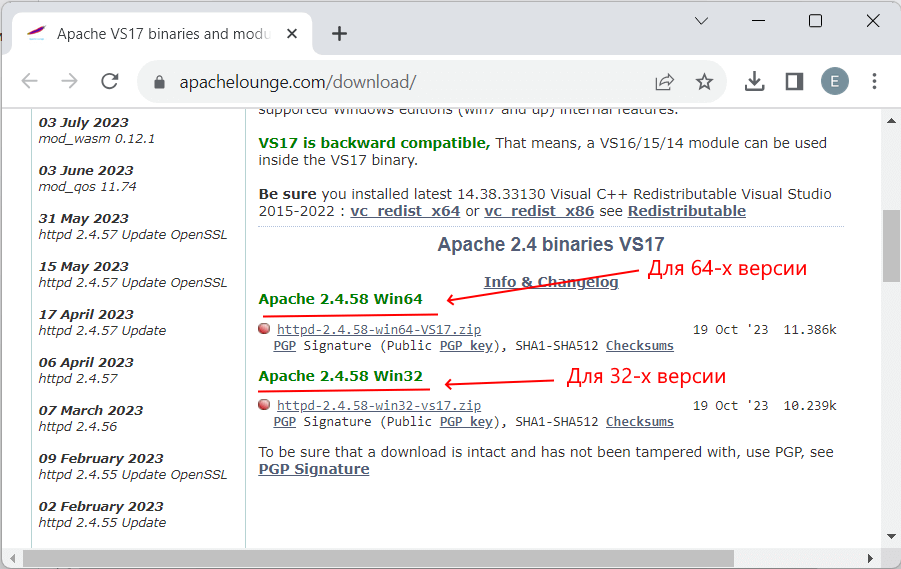
В подпункте Apache 2.4 binaries VS16 выберем последнюю версию дистрибутива сервера. На странице загрузок мы можем
найти две версии пакета Apache — для 64-битных систем и для 32-битных.
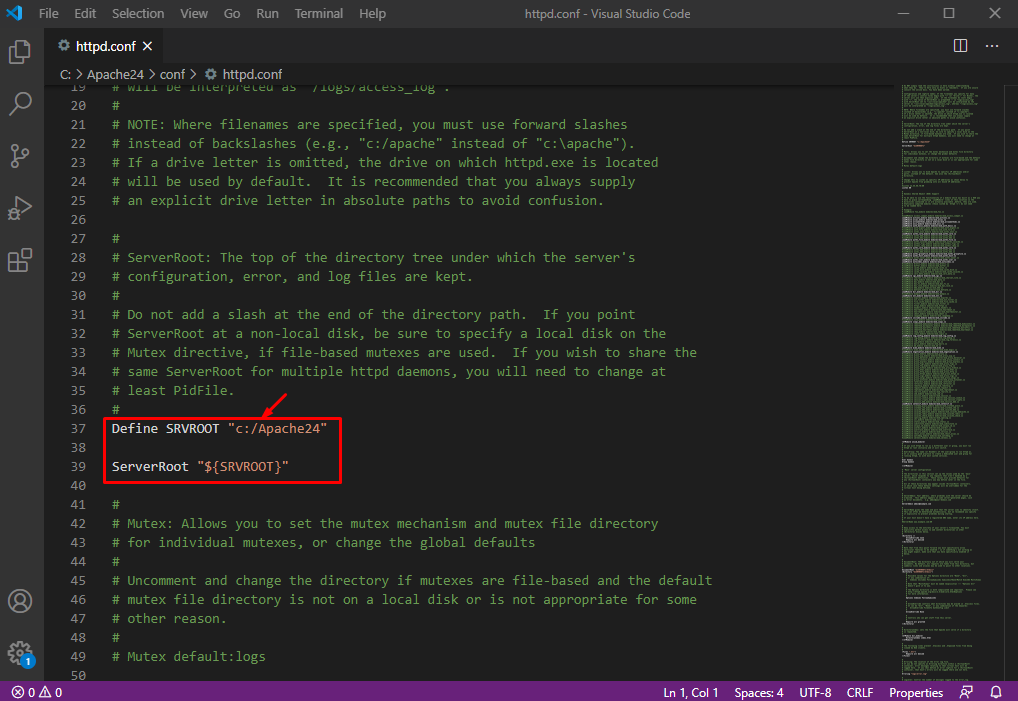
После загрузки пакета с Apache распакуем загруженный архив. В нем найдем папку непосредственно с файлами веб-сервера — каталог Apache24.
Переместим данный каталог на диск C, чтобы полный путь к каталогу составлял C:/Apache24.
Запуск Apache
В распакованном архиве в папке bin найдем файл httpd.exe
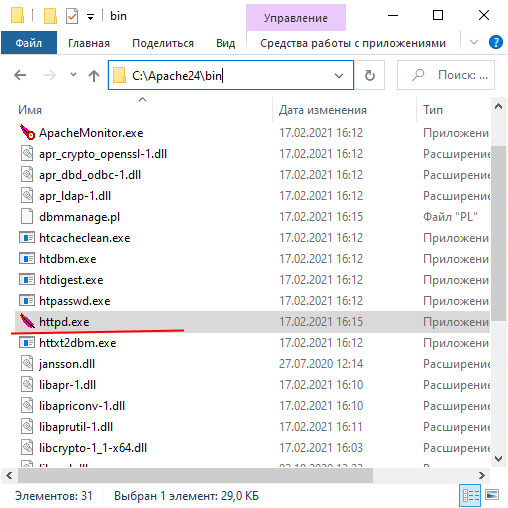
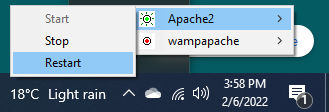
Это исполняемый файл сервера. Запустим его. Нам должна открыться следующая консоль:
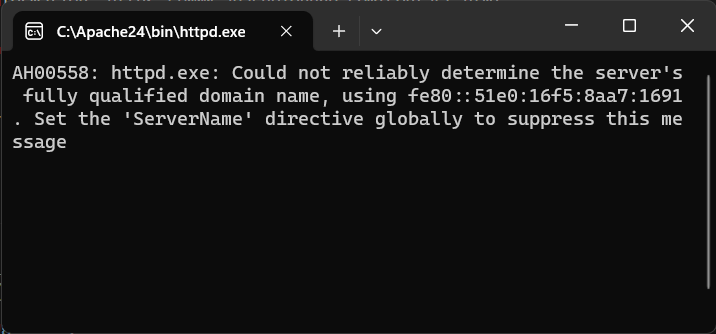
Пока работает это приложение, мы можем обращаться к серверу. Для его тестирования введем в веб-браузере адрес
http:\localhost. После этого веб-браузер должен отобразить следующую страницу:

Эта страница символизирует, что наш веб-сервер работает, и мы можем с ним работать.
Конфигурация веб-сервера
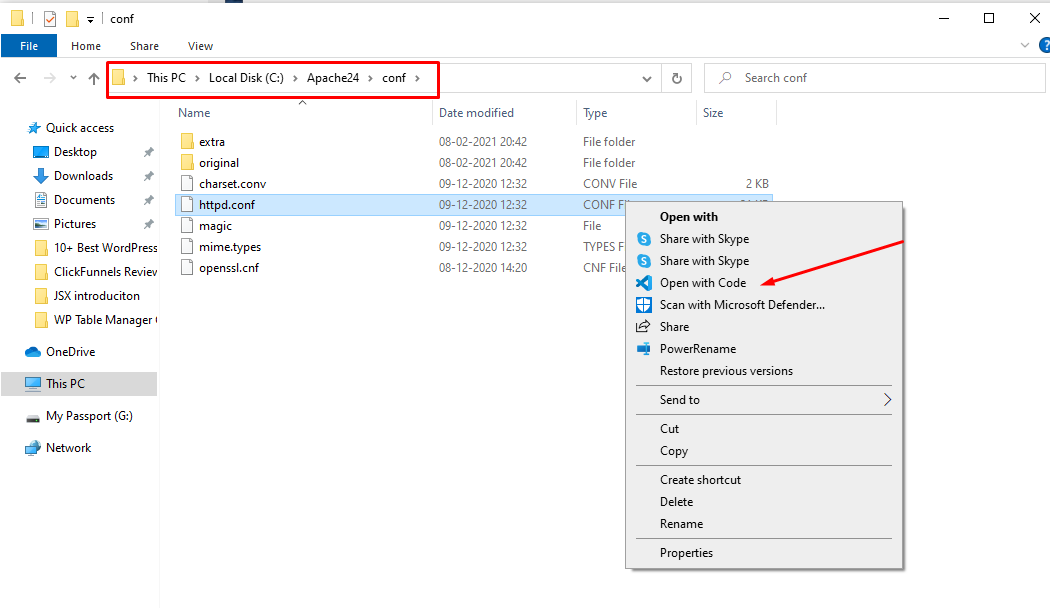
Теперь проведем конфигурацию сервера, чтобы связать его с ранее установленным интерпретатором PHP.. Для этого найдем в папке веб-сервера
в каталоге conf (то есть C:\Apache24\conf ) файл httpd.conf
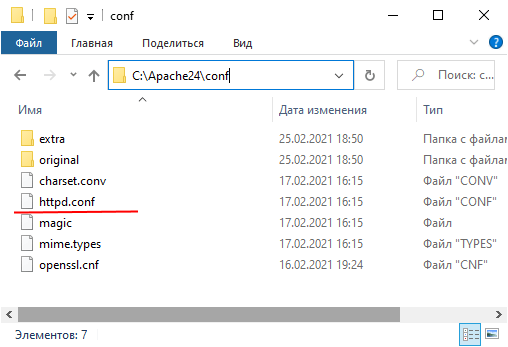
Откроем этот файл в текстовом редакторе. httpd.conf настраивает поведение веб-сервера.
Мы не будем подобно затрагивать его описания, а только лишь произведем небольшие изменения, которые потребуются нам для работы с PHP.
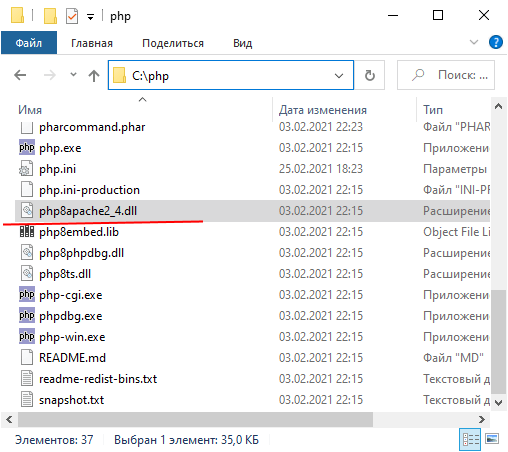
Прежде всего подключим PHP. Для этого нам надо подключить модуль php, предназначенный для работы с apache. В частности, в папке
php мы можем найти файл php8apache2_4.dll:
Для подключения php найдем в файле httpd.conf конец блока загрузки модулей LoadModule
//......................
#LoadModule vhost_alias_module modules/mod_vhost_alias.so
#LoadModule watchdog_module modules/mod_watchdog.so
#LoadModule xml2enc_module modules/mod_xml2enc.so
И в конце этого блока добавим строчки
LoadModule php_module "C:/php/php8apache2_4.dll"
PHPIniDir "C:/php"
Далее укажем место, где у нас будут храниться сайты. Для этого создадим, например, на диске С каталог localhost. Затем найдем в файле httpd.conf
строку
DocumentRoot "${SRVROOT}/htdocs"
<Directory "${SRVROOT}/htdocs">
По умолчанию в качестве хранилища документов используется каталог «c:/Apache24/htdocs». Заменим эту строку на следующую:
DocumentRoot "c:/localhost"
<Directory "c:/localhost">
Изменим пути файлам, в которые будут заноситься сведения об ошибках или посещении сайта. Для этого найдем строку
ErrorLog "logs/error.log"
И заменим ее на
ErrorLog "c:/localhost/error.log"
Далее найдем строку
CustomLog "logs/access.log" common
И заменим ее на
CustomLog "c:/localhost/access.log" common
Таким образом, файл error.log, в который записываются ошибки, и файл access.log, в который заносятся все
данные о посещении веб-сайта, будут располагаться в папке c:/localhost.
Затем найдем строчку:
#ServerName www.example.com:80
И заменим ее на
ServerName localhost
Далее найдем блок <IfModule mime_module>:
<IfModule mime_module>
    #
    # TypesConfig points to the file containing the list of mappings from
    # filename extension to MIME-type.
    #
    TypesConfig conf/mime.types
И под строкой <IfModule mime_module> добавим две строчки:
AddType application/x-httpd-php .php
AddType application/x-httpd-php-source .phps
То есть должно получиться:
<IfModule mime_module>
	AddType application/x-httpd-php .php
	AddType application/x-httpd-php-source .phps
    #
    # TypesConfig points to the file containing the list of mappings from
    # filename extension to MIME-type.
    #
    TypesConfig conf/mime.types
В данном случае мы добавили поддержку для файлов с расширением .php и .phps.
И в конце найдем блок <IfModule dir_module>:
<IfModule dir_module>
    DirectoryIndex index.html
</IfModule>
И заменим его на следующий:
<IfModule dir_module>
	DirectoryIndex index.html index.php
</IfModule>
В данном случае мы определяем файлы, которые будут выполняться при обращении к корню файла или каталога. То есть по сути определяем главные страницы
веб-сайта: index.html и index.php.
Это минимально необходимая конфигурация, которая нужна для работы с PHP.
Теперь наша задача — убедиться, что php подключен и работает правильно. Для этого перейдем в папку c:/localhost, которую мы создали для хранения
файлов веб-сервера, и добавим в нее обычный текстовый файл. Переименуем его в index.php и внесем в него следующее содержание:
<?php
phpinfo();
?>
В данном случае мы создали простейший скрипт, который выводит общую информацию о PHP.
Теперь заново запустим файл httpd.exe и обратимся к этому скрипту, набрав в строке браузера
адрес http://localhost/index.php
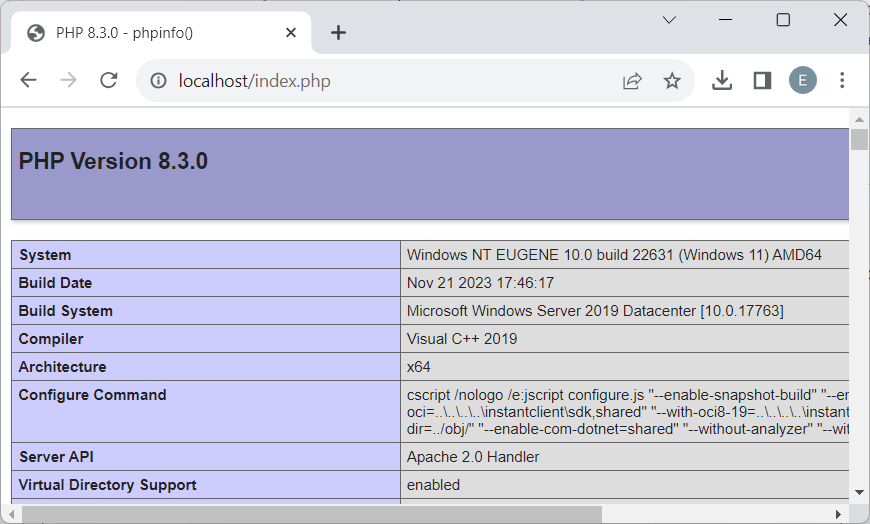
Что тут произошло? При обращении к сайту на локальной машине в качестве адреса указывается http://localhost.
Затем указывается имя ресурса, к которому идет обращение. В данном случае в качестве ресурса используется файл
index.php. И так как в файле httpd.conf в качестве хранилища документов веб-сервера указан каталог C:\localhost, то именно в этом каталоге и будет
веб-сервер будет производить поиск нужных файлов.
И поскольку выше при конфигурировании мы указали, что в качестве главной страницы может использоваться файл index.php, то мы можем также обратиться к
этому ресурсу просто http://localhost/
Таким образом, теперь мы можем создавать свои сайты на php.
Установка веб-сервера в качестве службы
Если мы часто работаем с веб-сервером, в том числе для программиррования на PHP, то постоянно запускать таким образом сервер,
может быть утомительно. И в качестве альтернативы мы можем установить Apache в качестве службы Windows.
Для этого запустим командную строку Windows от имени администратора и установим Apache в качестве службы с помощью команды:
C:\Apache24\bin\httpd.exe -k install
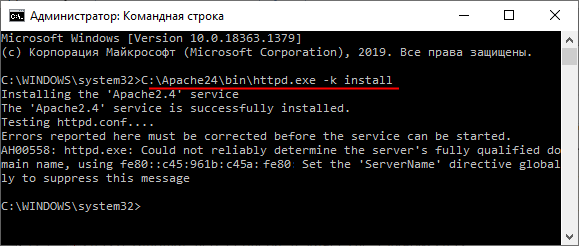
То есть в данном случае прописываем полный путь к файлу httpd.exe (C:\Apache24\bin\httpd.exe) и далее указываем команду на установку службы -k install.
Если установка завершится удачно, то в командная строка отобразит сообщение «The Apache2.4 service is successfully installed». Также будет проведено тестирование сервера.
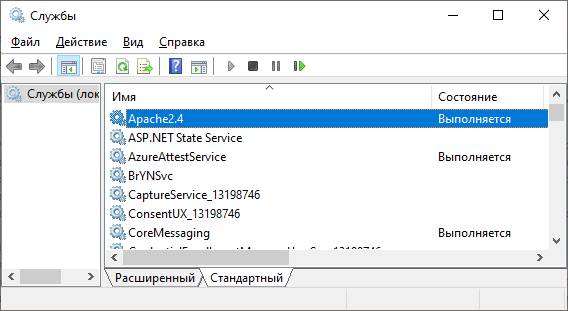
После установки службы убедимся, что она запущена
If you are into web development, sooner or later, you will find that you need a webserver to effectively work on your projects. Initially, it is easy to create an HTML file and run it via your browser. This approach is beginner-friendly and lacks the intricacies to handle a complex website creation.
In this tutorial, we are going to look at the steps required to install Apache Web Server on Windows.
However, before we get started, let’s first completely understand the concept of the webserver.
- What is a Web Server And Why Do You Need Apache?
- Getting Started With Apache On Windows
- Apache Web Server Windows Manual Install

What is a Web Server And Why Do You Need Apache?
When a browser sends a request for a website, it is sent to a server(webserver) and requests the data required to render the site. The resources requested by the browser can be images, files, or code files.
So, when a user requests a site, for example, www.myownsite.com; the browser simply requests the web server holding the site for the required content. Once the request is complete, the browser then renders the site on the computer for the user.
The web server plays a crucial role and acts as a doorway between the browser and the site’s file. Apart from storing the files, the webserver is also capable of processing data or code for the site, providing a way to create a dynamic site that reacts to the user’s requests.
Web servers can be created by anyone. They are used for hosting sites. On top of that, you can also use web servers for testing purposes. The good thing is that you can install a local webserver to test out your site!
But, why apache?
In case you are wondering why apache, then we also got you covered. Apache, in general, is a well-known web server capable of hosting almost every type of site. If you are using sites created using ASP.NET, then Apache won’t cut.
Apache’s open-source license also makes it an ideal choice for businesses as they do not have to worry about license payments or vendor-lockin problems.
Getting Started With Apache On Windows
Windows is always known for its friendliness. That’s why it common for you to find all-in-one packages. In case you want to set up your Apache server as fast as possible, you can use these all-in-one packages such as WampServer, and XAMPP. They are easy to set up and comes with wizard installation.
You also need to ensure that you have Visual C++ installed on your system. In case, you are not sure, you can download the visual C++ directly from the web.
However, if you are not fond of this approach, then let’s use the Apache installation wizard to the rescue.
To get started, you need to download Apache to your computer. You can visit their download page here: http://httpd.apache.org/download.cgi
Once there, you will see an .msi installation wizard option. Simply download it
Once downloaded, you need to run it to start the installation. The wizard will guide you through the whole process and you are done! So, if you are a novice and don’t want to jump into the intricacies of the installation process then this process is for you.
Apache Web Server Windows Manual Install
If using the wizard is not a cup of tea, then you can also manually install the Apache webserver on your Windows. Manually installing the web server means that you can configure the server according to your requirement. Other key benefits include that you can easily backup your web server when possible.
A manually installed web server also enables you to run it from anywhere. For instance, you can run Apache from a spare hard disk or removable storage including a USB drive.
So, why wait? Let’s list the process through which you can install Apache manually on your Windows.
- Get your IIS reconfigured
- Getting the files ready
- Extracting the file
- Apache configuration
- Change root and doing basic configuration testing
- Apache as a Windows service
- Web server testing
1) Get your IIS reconfigured
IIS stands for Internet Information Services. It is the service run by Windows to talk with the internet.
Apache, on the other hand, utilizes the TCP/IP port 80. This means that you need to re-configure or uninstall any software/solution that uses that port. This is the easiest way. Also, you can change the port at which Apache listens. However, changing Apache ports can be tricky and also makes many web applications and frameworks not work as intended.
Windows, by default, have IIS already configured to TCP/IP port 80. So, to make Apache work, you need to either reconfigure IIS or disable/remove the components or its service.
2) Getting the files ready
Just like the .msi setup, here also you need to download files. However, in this case, you need to download unofficial binary files. Head to Apache Longue: https://www.apachelounge.com/ and then download the latest zip file set from there.
3) Extracting the file
Once the file is download, we need to extract it. Copy the zip file to the root of C:/ drive and then extract it so that its content is saved in C:/Apache24.

This is done to make Apache work as optimally as possible. You can also install it in your other drives, but that’s not advisable as you need to do more configuration including changing he SVROOT configuration.
4) Apache configuration
It is now time for us to configure Apache.
To get started, you need to open up conf/httpd.conf. The file is present within the Apache24 folder.
We have Visual Studio Code so we opened the file using it. In case you do not have any editor installed, you can also edit the fileusing notepad.
You will instantly notice how the filepaths are coded. Here the forward slash is used (/) which is different from the backward slash used in Windows configuration files.
So, what else we need to do here.
You can configure based on your needs. In case you are not sure, follow the below configuration guidelines.
- Make sure the Apache is listening to the right port. Go to line 60. You will see the port associated with the Apache. By default, the port is set to 80. In case if you want to listen to a different port, change the setting here.
- Now move to line 162. Here you will find the mod-rewrite option.
LoadModule rewrite_module modules/mod_rewrite.so
It is an optional step, but enabling it will help you in long run.
- In line 277, you can change the server domain name.
ServerName example.com:80
If you are working on your local machine, you need to change it to the following:
ServerName localhost:80 - Lastly, you need to enable .htaccess overrides by moving to line 272. You need to change it form AllowOverride None to AllowOveride All
5) Change root and doing basic configuration testing
In the final step, you need to test if everything is working as intended. Before, that you may want to do one more thing to make your life easier in the long run.
By default, Apache saves all the files(returns) to C:/Apache24/htdocs.
To ensure that it is easy for you to work with re-installation and backups, you need to change the DocumentRoot to somewhere else.
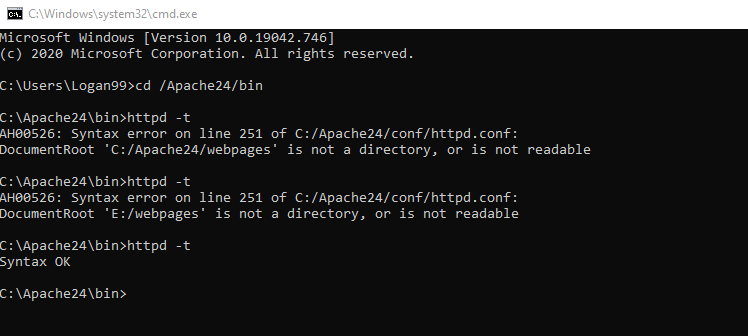
Go to line 251 and then set the root as follows:
DocumentRoot "E:/Projects/webpages"
<Directory "E:/Projects/webpages">
Once done, it is now time to test if everything is working as intended.
Open up the command prompt on your machine and then run the following command.
cd/ Apache24/bin
httpd -t
If it returns, “Sytnax OK”, then the configuration is done correctly.
6) Apache as a Windows service
With configuration done, it is now time to install Apache as a Windows service. This is an important step as without it, you won’t be able to run the Apache webserver at all.
To do so, you need to open the command prompt and run the following command.
cd /Apache24/bin
httpd -k install
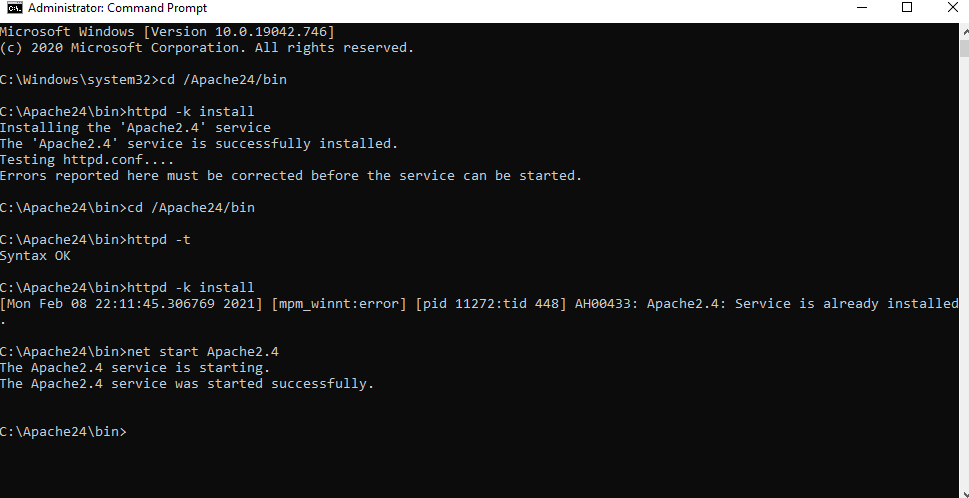
You can then manually run the server using net start Apache2.4
7) Web server testing
With everyone done, it is now time to test if the Apache web server is working as intended.
To do so, you need to create an index.html file within Apache’s web page webroot that we just set above. In case you didn’t change the webpage root, then you can proceed to create the file in htdocs folder.
<!DOCTYPE html>
<html lang="en">
<head>
    <meta charset="UTF-8">
    <meta name="viewport" content="width=device-width, initial-scale=1.0">
    <title>We are installing Apache Web Server</title>
</head>
<body>
    <h1>
        We manage to install Apache like it should! Let's go!
    </h1>
</body>
</html>
If Apache is working as intended, then the webpage should open as intended.
About the Author

ByteScout Team of Writers
ByteScout has a team of professional writers proficient in different technical topics. We select the best writers to cover interesting and trending topics for our readers. We love developers and we hope our articles help you learn about programming and programmers.
The whole business of a web server is to serve websites on the internet, and these are services that the developers of Apache think a server should offer. The Apache software is open-source infrastructure compatible with any operating system, like Windows. But how do you install Apache on Windows? Well, you’re in for a treat!
In this tutorial, you’ll learn how to install Apache on Windows and set up an Apache server to launch a web application.
Ready? Read on and start setting up your Apache server!
Prerequisites
This tutorial houses step-by-step instructions, but as long as you have a Windows 10 PC, you’re good to go – This tutorial uses a Windows 10 20H2 computer.
Downloading Apache on Windows
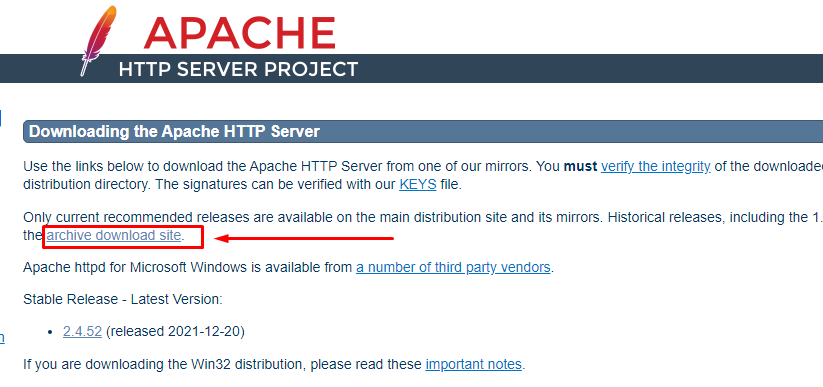
You’ll be launching a web application on your Apache server later in this tutorial. But as a first step, you’ll install Apache on your machine. You can download the Apache HTTP Server from Apache’s official download site.
1. Open your web browser, navigate to the Apache HTTP Server download page, and click on the archive download site link below. Doing so redirects your browser to the Apache HTTP Server Source Code Distributions page (step two).
2. Next, find and click on the binaries/ link to see the contents of the binaries package.
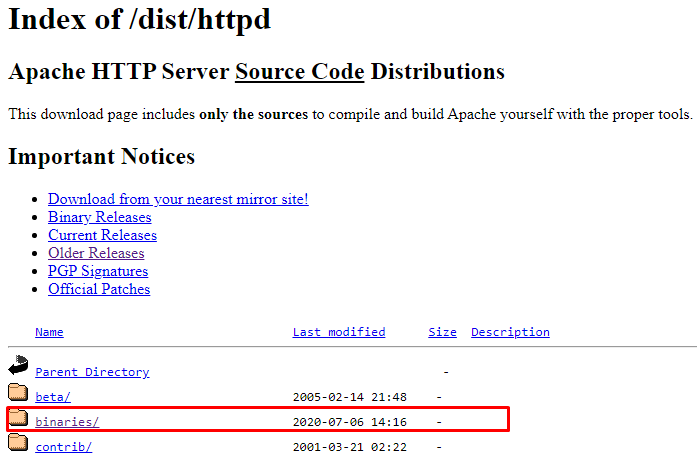
3. Scroll down to the end and click on the win32/ link to see the list of Apache packages you can choose to install on your machine.
4. Finally, look for Apache’s package installer for Windows and click on it to download the Apache package installer. You’ll download Apache 2.0 series for this tutorial, as shown below.

Configuring the Apache Installer to Install Apache on Windows
After downloading the Apache package, you’ll need to configure the installer and set where Apache gets resources to deploy by default.
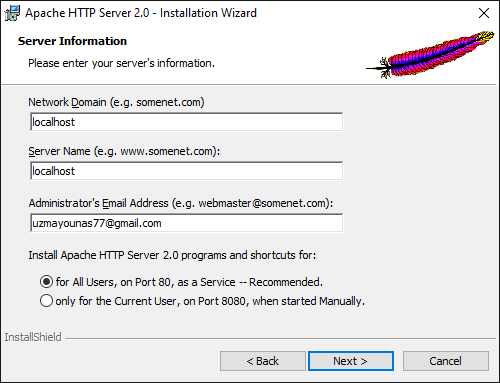
1. Run the Apache installer and click Next to accept the license agreement until you reach the Server Information page (step two).
2. Next, configure the server information with the following:
- Type localhost for the Network Domain as well Server Name.
- Enter your email address in the Administrator’s Email Address field.
- Leave the default setting for All Users, and click on Next.
You can also specify changes in these settings from the configuration files later.
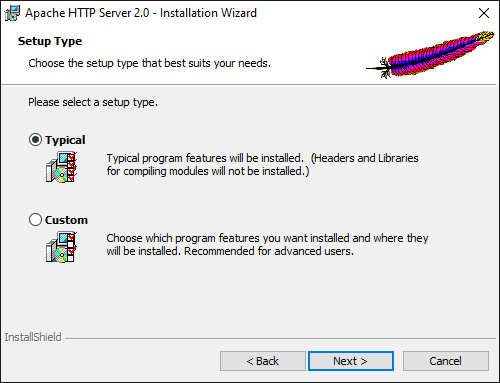
3. Choose Typical in the Setup Type page since you’re only working learning about the basics of Apache on Windows, and click Next.
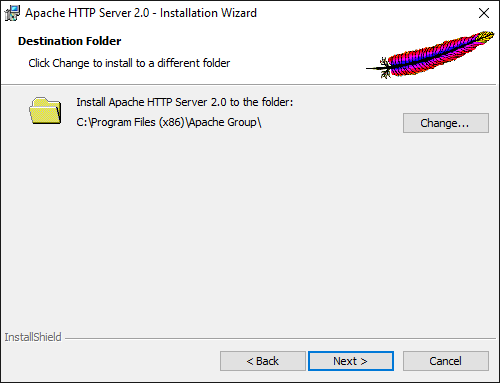
4. Now, leave the default installation path, as shown below, and click on Next.
You can change the installation path you prefer by clicking on the Change button and selecting your desired path.
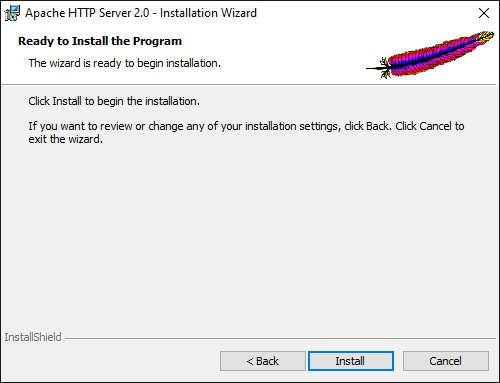
5. Click on Install to start installing Apache HTTP Server on your machine.
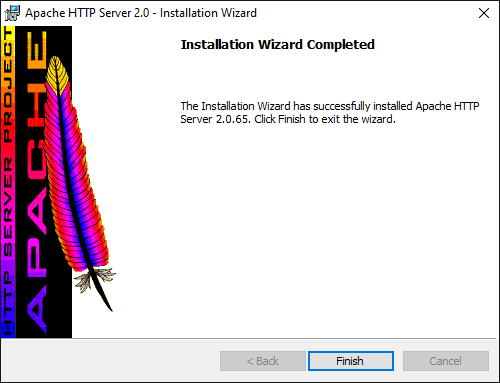
6. Click on Finish once the installation completes. Closing the installation wizard starts the Apache server automatically.
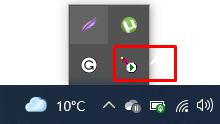
7. Look for the Apache icon in your system tray to verify the Apache server is running.
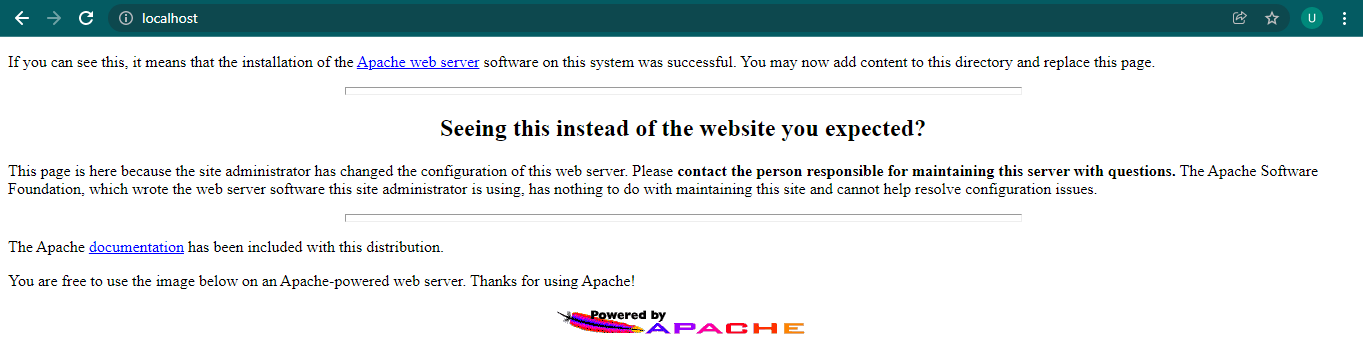
8. Finally, open your preferred browser and navigate to localhost, as shown below, to test your Apache Server installation.
You will see the following page if the installation is successful.
You can also navigate to the loopback address (http://127.0.0.1/) to access the Apache Server.
Allowing External Connections to the Apache Web Server
Although a localhost connection may work for testing, an external system may need to access the web page. Therefore you must open a connection via the Windows Firewall.
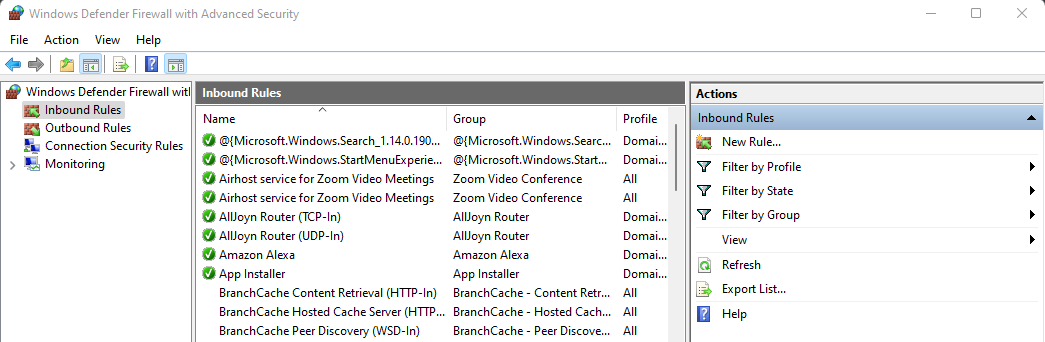
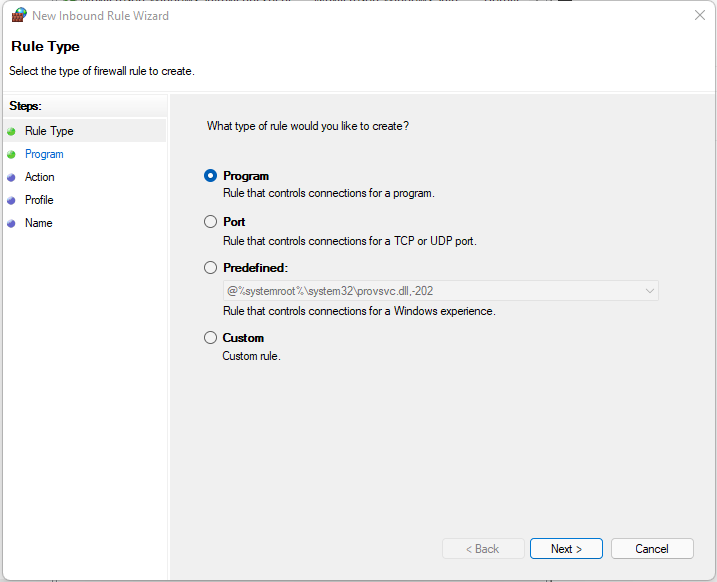
1. First, launch the Windows Defender Firewall with Advanced Security console.
2. Navigate to Inbound Rules and click New Rule.
3. Under Rule Type, select Program.
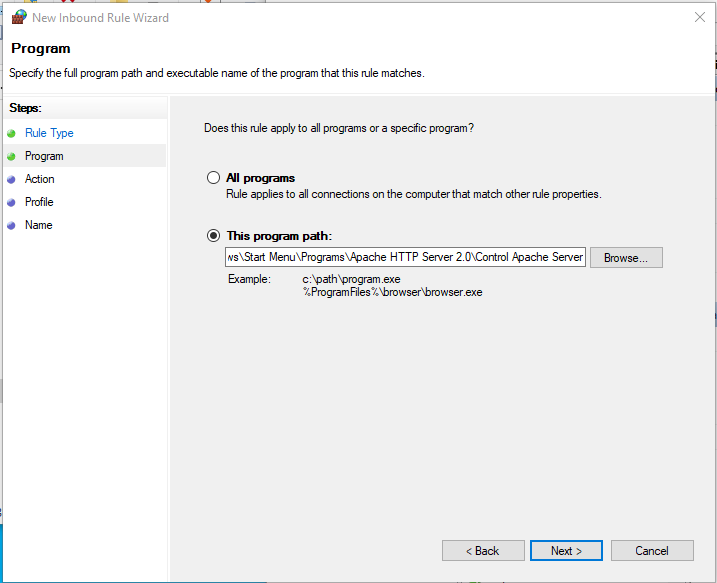
4. Browse, or enter, the path to the Apache server executable.
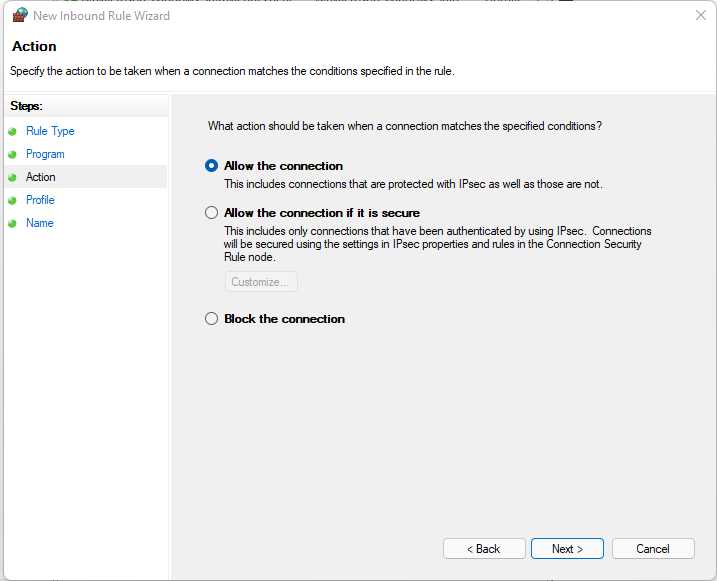
5. For the action, choose to Allow the connection.
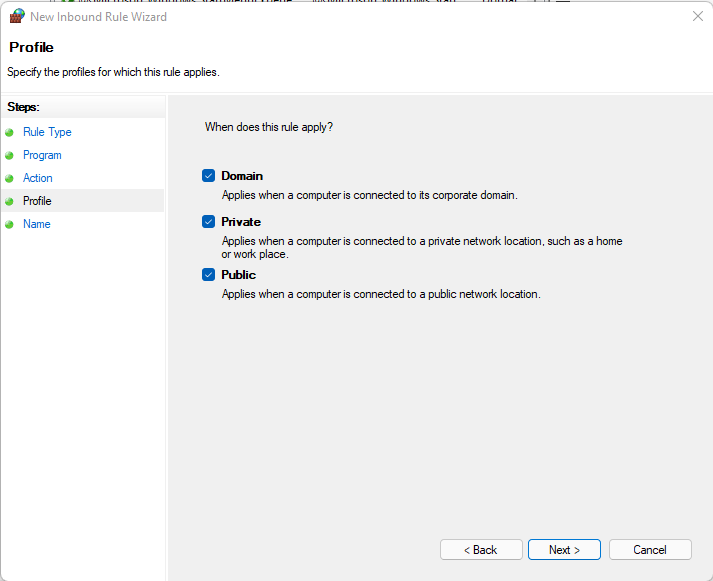
6. Under applied profiles, allow the default of all profiles.
7. Finally, give the rule a name and click on Finish.
Launching a Web Application
You’re now ready to launch your web application as Apache is running correctly. But where exactly do you store your web application for deployment?
The Apache server root directory (C:\Program Files\Apache Group\Apache2\) contains at least three important subdirectories:
- conf – Contains a file that tells Apache how to respond to different kinds of requests.
- htdocs – Contains the documents, images, or data that you want to serve to your clients.
- logs – Contains the log files that record what happened. You can consult …/logs/error_log whenever anything fails to work as expected.
Apache returns all the files placed in the C:\Program Files\Apache Group\Apache2\htdocs directory when localhost is launched.
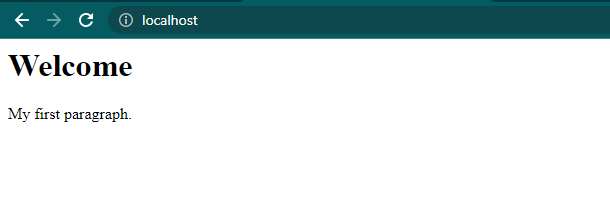
To see how the Apache server works, you’ll create an HTML file as your web application to launch.
1. First, delete all the default files in the C:\Program Files\Apache GroupApache2\htdocs directory.
2. Open your preferred text editor to create an index.html file in the htdocs directory, and populate the file with the code below.
The code below prints a message on a page when launched in a web browser.
<html>
  <style>
      <title>
          My Web Page
      </title>
  </style>
  <body>

     <h1>Welcome</h1>
     <p>My first paragraph.</p>

  </body>
</html>
3. Click on the Apache icon at the system tray to restart the Apache server, as shown below.
4. Lastly, navigate to your IP address or localhost on your web browser.
If all goes well, you’ll get the same message as below.
You can place an entire project into the htdocs folder and access it from the browser typing localhost/project_name/.
Updating Server Name and Administrator Email
By default, the Apache files are read-only. But typically, you’ll want to have more control over your Apache server configuration. How? You need to grant Apache files with Write permissions for any modification.
1. For this demo, grant permissions to the conf directory located in the C:\Program Files (x86)\Apache Group\Apache2 directory.
2. Once you’ve enabled the permissions, open the http.conf file located at C:\Program Files (x86)\Apache Group\Apache2\conf.
3. Lookup for the following line, replace localhost with your preferred name and save the changes.
ServerName gives the hostname of the server to use when creating redirection URLs
4. Finally, look for the following line, and replace admin@localdomain with your preferred email address.
ServerAdmin gives Apache an email address for automatic pages generation when some errors occur.
ServerAdmin admin@localdomainChanging the Root Directory
As you already know, Apache returns files from the htdocs folder. But you can also use another folder or drive to make backups and launch on Apache. Or if you just want to test your project without messing up anything in the original project directory.
1. Create a dummy folder with your preferred name. But for this demo, the folder is named MyApacheFolder in the E drive.
2. Create a new HTML file named index.html in the MyApacheFolder folder, and populate the file with the code below.
The code below prints the Launching Page From Other Directory message when you launch it on your web browser.
<html>
<style>
  <title>My Web Page </title>
</style>

<body>
  <h2>Launching Page From Other Directory</h2>
</body>

</html>
Now open the http.conf file and change some values as follow:
- Look for the DocumentRoot shown below, and change the value to your dummy folder’s path (E:\MyApacheFolder).

- Now, change the Directory value below with your dummy folder’s path (E:\MyApacheFolder).

- Save the changes you made to the http.conf file. These changes enable the Apache Server to access files from this folder instead of the default directory (htdocs).
4. Lastly, navigate to localhost on your web browser, and you’ll see the following message.
The Apache server will now launch all the sites from the new location (MyApacheFolder).

Conclusion:
Throughout this tutorial, you have learned how to download a Windows Apache server and allow running a website without any overhead. Apache server can be an appropriate solution for practically any HTTP protocol situation.
Now you are ready to host a single-page website or an enormous site serving millions of visitors. You can also use Apache as a test-server on personal desktops, writing and trying code in a local environment before publishing it to a broader audience.