В Windows Server 2022/2019/2016 с развёрнутыми службами Remote Desktop Services вы можете установить и настроить новый Remote Desktop Web Client HTML5. Этот веб клиент позволит любым устройствам (iOS, macOS, Android, Linux) получать доступ к вашим RemoteApp приложениям на RDS хостах прямо из любого браузера (не нужно устанавливать отдельный RDP клиент).
Содержание:
- Установка RD Web HTML5 клиента на Windows Server RDS
- Доступ к RDWeb серверу через браузер с HTML5
- Возможные проблемы с веб клиентом Remote Desktop
[contents h2]
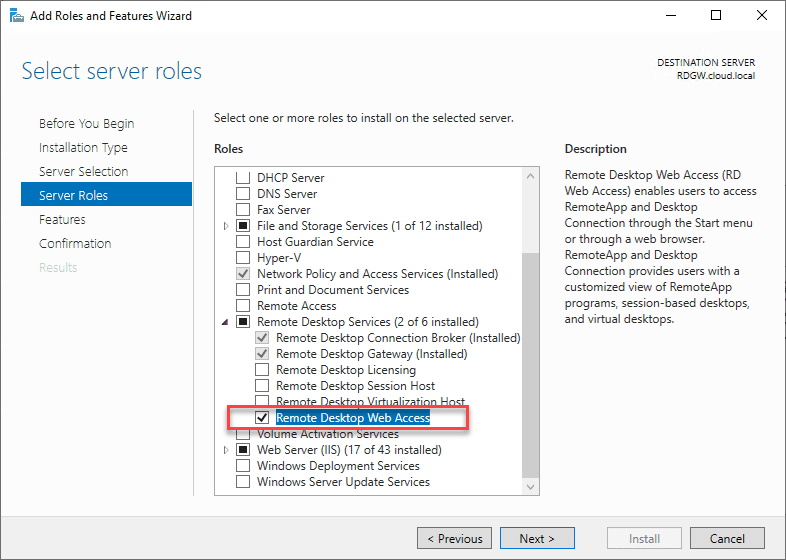
Remote Desktop Web Client доступен в виде расширения роли RD Web Access на RDS серверах под управлением Windows Server 2022/2019/2016.
Перед внедрением RD Web Client нужно убедится, что ваша RDS инфраструктура соответствует следующим требованиям:
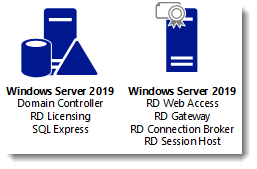
- Наличие развернутой инфраструктуры RDS (фермы Remote Desktop Services), включающей: шлюз Remote Desktop Gateway, RD Connection Broker и RD Web Access на Windows Server 2022/2019/2016;
- Используются терминальные лицензии (RDS CAL) в режиме Per User;
- На серверах RDS Gateway и Web Access должны использоваться SSL сертификаты, выданные доверенным CA. Поддерживаются бесплатные Let’s Encrypt сертификаты на RDS. Самоподписанные SSL сертификаты можно использовать в ограниченном режиме;
Установка RD Web HTML5 клиента на Windows Server RDS
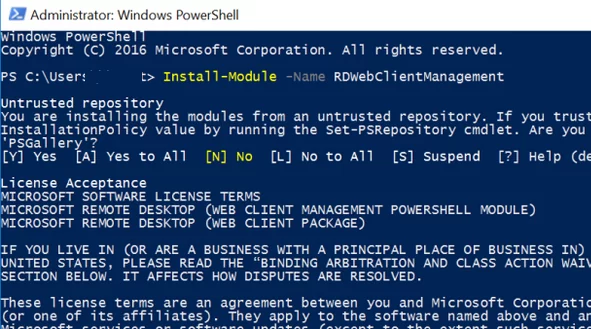
HTML5 RD Web Client не входит в дистрибутив Windows Server. Вам нужно вручную установить модуль RD Web Client Management из галереи скриптов PowerShell.
Для этого установите модуль PowerShellGet на сервере с ролью RD Web Access:
Install-Module -Name PowerShellGet -Force
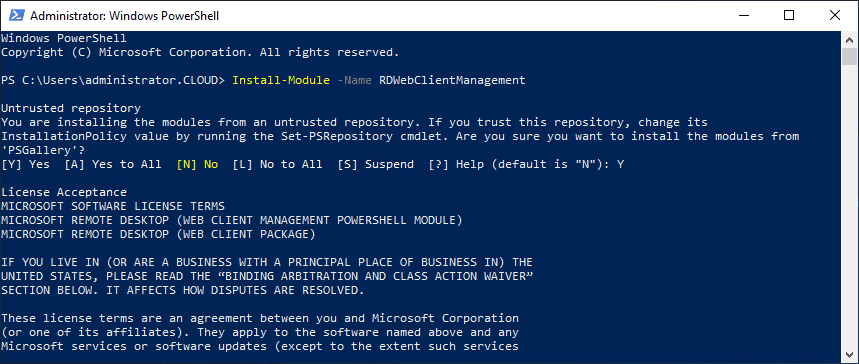
Перезапустите консоль PowerShell.exe и установите модуль RD Web Client Management:
Install-Module -Name RDWebClientManagement

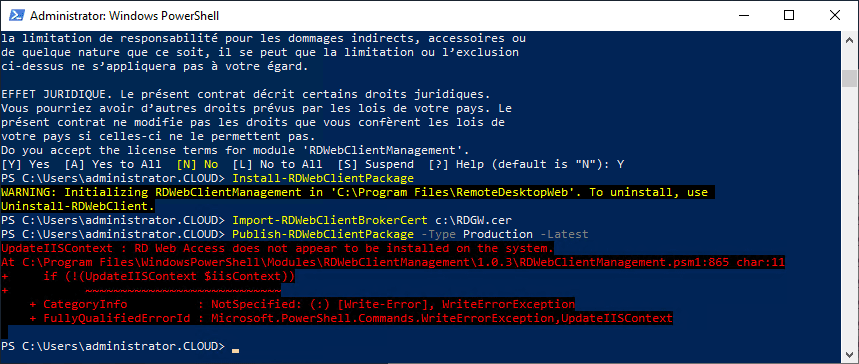
Чтобы принять лицензионное соглашение Microsoft, введите A.
Теперь нужно установить последнюю версию пакета Web Remote Desktop:
Install-RDWebClientPackage
После установки пакета, проверьте его свойства командой:
Get-RDWebClientPackage
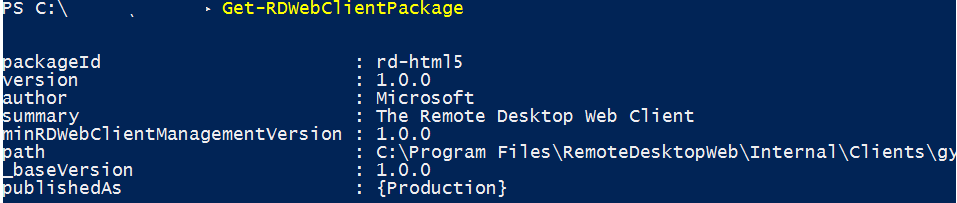
Как вы видите, у вас появился пакет rd-html 5.0 версия 1.0.0.
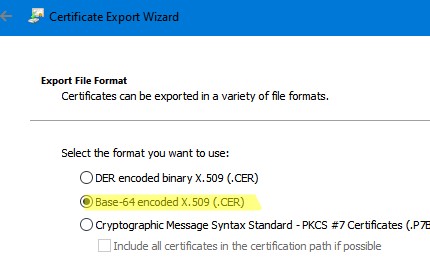
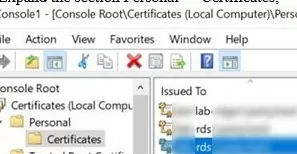
Далее вам нужно экспортировать SSL сертификат с сервера с ролью RDS Connection Broker, использующийся для SSO (Enable Single Sign On) в .cer файл (формат BASE64).
- Запустите консоль управления сертификатами компьютера
certlm.msc
: - Разверните раздел Personal -> Certificates;

- Найдите ваш сертификат, который используется в вашей RDS ферме, щелкните по нему правой кнопкой и выберите select All Tasks -> Export;

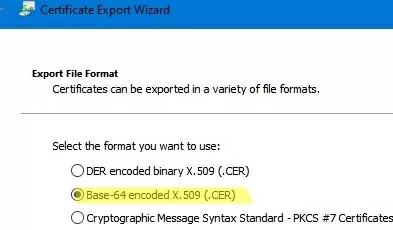
- Выберите формат экспорта Base-64 encoded X.509 (.cer) и укажите имя файла.

Импортируйте сертификат на сервере RD Web Access:
Import-RDWebClientBrokerCert C:\RDBroker.cer
Теперь можно опубликовать клиент RD Web:
Publish-RDWebClientPackage -Type Production -Latest

Для тестирования клиента RD Web, можно развернуть клиент с помощью команды:
Publish-RDWebClientPackage -Type Test -Latest
Клиент RD Web позволяет запускать RemoteApps в браузере или через локальный RDP клиент (в этом случае пользователь скачает *.rdp файл). Пользователь может сам выбрать нужные ему режим. Чтобы запуск разрешить RemoteApp только в браузере, выполните команду:
Set-RDWebClientDeploymentSetting -Name "LaunchResourceInBrowser" $true
Доступ к RDWeb серверу через браузер с HTML5
После того, как вы развернули пакет Web Client на RDS сервере, вы можете запустить браузер на клиентском компьютере. Поддерживаются все последние версии браузеров Microsoft Edge, Google Chrome, Safari, Mozilla Firefox. Для доступа к RDS серверам из браузера вам достаточно передать пользователям ссылку на сервер RDWeb.
Обязательно используйте FQDN имя сервера RD для подключения. Обратите внимание, что данное FQDN имя должно содержаться в вашем сертификате RDS развёртывания (проверьте поля Common Name/CN и Subject Alternative Names /SAN).
Откройте URL адрес:
_https://FQDN.server.name/RDWeb/webclient/index.html
Для доступа к тестовой среде используйте адрес:
_https://FQDN.server.name /RDWeb/WebClient-Test/index.html
Имя сервера должно соответствовать имени сервера RD Web Access в сертификате.
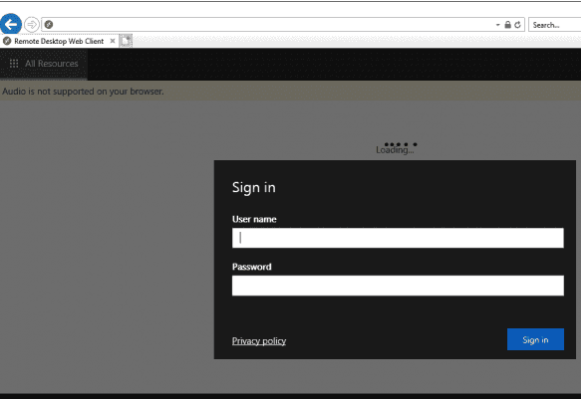
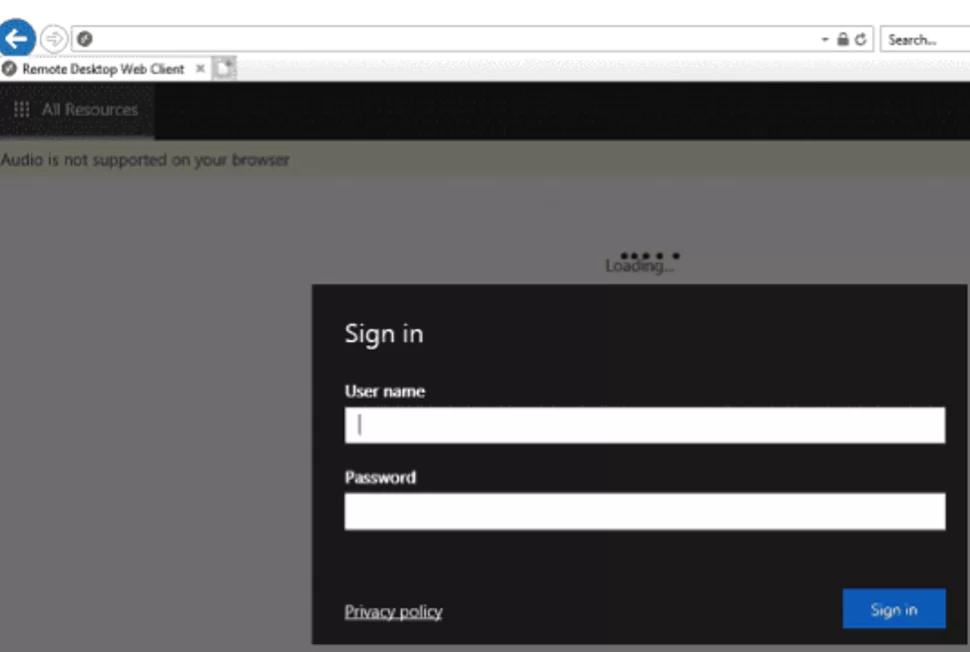
Авторизуйтесь на RDWeb сервере под своей учетной записью.
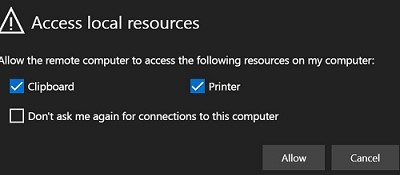
При входе у вас будет запрошено какие локальные ресурсы должны быть доступны в RD сессии. Пока доступно только перенаправление буфера обмена и принтеров (локальные диск и USB устройства через веб-клиент RDP не пробрасываются, нужно использовать полноценный клиент mstsc.exe, RDCMan или аналоги).
После успешного входа вы увидите все RemoteApp опубликованные в коллекциях. Вы можете переключаться между ними с помощью иконок в верхней части окна.
При запуске RemoteApp оно будет отображаться в браузере с возможностью развернуть окно на весь экран.
Печать из RD Web клиента осуществляется через виртуальный PDF принтер (Microsoft Print to PDF). Когда вы отправляете документ на печать в окне веб клиента, браузер предлагает скачать сформированный pdf файл. Вы можете открыть PDF файл а (PDF просмотрщик встроен в браузер Microsoft Edge) и распечатать на локальном принтере.

В HTML5 клиенте доступно динамическое изменение окна удаленного рабочего стола и возможность запуска в полноэкранном режиме. Через буфер обмена можно копировать только текст (файлы, графика через буфер веб клиента не копируются).
Возможные проблемы с веб клиентом Remote Desktop
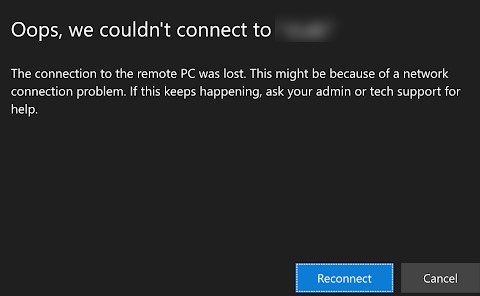
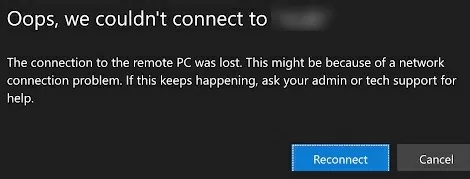
При входе на RD Web Access вы видите список опубликованных приложений Remote App, но при попытке запуска любого из них появляется ошибка:
Oops, we could not connect to Calculator.
The connection to the remote PC was lost. This might be because of a network connection problem. If this keeps happening, ask your administrator or tech support for help.
Не удалось подключиться к Calculator
Потеряно подключение к удаленному компьютеру. Возможно, есть проблема с сетевым подключением. Если это будет повторяться, обратитесь за помощью к своему администратору или специалисту службы технической поддержки.
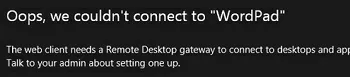
Также может быть ошибка:
The web client needs a Remote Desktop Gateway to connect to desktops and apps.
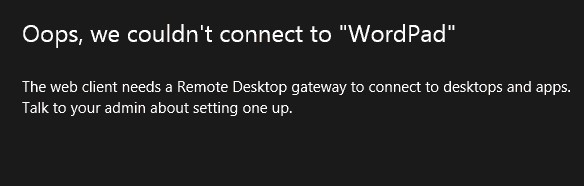
Эти ошибки возникают, если вы развернули ферму RDS без шлюза RD Web Gateway. Если у вас развернут только RD Connection Broker, нужно привязать ваш сертификат RDS на порт 3392. (см описание в разделе Connecting to RD Broker without RD Gateway in Windows Server 2019 — https://learn.microsoft.com/en-us/windows-server/remote/remote-desktop-services/clients/remote-desktop-web-client-admin).
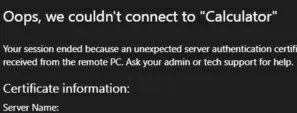
Ошибка:
Your session ended because an unexpected server authentication certificate was received from the remote PC. Ask your admin or tech support for help.
Ваш сеанс завершен, так как от удаленного компьютера получен непредвиденный сертификат проверки подлинности сервера. Обратитесь за помощью к своему администратору или специалисту службы технической поддержки.
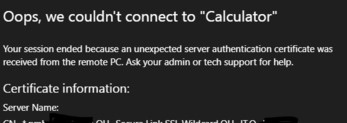
Проверьте корректность вашего RD сертификата (FQDN сервера, которые используется для запуска RD веб клиента должен содержаться в сертификате). Проверьте, что этот сертификат назначен на все роли в вашем развертывании RDS. Отдельно проверьте что этот сертификат задан в настройка сервера RDGW (вкладка SSL Certificates). Если возможно, используйте wildcard сертификат.


When configuring remote desktop services, one of the powerful capabilities that it provides is remote desktop web access, or rd web access as many know it as. Remote desktop services has become even easier to configure over the last few versions of Windows Server and this also goes for the remote desktop rd web access. In this post, we will take a look at Windows Server 2019 RD Web Access configuration and see how this is done with the latest version of Windows Server.
Remote Desktop Gateway, Certificates, and other things
To begin with, I already had a Windows Server 2019 Remote Desktop Gateway server configured and ready to go. Read my write up on how to configure Windows Server 2019 Remote Desktop Gateway server here. In my cofiguration in the lab of the rd web access, I built on the components that I already had installed on this box. This included installing the RD Web Access role.
In my configuration, I had a simple two server configuration – my remote desktop gateway server that also housed the RD Web access server and then the RDSH server that sits behind this server in the internal network.
Let’s see what steps are required to get the Windows Server 2019 rd web access configuration up and running ready to service clients via web access.

What does the RD Web Access role allow you to do? With the RD Web Access role installed, clients can easily access virtual machines via their browser without having to using a client of sorts or some other mechanism to connect.
This also opens up the opportunity for non Windows devices to connect to internal resources since all that is required is a browser. Your end users are given the various servers they can connect to via what are known as “Collections”. With the collection, users see the RDSH servers they have permissions to connect to.
Using PowerShell to RD Web Access Components
We need to install a few components for Windows Server 2019 RD Web Access. To do this, run the following cmdlets:
- Install-module -Name RDWebClientManagement
- Install-RDWebClientPackage
- Import-RDWebClientBrokerCert – Using this cmdlet, I pointed the cmdlet to the cert that was created when provisioning the RD Gateway server
- Publish-RDWebClientPackage
If you don’t already have the RD Web Access role installed, you will see the following error.
Remote Desktop Services Installation
Using Server Manager, you can finish out your Remote Desktop Services installation. To do this you just launch the Add Roles and Features Wizard and follow the wizard by selecting remote desktop services installation.
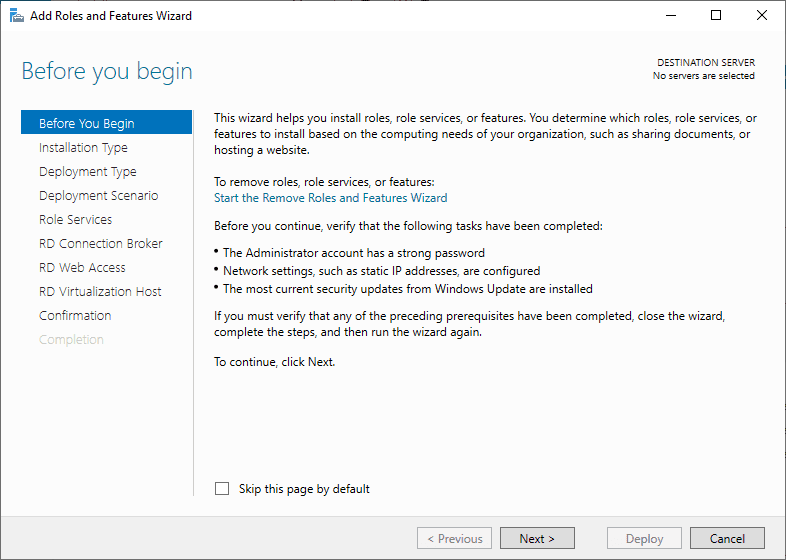
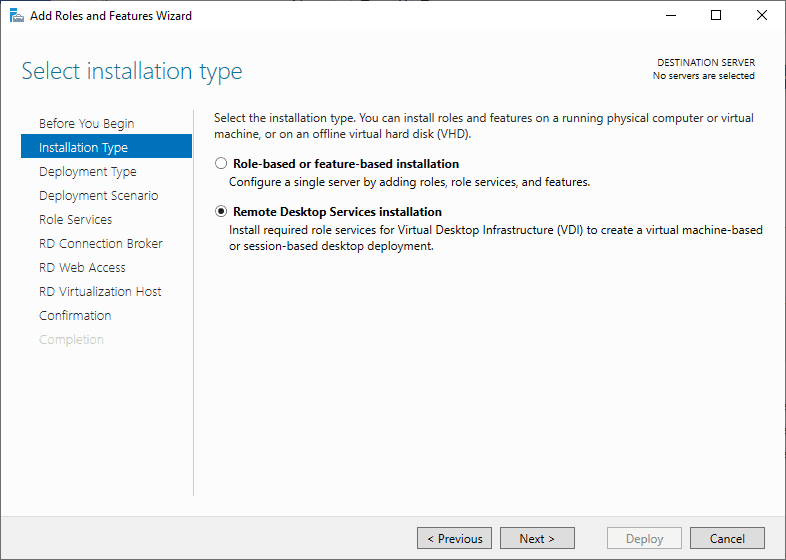
On the type of installation type, choose the Remote Desktop Services Installation. This will allow finishing out the remote desktop services installation.
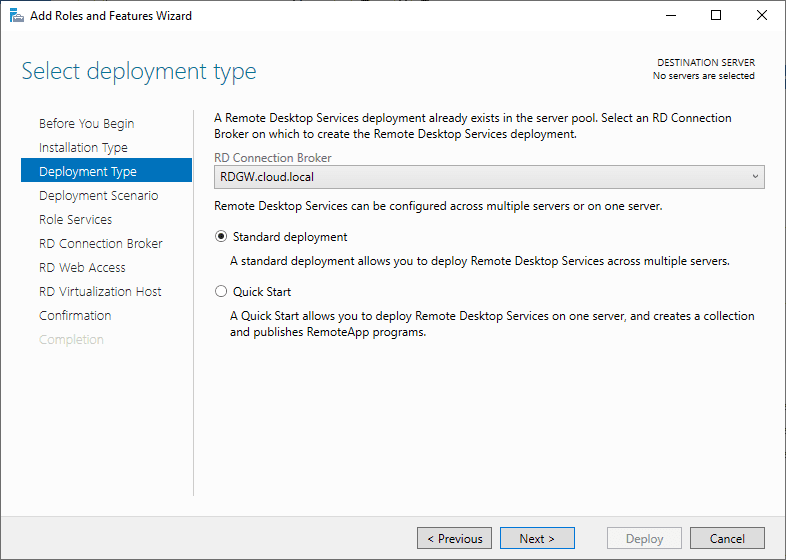
Here, I am selecting the Standard Deployment that allows you to deploy Remote Desktop Services across multiple servers and have a bit more control over the configuration.
Select the deployment scenario. Here select “Session-based desktop deployment”.

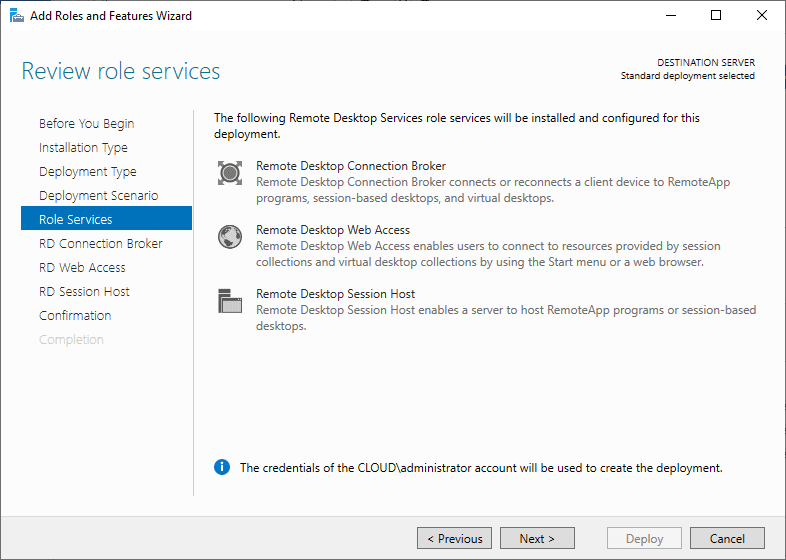
Role services that will be installed if needed on the target boxes include – REmote Desktop Connection Broker, Remote Desktop Web Access, and Remote Desktop Session Host.
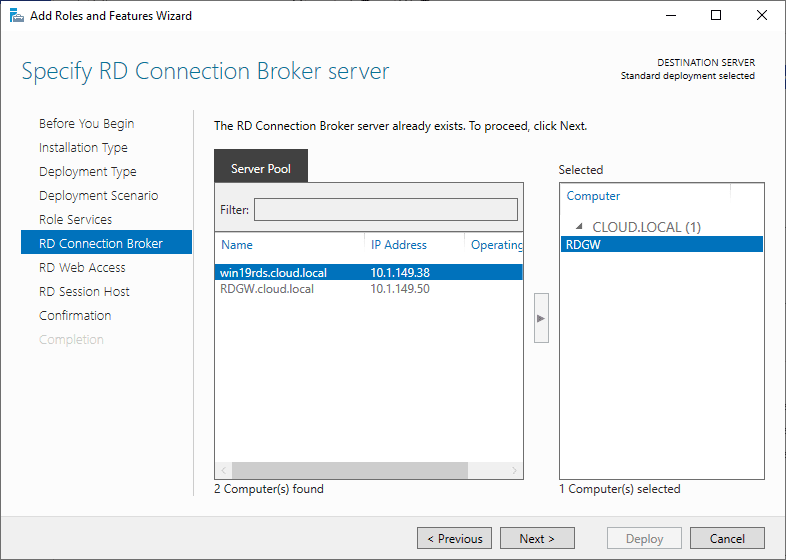
In the wizard, you will be able to select the servers you want to designate for each role. This includes the RD Connection Broker server.
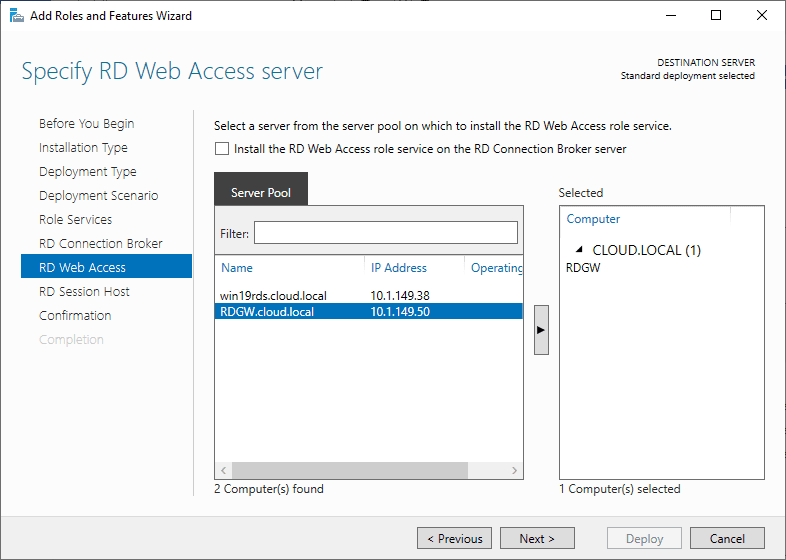
Specify the RD Web Access server during the configuration.
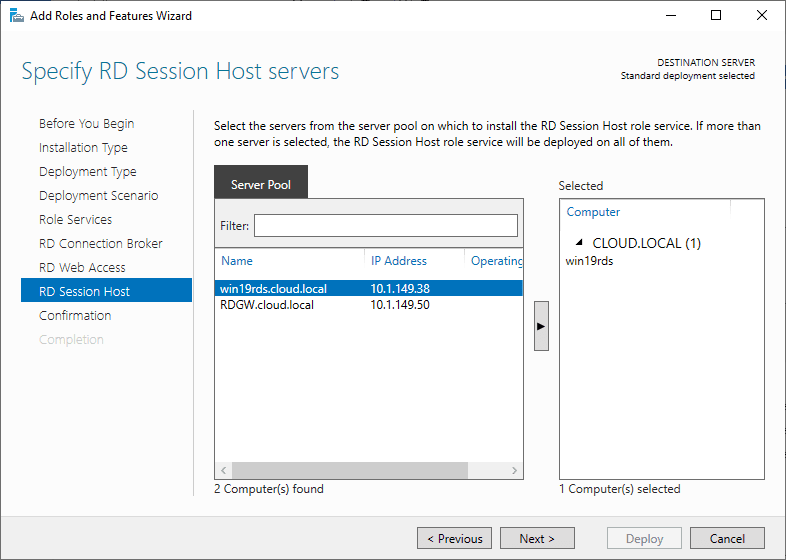
RD Session Host server specified in the configuration.
Confirm the configuration of the remote desktop services components.

Designate any missing remote desktop services components. There will be a “green plus” over the component that needs further configuration. Simply click the “plus” and set the configuration.
Creating RD Web Access Collections
To allow access to specific resources via the RD Web Access role, you need to create a Collection. The Collection is a set of RDSH servers that you entitle to specific users.
Start the wizard and name the Collection.
Specify the RD Session Host servers.

Specify user groups that are allowed to have access to connect to the collection.
You can configure User profile disks to store user profile settings in a central location.
Confirm the selections made in the collection creation.
Finish out creating the collection.
You can now test out the new collection and Windows Server 2019 RD web access by logging in on a browser. You should see the collection that you created and assigned to your users.
Wrapping Up
Hopefully this look at Windows Server 2019 RD web access configuration will help anyone who might be struggling to put the pieces together. The configuration of remote desktop services has gotten easier in the later versions of Windows Server.
Much of the process is wizard driven and helps to give visibility to parts of the configuration left to finalize and setup. This includes the remote desktop gateway server, rd web access server, and RDSH.
On Windows Server 2022/2019/2016 with Remote Desktop Services deployed, you can install and configure the new HTML5-based Remote Desktop Web Client. This web client will allow any device (iOS, macOS, Android, Linux) to access your RemoteApps on RDS hosts directly from any browser (no need to install an additional RDP client).
Contents:
- Installing RD Web HTML5 Client on Windows Server RDS
- Connecting to the RDWeb Access Server with Web (HTML5) Client
- Common RD Web Client Errors
Remote Desktop Web Client is available as an RD Web Access role feature on RDS servers running Windows Server 2022/2019/2016.
Before deploying the RD Web Client, you need to make sure that your RDS infrastructure meets the following requirements:
- A deployed RDS farm infrastructure, including Remote Desktop Gateway, RD Connection Broker, and RD Web Access on Windows Server 2022/2019/2016;
- Per User terminal licenses (RDS CAL) are used;
- RDS Gateway and Web Access servers must use SSL certificates issued by a trusted CA. You can use free Let’s Encrypt certificates on RDS or Self-signed SSL certificates (only in limited mode).
Installing RD Web HTML5 Client on Windows Server RDS
HTML5 RD Web Client is not included in the Windows Server distribution. You need to manually install the RD Web Client Management module from the PowerShell Script Gallery.
Install the PowerShellGet module on a server with the RD Web Access role:
Install-Module -Name PowerShellGet -Force
Restart the PowerShell.exe console and install the RD Web Client Management module:
Install-Module -Name RDWebClientManagement
To accept the terms of the Microsoft Licence Agreement, press A.
Then install the latest version of the Web Remote Desktop package:
Install-RDWebClientPackage
After the RDWebClientPackage package is installed, check its properties with the following command:
Get-RDWebClientPackage

As you can see, there appeared rd-html 5.0 package version 1.0.0.
Next, you need to export the SSL certificate from the server with the RDS Connection Broker role used for SSO (Enable Single Sign On) to a .cer file (BASE64 format).
- Open the computer certificate management console
certlm.msc; - Expand the section Personal -> Certificates;

- Find your certificate that is used in your RDS farm, right-click on it, and choose select All Tasks -> Export;

- Select the Base-64 encoded X.509 (.CER) export format and specify a file name.
Import the certificate to the RD Web Access server:
Import-RDWebClientBrokerCert C:\RDBrokerCert.cer
Now you can publish the RD Web Client:
Publish-RDWebClientPackage -Type Production -Latest

To test the RD Web Client, you can deploy it with the command:
Publish-RDWebClientPackage -Type Test -Latest
Connecting to the RDWeb Access Server with Web (HTML5) Client
After you have deployed the Web Client package on the RDS server, you can use a browser on a client computer to access RemoteApps and desktops. All the latest versions of Microsoft Edge, Google Chrome, Safari, and Mozilla Firefox are supported. In order to access RDS servers from a browser, just share the URL link to your RDWeb server with your users.
Be sure to use the FQDN of the RD Web server to connect. Note that this FQDN must be in your deployment’s RDS certificate (check the Common Name/CN and Subject Alternative Names /SAN fields)
Open the URL address:
https://RDWebFQDN.server.name/RDWeb/webclient/index.html
To access the test environment, use this URL address:
https://RDWebFQDN.server.name/RDWeb/WebClient-Test/index.html
The server name must match the RD Web Access server name in the SSL certificate.
Sign in to the RDWeb server using your credentials.
During sign-in, you will be prompted about what local resources should be available in your RD session. Only clipboard and printer redirection are available. Currently, the local drives and any USB devices cannot be redirected through the HTML5 RDP client. Instead, use the mstsc.exe client, RDCMan, or analog.
After a successful sign-in, you will see all RemoteApps published in the RD collection. You can switch between them using the icons at the top of the window.

When you run the RemoteApp, it will be displayed in the browser with the option to expand the window to full screen.
You can print from the Remote Desktop Web Client using the PDF Virtual Printer (Microsoft Print to PDF). Then you print something in the RD Web Client window, your browser prompts you to download a PDF file. You can open this PDF (using the built-in Edge PDF viewer or a third-party app) and print it to a local printer.

The dynamic changing of the RD window size and full-screen mode are available in the HTML5 RD web client. You can copy only text via the clipboard to your Remote Desktop session (but not files or graphics).
Common RD Web Client Errors
When you sign in to RD Web Access through the web client, you see a list of published Remote Apps, but when you try to launch any of them, you get an error:
Oops, we could not connect to Calculator. The connection to the remote PC was lost. This might be because of a network connection problem. If this keeps happening, ask your administrator or tech support for help.
There may also be an error:
The web client needs a Remote Desktop Gateway to connect to desktops and apps.
These errors occur if you have deployed an RDS farm without an RD Web Gateway. If you only have RD Connection Broker deployed, you need to bind your RDS certificate to port 3392 (see description in section Connecting to RD Broker without RD Gateway in Windows Server 2019 https://learn.microsoft.com/en-us/windows-server/remote/remote-desktop-services/clients/remote-desktop-web-client-admin).
Error:
Your session ended because an unexpected server authentication certificate was received from the remote PC. Ask your admin or tech support for help.
Check that your RD certificate is correct (the FQDN of the server with RD web client must be contained in the certificate). Verify that this certificate is assigned to all roles in your RDS deployment. Separately, check that this certificate is set in the RDGW server settings (SSL Certificates tab). If possible, use a wildcard certificate.
A step by step guide to build a Windows Server 2019 Remote Desktop Services deployment.
I posted this before based on Windows Server 2012 R2 RDS and thought it was high time to update this post to a more modern OS version.
I will provide all the steps necessary for deploying a single server solution using the GUI tools.
Although it is called a single server installation, we will need 2 servers as shown below.
Software used in this guide:
Windows Server 2019 ISO (evaluation can be downloaded here: https://www.microsoft.com/en-us/evalcenter/evaluate-windows-server-2019).
SQL Server 2017 Express x64 (free version can be downloaded here: https://www.microsoft.com/en-us/download/details.aspx?id=55994).
SQL Server 2016 Native Client (free version can be downloaded here: https://www.microsoft.com/en-us/download/details.aspx?id=52676. After clicking the download button select ENU\x64\sqlncli.msi). Although I’m installing SQL Express 2017, there are no newer client tools available.
SQL Server Management Studio (free, and can be downloaded here: https://docs.microsoft.com/en-us/sql/ssms/download-sql-server-management-studio-ssms).
And a certificate. I got mine for free from https://www.sslforfree.com/. This certificate needs to contain the FQDN you will use as the RD Web Access URL (mine is rds.it-worxx.nl in this guide). It needs to be in .pfx format and you need to have the private key in it.
This guide will not focus on building a domain using a single domain controller and adding the second server as a member server to this domain.
Also some basic knowledge is assumed in this guide. I will not detail how to create a Security Group and adding a computer account to it. I will also not detail how to install SQL Express, or adding logins to a SQL Server Instance security context. If you need extra help with this, Bing it or drop me a mail with details, and I will provide steps to continue.
I will be using Hyper-V on my Windows 10 1809 laptop and I have prepared 2 servers:
ITWDC (1 vCPU, 1024MB memory, dynamic, 60GB Harddisk)
Installed Windows
IPv4 192.168.0.4/24
Added .NET Framework 3.5 as a feature
Added Active Directory Domain Services as a role
Configured this server as a Domain Controller in a new forest: it-worxx.lab
ITWRDS (1 vCPU, 1024MB memory, dynamic, 60GB Harddisk)
Installed Windows
Added .NET Framework 3.5 as a feature
IPv4 192.168.0.10/24, DNS server 192.168.0.4
Configured it as a member server in the it-worxx.lab domain
Installing the Remote Desktop Services Roles
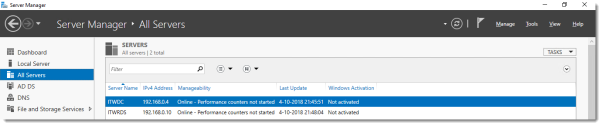
Log on to the Domain Controller, and in Server Manager right-click the All Servers node and add the second server using the Add Servers command (or select the All Servers node, click Manage and click Add Servers).
Now that all servers needed in this deployment scenario are present, click Manage, and click Add Roles & Features.
Before you begin
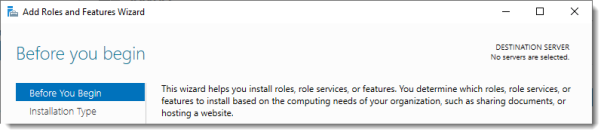
Click Next.
Select Installation Type
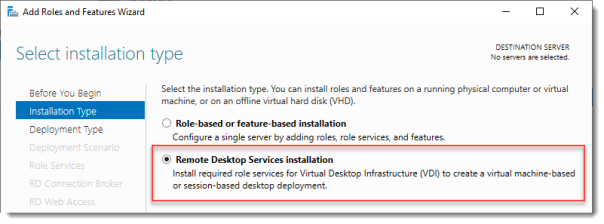
Select Remote Desktop Services installation.
Click Next.
Select Deployment Type

Although Quick Start might be a valid option for a single server deployment, leave the default selected. This will explain the steps necessary to install Remote Desktop Services in greater detail.
Click Next.
Select Deployment Scenario
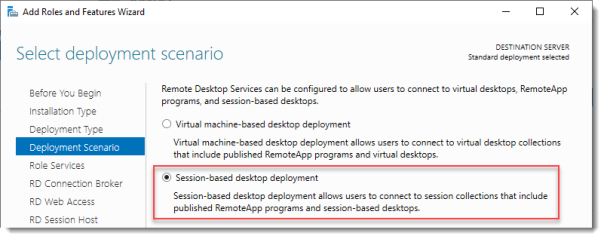
Select Session-based desktop deployment.
Click Next.
Review Role Services

Review the services that will be installed.
Click Next.
Specify RD Connection Broker server
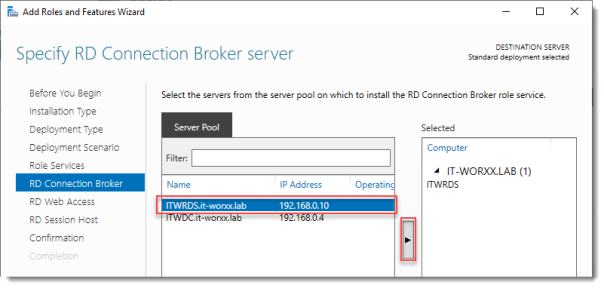
Click the member server and click the Add button.
Click Next.
Specify RD Web Access server
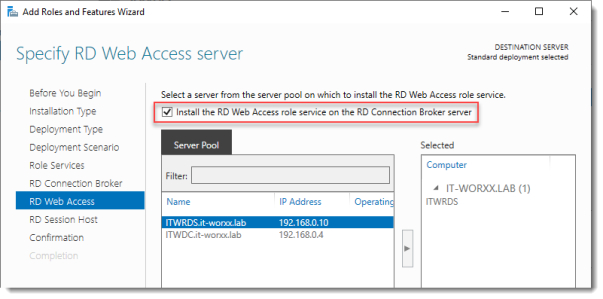
Check Install the RD Web Access role on the RD Connection Broker server.
Click Next.
Specify RD Session Host server
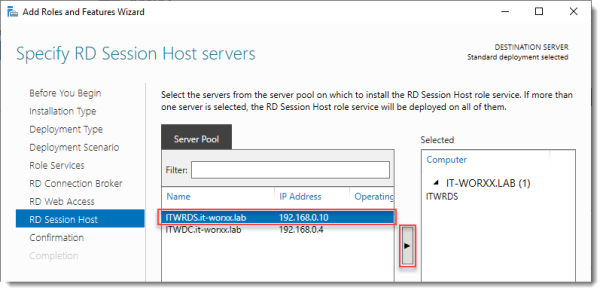
Click the member server and click the Add button.
Click Next.
Confirm selections
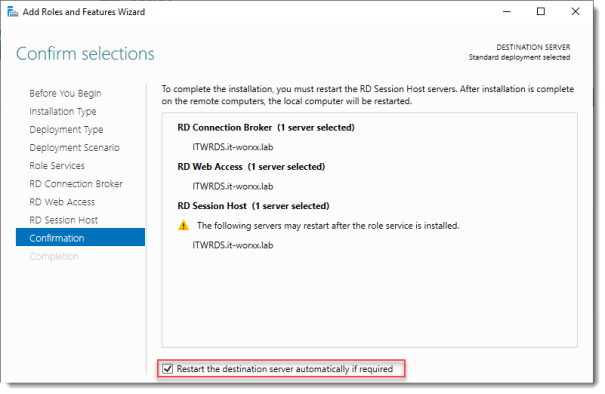
Check Restart the destination server automatically if required.
Click Deploy.
View progress
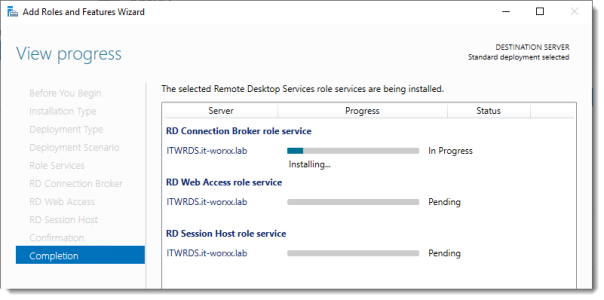
Wait until all role services are deployed and the member server has restarted.
Click Close.
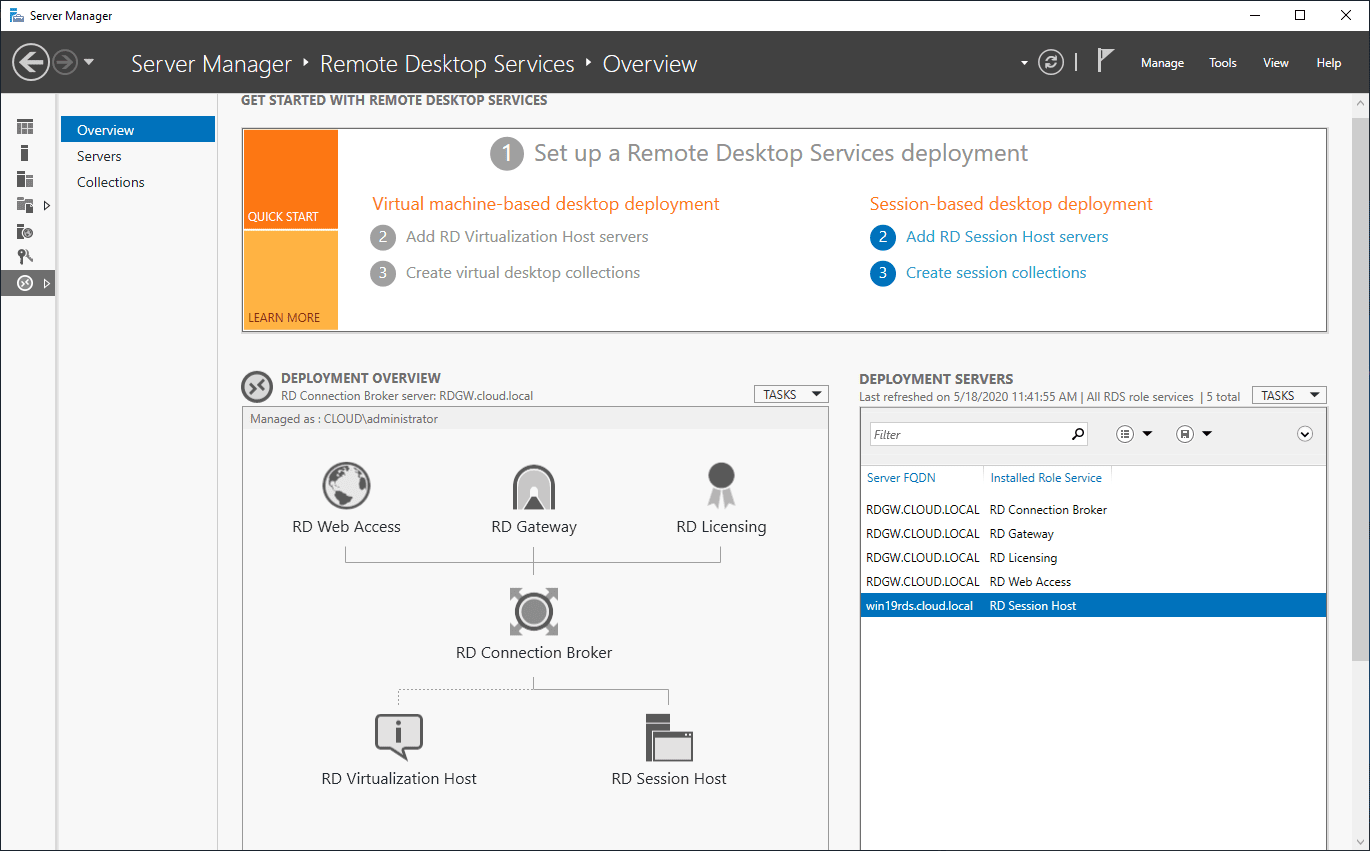
In Server Manager click Remote Desktop Services and scroll down to the overview.
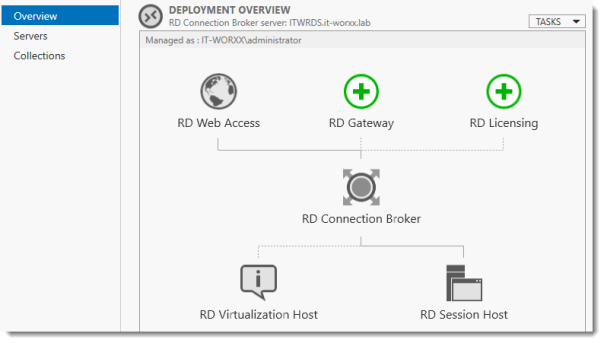
As you can see the deployment is missing a RD Gateway server and a RD Licensing server.
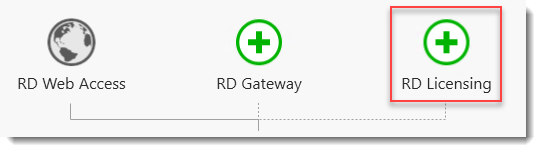
Click the Add RD Licensing server button.
Select a server
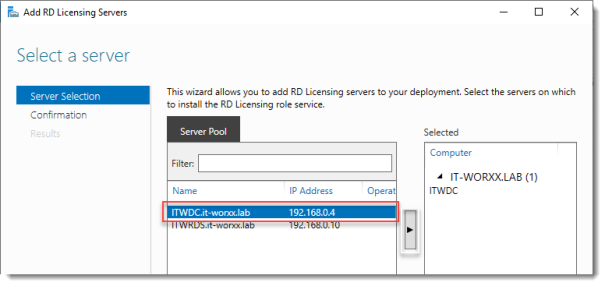
Click the domain controller and click the Add button.
Click Next.
Confirm selections
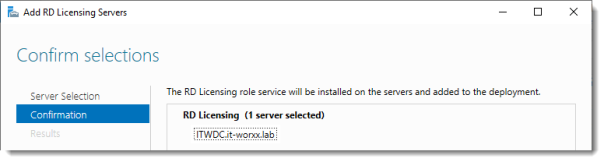
Click Add.
View progress
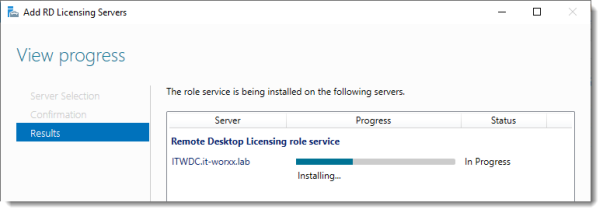
Wait until the role service is deployed. No restart is needed.
Click Close.
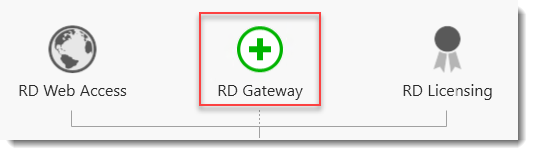
Click the Add RD Gateway server button.
Select a server
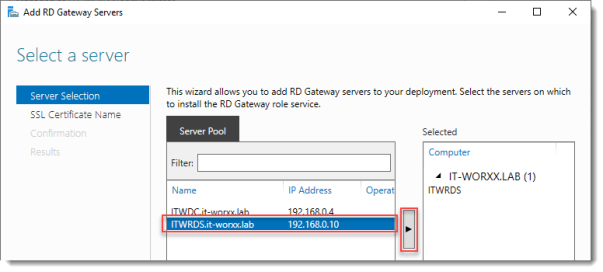
Click the member server and click the Add button.
Click Next.
Name the self-signed SSL certificate
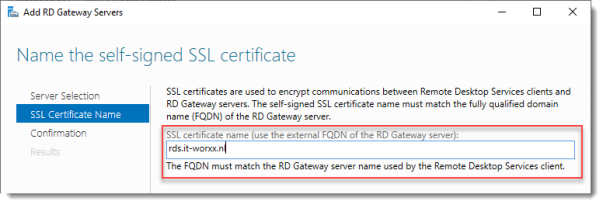
The wizard creates a self-signed certificate. We will deal with certificates in this deployment in a little bit. We will replace the self-signed certificate.
Enter the external Fully Qualified Domain Name which you will also use for the Web Access URL. In my case, for lack of a better name, I used “rds.it-worxx.nl”. I didn’t want to use “remote.it-worxx.nl” or “desktop.it-worxx.nl” or anything else.
Click Next.
Confirm selections
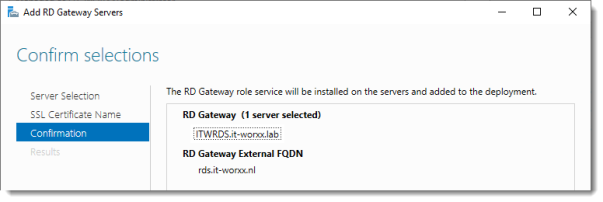
Click Add.
View progress
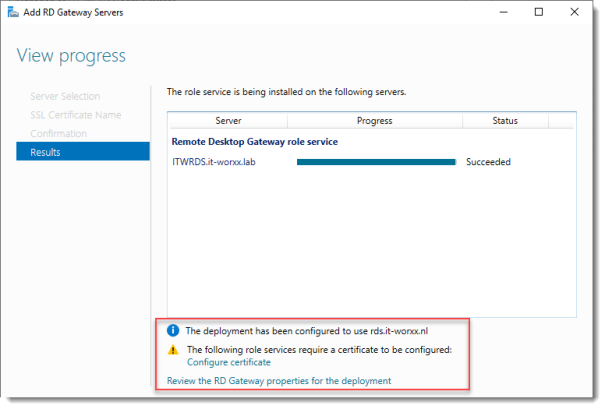
Wait until the role service is deployed. Again, no restart is needed.
Notice that “rds.it-worxx.nl” was configured for the deployment.
Also notice that even more certificate configuring is needed, but we’ll get to that later. Pay no attention to it for now. The same goes for the RD Gateway properties for the deployment. We’ll get to that later.
Click Close.
Review role installation and setting License Mode
Let’s have a quick look at the configuration we have so far.
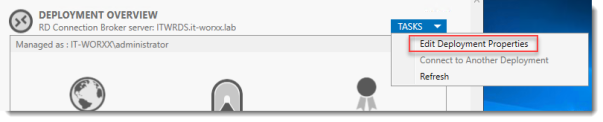
In Server Manager, Remote Desktop Services, Overview, click Tasks and click Edit Deployment Properties.
Configure the deployment
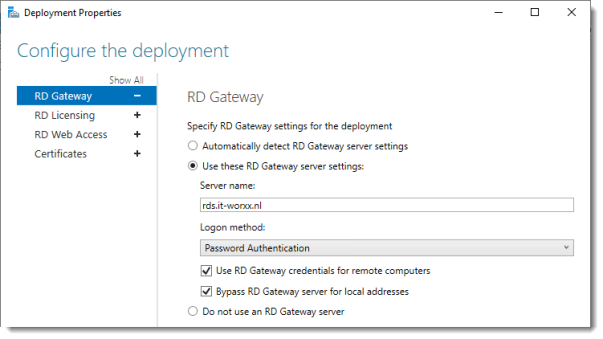
Review the RD Gateway settings and notice what settings are available.
Click RD Licensing.
Configure the deployment
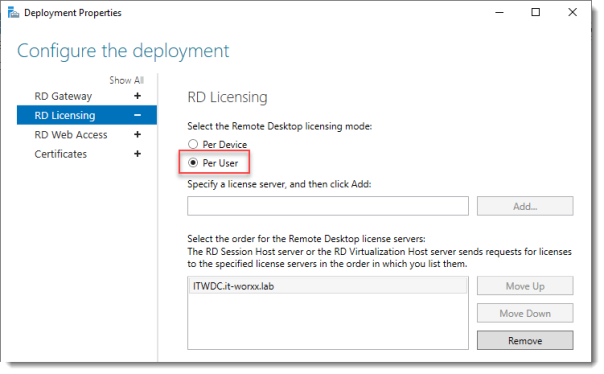
Notice that an RD License server is available, but no license type is selected yet.
I selected Per User, but since this is just a guide setup, it really doesn’t matter.
Click RD Web Access.
Configure the deployment
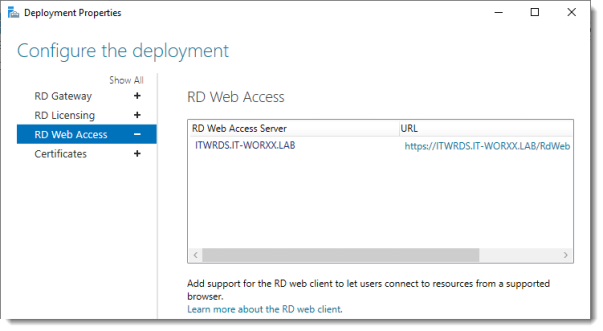
By default the RD Web Access IIS application is installed in /RdWeb.
If you want to know how to change this, check another post: https://msfreaks.wordpress.com/2013/12/07/redirect-to-the-remote-web-access-pages-rdweb/
This is for Windows Server 2012 R2 RDS, but it also works for Windows Server 2019 RDS.
Click Certificates.
Configure the deployment
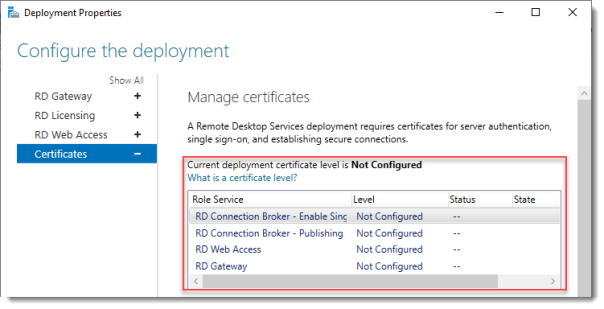
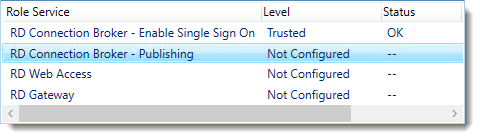
Notice that the certificate level currently has a status of Not Configured.
As you can see, certificates are used for different goals within the deployment.
The RD Gateway certificate is used for Client to gateway communication and needs to be trusted by the clients. Either install the self-signed certificate on all clients, or use a certificate for which the complete certificate chain is already trusted by all clients. As it said in the wizard, the external FQDN should be on the certificate.
The RD Web Access certificate is used by IIS to provide a server identity to the browser clients.
The RD Connection Broker actually has two goals for which it needs certificates. To enable single sign on (server to server authentication), and for publishing (signing RDP files). If you look in the deployment you’ll see that the Connection Broker is now configured to use “itwrds.it-worxx.lab”, so we have to change it to use an external FQDN as well.
If we use the same FQDN for all goals described above, we need only 1 certificate, and only 1 external IP address.
We’ll come back to this wizard later to assign the certificate. First order of business is to change the internal FQDN for the Connection Broker to an external FQDN.
Click OK (no reason why we shouldn’t commit the change we made on the licensing tab, remember?)
Changing the Connection Broker FQDN to an externally resolvable FQDN
Open DNS Manager on the domain controller and browse to Forward Lookup Zones.
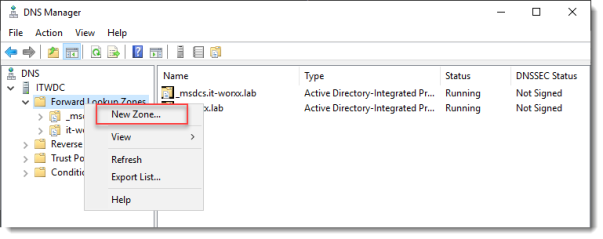
Right click Forward Lookup Zones and click New Zone… Go through this wizard accepting the defaults until you have to enter a Zone Name.
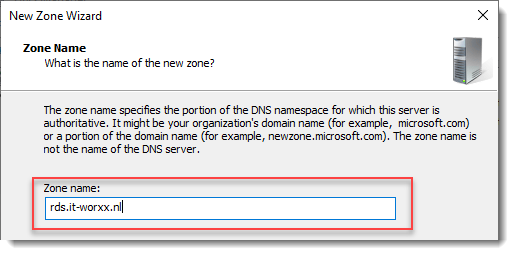
Enter the external FQDN which will also be used by the Connection Broker.
Finish the rest of the wizard accepting the defaults.
Browse to the newly created zone.
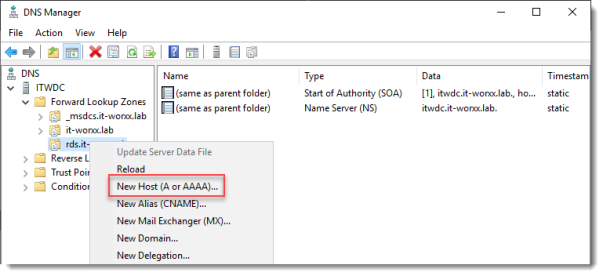
Right click the newly created zone and click New Host (A or AAAA)…
New Host
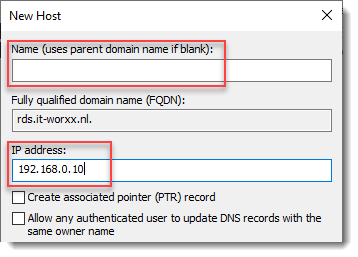
Leave the Name field blank, but enter the member server’s (holding the RD Connection Broker role) IPv4 address.
Click Add Host.
Now the configuration will be able to resolve “rds.it-worxx.nl” to the server holding the Connection Broker role, and this will work because “rds.it-worxx.nl” is also on the certificate that we will configure later.
Create a new Global Security Group called “RD Connection Brokers” and add the computer account for the member server to it as a group member.
We need this group to be able to convert the RD Connection Broker to a highly available RD Connection Broker. You’ll see why we need to do this in a few steps.
Reboot the member server to let it know it’s a member of the RDS Connection Brokers security group.
The next steps in re-configuring the RD Connection Broker depend on an SQL database shared by all Connection Brokers in the deployment. Without this configuration the RD Connection Broker will rely on the Windows Internal Database that was created during the initial deployment of the roles.
Install SQL Express on the Domain Controller (or use an existing SQL Server if you already have one).
It’s not best practice to install SQL onto a Domain Controller, but it’ll do for this guide.
Here’s a list of needed features:

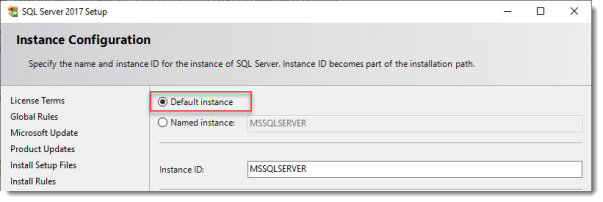
Use the Default Instance (so click Default, and do not leave the wizard’s selection on Named instance: SQLEXPRESS).
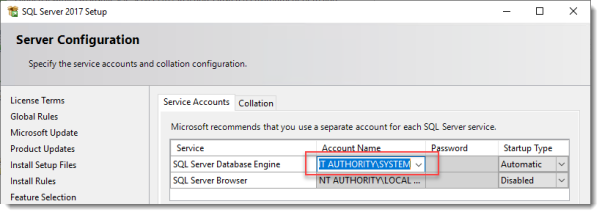
Set the SQL Service to start using SYSTEM because the default account of SQLSERVER cannot be used on a Domain Controller.
When the installation is done open SQL Configuration manager and browse to Client Protocols under SQL Native Client 11.0 Configuration.
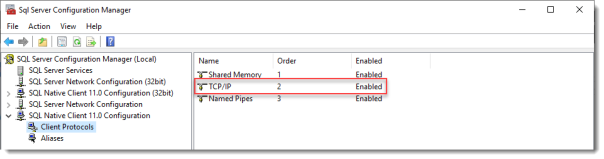
Check if TCP/IP is enabled under Client Protocols. SQL Express install enables this by default, but check it just to be sure, especially if you use an existing SQL Server.
Browse to Protocols for MSSQLSERVER under SQL Server Network Configuration.
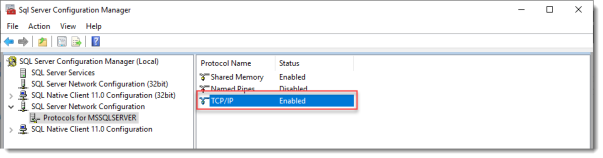
Enable TCP/IP. If this is a new SQL installation, this will be disabled by default.
Restart the SQL Server service if you changed this setting.
On the SQL Server, make sure port 1433 is not being blocked by Windows Firewall.

I added the SQL Server executable to the exception list to allow all inbound traffic, but TCP 1433 inbound should suffice.
If you installed SQL Server using the default folder locations, the sqlservr.exe executable is found in “C:\Program Files\Microsoft SQL Server\MSSQL14.MSSQLSERVER\MSSQL\Binn”.
Open SQL Server Management Studio, connect to the default instance on the Domain Controller and browse to Logins under Security.
Remember the Management Studio is no longer available with the SQL Server download, but is a different download.
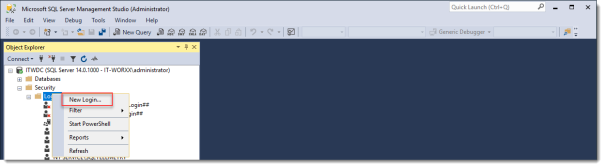
Right click Logins and click New Login…
Login – New
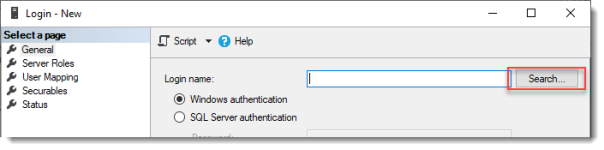
Click Search…
Select User, Service Account, or Group
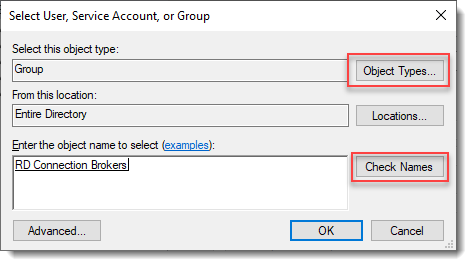
Click Object Types… and select Group.
Type the RDS Connection Brokers security group name and click Check Names.
Click OK.
Login – New
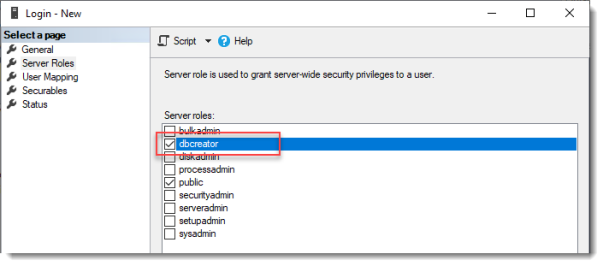
Click Server Roles and select dbcreator.
Click OK.
We have just effectively granted the RDS Connection Broker server the right to create databases.
We need this because the RDS Connection Broker service will try to migrate from WID (Windows Internal Database to a (high available) SQL Server instance when we convert the Broker to a high available broker.
Install the SQL Native Client on the member server (Client Components only). If you used the member server in this setup to install the SQL Management Studio, you can skip this step because the Native Client was installed with installing the Management Studio.
Everything we need is in place to convert the RD Connection Broker, so let’s do just that.
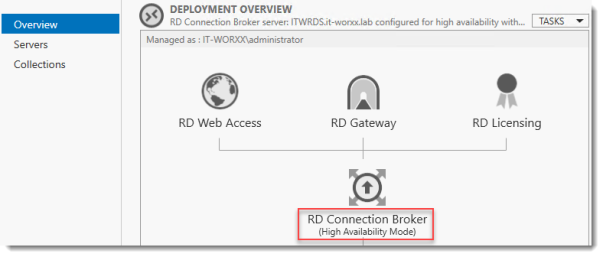
In Server Manager click Remote Desktop Services and scroll down to the overview.
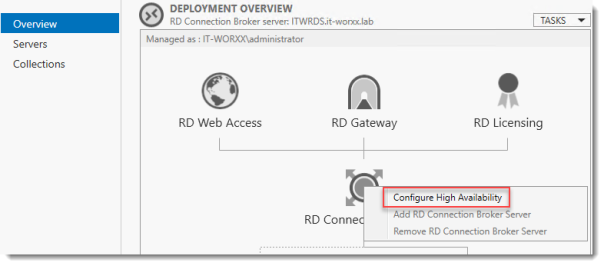
Right click RD Connection Broker and click Configure High Availability.
Before you begin
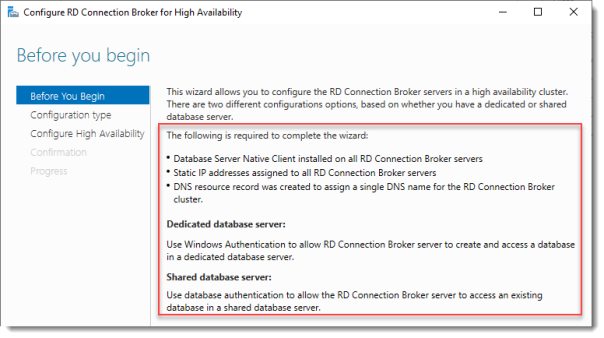
So we’re building a single node cluster here 
Look at the pre-requisites.
If you have more than one RD Connection Broker they need to be configured using DNS Round Robin.
Click Next.
Configure RD Connection Broker for High Availability
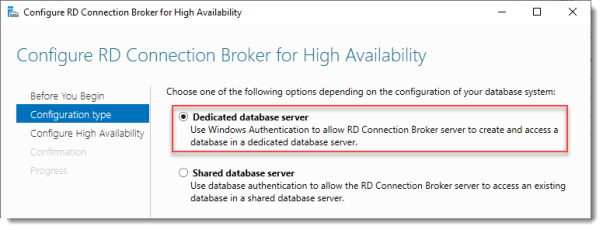
Since we just installed an SQL Server for this, leave the default selected. You’d use the other option for instance if you’d like to use Azure SQL for this deployment.
Click Next.
Configure RD Connection Broker for High Availability
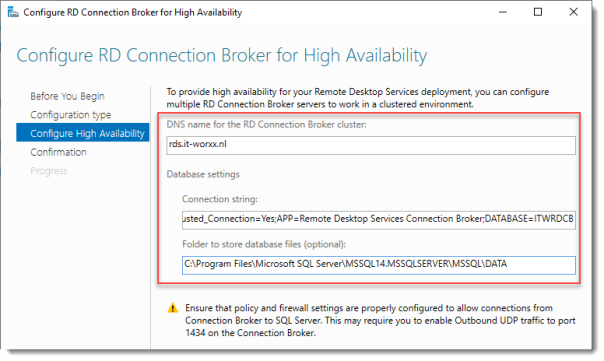
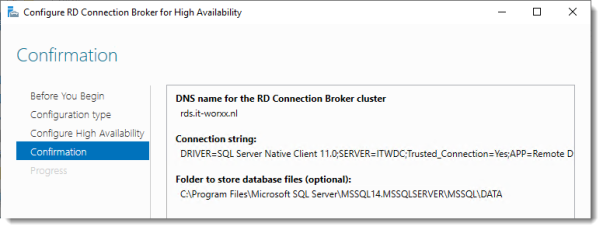
DNS name for the RD Connection Broker cluster:
The DNS Zone name we configured in DNS earlier: rds.it-worxx.nl
Connection string:
DRIVER=SQL Server Native Client 11.0;SERVER=ITWDC;Trusted_Connection=Yes;APP=Remote Desktop Services Connection Broker;DATABASE=ITWRDCB
Folder to store database files:
C:\Program Files\Microsoft SQL Server\MSSQL14.MSSQLSERVER\MSSQL\DATA
I used the instance default folder.
Click Next.
Confirmation
If you get an error before this page:
- Check if TCP/IP is enabled in client protocols and for your instance
- Check if you can reach port 1433 on the SQL Server from the member server
Click Configure.
Progress
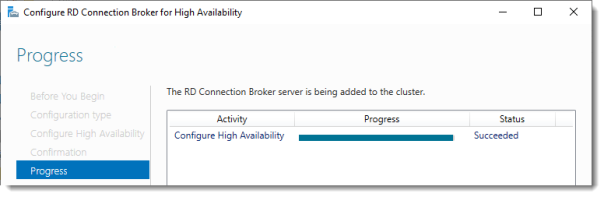
If you get an error on this page:
- Check SQL permissions for the security group
- Check if the database path you entered is correct
Click Close.
The RD Connection Broker is now in High Availability Mode, and configured as “rds.it-worxx.nl” and we are finally ready to complete the configuration.
Configuring Certificates

In Server Manager, Remote Desktop Services, Overview, click Tasks and click Edit Deployment Properties, then click Certificates.
Configure the deployment

Click RD Connection Broker – Enable Single Sign On and click Select Existing certificate.
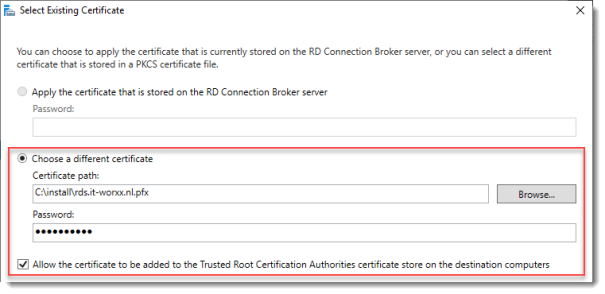
Browse to the .pfx file, enter its password, and check Allow the certificate..
Click OK.

So click Apply. This takes a little while, be patient.
Configure the deployment
Click RD Connection Broker – Publishing and click Select Existing certificate.
Browse to the .pfx file, enter its password, and check Allow the certificate..
Click OK.
Click Apply. This again takes a little while, be a little more patient.
Configure the deployment
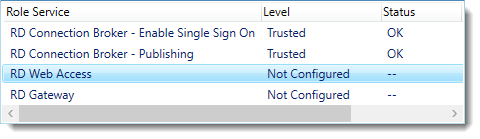
Click RD Web Access and click Select Existing certificate.

Note: Did you notice the warning when you select RD Web Access?
Browse to the .pfx file, enter its password, and check Allow the certificate..
Click OK.
Click Apply again. This takes another little while longer, be slightly more patient.
Configure the deployment
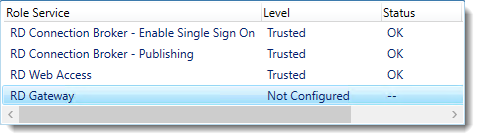
Last one. Click RD Gateway and click Select Existing certificate.
Browse to the .pfx file, enter its password, and check Allow the certificate..
Click OK.
Click OK to apply the final certificate step.
Configured all servers, configured certificates..
One thing left to do: Tell our RDS environment exactly what to publish.
Publishing resources to your users
In fact you can use this setup to either provide full desktop sessions on the Session Host, or you can choose to publish only applications on the Session Host.
Let’s publish full desktop sessions.

In Server Manager, Remote Desktop Services, Session Collections, click Tasks and click Create Session Collection.
Before you begin

Review the requirements. This won’t be an issue in this setup, but you could restrict access to this collection by selecting a select group of people.
Click Next.
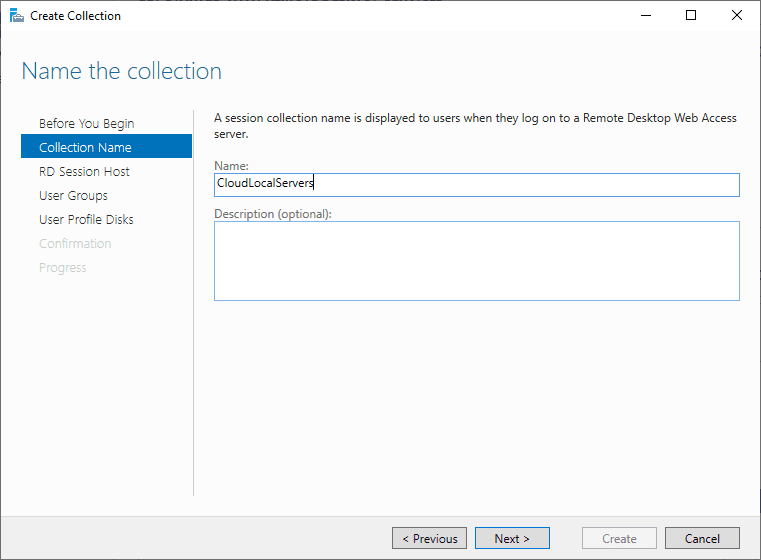
Name the collection
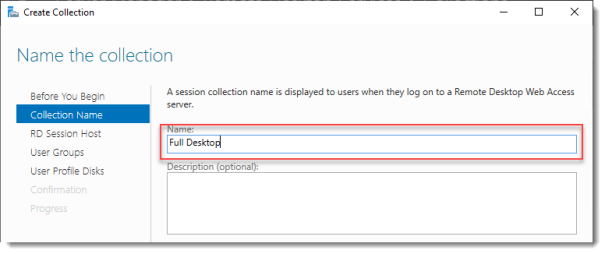
Enter a descriptive name. This name will be displayed under its icon in the Web Access interface.
Click Next.
Specify RD Session Host servers

Click the member server and click the Add button.
Click Next.
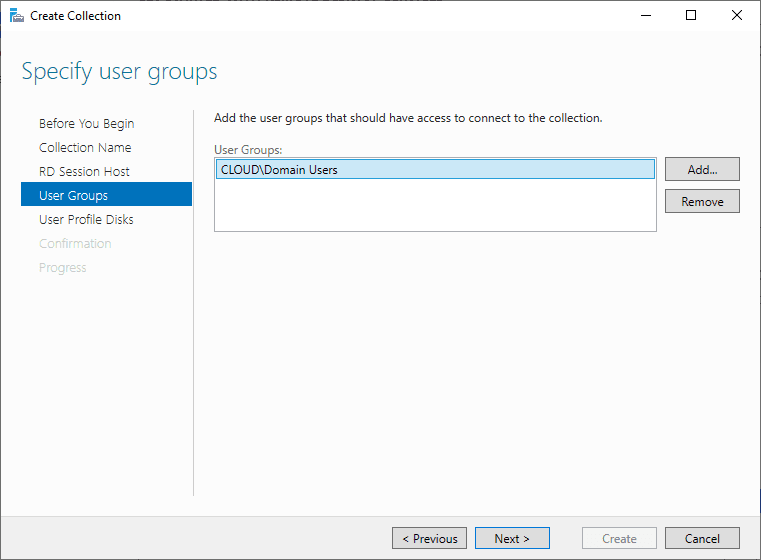
Specify user groups
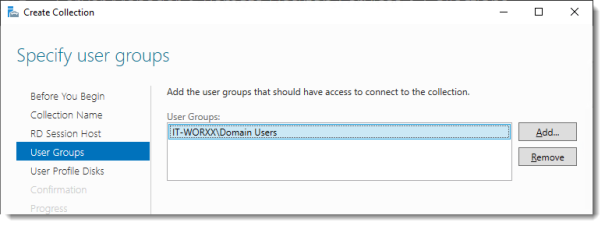
You can limit access to the resource here if you want. Add one or more groups to restrict access to these groups only. In this setup the default selection of Domain Users will do fine. Groups you specify here will be added to the list of groups of users that are allowed to connect using RDP to the Session Host server(s).
Click Next.
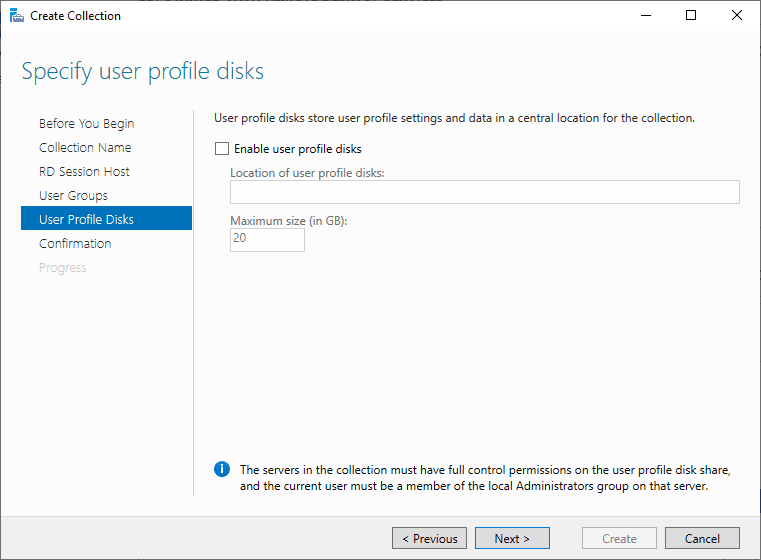
Specify user profile disks
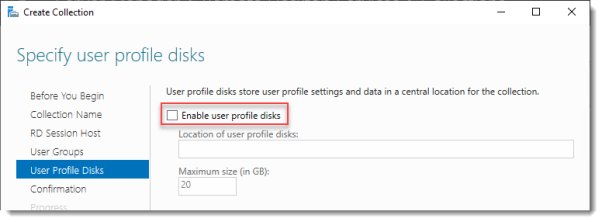
User profile disks are not in focus in this guide. Since I have no file shares configured in this setup, uncheck Enable user profile disks for now.
Click Next.
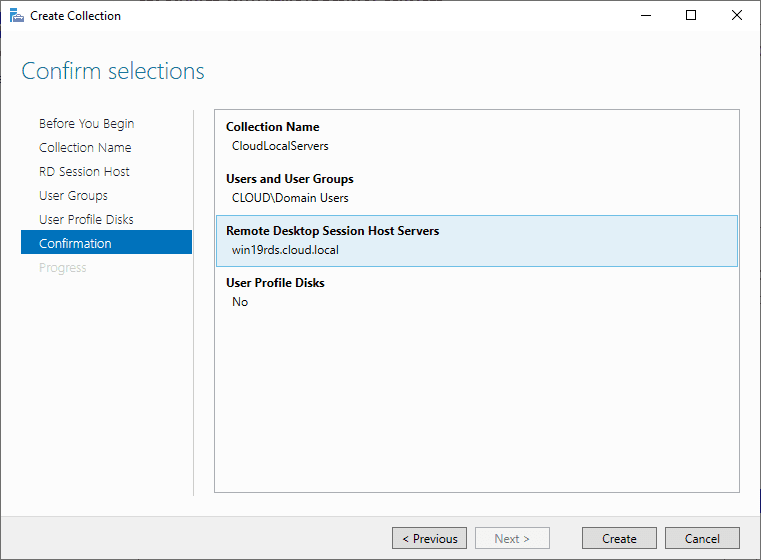
Confirm selections
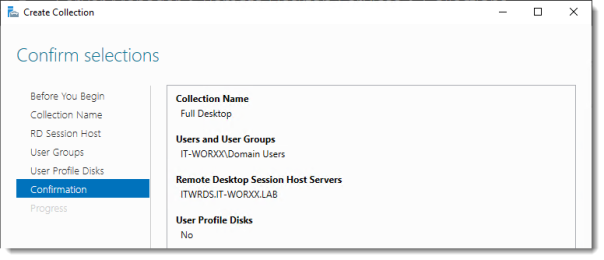
Review the information and click Create.
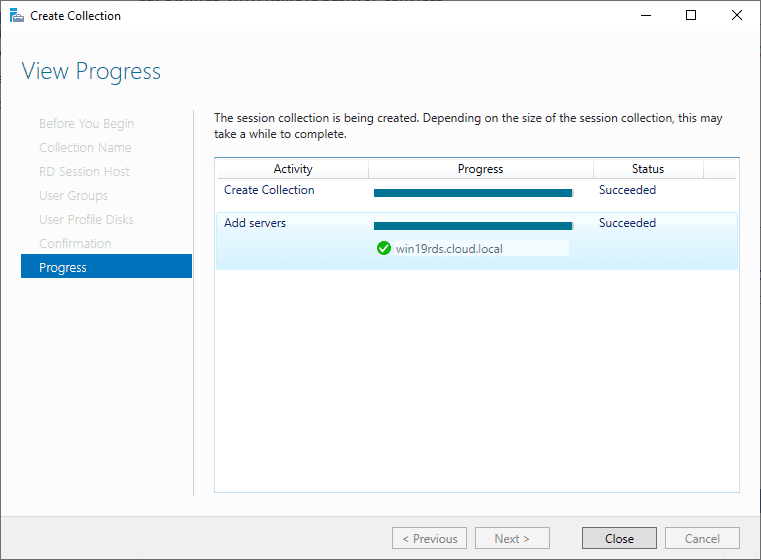
View Progress
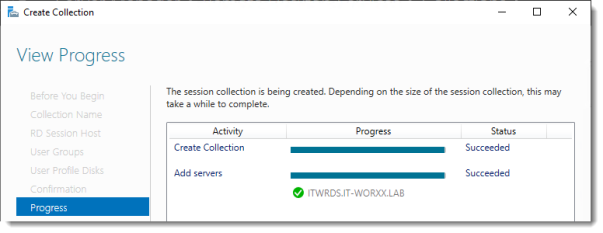
Wait until the collection is created and the server is added to the collection.
Click Close.
Time to test the setup!
Testing the setup
On a machine that has access to your test setup (you may have to add the external FQDN to your hosts file if you didn’t publish it to the internet) open https://rds.it-worxx.nl/rdweb
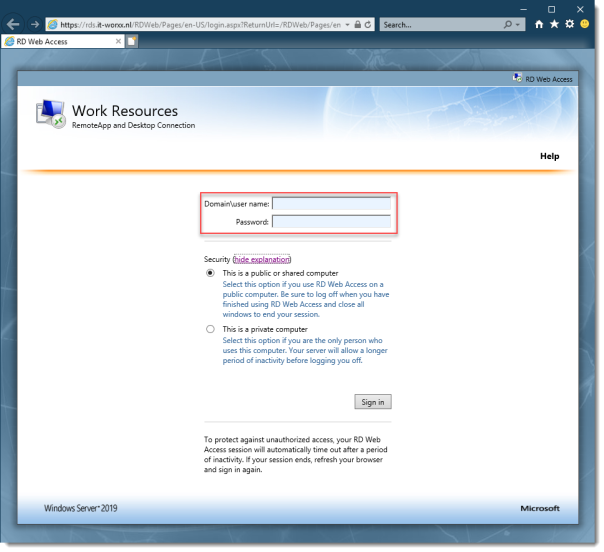
Hey! At least the RD Web Access application works 
Enter a valid username and password (IT-WORXX\username or username@it-worxx.lab).
Create a user for this, or simply use the domain admin account.
Click Sign in.
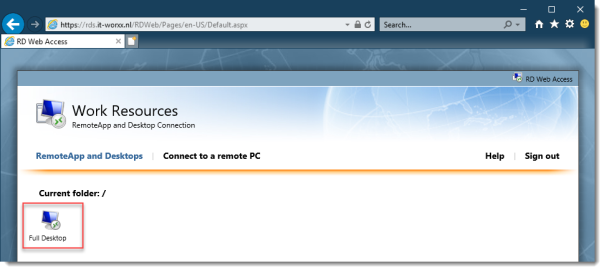
After logging in you are presented with the full desktop session collection we created.
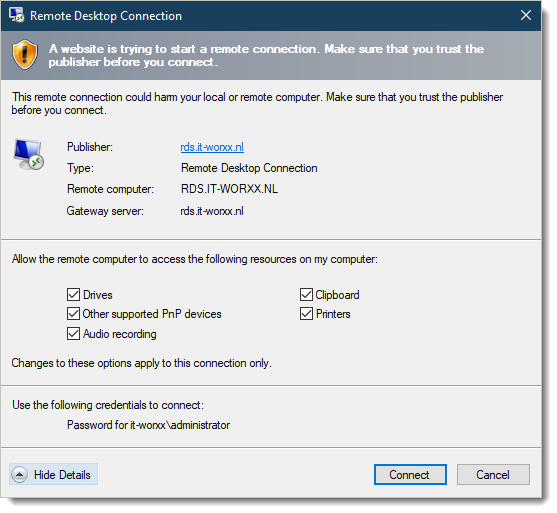
After clicking the Full Desktop icon you get the warning that devices are going to be redirected.
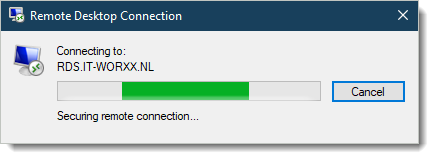
And when you click Connect, you connect
Enjoy.
Arjan

Contents
- 1 Configuring Remote Desktop Web Access In Server 2019
- 2 Configuring Remote Desktop Web Access In Server 2019
- 2.1 Conclusion
- 2.1.1 Related image with configuring remote desktop web access in server 2019
- 2.1.2 Related image with configuring remote desktop web access in server 2019
- 2.1 Conclusion
We believe in the power of knowledge and aim to be your go-to resource for all things related to Configuring Remote Desktop Web Access In Server 2019. Our team of experts, passionate about Configuring Remote Desktop Web Access In Server 2019, is dedicated to bringing you the latest trends, tips, and advice to help you navigate the ever-evolving landscape of Configuring Remote Desktop Web Access In Server 2019. tutorial how kaptechpro will desktop by access learn configuring in Description in- will install desktop to and this in web configure access 2019 remote of remote video server web
Configuring Remote Desktop Web Access In Server 2019 Youtube
Configuring Remote Desktop Web Access In Server 2019 Youtube
To do this, run the following cmdlets: install module name rdwebclientmanagement install rdwebclientpackage import rdwebclientbrokercert – using this cmdlet, i pointed the cmdlet to the cert that was created when provisioning the rd gateway server publish rdwebclientpackage install rdwebclientmanagement using powershell in windows server 2019. Make sure your remote desktop deployment has an rd gateway, an rd connection broker, and rd web access running on windows server 2016 or 2019. make sure your deployment is configured for per user client access licenses (cals) instead of per device, otherwise all licenses will be consumed. install the windows 10 kb4025334 update on the rd gateway.

How To Enable Remote Desktop In Windows Server 2019 Rootusers
How To Enable Remote Desktop In Windows Server 2019 Rootusers
This video is show on configure & installation remote desktop web access in server 2019.simple way to install & configure remote desktop web access. Use windows server 2019 for your remote desktop infrastructure (the web access, gateway, connection broker, and license server). windows server 2019 is backward compatible with these components, which means a windows server 2016 or windows server 2012 r2 rd session host can connect to a 2019 rd connection broker, but not the other way around. Description: in this video tutorial of configuring remote desktop web access in server 2019 by kaptechpro, will will learn how to install and configure remote desktop web access in. Remote desktop web client is available as an rd web access role feature on rds servers running windows server 2022 2019 2016. before deploying the rd web client, you need to make sure that your rds infrastructure meets the following requirements:.
Configuring Remote Desktop Web Access In Server 2019
Configuring Remote Desktop Web Access In Server 2019
welcome to my channel kaptechpro. description: in this video tutorial of configuring remote desktop web access in server this video is show on configure & installation remote desktop web access in server 2019. simple way to install & configure subscribe to the channel to follow future videos channel uc5t1qz449o713waxt3bycda in this video guide, we will see the steps to install and configure remote desktop services (rds) on windows server 2019 using this is a step by step guide on how to configure remote desktop web access services on rds server running on windows this is a step by step guide on how to manage remote app programs in rds web access on rds server 2019. 1. modify welcome to my channel kaptechpro. description: in this video demonstration of the installation of remote desktop services in remoteappprograms #windowsserver #remotedesktopservices. welcome to my channel kaptechpro. description: in this video tutorial of remote desktop web access using network load this video is describing the remote desktop (rd) web access on windows server 2016, and it’s providing an easy path for users configuring remote desktop web app in windows server 2019. video series on advance networking with windows server 2019: in this video guide, we will learn the steps on how to install and
Conclusion
All things considered, it is clear that the article delivers valuable insights regarding Configuring Remote Desktop Web Access In Server 2019. From start to finish, the writer presents an impressive level of expertise on the topic. In particular, the discussion of X stands out as particularly informative. Thank you for this article. If you have any questions, feel free to contact me through the comments. I look forward to hearing from you. Additionally, here are some similar content that you may find helpful: