From Wikipedia, the free encyclopedia
| Developer(s) | Microsoft |
|---|---|
| Included with | Windows Server 2008 through Windows Server 2022 |
| Predecessor | Remote Installation Services |
| Successor | Windows Assessment and Deployment Kit (WADK), Microsoft Deployment Toolkit,[1] System Center Configuration Manager[1] |
| Type | Remote deployment |
| License | Part of Microsoft Windows |
| Website | learn |
Windows Deployment Services (WDS) is a deprecated component of the Windows Server operating system that enables centralized, network-based deployment of operating systems to bare-metal computers. It is the successor to Remote Installation Services (RIS).[2] WDS officially supports remote deployment of Windows Vista and later, as well as Windows Server 2008 and later. However, because WDS uses disk imaging, in particular the Windows Imaging Format (WIM), it could deploy virtually any operating system. This is in contrast with its predecessor, RIS, which was a method of automating the installation process.
WDS was first bundled with Windows Server 2008 and made available as a supplement for Windows Server 2003 R2. Microsoft deprecated some parts of WDS in Windows Server 2022. It can no longer deploy Windows 11 using a boot.wim file used directly from a Windows ISO or from physical media.[1]
Automated image capture and apply[edit]
WDS functions in conjunction with the Preboot Execution Environment (PXE) to load a miniature edition of Windows known as Windows PE for installation and maintenance tasks. WDS functions as both a storage repository for the PXE network boot images as well as a repository for the actual operating system images to be installed on the target computer.
When multiple boot images are available, PXE booting via WDS will present the end-user with a boot menu to select the image to load.
Windows PE automation using Windows Assessment and Deployment Kit[edit]
To simplify the tasks of capturing and applying images, two special scripted Windows PE boot images can be created which automate these tasks. These scripted Windows PE boot images are created using the Windows Assessment and Deployment Kit (Windows ADK; previously named Windows Automated Installation Kit, WAIK), in combination with Windows 7 installation media containing the source WIM images, and then added to the WDS server’s boot image repository. The Windows PE boot images may be either 32- or 64-bit, but 32-bit tends to be more universally compatible across all potential hardware types.
A difficulty of Windows PE booting is that it needs to include network drivers and disk controller drivers intended to work with the target hardware to be imaged. The process of adding drivers to the Windows PE boot image can be automated using the WDS server console:
- Select the source WIM image, which may be either a new one created from original Windows 7 installation DVDs (32- or 64-bit), or a previously configured WIM.
- Select the drivers to install into the WIM
- WDS mounts the WIM to a virtual path, adds drivers to the virtual path, and generates a new WIM
- The updated WIM image is added to the boot image section of the WDS repository
This process can be repeated at a later time when a new system type needs to be captured but the current Windows PE Capture boot image does not include network drivers for it. The boot image is updated with the additional drivers using the WDS interface and automatically re-added to the WDS boot image collection to replace the original.
For specialty one-off systems this WIM driver update process is not necessary if the hard drive of the target system to be captured is removed from the source system after sysprepping, and is either installed in a computer with supported network drivers, or attached to the supported system using an external «USB to hard drive» adapter.
Automated apply process[edit]
Applying a captured image involves running a second Windows PE «Apply» boot image on the target system to receive the image. This boot image also needs the appropriate network and disk controller drivers as with the Windows PE Capture boot image.
- The system is booted using PXE network booting and the Windows PE Apply image is loaded.
- The operator logs on to the domain, and selects the boot image to apply.
- A disk partitioning screen appears and the location for the target image is selected. If the target storage is unformatted, a default partition set is created. For Vista and Windows 7, a small 100 megabyte boot partition is created for storing bootloader data separate from the rest of the system partition. This boot partition is normally hidden from the Windows Vista/7 user.
- The image data is applied to the selected partition, and the system reboots, either running the Sysprep manual mini-setup process or following the script created during the initial Sysprepping.
The WDS image creator may optionally select a separate WAIK / Sysprep installation script to be applied to the image during the first boot. This alternate script is selected within WDS by viewing the properties of each uploaded system image.
Manual image capture and deploy[edit]
It is technically possible to create scripts that manually perform the imaging, capture, and apply processes, using command line tools provided by Microsoft. However, the methods for doing this are complex and difficult.
In general, the tools involved are:
- dism – Deployment Image Service and Management Tool, used to add drivers to Windows PE boot images.
- imagex – used to capture and apply images. Creates either a single WIM structure, or can deduplicate data using a second shared resource WIM. Does not require a Windows Deployment Server to capture or apply images, and can work solely with a logged-on network share or mapped drive letter.
- wdsutil – used to manage the WDS server without the graphical user interface, and to add captured images to the repository.
Using imagex to manually create a WIM does not require the source operating system to be sysprepped or for the source partition to contain a Windows operating system. Any type of Windows-accessible file system can be imaged, including MSDOS, but the source system either needs to be able to run Windows PE or the source system’s hard drive is moved into a newer system that supports Windows PE.
Microsoft generally requires Windows 2000, XP, Vista, and Windows 7 to be sysprepped before imaging, due to certain security-related disk data that Microsoft requires to be unique across duplicated system images. Sysprep randomizes this data when the image is applied to a new system.
Imagex does not have any disk formatting and partitioning capabilities. Separate Windows command line tools such as diskpart are needed to define partitions on the target system for imagex to use.
See also[edit]
- List of Microsoft Windows components
- FOG Project
References[edit]
- ^ a b c «Windows Deployment Services (WDS) boot.wim support». Microsoft 365 Library. Microsoft. 2 December 2022 – via Microsoft Learn.
- ^ «Windows Deployment Services Overview». Windows Server 2012 R2 and Windows Server 2012 Technical Library. Microsoft. 31 August 2016 – via Microsoft Learn.
External links[edit]
- Official website
- Windows Deployment Services on Windows App Development Center (Microsoft)
Шаблон:Нет источников
Windows Deployment Services — серверная технология Microsoft для установки по сети операционных систем семейства Windows. Является преемником технологии RIS (Remote Installation Services).[1] WDS предназначена для удаленного развертывания Windows Vista, Windows 7, Windows 8, Windows Server 2008 и Windows Server 2012, также поддерживаются другие операционные системы. WDS включена в качестве Роли Сервера во все 32-битные и 64-битные версии Windows Server 2008, а также в качестве опционально устанавливаемого компонента в Windows Server 2003 Service Pack 2.
Автоматический захват и применение образа[]
WDS связывается с конечным компьютером по PXE для загрузки мини-версии Windows, известной как Windows PE, которая выполняет установку и настройку будущей клиентской системы. WDS включает в себя репозиторий для образов операционных систем, загружаемых по PXE, а также репозиторий для образов ОС, который будут в конечном итоге установлены на удаленный компьютер.
В случае, если доступна мультизагрузка, WDS предоставляет конечному пользователю boot-меню для выбора образа для загрузки.
Автоматизация Windows PE с помощью пакета WAIK[]
Для упрощения задачи записи и применения образов существует два специальных скриптовых загрузочных образов Windows PE, которые автоматизируют эти задачи. Эти скриптовые загрузочные образы Windows PE создаются с помощью пакета автоматической установки Windows, в сочетании с установочным носителем ОС Windows 7, содержащая исходные образы. Загрузочный образ Windows PE может быть либо 32-, либо 64-битным. 32-битный совместим с большим количеством типов оборудования.
Трудность загрузки Windows PE состоит в том, что она должна включать в себя сетевые драйверы и дисковые драйверы контроллера, предназначенные для работы с целевым аппаратным обеспечением образа. Процесс добавления драйверов в образ загрузки Windows PE может быть автоматизирован с помощью серверной консоли WDS:
- Выбрать источник WIM-образа, который может быть либо оригинальным образом Windows 7, либо ранее созданным WIM-образом.
- Выбрать необходимый драйвер в WIM.
- WDS монтирует WIM к виртуальному пути, добавляет драйверы к этому же пути, и создает новый WIM.
- Обновленный WIM этого образа добавляется к секции загрузочных образов в хранилище WDS.
Эту операцию можно будет повторить и позже, к примеру, когда при установке новой системы текущая Windows PE не будет иметь необходимых сетевых драйверов. Загрузочный образ обновляется с дополнительными драйверами, использующими интерфейс WDS, и автоматически повторно добавляется в коллекцию загрузочного образа WDS, чтобы заменить оригинал.
Обновление драйверов в WIM для единичных установок систем можно не производить, при условии, что после sysprepping жесткий диск будет извлечен и установлен в компьютер с поддерживаемой сетевой картой либо подключен как внешний жесткий диск.
Системы автоматизации WDS и двойной загрузки[]
Применение и автоматизация ввода WDS напрямую не поддерживают операционные системы с двойной загрузкой. Только одна операционная система может одновременно быть зафиксирована и развернута, и автоматизированный процесс захвата имеет дело только с отдельными разделами, содержащими установку операционной системы Windows утилитой Sysprep. Она не будет захватывать разделы данных с пометкой «только для чтения».
Тем не менее, применение и автоматизация ввода WDS напрямую можно использовать, чтобы дублировать и создавать системы с двойной загрузкой, если каждая операционная система фиксируется. Как правило, Windows XP и старые операционные системы должны быть применены в целевой системе до Vista, или Windows 7, в связи с различными системными загрузчиками, используемыми в новых операционных системах.
Руководство захвата и развертывания образа[]
Существует техническая возможность создать сценарии, которые вручную выполняют захват, и применения процессов, используя инструменты командной строки, предусмотренные Microsoft. Тем не менее, приёмы для этого являются сложными и трудными.
Участвующими средствами являются:
- DISM — система обслуживания образов развертывания и управления, используется для добавления драйверов для загрузочных образов Windows PE.
- ImageX — программа, используется для захвата и применения образов. Создает либо единую структуру WIM, либо для редупликации данных с использованием второго общего ресурса WIM. Не требует сервера развертывания Windows, чтобы захватывать или применять образы, и может работать только с общей сетевой папкой, либо с сетевого диска.
- WDSUTIL — команда, используется для управления сервером WDS без графического интерфейса пользователя.
С помощью ImageX можно вручную создавать WIM, не требующие исходной операционной системы.
Microsoft обычно требует Windows 2000, XP, Vista, и Windows 7, из-за определений, связанных с безопасностью данных на диске, что Microsoft требует, чтобы быть уникальным среди дублированных образов системы. Sysprep рандомизирует эти данные, когда образ применяется к новой системе.
Примечания[]
- ↑ Службы развёртывания Windows. Проверено 21 июля 2007.
| |
|
|---|---|
| Основные |
Aero • |
| Службы управления |
Архивация и восстановление • |
| Приложения |
Контакты • |
| Игры |
Chess Titans • |
| Ядро ОС |
Ntoskrnl.exe • |
| Службы |
Autorun.inf • |
| Файловые системы |
ReFS • |
| Сервер |
Active Directory • |
| Архитектура |
NT • |
| Безопасность |
BitLocker • |
| Совместимость |
Подсистема UNIX (Interix) • |
Время на прочтение
8 мин
Количество просмотров 218K
Начало и конец

Добрый день всем читающим!
Много статей было об этом, много блогов, но статья HowTo, без напильника, найдена не была, и это крайне печально.
Для небольших развертываний эта вещь, из коробки просто незаменима.
Для тех кто не знает: WDS (центр развертывания) это специальное средство, которое есть в серверной ОС Microsoft, с помощью него можно установить систему на большое количество компьютер одновременно, с помощью сети, используя PXE.
Также тут будет информация о препарировании wim, и немножко о DHCP.
Итак начнем под катом.
Часть 1. Установка
Эту часть можно пропустить тем, кто хоть раз делал установку служб\компонентов в Server 2012R2. Из этого блока нужен только пункт 1.3.
Идеалом для WDS является, если DHCP сервером является эта же машина. Тогда он может корректно передать информацию о PXE Boot.
1.1 Включение WDS
Установка WDS в картинках. Все просто.
Дальше начинается то, что потребует чуть больше, чем просто Nextnextnext)/
1.2 Включение роли
Настройка
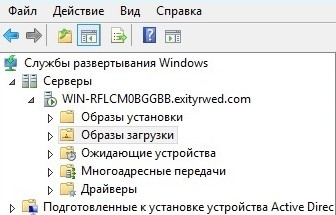
После установки выбираем в списке консоли наш сервер WDS.


Так как по умолчанию предлагается загрузочные и установочные образы хранить на системном диске (что не рекомендуется), то создадим на разделе E: папку RemoteInstall, которая и была указана мастеру настройки сервера.
Тут на ваш выбор
1.3 Образы
На установочном диске с любой системой, начиная с Vista, есть папка source, там лежат два файла boot.wim и install.wim
Boot.wim — это образ для запуска, предзагрузочный.
install.wim — это образ самой системы.
Если boot.wim ещё надо будет подготовить, для работы, то install.wim сразу готов для установки.

В диспетчере сервера boot — образы загрузки, install — образы установки.
Часть 2. Препарирование Boot.wim
Очень часто возникает одна большая пролема:
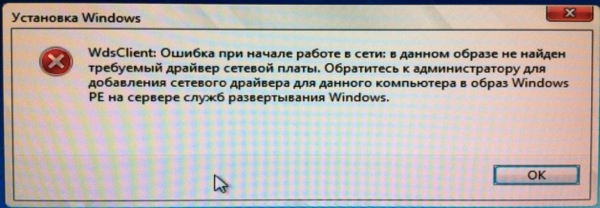
Сразу интегрируем необходимые драйвера в этот образ, дабы избежать этой проблемы.
Она возникает, из-за отсутствия в образе драйверов для сетевой карты, которая интегрирована \ установлена в компьютер, на котором будет происходить установка ОС.
2.1 Утилиты
По умолчанию в 2012 сервере, после установки WDS, утилита dism может работать с образами wim в полной мере.
Для 2008/R2 или 7 вам понадобится Windows Automated Installation Kit (WAIK) и у вас появится инструмент dism.
Создаем структуру папок: c:\drivers\mount — папка монтирования WIM образа; c:\drivers\lan_drivers — папка с драйверами для сетевой карты.
Копируем boot.wim от ОС в папку c:\drivers
Предостерегаю! Чем больше драйверов, тем больше универсальности, но и размер образа сильно увеличивается, это необходимо учитывать. Образ целиком заливается в RAM.
2.2 Препарирование
Для 2008\7 запускаем Deployment Tools Command Prompt из меню пуск с правами администратора.
Для 2012 — запускаем командную строку с правами администратора.
Смотрим содержимое загрузочного образа boot.wim:
dism /get-wiminfo /wimfile:c:\drivers\boot.wim
По идее там должно быть так:

Как видно из скриншота boot.wim содержит два образа — Windows PE (Индекс 1) и Windows Setup (Индекс 2). Драйвера для сетевой карты надо добавлять в Windows Setup, поэтому будем работать с образом 2 (Индекс 2).
Но не так всё просто.
Компания добра
Microsoft заблокировала для изменения этот образ, для его редактирования его надо «перезалить».
Выполняем:
Dism /Export-Image /SourceImageFile:c:\drivers\boot.wim /SourceIndex:1 /DestinationImageFile:c:\drivers\boot1.wim
Dism /Export-Image /SourceImageFile:c:\drivers\boot.wim /SourceIndex:2 /DestinationImageFile:c:\drivers\boot1.wim
Соответственно, мы перезалили образы Windows PE\Setup в новый файл.
Сначала скопировали первый, потом второй индекс.
Удаляем boot.wim, переименовываем boot1.wim в boot.wim
dism /get-wiminfo /wimfile:c:\drivers\boot.wim
Должна выдать те же два раздела, с index 1 & 2.
2.3 Добавление драйверов
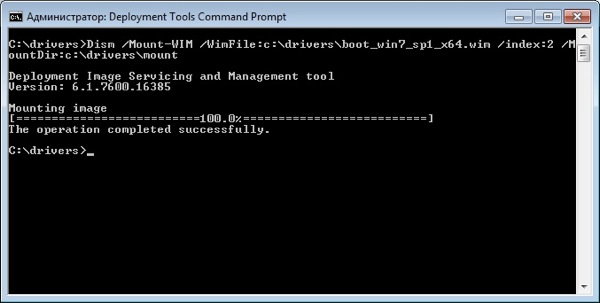
Монтируем образ с индексом 2 из файла boot.wim в папку «c:\drivers\mount» командой:
dism /Mount-Wim /WimFile:c:\drivers\boot.wim /index:2 /MountDir:c:\drivers\mount
Добавляем драйвера в образ. Драйвера можно добавлять по одному, либо сразу все из определенной директории.
Для добавления драйвера указываем полный путь к файлу .INF:
dism /image:c:\drivers\mount /add-driver /driver:«C:\drivers\lan_drivers\E1C5232.INF»
Если драйверов много, то указываем каталог в качестве источника для поиска и добавления драйверов:
dism /image:c:\drivers\mount /add-driver /driver:«C:\drivers\lan_drivers» /recurse /forceunsigned
параметр /recurse используется, чтобы установить драйвера из вложенных каталогов, а /ForceUnsigned для установки неподписанных драйверов.
После добавления всех драйверов загрузочный образ нужно закрыть (отмонтировать).
dism /unmount-wim /mountdir:c:\drivers\mount /commit
параметр /commit указывает, что нужно сохранять все изменения в образе, без него все изменения будут потеряны.
2.4 Образ в хранилище
Теперь перекопируем его в любую директорию, где у вас будут хранится образы.
И установим на сервер WDS.

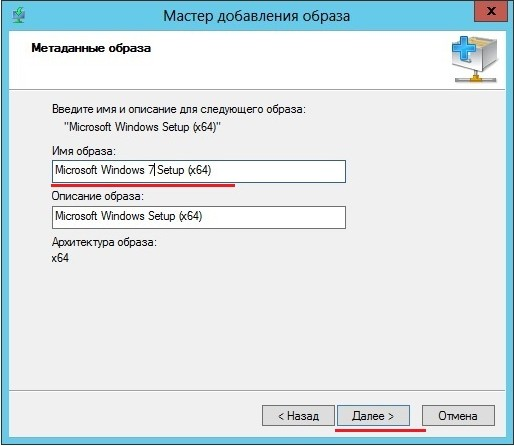
Теперь необходимо указать имя. Имя образа — это то, что будете видеть вы, при выборе загрузчиков, если у вас их несколько.
2.5 Безопастность
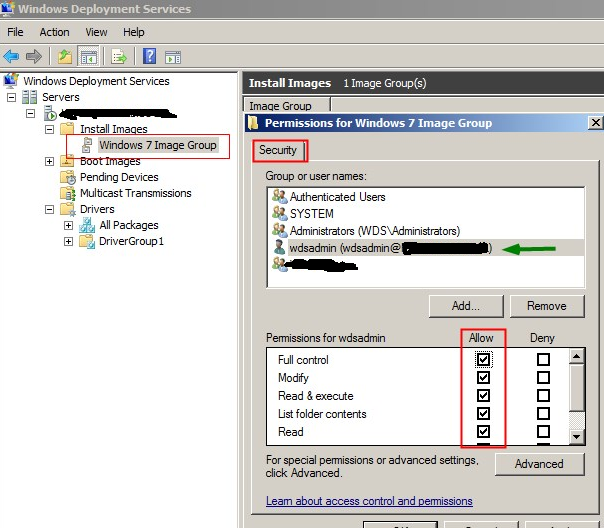
Security — Чтобы добавить разрешения для учетной записи пользователя на группу образов, щелкните правой кнопкой мыши группу оразов и нажмите security. Добавьте учетную запись пользователя из AD и настройте полный контроль. Если вы используете учетную запись администратора домена во время установки WDS, то это можно не делать.
Часть 3. Образ системы. Кастомный вариант
Для начала устанавливаем ОС. Ставим всё что надо.
Далее препарируем её. По ссылке создание настроенного образа операционной системы
Хорошая статья по IMAGEX + WINPE созданию образа там же есть ссылки вначале статьи для создания WIN7 & WIN8. Либо находим на просторах интернета WindowsPE, по вашему желанию)
Для дальшейшего нам нужен образ WinPe с утилитой ImageX правильной битности.
3.1 Создание образа и его копирование на сетевой ресурс с помощью Windows PE и программы ImageX
Теперь запишем образ компьютера, с помощью среды Windows PE и программы ImageX и сохраним на сетевом ресурсе.
Для этого необходимо загрузиться с диска Windows PE.
Для того чтобы иметь доступ на запись к сетевому ресурсу, необходимо к нему подключиться, введя следующую команду:
NET USE y: \\nmp\oem\<имя папки> /USER:AD\ *
И ввести свой пароль.
! надо понять какой диск является каким, для этого с помощью команды DIR C: (D,E,F & etc), перебираем диски, если их несколько
Далее необходимо записать образ основной установки с помощью программы ImageX, расположенной в среде Windows PE, или на другом диске, на сетевой ресурс. Для этого необходимо ввести следующую команду:e:\imagex.exe /capture d: y:\ <имя>.wim «<название>» /compress fast /verify
Где e:\ — RAM Disk, D: — OS Disc, Y: — сетевой диск. После этого пойдёт процесс создания и копирования образа на указанный сетевой ресурс.
По завершении создания образа и его копирования на сетевой ресурс необходимо ввести команду exit и приложение закроется и компьютер начнёт перегружаться.3.1.1 Ручное развертывание
Если необходимо руками образ развернуть (без WDS) но по сети
Битность системы должна быть той же, что и у системы, которую мы распаковываем.
После создания образа, можно развернуть его на новое оборудование с помощью программы ImageX и среды Windows PE.
Форматируем диск, для распаковки на него WMI.
Для этого надо ввести следующие команды:diskpart
select disk 0
clean
create partition primary size=100
select partition 1
format fs=ntfs label=«system»
assign letter=c
active
create partition primary
select partition 2
format fs=ntfs QUICK
assign letter=e
exitМожно создать сценарий для данной процедуры, сохранив приведенную информацию в текстовый файл в папке с образом. Чтобы выполнить сценарий из командной строки среды Windows PE, необходимо ввести команду: diskpart /s <имя_сценария>.txt
Форматирование следует проводить ТОЛЬКО в среде Windows PE. Если отформатировать жёсткий диск на другом компьютере средствами Windows, а затем вставить этот жёсткий диск в конечный компьютер, то образ с вероятностью 80% НЕ РАЗВЕРНЁТСЯ.
Подключаемся к сетевому ресурсу для развёртывания образа, введя следующую команду:
NET USE y: \\nmp\oem\<имя папки> /USER:AD\ *
Вводим пароль.
! надо понять какой диск является каким, для этого с помощью команды DIR C: (D,E,F & etc), перебираем диски, если их несколько
Разворачиваем образ на жесткий диск с помощью программы ImageX, с сетевого ресурса, введя следующую команду:d:\imagex.exe /apply y:\<имя>.wim 1 e: /verify
После этого пойдёт процесс развёртывания образа на указанный жёсткий диск с сетевого ресурса.
Далее, с помощью средства BCDboot необходимо инициализировать хранилище данных конфигурации загрузки (BCD) и скопировать файлы среды загрузки в системный раздел, введя в командной строке следующую команду:
e:\windows\system32\bcdboot e:\windows
По завершении создания образа и его копирования на сетевой ресурс необходимо ввести команду exit и приложение закроется и компьютер начнёт перегружаться.
Настроенный образ развернут на конечный компьютер.
3.2 Сервер
Настроим сервер, для работы с образами.
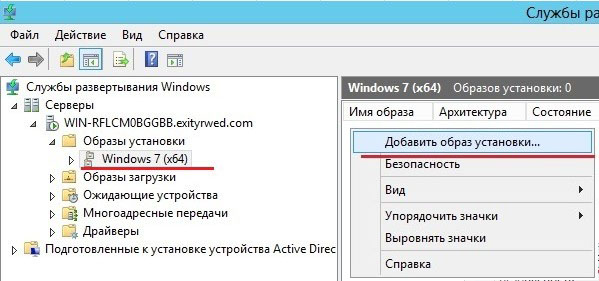
Добавим наш готовый образ в «Образы установки»:
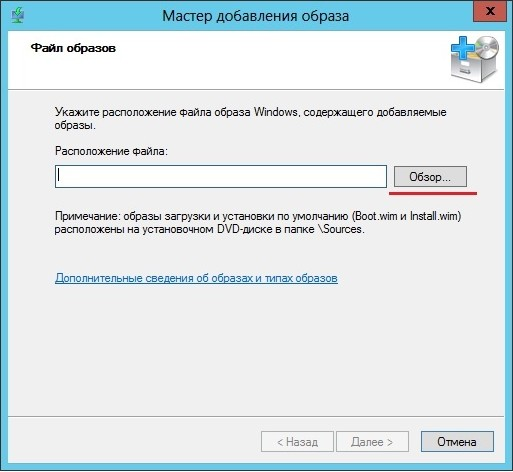
Как в случае с загрузочным образом указываем мастеру путь к файлу wim, который мы создали:
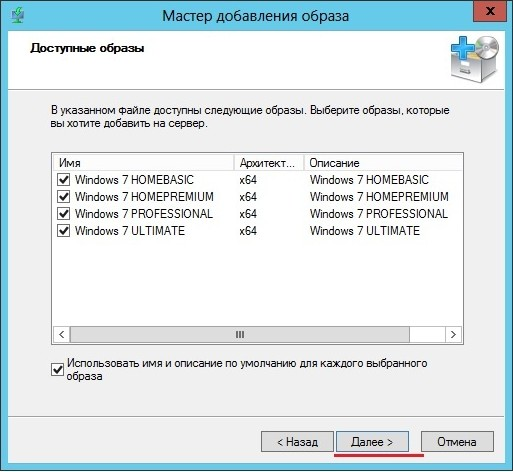
В оригинальном файле install.wim может содержаться несколько редакций:
Но в созданном должна быть только одна.
Часть 4. Великий и ужасный DHCP
1) WDS и DHCP установлены на одном сервере.
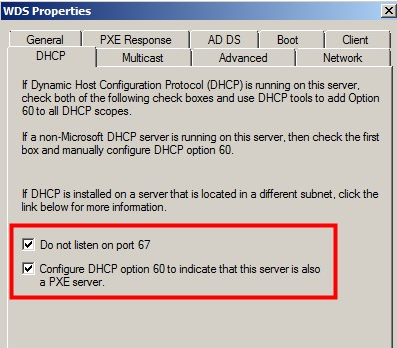
WDS и DHCP не могут занимать порт UDP 67 одновременно. Запретив службе WDS прослушивать порт UDP 67, можно предоставить порт для DHCP-трафика и присвоить DHCP-параметру 60 (параметр области или сервера) значение PXEClient, устранив конфликт.
Если служба WDS устанавливается на DHCP-сервере, в ходе настройки появляется страница DHCP Option 60. Установите флажки Do not listen on port 67 и Configure DHCP option 60 to PXEClient. В сообщении, получаемом клиентом от сервера DHCP, содержится IP-адрес, маска подсети и параметр 60.
В результате клиенту становится ясно, что сервер DHCP является одновременно и сервером WDS. Если позднее добавить DHCP к серверу WDS, можно настроить этот параметр, щелкнув правой кнопкой мыши на имени сервера в оснастке WDS и выбрав пункт Properties. На вкладке DHCP имеются аналогичные флажки.2) WDS и DHCP находятся на различных серверах, в одной подсети с клиентами.
Дополнительной настройки не требуется, так как WDS и DHCP расположены на разных серверах. Обе службы могут прослушивать порт UDP 67, а клиенты находятся в одной подсети с серверами WDS и DHCP, поэтому широковещательный трафик доступен для всех.
3) WDS и DHCP устанавливаются на различных серверах, в разных подсетях.
Службы WDS и DHCP, установленные на разных серверах, не мешают друг другу прослушивать порт UDP 67.
Вы должны настроить маршрутизатор на отправку широковещательных пакетов, потому что чаще всего мы видим, что широковещательные пакеты не могут идти в другие подсети. Кроме того, весь трафик на UDP порт 4011 от клиентских компьютеров к серверу служб развертывания Windows должен быть направлен соответствующим образом.
Чтобы помочь клиенту WDS найти сервер WDS мы должны настроить DHCP опцию 66 и DHCP опцию 67.
Настройка параметров DHCP в сети IPv4 выполняется из оснастки DHCP, доступной из раздела Administrative Tools меню Start.В оснастке DHCP разверните IPv4, а затем щелкните правой кнопкой мыши Server Options (или параметры области) и выберите пункт Configure Options. Прокрутите список до элемента 066 Boot Server Host Name, установите флажок и введите имя узла сервера WDS в текстовом поле (можно использовать имя, но желательно IP).
Затем установите флажок 067 Bootfile Name. В текстовом поле введите путь и имя файла Preboot Execution Environment (PXE) для загрузки на клиенте. Текстовое значение для параметра 67:
boot\x86\wdsnbp.com — 32 bit
ИЛИ
boot\x64\wdsnbp.com — 64 bitТакже есть рекомендации с иностранных сайтов:
Configure DHCP option 67 with the right boot image file.
For 32-bits systems \boot\x86\wdsnbp.com
For 64-bits systems \boot\x64\wdsnbp.com4.1 CNP
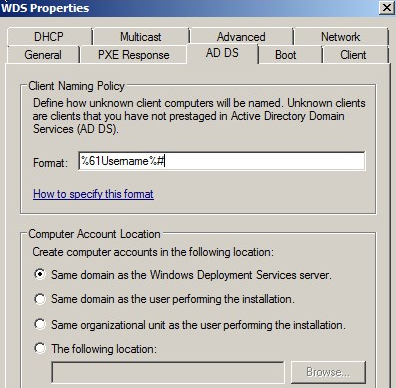
Client Naming Policy — в настройках сервера WDS, выберите AD DS. В Client Naming Policy указать формат, на основании которого компьютерам будет задаваться имя.
Шаблон по умолчанию именования %61Username% #, это означает, WDS создаст имя компьютера, используя имя пользователя, вошедшего на удаленный при выполнении процесса установки и # это число 1,2,3… до 999 будет добавлен после имени пользователя.4.2 Cisco DHCP MODE
Тут не так страшно как кажется:
BU# ip dhcp pool DATA
BU# option 66 ascii «1.2.3.4»
BU# option 67 ascii «bootfile.pxe»Часть 5. немного послесловия
Собственно всё. Это небольшая статья, и кажется она закончена.
Кто-бы что не говорил, но для небольших сеток это очень нужная вещь.
Для тех, кто захочет расширить функционал, есть просто отличная статья на Geektimes: «Добавляем WDS универсальности».На этому спешу откланяться, спасибо всем кто заинтересовался этой статьёй.
Гиктаймс форевер!
Если есть оЧепятки в тексте пиши в личных сообщениях, флудить и троллить не спортивно! Если можете что-то важное добавить, добавлю в статью.
UPD. спасибо darthslider и
navionСуществует MDT (Microsoft Delpoyment Toolkit).
С помощью него можно сразу добавить ключ в образ и установить продукты с quiet установкой.
Также настроить имя пользователя администратора и его пароль.
Требует отдельного компьютера и установленных зависимостей.darthslider
В первую очередь MDT — это поддежка Task Seqence, то есть это любые скрипты и настройки на любом этапе установки.
Так же это удобный редактор unattend.xml
Ну и в придачу установка ПО, постнастройка, ввод в домен и тд, а так же поддержка сценариев обновления ОС (захват по и настроек, установка новой ос, восстановление), миграции пользователя на новый пк (схоже с предыдущим сценарием). Но последние 2 пунтка это довольно сильное шаманство.(О настройке и поднятии видео ТУТ.)


Before you start
Objectives: Learn what is Windows Deployment Services, when do we use it, and what are the specifics about it.
Prerequisites: you should know about automated Windows installation.
Key terms: wds, image, server, boot, windows, client, install, file, capture, deployment, network
Imaging
Imaging is a process of taking a snapshot of the whole hard disk of any computer or server, and storing it to the file. So, a single image file contains the whole operating system installation. We can take that image and then deploy it to multiple computers at the same time. The benefit of this is that we only have to spend our time to configure one system, which we can use to create system images. Those images can then be deployed to other machines. The image which we deploy to other machines is called the base or source image.
WDS
The Windows Deployment Services (WDS) server role enables us to deploy Windows operating systems to client and server computers. Before we go any further in describing what a Windows Deployment Services are, we have to be aware that it is not available in all editions of Windows Server. Starting from Windows Server 2008, the WDS role is available in all Windows Server editions. The WDS can be used deploy Windows Server editions, Windows 8, Windows 7, and even earlier versions of Windows. By using WDS, client computers without the OS can boot from the network, contact the WDS server, download and install the operating system. WDS uses images for the installation.
WDS Images
We can have several types of images on our WDS server. We can extract those images from our DVD installation media or from downloadable media.
The first type of the WDS image is install image. Install image stores the operating system that will be installed on the client computers. When it comes to the image-based technology that is used for Windows Server 2008 and Windows 7 OS, a single Windows image can store all the different editions within a single WIM file. A WIM file is a Windows image file, so an image has a .wim extension.Install.wim can be located on the DVD installation media in the “sources” folder at the root of the DVD media. Each image is architecture specific (64 bit Itanium, 64 bit and 32 bit installations). When we add the install image in WDS, we can identify the editions that will be available for clients to install. When a client connects to the WDS server, a menu will be shown allowing us to select the edition to install. Each install image is architectural specific, which means that it can hold a 32-bit version or 64-bit version, along with different editions inside of it.
Another type of WDS image is the boot image. Boot images are used to boot computers before the install image is loaded. It holds the minimal operating system (Windows PE) that is sent to the client when it first connect to the WDS server. The default boot image file is called boot.wim, and this file is available on the operating system DVD in the Sources folder. During the boot process our client computer will first contact the WDS server, after which the server will send a boot image file to the client. The boot image file contains the WDS client software which is installed and started. Users will see a boot menu in which they will see the available operatings systems to install from the WDS server. So, the boot image will list all of the available install images. We can also have multiple boot images on our WDS server. In that case, clients will see a menu of boot images and be able to select the proper one.
In addition to the basic boot image, we also have two additional types of boot images. One of them is the capture image which is created by WDS to capture an existing image and store it onto the WDS server for later deployment. With capture boot image we can create custom install images. To do that first we have to create the capture boot image from a regular boot image. This image will include Windows PE and WDS Image Capture Wizard. We have to have a reference computer (which we have set up and customized earlier). On the reference computer we run the Sysprep utility to prepare it for the image capture. Then we boot the reference computer to the network and connect it to the WDS server. On the WDS server we select the capture image that we created earlier. Then we can use the Capture Wizard to select the disk partition containing the installation we want to capture, and a location to save the resulting image.
WDS uses a PXE method for client booting. PXE enables clients to boot of the network, to find WDS services and to load boot image. So, for client to be able to contact WDS server, the client network card must be PXE compliant, and most of todays NICs are. For cards that don’t support PXE, we have another type of boot image which is the discover boot image. Discover image can be used for computers that are not PXE compliant. That means that those computer cannot boot of the network. Discover image first has to be manually created on the WDS server, after which we can transfer it to external media such as CD, DVD or USB drive. Then we can use that media to boot up the computer into the discover image, which will then allow us to connect to the WDS server over the network. So, remember that clients have to have a PXE compliant NIC in order to contact the WDS server. If the NIC is not PXE compliant, then we must use another means of network boot such as a Windows PE trough the discover image of the WDS server. We can use WAIK tools to create an ISO image that contains the discover boot image. ISO can then be burned to CD or DVD using some tool that is capable of creating a disc from ISO.
Deployment Steps
When we boot our computer, we will use the PXE technology on our NIC to locate the WDS server. The WDS server then sends the boot image to the client. After the client chooses the proper install image, the image will be copied from the install image on the WDS server to the client computer. The installation process will appear as if we’re running it from a local media, but it is really being streamed from the WDS server. We can also configure an unattended installation on the WDS server using the answer files. With WDS we use two separate unattend (answer) files. The first file is Windows Deployment Services client unattend file and we use it to automate the WDS client screens. This includes configuration of authentication, selecting the install image, disk configuration, etc. This file is stored in WDSClientUnattend and it uses the Unattend.xml format. The other file is the “Image unattend” file which automates the remaining setup process. Depending on the operating system version, it will use either the Unattend.xml format or the Sysprep.ini format. This file is stored in $OEM$ structure or Unattend subfolder.
WDS Requirements
WDS server has some requirements. WDS requires that we have an Active Directory environment with the DNS server. We also need a DHCP server which will handle IP addressing. In addition, images have to be stored on NTFS partition. WDS is not available on the Windows Server 2008 Core installations. If we don’t have an active directory environment, we can take advantage of MDT or Microsoft Deployment Toolkit. We can also use ImageX and DISM to manage our images. All those tools are free, but if we are in an environment where we have many computers, we can take advantage of the WDS to maintain images.
WDS Features
WDS supports unicast and also multicast transmissions. Unicast transmits a separate image to each individual client, while multicast transmits a single image which is received by all clients configured to receive it. So, by using multicast we can send one image over the network to the multiple computers. This way we save some bandwidth on our network. WDS also supports scheduled casting. By using a schedule we can transfer images at a certain time or after a certain number of computers have contacted the WDS server, or both. This way we can deploy our images off peak times. Answer files must be used for unattended installations.
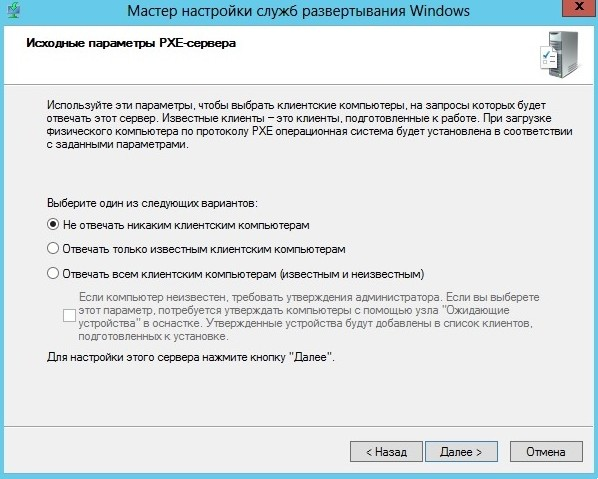
We can configure our WDS server to respond to clients in three different ways:
- Not Respond – we can enable this if we don’t want our WDS to respond to any client requests.
- Respond to Known – for this we have to have Active Directory (AD) available. All computers in AD (members of the domain) will be able to contact WDS. This way we can prevent unknown computers from accessing WDS. For computers that are not members of AD, and on which we want to install our image, we can use Pre-staging. By pre-staging our computer, we pre-create the computer account in AD with the proper names. When the pre-staged computer contacts WDS, it will supply it its existing computer name and in that way the WDS server will allow the imaging process.
- Respond to All – any computer that requests image from WDS will receive the image.
WDS is an update to Remote Installation Services (RIS) that was available in Windows 2003. We can also manage our WDS server by using WDSUTIL command line utility.
Remember
WDS server role enables the deployment of Windows operating systems over the network, like Server 2008, Windows 7 and earlier versions. An install image contains operating system that will be installed on client computers. A boot image is a Windows PE that is sent to the client when it first connects to the WDS. A capture boot image is used to create custom install images. A discover boot image is used when we don’t have PXE enabled NIC (we place it on removable media such as CD, DVD or USB). For WDS we have to have an Active Directory, DNS server, DHCP server, and we have to use NTFS for the WDS store. We can automate the installation process on WDS by using Windows Deployment Services client unattend file and Image unattend file. WDS supports unicast and multicast transmission methods.
In this article, we are going to learn ‘Step by Step Configure WDS Server (Windows Deployment Services) On Windows Server 2016’. Due to the increase in information technology (IT) solutions in organizations, the number of actual and virtual server images has also increased. Due to this situation, the deployment of operating systems takes longer to complete and requires valuable institutional resources. As a result, companies are looking for new ways to automate the service delivery process. Virtual machine environments have become ubiquitous in a datacenter and having the ability to deploy virtual server roles and workloads while deploying an operating system is an important part of the application process.
 On Windows Server 2016")
Windows Deployment Services (WDS) is a service role that allows you to deploy the Windows operating system to a PXE-enabled client. You can install a Windows operating system on a PXE-capable client without the need for physical media. Besides, it allows you to deploy a Windows operating system to multiple clients at the same time. In this way, reducing the entire installation time. WDS makes your life easier. You do not have to go to another room in the same room to deploy the operating system with the necessary software and drivers. Administrators can schedule schedules for deployment. The next day when you come in and log in to your computer, you will be installing a new operating system. In addition, drivers and software have been installed.
WDS Functions:
• Allows you to install a network-based operating system.
• Facilitate the process of deployment.
• Supports deployment of computers without any installed operating system.
• Provide end-to-end deployment solutions for clients and server computers.
• Use existing technologies like Windows PE, Windows Image File (.wim) and virtual hard disk (.vhd and .vhdx) image files, and image-based deployment.
Hardware Requirements:
- RAM: minimum of 4GB
- Processor: 64-bit processor
- Hard Drive Space: At least 10GB Or Depend On OS ISO and Software’s Size.
Prerequisites to Configure WDS Server:
Before configuring the WDS server, your server must be sure that the following requirements are met.
1)Changed Windows Server Hostname.
2)Turn off Windows Server Firewall.
3)Set Static IP on Windows Server.
 On Windows Server 2016")
4)Install and Configure DHCP Role.
You have learned in the previous article that ‘How To Configure DHCP Server Role on Windows Server 2016‘ Now let’s configure the DHCP Scope for this. Now go to Server Manager and right-click on the DHCP server and click on DHCP Manager.
 On Windows Server 2016")
Also Read – How To Configure DHCP Server Role on Windows Server 2016.
Now firstly expand the domain, then right-click on IPV4 and create a new scope.
 On Windows Server 2016")
The new scope window will open, then click on Next for further process.
 On Windows Server 2016")
Enter a scope name to identify which is the scope, and then click on Next.
 On Windows Server 2016")
Set the IP address range as the snapshot below. As you set up the IP address range, the IP address will be assigned to the client in the same range. Also, give the Length and Subnet mask and click on Next.
 On Windows Server 2016")
If you want to exclude the IP address set in the DHCP server, you can add it to the IP address ‘Exclusions and Delay‘. I’m not adding the IP address, if you want to, you can add the IP address.
 On Windows Server 2016")
The default 8 days in lease duration is set, which means that the client can use an IP address for 8 days. If you want to change the lease duration, you can change it.
 On Windows Server 2016")
If you want to have options like DNS servers and WiNS, click the yes button. Then click Next.
 On Windows Server 2016")
Set the IP address of these routers or default gateways, then click on the add button.
 On Windows Server 2016")
Enter the DNS server IP addresses that you would like your client to use
 On Windows Server 2016")
If you do not have a DNS server in the network, use the WINS server.
 On Windows Server 2016")
You can see that all the steps are done, now just click yes to activate the created scope.
 On Windows Server 2016")
The created new scope has been completed. Now click Finish.
 On Windows Server 2016")
Now you can see in the following snap New Scope has been activated.
 On Windows Server 2016")
Also Read – Configuration Of DHCP Reservation On Windows Server 2016.
Follow the below Steps To Install and Configure WDS Server (Windows Deployment Services) On Windows Server 2016:
Installation of WDS:
Step 1. Open Server Manager.
Step 2. Click Add Role and Features.
Step 3. Read the important requirements and try to meet them (this includes a strong password for the administrator account, stable IP configuration, and installation of the latest security updates). Click next to continue.
Step 4. Choose Roll-based or Feature-based installation and click Next.
Step 5. Select the destination server for WDS from the server pool and click Next.
 On Windows Server 2016")
Step 6. Select Windows Deployment Services from the server role. When you check that option, a new window will pop up. Click Add Features.
Step 7. Click Next two times.
 On Windows Server 2016")
Step 8. Click Next (Leave default selection of both deployment and transport server)
 On Windows Server 2016")
Step 9. Click Install
Step 10. Wait for the installation to complete. It may take several minutes to close.
 On Windows Server 2016")
Configuration of WDS:
Step 1. Open Server Manager Dashboard. Tools -> click Windows Deployment Services.
Step 2. Right-click on your WDS server and then click Configure Server.
 On Windows Server 2016")
Step 3. Read the pre-requisites and click next.
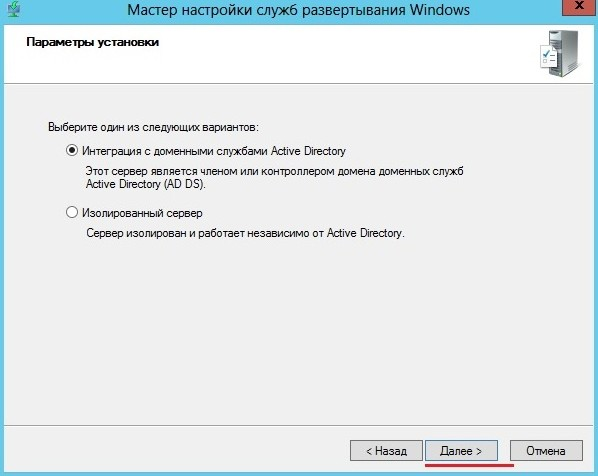
Step 4. Choose “Integrate with Active Directory“, If you have configured AD on my network. If you do not have AD configured and you are configuring WDS in standalone mode, select the standalone server. Click Next
 On Windows Server 2016")
Step 5. Provide a route to your NTFS drive where you want to store a boot image, install images, PXE boot files and WDS management tools. Click Next.
 On Windows Server 2016")
Step 6. I have configured DHCP on the same WDS server. So check both boxes and click next.
 On Windows Server 2016")
Step 7. Choose ‘Respond to all client computers‘ (known and unknown).
 On Windows Server 2016")
Step 8. Wait for the wizard to finish (this may take a few minutes to complete).
Step 9. Click Finish.
 On Windows Server 2016")
Add Install Images to WDS:
When you configure Windows Deployment Services on your server, the next step is to add an image to your WDS to the client machine. There are two types of images that you need to add. There is an install.wim (actual Windows installation files) and the other is boot.wim (used to boot client machines).
Step 1. Open windows deployment services console.
Step 2. Expand your server.
Step 3. Right-click on Install Images and then click Add Install Image.
 On Windows Server 2016")
Step 4. Provide the image group name and then click Next.
 On Windows Server 2016")
Step 5. Browse to the source folder (located on your Windows installation CD/DVD or local hard drive).
 On Windows Server 2016")
Step 6. Choose the install.wim file and click Next.
 On Windows Server 2016")
Step 7. Click Next.
 On Windows Server 2016")
Step 8. Select Image and Click Next.
 On Windows Server 2016")
Step 9. Check Summary and Click Next.
 On Windows Server 2016")
Step 10. Wait for the file to be copied. (This can take several minutes to complete).
Steps 11. Click On Finish.
 On Windows Server 2016")
Steps 12. As you can see on the output above we have successfully added the install.wim Image File.
 On Windows Server 2016")
Add Boot Image to WDS:
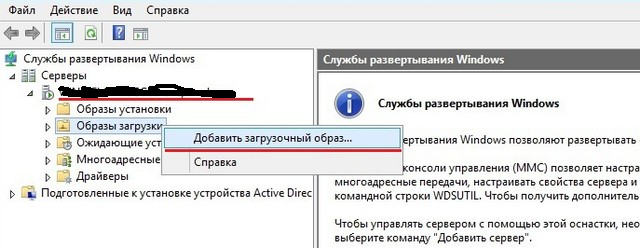
Step 1. In the Windows deployment services console, right-click boot image.
Step 2. Click on the Add boot image.
 On Windows Server 2016")
Step 3. Browse to the source folder of your CD/DVD and locate boot.wim.
 On Windows Server 2016")
Step 4. Click Next.
 On Windows Server 2016")
Step 5. Rename Image File and Click Next.
 On Windows Server 2016")
Step 6. Check Summary and Click Next.
 On Windows Server 2016")
Step 7. Wait for the file to be copied. (This can take several minutes to complete).
Steps 8. Click On Finish.
 On Windows Server 2016")
Steps 9. As you can see on the output above we have successfully added the boot.wim Image File.
 On Windows Server 2016")
Configure DHCP Scope Options:
Enabling bare-metal client systems on Windows Deployment Services (WDS) PXE-boot to kickstart the process of deploying Windows PE on a client system and running the Windows system. In some WDS environments, you might want to configure the following DHCP options to direct your PXE clients to the correct network boot file.
Steps 1. Now go to Server Manager and right-click on the DHCP server and click on DHCP Manager.
Steps 2. Right, click on Scope Options and click Configure Options.
 On Windows Server 2016")
Steps 3. Add Boot Server Hostname or IP in cope Options.
66 = DNS name of the WDS server
 On Windows Server 2016")
Steps 4. Option 67 Where can you get the boot file name to configure? This name will be something similar to boot\x64\wdsnbp.com where this route corresponds to the Remount folder on the WDS server.
67 = boot file name
 On Windows Server 2016")
Steps 5. Finally, we can start the WDS server. The WWS server has not been configured only. Right-click on the WDS server. hover your mouse over all the tasks, then click Start. Soon after the WDS server starts.
Note – Connect LAN with WDS server to switch or the client computer and start WDS server.
 On Windows Server 2016")
As you can see on the output above we have successfully started the WDS server.
 On Windows Server 2016")
Also Read – Step by Step Configure MDT Server (Microsoft Deployment Toolkit) on windows server 2016
Deploy Windows with WDS:
Steps 1. The client will want to install the Windows os of the system. First of all, connect the first WDS server to the client computer with a LAN cable. To confirm the same you can use the DHCP Address Lease.
 On Windows Server 2016")
Steps 2. Boot Client System With Network.
 On Windows Server 2016")
Steps 3. Check WDS IP and Hostname and press F12 to Deploy Windows.
 On Windows Server 2016")
The machine is booting via network and windows os files loading starts.
 On Windows Server 2016")
Steps 4. Select your location and Keyboard Language.
 On Windows Server 2016")
Steps 5. Enter WDS Credentials and connect WDS.
 On Windows Server 2016")
Now you can install windows on a client computer with a normal windows installation process.
Also Read – System Requirement and Installation Windows Server 2016.
That’s all, In this article, we have explained step by Step Configure WDS Server (Windows Deployment Services) On Windows Server 2016. I hope you enjoy this article. If you like this article, then just share it. If you have any questions about this article, please comment.