Ошибка WDF_Violation в Windows 10 во многих случаях возникает после подключения внешних устройств к компьютеру. Система реагирует синим экраном не дождавшись ответа в допустимом промежутке времени от клавиатуры или мыши после их подключении, при попытке синхронизации iOS-устройств с iTunes и прочее. Иногда из-за нее не удается загрузить систему, поскольку прерывает ее запуск до появления экрана блокировки. Узнаем подробнее, как ее исправить в Windows 10.

Причины ошибки
С ошибкой WDF_Violation можно столкнуться по следующим причинам:
- Повреждены системные файлы.
- Компьютер заражен вирусами или вредоносным ПО.
- Образование сбойных секторов на жестком диске.
- Неисправные или устаревшие драйвера.
- Повреждение разделов в системном реестре.
Отключение HpqKbFiltr.sys (для пользователей HP)
Как оказалось, причиной синего экрана является драйвер HpqKbFiltr.sys. Попробуйте его отключить.
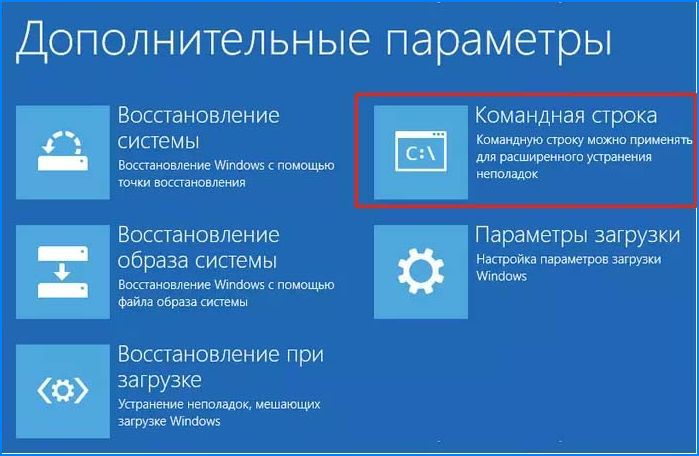
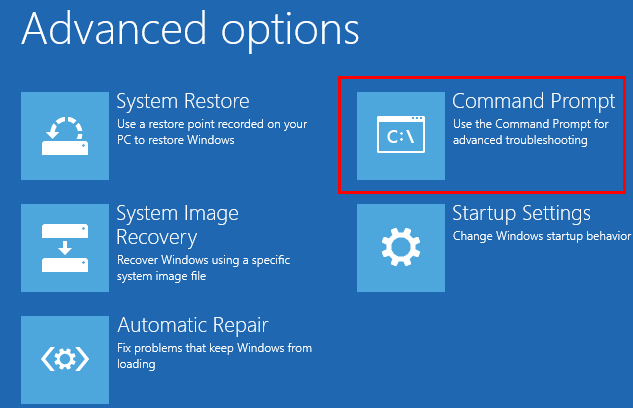
Обычно после возникновения синего экрана WDF_Violation в ходе следующей загрузки должно отобразится окно аварийного восстановления системы. Нажмите на кнопку «Дополнительные параметры». Если нет, используйте загрузочный диск с Windows для загрузки в среду восстановления.
Перейдите в раздел: Поиск и устранение неполадок – Дополнительные параметры – Командная строка.
Введите команды, подтверждая каждую на Enter:
c:
cd Windows
cd system32
cd drivers
ren HpqKbFiltr.sys HpqKbFiltr.sys.old
После перезагрузки Windows ошибка с кодом WDF_Violation должна исчезнуть.
Обновление драйверов
В большинстве случаев причиной ошибки являются устаревшие или поврежденные драйверы. В первую очередь нужно обновить драйвера материнской платы и всех интегрированных на нее устройств, дискретной видеокарты, сетевой карты, Bluetooth и подключаемого по USB адаптера Wi-Fi (при наличии). По отзывам пользователей, последние два устройства чаще вызывают синий экран с кодом остановки WDF_Violation.
Существует два способа обновления: автоматически или вручную. При использовании автоматического режима требуется подключение к интернету для доступа Windows к своей базе данных. Если этот вариант не работает, нужно перейти на сайт изготовителя, загрузить программное обеспечение в доступное место и установить его оттуда. Посмотрите один из примеров обновления сетевой карты:
Откройте Диспетчер устройств командой devmgmt.msc из окна «Выполнить» (Win + R).

Разверните вкладку Сетевые адаптеры, щелкните правой кнопкой мыши на устройстве и выберите «Обновить».

В следующем окне система запросит, каким путем хотите это сделать. Выберите второй вариант (поиск драйверов на этом компьютере) и продолжайте.

Укажите папку (расположение) файла драйвера после нажатия на кнопку Обзор, в которую он был ранее загружен из сайта производителя. После следуйте инструкциям до завершения установки. Таким образом, нужно обновить все оборудование.
После перезагрузите ПК и проверьте, устранена ли проблема.
Средство проверки драйверов
Неправильное взаимодействие системы с аппаратными модулями может привести к синему экрану WDF_Violation. Поэтому для выявления несоответствий попробуйте использовать встроенный инструмент Майкрософт.
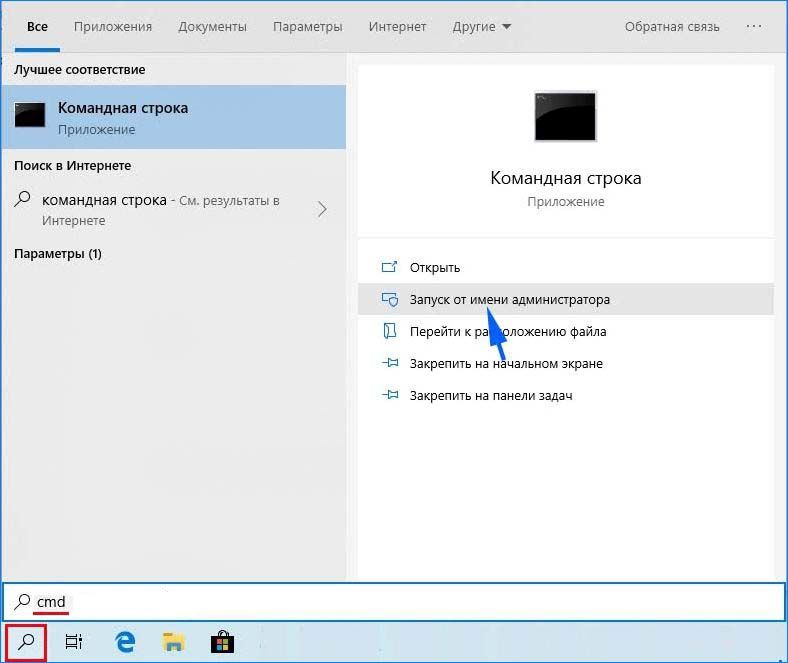
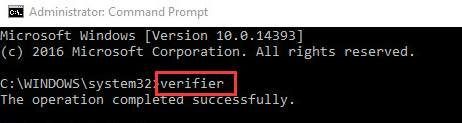
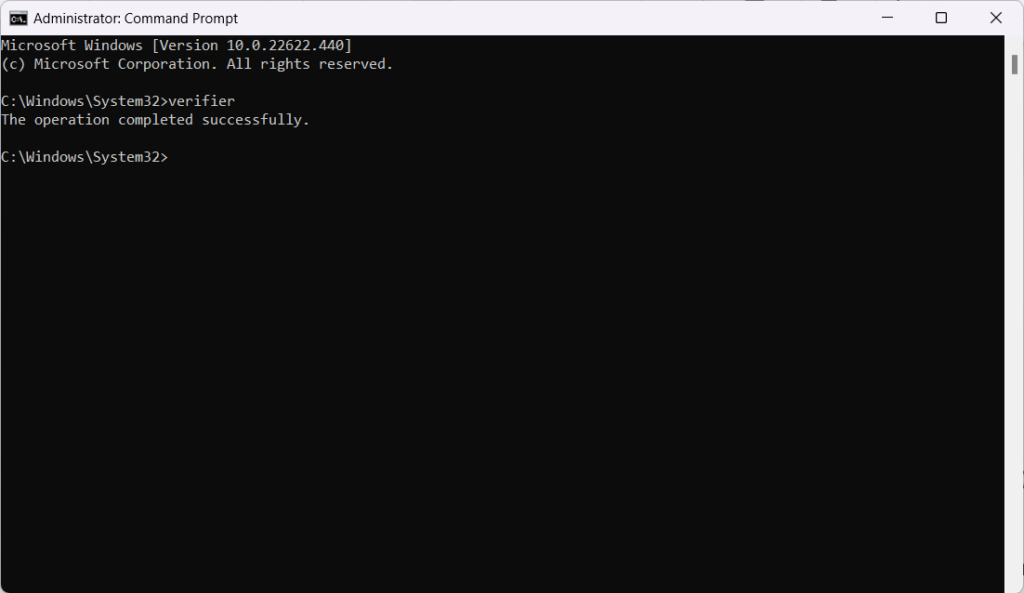
В поле системного поиска наберите «командная строка», при отображении результата щелкните на «Запуск от имени администратора».
В консоли выполните команду:
verifier

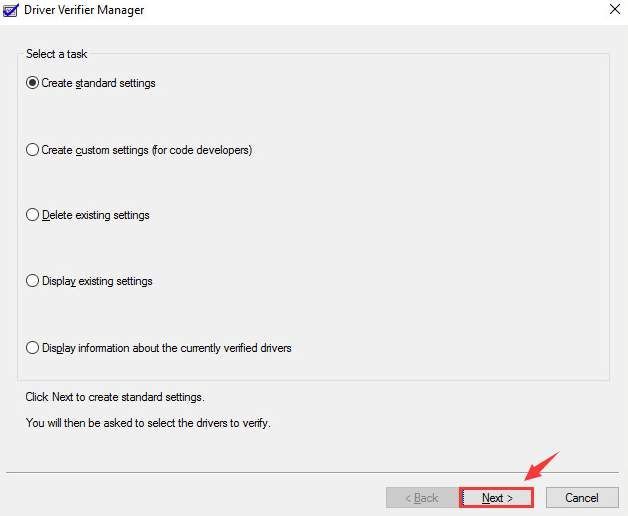
На первом экране выберите «Создать стандартные настройки» и продолжите.

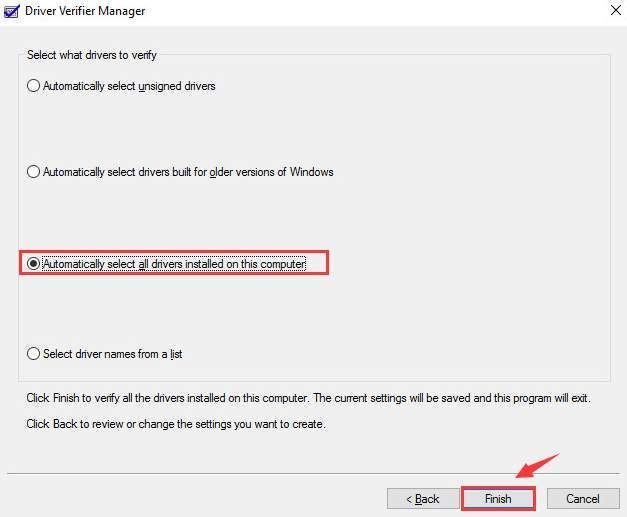
В следующем отметьте опцию «Автоматически выбрать все драйверы, установленные на этом компьютере» и щелкните на «Готово». Теперь инструмент проверит Windows на наличие ошибок.
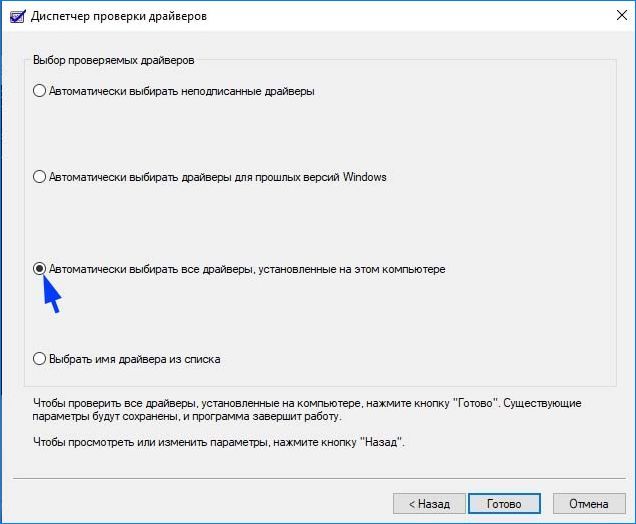
После завершения перезагрузите компьютер.
Если сканирование было прервано ошибкой WDF_Violation, перезагрузите компьютер в среду восстановления. Для этого включите компьютер и при появлении логотипа Windows отключите его нажатием на кнопку питания на системном блоке. Повторите так 3 раза, на следующий возникнет экран аварийного восстановления системы. Щелкните на Дополнительные параметры. Затем перейдите по пути: Поиск и устранение неисправностей – Дополнительные параметры и выберите Командную строку. Для отмены сканирования выполните команду verifier /bootmode resetonbootfail, затем закройте командную строку и щелкните на «Восстановление при загрузке»,
Проверка системы на наличие вредоносных программ
Иногда ошибку WDF_Violation могут вызвать вредоносные программы или вирусы. Они запускают специальные скрипты, работающие в фоновом режиме, которые могут извлекать данные или вносить изменения в настройки.
Если на компьютере отсутствует сторонний антивирус, выполните проверку систему Защитником Windows. В поле системного поиска введите «Брандмауэр Защитника Windows», при отображении искомого результата щелкните на «Открыть».
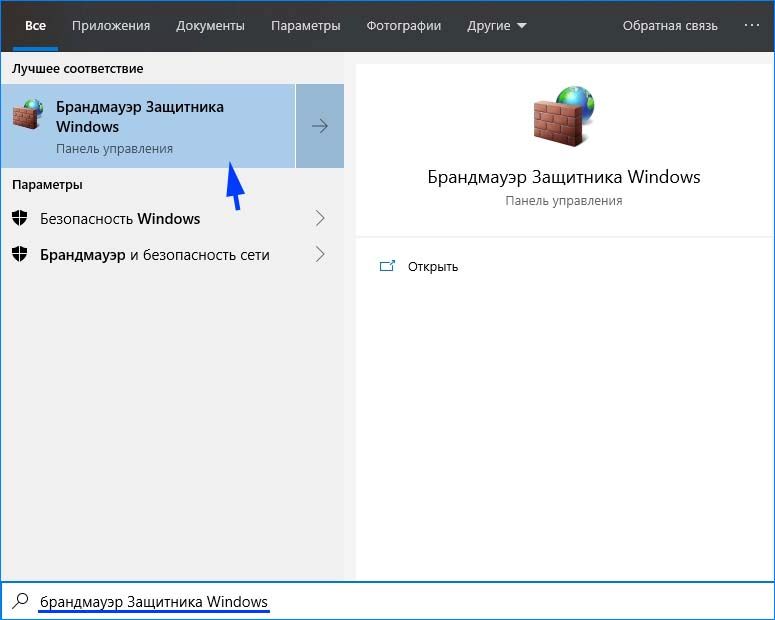
В открывшемся окне щелкните на «Проверить» и запустите «Полное сканирование».
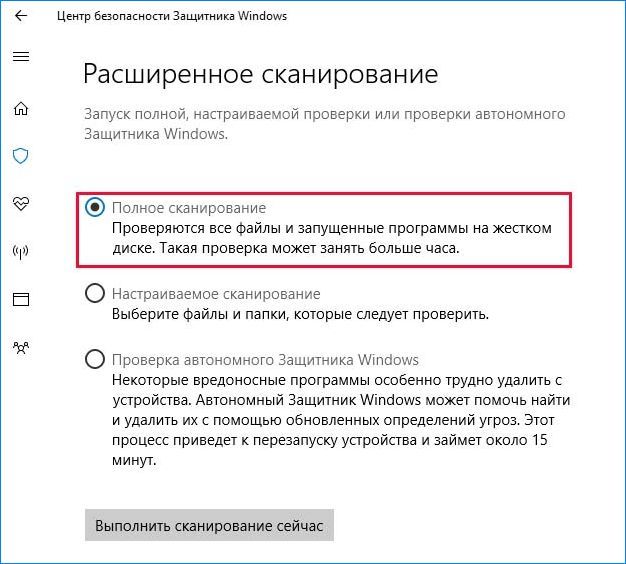
После завершения перезагрузите систему. Выполните то действие, которое вызывало ошибку WDF_Violation.
Отключение всех внешних устройств
Пользователям удавалось устранить синий экран после отключения всех внешних устройств. Вполне возможно, что в одном из них время от времени происходит сбой, что приводит к ошибке WDF_Violation.
Выключите компьютер, отсоедините кабель питания, затем отключите все устройства (включая мышь). Если используете ноутбук, извлеките батарею. После нажмите и удерживайте кнопку питания в течение 5-10 секунд. Подождите 5 минут, прежде чем включить ПК.
Если синий экран не возникает, подключите устройства по одному, пока не обнаружите проблемное. После попробуйте обновить его драйвер, чтобы устранить проблему.
Попробуйте наш инструмент устранения неполадок
Выберите операционную систему
Выберите язык програмирования (опционально)

Driver Easy немедленно исправляет ошибку синего экрана WDF_VIOLATION в Windows 10!
WDF_VIOLATION (где WDF означает Платформа драйверов Windows ) в Windows 10 обычно указывает на то, что Windows обнаружила ошибку в драйвере на основе фреймворка. Менее вероятно, что эта ошибка вызвана вашим оборудованием. Таким образом, решения этой проблемы не так уж трудно найти.
В этом посте мы покажем вам некоторые эффективные методы решения проблемы синего экрана смерти WDF_VIOLATION в Windows 10. Возможно, вам не придется пробовать их все; просто работайте вниз, пока не найдете тот, который работает для вас.
Способ 1: Обновите драйверы устройств
Способ 2: Использовать средство проверки драйверов
Способ 3: Восстановить системные файлы
ВАЖНЫЙ: Вам нужно будет войти в Windows на проблемном компьютере, чтобы попробовать любое из этих решений. Если вы не можете войти в Windows, включите и выключите компьютер 3 раза, чтобы выполнить жесткую перезагрузку и перезапустите его в безопасном режиме , затем попробуйте эти решения.
1: Обновите драйверы устройств
Как уже упоминалось, в большинстве случаев WDF_VIOLATION обычно вызывается определенными драйверами, драйверами дисплея или видео. Поэтому самый простой способ сделать это — обновить драйверы устройств для вашего ПК.
Есть два способа получить нужные драйверы для ваших устройств: вручную или автоматически.
Ручное обновление драйвера — Вы можете обновить свои драйверы вручную, зайдя на веб-сайт производителя и выполнив поиск самого последнего правильного драйвера. Обратите внимание, что вам всегда следует обращаться к производителю ПК, если вы являетесь пользователем ноутбука.
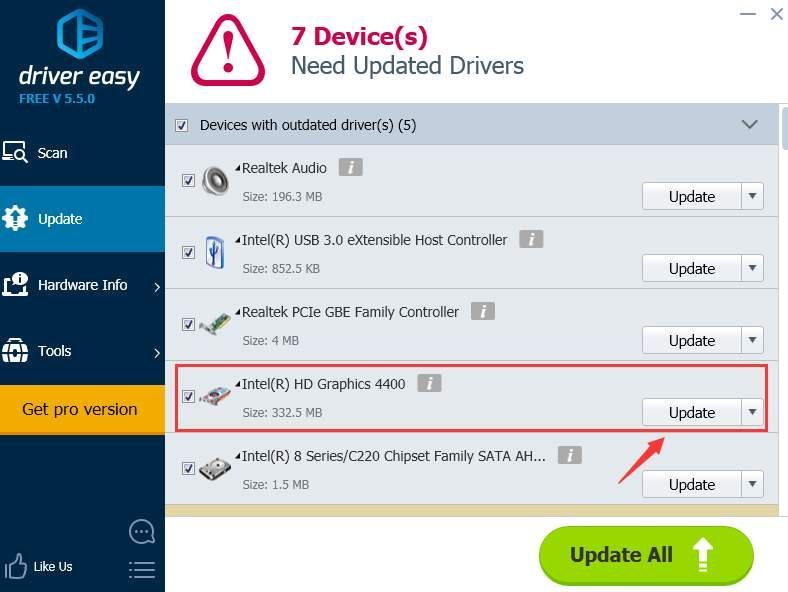
Автоматическое обновление драйверов – Если у вас нет времени, терпения или навыков работы с компьютером для обновления драйверов вручную, вместо этого вы можете сделать это автоматически с помощью Драйвер Легкий .Driver Easy автоматически распознает вашу систему и найдет нужные драйверыдля вашей системы и вашего варианта Windows 10, и он загрузит и установит их правильно:
один) Скачать и установите драйвер Easy.
2) Запустите Driver Easy и нажмите Сканировать сейчас кнопка. Затем Driver Easy просканирует ваш компьютер и обнаружит проблемные драйверы.

3) Нажмите на Обновлять кнопка рядом с отмеченными устройствами для автоматической загрузки драйверов, то вы можете установить их вручную (это можно сделать в БЕСПЛАТНОЙ версии).
Или нажмите Обновить все для автоматической загрузки и установки правильной версии всех отсутствующих или устаревших драйверов в вашей системе (для этого требуется Про версия — вам будет предложено обновить, когда вы нажмете Обновить все ).
2: Используйте средство проверки драйверов
Предупреждение : вы должны быть в группе администраторов на компьютере, чтобы использовать Driver Verifier. В середине сеанса ваш компьютер может крушение . Таким образом, его необходимо использовать, когда вы сделали резервную копию всех ваших важных данных и файлов.
Верификатор драйвера — это инструмент, предоставляемый Microsoft для мониторинга драйверов режима ядра Windows и графических драйверов для обнаружения недопустимых действий функций, которые могут нанести вред системе. Чтобы активировать его:
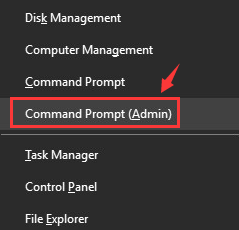
1) На клавиатуре нажмите Ключ Windows и Икс в то же время, затем выберите Командная строка (администратор) .
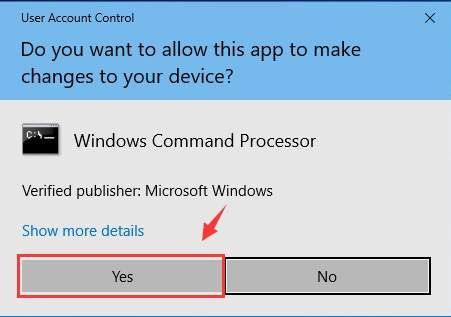
Когда будет предложено предоставить разрешение администратора, нажмите да .
2) Тип верификатор в окне командной строки. Затем нажмите Входить .
3) Выберите Создать стандартные настройки а затем нажмите Следующий продолжать.
4) Выберите Автоматически выбирать все драйверы, установленные на этом компьютере . Затем нажмите Заканчивать кнопку, чтобы начать проверку.
Когда процесс обнаружения завершится, просто следуйте инструкциям, чтобы избавиться от исправленной ошибки синего экрана WDF_VIOLATION.
Исправление 3: восстановить системные файлы
Ошибка синего экрана WDF_Violation может быть вызвана отсутствием, повреждением или повреждением системных файлов на вашем компьютере. Чтобы убедиться, что это так, вы должны запустить восстановление Windows.
Есть два способа исправить возможные проблемы с системными файлами:
- Восстановите и замените поврежденные системные файлы с помощью Reimage
- Запустить сканирование SFC
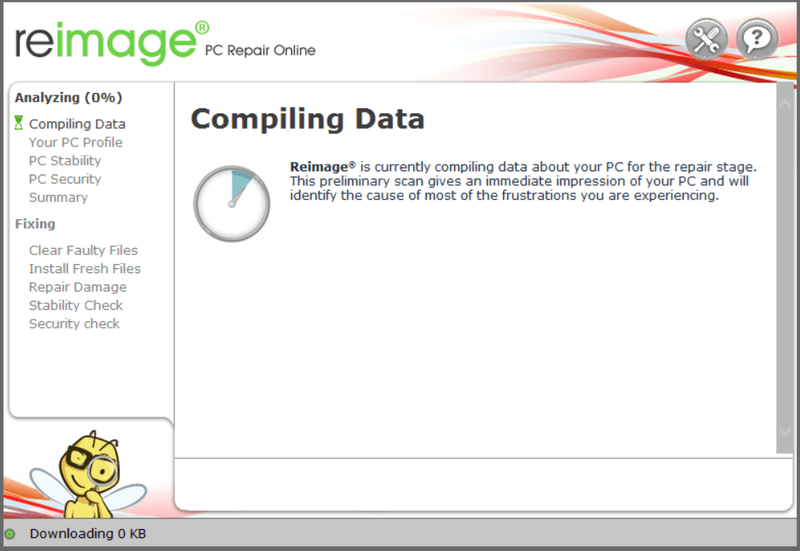
Восстановление и замена поврежденных системных файлов с помощью Reimage
Переизображение это инструмент, специализирующийся на ремонте Windows. С участием Переизображение , предварительно просканирует операционную систему вашего компьютера на наличие вирусов, вредоносных программ, отсутствующих, поврежденных или поврежденных файлов, затем удалит все найденные проблемные файлы и заменит их новыми здоровыми файлами. Это похоже на чистую переустановку вашей операционной системы, за исключением того, что вы не потеряете никаких пользовательских данных и всех программ, настройки точно такие же, как и до ремонта.
Вот как использовать Reimage для восстановления Windows:
один) Скачать и установить Reimage.
2) Откройте Reimage и нажмите да .
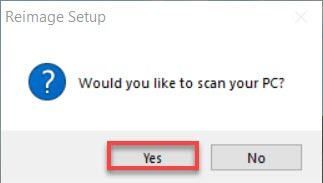
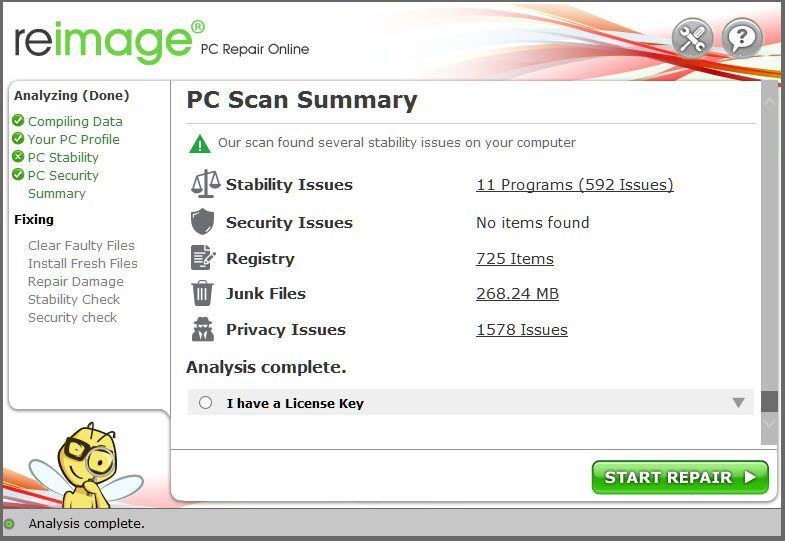
3) Подождите, пока Reimage выполнит сканирование вашего ПК. Процесс может занять пару минут.
4) После завершения сканирования вы получите сводку проблем, обнаруженных на вашем компьютере. Если вам нужно продолжить работу с функцией восстановления, вам потребуется приобрести полную версию.
 Полная версия Reimage поставляется с 60-дневной гарантией возврата денег и полной пользовательской поддержкой. Если у вас возникнут какие-либо проблемы при использовании Reimage или если он вам не подходит, не стесняйтесь обращаться к нам. Команда поддержки перерисовки .
5) Перезагрузите компьютер, чтобы изменения вступили в силу.
6) Проверьте свой компьютер, чтобы убедиться, что WDF_нарушение BSOD проблема была исправлена.
Исправление 3: Запустите восстановление Windows
Ошибка синего экрана WDF_Violation может быть вызвана отсутствием, повреждением или повреждением системных файлов на вашем компьютере. Чтобы убедиться, что это так, вы должны запустить восстановление Windows.
Есть два способа исправить возможные проблемы с системными файлами:
- Восстановите и замените поврежденные системные файлы с помощью Reimage
- Запустить сканирование SFC
Восстановите и замените поврежденные системные файлы с помощью Reimage
Переизображение это инструмент, специализирующийся на ремонте Windows. С участием Переизображение , предварительно просканирует операционную систему вашего компьютера на наличие вирусов, вредоносных программ, отсутствующих, поврежденных или поврежденных файлов, затем удалит все найденные проблемные файлы и заменит их новыми здоровыми файлами. Это похоже на чистую переустановку вашей операционной системы, за исключением того, что вы не потеряете никаких пользовательских данных и всех программ, настройки точно такие же, как и до ремонта.
Вот как использовать Reimage для восстановления Windows:
один) Скачать и установить Reimage.
2) Откройте Reimage и нажмите да .
3) Подождите, пока Reimage выполнит сканирование вашего ПК. Процесс может занять пару минут.
4) После завершения сканирования вы получите сводку проблем, обнаруженных на вашем компьютере. Если вам нужно продолжить работу с функцией восстановления, вам потребуется приобрести полную версию.
Полная версия Reimage поставляется с 60-дневной гарантией возврата денег и полной пользовательской поддержкой. Если у вас возникнут какие-либо проблемы при использовании Reimage или если он вам не подходит, не стесняйтесь обращаться к нам. Команда поддержки перерисовки .
5) Перезагрузите компьютер, чтобы изменения вступили в силу.
6) Проверьте свой компьютер, чтобы убедиться, что WDF_нарушение BSOD проблема была исправлена.
Запустить сканирование SFC
Проверка системных файлов ( SFC ) — это удобная функция Windows, которая помогает сканировать системные файлы и восстанавливать отсутствующие или поврежденные системные файлы (в том числе связанные с BSOD ). К запустить сканирование SFC :
1) На клавиатуре нажмите кнопку Windows logo key и введите команда . Затем щелкните правой кнопкой мыши Командная строка и нажмите Запустить от имени администратора .
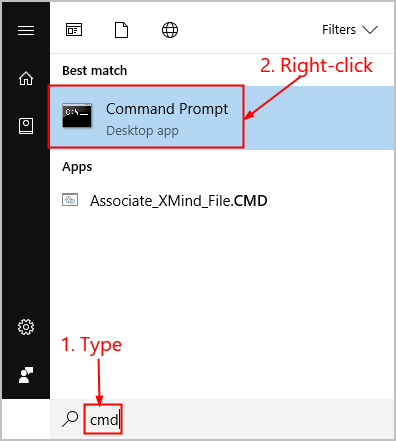
2) Нажмите да когда будет предложено подтвердить.
3) В окне командной строки введите sfc/scannow и нажмите Входить .
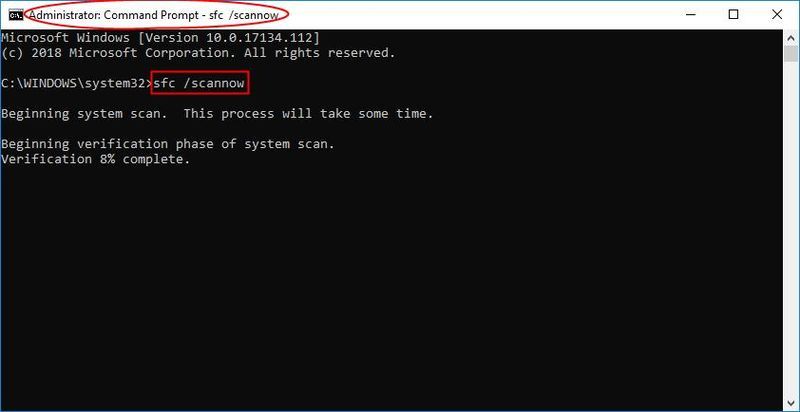
SFC потребуется некоторое время, чтобы заменить поврежденные системные файлы новыми, если он их обнаружит, поэтому наберитесь терпения.
4) Перезагрузите компьютер, чтобы изменения вступили в силу.
5) Проверьте свой компьютер, чтобы убедиться, что WDF_нарушение BSOD проблема была исправлена.
- BSOD
Are you facing the error message “Your PC ran into a problem and needs to restart” with the stop code wdf_violation? The reasons for WDF_VIOLATION could be various, but don’t worry. MiniTool Solution can help you learn what the error is and how to fix it easily.
What is WDF_VIOLATION
Many users have reported that they encountered WDF_VIOLATION error message after installing the latest Windows 10 updates. They said that they tried to boot their PC but it showed that Your PC ran into a problem and needs to restart and the stop code was wdf_violation.
Do you know what WDF_VIOLATION is and why it appears?
WDF stands for Windows Driver Frameworks, a set of Microsoft tools and libraries that aid in the creation of device drivers for Windows 2000 and later versions of Windows. The message WDF_VIOLATION indicates that Windows found an error in a framework-based driver.
Actually, the blue screen stop code wdf_violation is mostly seen in HP PCs, and the reasons could be various.
According to the investigation, the WDF_VIOLATION blue screen error is mainly caused by a faulty HP keyboard driver, HpqKbFiltr.sys (version 11.0.3.1), which is incompatible with Windows 10 version 1803 and Windows 10 version 1809 on HP computers.
Besides, this blue screen error is gradually seen on the other brand of computers due to the following reasons:
- Something wrong with USB peripherals
- Bluetoothdriver and other driver issues
- Corrupted systemfiles
- Virus attack
How to fix WDF_VIOLATION blue screen of death problem on your Windows 10? You can try the following solutions one by one.
Solution 1: Remove the Faulty HP Keyboard Driver
As it is mentioned, the faulty HpqKbFiltr.sys driver is a reason for the WDF_VIOLATION BSOD error. To address this issue, you need to remove or rename this faulty driver. If you are a HP user, you’d better try this solution.
Step 1: Enter the Windows Recovery Environment (WinRE).
Tip: Normally, Windows will attempt to enter WinRE to repair the system automatically when the computer is unable to boot. If Windows fails to enter WinRE, you can turning off and on the PC 3 times or use the installation media as an alternative way.
Step 2: Go to Troubleshoot > Advanced options > Command Prompt.
Step 3: Input the command below according to your version of Windows and press Enter to remove HpqKbFiltr.sys driver.
- 32-bit version of Windows: dism /Image:C /Remove-Driver /Driver: C:WindowsSystem32DriverStoreFileRepositoryhpqkbfiltr.inf_x86_f1527018cecbb8c2HpqKbFiltr.inf
- 64-bit version of Windows: dism /Image:C: /Remove-Driver/Driver: c:WindowsSystem32driverstoreFileRepositoryhpqkbfiltr.inf_amd64_714aca0508a80e9aHpqKbFiltr.inf
Step 4: Exit WinRE and reboot your computer to check whether wdf violation error has been fixed.
Note: Microsoft has released a patch KB4468304 to help people remove HpqKbFiltr.sys driver automatically. If your computer can boot successfully, you can click here to download and install it.
Solution 2: Disconnect All USB Peripherals
The wdf violation error could also be caused by some USB peripherals. Therefore, you can try disconnecting all USB peripherals from your computer to fix this error, including the mouse, camera, microphone and so on.
If it’s not working, you can disable USB ports in BIOS with the following steps.
Tip: The certain keys to enter BIOS and disable USB ports could be different on your version of BIOS so that these steps are for references only, and you need to follow the instructions on your screen.
Step 1: Restart your computer and keep pressing F2 or Del to enter BIOS.
Step 2: In BIOS, navigate to Advanced Tab > Miscellaneous Devices > External USB Ports, and then disable External USB ports.
Step 3: Save and exit the BIOS.
Once it’s done, restart your computer and see if WDF_VIOLATION is solved.
Solution 3: Uninstall Bluetooth Driver in Safe Mode
Some users have reported that they successfully removed the stop code wdf_violation by uninstalling Bluetooth driver. You can run Windows in Safe Mode and then remove the problematic driver if the first two methods are not effective for you.
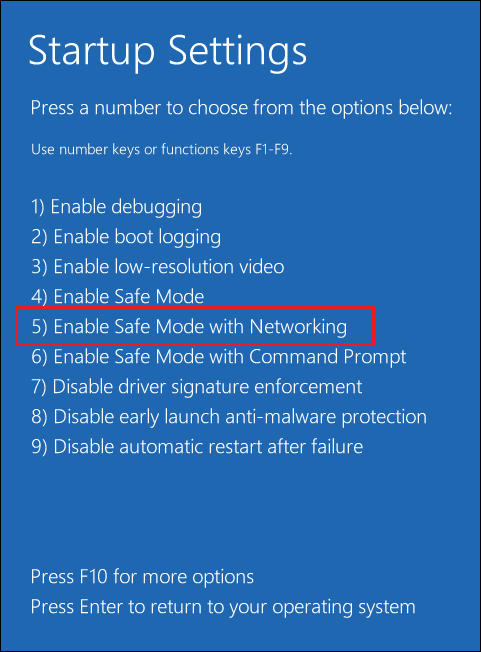
Step 1: Enter WinRE and click Troubleshoot > Advanced options > Startup Settings > Restart to open Startup Settings.
Step 2: Press F5 to select Enable Safe Mode with Networking to run your computer in Safe Mode.
Tip: Safe Mode is a built-in diagnostic mode of Windows 10 (7, 8, etc.). Therefore, you can start Windows 10 in Safe Mode to identify if it’s the Windows 10 default settings and drivers that are causing the misbehaving of Windows 10 PC.
Step 3: Press Win + X and choose Device Manager from the list.
Step 4: Now locate your Bluetooth driver and right-click it. Then choose Uninstall device from the menu.
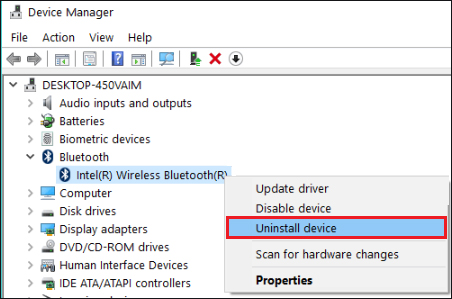
Step 5: In the pop-up window, check Delete the driver software for this device and click Uninstall.
Then you can restart your PC and check if it works well.
Tip: The WDF_VIOLATION blue screen error could also be caused by other drivers. You can check the crash log to find the problematic driver and uninstall it with the same method.
The WDF_VIOLATION blue screen error makes me annoyed, but fortunately, here are some solutions to remove it. I’d like to share it with you.Click to Tweet
Solution 5: Run Startup Repair
If you cannot enter Windows Safe Mode, Starup Repair is a good choice to solve the issue.
You are able to find Startup Repair in WinRE, or you can use a Windows installation disk to boot your PC, and then click Repair your computer.
After that, go to Troubleshoot > Advanced Options > Startup Repair. Choose the target operating system to fix and Windows will find the problems, fix them and then restart your computer.
Solution 6: Perform a System Restore
There is another way to solve WDF_VIOLATION: Perform a system restore. System Restore can help fix problems that make your computer run slowly or stop responding by getting Windows back to previous status.
If you have created a restore point before, you can use it to restore your system and fix WDF_VIOLATION error. Try these steps:
Step 1: In Safe Mode, press Win + S to open Search. Then input restore in the box and choose Create a restore point from the results.

Step 2: Go to System Protection tab and click System Restore.
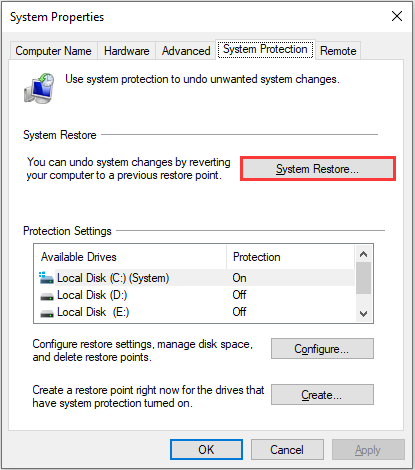
Tip: You can also enter System Restore in WinRE. Just go to Troubleshoot > Advanced options > System Restore. Then select your user account and type your password.
Step 3: Click Next when System Restore window opens.
Step 4: Select the restore point you want to use and click Next to proceed.
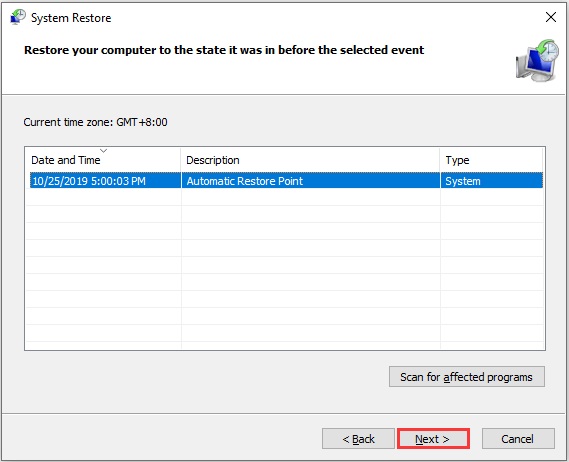
Step 5: Follow the instructions on the screen to finish the process.
Tip: System Restore does not affect any of your documents, pictures or other personal data, but recently installed programs and drivers might be uninstalled.
Solution 7: Run System File Checker
Corrupted system file could also be responsible for WDF_VIOLATION blue screen error. To fix the problem, you can run System File Checker (SFC) in Windows 10 Safe Mode.
Step 1: Run command prompt as administrator in Safe Mode.
Step 2: Input the command sfc /scannow and press Enter key. Then wait until the System File Check finish and then reboot your computer to see whether WDF_VIOLATION appears.
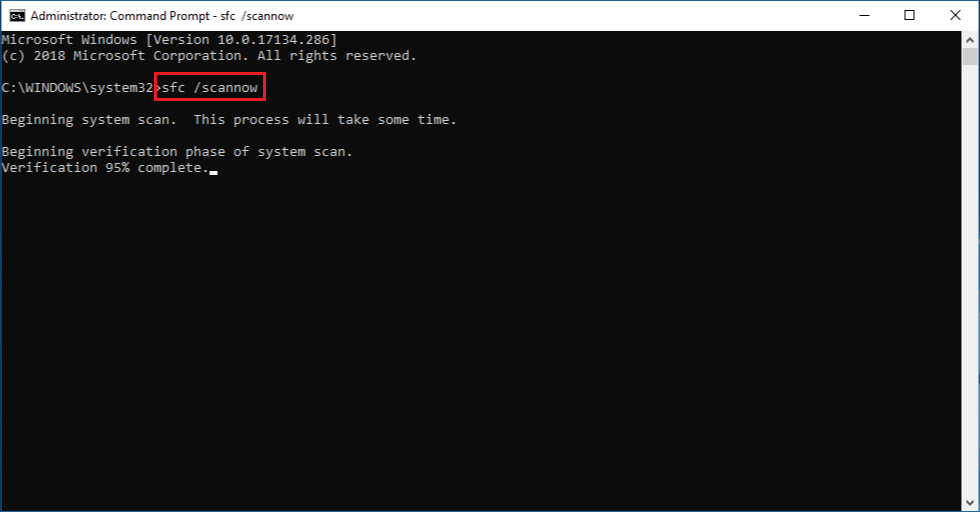
Tip: You can also use a Windows installation disk and follow the path: Repair your computer > > Troubleshoot > Advanced options > Command Prompt to open command prompt.
Solution 8: Reset or Reinstall Windows
If you still have WDF_VIOLATION blue screen issue after you tried the solutions above, you can reset or reinstall Windows to fix it.
Let’s see how to do it.
Just in case, you need to recover and backup important files before you reset or reinstall Windows as thees operations will clean the original system partition.
- If your operating system works well, you just need to back up your disk.
- If the computer fails toboot, you can use MiniTool Partition Wizard to perform data recovery.
Here is the guide on how to recover data when your PC cannot boot.
Tip: Considering that your PC is unable to start, you need to create a bootable media on another computer that works well.
Step 1: Click the following button to download and install MiniTool Partition Wizard.
Step 2: Launch it and create boot CD/DVD discs or boot flash drive with bootable media builder.
Step 3: Connect the bootable media to your PC on which WDF_VIOLATION appears, and configure the BIOS settings to boot from the media.
Step 4: Right-click your system partition and choose Data Recovery.
Tip: The drive letter can be changed in the bootable version and please make sure you have chosen the system partition.
Step 5: After scanning, check the files you need and then click Save.
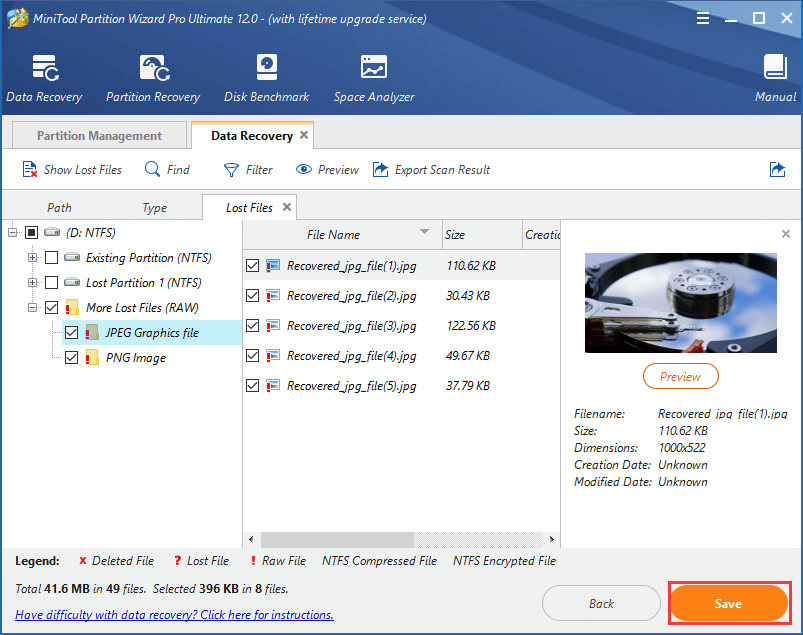
Tip: You need to choose another partition when you select a directory to save files.
Now you can reset or reinstall Windows to fix WDF_VIOLATION and there is no need to worry about data loss.
To reset Windows, you just need to enter WinRE and go to Troubleshoot > Rest this PC, and then follow the instructions to finish the process.
Tip: You can choose Keep my files when you reset this PC, which has no influence on your personal files and folders.
Here are 8 step by step solutions which are helpful when you encounter the error message “Your PC ran into a problem and needs to restart” with the stop code WDF_VIOLATION.Click to Tweet
Back up Your Windows
Now you must have removed WDF_VIOLATION blue screen error and boot your computer successfully. To avoid the similar system error in the next days, I recommend you to back up your disk so that you don’t need to spend much time on recovering your computer.
You can use MiniTool Partition Wizard Pro Ultimate. It is capable of copying all partitions and data from your system disk to another disk, and you can boot your PC from the copy. Click the button below to get the program if you haven’t installed it.
Step 1: Launch MiniTool Partition Wizard.
Step 2: Click Copy Disk Wizard from the action panel.
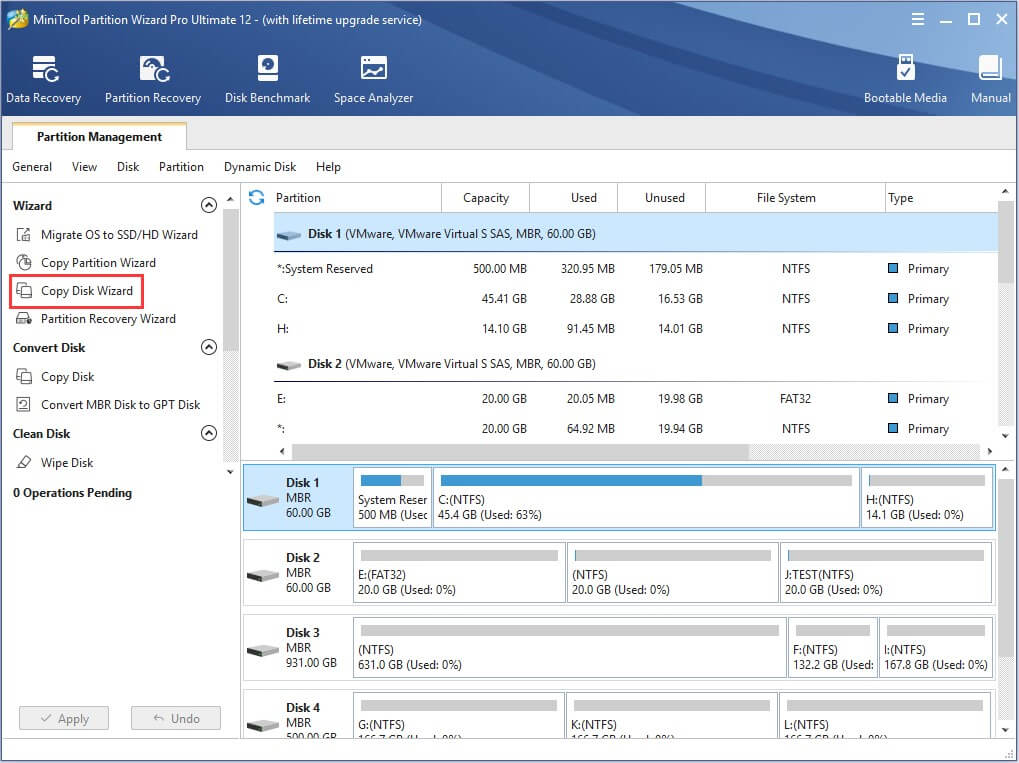
Step 3: Choose the disk you want to back up and follow the wizard to complete the backup process.
Tip: To avoid the virus attack which may cause some problems for your computer, you can run Windows Defender Firewall regularly.
Bottom Line
This article introduces the information about the error message “Your PC ran into a problem and needs to restart” with the stop code sdf_violation. You can find 8 ways to solve the problem and you’d better back up your disk so that you can boot the computer from the copy of the source disk once your PC run into a problem or crash.
If you have more ideas about how to fix WDF_VIOLATION blue screen error, please let us know by posting them in the comment section below. For any questions towards MiniTool Partition Wizard, you can contact us via [email protected] and you will get reply very soon.
WDF_VIOLATION FAQ
How do I open Safe Mode in Windows 10?
You can go to Windows Recovery Environment and click Troubleshoot > Advanced options > Startup Settings > Restart. Then Press 5 or F5 to boot Windows 10 in Safe Mode with Networking.
How do I exit Safe Mode?
- Open Run window and input msconfig. Then click OK to access System Configuration.
- Choose Boot tab, and uncheck the Safe boot option.
- Hit Apply and then click OK.
Blue Screen of Death is one of the most common Windows errors that abruptly crashes the entire system and negatively impacts your productivity. Many Windows 11/10 users are currently facing the BSOD error with the WDF_VIOLATION stop code. The error code indicates that Kernel-Mode Driver Framework has detected issues with the Framework-Based Drivers.
Recently, one of our team members was also repeatedly experiencing the same problem. After attempting different troubleshooting methods, they fixed this error from the roots. To check those tried and tested solutions, read this article and you should be able to resolve the WDF_VIOLATION error in your Windows 11/10 PC.
Here are some sources that are likely to cause the BSOD WDF_Violation error.
- Faulty Hardware
- Corrupted System Files
- Inaccurate BIOS Settings
- Outdated Drivers
- Less RAM
- Fault In Bluetooth Drivers
- Issues With USB Ports
- Third-Party Software
- Malware or Virus
Fix WDF_VIOLATION Error in Windows 11/10
Here in this section, we have mentioned over twelve most working solutions to help you login back into your system without interruption.
1. Rename Faulty HP Keyboard Driver
Many HP laptop users reported that a driver named, HpqKbFiltr.sys developed this issue on their machines. They also added that this particular driver was installed on their HP laptop through Windows Cumulative Update. Hence, this could be the same in your case if you are using an HP laptop. One of the ways to fix this issue is renaming the driver. You can follow along to rename the driver.
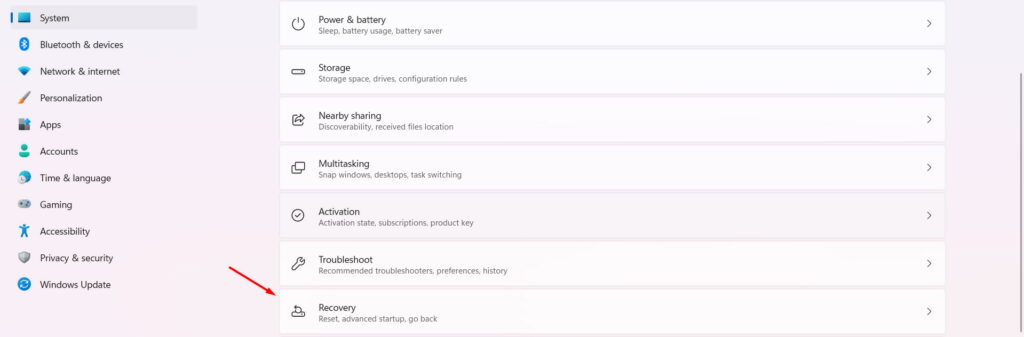
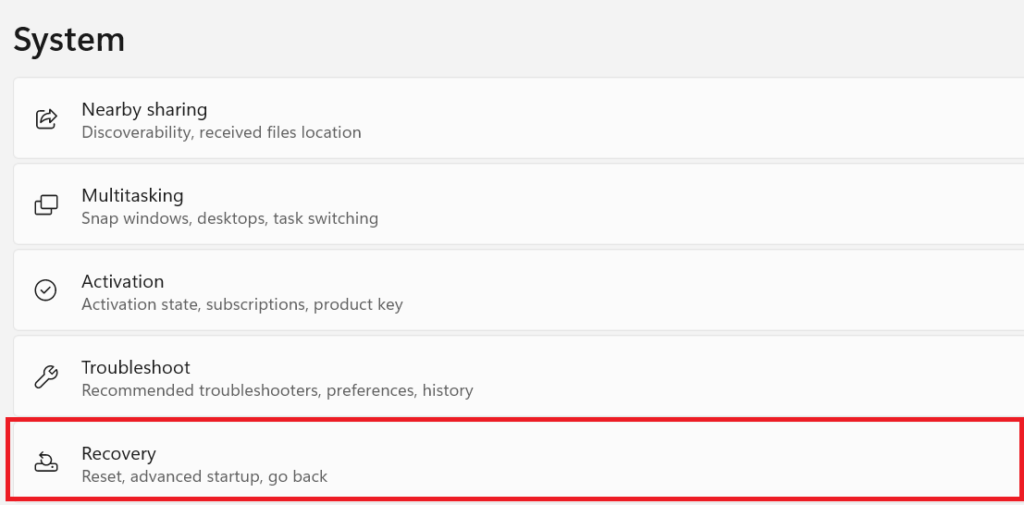
1. Open the Settings app by pressing Win + I.
2. Search for the Recovery section and click on it.
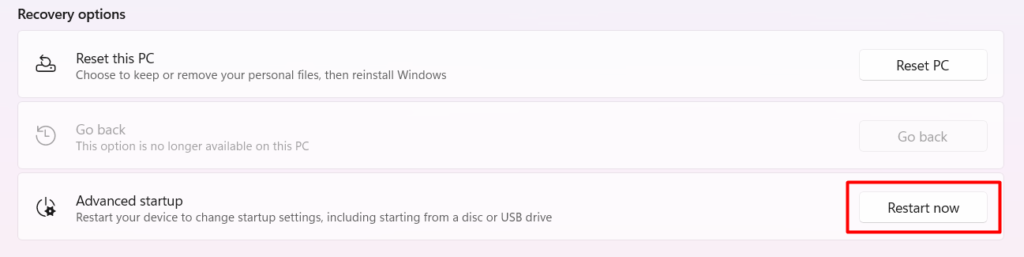
3. Click on Restart now to get access to advanced startup options.
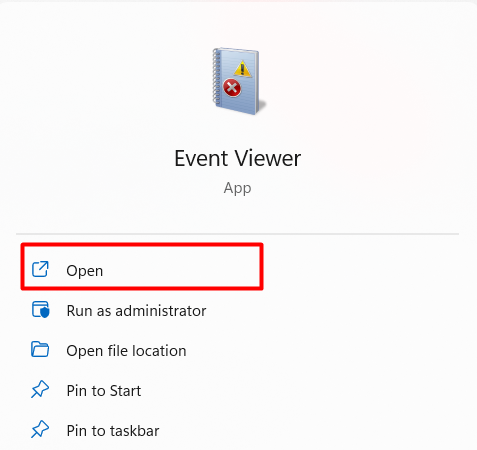
4. You will now see various options on the Choose an option window. Click on Troubleshoot from the given options.
5. Now, click on Advanced options in the Troubleshoot menu.
6. Click on Command Prompt once you enter the Advanced options window.
7. Execute the below-mentioned commands in CMD to rename HpqKbFiltr.sys keyboard driver.
C:cd C:\Windows\System32\driversren HpqKbFiltr.sys HpqKbFiltr.sys.bak8. Reboot the PC after executing the mentioned command. Your PC should now start properly without the BSOD WDF_VIOLATION error.
2. Remove the Faulty HP Keyboard Driver
If renaming the HpqKbFiltr.sys driver doesn’t solve the problem, you can now try removing the HP keyboard driver. Don’t fret. Removing a malfunctioned driver doesn’t affect your system’s performance. Your system will automatically install the missing driver when needed. We have explained the process of removing the HpqKbFiltr.sys driver in the below-mentioned steps.
Note: Before implementing the below-mentioned steps, ensure that your PC is booted into Safe Mode. If not, you can check above steps to do so.
1. Boot your PC into Safe Mode and open Command Prompt.
2. Execute the mentioned command in CMD.
For 32-bit System:
dism /Image:C\ /Remove-Driver /Driver: C:\Windows\System32\DriverStore\FileRepository\hpqkbfiltr.inf_x86_f1527018cecbb8c2\HpqKbFiltr.infFor 64-bit System:
dism /Image:C:\ /Remove-Driver/Driver: c:\Windows\System32\driverstore\FileRepository\hpqkbfiltr.inf_amd64_714aca0508a80e9a\HpqKbFiltr.inf3. That’s it. The faulty keyboard driver must be removed now. Reboot your PC normally and check the status of the issue.
3. Try Disconnecting USB Peripherals
Faults in your system’s hardware could also lead to issues like this. We are referring Hardware to USB Peripherals attached to the PC. Many Windows 11/10 users encountered the error because of faulty USB peripherals or USB ports. We suggest disconnecting all the USB peripherals one by one and rebooting the PC simultaneously. If the error gets fixed after disconnecting a specific USB device, we recommend replacing that particular accessory with a new one to avoid the same problem in the future.
4. Use Windows Driver Verifier Tool
One of the reasons for the WDF_VIOLATION error is an issue with the Framework-Based Drivers. But, there isn’t a straightforward method to detect the malfunctioned driver. You must first enable Minidumps and use the Driver Verifier Tool to continuously monitor all Kernel-Mode Drivers and Graphics Drivers. Follow the mentioned steps to use the Driver Verifier Tool to find out the culprit of the issue.
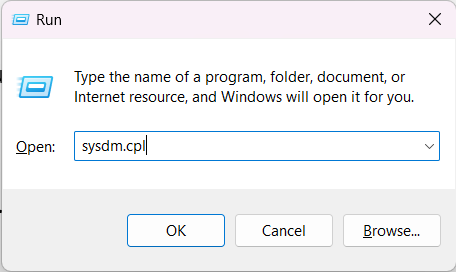
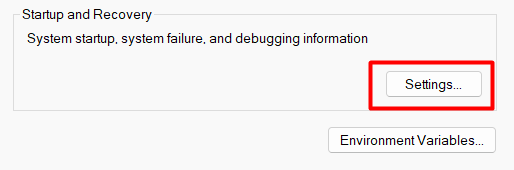
1. Press Win + R to open the Run program and type sysdm.cpl.
2. Head to Advanced > Startup & Recovery > Settings.
3. Uncheck the Automatically Restart option.
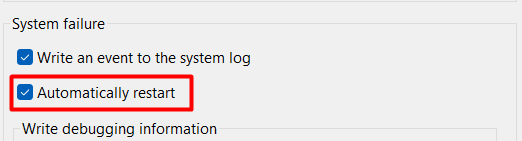
4. Select the Small memory dump (256 KB) option from the drop-down list under the Write debugging information section.

5. Make sure to set the Small dump directory to %SystemRoot%\Minidump.

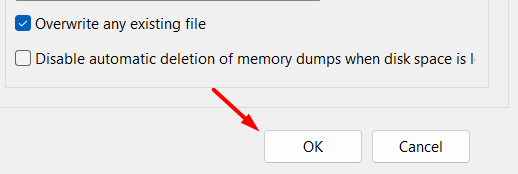
6. Click on OK to save the changes and reboot the PC.
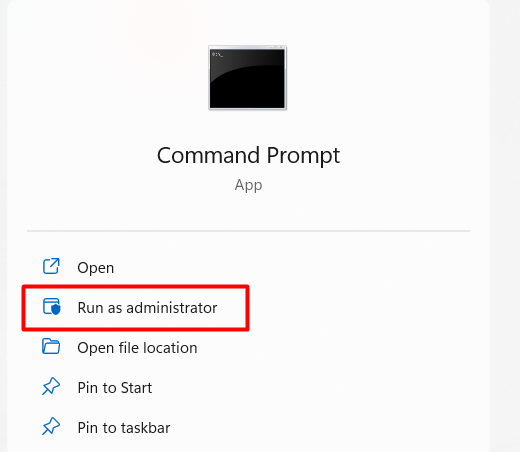
7. Run Command Prompt as administrator.
8. Type verifier in CMD and press Enter.
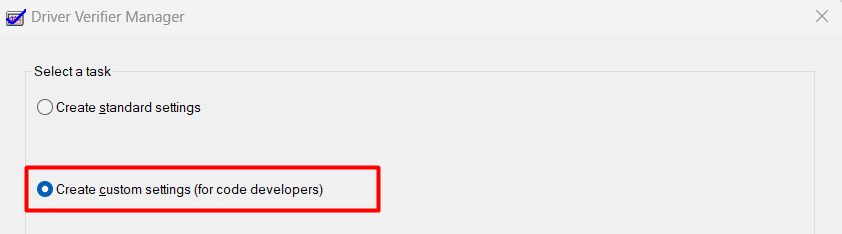
9. You will now see the Driver Verifier Manager window. Choose the Create custom settings (for code developers) option.
10. Check all the present in-the-box options, except Randomized low resources simulation and DDI compliance checking.

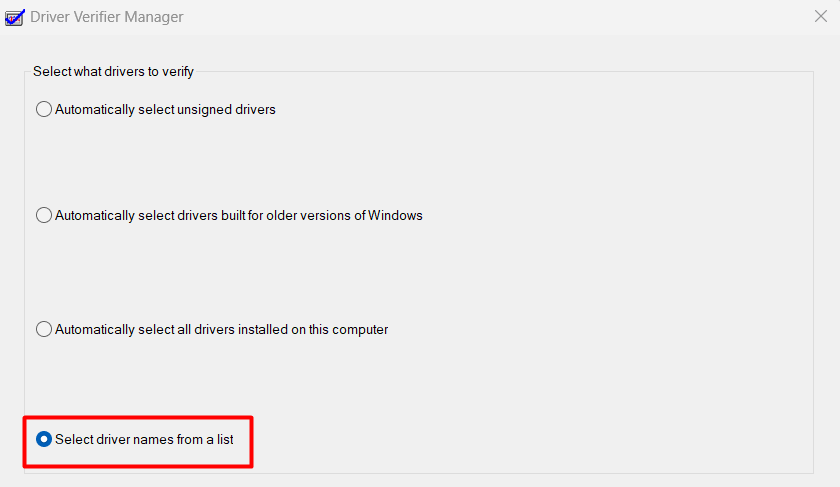
11. Click on the Select driver names from a list option.
12. Once done, select all the drivers that aren’t related to Microsoft Corporation. You can identify this by checking the Provider’s name.
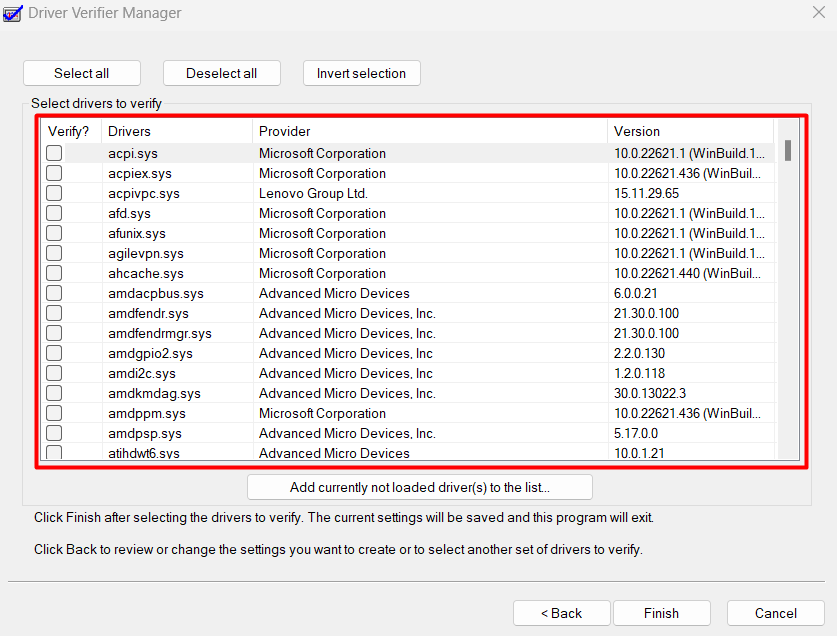
13. Lastly, click on the Finish button to save the changes.
That’s it. Now, wait for the next crash and the system to automatically create a DMP file. You can simply read the DMP file using the BlueScreenView tool.
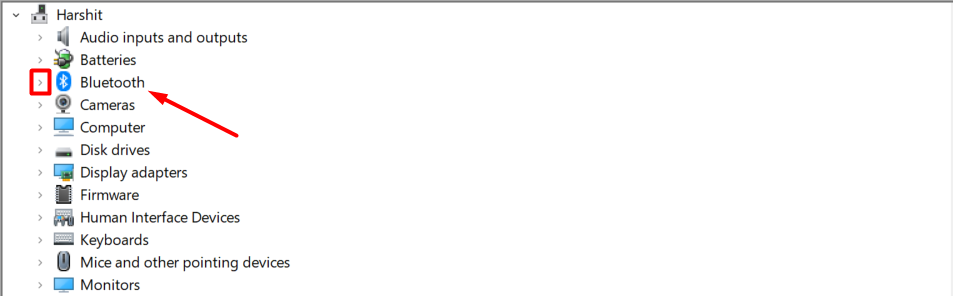
5. Update Bluetooth Drivers
Some Windows 11/10 users used the method mentioned above to create a DMP file. A few users reported that their DMP file declared Bluetooth drivers as the culprit of the issue. Fortunately, updating the Bluetooth drivers fixed the problem for them, and you can try the same. Follow the below-mentioned steps to update Bluetooth drivers from the Device Manager.
1. Press Win + R and type diskmgmt.msc in the search box.

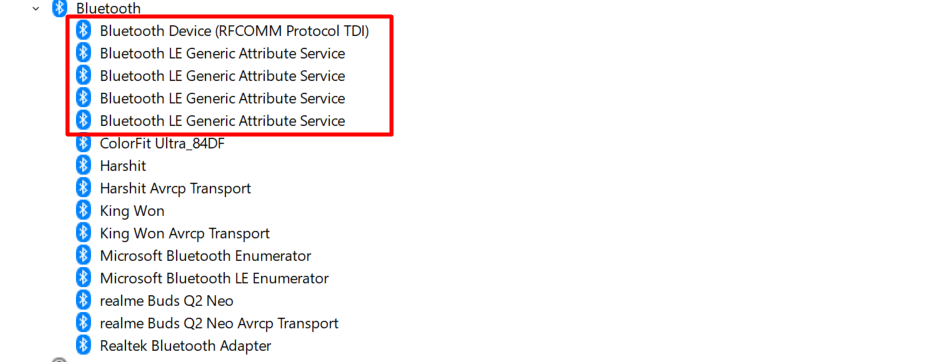
2. Click on Bluetooth to get a list of all Bluetooth drivers.
3. Right-click on the Bluetooth driver and click on the Update driver.
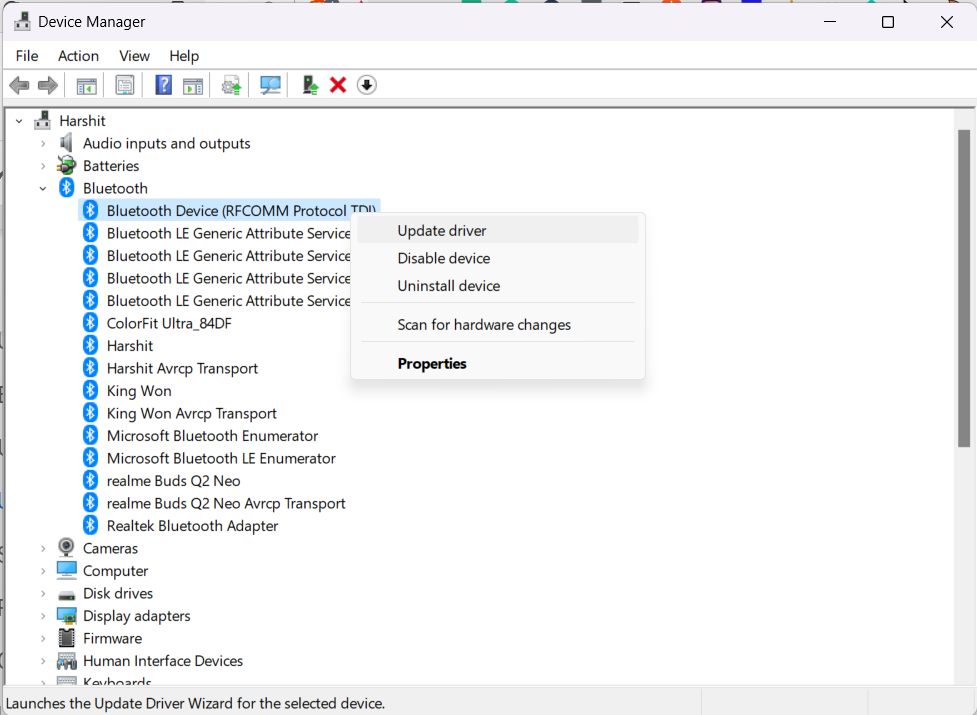
4. Follow the same steps with other Bluetooth drivers.
5. In the end, reboot the PC to see if the PC restarts normally or is still facing the same issue.
6. Scan For Viruses
It could be possible that your system has some infected files and applications that created this issue. We suggest running a Quick and later Detailed Scan to ensure everything on your system is safe. For this, You can use Windows’s Microsoft Defender Antivirus tool.
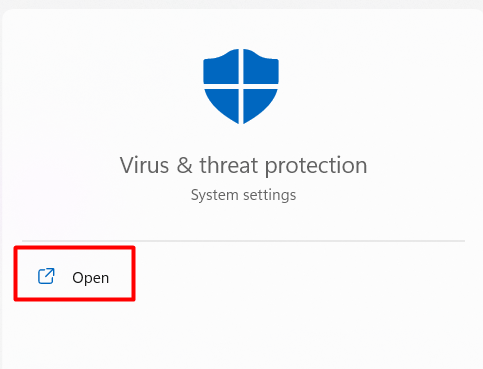
1. Press the Windows key.
2. Type Virus & threat protection and open it.
3. Click on the Quick scan.
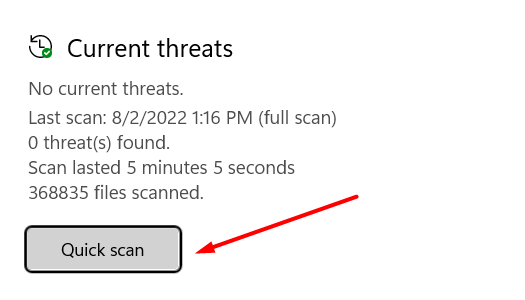
4. Wait until the scan completes and see the results. If the scanner finds something infected, you can cross-check it and remove it.
5. Click on the Scan options.

6. Select the Microsoft Defender Antivirus (offline scan) option.
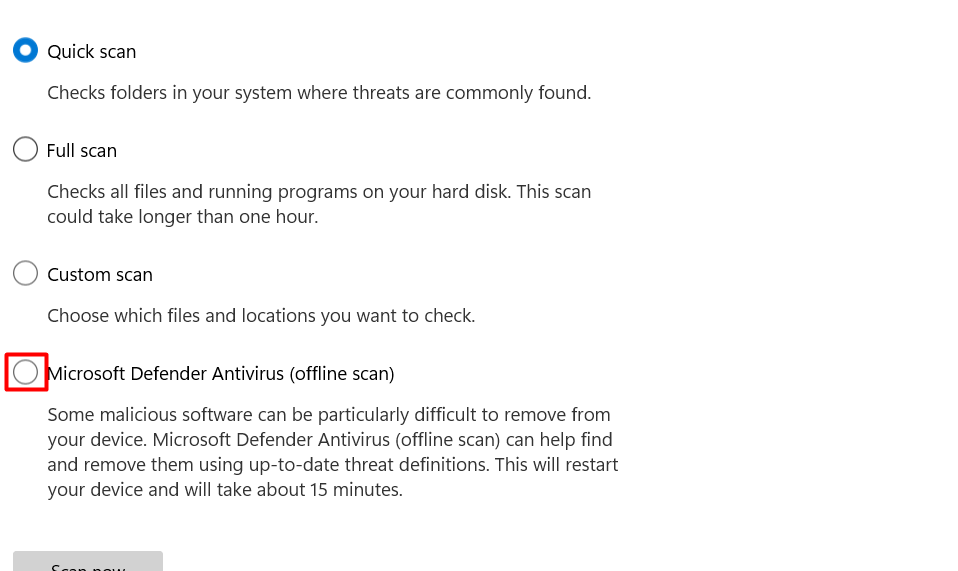
7. Click on the Scan now to run a detailed scan.

7. Run Windows Memory Diagnostic
BSOD error appears for many reasons, and one of the most common causes is defective hard drives. It could be possible that there are some issues with your hard drive. You can use the Memory Diagnostic tool to ensure your hard drives are in the perfect and working state. This tool will help you find and fix all problems related to the applications and memory with ease. You can follow the mentioned steps to use the Memory Diagnostic.
1. Press the Windows key and type Memory Diagnostic in the Search Box.
2. Click on Windows Memory Diagnostic.
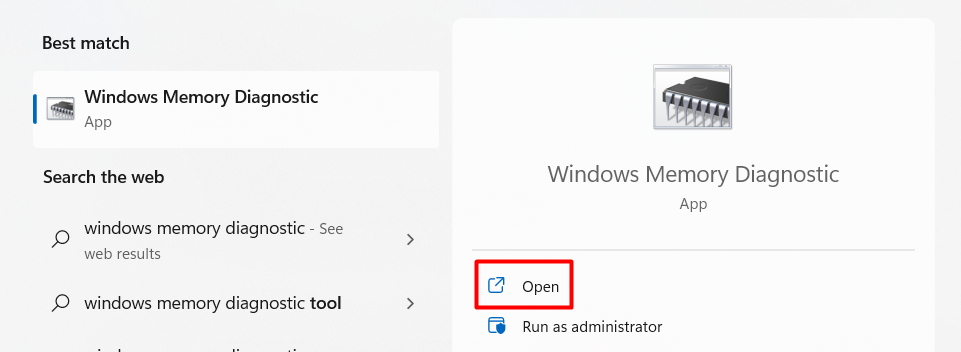
3. Select Restart now and check for problems.
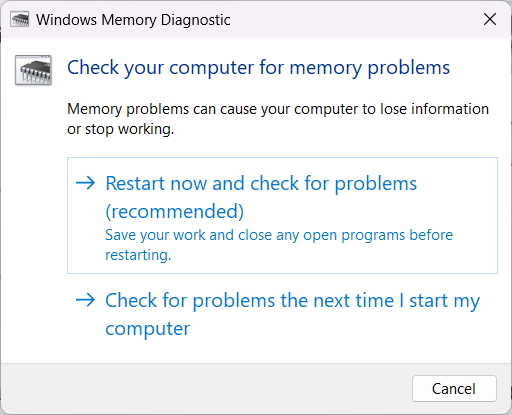
4. Your system will now reboot, and the tool will automatically start scanning for issues.
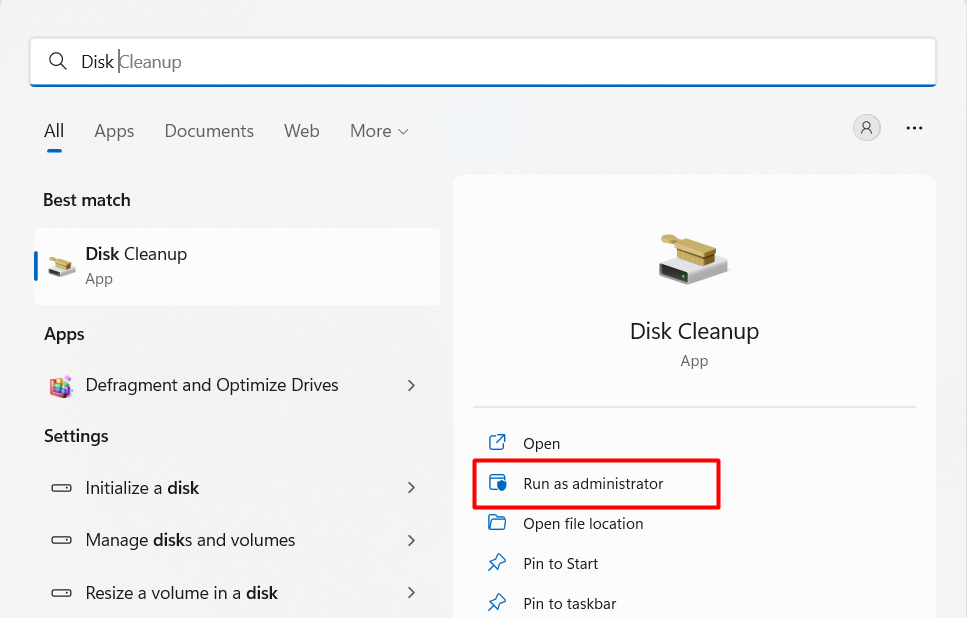
8. Use Disk Cleanup Tool
There is a possibility that the system isn’t getting ample storage to execute essential tasks, resulting in this issue. If this is the case, it can be easily fixed by freeing up some storage. Windows has an integrated Disk Cleanup tool that lets you clean unnecessary files in a few steps. Follow along to free up some space using the Disk Cleanup tool.
1. Press the Windows key and search Disk Cleanup.
2. Click on the Disk Cleanup.
3. Select Downloaded Program Files, Temporary Internet Files, Thumbnails, and Temporary Files.
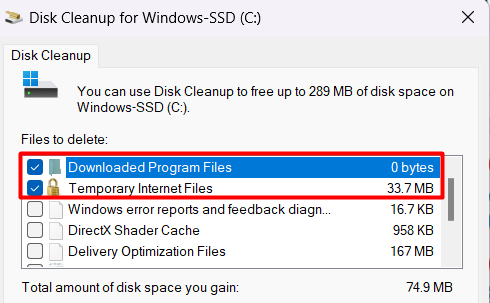
4. And finally, click on Clean up system files.
9. Uninstall Recent Updates
Several Windows 11/10 users reported that they started facing this issue after installing a Windows Cumulative Update. If you also started this error after the new update, then the culprit of the entire issue is in front of you. You can instantly fix the issue by uninstalling the update. You can follow along to do so.
Note: It is necessary to enter into Boot Mode before uninstalling recent updates. We recommend doing this to be on the safer side.
1. Open the Settings App and move to the Recovery settings.
2. Click on the Restart now button.
3. On the Choose an option window, click on Troubleshoot.
4. Then, click on Advanced options and head to Startup Settings.
5. Press F5 to enter into Safe Mode with the Internet.
6. Your PC will now restart only with essential drivers and applications. Press the Windows key and search Windows Update Settings.
7. Head to the Update history section in the Windows Update settings.
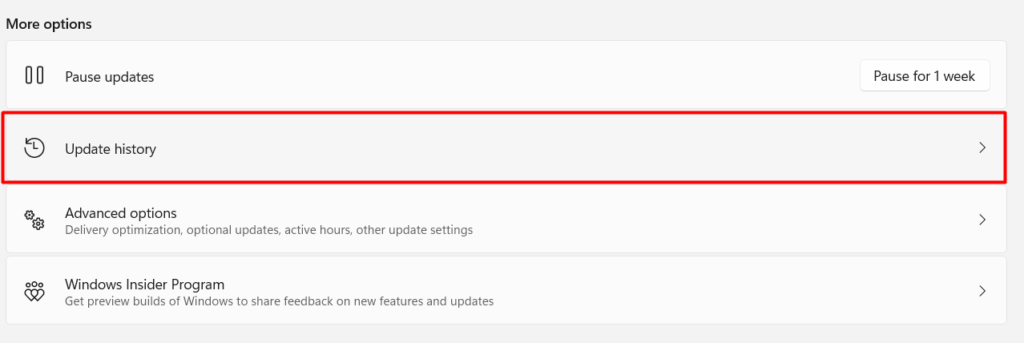
8. Scroll down and click on Uninstall Updates.

9. Click on Uninstall next to the recently installed Windows update.
10. Uninstall Recently Installed Applications
If you are getting WDF_VIOLATION issue after installing a new application, then uninstalling that recently installed app would be an ideal solution. We have explained the same in the below-mentioned steps.
1. Press Win + R, type appwiz.cpl, and hit Enter.
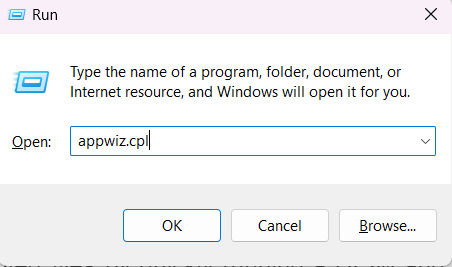
2. Try to remember the recently installed application/s and find them in the list of given applications.
3. Once found, right-click on the app and select Uninstall.

11. Run DISM, SFC Scan
In case the issue doesn’t fix after trying all the major solutions, then corrupted system files are expected to be the reason behind the issue. You can quickly find all the corrupted files by running a DISM and SFC scan. Follow the below-mentioned steps to do the same.
Run DISM Scan To Check for Files Integrity
1. Open CMD or Terminal as administrator.
2. Execute the mentioned command and press the Enter key: DISM.exe /Online /Cleanup-image /Restorehealth
3. Once the scan completes, restart the PC.
Quick SFC Scan To Fix Corrupted Files
1. Execute the mentioned command: SFC /scannow
2. Press the Enter key.
3. Restart the PC
12. CHKDSK Repair Command
Besides, we also suggest running the CHKDSK repair command to fix all errors related to your hard drive.
1. Run Command Prompt as administrator.
2. Copy and paste the mentioned command in the CMD and press Enter key: chkdsk /f C:

3. Restart the PC.
4. Open Event Viewer after the PC restarts.
5. Expand the Windows Logs section and click on Application.
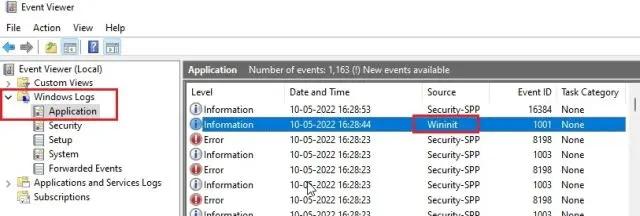
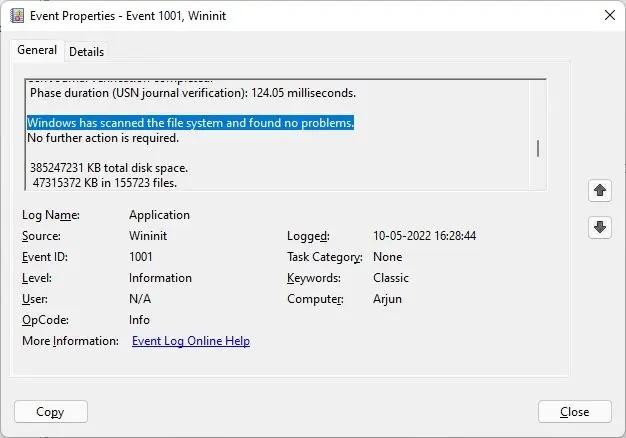
8. Search for Wininit and double click on it to open Event Properties windows.
10. On the Event Properties windows, you will see the errors found during the scan.
13. Reset BIOS Settings To Default
Putting BIOS settings to default could also fix the WDF_VIOLATION issue. However, not many users tried and suggested it. But, we found it useful because resetting the BIOS setting will make everything fresh. Hence, there are chances that this issue might disappear after doing this. Below are the steps to reset the BIOS settings in Windows 11.
1. Press Win + I to open the Settings window.
2. Open the Recovery section and click on the Restart now button under the Recovery options.
3. You will now be entered into the boot settings. Click on Troubleshoot on the Choose an option screen.
5. Select Advanced Options and then choose UEFI Firmware Settings.
7. Click on Restart to open the BIOS mode settings.
8. Press F9 to open Setup Defaults.
9. Lastly, select Yes using the keyboard arrow keys.
14. Reset the PC
If none of those mentioned above solutions works, the last option is to reset the PC and get everything back to the default state. We have mentioned the entire process of resetting the Windows 11/10 PC below.
1. Open the Settings app.
2. Head to the Recovery settings.
3. Click on Reset PC.

4. Select the Keep my files option.
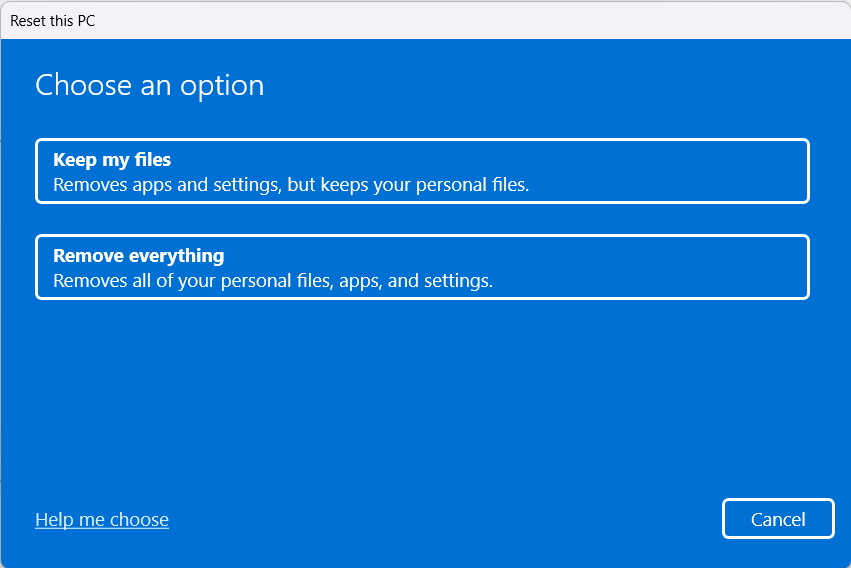
5. Your system will now return to the default state.
Frequently Asked Questions
How Do I Permanently Fix Blue Screen on Windows 10?
There are several ways to fix the blue screen error on Windows 10. One of the best ways is by uninstalling the recently installed Windows updates. You can also try using the Windows Driver Verifier tool to find the main culprit and rectify it accordingly.
How Do I Fix Blue Screen in Safe Mode?
You need to first open your system Settings app by pressing Win + I. Afterwards, head to the Recovery options and select Restart to open BIOS settings. First, click on Troubleshoot and then select Advanced options. Now, click on Command Prompt on the Advanced options screen. You can now try uninstalling recently installed third-party applications, recent updates, and Bluetooth drivers.
Can Not Fix Blue Screen of Death?
Blue Screen of Death mainly emerges due to hardware issues. Your PC might be having some hardware issues. In this situation, you can try hardware troubleshooting methods, such as fixing hard driver errors, clearing RAM sticks, etc.
Can RAM Cause Blue Screen?
Sometimes flaws in the RAM also lead to BSOD error. You can fix this error by trying different hardware and software troubleshooting methods.
Does BSOD Damage Your Computer?
Blue Screen of Death (BSOD) doesn’t damage your computer. It doesn’t affect your system files, applications, and anything else.
Final Words
You are working or playing, and everything suddenly stops due to a system crash. It ends up with a blue screen with an error code, WDF_VIOLATION. Getting this error could be frustrating and ruin your entire mood and day. We suggest trying the above-mentioned solutions to fix the WDF_VIOLATION Error in Windows 11/10.
На чтение 7 мин. Просмотров 5.4k. Опубликовано
Ошибка «Синий экран смерти» обычно указывает на наличие проблемы с определенным оборудованием или драйвером, и эту ошибку не следует воспринимать легкомысленно. Пользователи Windows 10 сообщили, что из-за ошибки wdf_violation BSoD они не могут запустить Windows 10, поэтому давайте посмотрим, как решить эту проблему.
Содержание
- Исправлена ошибка BSDD wdf_violation в Windows 10
- Решение 1. Отключите все периферийные устройства USB
- Решение 2 – Отключить порты USB в BIOS
- Решение 3 – Переустановите Windows 10
- Решение 4 – Удалить драйвер Bluetooth в безопасном режиме
- Решение 5 – Удалить проблемное программное обеспечение
- Решение 6 – Обновите ваши драйверы
- Решение 7 – Выполнить восстановление системы
Исправлена ошибка BSDD wdf_violation в Windows 10
Ошибки Blue Screen of Death, такие как wdf_violation, могут быть довольно проблематичными, и, говоря об этой ошибке, вот некоторые похожие проблемы, о которых сообщают пользователи:
- Wdf_violation Windows 10 loop . В некоторых случаях вы можете столкнуться с циклом wdf_violation, который не позволяет вам войти в Windows 10. Чтобы устранить проблему, войдите в безопасный режим и попробуйте удалить проблемный драйвер.
- Wdf_violation Lenovo . Об этой проблеме сообщили пользователи Lenovo, и если вы используете устройство Lenovo, вы можете попробовать некоторые из наших решений и проверить, решает ли это вашу проблему.
- Wdf_violation Windows 10 HP . Ряд пользователей также сообщили об этой проблеме на устройствах HP. Универсального решения для компьютеров HP не существует, поэтому вы можете попробовать любое решение из этой статьи.
- Wdf_violation Windows 8 . Эта ошибка может появляться в любой версии Windows, и даже если вы не используете Windows 10, вы сможете применить практически все решения из этой статьи для Windows 8.
- Wdf_violation Razer . Иногда эта проблема может возникать из-за вашего оборудования или периферийных устройств USB. Если это так, отключите все USB-устройства и попробуйте снова запустить компьютер.
- Wdf_violation при запуске, сбой . Эта проблема может возникать из-за сторонних приложений на вашем ПК, и для ее устранения рекомендуется найти и удалить проблемные приложения.
Решение 1. Отключите все периферийные устройства USB

Если у вас ошибка wdf_violation BSoD в Windows 10, вы можете попробовать отключить все ваши периферийные устройства USB. По словам пользователей, любое USB-устройство может вызвать появление этой ошибки, и есть сообщения о том, что эта ошибка была вызвана USB-камерой, поэтому, чтобы исправить эту ошибку, отключите все USB-периферийные устройства от компьютера.
Возможно, ваша проблема вызвана только одним USB-устройством, поэтому вам придется повторять этот шаг несколько раз, пока не найдете его.
- Читайте также: исправлено: USB не работает в Windows 10
Решение 2 – Отключить порты USB в BIOS
Некоторые пользователи предлагают отключить порты USB в BIOS в качестве возможного обходного пути. Для этого вам необходимо выполнить следующие шаги:
- Перезагрузите компьютер и продолжайте нажимать F2 или Del , чтобы войти в BIOS. Это может быть другой ключ в зависимости от вашей материнской платы, поэтому вам придется повторить этот шаг несколько раз.
- После открытия BIOS вам нужно перейти на вкладку «Дополнительно»> «Разные устройства»> «Внешние USB-порты» и отключить внешние USB-порты . Примечание. Этот процесс может отличаться в вашей версии BIOS, поэтому обратитесь к руководству по материнской плате для получения подробных инструкций.
- Сохраните изменения и перезагрузите компьютер.
Решение 3 – Переустановите Windows 10
Это решение следует использовать в качестве последнего средства , поэтому убедитесь, что вы используете его, только если вы использовали все другие решения. При переустановке Windows 10 все ваши файлы будут удалены, поэтому вам придется заново устанавливать все приложения. Вот почему мы настоятельно рекомендуем вам попробовать любое другое решение перед выполнением переустановки Windows 10.
Решение 4 – Удалить драйвер Bluetooth в безопасном режиме
В Windows есть специальный сегмент, который называется «Безопасный режим», и вы можете использовать его для устранения различных проблем. В этом сегменте используются драйверы по умолчанию, поэтому это идеальный инструмент, если вы не можете загрузить систему. Чтобы войти в безопасный режим, сделайте следующее:
- Перезагрузите компьютер пару раз во время загрузки. Кроме того, вы можете нажать значок Мощность на экране выбора профиля, нажать и удерживать клавишу Shift и выбрать в меню Перезагрузить . Вы также можете сделать это из Windows.
- Список опций теперь появится. Выберите Устранение неполадок> Дополнительные параметры> Параметры запуска . Нажмите кнопку Перезагрузить .
- Когда ваш компьютер перезагрузится, вы увидите список параметров. Нажмите 5 или F5 , чтобы выбрать Безопасный режим с поддержкой сети .
После входа в безопасный режим вам необходимо найти и удалить проблемный драйвер.Многие пользователи утверждают, что драйвер Bluetooth вызвал эту проблему для них, и вы можете удалить его, выполнив следующие действия:
-
Нажмите Windows Key + X , чтобы открыть меню Win + X. Теперь выберите Диспетчер устройств из списка.

-
Теперь найдите драйвер Bluetooth , щелкните правой кнопкой мыши и выберите в меню Удалить устройство .
-
Когда появится меню подтверждения, выберите Удалить программное обеспечение драйвера для этого устройства и нажмите Удалить для подтверждения.


После этого перезагрузите компьютер и попробуйте снова запустить Windows 10. Имейте в виду, что другие драйверы могут вызвать эту проблему, поэтому не сосредотачивайтесь только на драйвере Bluetooth. Чтобы увидеть, какой драйвер вызывает проблему, обязательно проверьте журнал сбоев.
Стоит также отметить, что иногда неустановленный драйвер может автоматически установить себя заново, поэтому вам придется заблокировать Windows 10 от автоматической установки драйверов.
Решение 5 – Удалить проблемное программное обеспечение
В некоторых случаях ошибка wdf_violation может возникнуть из-за проблемного программного обеспечения. Иногда сторонние приложения могут быть не полностью совместимы с Windows 10, что может привести к появлению этой и других ошибок.
Чтобы решить эту проблему, рекомендуется удалить проблемное приложение с ПК. По словам пользователей, программное обеспечение SteelSeries Engine вызывало проблему на их ПК, но после ее удаления проблема была полностью решена.
Имейте в виду, что вам нужно полностью удалить это приложение, чтобы навсегда решить проблему. Иногда оставшиеся файлы могут привести к повторному появлению проблемы, поэтому рекомендуется использовать программу удаления.
Если вы не знакомы, это специальное программное обеспечение, которое полностью удалит выбранное приложение вместе со всеми его файлами и записями реестра. Существует множество отличных приложений для удаления программ, но одним из лучших является Revo Uninstaller , поэтому обязательно попробуйте его.
Решение 6 – Обновите ваши драйверы
По словам пользователей, иногда ошибка wdf_violation может появиться из-за ваших драйверов. Если ваши драйверы устарели, это может привести к определенным проблемам, поэтому рекомендуется обновить драйверы на вашем компьютере. Для этого вам нужно найти драйвер, который вызывает проблему, и обновить его.
Чтобы выяснить проблемный драйвер, проверьте сообщение об ошибке перед перезагрузкой компьютера и посмотрите, упоминается ли какой-либо файл. Если это так, это означает, что этот файл отвечает за сбой. Теперь вам нужно провести небольшое исследование и выяснить, относится ли этот файл к определенному устройству или драйверу.
Если это так, вам нужно обновить драйвер до последней версии и проверить, помогает ли это. Иногда обновление драйвера вручную может быть утомительным занятием, поэтому вы можете рассмотреть возможность использования стороннего программного обеспечения, которое автоматически обновит все ваши драйверы.
TweakBit Driver Updater – это простой инструмент для обновления драйверов, который обновит все устаревшие драйверы на вашем компьютере всего за пару кликов.
Как только ваши драйверы обновлены, проблема должна быть полностью решена, и все снова начнет работать.
Решение 7 – Выполнить восстановление системы
Другим инструментом, который может помочь вам исправить ошибку BSDD wdf_violation, является Восстановление системы. Если вы не знакомы, ваша система автоматически создает точки восстановления после установки нового программного обеспечения или обновления. Вы можете использовать эти точки восстановления для восстановления вашей системы и устранения проблем, подобных этой.
Для этого выполните следующие действия:
-
Нажмите Windows Key + S и введите восстановление системы . Выберите Создать точку восстановления из списка результатов.
-
Появится окно Свойства системы . Нажмите кнопку Восстановление системы .
-
Когда откроется окно Восстановление системы , нажмите Далее .
-
Если доступно, установите флажок Показать больше точек восстановления и выберите нужную точку восстановления. Теперь нажмите Далее , чтобы продолжить.
- Следуйте инструкциям на экране для завершения процесса восстановления.


Если вы не можете получить доступ к Windows 10 из-за ошибки wdf_violation, вы всегда можете выполнить восстановление системы вне Windows, выполнив следующие действия:
- Перезагрузите компьютер пару раз во время загрузки.
- Выберите Устранение неполадок> Дополнительные параметры> Восстановление системы .
- Выберите свою учетную запись и введите свой пароль.
- Появится окно Восстановление системы , и вы сможете выбрать точку восстановления и восстановить систему.
Ошибка Wdf_violation BSoD может быть довольно проблематичной в Windows 10, но мы надеемся, что некоторые из наших решений были вам полезны.