FAQ
[Ноутбук/AIO] Как включить функцию Wake on LAN (WOL)
Функция пробуждения по локальной сети (Wake on LAN) позволяет вывести систему из режима сна или гибернации через сеть. В этой статье описывается, как включить функцию пробуждения по локальной сети(Wake on LAN) для ноутбука ASUS или моноблока.
Примечание. Доступность функции пробуждения по локальной сети (Wake on LAN) зависит от модели компьютера.
Чтобы использовать функцию пробуждения по локальной сети (Wake on LAN) необходимо сначала настроить соответствующие параметры конфигурации ОС Windows и BIOS. Пожалуйста, выполните следующие действия:
Отключите функцию быстрого запуска
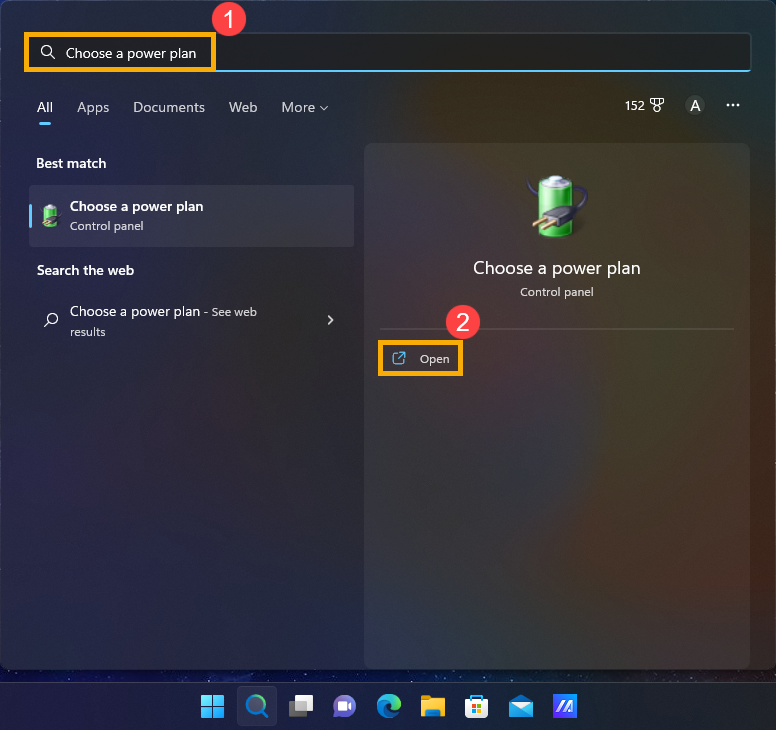
- Напишите в строке поиска Windows и выполните поиск [Выбрать схему электропитания]①, потом нажмите [Открыть]②.

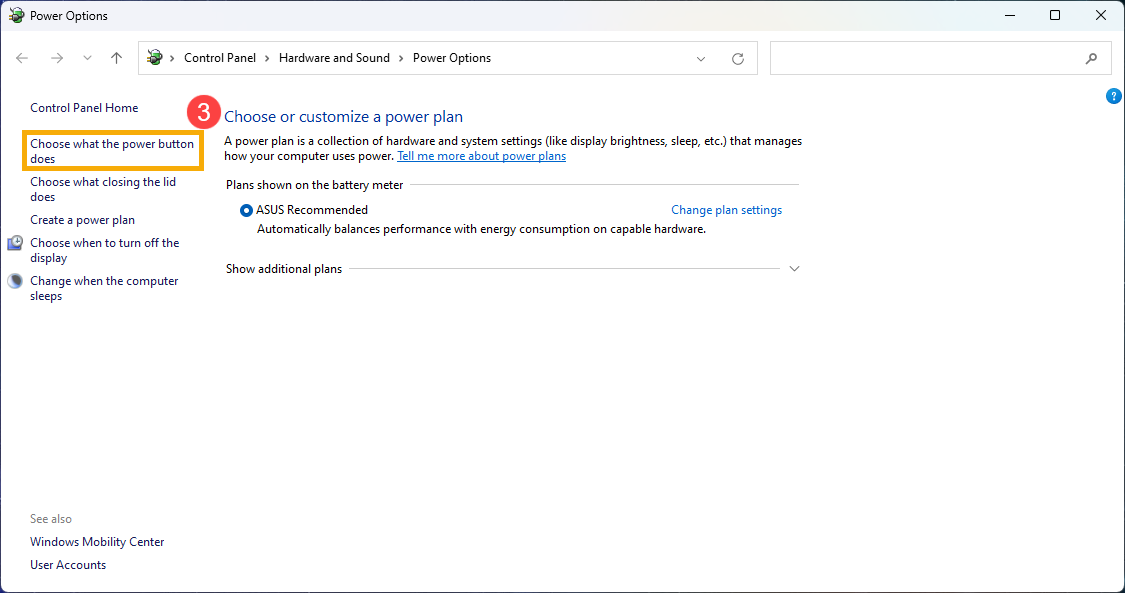
- Нажмите на [Действия кнопок питания]③.
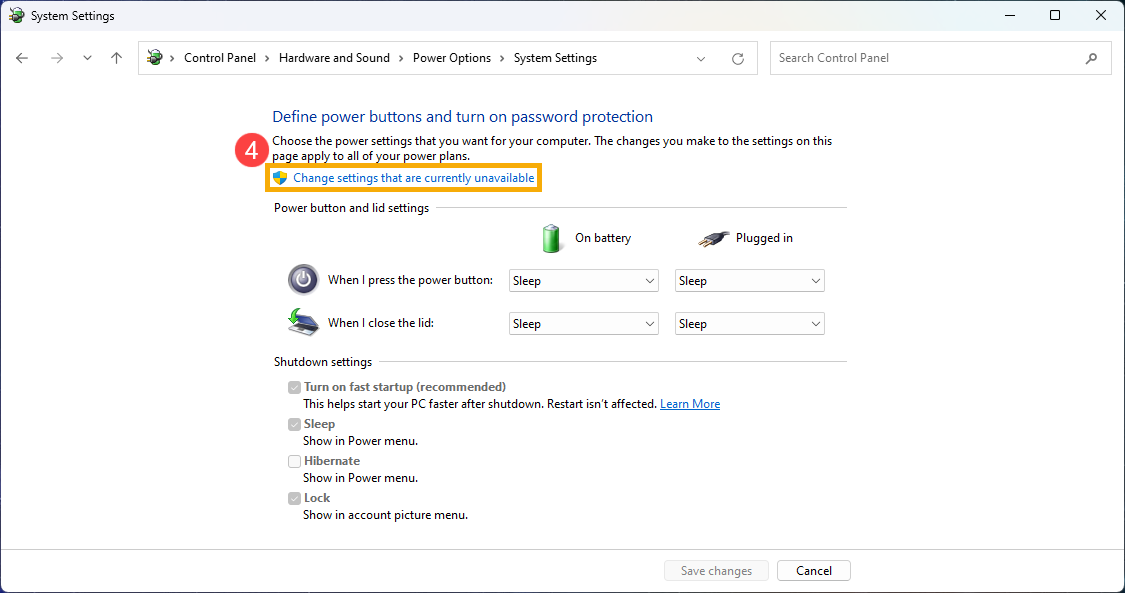
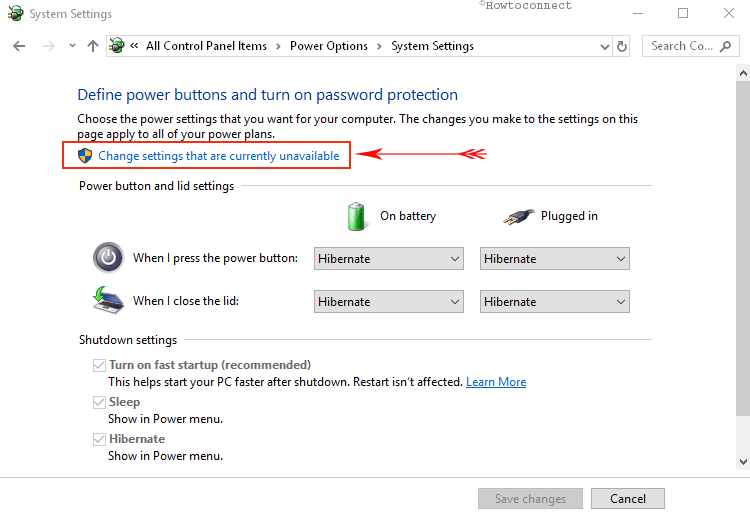
- Нажмите на [Изменение параметров, которые сейчас недоступны]④.
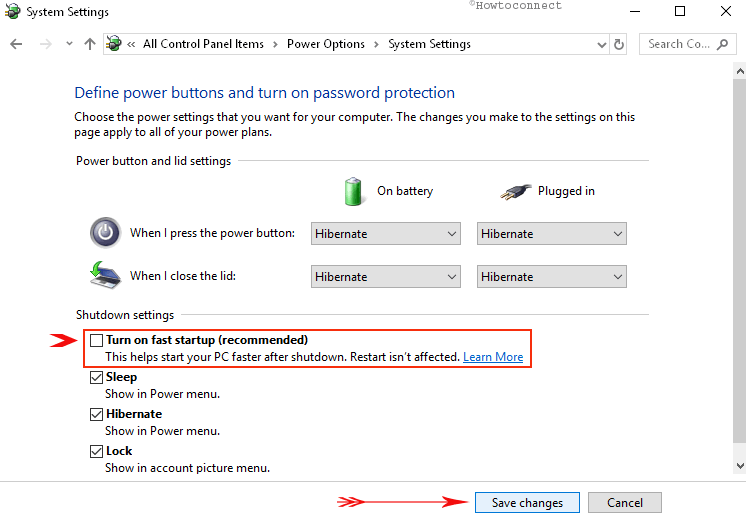
- Снимите галочку с параметра [Включить быстрый запуск]⑤, потом нажмите на кнопку [Сохранить изменения]⑥.

Параметр «Разрешить этому устройству выводить компьютер из ждущего режима» в настройках сетевого Ethernet адаптера
- Нажмите правой кнопкой мыши на значок [Пуск] в панели задач①, выберите и откройте [Диспетчер устройств]②.
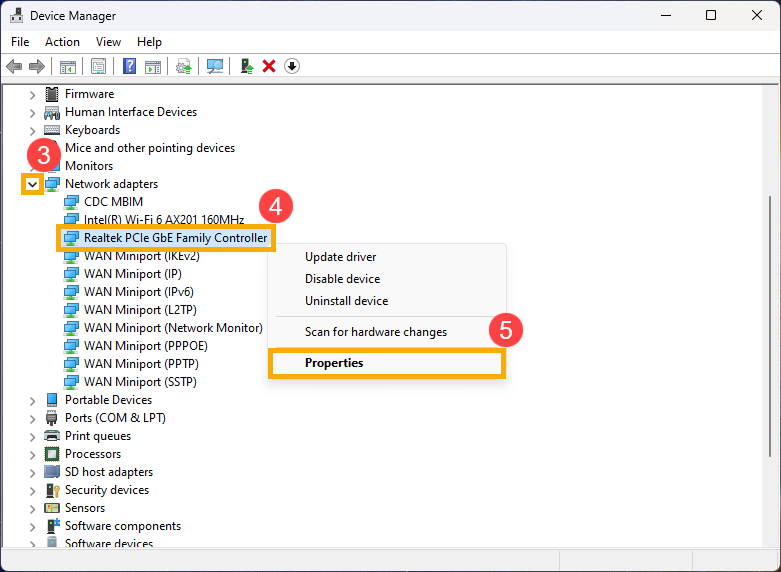
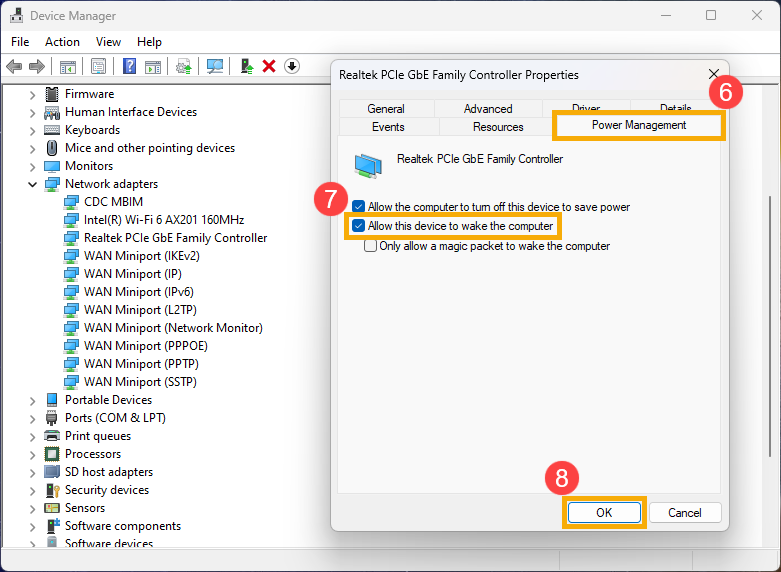
- Раскройте список сетевых адаптеров — нажмите на стрелочку [Сетевые адаптеры]③, потом нажмите правой кнопкой мыши на [модель сетевого адаптера]④ и выберите [Свойства]⑤.
Примечание: Название сетевого адаптера может отличаться в зависимости от модели. - Нажмите на вкладку [Управление электропитанием]⑥, установите галочку для параметра [Разрешить этому устройству выводить компьютер из ждущего режима]⑦, потом нажмите [OK]⑧.
 в панели задач
Включите функцию пробуждения по сети (Wake on LAN) в настройках конфигурации BIOS
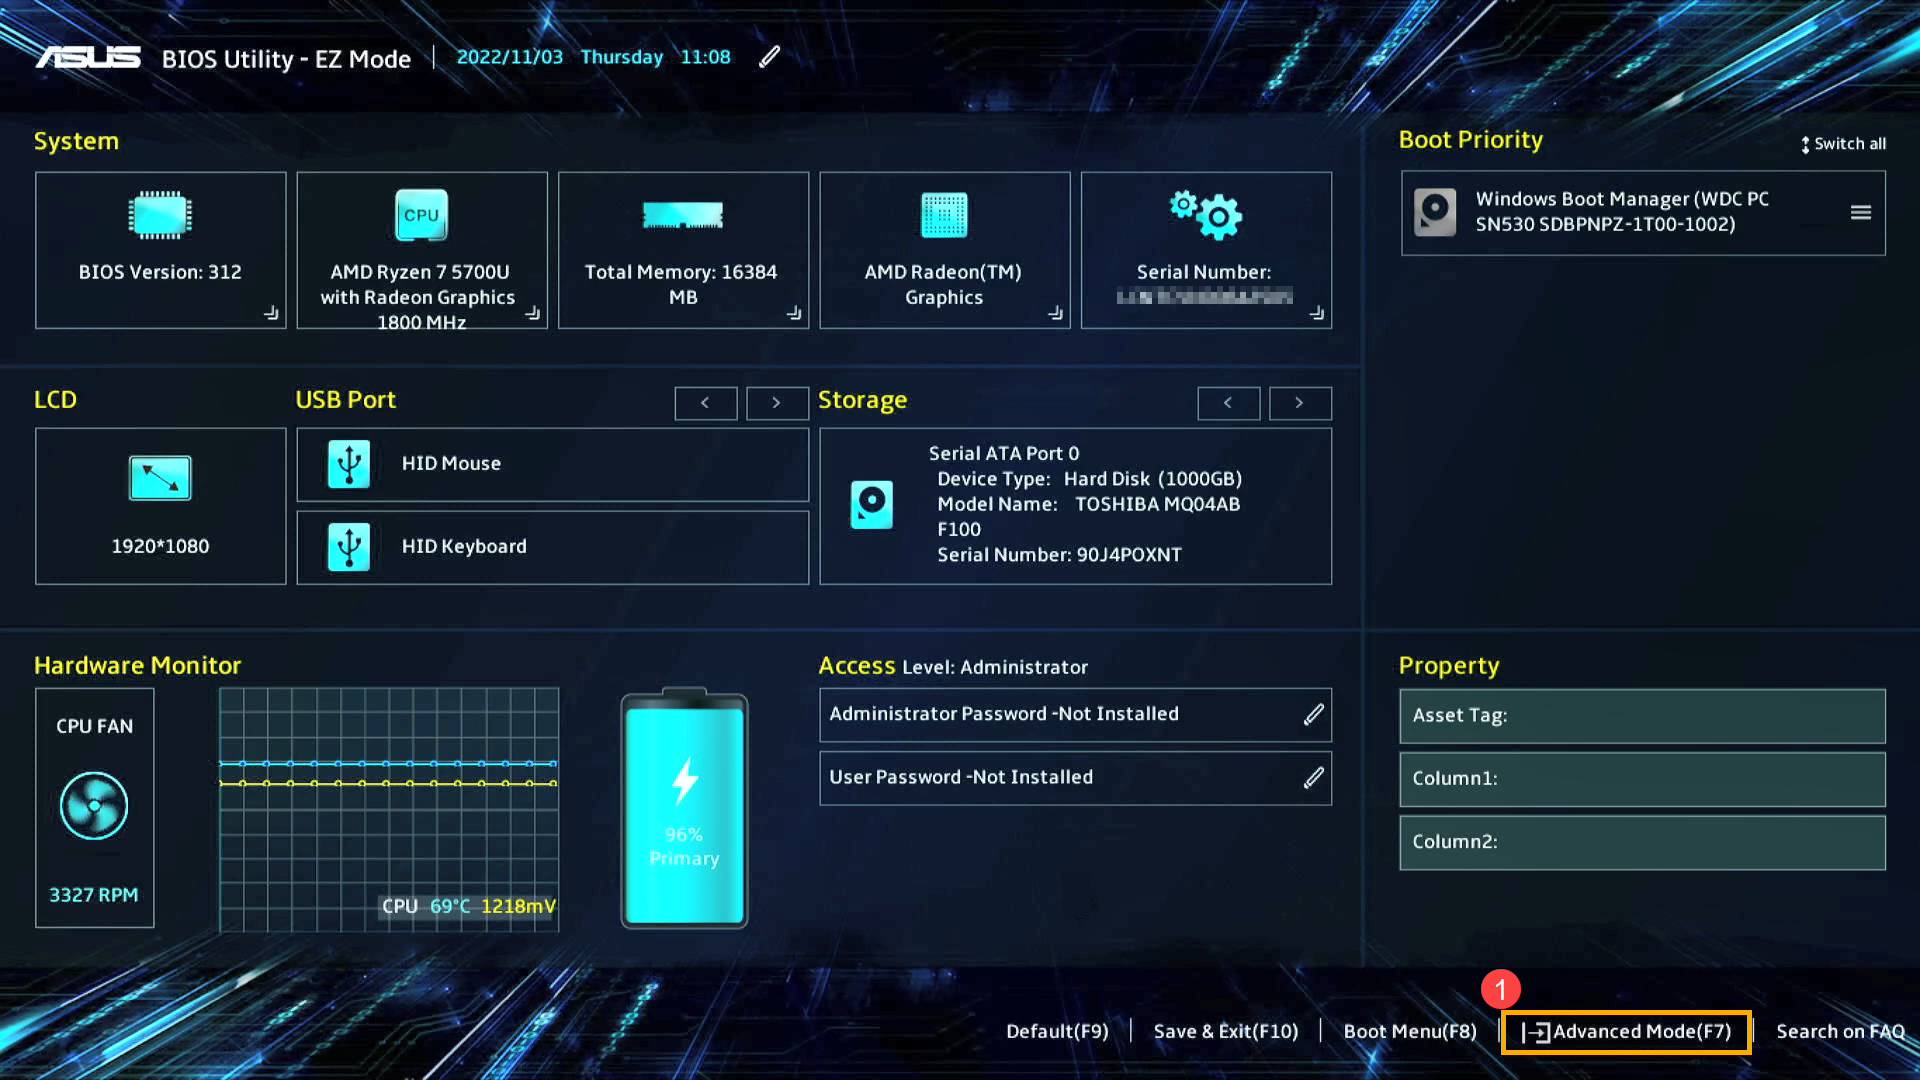
- Пока компьютер выключен нажмите и удерживайте клавишу [F2] на клавиатуре, потом нажмите на [Кнопку питания] (не отпускайте клавишу [F2] пока компьютер не войдет в настройки BIOS). В статье по ссылке Вы можете больше узнать о том, Как войти в настройки BIOS.
- После входа в настройки BIOS, выберите расширенный режим отображения настроек — Advanced Mode, нажав на клавишу [F7] или с помощью мышки①.
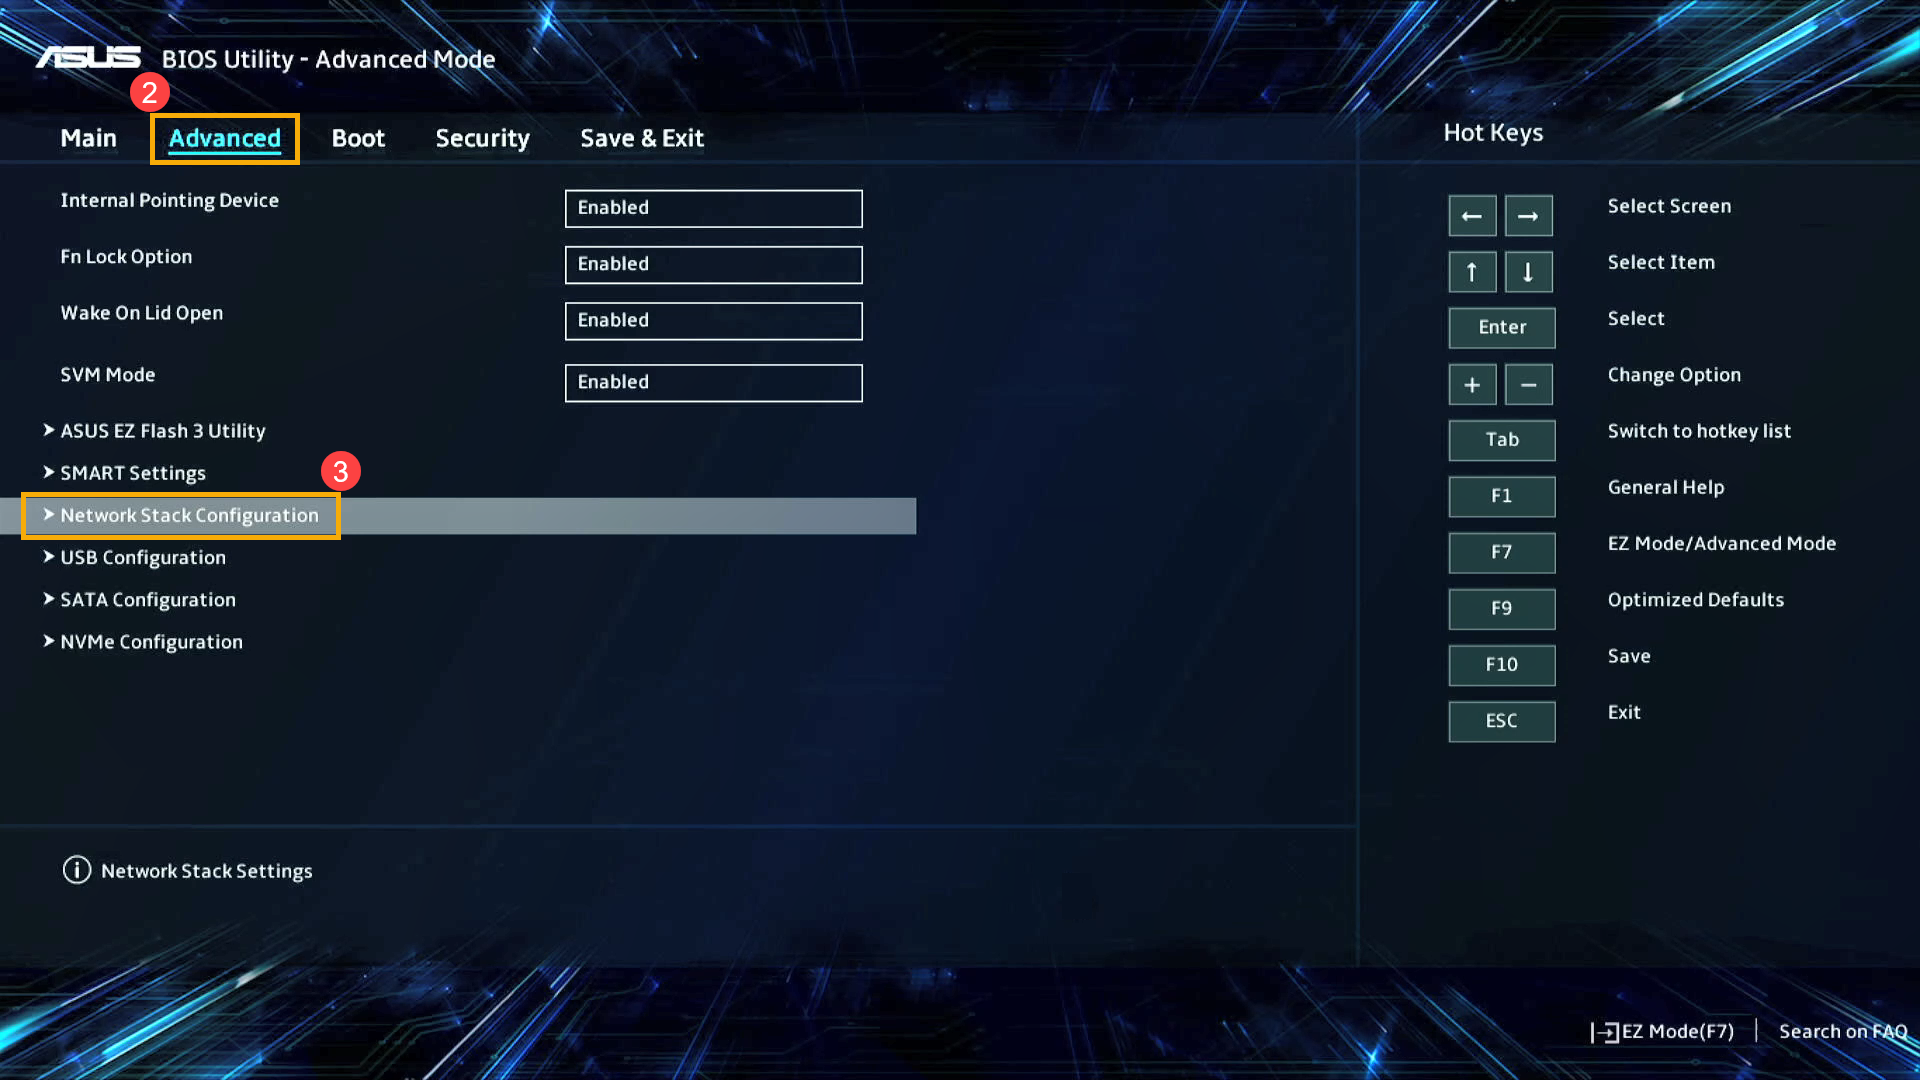
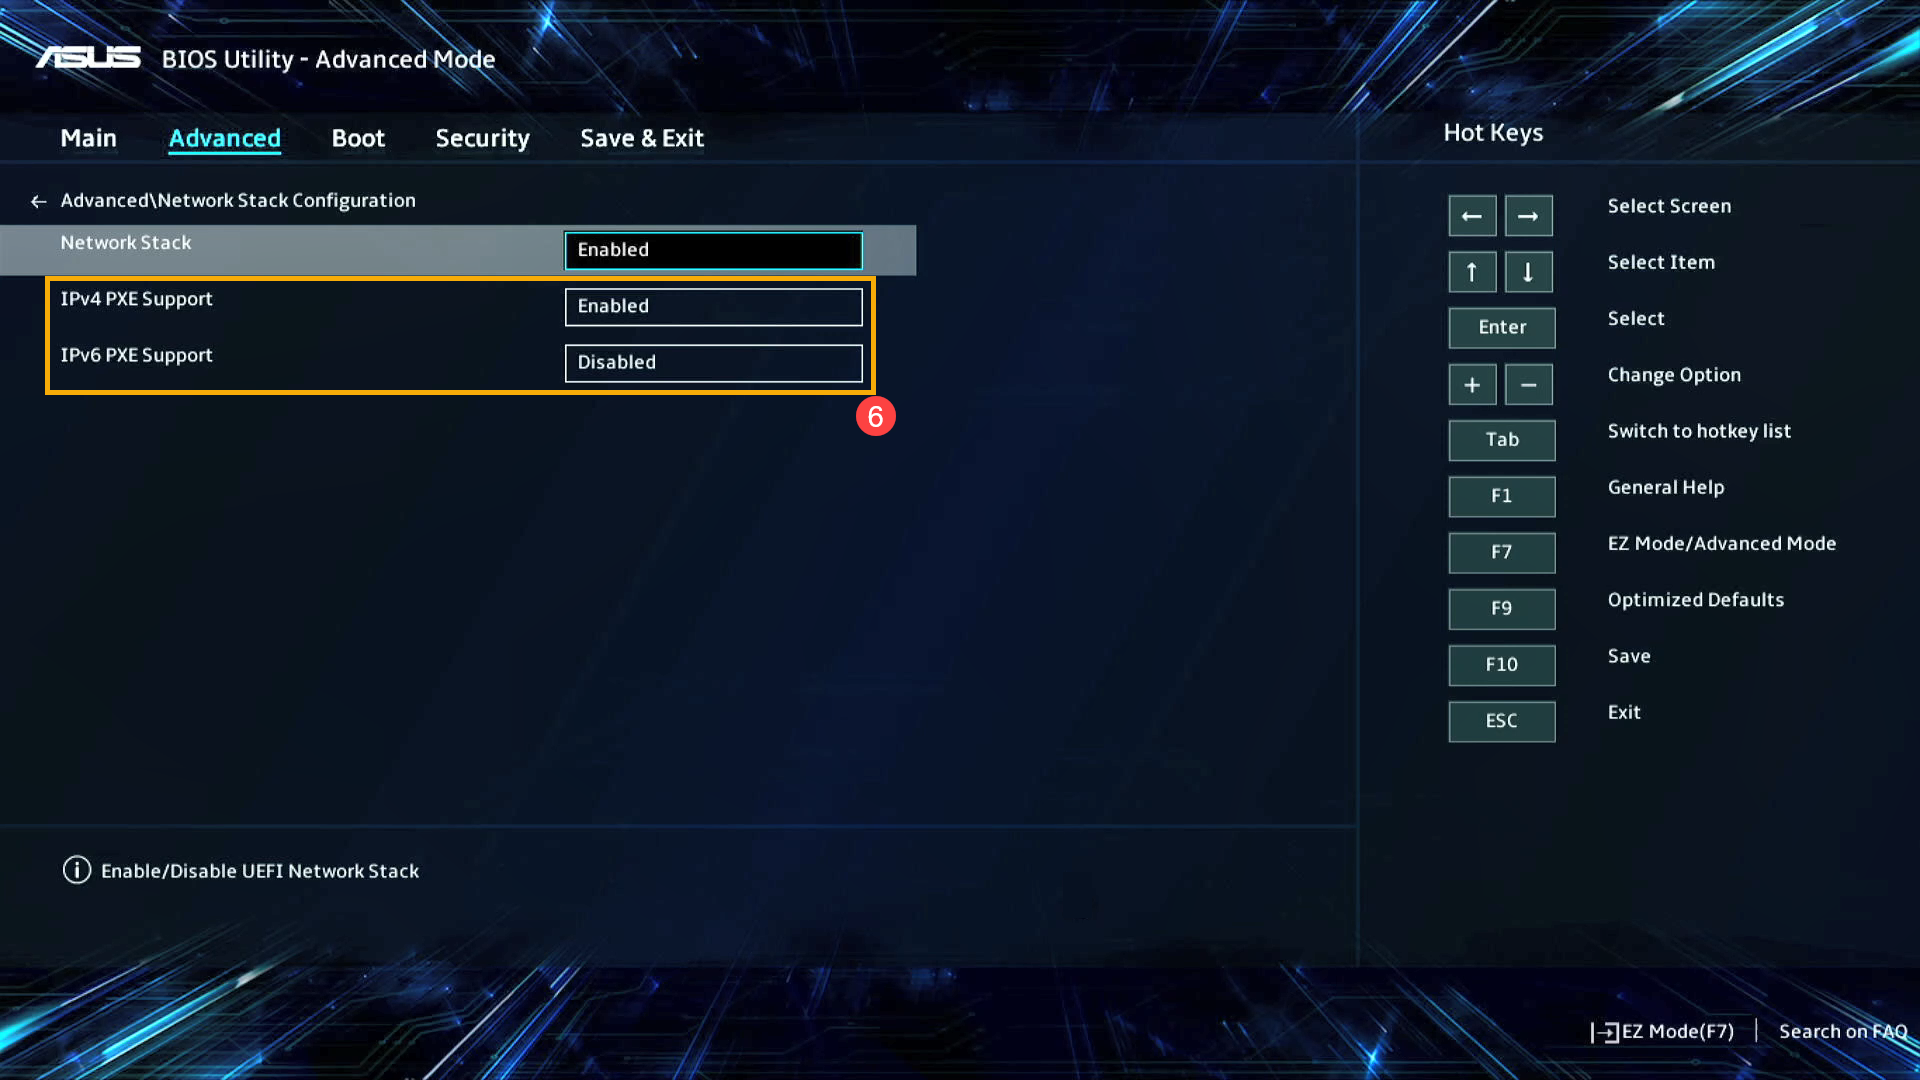
- После переключения в расширенный режим отображения настроек, перейдите на вкладку [Advanced]② и выберите раздел [Network Stack Configuration]③.
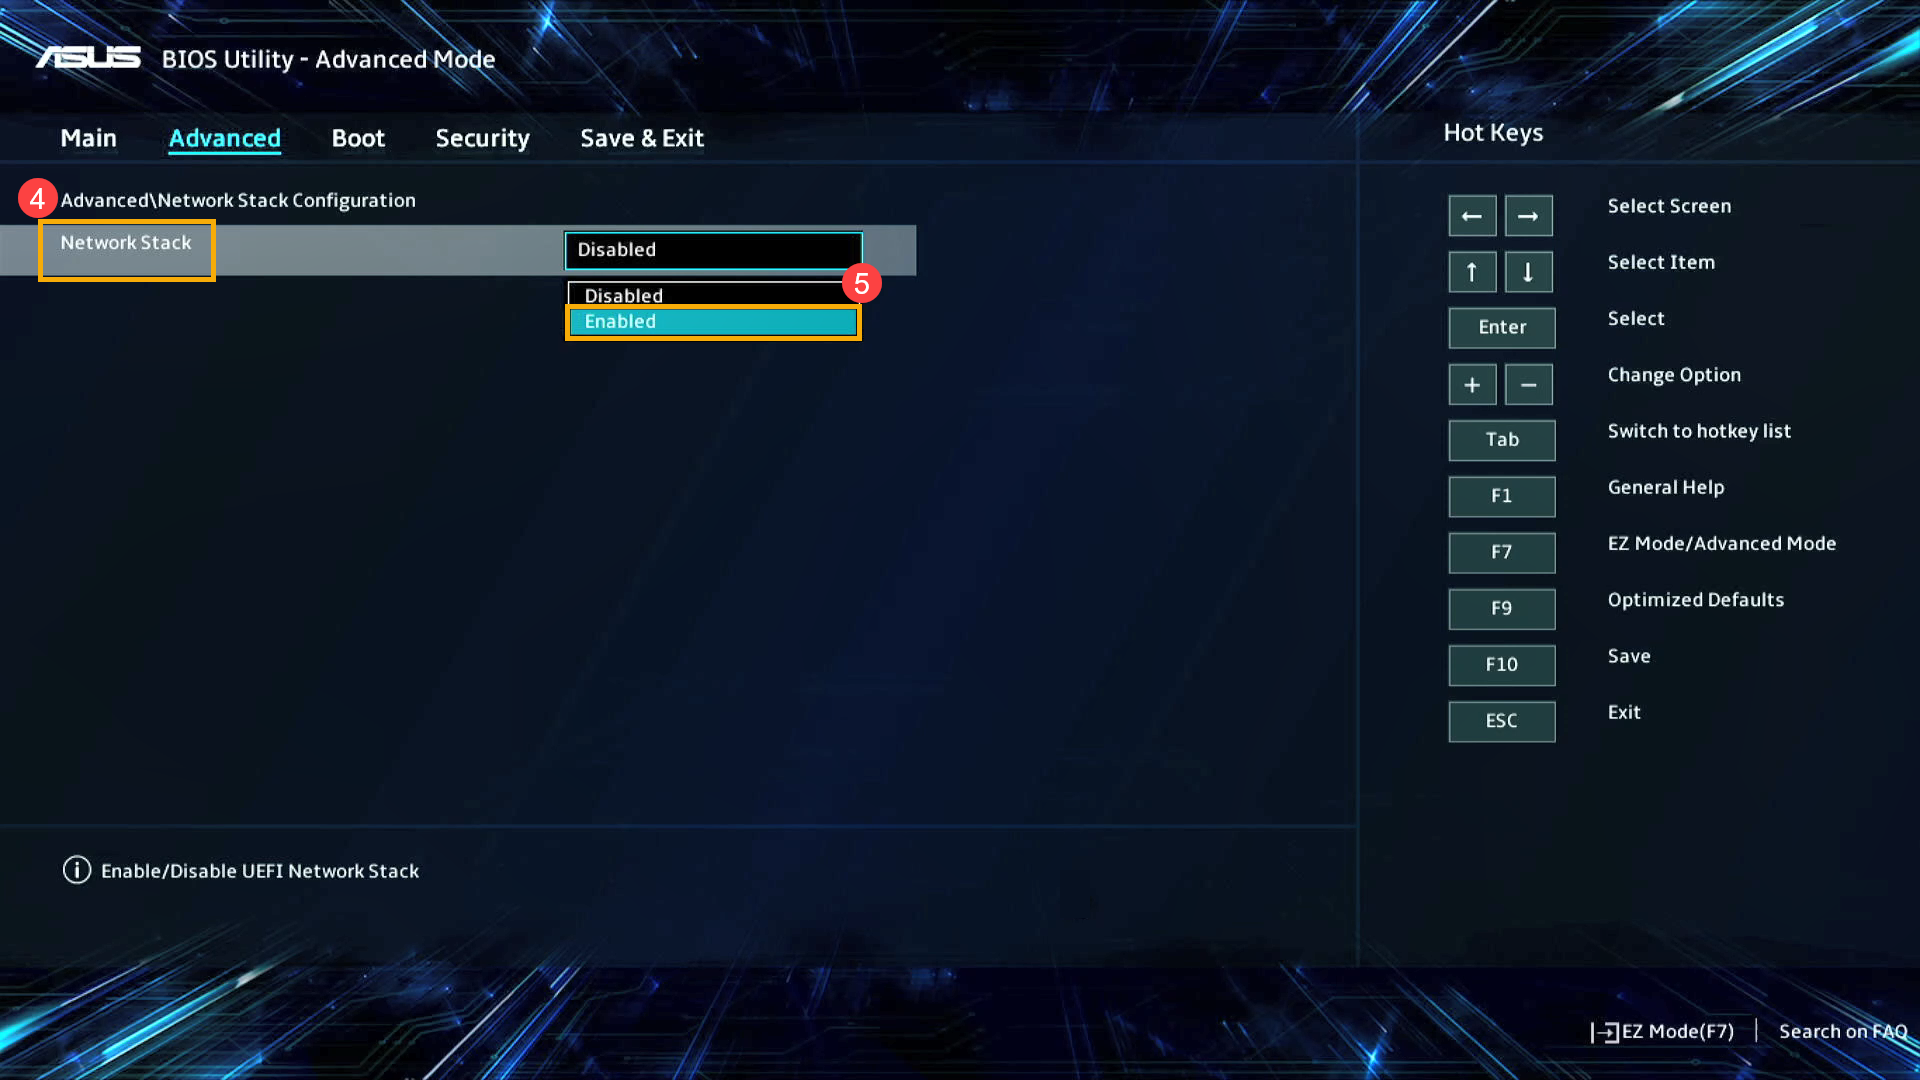
- В разделе Network Stack Configuration для параметра [Network Stack]④ установите значение [Enabled]⑤.
- Включите или выключите параметры IPv4 PXE или IPv6 PXE, в зависимости от Ваших требований⑥.
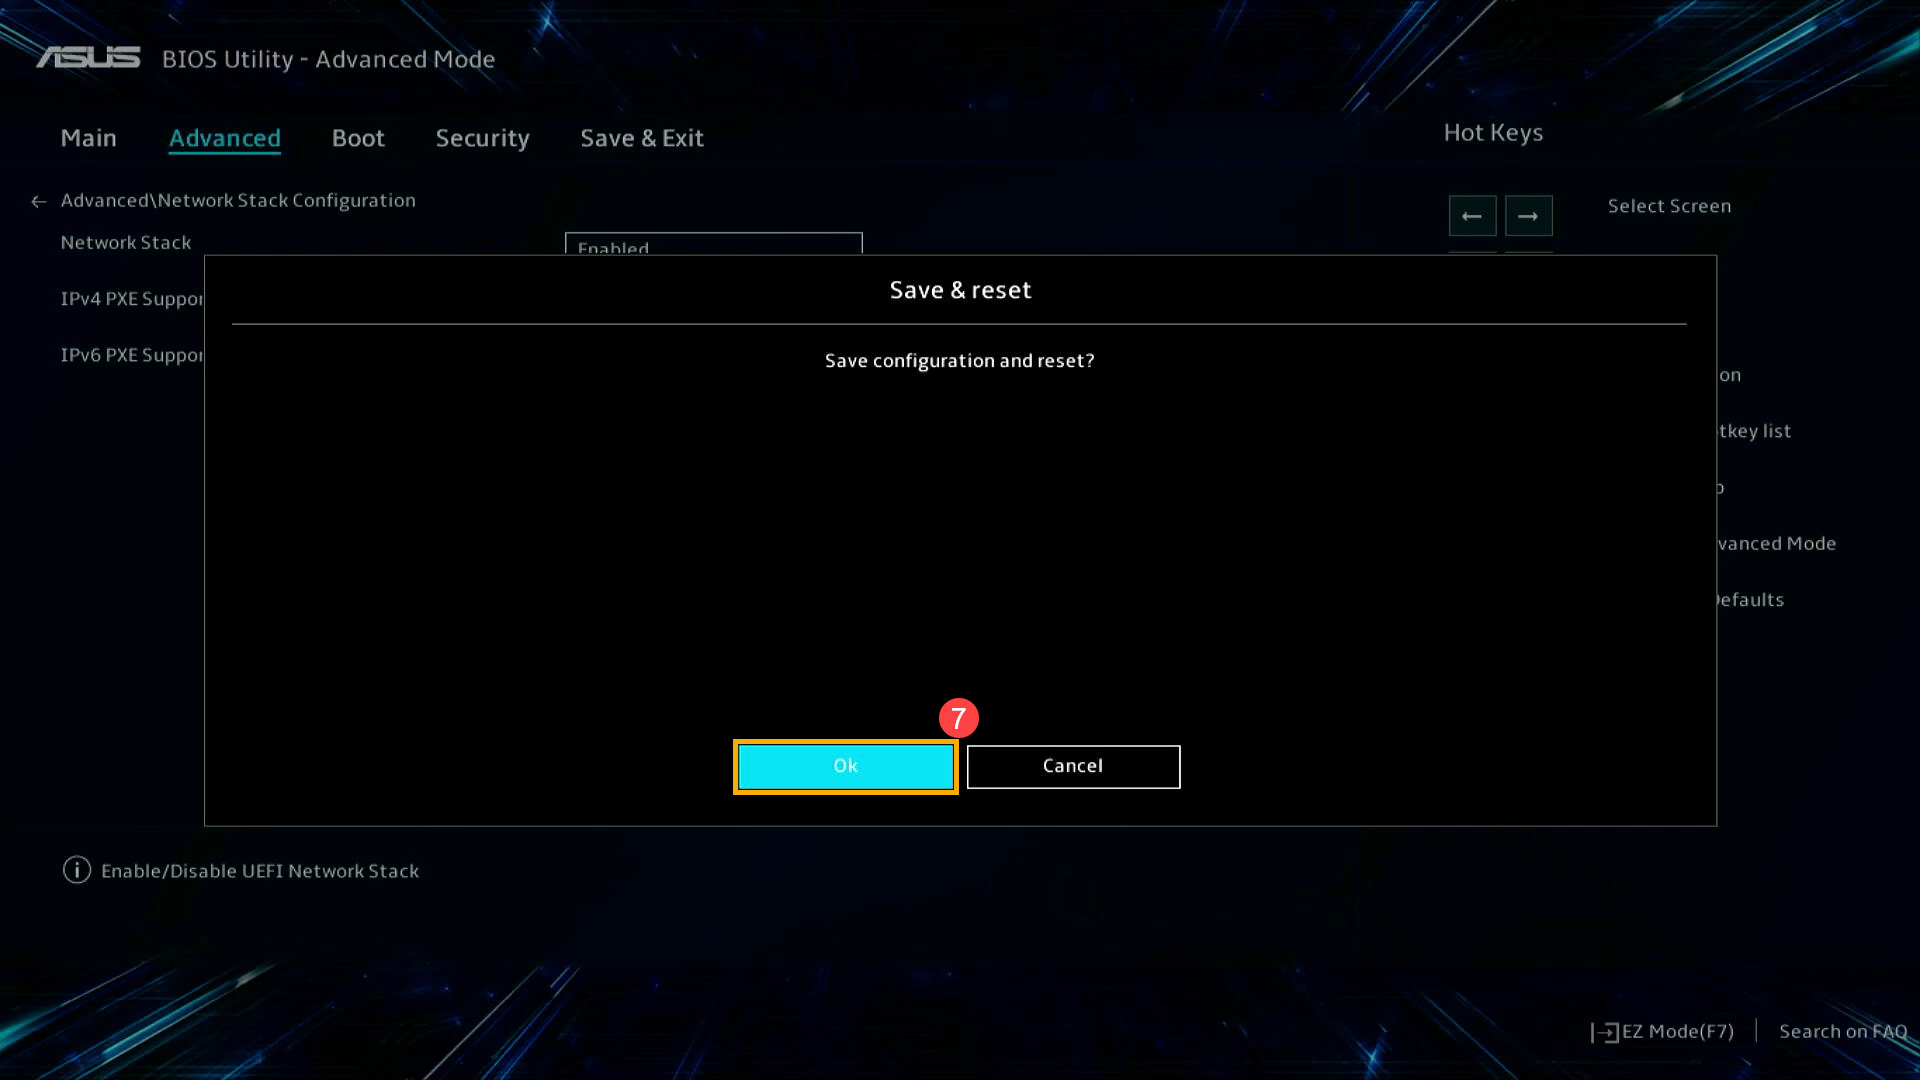
- Теперь нажмите клавишу [F10] и выберите [Ok]⑦ для сохранения изменений и выхода из BIOS.
- Компьютер перезагрузится, будет выполнена загрузка Windows. Теперь Вы можете использовать функцию пробуждения по локальной сети (Wake on LAN).
 на клавиатуре, потом нажмите на [Кнопку питания] (не отпускайте клавишу [F2] пока компьютер не войдет в настройки BIOS). В статье по ссылке Вы можете больше узнать о том, Как войти в настройки BIOS.
Эта информация была полезной?
Yes
No
- Приведенная выше информация может быть частично или полностью процитирована с внешних веб-сайтов или источников. Пожалуйста, обратитесь к информации на основе источника, который мы отметили. Пожалуйста, свяжитесь напрямую или спросите у источников, если есть какие-либо дополнительные вопросы, и обратите внимание, что ASUS не имеет отношения к данному контенту / услуге и не несет ответственности за него.
- Эта информация может не подходить для всех продуктов из той же категории / серии. Некоторые снимки экрана и операции могут отличаться от версий программного обеспечения.
- ASUS предоставляет вышеуказанную информацию только для справки. Если у вас есть какие-либо вопросы о содержании, пожалуйста, свяжитесь напрямую с поставщиком вышеуказанного продукта. Обратите внимание, что ASUS не несет ответственности за контент или услуги, предоставляемые вышеуказанным поставщиком продукта.
Introduction and requirements.
Since the introduction of Fast Startup in Windows 10 WOL from a complete power off has been awkward and complicated to implement. Although as far as i know it’s still not possible to do this with Fast Startup enabled this guide will walk you through disabling fast startup and configuring the required UEFI settings.
Requirements
- A wired network connection, most Wi-Fi cards don’t support WOL
Goals
- To be able to turn your computer on from your LAN (or remotely if you port forward etc) on Windows 10
Notice
Please note for this guide i will be using my own PC which is running a ASUS X299 motherboard, similar options should apply to other brands and they should be pretty identical between other ASUS motherboards. My Motherboard also has 2 network ports so for the purpose of this guide i have set WOL only on the second of the 2.
Windows settings
The first thing you need to do is disable Fast Startup, if this option doesn’t exist it’s likely already off, it will be off if you have previously disabled hibernate with powercfg /h off.
- Press Windows + R and type powercfg.cpl and then press enter.
- Select Choose what the power buttons do and then under Shutdown Settings.

- If these options are greyed out click Change settings that are current unavailable and the options will no longer be greyed out.
- Now simply un-check Turn on fast startup and press Save Changes.

Now that we have disabled Fast Startup will need to make sure the network adaptor is setup correctly.
- Press Windows + R and type ncpa.cpl and then press enter.
- Right click the network adaptor you wish to set WOL up on and press Properties and then Configure
- Next click the Power Management tab and make sure it’s as shown below.

- Depending on your network adaptor you may also need to go in to the Advanced tab and enable something like Wake on Magic Packet or Wake on Shutdown or Enable PME as shown below.

- This should be all that is needed from the Windows side of things. we now need to access your UEFI to configured the low level settings.


UEFI settings
Now that we have Windows configured correctly we need to configure a couple of things in the UEFI.
- The easiest way to get in to the UEFI on Windows 10 is to hold the Shift Key while pressing Restart and once you are at a menu select Troubleshoot and then UEFI Firmware Settings once you click this you will be rebooted in to the UEFI.


- Once you are in the UEFI the process will vary depending on your Manufacturer. As mentioned previously this guide will mostly focus on ASUS but similar options usually exist on Gigabyte, MSI, EVGA etc.
- Press «F7» to enter Advanced Mode, Once in Advanced mode navigate to the following sections


Testing
Now you should be ready to test. I use a android phone on the same network for testing, to do this i use the app Wake On LAN (https://play.google.com/store/apps/details?id=co.uk.mrwebb.wakeonlan&hl=en) there are similar for other platforms.
Troubleshooting
If you are having issues please let me know in the comments below.
When you need to power on a system remotely you are fortunate that Microsoft lets you activate Wake on LAN in Windows 10. Using this terrific feature, you can wake up the computer from shut down, sleep or hibernate over a local area network from miles away. Having WoL (Wake on LAN) support in hardware, this special feature turns into the power button. This ability to power on a remote system depends on two things – Network card and your BIOS.
The interesting fact is that you don’t require any particular 3rd party software to enable WOL. You can either activate it using the network card’s firmware or through BIOS. So, here, we will discuss the way to Wake on LAN Windows 10 moreover tweak BIOS settings if necessary.
Wake on LAN (short form WOL) is known for waking up from either sleep, hibernate or shut down mode. After enabling this feature, you can awake Windows by sending the “magic packet” having MAC address from others. Before going any deeper, you need to ensure the device is in hibernation or sleep mode instead. Additionally, there should be an end to end network between two or more devices and an active Ethernet connection.
Now, pursue the below-given series of steps and activate Wake on LAN in Windows 10.
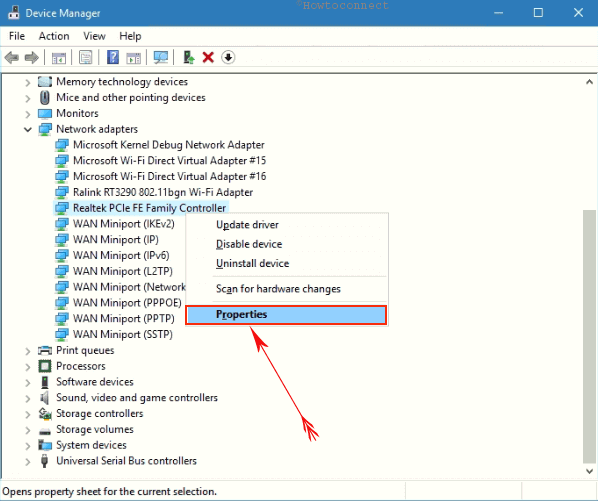
Step-1: First and foremost, execute a right-click on the Start button on the taskbar. From the menu that shows up on the screen, locate and hit Device Manager.
Step-2: Expand Network Adaptor from left and put a right-click on your network card in use.
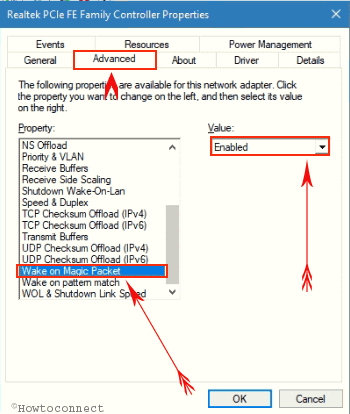
Step-3: Select Properties from the list and open Advanced tab from the popup.
Step-4: Roll over the list of Property and select Wake on Magic Packet as depicted in the given image. Once you find it, click the drop-down under Value and choose the Enabled option.
Step-5: Next, head to the Power Management tab as well as check the options entitled with “Allow this device to wake the computer” and “Only allow a magic packet to wake the computer”.
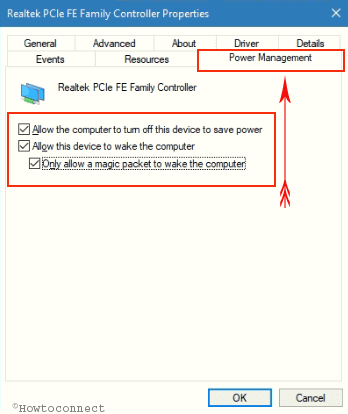
Step-6: Hit on OK button from the bottom with a view to saving changes.
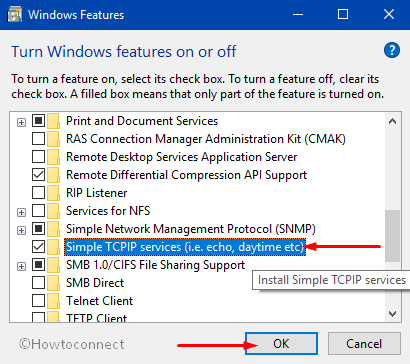
Step-7: Once, you do this, you have to install the simple TCIP Service feature. So, on Cortana text field, type Windows Features and press Enter.
Step-8: On the window that opens up, tick mark the option Simple TCPIP services and click OK.
These guidelines are same for all the manufacturers but enabling WOL on BIOS differs from one to another. So, in the below section, we are going to discuss the series of steps to activate Wake on LAN in Windows 10 in different BIOS setup.
01. Asus BIOS Wake on LAN Configuration
- Enter into “BIOS setup” by hitting any of these keys – ESC, DELETE or F2.
- Conduct a click on Advanced tab from BIOS SETUP UTILITY screen.
- Head to APM and make the “Power on by PCIE/PCI” option Enabled.
If you find the steps are not complying with your one, we recommend you to go through the Motherboard manual provided by the manufacturer. You will get instructions there for your Windows and thus you can follow that for the same purpose.
02. HP BIOS Configuration Wake on LAN
a) Once you power on the system, hit the assigned key to get into BIOS which is generally the “F1, F2, Del, or Esc” key. But it may differ depending on the BIOS version.
b) Open the Power tab using right arrow key and engage using Enter.
c) Reach out to “Hardware Power Management” with the help of arrow keys and hit Enter once selected.
d) Here, ensure that “S5 Wake on LAN” option is set to Enabled. If you find it Disabled, use arrow keys in order to change the status.
For many, the Wake on LAN in Windows 10 fails to perform after the upgradation. If you are also facing issues, follow the given sequence of phases and their steps carefully.
Phase 1 – Update the BIOS
The vital task is to verify whether you hold the latest version of the BIOS. To do so, navigate to the HP official website and ensure to install the appropriate BIOS update for your computer.
In this concern, you may prefer to follow Windows 10 – 5 Ways To Know BIOS Version of MotherBoard.
Phase 2 – Turn Off Hybrid Shutdown
1. Conduct a right-click on the battery icon at the taskbar and click on Power options as depicted in the following image.

2. Make a click on the option namely Choose what the power button does on the left column of the next window. Moving ahead, click Change settings that are currently unavailable ( see snapshot).
3. Here, ensure to uncheck the option “Turn on fast startup“. Lastly, click Save changes button.
Phase 3 – Activate Wake on LAN in Windows 10 setting for LAN driver
1. First of all, access Device Manager using any of your ways. Once you open it, expand the “Network Adapter” and then identify your LAN driver.
2. After locating the LAN device, conduct a right click on it and choose Properties.
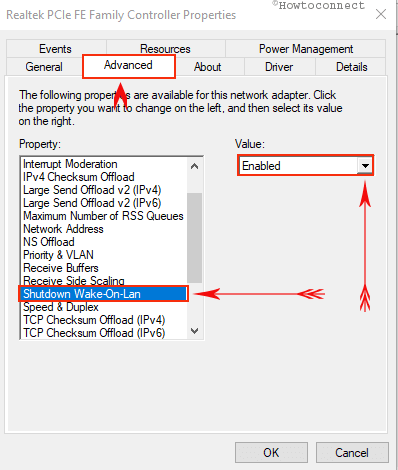
3. Here, head to the Advanced tab and underneath the Property list locate the option Shutdown Wake on LAN. Once you find it, select it. Now, on its right side click the drop-down below Value option and choose Enabled.
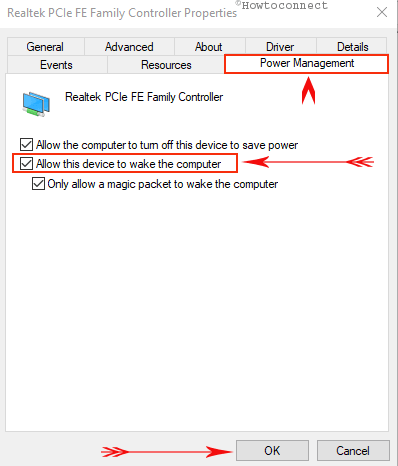
4. Now, switch to the Power Management tab and ensure that the option namely “Allow this device to wake the computer” is selected (see snapshot). Finally, click the Ok button and implement the changes you did to the LAN device.
Phase 4 – Manually Include the HP Registry Key
Type the command regedit on Cortana and hit Enter to access the “Registry Editor”. Click Yes upon the prompt of UAC on the screen.
Now, reach out the following path carefully –
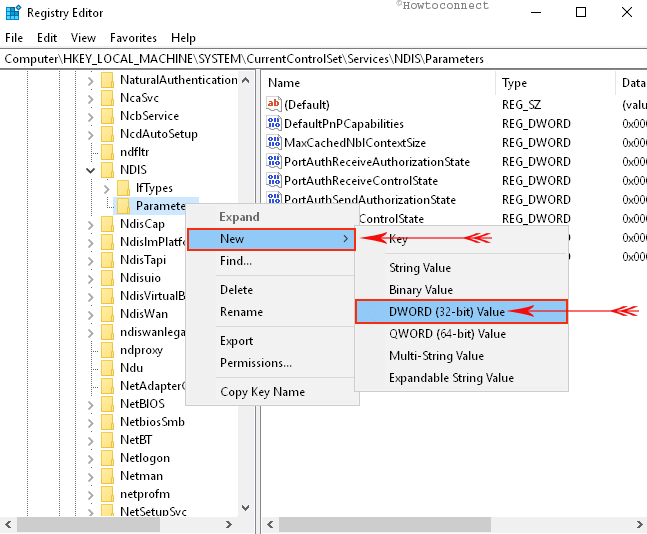
HKEY_LOCAL_MACHINE\SYSTEM\CurrentControlSet\Services\NDIS\Parameters
Once you reach Parameters key, right-click and hover the cursor over New. Next, choose DWORD (32 bit-Value) and name it as AllowWakeFromS5.
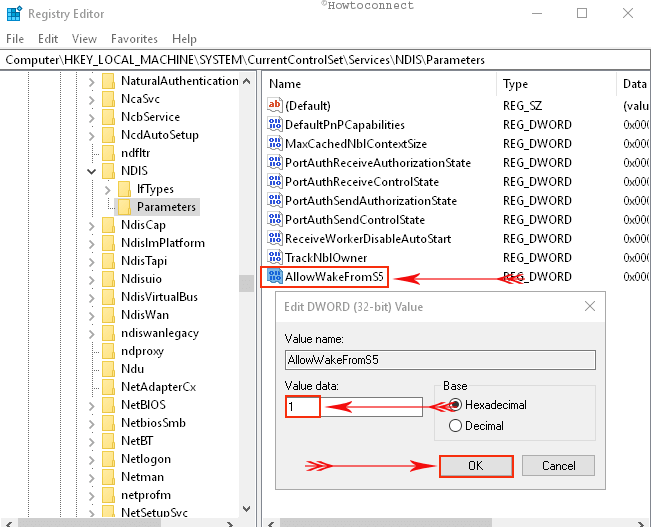
Double-click on the DWORD and assign its Value as 1 and click Ok to save the modification.
03. Acer BIOS Setting Change for Wake on LAN
First of all, turn on the system and sharply press “F2 or DELETE” key when the logo shows up on the screen and get access to the BIOS. Moving ahead, navigate to Power Management Setup using arrow keys and hit Enter button.
Next, go to Deep Power Off Mode and change its status to Disabled and lastly press Enter key. Now, move to “Power On by PCIE Devices” and set it as Enabled. Lastly, save all these modifications the by pressing F10 key.
04. For Biostar BIOS WOL activation
Power On the Windows and Press F1, F2, Esc and Del keys at the startup. You will be guided to BIOS setup utility and keys will vary from one model to others. Select the Power Management Setup using navigation keys and hit Enter immediately.
Find the option WOL(PME#) From Soft Off in the list and change its status to Enabled. If it is not, then with the help of the arrow keys to highlight it.
05. American Megatrends BIOS settings for Wake on LAN
- Enter into the BIOS setup screen and to do so, first, turn on the system. Upon the first beep, quickly hit one of these keys – F1, F2, Esc and Del key.
- Go to the Advanced menu using the side arrows.
- Now, find Chipset Configuration, select it and hit Enter. Moving on, reach out to Southbridge Configuration, and again press Enter key.
- Here, locate “Wake on LAN from S5” option and set its status as Enabled.
06. Dell BIOS Setting for Wake on LAN
- Follow this link and download Dell Command | Configure in the first place. Once downloading ends, Run it as Administrator.
- Once prompt, select Multi-Platform Package in the type of package. Make changes in the status of following options:
a) “Wake On LAN- Enable
b) Block S3 sleep state- Enable
c) Deep Sleep Control- Disable”
- Hit the Export .EXE button from the bottom. The System will ask the passwords for the sake of authentication. However, you can skip this step as there was no password configured before.
- You can now run the feature by distributing it using the network share. Alternatively, you can execute commands such as PSEXEC or GFI Remote Console.
07. Lenovo
The experts at the Lenovo Community explicitly explains on How to activate Wake on LAN in Windows 10. For Lenovo system, all you need is to configure the network adapter settings shown above. When the computer is in shutdown or in hibernate state, WoL requires crossing the BIOS. So, waking up from sleep will be fine as the LAN card supports it. And it is the operating system that wakes the system up and not the BIOS.
How to Use Wake on LAN in Windows 10 Feature to Resume a System Remotely
Way 1 – By Port- Forwarding
After you activate Wake on LAN in Windows 10 through network card and motherboard, let us learn how you will resume the system.
1. Once you successfully enable the WoL feature, restart your Windows 10 PC. Next, type Windows Firewall on Cortana search field and hit Enter. Click Advanced settings option on the left sidebar of the following window.
2. Conduct a click on Inbound Rules on the left column.
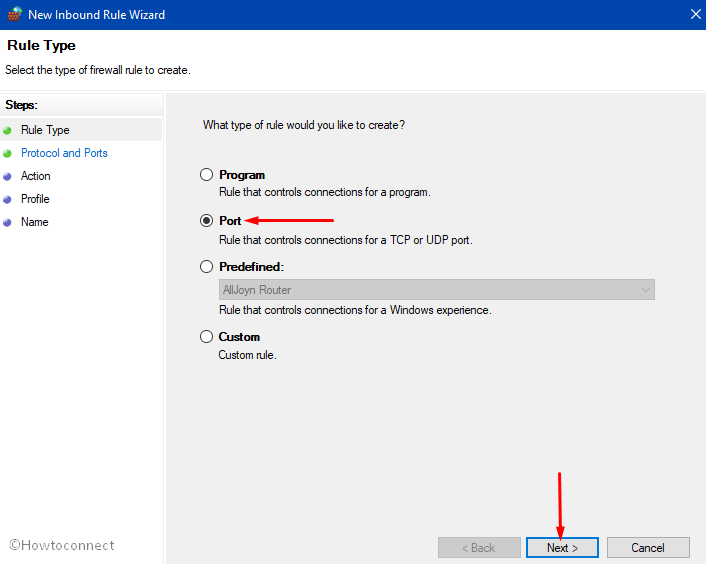
3. Click New Rule option from the right pane. Select Port radio button when a new wizard pops-up and click Next.
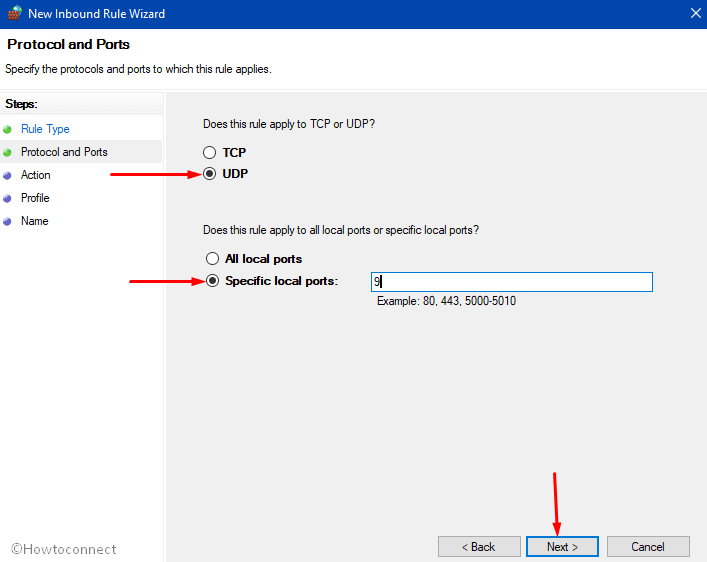
4. First, select UDP and then choose “Specific local ports“. Usually, most utilities use port 7 0r 9, so you can type 9 in the Specific local ports field and click Next. Follow the guidelines of the wizard and finish generating a new Inbound Rule to launch the required port.
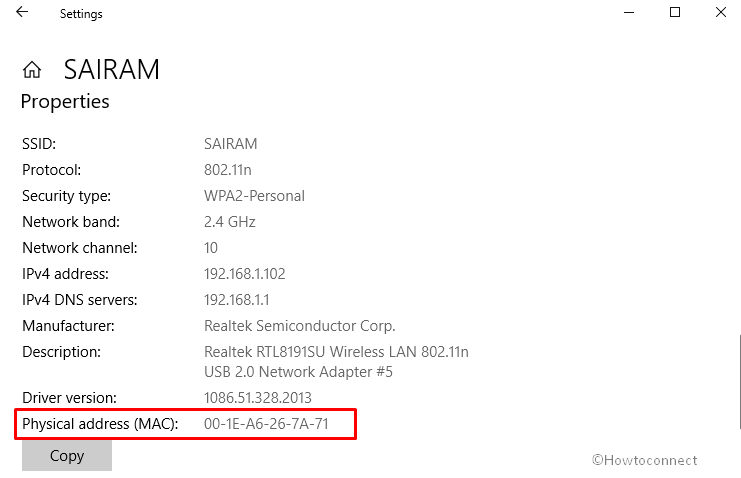
5. Now, you need to note down the MAC address somewhere safely and do to so, launch Settings application using “Win – I” hotkeys.
6. Navigate to Network & Internet => Ethernet and click the connection name on the right side. If you are using a wireless connection, click Wi-Fi and select the connection name.
7. On the next page, scroll down and you can notice the MAC address, note down it somewhere safe.
8. Moving ahead, on another computer, download this free utility WolCmd using the below link.
https://www.depicus.com/wake-on-lan/wake-on-lan-cmd
9. Finally, run this command line utility as per the given below syntax –
wolcmd [mac address] [ip address] [subnet mask] [port number]
10. For example, to resume my computer, I have to run this command –
wolcmd 001EA6267A71 192.168.1.102 255.255.255.0 9
Note – Ensure to remove “–” from the MAC address before running it.
If you are not aware of the IP address, subnet mask, then go through our tutorial on How to Detect IP Address of Router on Windows 10.
11. As the last thing, you can also generate a shortcut of wolcmd and wake up the system with a single click.
Way 2 – Using Remote Software
Another simpler way to resume a system through Wake on LAN is by using a remote software such as TeamViewer. It has a built-in support to awaken the PC. Here, we are taking Team Viewer as an example and let us go through the steps now.
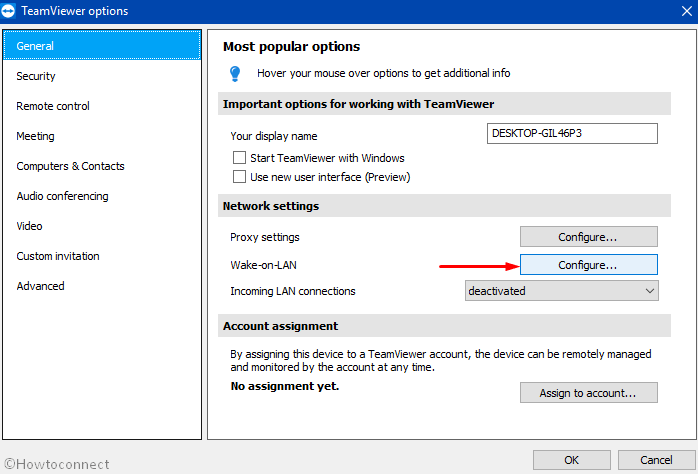
- On the main screen of TeamViewer, click Extras tab and select Options.
- Under Network settings section, locate Wake on LAN option. To set it up, make a click on the Configure button that appears next to it.
- To monitor and manage things remotely, you have to first assign your device to a “TeamViewer account”.
- Follow the guidelines on the dialog and complete the setup in order to use Wake on LAN in Windows 10.
For reference, if you use Team Viewer to remotely access another system, you may like to read our tutorial on How to Connect to Teamviewer Partner Without Password.
Conclusion
For enjoying the ultimate ease of access, Microsoft adorns Windows 10 with a special feature to activate Wake on LAN in Windows 10. Though the procedure is same for but irrespective of different manufacturers, settings in BIOS are different. We have discussed probable setup options so that you can enable this feature for your Windows. If you have some more information on other important motherboards, do share with us.
If your Asus motherboard supports Wake-on-LAN (WOL), you can use it to wake up a sleeping or hibernating computer over the network. Enter the BIOS’s Advanced Mode and find the APM Configuration section to activate this function.
However, before doing any of these, you want to confirm whether your board supports Wake-On-LAN functionality.
In this article, I will walk you through verifying your motherboard’s compatibility with the Wake on LAN feature and how to enable and configure it. We’ll also look at how to fix WOL not working because that can also be a head-scratcher.
I’m using an ASUS X299 motherboard with two network ports and will only enable WOL on the second. The examples I will cite in this article will apply to other models and even different brands since they are identical.
Now, before we dive into how you can enable or configure WOL on your motherboard, here’s how to check if it supports the function.
Does Your System Support The Wake-on-LAN Function?
There’s only one way to find out:
Navigate to the “Tech Specs” page for your motherboard model on the official Asus website HERE. Check the manageability item of the system specs to confirm if the WOL by PME supports the Wake-On-LAN function.
If it dYout and enables the function in your BIOS. Here’s if it does how to go about it:
How to Enable Wake-On-LAN on An Asus Motherboard
Step 1: Turn on your system and start hitting the Del key to access the BIOS.
Step 2: Navigate to the “Advanced” page and click on “APM configuration.”
I have encountered issues where users could not find the “Apm Configuration” tab in the advanced Mode of the UEFI BIOS utility.
If this sounds like your situation when you get to this point, check that your motherboard supports VOL via PME_PXE.
If it does, and you can still see any options for the APM configuration, try updating the BIOS.
But before you do that, consider scrolling or using the arrow keys to tab down until you find the item. In most cases, the option is below the first page in Advanced, and you aren’t looking at it that way.
Step 3: Now, click “Power on by PCI-E” and set it to e.
Step 4: You have completed the process, so press the F10 key and click “OK” to save the setting.
Your system will automatically reboot, which means you’ve successfully enabled Wake-On-LAN on your Asus motherboard.
How to Configure Wake-On-LAN on an Asus Motherboard
Implementing the WOL function on Windows 10 can become more complicated given the advent of Windows’ Fast Startup feature.
In other words, running the function won’t be as easy while Fast Startup is enabled. So in this section, you will learn how to disable Fast Startup on Windows and configure the required UEFI settings.
First, I recommend you get a wired network connection because if you use Wi-Fi cards, you may run out of luck on compatibility with WOL.
Step 1: The first step is to disable Fast Startup (you won’t have to do this if the option doesn’t exist or if you’ve previously disabled hibernate). So, press Windows + R and type powercfg into the search box. CPL
Step 2: Click on “Choose what the power buttons do,” then navigate to the “Shutdown Settings.” The options under this place could be grayed out, preventing you from resetting it. So to make it accessible, click “Change settings that are currently unavailable.”
Step 3: Now that it’s no longer grayed out, uncheck the “Turn on fast startup” item and save the changes.
Step 4: The next thing is to set up the network adapter. So, press Windows + R and enter “
Step 5: Move the navigator over your preferred network adaptor wherein you intend to set WOL, right-click on it, select “Properties,” and then click on “Configure.”
Step 6: Go to the “Power Management” section and check that the network adaptor is set up correctly.
This is the required configuration to observe on the Windows side to ensure your WOL is up and working.
However, after this configuration, you may need to enable “Wake on Magic Packet” or “Enable PME” in the Advanced tab of the window; it depends on the network adapter you’re working with.
With this out of the way, it’s time to configure WOL in the UEFI utility environment. To do this, follow these steps:
Step 1: If you’re running Windows 10, press Restart while holding the Shift Key. On the menu that comes up, click on Troubleshoot > UEFI Firmware Settings. This will reboot the system into the UEFI.
Step 2: Access the Advanced Mode by pressing “F7.”
Step 3: Move to the Advanced tab and click on the “APM Configuration” item.
Step 4: Enable the Power On By PCI-E/PCI and disable the ErP Ready.
Step 5: Select your LAN adaptor > NIC Configuration > Wake On LAN set to Enabled from the “Advanced” menu.
And that’s it. You’ve successfully configured WOL on the Windows and UEFI sides of the spectrum.
Why is wake-on-LAN not working?
If the WOL function does not work after being enabled, it could signal a low battery.
So be sure the link light remains on when the system is turned off because the NIC won’t receive the magic packet to boot the system if there’s no link light.
If you are experiencing this issue on your Asus motherboard with Windows 10, there could be other reasons, but here is the most common fix for when Wake-On-LAN won’t work:
Step 1: Go to the Windows startup menu and navigate to the “Device Manager” section.
Step 2: Select “Network Adapters” and choose the network controller.
Step 3: Look at the driver version and ensure it is installed. So navigate to “Driver” for this information.
Step 4: The next thing is to allow the device to wake the computer, so move to the “Power Management” page and ensure this feature is checked.
Step 5: Go through the steps shared above for switching off the Fast Startup feature on Windows 10 under the “Additional Power Settings” section of “Power Options.”
When enabled, it prevents the system from working correctly.
In Conclusion
In summary, “wake-on-LAN” is a feature that allows a computer to be turned on remotely by sending a specially crafted packet over a network. To enable this feature on an ASUS motherboard, you need to do the following:
Enter the BIOS settings by pressing the key that appears on the screen during boot (often F2, Del, or Esc).
Look for a setting related to wake-on-LAN or power-on by PCI-E or PCI in the Power Management or Advanced tab.
Set the option to “enabled” or “on” and save your changes before exiting the BIOS.
Once wake-on-LAN is enabled in the BIOS, you can also configure your operating system to allow for WoL functionality. This usually involves enabling WoL in the network adapter properties in the Device Manager.
If WoL is not working, there are a few things you can check:
Ensure that the motherboard is connected to a network that sends WoL packets.
Check that the network adapter supports WoL and is enabled in the device settings.
Verify that the MAC address of the network adapter is correctly entered into the WoL client software or configuration settings.
Some ASUS motherboards have a separate WoL setting in the Windows software, which may need to be enabled.
Overall, WoL can be a convenient feature to have, especially for remote management of a computer. By follFollowingeps the above, you can configure and troubleshoot WoL on an ASUS motherboard.
Expert-tested solutions to fix WOL on your PC right now
by Andrew Wafer
Andrew is not just trying to bring you closer to Windows, but he’s truly interested in this platform. He just happens to be passionate about sharing that knowledge… read more
Updated on
- Wake-on-LAN is a default feature in Windows 10 that allows you to start a PC with a signal through the network.
- It is actually a network so-called magic packet that will trigger the start of the machine.
- If Wake On LAN is not working, you will have to make a few changes to the system using Settings, BIOS, and the Registry Editor.
XINSTALL BY CLICKING THE DOWNLOAD
FILE
Your Windows device can be used in different ways and for various tasks since Microsoft added useful in-built features that can ease your daily schedule.
But, maybe the most popular feature that can be used in Windows 10 and Windows 11 is Wake-on-LAN. Unfortunately, more and more users are complaining about WOL issues, which means that we must find a way to fix these problems.
So, due to some reasons, if the Wake on LAN is not working on your device, try to use the guidelines from below in order to easily correct that.
Why is my Wake-On-LAN not working?
- Wake-on-LAN not working after shutdown, over Internet, after a long sleep – There are various problems with Wake-on-LAN that can occur and users reported that they are unable to wake their PC over Internet or after a long sleep.
- ASUS Wake-on-LAN not working – This problem can appear on almost any PC and many ASUS users reported it. To fix the issue, you need to update your driver or your BIOS.
- GIGABYTE Wake on LAN not working – This issue can also come up on PCs that run GIGABYTE hardware.
- Shutdown Wake-on-LAN Realtek – Many Realtek owners reported this issue with Realtek network adapters. In most cases, you can fix this problem by updating your drivers or by making a few changes in your registry.
- Wake-on-LAN in BIOS – In order to use the Wake-on-LAN feature, first you need to enable it in BIOS. In addition, you also have to disable Deep Sleep mode as well. If you don’t see these options available, update your BIOS to the latest version.
How can I fix Wake On LAN not working on my PC?
- Why is my Wake-On-LAN not working?
- How can I fix Wake On LAN not working on my PC?
- 1. Disable Fast Startup
- 2. Use Network Configuration Settings
- 3. Install the older network driver
- 4. Install the latest network driver
- 5. Check your BIOS settings
- 6. Modify your registry
- 7. Change your power plan settings
- 8. Upgrade BIOS
- 9. Reset BIOS and enable APM
- What can I do if Wake On LAN is not working on Windows 11?
- What is Wake-on-LAN?
- How can I find the MAC address on Windows 10?
1. Disable Fast Startup
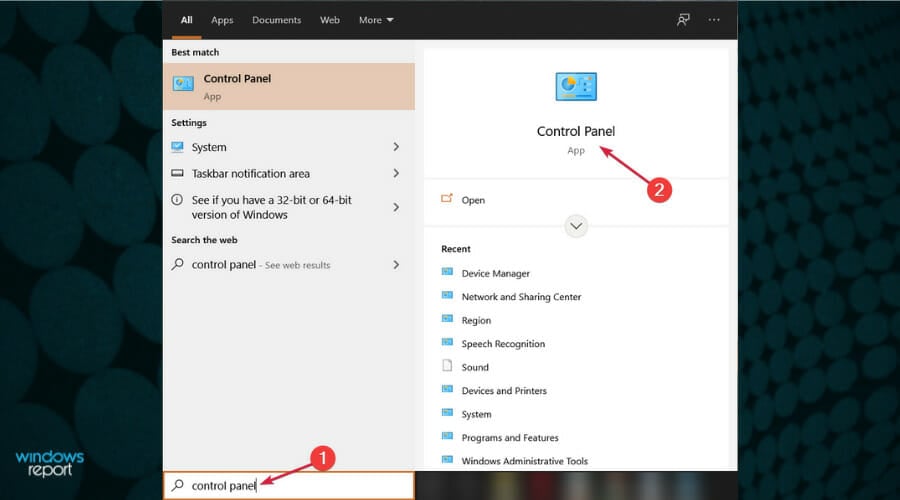
- In the Search bar enter control panel. Select Control Panel from the list of results.

- When Control Panel opens, select Power Options from the menu.

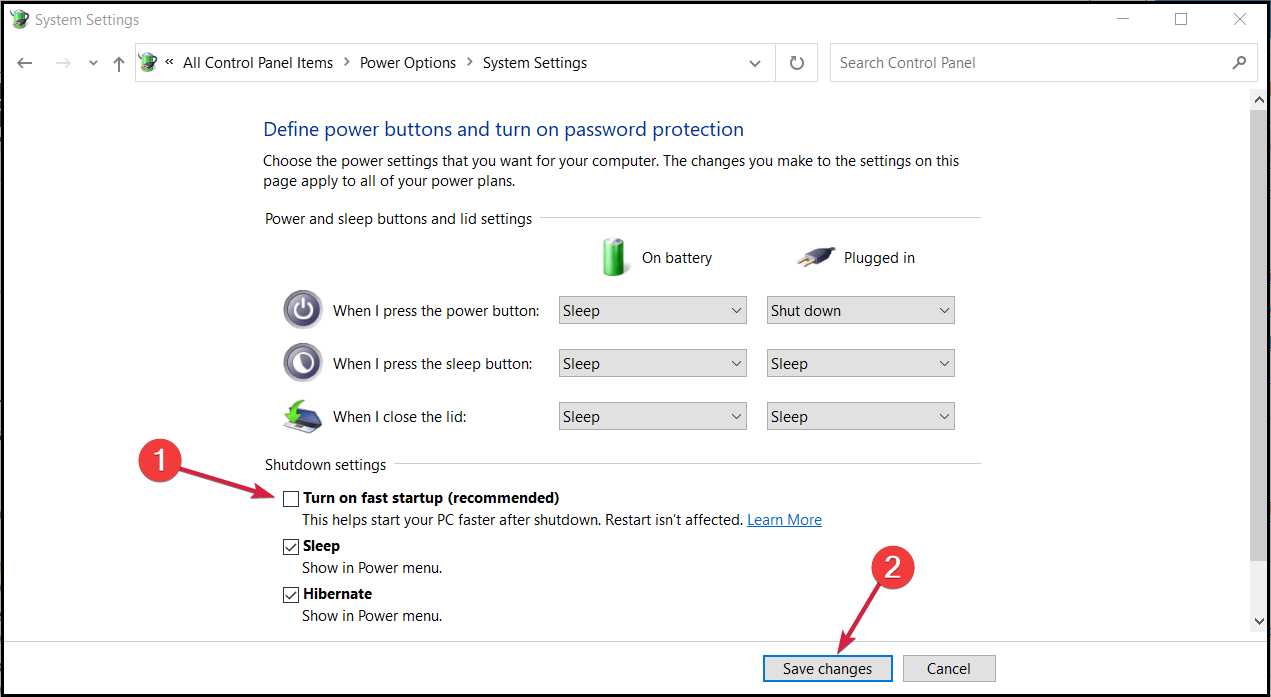
- Power Options window will now appear. Click on Choose what the power button does from the menu on the left.
- Now click on Change settings that are currently unavailable.
- Uncheck Turn on fast startup option and click on Save changes.


Fast Startup is a feature that can be activated or disabled from your Windows 10 settings. When enabled, you will be able to power off your device faster than usual.
But, in some cases, the WOL protocol will not work when the mentioned feature is activated. Therefore, you need to disable it to fix the problem.
After making these changes, check if the Wake-on-LAN feature is working. When you can’t perform this procedure, learn how to fix Control Panel if it’s not opening.
2. Use Network Configuration Settings
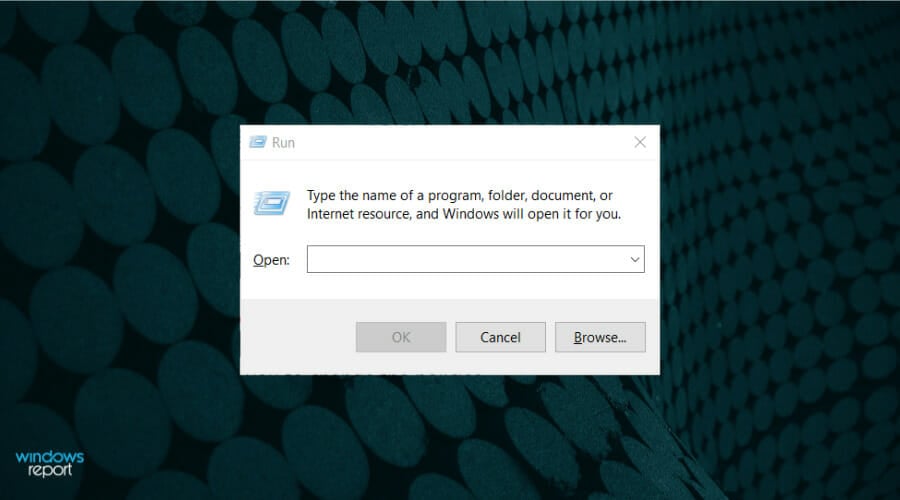
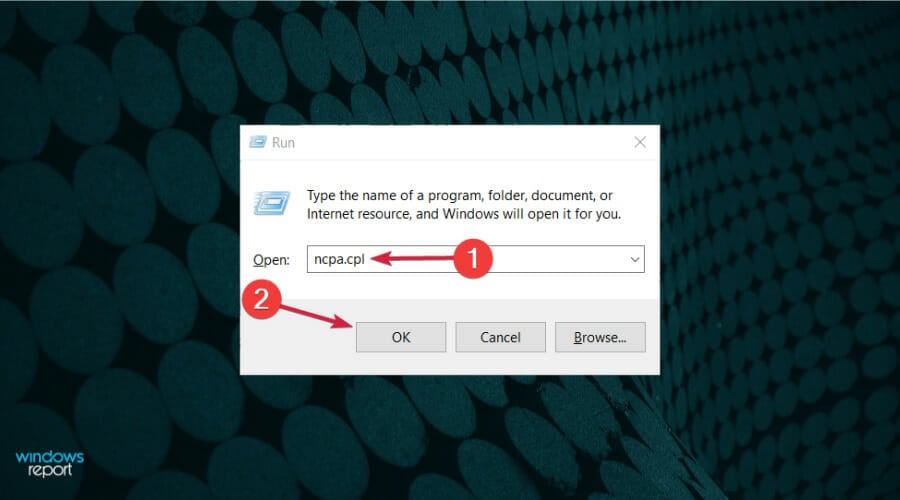
- From the Start screen use Win + R keyboard buttons in order to launch the Run console.
- In the Run box type ncpa.cpl and click OK.
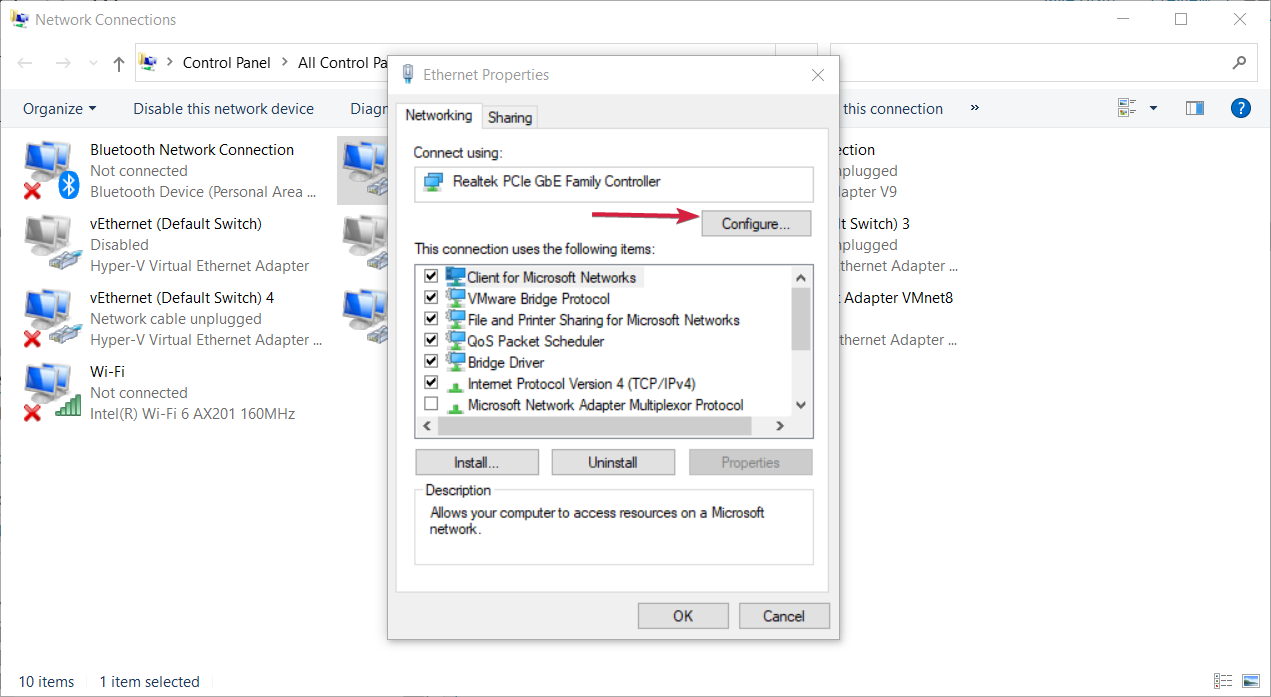
- Right click your connection and choose Properties from the menu.
- When Properties window opens click on Configure.
- Go to Advanced tab and select the Enable PME option. Change the value into to Enabled and save changes. For some adapters the function is called Shutdown Wake-On-Lan so if you can’t see the Enable PME, you should enable this instead.
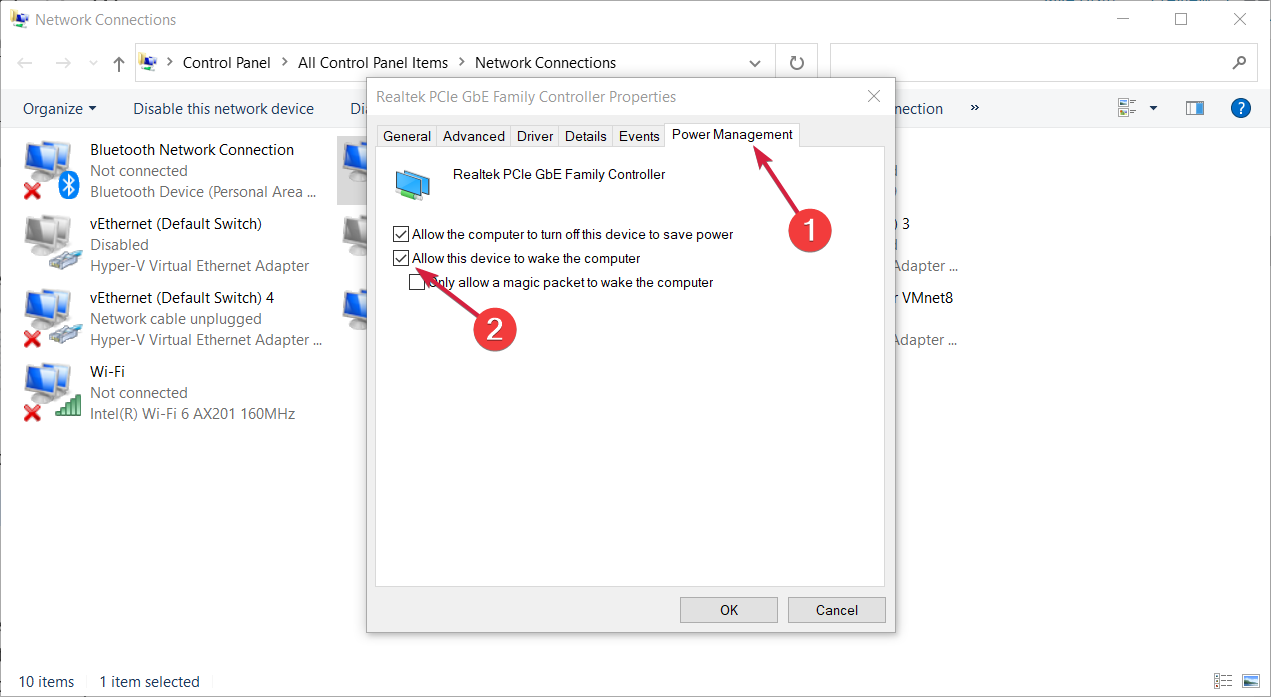
- Next, click the Power Management tab and check the Allow this device to wake the computer.


If you can’t perform this method our solutions on how to fix the Start button will help you solve this problem right away. Most users don’t know what to do when the Windows key stops working.
3. Install the older network driver
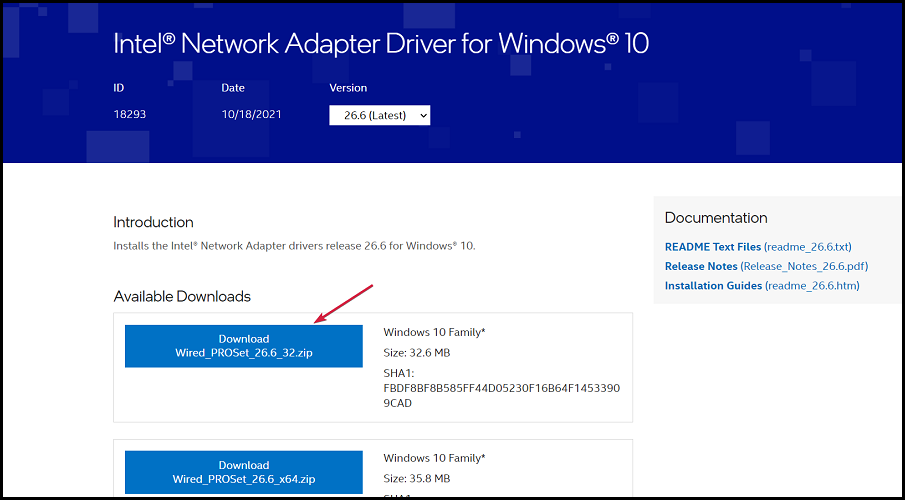
- Go to your network adapter or motherboard manufacturer’s website, locate the driver for your device, and download it.

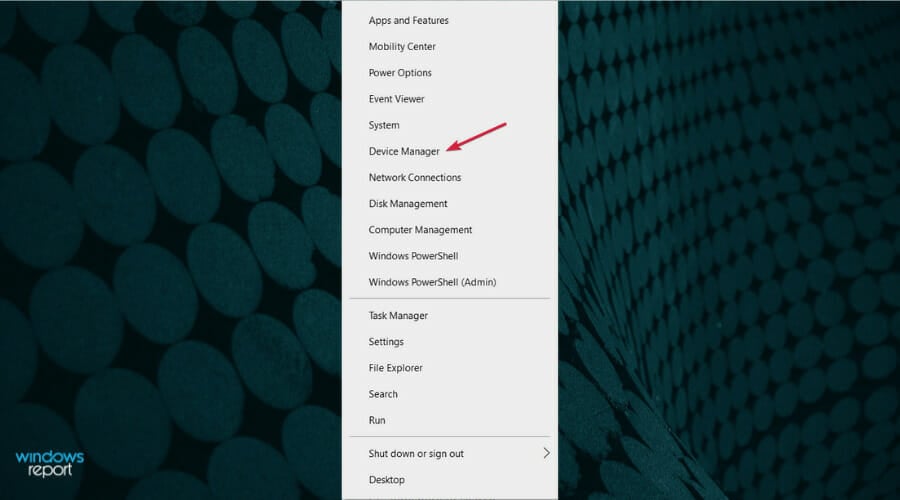
- Now press Windows key + X to open Win + X menu and choose Device Manager from the list.
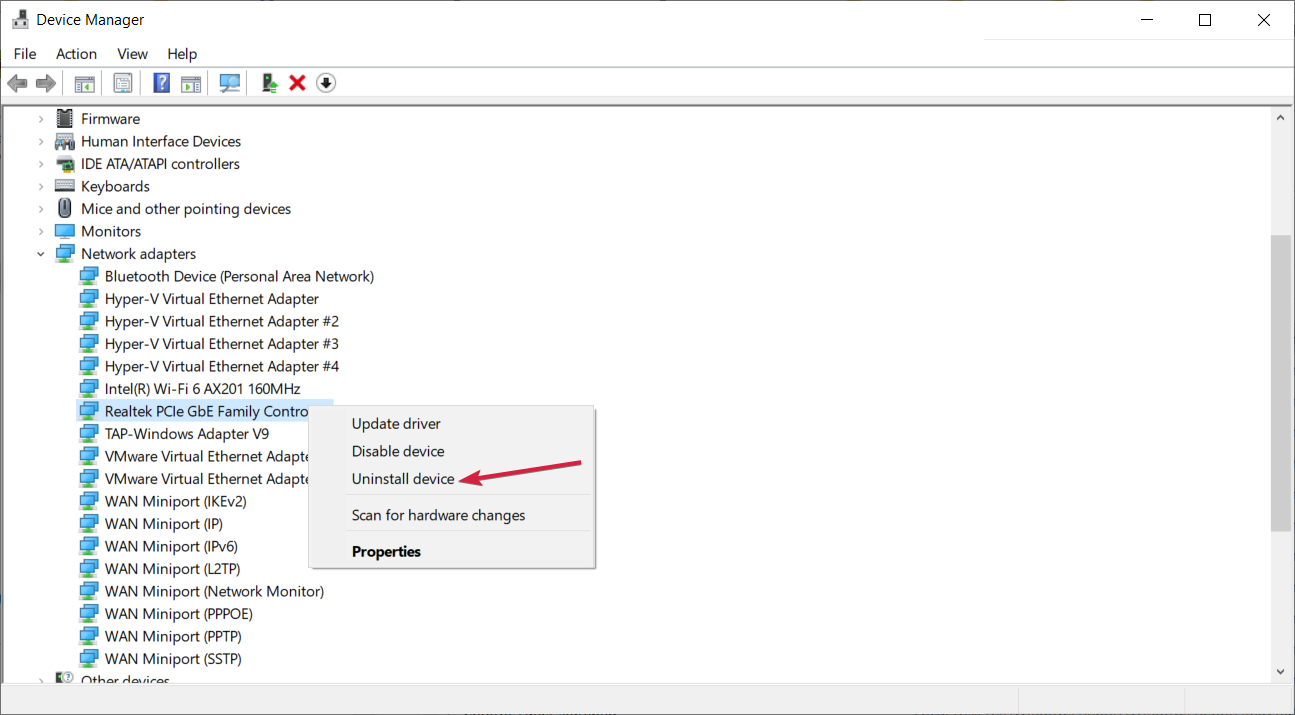
- Once Device Manager opens, locate your network adapter, right click it and choose Uninstall device.

- When the confirmation dialog appears, click on Uninstall.
- Now click on Scan for hardware changes icon. Windows will now try to install the default driver.


If Wake-on-LAN is not working in Windows 10, the problem might be related to your network driver.
According to users, they managed to fix the issue simply by installing the older version of their network driver.
Once the default driver is installed, check if the problem is resolved. If the issue persists or if that default driver doesn’t work at all, install the driver that you downloaded in Step 1.
After installing the older driver, check if the Wake-on-LAN feature works. If the older driver solves the problem, you’ll have to prevent Windows from automatically updating it in the future.
In case the manual process doesn’t work out and you need a more streamlined method, the standalone driver manager will help you in any matter.
How we test, review and rate?
We have worked for the past 6 months on building a new review system on how we produce content. Using it, we have subsequently redone most of our articles to provide actual hands-on expertise on the guides we made.
For more details you can read how we test, review, and rate at WindowsReport.
Most common Windows errors and bugs can result from faulty or incompatible drivers. An outdated system can lead to lags, system issues, or even BSoDs.
You can prevent these problems by using an automatic tool that will search and install the correct drivers on your computer with just a few clicks. That’s why we recommend you use Outbyte Driver Updater.
Here’s how to do it:
- Download and install the Outbyte Driver Updater app.
- Launch the software.
- Wait for the app to detect all incompatible drivers.
- Afterward, it will show you a list of the drivers found to select the ones to Update or Ignore.
- Click on Update & Apply Selected to download and install the newest versions.
- Restart your PC to ensure the applied changes.


Outbyte Driver Updater
Use this software and solve all driver-related issues from your PC.
Disclaimer: You may need to upgrade the app from the free version to perform specific actions.
4. Install the latest network driver
- Press the Windows key + X and select Device Manager from the list.
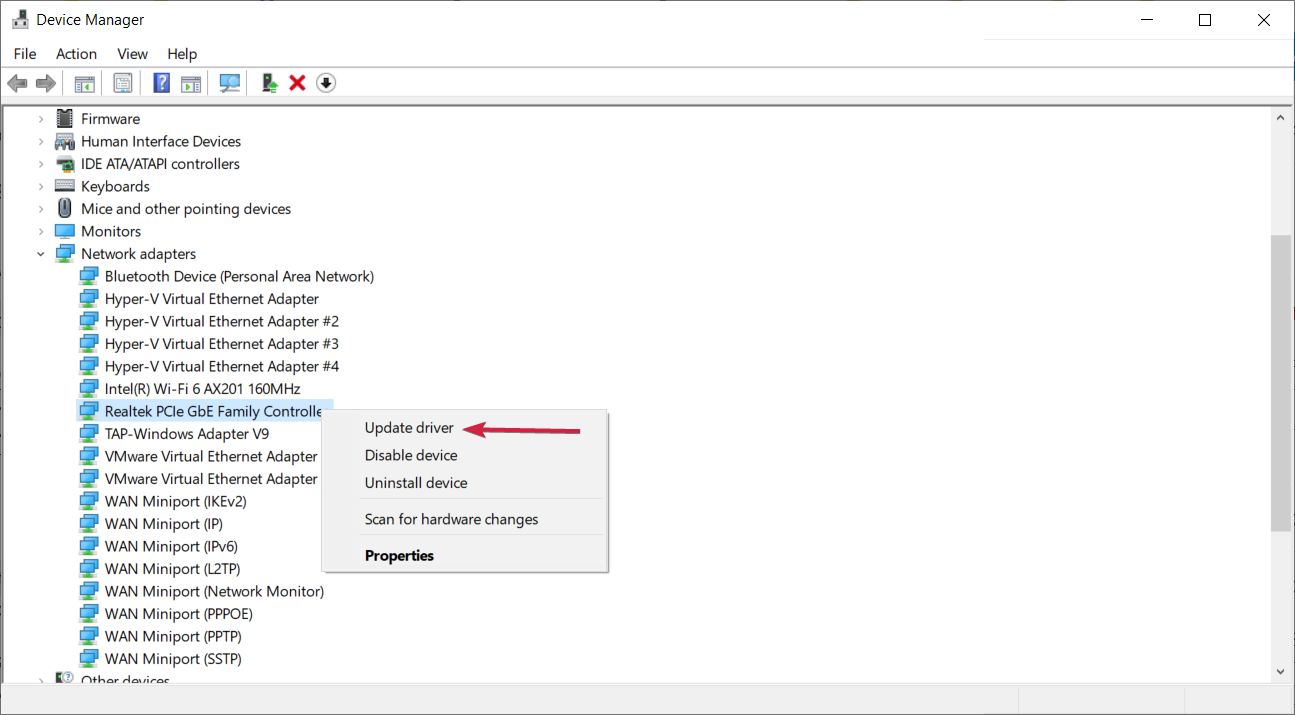
- Expand the Network adapters section, right click the device and select Update driver.
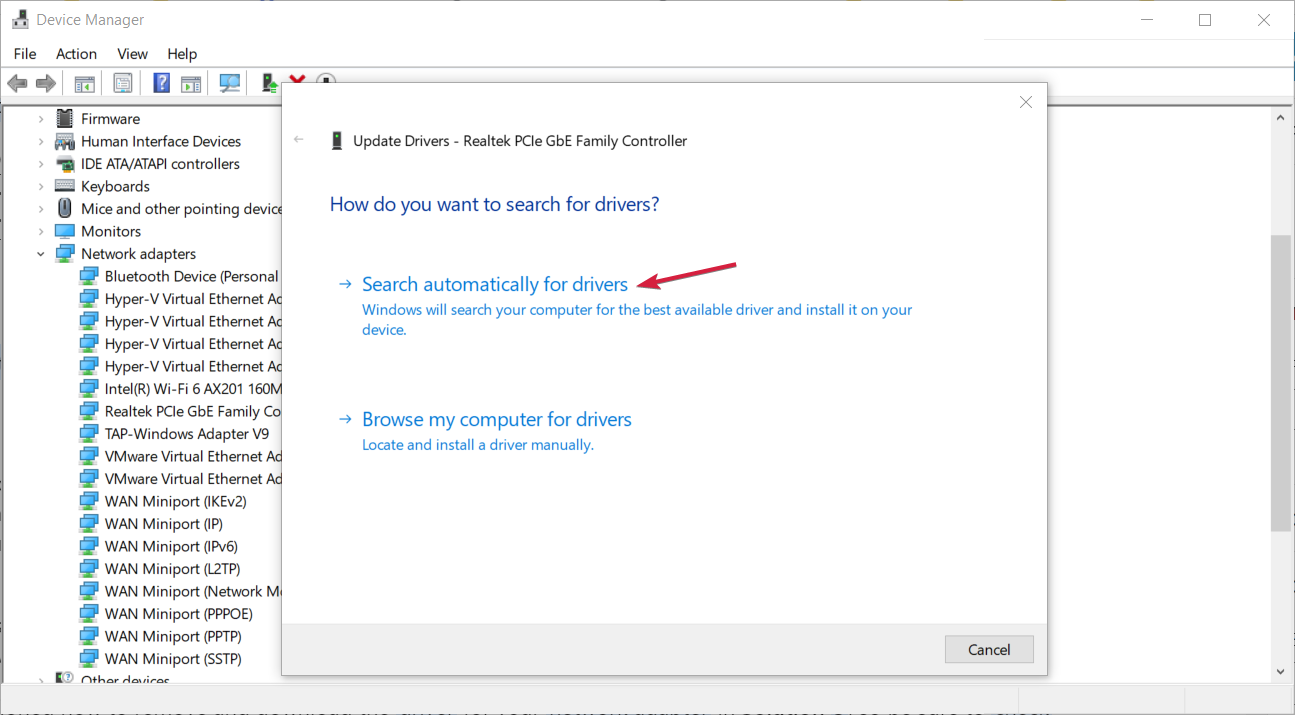
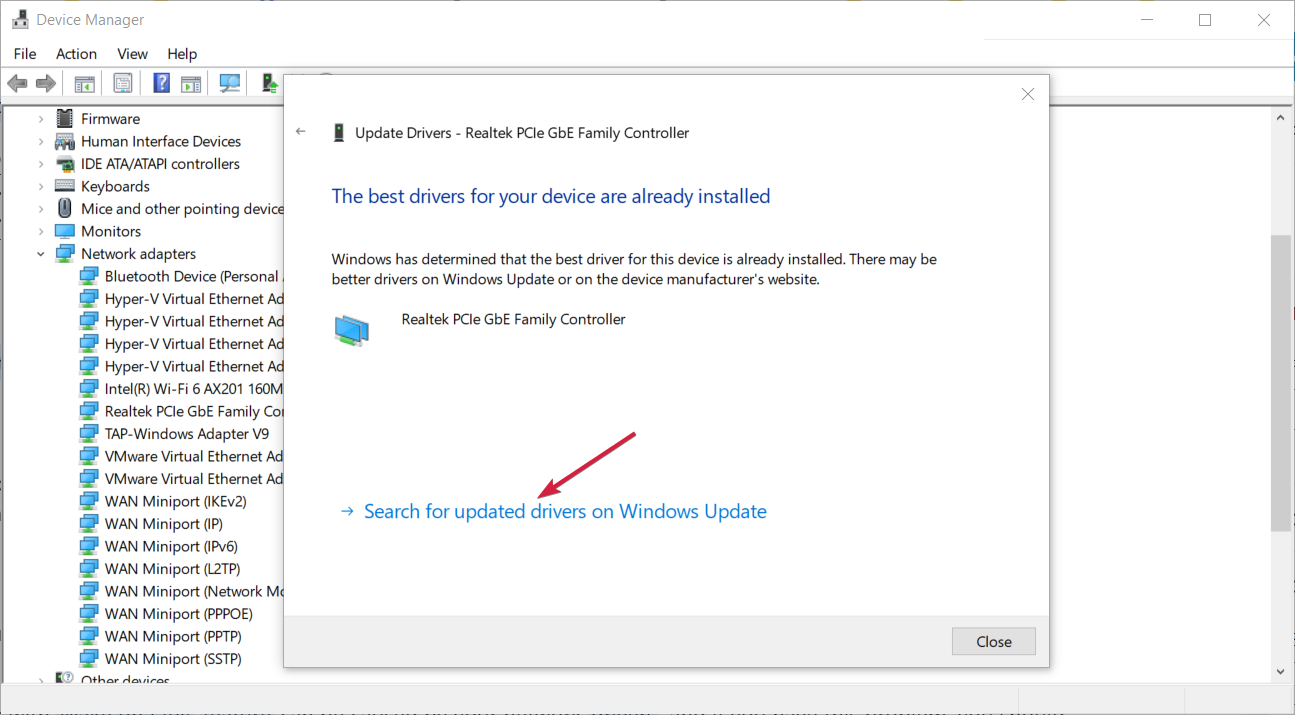
- You can click on Search automatically for drivers of if you downloaded the latest driver from the manufacturer you can opt for the second choice and indicate its location on your PC.
- If the system finds a new one, it will install it and you will be prompted for a restart. If not, click on Search for updated drivers on Windows Update.
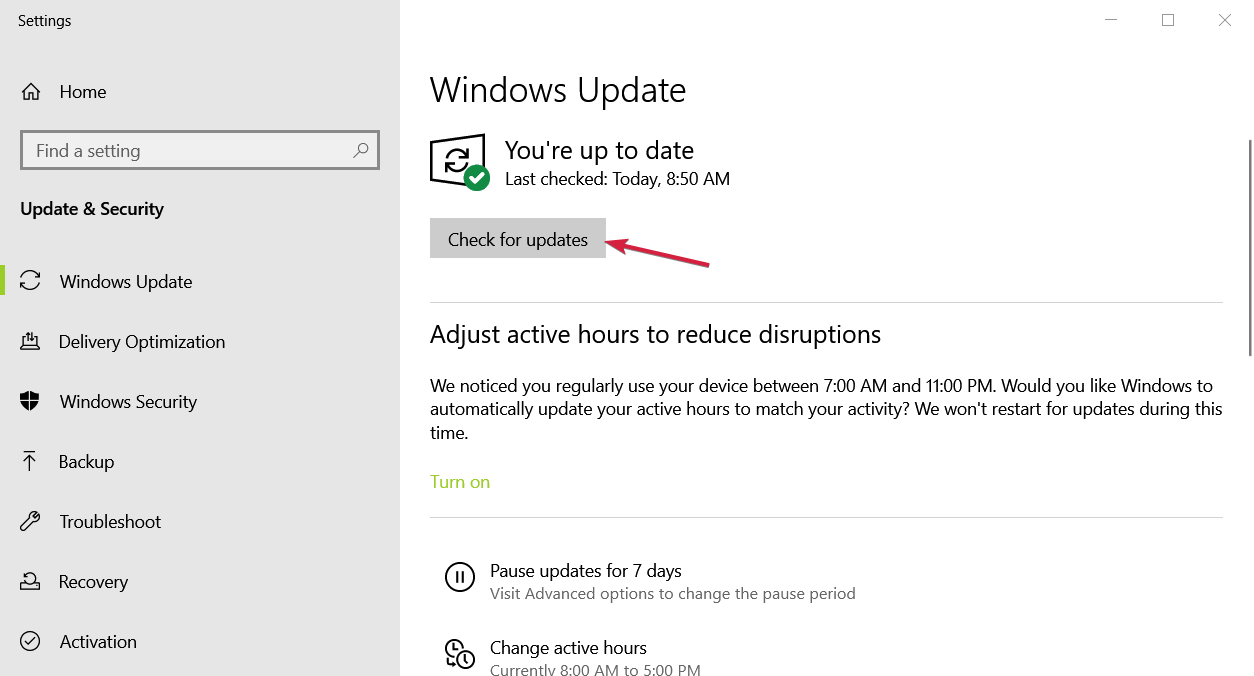
- Hit the Check for updates button and if there are any, download and install them. Also, check the Optional updates if the system finds any.

Problems with the Wake-on-LAN feature can be caused by your network drivers, and if you have this issue, you should try removing your current network driver and updating it to the latest version.
We mentioned how to remove and download the driver for your network adapter in Solution 3, so be sure to check it out for detailed instructions.
Once your network driver is up to date, the issue should be completely resolved, and you’ll be able to use the Wake-on -LAN feature again.
If you don’t want to fix the drivers manually, we suggest doing it automatically by using third-party software which will download and update the drivers that better match your needs.
These applications have been developed to prevent PC damage due to incorrect driver versions installations. After you select the drivers to update, the software will do all the work on your behalf automatically.
- How to Automatically Detect LAN Settings Windows 10
- How to Reset the Wi-Fi Adapter in Windows 10
- 4 Ways to Map A Network Drive in Windows 10
- How To Change IP Address Without VPN On Windows 10 [4 Ways]
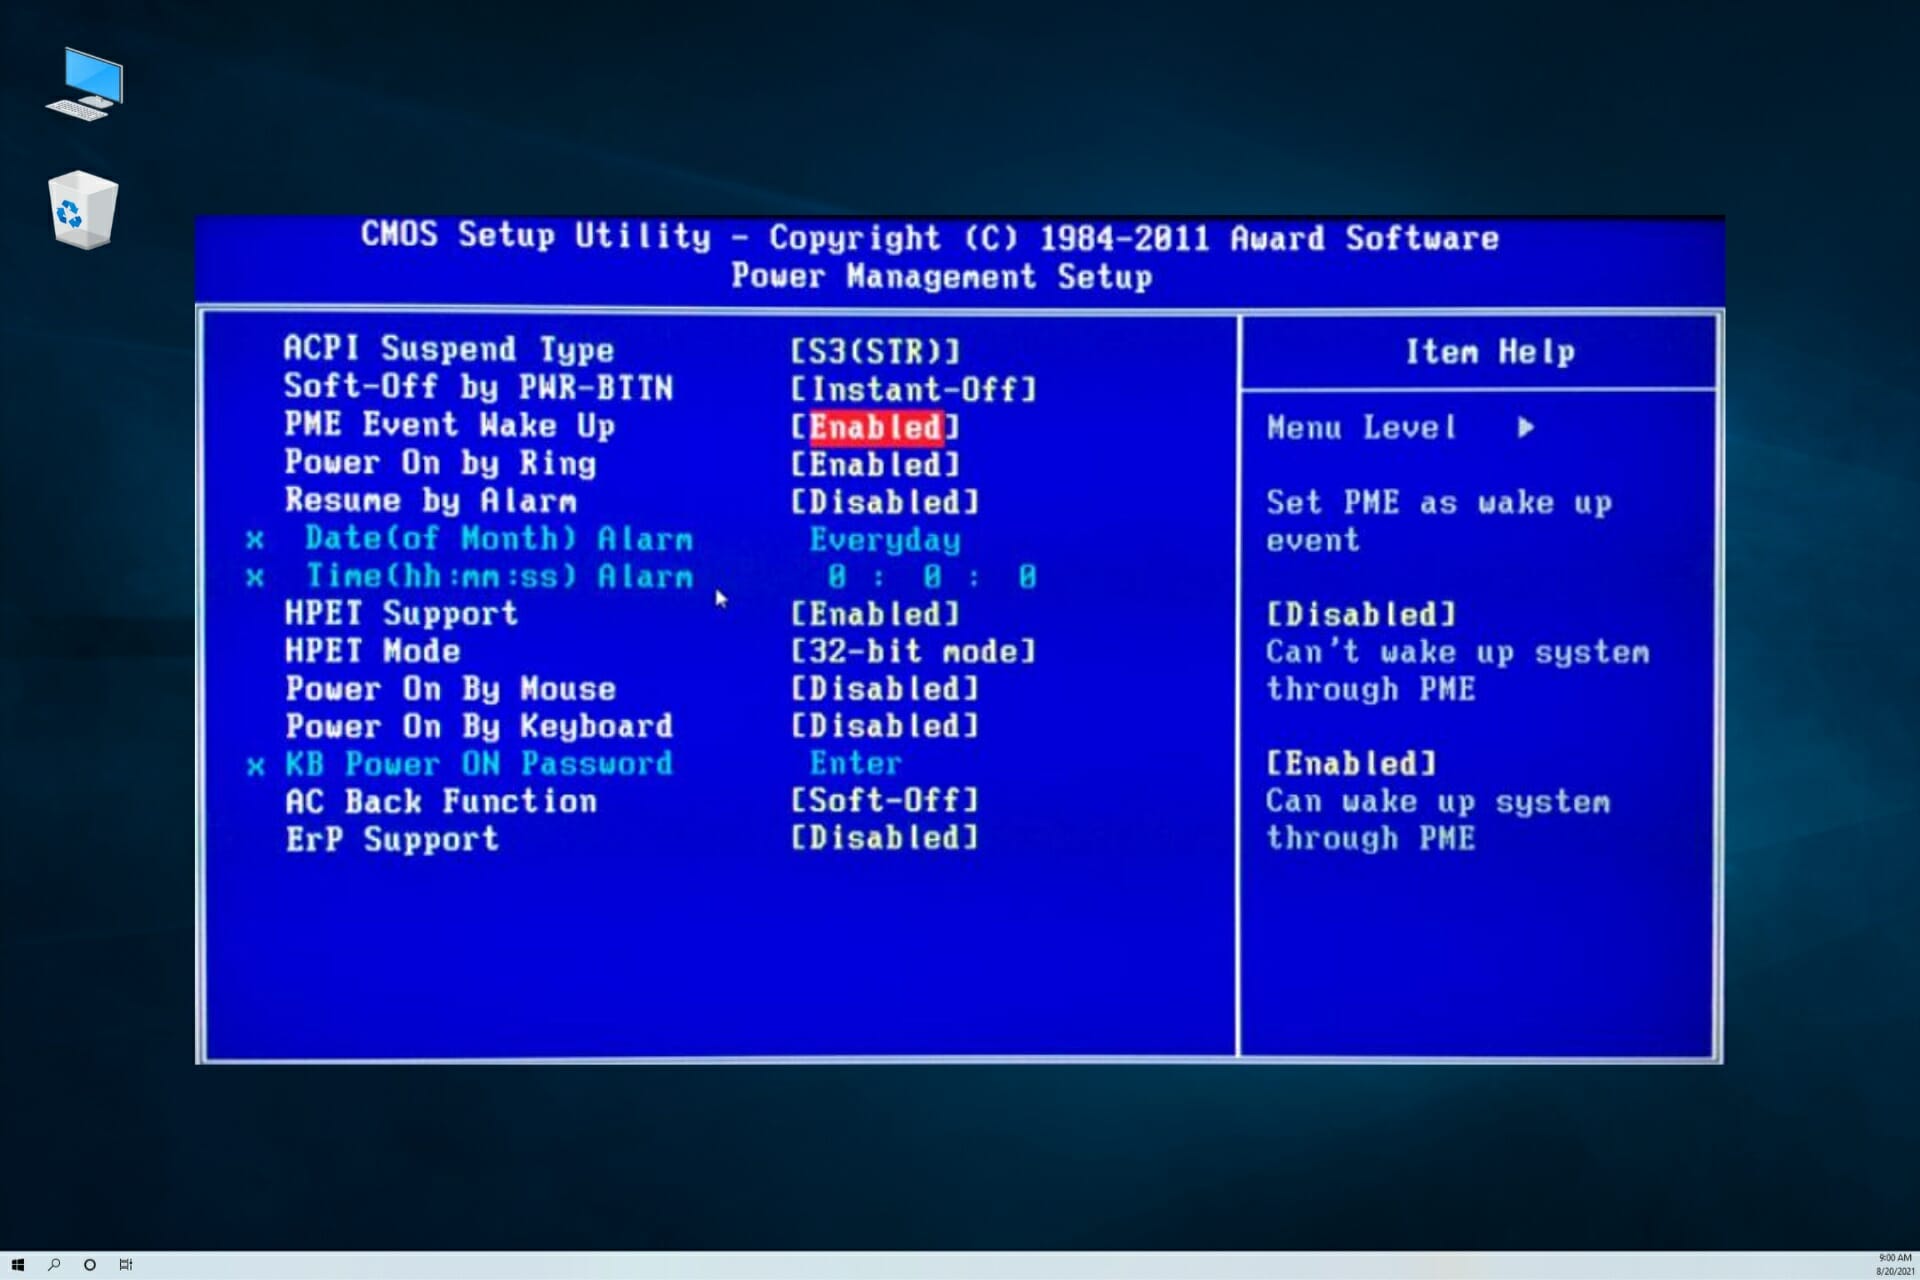
5. Check your BIOS settings
- Restart your PC and press an F, Del, or Enter keys according to your settings to enter BIOS. This can be different for every manufacturer so look for your PC instructions or the indications on your screen.
- Now look for the Power management section and enable the Wake-on-LAN feature. This may be called differently on each version of BIOS and motherboard. In our example it’s PME Event Wake Up.
- Also, if you have a DELL PC or laptop, try to locate the Deep Sleep Control feature and disable it. If you don’t have it, move on and press the F10 key to save the changes and exit.

After enabling these features the problem should be resolved. If you can’t enter BIOS, follow our solutions on what to do if your PC skips BIOS.
6. Modify your registry

NOTE
This solution will only work if you have a Realtek adapter.
6.1 Find the Registry key for your network adapter
- Press the Windows key + X and select Device Manager from the list.
- Click the Network adapters section to expand it, right-click the adapter and select Properties.

- Now click on the Details tab, select Driver key from the drop-down menu and you now know what is the key for your network adapter.


6.2 Change the network adapter Registry key values
- Press Windows key + R and enter regedit. Press Enter or click on OK.
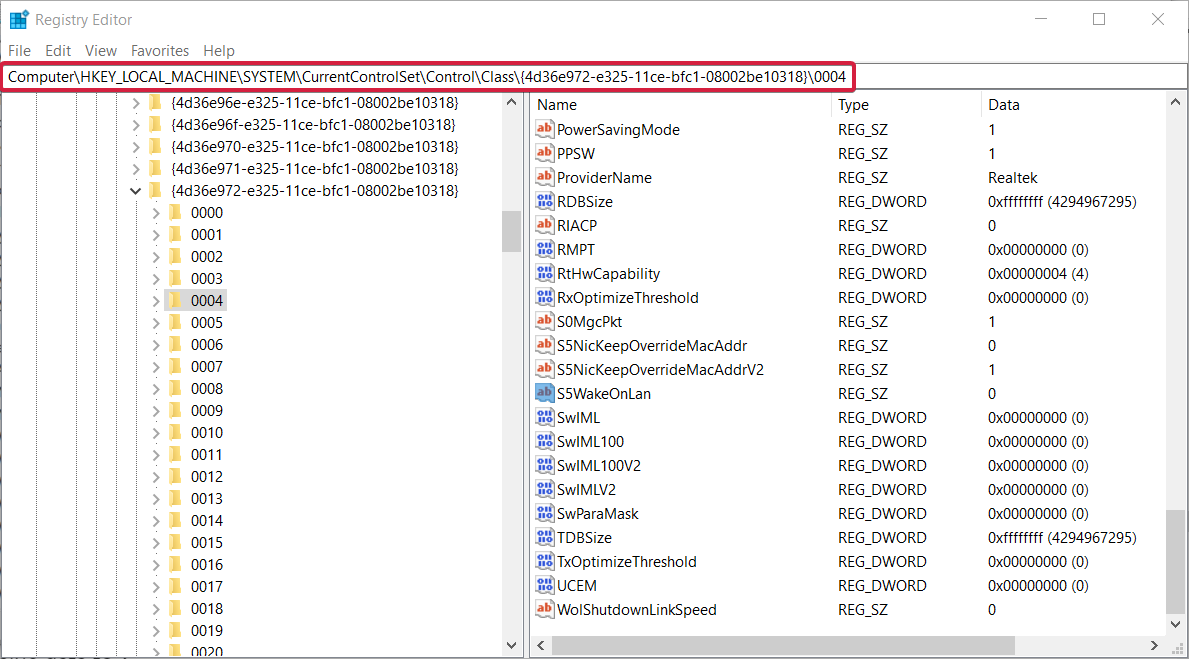
- When Registry Editor opens in the left panel navigate to the following key (keep in mind that the last part might be different on your PC, so you might need to manually find your network adapter):
Computer\HKEY_LOCAL_MACHINE\SYSTEM\CurrentControlSet\Control\Class\4de3e972-e325-11ce-bfc1-08002be10318
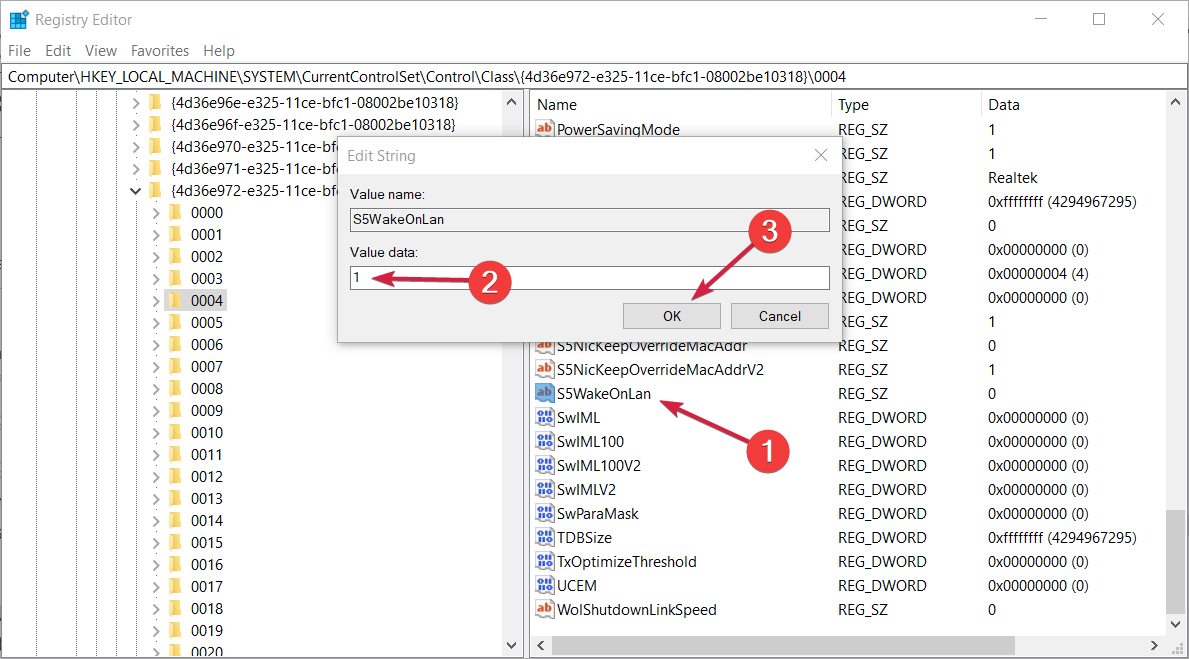
- Once you find your Realtek adapter, in the right pane you should see S5WakeOnLAN DWORD. Double click it and change its Value data to 1.
- Now, double click PowerDownPll DWORD and set its Value data to 0.

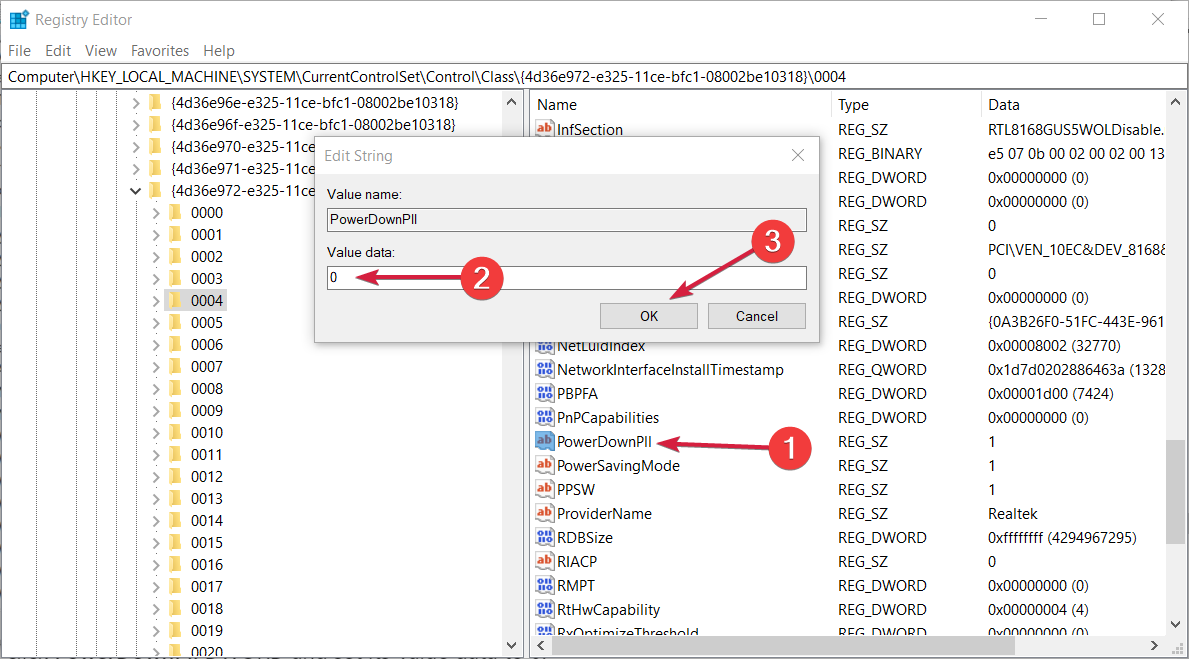
If Wake on LAN isn’t working in Windows 10, the problem might be related to your registry. To fix the issue, you need to find your network device and change its settings.
6.3 Change the NDIS Parameters key
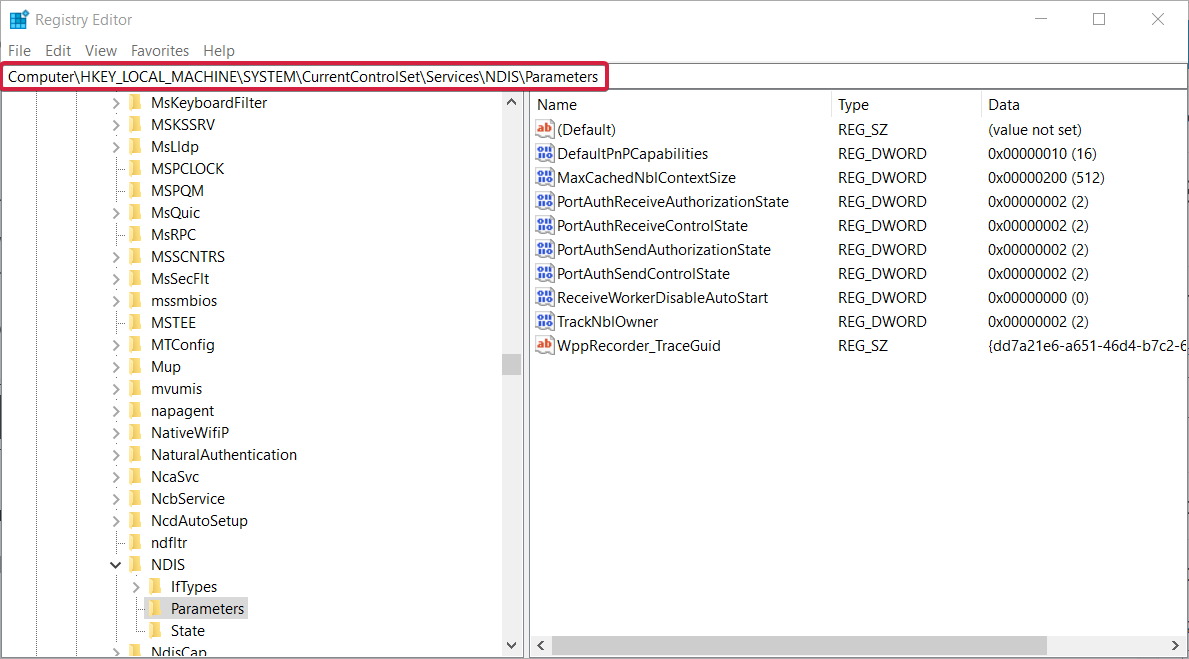
- While in the Registry Editor, navigate to the following key:
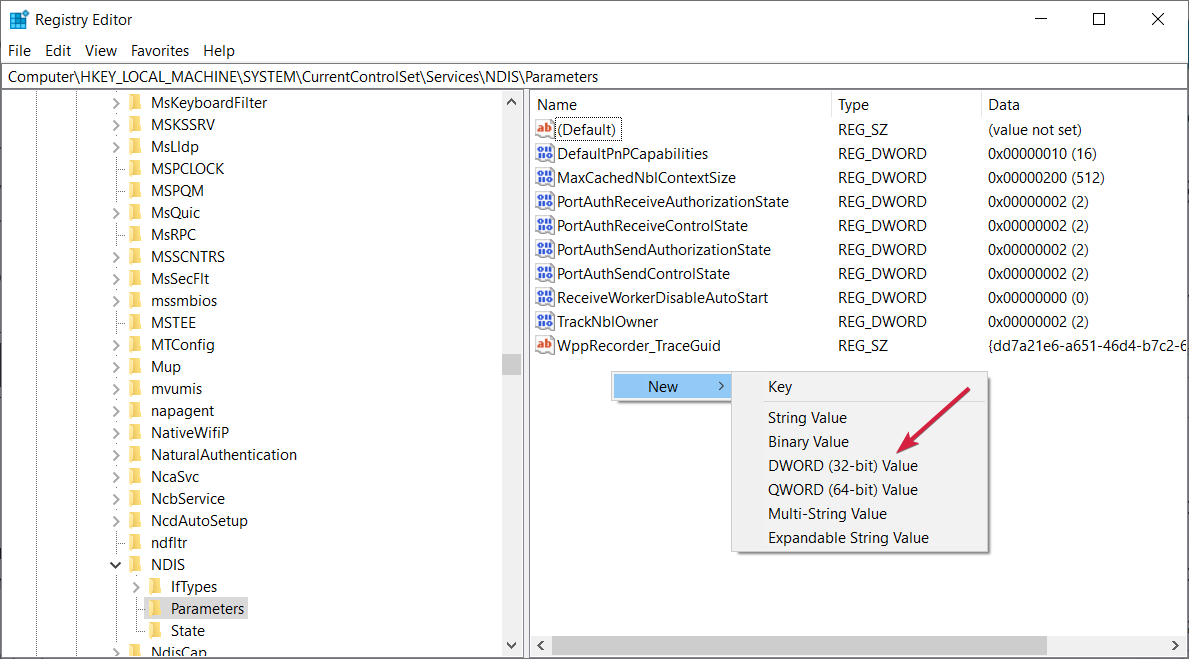
KEY_LOCAL_MACHINE\SYSTEM\CurrentControlSet\Services\NDIS\Parameters - Right-click on an empty space from the right pane, select New, and then choose DWORD (32-bit) Value.
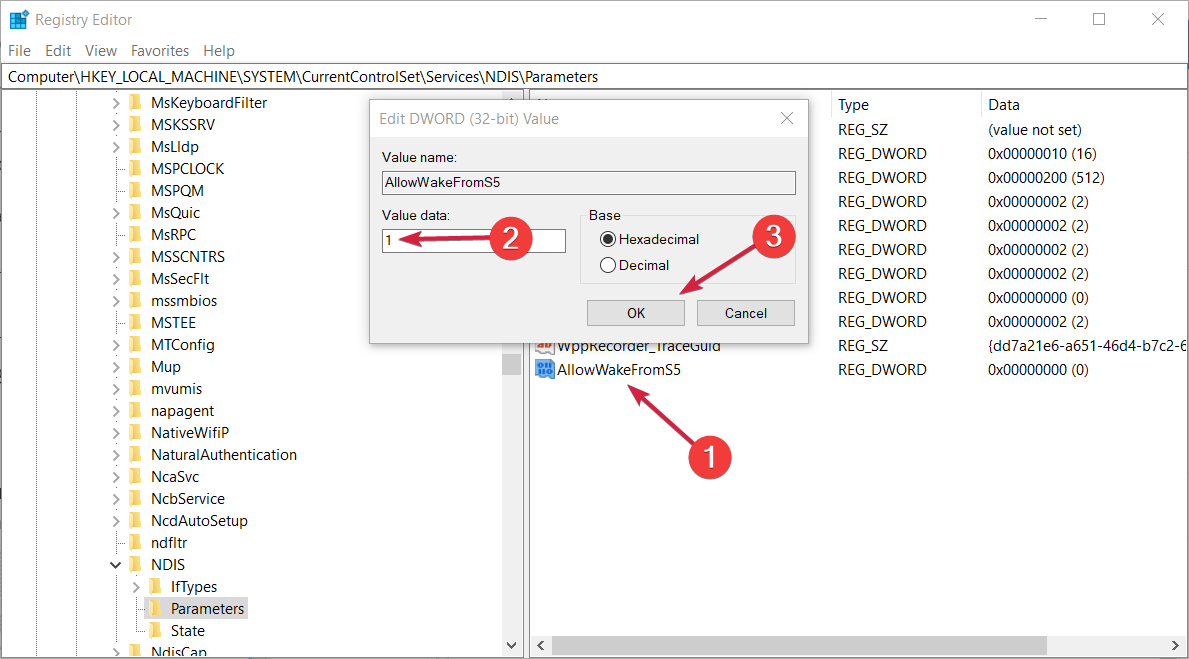
- Name the new value AllowWakeFromS5.
- Double click the item and set its Value data to 1, then hit the OK button.
- Exit the Registry Editor and restart your PC.

7. Change your power plan settings
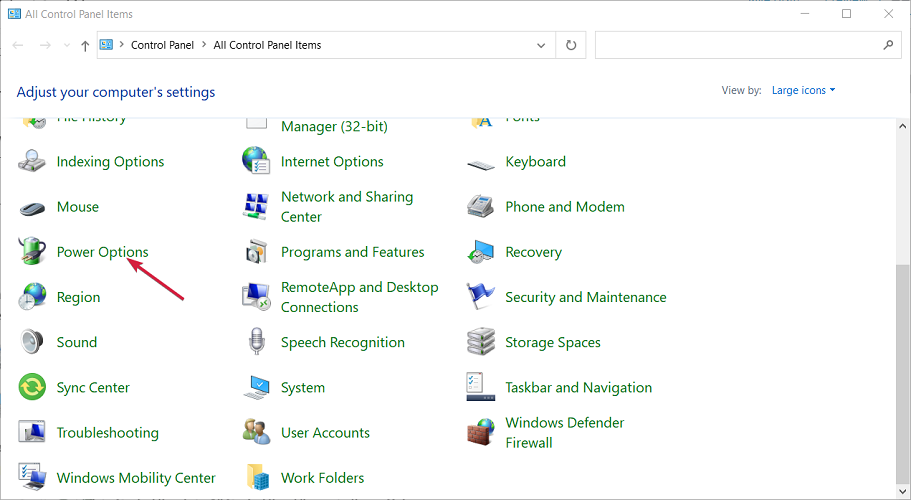
- In the Search bar enter control panel. Select Control Panel from the list of results.
- When Control Panel opens, select Power Options from the menu.
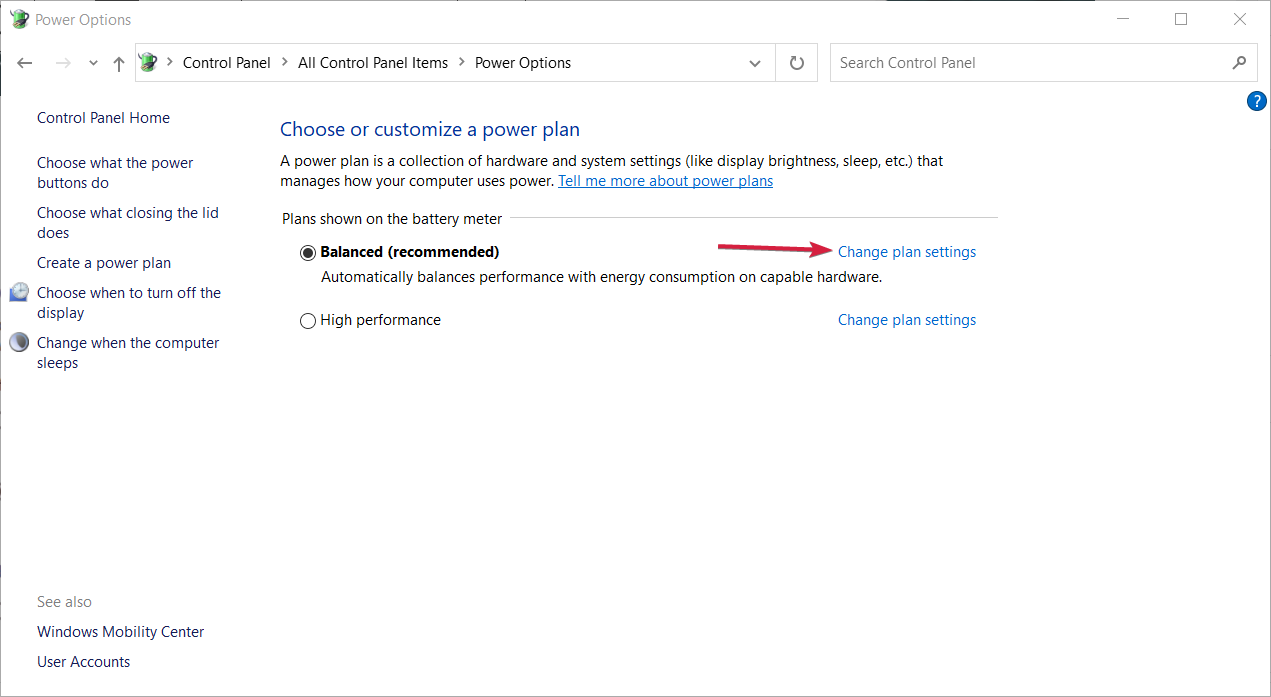
- When it opens, locate your power plan and click on Change plan settings next to it.
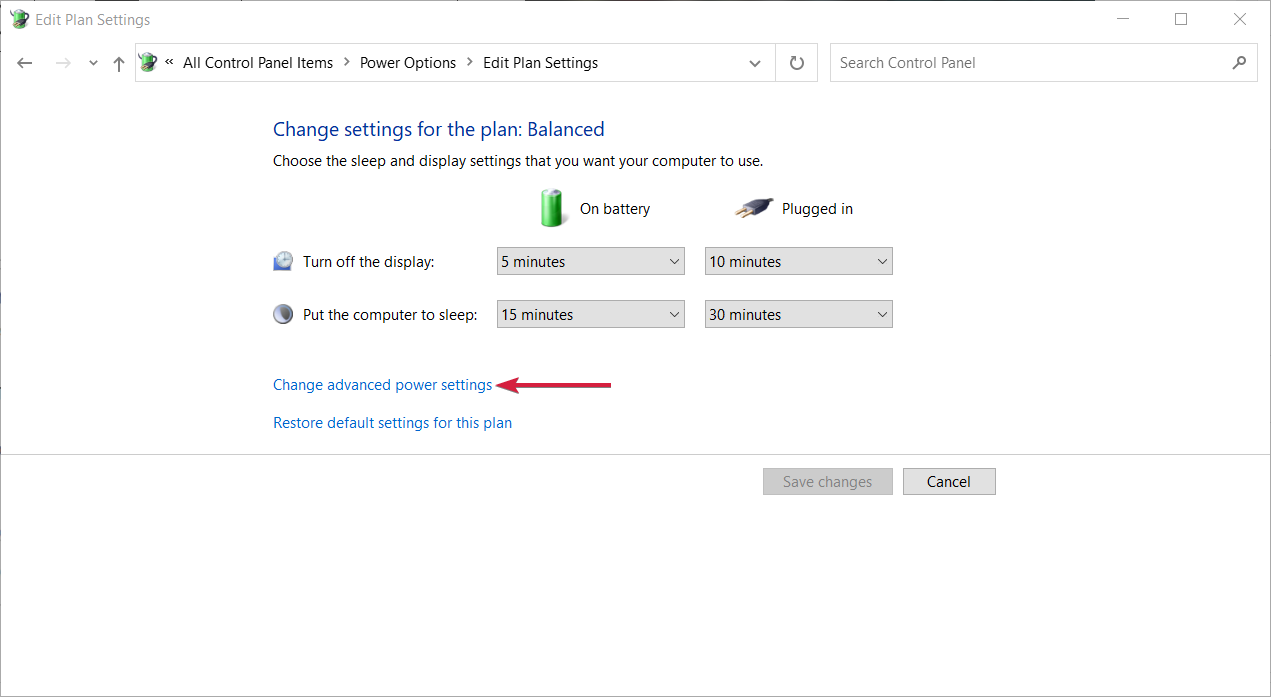
- Now click on Change advanced power settings.
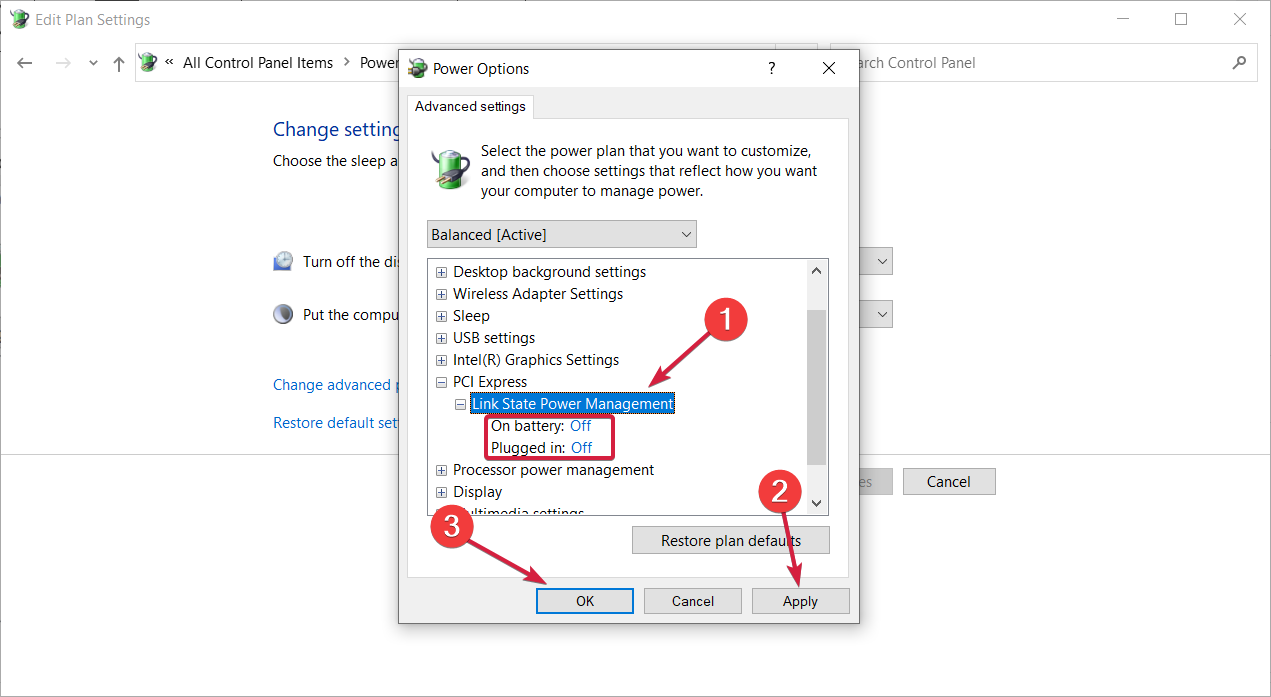
- Expand PCI Express section and set power saving to Off. Now click on Apply and OK to save the changes.
According to our readers, you might be able to fix the problems with the WOL not working simply by changing your Power Settings so follow the steps above to do that.
8. Upgrade BIOS
If you’re having problems with Wake-on-LAN, you might be able to solve them by updating BIOS to the latest version. BIOS update is a complicated procedure, and it can be potentially dangerous if you don’t perform it properly.
To see how to properly update your BIOS, be sure to check your motherboard manual for detailed instructions.
In addition to upgrading BIOS, a few of our readers reported that downgrading BIOS to the older version fixed the problem for them, so you might want to try that if the BIOS upgrade doesn’t work.
- Slow LAN speed on Windows 10/11 PCs [FIX]
- How to Automatically Detect LAN Settings Windows 10
- How to Reset the Wi-Fi Adapter in Windows 10
- 4 Ways to Map A Network Drive in Windows 10
- How To Change IP Address Without VPN On Windows 10 [4 Ways]
9. Reset BIOS and enable APM
If Wake-on-LAN isn’t working, you might be able to fix the problem simply by resetting your BIOS. You can do that from BIOS or by removing your battery from the motherboard for a couple of minutes.
Again, this is a delicate procedure so you should check the precise instructions from your manufacturer or leave this for professionals. If opening the PC case voids your warranty, do not attempt this.
After resetting your BIOS, be sure to enable APM in BIOS. You can do that by going to the Advanced section. Once you do all that, Wake-on-LAN should start working.
What can I do if Wake On LAN is not working on Windows 11?
Although the solutions above are technically for Windows 10, you can safely use them on a Windows 11 PC as well to solve WOL issues.
The steps to solve Wake on LAN not working on Windows 11 are mostly the same, and the best solution remains tweaking your Power Settings.
What is Wake-on-LAN?
Wake-on-LAN is a Windows default feature that basically allows a computer to be turned on by a network message.
This awakening message will be sent from a program that is running on another computer, laptop, tablet, or desktop, which is located on the same local area network.
Wake-on-LAN can be easily and safely used on any Windows 10-based device, though in rare cases, you might notice that you can’t use this protocol.
This is a useful feature that allows you to wake up your PC remotely, but sometimes issues with it can occur. To learn more, we have a great guide on how to enable wake on LAN in Windows 11, so don’t miss it.
How can I find the MAC address on Windows 10?
To use the Wake-on-LAN feature and wake up your or another PC from sleep, you will need its Mac address, a unique 12-digit code for any network adapter.
There are a few ways to find out that information but we’re going to show you only the easiest method below:
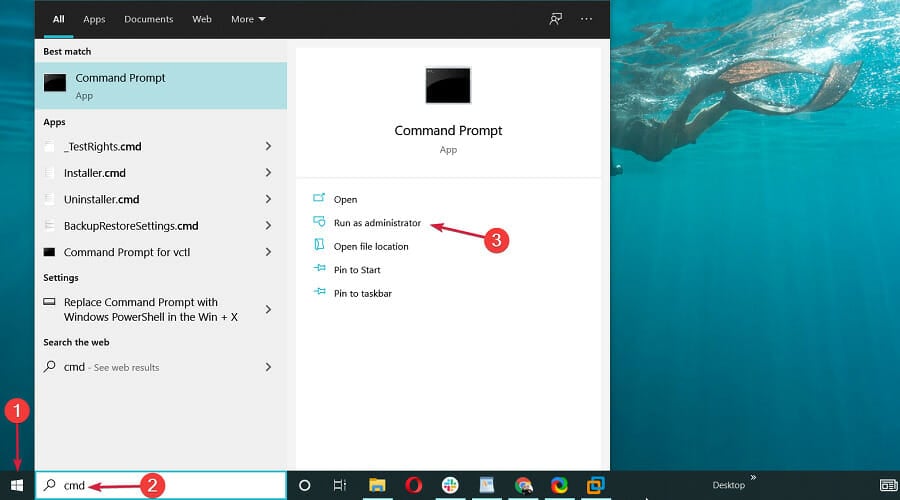
- Click the Start button, type cmd, and select Run as administrator to launch Command Prompt with full privileges.
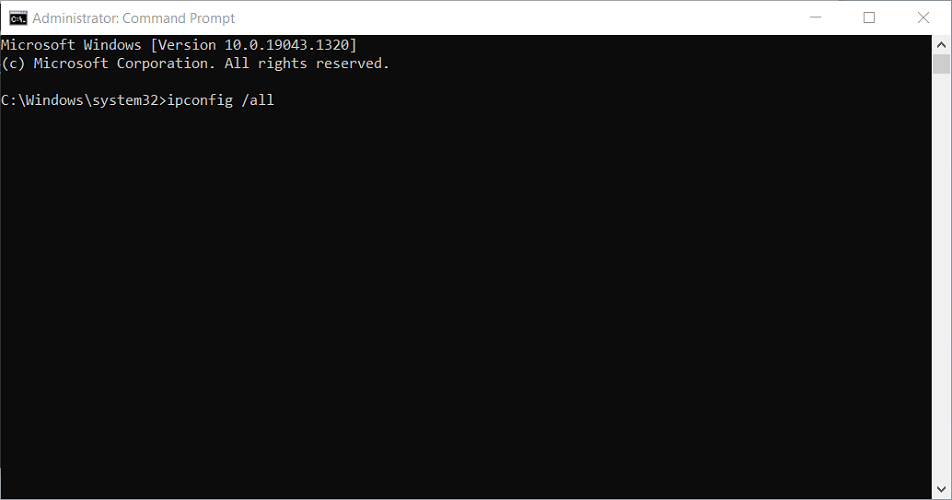
- Now type or paste the following command and press Enter to run it: ipconfig /all

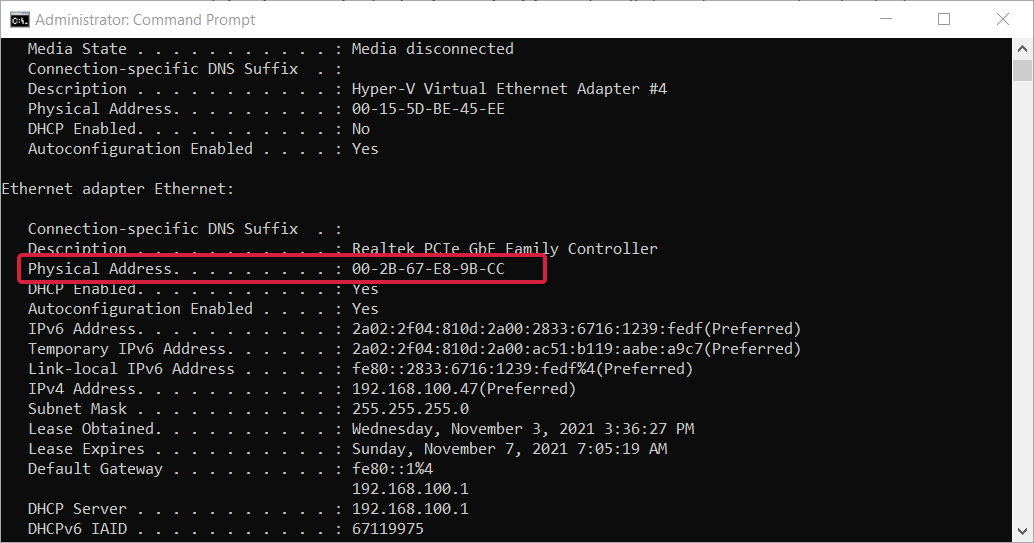
- The command will display a lot of network adapter settings. Look for the Ethernet adapter and you will find its physical address that you will have to use to wake this PC up using the LAN connection.

Now, the Wake-on-Lan feature should be working just fine on your Windows device.
If these steps aren’t useful for you, try to put your computer to hibernate instead of shutting it off – usually, this is resolving all the problems.
And while we are on the subject, you might be interested in the best remote PC wake-up software to use right now.
We also have a list of the best VPN for LAN that you can use right now to ensure your privacy.
Be careful because the Wake-on-LAN is a two-way street feature. If someone has physical access to your PC, it can set it up to be awakened and control it afterward with remote software.
This can cause a major breach of your data, so if it’s not absolutely necessary to enable the Wake-on-LAN, don’t do it.
Also, use the comments field below if you have questions regarding the Wake On LAN not working issue or if you need our assistance and we will get back to you as soon as possible.
![]()