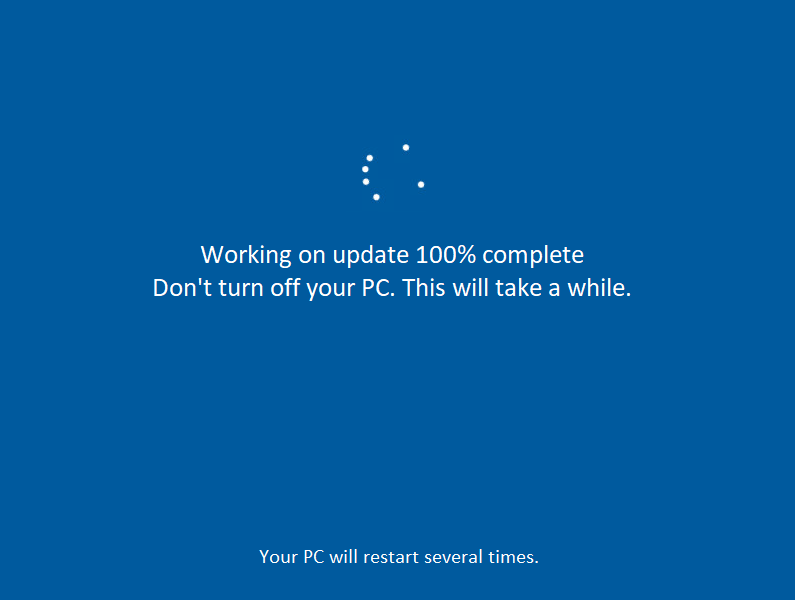
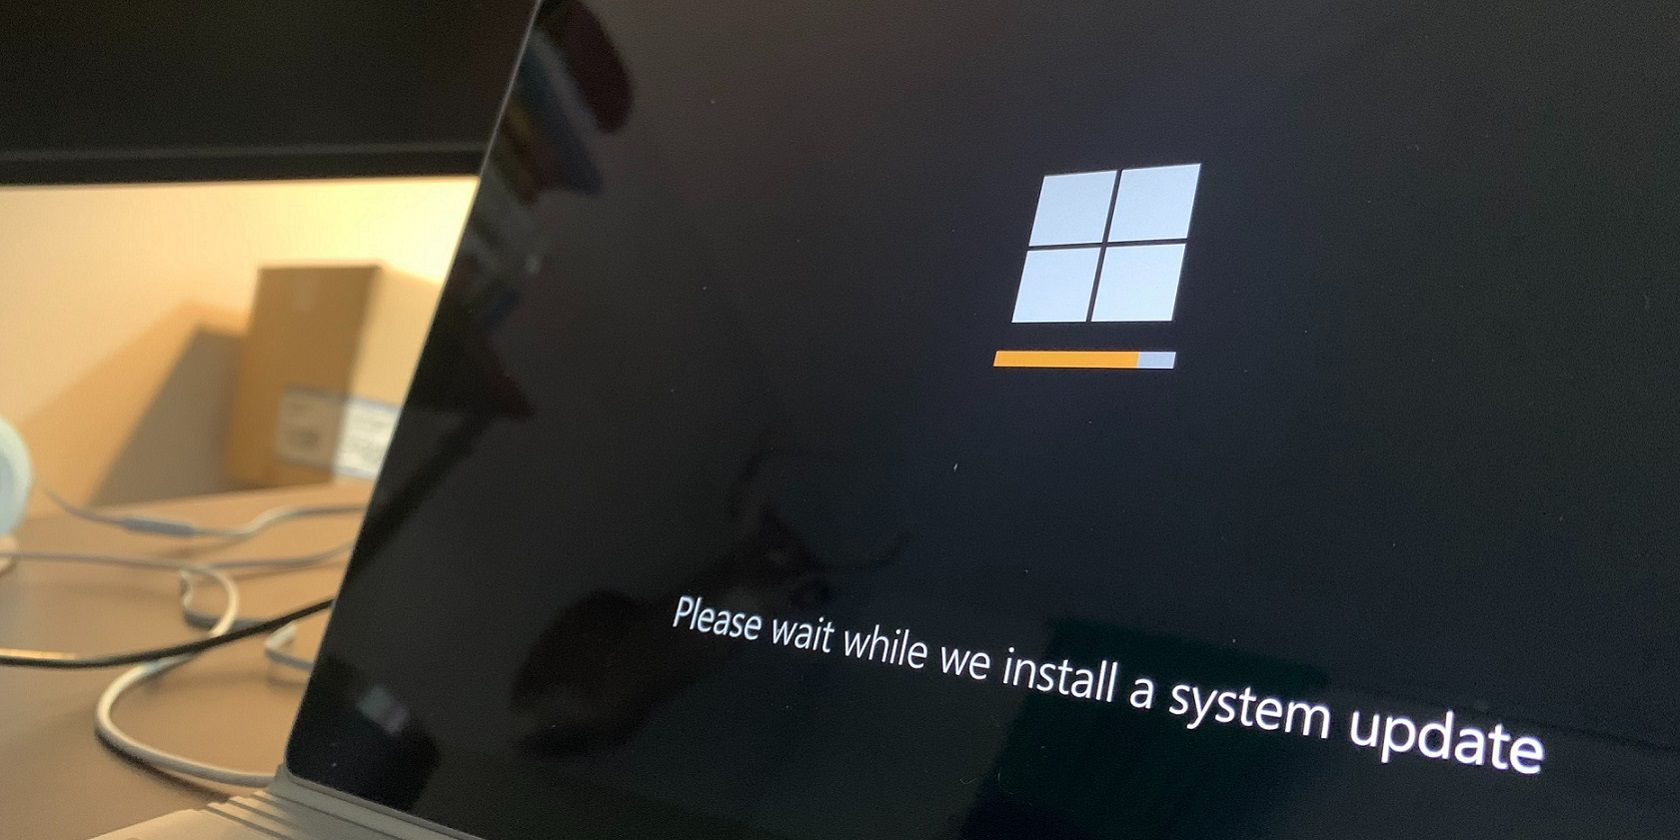
If you see the message “Working on updates, 100% complete. Don’t turn off your computer” when performing a Windows update, don’t worry!
Although it’s incredibly frustrating, you’re definitely not the only person to experience this issue. Thousands of Windows users have recently reported the very same issue. More importantly, you should be able to fix it pretty easily…
Try these fixes
Here’s a list of fixes that have resolved this problem for other Windows users. You don’t have to try them all. Just work your way through the list until you find the one that does the trick for you.
- Remove any USB peripherals and wait for the update process to finish
- Force restart your PC
- Run Windows Update troubleshooter
- Reset Windows Update components
- Download updates from Microsoft Update Catalog manually
- Pro tip: Want us to fix the problem for you?
Fix 1: Remove any USB peripherals and wait for the update process to finish
If you seldom check for Windows updates, it may take a long time for Windows to complete the update process. Maybe your PC is not “stuck” at Windows update, and Windows is just configuring and installing update packages.
If you temporarily don’t need to use your PC, you can just wait for 2 to 3 hour to see if the update process can complete. If there are any USB devices (like printers, USB flash drives, etc.) connected to your PC, you can try removing it from your PC. Some Windows users reported that after they disconnect all the USB peripherals from their PCs, the update process completes quickly.
See if this issue persists after you wait for 2 to 3 hours. If it persists ,try the next fix below to force restart your PC.
Fix 2: Force restart your PC
If Your PC gets stuck at 100% when you’re performing a Windows update, you need to force restart your PC first. If you don’t know how to do it, you can follow the instruction below:
- Press and keep holding the power button on your computer case until your PC shuts down.
- Disconnect any external power supply or remove the battery from your laptop.
- Hold down the power button for about 15 seconds.
- Wait a few minutes and then plug in your PC or connect the battery to your laptop.
- Press the power button again to reboot your system.
- Select the option to boot normally if you get a notice that the computer shut down improperly.
If you still cannot access to the desktop, you can try starting your PC in safe mode with network. When you signed into your Windows system in safe mode with network, try the next fix below to run Windows Update troubleshooter.
Fix 3: Run Windows Update troubleshooter
Windows Update troubleshooter is a built-in tool that can help you analyze and resolve issues related to Windows update. Try running Windows Update troubleshooter to see if you can resolve this issue. Here is how to do it:
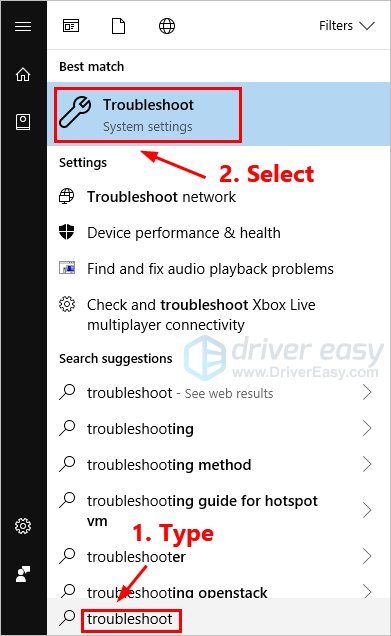
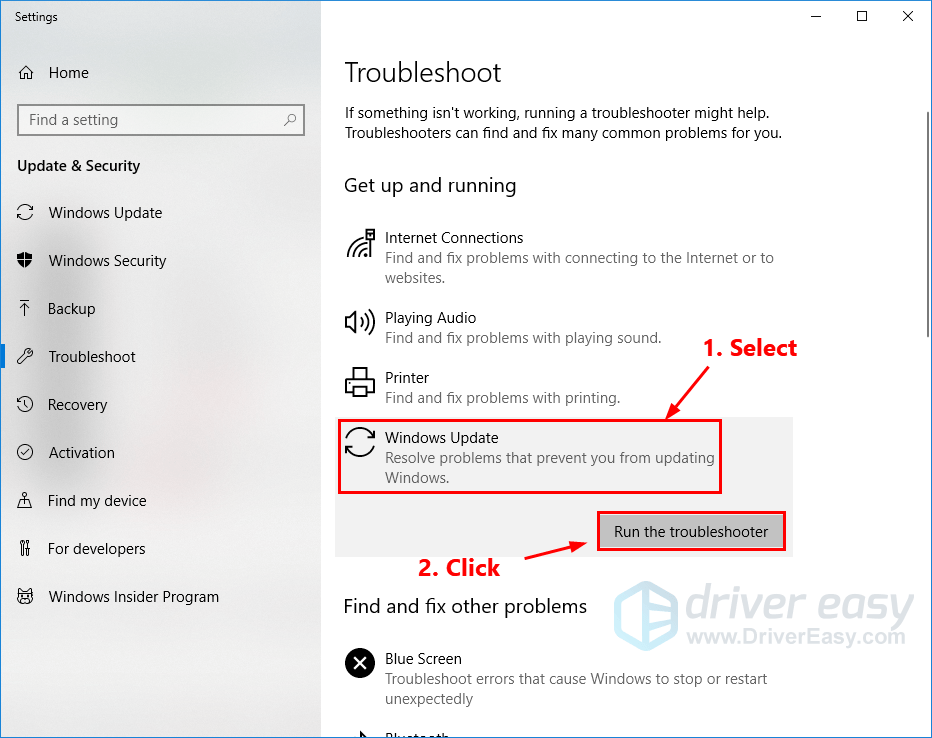
- On your keyboard, press the Windows logo key and type troubleshoot. In the list of search results, select Troubleshoot.

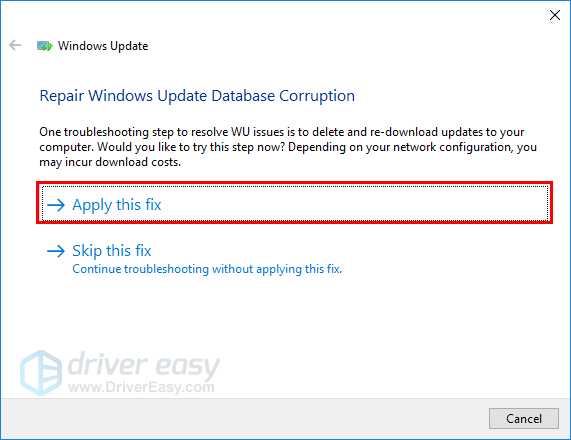
- In the pop-up window, select Windows Update and click Run the troubleshooter. You’ll be prompted for permission. Click Yes to run Windows Update troubleshooter.

- Click Apply this fix to continue.

- Follow the on-screen instructions to troubleshoot this issue.

Perform a Windows update again to see if you can install the update. If this issue reappears, try the next fix, below.
Fix 4: Reset Windows Update components
If Windows Update components corrupted, Windows Update may not work properly. Maybe that’s reason behind this issue. To resolve it, try resetting Windows Update components. Here is how to do it:
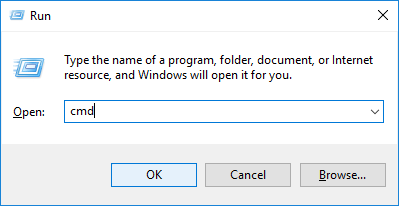
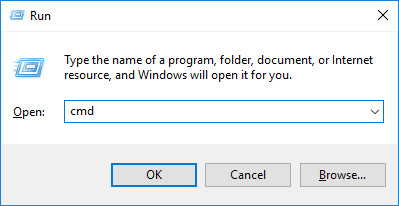
- On your keyboard, press the Windows logo key and R at the same time to invoke the Run dialog. Type cmd and press Ctrl, Shift and Enter at the same time to run Command Prompt as administrator. You’ll be prompted for permission. Click Yes to open Command Prompt.

- In Command Prompt, type the command lines below and press Enter on your keyboard after typing each:
net stop bits
net stop wuauserv
net stop appidsvc
net stop cryptsvcNote: The Windows Update related system services will be stopped after executing the command lines above.
- In Command Prompt, type the following command lines and press Enter after typing each:
ren %systemroot%\SoftwareDistribution SoftwareDistribution.old
ren %systemroot%\system32\catroot2 catroot2.oldNote: You will rename the SoftwareDistribution and catroot2 folder as SoftwareDistribution.old and catroot2.old after you run these two command lines. These two folders are used by Windows Update to save temporary update files.
By renaming these two folders, Windows will think these two folders are missing, and Windows will create new ones to store Windows update files. By doing that, you can avoid many Windows Update issues caused by the old corrupted temporary files in these two folders.
- In Command Prompt, type the following command lines and press Enter after each:
net start bits
net start wuauserv
net start appidsvc
net start cryptsvcNote: After you executed the command lines above, you start the Windows Update related system services.
Check to see if this resolved your Windows Update problem. Hopefully it did. But if not, try the next fix, below.
Fix 5: Download updates from Microsoft Update Catalog manually
Microsoft Update Catalog offers updates for Windows 2000 SP3 and later version of Windows operating system. You can try downloading the updates you failed to install from Microsoft Update Catalog and install them manually to see if you can fix this issue.
Before you download updates, you need to check the system type of your Windows OS. If you don’t know how to do it, follow the instructions below to view your system type:
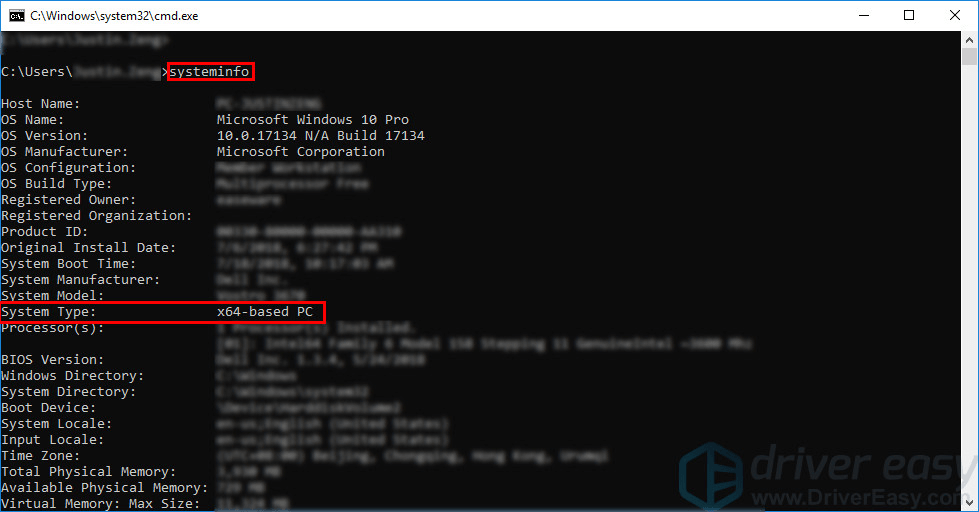
- On your keyboard, press the Windows Logo key and R at the same time to open the Run dialog. Type cmd and press Enter to open Command Prompt.
- Type the command line systeminfo and press Enter to view your system type.

Note: “X64-based PC” indicates that your Windows OS is 64-bit; “X86-based PC” means that your Windows OS is 32-bit.

Now, you can follow the steps below to download Windows updates manually:
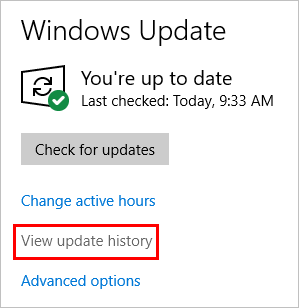
- On your keyboard, press the Windows logo key and type windows update, then press Enter to open Windows Update.
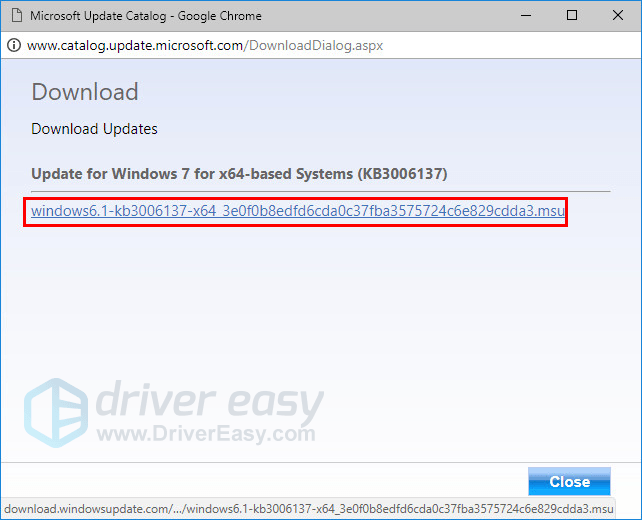
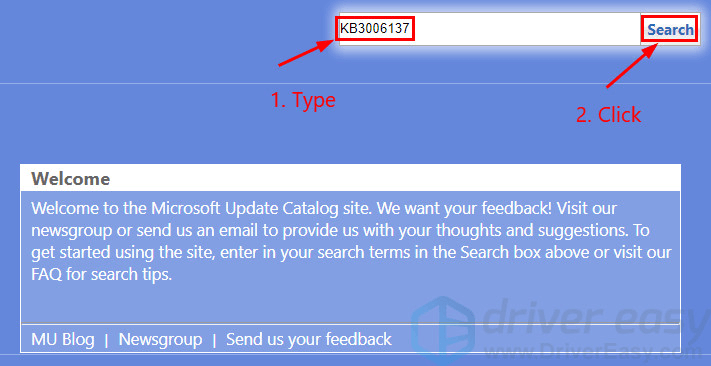
- Click View update history to check the updates you failed to install. For example, if you fail to install update KB3006137, you can download that update and install it manually.

- Visit Microsoft Update Catalog.
- Type the update number that you want to download. In this example, type KB3006137 and then click Search.

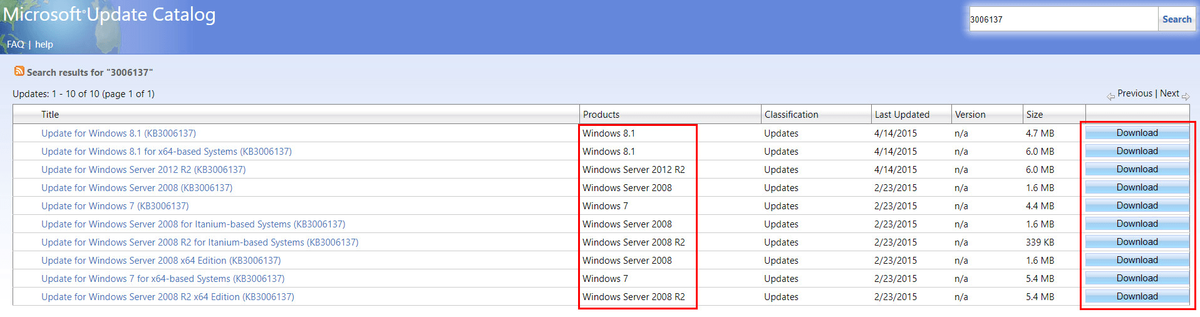
- In the list of search results, select the correct update for your operating system and click Download.
Note: If your Windows OS is 64-bit, you should download the update whose name contains “x64-based”.

- In the pop-up window, click the link to start downloading the updates.

- Double-click the downloaded file and follow the on-screen instructions to install the update.


Restart your PC to see if this issue persists. If not, congratulations! You’ve resolved this annoying issue! But if this issue reappears, you can try the last fix, below.
Pro tip: Want us to fix the problem for you?
If none of the fixes above worked, or you just don’t have the time or confidence to troubleshoot the problem for yourself, get us to fix it for you. All you need to do is buy a 1-year subscription to Driver Easy (just $29.95) and you get free technical support as part of your purchase. This means you can contact our computer technicians directly and explain your problem, and they’ll investigate to see if they can resolve it remotely.
IMPORTANT: Please attach the URL of this article when you contact us, so we could help you resolve the problem ASAP. You can expect us to respond within two working days.
You can contact us easily via the Driver Easy Feedback tool. To learn how to use this tool, please visit this link:
https://www.drivereasy.com/help55/feedback/.
50
50 people found this helpful
Попробуйте наш инструмент устранения неполадок
Выберите операционную систему
Выберите язык програмирования (опционально)
‘>
Если вы видите сообщение «Работаем над обновлениями, готово на 100%. Не выключайте компьютер » при обновлении Windows не беспокойтесь!
Хотя это очень неприятно, но вы определенно не единственный, кто столкнулся с этой проблемой. Тысячи пользователей Windows недавно сообщили о той же проблеме. Что еще более важно, вы сможете легко это исправить …
Попробуйте эти исправления
Вот список исправлений, которые решили эту проблему для других пользователей Windows. Необязательно пробовать их все. Просто пролистайте список, пока не найдете тот, который подойдет вам.
- Удалите все периферийные USB-устройства и дождитесь завершения процесса обновления.
- Принудительно перезагрузите компьютер
- Запустите средство устранения неполадок Центра обновления Windows.
- Сбросить компоненты Центра обновления Windows
- Загрузить обновления из каталога Центра обновления Майкрософт вручную
- Совет: хотите, чтобы мы решили проблему за вас?
Исправление 1. Удалите все периферийные USB-устройства и дождитесь завершения процесса обновления.
Если вы редко проверяете наличие обновлений Windows, для завершения процесса обновления Windows может потребоваться много времени. Возможно, ваш компьютер не «застрял» на обновлении Windows, а Windows просто настраивает и устанавливает пакеты обновлений.
Если вам временно не нужно использовать компьютер, просто подождите 2–3 часа, чтобы проверить, завершится ли процесс обновления. Если к вашему ПК подключены какие-либо USB-устройства (например, принтеры, USB-накопители и т. Д.), Вы можете попробовать удалить их с вашего ПК. Некоторые пользователи Windows сообщили, что после отключения всех периферийных USB-устройств от своих компьютеров процесс обновления завершается быстро.
Посмотрите, сохраняется ли эта проблема после того, как вы подождете 2–3 часа. Если проблема не исчезнет, попробуйте следующее исправление, указанное ниже, чтобы принудительно перезагрузить компьютер.
Исправление 2: принудительно перезагрузите компьютер
Если ваш компьютер завис на 100%, когда вы выполняете обновление Windows, вам нужно сначала принудительно перезагрузить компьютер. Если вы не знаете, как это сделать, следуйте инструкциям ниже:
- Пресса и Продолжай держаться кнопка питания на корпусе вашего компьютера пока ваш компьютер не выключится .
- Отключить любой внешний источник питания или извлеките аккумулятор из ноутбука.
- Удерживать кнопка питания примерно пятнадцать секунд.
- Подожди несколько минут а затем подключите компьютер или подключите аккумулятор к ноутбуку.
- Снова нажмите кнопку питания, чтобы перезагрузить систему.
- Выберите вариант обычной загрузки если вы получили уведомление о том, что компьютер выключился неправильно.
Если вы по-прежнему не можете получить доступ к рабочему столу, вы можете попробовать запуск вашего ПК в безопасном режиме с сетью . Когда вы вошли в свою систему Windows в безопасном режиме с сетью, попробуйте следующее исправление ниже, чтобы запустить средство устранения неполадок Центра обновления Windows.
Исправление 3. Запустите средство устранения неполадок Центра обновления Windows.
Средство устранения неполадок Центра обновления Windows — это встроенный инструмент, который может помочь вам проанализировать и решить проблемы, связанные с обновлением Windows. Попробуйте запустить средство устранения неполадок Центра обновления Windows, чтобы узнать, можно ли решить эту проблему. Вот как это сделать:
- На клавиатуре нажмите клавиша с логотипом Windows и введите устранять неполадки . В списке результатов поиска выберите Устранение неполадок .

- Во всплывающем окне выберите Центр обновления Windows и нажмите Запустите средство устранения неполадок . Вам будет предложено разрешение. Нажмите да для запуска средства устранения неполадок Центра обновления Windows.
- Нажмите Применить это исправление продолжать.
- Следуйте инструкциям на экране, чтобы устранить эту проблему.


Выполните обновление Windows еще раз, чтобы проверить, сможете ли вы установить обновление. Если эта проблема появляется снова, попробуйте следующее исправление, указанное ниже.
Исправление 4: сбросить компоненты Центра обновления Windows
Если компоненты Центра обновления Windows повреждены, Центр обновления Windows может работать неправильно. Может быть, это причина этой проблемы. Чтобы решить эту проблему, попробуйте сбросить компоненты Центра обновления Windows. Вот как это сделать:
- На клавиатуре нажмите клавиша с логотипом Windows и р в то же время, чтобы вызвать диалоговое окно «Выполнить». Тип cmd и нажмите Ctrl , сдвиг и Войти в то же время запустить командную строку от имени администратора . Вам будет предложено разрешение. Нажмите да , чтобы открыть командную строку.
- В командной строке введите приведенные ниже командные строки и нажмите Войти на твоей клавиатуре после ввода каждого :
чистые стоповые биты
чистая остановка wuauserv
чистая остановка appidsvc
чистая остановка cryptsvcЗаметка: Системные службы, связанные с Центром обновления Windows, будут остановлены после выполнения указанных выше командных строк.
- В командной строке введите следующие командные строки и нажмите Войти после ввода каждого:
ren% systemroot% SoftwareDistribution SoftwareDistribution.old
ren% systemroot% system32 catroot2 catroot2.oldЗаметка: Вы будете переименовать папку SoftwareDistribution и catroot2 как SoftwareDistribution.old и catroot2.old после запуска этих двух командных строк. Эти две папки используются Центром обновления Windows для сохранения временных файлов обновлений.
При переименовании этих двух папок Windows будет думать, что эти две папки отсутствуют, и Windows создаст новые для хранения файлов обновлений Windows. Таким образом вы сможете избежать многих проблем с Центром обновления Windows, вызванных старыми поврежденными временными файлами в этих двух папках.
- В командной строке введите следующие командные строки и нажмите Войти после каждого:
чистые стартовые биты
чистый старт wuauserv
чистый старт appidsvc
чистый старт cryptsvcЗаметка: После выполнения приведенных выше командных строк вы запускаете системные службы, связанные с Центром обновления Windows.

Проверьте, решило ли это вашу проблему с Центром обновления Windows. Надеюсь, это так. Но если нет, попробуйте следующее исправление, указанное ниже.
Исправление 5. Загрузите обновления из каталога Центра обновления Майкрософт вручную.
Каталог Центра обновления Майкрософт предлагает обновления для Windows 2000 SP3 и более поздних версий операционной системы Windows. Вы можете попробовать загрузить обновления, которые вам не удалось установить, из каталога Центра обновления Майкрософт и установить их вручную, чтобы посмотреть, сможете ли вы решить эту проблему.
Перед тем, как скачивать обновления, вам необходимо проверьте тип системы вашей ОС Windows. Если вы не знаете, как это сделать, следуйте инструкциям ниже, чтобы узнать тип вашей системы:
- На клавиатуре нажмите клавиша с логотипом Windows и р в то же время, чтобы открыть диалоговое окно «Выполнить». Тип cmd и нажмите Войти , чтобы открыть командную строку.
- Введите командную строку системная информация и нажмите Войти чтобы просмотреть тип вашей системы.
Запись: ‘ ПК на базе X64 »Означает, что ваша ОС Windows 64-битный ; ‘ ПК на базе X86 »Означает, что ваша ОС Windows 32-битный .

Теперь вы можете выполнить следующие действия, чтобы загрузить обновления Windows вручную:
- На клавиатуре нажмите клавиша с логотипом Windows и введите Центр обновления Windows , затем нажмите Войти открыть Центр обновления Windows .
- Нажмите Посмотреть историю обновлений чтобы проверить обновления, которые вам не удалось установить. Например, если вам не удалось установить обновление KB3006137, вы можете загрузить это обновление и установить его вручную.
- Визит Каталог Центра обновления Майкрософт .
- Введите номер обновления, которое вы хотите загрузить. В этом примере введите KB3006137 и затем щелкните Поиск .
- В списке результатов поиска выберите правильное обновление для вашей операционной системы и нажмите Скачать .
Примечание. Если ваш ОС Windows 64-битная , вам следует скачать обновление, в названии которого содержится « x64 на базе ».
- Во всплывающем окне щелкните ссылку, чтобы начать загрузку обновлений.
- Двойной щелчок загруженный файл и следуйте инструкциям на экране, чтобы установить обновление.

Перезагрузите компьютер, чтобы проверить, сохраняется ли эта проблема. Если нет, поздравляю! Вы решили эту досадную проблему! Но если эта проблема появится снова, вы можете попробовать последнее исправление, указанное ниже.
Совет: хотите, чтобы мы решили проблему за вас?
Если ни одно из вышеперечисленных исправлений не помогло или у вас просто нет времени или уверенности, чтобы устранить проблему самостоятельно, попросите нас исправить ее за вас. Все, что вам нужно сделать, это Pro версия (всего 29,95 долларов США), и вы получаете бесплатную техническую поддержку в рамках покупки. Это означает, что вы можете напрямую связаться с нашими компьютерными специалистами и объяснить свою проблему, и они расследуют ее, чтобы узнать, могут ли они решить ее удаленно.
ВАЖНЫЙ: Пожалуйста прикрепите URL этой статьи когда вы свяжетесь с нами, чтобы мы могли помочь вам решить проблему как можно скорее. Вы можете ожидать от нас ответа в течение двух рабочих дней.
Вы можете легко связаться с нами через Инструмент быстрой обратной связи с драйверами . Чтобы узнать, как использовать этот инструмент, перейдите по этой ссылке:
https://www.drivereasy.com/help55/feedback/ .
Many people have recently reported the very same issue — Windows update stuck at 100. If you are one of them and trying to find some efficient methods to get rid of this issue, then this post written by MiniTool can help you.
Windows Updates Stuck at 100
Windows Update is a key part of the system to ensure smooth system performance. Windows 11/10 automatically downloads and installs important updates from Microsoft Server, but sometimes update installations get stuck or freeze when processing updates on Startup.
You may see the following message: “Working on update 100% complete. Don’t turn off your PC. This will take a while.” and you will be stuck on the Windows update screen. There are many reasons for the issue, but most of the time it caused by the conflicts with software or drivers.
Now, it’s time to see how to actually fix the “Windows update stuck at 100” issue with the below-listed troubleshooting guide.
How to Fix the “Windows Updates Stuck at 100” Issue
- Remove any USB peripherals
- Run Windows Update Troubleshooter
- Rename SoftwareDistribution Folder
- Perform a Clean Boot
- Uninstall the Particular Update
- Run DISM in Safe Mode
- Run Automatic Repair
- Perform System Restore in WinRE
It’s frustrating to encounter the “Windows stuck on update” error frustrating, but you should notice that your update probably isn’t stuck, and you’ll just have to wait for a while to complete the installation. If it is still stuck at the interface, you can try the methods below.
Method 1: Remove Any USB Peripherals
If your Windows update stuck at 100, the first thing you can try is to remove any external device connected to PC and make sure you also disconnect any device connected via USB like pen drives, mouse or keyboard, portable hard disk, etc.
Once you have successfully removed any USB peripherals, try to update the Windows again and check if the issue has been fixed or not.
Method 2: Run Windows Update Troubleshooter
If you are still stuck on the screen, then you should restart your computer in Safe Mode before you do any operations. You can use Windows 11/10 recovery bootable media like a DVD/USB bootable drive to enter WinRE to enter into Safe Mode. Here are the steps:
Step 1: Insert your Windows installation CD/DVD or USB bootable drive to your computer, and start the computer.
Step 2: Enter the BIOS.
Step 3: Choose the DVD or USB flash drive as the first boot device and boot the Windows 11/10 PC from the device.
Step 4: Click Repair your computer to enter into WinRE successfully.
Now, you can continue to enter Safe Mode.
Step 1: From the Choose an option screen, click the Troubleshoot option. Next, click Advanced options.
Step 2: Click the Startup Settings option.
Step 3: Click the Restart button.
Step 4: Then you will see multiple options for startup. Press the F4 key to enable Safe Mode.
Tip: You should try Method 2 to 6 in Safe Mode. Try 7 to 8 in WinRE (Windows Recovery Environment ).
Now your PC will restart in Safe Mode. Then running Windows Update Troubleshooter is the easiest and fastest method to fix the “Windows update stuck at 100” error. Windows Update Troubleshooter is a built-in feature designed to fix Windows update errors.
Now you can follow the instructions step by step below to run Windows Update Troubleshooter:
Step 1: Type Settings in the Search box to open it.
Step 2: Choose Update & Security and then select Troubleshoot in the left panel.
Step 3: Click Windows Update under the Get up and running section in the right panel and then click Run the troubleshooter.

Step 4: It will start to detect the existing problems and you just need to wait for the process finished. Then click Apply this fix.
Step 5: Follow the on-screen instructions to finish the repair process.
Restart your computer and then check if the “working on updates 100 complete” issue still exists. If this method cannot fix the error, try the next methods.
Method 3: Rename SoftwareDistribution Folder
The next method for you is to rename the SoftwareDistribution folder. Here is how to do that:
Step 1: Type Command Prompt in the Search box, then right-click the first result to choose Run as administrator.
Step 2: Now type the following commands to stop Windows Update Services and then press Enter after each one:
net stop wuauserv
net stop cryptSvc
net stop bits
net stop msiserver

Step 3: Next, type the following command to rename SoftwareDistribution Folder and then press Enter:
ren C:\Windows\SoftwareDistribution SoftwareDistribution.old
Step 4: Finally, type the following commands to start Windows Update Services and press Enter after each one:
net start wuauserv
net start cryptSvc
net start bits
net start msiserver
Reboot your PC and check if the “working on updates 100” issue has gone.
Tip: To learn more information about renaming or deleting SoftwareDistribution Folder, this post – How to Rename or Delete Software Distribution Folder on Windows is what you need.
Method 4: Perform a Clean Boot
Performing a clean boot can help you start Windows through a minimal set of drivers and startup programs, which can avoid software conflicts while installing Windows updates. In order to perform a clean boot, you need to do:
Step 1: Type msconfig in the Run box(pressing the Windows +R keys), and press Enter.
Step 2: Then go to the Services tab. Check the Hide All Microsoft Services box.
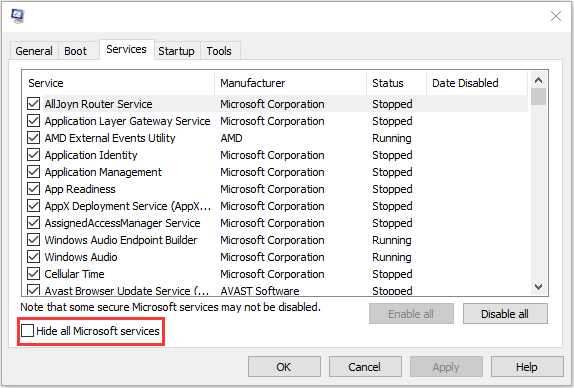
Step 3: Now, click the Disable all button, and click Apply to save the change.
Step 4: Navigate to the Startup tab and click Open Task Manager.
Step 5: In the Task Manager tab, select the first enabled application and click Disable. Here you need to disable all enabled applications one by one. After disabling all programs, close Task Manager and click OK.
Afterward, you can restart the computer to update Windows again. If the “working on updates 100% complete” error doesn’t occur when in a clean boot state, then it indicates that one of the programs was causing the error.
Method 5: Uninstall the Particular Update Causing the Issue
If the error still occurs, you can also try uninstalling the particular update that causes the issue. The steps are as follows:
Step 1: Open Control Panel. Click the Programs and Features section.
Step 2: From the left-hand menu, click View installed updates.

Step 3: Now right-click the particular update which is causing this problem and select Uninstall.
Restart your PC and the “Windows update stuck at 100” issue should be fixed.
Method 6: Run DISM in Safe Mode
You can also try running DISM, which allows you to repair corrupted system files. Please refer to the following steps:
Step 1: Type cmd in the Search box, then right-click the first result to choose Run as administrator.
Step 2: Type the following commands and press Enter after each one:
Dism /Online /Cleanup-Image /CheckHealth
Dism /Online /Cleanup-Image /ScanHealth
Dism /Online /Cleanup-Image /RestoreHealth
Step 3: Let the DISM command run and wait for it to finish. If the above commands won’t work, then try the commands below:
Dism /Image:C:\offline /Cleanup-Image /RestoreHealth /Source:c:\test\mount\windows
Dism /Online /Cleanup-Image /RestoreHealth /Source:c:\test\mount\windows /LimitAccess
Reboot your PC and this should fix the “Windows stuck on update“ issue.
Method 7: Run Automatic Repair
If the working on updates 100 complete issue still occurs, you have to run Automatic Repair. I will show you how to run it step by step.
Step 1: Click Repair your computer in the bottom-left corner to enter WinRE.

Step 2: You need to click Troubleshoot in the popup window to continue.
Step 3: Click Advanced options to go to the next page.
Step 4: Choose the Startup Repair in the Advanced options screen and wait for the process to be completed.
Now, when the process is finished, you can restart your computer and run Windows update to check whether the working on updates 100 is solved.
Tip: If you find that Windows Automatic Repair is not working, this post – How To Fix “Windows Automatic Repair Not Working” can help you fix this issue.
Method 8: Perform System Restore in WinRE
If the previous methods don’t work, you should perform a system restore via WinRE. Here is how to do that:
Tip: Only if you have created a restore point in advance, you can try this method.
Step 1: Enter WinRE.
Step 2: You should click Troubleshoot in Choose an option, and then choose Advanced options.
Step 3: Choose System Restore in Advanced options.

Step 4: Follow the on-screen instructions to complete the restore.
Now, try to run Windows update and the issue should be fixed.
More useful solutions you can find by watching this video:
My Windows update was stuck at 100 and I didn’t know how to fix it. Thanks to this post, it helped me solve the issue. I’d like to share it with more friends.Click to Tweet
What to Do After Solving Windows Update Stuck at 100?
After solving the problem of Windows update stuck at 100%, you had better create a system image to restore your system when it crashes.
Referring to create a system image, it is highly recommended you to use MiniTool ShadowMaker – a piece of fantastic and professional backup software. It is pretty easy and safe to back up and restore your system.
In addition to backing up your operating system, you can also use MiniTool ShadowMaker to back up files and folders, disks and partitions. What’s better, you can use it for free within 30 days, so just download it and have a try.
MiniTool ShadowMaker TrialClick to Download100%Clean & Safe
Here are the instructions to create a system image with MiniTool ShadowMaker:
Step 1: Launch MiniTool ShadowMaker, then click Keep Trial.
Step 2: MiniTool ShadowMaker selects the source by default. Thus, you just need to choose the backup destination.
Step 3: Go to the Backup page. Click Back Up Now to start creating a system image.
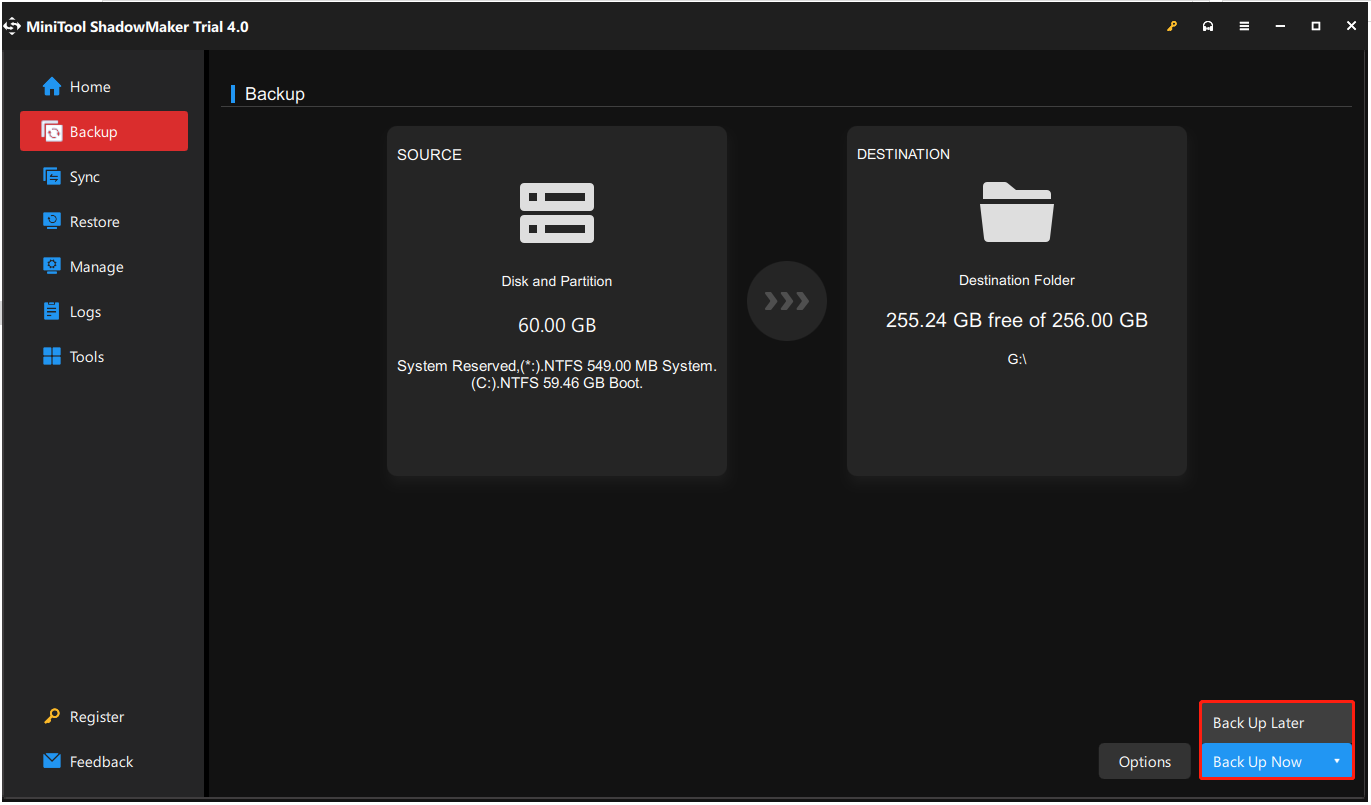
Tip: If you click Back Up Later, then you can click Back up Now to begin the backup task on the Manage page.
Step 4: Wait for MiniTool ShadowMaker to finish backing up the operating system.
In order to keep my system safe, I make a backup of it successfully with MiniTool ShadowMaker. It helps me a lot!Click to Tweet
Final Words
To sum up, this post has introduced what causes the error of Windows update stuck at 100 and shown 8 solutions to fix it. If you come across the same issue, try these solutions. If you have any better solution to fix the issue, you can share it in the comment zone.
After fixing this problem, it is recommended you create a system image. If you have any problem when using MiniTool program, please feel free to contact us via the email [email protected] and we will reply to you as soon as possible.
Windows Updates Stuck at 100 FAQ
How long should Windows update take?
In general, the update should be between 10 and 30 minutes on a computer. However, if you install your Windows on a conventional hard drive, the process will take a while. You can schedule the installation within the next five days, but you cannot delay it indefinitely.
Can I stop a Windows update in progress?
- Search for Control Panel in the Windows 10 Search box and select the relevant result.
- Select Security and Maintainance from the list of menu options.
- Click Maintenance, select Stop Maintenance.
What happens if I shut down during the Windows update?
Your PC will be seriously damaged if you shut down in the middle of the update installation. If the PC shuts down because of power failure, you need to wait for some time and then restart the computer to install the updates one more time. Your computer is likely to become bricked.
Can you fix a bricked computer?
Bricked devices cannot be powered on and function properly. Bricked devices cannot be fixed by conventional methods. For example, if Windows fails to start on your computer, your computer is not “bricked” because another operating system can be installed on it.
Когда ваш компьютер работает медленно или некорректно, одним из решений может быть установка новой операционной системы. Однако, для этого вам понадобится загрузочный диск, и в частности, диск 100 Windows 10 system. В этой статье мы покажем вам подробные инструкции о том, как правильно загрузить данный диск на ваш компьютер.
Прежде всего, вам потребуется скачать образ операционной системы Windows 10 system с официального сайта Microsoft или другого доверенного источника. Убедитесь, что вы скачиваете версию для вашей архитектуры компьютера (32-бит или 64-бит). Затем, используя специальное ПО для записи образов на диск (например, Rufus или UltraISO), создайте загрузочный диск из скачанного образа.
Когда ваш загрузочный диск готов, вставьте его в компьютер и перезагрузите систему. Во время загрузки выберите загрузку с диска (чаще всего, для этого нужно нажать клавишу F12 или F10 во время старта компьютера). Затем следуйте инструкциям на экране, чтобы установить операционную систему Windows 10 system. Будьте внимательны и следуйте именно этим инструкциям, чтобы избежать ошибок во время установки.
Инструкции по установке операционной системы могут немного отличаться в зависимости от версии диска и вашей конфигурации компьютера. Поэтому рекомендуется перед началом установки ознакомиться с подробным руководством, поставляемым с диском, или обратиться за помощью к специалисту.
После завершения установки операционной системы Windows 10 system, вам потребуется активировать ее с помощью лицензионного ключа. Если у вас уже есть ключ, введите его в соответствующем окне. Если же ключ отсутствует, вы можете воспользоваться триальной версией Windows 10 system или приобрести ключ у официального дилера Microsoft.
Теперь, после завершения всех действий, ваш компьютер должен быть готов к работе сбалансированно и быстро с новой операционной системой Windows 10 system. Не забудьте установить необходимые драйвера и программы, чтобы ваш компьютер работал еще лучше.
Содержание
- Подготовка к загрузке
- Процесс загрузки Windows 10 system на диск 100
- Завершение загрузки и проверка установки
Подготовка к загрузке
Прежде чем приступить к загрузке диска Windows 10, необходимо выполнить несколько предварительных действий. Эти шаги помогут вам гарантировать успешную установку и избежать возможных проблем.
1. Проверьте системные требования
Убедитесь, что ваш компьютер соответствует минимальным системным требованиям для установки Windows 10. Обратите внимание на объем оперативной памяти, требования к процессору и дисковому пространству. Если ваш компьютер удовлетворяет требованиям, можно переходить к следующему шагу.
2. Создайте резервную копию данных
Перед установкой операционной системы рекомендуется создать резервную копию всех важных данных. Это позволит вам сохранить информацию в случае ошибки или проблемы во время загрузки. Вы можете использовать внешний жесткий диск, облачное хранилище или другие средства для создания резервной копии.
3. Подготовьте установочный диск
Скачайте официальный образ Windows 10 соответствующей редакции с официального сайта Microsoft. Затем приведите загрузочный диск в нужное состояние. Для этого может потребоваться использование специальных программ, таких как Rufus или Windows USB/DVD Download Tool.
4. Обновите драйверы
Перед загрузкой новой операционной системы рекомендуется обновить драйверы вашего компьютера до последних версий. Это поможет избежать совместимости и проблем с оборудованием во время установки Windows 10. Скачайте последние драйверы с официального сайта производителя вашего компьютера или используйте программы для автоматического обновления драйверов.
После выполнения всех этих шагов вы будете готовы к загрузке диска Windows 10 и установке новой операционной системы на ваш компьютер.
Процесс загрузки Windows 10 system на диск 100
Для загрузки Windows 10 system на диск 100 необходимо выполнить следующие шаги:
- Подключите диск 100 к компьютеру с помощью USB-кабеля.
- Вставьте установочный диск или флеш-накопитель с Windows 10 system в оптический привод или USB-порт соответственно.
- Перезагрузите компьютер и нажмите клавишу Del или F2 (зависит от модели компьютера) для входа в BIOS.
- В BIOS найдите раздел Boot или Boot Order. В нем выберите установочный диск или флеш-накопитель с Windows 10 system в качестве первого устройства загрузки.
- Сохраните изменения и выйдите из BIOS.
- Компьютер перезагрузится и начнется загрузка с установочного диска или флеш-накопителя.
- На первом экране установщика Windows 10 выберите язык, время и валюту, а затем нажмите кнопку Далее.
- Перейдите на следующий экран, где вы можете нажать кнопку Установить сейчас или воспользоваться дополнительными параметрами установки.
- Прочитайте и принимайте лицензионное соглашение, затем нажмите кнопку Далее.
- На следующем экране выберите раздел «Диск 100» и нажмите кнопку Далее.
- Дождитесь окончания установки Windows 10 system на диск 100 и следуйте инструкциям на экране для завершения процесса.
После завершения установки Windows 10 system на диск 100, компьютер будет автоматически перезагружен и готов к использованию.
Завершение загрузки и проверка установки
После успешной загрузки и установки Windows 10 системы с диска 100, вам будет предложено выполнить несколько дополнительных шагов, чтобы завершить процесс и проверить корректность установки. Вот что нужно сделать:
- Выберите язык, регион и предпочтительные параметры клавиатуры.
- Прочитайте и принимайте лицензионное соглашение на использование продукта.
- Выберите одну из следующих опций:
- «Обновить этот компьютер с сохранением личных файлов и приложений» — для сохранения данных и программ, установленных на вашем компьютере.
- «Полная установка» — для чистой установки Windows 10 без сохранения старых данных и программ.
- Выберите диск для установки операционной системы Windows 10. Обычно это диск C:
- Начните процесс установки, нажав на кнопку «Установить».
- Подождите, пока установка будет завершена. Это может занять некоторое время.
- Когда установка будет завершена, ваш компьютер перезагрузится и вам будет предложено ввести информацию о себе, включая имя пользователя и пароль.
- Войдите в свою учетную запись и установите дополнительные настройки, такие как подключение к Интернету, выбор фонового изображения и другие параметры.
Поздравляю, теперь ваш компьютер готов к использованию с установленной системой Windows 10! Убедитесь, что все ваши программы и данные работают должным образом, чтобы убедиться в успешном завершении процесса установки. Если у вас возникли проблемы или вопросы, обратитесь к документации или службе поддержки Microsoft. Удачи!
Sometimes, Windows update gets stuck on deciding if it has finished updating or not. Fortunately, there are ways to fix this issue.
Update errors are nothing new for Windows users. In some cases, the updates simply do not start, while in others, they start fine, but become stuck at some point.
There have been reports by users that the system updates get stuck at 100% and prevent the PC from restarting automatically. This issue can be caused by a number of reasons such as unexpected hardware changes, malware, interference of a third-party program, and corruption errors.
Below, we have listed the most effective troubleshooting methods you can try to fix this issue for good.
1. Wait for the Process to Complete
It may take longer for some Windows updates to install, so before you begin troubleshooting, ensure that the update is stuck and not in between operations.
The best way to do this is by waiting for the process to complete on its own. You should give the update process at least 3-4 hours before proceeding with the troubleshooting methods if you can. Some users left their computers overnight for the updates to be installed.
We understand that waiting this long might not be possible for everyone and if it does not suit you as well, go ahead with the methods below. It is also important to note that before proceeding with the methods in this guide that require you to access your system, you will need to break the update loop that is causing the issue. To do this, reboot your PC to perform the steps listed.
2. Remove Any USB Peripherals and Restart Your PC
Start by removing any USB peripherals that may be connected to your PC. When you have extra external devices connected, your PC thinks of it as a change in the default hardware settings, leading to issues like the one at hand.
Once you have removed all peripherals, wait for a few minutes and see if it makes any difference. If not, you can try force restarting the PC. However, this method involves removing the battery from your laptop, so we recommend you only proceed if you have some experience doing so.
Here is how you can force restart your PC:
- Press and hold the power button of your PC to shut it down.
- Once it shuts down, remove the power supply and battery.
- Then, wait for a few minutes before inserting it back.
- Now, boot your PC and see if the issue is resolved.
3. Restart the Windows Update Service
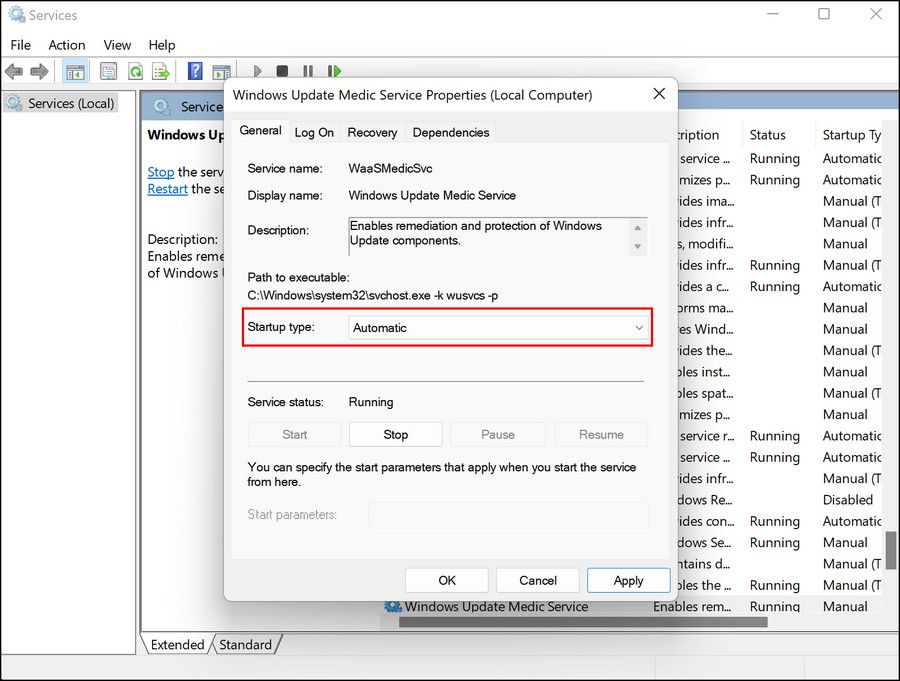
The Windows Update service handles the download, installation, and removal of updates on your system. If this service is disabled or not working as it is supposed to, you are likely to encounter issues while updating your operating system and its applications.
If removing the external peripherals did not help, then you can try restarting the Windows Update service.
Here is how you can make sure that the update service is running properly:
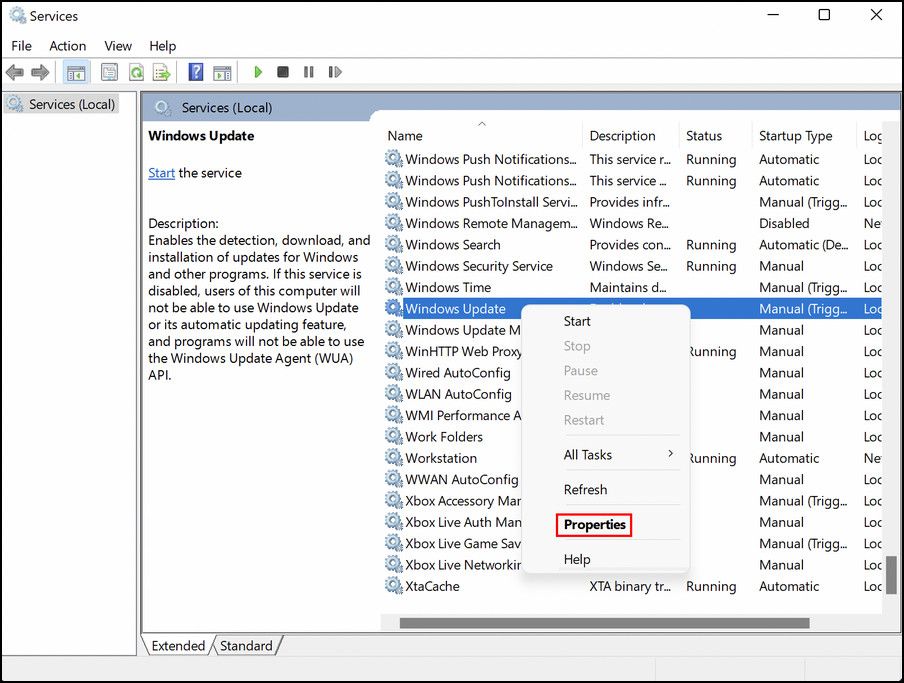
- Press Win + R to open Run.
- Type «services.msc» in Run and press Enter.
- In the following window, look for the Windows Update service and right-click on it.
- Choose Properties from the context menu.

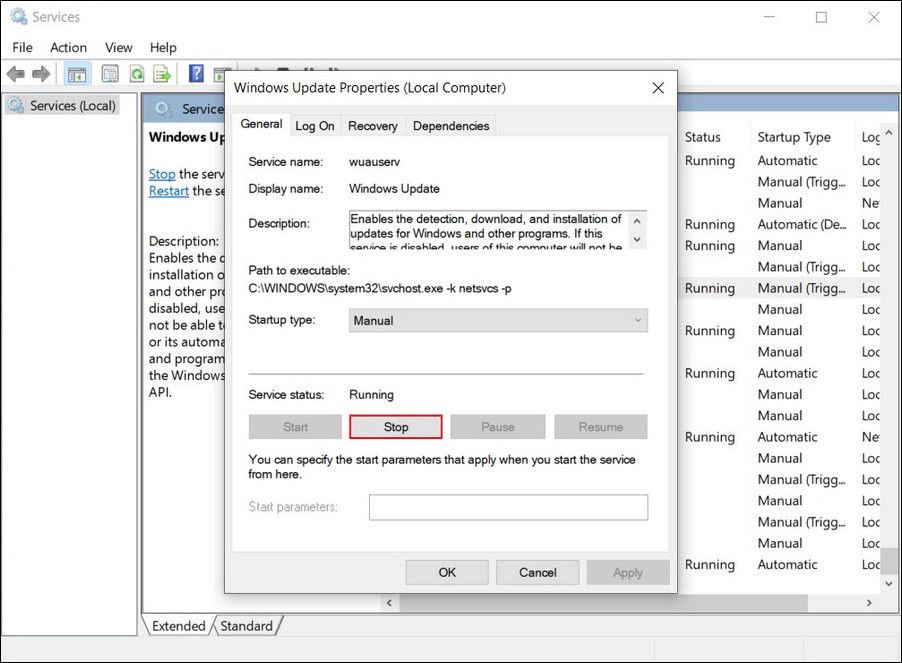
- In the Properties dialog, click on the Stop button.

- Wait for a few seconds before hitting the Start button again.
- Expand the dropdown for Startup type and choose Automatic from the list.

- Click Apply > OK to save the changes.
4. Scan for Viruses
Your operating system might also be infected with a virus or corruption error that is preventing you from installing the latest updates.
To check if this is the case, try running a system scan using the security program you have installed on your PC. If you do not have a third-party security program, you can run built-in troubleshooting utilities like SFC, DISM, and CHKDSK via Command Prompt.
However, if you are unable to use the basic Windows features and applications installed, then you must first boot into Repair Mode. Once you are in the Repair Mode, head over to Troubleshoot > Advanced options. Then, choose Command Prompt from the list of options and run the scans.
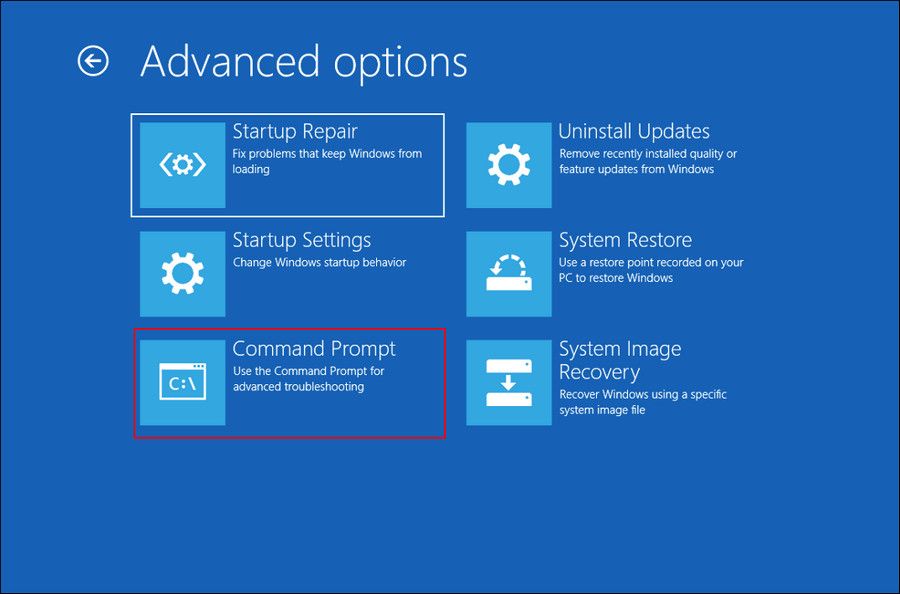
If these utilities find any issues, they will attempt to resolve them without requiring your input. After the scans, check if the issue is resolved.
5. Run the Windows Update Troubleshooter
Another troubleshooting method that has helped users fix the issue is running the Windows Update troubleshooter. This is a built-in utility that is specifically designed by Microsoft to fix issues regarding Windows updates.
Here is how you can run it:
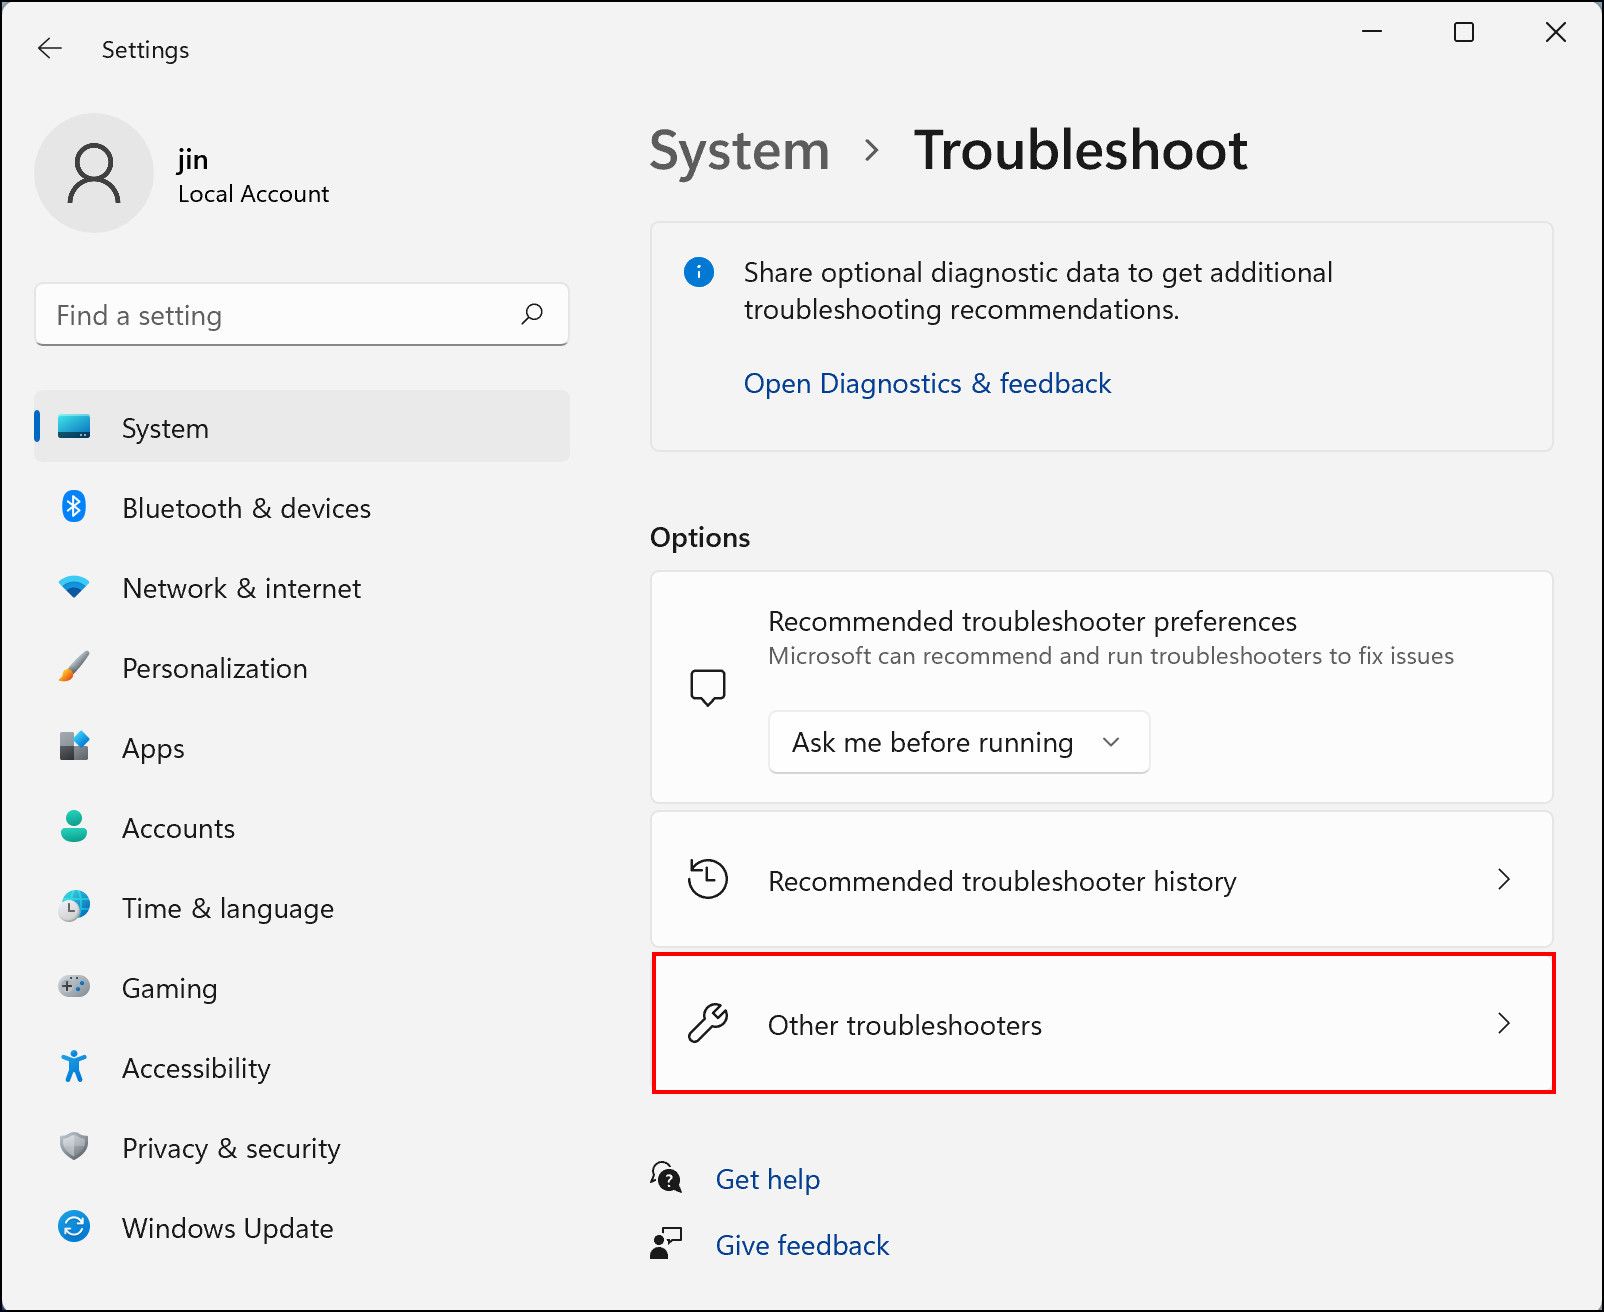
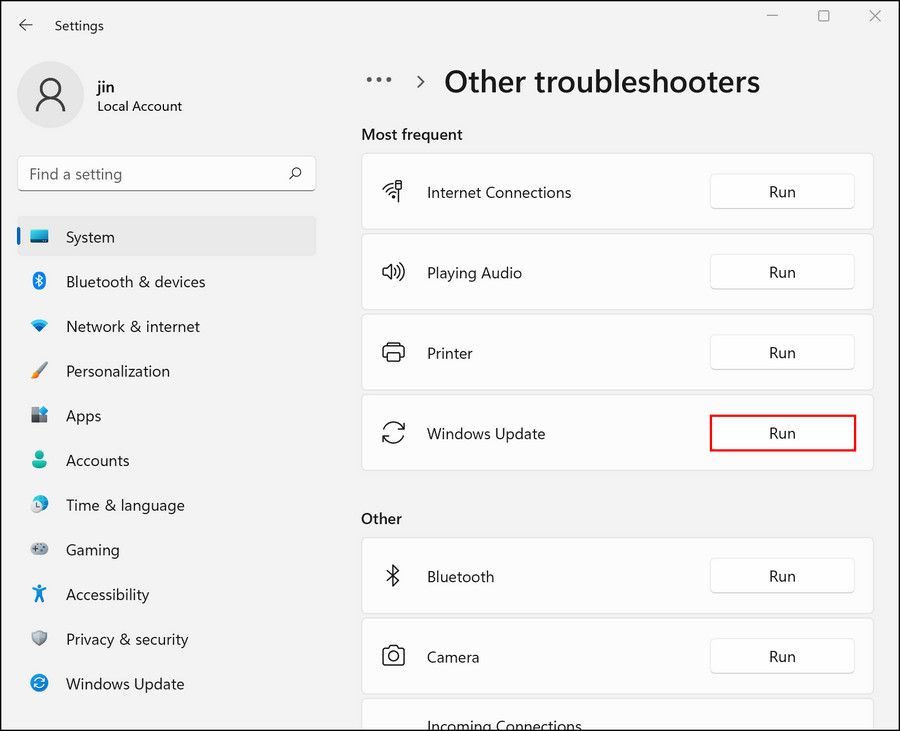
- Press Win + I to open Windows Settings.
- Choose Troubleshoot from the left pane and click on Other troubleshooters on the right side of the window.

- In the following window, look for Windows Update troubleshooter and click on the Run button associated with it.

- The troubleshooter will now begin scanning the system for potential errors. If it finds issues, it will recommend fixes. In that case, click on Apply this fix.
- If not, click Close the troubleshooter and move to the next method below.
6. Boot Into Safe Mode
Safe Mode is a Windows mode that launches Windows with only the basic drivers and programs. This troubleshooting mode helps users determine if a background process is causing issues within the system.
In this method, we will first boot into Safe Mode using the Repair Mode and then restart the PC normally. Hopefully, this will fix the problem at hand.
Here is what you need to do:
- Boot Windows and during the process, press the F11 key repeatedly till Windows displays the Advanced Startup screen.
- Head over to navigate to Troubleshoot > Advanced options > Startup settings.

- Click on the Restart button in the following window.

- Hit the F5 key on the keyboard to proceed. This will launch the Safe Mode successfully.
- In Safe Mode, restart your PC the normal way (Start menu > Sign out > Restart).


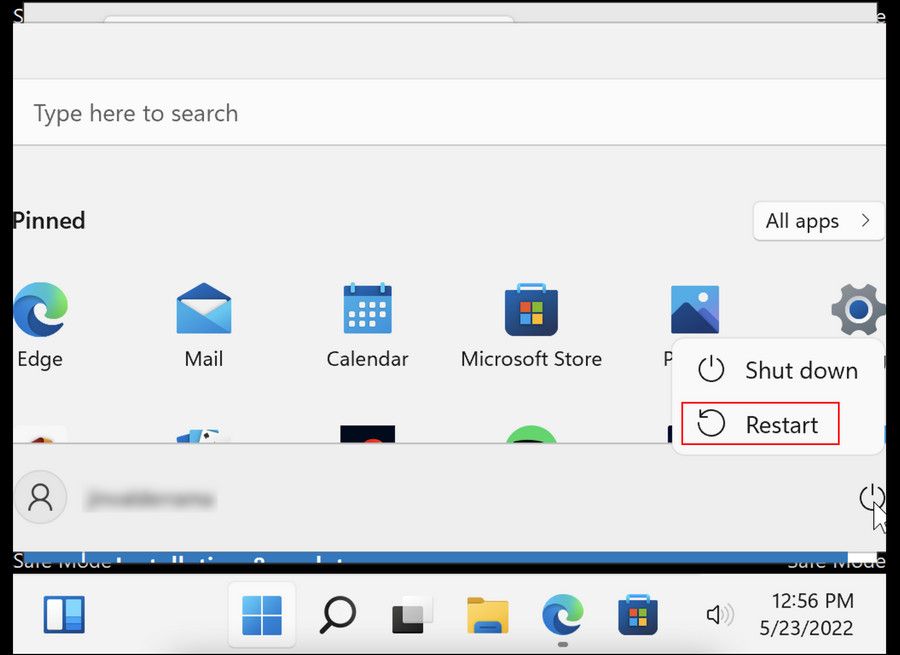
Upon reboot, the issue should no longer appear. You can now check if the updates are successfully installed. If not, you can try any one of the different methods to update Windows manually.
Resume the Update Process on Windows 11
We hope that at least one of the methods listed above was able to help you. Nevertheless, if you have come this far without finding a solution, you should consider performing a complete system reset since the issue is likely caused by a component that conventional troubleshooting methods cannot fix.