The Media Creation tool is a useful utility that lets you upgrade or reinstall Windows on your system’s hard disk. But like other apps, it also sometimes behaves weirdly, as it’s behaving for many users. For instance, some users aren’t able to open the Media Creation tool on their PC.
Whereas a set of users are unable to upgrade or clean install Windows using it on their system’s hard disk. If you also find yourself in a similar situation, fret not, as it’s easily fixable. Here in this guide, we’ve shared some ways that can help you fix the Media Creation tool not working issue in Windows 11.
Here are some possible reasons for the Windows Media Creation tool not working issue in Windows 11:
- Lack of Required Privileges
- Interference From Antivirus
- Insufficient Disk Space
- Disabled TLS 1.1 & TLS 1.2
- Enabled VPN
- Conflicting Programs
- The Media Creation Tool’s Executable Is Blocked
Fix the Media Creation Tool Not Working Issue in Windows 11
Here’s a compiled list of all the working solutions that can fix the Media Creation tool not working issue:
Note: Before trying the solutions below, plug the bootable USB drive into your system if you’re trying to clean install Windows.
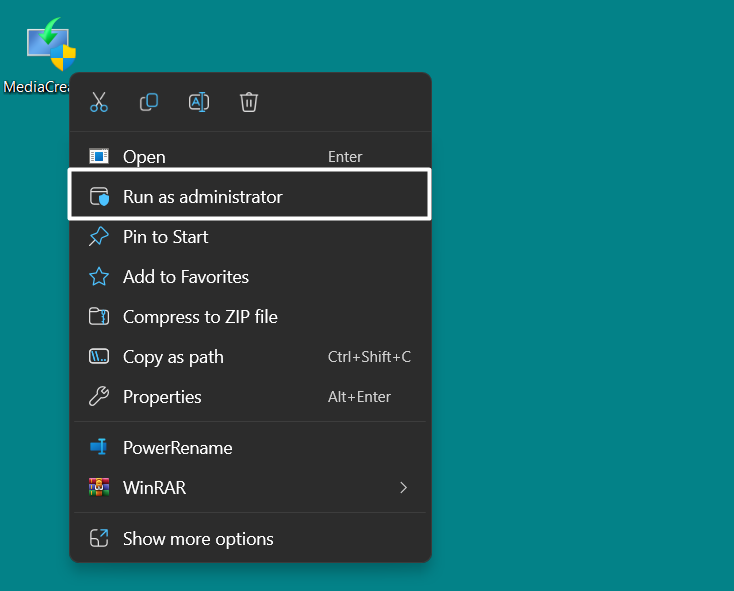
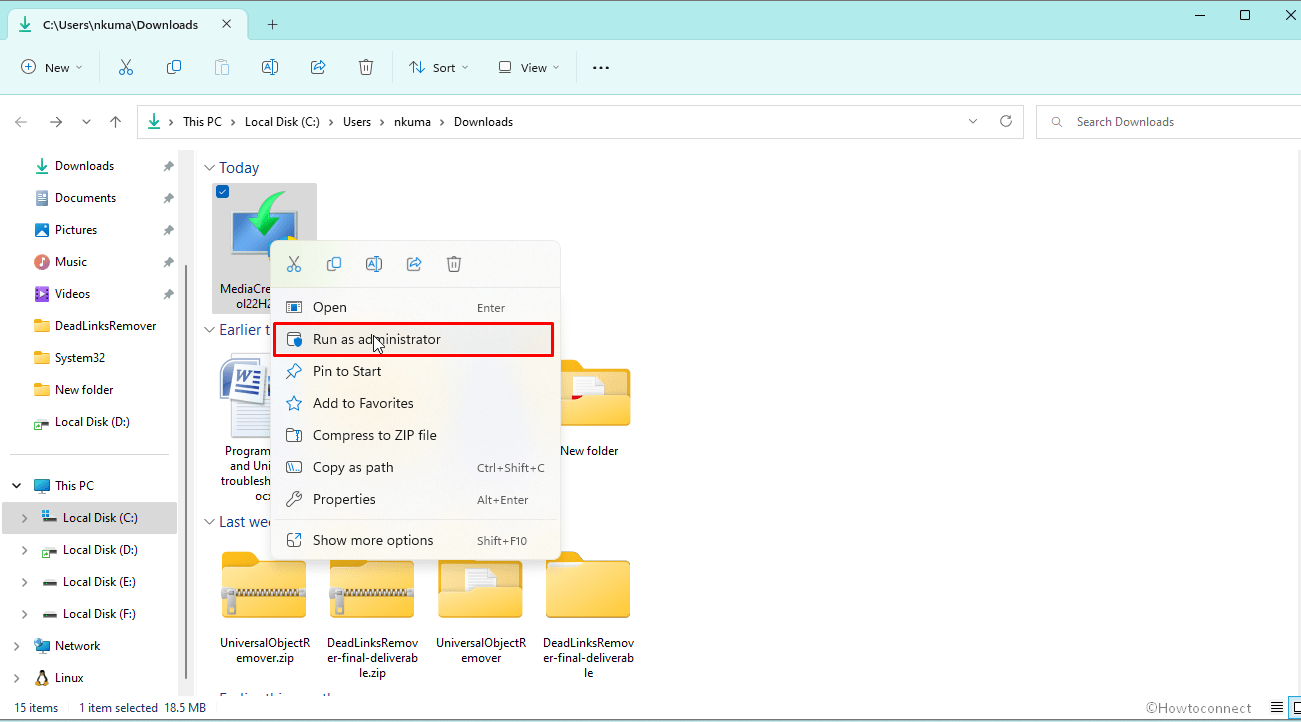
1. Try Opening the Media Creation Tool as an Administrator
Sometimes programs fail to open because of a lack of administrative privileges, which could be the same in your case. Due to this, we suggest you open the Media Creation tool as an admin to see if it fixes the issue.
You can follow the steps right below to know how to launch the Media Creation tool as an admin:
1. Press the Windows key on your keyboard to open the Windows Search Box, and type Media Creation in it.

2. Click on Run as administrator in the search results under the Media Creation tool to open it with admin rights.
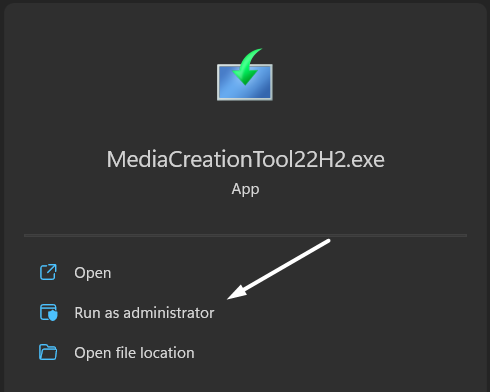
Tip: Another way to do so is by right-clicking on the Media Creation tool’s executable file and selecting the Run as administrator option from the context menu.
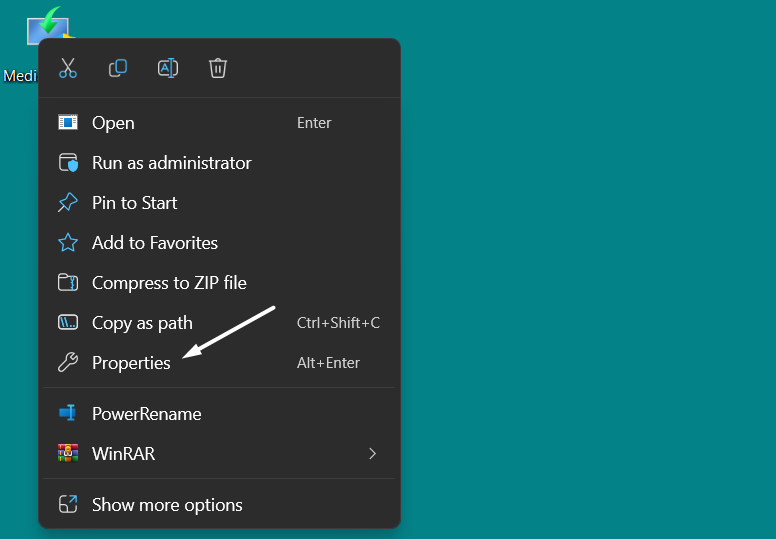
2. Unblock the Media Creation Tool
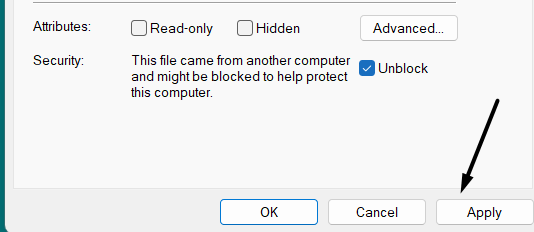
It could be possible that the Media Creation tool’s executable file is blocked on your PC. Due to this, it’s not opening on your system. Thus, we suggest you ensure that the file isn’t blocked on your system, and you can ensure this by following the below-listed steps:
1. Move to the location on your system where you’ve saved the Media Creation tool’s executable file.

2. Right-click on the executable file and select the Properties option from the contextual menu.
3. Ensure the checkbox next to Unblock under the Security section is unchecked.
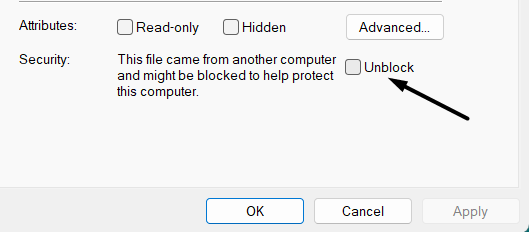
4. Lastly, click the Apply button to save the changes and then click on OK to close the box.
3. Disable VPN Client
An active VPN is one of the most common causes of the ill-functioning of the Media Creation tool. So if you’re using an external or built-in VPN, try disabling it. You can follow the below steps to turn it off:
1. Open the Windows Search Box, type VPN settings in it, and click on it in the search results.

2. Click on the VPN connection that’s active and click on the Diconnect button to deactivate it right now.

3. In the end, switch off the Allow VPN over metered networks and Allow VPN while roaming toggles.

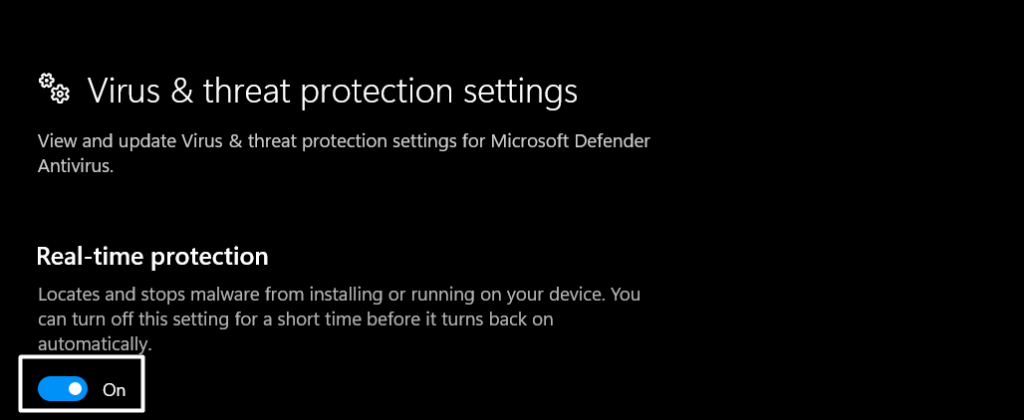
4. Turn Off Your Antivirus
Another common cause of the “There was a problem running this tool” error is the enabled antivirus. Keeping this cause in mind, we suggest you disable your system’s integrated antivirus to check whether it’s causing this issue. You can check the below steps to switch it off:
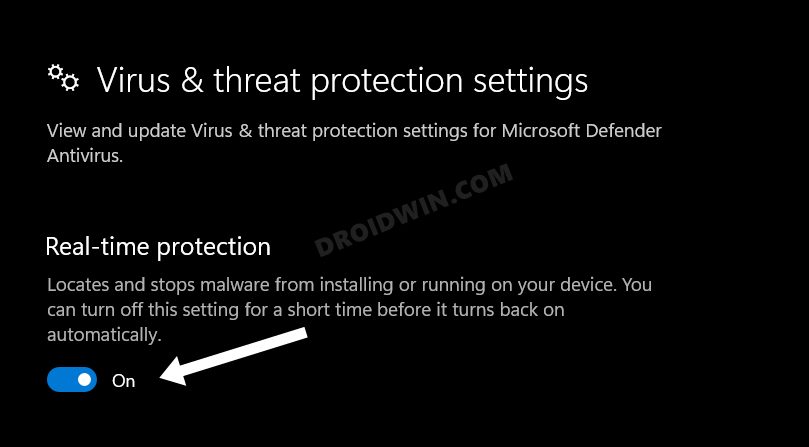
1. Open the Virus & threat protection settings on your Windows PC or laptop using the Windows Search Box.

2. Click on the Manage settings text under the Virus & threat protection settings section.

3. Disable the toggle under the Real-time protection section and then check the issue’s status.
5. Delete Conflicting Programs
In some cases, it’s found that third-party programs conflicted with the Media Creation tool, due to which they got the “There was a problem running this tool” error on their Windows PC.
This could be the same in your case, and to check this try removing potentially conflicted programs from your system.
6. Run Antivirus Scan
You may have mistakenly downloaded infectious files on your system, due to which the Media Creation Tool isn’t working. To check whether malware is causing this issue, we advise you to run a virus scan on your PC. So, here are the steps to do so:
1. Open the Windows Search Box on your PC by pressing the Windows and S keys at the same time.

2. Type Virus & threat protection in the search box, and select it from the Best match section.
3. Click the Quick scan button on the Virus & threat protection window to start the antivirus scan.

4. Once the scan is ended, check if the scan has found any suspicious files on your system. If yes, follow the on-screen instructions to remove them.
7. Enable TLS 1.1 & TLS 1.2
Transport Layer Security (TLS) is simply a security protocol that provides communications protection over a computer network. Some users said that enabling TLS 1.1 & TLS 1.2 in the system could fix the Media Creation Tool not working issue in Windows 11. So, try the same by following the below-mentioned steps and check the issue’s status:
1. Right-click on your desktop’s blank space, and then hover the arrow on the New option.

2. Select the Text Document option from the New dropdown menu to create a new text file.
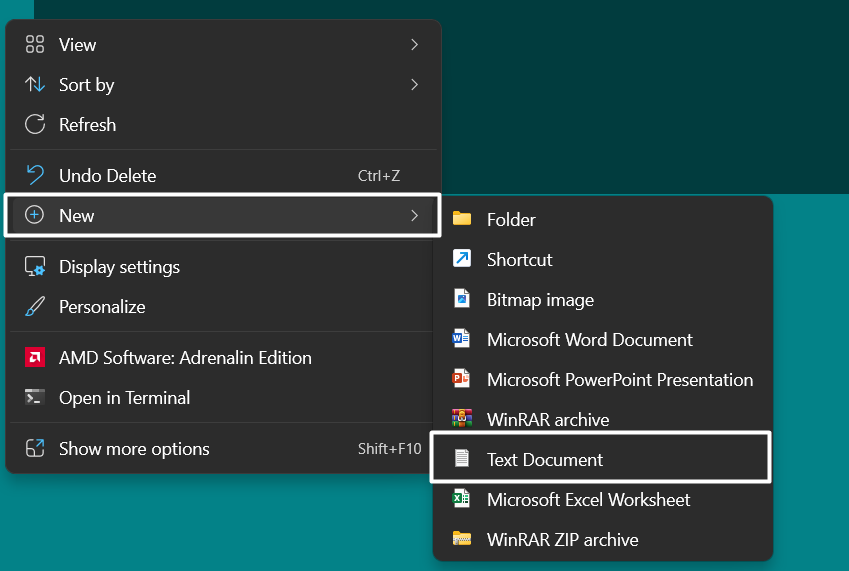
3. Once the new text document is created, copy-paste the below-mentioned line of codes into it:
Windows Registry Editor Version 5.00[HKEY_LOCAL_MACHINE\SOFTWARE\Microsoft\Windows\CurrentVersion\Internet Settings\WinHttp] “DefaultSecureProtocols”=dword:00000a00[HKEY_LOCAL_MACHINE\SOFTWARE\Wow6432Node\Microsoft\Windows\CurrentVersion\Internet Settings\WinHttp] “DefaultSecureProtocols”=dword:00000a00[HKEY_LOCAL_MACHINE\SYSTEM\CurrentControlSet\Control\SecurityProviders\SCHANNEL\Protocols\TLS 1.1\Client] “DisabledByDefault”=dword:00000000 “Enabled”=dword:00000001[HKEY_LOCAL_MACHINE\SYSTEM\CurrentControlSet\Control\SecurityProviders\SCHANNEL\Protocols\TLS 1.2\Client] “DisabledByDefault”=dword:00000000 “Enabled”=dword:00000001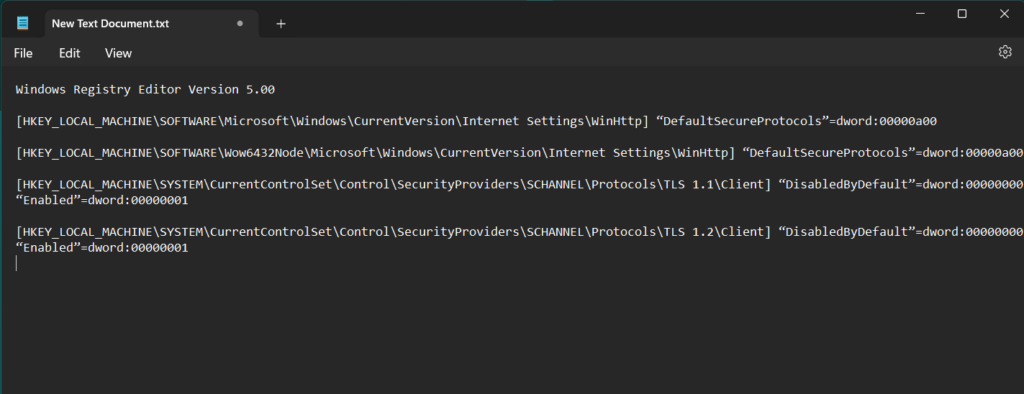
4. Click on File in the top ribbon menu, and then select Save as from the dropdown menu.
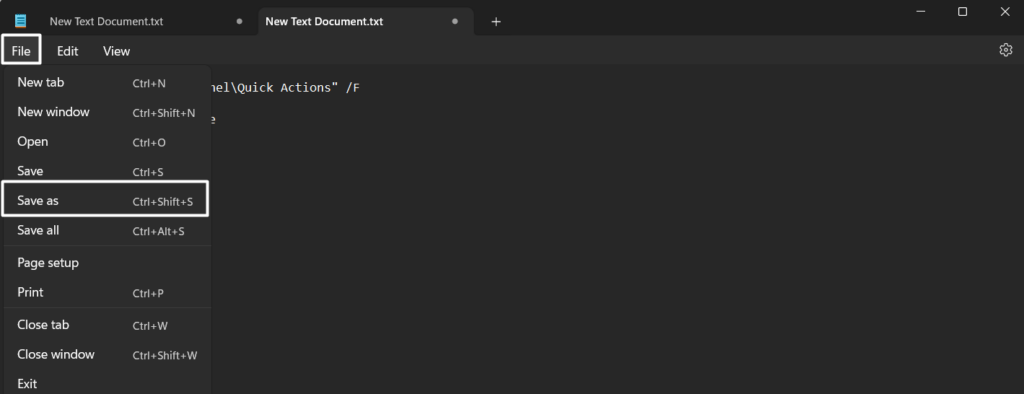
5. Type Enable TLS.reg in the File name: field and click on the Save button to save the file with this name.

6. Double-click on the new Enable TLS.reg registry file to apply it and then check the issue’s status.

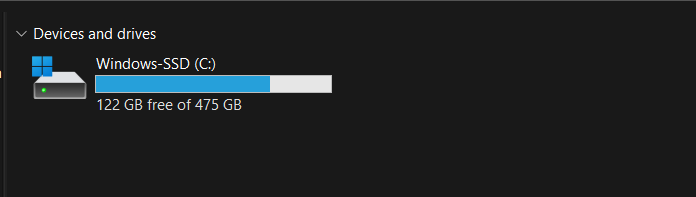
8. Make Sure Enough Space Is Available on Your System Disk
To use the Media Creation tool on your Windows 11 PC, it should have at least 8 GB of free space on your hard disk. So make sure your Windows system’s disk has this much free storage. You can check the same in the This PC section of the Windows File Explorer.
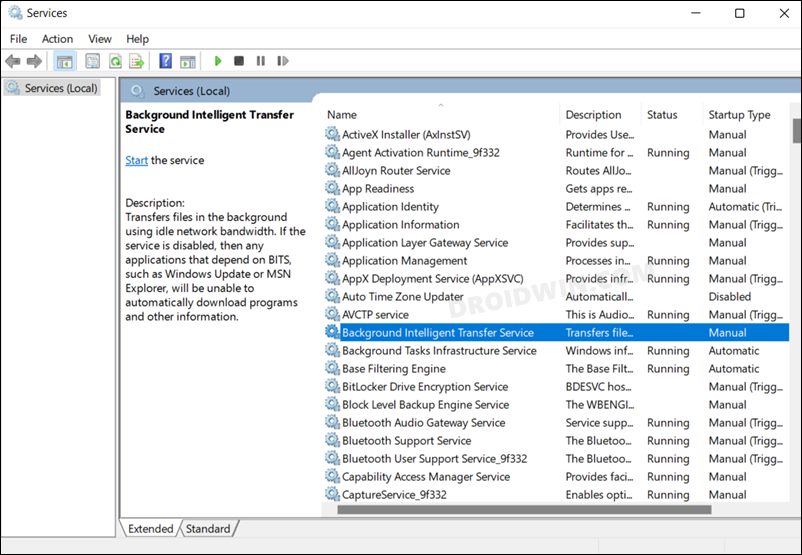
9. Restart All the Important Services
The working of the Media Creation tool also depends on the functioning of a few Windows services. It’s possible that the below-mentioned services aren’t working, which is why this issue is occurring:
- Background Intelligent Transfer Service (BITS)
- Server
- TCP/IP NetBIOS Helper
- Workstation
- IKE and AuthIP IPsec Keying Modules
- Windows Update or Automatic Updates
Due to this reason, we suggest you restart all the stated Windows services and check if doing so fixes the issue. You can check the below-mentioned steps to know how to restart them:
1. Open the Services utility on your Windows 11 PC using the Run utility or any other way.

2. Search for any of the above-mentioned Windows services in the Services tab and right-click on it.
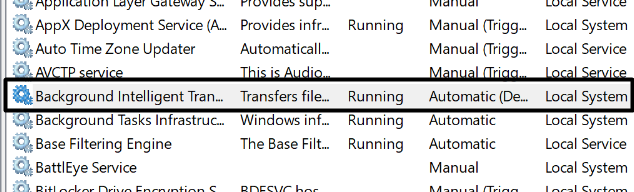
3. Choose the Restart option from the right-click menu to restart the selected Windows service.
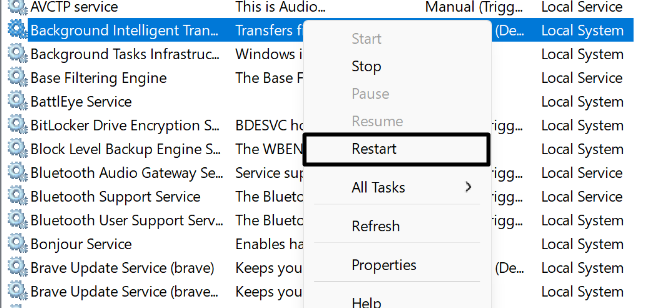
4. Apply the same steps to other mentioned Windows services and check if the issue is gone.
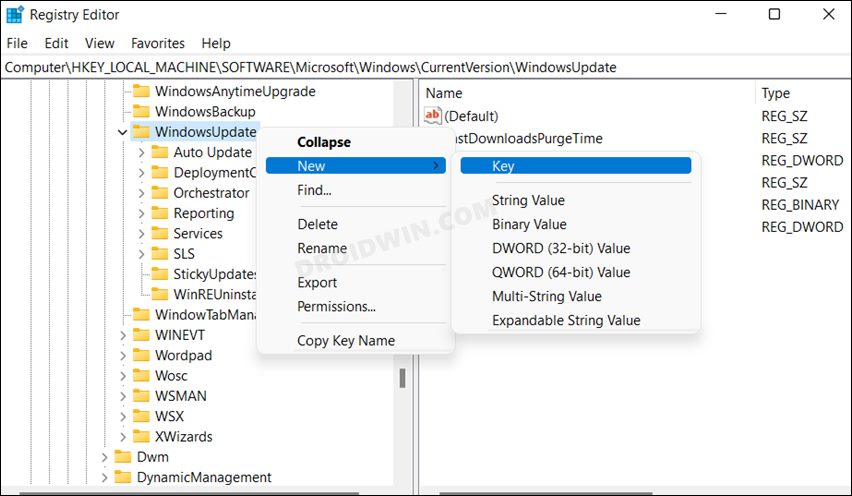
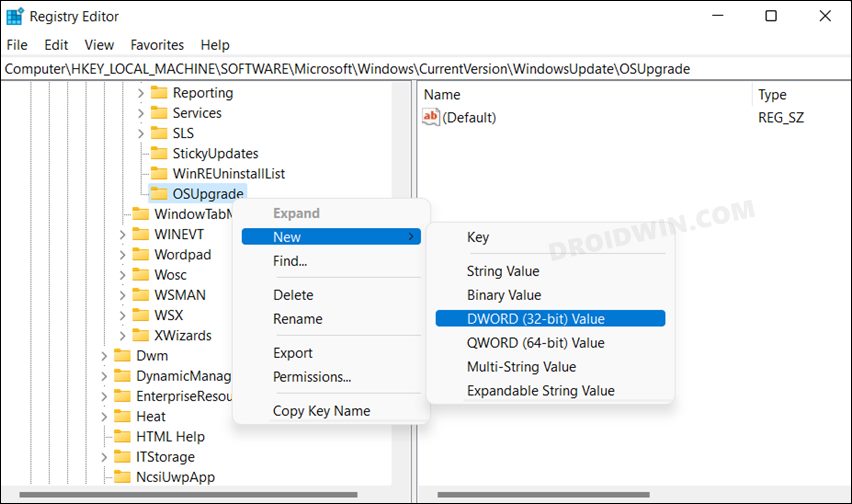
10. Create a New Registry Key
If nothing worked out for you until now, then there’s a higher chance that this solution would work. So, all you need to do is, dig a bit in the Registry Editor and create a new registry key called AllowOSUpgrade.
So, try the same with the below-mentioned instructions:
1. Open the Run utility, type regedit in its search box, and hit Enter to get the UAC prompt.
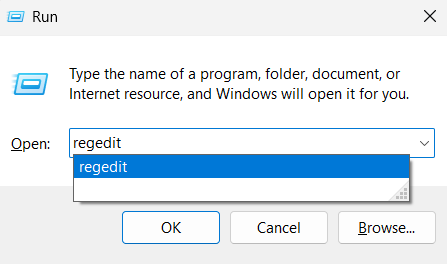
2. Click on Yes on the UAC prompt and go to the below-mentioned path in the Registry Editor:
Computer\HKEY_LOCAL_MACHINE\SOFTWARE\Microsoft\Windows\CurrentVersion\WindowsUpdate\OSUpgrade![]()
3. Right-click the OSUpgrade key on the left and choose the New > DWORD (32-bit) Value option.
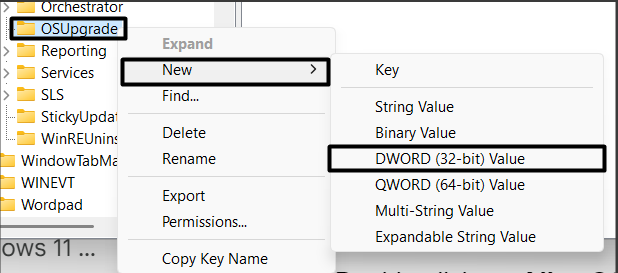
4. Enter AllowOSUpgrade in the Value name: text field and click the OK button to save the name.
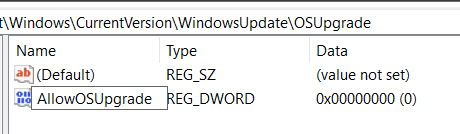
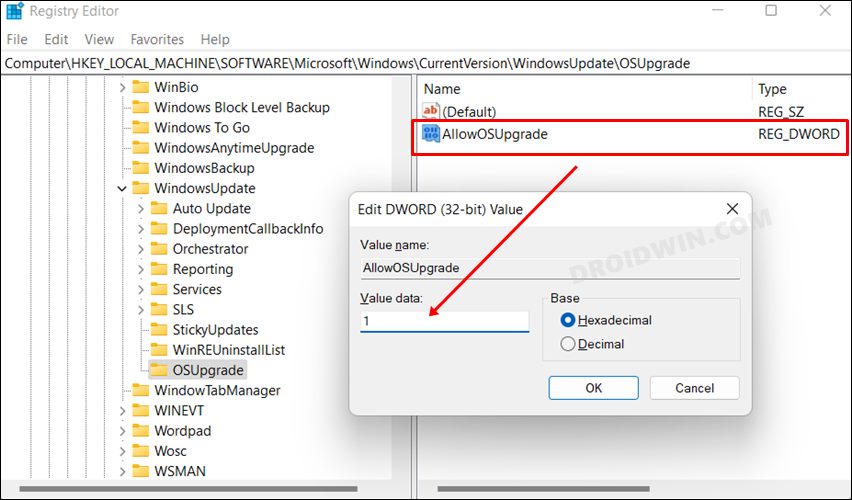
5. Double-click on AllowOSUpgrade in the right pane and enter 1 in the Value data: text field.
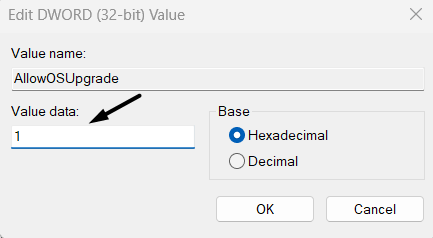
6. Click the OK button on the Edit DWORD(32-Bit) Value prompt and restart your PC to check the issue’s status.

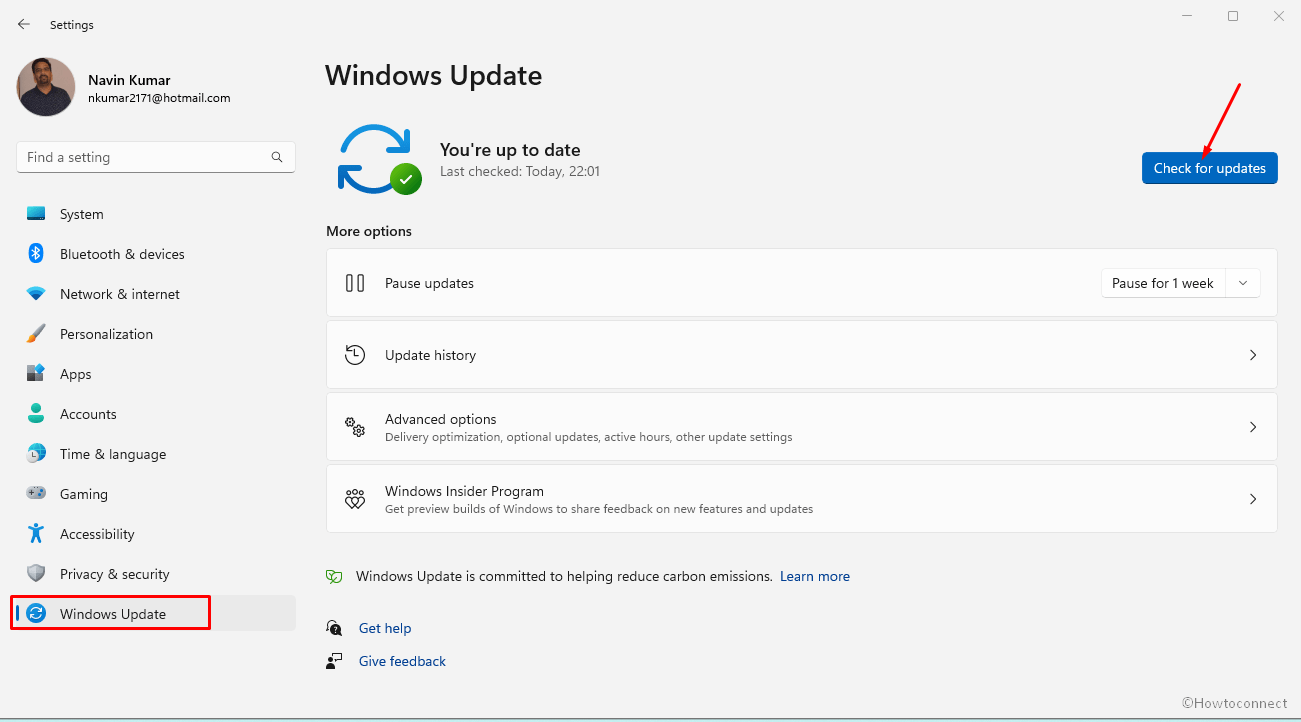
11. Make Sure You’re On the Latest Windows Version
It could be possible that your Windows 11 PC isn’t running on the latest version of Windows. As a result, this problem is appearing. In that case, we suggest you install all pending Windows updates and then check if the Windows 11 Media Creation tool not working issue is fixed.
Try updating your Windows 11 PC by following the below-mentioned steps:
1. Launch the Settings app and click on the Windows Update option at the top right corner.
2. Click the Check for updates button in the following window to search for new Windows updates.

3. In case it shows some Windows updates to install, click the respective button to install them.

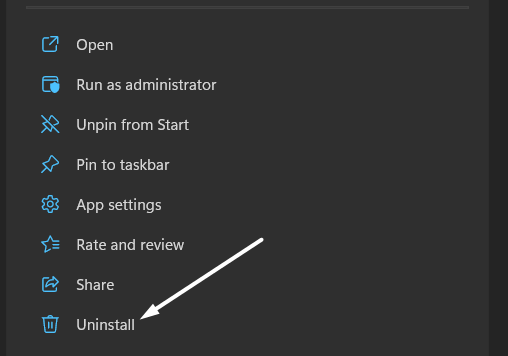
12. Reinstall the Media Creation Tool
One of the easiest ways to resolve all kinds of issues with the Windows Media Creation tool is to reinstall the tool itself. So, uninstall Media Creation from your system and reinstall it by clicking here. Once the tool is downloaded, install it and then check the issue’s status.
13. Clean the Installation Drive
One of Microsoft’s Independent Advisors advised affected users to clean the installation disk before upgrading to Windows’ latest edition.
This is because errors in the disk could also make the Media Creation tool ill. So clean your disk by following the steps right below:
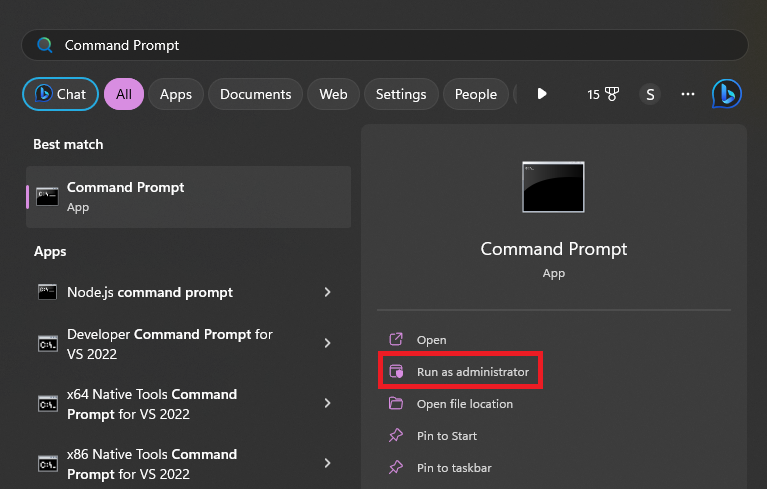
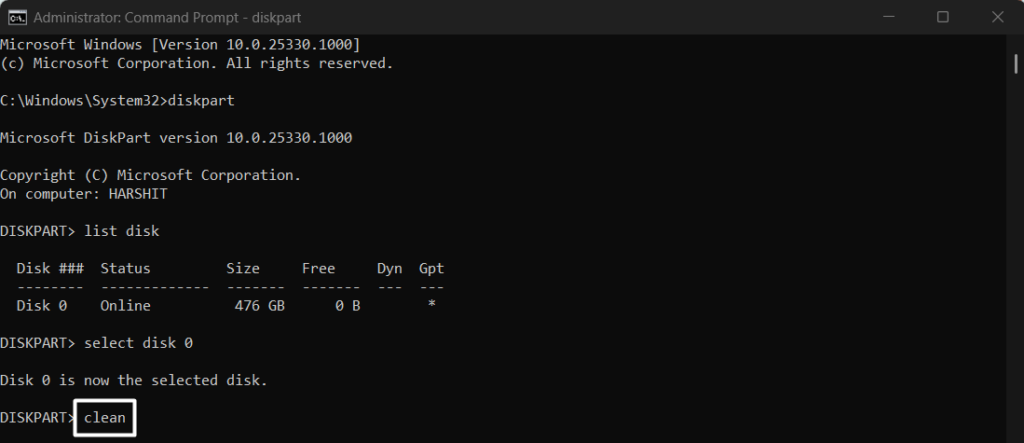
1. Open the Command Prompt program with administrative privileges on your Windows 11 PC.
2. Execute the below-listed command in the console to get a list of all disks with available space:
list disk
3. Run the below command in it but make sure to change “1” with the disk’s number that you want to clean:
select disk 1
4. Lastly, type the clean command in it and press Enter to start cleaning the selected disk.
14. Try An Alternate Way
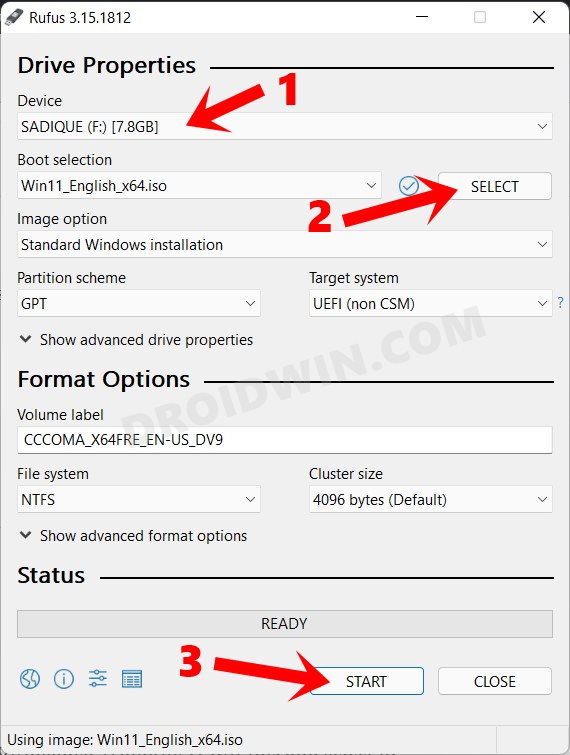
If you’re still unable to clean install the new Windows 11 on your PC, then try another way. One of the ways to do so is by creating an installation USB drive. For that, you need to use the Rufus software.
You check our guide, as it explains the same in detail. This guide also mentions other ways to upgrade the system to the latest version, so check them too.
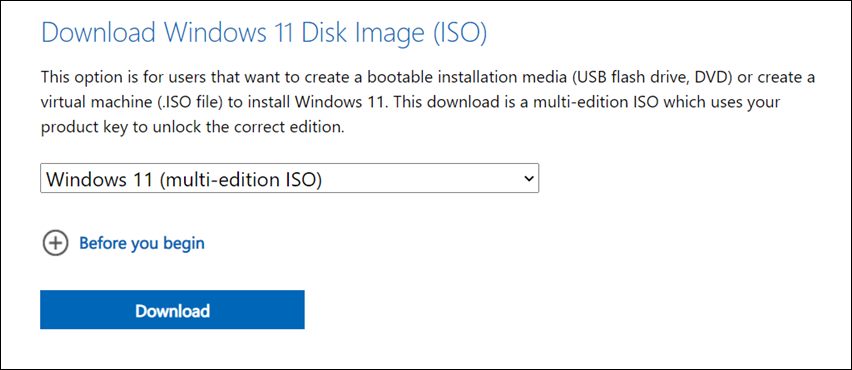
15. Clean Install Windows 11 Using ISO File
If the previous method also doesn’t work, then direct download the Windows 11 ISO file on your system and use it to install Windows 11 on your system’s drive. So, click here to download the Windows 11 ISO file on your PC.
Once you’ve downloaded the ISO, check the instructions mentioned in our guide to know how to clean install Windows 11 using it.
FAQs
Why Is Windows Media Creation Tool Not Launching?
You may not have the required permission to open the Windows Media Creation tool on your system. Some other reasons could be viruses, conflicting apps, insufficient disk space, etc.
Why Can’t Windows 11 Media Creation Tool Find USB?
If the Windows 11 Media Creation tool is unable to detect your USB, it could be possible that it isn’t properly connected to the system. Another reason could be problems with the USB port.
How Do I Fix Windows Media Creation Tool Error?
Restarting the system is one of the easiest solutions to resolve all the Windows Media Creation tool’s related errors. You can also try disabling the VPN client to check if it fixes those errors with it.
How Do I Fix Error Code 0x80072F8F 0x20000?
Follow the below-mentioned instructions to fix the 0x80072F8F 0x20000 error in Windows 11:
1. Hit the Windows key and R keys concurrently to open Run and type the below path in it:
C:\Windows\SoftwareDistribution\Download2. Press the Ctrl + A keys at the same time to select all the files and then click on the Bin icon in the top menu.
3. After deleting all the files, open the Command Prompt utility and execute the below command in it:
wuauclt.exe /updatenowHow To Install Windows 11 Without Media Creation Tool?
One of the methods to install Windows 11 without the Media Creation tool is directly downloading the Windows 11 ISO file. Another possible method is using the Rufus software.
Upgrade Windows With Ease
Most of us use the Media Creation tool to upgrade our system to the latest version. But sometimes, it suddenly stops working, due to which it becomes difficult to upgrade or clean install Windows on our system.
If you were also facing issues with the Media Creation tool on your Windows 11 PC, we hope they have gotten fixed now, as we shared some proven ways in this in-depth guide. Also, make sure to share which fix helped you get rid off Media Creation tool not working issue.
Windows Media Creation Tool is a very useful tool that can help you upgrade your Windows system to the latest version or install the latest Windows 10/11 on your device. However, if Windows Media Creation Tool is not working, do you know how to fix it? You can find some easy solutions here.
Windows Media Creation Tool is an official tool from Microsoft. You can use it to upgrade your system to the latest version or install the latest Windows 10/11 on your device. MiniTool Software has talked about Windows 10 Media Creation Tool in this article: A Complete Guide to Windows 10 Media Creation Tool: How to Use.
However, the usage of Windows 10 Media Creation Tool and Windows 11 Media Creation Tool is slightly different.
For example,
You can use Windows 10 Media Creation Tool to:
- Upgrade your PC to the latest version.
- Create a Windows 10 installation USB drive.
- Download a Windows 10 ISO file.
You can use Windows 11 Media Creation Tool to:
- Create a Windows 11 installation USB drive.
- Download a Windows 11 ISO file.
You see the only difference is that you can’t use Windows 11 Media Creation Tool to directly upgrade your PC now. But it is not a big problem. You can use Windows 11 Installation Assistant to update your system. The effect is the same.
Windows 10/11 Media Creation Tool is not preinstalled on your PC. You need to download it from the Microsoft software download site.
- Download Windows 10 Media Creation Tool
- Download Windows 11 Media Creation Tool
After downloading Windows 10/11 Media Creation Tool, you can directly open and run it to do what you want to do. However, some users report that their Windows Media Creation Tool is not working.
There are multiple scenarios for this problem. For example:
- Windows 11 Media Creation Tool not working
- Windows 10 Media Creation Tool not working
- Windows Media Creation Tool won’t run
- Windows Media Creation Tool won’t open
- Windows Media Creation Tool couldn’t run on a PC
- And more….
We propose some solutions to these problems. You can try them to help you out.
If Windows Media Creation Tool is not working or you can’t open it on your PC, you can delete the tool and download it again. This is the quickest way to solve this issue: you need to make sure your downloaded Media Creation Tool is complete.
Your internet connection should be enabled and work smoothly during the download process. This is also to ensure the integrity of the download. On the other hand, it also requires a good network connection when using Windows Media Creation Tool.
If the above method doesn’t work for you, you can run the tool as administrator to have a try. You can right-click the Media Creation Tool and select Run as administrator. If the User Account Control interface pops up, you need to click the Yes button to continue.

Fix 3: Create an AllowOSUpgrade Registry Key
Windows Registry is an administrative tool that saves information about your installed programs and services on your Windows PC. It contains an OSUpgrade registry key and it is related to your Windows update. You can create an AllowOSUpgrade Registry key to allow Windows Media Creation Tool to run and upgrade your system.
Tips:
You should back up the registry key in advance to protect your system.
Step 1: Click the search icon from the taskbar, then search for Registry Editor. Select Registry Editor to open this tool. If you receive the User Account Control interface, click the Yes button to continue.
Step 2: Go to the following path. You can directly copy and paste this path to the address bar and press Enter to open the path.
Computer\HKEY_LOCAL_MACHINE\SOFTWARE\Microsoft\Windows\CurrentVersion\WindowsUpdate\OSUpgrade
Step 3: Right-click the OSUpgrade key and go to New > DWORD (32-bit) Value to create a new key. Then, rename the new key to AllowOSUpgrade.
Step 4: Double-click the newly created value to open it. Then, change the value data to 1.

Step 5: Click OK to save the change.
Step 6: Restart your computer.
After these steps, you can run Windows Media Creation Tool again and check if it runs normally.
Fix 4: Enable the Relevant Services
If Windows Media Creation Tool is not working on your PC, you also need to check if the Windows update relevant services are enabled.
You may disable one or more of the following services by mistake but you don’t it:
- Background Intelligent Transfer Service (BITS)
- Server
- TCP/IP NetBIOS Helper
- Workstation
- IKE and AuthIP IPsec Keying Modules
- Windows Update
Any service being shut down will affect Windows 10/11 Media Creation Tool. You can open Services to check.
Step 1: Press Windows + R to open Run.
Step 2: Type services.msc in the Run dialog and press Enter to open the Services app.
Step 3: Check if the above services are enabled. If one service is disabled, you can double-click that service and select Automatic for Status type. Then, click Apply and OK to save the change.
Step 4: Close Services.
After these steps, you can run Media Creation Tool again and see if it can run successfully.
Fix 5: Check the Available Space on Your System Disk
You should have at least 8 GB of free space on the C drive to run Media Creation Tool on your PC. You can go to File Explorer to check if the free space is enough. If not, you can delete unimportant files on the C drive to free up more space. You can also run Disk Cleanup to get more available space.
Here are 10 ways to free up disk space on Windows 10/11.
Fix 6: Use another Way to Upgrade Your PC
Using Media Creation Tool is not the only way to upgrade your PC. If you can’t use this tool to perform a Windows 10/11 update, you can use another way to do the job.
For example, you can check for updates in Windows Update, then download and install the available update on your device.
You can also download a Windows 10/11 disk image (ISO), create a Windows 10/11 installation USB drive using Rufus, and then install Windows 10/11 from USB.
Fix 7: Use another Way to Create a Windows 10/11 Installation USB Drive
If you can’t use Windows Media Creation Tool to create an installation USB drive, you can try another tool like Rufus to create a Windows installation USB drive. This method is free: Rufus is free for download, and Windows 10/11 ISO file is free for download. You just need to prepare a USB drive that has at least 8 GB of space.
Fix 8: Use another Way to Download a Windows 10/11 ISO File
If you can’t use Windows Media Creation Tool to download an ISO file due to Media Creation Tool not working or opening, you still have other choices to download a Windows 10/11 ISO file.
Microsoft allows you to directly download a Windows 10 ISO file (all editions) on a non-Windows device from the Windows 10 software download page. You can set a non-Windows agent in Chrome and then download a Windows 10 ISO file.
Windows 11 ISO download is different. You can download the Windows 11 disk image directly from Microsoft’s official site.
So, it is not a big deal if Windows Media Creation Tool is not working on your PC. You see, there are many ways to replace this tool.
Click to Tweet
Recover Your Lost and Deleted Files on Windows 10/11
Usually, Windows 10/11 updates via Media Creation Tool will not delete files on your device. But to protect your files and system, you’d better use MiniTool ShadowMaker to back up your computer to an external hard drive. If a Windows update destroys your system or deletes your files, you can restore them using your backup.
MiniTool ShadowMaker TrialClick to Download100%Clean & Safe
However, if there is no available backup to restore your files, what can you do to save your losses? You can try professional data recovery software like MiniTool Power Data Recovery.
It is a free file recovery tool that is specially designed to recover files from different types of data storage devices. This MiniTool data recovery software can work in different situations. For example:
- When you permanently delete a file from your computer, you can recover it using this software as long as that file is not overwritten by new data.
- When you can’t open a data storage drive, you can use this tool to rescue your files and then fix the inaccessible drive.
- If you want to recover data from an SD card, you can also try this tool.
- When your Windows system corrupts, you can boot your device from the bootable edition of this software and then recover data. After that, you can feel free to reinstall Windows or use other methods to fix the system.
- If you can’t find some of your important files after upgrading Windows 10/11 to the latest version, you can run this software to scan the drive that previously saved the files and recover them.
You can first run the MiniTool Power Data Recovery trail edition to see if it can find your needed files and then decide whether to use this tool to recover data.
MiniTool Power Data Recovery TrialClick to Download100%Clean & Safe
You can follow these steps to recover data using this MiniTool software.
Step 1: Launch MiniTool Power Data Recovery.
Step 2: You need to find the drive where the lost files were previously saved, hover over that drive, and then click the Scan button to start scanning.
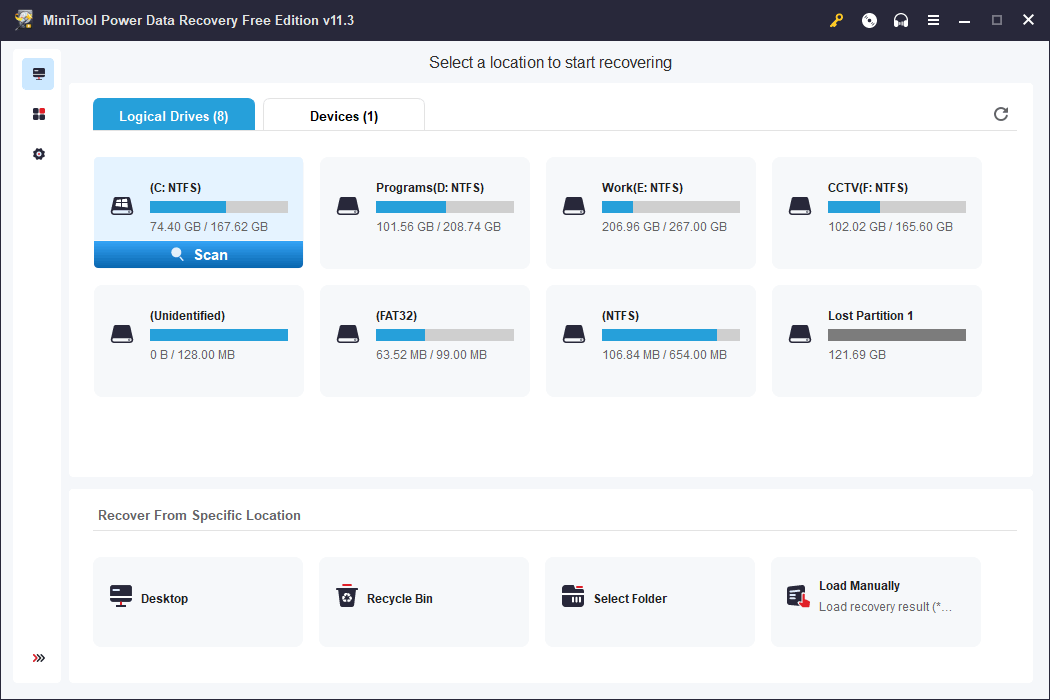
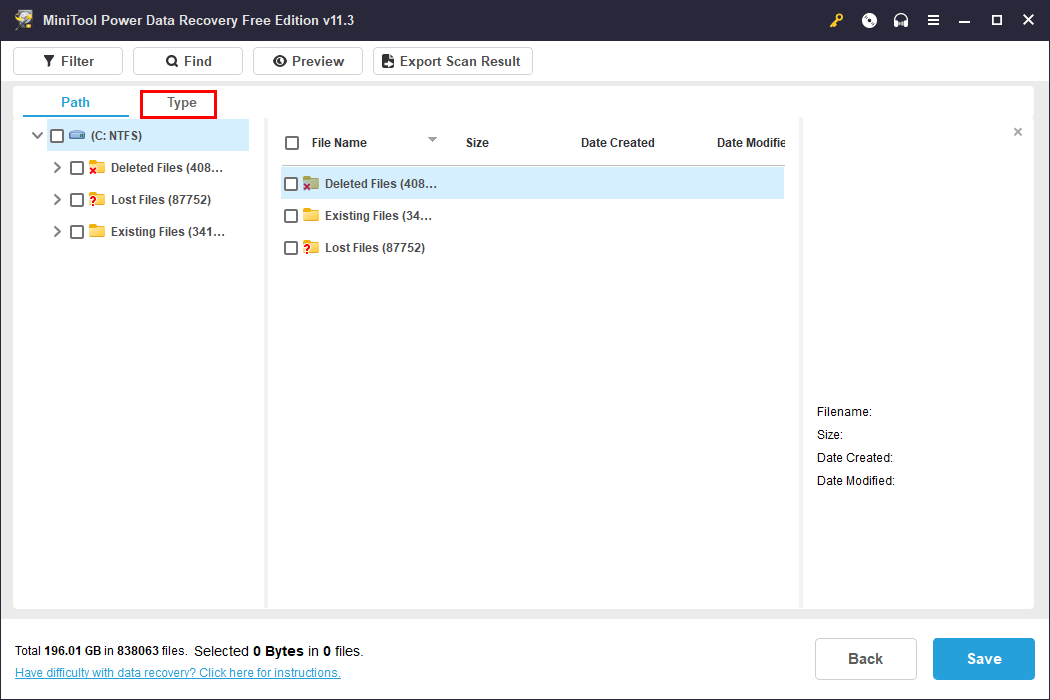
Step 3: After scanning, this software will show you the files it finds. These files are listed by path by default. You can open each path to look for your needed items. If you want to find certain types of files, you can switch to Type to make this software display files by type, then you can find files by type.
To recover data using this software, you need to use a full edition of this software. You can get a license key from the MiniTool official site, then click the key icon from the above ribbon menu, enter the license key, and press Enter to register the software.
After registering the software, you can select all your needed files once, then click the Save button, and select a suitable path to save them. To avoid data from being overwritten, the destination folder should not be the original location of the lost files.
Wrap Things up
By reading this, you should know the things you can do to fix the issue if Windows Media Creation Tool is not working on your PC. You can take steps to resolve the problem. You can also use another way to do the same thing that Media Creation Tool should do for you.
Additionally, if you are looking for a data recovery program to retrieve your files, you can try MiniTool Power Data Recovery.
Should you have other related issues that need to be fixed, you can let us know in the comments. You can also contact us via [email protected].
The media creation tool serves a prominent function as it lets you download a Windows 11 or 10 installation file to a flash drive (or DVD) which can be used later in reinstalling the same. This backup option is critical if something goes wrong with your computer and can throw an error 0x8007043C-0x90018. Furthermore, having a physical copy of the operating system is advantageous.
However, despite how beneficial this tool may sound it’s prone to errors like the recent ones with the code 0x8007043C-0x90018. For a user, it may become irritating to witness such an error code, so we have found some ways to resolve this issue which this post will deal with. See – Fix: Error 0xa0000400 Media Creation Tool or Update Assistant Windows 10.
Here is how to fix Media Creation Tool Error code 0x8007043C-0x90018 in Windows 11 or 10 –
Way-1: Create AllowOSUpgrade Registry key
The registry database can be crucial in resolving the error code 0x8007043C-0x90018 as you’ll see an OSUpgrade key associated with the latest Windows update there. For Media Creation Tool OR MCT to function and perform the necessary upgrades, you must first set up an “AllowOSUpgrade” entry.
- Click the search icon in the taskbar
- Type – regedit.exe.
- Press Enter.
- If the User Account Control interface appears, click the Yes option to continue.
- Follow the path indicated. You may copy and paste this path straight into the address bar, then press Enter to open it.
Computer\HKEY_LOCAL_MACHINE\SOFTWARE\Microsoft\Windows\CurrentVersion\WindowsUpdate\OSUpgrade- Right click on WindowsUpdate.
- Select New followed by Key.
- Name this entry OSUpgrade.
- Now, go to the right pane and right click on an empty space.
- Select New => DWORD (32-bit) Value.
- Rename the newly created value to AllowOSUpgrade.
- To open the newly generated value, double-click it. Then, replace the data value with 1.
- Click OK to save the modification.
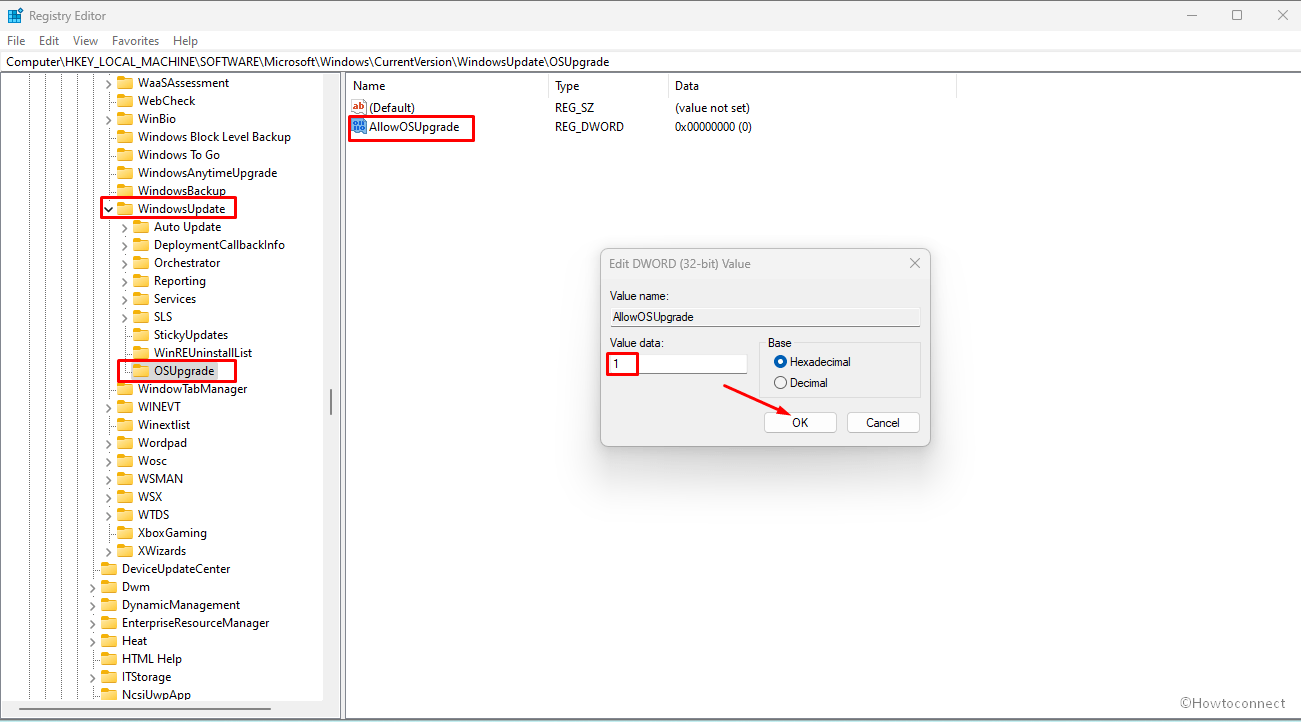
- Then, Restart the PC.
Way-2: Turn on the Services related to Windows update
If Media Creation Tool doesn’t work and is continuously showing 0x8007043C-0x90018 error, you should check if the Windows update services are turned on or not.
You might have accidentally turned off one or more of the services like TCP/IP, NetBIOS Helper, Background Intelligent Transfer Service (BITS), Server, Workstation, Windows Update or IKE, and AuthIP IPsec Keying Modules.
The Windows 10/11 Media Creation Tool is affected by any of these aforementioned services’ status. To rectify it, follow the below-mentioned steps:
- To open Run, press Windows + R.
- Type services.msc and hit Enter.
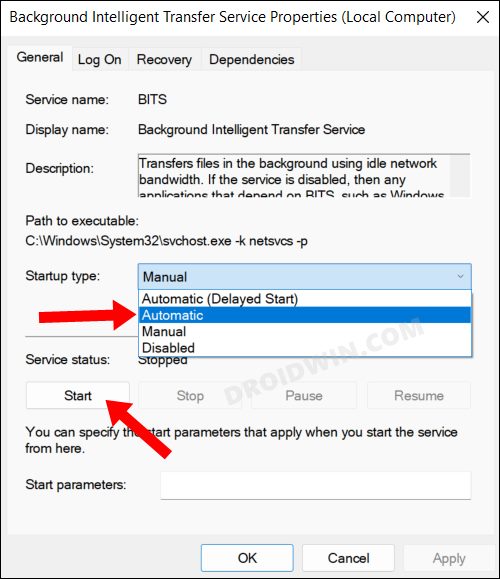
- Look for Background Intelligent Transfer Service (BITS) and right-click on it.
- From the context menu, select Properties.
- Click the Start button in the Properties dialog. If the service is currently running, you can restart it. For this click on Stop and then on Start.
- Select Automatic as the Startup type.
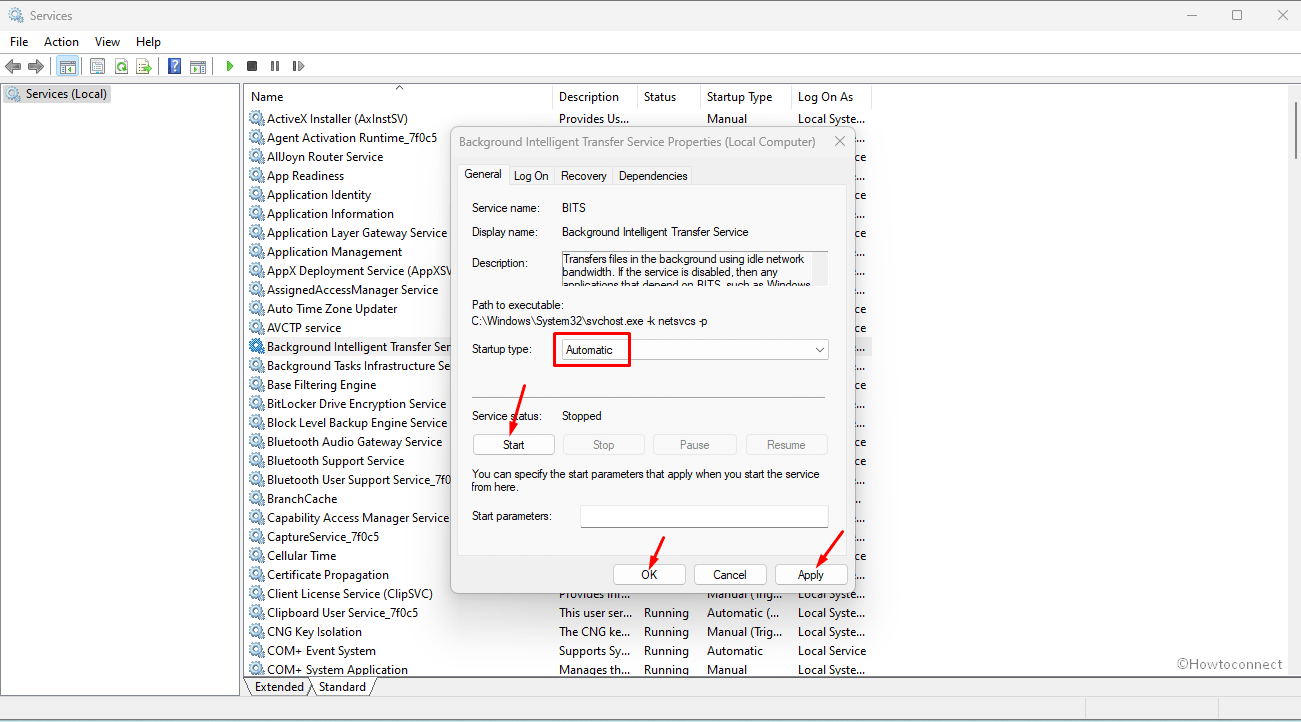
- Follow the same procedure for the other services like TCP/IP, NetBIOS Helper, Background Intelligent Transfer Service (BITS), Server, Workstation, Windows Update or IKE, and AuthIP IPsec Keying Modules.
- Close the Services window and verify if you can now use the Media Creation tool without any problems.
Most of the time this way proves to be useful and helps in termination of the such error, however, if you still witness it, try following the next way.
Way-3: Run MCT as Administrator
Running Windows as an administrator gives you the authority to make system-wide modifications and provides you complete control over the system.
Furthermore, it allows making changes to any aspect including security, software, hardware, user accounts, and file access. To fix 0x8007043C-0x90018 this issue, follow these steps:
- Right-click on Media Creation Tool (such as MediaCreationTool22H2.exe).
- Then, choose from the drop-down list to Run as administrator.
- If the User Account Control dialog box appears, you must click the Yes option to proceed.
See – How to Fix Media Creation Tool Won’t Open in Windows 10.
Way-4: Maintain Enough Space in your PC
To resolve the error code 0x8007043C-0x90018 you would need to allocate at least 8 GB of free space for the Media Creation Tool on the C drive.
You may use File Explorer to see if there is enough room. If not, you can free up space on the concerned disc by deleting irrelevant files. Additionally, you can run Disk Cleanup to arrange additional space.
- Click Start.
- Type cleanmgr and press Enter.
- Select (C:) from the drop-down and click on OK.
- On the next window, click on Clean up system files.
- Again, choose the same disk and click on OK.
- When the Disk Cleanup for (C:) window appears, click on OK.
- Select Yes on the verification prompt.
Way-5: Delete and Redownload the Media Creation Tool
Media Creation Tool does not work problem can be rescued by removing and redownloading the same setup file. Because this is the easiest approach to address the issue of 0x8007043C-0x90018, ensure that your concerned download is complete.
Way-6: Ensure that pending updates are installed
Keeping Windows up-to-date is essential. The most recent upgrades include new features and ensure that your computer and its apps remain compatible. The majority of updates also include security patches and bug fixes, allowing you to eliminate Windows difficulties with no effort.
If your version of Windows is out-of-date, you may experience troubles with the Media Creation tool that might show error codes like 0x8007043C-0x90018. Follow the procedures below to install the most recent Windows updates –
- Right click on Start and select Settings.
- Select Windows Update from the menu on the left.
- Click the check for Updates on the window’s right side.
- The system will check for available updates and alert you if any are found. Install any pending updates individually if any are found.
Way-7: Use Rufus to create bootable media
Encountering 0x8007043C-0x90018 is not a problem when you use an alternative like Rufus to create bootable media. Even this tool will remove the system requirements restrictions imposed for Windows 11 like TPM and Secure Boot hence go ahead with it –
- Follow How to Use Rufus to Install Windows 10.
- Then plug in the USB and power on the computer.
- Select the peripheral in Boot device option.
- Go with the instructions on setup and complete installation.
We are certain that any of the 7 ways presented should be effective in repairing the Media Creation Tool error code 0x8007043C-0x90018 on Windows 11 or 10.
Methods:
Way-1: Create AllowOSUpgrade Registry key
Way-2: Turn on the Services related to Windows update
Way-3: Run MCT as Administrator
Way-4: Maintain Enough Space in your PC
Way-5: Delete and Redownload the Media Creation Tool
Way-6: Ensure that pending updates are installed
Way-7: Use Rufus to create bootable media
That’s all!!
Repair any Windows problems such as Blue/Black Screen, DLL, Exe, application, Regisrty error and quickly recover system from issues using Reimage.
In this guide, we will show you numerous methods to fix the issue of the Media Creation Tool not working in Windows 11. There exists quite a few methods through which you could upgrade your PC to the latest iteration of the OS. While the most straightforward approach is to do so via the Settings menu, but that might not be the most viable method for some.
For example, if your PC is stuck in a bootloop, or it does not meet the recommended requirements [it has TPM 1.2 instead of TPM 2.0], then you wouldn’t be able to get hold of this update via the Settings menu. In such instances, you could opt for quite a few alternative methods. These include the likes of using a Windows 11 Installation Assistant, downloading an ISO and mounting it on a USB Drive via a third-party app like Rufus, or letting Windows do this task via the Media Creation Tool.
In this regard, the latter method is mostly preferred as it easily creates a bootable USB without any interaction with a third-party app. However, not many users are currently able to make full use of this software. Many have voiced their concern that Media Creation Tool is not working on their Windows 11 PC. If you are also in the same boat, then fret not. This guide will make you aware of a few nifty workarounds that shall help you resolve this issue. Follow along.
It is recommended that you try out each of the below-mentioned workarounds and then see which one spells out success for you. So with that in mind, let’s get started.
FIX 1: Run as Administrator
- First and foremost, you should run the tool with elevated permissions.
- So right-click on MediaCreationToolW11.exe and select Run as administrator.

- After that, click YES in the confirmation dialog box. That’s it.
- Now launch the Media Creation Tool and see if it working on your Windows 11 PC or not.

FIX 2: Clear Temporary Folder
If a lot of temporary data gets accrued over the due course of time, then not only will it slow down the app but it could well conflict with the app’s normal behavior as well. Therefore, you should consider deleting these data at regular intervals, and now could be just the right time to do so.
- Bring up the Run dialog box via Wndows+R shortcut keys.
- Then type in the below command to open the Temporary folder
%TEMP%
 Select all the files via Ctrl+A and hit the Delete key.
- Now launch the Media Creation Tool and check if it working on your Windows 11 PC.
 Select all the files via Ctrl+A and hit the Delete key.
FIX 3: Disable Windows Defender
In some instances, the antivirus app might raise a red flag against a non-malicious program and hence could end up blocking its normal functionality. Therefore, you should consider temporarily disabling your antivirus app and then try running the tool. Given below are the steps for Windows Defender [the instructions might be different for other third-party antivirus apps].
- Open Windows Security and go to Virus and Threat Protection
- Then click on Manage Settings under Virus and Threat Protection Settings.
- After that, disable the toggle next to Real-Time Protection.
- Now launch the Media Creation Tool and check if it working on your Windows 11 PC.

FIX 4: Re-Enable Windows Services
If the background Windows services related to updates aren’t functioning along the expected lines, then its consequences would be felt by all the processes and apps that are dependent on it. So your best bet is to restart those services and let them start off with a fresh instance from scratch. Here’s how it could be done:
- To begin with, launch the Services app from the Start Menu
- Then double click on the Background Intelligent Transfer Service to open it.

- Change its Startup Type to Automatic and then click on the Start button.

- Likewise, do the same for the following services:
Server
TCP/IP NetBIOS Helper
Workstation
IKE and AuthIP IPsec Keying Modules
Windows Update or Automatic Updates
- Once done, launch the Media Creation Tool and check if it working on your Windows 11 PC.
FIX 5: Registry Editor Tweak
In this method, we will be manually instructing the system to pave the way for an OS upgrade. For that, we will create a new DWORD file titled AllowOSUpgrade and then assign it the 1 binary value to enable it. This file will then clear all the roadblocks for the upgrade and the tool would then be able to function without any issues. So let’s put this fix to the test right away.
- Launch Registry Editor and head over to the below location:
Computer\HKEY_LOCAL_MACHINE\SOFTWARE\Microsoft\Windows\CurrentVersion\WindowsUpdate
- Then right-click on WindowsUpdate and select New > Key. Name it OSUpgrade.

- After that, right-click on OSUpgrade and select the New > DWORD (32-bit) Value.

- Name it AllowOSUpgrade and double click to open it. then type in 1 in the Value Data field and hit OK.

- Finally, restart your PC and check if it fixes the Media Creation Tool not working issue in Windows 11.
FIX 6: Use Rufus and Windows 11 ISO
If none of the aforementioned methods managed to spell out success, then your last course of action should be to minimize your dependency on this tool and instead take the help of a third-party tool, at least for creating a bootable USB. Here’s what you need to do in this regard [For detailed step-by-step instructions, check out our guide on How to Install Windows 11 Using ISO File and Bootable USB]
- To begin with, download the Windows 11 ISO file from its official site.

- Then plug in the Pendrive to your PC [make sure it has at least 8GB free space].
- Now download and install the Rufus Tool.
- Then launch it and select the Windows 11 ISO file under the Image Option.

- Next up, change the Partition Scheme to GPT and hit Start. Rufus will now create a bootable Pendrive with Windows 11.

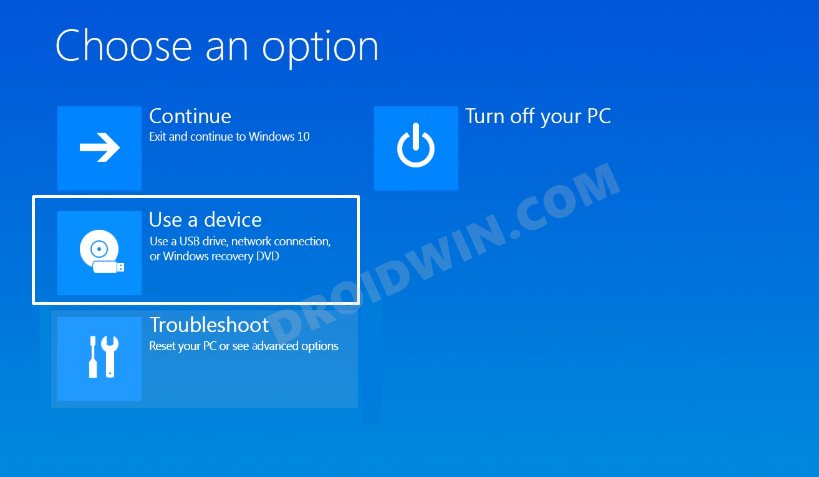
- Once done, power off your PC. Now turn it back on and press the F8 key before Windows boots to the OS.
- You shall now be taken to the Advanced Boot Menu. Click on Use a Device and select your Pendrive from the list.

- Now proceed with the on-screen instructions to complete the setup.

That’s it. These were the six different methods to fix the issue of the Media Creation Tool not working in Windows 11. If you have any queries concerning the aforementioned steps, do let us know in the comments. We will get back to you with a solution at the earliest.
- How to Uninstall Windows 11 Updates via Settings/CMD/Recovery
- How to Manually Download a Particular/Specific Windows 11 Update
- 5 Methods to Stop or Disable Windows 11 Update
- How to Update Apps in Windows 11 via Command Prompt
About Chief Editor

Sadique Hassan
administrator
A technical geek by birth, he always has a keen interest in the Android platform right since the birth of the HTC Dream. The open-source environment always seems to intrigue him with the plethora of options available at his fingertips. “MBA by profession, blogger by choice!”
В последнее время многие пользователи системы Windows 11 сталкиваются с проблемой вылета приложений. Это может быть вызвано разными причинами, включая несовместимость программ с новой операционной системой или ошибки в самой системе. Чтобы решить эту проблему, компания Microsoft предлагает использовать Media Creation Tool для Windows 11.
Media Creation Tool — это официальное приложение от Microsoft, которое помогает пользователям создавать загрузочные носители и устанавливать операционную систему Windows. Однако, оно также может использоваться для решения проблемы вылета приложений. С помощью Media Creation Tool вы сможете обновить операционную систему, исправить ошибки и улучшить работу приложений на Windows 11.
Для того чтобы воспользоваться Media Creation Tool, вам потребуется загрузить его с официального сайта Microsoft и запустить на вашем компьютере. Затем следуйте инструкциям на экране, чтобы создать загрузочный носитель или обновить операционную систему. После завершения процесса вы можете запустить приложения и проверить, решена ли проблема вылета.
Media Creation Tool для Windows 11 является простым и эффективным решением для тех, кто столкнулся с проблемой вылета приложений. Оно поможет вам исправить ошибки и улучшить работу операционной системы. Пользуйтесь Media Creation Tool и наслаждайтесь безпроблемной работой приложений на Windows 11!
Содержание
- Что такое Media Creation Tool
- Преимущества использования Media Creation Tool
- Как решить проблему вылета Media Creation Tool
С помощью Media Creation Tool вы можете:
| Создать загрузочный флеш-накопитель или DVD-диск | Прямо из приложения вы можете создать загрузочный носитель, который позволит вам установить или обновить операционную систему Windows. Это особенно полезно, если у вас нет доступа к интернету или если вы хотите установить Windows на несколько компьютеров. |
| Скачать образ ISO | Media Creation Tool также позволяет вам скачать ISO-файл операционной системы Windows, который можно использовать для установки или обновления Windows. Вы можете выбрать версию и язык операционной системы, чтобы получить нужный образ ISO. |
| Обновлять существующую систему | Если у вас уже установлена операционная система Windows, вы можете использовать Media Creation Tool для обновления до последней версии Windows. Это позволяет вам получить новые функции и исправления без необходимости выполнения полной установки системы. |
Media Creation Tool предоставляет простой и удобный способ создания установочных носителей операционной системы Windows. Он поддерживает различные версии Windows и предлагает гибкие варианты, чтобы удовлетворить потребности пользователей.
1. Простота использования: Media Creation Tool обладает интуитивно понятным интерфейсом, что делает его доступным даже для неопытных пользователей. Даже если вы впервые сталкиваетесь с созданием установочного носителя или обновлением операционной системы, вы легко разберетесь в этом инструменте.
2. Универсальность: Media Creation Tool поддерживает различные варианты обновления или установки операционной системы Windows 11. Вы можете выбрать, что лучше подходит для вас – обновление вашей текущей ОС до Windows 11 или создание загрузочной флешки или ISO-файла для установки ОС с нуля. Гибкость выбора позволяет каждому пользователю адаптировать процесс обновления или установки под собственные потребности.
3. Оптимизация процесса обновления: Media Creation Tool позволяет существенно упростить и ускорить процесс обновления операционной системы до Windows 11. Он автоматически проверяет наличие необходимых обновлений, исключает возможные конфликты и предлагает оптимальную стратегию обновления. Это позволяет сэкономить время и избежать проблем, связанных с обновлением ОС.
4. Гарантия безопасности: Media Creation Tool обеспечивает безопасность данных во время процесса обновления или установки ОС. Он предоставляет возможность создать резервную копию важных файлов и настроек вашей текущей ОС, чтобы избежать потери данных. Благодаря этому вы можете быть уверены в сохранности ваших личных данных и восстановлении системы в случае потребности.
5. Поддержка и обновления: Media Creation Tool является официальным инструментом Microsoft, что гарантирует его надежность и постоянные обновления. Вы получите все последние исправления и новые функции, которые помогут вам поддерживать вашу операционную систему Windows 11 в актуальном состоянии.
Все эти преимущества делают Media Creation Tool идеальным инструментом для обновления или установки операционной системы Windows 11. Воспользуйтесь его удобством и функциональностью для максимальной производительности вашего компьютера.
1. Обновите Media Creation Tool:
Первым шагом, который следует предпринять, это убедиться, что у вас установлена последняя версия Media Creation Tool. Проверьте наличие обновлений и установите их, если таковые имеются. Это может помочь исправить ошибки и проблемы, связанные с программой.
2. Запустите Media Creation Tool в режиме совместимости:
Если у вас возникла проблема с вылетом Media Creation Tool, попробуйте запустить программу в режиме совместимости с предыдущими версиями Windows. Для этого сделайте следующее:
- Щелкните правой кнопкой мыши по ярлыку Media Creation Tool на рабочем столе или в меню «Пуск».
- Выберите «Свойства».
- Перейдите на вкладку «Совместимость».
- Установите флажок возле опции «Запустить эту программу в режиме совместимости» и выберите предыдущую версию Windows из выпадающего списка.
- Нажмите «ОК», чтобы сохранить изменения.
3. Отключите антивирусное программное обеспечение:
Временное отключение антивирусного программного обеспечения может помочь решить проблему вылета Media Creation Tool. Некоторые антивирусные программы могут блокировать работу программы, поэтому временное отключение может устранить эту проблему. Если после отключения антивирусного программного обеспечения проблема исчезла, попробуйте настроить программу таким образом, чтобы она не блокировала Media Creation Tool.
4. Перезагрузите компьютер:
Иногда, простое перезагрузка компьютера может помочь исправить проблему. Закройте Media Creation Tool, перезагрузите компьютер и попробуйте запустить программу снова. Это может помочь восстановить нормальную работу программы.
Если ни один из вышеуказанных способов не решает проблему вылета Media Creation Tool, рекомендуется обратиться за поддержкой к официальному сервисному центру Windows или разработчику программы. Они смогут предложить индивидуальные рекомендации и помочь найти решение.