Последнее обновление: 31.10.2015
Окна открытия и сохранения файла представлены классами OpenFileDialog и SaveFileDialog.
Они имеют во многом схожую функциональность, поэтому рассмотрим их вместе.
OpenFileDialog и SaveFileDialog имеют ряд общих свойств, среди которых можно выделить следующие:
-
DefaultExt: устанавливает расширение файла, которое добавляется по умолчанию, если пользователь ввел имя файла без расширения -
AddExtension: при значенииtrueдобавляет к имени файла расширение при его отсуствии. Расширение берется из
свойстваDefaultExtилиFilter -
CheckFileExists: если имеет значениеtrue, то проверяет существование файла с указанным именем -
CheckPathExists: если имеет значениеtrue, то проверяет существование пути к файлу с указанным именем -
FileName: возвращает полное имя файла, выбранного в диалоговом окне -
Filter: задает фильтр файлов, благодаря чему в диалоговом окне можно отфильтровать файлы по расширению. Фильтр задается в следующем формате
Название_файлов|*.расширение. Например,Текстовые файлы(*.txt)|*.txt. Можно задать сразу несколько фильтров, для этого они разделяются
вертикальной линией |. Например,Bitmap files (*.bmp)|*.bmp|Image files (*.jpg)|*.jpg -
InitialDirectory: устанавливает каталог, который отображается при первом вызове окна -
Title: заголовок диалогового окна
Отдельно у класса SaveFileDialog можно еще выделить пару свойств:
-
CreatePrompt: при значенииtrueв случае, если указан не существующий файл, то будет отображаться сообщение о его создании -
OverwritePrompt: при значенииtrueв случае, если указан существующий файл, то будет отображаться сообщение о том, что файл будет перезаписан
Чтобы отобразить диалоговое окно, надо вызвать метод ShowDialog().
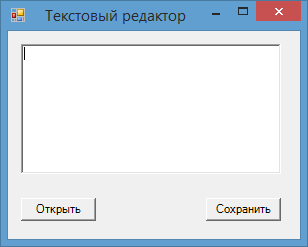
Рассмотрим оба диалоговых окна на примере. Добавим на форму текстовое поле textBox1 и две кнопки button1 и button2. Также перетащим с панели инструментов
компоненты OpenFileDialog и SaveFileDialog. После добавления они отобразятся внизу дизайнера формы. В итоге форма будет выглядеть примерно так:
Теперь изменим код формы:
public partial class Form1 : Form
{
    public Form1()
    {
        InitializeComponent();

        button1.Click += button1_Click;
        button2.Click += button2_Click;
        openFileDialog1.Filter = "Text files(*.txt)|*.txt|All files(*.*)|*.*";
        saveFileDialog1.Filter = "Text files(*.txt)|*.txt|All files(*.*)|*.*";
    }
    // сохранение файла
    void button2_Click(object sender, EventArgs e)
    {
        if (saveFileDialog1.ShowDialog() == DialogResult.Cancel)
            return;
        // получаем выбранный файл
        string filename = saveFileDialog1.FileName;
        // сохраняем текст в файл
        System.IO.File.WriteAllText(filename, textBox1.Text);
        MessageBox.Show("Файл сохранен");
    }
    // открытие файла
    void button1_Click(object sender, EventArgs e)
    {
        if (openFileDialog1.ShowDialog() == DialogResult.Cancel)
            return;
        // получаем выбранный файл
        string filename = openFileDialog1.FileName;
        // читаем файл в строку
        string fileText = System.IO.File.ReadAllText(filename);
        textBox1.Text = fileText;
        MessageBox.Show("Файл открыт");
    }
}
По нажатию на первую кнопку будет открываться окно открытия файла. После выбора файла он будет считываться, а его текст будет отображаться в
текстовом поле. Клик на вторую кнопку отобразит окно для сохранения файла, в котором надо установить его название. И после этого произойдет сохранение
текста из текстового поля в файл.
4 Answers
These links explain it with examples
http://dotnetperls.com/openfiledialog
http://www.geekpedia.com/tutorial67_Using-OpenFileDialog-to-open-files.html
private void button1_Click(object sender, EventArgs e)
{
    int size = -1;
    OpenFileDialog openFileDialog1 = new OpenFileDialog();
    DialogResult result = openFileDialog1.ShowDialog(); // Show the dialog.
    if (result == DialogResult.OK) // Test result.
    {
       string file = openFileDialog1.FileName;
       try
       {
          string text = File.ReadAllText(file);
          size = text.Length;
       }
       catch (IOException)
       {
       }
    }
    Console.WriteLine(size); // <-- Shows file size in debugging mode.
    Console.WriteLine(result); // <-- For debugging use.
}
answered Feb 15, 2011 at 4:00
DiviDivi
7,63113 gold badges47 silver badges63 bronze badges
0
var FD = new System.Windows.Forms.OpenFileDialog();
if (FD.ShowDialog() == System.Windows.Forms.DialogResult.OK) {
    string fileToOpen = FD.FileName;

    System.IO.FileInfo File = new System.IO.FileInfo(FD.FileName);

    //OR

    System.IO.StreamReader reader = new System.IO.StreamReader(fileToOpen);
    //etc
}
answered Feb 15, 2011 at 3:59
Adam RackisAdam Rackis
82.2k57 gold badges272 silver badges396 bronze badges
0
OpenFileDialog fdlg = new OpenFileDialog();
fdlg.Title = "C# Corner Open File Dialog" ;
fdlg.InitialDirectory = @"c:\" ;
fdlg.Filter = "All files (*.*)|*.*|All files (*.*)|*.*" ;
fdlg.FilterIndex = 2 ;
fdlg.RestoreDirectory = true ;
if(fdlg.ShowDialog() == DialogResult.OK)
{
textBox1.Text = fdlg.FileName ;
}
In this code you can put your address in a text box.
Josh R
1051 silver badge6 bronze badges
answered Jul 25, 2014 at 7:57
alireza0000alireza0000
3513 silver badges3 bronze badges
1
-
Upvote for the inclusion of the «Filter»!
Aug 9 at 13:50
        int size = -1;
        OpenFileDialog openFileDialog1 = new OpenFileDialog();
        openFileDialog1.InitialDirectory = @"YOUR FILE PATH";
        DialogResult result = openFileDialog1.ShowDialog();
        // Show the dialog.
        openFileDialog1.RestoreDirectory = true;
        openFileDialog1.Title = "BROWSE TEXT BLT";
        openFileDialog1.FilterIndex = 2;
        openFileDialog1.CheckFileExists = true;
        openFileDialog1.CheckPathExists = true;
        if (result == DialogResult.OK) // Test result.
        {
            string file = openFileDialog1.FileName;
            try
            {
                string text = System.IO.File.ReadAllText(file);
                size = text.Length;
            }
            catch (System.IO.IOException ex)
            {
                throw ex;
            }
            TXT_FOLDER_PATH.Text = file;
         }
answered Sep 24, 2022 at 11:09
В данной заметке я решил кратко, а главное наглядно продемонстрировать пример создания окна для выбора файла.
Сразу оговорюсь, что если Вас интересует окно для выбора директории, то Вам нужно смотреть данную заметку.
По сравнению с окном для выбора папок, форма для выбора файлов более богата настройками. Однако в целом принцип работы класса OpenFileDialog не отличается от класса FolderBrowserDialog. Создадим новую форму и перейдем к ее коду. Там уже будет создан конструктор нашей формы, именно там мы и будем вызывать наше окно, для выбора файла.
public Form1()
        {
            InitializeComponent();
            OpenFileDialog OPF = new OpenFileDialog();
            if (OPF.ShowDialog() == DialogResult.OK)
            {
                MessageBox.Show(OPF.FileName);
            }
        }
Пример уже вполне рабочий, однако использовать данный класс так не стоит. Главная причина этому — форма показывает нам абсолютно все файлы. В жизни такое бывает редко, поэтому давайте ограничим отображение только файлами txt и cs. Для этого нам понадобиться свойство Filter.
OPF.Filter = "Файлы txt|*.txt|Файлы cs|*.cs";
Фильтр задается через разделитель по следующему принципу: «ОписаниеТипаФайла|МаскаПоискаФайла[|…]». Таким образом в нашем примере в качестве описания выступают фразы «Файлы txt» и «Файлы cs», а в качества масок «*.txt» и «*.cs» — что соответствует любым файлам с расширением txt и cs. Так же мы можем явно задать имя файла, который нам нужно выбрать.
OPF.Filter = "Файлы txt|*.txt|Файлы cs|Form1.cs";
Так же мы можем разрешить пользователю выбор нескольких файлов сразу, для этого необходимо поставить свойство Multiselect = true. Однако тогда, для полечения всех имен выбранных файлов необходимо будет использовать массив FileNames вместо свойства FileName.
public Form1()
        {
            InitializeComponent();
            OpenFileDialog OPF = new OpenFileDialog();
            OPF.Multiselect = true;
            if (OPF.ShowDialog() == DialogResult.OK)
            {
                foreach (string file in OPF.FileNames)
                {
                    MessageBox.Show(file);
                }
            }
        }
В целом если покопаться в свойствах класса OpenFileDialog можно найти еще несколько забавных свойств, однако основные из них, я описал выше.
|
0 / 0 / 0 Регистрация: 25.11.2012 Сообщений: 16 |
|
|
1 |
|
Какими средствами реализовать выбор файла для открытия или сохранения28.11.2012, 18:04. Показов 5032. Ответов 2
не могу найти что писать в коде когда пользователь нажимает на кнопку «открыть» и он может выбрать файл с компьютера ( любой текстовый документ) и при нажатии «сохранить» так же открывается диалоговое окно и пользователь выбирает папку куда его сохранить, подскажите пожалуйста
0 |
|
Programming Эксперт 94731 / 64177 / 26122 Регистрация: 12.04.2006 Сообщений: 116,782 |
28.11.2012, 18:04 |
|
Ответы с готовыми решениями: Как в QML сдлать так, чтобы FileDialog задавал путь для сохранения файла, а не для открытия? Какими средствами можно реализовать прайс-лист оборудования Выбор файла для открытия
2 |
|
Не осилил Linux 267 / 61 / 6 Регистрация: 06.08.2009 Сообщений: 223 |
|
|
28.11.2012, 18:11 |
2 |
|
гугли OpenFileDialog, SaveFileDialog, BrowserFolderDialog
0 |
|
Ninochka 3 / 3 / 1 Регистрация: 12.05.2010 Сообщений: 27 |
||||||||
|
29.11.2012, 13:57 |
3 |
|||||||
|
РешениеОткрыть файл источник:
Сохранить файл источник:
0 |
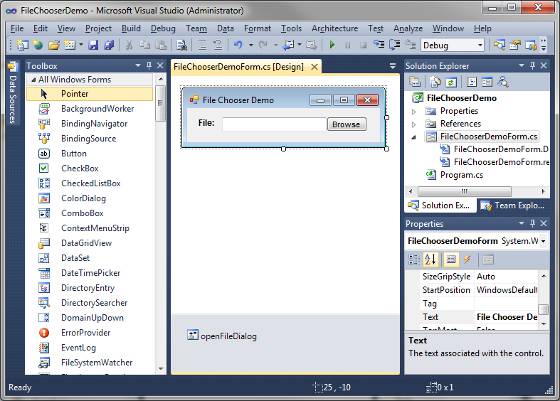
I wanted to create a form element that looks like this.
The solution was such that when users click «Browse», a open file dialog will show up to allow them to choose a file for my program to process. In this post, I shall discuss how I had implemented this solution.
Elements on the windows form
The classes needed for this solution are as follows:
- System.Windows.Forms.Label
- System.Windows.Forms.TextBox
- System.Windows.Forms.Button
- System.Windows.Forms.OpenFileDialog dialog
Except for OpenFileDialog, all of the above components will have their visuals on the windows form:
Implementing the logic to show the file dialog when users click «Browse»
Double-click on the «Browse» button in the Designer to generate a function and associate it with the Button.Click event. In the generated code, include the codes to show the OpenFileDialog:
// Event handler for browseButton
private void browseButton_Click(object sender, EventArgs e)
{
    // Show the dialog that allows user to select a file, the
    // call will result a value from the DialogResult enum
    // when the dialog is dismissed.
    DialogResult result = this.openFileDialog.ShowDialog();
    // if a file is selected
    if (result == DialogResult.OK)
    {
        // Set the selected file URL to the textbox
        this.fileURLTextBox.Text = this.openFileDialog.FileName;
    }
}
With that, we are able to get the file URL that users have selected from the text box. Alternatively, if we are just going to process a file, we could have just call our backend code from within the if statement. However, for my case, I will want to get more user input before I process the file, that was why I had set the file URL to the text box. This will allow my program to get the file URL of the selected file when users had submitted more input.
Other configurations
Set the TextBox as readonly
Similar to a file upload html element, I will only allow my users to see which file that they have selected. By setting the ReadOnly property of the TextBox instance to true, users can click on the file URL text to verify their selection but not able to change the contents with their keyboards.
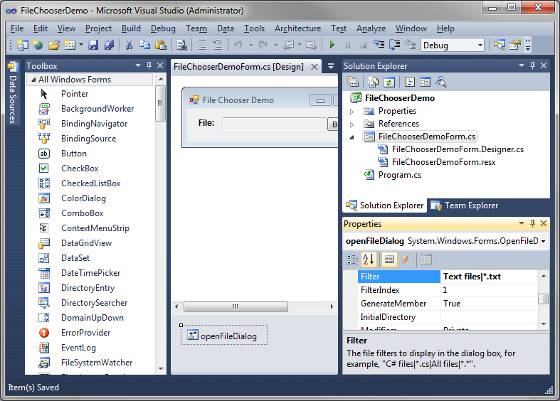
Set the file filter for the OpenFileDialog
By default, the OpenFileDialog allows users to select any files that they want. However, in my application, I only want them to select .txt files. By setting the Filter property of the OpenFileDialog instance, I can configure the OpenFileDialog to only display the type of files I want my users to select. The easiest way is to do so in the designer:
About Clivant
Clivant a.k.a Chai Heng enjoys composing software and building systems to serve people. He owns techcoil.com and hopes that whatever he had written and built so far had benefited people. All views expressed belongs to him and are not representative of the company that he works/worked for.


 Выбор файла для открытия

