From SambaWiki
Introduction
After setting up a Samba Active Directory (AD) or an Samba NT4 domain, you have to join machines to the domain. Only machines joined to the domain are enabled to use domain resources. During the join, a machine account is created in the domain to authenticate the computer as a member.
In case, you are joining a Windows Server as a domain controller (DC) to an AD, see:
- Joining a Windows Server 2008 / 2008 R2 DC to a Samba AD
- Joining a Windows Server 2012 / 2012 R2 DC to a Samba AD
Use this documentation for joining a Windows client or server operating system to a Samba AD or Samba NT4 domain as a domain member.
System Requirements
Supported Windows Versions
To join a domain, the Windows edition requires the corresponding capabilities. You can join the following Windows operating systems as a domain member:
Workstation editions:
- Windows 10: Pro, Enterprise, and Education
- Windows 8 and 8.1: Pro and Enterprise
- Windows 7: Professional, Ultimate, and Enterprise
- Windows Vista: Business, Ultimate, and Enterprise
- Windows XP: Professional
- Windows 2000: Professional
- Windows NT4 (only NT4 domain support)
Server (all editions):
- Windows Server 2019
- Windows Server 2016
- Windows Server 2012 and 2012R2
- Windows Server 2008 and 2008R2
- Windows Server 2003 and 2003R2
- Windows Server 2000
Permissions
To join a machine to a domain you require:
- local administrator permissions on the computer you want to join
- credentials of a domain account that is enabled to join machines to the domain. For example:
- the domain administrator account
- an account with delegated permissions (AD only)
- Note, that in an AD authenticated user accounts are enabled to join up to 10 machines to the domain, if the administrator has not disabled the feature. See https://support.microsoft.com/kb/243327/en
Required Settings for NT4 Domains
If you are joining the host to a Samba NT4 domain, some Windows operating systems require modifications. See Required Settings for Samba NT4 domain.
DNS Settings (AD only)
In an Active Directory (AD), a working DNS configuration is indispensable. AD uses DNS to locate domain controllers (DC), resolve host names, and for many other tasks. Ensure that the client has at least one DNS server configured, that is able to resolve the AD DNS zone. For further information, see DNS Configuration on Windows Hosts.
Date and Time Settings (AD only)
Active Directory uses Kerberos for authentication. Kerberos requires that the domain member and the domain controllers (DC) are having a synchronous time. If the difference exceeds 5 minutes (default), the client is not able to access domain resources for security reasons.
Before you join the domain, check the time configuration:
- Open the
Control Panel.
- Navigate to
Clock, Language and Region.
- Click
Date and Time.
- Verify the date, time, and time zone settings. Adjust the settings, if necessary.
- Click
OKto save the changes.
Joining a Windows Client or Server to a Domain
- Open the
Control Panel.
- Navigate to
System and Security/ System.
- Click
Change settings, next to the computer name.
- On the
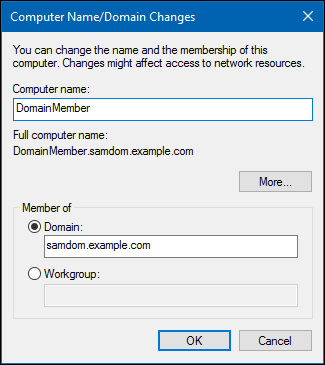
Computer Nametab, click theChangebutton.
- Verify the computer name. If you rename the computer, reboot before joining the domain.
- Select
Domain, enter the name of your domain, and clickOK.

- Active Directory (AD) only: You can enter the NetBIOS name of the domain, if your client is able to resolve it. For example:
samdominstead ofsamdom.example.com.
- Enter the credentials of an account that is able to join a computer to the domain. For example, the domain administrator account. Click
OKto continue.
- Reboot the computer after the computer successfully joined the domain.
This howto covers adding Window workstations to an NT4 style domain and adding workstations to AD capable domains. This is typically a straight-forward process but there can be some issues if you don’t have things configured properly on your server and network or if your workstation OS version doesn’t play nice for various reasons (which is more and more common).
Preparation
It is recommended that you have the following actions completed on your network before adding workstations to your domain:
-
Server Name
-
Certificates
-
Time and Date
-
DNS
-
WINS
Server Name
You will need to decide on the convention of the server name before setting things up. Most of this is done already in the wizard and so this consideration should happen even before you do the initial wizard. Here is a list of names that you will be asked for for your server:
-
Domain Name
-
Hostname
-
Internet Hostname
-
Domain
-
Server Name
Domain Name
During the Wizard, in the section entitled ‘Internet Domain’, you will be asked for your Internet Domain. While you can use a domain name that employs a bogus top level domain like ‘.local’ or ‘.lan’, you can just as easily use your valid domain that you purchased from ClearCenter or some other registrar. The advantage of using a valid domain that is purchased from ClearCenter is that your boxes can tie in nicely to Dynamic DNS for ease of management and resiliency during network changes.
There is some debate about whether it is best practice or not to have a bogus domain on your LAN while employing valid domains on the internet or whether using a valid domain across the board is best.
The typical arguments for the bogus domains on LAN is that if you have a bogus domain names then you can address internal resources without revealing the IP addresses used internally to the outside. This is requires that you use a DNS server on the inside of your network. ClearOS can perform the function of this DNS server if needed.
The typical arguments for using a valid domain name on the LAN is that since you are using DNS on the inside of your LAN anyways, you can just use split-horizon DNS type topologies so that DNS inquiries on the LAN reveal the LAN servers in addition to external servers while external DNS queries only reveal externally configured server. ClearOS can perform the function of a caching split-horizon DNS server if needed. We recommend this method because it simplifies the environment.
Hostname
This is the fully qualified domain name that your server will be known. Primarily this is a LAN perspective. If you are using a bogus domain name for the LAN it should be based on that bogus domain name. For example, ‘server1.system.lan’. If you are using split horizon DNS then it would follow your valid fully qualified doamin name. For example, ‘server1.example.com’.
Internet Hostname
This is the hostname that would work for a valid DNS name from the outside world even if you are using bogus domain names on the inside. If you do not have a valid external name (because you having registered a domain), you can use the ‘poweredbyclear.com’ name which is designated to this box in your portal. The Internet Hostname parameter is used by programs like apache to designate your name space for your box as a distinct object from virtual names or other items. If you are using a valid domain name for your hostname (like ‘server1.example.com’ for example under split-horizon DNS), then you can simply set the value to be the exact same as the hostname.
Domain
Not to be confused with ‘Domain Name’, this is the windows NT4 style short domain name that complies with NetBIOS. You will input this information in the Windows Networking module or the Active Directory Connector module. It follows the specification for LANManager domain names instead of Internet domain names. The domain is restricted to a 15 character, caseless name without special characters. The most common practice is to use the primary element of the Domain Name as the Domain if it comports with the requirements. For example, if the Hostname is ‘server1.example.com’ then you would set the Domain to be ‘EXAMPLE’. The character limit for this value is 15 characters.
Server Name
This is the short servername used in Windows environments and complies with NetBIOS standards. It is not the full DNS name but in best practices would equal the name of the first part of the fully qualified domain name. For example, if your Hostname was ‘server1.example.com’, this name would be ‘SERVER1’.
Certificates
While this isn’t a strict requirement it is best practice to have the certificate authority of the servers set up and configured before proceeding. This should use ‘Hostname’ or ‘Internet Hostname’ configured previously for your certificate so that the names match. This will remove the certificate error if you happen to trust this CA with your workstation (which is also a best practice.)
Time and Date
It is essential that the time and date on your network is consistent throughout. Part of the security model for CIFS (Common Internet File System, the protocol used by Windows Networking) relies on the time being accurate between the workstation and the server (and also the server and other servers which is especially important when using the Active Directory Connector).
One approach is to point all the workstations and servers to an external time server. This is by far the easiest configuration.
Another approach is to set up ClearOS or an AD server as a network time (NTP) server and point all of the time sync for workstations and servers to this central server. Then you can point just this central server to an external time sync device. The reason why this approach is more scalable is that it works even when your external connectivity to the Internet is down. Even if the central server is not able to get an accurate time from the world-view of things, it is able to keep all the nodes close by accurate. It is ok for it to even be wrong so long as everything else is wrong together! Another advantage to this approach is that you don’t have increased usage of your internet pipe for updates to network time.
DNS
It is important to have a solid DNS strategy for your LAN infrastructure. ClearOS is capable of acting as a Caching DNS server. DNS queries to ClearOS are handled in the following order:
-
Split referrals to other DNS providers
-
DNS includes
-
Hosts file
-
DNS lookup external
ClearOS can reference other servers on your network and be used only for its own purposes, or ClearOS can be used as a primary location for DNS queries. Generally speaking, ClearOS is very fast at providing DNS resolution. In situations where there is an AD server present, it is recommended that the workstations on the network use AD for their DNS (This include deployments with Microsoft running as an AD domain controller and also situations where ClearOS is the AD domain controller, ie. Samba Directory.)
Split referrals to other DNS providers
In some cases it may be useful to refer ClearOS to different DNS provider for the implicit purpose of resolving a specific or several specific domains. This is recommended for Active Directory Connector and you can use this guide to assist you.
DNS includes
While this is not required for anything related to this specific topic, it is useful to mention. You can include DNS statements within the DNS server to override other lookups. This can be useful in poisoning a specific DNS host or redirecting it for other purposes. For example, if on the local domain is web server that has a public IP address that is forwarded into your domain, you will not be able to use the external address to get to it. But by using a DNS include you can override the external lookup and provide the internal hostname to IP address designation.
This process works for DNS names that you want to work (split horizon DNS) and for DNS names that you don’t want to work (poison DNS.)
Hosts file
DNS lookup external
Windows 7 and later Registry Changes to join a domain
For Windows 7 and later you will need to make changes to the workstation. You can manually make the changes using ‘regedit’ or create this as a file in notepad and save it with the ‘.reg’ extension. Then, double-click to add it to the registry. Here is the code:
Windows Registry Editor Version 5.00

[HKEY_LOCAL_MACHINE\System\CurrentControlSet\Services\LanManWorkstation\Parameters]

"DomainCompatibilityMode"=dword:00000001
"DNSNameResolutionRequired"=dword:00000000
“DomainCompatibilityMode”=dword:00000001“
By setting this parameter, you tell your workstation that you want it to use NT4 style domains. There is no security risk here other than the kerberos-layer differences intrinsic between NT4 and 2000 and it does not prohibit the workstation from joining an Windows 2000 domain or later domain.
“DNSNameResolutionRequired”=dword:00000000
As part of the domain join process, Windows 2000 and later domains not only make a computer account for the domain but also create a DNS entry. The workstation then validates that the DNS entry resolves before allowing the workstation to join the domain. There is no integration point in NT4 domains to DNS so this doesn’t occur and as a result, the workstation will not join the domain. In our opinion, this was added to Windows 2000 domains and later in order to make management of DNS for workstations smoother. It doesn’t enhance security but since it is required by default and doesn’t work this way under NT4-style domains, we must disable it for the time being.
Windows 10 Registry Changes to run logon scripts
Microsoft have decided for security reasons to disable logon scripts from running in Windows 10, now preferring to use Group Policies. You cannot apply Group Policies automatically to the NT4 style of domains which ClearOS is using. To re-enable logon scripts in Windows 10 you need to make some registry changes before you join the domain. The easiest way is to create a file, say logon.reg with the following contents:
Windows Registry Editor Version 5.00

[HKEY_LOCAL_MACHINE\SOFTWARE\Microsoft\Windows\CurrentVersion\Policies\System]
"EnableLinkedConnections"=dword:00000001

[HKEY_LOCAL_MACHINE\SOFTWARE\Policies\Microsoft\Windows\NetworkProvider\HardenedPaths]
"\\\\*\\NETLOGON"="RequireMutualAuthentication=0, RequireIntegrity=0,RequirePrivacy=0"
"\\\\*\\SYSVOL"="RequireMutualAuthentication=0, RequireIntegrity=0,RequirePrivacy=0"
"\\\\{MyWindowsDomainName}\\netlogon"="RequireMutualAuthentication=0, RequireIntegrity=0,RequirePrivacy=0"
Change {MyWindowsDomainName} to your domain name (default is CLEARSYSTEM) then import the file by double-clicking on it before you join the domain.
If you do not enable “Windows 10 Domain Logons” in Windows Networking, you can set “RequirePrivacy=1” and the more secure SMB3 protocol will be used.
You can create a single file with both sets of registry changes. The logon script registry changes have no effect on versions of Windows prior to Windows 10.
Microsoft seem to be pushing changes to Windows requiring the use of FQDN’ rather than NetBIOS or server names so you may have to change the above registry entries to:
[HKEY_LOCAL_MACHINE\SOFTWARE\Policies\Microsoft\Windows\NetworkProvider\HardenedPaths]
"\\\\*.internal.domain.tld\\NETLOGON"="RequireMutualAuthentication=0, RequireIntegrity=0,RequirePrivacy=0"
"\\\\*.internal.domain.tld\\SYSVOL"="RequireMutualAuthentication=0, RequireIntegrity=0,RequirePrivacy=0"
"\\\\internal.domain.tld\\netlogon"="RequireMutualAuthentication=0, RequireIntegrity=0,RequirePrivacy=0"
where internal.domain.tld is your Default Domain from the IP Settings screen.
Enabling the SMB1.0 Protocol in Windows 10
Windows 10, since the Fall Creators Update (1709), is no longer shipping with SMB1.0 support enabled. This means that if you enable “Windows 10 Domain Logons”, Windows 10 machines can no longer access Windows Networking (Samba) Domains. If you try to join a ClearOS Domain you may get the following popup:

The cause is that SMB1.0 support is now disabled by default in Windows 10. The link takes you to this Microsoft document. To enable SMB1.0 support see this Microsoft document or just go Control Panel > Programs and Features > “Turn Windows Features on and off” then scroll down to SMB 1.0/CIFS File Sharing Support and enable it. You will need to reboot afterwards. There is also a PowerShell method in the document.
With ClearOS7 up to date, including samba-4.7.1 and later, there is no need to enable what was formerly named “Windows 10 Domain Logons” and is now named “Force SMB1 Protocol” if enabled. If disabled, the parameter won’t show. Then you won’t need to enable SMB1.0 in your Windows 10 clients.
If you feel you really need to force the SMB1 protocol to be used, you can edit /etc/samba/smb.conf and add the line:
server max protocol = NT1
It is worth pointing out that it was a vulnerability in the SMB1 protocol which enabled the WannaCry virus to spread.
Outlook Authentication and Other Cryprographic Issues
Once you have joined a domain, Outlook 2016 (and probably other versions) may no longer authenticate with the mail server if you are logged in with a domain account, but will authenticate if you are logged in with a local user account. In that case, run regedit to edit the Windows registry, navigate to HKEY_LOCAL_MACHINE\SOFTWARE\Microsoft\Cryptography\Protect\Providers\df9d8cd0-1501-11d1-8c7a-00c04fc297eb and add a registry dword “ProtectionPolicy” if it does not exist. Then change its value to 1.
You can create a registry file, called, for example, outlook.reg and in it put:
Windows Registry Editor Version 5.00

[HKEY_LOCAL_MACHINE\SOFTWARE\Microsoft\Cryptography\Protect\Providers\df9d8cd0-1501-11d1-8c7a-00c04fc297eb]
"ProtectionPolicy"=dword:00000001
You can then double-click on the file to import it to the registry. You can also combine it into a single file with any of the other tweaks in this document.
The same fix will work for other cryptographic issues such as the following Security event log:
- <Event xmlns="http://schemas.microsoft.com/win/2004/08/events/event">
- <System>
<Provider Name="Microsoft-Windows-Security-Auditing" Guid="{54849625-5478-4994-a5ba-3e3b0328c30d}" />
<EventID>5061</EventID>
<Version>0</Version>
<Level>0</Level>
<Task>12290</Task>
<Opcode>0</Opcode>
<Keywords>0x8010000000000000</Keywords>
<TimeCreated SystemTime="2021-03-15T15:55:31.9826620Z" />
<EventRecordID>59773</EventRecordID>
<Correlation ActivityID="{298d4885-19b3-0002-c048-8d29b319d701}" />
<Execution ProcessID="712" ThreadID="3508" />
<Channel>Security</Channel>
<Computer>win10vbox.BCHC</Computer>
<Security />
</System>
- <EventData>
<Data Name="SubjectUserSid">S-1-5-21-3520332428-963461979-760293181-1000</Data>
<Data Name="SubjectUserName">aaron</Data>
<Data Name="SubjectDomainName">BCHC</Data>
<Data Name="SubjectLogonId">0x37354</Data>
<Data Name="ProviderName">Microsoft Software Key Storage Provider</Data>
<Data Name="AlgorithmName">UNKNOWN</Data>
<Data Name="KeyName">{A6AFA0E7-4B31-4028-9FFA-6813724D0BD3}</Data>
<Data Name="KeyType">%%2500</Data>
<Data Name="Operation">%%2480</Data>
<Data Name="ReturnCode">0x80090016</Data>
</EventData>
</Event>
The following System Log:
- <Event xmlns="http://schemas.microsoft.com/win/2004/08/events/event">
- <System>
<Provider Name="Schannel" Guid="{1f678132-5938-4686-9fdc-c8ff68f15c85}" />
<EventID>36870</EventID>
<Version>0</Version>
<Level>2</Level>
<Task>0</Task>
<Opcode>0</Opcode>
<Keywords>0x8000000000000000</Keywords>
<TimeCreated SystemTime="2021-03-15T15:55:32.5636483Z" />
<EventRecordID>5996</EventRecordID>
<Correlation ActivityID="{298d4885-19b3-0002-c048-8d29b319d701}" />
<Execution ProcessID="712" ThreadID="1020" />
<Channel>System</Channel>
<Computer>win10vbox.BCHC</Computer>
<Security UserID="S-1-5-18" />
</System>
- <EventData>
<Data Name="Type">server</Data>
<Data Name="ErrorCode">0x8009030d</Data>
<Data Name="ErrorStatus">10001</Data>
</EventData>
</Event>
And the following Application and services log (Dexcom in this case):
- <Event xmlns="http://schemas.microsoft.com/win/2004/08/events/event">
- <System>
<Provider Name="Dexcom Uploader" />
<EventID Qualifiers="0">0</EventID>
<Version>0</Version>
<Level>2</Level>
<Task>0</Task>
<Opcode>0</Opcode>
<Keywords>0x80000000000000</Keywords>
<TimeCreated SystemTime="2021-03-15T17:46:53.6859209Z" />
<EventRecordID>278</EventRecordID>
<Correlation />
<Execution ProcessID="0" ThreadID="0" />
<Channel>Dexcom</Channel>
<Computer>win10vbox.BCHC</Computer>
<Security />
</System>
- <EventData>
<Data>Error: SuperSocket - Error: Session: 21a7c61b-b266-4036-ac3d-1890e86ea423/127.0.0.1:50298 Unexpected error Caller: OnBeginInitStream, file path: d:\WorkShop\SuperSocket\v1.6\SocketEngine\AsyncStreamSocketSession.cs, line number: 255 Exception: System.ComponentModel.Win32Exception (0x80004005): The credentials supplied to the package were not recognized at System.Net.Security.SslState.InternalEndProcessAuthentication(LazyAsyncResult lazyResult) at System.Net.Security.SslState.EndProcessAuthentication(IAsyncResult result) at System.Net.Security.SslStream.EndAuthenticateAsServer(IAsyncResult asyncResult) at SuperSocket.SocketEngine.AsyncStreamSocketSession.OnBeginInitStream(IAsyncResult result, Boolean connect)</Data>
</EventData>
</Event>
search?q=clearos%2C%20clearos%20content%2C%20kb%2C%20bestpractices%2C%20Windows%20Networking%2C%20app-windows-networking%2C%20clearos6%2C%20clearos7%2C%20categoryserver%2C%20subcategoryfile%2C%20maintainer_dloper&btnI=lucky

Adding a Windows 2019 DC to Your Samba Domain
In this document MSAD 2016 or 2019 joins a Samba-AD with version 4.15.
This documentation is intended for system administrators that need an MS-AD domain controller in their Samba-AD domain for technical reasons (Azure-Sync, etc.).
❗Hint
Since version 4.12, Samba-AD manages a 2012R2 schema level but still with a functional level in 2008R2. It is therefore possible to join a Windows Server 2012R2 configured in 2008R2 functional level with a Samba-AD domain as an AD.
✅Important
Since version 4.12, Samba-AD manages a 2012R2 schema level but still with a functional level in 2008R2. It is therefore possible to join a Windows Server 2012R2 configured in 2008R2 functional level with a Samba-AD domain as an AD.
Microsoft Active Directory 2019
Preparing your Samba-AD for the future junction
- Backup the Samba-AD because irreversible changes will be made;
- Upgrade Samba to its latest 4.15 version;
- Install the required dependencies to join the Windows Server:
# RedHat8 and derived distributions
yum install python3-markdown
# Debian
apt install python3-markdown
Enter fullscreen mode
Exit fullscreen mode
- Then run the following commands, these will join the MS Server 2019 in your domain:
samba-tool domain schemaupgrade
samba-tool domain functionalprep --function-level=2012_R2 --forest-prep --domain-prep
Enter fullscreen mode
Exit fullscreen mode
- Set schema version to 2019
priv=$(smbd -b | grep -i private_dir | cut -d : -f 2 | xargs)
defaultNamingContext=$(ldbsearch -H ldap://127.0.0.1 -s base -b "" defaultNamingContext | grep defaultNamingContext | cut -d : -f 2 | xargs)
schemaNamingContext=$(ldbsearch -H ldap://127.0.0.1 -s base -b "" schemaNamingContext | grep schema | cut -d : -f 2 | xargs)
ldbedit -e "sed -i 's/objectVersion:.*/objectVersion: 88/g'" -H $priv/sam.ldb '(objectClass=dMD)' -b $schemaNamingContext
Enter fullscreen mode
Exit fullscreen mode
- Check the directory database:
samba-tool dbcheck --cross-ncs --fix --yes --reset-well-known-acls
Enter fullscreen mode
Exit fullscreen mode
☑️Note
It is possible that errors appear when launching the command the first time, just run it a second time.
- Enable schema updates in Samba AD:
if grep -q "dsdb:schema update allowed" /etc/samba/smb.conf; then
    sed -i '/dsdb:schema update allowed=true/d' /etc/samba/smb.conf
fi
sed -i '/global/a dsdb:schema update allowed=true' /etc/samba/smb.conf
systemctl restart samba-ad-dc
Enter fullscreen mode
Exit fullscreen mode
Preparing and joining the Microsoft Active Directory 2019
☑️Note
It is recommended to use an English version of Windows Server for infrastructure services. This allows you to have logs in English and feel less lonely when searching on the Internet.
-
If not already done, set the server to a fixed IP and configure the DNS redirector to point to the main AD;
-
Force the activation of the Sysvol directory on the MS-AD:
  Set-ItemProperty -Path "HKEY_LOCAL_MACHINE\SYSTEM\CurrentControlSet\Services\Netlogon\Parameters"  -Name "SysVolReady" -Value  0
  Restart-Computer
Enter fullscreen mode
Exit fullscreen mode
- Install the Active Directory components. In a PowerShell console run the following commands:
Install-WindowsFeature AD-Domain-Services
Add-WindowsFeature RSAT-ADLDS
Add-WindowsFeature RSAT-ADDS-Tools
Add-WindowsFeature RSAT-DNS-Server
Add-WindowsFeature RSAT-DFS-Mgmt-Con
Add-WindowsFeature GPMC
Enter fullscreen mode
Exit fullscreen mode
- Now that the role is installed, promote the server to AD and set it up;
☑️Note
The following command will open a popup that will ask for the Domain Admins credentials to join the server (in graphical mode), then the credentials for the AD restore mode (in text mode).
☑️Note
- If not already done, synchronize the time between MS-AD domain controller in their Samba-AD domain with the following command:
w32tm /config /syncfromflags:manual /manualpeerlist:”NTP Server” /reliable:yes /update
w32tm /resync /force
Enter fullscreen mode
Exit fullscreen mode
☑️Note
Of course modify the values Credential, DomainName, SiteName and ReplicationSourceDC.
There is a back quote character at the end of each line. Do not remove it or PowerShell will interpret this command as multiple commands.
Install-ADDSDomainController  `
   -Credential (Get-Credential "MIGRATE\Administrator") `
   -DomainName 'migrate.lab' `
   -SiteName 'Default-First-Site-Name' `
   -ReplicationSourceDC smb-adds01.migrate.lab `
   -CreateDnsDelegation:$false  `
   -DatabasePath 'C:\Windows\NTDS' `
   -InstallDns:$true  `
   -LogPath 'C:\Windows\NTDS' `
   -NoGlobalCatalog:$false `
   -SysvolPath 'C:\Windows\SYSVOL'  `
   -NoRebootOnCompletion:$true  `
   -Force:$true
Restart-Computer
Enter fullscreen mode
Exit fullscreen mode
☑️Note
At this stage, the Windows Active Directory is properly attached to the domain. However, some options need to be adjusted on the sysvol, DNS and NTP parts.
- Force the activation of the Sysvol directory on the MS-AD:
Set-ItemProperty -Path "HKLM:\SYSTEM\CurrentControlSet\Services\Netlogon\Parameters" -Name "SysvolReady" -Value "1"
Enter fullscreen mode
Exit fullscreen mode
-
Copy the contents of the
SYSVOLfrom the Samba-AD server. To do this, in a file explorer, type\\srvads\\sysvol, then go to the folder corresponding to your domain name (for example ad.mydomain.lan) and copyPoliciesandScriptsintoC:windowsSYSVOLdomain(but not the domain name). After the copy we will have these two directories:- C:windowsSYSVOLdomainPolicies;
- C:windowsSYSVOLdomainScripts;
⚠️Warning
Samba does not support DFS-R or FRS protocols.
Therefore, it will be necessary to manually synchronize the SYSVOL directory each time a GPO is created or modified.
☑️Note
There is a link from C:\windows\SYSVOL\sysvol\ad.mydomain.lan to C:\windows\SYSVOL\domain.
- Restart the MS-AD server:
shutdown -r -t 0
Enter fullscreen mode
Exit fullscreen mode
-
Reverse DNS servers on the network card. The primary DNS server must be itself (
127.0.0.1), and the secondary DNS server is the Samba-AD server (Microsoft does the opposite when joining) -
In the DNS console, change the DNS redirector to the network recursor (by default Windows sets the first domain controller as the recursor when joining).
-
The change the NTP configuration in the MS-AD registry:
Set-ItemProperty -Path "HKLM:\SYSTEM\CurrentControlSet\Services\W32Time\Parameters" -Name "Type" -Value "NTP"
Enter fullscreen mode
Exit fullscreen mode
- Then restart the NTP service with a command prompt on the MS-AD server:
  net stop w32time
  net start w32time
Enter fullscreen mode
Exit fullscreen mode
- Finally, update the DNS and Kerberos configuration of the Samba-AD server by updating the information about the new Windows server. To do this, modify the files
/etc/hosts,/etc/resolv.confand/etc/krb5.conf;
Final Checks
- Check the directory database in Samba-AD server:
samba-tool dbcheck --cross-ncs --fix --yes --reset-well-known-acls
Enter fullscreen mode
Exit fullscreen mode


In this tutorial we will create a new Windows Server 2012 VM and add it to EXAMPLE.COM domain which we created in our previous article using Samba4 AD DC. We can use samba-tool to manage the Active Directory organization but with Windows it is always easier with GUI. Moreover it will feel friendly to anyone who is coming from a Windows background managing Windows Active Directory.
Install Windows Server 2012
Bringing up of Windows Server 2012 VM is not covered as part of this tutorial so I hope you already have your Windows VM or server.
Add Windows to Samba AD DC
Once your Windows Server is up and running, open the run prompt using Ctrl+r and enter ncpa.cpl
This will open Network Connections window
")
Choose your Ethernet Card, right click and select Properties
")
Select «Internet Protocol Version» based on the version you are using. Since I am using IPv4 network, I will choose V4, click on Properties
")
Provide the IP of your DNS server in the Preferred DNS server. Since we do not have Alternate DNS Server at the moment so we will leave it to only one DNS value.
")
Next open the Properties of This PC and click on Change settings
")
Select the Computer Name TAB and click on Change
")
Now here we need to provide the Realm Name of our Active Directory which in this case is EXAMPLE.COM
")
As soon as you click on OK you will get a login prompt to authenticate to your Samba Active Directory Domain Controller
")
If the authentication was successful then you should get a confirmation prompt
")
Next the server must be rebooted to complete the process of adding Windows Server to Samba Active Directory DC.
ALSO READ: Install Oh My Zsh on Linux [Step-by-Step]
")
Install Remote Server Administration Tools (RSAT)
We have samba-tool command which can be used to manage Samba Active Directory DC from the Linux command line but it is more friendly to use the native Windows administrative tools instead. To do so we need to install the Remote Server Administration Tools (RSAT).
- To install RSAT feature, start Server Manager
- From the Manage menu, select Add Roles and Features.
- Click Next to the Before you begin screen.
- For Select installation type, select Role-based or Feature-based installation, and click Next.
- Select the server and click Next.
- Click Next to Server Roles as this does not require any additional role to be added.
- On the Features screen, scroll down to Remote Server Administration Tools,then expand the Feature and Role Administration Tools, select the tools you want installed, then click Next.
- Click Next to the Confirmation.
Click Install to complete the installation, then click Close once complete.
Check Domain Controllers
Now we will use our Windows Server to manage Samba Active Directory Domain Controller.
Open the run prompt on your windows workstation, and enter «dsa.msc» which is the shortcut for «Active Directory Users and Computers«
Check the available Domain Controllers. It shows the hostname of our samba-ad.example.com active directory
")
Create AD Users and Groups
Next to create users and groups in the Active Directory, click on the user icon
")
This will open a new pop up window where you can fill in the user details
")
Now you can follow the on-screen instructions to complete the process. Similarly you can create groups, add computers to the domain and much more.
Conclusion
In this tutorial we added Windows Server 2012 to our Samba Active Directory Domain Controller. Similarly you can also add any WIndows Workstation to the Samba AD and then install RSAT to manage your Domain Controller.
ALSO READ: Install & Configure FreeIPA Server in RHEL/CentOS 8
Lastly I hope the steps from the article to add Windows Workstation using Samba Domain was helpful. So, let me know your suggestions and feedback using the comment section.
Can’t find what you’re searching for? Let us assist you.
Enter your query below, and we’ll provide instant results tailored to your needs.
Обновлено 24 марта 2021
![]()
Содержание
- Введение
- Настройка сервера
- Настройка LDAP
- Настройка Samba
- Добавление и удаление пользователей
- Настройка прав доступа
- Настройка прав доступа к файловой системе
- Настройка прав доступа для пользователей Windows-компьютеров
- Структура Samba-групп
- Подключение Unix-клиентов
- Подключение Windows-клиентов
- Подключение клиента с ОС Windows 7
- Подключение клиента с ОС Windows 10
- Подключение клиента с ОС Windows Server 2008
- Подключение клиента с ОС Windows 7
- Просмотр информации
Введение
Samba — это популярный пакет программ с открытыми исходными текстами, который предоставляет файловые и принт-сервисы Microsoft® Windows® клиентам. Настройка Samba-сервера может быть выполнена при помощи утилит Calculate входящих в пакет sys-apps/calculate-server. Для хранения учётных записей пользователей, групп и машин и управления ими утилиты используют OpenLDAP-сервер. Необходимое программное обеспечение входит в состав Calculate Directory Server.
В качестве Linux клиента может выступать любая версия Calculate Linux Desktop (CLD, CLDC, CLDL, CLDM или CLDX). В качестве Windows клиентов могут быть использованы операционные системы семейства Windows. На данный момент Microsoft прекратила официальную поддержку доменов NT4 в операционных системах Windows. Однако с некоторыми изменениями вы все еще можете использовать более поздние выпущенные операционные системы Windows с доменом Samba NT4.
Настройка сервера
Настройка Samba-сервера выполняется в несколько этапов. Так как все данные пользователей и машин хранятся в LDAP, вначале неободимо выполнить настройку OpenLDAP-сервера, а затем — настройку LDAP для хранения учётных записей пользователей Linux. Это необходимо для работы Linux-клиентов. После этого можно настроить Samba-сервер.
Настройка LDAP
Настройте LDAP-сервер согласно руководству.
Настройка Samba
Перед настройкой Samba-сервера настройте LDAP для хранения учётных записей Unix-пользователей. Для этого выполните:
 * ПРЕДУПРЕЖДЕНИЕ: Выполнение этой программы изменит конфигурационные файлы и базу данных сервиса LDAP.
 Если вы готовы продолжить выполнение программы, введите 'yes', если нет - 'no': yes

 * Добавлен ldif файл ...                                                                                        [ ok ]
 * Unix сервис сконфигурирован ...                                                                               [ ok ]
Для настройки Samba-сервера выполните:
 * ПРЕДУПРЕЖДЕНИЕ: Выполнение этой программы изменит конфигурационные файлы Samba сервиса.
 Если вы готовы продолжить выполнение программы, введите 'yes', если нет - 'no': yes

 * Добавлен ldif файл ...                                                                                        [ ok ]
 * Запускается Samba ...                                                                                         [ ok ]
 * Пользователь client добавлен в Unix сервис
 * Пользователь client добавлен в Samba сервис
 * Пользователь admin добавлен в Unix сервис
 * Пользователь admin добавлен в Samba сервис
 * Samba сервис сконфигурирован ...                                                                              [ ok ]
В качестве параметров вы можете указать netbios и workgroup.
- -n name — устанавливает имя NetBIOS, под которым будет работать Samba сервер. По умолчанию оно устанавливается равным первому компоненту DNS-имени хоста.
- -w workgroup — имя домена или рабочей группы NT для компьютеров, которые будут получать доступ к этому серверу.
Задайте пароль администратора (пользователь с логином admin):
Новый пароль:
Повторите новый пароль:
* Пароль пользователя admin Samba сервиса изменен
Заметка
Пользователь admin используется только для ввода клиентского компьютера с ОС Windows в домен. Admin не имеет домашней директории.
Если нужен администратор домена для управления компьютерами на Windows, создайте нового пользователя и включите его в доменную группу Domain Admins.
Пример создания администратора домена:
Новый SMB пароль:
Повторите новый SMB пароль:
* Пользователь d_admin добавлен в Unix сервис
* Пользователь d_admin добавлен в Samba сервис
Добавление и удаление пользователей
Для работы с пользователями используйте аналоги стандартных Unix-команд: cl-useradd, cl-userdel, cl-usermod, cl-passwd, cl-groupadd, cl-groupdel, cl-groupmod. Синтаксис этих команд будет во многом совпадать с одноименными системными утилитами.
Для примера добавьте пользователя test и задайте ему пароль:
* Пользователь test добавлен в Unix сервис
* Пользователь test добавлен в Samba сервис
Новый пароль:
Повторите новый пароль:
* Пароль пользователя Unix сервиса изменен
* Пароль пользователя test Samba сервиса изменен
Настройка прав доступа
Настройка прав доступа к файловой системе
Для настройки прав доступа к файлам на сервере используйте ACL (Access Control List — список контроля доступа). Изменяя права на файлы, вы ограничиваете к ним доступ в равной степени как для Windows-, так и для Linux-клиентов. При отсутствии прав доступа к файлам и директориям они не будут отображаться в Samba-ресурсе.
Права доступа применяются как к файлам, так и к директориям. Вы можете указать права доступа на владельца файла, либо на группу. Если Windows-клиент будет распознавать только Samba-группы, то в Linux будут отображаться имена Unix- и Samba-групп. Поэтому, для разграничения прав доступа, предпочтительней использовать Samba-группы.
Для примера создадим Samba-группу manager:
* Группа 'manager' добавлена в Samba сервис
Для создания Unix-группы job, достаточно выполнить:
* Группа 'job' добавлена в Unix сервис
Настройка прав доступа для пользователей Windows-компьютеров
Для настройки дополнительных прав Windows машин, таких как: возможность устанавливать программы, возможность выхода из домена и т.д., используйте Samba группы.
Пример повышения прав пользователя test до администратора домена:
* Пользователи добавлены в группу Domain Admins
Структура Samba-групп
Samba-группы могут быть следующих типов:
- Доменные группы (номер типа группы 2)
- Локальные группы (номер типа группы 4)
- Встроенные группы (номер типа группы 5)
Группы, созданные по умолчанию:
-
Доменные группы — глобальные группы, которые действуют в домене.
- Domain Admins — администраторы домена (полные права на компьютерах в домене).
- Domain Guests — гости домена (минимальные права).
- Domain Users — пользователи домена.
- Domain Computers — компьютеры домена.
-
Локальные группы — группы, действующие локально на данном компьютере.
Локальные группы отсутствуют -
Встроенные группы — группы встроенные в систему.
- Administrators — администраторы (полные права).
- Account Operators — операторы учетных записей. Создание и управление пользовательской учетной информацией, создание и управление группами, резервное копирование файлов и каталогов.
- Backup Operators — операторы архивов. Резервное копирование, восстановление из резервной копии, остановка системы.
- Print Operators — операторы печати. Управление принтерами, резервное копирование.
- Replicators — репликаторы. Эта группа используется службой репликации File Replication на контроллерах домена.
- System Operators — операторы системы. Изменение системного времени, останов системы, останов с удаленной системы, резервное копирование, восстановление из резервной копии, блокирование сервера, преодоление блокировки сервера, форматирование жесткого диска, управление сетевыми каталогами, управление принтерами.
Пример создания доменной группы test. По умолчанию создается доменная группа, тип группы — 2.
* Группа 'test' добавлена в Samba сервис
Пример создания встроенной группы Power Users — пользователей, имеющих дополнительные права.
* Группа 'Power Users' добавлена в Samba сервис
Где:
- g — идентификатор группы 547 (Group ID)
- rid — уникальный идентификатор 547 (RID)
- t — тип группы 5 (встроенная группа)
Подключение Unix-клиентов
Клиентская машина должна резолвить имя сервера calculate.example.org (hostname -f). Если у вас не настроен DNS, используйте один из двух вариантов:
- На клиенте пропишите IP адрес сервера в /etc/hosts:
<IP адрес> calculate.example.org
- На сервере отредактируйте файл /var/calculate/remote/calculate.env, прописав в него IP адрес сервера:
[client]
sr_samba_host = <IP адрес>
Для подключения Unix-клиентов укажите пароль для служебного пользователя client:
Новый пароль:
Повторите новый пароль:
* Пароль пользователя client Samba сервиса изменен
На клиентской машине выполните:
* Проверка DOMAIN на наличие доменных ресурсов ...                                                              [ ok ]
Пароль для ввода рабочей станции в домен:
* Samba ресурс [remote] подключен
* Применены шаблоны ввода в домен ...
* Компьютер настроен для работы в домене
* Компьютен добавлен в домен DOMAIN
где DOMAIN — сетевое имя или IP-адрес сервера.
Подключение Windows-клиентов
Важно
В ОС семейства Windows активируйте учетную запись Администратора командой:
net user Администратор /active:yes
Подключение клиента с ОС Windows 7
Для подключения клиента с ОС Windows 7 войдите в систему под учётной записью Администратора и с помощью текстового редактора создайте текстовый файл с именем samba_7_2008_fix.reg со следующим содержимым:
samba_7_2008_fix.reg
Windows Registry Editor Version 5.00

[HKEY_LOCAL_MACHINE\System\CurrentControlSet\Services\LanManWorkstation\Parameters]
"DomainCompatibilityMode"=dword:00000001
"DNSNameResolutionRequired"=dword:00000000
Дважды кликните файл, чтобы импортировать его в реестр. После этого перезагрузитесь, чтобы изменения вступили в силу.
Теперь необходимо ввести компьютер в Samba-домен. Для этого перейдите в свойства компьютера, а оттуда в настройку удалённого доступа. Во вкладке «Имя компьютера» нажмите кнопку «Изменить».

Далее укажите, что компьютер является членом домена, и введите его имя:

Введите имя и пароль пользователя, созданного на Samba-сервере и входящего в группу администраторов домена:

После этого компьютер станет членом домена:

Подключение клиента с ОС Windows 10
Для подключения клиента с ОС Windows 10 войдите в систему под учётной записью Администратора и с помощью текстового редактора создайте текстовый файл с именем samba_7_2008_fix.reg со следующим содержимым:
samba_7_2008_fix.reg
Windows Registry Editor Version 5.00

[HKEY_LOCAL_MACHINE\System\CurrentControlSet\Services\LanManWorkstation\Parameters]
"DomainCompatibilityMode"=dword:00000001
"DNSNameResolutionRequired"=dword:00000000
Дважды кликните файл, чтобы импортировать его в реестр. После этого перезагрузитесь, чтобы изменения вступили в силу.
После этого перезапустите сервис samba:
samba             | * samba -> stop: smbd ...                             [ ok ]
samba             | * samba -> stop: nmbd ...                             [ ok ]
samba             | * samba -> start: smbd ...                            [ ok ]
samba             | * samba -> start: nmbd ...                            [ ok ]
Теперь необходимо ввести компьютер в Samba-домен. Для этого перейдите в свойства компьютера, а оттуда в настройку удалённого доступа. Во вкладке «Имя компьютера» нажмите кнопку «Изменить».

Далее укажите, что компьютер является членом домена, и введите его имя:

Введите имя и пароль пользователя, созданного на Samba-сервере и входящего в группу администраторов домена:

После этого компьютер станет членом домена:
Подключение клиента с ОС Windows Server 2008
Для подключения клиента с ОС Windows 2008 войдите в систему под учётной записью Администратора и с помощью текстового редактора создайте текстовый файл с именем samba_7_2008_fix.reg со следующим содержимым:
samba_7_2008_fix.reg
Windows Registry Editor Version 5.00

[HKEY_LOCAL_MACHINE\System\CurrentControlSet\Services\LanManWorkstation\Parameters]
"DomainCompatibilityMode"=dword:00000001
"DNSNameResolutionRequired"=dword:00000000
Дважды кликните файл, чтобы импортировать его в реестр. После этого перезагрузитесь, чтобы изменения вступили в силу.
Теперь необходимо ввести компьютер в Samba)домен. Для этого перейдите в свойства компьютера, а оттуда в настройку удалённого доступа. Во вкладке «Имя компьютера» нажмите кнопку «Изменить».

Далее укажите, что компьютер является членом домена, и введите его имя:

Введите имя и пароль пользователя, созданного на Samba-сервере и входящего в группу администраторов домена:

После этого компьютер станет членом домена:

Просмотр информации
Для просмотра информации о пользователях и группах сервера используйте утилиту cl-info. В качестве параметра может выступать один из сервисов: unix или samba.
Пример команды для вывода списка Unix-пользователей:
Все LDAP пользователи для сервиса Unix
+------+--------+-----------------------------+------------------+---------------------+
| ID   | Логин  | Полное имя                  | Первичная группа | Домашняя директория |
+------+--------+-----------------------------+------------------+---------------------+
| 900  | client | Client unix workstation     | 900              | /dev/null           |
| 901  | admin  | Administrator samba service | 544              | /dev/null           |
| 1000 | user1  | Calculate user              | user1            | /home/user1         |
| 1001 | user2  | Calculate user              | user2            | /home/user2         |
+------+--------+-----------------------------+------------------+---------------------+
(4 строк)
Пример команды для вывода списка Samba-пользователей:
Все LDAP пользователи для сервиса Samba
+--------+-----------------------------+--------------+--------+
| Логин  | Полное имя                  | Заблокирован | Пароль |
+--------+-----------------------------+--------------+--------+
| client | Client unix workstation     | Нет          | Да     |
| admin  | Administrator samba service | Нет          | Да     |
| user1  | Calculate user              | Нет          | Да     |
| user2  | Calculate user              | Нет          | Да     |
+--------+-----------------------------+--------------+--------+
(4 строк)
Пример команды для просмотра информации о пользователе user1 Unix-сервиса:
Информация о пользователе user1 для сервиса Unix
+-----------------------+--------------------------+
| Поле                  | Значение                 |
+-----------------------+--------------------------+
| ID                    | 1000                     |
| Логин                 | user1                    |
| Полное имя            | Calculate user           |
| Заблокирован          | Нет                      |
| Видимый               | Да                       |
| Первичная группа      | user1                    |
| Дополнительные группы | user1                    |
|                       | group                    |
| Домашняя директория   | /home/user1              |
| Оболочка              | /bin/bash                |
| Пароль                | Да                       |
| Изменение пароля      | 25.09.2018               |
| Jabber ID             | user1@server.example.com |
| Почтовый адрес        | usr1@example.com         |
+-----------------------+--------------------------+
(14 строк)
Пример команды для просмотра информации о пользователе user1 Samba-сервиса:
Информация о пользователе user1 для сервиса Samba
+-----------------------+------------------------------------------------------+
| Поле                  | Значение                                             |
+-----------------------+------------------------------------------------------+
| Логин                 | user1                                                |
| Полное имя            | Calculate user                                       |
| Заблокирован          | Нет                                                  |
| Пароль                | Да                                                   |
| Изменение пароля      | 25.09.2018                                           |
| Дополнительные группы | Нет                                                  |
| Домашняя директория   | /var/calculate/server-data/samba/home/user1          |
| Общая директория      | /var/calculate/server-data/samba/share               |
| Linux профиль         | /var/calculate/server-data/samba/profiles/unix/user1 |
| Windows профиль       | /var/calculate/server-data/samba/profiles/win/user1  |
| Windows logon         | /var/calculate/server-data/samba/netlogon/user1      |
+-----------------------+------------------------------------------------------+
(11 строк)
Пример команды для вывода списка Unix-групп:
Все LDAP группы для сервиса Unix
+------------+--------------------+------+
| Группа     | Полное имя         | GID  |
+------------+--------------------+------+
| maildomain | Default Mail Users | 1000 |
| user1      | Calculate group    | 1001 |
| user2      | Calculate group    | 1002 |
| group      | Calculate group    | 1003 |
+------------+--------------------+------+
(4 строк)
Пример команды для вывода списка Samba-групп:
Все LDAP группы для сервиса Samba
+-------------------+-----+-------------------+
| Группа            | GID | Тип группы        |
+-------------------+-----+-------------------+
| System Operators  | 549 | встроенная группа |
| Print Operators   | 550 | встроенная группа |
| Domain Guests     | 514 | доменная группа   |
| Domain Admins     | 512 | доменная группа   |
| Account Operators | 548 | встроенная группа |
| Domain Users      | 513 | доменная группа   |
| Administrators    | 544 | встроенная группа |
| client            | 900 | доменная группа   |
| Backup Operators  | 551 | встроенная группа |
| Replicators       | 552 | встроенная группа |
| Domain Computers  | 515 | доменная группа   |
+-------------------+-----+-------------------+
(11 строк)
Пример команды для просмотра информации о группе group Unix-сервиса:
+-----------------------+-----------------+
| Поле                  | Значение        |
+-----------------------+-----------------+
| Группа                | group           |
| Полное имя            | Calculate group |
| GID                   | 1003            |
| Пользователи в группе | user1           |
|                       | user2           |
+-----------------------+-----------------+
(5 строк)
Пример команды для просмотра информации о группе Domain Users Samba-сервиса:
Информация о группе Domain Users для сервиса Samba
+-----------------------+-----------------+
| Поле                  | Значение        |
+-----------------------+-----------------+
| Группа                | Domain Users    |
| Полное имя            | Domain Users    |
| GID                   | 513             |
| Тип группы            | доменная группа |
| Пользователи в группе | Нет             |
+-----------------------+-----------------+
(5 строк)