Окружение
- Astra Linux Special Edition 1.6
- Astra Linux Special Edition 1.7 Update 2 (№ 2022-0819SE17)
- Astra Linux Common Edition 2.12
- ПК СВ «Брест» 2.9 Astra Linux Special Edition 1.6 Update 9 (№ 20211008SE16)
Вопрос
Возможно ли ввести в домен FreeIPA рабочие станции с ОС Windows 10?
Ответ
FreeIPA не поддерживает ввод в домен рабочих станций с ОС Windows.
Вариант ограниченного взаимодействия Windows-систем с FreeIPA-доменом на уровне Kerberos приведен в статье.
Contents
Windows_authentication_against_FreeIPA#
Windows authentication against FreeIPA#
This article describes direct integration between FreeIPA and Windows
machine, i.e. without involving Active Directory server. This
article does not apply to configurations where trust between AD and
FreeIPA was established. Note also that the described
configuration is not supported by FreeIPA development team and also is
not supported by Red Hat Enterprise Linux Identity Management product. A
work on making possible to login to Windows machines already enrolled
into a trusted Active Directory forest is ongoing and is not available
yet in any released FreeIPA version.
-
If you already have AD we recommend using this system with AD and
using trusts between AD and IPA. -
If you do not have AD then use Samba 4 instead of it. As of Samba
4.3, Samba AD can establish cross-realm trusts. The feature is still
incomplete and lacks proper access controls but it can be configured
to trust FreeIPA. -
If neither of the two options work for you you can configure Windows
system to work directly with IPA as described below. It is an option
of last resort because IPA does not provide the services windows
client expects and FreeIPA development team does not support this
mode. If this is good enough for you, fine by us. -
Build a native Windows client (cred provider) for IPA using latest
Kerberos. This would be really useful if someone does that because we
don’t have capacity to not build this ourselves. With the native OTP
support in IPA it becomes a real business opportunity to provide a
native 2FA inside enterprise across multiple platforms. But please do
it open source way otherwise we would not recommend you
FreeIPA is not an Active Directory server#
FreeIPA is not a re-implementation of Microsoft Active Directory.
FreeIPA is focused on Linux (and other standards compliant) systems.
For this reason FreeIPA without configured AD trust can
provide only
authentication service
for Windows hosts (via standard Kerberos
protocol).
FreeIPA can’t provide account database for Windows hosts in the same way
as AD does. You have to create local Windows account and appropriate
account mapping for each user if you select direct Windows<=>FreeIPA
integration. (This limitation doesn’t apply if you use AD
trust.)
Project pGina could help you to overcome some
limitations.
Configure FreeIPA#
| ``1. Create the host principal in the web interface``
| ``2. Create IPA users to correspond to Windows users``
| ``3. Reset the user's IPA password to a known password using the web interface or CLI,``
| ``   the user will be prompted to change at first log in.``
| ``4. On the IPA server run``
| `` ipa-getkeytab -s [kdc DNS name]``
| ``               -p host/[machine-name]``
| ``               -e  arcfour-hmac``
| ``               -k krb5.keytab.[machine-name]``
| ``               -P``
| `` At the prompt enter a random MACHINE_PASSWORD``
| `` (you will enter this later on the windows machine too).``
| `` ``\ **``Note:``\ ````\ ``you``\ ````\ ``can``\ ````\ ``change``\ ````\ ``the``\ ````\ ``-e``\ ````\ ``argument``\ ````\ ``to``\ ````\ ``include``\ ````\ ``also``**
| `` ``\ **``AES``\ ````\ ``enctypes``\ ````\ ``from``\ ````\ ``FreeIPA``\ ````\ ``2.1.4``\ ````\ ``and``\ ````\ ``higher.``**\ `` (FreeIPA ticket ``\ ```2038`` <https://fedorahosted.org/freeipa/ticket/2038>`__\ ``)``

| `` ``\ **``Note:``\ ````\ ``Windows``\ ````\ ``machines``\ ````\ ``names``\ ````\ ``cannot``\ ````\ ``exceed``\ ````\ ``15``\ ````\ ``characters``**
| ``  -- pointed out by Han Boetes on 2013-01-03 on freeipa-users mailing list``
Configure Windows (ksetup)#
| ``1. ksetup /setdomain [REALM NAME]``
| ``2. ksetup /addkdc [REALM NAME] [kdc DNS name]``
| ``3. ksetup /addkpasswd [REALM NAME] [kdc DNS name]``
| ``4. ksetup /setcomputerpassword [MACHINE_PASSWORD] (the one used above)``
| ``5. ksetup /mapuser * *``
| ``6. Run gpedit.msc, open the key called:``
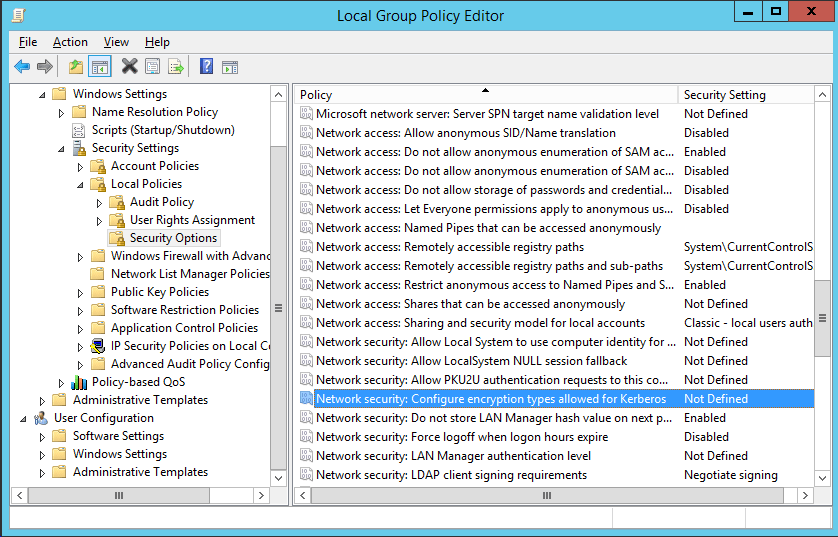
| `` "Network Security: Configure encryption types allowed for Kerberos”``
| `` under:``
| ``   Computer Configuration``
| ``     Windows Settings``
| ``       Security Settings``
| ``         Local Policies``
| ``           Security Options``
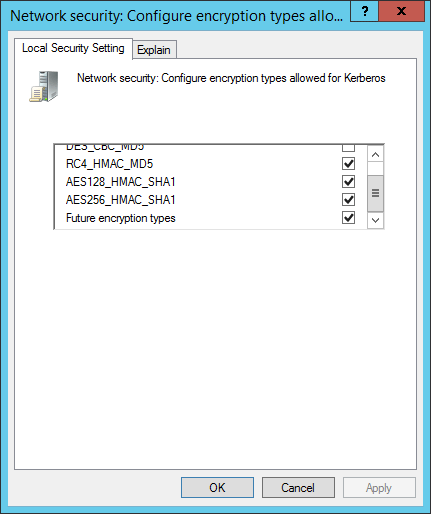
| `` and deselect everything except RC4_HMAC_MD5``
| ``7. *** REBOOT ***``
| ``8. Add local user accounts for all users that need to be able to log in.``
| ``9. Log in as [user]@[REALM] with the initial password, you will be prompted``
| ``to change the password then logged in.``
Note: Configuring encryption types is not needed from FreeIPA 2.1.4
and higher. (FreeIPA ticket
2038)
The FreeIPA team thanks ‘Jimmy’ for providing this information on the
freeipa-users
mailing list. See mailing list archives for the original text. Several
amendments were made.
In most cases Windows desktops or servers will typically be joined to a Windows domain controller running Microsoft’s Active Directory, however this is not the only option.
It is possible to join Windows to a FreeIPA realm and then log into the Windows computer with an account from FreeIPA as it makes use of Kerberos for single sign on (SSO). FreeIPA is an open-source project sponsored by Red Hat, which attempts to provide similar functionality to Active Directory for Linux and Unix systems.
This may be a good option if you already run a large Linux or Unix environment, but need to have a small amount of Windows servers capable of using the same centrally managed user accounts.
We are assuming that you already have FreeIPA set up and ready to use. We will only be detailing how to configure the Windows operating system to join an existing Kerberos realm. In this example FreeIPA is setup on the example.com domain.
FreeIPA will only be providing the authentication service for our Windows server here with Kerberos. FreeIPA is not able to maintain an account database for Windows computers in the same manner that Active Directory does, so we therefore still need to create local Windows accounts for each user on the Windows computer, although they will have no passwords set in Windows.
Configure FreeIPA
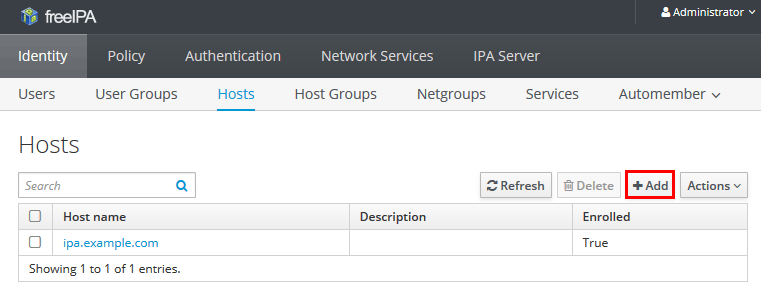
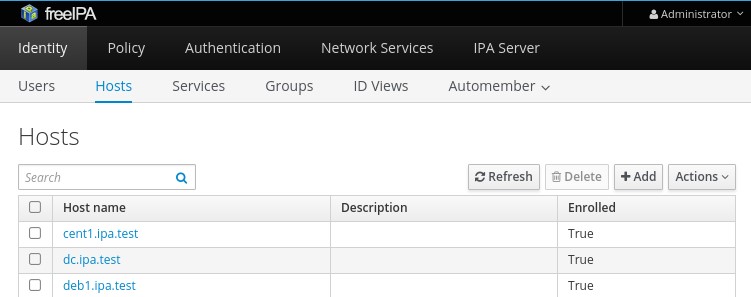
Log into FreeIPA and under Identity, select Hosts. Click the +Add button to create a new host.
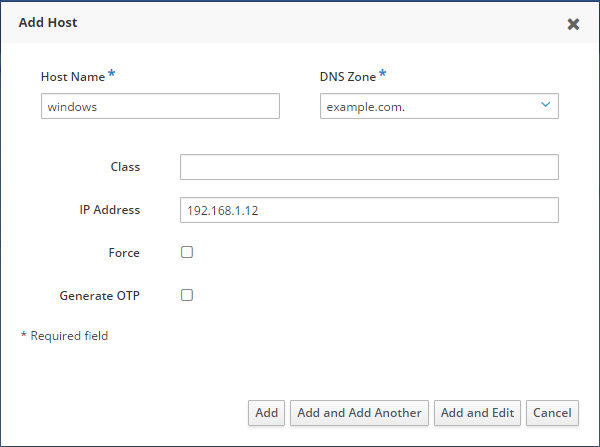
In this instance the hostname of our Windows computer is ‘windows’, we also specify the DNS domain afterwards. As FreeIPA is managing DNS for me, this is prefilled. if you are not using FreeIPA to manage DNS then you may need to manually enter the domain name.
Next on the FreeIPA server we need to run the ipa-getkeytab command to generate a keytab file for the Windows computer. In order to perform administrative tasks on the IPA server we must first authenticate, we do this with the kinit command and specify the IPA admin user, as shown below.
[root@ipa ~]# kinit admin
Password for [email protected]:
You can run the ‘klist’ command afterwards to check that you have a valid ticket.
Now we can run the ipa-getkeytab command as shown below. The -s option is used to specify the IPA server, which in this example is ipa.example.com – the server we are running this command on. The -p option is used to specify the principal-name of the host, which in this case is ‘host/’ followed by the fully qualified domain name (FQDN) of the Windows computer that we added through the FreeIPA web interface previously. The -e option is used to specify the encryption type used to generate the keys, here we’re using arcfour-hmac. The -k option is used to specify the keytab file that we want to create, in this case the file krb5.keytab.windows will be made in the current working directory. Finally the -P option is used to specify the password for the key, you will need to remember this as we will enter it on the Windows computer later.
[root@ipa ~]# ipa-getkeytab -s ipa.example.com -p host/windows.example.com -e arcfour-hmac -k krb5.keytab.windows -P
New Principal Password:
Verify Principal Password:
Keytab successfully retrieved and stored in: krb5.keytab.windows
If you get the error message “Kerberos User Principal not found. Do you have a valid Credential Cache?” be sure that you successfully ran the ‘kinit’ command.
Configure Windows
The Windows computer will need to be able to resolve the name of the IPA server with DNS, so ensure that Windows has appropriate DNS configuration for this. As my FreeIPA server is managing DNS, I have simply set the Windows machine to use FreeIPA for DNS.
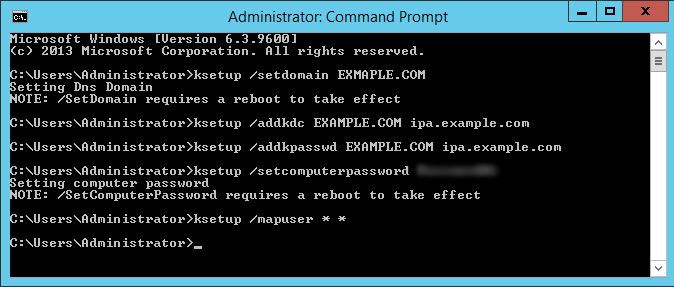
On the Windows computer, open command prompt as administrator and run the below commands. Note that the Realm must be specified in capital letters, as this is the custom for realm names in Linux/Unix. In my example the realm is EXAMPLE.COM and the key distribution center (KDC) is the FreeIPA server, which for me is ipa.example.com
ksetup /setdomain [REALM]
ksetup /addkdc [REALM] [KDC]
ksetup /addkpasswd [REALM] [KDC]
ksetup /setcomputerpassword [PASSWORD]
ksetup /mapuser * *
Note that the Password above is the one that we set in the FreeIPA web interface for the host principal earlier. The /mapuser command will map all accounts within the EXAMPLE.COM Kerberos realm to any existing account of the same name on this Windows computer.
These changes will require a reboot, as you will be advised, hold off on this for now.
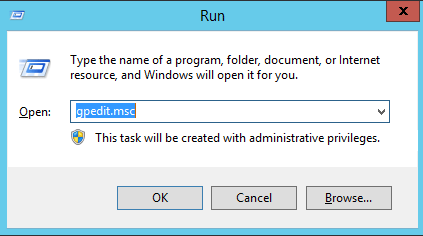
Next press the Windows key + R to open the Run window, type gpedit.msc and select OK. This will open up the Local Group Policy Editor for the machine.
From the Computer Configuration options, select Windows Settings > Security Settings > Local Policies > Security Options > Network Security: Configure encryption types allowed for Kerberos.
In this instance we will select everything except for the first two DES options. The official FreeIPA documentation claims to only require RC4_HMAC_MD5 selected, but I received an error regarding supported encryption types with only this enabled. Select Apply or OK to save the changes.
Once this is complete, reboot the Windows machine to apply the ksetup changes from earlier.
When the Windows machine is back up, create a local user account that maps to a user that exists in FreeIPA. In my example I have a user called ‘test’ that was created in the FreeIPA web interface, so I will create a user with the username of test in Windows. You do NOT need to set a password on this user account in Windows, as authentication will be handled by FreeIPA.
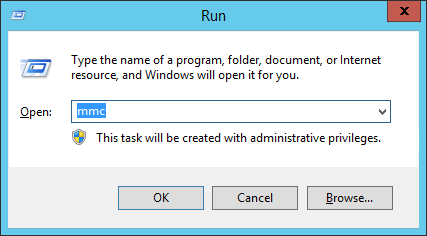
You can create a local user account by pressing the Windows key + R to open the Run window, and enter ‘mmc’ then select OK.
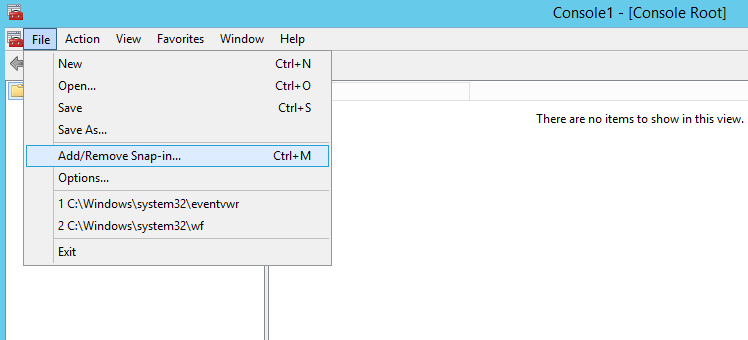
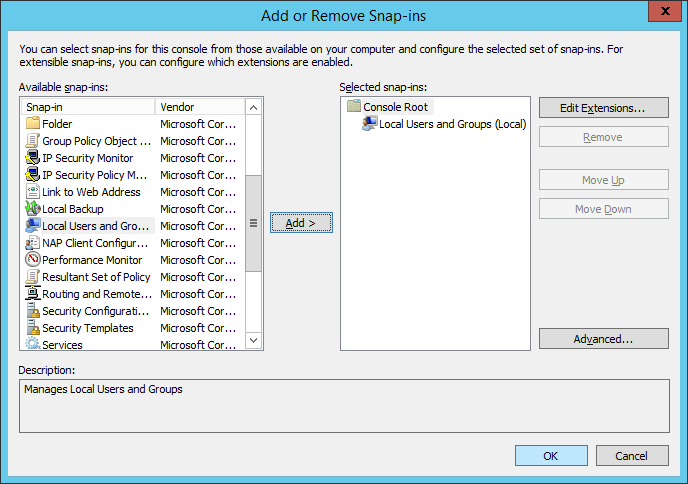
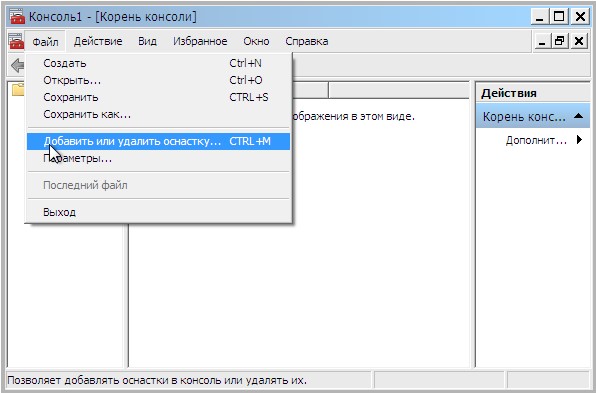
Once the MMC window opens, select File > Add/Remove Snap-in…
From the next window, select Local Users and Groups, then click the “Add >” button, followed by Finish, then OK. From here you can create your local user accounts in Windows. Remember, we do NOT want to add any passwords to these. The username also needs to match the username that exists in FreeIPA.
Configure Remote Desktop
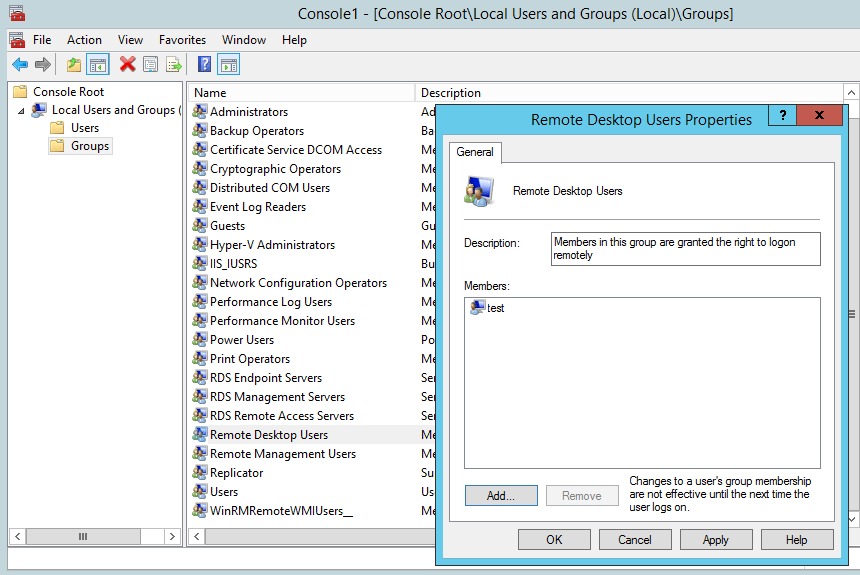
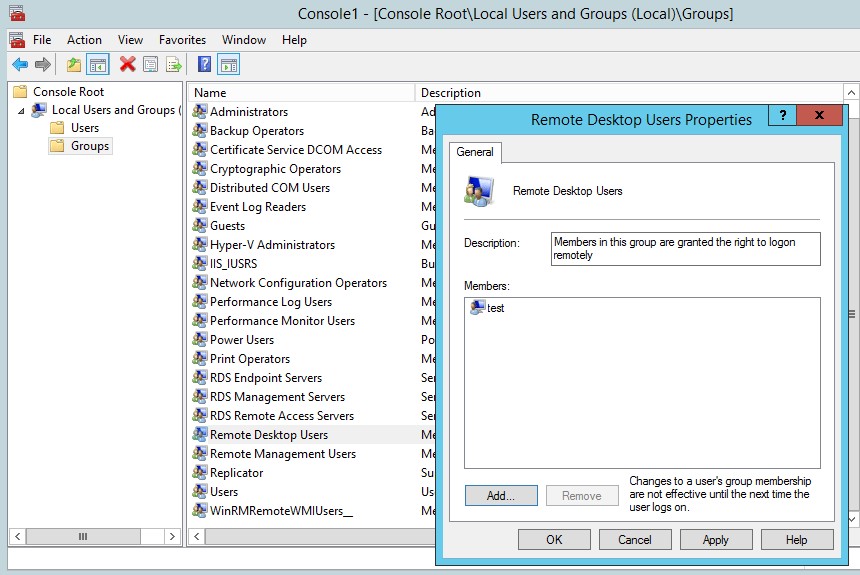
By default a fresh user account will not be able to connect via remote desktop unless it has been given permission to do so. While you still have the Local Users and Groups console open through MMC, go to Groups and select the Remote Desktop Users group and add your user account that was just created to this group.
Before performing the first login, you’ll want to temporarily disable remote desktops Network Level Authentication (NLA) on the Windows server otherwise you will receive an error about NLA failing to contact a Windows domain controller on first login. This only seems to happen when logging into an account for the first time with an expired password that requires changing. Once the password has been set and is no longer in an expired state, logging in with NLA will work fine.
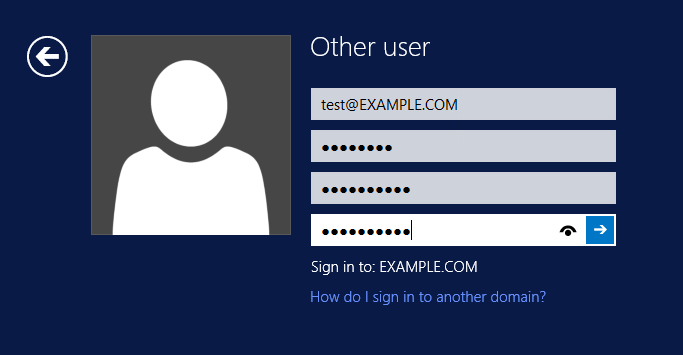
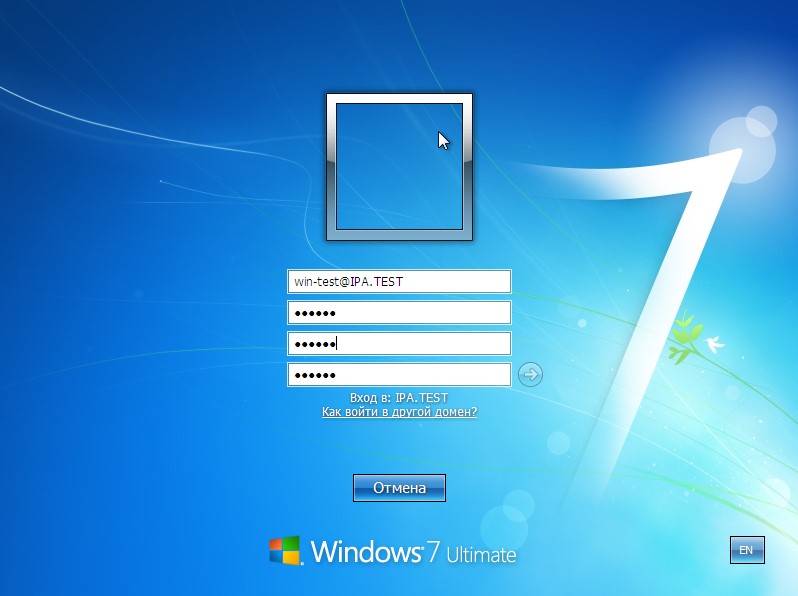
That’s it, you should now be able to log into Windows with this account. You will need to specify username@REALM to login, so if you’ve been following this example I’ll be using [email protected]. Don’t forget that the realm name must be in caps. Also by default when you create a new user account in FreeIPA the password will be in the expired state and will need to be changed on first login, as shown below.
By doing this we no longer need to access this singular Windows server with local user accounts, we can now access it with our accounts in the FreeIPA Kerberos realm. Granted we still have to create a local account on the Windows computer initially, however the authentication is handled centrally on the FreeIPA server using Kerberos, no passwords are stored on the Windows machine which can make credential management easier.
Troubleshooting
I had all sorts of different problems along the way while originally setting this up, so I have documented them all here along with associated solutions. In most cases the steps above should “just work”. Hopefully these solutions are useful, as most of these errors came from the Windows server, and of course when you perform a Google search for those errors you get solutions for fixing the problems in Windows, rather than answers relating to FreeIPA.
- There are currently no logon servers available to service the logon request.
For me this was due to a lack of DNS on the Windows server. The Windows server was not pointing to a DNS server that had the required records for FreeIPA. As I have set my FreeIPA server itself to provide DNS, the fix here was to simply use the FreeIPA server for DNS.If your instance of FreeIPA is not configured to manage DNS, it can be added on by installing the ipa-server-dns package. To set it up, run the ‘ipa-dns-install’ command and follow the prompts. As I was setting this up to manage DNS for the domain example.com, I received the below error message.
2016-12-29T04:27:00Z DEBUG The ipa-dns-install command failed, exception: ValueError: DNS zone example.com. already exists in DNS and is handled by server(s): a.iana-servers.net., b.iana-servers.net.
This was simply because DNS for the example.com domain exists out there on the Internet already. I temporarily changed the /etc/resolv.conf file to point to the FreeIPA server itself rather than an external DNS server and then ran ipa-dns-install again. During this process you can specify an external forwarder to use. If you already have some other DNS server that handles the records for your Kerberos realm, you’ll likely want to use this instead of configuring FreeIPA to manage DNS.
- The encryption type requested is not supported by the KDC.
When I attempted to Windows connect via remote desktop, I was asked to change my expired password. This is expected, as it is required for all new accounts created in FreeIPA by default. After entering my new password, I received the error “The encryption type requested is not supported by the KDC.” This was because originally in Windows I did not enable enough encryption types, with all selected except for the first two DES options as mentioned previously I was able to log in without further problems. Scroll up a little bit and take a loon at the section where we configured this. - preauth (encrypted_timestamp) verify failure: Decrypt integrity check failed.
When trying to log in through remote desktop, I received some generic message about the login failing. Only when I checked the /var/log/krb5kdc.log file on the FreeIPA server did this make sense.
Dec 28 20:44:14 ipa.example.com krb5kdc[44951](info): AS_REQ (7 etypes {18 17 23 3 1 24 -135}) 192.168.1.12: NEEDED_PREAUTH: [email protected] for kadmin/[email protected], Additional pre-authentication required
Dec 28 20:44:14 ipa.example.com krb5kdc[44950](info): preauth (encrypted_timestamp) verify failure: Decrypt integrity check failed
Dec 28 20:44:14 ipa.example.com krb5kdc[44950](info): AS_REQ (7 etypes {18 17 23 3 1 24 -135}) 192.168.1.12: PREAUTH_FAILED: [email protected] for kadmin/[email protected], Decrypt integrity check failed
If you know anything about Kerberos, you’ll know that it’s important for all servers to maintain the same time. In this case, my Windows server was in my local timezone of AEDT, but the FreeIPA server was in PST. I was able to resolve this by setting the timezone on the FreeIPA server with the below command so that it matched the time of the Windows server.
[root@ipa log]# date
Wed Dec 28 20:45:04 PST 2016
[root@ipa log]# timedatectl set-timezone Australia/Sydney
[root@ipa log]# date
Thu Dec 29 15:46:29 AEDT 2016
I suggest our guide on configuring NTP in Linux if you need further assistance with this.
This one was fairly straightforward, after many login attempts while performing troubleshooting I locked out the account in FreeIPA. The /var/log/krb5kdc.log file on the FreeIPA server showed:
Dec 29 15:46:39 ipa.example.com krb5kdc[44950](info): AS_REQ (7 etypes {18 17 23 3 1 24 -135}) 192.168.1.12: CLIENT KEY EXPIRED: [email protected] for krbtgt/[email protected], Password has expired
Dec 29 15:46:49 ipa.example.com krb5kdc[44951](info): AS_REQ (7 etypes {18 17 23 3 1 24 -135}) 192.168.1.12: LOCKED_OUT: [email protected] for kadmin/[email protected], Clients credentials have been revoked
While attempting to set a new password on first login with a new account, I was not choosing a strong enough password as per my FreeIPA password policy. This resulted in the below error message in the /var/log/kadmind.log file on the FreeIPA server. The solution was of course to use a stronger password.
Dec 29 15:54:58 ipa.example.com kadmind[44955](Error): password quality module empty rejected password for [email protected]: Empty passwords are not allowed
Dec 29 15:54:58 ipa.example.com kadmind[44955](Notice): chpw request from 192.168.1.12 for [email protected]: Password is too short
I’m not exactly sure how I fixed this, basically the below is what showed in the /var/log/krb5kdc.log file on the FreeIPA server when the Windows server reported this error.
Dec 29 15:55:16 ipa.example.com krb5kdc[44951](info): AS_REQ (7 etypes {18 17 23 3 1 24 -135}) 192.168.1.12: NEEDED_PREAUTH: [email protected] for krbtgt/[email protected], Additional pre-authentication required
Dec 29 15:55:16 ipa.example.com krb5kdc[44951](info): AS_REQ (7 etypes {18 17 23 3 1 24 -135}) 192.168.1.12: ISSUE: authtime 1482987316, etypes {rep=18 tkt=18 ses=18}, [email protected] for krbtgt/[email protected]
Dec 29 15:55:16 ipa.example.com krb5kdc[44951](info): TGS_REQ (7 etypes {18 17 23 3 1 24 -135}) 192.168.1.12: UNKNOWN_SERVER: authtime 0,  [email protected] for krbtgt/[email protected], Server not found in Kerberos database
Basically I reran the ksetup commands mentioned above, performed the reboot again, and everything was fine, so it’s possible I had some sort of typo the first time around or that my DNS was not properly configured the first time I ran through the ksetup commands. Other things to check would be that the host principal in FreeIPA correctly matches the hostname of the Windows server and the value specified in the -p option when running ipa-getkeytab.
The solution, as advised, is to disable NLA on the Windows computer. This will fail as there is no Windows domain controller to contact as we’re using FreeIPA. I have found that this is only a problem when connecting with remote desktop with a new account for the first time. After the first login and the expired password for the account has been reset, turning NLA back on seems to work without issue. Note that leaving NLA on may be problematic in the future when an accounts password expires. As long as you change the password on some other Linux server or directly in FreeIPA itself this should not be a problem and you should be fine to leave NLA enabled.
For any other connectivity issues, I’d recommend confirming the firewall on your FreeIPA server is allowing the necessary ports through from the Windows server. There are a fair amount of ports required for everything to work nicely, if in doubt you can try temporarily disabling your firewall and testing again as this should either confirm or deny whether or not the firewall was the issue. If it was, simply check the firewall logs and view the traffic that is being dropped, or better yet just do this rather than temporarily reducing your security by disabling the firewall.
Summary
To get the full features that Microsoft Windows offers, it is recommended that you join the Windows machine to an Active Directory domain. However if this is not practical due to a small number of Windows machines in your environment, it is possible to perform the steps above in order to log into Windows using user credentials from FreeIPA by using Kerberos, providing us with single sign on.
While that sounds good in theory this solution can often be difficult to get working correctly, as you have seen in the troubleshooting section above I had my fair share of random errors during the setup process.
Время на прочтение
6 мин
Количество просмотров 15K
В IT-инфраструктуре HOSTKEY для хранения учетных данных и контроля доступа традиционно использовался FreeIPA. Когда появилась необходимость управлять офисными компьютерами с Windows и оборудованием Cisco Systems, пришлось задуматься об интеграции с Active Directory. Рассказываем, как она была реализована в нашей локальной сети.
Для решения задачи можно интегрировать клиентов Linux непосредственно в домен Active Directory и управлять ими с контроллера домена. Второй вариант — интеграция, основанная на синхронизации данных или доверии домена (AD trust). В этом случае учетные записи пользователей с ранее определенными атрибутами реплицируются в другой службе каталогов и становятся доступными для клиентов на Linux.
Недостатки AD trust
Хотя на AD trust тратятся значительные ресурсы разработчиков, это решение имеет существенные минусы и подходит компаниям, инфраструктура которых изначально основана на Active Directory. Мы же работали с FreeIPA, поэтому внедрение требовало значительных трудозатрат: фактически всю систему управления учетными записями пользователей пришлось бы создавать заново.
Второй минус — необходимость постоянной поддержки серверов с AD и FreeIPA,так как при падении связи между ними сервер с FreeIPA становится бесполезен и нарушается работа всей компании. Авторизация — чувствительный участок, который должен быть максимально отказоустойчивым. AD trust в подобной ситуации — дополнительная точка отказа.
Плюсы и минусы Windows sync
Вариант с механизмом Windows sync из FreeIPA предполагает полную синхронизацию всех учетных данных по протоколу LDAP. При этом FreeIPA и Active Directory остаются автономными решениями, и в случае повреждения любого сервера откажут только подключенные к нему сервисы, а не вся инфраструктура. Пользователь работает через одно окно с FreeIPA: например, в нем можно изменить пароль учетной записи одновременно для основанной на Windows и на Linux инфраструктуре.
Мы остановились на этом варианте, но решили его доработать, поскольку Windows sync не предназначен для управления группами.
К сожалению, механизм синхронизации Windows sync во FreeIPA не считается приоритетным и не развивается, особенно в вопросах управления группами. Нам же группы были необходимы, чтобы организовать структуру персонала по отделам или в ином произвольном порядке. Такой подход позволяет прописывать правила и политики на группу, а не на каждого пользователя в отдельности, что значительно упрощает управление учетными записями и доступом к данным, а также доставку ПО. Другое преимущество групп — они могут быть вложенными.
Например, структура отдела DEVOPS у нас состоит из следующих подгрупп, для каждой из которых определены наборы прав и политик, а также необходимых для работы сервисов:
Созданную учетную запись сотрудника мы добавляем в определенную подгруппу, например в младших инженеров. В итоге новый пользователь оказывается в целом наборе групп: пользователи Rocket.Chat, Jira и т. д. Он автоматически получает доступ ко всем прописанным для подгруппы сервисам. Такую схему нетрудно построить и путем создания полностью аналогичных групп во FreeIPA и AD, но администрировать их придется вручную. Минусы очевидны: будет тратиться время на выполнение рутинных задач, а также (и это главное) возникнут потенциальные угрозы безопасности инфраструктуры. Например, простая смена прав доступа может привести к сбоям в производственном процессе из-за ошибок ручной настройки.
Решение
Нам была необходима автоматическая синхронизация, которую пришлось реализовать самостоятельно на основе module manage-freeipa. В итоге был написан скрипт, который получает информацию о группах во FreeIPA, включая вложенные подгруппы, и переносит ее в AD. Приводим пошаговое описание алгоритма:
1. Импорт модуля module manage-freeipa.
2. После импорта модуля мы подключаемся к серверу с помощью заранее добавленных учетных данных:
$IPAURL = "freeipa_URL"
$IPAUSER = "USER"
$IPAPASS = "PASSWORD"
$ADOUUSERS = "*OU=users,OU=ipa,DC=win,DC=EXAMPLE,DC=COM"
$ADOUGROUPS = "*OU=groups,OU=ipa,DC=win,DC=EXAMPLE,DC=COM"
3. Затем в AD запрашиваем список групп из OU:
$OU = Get-ADOrganizationalUnit -SearchBase "OU=groups,OU=ipa,DC=win,DC=EXAMPLE,DC=COM" -Filter *4. Фильтруем группу trust admins, которая не участвует в синхронизации данных между FreeIPA и AD:
$groupsAD = $OU | ForEach-Object {Get-ADGroup -SearchBase $_.DistinguishedName -Filter *} | Where {$_.name -notlike "trust admins"}5. Получаем список всех групп в FreeIPA, за исключением trust admins и групп, которые используются исключительно в управляемой FreeIPA инфраструктуре. Выбор осуществляется только по полю cn:
$groupsIPA = Find-IPAGroup | Where {$_.dn -notlike "cn=invapi*" -and $_.dn -notlike "cn=jira*" -and $_.dn -notlike "cn=trust admins*"} | Select-Object -Property cn6.Существует ряд групп, которые есть только в AD, мы ищем их и убираем из общего списка:
$groupsOnlyAD = $groupsAD.name | ?{$groupsIPA.cn -notcontains $_}
$listGroupsAD = $groupsAD.Name | ?{$groupsOnlyAD -notcontains $_}
7. Берем список из FreeIPA и отсекаем все группы, которые есть в AD. В итоге остается только список новых групп, которые есть в FreeIPA, но отсутствуют в AD:
$listAddGroups = $groupsIPA.cn | ?{$groupsAD.Name -notcontains $_}8. Далее идет команда на добавление этих групп в AD:
$listAddGroups | ForEach-Object {New-ADGroup $_ -path 'OU=groups,OU=ipa,DC=win,DC=EXAMPLE,DC=COM' -GroupScope Global -PassThru -Verbose}9. Затем идет цикл операций для каждой группы AD, которая есть в списке $ListGroupsAD.
9.1. Получаем список пользователей — участников группы в AD:
$listGroupsAD |
ForEach { $Groupname = $_
$listGroupMembersUsersAD = Get-ADGroupMember $Groupname | Where {$_.distinguishedName -like $ADOUUSERS} | select SamAccountName
9.2. Получаем список подгрупп участников группы в AD:
$listGroupMembersGroupsAD = Get-ADGroupMember $Groupname | Where {$_.distinguishedName -like $ADOUGROUPS} | select SamAccountName 9.3. Получаем список пользователей этой группы во FreeIPA:
$listGroupMemberUserIPA = Invoke-FreeIPAAPIgroup_show -group_name $Groupname | Select-Object -Property member_user9.4. Получаем список подгрупп этой группы во FreeIPA:
$listGroupMemberGroupIPA = Invoke-FreeIPAAPIgroup_show -group_name $Groupname | Select-Object -Property member_group9.5. Списки подгрупп и пользователей в FreeIPA и AD сравниваются (список пользователей FreeIPA вычитается из списка пользователей из AD и наоборот). Формируются списки пользователей и подгрупп на добавление и удаление:
$delListMembers = $listGroupMembersUsersAD.SamAccountName | ?{$listGroupMemberUserIPA.member_user -notcontains $_}
$delListGroups = $listGroupMembersGroupsAD.SamAccountName | ?{$listGroupMemberGroupIPA.member_group -notcontains $_}
$addListMembers = $listGroupMemberUserIPA.member_user| ?{$listGroupMembersUsersAD.SamAccountName -notcontains $_}
$addListGroups = $listGroupMemberGroupIPA.member_group | ?{$listGroupMembersGroupsAD.SamAccountName -notcontains $_}
9.6. Далее идет проверка, есть ли кто-то в списке на удаление пользователей и подгрупп: если никого нет, следующий шаг пропускается:
if (! ([string]::isnullorempty($delListMembers)))
{
$delListMembers | ForEach-Object {Remove-ADGroupMember $Groupname $_ -Confirm:$false}
}
if (! ([string]::isnullorempty($delListGroups)))
{
$delListGroups | ForEach-Object {Remove-ADGroupMember $Groupname $_ -Confirm:$false}
}
9.7. Такая же проверка выполняется на добавление пользователей и подгрупп:
if (! ([string]::isnullorempty($addListGroups))){
$addListGroups | ForEach-Object { Add-AdGroupMember -Identity $Groupname -members $_ }
}
if (! ([string]::isnullorempty($addListMembers)))
9.8. Перед добавлением пользователя в группу в AD необходимо проверить, есть ли он в AD. Весь цикл операций пункта 9 выполняется для каждой группы списка $listGroupsAD, полученного в пункте 6. После завершения происходит отключение сессии от сервера FreeIPA:
$addListMembers |
ForEach-Object { try
{
Get-ADUser -Identity $_
Add-AdGroupMember -Identity $Groupname -members $_
}
catch {}
}
}
}
Disconnect-IPA
Скрипт запускается планировщиком заданий каждые 15 минут.
Выводы
Скрипт значительно упростил управление учетными записями пользователей и введение новых сотрудников в рабочий процесс, а также повысил общую безопасность внутренней IT-инфраструктуры компании HOSTKEY. Дальше мы планируем настроить интеграцию FreeIPA с Active Directory напрямую через API без прокладки в виде module manage-freeipa. Это придется сделать по соображениям безопасности, поскольку последний раз модуль обновлялся два года назад. Существует риск, что он будет заброшен разработчиками.
А здесь можно прочесть, как реализовать проксирование административной панели FreeIPA через HAProxy.
А специальный промокод «Я С ХАБРА» откроет врата щедрости: назовите его консультанту на сайте при размещении заказа — и получите дополнительную скидку. Платить можно как всегда в рублях с НДС российской компании или в евро — компании в Нидерландах.
Contents
- 1 Windows authentication against FreeIPA
- 1.1 FreeIPA is not an Active Directory server
- 1.2 Configure FreeIPA
- 1.3 Configure Windows (ksetup)
Windows authentication against FreeIPA
This article describes direct integration between FreeIPA and Windows machine, i.e. without involving Active Directory server. This article does not apply to configurations where trust between AD and FreeIPA was established. Note also that the described configuration is not supported by FreeIPA development team and also is not supported by Red Hat Enterprise Linux Identity Management product. A work on making possible to login to Windows machines already enrolled into a trusted Active Directory forest is ongoing and is not available yet in any released FreeIPA version.
- If you already have AD we recommend using this system with AD and using trusts between AD and IPA.
- If you do not have AD then use Samba 4 instead of it. As of Samba 4.3, Samba AD can establish cross-realm trusts. The feature is still incomplete and lacks proper access controls but it can be configured to trust FreeIPA.
- If neither of the two options work for you you can configure Windows system to work directly with IPA as described below. It is an option of last resort because IPA does not provide the services windows client expects and FreeIPA development team does not support this mode. If this is good enough for you, fine by us.
- Build a native Windows client (cred provider) for IPA using latest Kerberos. This would be really useful if someone does that because we don’t have capacity to not build this ourselves. With the native OTP support in IPA it becomes a real business opportunity to provide a native 2FA inside enterprise across multiple platforms. But please do it open source way otherwise we would not recommend you
FreeIPA is not an Active Directory server
FreeIPA is not a re-implementation of Microsoft Active Directory. FreeIPA is focused on Linux (and other standards compliant) systems.
For this reason FreeIPA without configured AD trust can provide only authentication service for Windows hosts (via standard Kerberos protocol). FreeIPA can’t provide account database for Windows hosts in the same way as AD does. You have to create local Windows account and appropriate account mapping for each user if you select direct Windows<=>FreeIPA integration. (This limitation doesn’t apply if you use AD trust.)
Project pGina could help you to overcome some limitations.
Configure FreeIPA
1. Create the host principal in the web interface
2. Create IPA users to correspond to Windows users
3. Reset the user's IPA password to a known password using the web interface or CLI,
   the user will be prompted to change at first log in.
4. On the IPA server run
 ipa-getkeytab -s [kdc DNS name]
               -p host/[machine-name]
               -e  arcfour-hmac
               -k krb5.keytab.[machine-name]
               -P
 At the prompt enter a random MACHINE_PASSWORD
 (you will enter this later on the windows machine too).
 Note: you can change the -e argument to include also
 AES enctypes from FreeIPA 2.1.4 and higher. (FreeIPA ticket 2038)
 Note: Windows machines names cannot exceed 15 characters
  -- pointed out by Han Boetes on 2013-01-03 on freeipa-users mailing list
Configure Windows (ksetup)
1. ksetup /setdomain [REALM NAME]
2. ksetup /addkdc [REALM NAME] [kdc DNS name]
3. ksetup /addkpasswd [REALM NAME] [kdc DNS name]
4. ksetup /setcomputerpassword [MACHINE_PASSWORD] (the one used above)
5. ksetup /mapuser * *
6. Run gpedit.msc, open the key called:
 "Network Security: Configure encryption types allowed for Kerberos”
 under:
   Computer Configuration
     Windows Settings
       Security Settings
         Local Policies
           Security Options
 and deselect everything except RC4_HMAC_MD5
7. *** REBOOT ***
8. Add local user accounts for all users that need to be able to log in.
9. Log in as [user]@[REALM] with the initial password, you will be prompted
to change the password then logged in.
Note: Configuring encryption types is not needed from FreeIPA 2.1.4 and higher. (FreeIPA ticket 2038)
The FreeIPA team thanks ‘Jimmy’ for providing this information on the freeipa-users mailing list. See mailing list archives for the original text. Several amendments were made.
Предполагается, что у вас уже есть IPA домен, готовый к использованию. В этом примере IPA устанавливается в домен ipa.test.
IPA будет предоставлять услугу аутентификации для клиента Windows с помощью Kerberos. IPA не может поддерживать базу данных учетных записей для компьютеров Windows таким же образом, что и Active Directory, поэтому нам по-прежнему необходимо создавать локальные учетные записи Windows для каждого пользователя на компьютере под управлением Windows, хотя у них не будет паролей, установленных в Windows.
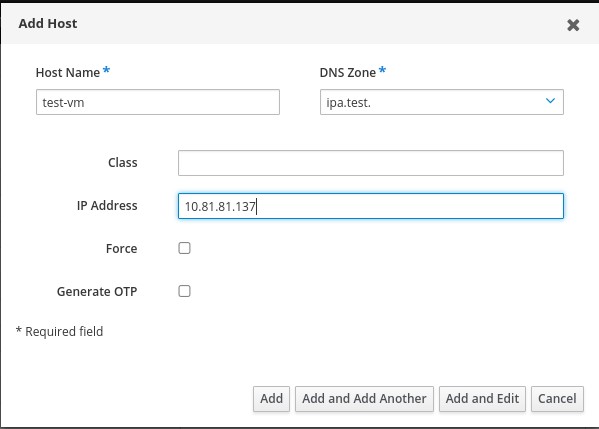
Войдите в IPA и на вкладке Identity, выберите Hosts. Нажмите кнопку +Add, чтобы создать новый хост.
Введите имя хоста компьютера Windows, в примере — «test-vm». Укажите DNS зону.
Далее на сервере IPA нужно запустить команду ipa-getkeytab для создания файла keytab для созданного хоста. Чтобы выполнять административные задачи на сервере IPA, сначала нужно аутентифицироваться, делается это с помощью команды kinit, укажите пользователя admin, как показано ниже.
[ root @ ipa ~] # kinit admin

Password for admin@IPA.TEST :
Затем вы можете запустить команду «klist», чтобы проверить, что у вас есть действительный билет керберос.
Нужно выполнить команду ipa-getkeytab, как показано ниже.
[root@ipa~] # ipa-getkeytab -s dc.ipa.test -p host/test-vm.ipa.test -e arcfour-hmac -k krb5.keytab.windows -P
New Principal Password:
Verify Principal Password:
Keytab successfully retrieved and stored in: krb5.keytab.windows
-s используется для указания IPA-сервера, в примере dc.ipa.test
-p используется для указания главного имени хоста, которым в примере является «host/», за которым следует полное доменное имя (FQDN) компьютера Windows, которое мы добавили через веб-интерфейс IPA ранее.
-e используется для указания типа шифрования, используемого для генерации ключей, здесь мы используем arcfour-hmac.
-k используется для указания файла keytab, который мы хотим создать, в этом случае файл krb5.keytab.windows будет создан в текущем рабочем каталоге.
-P используется для указания пароля для ключа, вам нужно будет запомнить его, поскольку мы войдем на компьютер с Windows позже.
Если вы получите сообщение об ошибке » Kerberos user principal could not be found. Do you have a valid credential cache?» Убедитесь, что вы успешно выполнили команду «kinit».
Необходимо, чтобы компьютер с ОС Windows разрешал имя сервера IPA с помощью DNS, поэтому убедитесь, что он имеет соответствующую конфигурацию DNS. В примере IPA-сервер управляет DNS зонами, по этому Windows-машина использует IPA в качестве DNS сервера.
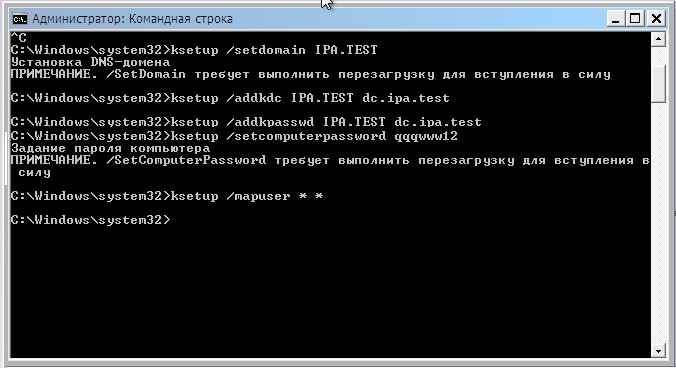
На компьютере Windows откройте командную строку от имени администратора и выполните приведенные ниже команды. Обратите внимание, что Realm должен быть указан заглавными буквами. В примере REALM – IPA.TEST, KDC — IPA-сервер dc.ipa.test
ksetup /setdomain [REALM]
ksetup /addkdc [REALM] [KDC]
ksetup /addkpasswd [REALM] [KDC]
ksetup /setcomputerpassword [ПАРОЛЬ]
ksetup /mapuser * *
Обратите внимание, что вышеприведенный пароль является паролем, который был установлен ранее в веб-интерфейсе IPA. Команда mapuser отразит все учетные записи в области Kerberos IPA.TEST в любую существующую учетную запись с таким же именем на этом компьютере под управлением Windows.
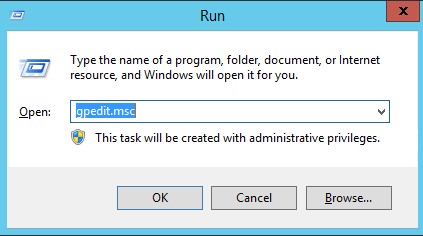
Затем нажмите клавишу Windows + R, чтобы открыть окно «Выполнить», введите gpedit.msc и выберите «ОК».
Это откроет редактор локальной групповой политики.
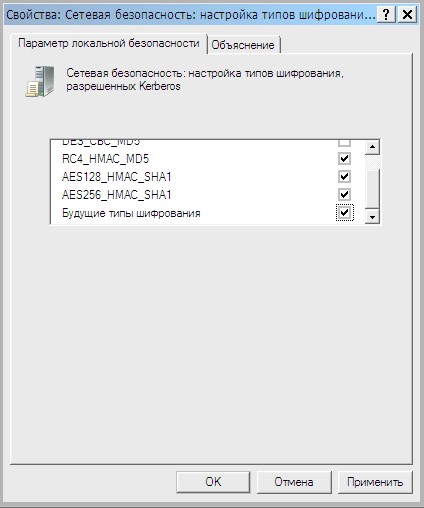
В разделе «Параметры конфигурации компьютера» выберите «Конфигурация Windows»> «Параметры безопасности»> «Локальные политики»> «Параметры безопасности»> «Сетевая безопасность настройка типов шифрования, разрешенных Kerberos.
В этом случае мы выберем все, кроме первых двух параметров DES. Выберите «Применить» или «ОК», чтобы сохранить изменения.
Перезагрузите компьютер Windows, чтобы применить изменения ksetup.
Создайте локальную учетную запись пользователя с именем пользователя IPA. Пароль задавать не нужно..
Вы можете создать локальную учетную запись пользователя, нажав клавишу Windows + R, чтобы открыть окно «Выполнить», и введите «mmc», затем нажмите «ОК».
В открывшемся MMC, выберите «Файл»> «Добавить или удалить оснастку».
В следующем окне выберите «Локальные пользователи и группы», затем нажмите кнопку «Добавить», затем «Готово», затем «ОК». Отсюда вы можете создавать свои локальные учетные записи пользователей в Windows. Помните, что не нужно добавлять пароли. Имя пользователя также должно совпадать с именем пользователя, которое существует в IPA.
Настройка удаленного рабочего стола
По умолчанию новая учетная запись пользователя не сможет подключаться по удаленному рабочему столу. Находясь в оснастке «Локальные пользователи и группы» добавьте созданного пользователя в группу «пользователи удаленного рабочего стола»
Вот и все, теперь вы можете войти в Windows с этой учетной записью. Вам нужно будет указать имя пользователя @REALM для входа в систему, поэтому, если вы будете следовать этому примеру, используйте win-test@IPA.TEST.
Если вы нашли ошибку, пожалуйста, выделите текст и нажмите Ctrl+Enter.
In most cases Windows desktops or servers will typically be joined to a Windows domain controller running Microsoft’s Active Directory, however this is not the only option.
It is possible to join Windows to a FreeIPA realm and then log into the Windows computer with an account from FreeIPA as it makes use of Kerberos for single sign on (SSO). FreeIPA is an open-source project sponsored by Red Hat, which attempts to provide similar functionality to Active Directory for Linux and Unix systems.
This may be a good option if you already run a large Linux or Unix environment, but need to have a small amount of Windows servers capable of using the same centrally managed user accounts.
We are assuming that you already have FreeIPA set up and ready to use. We will only be detailing how to configure the Windows operating system to join an existing Kerberos realm. In this example FreeIPA is setup on the example.com domain.
FreeIPA will only be providing the authentication service for our Windows server here with Kerberos. FreeIPA is not able to maintain an account database for Windows computers in the same manner that Active Directory does, so we therefore still need to create local Windows accounts for each user on the Windows computer, although they will have no passwords set in Windows.
Configure FreeIPA
Log into FreeIPA and under Identity, select Hosts. Click the +Add button to create a new host.
In this instance the hostname of our Windows computer is ‘windows’, we also specify the DNS domain afterwards. As FreeIPA is managing DNS for me, this is prefilled. if you are not using FreeIPA to manage DNS then you may need to manually enter the domain name.
Next on the FreeIPA server we need to run the ipa-getkeytab command to generate a keytab file for the Windows computer. In order to perform administrative tasks on the IPA server we must first authenticate, we do this with the kinit command and specify the IPA admin user, as shown below.
[[email protected] ~]# kinit admin
Password for [email protected]:
You can run the ‘klist’ command afterwards to check that you have a valid ticket.
Now we can run the ipa-getkeytab command as shown below. The -s option is used to specify the IPA server, which in this example is ipa.example.com – the server we are running this command on. The -p option is used to specify the principal-name of the host, which in this case is ‘host/’ followed by the fully qualified domain name (FQDN) of the Windows computer that we added through the FreeIPA web interface previously. The -e option is used to specify the encryption type used to generate the keys, here we’re using arcfour-hmac. The -k option is used to specify the keytab file that we want to create, in this case the file krb5.keytab.windows will be made in the current working directory. Finally the -P option is used to specify the password for the key, you will need to remember this as we will enter it on the Windows computer later.
[[email protected] ~]# ipa-getkeytab -s ipa.example.com -p host/windows.example.com -e arcfour-hmac -k krb5.keytab.windows -P
New Principal Password:
Verify Principal Password:
Keytab successfully retrieved and stored in: krb5.keytab.windows
If you get the error message “Kerberos User Principal not found. Do you have a valid Credential Cache?” be sure that you successfully ran the ‘kinit’ command.
Configure Windows
The Windows computer will need to be able to resolve the name of the IPA server with DNS, so ensure that Windows has appropriate DNS configuration for this. As my FreeIPA server is managing DNS, I have simply set the Windows machine to use FreeIPA for DNS.
On the Windows computer, open command prompt as administrator and run the below commands. Note that the Realm must be specified in capital letters, as this is the custom for realm names in Linux/Unix. In my example the realm is EXAMPLE.COM and the key distribution center (KDC) is the FreeIPA server, which for me is ipa.example.com
ksetup /setdomain [REALM]
ksetup /addkdc [REALM] [KDC]
ksetup /addkpasswd [REALM] [KDC]
ksetup /setcomputerpassword [PASSWORD]
ksetup /mapuser * *
Note that the Password above is the one that we set in the FreeIPA web interface for the host principal earlier. The /mapuser command will map all accounts within the EXAMPLE.COM Kerberos realm to any existing account of the same name on this Windows computer.
These changes will require a reboot, as you will be advised, hold off on this for now.
Next press the Windows key + R to open the Run window, type gpedit.msc and select OK. This will open up the Local Group Policy Editor for the machine.
From the Computer Configuration options, select Windows Settings > Security Settings > Local Policies > Security Options > Network Security: Configure encryption types allowed for Kerberos.
In this instance we will select everything except for the first two DES options. The official FreeIPA documentation claims to only require RC4_HMAC_MD5 selected, but I received an error regarding supported encryption types with only this enabled. Select Apply or OK to save the changes.
Once this is complete, reboot the Windows machine to apply the ksetup changes from earlier.
When the Windows machine is back up, create a local user account that maps to a user that exists in FreeIPA. In my example I have a user called ‘test’ that was created in the FreeIPA web interface, so I will create a user with the username of test in Windows. You do NOT need to set a password on this user account in Windows, as authentication will be handled by FreeIPA.
You can create a local user account by pressing the Windows key + R to open the Run window, and enter ‘mmc’ then select OK.
Once the MMC window opens, select File > Add/Remove Snap-in…
From the next window, select Local Users and Groups, then click the “Add >” button, followed by Finish, then OK. From here you can create your local user accounts in Windows. Remember, we do NOT want to add any passwords to these. The username also needs to match the username that exists in FreeIPA.
Configure Remote Desktop
By default a fresh user account will not be able to connect via remote desktop unless it has been given permission to do so. While you still have the Local Users and Groups console open through MMC, go to Groups and select the Remote Desktop Users group and add your user account that was just created to this group.
Before performing the first login, you’ll want to temporarily disable remote desktops Network Level Authentication (NLA) on the Windows server otherwise you will receive an error about NLA failing to contact a Windows domain controller on first login. This only seems to happen when logging into an account for the first time with an expired password that requires changing. Once the password has been set and is no longer in an expired state, logging in with NLA will work fine.
That’s it, you should now be able to log into Windows with this account. You will need to specify [email protected] to login, so if you’ve been following this example I’ll be using [email protected] Don’t forget that the realm name must be in caps. Also by default when you create a new user account in FreeIPA the password will be in the expired state and will need to be changed on first login, as shown below.
By doing this we no longer need to access this singular Windows server with local user accounts, we can now access it with our accounts in the FreeIPA Kerberos realm. Granted we still have to create a local account on the Windows computer initially, however the authentication is handled centrally on the FreeIPA server using Kerberos, no passwords are stored on the Windows machine which can make credential management easier.
Troubleshooting
I had all sorts of different problems along the way while originally setting this up, so I have documented them all here along with associated solutions. In most cases the steps above should “just work”. Hopefully these solutions are useful, as most of these errors came from the Windows server, and of course when you perform a Google search for those errors you get solutions for fixing the problems in Windows, rather than answers relating to FreeIPA.
- There are currently no logon servers available to service the logon request.
For me this was due to a lack of DNS on the Windows server. The Windows server was not pointing to a DNS server that had the required records for FreeIPA. As I have set my FreeIPA server itself to provide DNS, the fix here was to simply use the FreeIPA server for DNS.If your instance of FreeIPA is not configured to manage DNS, it can be added on by installing the ipa-server-dns package. To set it up, run the ‘ipa-dns-install’ command and follow the prompts. As I was setting this up to manage DNS for the domain example.com, I received the below error message.
2016-12-29T04:27:00Z DEBUG The ipa-dns-install command failed, exception: ValueError: DNS zone example.com. already exists in DNS and is handled by server(s): a.iana-servers.net., b.iana-servers.net.
This was simply because DNS for the example.com domain exists out there on the Internet already. I temporarily changed the /etc/resolv.conf file to point to the FreeIPA server itself rather than an external DNS server and then ran ipa-dns-install again. During this process you can specify an external forwarder to use. If you already have some other DNS server that handles the records for your Kerberos realm, you’ll likely want to use this instead of configuring FreeIPA to manage DNS.
- The encryption type requested is not supported by the KDC.
When I attempted to Windows connect via remote desktop, I was asked to change my expired password. This is expected, as it is required for all new accounts created in FreeIPA by default. After entering my new password, I received the error “The encryption type requested is not supported by the KDC.” This was because originally in Windows I did not enable enough encryption types, with all selected except for the first two DES options as mentioned previously I was able to log in without further problems. Scroll up a little bit and take a loon at the section where we configured this. - preauth (encrypted_timestamp) verify failure: Decrypt integrity check failed.
When trying to log in through remote desktop, I received some generic message about the login failing. Only when I checked the /var/log/krb5kdc.log file on the FreeIPA server did this make sense.
Dec 28 20:44:14 ipa.example.com krb5kdc[44951](info): AS_REQ (7 etypes {18 17 23 3 1 24 -135}) 192.168.1.12: NEEDED_PREAUTH: [email protected] for kadmin/[email protected], Additional pre-authentication required
Dec 28 20:44:14 ipa.example.com krb5kdc[44950](info): preauth (encrypted_timestamp) verify failure: Decrypt integrity check failed
Dec 28 20:44:14 ipa.example.com krb5kdc[44950](info): AS_REQ (7 etypes {18 17 23 3 1 24 -135}) 192.168.1.12: PREAUTH_FAILED: [email protected] for kadmin/[email protected], Decrypt integrity check failed
If you know anything about Kerberos, you’ll know that it’s important for all servers to maintain the same time. In this case, my Windows server was in my local timezone of AEDT, but the FreeIPA server was in PST. I was able to resolve this by setting the timezone on the FreeIPA server with the below command so that it matched the time of the Windows server.
[[email protected] log]# date
Wed Dec 28 20:45:04 PST 2016
[[email protected] log]# timedatectl set-timezone Australia/Sydney
[[email protected] log]# date
Thu Dec 29 15:46:29 AEDT 2016
I suggest our guide on configuring NTP in Linux if you need further assistance with this.
This one was fairly straightforward, after many login attempts while performing troubleshooting I locked out the account in FreeIPA. The /var/log/krb5kdc.log file on the FreeIPA server showed:
Dec 29 15:46:39 ipa.example.com krb5kdc[44950](info): AS_REQ (7 etypes {18 17 23 3 1 24 -135}) 192.168.1.12: CLIENT KEY EXPIRED: [email protected] for krbtgt/[email protected], Password has expired
Dec 29 15:46:49 ipa.example.com krb5kdc[44951](info): AS_REQ (7 etypes {18 17 23 3 1 24 -135}) 192.168.1.12: LOCKED_OUT: [email protected] for kadmin/[email protected], Clients credentials have been revoked
While attempting to set a new password on first login with a new account, I was not choosing a strong enough password as per my FreeIPA password policy. This resulted in the below error message in the /var/log/kadmind.log file on the FreeIPA server. The solution was of course to use a stronger password.
Dec 29 15:54:58 ipa.example.com kadmind[44955](Error): password quality module empty rejected password for [email protected]: Empty passwords are not allowed
Dec 29 15:54:58 ipa.example.com kadmind[44955](Notice): chpw request from 192.168.1.12 for [email protected]: Password is too short
I’m not exactly sure how I fixed this, basically the below is what showed in the /var/log/krb5kdc.log file on the FreeIPA server when the Windows server reported this error.
Dec 29 15:55:16 ipa.example.com krb5kdc[44951](info): AS_REQ (7 etypes {18 17 23 3 1 24 -135}) 192.168.1.12: NEEDED_PREAUTH: [email protected] for krbtgt/[email protected], Additional pre-authentication required
Dec 29 15:55:16 ipa.example.com krb5kdc[44951](info): AS_REQ (7 etypes {18 17 23 3 1 24 -135}) 192.168.1.12: ISSUE: authtime 1482987316, etypes {rep=18 tkt=18 ses=18}, [email protected] for krbtgt/[email protected]
Dec 29 15:55:16 ipa.example.com krb5kdc[44951](info): TGS_REQ (7 etypes {18 17 23 3 1 24 -135}) 192.168.1.12: UNKNOWN_SERVER: authtime 0,  [email protected] for krbtgt/[email protected], Server not found in Kerberos database
Basically I reran the ksetup commands mentioned above, performed the reboot again, and everything was fine, so it’s possible I had some sort of typo the first time around or that my DNS was not properly configured the first time I ran through the ksetup commands. Other things to check would be that the host principal in FreeIPA correctly matches the hostname of the Windows server and the value specified in the -p option when running ipa-getkeytab.
The solution, as advised, is to disable NLA on the Windows computer. This will fail as there is no Windows domain controller to contact as we’re using FreeIPA. I have found that this is only a problem when connecting with remote desktop with a new account for the first time. After the first login and the expired password for the account has been reset, turning NLA back on seems to work without issue. Note that leaving NLA on may be problematic in the future when an accounts password expires. As long as you change the password on some other Linux server or directly in FreeIPA itself this should not be a problem and you should be fine to leave NLA enabled.
For any other connectivity issues, I’d recommend confirming the firewall on your FreeIPA server is allowing the necessary ports through from the Windows server. There are a fair amount of ports required for everything to work nicely, if in doubt you can try temporarily disabling your firewall and testing again as this should either confirm or deny whether or not the firewall was the issue. If it was, simply check the firewall logs and view the traffic that is being dropped, or better yet just do this rather than temporarily reducing your security by disabling the firewall.
Summary
To get the full features that Microsoft Windows offers, it is recommended that you join the Windows machine to an Active Directory domain. However if this is not practical due to a small number of Windows machines in your environment, it is possible to perform the steps above in order to log into Windows using user credentials from FreeIPA by using Kerberos, providing us with single sign on.
While that sounds good in theory this solution can often be difficult to get working correctly, as you have seen in the troubleshooting section above I had my fair share of random errors during the setup process.
В IT-инфраструктуре HOSTKEY для хранения учетных данных и контроля доступа традиционно использовался FreeIPA. Когда появилась необходимость управлять офисными компьютерами с Windows и оборудованием Cisco Systems, пришлось задуматься об интеграции с Active Directory. Рассказываем, как она была реализована в нашей локальной сети.
Для решения задачи можно интегрировать клиентов Linux непосредственно в домен Active Directory и управлять ими с контроллера домена. Второй вариант — интеграция, основанная на синхронизации данных или доверии домена (AD trust). В этом случае учетные записи пользователей с ранее определенными атрибутами реплицируются в другой службе каталогов и становятся доступными для клиентов на Linux.
Недостатки AD trust
Хотя на AD trust тратятся значительные ресурсы разработчиков, это решение имеет существенные минусы и подходит компаниям, инфраструктура которых изначально основана на Active Directory. Мы же работали с FreeIPA, поэтому внедрение требовало значительных трудозатрат: фактически всю систему управления учетными записями пользователей пришлось бы создавать заново.
Второй минус — необходимость постоянной поддержки серверов с AD и FreeIPA,так как при падении связи между ними сервер с FreeIPA становится бесполезен и нарушается работа всей компании. Авторизация — чувствительный участок, который должен быть максимально отказоустойчивым. AD trust в подобной ситуации — дополнительная точка отказа.
Плюсы и минусы Windows sync
Вариант с механизмом Windows sync из FreeIPA предполагает полную синхронизацию всех учетных данных по протоколу LDAP. При этом FreeIPA и Active Directory остаются автономными решениями, и в случае повреждения любого сервера откажут только подключенные к нему сервисы, а не вся инфраструктура. Пользователь работает через одно окно с FreeIPA: например, в нем можно изменить пароль учетной записи одновременно для основанной на Windows и на Linux инфраструктуре.
Мы остановились на этом варианте, но решили его доработать, поскольку Windows sync не предназначен для управления группами.
К сожалению, механизм синхронизации Windows sync во FreeIPA не считается приоритетным и не развивается, особенно в вопросах управления группами. Нам же группы были необходимы, чтобы организовать структуру персонала по отделам или в ином произвольном порядке. Такой подход позволяет прописывать правила и политики на группу, а не на каждого пользователя в отдельности, что значительно упрощает управление учетными записями и доступом к данным, а также доставку ПО. Другое преимущество групп — они могут быть вложенными.
Например, структура отдела DEVOPS у нас состоит из следующих подгрупп, для каждой из которых определены наборы прав и политик, а также необходимых для работы сервисов:
Созданную учетную запись сотрудника мы добавляем в определенную подгруппу, например в младших инженеров. В итоге новый пользователь оказывается в целом наборе групп: пользователи Rocket.Chat, Jira и т. д. Он автоматически получает доступ ко всем прописанным для подгруппы сервисам. Такую схему нетрудно построить и путем создания полностью аналогичных групп во FreeIPA и AD, но администрировать их придется вручную. Минусы очевидны: будет тратиться время на выполнение рутинных задач, а также (и это главное) возникнут потенциальные угрозы безопасности инфраструктуры. Например, простая смена прав доступа может привести к сбоям в производственном процессе из-за ошибок ручной настройки.
Решение
Нам была необходима автоматическая синхронизация, которую пришлось реализовать самостоятельно на основе module manage-freeipa. В итоге был написан скрипт, который получает информацию о группах во FreeIPA, включая вложенные подгруппы, и переносит ее в AD. Приводим пошаговое описание алгоритма:
1. Импорт модуля module manage-freeipa.
2. После импорта модуля мы подключаемся к серверу с помощью заранее добавленных учетных данных:
$IPAURL = "freeipa_URL"
$IPAUSER = "USER"
$IPAPASS = "PASSWORD"
$ADOUUSERS = "*OU=users,OU=ipa,DC=win,DC=EXAMPLE,DC=COM"
$ADOUGROUPS = "*OU=groups,OU=ipa,DC=win,DC=EXAMPLE,DC=COM"
3. Затем в AD запрашиваем список групп из OU:
$OU = Get-ADOrganizationalUnit -SearchBase "OU=groups,OU=ipa,DC=win,DC=EXAMPLE,DC=COM" -Filter *4. Фильтруем группу trust admins, которая не участвует в синхронизации данных между FreeIPA и AD:
$groupsAD = $OU | ForEach-Object {Get-ADGroup -SearchBase $_.DistinguishedName -Filter *} | Where {$_.name -notlike "trust admins"}5. Получаем список всех групп в FreeIPA, за исключением trust admins и групп, которые используются исключительно в управляемой FreeIPA инфраструктуре. Выбор осуществляется только по полю cn:
$groupsIPA = Find-IPAGroup | Where {$_.dn -notlike "cn=invapi*" -and $_.dn -notlike "cn=jira*" -and $_.dn -notlike "cn=trust admins*"} | Select-Object -Property cn6.Существует ряд групп, которые есть только в AD, мы ищем их и убираем из общего списка:
$groupsOnlyAD = $groupsAD.name | ?{$groupsIPA.cn -notcontains $_}
$listGroupsAD = $groupsAD.Name | ?{$groupsOnlyAD -notcontains $_}
7. Берем список из FreeIPA и отсекаем все группы, которые есть в AD. В итоге остается только список новых групп, которые есть в FreeIPA, но отсутствуют в AD:
$listAddGroups = $groupsIPA.cn | ?{$groupsAD.Name -notcontains $_}8. Далее идет команда на добавление этих групп в AD:
$listAddGroups | ForEach-Object {New-ADGroup $_ -path 'OU=groups,OU=ipa,DC=win,DC=EXAMPLE,DC=COM' -GroupScope Global -PassThru -Verbose}9. Затем идет цикл операций для каждой группы AD, которая есть в списке $ListGroupsAD.
9.1. Получаем список пользователей — участников группы в AD:
$listGroupsAD |
ForEach { $Groupname = $_
$listGroupMembersUsersAD = Get-ADGroupMember $Groupname | Where {$_.distinguishedName -like $ADOUUSERS} | select SamAccountName
9.2. Получаем список подгрупп участников группы в AD:
$listGroupMembersGroupsAD = Get-ADGroupMember $Groupname | Where {$_.distinguishedName -like $ADOUGROUPS} | select SamAccountName 9.3. Получаем список пользователей этой группы во FreeIPA:
$listGroupMemberUserIPA = Invoke-FreeIPAAPIgroup_show -group_name $Groupname | Select-Object -Property member_user9.4. Получаем список подгрупп этой группы во FreeIPA:
$listGroupMemberGroupIPA = Invoke-FreeIPAAPIgroup_show -group_name $Groupname | Select-Object -Property member_group9.5. Списки подгрупп и пользователей в FreeIPA и AD сравниваются (список пользователей FreeIPA вычитается из списка пользователей из AD и наоборот). Формируются списки пользователей и подгрупп на добавление и удаление:
$delListMembers = $listGroupMembersUsersAD.SamAccountName | ?{$listGroupMemberUserIPA.member_user -notcontains $_}
$delListGroups = $listGroupMembersGroupsAD.SamAccountName | ?{$listGroupMemberGroupIPA.member_group -notcontains $_}
$addListMembers = $listGroupMemberUserIPA.member_user| ?{$listGroupMembersUsersAD.SamAccountName -notcontains $_}
$addListGroups = $listGroupMemberGroupIPA.member_group | ?{$listGroupMembersGroupsAD.SamAccountName -notcontains $_}
9.6. Далее идет проверка, есть ли кто-то в списке на удаление пользователей и подгрупп: если никого нет, следующий шаг пропускается:
if (! ([string]::isnullorempty($delListMembers)))
{
$delListMembers | ForEach-Object {Remove-ADGroupMember $Groupname $_ -Confirm:$false}
}
if (! ([string]::isnullorempty($delListGroups)))
{
$delListGroups | ForEach-Object {Remove-ADGroupMember $Groupname $_ -Confirm:$false}
}
9.7. Такая же проверка выполняется на добавление пользователей и подгрупп:
if (! ([string]::isnullorempty($addListGroups))){
$addListGroups | ForEach-Object { Add-AdGroupMember -Identity $Groupname -members $_ }
}
if (! ([string]::isnullorempty($addListMembers)))
9.8. Перед добавлением пользователя в группу в AD необходимо проверить, есть ли он в AD. Весь цикл операций пункта 9 выполняется для каждой группы списка $listGroupsAD, полученного в пункте 6. После завершения происходит отключение сессии от сервера FreeIPA:
$addListMembers |
ForEach-Object { try
{
Get-ADUser -Identity $_
Add-AdGroupMember -Identity $Groupname -members $_
}
catch {}
}
}
}
Disconnect-IPA
Скрипт запускается планировщиком заданий каждые 15 минут.
Выводы
Скрипт значительно упростил управление учетными записями пользователей и введение новых сотрудников в рабочий процесс, а также повысил общую безопасность внутренней IT-инфраструктуры компании HOSTKEY. Дальше мы планируем настроить интеграцию FreeIPA с Active Directory напрямую через API без прокладки в виде module manage-freeipa. Это придется сделать по соображениям безопасности, поскольку последний раз модуль обновлялся два года назад. Существует риск, что он будет заброшен разработчиками.
А здесь можно прочесть, как реализовать проксирование административной панели FreeIPA через HAProxy.
А специальный промокод «Я С ХАБРА» откроет врата щедрости: назовите его консультанту на сайте при размещении заказа — и получите дополнительную скидку. Платить можно как всегда в рублях с НДС российской компании или в евро — компании в Нидерландах.
2017-12-01 14:44:49 7805 2
Существует возможность добавления Windows машин в домен Freeipa и последующая авторизация а них с помощью доменных аккаунтов с импользованием протокола Kerberos. Freeipa это проект с открытым исходныи кодом, спонсируемый RedHat, который старается предоставить аналогичную с доменом Active Directory функциональность, только для Linux и Unix систем.
Настройку сервера Freeipa мы рассматривали в статьях ранее.
Для настройки будет испоьзоваться настроенный ранее сервер Freeipa на операционный системе CentOs7 с именем freeipa.test.un и машина Windows 7 с именем test-windows.
Настройка сервера Freeipa
С помощью веб-интерфейса Freeipa созданим новый узел в домене
Identity->Узлы(Hosts)->+Добавить(+Add):

Автоматически будет добавлена A-запись в интегрированный DNS сервер домена Freeipa
Теперь необходимо сгенерировать keytab файл для Windows машины
Получаем билет Kerberos для админа:
kinit admin
Вводим пароль пользователя admin:
Password for admin@TEST.UN:
Проверяем полученный билет:
klist
Ticket cache: KEYRING:persistent:0:0
Default principal: admin@TEST.UN

Valid starting       Expires              Service principal
29.11.2017 10:20:35  30.11.2017 10:20:32  krbtgt/TEST.UN@TEST.UN
Генерируем файл keytab:
ipa-getkeytab -s freeipa.test.un -p host/test-windows.test.un
-e arcfour-hmac -k krb5.keytab.test-windows.test.un -P
Создаем пароль для доступа к файлу keytab
New Principal Password:
Verify Principal Password:
Keytab successfully retrieved and stored in: krb5.keytab.test-windows.test.un
Настройка Windows
На Windows машине в качестве DNS сервера должен быть указан DNS сервер домена Freeipa
Открываем командную строку и вводим следующие команды (Имя области должно быть в верхнем регистре):
ksetup /setdomain TEST.UN
ksetup /addkdc TEST.UN freeipa.test.un
ksetup /addkpasswd TEST.UN freeipa.test.un
ksetup /setcomputerpassword *password* - пароль который указан при создании keytab
ksetup /mapuser * *
Теперь добавляем локальных пользователей на Windows машине у которых логин совпадает с логинами в домене Freeipa. Под этимм пользователями можно будет логиниться на машину и получать доступ к сервисам домена, аутентификацию они будут проходить в домене.

После этого перезагружаем машину и пытаемся залогиниться под учеткой из домена Freeipa.
Для входа указываем логи пользователя и домен в верхнем регистре «admin@TEST.UN»

| Данная страница находится в разработке. Эта страница ещё не закончена. Информация, представленная здесь, может оказаться неполной или неверной. |
Примечание: В примере для создания доверительных отношений будут использоваться следующие данные:
- Домен FreeIPA — example.test
- Сервер FreeIPA — ipa.example.test (192.168.0.113)
- NetBIOS имя IPA домена: EXAMPLE
- Домен AD — test.alt
- Сервер AD — dc1.test.alt (192.168.0.122)
- NetBIOS имя AD домена: TEST
FreeIPA использует Samba для интеграции в Active Directory. Для работы Samba необходим работающий стек IPv6.
Настройка DNS
Перед подключением FreeIPA и Active Directory (AD) к доверию необходимо убедиться, что серверы видят друг друга и правильно разрешают доменные имена. В этом сценарии описывается настройка DNS для разрешения доменных имен между:
- основной сервер FreeIPA, использующий интегрированный сервер DNS и CA;
- контроллер домена AD.
Для настройки DNS необходимо:
- настроить зоны DNS на сервере FreeIPA;
- настроить условную переадресацию DNS в AD;
- проверить правильности конфигурации DNS.
Настройка зоны перенаправления DNS на сервере FreeIPA
С помощью зон перенаправления DNS (forward zone) DNS-запросы для определенной зоны можно перенаправлять на другой DNS-сервер. Например, можно перенаправлять DNS-запросы для домена AD на DNS-сервер AD.
Настройка зоны перенаправления в веб-интерфейсе FreeIPA:
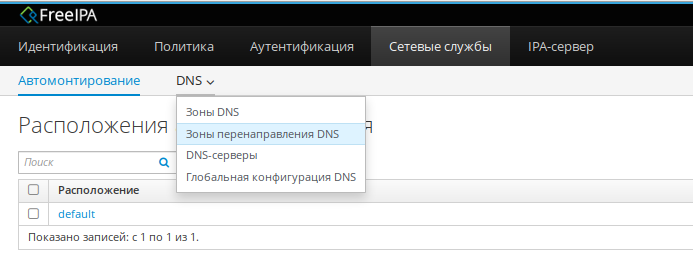
- Перейти на вкладку «Сетевые службы».
- В выпадающем меню выбрать «DNS» «Зоны перенаправления DNS»:
- Нажать кнопку «Добавить».
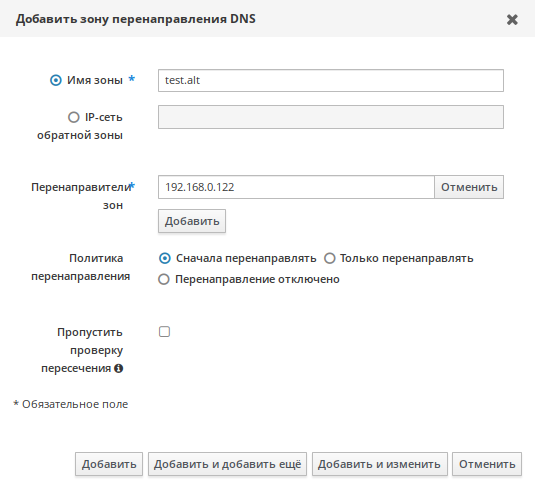
- В диалоговом окне «Добавить зону перенаправления DNS» добавить имя зоны.
- В строке «Перенаправители зон» нажать кнопку «Добавить».
- В поле «Перенаправители зон» добавить IP-адрес сервера, для которого создается новая зона перенаправления:
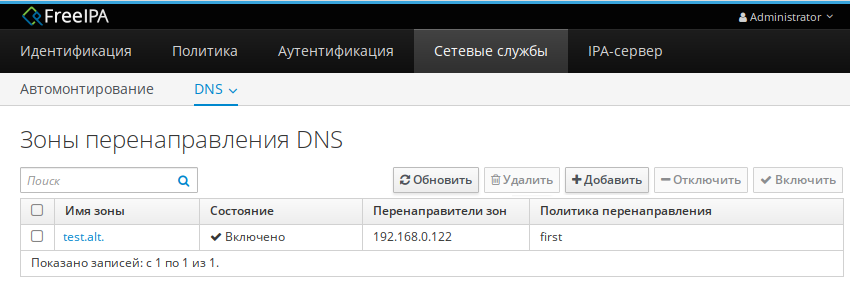
- Нажать кнопку «Добавить». Зона перенаправления DNS будет добавлена:
Создание зоны переадресации DNS для домена AD в командной строке (следует указать IP-адрес удаленного DNS-сервера с параметром —forwarder):
# kinit admin
# ipa dnsforwardzone-add test.alt --forwarder=192.168.0.122 --forward-policy=first
Сервер проверит DNS-перенаправитель (перенаправители).
Это может занять некоторое время; пожалуйста, подождите...
Имя зоны: test.alt.
Активная зона: TRUE
Перенаправители зон: 192.168.0.122
Политика перенаправления: first
Примечание: Если при добавлении зоны перенаправления появляется предупреждение об ошибке проверки DNSSEC, это означает что удалённый DNS-сервер не использует DNSSEC. Рекомендуется включить DNSSEC на удаленном DNS-сервере.
Если включить проверку DNSSEC на удаленном DNS-сервере нельзя, можно отключить DNSSEC на сервере FreeIPA. Для этого в файле /etc/bind/ipa-options-ext.conf следует привести параметр dnssec-validation к виду:
И перезапустить службу DNS:
# systemctl restart bind.service
Проверка настройки:
# dig dc1.test.alt +noall +answer
dc1.test.alt.       709 IN  A   192.168.0.122
Настройка переадресации DNS в AD
В этом разделе описывается, как настроить переадресацию DNS в Active Directory для сервера FreeIPA.
Samba DC
Если используется dns_backend BIND9_DLZ добавить в файл /etc/bind/options.conf строки:
zone "example.test" {
    type forward;
    forwarders { 192.168.0.113; };
};
Перезапустить службу DNS:
# systemctl restart bind.service
Windows Server с AD
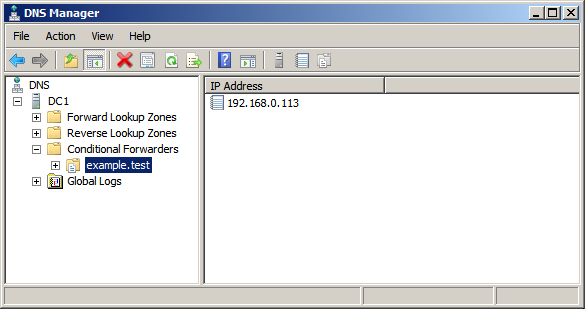
На AD сервере создать сервер условной пересылки для зоны IPA домена.
В графическом интерфейсе:
- Открыть «Диспетчер DNS» («DNS Manager»).
- В разделе «Серверы условной пересылки» («Conditional Forwarders») добавить новый сервер пересылки указав FQDN и IP-адрес сервера FreeIPA:
- Сохранить настройки.
В командной строке:
C:> dnscmd 127.0.0.1 /ZoneAdd example.test /Forwarder 192.168.0.113
DNS Server 127.0.0.1 created zone example.test:

Command completed successfully
Проверка конфигурации DNS
Перед настройкой доверия необходимо убедиться, что серверы FreeIPA и AD могут разрешать себя и друг друга.
На сервере FreeIPA
Проверить наличие записей для работы сервисов IPA на DNS-сервере IPA.
- Запись отвечающая за работу сервисов Kerberos через UDP и LDAP через TCP:
-
# dig +short -t SRV _kerberos._udp.example.test
0 100 88 ipa.example.test.
dig +short -t SRV _ldap._tcp.example.test
0 100 389 ipa.example.test.
- В выводе команд должен быть отображен список всех серверов IPA.
-
- Запись отвечающая за имя Kerberos realm IPA домена:
-
# dig +short -t TXT _kerberos.example.test
"EXAMPLE.TEST"
-
- Наличие записей для работы сервисов AD на DNS-сервере IPA:
-
# dig +short -t SRV _kerberos._tcp.dc._msdcs.test.alt
0 100 88 dc.test.alt.
# dig +short -t SRV _ldap._tcp.dc._msdcs.test.alt
0 100 389 dc.test.alt.
-
Примечание: Если два первых шага не вернули все ожидаемые записи, обновите конфигурацию DNS, добавив недостающие записи.
Если в среде IPA используется встроенный DNS-сервер:
# ipa dns-update-system-records
Если в среде IPA не используется встроенный DNS-сервер. На сервере FreeIPA экспортировать записи DNS в файл:
# ipa dns-update-system-records --dry-run --out dns_records_file.nsupdate
Отправить запрос на обновление DNS на DNS-сервер с помощью утилиты nsupdate и файла dns_records_file.nsupdate.
На сервере AD
- На сервере AD запустить утилиту nslookup.exe для поиска служебных записей:
-
C:>nslookup.exe
> set type=SRV
-
- Введите доменное имя для служебных записей Kerberos через UDP и LDAP через TCP:
-
 > _kerberos._udp.example.test
_kerberos._udp.example.test       SRV service location:
    priority                = 0
    weight                  = 100
    port                    = 88
    svr hostname            = ipa.example.test
ipa.example.test internet address = 192.168.0.113
> _ldap._tcp.example.test
_ldap._tcp.example.test       SRV service location:
    priority                = 0
    weight                  = 100
    port                    = 389
    svr hostname            = ipa.example.test
ipa.example.test internet address = 192.168.0.113
-
- Запись отвечающая за имя Kerberos realm IPA домена:
-
C:>nslookup.exe
> set type=TXT
> _kerberos.example.test
_kerberos.example.test        text =

    "EXAMPLE.TEST"
-
Подготовка сервера FreeIPA к доверию
Установить необходимые пакеты:
# apt-get install freeipa-server-trust-ad
Прежде чем устанавливать доверительные отношения с AD, следует подготовить домен FreeIPA с помощью утилиты ipa-adtrust-install.
Сконфигурировать сервер FreeIPA для доверительных отношений с AD:
# ipa-adtrust-install
The log file for this installation can be found in /var/log/ipaserver-adtrust-install.log
==============================================================================
This program will setup components needed to establish trust to AD domains for
the IPA Server.

This includes:
  * Configure Samba
  * Add trust related objects to IPA LDAP server

To accept the default shown in brackets, press the Enter key.

Configuring cross-realm trusts for IPA server requires password for user 'admin'.
This user is a regular system account used for IPA server administration.

admin password:
Записи DNS создаются автоматически, если FreeIPA был установлен с интегрированным DNS-сервером. Если FreeIPA установлен без встроенного DNS-сервера, ipa-adtrust-install выведет список служебных записей, которые нужно вручную добавить в DNS.
Далее скрипт сообщает, что файл /etc/samba/smb.conf уже существует и будет переписан:
WARNING: The smb.conf already exists. Running ipa-adtrust-install will break your existing samba configuration.
Do you wish to continue? [no]: yes
Скрипт спросит необходимо ли конфигурировать slapi-nis плагин для поддержки работы старых клиентов (SSSD < 1.9) с пользователем из доверенного домена:
Do you want to enable support for trusted domains in Schema Compatibility plugin?
This will allow clients older than SSSD 1.9 and non-Linux clients to work with trusted users.

Enable trusted domains support in slapi-nis? [no]: yes
При появлении запроса NetBIOS введите имя NetBIOS для домена FreeIPA или нажмите Enter, чтобы принять предложенное имя:
Trust is configured but no NetBIOS domain name found, setting it now.
Enter the NetBIOS name for the IPA domain.
Only up to 15 uppercase ASCII letters, digits and dashes are allowed.
Example: EXAMPLE.

NetBIOS domain name [EXAMPLE]:
Далее будет предложено запустить задачу генерации SID, чтобы создать SID для всех существующих пользователей:
Do you want to run the ipa-sidgen task? [no]: yes
Это ресурсоемкая задача, поэтому, если у вас много пользователей, можно запустить ее в другое время.
Done configuring CIFS.
=============================================================================
Setup complete

You must make sure these network ports are open:
    TCP Ports:
      * 135: epmap
      * 138: netbios-dgm
      * 139: netbios-ssn
      * 445: microsoft-ds
      * 1024..1300: epmap listener range
      * 3268: msft-gc
    UDP Ports:
      * 138: netbios-dgm
      * 139: netbios-ssn
      * 389: (C)LDAP
      * 445: microsoft-ds

See the ipa-adtrust-install(1) man page for more details
Перезапустить ipa:
# ipactl restart
Restarting Directory Service
Restarting krb5kdc Service
Restarting kadmin Service
Restarting named Service
Restarting httpd Service
Restarting ipa-custodia Service
Restarting pki-tomcatd Service
Restarting smb Service
Restarting winbind Service
Restarting ipa-otpd Service
Restarting ipa-dnskeysyncd Service
ipa: INFO: The ipactl command was successful
Используйте утилиту smbclient, чтобы убедиться, что Samba отвечает на аутентификацию Kerberos со стороны FreeIPA:
# smbclient -L ipa.example.test -k
lpcfg_do_global_parameter: WARNING: The "domain logons" option is deprecated

    Sharename       Type      Comment
    ---------       ----      -------
    IPC$            IPC       IPC Service (Samba 4.14.10)
…
Настройка доверия
Сервер FreeIPA позволяет настроить три типа соглашений о доверии:
- одностороннее доверие — вариант по умолчанию. Одностороннее доверие позволяет пользователям и группам AD получать доступ к ресурсам в FreeIPA, но не наоборот. Домен FreeIPA доверяет лесу AD, но лес AD не доверяет домену FreeIPA;
- двустороннее доверие — позволяет пользователям и группам AD получать доступ к ресурсам в FreeIPA. Обратите внимание, что эта функция двустороннего доверия не позволяет пользователям IdM входить в системы Windows, а двустороннее доверие в IdM не дает пользователям никаких дополнительных прав по сравнению с решением одностороннего доверия в AD. Чтобы создать двустороннее доверие в команду следует добавить параметр —two-way=true;
- внешнее доверие — доверительные отношения между FreeIPA и доменом AD в разных лесах. В то время как доверие леса всегда требует установления доверия между FreeIPA и корневым доменом леса Active Directory, внешнее доверие может быть установлено от FreeIPA к домену в лесу. Рекомендуется только в том случае, если невозможно установить доверие леса между корневыми доменами леса по административным или организационным причинам. Чтобы создать внешнее доверие в команду следует добавить параметр —external=true.
В командной строке
Добавление двунаправленных доверительных отношений леса (Forest Trust) с AD:
# kinit admin
# ipa trust-add --type=ad test.alt --admin Administrator --password --two-way=true
Пароль администратора домена Active Directory:
…
При появлении запроса следует ввести пароль администратора домена Active Directory.
Внимание! Учетная запись пользователя, используемая при создании доверия (аргумент опции
—admin
), должна быть членом группы Domain Admins. Имя учетной записи должно быть на английском языке.
Чтобы увидеть список всех доверенных доменов из леса используйте следующую команду:
# ipa trustdomain-find test.alt
  Имя домена: test.alt
  Имя домена NetBIOS: TEST
  Идентификатор безопасности домена: S-1-5-21-90931260-536030259-1550036695
  Домен включён: True
---------------------------------
Количество возвращённых записей 1
---------------------------------
В веб-интерфейсе
- В веб-интерфейсе перейти на вкладку IPA-сервер.
- Выбрать пункт меню «Отношения доверия»→«Отношения доверия»:
- Нажать кнопку «Добавить».
- В диалоговом окне «Добавить отношение доверия» ввести имя домена Active Directory. В поля «Учетная запись» и «Пароль» указать учетные данные администратора AD:
- (Необязательно) Отметить пункт «Двустороннее отношение доверия», если нужно разрешить пользователям и группам AD доступ к ресурсам в FreeIPA. Однако двустороннее доверие в FreeIPA не дает пользователям никаких дополнительных прав по сравнению с односторонним доверием в AD. Оба решения считаются одинаково безопасными из-за настроек фильтрации SID доверия между лесами по умолчанию.
- (Необязательно) Отметить «Внешнее отношение доверия», если настраивается доверие с доменом AD, который не является корневым доменом леса AD.
- (Необязательно) По умолчанию сценарий установки доверия пытается определить соответствующий тип диапазона идентификаторов. Также можно явно задать тип диапазона идентификаторов.
- Нажать кнопку «Добавить».
Если доверие было успешно добавлено, сообщение об этом появится во всплывающем окне.

Проверка конфигурации Kerberos
Для проверки конфигурации Kerberos, следует проверить, возможно ли получить билет для пользователя FreeIPA и может ли пользователь FreeIPA запрашивать служебные билеты.
Запросить билет для пользователя AD:
kinit ivanov@test.alt
Password for ivanov@test.alt:
Запросить службу билетов в домене FreeIPA:
# kvno -S host ipa.example.test
host/ipa.example.test@EXAMPLE.TEST: kvno = 2
Если билет службы AD предоставлен, в списке билетов будет отображаться билет на предоставление билетов между областями (TGT) — krbtgt/IPA.DOMAIN@AD.DOMAIN:
klist
Ticket cache: KEYRING:persistent:0:krb_ccache_gyp3KvL
Default principal: ivanov@TEST.ALT

Valid starting       Expires              Service principal
07.02.2022 12:11:13  07.02.2022 22:10:36  host/ipa.example.test@EXAMPLE.TEST
	renew until 07.02.2022 12:12:14
07.02.2022 12:12:14  07.02.2022 22:10:36  krbtgt/EXAMPLE.TEST@TEST.ALT
	renew until 07.02.2022 12:12:14
07.02.2022 12:10:36  07.02.2022 22:10:36  krbtgt/TEST.ALT@TEST.ALT
	renew until 08.02.2022 12:10:32
Проверка конфигурации доверия в FreeIPA
Проверка наличия записей для работы сервисов IPA на DNS-сервере IPA:
- Запись отвечающая за работу сервисов Kerberos через UDP и LDAP через TCP:
-
# dig +short -t SRV _kerberos._udp.dc._msdcs.example.test 0 100 88 ipa.example.test. -
# dig +short -t SRV _ldap._tcp.dc._msdcs.example.test 0 100 389 ipa.example.test. - В выводе этих команд должны быть перечислены все серверы FreeIPA, на которых была выполнена ipa-adtrust-install.
-
- Запись отвечающая за имя Kerberos realm IPA домена:
-
dig +short -t TXT _kerberos.example.test
"EXAMPLE.TEST"
-
Проверка наличия записей для работы сервисов AD на DNS-сервере IPA.
- Запись отвечающая за работу сервисов Kerberos через UDP и LDAP через TCP:
-
# dig +short -t SRV _kerberos._udp.dc._msdcs.test.alt 0 100 88 dc.test.alt. -
# dig +short -t SRV _ldap._tcp.dc._msdcs.test.alt
0 100 389 dc.test.alt.
-
Внимание! Если запись _kerberos._udp.dc._msdcs.test.alt. не доступна проверьте _kerberos._tcp.dc._msdcs.test.alt.
Проверка конфигурации доверия в AD
Примечание: Необходимо войти в систему с правами администратора.
- После выполнения команды ipa-adtrust-install должны появится записи отвечающие за работу сервисов MS DC Kerberos через UDP и LDAP через TCP:
-
 C:>nslookup.exe
> set type=SRV
> _kerberos._udp.dc._msdcs.example.test.
_kerberos._udp.dc._msdcs.example.test        SRV service location:
    priority = 0
    weight = 100
    port = 88
    svr hostname = ipa.example.test
> _ldap._tcp.dc._msdcs.example.test.
_ldap._tcp.dc._msdcs.example.test        SRV service location:
    priority = 0
    weight = 100
    port = 389
    svr hostname = ipa.example.test
ipa.example.test internet address = 192.168.0.113
-
- Проверить наличие записей для работы сервисов AD на DNS-сервере AD. Запись отвечающая за работу сервисов Kerberos через UDP и LDAP через TCP:
-
 C:>nslookup.exe
> set type=SRV
> _kerberos._udp.dc._msdcs.test.alt.
_kerberos._udp.dc._msdcs.test.alt.    SRV service location:
    priority = 0
    weight = 100
    port = 88
    svr hostname = dc1.test.alt.
dc1.domc.testc internet address = 192.168.0.122
> _ldap._tcp.dc._msdcs.test.alt.
_ldap._tcp.dc._msdcs.test.alt.    SRV service location:
    priority = 0
    weight = 100
    port = 389
    svr hostname = dc1.dtest.alt.
dc1.domc.testc internet address = 192.168.0.122
-
Проверка пользователей доверенного домена
Провериnm имеет ли доступ к пользователям из доверенного домена рабочие станции IPA.
На рабочей станции IPA выполнить команду:
# getent passwd ivanov@test.alt
ivanov@test.alt:*:348001105:348001105:Иван Иванов:/home/test.alt/ivanov:
Где ivanov это пользователь из AD домена. Назначить оболочку входа для пользователей из доверенного домена можно добавив на сервере IPA в файл /etc/sssd/sssd.conf следующую строчку:
[domain/example.test]
...
default_shell = /bin/bash
...
Вывод команды должен стать таким:
# systemctl restart sssd
# getent passwd ivanov@test.alt
ivanov@test.alt:*:348001105:348001105:Иван Иванов:/home/test.alt/ivanov:/bin/bash
Удаление доверия
В этом разделе описывается, как удалить доверие FreeIPA/AD на стороне FreeIPA.
В командной строке
- Удалить конфигурацию доверия из FreeIPA:
- Удалить объект доверия из конфигурации Active Directory.
- Проверка удаления доверия:
-
# ipa trust-show test.alt
ipa: ERROR: test.alt: отношение доверия не найден
-
В веб-интерфейсе
- В веб-интерфейсе перейти на вкладку IPA-сервер.
- Выбрать пункт меню «Отношения доверия»→«Отношения доверия».
- Выбрать объект доверия, которое требуется удалить.
- Нажать кнопку «Удалить»:
- В диалоговом окне «Удалить отношения доверия» нажать кнопку «Удалить»:
- Удалить объект доверия из конфигурации Active Directory.
Если доверие было успешно удалено, сообщение об этом появится во всплывающем окне.
Вы уверены, что хотите удалить это сообщение?
0
Предварительные настройки клиентского компьютера
Для ввода клиентского компьютера в домен FreeIPA должны быть выполнены следующие условия:
1. Клиентский компьютер и сервер FreeIPA должны видеть друг друга по сети (для проверки использовать команду «ping <ip адрес>«);
2. На клиентском компьютере должно быть настроено разрешение имени сервера FreeIPA, в качестве сервера DNS должен быть указан сервер FreeIPA (для проверки использовать «ping ipaserver.ipadomain.ru» и убедиться, что этот сервер отвечает).
AstraLinux писал(а)
В /etc/hostname должно содержаться полное доменное имя (FQDN) компьютера (например, client.ipadomain.ru).
Файл /etc/hosts не должен использоваться в качестве базы данных доменных имен других хостов. Так как запрос к этому файлу имеет приоритет перед обращением к DNS.
FQDN состоит из имени компьютера (короткое имя, shortname) и имени домена. В примере выше client - это имя компьютера, ipadomain.ru - имя домена. Имя компьютера должно являться допустимым именем DNS, то есть в имени разрешается использовать только строчные буквы, числа, и символ тире (минус, "-"). Заглавные буквы недопустимы.
Чтобы не было путаницы, в нем рекомендуется только запись «самого себя«, <ip адрес> + FQDN + имя компьютера (короткое имя). Данная запись добавляется автоматически во время установки FreeIPA сервера.
3. Клиентский компьютер не должен быть уже введён в другой домен (в частности, в домен ALD);
Для добавления имени хоста можно выполнить команду:
hostnamectl set-hostname client.ipadomain.ru
Для клиентов, использующих динамические IP-адреса, получаемые от DHCP-сервера, для обновления таблиц адресов после добавления имени хоста рекомендуется выполнить команды:
sudo dhclient -r
sudo dhclient
Настроить разрешение имён можно с помощью графического менеджера сетевых подключений NetworkManager.
После внесения изменений перезапустить сетевое подключение.
Пример сценария настройки DNS на клиентском компьютере из командной строки (сценарий применим для русскоязычных компьютеров с включенной сетевой службой NetworkManager):
# отключаем соединение
sudo nmcli con down "Проводное соединение 1"
# настраиваем сетевую карту соединения - по умолчанию eth0
sudo nmcli con mod "Проводное соединение 1" connection.interface-name eth0
# настраиваем DNS - вместо 10.0.2.100 указать IP-адрес сервера DNS. При необходимости указать адрес локального сервера DNS
sudo nmcli con mod "Проводное соединение 1" ipv4.dns "10.0.2.100 8.8.8.8"
sudo nmcli con mod "Проводное соединение 1" ipv4.ignore-auto-dns yes
# включаем сетевое соединение
sudo nmcli con up "Проводное соединение 1"
Установка пакетов
При установке инструментов Astra Linux все необходимые пакеты устанавливаются автоматически.
Графический инструмент
Графический инструмент для ввода в домен представлен в пакете fly-admin-freeipa-client.
Для его установки можно использовать команду:
sudo apt install fly-admin-freeipa-client
Командная строка
Для установки инструмента командной строки можно использовать команду:
sudo apt install astra-freeipa-client
———
В благодарность за информацию посмотрите рекламу, может что-то заинтересует) Отключите антибаннер в вашем браузере.
Raijin Сообщений: 2748
Администратор
0
Ввод компьютера в домен
Графический инструмент
После установки графический инструмент fly-admin-freeipa-client доступен для запуска из командной строки или через систему меню:
«Пуск» — «Панель управления» — Сеть» — «Настройка FreeIPA клиент Fly»
Для ввода компьютера в домен нужно:
1. Выполнить предварительную настройку DNS, как описано выше;
2. Запустить графический инструмент fly-admin-freeipa-client и в открывшемся окне ввести
* Имя домена;
* Имя администратора домена;
* Пароль администратора домена;
После ввода данных нажать кнопку «Подключиться«
———
В благодарность за информацию посмотрите рекламу, может что-то заинтересует) Отключите антибаннер в вашем браузере.
Raijin Сообщений: 2748
Администратор
0
Командная строка
Выполнить предварительную настройку DNS, как описано выше, после чего ввод компьютера в домен FreeIPA выполняется командой:
sudo astra-freeipa-client
в качестве имени домена будет автоматически использовано доменное имя сервера DNS.
Или указать имя домена с помощью опции » -d » :
sudo astra-freeipa-client -d ipadomain.ru
При этом можно указать дополнительные опции:
-p для ввода пароля (небезопасно);
-y для автоматического ответа «да» на все вопросы;
Вывод клиентской машины из домена
Для вывода клиентской машины из домена рекомендуется использовать на выводимой машине команду:
sudo astra-freeipa-client -U
———
В благодарность за информацию посмотрите рекламу, может что-то заинтересует) Отключите антибаннер в вашем браузере.
Введение
Для настройки функций доменной авторизации и SSO для входа в систему централизованного управления необходимо выполнить ряд действий:
- Настроить веб-сервер (ngnix или apache) на поддержку аутентификации HTTP Negotiate.
- Выполнить соответствующие настройки на стороне домена: создать SPN, ServiceUser.
- Сгенерировать keytab-файл.
- Выполнить настройку используемого браузера.
Для получения дополнительной информации по процессу аутентификации Kerberos, типам шифрования, конфигурации Kerberos, настройке оповещателей и т.д. см. документ Аутентификация Kerberos.
Настройка веб-сервера
Для настройки AD-аутентификации для apache рекомендуем ознакомиться с подробными материалами в сети Интернет ([1], [2]).
Далее приводится подробное описание процесса подготовки и настройки веб-сервера ngnix и всей системы в целом.
В базовой поставке nginx функционал AD-аутентификации отсутствует. Для добавления данного функционала рекомендуется использовать модуль SPNEGO. Таким образом, для начала необходимо собрать nginx с нужным нам модулем. Для этого выполните следующее:
-
Выполните установку nginx.
-
Скачайте последнюю версию исходников веб-сервера с официального сайта.
wget http://nginx.org/download/nginx-1.17.1.tar.gz
-
Распакуйте папку с исходниками веб-сервера и поместите туда исходники модуля spnego-http-auth-nginx-module следующим образом:
tar xvzf nginx-1.17.1.tar.gz
cd nginx-1.17.1
git clone https://github.com/stnoonan/spnego-http-auth-nginx-module
-
Выполните команду просмотра текущей версии ngnix. На экране появится список опций сборки ngnix из базовой поставки:
# nginx -V
nginx version: nginx/1.12.2
built by gcc 4.9.2 (Debian 4.9.2-10+deb8u1)
built with OpenSSL 1.1.0g  2 Nov 2017
TLS SNI support enabled
configure arguments: --prefix=/etc/nginx --sbin-path=/usr/sbin/nginx --modules-path=/usr/lib/nginx/modules --conf-path=/etc/nginx/nginx.conf --error-log-path=/var/log/nginx/error.log --http-log-path=/var/log/nginx/access.log --pid-path=/var/run/nginx.pid --lock-path=/var/run/nginx.lock
--http-client-body-temp-path=/var/cache/nginx/client_temp --http-proxy-temp-path=/var/cache/nginx/proxy_temp --http-fastcgi-temp-path=/var/cache/nginx/fastcgi_temp --http-uwsgi-temp-path=/var/cache/nginx/uwsgi_temp --http-scgi-temp-path=/var/cache/nginx/scgi_temp --user=nginx  --group=nginx --with-http_ssl_module --with-http_realip_module --with-http_addition_module --with-http_sub_module --with-http_dav_module --with-http_flv_module --with-http_mp4_module --with-http_gunzip_module --with-http_gzip_static_module --with-http_random_index_module --with-http_secure_link_module --with-http_stub_status_module --with-http_auth_request_module --with-http_xslt_module=dynamic --with-http_image_filter_module=dynamic --with-http_geoip_module=dynamic --with-http_perl_module=dynamic --with-threads --with-stream --with-stream_ssl_module --with-http_slice_module --with-mail --with-mail_ssl_module --with-file-aio --with-ipv6 --with-http_v2_module --with-debug --with-cc-opt='-g -O2 -fstack-protector-strong -Wformat -Werror=format-security -Wp,-D_FORTIFY_SOURCE=2' --with-ld-opt='-Wl,-Bsymbolic-functions -Wl,-z,relro -Wl,--as-needed'
-
Скопируйте приведенный список опций во временный текстовый файл и добавьте новую опцию:
--add-module=spnego-http-auth-nginx-module
-
Выполните сборку веб-сервера с нужными параметрами (скопированными из текстового файла):
./configure --prefix=/etc/nginx --sbin-path=/usr/sbin/nginx --modules-path=/usr/lib/nginx/modules --conf-path=/etc/nginx/nginx.conf
--error-log-path=/var/log/nginx/error.log --http-log-path=/var/log/nginx/access.log --pid-path=/var/run/nginx.pid
--lock-path=/var/run/nginx.lock --http-client-body-temp-path=/var/cache/nginx/client_temp
--http-proxy-temp-path=/var/cache/nginx/proxy_temp --http-fastcgi-temp-path=/var/cache/nginx/fastcgi_temp
--http-uwsgi-temp-path=/var/cache/nginx/uwsgi_temp --http-scgi-temp-path=/var/cache/nginx/scgi_temp --user=nginx
--group=nginx --with-http_ssl_module --with-http_realip_module --with-http_addition_module --with-http_sub_module
--with-http_dav_module --with-http_flv_module --with-http_mp4_module --with-http_gunzip_module --with-http_gzip_static_module
--with-http_random_index_module --with-http_secure_link_module --with-http_stub_status_module --with-http_auth_request_module
--with-http_xslt_module=dynamic --with-http_image_filter_module=dynamic --with-http_geoip_module=dynamic --with-http_perl_module=dynamic
--with-threads --with-stream --with-stream_ssl_module --add-module=spnego-http-auth-nginx-module --with-http_slice_module
--with-mail --with-mail_ssl_module --with-file-aio --with-ipv6 --with-http_v2_module --with-debug --with-cc-opt='-g -O2
-fstack-protector-strong -Wformat -Werror=format-security -Wp,-D_FORTIFY_SOURCE=2' --with-ld-opt='-Wl,-Bsymbolic-functions
-Wl,-z,relro -Wl,--as-needed'
Обратите внимание, что утилиты для сборки должны быть установлены в системе, а nginx должен быть остановлен.
По завершении процедуры мы получим рабочий самосборный nginx с нужным модулем. Проверить это можно также — nginx -V и посмотреть в параметрах наличие модуля.
- Запустите веб-сервер ngnix.
Создание SPN
SPN (Service Principal Name) — уникальный идентификатор экземпляра сервиса. SPN используется аутентификацией Kerberos для сопоставления экземпляра сервиса с учетной записью сервиса (service logon account). Это позволяет клиентским приложением аутентифицироваться в роли сервиса даже не зная имени пользователя.
До того как аутентификация Kerberos сможет использовать SPN для аутентификации сервиса, SPN должен быть привязан к учетной записи, которая будет использоваться для входа. SPN может быть привязан только к одной учетной записи. Если учетная запись, привязанная к SPN, изменяется, то необходимо заново выполнить привязку.
Когда клиент хочет воспользоваться сервисом, он находит экземпляр сервиса и составляет SPN для этого экземпляра, далее использует этот SPN для аутентификации.
DC Windows
Для начала необходимо создать на контроллере домена (DC) пользователя, к которому впоследствии мы привяжем SPN.
Например создадим пользователя squid:
Далее необходимо запретить пользователю смену пароля и не ограничивать срок действия пароля. Последнее важно, так как иначе при истечении срока действия пароля придется не только менять пароль, но и заново генерировать keytab-файлы привязанные к этому пользователю:
В целях безопасности рекомендуется исключить сервисного пользователя из доменных групп.
Создадим SPN для прокси-сервера squid HTTP/sqserver.domg.testg и привяжем его к пользователю squid.
Для этого в командной строке на контроллере домена выполним следующую команду:
C:>setspn -A HTTP/sqserver.domg.testg squid
Регистрация ServicePrincipalNames для CN=squid,CN=Users,DC=domg,DC=testg
        HTTP/sqserver.domg.testg
Обновленный объект
Проверить привязанные SPN у пользователя можно командой:
C:>setspn -L squid
Зарегистрирован ServicePrincipalNames для CN=squid3,CN=Users,DC=domg,DC=testg:
        HTTP/sqserver.domg.testg
DC FreeIPA
Для добавления SPN зайдите в web-интерфейс сервера FreeIPA->Identity->Services→Add:
В открывшемся окне необходимо выбрать имя сервиса и имя хоста, к которому будет привязан сервис:
Чтобы добавить SPN с коротким именем хоста (например это необходимо для samba), выполните команду:
ipa service-add cifs/samba --force
Генерирование keytab-файла
Создать keytab-файл можно разными способами.
Рассмотрим некоторые из них.
На контроллере домена Windows 2008 R2
Необходимо выполнить следующую команду:
C:>ktpass -princ HTTP/sqserver.domg.testg@DOMG.TESTG -mapuser squid -pass Pa$$word -ptype KRB5_NT_PRINCIPAL -out C:squid.keytab
Targeting domain controller: dcd.domg.testg
Using legacy password setting method
Successfully mapped HTTP/sqserver.domg.testg to squid.
Key created.
Output keytab to C:squid.keytab:
Keytab version: 0x502
keysize 70 HTTP/sqserver.domg.testg@DOMG.TESTG ptype 1 (KRB5_NT_PRINCIPAL) vno 6
 etype 0x17 (RC4-HMAC) keylength 16 (0x1a4b1757588cab6298e29e91c06df58d)
Рассмотрим параметры команды подробнее:
- -princ — имя принципала содержащее SPN и Kerberos-область (realm)
- -mapuser — пользователь к которому привязывается SPN
- -pass — пароль пользователя
- -ptype — указывает тип принципала (рекомендуется KRB5_NT_PRINCIPAL)
- -out — путь и имя генерируемого файла
На машине с Debian
С помощью ktutil
Этот способ работает если SPN предварительно были созданы и привязаны.
Установим необходимый пакет:
apt-get install krb5-kadmin
Запустим ktutil и создадим keytab-файл:
ktutil
ktutil:  addent -password -p HTTP/sqserver.domg.testg@DOMG.TESTG -k 6 -e RC4-HMAC
Password for HTTP/sqserver.domg.testg@DOMG.TESTG:
ktutil:  wkt squid.keytab
ktutil:  q
С помощью Samba
Для создания keytab-файла с помощью samba, необходима работающая kerberos-аутентификация.
При использовании этого метода нет необходимости генерировать и привязывать SPN на контроллере домена.
Приведите файл настроек /etc/samba/smb.conf к следующему виду:
realm = DOMG.TESTG
workgroup = DOMG
server string = Samba server on %h (v. %v)
security = ads
dedicated keytab file = /etc/krb5.keytab
kerberos method = dedicated keytab
Введите машину в домен:
net -v ads join DOMG.TESTG -UAdministrator
Using short domain name -- DOMG
Joined 'DOSERVER' to dns domain 'domg.testg'
Проверить ввод в домен можно командой:
net ads testjoin
Join is OK
После этого в домене будет создан аккаунт компьютера к которому можно будет привязать SPN.
Создадим keytab-файл для компьютера:
net ads keytab create -UAdministrator
Добавим в keytab-файл принципала сервиса «HTTP»:
net ads keytab add HTTP -U Administrator
Processing principals to add...
Далее можно поменять права на keytab и отредактировать его утилитой kutil.
С помощью Samba DC
При использовании этого метода kerberos ни при чём, а все действия выполняются на машине с домен-контроллером.
Создадим пользователя, с которым будем связывать создаваемые SPN:
samba-tool user create <someuser>
samba-tool user setexpiry <someuser> --noexpiry
Привяжем к нему SPN (возможно несколько раз для разных сервисов):
samba-tool spn add <service-name>/test.example.com <someuser>
Создадим keytab:
samba-tool domain exportkeytab /tmp/keytab --principal=<service-name>/test.example.com
Данную процедуру необходимо выполнить несколько раз для всех spn, которые требуется поместить в keytab.
Проверка:
klist -ke /tmp/keytab
  Keytab name: FILE:/etc/http.keytab
  KVNO Principal
  ---- --------------------------------------------------------------------------
     1 host/test.address.com@INTRANET.COM (des-cbc-crc)
     1 host/test.address.com@INTRANET.COM (des-cbc-md5)
     1 host/test.address.com@INTRANET.COM (arcfour-hmac)
     1 HTTP/test.address.com@INTRANET.COM (des-cbc-crc)
     1 HTTP/test.address.com@INTRANET.COM (des-cbc-md5)
     1 HTTP/test.address.com@INTRANET.COM (arcfour-hmac)
С помощью FreeIPA Client
Для этого способа необходимо ввести машину в домен FreeIPA.
Для генерации keytab-файла используется команда:
ipa-getkeytab -s dc.ipa.server.ru -p HTTP/httpserver.ipa.server.ru -k /etc/http.keytab
Здесь:
- dc.ipa.server.ru — FreeIPA сервер
- HTTP/httpserver.ipa.server.ru — SPN
- /etc/http.keytab — местоположение создаваемого keytab-файла
Проверка keytab-файла
Для проверки keytab-файла необходима настроенная Kerberos-аутентификация.
Это можно проверить командой:
kinit Administrator@DOMG.TESTG
Она должна запрашивать пароль и получать билет:
klist
Ticket cache: KEYRING:persistent:0:0
Default principal: Administrator@DOMG.TESTG
Valid starting       Expires              Service principal
14.03.2017 16:45:58  15.03.2017 02:45:58  krbtgt/DOMG.TESTG@DOMG.TESTG
	renew until 21.03.2017 16:44:36
Попробуем зарегистрироваться с помощью keytab-файла:
kinit -V -k HTTP/sqserver.domg.testg -t /home/test/squid.keytab
Using existing cache: persistent:0:krb_ccache_95Lkl2t
Using principal: HTTP/sqserver.domg.testg@DOMG.TESTG
Using keytab: /home/test/squid.keytab
Authenticated to Kerberos v5
Проверить версию ключей на сервере можно, предварительно получив билет, с помощью команды:
kvno HTTP/sqserver.domg.testg
HTTP/sqserver.domg.testg@DOMG.TESTG: kvno = 6
Проверить версию kvno и список ключей в keytab-файле можно с помощью команды:
klist -ket /home/test/squid.keytab
Keytab name: FILE:/home/test/squid.keytab
KVNO Timestamp           Principal
---- ------------------- ------------------------------------------------------
   6 01.01.1970 03:00:00 HTTP/sqserver.domg.testg@DOMG.TESTG (arcfour-hmac)
После всех проверок желательно удалить полученные билеты командой:
Подготовка и настройка клиентского браузера
В данном разделе рассматривается процесс настройки аутентификации Kerberos для разных браузеров, чтобы обеспечить прозрачную и безопасную аутентификацию на веб-серверах без необходимости повторного ввода пароля пользователя в корпоративной сети. Большинство современных браузеров (IE, Chrome, Firefox) поддерживают Kerberos, однако для его работы необходимо выполнить несколько дополнительных настроек.
Рассмотрим пример разрешения клиентам Kerberos проходить аутентификацию с использованием браузера на любых веб-серверах домена applite.ru (в данном случае вместо IP-адреса веб-сервера следует всегда использовать имя DNS или полное доменное имя).
Настройка Kerberos-аутентификации в Internet Explorer
Перейдите в Свойства браузера -> Безопасность -> Местная интрасеть и нажмите Сайты -> Дополнительно. Добавьте следующие записи в зону:
https://*.applite.ruhttp://*.applite.ru
Групповые политики
Добавить сайты в эту зону также можно с помощью групповой политики: Конфигурация компьютера -> Административные шаблоны -> Компоненты Windows -> Internet Explorer -> Панель управления Интернетом -> Страница безопасности -> Назначение сайта в зону. Добавьте запись со значением 1 для каждого веб-сайта.
Затем перейдите на вкладку Дополнительно и в разделе Безопасность убедитесь, что установлен флажок «Разрешить встроенную проверку подлинности Windows».
Убедитесь, что веб-сайты, для которых включена аутентификация Kerberos, находятся только в зоне локальной интрасети. Токен Kerberos для веб-сайтов, включенных в зону надежных сайтов (Trusted Zone), не отправляется.
Настройка Kerberos-аутентификации в Google Chrome
Чтобы функция SSO работала в Google Chrome, настройте Internet Explorer, используя метод, описанный выше (Chrome использует настройку IE). Кроме того, следует отметить, что все новые версии Chrome автоматически обнаруживают поддержку Kerberos на сайте. Если вы используете одну из более ранних версий Chrome (Chromium), запустите ее со следующими параметрами, чтобы проверка подлинности Kerberos на ваших веб-серверах работала правильно:
--auth-server-whitelist="*.applite.ru"
--auth-negotiate-delegate-whitelist="*.applite.ru"
Например:
"C:Program Files (x86)GoogleChromeApplicationchrome.exe” --auth-server-whitelist="*.applite.ru" --auth-negotiate-delegate-whitelist="*.applite.ru"
Вы также можете настроить эти параметры с помощью GPO для Chrome (политика AuthServerWhitelist) или параметра реестра AuthNegotiateDelegateWhitelist, расположенного в разделе реестра HKLMSOFTWAREPoliciesGoogleChrome.
Чтобы изменения вступили в силу, перезапустите браузер и сбросьте билеты Kerberos с помощью команды очистки klist purge.
Настройка Kerberos-аутентификации в Firefox
По умолчанию поддержка Kerberos в Firefox отключена. Чтобы включить поддержку аутентификации, откройте окно настройки браузера (введите about:config в адресной строке). Затем в следующих параметрах укажите адреса веб-серверов, для которых вы собираетесь использовать аутентификацию Kerberos.
network.negotiate-auth.trusted-urisnetwork.automatic-ntlm-auth.trusted-uris
Для удобства вы можете отключить обязательный ввод адреса FQDN-сервера в адресной строке Mozilla Firefox, включив параметр network.negotiate-auth.allow-non-fqdn.
Чтобы проверить, что браузер прошел проверку подлинности Kerberos на сервере, воспользуйтесь отладчиком Fiddler или командой klist tickets.

