Как мне ввести в домен Windows Active Directory ОС линукс на базе CentOS 8 / RHEL 8? В этом руководстве мы обсудим, как использовать систему realmd для присоединения сервера или рабочей станции CentOS 8 / RHEL 8 к домену Active Directory. Realmd предоставляет ясный и простой способ обнаружения доменов идентификации и присоединения к ним для достижения прямой интеграции доменов.
В большинстве корпоративных сред домен Active Directory используется в качестве центрального концентратора для хранения информации о пользователях. В этой интеграции realmd настраивает базовые системные службы Linux, такие как SSSD или Winbind, для подключения к домену. Системы Linux подключены к Active Directory для получения информации о пользователях для запросов аутентификации.
В этом руководстве будет показано, как настроить SSSD для получения информации из доменов в одном лесу ресурсов Active Directory. Если вы работаете с несколькими лесами AD, это руководство может вам не подойти.
Шаг 1. Установите необходимые пакеты
Для интеграции CentOS 8 / RHEL 8 AD требуется ряд пакетов. Установите их в своей системе, выполнив следующие команды:
sudo dnf install realmd sssd oddjob oddjob-mkhomedir adcli samba-common samba-common-tools krb5-workstation authselect-compat
Подтвердите запрос на установку.
Last metadata expiration check: 0:19:18 ago on Fri 27 Sep 2019 09:45:40 PM EAT.
Package realmd-0.16.3-16.el8.x86_64 is already installed.
Package sssd-2.0.0-43.el8_0.3.x86_64 is already installed.
Package adcli-0.8.2-2.el8.x86_64 is already installed.
Package samba-common-4.9.1-8.el8.noarch is already installed.
Dependencies resolved.
===================================================================================================================================================
 Package                                  Arch                         Version                               Repository                       Size
===================================================================================================================================================
Installing:
 oddjob                                   x86_64                       0.34.4-7.el8                          AppStream                        83 k
 oddjob-mkhomedir                         x86_64                       0.34.4-7.el8                          AppStream                        52 k
 samba-common-tools                       x86_64                       4.9.1-8.el8                           BaseOS                          461 k
Installing dependencies:
 samba-libs                               x86_64                       4.9.1-8.el8                           BaseOS                          177 k

Transaction Summary
===================================================================================================================================================
Install  4 Packages

Total download size: 773 k
Installed size: 1.7 M
Is this ok [y/N]: y
На новом компьютере с RHEL 8 вам необходимо зарегистрировать его для установки пакетов.
$ sudo subscription-manager register

Registering to: subscription.rhsm.redhat.com:443/subscription

Username:

Password:

The system has been registered with ID: d39d60a7-3236-4287-b361-53264159f5d1

The registered system name is: master.example.com
$ sudo subscription-manager attach --auto

Installed Product Current Status:

Product Name: Red Hat Enterprise Linux for x86_64

Status:       Subscribed
Перед выполнением интеграции AD убедитесь, что компьютер CentOS / RHEL 8 может разрешить и обнаружить домен AD.
Проверьте настройки DNS.
$ cat /etc/resolv.conf
Убедитесь, что обнаружение домена AD прошло успешно.
$ realm discover example.com
example.com

type: kerberos

realm-name: EXAMPLE.COM

domain-name: example.com

configured: no

server-software: active-directory

client-software: sssd

required-package: oddjob

required-package: oddjob-mkhomedir

required-package: sssd

required-package: adcli

required-package: samba-common-tools
Шаг 3. Присоединитесь к Linux-машине CentOS 8 / RHEL 8 в домене Active Directory.
Учетная запись администратора AD требуется для интеграции компьютера CentOS 8 / RHEL 8 с доменом Windows Active Directory.
Убедитесь, что у вас есть имя пользователя и пароль администратора. Затем выполните приведенную ниже команду, чтобы присоединить систему CentOS 8 / RHEL 8 Linux к домену Active Directory.
$ realm join example.com -U Administrator

Password for Administrator:
Замените Administrator на свою учетную запись администратора AD и введите пароль, когда его попросят. Проверьте, чтобы соединение было успешным.
$ sudo realm list

example.com

type: kerberos

realm-name: EXAMPLE.COM

domain-name: example.com

configured: kerberos-member

server-software: active-directory

client-software: sssd

required-package: oddjob

required-package: oddjob-mkhomedir

required-package: sssd

required-package: adcli

required-package: samba-common-tools

login-formats: %U@example.com

login-policy: allow-realm-logins
Как только машина будет присоединена, выполните приведенные ниже команды.
sudo authselect select sssd

sudo authselect select sssd with-mkhomedir
Ваш файл конфигурации sssd.conf должен выглядеть, как показано ниже
$ cat /etc/sssd/sssd.conf
[sssd]
domains = example.com
config_file_version = 2
services = nss, pam
default_domain_suffix = example.com

[nss]
homedir_substring = /home

[pam]

[domain/example.com]
ad_domain = example.com
krb5_realm = EXAMPLE.COM
realmd_tags = manages-system joined-with-samba
cache_credentials = True
id_provider = ad
krb5_store_password_if_offline = True
default_shell = /bin/bash
ldap_id_mapping = True
use_fully_qualified_names = True
fallback_homedir = /home/%u@%d
access_provider = ad
Когда в конфигурационный файл вносятся изменения, требуется перезапуск службы.
sudo systemctl restart sssd
Статус должен быть запущен.
$ systemctl status sssd

● sssd.service - System Security Services Daemon

Loaded: loaded (/usr/lib/systemd/system/sssd.service; enabled; vendor preset: disabled)

Active: active (running) since Fri 2019-09-27 22:30:25 EAT; 37min ago

Main PID: 32474 (sssd)

CGroup: /system.slice/sssd.service

├─32474 /usr/sbin/sssd -i --logger=files

├─32478 /usr/libexec/sssd/sssd_be --domain example.com --uid 0 --gid 0 --logger=files

├─32479 /usr/libexec/sssd/sssd_nss --uid 0 --gid 0 --logger=files

└─32480 /usr/libexec/sssd/sssd_pam --uid 0 --gid 0 --logger=files

................................................................
Если интеграция работает, должна быть возможность получить информацию о пользователе AD.
$ id jmutai@example.com

uid=1783929917(jmutai@example.com) gid=1784800513(domain users@example.com) groups=1783870513(domain users@example.com)
Шаг 4. Контроль доступа – ограничение для пользователя / группы
Доступ к зарегистрированному серверу можно ограничить, разрешив только определенным пользователям / группам.
Ограничение для пользователей
Чтобы разрешить пользователю доступ через SSH и консоль, используйте команду:
$ realm permit user1@example.com

$ realm permit user2@example.com user3@example.com
Разрешить доступ к группе – Примеры
$ ream permit -g sysadmins

$ realm permit -g 'Security Users'

$ realm permit 'Domain Users' 'admin users'
Это изменит файл sssd.conf
Если вместо этого вы хотите разрешить доступ всем пользователям, запустите:
$ sudo realm permit --all
Чтобы запретить доступ всем пользователям домена, используйте:
$ sudo realm deny --all
Шаг 5. Настройте доступ Sudo
По умолчанию у пользователей домена не будет разрешения на повышение привилегий до root. Пользователям должен быть предоставлен доступ на основе имен пользователей или групп.
Давайте сначала создадим файл разрешений sudo.
$ sudo vi /etc/sudoers.d/domain_admins
Добавить одного пользователя:
user1@example.com ALL=(ALL) ALL
Добавить еще одного пользователя:
user1@example.com     ALL=(ALL)   ALL

user2@example.com     ALL=(ALL)   ALL
Добавить группу
%group1@example.com ALL=(ALL) ALL
Добавить группу с пробелами в имени
%security\ users@example.com       ALL=(ALL)       ALL

%system\ super\ admins@example.com ALL=(ALL)       ALL
Шаг 6. Проверьте доступ по SSH.
Получите доступ к серверу удаленно, поскольку пользователю AD разрешено входить в систему.
$ ssh jmutai@localhost

The authenticity of host 'localhost (::1)' can't be established.

ECDSA key fingerprint is SHA256:wmWcLi/lijm4zWbQ/Uf6uLMYzM7g1AnBwxzooqpB5CU.

ECDSA key fingerprint is MD5:10:0c:cb:22:fd:28:34:c6:3e:d7:68:15:02:f9:b4:e9.

Are you sure you want to continue connecting (yes/no)? yes

Warning: Permanently added 'localhost' (ECDSA) to the list of known hosts.
Это подтверждение того, что наша конфигурация прошла успешно.
Посетите вики-страницы realmd и sssd, чтобы узнать больше.
Оригинал статьи на английском здесь.
Red Hat Enterprise Linux 8
Joining RHEL hosts to AD and accessing resources in AD
Abstract
Administrators can join Red Hat Enterprise Linux (RHEL) hosts to an Active Directory (AD) domain by using the System Security Services Daemon (SSSD) or the Samba Winbind service to access AD resources. Alternatively, it is also possible to access AD resources without domain integration by using a Managed Service Account (MSA).
Making open source more inclusive
Red Hat is committed to replacing problematic language in our code, documentation, and web properties. We are beginning with these four terms: master, slave, blacklist, and whitelist. Because of the enormity of this endeavor, these changes will be implemented gradually over several upcoming releases. For more details, see our CTO Chris Wright’s message.
In Identity Management, planned terminology replacements include:
- block list replaces blacklist
- allow list replaces whitelist
- secondary replaces slave
-
The word master is being replaced with more precise language, depending on the context:
- IdM server replaces IdM master
- CA renewal server replaces CA renewal master
- CRL publisher server replaces CRL master
- multi-supplier replaces multi-master
Providing feedback on Red Hat documentation
We appreciate your feedback on our documentation. Let us know how we can improve it.
Submitting comments on specific passages
- View the documentation in the Multi-page HTML format and ensure that you see the Feedback button in the upper right corner after the page fully loads.
- Use your cursor to highlight the part of the text that you want to comment on.
- Click the Add Feedback button that appears near the highlighted text.
- Add your feedback and click Submit.
Submitting feedback through Jira (account required)
- Log in to the Jira website.
- Click Create in the top navigation bar
- Enter a descriptive title in the Summary field.
- Enter your suggestion for improvement in the Description field. Include links to the relevant parts of the documentation.
- Click Create at the bottom of the dialogue.
Chapter 3. Managing direct connections to AD
You can use the System Security Services Daemon (SSSD) or Samba Winbind to connect your Red Hat Enterprise Linux (RHEL) system to Active Directory (AD). This section describes how to modify and manage your connection to AD when your RHEL system is already configured as an AD client.
Prerequisites
- You have connected your RHEL system to the Active Directory domain, either with SSSD or Samba Winbind.
3.1. Modifying the default Kerberos host keytab renewal interval
SSSD automatically renews the Kerberos host keytab file in an AD environment if the adcli package is installed. The daemon checks daily if the machine account password is older than the configured value and renews it if necessary.
The default renewal interval is 30 days. To change the default, follow the steps in this procedure.
Procedure
-
Add the following parameter to the AD provider in your
/etc/sssd/sssd.conffile:ad_maximum_machine_account_password_age = value_in_days -
Restart SSSD:
# systemctl restart sssd
-
To disable the automatic Kerberos host keytab renewal, set
ad_maximum_machine_account_password_age = 0.
3.2. Removing a RHEL system from an AD domain
Follow this procedure to remove a Red Hat Enterprise Linux (RHEL) system that is integrated into Active Directory (AD) directly from the AD domain.
Prerequisites
- You have used the System Security Services Daemon (SSSD) or Samba Winbind to connect your RHEL system to AD.
Procedure
-
Remove a system from an identity domain using the
realm leavecommand. The command removes the domain configuration from SSSD and the local system.# realm leave ad.example.comWhen a client leaves a domain, the account is not deleted from AD; the local client configuration is only removed. If you want to delete the AD account, run the command with the
--removeoption. You are prompted for your user password and you must have the rights to remove an account from Active Directory. -
Use the
-Uoption with therealm leavecommand to specify a different user to remove a system from an identity domain.By default, the
realm leavecommand is executed as the default administrator. For AD, the administrator account is calledAdministrator. If a different user was used to join to the domain, it might be required to perform the removal as that user.# realm leave [ad.example.com] -U [AD.EXAMPLE.COM\user]'
The command first attempts to connect without credentials, but it prompts for a password if required.
Verification steps
-
Verify the domain is no longer configured:
# realm discover [ad.example.com]
ad.example.com
    type: kerberos
    realm-name: EXAMPLE.COM
    domain-name: example.com
    configured: no
    server-software: active-directory
    client-software: sssd
    required-package: oddjob
    required-package: oddjob-mkhomedir
    required-package: sssd
    required-package: adcli
    required-package: samba-common-tools
Additional resources
-
See the
realm(8)man page.
3.3. Setting the domain resolution order in SSSD to resolve short AD user names
By default, you must specify fully qualified usernames, like ad_username@ad.example.com and group@ad.example.com, to resolve Active Directory (AD) users and groups on a RHEL host connected to AD with the SSSD service.
This procedure sets the domain resolution order in the SSSD configuration so you can resolve AD users and groups using short names, like ad_username. This example configuration searches for users and groups in the following order:
-
Active Directory (AD) child domain
subdomain2.ad.example.com -
AD child domain
subdomain1.ad.example.com -
AD root domain
ad.example.com
Prerequisites
- You have used the SSSD service to connect the RHEL host directly to AD.
Procedure
-
Open the
/etc/sssd/sssd.conffile in a text editor. -
Set the
domain_resolution_orderoption in the[sssd]section of the file.domain_resolution_order = subdomain2.ad.example.com, subdomain1.ad.example.com, ad.example.com
- Save and close the file.
-
Restart the SSSD service to load the new configuration settings.
[root@ad-client ~]# systemctl restart sssd
Verification Steps
-
Verify you can retrieve user information for a user from the first domain using only a short name.
[root@ad-client ~]# id <user_from_subdomain2>
uid=1916901142(user_from_subdomain2) gid=1916900513(domain users) groups=1916900513(domain users)
3.4. Managing login permissions for domain users
By default, domain-side access control is applied, which means that login policies for Active Directory (AD) users are defined in the AD domain itself. This default behavior can be overridden so that client-side access control is used. With client-side access control, login permission is defined by local policies only.
If a domain applies client-side access control, you can use the realmd to configure basic allow or deny access rules for users from that domain.
Access rules either allow or deny access to all services on the system. More specific access rules must be set on a specific system resource or in the domain.
3.4.1. Enabling access to users within a domain
By default, login policies for Active Directory (AD) users are defined in the AD domain itself. Follow this procedure to override this default behavior and configure a RHEL host to enable access for users within an AD domain.
It is not recommended to allow access to all by default while only denying it to specific users with realm permit -x. Instead, Red Hat recommends maintaining a default no access policy for all users and only grant access to selected users using realm permit.
Prerequisites
- Your RHEL system is a member of the Active Directory domain.
Procedure
-
Grant access to all users:
# realm permit --all
-
Grant access to specific users:
$ realm permit aduser01@example.com
$ realm permit 'AD.EXAMPLE.COM\aduser01'
Currently, you can only allow access to users in primary domains and not to users in trusted domains. This is due to the fact that user login must contain the domain name and SSSD cannot currently provide realmd with information about available child domains.
Verification steps
-
Use SSH to log in to the server as the
aduser01@example.comuser:$ ssh aduser01@example.com@server_name [aduser01@example.com@server_name ~]$
-
Use the ssh command a second time to access the same server, this time as the
aduser02@example.comuser:$ ssh aduser02@example.com@server_name Authentication failed.
Notice how the aduser02@example.com user is denied access to the system. You have granted the permission to log in to the system to the aduser01@example.com user only. All other users from that Active Directory domain are rejected because of the specified login policy.
If you set use_fully_qualified_names to true in the sssd.conf file, all requests must use the fully qualified domain name. However, if you set use_fully_qualified_names to false, it is possible to use the fully-qualified name in the requests, but only the simplified version is displayed in the output.
Additional resources
-
See the
realm(8)man page.
3.4.2. Denying access to users within a domain
By default, login policies for Active Directory (AD) users are defined in the AD domain itself. Follow this procedure to override this default behavior and configure a RHEL host to deny access to users within an AD domain.
It is safer to only allow access to specific users or groups than to deny access to some, while enabling it to everyone else. Therefore, it is not recommended to allow access to all by default while only denying it to specific users with realm permit -x. Instead, Red Hat recommends maintaining a default no access policy for all users and only grant access to selected users using realm permit.
Prerequisites
- Your RHEL system is a member of the Active Directory domain.
Procedure
-
Deny access to all users within the domain:
# realm deny --all
This command prevents
realmaccounts from logging into the local machine. Userealm permitto restrict login to specific accounts. -
Verify that the domain user’s
login-policyis set todeny-any-login:[root@replica1 ~]# realm list example.net type: kerberos realm-name: EXAMPLE.NET domain-name: example.net configured: kerberos-member server-software: active-directory client-software: sssd required-package: oddjob required-package: oddjob-mkhomedir required-package: sssd required-package: adcli required-package: samba-common-tools login-formats: %U@example.net login-policy: deny-any-login
-
Deny access to specific users by using the
-xoption:$ realm permit -x 'AD.EXAMPLE.COM\aduser02'
Verification steps
-
Use SSH to log in to the server as the
aduser01@example.netuser.$ ssh aduser01@example.net@server_name Authentication failed.
If you set use_fully_qualified_names to true in the sssd.conf file, all requests must use the fully qualified domain name. However, if you set use_fully_qualified_names to false, it is possible to use the fully-qualified name in the requests, but only the simplified version is displayed in the output.
Additional resources
-
See the
realm(8)man page.
3.5. Applying Group Policy Object access control in RHEL
A Group Policy Object (GPO) is a collection of access control settings stored in Microsoft Active Directory (AD) that can apply to computers and users in an AD environment. By specifying GPOs in AD, administrators can define login policies honored by both Windows clients and Red Hat Enterprise Linux (RHEL) hosts joined to AD.
The following sections describe how you can manage GPOs in your environment:
- How SSSD interprets GPO access control rules
- List of GPO settings that SSSD supports
- List of SSSD options to control GPO enforcement
- Changing the GPO access control mode
- Creating and configuring a GPO for a RHEL host
3.5.1. How SSSD interprets GPO access control rules
By default, SSSD retrieves Group Policy Objects (GPOs) from Active Directory (AD) domain controllers and evaluates them to determine if a user is allowed to log in to a particular RHEL host joined to AD.
SSSD maps AD Windows Logon Rights to Pluggable Authentication Module (PAM) service names to enforce those permissions in a GNU/Linux environment.
As an AD Administrator, you can limit the scope of GPO rules to specific users, groups, or hosts by listing them in a security filter.
Limitations on filtering by hosts
Older versions of SSSD do not evaluate hosts in AD GPO security filters.
- RHEL 8.3.0 and newer: SSSD supports users, groups, and hosts in security filters.
-
RHEL versions older than 8.3.0: SSSD ignores host entries and only supports users and groups in security filters.
To ensure that SSSD applies GPO-based access control to a specific host, create a new Organizational Unit (OU) in the AD domain, move the system to the new OU, and then link the GPO to this OU.
Limitations on filtering by groups
SSSD currently does not support Active Directory’s built-in groups, such as Administrators with Security Identifier (SID) S-1-5-32-544. Red Hat recommends against using AD built-in groups in AD GPOs targeting RHEL hosts.
Additional resources
- For a list of Windows GPO options and their corresponding SSSD options, see List of GPO settings that SSSD supports.
3.5.2. List of GPO settings that SSSD supports
The following table shows the SSSD options that correspond to Active Directory GPO options as specified in the Group Policy Management Editor on Windows.
Table 3.1. GPO access control options retrieved by SSSD
| GPO option | Corresponding sssd.conf option |
|---|---|
|
Allow log on locally |
|
|
Allow log on through Remote Desktop Services |
|
|
Access this computer from the network |
|
|
Allow log on as a batch job |
|
|
Allow log on as a service |
|
Additional resources
-
For more information about these
sssd.confsettings, such as the Pluggable Authentication Module (PAM) services that map to GPO options, see thesssd-ad(5)Manual page entry.
3.5.3. List of SSSD options to control GPO enforcement
You can set the following SSSD options to limit the scope of GPO rules.
The ad_gpo_access_control option
You can set the ad_gpo_access_control option in the /etc/sssd/sssd.conf file to choose between three different modes in which GPO-based access control operates.
Table 3.2. Table of ad_gpo_access_control values
| Value of ad_gpo_access_control |
Behavior |
|---|---|
|
|
GPO-based access control rules are evaluated and enforced. |
|
|
GPO-based access control rules are evaluated but not enforced; a |
|
|
GPO-based access control rules are neither evaluated nor enforced. |
The ad_gpo_implicit_deny option
The ad_gpo_implicit_deny option is set to False by default. In this default state, users are allowed access if applicable GPOs are not found. If you set this option to True, you must explicitly allow users access with a GPO rule.
You can use this feature to harden security, but be careful not to deny access unintentionally. Red Hat recommends testing this feature while ad_gpo_access_control is set to permissive.
The following two tables illustrate when a user is allowed or rejected access based on the allow and deny login rights defined on the AD server-side and the value of ad_gpo_implicit_deny.
Table 3.3. Login behavior with ad_gpo_implicit_deny set to False (default)
| allow-rules | deny-rules | result |
|---|---|---|
|
missing |
missing |
all users are allowed |
|
missing |
present |
only users not in deny-rules are allowed |
|
present |
missing |
only users in allow-rules are allowed |
|
present |
present |
only users in allow-rules and not in deny-rules are allowed |
Table 3.4. Login behavior with ad_gpo_implicit_deny set to True
| allow-rules | deny-rules | result |
|---|---|---|
|
missing |
missing |
no users are allowed |
|
missing |
present |
no users are allowed |
|
present |
missing |
only users in allow-rules are allowed |
|
present |
present |
only users in allow-rules and not in deny-rules are allowed |
Additional resources
- For the procedure to change the GPO enforcement mode in SSSD, see Changing the GPO access control mode.
-
For more details on each of the different GPO modes of operation, see the
ad_gpo_access_controlentry in thesssd-ad(5)Manual page.
3.5.4. Changing the GPO access control mode
This procedure changes how GPO-based access control rules are evaluated and enforced on a RHEL host joined to an Active Directory (AD) environment.
In this example, you will change the GPO operation mode from enforcing (the default) to permissive for testing purposes.
If you see the following errors, Active Directory users are unable to log in due to GPO-based access controls:
-
In
/var/log/secure:Oct 31 03:00:13 client1 sshd[124914]: pam_sss(sshd:account): Access denied for user aduser1: 6 (Permission denied) Oct 31 03:00:13 client1 sshd[124914]: Failed password for aduser1 from 127.0.0.1 port 60509 ssh2 Oct 31 03:00:13 client1 sshd[124914]: fatal: Access denied for user aduser1 by PAM account configuration [preauth]
-
In
/var/log/sssd/sssd__example.com_.log:(Sat Oct 31 03:00:13 2020) [sssd[be[example.com]]] [ad_gpo_perform_hbac_processing] (0x0040): GPO access check failed: [1432158236](Host Access Denied) (Sat Oct 31 03:00:13 2020) [sssd[be[example.com]]] [ad_gpo_cse_done] (0x0040): HBAC processing failed: [1432158236](Host Access Denied} (Sat Oct 31 03:00:13 2020) [sssd[be[example.com]]] [ad_gpo_access_done] (0x0040): GPO-based access control failed.
If this is undesired behavior, you can temporarily set ad_gpo_access_control to permissive as described in this procedure while you troubleshoot proper GPO settings in AD.
Prerequisites
- You have joined a RHEL host to an AD environment using SSSD.
-
Editing the
/etc/sssd/sssd.confconfiguration file requiresrootpermissions.
Procedure
-
Stop the SSSD service.
[root@server ~]# systemctl stop sssd -
Open the
/etc/sssd/sssd.conffile in a text editor. -
Set
ad_gpo_access_controltopermissivein thedomainsection for the AD domain.[domain/example.com] ad_gpo_access_control=permissive ...
-
Save the
/etc/sssd/sssd.conffile. -
Restart the SSSD service to load configuration changes.
[root@server ~]# systemctl restart sssd
Additional resources
- For the list of different GPO access control modes, see List of SSSD options to control GPO enforcement.
3.5.5. Creating and configuring a GPO for a RHEL host in the AD GUI
A Group Policy Object (GPO) is a collection of access control settings stored in Microsoft Active Directory (AD) that can apply to computers and users in an AD environment. The following procedure creates a GPO in the AD graphical user interface (GUI) to control logon access to a RHEL host that is integrated directly to the AD domain.
Prerequisites
- You have joined a RHEL host to an AD environment using SSSD.
- You have AD Administrator privileges to make changes in AD using the GUI.
Procedure
-
Within
Active Directory Users and Computers, create an Organizational Unit (OU) to associate with the new GPO:- Right-click on the domain.
-
Choose
New. -
Choose
Organizational Unit.
- Click on the name of the Computer Object that represents the RHEL host (created when it joined Active Directory) and drag it into the new OU. By having the RHEL host in its own OU, the GPO targets this host.
-
Within the
Group Policy Management Editor, create a new GPO for the OU you created:-
Expand
Forest. -
Expand
Domains. - Expand your domain.
- Right-click on the new OU.
-
Choose
Create a GPO in this domain.
-
Expand
-
Specify a name for the new GPO, such as
Allow SSH accessorAllow Console/GUI accessand clickOK. -
Edit the new GPO:
-
Select the OU within the
Group Policy Managementeditor. -
Right-click and choose
Edit. -
Select
User Rights Assignment. -
Select
Computer Configuration -
Select
Policies. -
Select
Windows Settings. -
Select
Security Settings. -
Select
Local Policies. -
Select
User Rights Assignment.
-
Select the OU within the
-
Assign login permissions:
-
Double-Click on
Allow log on locallyto grant local console/GUI access. -
Double-click on
Allow log on through Remote Desktop Servicesto grant SSH access.
-
Double-Click on
-
Add the user(s) you want to access either of these policies to the policies themselves:
-
Click
Add User or Group. - Enter the username within the blank field.
-
Click
OK.
-
Click
Additional resources
- For more details on Group Policy Objects, see Group Policy Objects in Microsoft documentation.
3.5.6. Additional resources
- For more information about joining a RHEL host to an Active Directory environment, see Connecting RHEL systems directly to AD using SSSD.
Legal Notice
Copyright © 2023 Red Hat, Inc.
The text of and illustrations in this document are licensed by Red Hat under a Creative Commons Attribution–Share Alike 3.0 Unported license («CC-BY-SA»). An explanation of CC-BY-SA is available at http://creativecommons.org/licenses/by-sa/3.0/. In accordance with CC-BY-SA, if you distribute this document or an adaptation of it, you must provide the URL for the original version.
Red Hat, as the licensor of this document, waives the right to enforce, and agrees not to assert, Section 4d of CC-BY-SA to the fullest extent permitted by applicable law.
Red Hat, Red Hat Enterprise Linux, the Shadowman logo, the Red Hat logo, JBoss, OpenShift, Fedora, the Infinity logo, and RHCE are trademarks of Red Hat, Inc., registered in the United States and other countries.
Linux® is the registered trademark of Linus Torvalds in the United States and other countries.
Java® is a registered trademark of Oracle and/or its affiliates.
XFS® is a trademark of Silicon Graphics International Corp. or its subsidiaries in the United States and/or other countries.
MySQL® is a registered trademark of MySQL AB in the United States, the European Union and other countries.
Node.js® is an official trademark of Joyent. Red Hat is not formally related to or endorsed by the official Joyent Node.js open source or commercial project.
The OpenStack® Word Mark and OpenStack logo are either registered trademarks/service marks or trademarks/service marks of the OpenStack Foundation, in the United States and other countries and are used with the OpenStack Foundation’s permission. We are not affiliated with, endorsed or sponsored by the OpenStack Foundation, or the OpenStack community.
All other trademarks are the property of their respective owners.
В этой статье мы обсудим, как добавить сервера или рабочие станции с RHEL 8, Oracle, Rocky Linux, Fedora, CentOS в домен Active Directory с помощью realmd, и как аутентифицироваться на Linux хосте с помощью учетной записи Active Directory. Сервис Realmd (Realm Discovery) существенно упрощает обнаружение и добавление хостов Linux в домен AD. Realmd использует для проверки и аутентификации учетных записей SSSD (через Kerberos и LDAP) или Winbind.
Сначала нужно установить необходимые пакеты:
$ sudo dnf install realmd sssd oddjob oddjob-mkhomedir adcli samba-common samba-common-tools krb5-workstation authselect-compat
Совет. На новом хосте с RHEL сначала нужно зарегистрировать хост и активировать подписку:$ sudo subscription-manager register
$ sudo subscription-manager attach –auto
В настройках DNS проверьте, что указаны IP адреса хостов, которые могут разрешить имена в домене Active Directory (обычно здесь указываются ближайшие к вам контроллеры домена AD).
$ cat /etc/resolv.conf
nameserver 192.168.42.10
nameserver 192.168.142.10
search vmblog.ru
Проверьте, что ваш хост Linux способен отрезолвить имя вашего домена:
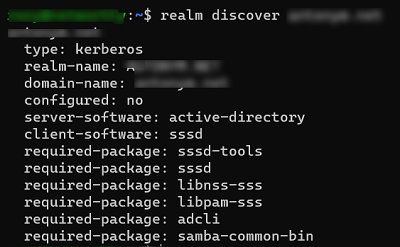
$ realm discover vmblog.ru
vmblog.ru

type: kerberos
realm-name: VMBLOG.RU
domain-name: vmblog.ru

configured: no
server-software: active-directory
client-software: sssd
required-package: oddjob
required-package: oddjob-mkhomedir
required-package: sssd
required-package: adcli
required-package: samba-common-tools
Убедитесь, что время на вашем хосте синхронизированы с NTP источником в домене (или общим внешним NTP).
Для присоединения Linux хоста к домену Active Directory вам понадобится учетная запись AD с правами администратора домена (или учетная запись, которой делегированы права на добавление компьютеров в домен).
Чтобы добавить хост в домен, выполните:
$ sudo realm join vmblog.com -U apetrov
Укажите пароль учетной записи
Password for apetrov:
Проверьте, что ваш компьютер установил доверительные отношения с доменом:
$ sudo realm list
vmblog.ru
type: kerberos
realm-name: VMBLOG.RU
domain-name: vmblog.ru
configured: kerberos-member
server-software: active-directory
client-software: sssd
required-package: oddjob
required-package: oddjob-mkhomedir
required-package: sssd
required-package: adcli
required-package: samba-common-tools
login-formats: %U@vmblog.ru
login-policy: allow-realm-logins
Учетная запись вашего Linux хоста должна появиться в корневом OU Computers в AD.
Чтобы разрешить аутентификацию в Linux с помощью учетной записью пользователя Active Directory нужно sssd:
$ sudo authselect select sssd
$ sudo authselect select sssd with-mkhomedir
Ваш файл /etc/sssd/sssd.conf должен выглядеть примерно так:
$ cat /etc/sssd/sssd.conf
[sssd]
domains = vmblog.ru
config_file_version = 2
services = nss, pam
default_domain_suffix = vmblog.ru
[nss]
homedir_substring = /home
[pam]
[domain/example.com]
ad_domain = vmblog.ru
krb5_realm = VMBLOG.RU
realmd_tags = manages-system joined-with-samba
cache_credentials = True
id_provider = ad
krb5_store_password_if_offline = True
default_shell = /bin/bash
ldap_id_mapping = True
use_fully_qualified_names = True
fallback_homedir = /home/%u@%d
access_provider = ad
После внесения изменения в sssd.conf, перезапустите службу:
$ sudo systemctl restart sssd
Теперь вы может выполнить аутентификацию в Linux с помощью учетной записи Active Directory (указывается в формате UPN: user@vmblog.ru).
Проверьте, что теперь вы можете получить информацию о любом пользователе AD:
$ id apetrov@vmblog.ru
Чтобы разрешить доменным пользователям вход на хост Linux (консоль+SSH), выполните:
$ realm permit apetrov1@vmblog.ru ivanov2@vmblog.ru
Разрешить вход для доменной группы:
$ ream permit -g LinuxAdmins@vmblog.ru
Чтобы разрешить, запретить доступ всем пользователям домена:
$ sudo realm permit --all
$ sudo realm deny --all
По умолчанию у доменных пользователей нет прав на повышение привилегий. Создайте файл:
$ sudo nano /etc/sudoers.d/linux-admins
И добавьте в него пользователей и группы, которым разрешено повышение привилегий с помощью sudo:
%LinuxAdminx@vmblog.ru ALL=(ALL) ALL
aivanov@vmblog.ru ALL=(ALL) ALL
Измените права на файл:
$ chmod 0440 /etc/sudoers.d/linux-admins
Теперь попробуйте аутентифицироваться на вашем Linux хосте с доменной учетной записью.
Процесс добавления Ubuntu/Debian в домен AD описан в другой статье.
Microsoft has its Identity Management suite to build around the Active Directory, and Red Hat has its identity management directory server. In this article I will share the steps to add Linux to Windows Active Directory Domain. The steps are validated by adding RHEL/CentOS 7 and 8 Linux to Windows Active Directory configured on Windows Server 2012 R2.
Some more articles on similar topic:
- How to join Linux client to Windows AD Domain using realmd with SSSD (CentOS/RHEL 7/8)
- How to join Linux client to Windows AD Domain using adcli with SSSD (CentOS/RHEL 7/8)
- How to join Linux client to Windows AD Domain using winbind (CentOS/RHEL 7/8)
1. Overview on realmd tool
RealmD is a tool that will easily configure network authentication and domain membership. With RHEL/CentOS 7, RealmD is fully supported and can be used to join IdM, AD, or Kerberos realms. The main advantage of using realmd is the ability to provide a simple one-line command to enroll into a domain as well as configure network authentication.
For example, realmd can easily configure:
- PAM Stack
- NSS Layer
- Kerberos
- SSSD
- Winbind
The realmd system supports the following domain types:
- Microsoft Active Directory
- Red Hat Enterprise Linux Identity Management
The following domain clients are supported by realmd:
- SSSD for both RHEL/CentOS Identity Management and Microsoft Active Directory
- Winbind for Microsoft Active Directory
ALSO READ: Step-by-Step: Upgrade multiple HPE VC firmware with SUM
Following table lists some of the most used realm commands:
| Command | Description |
|---|---|
| realm discover | Run a discovery scan for domains on the network. |
| realm join | Add the system to the specified domain. |
| realm leave | Remove the system from the specified domain. |
| realm list | List all configured domains for the system or all discovered and configured domains. |
| realm permit | Enable access for specified users or for all users within a configured domain to access the local system |
| realm deny | Restrict access for specified users or for all users within a configured domain to access the local system |
2. Lab Environment
For demonstrations in this article to add Linux to Windows AD Domain on RHEL/CentOS 7/8, we will use two virtual machines running in an Oracle VirtualBox installed on my Linux Server virtualization environment.
I have written another article with the steps to add Linux to Windows AD Domain on RHEL/CentOS 8 setup using Samba winbind.
We have a Microsoft Server 2012R2 Active Directory Domain Controller with the IP address 192.168.0.107 and the CentOS 8 host with the IP address 192.168.0.117. In this article I will only cover the part to add Linux to Windows AD Domain on the client side. So this article to add Linux to Windows AD Domain requires a pre-configured Windows Active Directory.
3. Pre-requisites to add Linux to Windows AD Domain
3.1 Update /etc/resolv.conf
Make sure RHEL/CentOS client machine is able to resolve Active Directory servers. To do this update your /etc/resolv.conf with the IP address of your Domain Controller on your RHEL / CentOS 7/8 client host.
[root@adcli-client ~]# cat /etc/resolv.conf
search golinuxcloud.com
nameserver 192.168.0.107
ALSO READ: Steps to join/add CentOS 8 to Windows Domain Controller (RHEL 
3.2 Verify Domain Name Resolution
Verify if the client is able to resolve the domain name:
[root@centos8 ~]# nslookup golinuxcloud.com
Server:         192.168.0.107
Address:        192.168.0.107#53

Name:   golinuxcloud.com
Address: 192.168.0.107
Verify the configuration for name resolution. In particular, verify the DNS SRV records.
 ~]# host -t SRV _kerberos._udp.golinuxcloud.com.
_kerberos._udp.golinuxcloud.com has SRV record 0 100 88 win-71humtros3m.golinuxcloud.com.

 ~]# host -t SRV _ldap._tcp.golinuxcloud.com.
_ldap._tcp.golinuxcloud.com has SRV record 0 100 389 win-71humtros3m.golinuxcloud.com.

~]# host -t SRV _ldap._tcp.dc._msdcs.golinuxcloud.com
_ldap._tcp.dc._msdcs.golinuxcloud.com has SRV record 0 100 389 win-71humtros3m.golinuxcloud.com.
3.3 Install packages (RHEL/CentOS 7)
For minimal install servers, you need to install krb5-workstation package , which provides klist command. Install adcli package along with sssd:
Here,
- sssd: The System Security Services daemon can be used to divert client authentication as required
- adcli: These are the tools for joining and managing AD domains
[root@adcli-client ~]# yum install adcli sssd authconfig realmd krb5-workstation oddjob oddjob-mkhomedir
3.4 Install packages (RHEL/CentOS 
Following list of packages are required for integrating Linux client to Windows domain using realm. We need oddjob oddjob-mkhomedir to make sure the home directory is automatically created for domain users.
[root@centos8 ~]# dnf -y install realmd adcli sssd oddjob oddjob-mkhomedir samba-common-tools krb5-workstation authselect-compat
4. Using realm to join Linux to Windows Domain
With all the packages installed, we can use the realm command to add Linux to Windows AD Domain and manage our enrolments. This command is part of the realmd package that we added.
4.1 List configured domains
We can use the list subcommand to ensure that we are not currently part of a domain:
[root@realm-client ~]# realm list
The output should be blank.
4.2 Discover available domains in the network
Now, we are ready to proceed with the next step i.e. to add Linux to Windows AD Domain. With a simple environment, you will know the domain that you want to join; at least we certainly hope that you do. In our case, we do know it and this is golinuxcloud.com.
The realm discover command returns complete domain configuration and a list of packages that must be installed for the system to be enrolled in the domain.
[root@realm-client ~]# realm discover golinuxcloud.com
GOLINUXCLOUD.COM
  type: kerberos
  realm-name: GOLINUXCLOUD.COM
  domain-name: GOLINUXCLOUD.COM
  configured: no
  server-software: active-directory
  client-software: sssd
  required-package: oddjob
  required-package: oddjob-mkhomedir
  required-package: sssd
  required-package: adcli
  required-package: samba-common-tools
golinuxcloud.com
  type: kerberos
  realm-name: GOLINUXCLOUD.COM
  domain-name: golinuxcloud.com
  configured: no
ALSO READ: Configure FTP server and pam.d to authenticate users with AD (CentOS/RHEL 7/8)
4.3 Join Linux client to Windows domain
The realm join command then sets up the local machine for use with a specified domain by configuring both the local system services and the entries in the identity domain. The process run by realm join follows these steps:
- Running a discovery scan for the specified domain.
- Automatic installation of the packages required to join the system to the domain.
- Joining the domain by creating an account entry for the system in the directory.
- Creating the
/etc/krb5.keytabhost keytab file. - Configuring the domain in SSSD and restarting the service.
- Enabling domain users for the system services in PAM configuration and the
/etc/nsswitch.conffile.
[root@realm-client ~]# realm join --user=Administrator golinuxcloud.com
Password for Administrator:
Initially I was getting following error while trying to join my Linux client to Windows domain using realm:
 ~]# realm join  --user=Administrator golinuxcloud.com
Password for Administrator:
See: journalctl REALMD_OPERATION=r597.2528
realm: Couldn't join realm: Failed to join the domain
In the journalctl logs I could find the following logs:
Mar 04 12:11:21 centos8 realmd[2314]:  ! Couldn't authenticate as: Administrator@GOLINUXCLOUD.COM: KDC has no support for encryption type
Mar 04 12:11:21 centos8 realmd[2314]:  ! Couldn't authenticate as: Administrator@GOLINUXCLOUD.COM: KDC has no support for encryption type
Mar 04 12:11:21 centos8 realmd[2314]: adcli: couldn't connect to GOLINUXCLOUD.COM domain: Couldn't authenticate as: Administrator@GOLINUXCLOUD.COM: KDC has no support for encryption type
Mar 04 12:11:21 centos8 realmd[2314]: adcli: couldn't connect to GOLINUXCLOUD.COM domain: Couldn't authenticate as: Administrator@GOLINUXCLOUD.COM: KDC has no support for encryption type
Mar 04 12:11:21 centos8 realmd[2314]: process exited: 2534
Mar 04 12:11:21 centos8 realmd[2314]:  ! Failed to join the domain
Mar 04 12:11:21 centos8 realmd[2314]:  ! Failed to join the domain
4.4 How to fix “KDC has no support for encryption type”?
Method-1
With RHEL/CentOS 8, rc4 is not in the DEFAULT crypto policy anymore, see man crypto-policies for details. Unfortunately it is still the common fallback in AD.
So we can add rc4-hmac in /etc/krb5.conf.d/crypto-policies as permitted_enctypes as shown below.
[libdefaults]
permitted_enctypes = aes256-cts-hmac-sha1-96 aes256-cts-hmac-sha384-192 camellia256-cts-cmac aes128-cts-hmac-sha1-96 aes128-cts-hmac-sha256-128 camellia128-cts-cmac rc4-hmac
Now you can re-try to join Linux client to windows domain using realm:
[root@realm-client ~]# realm join --user=Administrator golinuxcloud.com
Password for Administrator:
ALSO READ: How to list packages in a yum group? [SOLVED]
Method-2
Here also we add rc4 encryption policy but instead of using /etc/krb5.conf.d/crypto-policies, we will add following content in a new file under /etc/krb5.conf.d/
~]# cat /etc/krb5.conf.d/enctypes
[libdefaults]
   default_tgs_enctypes = aes256-cts-hmac-sha1-96 aes256-cts-hmac-sha384-192 camellia256-cts-cmac aes128-cts-hmac-sha1-96 aes128-cts-hmac-sha256-128 camellia128-cts-cmac rc4-hmac
   default_tkt_enctypes = aes256-cts-hmac-sha1-96 aes256-cts-hmac-sha384-192 camellia256-cts-cmac aes128-cts-hmac-sha1-96 aes128-cts-hmac-sha256-128 camellia128-cts-cmac rc4-hmac
Now you can try to join Linux client to the windows domain using realm:
[root@realm-client ~]# realm join --user=Administrator golinuxcloud.com
Password for Administrator:
Method-3
You can allow weak encryption by defining the following under [libdefaults] in /etc/krb5.conf file:
allow_weak_crypto = true
default_tgs_enctypes = arcfour-hmac-md5 des-cbc-crc des-cbc-md5
default_tkt_enctypes = arcfour-hmac-md5 des-cbc-crc des-cbc-md5
Now you can try to join Linux client to the windows domain using realm:
[root@realm-client ~]# realm join --user=Administrator golinuxcloud.com
Password for Administrator:
For more information you can follow Ensuring support for common encryption types in AD and RHEL
5. Verify if Linux client is integrated to windows domain
As a standard user, you can then list the domain you have joined using the realm list command again. We should note that the output at first may seem similar to the realm discover golinuxcloud.com command that we ran earlier; however, on closer examination, we will see that we are now a member server, as shown by configured: kerberos-member in the following command:
")
6. Configure NSS for SSSD service
Next we need to configure NSS to authenticate the users in the Linux client and create home directories for AD users:
6.1 On RHEL/CentOS 7
You can use authconfig on RHEL/CentOS 7 server to configure PAM and make sure the home directories of AD users are automatically created:
# authconfig --enablesssd --enablesssdauth --enablemkhomedir --update
Next enable and start/restart oddjobd.service
~]# systemctl enable --now oddjobd.service
6.2 On RHEL/CentOS 8
We will use authselect which is the new version of authconfig in RHEL/CentOS 8 for configuring PAM files and making sure that home directories of AD users are automatically created when they login to the Linux client:
~]# authselect select sssd with-mkhomedir
Profile "sssd" was selected.
The following nsswitch maps are overwritten by the profile:
- passwd
- group
- netgroup
- automount
- services

Make sure that SSSD service is configured and enabled. See SSSD documentation for more information.

- with-mkhomedir is selected, make sure pam_oddjob_mkhomedir module
  is present and oddjobd service is enabled and active
  - systemctl enable --now oddjobd.service
Next enable and start/restart oddjobd.service
~]# systemctl enable --now oddjobd.service
ALSO READ: How to add Windows Workstation to Samba AD DC (with screenshots)
7. Login as Active Directory User on Linux Client
Let us try to login to our Linux client using Windows AD user and verify if the home directory is automatically created. But first we need to check if our Linux client is able to get the user details of AD users:
~]# id GOLINUXCLOUD\\Administrator
uid=111800500(administrator@GOLINUXCLOUD.COM) gid=111800513(domain users@GOLINUXCLOUD.COM) groups=111800513(domain users@GOLINUXCLOUD.COM),111800520(group policy creator owners@GOLINUXCLOUD.COM),111800512(domain admins@GOLINUXCLOUD.COM),111800572(denied rodc password replication group@GOLINUXCLOUD.COM),111800518(schema admins@GOLINUXCLOUD.COM),111800519(enterprise admins@GOLINUXCLOUD.COM)
So our Administrator user from the AD is detected by the Linux client, so let’ try to switch user to Administrator:
")
As expected the home directory for our AD user was automatically created.
8. Leaving Active Directory domain
There will be occurrences where the Linux server needs to be removed from active directory domain. Often, this is the case where it is removed from one active directory domain before being added to another active directory domain. Should this be required, the realm command makes the process easy.
The additional option: --remove will ensure that the computer account is also deleted from the domain; otherwise, it should be deleted separately.
[root@realm-client ~]# realm leave golinuxcloud.com --remove
Password for Administrator:
Summary
In this article we learned how we can join a Linux client (CentOS/RHEL 7/8) to Windows AD Domain using realmd tool. The realmd system provides a clear and simple way to discover and join identity domains. It does not connect to the domain itself but configures underlying Linux system services, such as SSSD or Winbind, to connect to the domain.
It can run a discovery search to identify available AD and Identity Management domains and then join the system to the domain, as well as set up the required client services used to connect to the given identity domain and manage user access. Additionally, because SSSD as an underlying service supports multiple domains, realmd can discover and support multiple domains as well.
ALSO READ: Install Oh My Zsh on Linux [Step-by-Step]
Further Reading
You can go through the following articles to learn more about integrating Linux client to Windows domain using realmd
Using realmd to Connect to an Active Directory Domain
man page of krb5.conf [libdefaults]
Related Searches: linux login with active directory, join linux server to active directory, add linux server to windows domain, linux active directory authentication, how to add a linux system to a windows domain, linux windows domain authentication, linux ad integration
In Most of the Organizations users and groups are created and managed on Windows Active Directory. We can integrate our RHEL 7 and CentOS 7 servers with AD(Active Directory) for authenticate purpose. In other words we can join our CentOS 7 and RHEL 7 Server on Windows Domain so that system admins can login to these Linux servers with AD credentials. While creating UNIX users on AD we can map these users to a specific group so that level of access is controlled centrally from AD.
In this article we discuss how to integrate CentOS 7.x & RHEL 7.x with AD(Windows Server 2008 R2 & Windows Server 2012 R2). Following steps are applicable for both CentOS 7 and RHEL 7.
Step:1 Install the required packages using yum command
Use the yum command to install following packages from the command line.
[root@servera ~]# yum install sssd realmd oddjob oddjob-mkhomedir adcli samba-common samba-common-tools krb5-workstation openldap-clients policycoreutils-python
Update the /etc/hosts file and /etc/resolv.conf so that dns name or hostname of AD server gets resolved correctly. In my case AD server hostname is “adserver.example.com“, so place the below line in /etc/hosts file
192.168.0.151 adserver.example.com adserver
Contents of resolv.conf should be something like below. Just replace the domain name and ip address of dns server as per your setup
[root@servera ~]# cat /etc/resolv.conf
search example.com
nameserver 192.168.0.151
[root@servera ~]#
Step:2 Now Join Windows Domain or Integrate with AD using realm command
When we install above required packages then realm command will be available. We will use beneath realm command to integrate CentOS 7 or RHEL 7 with AD via the user “tech”. tech is a bind user which have required privileges on AD or we can also administrator user of AD Server for integration purpose.
[root@servera ~]# realm join --user=tech adserver.example.com
Password for tech:
[root@servera ~]#
Now verify whether our server has joined the Windows domain or not. Simply run the command ‘realm list‘
 [root@servera ~]# realm list
example.com
  type: kerberos
  realm-name: EXAMPLE.COM
  domain-name: example.com
  configured: kerberos-member
  server-software: active-directory
  client-software: sssd
  required-package: oddjob
  required-package: oddjob-mkhomedir
  required-package: sssd
  required-package: adcli
  required-package: samba-common-tools
  login-formats: %[email protected]
  login-policy: allow-realm-logins
[root@servera ~]#
Whenever we run ‘realm join’ command it will automatically configure ‘/etc/sssd/sssd.conf‘ file.
Step:3 Check and Verify AD users on REHL 7 or CentOS 7 Servers
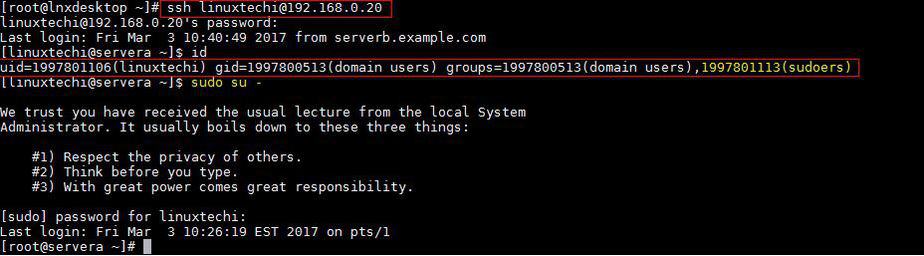
With ‘id‘ command on Linux we can verify the user’s uid and gid and their group information. At this point of time our server is now the part of windows domain. Use below command to verify AD users details.
[root@servera ~]# id [email protected]
uid=1997801106([email protected]) gid=1997800513(domain [email protected]) groups=1997800513(domain [email protected])
[root@servera ~]#
You might have noticed in above command that i have mentioned domain name as well along with user name because this is controlled by ‘/etc/sssd/sssd.conf’ file. If we execute id command without domain name then we will not get any details for user.
[root@servera ~]# id linuxtechi
id: linuxtechi: no such user
[root@servera ~]#
We can change this behavior by editing the file /etc/sssd/sssd.conf.
Change the following parameters from
use_fully_qualified_names = True
fallback_homedir = /home/%u@%d
to
use_fully_qualified_names = False
fallback_homedir = /home/%u
Restart the sssd service using following systemctl command
[root@servera ~]# systemctl restart sssd
[root@servera ~]# systemctl daemon-reload
Now run the id command and see whether you are able get AD user details without mentioning domain name
[root@servera ~]# id linuxtechi
uid=1997801106(linuxtechi) gid=1997800513(domain users) groups=1997800513(domain users)
[root@servera ~]#
Let’s try ssh CentOS 7 or RHEL 7 Server with AD credentials
[root@lnxdesktop ~]# ssh [email protected]
[email protected]'s password:
Last login: Fri Mar  3 10:18:41 2017 from serverb.example.com
[linuxtechi@servera ~]$ id
uid=1997801106(linuxtechi) gid=1997800513(domain users) groups=1997800513(domain users)
[linuxtechi@servera ~]$ pwd
/home/linuxtechi
[linuxtechi@servera ~]$
Step:4 Sudo rights for AD users on CentOS 7 or RHEL 7
In case you want to configure sudo rights for AD users then the best way is to create a group on AD with name sudoers and add Linux/UNIX users in that group and on Linux Server create a file with name “sudoers” under the folder /etc/sudoers.d/
Put the following content in the file.
[root@servera ~]# cat /etc/sudoers.d/sudoers
%sudoers    ALL=(ALL)       ALL
[root@servera ~]#
In my case I have given all the rights to the users which are part of sudoers group. Once your done with these changes re-login to your server with AD credentials and see whether user is part of sudoers group.
That’s all from this article, Hope you guys got an idea how to join RHEL or CentOS server with Windows Domain. Please share your feedback and valuable comments.