The Vulkan SDK Includes:
Vulkan Loader
The Vulkan SDK includes the Khronos‐branded Vulkan loader binary for Linux and macOS. On Windows, the Vulkan Loader is delivered with the hardware vendor driver update packages. The loader discovers and manages the Vulkan devices and layers available to the application.
Vulkan Application Developer Tools
The SDK provides you with tools to assist the developer during application development. Common tools are the Validation Layers, apidump, vulkaninfo, and capture/replay tools.
Vulkan Capture Tools
The capture and replay tools allow you to capture API calls in binary format and play them back. This is useful for sharing traces when debugging your applications with third parties (such as IHVs) without having to share the application. For application developers it can be useful to validate that the application is executing Vulkan API usage as expected.
SPIR‐V™ Tools
SPIR‐V is a new binary intermediate representation (IR) for graphical shaders and compute kernels. The Vulkan graphics API requires the SPIR‐V format for all shaders. To help you meet this requirement, the SDK includes tools for proper shader generation, GLSL and HLSL conversion, inspection, and compression improvement.
SDK Documentation
Each SDK is for a Vulkan header version. Online documentation for all the tools in the SDK is included as well as builds of the Vulkan specification for the header version.
Vulkan Samples and Tutorial
An online Vulkan tutorial is provided that will take the user through the steps to render a basic object on the screen. In addition, there are simple Vulkan samples that demonstrate the use of some of the Vulkan API calls.
Benefits of Using the SDK
- Provides your developers with the essential tools needed for developing Vulkan applications
- Streamlines the process of developing applications in Vulkan by delivering pre-built versions of key developer’s tools relative to the Vulkan header version

Our Work with the Khronos Group
LunarG has a long-standing partnership with the Khronos Group, a technology consortium that works to develop advanced, royalty-free, acceleration standards for 3D graphics. LunarG is also actively involved in influencing the Vulkan specification process, and in representing its clients’ needs at Vulkan Working Group meetings.

Find answers to your most pressing questions about the Vulkan SDK.
Read FAQ
White Paper
Vulkan SDK Version Compatibility

Need Help with
3D Graphics Software?
Interested in LunarG software services or have a unique need that you don’t see represented here? Let’s talk about your project…

Are you looking to take your PC gaming to the next level? Installing Vulkan on Windows 10 is a great way to get the most out of your gaming experience. Vulkan is a powerful 3D graphics and compute API that is designed to provide low-overhead, cross-platform access to modern graphics processing units (GPUs). This guide will show you how to quickly and easily install Vulkan on Windows 10.
Installing Vulkan on Windows 10 is a straightforward process.
Firstly, download the Vulkan Runtime Libraries from the official website.
Then, run the installation package and follow the on-screen instructions.
At last, restart your computer and you’re done.
- Download the Vulkan Runtime Libraries from the official website.
- Run the installation package.
- Follow the on-screen instructions.
- Restart your computer.

What is Vulkan and How to Install it on Windows 10?
Vulkan is an open-source 3D graphics and compute API that is used for developing high-performance, cross-platform applications. It is designed to provide low-level access to modern GPUs and to provide a powerful and efficient way to access them. Vulkan allows developers to create truly high-performance, multi-threaded 3D applications with a powerful, low-overhead API. By providing low-level access to the hardware, developers can create applications that are faster, more efficient, and more responsive.
Vulkan is supported on Windows 10, making it easier than ever to take advantage of the power of modern GPUs. In this guide, we will show you how to install Vulkan on Windows 10. We will cover the steps required to install the Vulkan SDK, as well as the steps required to start developing Vulkan applications.
Download the Latest Version of Vulkan SDK
The first step to installing Vulkan on Windows 10 is to download the latest version of the Vulkan SDK. The Vulkan SDK is available for download from the LunarG website. Once the SDK is downloaded, unzip the downloaded file and run the setup program. This will install the Vulkan SDK and all of its components.
Once the SDK is installed, you will need to set up the environment variables. This can be done by going to the Advanced System Settings in the Control Panel, then selecting the Environment Variables button. You will need to add the following environment variables: Vulkan_SDK_PATH, VULKAN_SDK, and VULKAN_SDK_VERSION.
Install the Vulkan Runtime Libraries
After installing the Vulkan SDK, you will need to install the Vulkan Runtime Libraries. The Vulkan Runtime Libraries are provided by the GPU manufacturers and are necessary for Vulkan applications to run properly. To install the Vulkan Runtime Libraries, you will need to go to the GPU manufacturer’s website and download the latest version of the Vulkan Runtime Libraries. Once the files have been downloaded, you will need to install them by running the setup program.
Enable the Vulkan API
Once the Vulkan Runtime Libraries have been installed, you will need to enable the Vulkan API in your system. This can be done by going to the Control Panel and selecting the “Programs and Features” option. Then, select “Turn Windows Features On or Off.” You will need to check the box next to “Vulkan Runtime Libraries” and then click “OK.” This will enable the Vulkan API in your system.
Install the Vulkan Drivers
The last step to installing Vulkan on Windows 10 is to install the Vulkan drivers. The drivers are provided by the GPU manufacturer and are necessary for Vulkan applications to run properly. To install the Vulkan drivers, you will need to go to the GPU manufacturer’s website and download the latest version of the Vulkan drivers. Once the drivers have been downloaded, you will need to install them by running the setup program.
Testing the Installation
Once the Vulkan SDK, Vulkan Runtime Libraries, Vulkan API, and Vulkan drivers have been installed, you will need to test the installation to make sure everything is working correctly. To do this, you will need to run a Vulkan application. You can find a list of Vulkan applications on the LunarG website. Once the application is running, you should see the Vulkan logo in the top-right corner of the window. If you see the logo, then your installation has been successful.
Troubleshooting
If you encounter any issues while installing or running Vulkan applications, you can refer to the Vulkan troubleshooting guide. This guide will help you identify and resolve any issues you may be having.
Frequently Asked Questions
What is Vulkan?
Vulkan is a low-overhead, cross-platform 3D graphics and compute API. It provides high-efficiency, cross-platform access to modern GPUs used in a wide variety of devices from PCs and consoles to mobile phones and embedded platforms. Vulkan is designed to give maximum control to the developer to provide the best possible performance and flexibility.
What do I need to install Vulkan on Windows 10?
In order to install Vulkan on Windows 10, you will need to have the latest version of Windows 10 installed, as well as the latest drivers for your graphics card. You will also need to download the Vulkan SDK from the LunarG website and install it on your system.
How do I install the Vulkan SDK?
Once you have the latest version of Windows 10 and the latest drivers for your graphics card, you can download the Vulkan SDK from the LunarG website. Once downloaded, you will need to extract the files from the .zip archive and run the setup.exe file to install the SDK.
How do I check if Vulkan is installed correctly?
Once you have installed the Vulkan SDK, you can check that it is installed correctly by opening the ‘vulkaninfo.exe’ file located in the ‘bin’ folder of the SDK. This will display information about your system and the Vulkan version that is installed.
Are there any known issues with Vulkan on Windows 10?
There are no known issues with Vulkan on Windows 10, however, it is important to ensure that you have the latest drivers for your graphics card installed in order to ensure the best performance and compatibility.
What are the benefits of using Vulkan on Windows 10?
The benefits of using Vulkan on Windows 10 include improved performance and efficiency, as well as better compatibility with newer hardware. Vulkan also provides an easier development process, allowing developers to quickly deploy applications for a wide range of platforms. Additionally, Vulkan is cross-platform and can be used on multiple operating systems, including Windows, Android and Linux.
How to Install Vulkan API
In conclusion, installing Vulkan on Windows 10 is a simple but important task for anyone who wants to get the most out of their gaming experience. With the help of this guide, you can easily install Vulkan on Windows 10 without any difficulty. With Vulkan, you can take advantage of next-level graphics and performance, so get out there and start gaming!
Время на прочтение
12 мин
Количество просмотров 33K

Я переводчик ижевской компании CG Tribe и здесь я буду публиковать перевод руководства к Vulkan API. Ссылка на источник — vulkan-tutorial.com. Это моя вторая публикация, которая посвящена переводу раздела Development Environment.
1. Вступление
См. статью автора kiwhy — habr.com/ru/post/462137
2. Краткий обзор
См. статью — habr.com/ru/post/524992
3. Настройка окружения
Windows
- Vulkan SDK
- GLFW
- GLM
- Настройка Visual Studio
Linux
- Vulkan Packages
- GLFW
- GLM
- Компилятор шейдеров
- Настройка проекта для makefile
MacOS
- Vulkan SDK
- GLFW
- GLM
- Настройка Xcode
В этой главе мы настроим рабочую среду и установим несколько полезных библиотек. Инструменты, которые мы будем использовать, являются кроссплатформенными (разумеется, за исключением компилятора). Однако их установка в Windows, Linux и MacOS отличается, поэтому в руководстве каждая из этих ОС будет рассматриваться отдельно.
Windows
Если вы занимаетесь разработкой для Windows, то, скорее всего, вы используете Visual Studio. Для полной поддержки С++17 необходимо использовать Visual Studio 2017 или 2019. Шаги, описанные ниже, подходят для VS 2017.
Vulkan SDK
Самым важным компонентом для разработки программ с Vulkan является SDK. Он включает в себя заголовочные файлы, стандартные слои валидации, инструменты отладки и загрузчик функций Vulkan. Загрузчик ищет методы драйвера в рантайме (во время исполнения) так же, как это делает библиотека GLEW для OpenGL.
SDK можно загрузить с сайта LunarG. Для этого используйте кнопки внизу страницы. Вам необязательно создавать аккаунт, однако с ним у вас будет доступ к дополнительной документации.

Устанавливая SDK, запомните место установки.
Следующим шагом проверьте, поддерживает ли Vulkan ваша видеокарта и драйвер. Перейдите в папку с SDK, откройте папку Bin и запустите демо-проект vkcube.exe. Должно появиться следующее:

Если вы получили сообщение об ошибке, убедитесь, что ваша видеокарта поддерживает Vulkan, а драйвер обновлен до последней версии. См. главу Введение, в которой даны ссылки на драйверы крупных производителей.
В этой папке есть и другие программы, которые могут оказаться полезными для разработки. Программы glslangValidator.exe и glslc.exe используются для компиляции шейдеров из GLSL в байт-код. Подробно эта тема будет рассмотрена в главе Шейдерные модули. В папке Bin также находятся dll библиотеки загрузчика Vulkan и слоёв валидации, в папке Lib — статические библиотеки, а в папке Include – заголовочные файлы Vulkan. Вы можете изучить и другие файлы, но для руководства они нам не понадобятся.
GLFW
Как уже было сказано, Vulkan – это API, независимый от платформы, в котором нет инструментов создания окна для отображения результатов рендеринга. Чтобы использовать преимущества кроссплатформенности Vulkan и избежать ужасов Win32, мы будем использовать библиотеку GLFW для создания окна. Есть и другие доступные библиотеки, например, SDL, но GLFW лучше тем, что она абстрагирует не только создание окна, но и некоторые другие платформенно-зависимые функции.
Последнюю версию библиотеки GLFW можно найти на официальном сайте. В руководстве мы будем использовать 64-битные сборки, но вы, разумеется, можете выбрать и 32-битные. В этом случае убедитесь, что вы ссылаетесь на файлы Vulkan SDK в папке Lib32, а не в Lib. После скачивания распакуйте архив в удобное место. Мы создали новую папку Libraries в папке Visual Studio.

GLM
В отличие от DirectX 12, в Vulkan нет библиотеки для операций линейной алгебры, поэтому ее придется скачать отдельно. GLM – это удобная библиотека, разработанная для использования с графическими API, она часто используется с OpenGL.
Библиотека GLM – это header only библиотека. Скачайте последнюю версию и сохраните ее в удобном месте. У вас должна получиться подобная структура каталогов:

Настройка Visual Studio
После установки всех библиотек мы можем настроить проект Visual Studio для Vulkan и написать немного кода, чтобы убедиться, что все работает.
Откройте Visual Studio и создайте новый проект Windows Desktop Wizard. Введите имя проекта и нажмите OK.

В поле Application type выберите Console Application (.exe), чтобы видеть сообщения отладки. Также выберите Empty Project, чтобы Visual Studio не добавила шаблонный код.

Нажмите OK, чтобы создать проект, и добавьте .cpp файл. Наверняка вы и так знаете, как это сделать, но мы не стали пропускать эти действия, чтобы инструкция получилась полной.


Добавьте в файл код, указанный ниже. Вам необязательно пытаться понять его сейчас, важно узнать, соберется ли и запустится ли программа. В следующей главе мы начнем описание с самых азов.
#define GLFW_INCLUDE_VULKAN
#include <GLFW/glfw3.h>

#define GLM_FORCE_RADIANS
#define GLM_FORCE_DEPTH_ZERO_TO_ONE
#include <glm/vec4.hpp>
#include <glm/mat4x4.hpp>

#include <iostream>

int main() {
    glfwInit();

    glfwWindowHint(GLFW_CLIENT_API, GLFW_NO_API);
    GLFWwindow* window = glfwCreateWindow(800, 600, "Vulkan window", nullptr, nullptr);

    uint32_t extensionCount = 0;
    vkEnumerateInstanceExtensionProperties(nullptr, &extensionCount, nullptr);

    std::cout << extensionCount << " extensions supported\n";

    glm::mat4 matrix;
    glm::vec4 vec;
    auto test = matrix * vec;

    while(!glfwWindowShouldClose(window)) {
        glfwPollEvents();
    }

    glfwDestroyWindow(window);

    glfwTerminate();

    return 0;
}
Откройте диалог с настройками проекта и убедитесь, что в меню выбрано All Configurations. Это нужно из-за того, что большинство настроек применяются как в режиме Debug, так и в Release.


Перейдите в C++ -> General -> Additional Include Directories и выберите <Edit...> в выпадающем списке.

Добавьте include директории для Vulkan, GLFW и GLM:

Перейдите в Linker → General → Additional Library Directories и добавьте расположения lib-файлов для Vulkan и GLFW:


Перейдите в Linker → Input и выберите Edit в выпадающем списке Additional Dependencies.
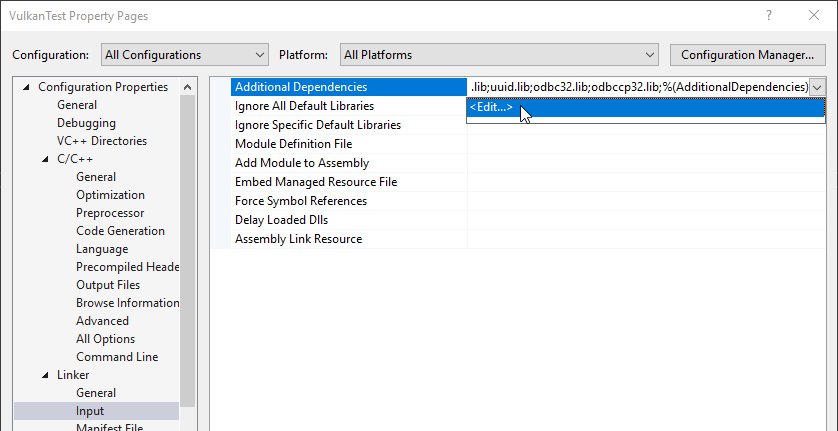
Введите имена lib-файлов Vulkan и GLFW:

И измените настройки стандарта на C++:

Теперь вы можете закрыть диалог с настройками проекта. Если все сделано верно, подсветки ошибок в коде больше не будет.
Не забудьте выбрать для компиляции 64-битный режим.

Нажмите F5, чтобы скомпилировать и запустить проект. Вы увидите командную строку и окно, подобное этому:

Проверьте, чтобы число расширений не равнялось нулю («X extensions supported» в консоли).
Поздравляем, вы готовы к работе с Vulkan!
Linux
Инструкции ниже предназначены для пользователей Ubuntu, но вы можете следовать им, изменив команды apt на подходящие вам команды менеджера пакетов. Вам нужен компилятор с поддержкой С++17 (GCC 7+ или Clang 5+). Вам также понадобится утилита make.
Vulkan Packages
Самыми важными компонентами для разработки с использованием Vulkan под Linux являются загрузчик Vulkan, слои валидации и несколько утилит командной строки для проверки совместимости вашего компьютера с Vulkan:
sudo apt install vulkan-tools: утилиты командной строки, особенно можно выделитьvulkaninfoиvkcube. Запустите их, чтобы проверить, поддерживает ли ваш ПК Vulkan.sudo apt install libvulkan-dev: устанавливает загрузчик Vulkan. Загрузчик ищет методы драйвера в рантайме (во время исполнения) так же, как это делает библиотека GLEW для OpenGL.sudo apt install vulkan-validationlayers-dev: устанавливает стандартные слои валидации, которые необходимы при отладке программ с Vulkan. О них мы поговорим в следующей главе.
Также не забудьте запустить vkcube, после чего на экране должно появиться следующее:

Если вы получили сообщение об ошибке, убедитесь, что ваша видеокарта поддерживает Vulkan, а драйвер обновлен до последней версии. См. главу Введение, в которой даны ссылки на драйверы крупных производителей.
GLFW
Как уже было сказано, Vulkan – это API, независимый от платформы, в котором нет инструментов создания окна для отображения результатов рендеринга. Чтобы использовать преимущества кроссплатформенности Vulkan и избежать ужасов X11, мы будем использовать библиотеку GLFW для создания окна. Есть и другие доступные библиотеки, например, SDL, но GLFW лучше тем, что она абстрагирует не только создание окна, но и некоторые другие платформенно-зависимые функции.
Мы будем устанавливать GLFW с помощью следующей команды:
sudo apt install libglfw3-devGLM
В отличие от DirectX 12, в Vulkan нет библиотеки для операций линейной алгебры, поэтому ее придется скачать отдельно. GLM – это удобная библиотека, разработанная для использования с графическими API, она часто используется с OpenGL.
Библиотека GLM – это header only библиотека. Ее можно установить из пакета libglm-dev:
sudo apt install libglm-devКомпилятор шейдеров
Теперь, когда настройка почти завершена, осталось установить программу для компиляции шейдеров из GLSL в байт-код.
Два наиболее известных компилятора шейдеров — это glslangValidator от Khronos Group и glslc от Google. По использованию glslc похож на GCC и Clang, поэтому мы остановим выбор на нем. Скачайте бинарники и скопируйте glslc в /usr/local/bin. Обратите внимание, что, в зависимости от ваших прав доступа, вам может понадобиться команда sudo. Для тестирования запустите glslc, после чего должно появиться предупреждение:
glslc: error: no input files
Мы подробно рассмотрим glslc в главе о шейдерных модулях.
Настройка проекта для makefile
После установки всех библиотек мы можем настроить проект makefile для Vulkan и написать немного кода, чтобы убедиться, что все работает.
Создайте новую папку в удобном месте и назовите ее VulkanTest. Создайте файл с именем main.cpp и вставьте в него код, приведенный ниже. Вам необязательно пытаться понять его сейчас, важно узнать, соберется ли и запустится ли программа. В следующей главе мы начнем описание с самых азов.
#define GLFW_INCLUDE_VULKAN
#include <GLFW/glfw3.h>

#define GLM_FORCE_RADIANS
#define GLM_FORCE_DEPTH_ZERO_TO_ONE
#include <glm/vec4.hpp>
#include <glm/mat4x4.hpp>

#include <iostream>

int main() {
    glfwInit();

    glfwWindowHint(GLFW_CLIENT_API, GLFW_NO_API);
    GLFWwindow* window = glfwCreateWindow(800, 600, "Vulkan window", nullptr, nullptr);

    uint32_t extensionCount = 0;
    vkEnumerateInstanceExtensionProperties(nullptr, &extensionCount, nullptr);

    std::cout << extensionCount << " extensions supported\n";

    glm::mat4 matrix;
    glm::vec4 vec;
    auto test = matrix * vec;

    while(!glfwWindowShouldClose(window)) {
        glfwPollEvents();
    }

    glfwDestroyWindow(window);

    glfwTerminate();

    return 0;
}
Следующим шагом будет написание makefile для компиляции и запуска. Создайте новый пустой файл с именем Makefile. Предполагается, что у вас уже есть начальный опыт работы с makefiles. Если нет, то это руководство поможет вам быстро войти в курс дела.
Сначала необходимо определить несколько переменных, чтобы упростить оставшуюся часть файла. Определите переменную CFLAGS, которая укажет базовые флаги компилятора:
CFLAGS = -std=c++17 -O2
Мы используем современный С++ (-std=c++17). Также мы задаем уровень оптимизации О2. Можно удалить уровень -О2 для более быстрой компиляции программ, но для релизной сборки его все равно нужно будет вернуть.
Аналогично определите базовые флаги линкера в переменной LDFLAGS:
LDFLAGS = -lglfw -lvulkan -ldl -lpthread -lX11 -lXxf86vm -lXrandr -lXi
Флаг -lglfw подключает библиотеку GLFW, -lvulkan — загрузчик Vulkan, а остальные флаги — низкоуровневые библиотеки и зависимости самой GLFW.
Теперь вам будет несложно определить правило для компиляции VulkanTest. Не забудьте, что для отступов необходимо использовать табы вместо пробелов.
VulkanTest: main.cpp
    g++ $(CFLAGS) -o VulkanTest main.cpp $(LDFLAGS)
Проверьте, работает ли сборка. Сохраните makefile и запустите make из папки с main.cpp и Makefile. В результате должен получиться исполняемый файл VulkanTest.
Теперь необходимо задать еще два правила — test и clean. Test запускает исполняемый файл, а clean удаляет его.
.PHONY: test clean

test: VulkanTest
    ./VulkanTest

clean:
    rm -f VulkanTest
Запуск команды make test позволит убедиться, что программа работает успешно. При закрытии пустого окна программа должна завершиться успешным кодом возврата (0). У вас должен получиться готовый makefile, похожий на приведенный ниже:
CFLAGS = -std=c++17 -O2
LDFLAGS = -lglfw -lvulkan -ldl -lpthread -lX11 -lXxf86vm -lXrandr -lXi

VulkanTest: main.cpp
    g++ $(CFLAGS) -o VulkanTest main.cpp $(LDFLAGS)

.PHONY: test clean

test: VulkanTest
	./VulkanTest

clean:
    rm -f VulkanTest
Вы можете использовать эту структуру каталогов в качестве шаблона для проектов Vulkan. Для этого скопируйте ее, переименуйте, например, в HelloTriangle и удалите весь код из main.cpp.
Итак, теперь вы готовы к настоящему приключению.
MacOS
Инструкции ниже предназначены для тех, кто использует Xcode и менеджер пакетов Homebrew. Имейте в виду, что версия MacOS не должна быть ниже 10.11, а ваше устройство должно поддерживать Metal API.
Vulkan SDK
Самым важным компонентом для разработки программ с Vulkan является SDK. Он включает в себя заголовочные файлы, стандартные слои валидации, инструменты отладки и загрузчик функций Vulkan. Загрузчик ищет методы драйвера в рантайме (во время исполнения) так же, как это делает библиотека GLEW для OpenGL.
SDK можно загрузить с сайта LunarG. Для этого используйте кнопки внизу страницы. Вам необязательно создавать аккаунт, однако с ним у вас будет доступ к дополнительной документации.
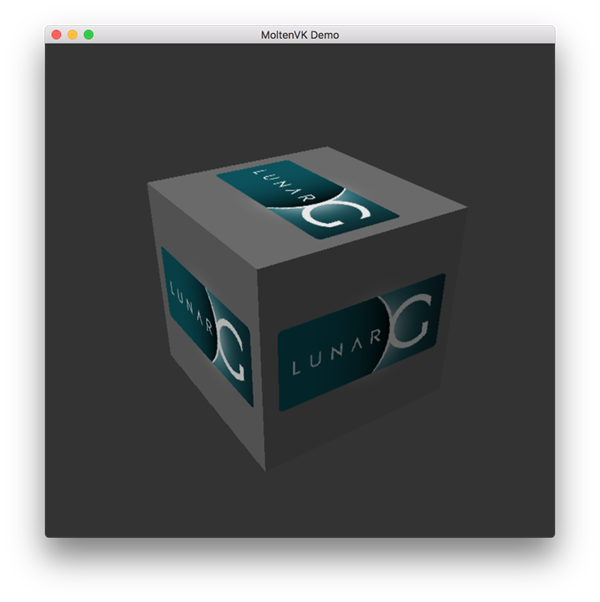
Версия SDK для MacOS использует библиотеку MoltenVK. MacOS не имеет прямой поддержки Vulkan, а MoltenVK используется как прослойка для передачи вызовов в Apple Metal. Благодаря этому вы можете воспользоваться преимуществами отладки и производительности Apple Metal.
После загрузки MoltenVK извлеките содержимое в любую папку (имейте в виду, что вам необходимо будет ссылаться на нее при создании проекта в Xcode). Внутри извлеченной папки, в папке Applications, должны находиться исполняемые файлы, которые позволят запустить несколько демо-проектов с использованием SDK. Запустите исполняемый файл vkcube, и вы увидите следующее:
GLFW
Как уже было сказано, Vulkan – это API, независимый от платформы, в котором нет инструментов создания окна для отображения результатов рендеринга. Мы будем использовать библиотеку GLFW для создания окна. Есть и другие доступные библиотеки, например, SDL, но GLFW лучше тем, что она абстрагирует не только создание окна, но и некоторые другие платформенно-зависимые функции.
Для установки GLFW на MacOS мы будем использовать менеджер пакетов Homebrew:
brew install glfwGLM
В Vulkan нет библиотеки для операций линейной алгебры, поэтому ее придется скачать отдельно. GLM – это удобная библиотека, разработанная для использования с графическими API, она часто используется с OpenGL.
Библиотека GLM – это header only библиотека. Ее можно установить из пакета glm:
brew install glmНастройка Xcode
После установки всех библиотек мы можем настроить проект Xcode для Vulkan. Всякий раз при упоминании папки vulkansdk, мы будем иметь в виду папку, в которую вы извлекли Vulkan SDK.
Запустите Xcode и создайте новый проект Xcode. В появившемся окне выберите Application > Command Line Tool.

Выберите Next, введите имя проекта и в пункте Language выберите C++.
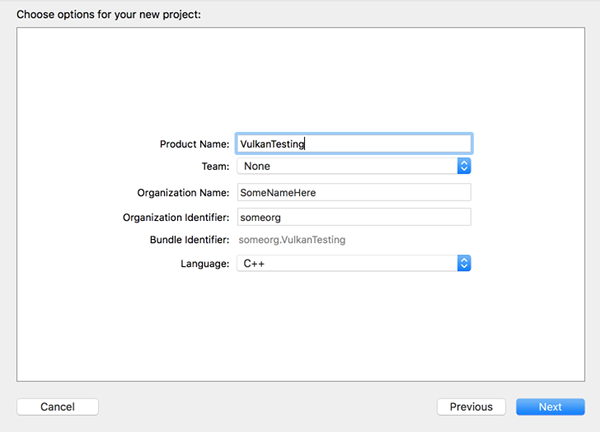
Нажмите Next, чтобы создать проект (в актуальном XCode12 вам потребуется ещё выбрать место для папки проекта — Прим. пер.). Когда проект будет создан, измените код в файле main.cpp на следующий:
#define GLFW_INCLUDE_VULKAN
#include <GLFW/glfw3.h>

#define GLM_FORCE_RADIANS
#define GLM_FORCE_DEPTH_ZERO_TO_ONE
#include <glm/vec4.hpp>
#include <glm/mat4x4.hpp>

#include <iostream>

int main() {
    glfwInit();

    glfwWindowHint(GLFW_CLIENT_API, GLFW_NO_API);
    GLFWwindow* window = glfwCreateWindow(800, 600, "Vulkan window", nullptr, nullptr);

    uint32_t extensionCount = 0;
    vkEnumerateInstanceExtensionProperties(nullptr, &extensionCount, nullptr);

    std::cout << extensionCount << " extensions supported\n";

    glm::mat4 matrix;
    glm::vec4 vec;
    auto test = matrix * vec;

    while(!glfwWindowShouldClose(window)) {
        glfwPollEvents();
    }

    glfwDestroyWindow(window);

    glfwTerminate();

    return 0;
}
Имейте в виду, вам необязательно пытаться понять весь код сейчас. Мы просто хотим использовать некоторые вызовы API, чтобы убедиться, что все работает правильно.
Xcode покажет некоторые ошибки, например, библиотеки, которые не были найдены. Необходимо настроить проект так, чтобы устранить эти ошибки. Выберите ваш проект в панели Project Navigator. Откройте вкладку Build Settings и выполните следующее:
- Найдите поле Header Search Paths и добавьте ссылку на
/usr/local/include(это место, куда Homebrew устанавливает заголовочные файлы, поэтому здесь должны быть файлы glm и glfw3) и ссылку наvulkansdk/macOS/includeдля заголовочных файлов Vulkan. - Найдите поле Library Search Paths и добавьте ссылку на
/usr/local/lib(это еще одно место, куда Homebrew устанавливает библиотечные файлы, поэтому здесь должны быть файлы glm и glfw3) и ссылку наvulkansdk/macOS/lib.
В результате у вас должно получиться следующее (разумеется, пути будут отличаться в зависимости от расположения ваших файлов):

(На скриншоте на каждый параметр приходится по одному пути. Но, если следовать этому мануалу, вы получите по два пути на параметр. — Прим. пер.)
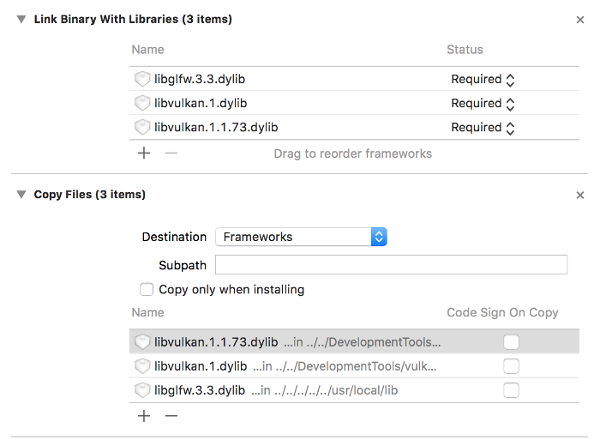
Теперь перейдем во вкладку Build Phases → Link Binary With Libraries и добавим фреймворки glfw3 и vulkan. Чтобы упростить задачу, мы будем добавлять в проект динамические библиотеки (если вы хотите использовать статические библиотеки, вы можете изучить документацию к ним).
- Для glfw откройте папку
/usr/local/lib(для этого вызовите Spotlight – Command+Space и введите в строку поиска /usr/local/lib – Прим. пер.), где вы найдете файл с именем, похожим наlibglfw.3.x.dylib(“x” — это номер версии библиотеки; он зависит от даты загрузки пакета из Homebrew). Перетащите файл во вкладку Linked Frameworks and Libraries в Xcode. - Для vulkan перейдите в
vulkansdk/macOS/lib. Сделайте то же самое с файламиlibvulkan.1.dylibиlibvulkan.1.x.xx.dylib(здесь “x” — это номер версии загруженного SDK).
После добавления библиотек в той же вкладке Copy Files измените Destination на “Frameworks”, очистите поле Subpath и уберите флажок напротив “Copy only when installing”. Нажмите на “+” и добавьте все три фреймворка. (Также уберите флажок напротив Code Sign On Copy, если он там есть. — Прим. пер.)
Конфигурация Xcode должна иметь следующий вид:

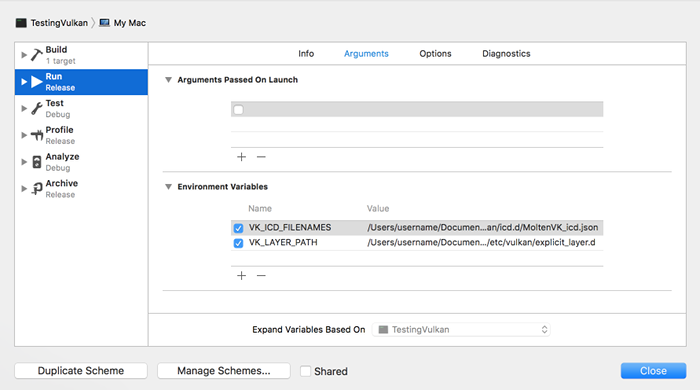
Осталось настроить несколько переменных среды. В панели инструментов Xcode перейдите в Product > Scheme > Edit Scheme... и во вкладке Arguments добавьте две переменные среды:
• VK_ICD_FILENAMES = vulkansdk/macOS/share/vulkan/icd.d/MoltenVK_icd.json
• VK_LAYER_PATH = vulkansdk/macOS/share/vulkan/explicit_layer.d
У вас должно получиться следующее:

Итак, настройка завершена! После запуска проекта (не забудьте установить конфигурацию сборки Debug или Release) вы увидите следующее:

Число расширений должно быть больше нуля («X extensions supported» в консоли). Остальные логи берутся из библиотек. Вы можете получать разные сообщения в зависимости от вашей конфигурации.
Поздравляем! Теперь вы готовы к реальной работе с Vulkan.
-
Windows
-
Vulkan SDK
-
GLFW
-
GLM
-
Setting up Visual Studio
-
-
Linux
-
Vulkan Packages
-
GLFW
-
GLM
-
Shader Compiler
-
Setting up a makefile project
-
-
MacOS
-
Vulkan SDK
-
GLFW
-
GLM
-
Setting up Xcode
-
In this chapter we’ll set up your environment for developing Vulkan applications
and install some useful libraries. All of the tools we’ll use, with the
exception of the compiler, are compatible with Windows, Linux and MacOS, but the
steps for installing them differ a bit, which is why they’re described
separately here.
Windows
If you’re developing for Windows, then I will assume that you are using Visual
Studio to compile your code. For complete C++17 support, you need to use either
Visual Studio 2017 or 2019. The steps outlined below were written for VS 2017.
Vulkan SDK
The most important component you’ll need for developing Vulkan applications is
the SDK. It includes the headers, standard validation layers, debugging tools
and a loader for the Vulkan functions. The loader looks up the functions in the
driver at runtime, similarly to GLEW for OpenGL — if you’re familiar with that.
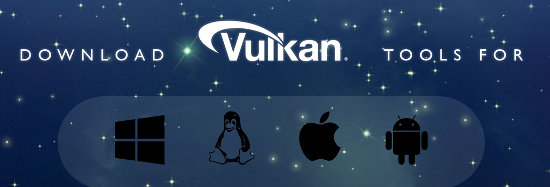
The SDK can be downloaded from the LunarG website
using the buttons at the bottom of the page. You don’t have to create an
account, but it will give you access to some additional documentation that may
be useful to you.
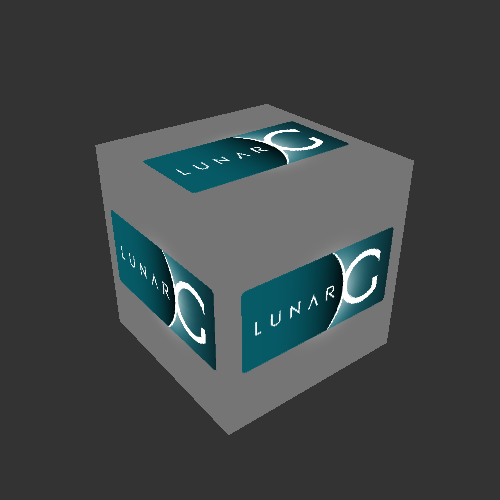
Proceed through the installation and pay attention to the install location of
the SDK. The first thing we’ll do is verify that your graphics card and driver
properly support Vulkan. Go to the directory where you installed the SDK, open
the Bin directory and run the vkcube.exe demo. You should see the following:
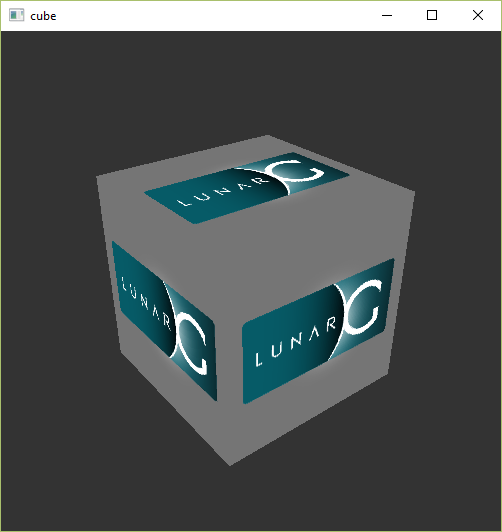
If you receive an error message then ensure that your drivers are up-to-date,
include the Vulkan runtime and that your graphics card is supported. See the
introduction chapter for links to drivers from the major
vendors.
There is another program in this directory that will be useful for development. The glslangValidator.exe and glslc.exe programs will be used to compile shaders from the
human-readable GLSL to
bytecode. We’ll cover this in depth in the shader modules
chapter. The Bin directory also contains the binaries of the Vulkan loader
and the validation layers, while the Lib directory contains the libraries.
Lastly, there’s the Include directory that contains the Vulkan headers. Feel free to explore the other files, but we won’t need them for this tutorial.
GLFW
As mentioned before, Vulkan by itself is a platform agnostic API and does not
include tools for creating a window to display the rendered results. To benefit
from the cross-platform advantages of Vulkan and to avoid the horrors of Win32,
we’ll use the GLFW library to create a window, which
supports Windows, Linux and MacOS. There are other libraries available for this
purpose, like SDL, but the advantage of GLFW is that
it also abstracts away some of the other platform-specific things in Vulkan
besides just window creation.
You can find the latest release of GLFW on the official website.
In this tutorial we’ll be using the 64-bit binaries, but you can of course also
choose to build in 32 bit mode. In that case make sure to link with the Vulkan
SDK binaries in the Lib32 directory instead of Lib. After downloading it, extract the archive
to a convenient location. I’ve chosen to create a Libraries directory in the
Visual Studio directory under documents.
GLM
Unlike DirectX 12, Vulkan does not include a library for linear algebra
operations, so we’ll have to download one. GLM is a
nice library that is designed for use with graphics APIs and is also commonly
used with OpenGL.
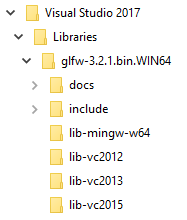
GLM is a header-only library, so just download the latest version
and store it in a convenient location. You should have a directory structure
similar to the following now:

Setting up Visual Studio
Now that you’ve installed all of the dependencies we can set up a basic Visual
Studio project for Vulkan and write a little bit of code to make sure that
everything works.
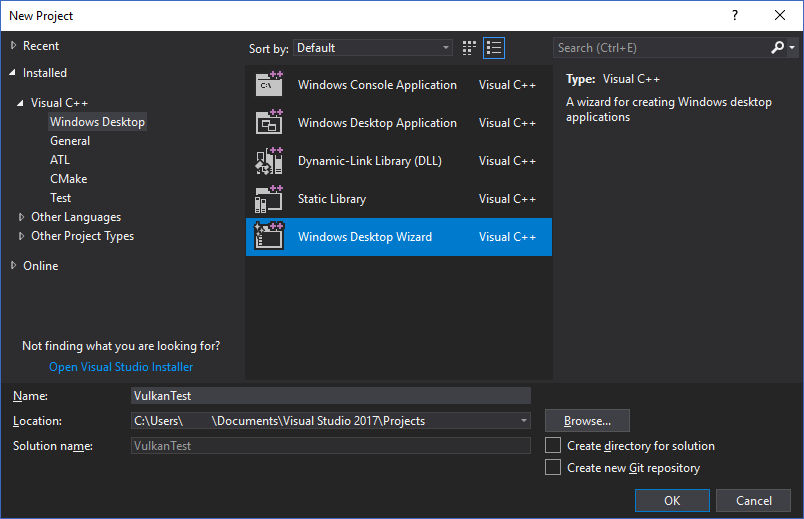
Start Visual Studio and create a new Windows Desktop Wizard project by entering a name and pressing OK.
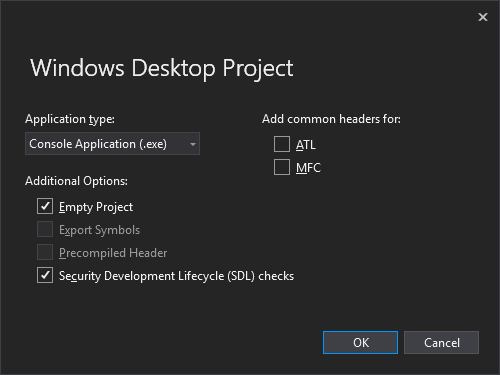
Make sure that Console Application (.exe) is selected as application type so that we have a place to print debug messages to, and check Empty Project to prevent Visual Studio from adding boilerplate code.
Press OK to create the project and add a C++ source file. You should
already know how to do that, but the steps are included here for completeness.
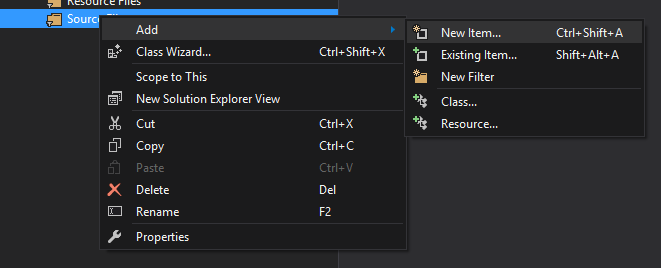

Now add the following code to the file. Don’t worry about trying to
understand it right now; we’re just making sure that you can compile and run
Vulkan applications. We’ll start from scratch in the next chapter.
#define GLFW_INCLUDE_VULKAN
#include <GLFW/glfw3.h>

#define GLM_FORCE_RADIANS
#define GLM_FORCE_DEPTH_ZERO_TO_ONE
#include <glm/vec4.hpp>
#include <glm/mat4x4.hpp>

#include <iostream>

int main() {
    glfwInit();

    glfwWindowHint(GLFW_CLIENT_API, GLFW_NO_API);
    GLFWwindow* window = glfwCreateWindow(800, 600, "Vulkan window", nullptr, nullptr);

    uint32_t extensionCount = 0;
    vkEnumerateInstanceExtensionProperties(nullptr, &extensionCount, nullptr);

    std::cout << extensionCount << " extensions supported\n";

    glm::mat4 matrix;
    glm::vec4 vec;
    auto test = matrix * vec;

    while(!glfwWindowShouldClose(window)) {
        glfwPollEvents();
    }

    glfwDestroyWindow(window);

    glfwTerminate();

    return 0;
}
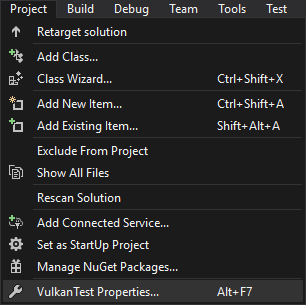
Let’s now configure the project to get rid of the errors. Open the project
properties dialog and ensure that All Configurations is selected, because most
of the settings apply to both Debug and Release mode.

Go to C++ -> General -> Additional Include Directories and press <Edit...>
in the dropdown box.
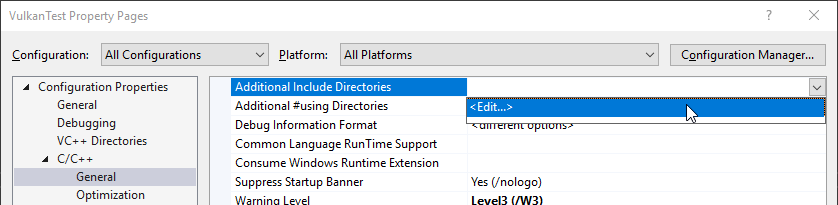
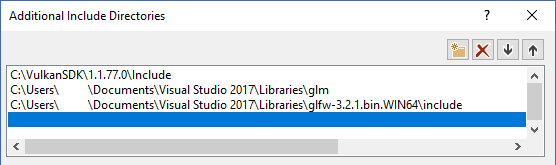
Add the header directories for Vulkan, GLFW and GLM:
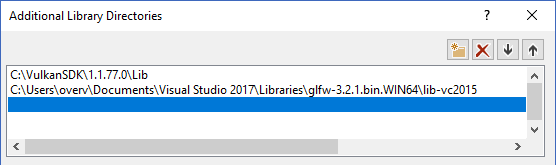
Next, open the editor for library directories under Linker -> General:
And add the locations of the object files for Vulkan and GLFW:
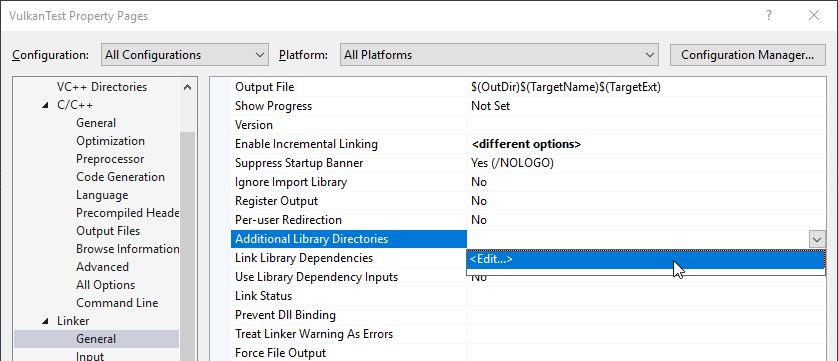
Go to Linker -> Input and press <Edit...> in the Additional Dependencies
dropdown box.

Enter the names of the Vulkan and GLFW object files:

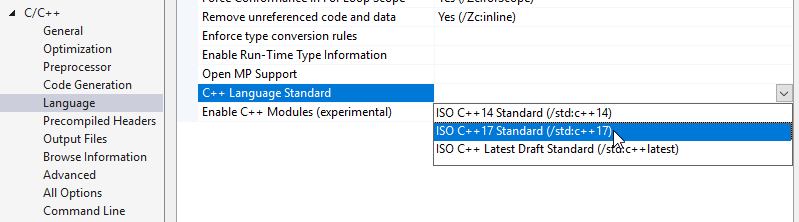
And finally change the compiler to support C++17 features:
You can now close the project properties dialog. If you did everything right
then you should no longer see any more errors being highlighted in the code.
Finally, ensure that you are actually compiling in 64 bit mode:

Press F5 to compile and run the project and you should see a command prompt
and a window pop up like this:

The number of extensions should be non-zero. Congratulations, you’re all set for
playing with Vulkan!
Linux
These instructions will be aimed at Ubuntu, Fedora and Arch Linux users, but you may be able to follow
along by changing the package manager-specific commands to the ones that are appropriate for you. You should have a compiler that supports C++17 (GCC 7+ or Clang 5+). You’ll also need make.
Vulkan Packages
The most important components you’ll need for developing Vulkan applications on Linux are the Vulkan loader, validation layers, and a couple of command-line utilities to test whether your machine is Vulkan-capable:
-
sudo apt install vulkan-toolsorsudo dnf install vulkan-tools: Command-line utilities, most importantlyvulkaninfoandvkcube. Run these to confirm your machine supports Vulkan. -
sudo apt install libvulkan-devorsudo dnf install vulkan-loader-devel: Installs Vulkan loader. The loader looks up the functions in the driver at runtime, similarly to GLEW for OpenGL — if you’re familiar with that. -
sudo apt install vulkan-validationlayers-dev spirv-toolsorsudo dnf install mesa-vulkan-devel vulkan-validation-layers-devel: Installs the standard validation layers and required SPIR-V tools. These are crucial when debugging Vulkan applications, and we’ll discuss them in the upcoming chapter.
On Arch Linux, you can run sudo pacman -S vulkan-devel to install all the
required tools above.
If installation was successful, you should be all set with the Vulkan portion. Remember to run
vkcube and ensure you see the following pop up in a window:
If you receive an error message then ensure that your drivers are up-to-date,
include the Vulkan runtime and that your graphics card is supported. See the
introduction chapter for links to drivers from the major
vendors.
GLFW
As mentioned before, Vulkan by itself is a platform agnostic API and does not
include tools for creation a window to display the rendered results. To benefit
from the cross-platform advantages of Vulkan and to avoid the horrors of X11,
we’ll use the GLFW library to create a window, which
supports Windows, Linux and MacOS. There are other libraries available for this
purpose, like SDL, but the advantage of GLFW is that
it also abstracts away some of the other platform-specific things in Vulkan
besides just window creation.
We’ll be installing GLFW from the following command:
sudo apt install libglfw3-dev
or
sudo dnf install glfw-devel
or
sudo pacman -S glfw-wayland # glfw-x11 for X11 users
GLM
Unlike DirectX 12, Vulkan does not include a library for linear algebra
operations, so we’ll have to download one. GLM is a
nice library that is designed for use with graphics APIs and is also commonly
used with OpenGL.
It is a header-only library that can be installed from the libglm-dev or
glm-devel package:
sudo apt install libglm-dev
or
sudo dnf install glm-devel
or
sudo pacman -S glm
Shader Compiler
We have just about all we need, except we’ll want a program to compile shaders from the human-readable GLSL to bytecode.
Two popular shader compilers are Khronos Group’s glslangValidator and Google’s glslc. The latter has a familiar GCC- and Clang-like usage, so we’ll go with that: on Ubuntu, download Google’s unofficial binaries and copy glslc to your /usr/local/bin. Note you may need to sudo depending on your permissions. On Fedora use sudo dnf install glslc, while on Arch Linux run sudo pacman -S shaderc. To test, run glslc and it should rightfully complain we didn’t pass any shaders to compile:
glslc: error: no input files
We’ll cover glslc in depth in the shader modules chapter.
Setting up a makefile project
Now that you have installed all of the dependencies, we can set up a basic
makefile project for Vulkan and write a little bit of code to make sure that
everything works.
Create a new directory at a convenient location with a name like VulkanTest.
Create a source file called main.cpp and insert the following code. Don’t
worry about trying to understand it right now; we’re just making sure that you
can compile and run Vulkan applications. We’ll start from scratch in the next
chapter.
#define GLFW_INCLUDE_VULKAN
#include <GLFW/glfw3.h>

#define GLM_FORCE_RADIANS
#define GLM_FORCE_DEPTH_ZERO_TO_ONE
#include <glm/vec4.hpp>
#include <glm/mat4x4.hpp>

#include <iostream>

int main() {
    glfwInit();

    glfwWindowHint(GLFW_CLIENT_API, GLFW_NO_API);
    GLFWwindow* window = glfwCreateWindow(800, 600, "Vulkan window", nullptr, nullptr);

    uint32_t extensionCount = 0;
    vkEnumerateInstanceExtensionProperties(nullptr, &extensionCount, nullptr);

    std::cout << extensionCount << " extensions supported\n";

    glm::mat4 matrix;
    glm::vec4 vec;
    auto test = matrix * vec;

    while(!glfwWindowShouldClose(window)) {
        glfwPollEvents();
    }

    glfwDestroyWindow(window);

    glfwTerminate();

    return 0;
}
Next, we’ll write a makefile to compile and run this basic Vulkan code. Create a
new empty file called Makefile. I will assume that you already have some basic
experience with makefiles, like how variables and rules work. If not, you can
get up to speed very quickly with this tutorial.
We’ll first define a couple of variables to simplify the remainder of the file.
Define a CFLAGS variable that will specify the basic compiler flags:
CFLAGS = -std=c++17 -O2
We’re going to use modern C++ (-std=c++17), and we’ll set optimization level to O2. We can remove -O2 to compile programs faster, but we should remember to place it back for release builds.
Similarly, define the linker flags in a LDFLAGS variable:
LDFLAGS = -lglfw -lvulkan -ldl -lpthread -lX11 -lXxf86vm -lXrandr -lXi
The flag -lglfw is for GLFW, -lvulkan links with the Vulkan function loader and the remaining flags are low-level system libraries that GLFW needs. The remaining flags are dependencies of GLFW itself: the threading and window management.
It is possible that the Xxf68vm and Xi libraries are not yet installed on your system. You can find them in the following packages:
sudo apt install libxxf86vm-dev libxi-dev
or
sudo dnf install libXi-devel libXxf86vm-devel
or
sudo pacman -S libxi libxxf86vm
Specifying the rule to compile VulkanTest is straightforward now. Make sure to
use tabs for indentation instead of spaces.
VulkanTest: main.cpp
    g++ $(CFLAGS) -o VulkanTest main.cpp $(LDFLAGS)
Verify that this rule works by saving the makefile and running make in the
directory with main.cpp and Makefile. This should result in a VulkanTest
executable.
We’ll now define two more rules, test and clean, where the former will
run the executable and the latter will remove a built executable:
.PHONY: test clean

test: VulkanTest
    ./VulkanTest

clean:
    rm -f VulkanTest
Running make test should show the program running successfully, and displaying the number of Vulkan extensions. The application should exit with the success return code (0) when you close the empty window. You should now have a complete makefile that resembles the following:
CFLAGS = -std=c++17 -O2
LDFLAGS = -lglfw -lvulkan -ldl -lpthread -lX11 -lXxf86vm -lXrandr -lXi

VulkanTest: main.cpp
    g++ $(CFLAGS) -o VulkanTest main.cpp $(LDFLAGS)

.PHONY: test clean

test: VulkanTest
	./VulkanTest

clean:
    rm -f VulkanTest
You can now use this directory as a template for your Vulkan projects. Make a copy, rename it to something like HelloTriangle and remove all of the code in main.cpp.
You are now all set for the real adventure.
MacOS
These instructions will assume you are using Xcode and the Homebrew package manager. Also, keep in mind that you will need at least MacOS version 10.11, and your device needs to support the Metal API.
Vulkan SDK
The most important component you’ll need for developing Vulkan applications is the SDK. It includes the headers, standard validation layers, debugging tools and a loader for the Vulkan functions. The loader looks up the functions in the driver at runtime, similarly to GLEW for OpenGL — if you’re familiar with that.
The SDK can be downloaded from the LunarG website using the buttons at the bottom of the page. You don’t have to create an account, but it will give you access to some additional documentation that may be useful to you.
The SDK version for MacOS internally uses MoltenVK. There is no native support for Vulkan on MacOS, so what MoltenVK does is actually act as a layer that translates Vulkan API calls to Apple’s Metal graphics framework. With this you can take advantage of debugging and performance benefits of Apple’s Metal framework.
After downloading it, simply extract the contents to a folder of your choice (keep in mind you will need to reference it when creating your projects on Xcode). Inside the extracted folder, in the Applications folder you should have some executable files that will run a few demos using the SDK. Run the vkcube executable and you will see the following:

GLFW
As mentioned before, Vulkan by itself is a platform agnostic API and does not include tools for creation a window to display the rendered results. We’ll use the GLFW library to create a window, which supports Windows, Linux and MacOS. There are other libraries available for this purpose, like SDL, but the advantage of GLFW is that it also abstracts away some of the other platform-specific things in Vulkan besides just window creation.
To install GLFW on MacOS we will use the Homebrew package manager to get the glfw package:
brew install glfw
GLM
Vulkan does not include a library for linear algebra operations, so we’ll have to download one. GLM is a nice library that is designed for use with graphics APIs and is also commonly used with OpenGL.
It is a header-only library that can be installed from the glm package:
brew install glm
Setting up Xcode
Now that all the dependencies are installed we can set up a basic Xcode project for Vulkan. Most of the instructions here are essentially a lot of «plumbing» so we can get all the dependencies linked to the project. Also, keep in mind that during the following instructions whenever we mention the folder vulkansdk we are refering to the folder where you extracted the Vulkan SDK.
Start Xcode and create a new Xcode project. On the window that will open select Application > Command Line Tool.
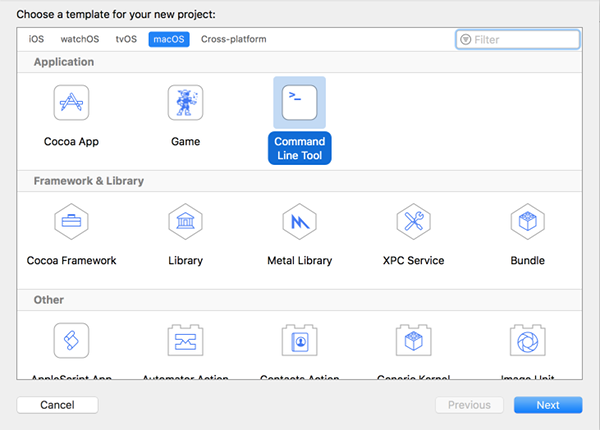
Select Next, write a name for the project and for Language select C++.

Press Next and the project should have been created. Now, let’s change the code in the generated main.cpp file to the following code:
#define GLFW_INCLUDE_VULKAN
#include <GLFW/glfw3.h>

#define GLM_FORCE_RADIANS
#define GLM_FORCE_DEPTH_ZERO_TO_ONE
#include <glm/vec4.hpp>
#include <glm/mat4x4.hpp>

#include <iostream>

int main() {
    glfwInit();

    glfwWindowHint(GLFW_CLIENT_API, GLFW_NO_API);
    GLFWwindow* window = glfwCreateWindow(800, 600, "Vulkan window", nullptr, nullptr);

    uint32_t extensionCount = 0;
    vkEnumerateInstanceExtensionProperties(nullptr, &extensionCount, nullptr);

    std::cout << extensionCount << " extensions supported\n";

    glm::mat4 matrix;
    glm::vec4 vec;
    auto test = matrix * vec;

    while(!glfwWindowShouldClose(window)) {
        glfwPollEvents();
    }

    glfwDestroyWindow(window);

    glfwTerminate();

    return 0;
}
Keep in mind you are not required to understand all this code is doing yet, we are just setting up some API calls to make sure everything is working.
Xcode should already be showing some errors such as libraries it cannot find. We will now start configuring the project to get rid of those errors. On the Project Navigator panel select your project. Open the Build Settings tab and then:
- Find the Header Search Paths field and add a link to
/usr/local/include(this is where Homebrew installs headers, so the glm and glfw3 header files should be there) and a link tovulkansdk/macOS/includefor the Vulkan headers. - Find the Library Search Paths field and add a link to
/usr/local/lib(again, this is where Homebrew installs libraries, so the glm and glfw3 lib files should be there) and a link tovulkansdk/macOS/lib.
It should look like so (obviously, paths will be different depending on where you placed on your files):

Now, in the Build Phases tab, on Link Binary With Libraries we will add both the glfw3 and the vulkan frameworks. To make things easier we will be adding the dynamic libraries in the project (you can check the documentation of these libraries if you want to use the static frameworks).
- For glfw open the folder
/usr/local/liband there you will find a file name likelibglfw.3.x.dylib(«x» is the library’s version number, it might be different depending on when you downloaded the package from Homebrew). Simply drag that file to the Linked Frameworks and Libraries tab on Xcode. - For vulkan, go to
vulkansdk/macOS/lib. Do the same for the both fileslibvulkan.1.dylibandlibvulkan.1.x.xx.dylib(where «x» will be the version number of the the SDK you downloaded).
After adding those libraries, in the same tab on Copy Files change Destination to «Frameworks», clear the subpath and deselect «Copy only when installing». Click on the «+» sign and add all those three frameworks here aswell.
Your Xcode configuration should look like:
The last thing you need to setup are a couple of environment variables. On Xcode toolbar go to Product > Scheme > Edit Scheme..., and in the Arguments tab add the two following environment variables:
- VK_ICD_FILENAMES =
vulkansdk/macOS/share/vulkan/icd.d/MoltenVK_icd.json - VK_LAYER_PATH =
vulkansdk/macOS/share/vulkan/explicit_layer.d
It should look like so:
Finally, you should be all set! Now if you run the project (remembering to setting the build configuration to Debug or Release depending on the configuration you chose) you should see the following:
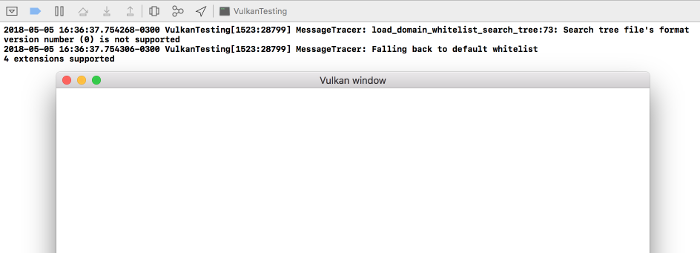
The number of extensions should be non-zero. The other logs are from the libraries, you might get different messages from those depending on your configuration.
You are now all set for the real thing.
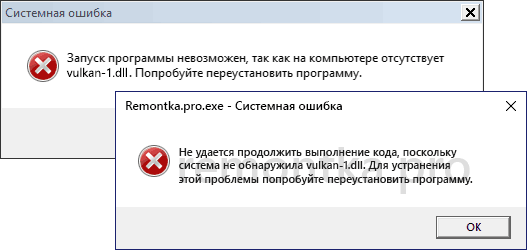
 При запуске некоторых игр пользователи могут столкнуться с ошибкой «Не удается продолжить выполнение кода, поскольку система не обнаружила vulkan-1.dll» или «Запуск программы невозможен, так как на компьютере отсутствует vulkan-1.dll».
В этой пошаговой инструкции подробно о том, как скачать vulkan-1.dll с официального сайта или в комплекте драйверов для Windows 11, Windows 10 и 7, чтобы исправить ошибку при запуске игр и программ.
Vulkan-1.dll в составе Vulkan Runtime Libraries в комплекте драйверов видеокарты
Vulkan-1.dll представляет собой один из файлов, входящих в комплект Vulkan Runtime Libraries — библиотек, которые могут использоваться в различных играх для Windows 11, 10 или Windows 7 (а также других платформ) с игровыми движки от Valve и не только.

Не следует вручную скачивать отдельный файл vulkan-1.dll, копировать его в папку System32 или SysWOW64 и пробовать зарегистрировать в системе: с большой вероятностью, это не решит проблему и, кроме этого, не вполне безопасно.
Пакет библиотек Vulkan Runtime Libraries по умолчанию поставляется и устанавливается вместе с драйверами видеокарты. Если драйверы видеокарты были установлены системой автоматически, рекомендую вручную скачать последнюю версию драйверов с официального сайта NVIDIA GeForce, AMD Radeon и Intel и установить их. После установки и перезагрузки компьютера, проблема должна быть решена — файлы vulkan-1.dll как x64 так и 32-бит будут установлены в необходимые расположения на вашем компьютере или ноутбуке.
Ранее (в старых версиях драйверов) после установки в списке установленных программ Windows появлялся пункт Vulkan Run Time Libraries, в новых версиях драйверов не появляется. Однако, вы можете легко проверить наличие библиотек Vulkan: нажмите клавиши Win+R, введите vulkaninfo и нажмите Enter. Если откроется окно со служебной информацией о версиях и поддерживаемых функциях Vulkan, значит необходимые DLL в наличии.

Следует учитывать следующий момент: если у вас очень старая видеокарта и для неё доступны лишь старые версии драйверов, Vulkan может отсутствовать в комплекте. Вы можете ознакомиться со списком видеокарт и версий драйверов, где vulkan-1.dll и остальные компоненты присутствуют на сайтах:
- Для NVIDIA GeForce — https://developer.nvidia.com/vulkan-driver
- Для AMD Radeon — https://gpuopen.com/version-table/
Как скачать установщик Vulkan Runtime Libraries (VulkanRT) отдельно с официального сайта
Если предыдущий метод по какой-то причине вам не подходит, вы можете скачать vulkan-1.dll в составе Vulkan Runtime Libraries с официального сайта разработчика:
- Зайдите на официальный сайт загрузки Vulkan — https://vulkan.lunarg.com/sdk/home
- В разделе «Windows» нажмите «Latest Runtime/ZIP» или по файлу установщика в пункте Runtime.
- Скачайте файл установщика (Runtime Installer) и запустите установку.


После установки Vulkan Runtime Libraries (может потребоваться перезагрузка компьютера), файл vulkan-1.dll будет располагаться в папках C:\Windows\System32 и C:\Windows\SysWOW64 и нужным образом зарегистрирован в Windows. Следует учитывать, что Vulkan может не поддерживаться или иметь ограниченную поддержку на очень старых видеокартах.