 Windows — многопользовательская система, что означает, что в ней могут относительно независимо работать несколько пользователей. Помимо пользовательских учетных записей, создаваемых при установке и после, в системе предусмотрено несколько скрытых системных учетных записей. При необходимости вы можете получить список и тех и других.
В этой простой инструкции подробно о способах посмотреть список пользователей Windows 11 или Windows 10, большинство из которых подойдёт и для предыдущих версий системы. Если вам требуется получить список пользователей без входа в систему, обратите внимание на последний раздел этого материала.
Windows PowerShell или Терминал Windows
Если по той или иной причине вам потребовалось получить список всех пользователей Windows 11, Windows 10 или одной из предыдущих версий системы — сделать это можно как в графическом интерфейсе, так и средствами командной стройки или PowerShell.
Я рекомендую начать с PowerShell, так как он позволяет быстро получить максимум информации об учетных записях пользователей:
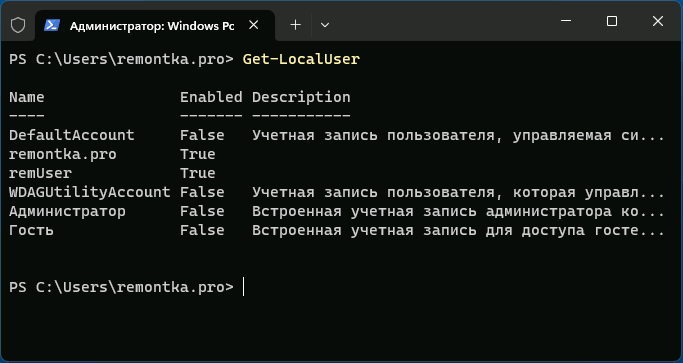
- Запустите Windows PowerShell или Терминал Windows от имени администратора, для этого можно нажать правой кнопкой мыши по кнопке «Пуск» и выбрать нужный пункт контекстного меню.
- Введите команду
Get-LocalUser
и нажмите Enter.
- В результате вы получите полный список учетных записей пользователей, а также информацию, включена ли учетная запись в столбце «Enabled».

Обратите внимание, некоторые учетные записи могут вызвать вопросы, ответы на них можно найти в статьях:
- Как включить скрытую системную учетную запись Администратор в Windows 11 (подойдет и для Windows 10)
- Для чего нужна учетная запись WDAGUtilityAccount в Windows 11/10
Командная строка
Список пользователей Windows можно получить с помощью командной строки:
- Запустите командную строку (права администратора не обязательны).
- Введите команду
net user
и нажмите Enter, чтобы получить список всех пользователей.

- Ещё одни вариант команды:
wmic useraccount get name


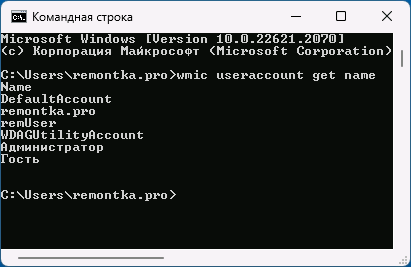
Оба варианта отобразят как активных, так и отключенных (скрытых) пользователей, но без информации, о том, что это за учетная запись и включена ли она. Второй вариант команды допускает следующую модификацию:
wmic useraccount get name,status
для просмотра информации о статусе учетных записей (для включенных — Ok, для отключенных — Degraded).
Параметры Windows 11 и Windows 10
«Основной», но не идеальный метод просмотра списка пользователей в графическом интерфейсе — приложение «Параметры»:
- Откройте «Параметры».
- В Windows 11 откройте раздел «Учетные записи» — «Другие пользователи» для того, чтобы посмотреть список пользователей, помимо текущего (и без отключенных и системных учетных записей).

- Если вы используете семейную группу (например, для родительского контроля Windows), пользователи, добавленные в семью, будут показаны не в «Другие пользователи», а в «Учетные записи» — «Семья».

- В Windows 10 откройте «Параметры» — «Учетные записи» — «Семья и другие пользователи». На открывшемся экране будут показаны пользователи компьютера (за исключением текущего), а также члены семейной группы при их наличии.


Как в Windows 11, так и в Windows 10 в «Параметрах» вы не увидите отключенные учетные записи.
Локальные пользователи и группы
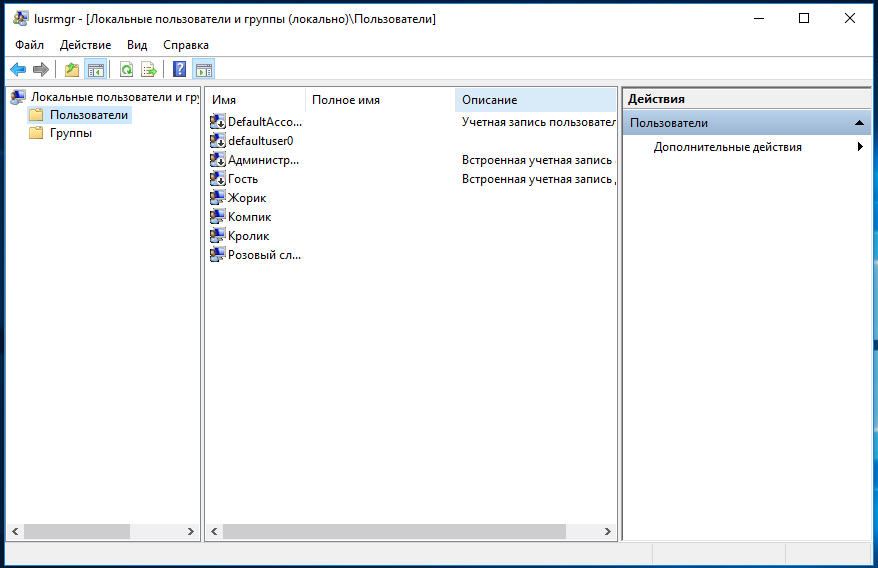
Ещё один вариант просмотра пользователей в графическом интерфейсе — оснастка «Локальные пользователи и группы».
- Нажмите клавиши Win+R на клавиатуре, либо нажмите правой кнопкой мыши по кнопке «Пуск» и выберите пункт «Выполнить». Введите lusrmgr.msc в диалоговое окно «Выполнить» и нажмите Enter.
- В открывшемся окне «Пользователи» вы сможете посмотреть список пользователей текущей системы, их статус (если рядом со значком отображается стрелка — пользователь отключен).

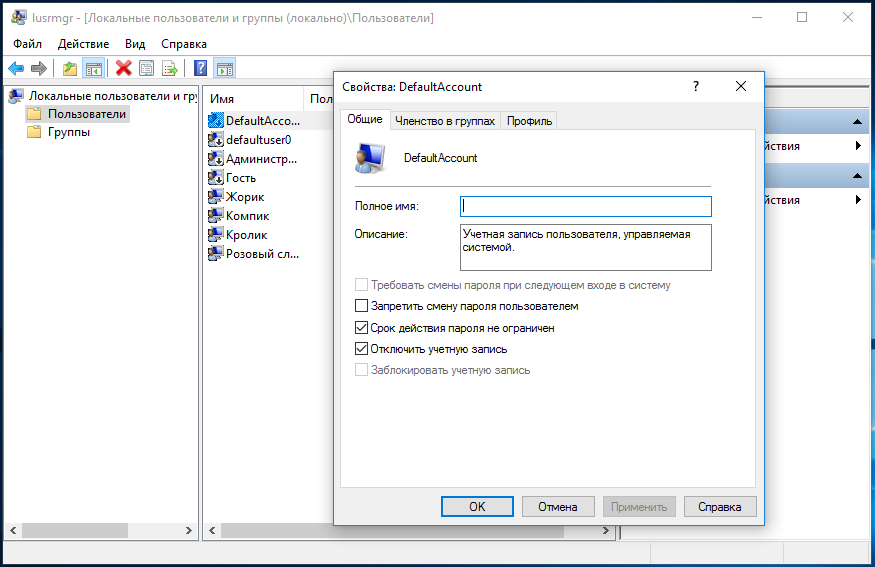
- Дважды нажав по учетной записи пользователя, можно изменить её параметры (например, включить или отключить пользователя) и посмотреть описание.


Некоторые дополнительные детали, которые могут пригодиться в части получения списка пользователей:
- Если при использовании способов получения списка пользователей в командной строке или PowerShell вам требуется вывести список в файл, просто добавьте «> путь_к_файлу» через пробел после команды, например:
wmic useraccount get name,status > spisok.txt
Учитывайте, что путь (папка) в которую сохраняется файл должен существовать, а если для сохранения файла в указанном расположении требуются права администратора, консоль следует запускать с соответствующими правами.
- При необходимости получить список пользователей без входа в систему в случае, если он невозможен, либо если система не запускается, вы можете использовать утилиты с WinPE, те же самые, которые описаны в последней части инструкции про сброс пароля Windows 11 (подойдет и для других версий системы).
Если у вас остаются вопросы, касающиеся просмотра списка пользователей Windows, вы можете задать их в комментариях ниже, описав ситуацию и задачу в деталях.
Если вам нужно посмотреть все существующие учетные записи пользователей, которые используют ваше устройство, в этом руководстве вы узнаете четыре способа сделать это в Windows 10.
В Windows 10, вы можете быстро проверить полную информацию обо всех учетных записях пользователей. Если более чем один человек использует ваш персональный компьютер или у вас есть более одного аккаунта пользователя, если есть необходимость проверить полную информацию о всех учетных записях пользователей, то эта статья поможет вам. Кроме того, в отдельных случаях вам также может понадобиться посмотреть скрытые учетные записи пользователей, доступные в вашей системе, такие как учетная запись администратора, которая по умолчанию отключена.
Чтобы посмотреть все существующие учетные записи в Windows 10 существует несколько способов просмотра этой информации с использованием встроенных инструментов и командной строки.
В этом руководстве вы узнаете четыре способа посмотреть список всех учетных записей, доступных в Windows 10.
- Как просмотреть все учетные записи с помощью приложения «Параметры»
- Как просмотреть все учетные записи с помощью консоли «Управление компьютером»
- Как просмотреть все учетные записи в Windows 10 с помощью командной строки
- Как просмотреть все учетные записи с помощью PowerShell
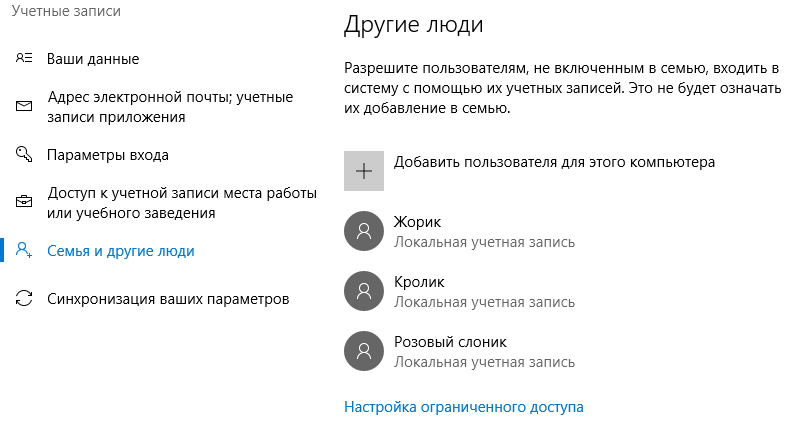
Как просмотреть все учетные записи Windows 10 с помощью приложения «Параметры».
Самый простой способ посмотреть учетные записи, доступные на вашем устройстве, — это приложение «Параметры»:
- Откройте приложение нажав клавиши Win I.
- Перейдите в группу настроек «Учетные записи».
- Нажмите раздел слева «Семья и другие пользователи».
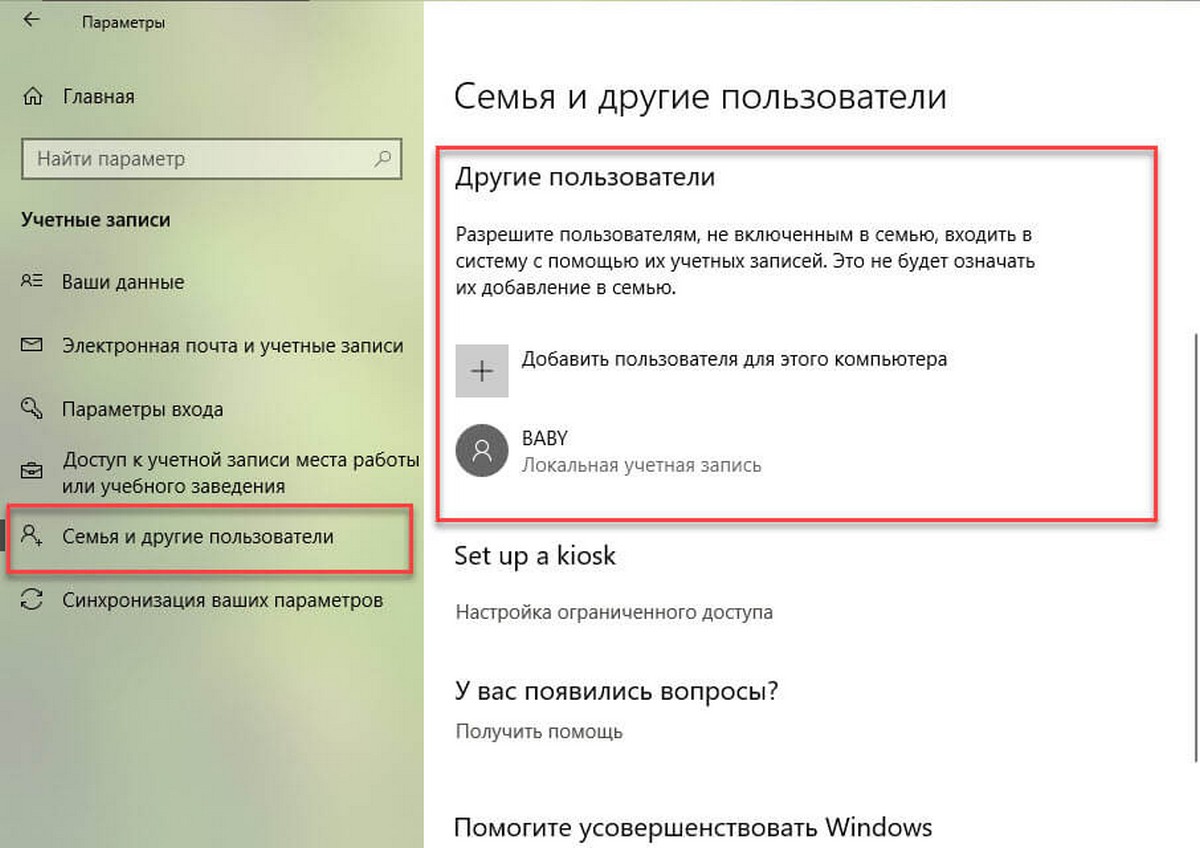
На этой странице вы найдете существующие учетные записи пользователей, настроенные на вашем ПК, но эта страница имеет ограничения, поскольку она не содержит встроенных учетных записей пользователей, таких как встроенная учетная запись администратора .
Кроме того, вы заметите, что текущая учетная запись пользователя также не указана, но это потому, что эта информация отображается на странице «Ваши данные».
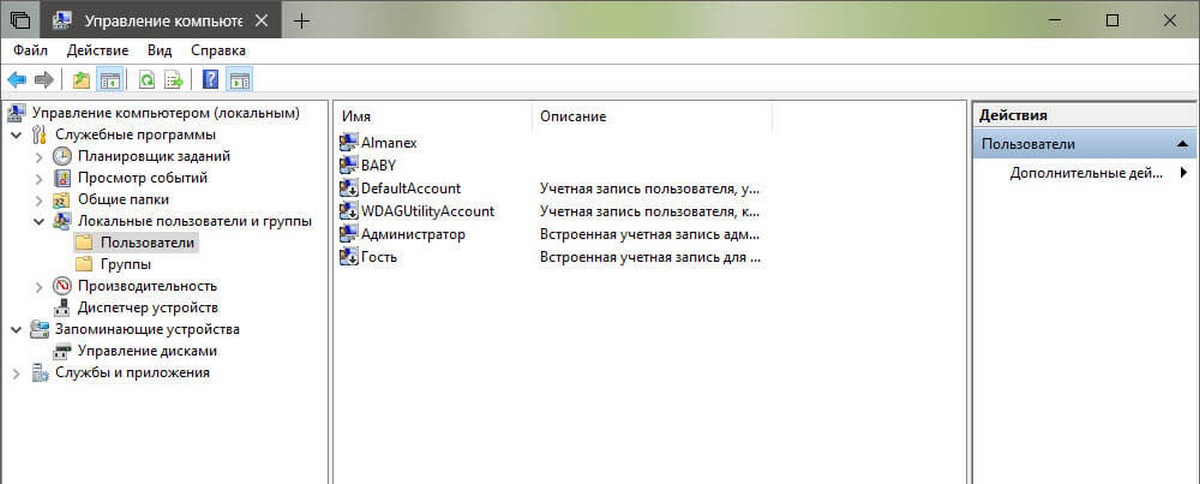
Как просмотреть все учетные записи с помощью консоли «Управление компьютером».
Если вы используете Windows 10 Pro, вы можете использовать консоль «Управление компьютером» для просмотра всех учетных записей, на вашем устройстве.
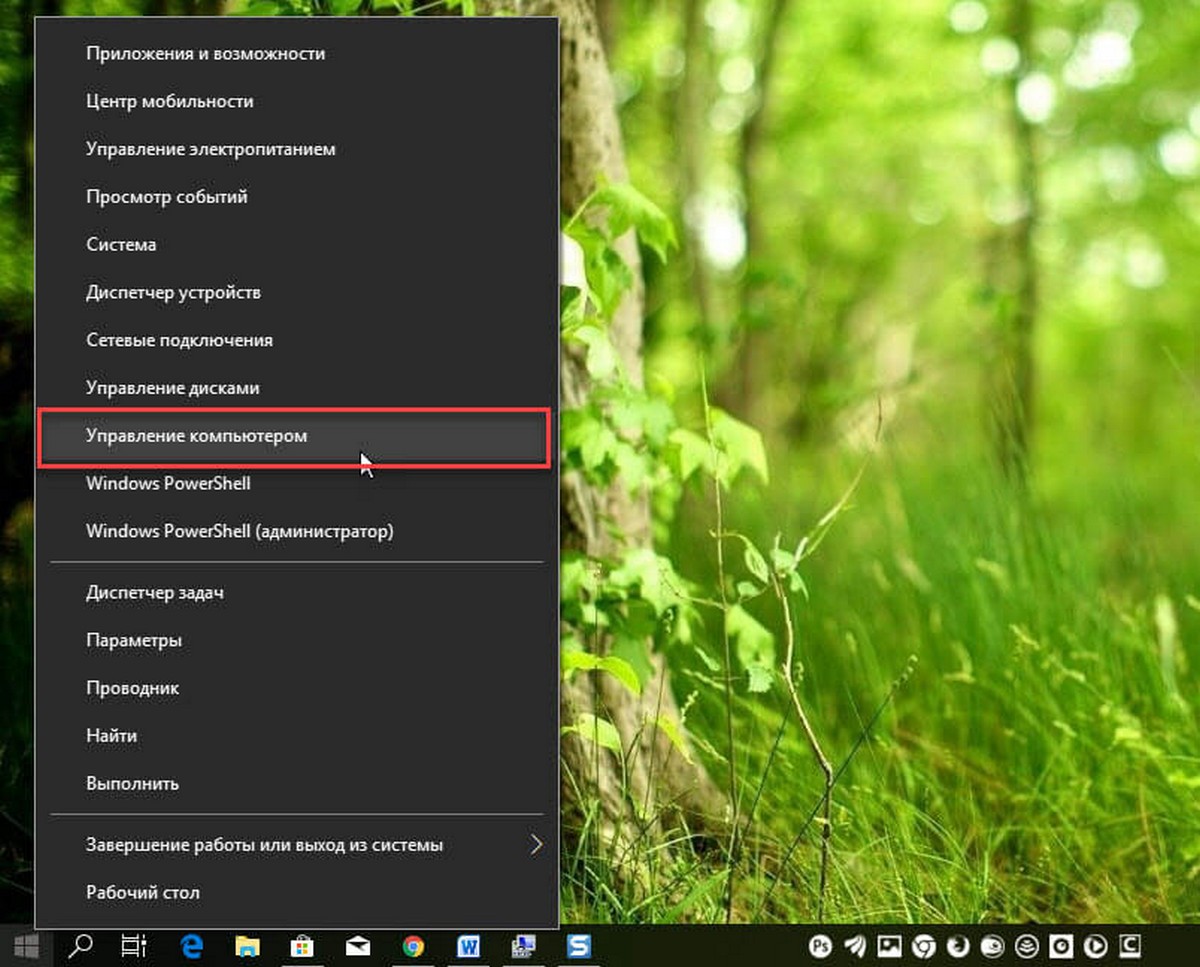
- Кликните правой кнопкой мыши на кнопке «Пуск» и выберите в меню «Управление компьютером».
- В консоли перейдите по следующему пути:
Локальные пользователи и группы → Пользователи
Вы увидите список всех учетных записей, созданных в Windows 10.
Как просмотреть все учетные записи Windows 10 с помощью командной строки
В Windows 10, вы можете быстро проверить полную информацию обо всех учетных записях пользователей, используя одну команду.
- Откройте командную строку, введите следующую команду и нажмите клавишу Enter.
wmic useraccount list full
Вы увидите следующие детали:
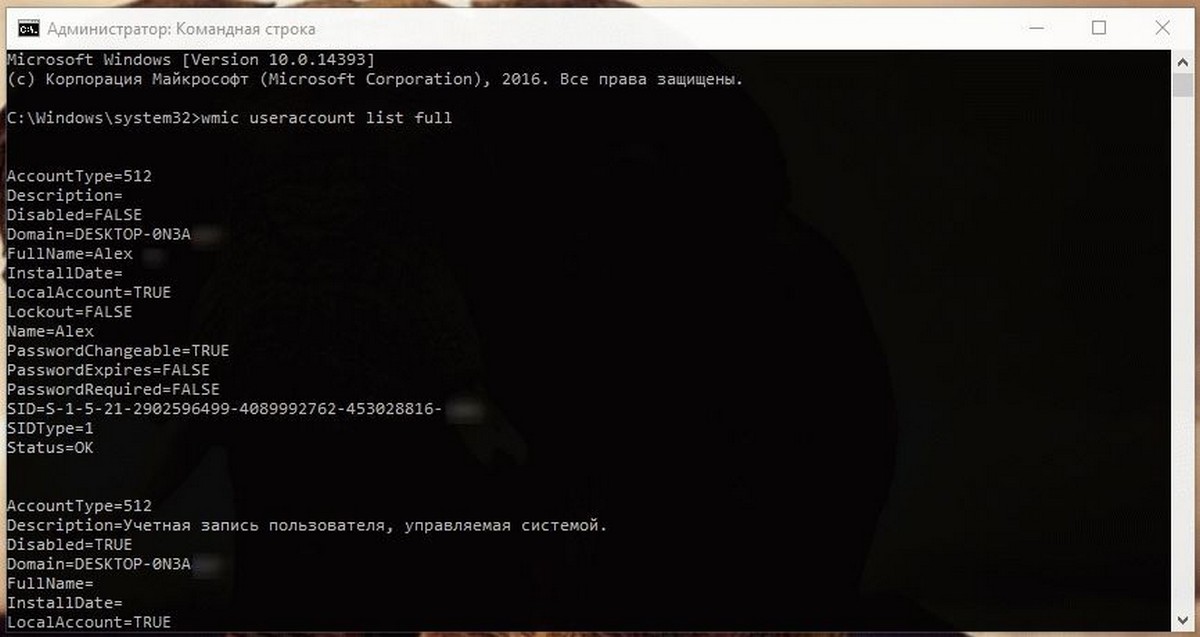
Самый первый аккаунт встроенная учетная запись администратора, учетная запись по умолчанию отключена — но вы можете включить эту скрытую учетную запись администратора, если у вас есть необходимость.
Второй аккаунт — Учетная запись пользователя управляемая системой, как указано в описании. Если вы используете Windows 10.
Третий аккаунт учетная запись гостя .
Последняя учетная запись пользователя, который используется для доступа к компьютеру. Если у вас есть несколько учетных записей пользователей, вы найдете их ниже одну за другой.
Есть несколько деталей, которые видны на экране командной строки. Вы увидите следующее:
- Тип аккаунта
- Описание
- Полное имя
- Дата установки
- Статус локальной учетной записи
- Lockout status
- Имя
- Пароль Изменяемый
- Пароль Истекает
- Требуется пароль или нет
- SID
- SID Тип
- Статус
AccountType = 512 указывает на то, что все учетные записи являются регулярными. Если ваш компьютер подключен к домену, вы можете увидеть другие значения, такие как 256 (Temp Duplicate Account), 2048 (Trust Account Interdomain), 4096 (Trust Account Workstation) или 8192 (Trust Account Server).
Disabled = FALSE / TRUE, указывает на то, активен или нет этот конкретный аккаунт. Если установлено значение FALSE, это означает, что ваша учетная запись не активна и наоборот.
PasswordChangable = TRUE / FALSE указывает на то, можно ли изменить пароль этой учетной записи или нет. Если установлено значение TRUE, то вы можете его изменить.
PasswordExpired = TRUE / FALSE сообщает срок действия пароля этой учетной записи пользователя после заданного промежутка времени.
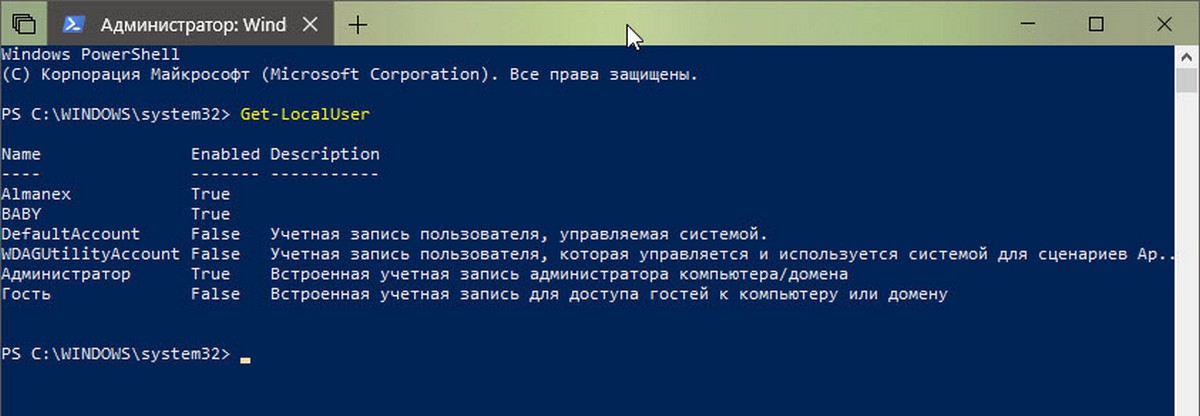
Как просмотреть все учетные записи с помощью PowerShell
Кроме того, вы даже можете использовать одну команду в PowerShell для просмотра списка с подробной информацией о каждой учетной записи, доступной в Windows 10.
- Откройте PowerShell от имени администратора.
- Введите следующую команду, чтобы перечислить все существующие учетные записи и нажмите Enter:
Get-LocalUser
- Вы увидите список всех учетных записей, настроенных на вашем устройстве, с их описанием, активностью.
Если вам нужно экспортировать список учетных записей в текстовый файл, вы можете добавить в командуследущее. Например:
Get-LocalUser > c:\path\to\output\folder\list.txt
В случае, если одна из учетных записей была создана с использованием учетной записи Microsoft, имя учетной записи будет содержать только первые пять букв адреса электронной почты.
Это основные вещи, которые нужно знать, чтобы понять детали всех учетных записей пользователей на компьютере Windows 10.
The Net User command is a Windows command-line utility that allows you to manage Windows server local user accounts or on a remote computer.
The command Net User allow you to create, delete, enable, or disable users on the system and set passwords for the net user accounts.
Windows administrators can perform add or modifications in domain user accounts using the net user command-line tool.
You can get net user account information, enable or disable a user account, sets the home directory path, set account expiration, and so on.

In this article, we will discuss how to use the net user command-line tool with examples to get user account information, domain account status, and password expiry date.
Net User Command Syntax
The basic syntax for the net user command is as follows:
net user [<UserName> {<Password> | *} [<Options>]] [/domain]
net user [<UserName> {<Password> | *} /add [<Options>] [/domain]]
net user [<UserName> [/delete] [/domain]]
Refer to the below most important net user command parameters:
| Parameter | Description |
|---|---|
| Username | Enable or disable the user account |
| Password | It specifies the user account name to add, modify, or display user account information |
| /domain | Perform the operation on the domain controller |
| /active:{no | yes} | Enable or disable user account |
| /comment | Provide descriptive comments for the user account |
| /expires | Specify the date to expire user account |
| net help | Display help for the net user command |
| <Options> | Specify command-line options |
Refer to the following table to know more about options used in net user command.
| Command-line option syntax | Description |
|---|---|
| /active:{no | yes} | Use this option to enable or disable a user account. The default value is yes (active). |
| /comment:”<Text>” | Use this to provide comments for the user account, max 48 characters, and should be enclosed in quotation marks. |
| /countrycode:<NNN> | /countrycode option is used to set the country code for the user account to display help or error messages in their language. The default value is 0, which means the computer’s default country/region code. |
| /expires:{{<MM/DD/YYYY> | <DD/MM/YYYY> | <mmm,dd,YYYY>} | never} | Use this option to specify the date for the user account to expire. If the expiration date is not specified, it will assume never expires. |
| /fullname:”<Name>” | Specify the user’s full name instead of username. |
| /homedir:<Path> | Use this option to set the path for the user’s home directory. |
| /passwordchg:{yes | no} | Use this to specify if the user can change their own password. The default value is yes. |
| /passwordreq:{yes | no} | It specifies if the user must have a password or not. The default is yes. |
| /profilepath:[<Path>] | Use this option to sets a path for the user’s logon profile. This path points to a registry profile. |
| /scriptpath:<Path> | Use this to set a path for the user’s logon script. <Path> should be relative. |
| /times:{<Day>[<-Day>][,<Day>[-<Day>]],<Time>[-<Time>][,<Time>[-<Time>]][;] | all} | It specifies the times that users are allowed to use the computer. |
| /usercomment:”<Text>” | It specifies that an administrator can add or change the “User comment” for the account. |
| /workstations:{<ComputerName>[,…] | *} | It lists as many as eight workstations from which a user can log on to the network. |
Net User – List All User Accounts
Use the Net User command and run it on the Windows command prompt without any parameter to list all user accounts on the local user account.
Open a command prompt to run the net user command below
net user
The above Windows net user command returns the list of all user accounts on the local computer.

You can also use the net users command without any parameters on the cmd to retrieve a list of all user accounts on your computer.
Run the command net user on the domain controller to get a list of all users on the domain.
net user
The output of the above command net user gets the domain username accounts.

You can also use the net user command-line tool to get user account information, modify a user account, and check when the password was last set.
Net User Account – Display User Account Information
Run the net user command in the command line to get user account information.
# Get the user account information for Toms user.
net user Toms
The above net user command uses the username to retrieve user details and display net user account information below
C:\>net user Toms
User name                    Toms
Full Name                    John Paul
Comment                      Built-in account for administering the computer/domain
User's comment
Country/region code          000 (System Default)
Account active               Yes
Account expires              Never

Password last set            7/29/2021 6:55:50 PM
Password expires             9/9/2021 6:55:50 PM
Password changeable          7/30/2021 6:55:50 PM
Password required            Yes
User may change password     Yes

Workstations allowed         All
Logon script
User profile
Home directory
Last logon                   8/2/2021 11:53:32 AM

Logon hours allowed          All

Local Group Memberships      *Administrators
Global Group memberships     *Domain Admins        *Group Policy Creator
                             *Schema Admins        *Domain Users
                             *Enterprise Admins
The command completed successfully.


C:\>
Cool Tip: How to get-aduser in the active directory using PowerShell!
Net User Add Account
To create a new local user account, use the /Add parameter and specify the desired username:
# Create a new user account on local computer with login name Teresa
net user /Add Teresa
To create a domain user account, add the /domain parameter and specify the username and password:
# Create a new user account on domain with login name Peter and password Shell@123
net user /Add /domain Peter Shell@123
The above command creates a user account on the domain with a username Peter and password as Shell@123 as plain text in the command line.
Another option to specify the password is using the * in the command after the username, it will show a prompt to enter the password.
net user /Add /domain Peter *
Net User Delete User Account
To delete a local user account, use the /delete parameter and specify the username, it will delete the user account. It doesn’t ask for confirmation before deleting a user account.
# Delete the user on the local computer
net user /delete Teresa
To delete a domain user account, add the /domain parameter and specify the username.
# Delete the domain user account
net user /delete /domain Peter
Net User Password Change for User Account
If you want to change a user password using the command line, use the net user command-line tool to set the password.
The syntax for the command net user to set a password for a user account is given below:
net user userid password
Let’s consider an example to reset the password for user account GaryW on the local computer, run the below command
net user garyw Test@123
In the above net user command, garyw is a user account id and Test@123 is a password that is used with the command to set the password for the user account on the local computer.
The output of the above command as below

Note: Run Windows command prompt using administrator account privileges else it will display “System error 5 has occurred. Access is denied“
There is an alternative and secure way to change the user password using the net user cmd tool as below
C:\>net user garyw *
Type a password for the user:
Retype the password to confirm:
The command completed successfully.
In the command, use * after the user name and hit enter.
It will prompt you to type the password for the user: and retype the password to confirm.
While typing a password, it won’t display password text on the command line.
Cool Tip: How to get-aduser password expiration date in PowerShell!
Net User /domain – change domain user account password
Using the net user Windows command-line tool, you can set the password for the domain user account.
The syntax for the command net user to set the password for the domain user account is:
net user username /domainRun the following command to reset the domain user account password
net user garyw * /domain
In the above command, the net user command takes the user id as input, * indicates to prompt for the password. /domain specifies to perform domain account password change operation.
The output of the above net user /domain password change as below

Cool Tip: How to use the Get-AdUser cmdlet to manage Active Directory Use Account!
Net User Disable Account
To disable or lock a domain account using the net user command-line tool, use the /Active:No and /domain parameters and specify the username:
# Disable the user account on domain
net user garyw /Active:No /domain
The above net user command disables the user account or locks the domain user account specified using the user name and /Active set to No in the net user /domain command.
Run the command net user garyw /domain to check the user’s account status, it displays Account active : No
C:\>net user garyw /domain
User name                    garyw
Full Name                    Gary Willy
Comment
User's comment
Country/region code          000 (System Default)
Account active               No
Account expires              Never
To disable a local user account, use the /Active:No parameter:
# Disable local user account
net user testadmin /Active:No
Cool Tip: How to find a disabled aduser using PowerShell!
Net User to Enable Domain Account
To enable or unlock the domain user account using the net user command, use the /Active:Yes and /domain parameters and specify the username:
# Enables domain user account
net user garyw /Active:Yes /domain
net user /domain command using /Active option set to Yes enables user account.
To enable a local user account, use the /Active:Yes parameter and specify the username:
net user testadmin /Active:Yes
Net User User Password Policy
If you want users to restrict them to change their domain account password or allow domain account user to change their password, use the /Passwordchg:No parameter and specify the username:
net user garyw /Passwordchg:No
In the above net user command, /Passwordchg:No prevents the user from changing the password.
To allow users to change the password, use the /Passwordchg:Yes and specify the username:
net user garyw /Passwordchg:Yes
The above command, /Passwordchg:Yes allows the user to change their password.
Cool Tip: How to find active directory groups I m in using PowerShell!
Net User to Find User Full Name
You can use the net user command-line tool to find the user’s full name in the domain using the Find /i parameter and specify the “full name” :
net user garyw /domain | Find /i "full name"
The above command finds the full name of the user in the domain, it uses the username /domain to find the user account in the domain and pipes the result to get the full name.
C:\Windows\system32>net user garyw /domain | Find /i "full name"
Full Name                    Gary Willy
Set Home Directory Path For User
Use the net user command-line tool to set a home directory path for a new user or existing user using the homedir option as below
Set the home directory path for the new user:
# Set the home directory path for user adams
net user adams /domain /add /homedir:C:\users\adams
In the above command, the net user creates a new user with the name adams in the domain and set up the home directory path for the user to C:\users\adams
You can set up a home directory for the existing user as below
# Set the home directory path for existing user garyw
net user garyw /domain /homedir:C:\users\garyw
In the above command, it set up the home directory path for the existing user in the domain using the net user command and homdir option.
Cool Tip: How to unlock the ad account in the active directory using PowerShell!
Set Expiry date for User Account on Local and Domain
The expiration date for the user account has been good practice for organizations to manage security and resource management.
Using the net user command, you can easily set an expiry date for the user account on the local computer or domain user account.
To set up an expiry date for user accounts on the local computer or a Windows 11 user account, use the /expires parameter and specify the date in MM/DD/YYYY format:
# Set expire date for local user account
Net User devadmin /expires:03/05/2023
In the above command, the net user command takes the username as the input parameter and uses /expires option to set up the expiry date for the user account on the local computer.
If you want to set up an expiry date for the user account on the domain controller, run the following command.
# Set expire date for domain user account
Net User Toms /domain /expires:09/20/2022
In the above command, the net user takes the user name and uses /domain to set up an expiry date in the domain using /expires option.
Set Login Times for User Account
Using the net user command, you can set log in times for the user account to allow them to be used within specific hours only. Use the /time parameter followed by the allowed login times.
Run the following command to set login times for the user account on the local computer.
# Set login time to allow user login in specific duration
Net User Toms /time:M-F,07:00-16:00
In the above command, the net user command takes the user name to set up login time for the account to allow login between 7 am to 4 pm on Monday-Friday only.
For domain user accounts, add the /domain parameter:
# Set login time to allow user login in specific duration on the domain
Net User garyw /time:M-F,07:00-16:00 /domain
Net User Command Examples and FAQ
How to reset the user password using the net user command?
Open the Windows command prompt with Administrator privileges and run the following command to reset the password for a user account.
net user userid newpassword
How to use the net user command?
The net user is a command-line tool to manage user accounts on local and domain controllers. To use the net user command, open the command prompt and type the net user command, it will list all user accounts.
net user
How to check domain user details in cmd?
Use the net user command to view the user account details on the domain. The syntax to check user account information is:
net user userid
How to use the net user command to see when the password expires?
If you run net user userid on cmd terminal, it retrieves user information that includes the property “Password expires“. Use this property to see the user account password expiry date.
How to use the net user command to check the last login of the user?
To check the last login of the user on the domain using the net user command, run the command prompt and run the below command.
net user Toms /domain | Findstr "Last"
It returns the Last Login date for the user account on the domain.
How to use the net user command to set a password never expires using the command line?
To set the password never expires on the user account using the net user command in the cmd terminal, run the following command.
WMIC useraccount where Name='username' set PasswordExpires=FALSE
For example, to set the administrator password never expires using the net user command,
net user administrator |findstr /C:expires
Returns the output as
Account expires Never
Password expires 2/26/2023 4:10:20 PM
Run the WMIC command to set the PasswordExpires property for the administrator account to false.
WMIC useraccount where Name='administrator' SET PasswordExpires=FALSE
The above command line tool set up the administrator password never set to expire.
Conclusion
I hope the above article on the net user command line tool in the Windows system helps you to understand how to manage net user accounts using the command line.
net user without any option gets all the user accounts on the computer. You can also use the net users command to manage the user accounts on the local and domain controller.
You can find more topics about PowerShell Active Directory commands and PowerShell basics on the ShellGeek home page.
Для просмотра и управления учетными записями через командную строку используется команда NET USER.
Если ввести команду net user без параметров, то она покажет список пользователей Windows. Для просмотра справки по команде необходимо указать параметр net user /?

Список основных команд для работы с учетными записями через командную строку:
| Добавить пользователя | net user /add имя_пользователя пароль |
| Включить учетную запись пользователя | net user /active:yes имя_пользователя |
| Отключить учетную запись пользователя | net user /active:no имя_пользователя |
| Удалить пользователя | net user /delete имя_пользователя |
Для добавления пользователя в группу в командной строке используется команда управления локальными группами net localgroup
| Добавить пользователя в группу | net localgroup имя_группы имя_пользователя /add |
| Удалить пользователя из группы | net localgroup имя_группы имя_пользователя /delete |
Например, необходимо создать учетную запись пользователя «Root» с правами администратора и паролем 12345.
Создаем учетную запись:
net user /add root 12345Добавляем созданного пользователя в группу администраторов:
net localgroup Администраторы rootЧтобы просмотреть список всех локальных пользователей компьютера, достаточно зайти в раздел «Семья и другие люди» приложение «Параметры», но это далеко не единственный способ. Получить список локальных учетных записей также можно с помощью командной строки PowerShell и оснастки управления локальными пользователями и группами. Давайте посмотрим, как это делается на примере с Windows 10.
В PowerShell
Откройте любым удобным вам способом PowerShell и выполните в ней команду Get-LocalUser. При этом вы получите полный список всех имеющихся на компьютере пользователей, включая учетные записи скрытого администратора, гостя, «управляемого» системой пользователя и defaultuser0 — еще одной учетной записи, не принадлежащей ни к какой группе.
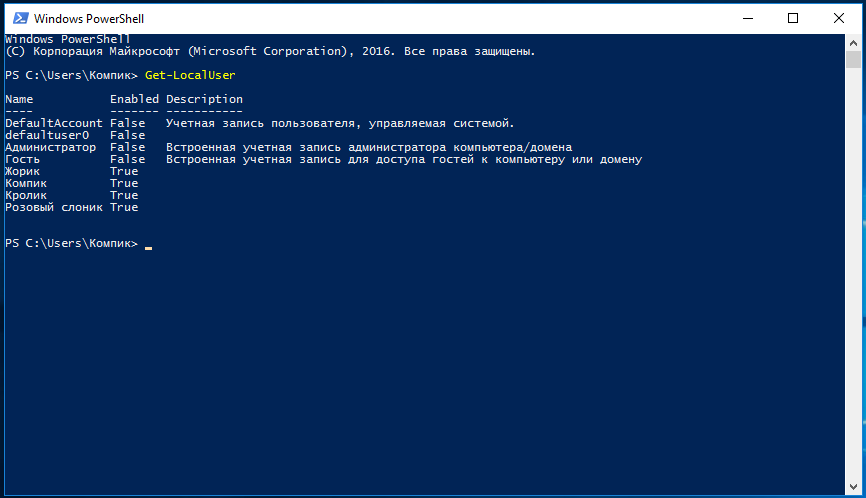
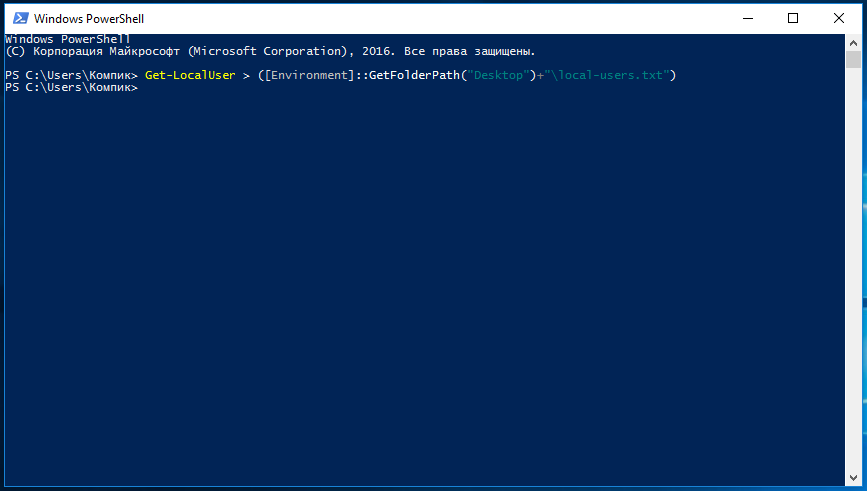
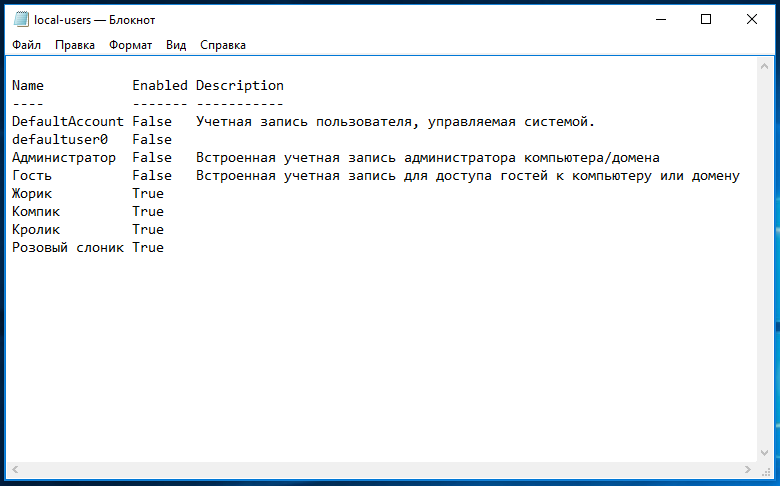
Особого внимания на них обращать не нужно, тем более, что все они по умолчанию имеют статус false, то есть являются неактивными. Некоторые из них, например, defaultuser0 можно безболезненно удалить через оснастку lusrmgr.msc. Да, если список вам понадобится в дальнейшем, можете перенаправить команду вывода в текстовый файл с сохранением его на рабочий стол. Вот так:
Get-LocalUser > ([Environment]::GetFolderPath("Desktop")+"\local-users.txt")
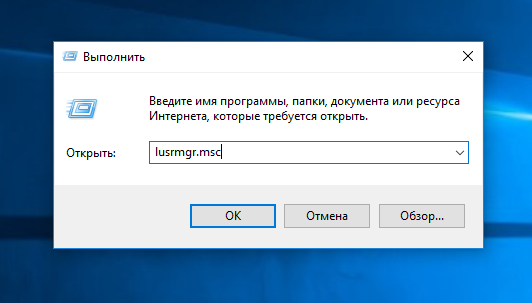
Через оснастку управления локальными пользователями и группами
Нажмите на клавиатуре Win + R, введите в диалоговое окошко Выполнить команду lusrmgr.msc и нажмите ввод.
В левой колонке открывшегося окна кликните по каталогу «Пользователи» и в средней части окна оснастки тут же получите полный список всех имеющихся на компьютере локальных учетных записей.
С помощью оснастки вы также можете управлять профилями пользователей, как то: удалять их, просматривать свойства, устанавливать пароль, добавлять в группы, активировать или напротив, отключать.
А еще вы можете экспортировать данные профилей в файл, воспользовавшись опцией меню Действие -> Экспортировать список.
![]() Загрузка…
Загрузка…