Loading
Table of Content
- What are Outlook Temporary Files?
- Why do temporary Outlook files need to be deleted?
- How to remove temporary files in Windows 10?
- Learn to delete Outlook Temporary Files
- Method 1 — Locate temporary files location through windows registry
- Method 2 — Manually locating Temporary files
- Conclusion
The blog’s title hints at our upcoming topic: a manual approach to removing temporary Outlook files on the Windows 10 operating system. However, before diving into the method itself, it’s crucial to understand what Outlook temporary files are and why they should be deleted. Let’s initiate a conversation on this matter.
What are Outlook Temporary Files?
Whenever an Outlook user opens or adds email attachments, duplicates of these attachments are saved within a sub-directory of the Outlook Temporary Internet Files folder. Initially, Outlook checks for the existence of the .OLK folder in the registry to store these temporary attachment files. If the folder does not exist, Outlook autonomously generates it. This process is carried out to enhance the security of received attachments by storing them in a separate location.
The basic path location for this temporary internet file for attachments is
C:\Users\%username%\AppData\Local\Microsoft\Windows\Temporary Internet Files\Content.Outlook\
We’ve discussed the creation of Outlook temporary files, but the question remains: why should we bother deleting them? In the upcoming section, we’ll delve into the problems that can arise from these temporary Outlook files, which can ultimately impact Outlook’s performance.
Why do temporary Outlook files need to be deleted?
Outlook users encounter the following issues as a result of temporary files in Outlook:
Security Risks –
Occasionally, even if you’ve deleted attachments, opened and closed them, or accidentally closed Outlook, copies of these attachments may still linger in the designated temporary folder. Those familiar with this folder’s location can potentially access sensitive information within these attachments. To safeguard your confidential data from potential theft, it’s advisable to regularly remove temporary Outlook files from your system.
Disk Space –
On occasion, Outlook users encounter difficulties accessing email attachments due to insufficient space in the Outlook temporary files directory. This issue typically arises when a substantial number of attachments accumulate within Outlook over time, and the temporary file folder remains unmanaged. Consequently, this directly impacts Outlook’s performance, leading to user frustration. Hence, the user must delete the Outlook temporary files to fix ‘Outlook attachments unable to access’ issue.
The aforementioned factors underscore the importance of removing temporary Outlook files. Now, let’s explore how to locate and subsequently delete these files from the temporary folder that has been generated on your computer.
How to remove temporary files in Windows 10?
Windows 10 offers a convenient built-in cleanup tool for removing temporary and unnecessary files from your system. To do this, simply follow these steps:
- Enter ‘disk cleanup’ into the search bar and then open the utility. Within this tool, you can select the drive on which you wish to initiate the cleanup process.
- Select Drive C and then click the «OK» button to reveal a list of available options.
- Choose the checkboxes to mark the folder for deletion. This action will display the total amount of data scheduled for removal. Click the OK button, and a pop-up dialog will appear, confirming your intention to permanently delete the file.
- Select Delete File. This action will result in the permanent deletion of all files.
Learn to delete Outlook Temporary Files
Method 1 — Locate temporary files location through windows registry
This is the primary section for our blog readers. Deleting temporary files after you’ve identified them is a straightforward task. The entire procedure involves the following steps:
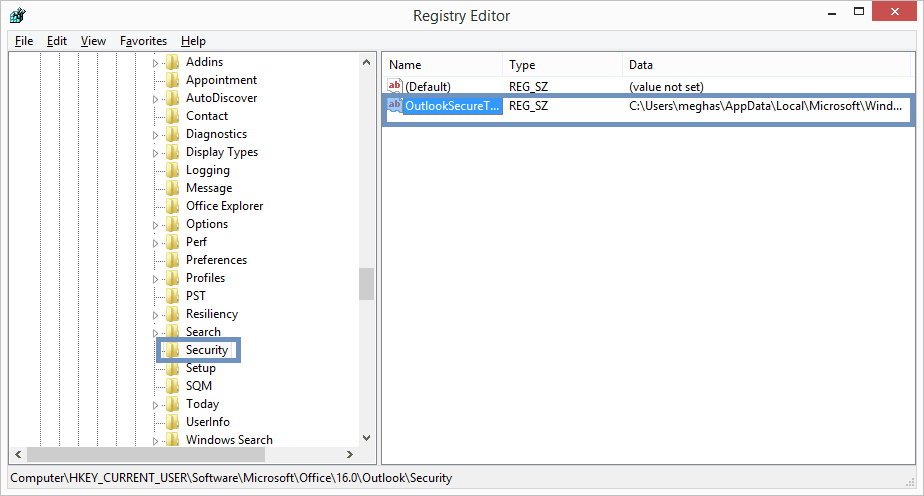
The OLK folder path varies depending on the version of Outlook you’re using, and you can obtain it directly from the registry key generated by Outlook. To retrieve the path, simply open the Run dialog by pressing Windows+R, then type «regedit» and click the OK button. The Registry Editor page will get open. Here locate the registry key as per your Outlook versions by following the given paths.
Outlook 2016-HKEY_CURRENT_USER/Software/Microsoft/Office/16.0/Outlook/Security
Outlook 2013-
HKEY_CURRENT_USER/Software/Microsoft/Office/15.0/Outlook/Security
Outlook 2010-
HKEY_CURRENT_USER/Software/Microsoft/Office/14.0/Outlook/Security
Outlook 2007-
HKEY_CURRENT_USER/Software/Microsoft/Office/12.0/Outlook/Security
Outlook 2003-
HKEY_CURRENT_USER/Software/Microsoft/Office/11.0/Outlook/Security
Navigate to the «Security» location in the above pathway, then double-click on the «OutlookSecureTempFolder» key in the right pane to access it.
Hold down the CTRL key and duplicate the file folder path.
To begin, initiate Windows Explorer by pressing Windows+E. Once it’s open, navigate to the top address bar and paste the copied path. Next, hit the Enter key on your keyboard. You should now see the temporary files. Simply choose the ones you want to delete. For permanent removal, also empty the Recycle Bin.
Method 2 — Manually locating Temporary files
The method outlined above proves effective in situations where Outlook is properly configured, the ‘OutlookSecureTempFolder’ registry field is present with a valid path, and all conditions are met. However, if any of these conditions are not satisfied, the Windows Operating System resorts to using the Temporary Internet Files folder as the root directory for temporary file storage. It generates a new folder within the Temporary Internet Files directory, assigning it a randomly generated name. In such cases, you’ll need to employ an alternative approach to locate this path, as the previously discussed method will not yield the desired results.
The location of Temporary Internet Files differs depending on the version of Windows you are using. In the following section, we will outline the specific paths for different Windows Operating System versions:
For Windows XP Operating System
C:\Documents and Settings\ username\Local Settings\Temporary Internet Files\Content.Outlook
For Windows 7 and Windows Vista Operating System
C:\Users\ username \AppData\Local\Microsoft\Windows\Temporary Internet Files\Content.Outlook
For Windows 8 and higher versions
C:\Users\username\AppData\Local\Microsoft\Windows\INetCache\Content.Outlook
We’ve established the default paths for various operating systems, but it’s worth noting that the version of your Outlook application can also introduce a slight variation in this regard.
In every Windows version, you’ll discover a subfolder featuring a randomly generated name specifically for Outlook 2007 and later editions. You can navigate directly to this path as previously indicated, locate the randomly generated folder, and proceed to erase all of its contents in order to eliminate all Outlook temporary files.
If you are using an older edition of Outlook, like Outlook 2003, you must check the ‘Temporary Internet Files’ directory based on the registry entry’s name to locate the folder containing temporary Outlook files.
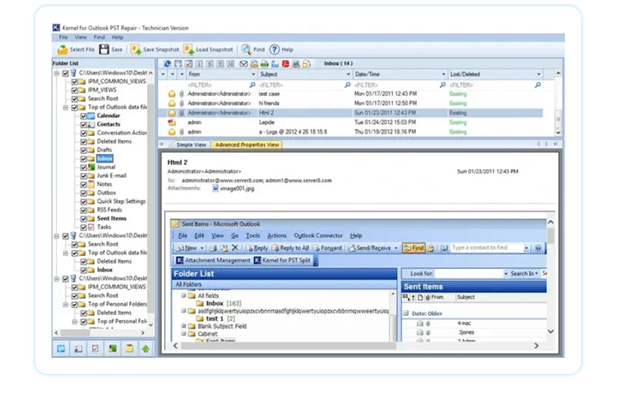
We’ve explored two approaches for pinpointing the folder housing temporary Outlook files. Feel free to choose the method that best fits your needs to tidy up your Outlook temporary files. This can also assist in resolving the ‘Attachments not opening’ problem, though it’s just one potential solution. If this doesn’t resolve the issue for you, it’s possible that your PST file is corrupt. If that is the issue, you need a promising and efficient tool such as Kernel Outlook PST Repair. It is an efficient tool that can fix PST corruption in very quick and easy Steps.
Conclusion:
In this blog post, we have explored the concept of Outlook temporary files and their crucial role in ensuring the smooth operation of Outlook. We also delved into the potential problem of attachments failing to open, which can sometimes be attributed to these temporary files. Additionally, we shed light on the security risks associated with these temporary files, as they can be exploited by malicious actors to gain access to sensitive information on your system. Furthermore, we have shared the registry path applicable to all active versions of Outlook, along with the specific registry entry that houses the path to the temporary files location. As a proactive solution, we highly recommend utilizing the Outlook repair tool, a robust and efficient tool designed to swiftly address PST corruption with minimal hassle.
- Free Download 100% SECURE
- Buy Now
Free up space on your PC by removing temporary files
by Madalina Dinita
Madalina has been a Windows fan ever since she got her hands on her first Windows XP computer. She is interested in all things technology, especially emerging technologies… read more
Updated on
- Outlook and any other mailbox service stores the temporary files in a folder on your PC.
- It’s likely that the size of these temporary files will balloon and cause performance issues.
- Sometimes even PC cleaners fail to delete the temporary Outlook files.
- So the next time you run out of storage space, do ensure you clean Outlook’s temp files.
XINSTALL BY CLICKING THE DOWNLOAD
FILE
Outlook is undoubtedly one of the most preferred mailboxes but it does come with a few nuances of its own. The one we are going to cover in this segment is the Storage Issues.
Most of us are not aware that Outlook or, as a matter of fact, any other mailbox service stores temporary files in a folder of your PC.
Why should I delete Outlook’s temporary files?
It’s quite likely that the size of these temporary files will balloon and not only cause performance issues, but also increase the risk of data thefts.
The temporary files include the attachments you view without downloading and the actual attachments that have been opened.
Needless to say, the temporary folder contains sensitive data.
Another side effect is that users will no more be able to open the new Outlook email attachments as the system is already bloated with previous temporary files.
Ironically sometimes even PC cleaners fail to delete the temporary Outlook files. So the next time you run out of storage space does make it a point to clean the Outlook temporary files.
Let’s check out some of the best methods to clear Outlook temp files and let’s start with the easiest of them all.
How can I clear Outlook temp files?
1. Delete Outlook temporary files via Registry Editor
1. Press the Windows + R keys on your keyboard to open the Run dialog.
2. Type regedit in the dialog box and press Enter to run it and open the Registry Editor app.
3. Navigate to Security > OutlookSecureTempFolder.
How we test, review and rate?
We have worked for the past 6 months on building a new review system on how we produce content. Using it, we have subsequently redone most of our articles to provide actual hands-on expertise on the guides we made.
For more details you can read how we test, review, and rate at WindowsReport.
4. Right-click on OutlookSecureTempFolder and select Modify from the options.
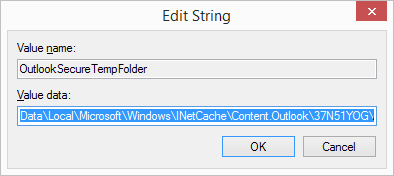
5. In the Edit String window, you need to copy the path to your clipboard.
6. Now press the Windows + E keys to open File Explorer.
7. Paste the previously copied path onto File Explorer’s search bar press Enter.
8. Once inside the Outlook temp files folder, you can directly delete the temp files.
Thankfully, one can directly delete the temp files from the Outlook folders, but the issue here is that the temp folder location is stored in registry keys.
We have listed the Outlook version along with the name of the key. Just head over to the registry and find the location of the temp files:
Outlook 2003-HKEY_CURRENT_USER\Software\Microsoft\Office\11.0\Outlook\Security
Outlook 2007-HKEY_CURRENT_USER\Software\Microsoft\Office\12.0\Outlook\Security
Outlook 2010-HKEY_CURRENT_USER\Software\Microsoft\Office\14.0\Outlook\Security
Outlook 2013-HKEY_CURRENT_USER\Software\Microsoft\Office\15.0\Outlook\Security
Outlook 2016-HKEY_CURRENT_USER\Software\Microsoft\Office16.0\Outlook\Security
2. Use Outlook Temp Cleaner for Windows

The one thing I really appreciate about the Windows Ecosystem is the availability of tools, every error has a tool to patch it.
Outlook Temp Cleaner is something that is best for those of us who don’t want to struggle a lot trying to locate the Secured Outlook Temporary files.
This is a free utility and pretty simple to use as well on Windows 10, and it will safely clear your Outlook’s temp files.
Download the Outlook Temp Cleaner file and run it. The tool automatically locates the temporary files and cleans up the SecureTempFolder.
It can also be used by admins with corporate login and logoff scripts without the need for any end-user interaction.
Outlook Tem Cleaner also displays the current size of the temp files that are stored in the folder and offers one button to delete all the temporary files.
One can also use the Empty Folder option to schedule the temp file cleaning process. That being said, the program needs Microsoft’s .Net Framework for functioning.
Also, you can choose one of the best tools to delete junk files from your PC from our list.
- 5 best IMAP email backup software [Windows 10/11 & Mac]
- 5+ best Windows 10 email clients & 3 best apps to use
- 5 Best Browsers for Outlook 365 that are Fully Supported
- 10 Best Outlook features you need to try right now
3. Use a cleaning software
A professional tool for clearing temporary files can select Outlook as one of the apps mentioned and enable for cleanup, and the temporary folder for Outlook named OLK, can be securely emptied.
It’s one of those free computer cleanup programs that come in helpful when you need to delete temporary files. You can delete them manually, but you can save a lot of time by pressing a button twice.
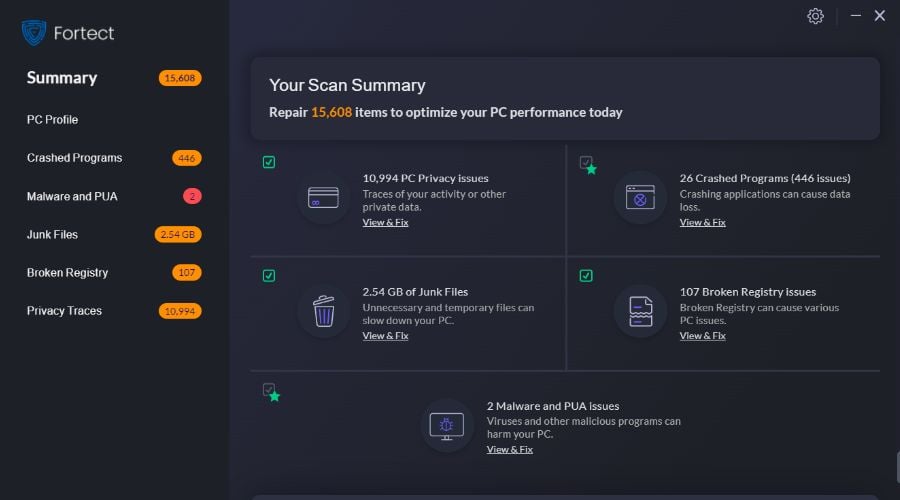
Fortect is trustful software that can only delete files that are safe to remove. Of course, if you are hesitant or until you can trust it, you should take precautions and back up your Outlook folders.
➡️ Get Fortect
It’s also worth mentioning that OutlookTools is yet another free cool program that not only lets you delete the temp files in an instant but will also give you other powerful features.
We can name an Outlook startup switch, Tweaks to New Mail alert notification, and also an option to unblock the attachments altogether.
If your Windows’s temporary files won’t delete, check out our dedicated guide to find out what to do.
In case you notice a large number of temporary files, you can always disable Outlook logging to save space.
Did you manage to safely clear temporary files within Outlook on your Windows 10 device? If you encountered any other issues, please let us know in the comment below.
Table of Contents:
OutlookSecureTempFolder or also called as Outlook temporary folder is used to store files like attachments when you open them in Outlook. Every time, you close the mail without closing the attachment, the attachment file will not be cleared from the Outlook temp cache folder. This continues to become an issue when the Outlook temp folder is full and you need to clear it manually.
This issue is quite common in Outlook versions like Outlook 2007, Outlok 2013 where attachments fail to open. Outlook 2016 and Outlook 2019 users do not face this issue as they are handled better here. You will find the following error message when you try to open or save any attachments:
Cannot create file: file name. Right-click the folder that you want to create the file in and then click Properties on the shortcut menu to check your permissions for the folder.
Where are Outlook Temporary files Stored?
Temporary files that are saved when you open attachments from your emails are stored in a hidden folder under Temporary Internet Files. Depending on the Outlook version you are using, Outlook searches for the “.olk” folder to save the temporary attachment files. If the folder doesn’t exist, Outlook creates the new folder and safely saves these attachment files.
The location of this Outlook temporary folder is as mentioned below. C:\Users\%username%\AppData\Local\Microsoft\Windows\Temporary Internet Files\Content.Outlook
You can copy and paste this location in the file explorer and hit enter to find Outlook secure temp folder.
How Do I Delete temporary Outlook Files in Windows?
There are two simple ways to delete temporary Outlook files on your Windows computer. The first way is using the registry keys to find and remove temporary files. The other way is to manually locate the files and delete it. It is a simple process, finding the location is the key here, follow the below mentioned methods you will be able to do it on your own.
Locate SecureTempFolder Using Windows Registry
Usually the location of the OutlookSecureTempFolder stored in the Windows registry. You can access this folder to clear the folder by deleting the temporary files or you can create a new temp folder.
The temporary file folder varies with the Outlook versions, refer to the below mentioned table to know how to find Outlook temp files on Windows 10 or previous versions:
| Outlook Version | Location of Outlook Temporary Folder |
| Outlook 2019 | HKEY_CURRENT_USER\SOFTWARE\Microsoft\Office\16.0\Outlook\Security |
| Outlook 2016 | HKEY_CURRENT_USER/Software/Microsoft/Office/16.0/Outlook/Security |
| Outlook 2013 | HKEY_CURRENT_USER/Software/Microsoft/Office/15.0/Outlook/Security |
| Outlook 2010 | HKEY_CURRENT_USER/Software/Microsoft/Office/14.0/Outlook/Security |
| Outlook 2007 | HKEY_CURRENT_USER/Software/Microsoft/Office/12.0/Outlook/Security |
| Outlook 2003 | HKEY_CURRENT_USER/Software/Microsoft/Office/11.0/Outlook/Security |
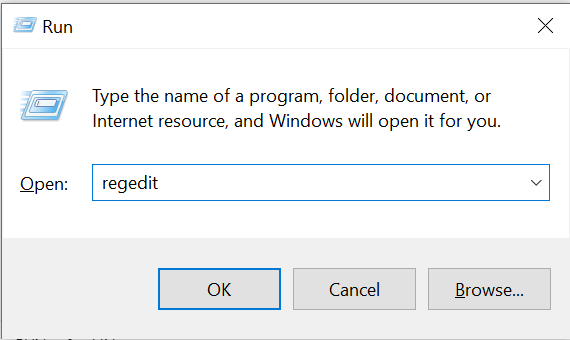
- Press Windows+R and type regedit and click on OK
- Registry Editor Windows opens, here you can also refer to the table above for the location
- Under Outlook go to Security
- Here you will see OutlookSecureTempFolder
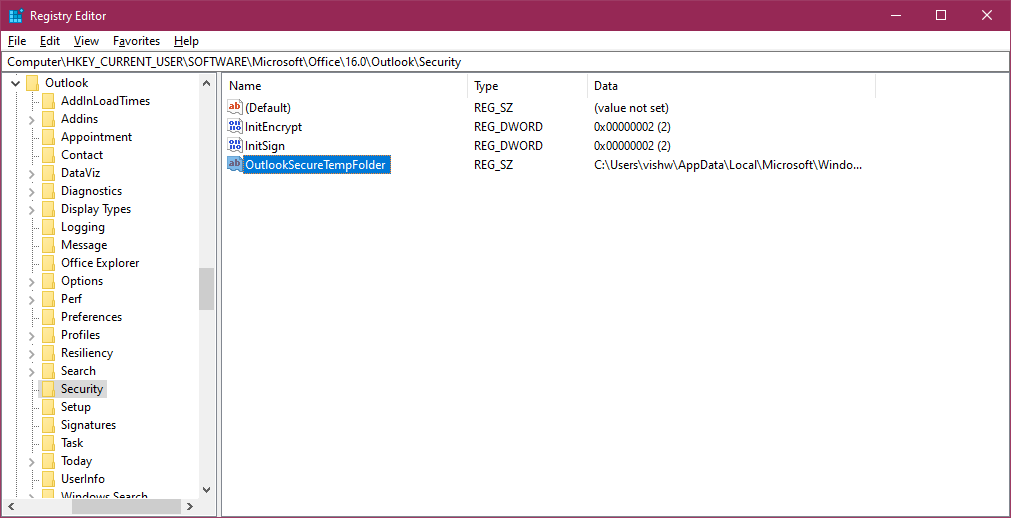
- Right click on OutlookSecureTempFolder and click on Modify

- In the Edit String Window copy the path present under value data.
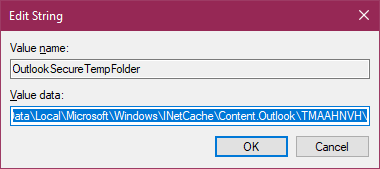
- Press Windows+E to open Windows Explorer search the path by pasting it in search bar.
- The temporary files will be visible now, you can delete files you don’t want. It is important that you delete these Outlook files permanently.
- Restart Outlook, you should be able to access the Outlook smoothly without any attachment issues.
Manually Clear Outlook Temp Files On Windows 11, 10, 8 or 7
Use the previous method, if you have never played around with your Outlook Configuration. If it didn’t work out for some reasons, you can use the manual method to find out how to find Outlook temp files and delete temporary files on Windows. Again these methods vary with the version of the Operating System you are using, kindly refer to the below mentioned steps according to your own Windows version.
If the files are stored in the SecureTempFolder or Windows will save these files under Temporary Internet Files folders. We need to find this folder which is different for every Windows OS.
Here’s the location of Outlook Temp Folders with their Windows operations system:
| Windows version | Temporary Internet Files Folder location |
| Windows 11, Windows 10 Windows 8.1 and Windows 8 | C:\Users\username\AppData\Local\Microsoft\Windows\INetCache\Content.Outlook |
| Windows 7 and Windows Vista | C:\Users\ username \AppData\Local\Microsoft\Windows\Temporary Internet Files\Content.Outlook |
| Windows XP | C:\Documents and Settings\ username\Local Settings\Temporary Internet Files\Content.Outlook |
Using the above mentioned path you can find the Temporary Internet Files folder. Under this folder you need to find the .OLK folder or Content.Outlook folder. Users of Windows OS with Outlook version above Outlook 2010, you might not be able to find the folder.
This is because Outlook manages the SecureTempFolder files better. You need not worry about clearing temporary files.
These two ways you can easily find and clear the temporary Outlook files that cause trouble in using Outlook attachments. Even after performing the above operation, if you are still facing issues with attachments in Outlook. It can be an issue with your attachment or an underlying issue with the PST file.
You might have to consider fixing the PST file, if you have important files being lost due to a corrupt PST file. We recommend you make use of the Remo PST Repair Tool to easily repair any corruption with your Outlook data file. You can download the tool here.
- Free Download For Windows
How to Find and Delete Outlook Temp on Mac?
If you are Microsoft Office users on Mac and worried about finding Outlook temp files on Mac, do not worry we got you covered. Similar to the Windows OS, macOS stores the temporary items of Outlook in a folder. Simply follow the below mentioned steps to access the Outlook temp folder and delete Outlook Temp files on Mac. The following method can be applied to all versions of macOS with Outlook:
- Open finder in mac OS
- Drag down the Go menu and select Go To Folder you can also do it by clicking on command+Shift+G
- Then input the following path in address bar ~/Library/Caches/TemporaryItems/Outlook Temp/
- Click on Go button to find the Outlook Temp Folder
Here in the folder you can find all the Outlook items like email attachments, html signatures, calendars etc. If you have enabled private folders visible, you can also manually find the Temp folder on Outlook Mac with this path: Library > Caches > Temporary Items > Outlook Temp directory.
Here, once you find the files, you can take a copy of the files you are looking or clear Outlook temp folder to fix your Outlook issue easily.
Note: Did Outlook blocked your email attachments? Know-how to unblock Outlook attachments.
Final Words:
All the above mentioned methods will certainly help you in making your Outlook problems go away by clearing the Outlook secure temp folder on both Windows and Mac. Hope the methods mentioned helped you in clearing your problem. If you have any questions with respect to the information mentioned above please do comment below. Do not forget to use Remo Outlook PST Repair to fix any issues with Outlook.
Frequently Asked Questions:
1. Is it safe to delete Outlook temp files?
Yes, they may and ought to be periodically eliminated. The temporary folder gives applications a place to work. There, programs can create temporary files for their own short-term needs. When software stops, it should remove all temporary files, but this doesn’t always happen for a variety of reasons (for example, if the program crashes, it never gets to do this). It’s wise to regularly clear out anything that has accumulated there.
2. Why is the temporary folder cleared?
Applications and programs can store temporary files on your computer that can consume a lot of storage space. Clearing these files is a smart approach to free up space on your hard drive if you are running low.
3. Where are temp files from Outlook stored?
In Vista, Windows 7/8/10 and newer versions like Windows 11, Outlook’s secure temp folder is at C:\Users\username\AppData\Local\Microsoft\Windows\Temporary Internet Files\Content.
Tony Landry is a Web Content Editor at Remo Software. He loves to write, edit, and manage content for users trying to troubleshoot and fix problems on Windows, Outlook, storage drives, and Cloud storage networks. With an aptitude that transcends writing, Tony is recognized as a Microsoft Outlook, Word, and PowerPoint expert. His comprehensive solutions stem from an in-depth understanding of these tools, enhancing his standing as a trusted problem-solving resource. He has published more than 200 articles on the Remo Software blog. He actively engages in research and problem-solving techniques to consistently generate great web content. Fixing various hardware problems on computer and storage devices along with a great knack for fixing Outlook errors, Tony is also the fun-time IT guy for all his work friends. Tony Landry’s work has been published in windowstechit, onlinegeeks, journeybytes and onlinecomputertips.
Articles: 207
Outlook так же как и другие приложения сохраняет на ПК временные файлы для ускорения работы приложения. Эти файлы позволяют Outlook выполнять некоторые действия быстрее, чем если бы файлы кэша отсутствовали. Однако, если количество таких файлов преизбыточно, это может привести к снижению производительности приложения, тогда необходимо эти файлы очищать, а как это сделать рассмотрим в данной статье.
Очистка кэша через проводник
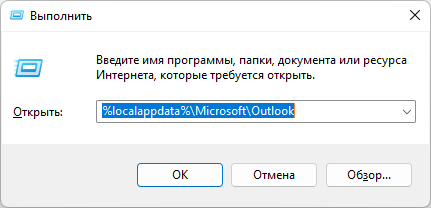
Самый простой способ очистки кэша — проводник Windows 11. На клавиатуре нажимаем на клавиши «Win+R», чтобы открыть окно выполнить, в которое вставляем следующий путь:
%localappdata%\Microsoft\Outlook
Нажимаем клавишу «ОК», чтобы перейти в папку «Outlook».
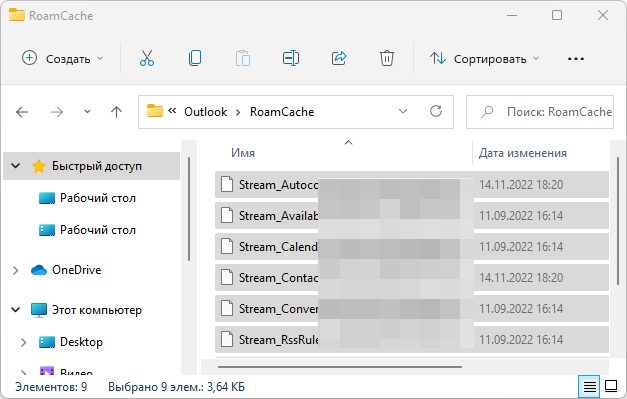
Далее переходим в папку «RoamCache» и удаляем внутри все содержимое. Для быстрого выделения/удаления всех файлов можно воспользоваться комбинацией «Ctrl+A», а затем нажать «Del».
Очистка отдельных записей кэша
Способ, который мы использовали выше удалит весь кэш в Outlook, однако можно удалять отдельные записи, например, адрес электронной почты, который вводился ранее в Outlook.
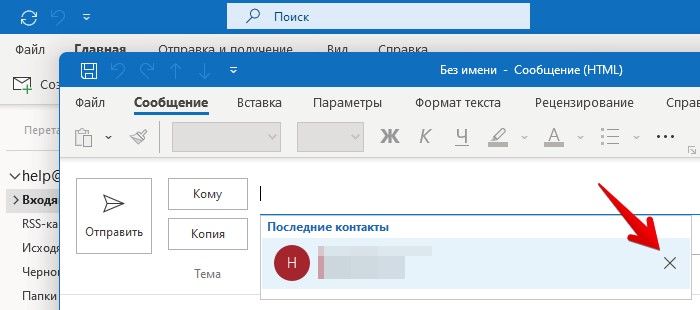
Для этого в главном окне приложения нажимаем на «Создать сообщение».
Затем щелкаем курсором по полю «Кому», чтобы отобразить список ранее использованных почтовых ящиков для отправки. При наведении на элемент в списке, справа будет отображаться крест, при помощи которого можно удалить запись из Outlook 2021.
Очистить кэш автозавершения и кэш форм
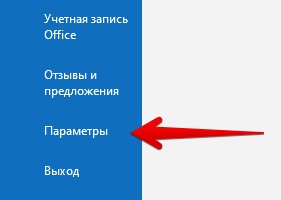
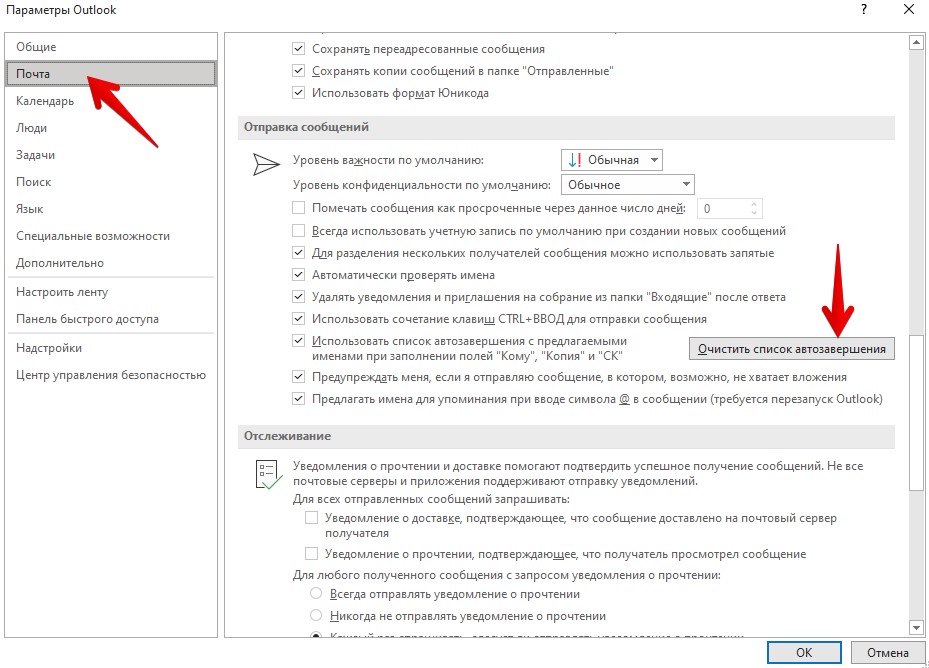
Чтобы удалить из кэша список автозавершения, нажимаем в главном окне «Файл», затем «Параметры» чтобы перейти в окно «Параметры Outlook».
Затем переходим в раздел «Почта», находим пункт «Отправка сообщений» и нажимаем на кнопку «Очистить список автозавершения».
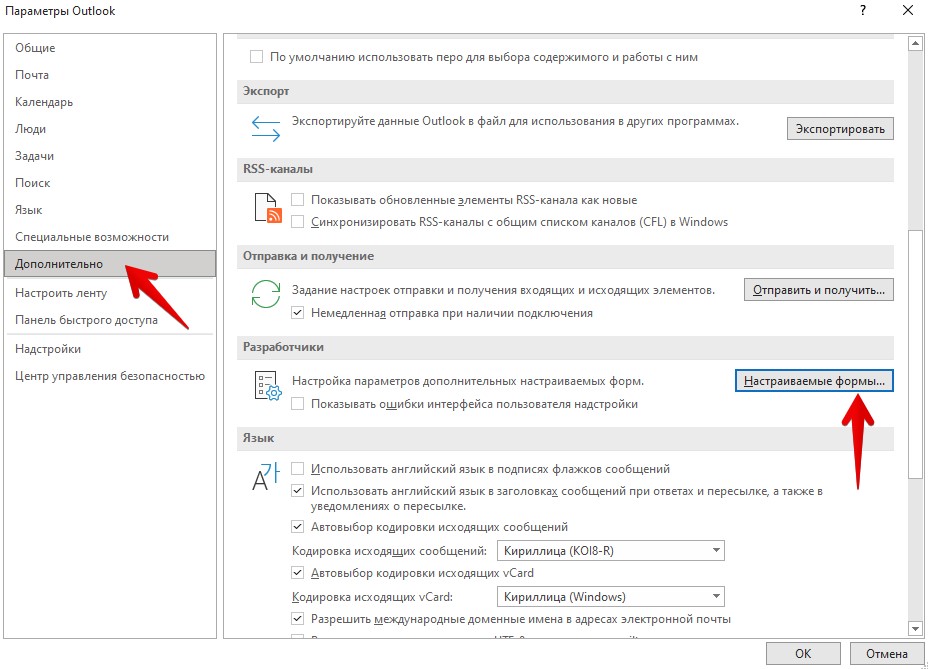
Для очистки кэша форма переходим в раздел «Дополнительно», затем в пункт «Разработчики», а после нажимаем кнопку «Настраиваемые формы…».
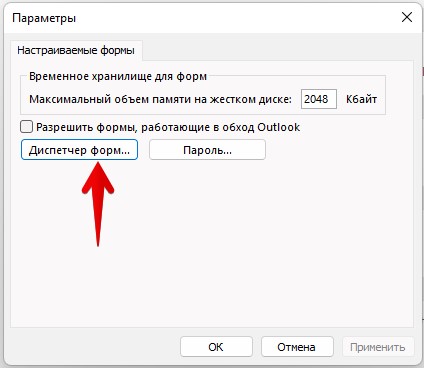
В окне «Параметры» нажимаем на кнопку «Диспетчер форм».
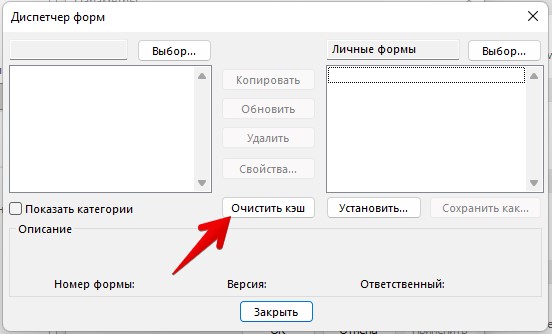
В окне «Диспетчер форм» нажимаем кнопку «Очистить кэш».
