Split tunneling lets you use VPN and local traffic at the same time
by Elena Constantinescu
Elena started writing professionally in 2010 and hasn’t stopped exploring the tech world since. With a firm grasp of software reviewing and content editing, she is always trying… read more
Updated on
- VPN split tunneling is a practical feature that allows you to access two networks at the same time. You can easily enable it through the Windows 10 built-in settings.
- Split-tunneling mode is great for remotely connecting to the workplace, saving your network bandwidth, or optimizing your Internet connection speed.
- It’s possible to edit the VPN connection details of the Windows 10 built-in VPN provider, use PowerShell, or configure router firmware options.
- However, the easiest way to control split tunneling is by using a commercial VPN service.
VPN split tunneling on Windows 10 allows you to access two networks at the same time: yours and the remote computer.
As opposed to redirecting all network data through VPN, this technique isolates VPN traffic from Internet connections.
For instance, you can remotely connect to your workplace through VPN to access the company’s internal resources, such as file servers or printers.
At the same time, it’s possible to stay connected to your home network and access the Internet.
VPN split tunneling is useful for managing the network bandwidth and excluding unnecessary applications from the VPN tunnel, particularly if the VPN bandwidth is limited or if the VPN hampers the Internet speed.
For example, if you use a VPN to watch Netflix, you can enable split tunneling on Windows 10 to route a web browser’s traffic through VPN while using another browser to stay directly connected to the Internet.
Check out our step-by-step instructions below to learn how to enable split tunneling using the Windows 10 built-in settings and a premium VPN client.
Make sure to create a VPN connection before trying method 1 or 2.
What is split tunneling Windows 10?
As mentioned, the split tunneling feature lets you use both VPN and local traffic at the same time.
There are multiple scenarios when this can be useful. For instance, if you use a VPN for gaming, the split tunneling feature may improve overall speed.
This happens because you have the option to allocate all of your VPN’s traffic to your game and all the other processes will connect through your home network’s server.
Windows 10 users can enable the split tunneling feature for the native Windows VPN app, or use a third-party VPN client that includes this feature.
How do I set up split tunneling in Windows 10?
1. Edit the VPN connection properties
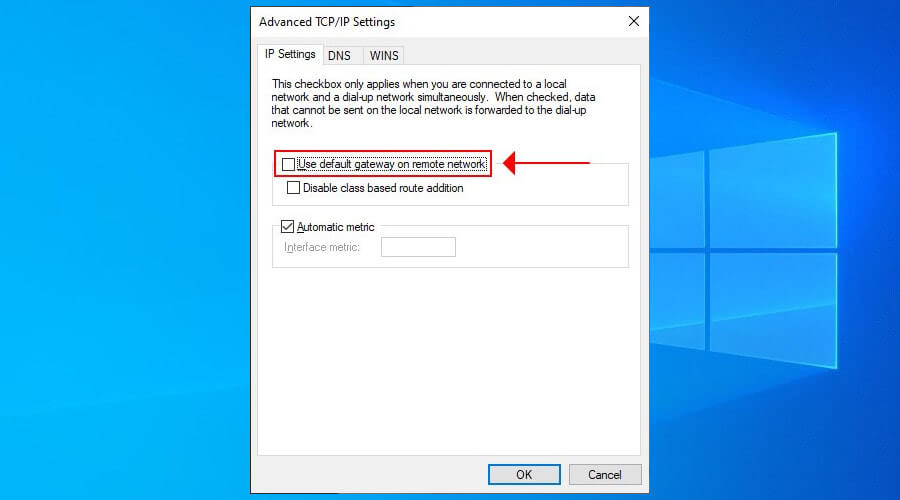
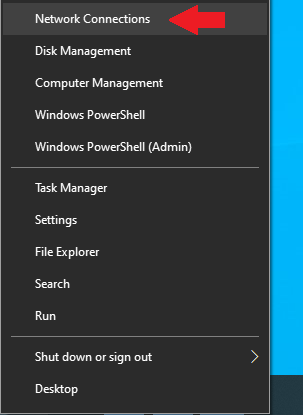
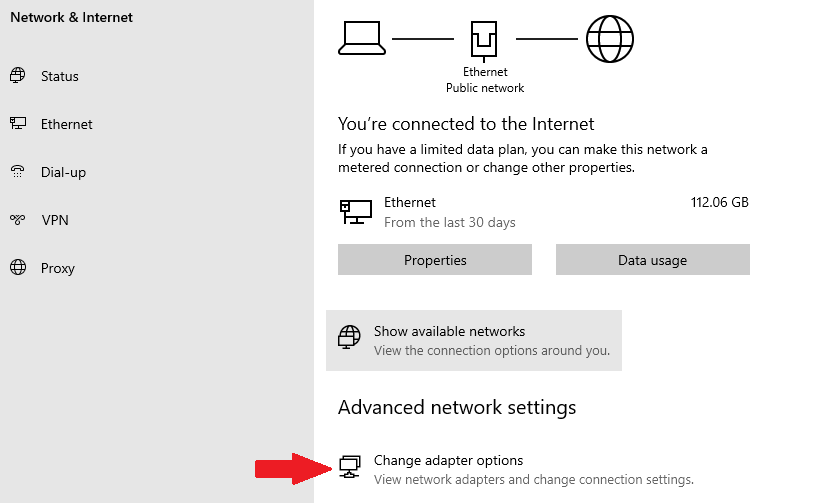
- Right-click the Windows 10 Start button and go to Network Connections.
- Click Change adapter options.
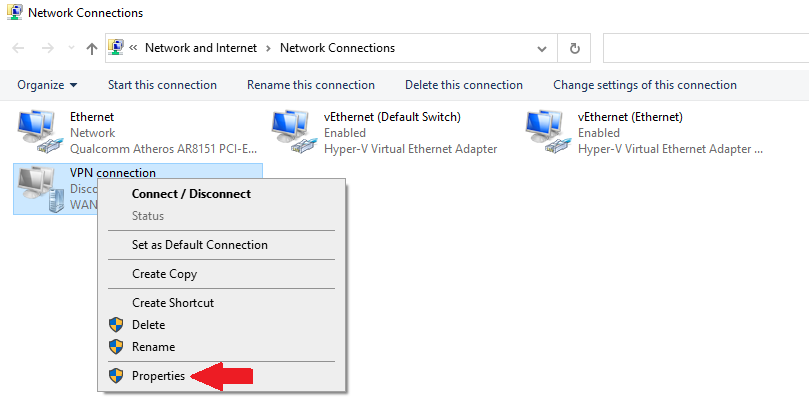
- Right-click your VPN connection and open Properties.
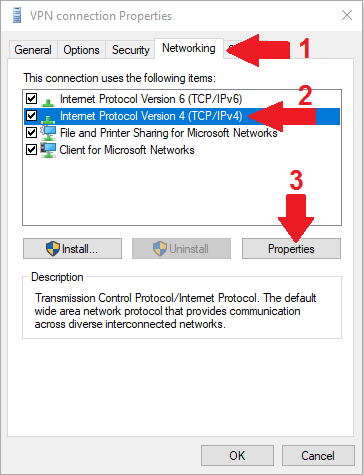
- In the Networking tab, select Internet Protocol Version 4 (TCP/IPv4).
- Click Advanced.
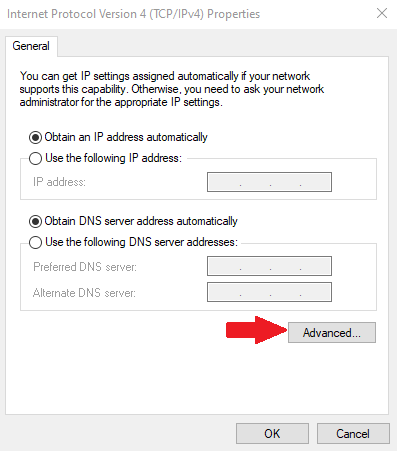
- In the General tab, click Advanced.
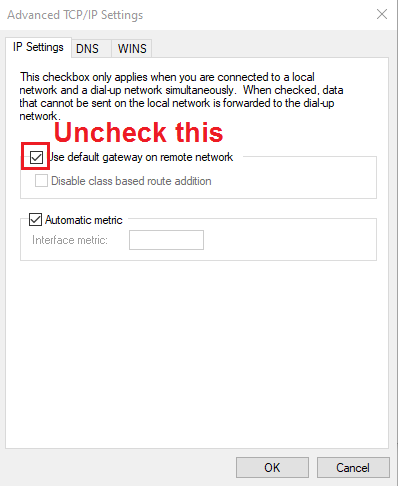
- Disable Use default gateway on remote network.
- Restart your VPN connection.
To disable split tunneling, go to the same place and enable Use default gateway on remote network.
This method can be used to remotely connect to another PC, in order to access files through VPN and use the remote LAN resources while also staying connected to your home network.
2. Use PowerShell
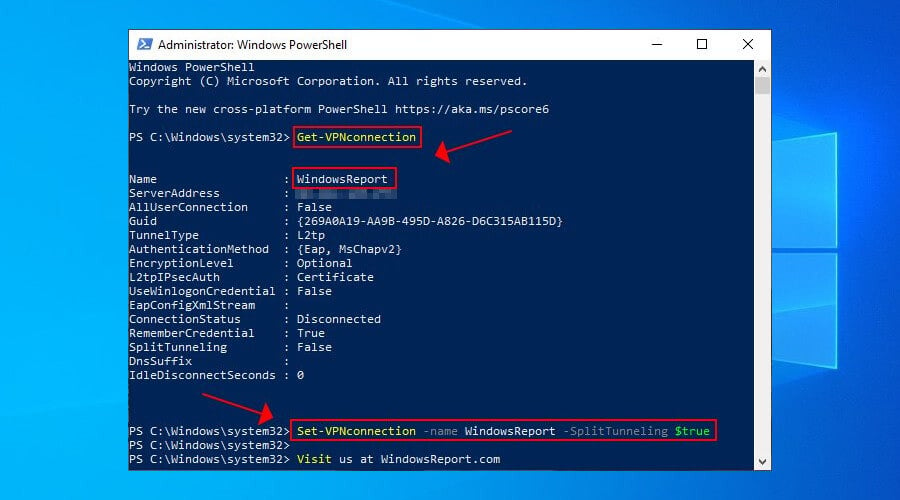
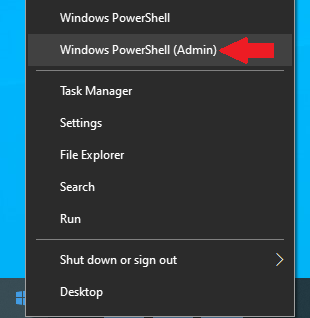
- Right-click Start and select Windows PowerShell (Admin).
- If you don’t know the VPN connection’s name, use Get-VPNconnection.
- To enable VPN split tunneling in Windows 10, paste:
Set-VPNconnection -name YourVPNconnection -SplitTunneling $true - Replace YourVPNconnection with the actual name and press Enter.
- To disable VPN split tunneling, paste:
Set-VPNconnection -name YourVPNconnection -SplitTunneling $false
This method uses the L2tp split tunnel and is identical to the first one but faster for Windows 10 users familiar with PowerShell.
Furthermore, it’s possible to create and run PowerShell scripts that automatically execute commands like enabling or disabling split tunneling.
Join our PowerShell Troubleshooting Hub if you’re experiencing any issues with this utility.
3. Get a VPN client with split tunneling

- Sign up for a VPN subscription plan (we recommend PIA).
- Download and install the Windows 10 desktop client.
- Launch the app and click its icon in the systray.
- Go to Settings > Network.
- Enable Split Tunnel and Allow LAN Traffic.
- Click Add Application and select a program.
- Open the dropdown menu next to the program
- Select Bypass VPN if you want the program to stay connected to your home network.
- Or, choose Only VPN to connect the program to the VPN server.
- Set All Other Apps to Bypass VPN or Only VPN (opposite of the program’s connection mode).
- Click IP address if you want to exclude specific IP addresses from the VPN tunnel.
- Restart PIA and the programs added to split tunneling.
There are few VPN clients with split-tunneling support, and Private Internet Access is the best of them. It grants you more possibilities than Windows 10.
Specifically, you can create a whitelist or blacklist of applications and IP addresses to always use VPN or to always bypass it and remain connected to the Internet directly.
Furthermore, PIA is the best VPN for Paypal to help you make secure transactions over public, unencrypted Wi-Fi hotspots.
More about PIA:
- No logs or leaks
- 24/7 live chat support
- 30-day money-back guarantee (no free trial)
- Pay with a credit card, PayPal, or crypto

Private Internet Access
Easily enable VPN split tunneling on Windows 10 with the help of PIA.
4. Change router firmware settings
Is split tunneling safe?
Split tunneling is perfectly safe to set up and use. You don’t have to worry about any security vulnerabilities when setting up a VPN between two networks.
Does OpenVPN support split tunneling?
Yes, OpenVPN supports split tunneling. You can exclude IP addresses using route IPaddress netmask net_gateway. For example, route 192.168.1.0 255.255.255.0 net_gateway
How do I know if my VPN is split tunneling?
Launch PowerShell, paste Get-VPNconnection and check the SplitTunneling status.
Conclusion
To sum up, you can set up split tunneling by editing the Windows 10 VPN connection properties or by using PowerShell.
However, we believe the easiest way is by turning to a VPN service with split tunneling support, such as Private Internet Access.
PIA makes it easier to toggle split tunneling and features many other awesome features.
A fourth alternative is to set up split tunneling mode at the router level if your router firmware supports this feature. It will divert network traffic for all devices connected to your home Wi-Fi.
Did you manage to set up a split tunnel through VPN? Let us know how you did it in the comment section below.
![]()
Introduction
In some use cases the integrated Windows vpn client might fit your needs. Some vpn options however can’t be configured through the default settings. One of those options is “split-tunneling”. I will show you how to enable and configure it. Most advanced features can be configured using Powershell.
Setting up a VPN Connection
A new vpn connection can be created through the Windows settings -> vpn or using Powershell. In this example I will show you how to create a new connection using Powershell. The required settings depend on your vpn provider/firewall vendor.
In this example I’m using IKEv2:
Add-VpnConnection -Name 'Test-VPN' -ServerAddress 'test-fw.lab.local' -TunnelType 'IKEv2' -EncryptionLevel 'Required' -AuthenticationMethod Eap -RememberCredentialThis command will create a vpn connection named “Test-VPN” using “IKEv2” as a vpn type and “Eap” as an authentication method. The server address can be either a domain name or ip address.
For more information and additional configuration options please refer to the following section:
Additional Information and Links
Configure Split-Tunnel Settings
In the following steps you need to provide the vpn connection name. The vpn connection name needs to match the name provided in the previous step.
List all VPN Connections (Optional)
If you are unsure about the correct vpn name you can use the following command to list all available vpn connections:
Enable Split-Tunneling
After setting up and your vpn connection you can now enable split-tunneling:
Set-VpnConnection -Name 'Test-VPN' -SplitTunneling $TrueSet VPN Routes
Once split-tunneling is enabled we need to tell the vpn connection which networks or hosts should be routed through the vpn.
This can be done with the following command:
Add-VpnConnectionRoute -ConnectionName "Test-VPN" -DestinationPrefix 172.22.22.0/24Now every destination of subnet 172.22.22.0/24 gets routed through the vpn connection named “Test-VPN”.
List Active VPN Routes
Unfortunately there is not currently a direct cmdlet available to list routes associated with a connection.
You can use the following command to list all routes for the specified connection:
(Get-VpnConnection -ConnectionName "Test-VPN").routesTo get an idea what multiple routes would look like I added another one beforehand.
The output lists all active routes:
DestinationPrefix : 172.22.22.0/24
InterfaceIndex    :
InterfaceAlias    : Test-VPN
AddressFamily     : IPv4
NextHop           : 0.0.0.0
Publish           : 0
RouteMetric       : 1
PolicyStore       :

DestinationPrefix : 172.22.23.0/24
InterfaceIndex    :
InterfaceAlias    : Test-VPN
AddressFamily     : IPv4
NextHop           : 0.0.0.0
Publish           : 0
RouteMetric       : 1
PolicyStore       :
Remove VPN Routes
You can also remove a vpn route by specifying the “Connection Name” and “Destination Prefix”:
Remove-VpnConnectionRoute -ConnectionName "Test-VPN" -DestinationPrefix "172.22.23.0/24"Remove VPN Connection
Removing the complete vpn connection is also possible with the following command:
Remove-VpnConnection -Name "Test-VPN" -ForceAdditional Information and Links
You can find all available configuration options at docs.microsoft.com.
Conclusion
Split-Tunneling can be enabled quite easily using Powershell. For large installations these tasks can also be automated by creating Powershell scripts which include all required settings. These scripts could then be used to configure multiple clients.
Have you ever noticed your Internet connection is slower when connected to a VPN? Then enabling Split Tunnel may be the answer for you!.

In a VPN connection, split tunneling is the practice of routing only some traffic over the VPN, while letting other traffic directly access the Internet. Usually, what is routed over the VPN will be traffic destined for internal resources, while web surfing, email, skype, etc. will go directly to the Internet. An advantage of using split tunneling, is that it alleviates bottlenecks and conserves bandwidth as Internet traffic, does not have to pass through the VPN server.
Split tunneling can be used for several different purposes including:
- Allowing normal use of the internet while simultaneously accessing resources only available to VPN users, such as a business server
- Setting up specific devices, such as game consoles or streaming media boxes, to use (or not use) the VPN without affecting other devices on the network
- Sending all of a device’s traffic through the VPN except when accessing content or services that don’t allow VPN connections, such as MLB.tv or Netflix
- Sending all traffic through the VPN except for content and services that require low latency, such as VoIP applications and online games
- Only routing torrent traffic through the VPN, while all other internet traffic goes to the default network
- Access the VPN without affecting your connection to other devices on the local network, such as printers or a Plex Media Server
Pros
If you are going to split tunnel, then you are going to reduce the overall bandwidth impact on your Internet circuit. Only the traffic that needs to come over the VPN will, so anything a user is doing that is not “work related” will not consume bandwidth. In addition, anything external to your network, that is also latency sensitive will not suffer from the additional latency introduced by tunneling everything over the VPN to the corporate network, then back out to the Internet, and the return traffic routing over the reverse. Users will get the best experience in terms of network performance, and the company will consume the least bandwidth.
Cons
If security is supposed to monitor all network traffic, or perhaps merely protect users from malware and other Internet threats by filtering traffic, users who are split tunneling will not get this protection and security will be unable to monitor traffic for threats or inappropriate activity. Users on open networks such as hotel wireless or hotspots will also be transmitting much of their traffic in the clear. Traffic to websites that use HTTPS will still be protected, but other traffic will be vulnerable to snooping.
How to Enable Spit Tunnel in Windows 10
In order to enable Split Tunnel in Windows 10, you must be sure the VPN is already working. If you have a problem with your VPN connection, like it is not connecting, or dropping every 5 minutes, etc. Split Tunnel won’t make a difference, so resolve those issues first. Once you have a working VPN connection, the way to change VPN Split Tunnel in Windows 10 is using Powershell.
Windows is fairly limited when it comes to split tunneling. There’s no way that we’re aware of to split tunnel by app or destination. Instead, the split tunneling option in Windows is much broader. You can choose not to tunnel IPv4 and IPv6 traffic so that only local traffic goes through the VPN. That’s useful if only need to use the VPN to access remote resources not available from your normal internet connection, but not much else.
Furthermore, Windows only split tunnels VPN protocols that it has built-in support for. That means you’ll need to configure an L2TP, SSTP, or PPTP connection first. OpenVPN won’t work here.
This example, will use your local connection to access the internet while the VPN will be used to access remote resources, such as a private business server that can only be accessed via VPN. The VPN will only be used when a host isn’t available on the local network.
In this tutorial, will use Windows 10. We’ll assume you’ve already set up your VPN connection, and you only need to enable split tunneling. You’ll need admin privileges and the destination subnet for your VPN private space.
Using Powershell to configure Split Tunnel
In your Windows search bar, type Powershell and right click it to Run as administrator split tunnel windows

Type the following command and press Enter:
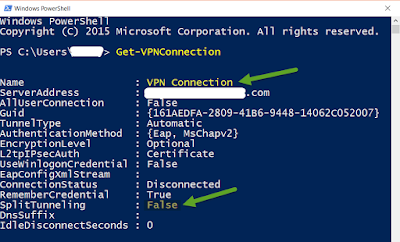
Get-VPNConnection This will bring up a list of all your available VPN connections. (I test a lot of VPNs so there are several in my screenshot, but you’ll likely only have one.) Make a note of the Name of the VPN you want to split tunnel.

Type the following command and hit Enter, replacing <VPN NAME> with the name you noted in the previous step:
Set-VPNConnection -Name “<VPN NAME>” -SplitTunneling $TrueYou can check that split tunneling is enabled by entering the Get-VPNConnection command again. The split tunneling field should now be set to True.

Next, enter this command and make a note of the Description field:
ipconfig /allIf necessary, add the route. Replace <DESTINATION SUBNET> with the subnet you want to route through the VPN, and <INTERFACE> with the name of the Description field we mentioned in the last step:
netsh interface ipv4 add route <DESTINATION SUBNET> "<INTERFACE NAME>"If you want to disable split tunneling, enter this command:
Set-VPNConnection -Name "<VPN NAME>" -SplitTunneling $FalseWe hope this guide helps you with your VPN deployment. Here at Austral Tech we are VPN experts and we have experience setting up VPN tunnels with F5 Products, Checkpoint, Ubiquiti and Cloud providers (AWS, Azure and Google). So if you need help with your VPN deployment, don’t hesitate to contact us!
Need a quick boost of speed in a multiplayer game or video call, but still want to keep the VPN on for torrenting or Netflix on a side screen? Well, split tunneling lets you «whitelist» which apps use or don’t use the VPN connection, leaving your ISP’s servers to do the grunt work. Today, we’ll be looking at how to enable VPN split tunneling in Windows 10.
Here are four different methods to do so, although the easiest one remains to get a commercial split-tunneling VPN. We’ll cover that option later in the article as well.
Before we move on, make sure you know how to set up a VPN on Windows. This is because the first two methods involve a manually created VPN connection.
Using Windows 10’s built-in VPN
While Windows 10 has a built-in VPN option, it doesn’t support newer VPN protocols such as OpenVPN or WireGuard. If you’re new to VPNs, we recommend using a fast and secure provider (like ExpressVPN) and enabling their built-in split tunneling option.
Method #1: Using Network Settings
One way to enable VPN split tunneling in Windows 10 is to disable the «Use default gateway on remote network» option on your manually created VPN connection. Here’s how to do so.
Step 1: Right-click the Start button then click on Network Connections.
Step 2: Under Advanced network settings, click the Change adapter options button.
Step 3: Locate your VPN connection (in our case, the cleverly named «VPN connection»). Right-click on it and click Properties.
Step 4: Click on the Networking tab, then select Internet Protocol Version 4 (TCP/IPv4), and click on Properties.
Step 5: In the Internet Protocol Version 4 (TCP/IPv4) Properties menu, click on «Advanced…«.
Step 6: In the IP Settings tab, untick the box that says «Use default gateway on remote network«.
And that’s how to enable VPN split tunneling in Windows 10 using the settings on your virtual network adapter. Now all you need to do is restart your VPN connection.
How to disable VPN split tunneling
If you ever want to disable split tunneling, navigate to the same menu and tick the «Use default gateway on remote network» checkbox.
Method #2: Using PowerShell
This next method basically does the same thing, but you don’t need to navigate through so many menus.
Step 1: Once again, right-click on the Start button and click on Windows PowerShell (Admin).
Step 2: Copy and paste this line of code into PowerShell. Change «VPNConnectionName» to whatever you named your connection (ours is literally just called «VPN connection»).
Set-VPNconnection -name VPNConnectionName -SplitTunneling $true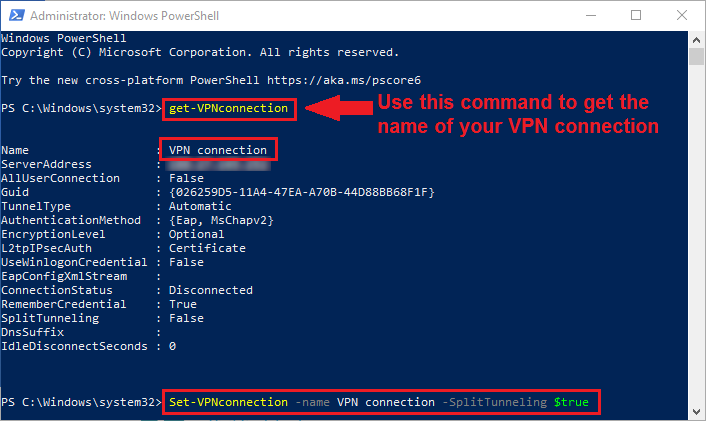
Note that you can use the command Get-VPNconnection to get the name of the connection, as well as some additional info. Saves you time instead of navigating all the way to the network adapter settings.
Disabling VPN split tunneling with PowerShell
To disable the option, simply change the value at the end of the code line from «$true» to «$false» (without the quote marks).
Method #3: Get a VPN with Split Tunneling
If you’re wondering how to enable VPN split tunneling in Windows 10 without any sort of complications or manual VPN settings, this is the way to go. We’ll be using ExpressVPN to showcase the quick process, though it should be fairly similar to other providers.
|
Servers 3,000+ Countries 94 |
|
| Try Risk-Free |
Parallel Connections 5 Live Chat Yes |
Step 1: First, launch ExpressVPN (log in if necessary). Click on the Menu button in the top left corner of the app (three vertical lines).

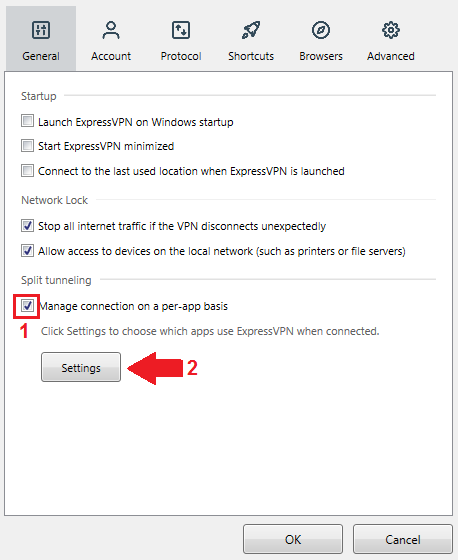
Step 2: In the General tab, tick the checkbox that says «Manage connections on a per-app basis«. Then click on Settings.
Now, there are two ways you can use split tunneling in ExpressVPN. We’ll separate the two under Step 3A and 3B.
Step 3A: First, you can disallow apps from using the VPN.
This is useful in case you want to use a different browser to watch Netflix locally, or make a video call that requires faster network speeds than with an active VPN connection. Just a couple of examples, but you get the idea.
Anyway, click on «Do not allow selected apps to use the VPN«. Then click on the plus sign (+) to add apps that won’t use ExpressVPN. Use the «Add another app» option if your choice is not on the list, and head to the folder where it’s installed.
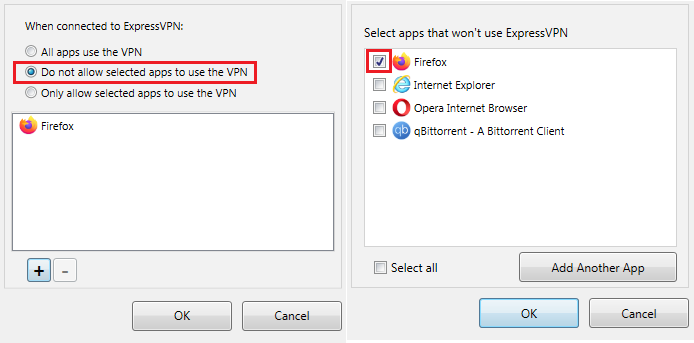
Step 3B: Use the «Only allow selected apps to use the VPN» option if you want to use your ISP’s servers for the rest of your traffic. Useful in case you have stuff running in the background, and want to use VPN to stream content from abroad in a separate browser.
Step 4: Click OK to apply your settings, no matter which option you picked. Restart your VPN and the apps you’ve selected to ensure everything works properly.
How to disable split tunneling in ExpressVPN
If you want to disable split tunneling in ExpressVPN (or any other provider), simply select the «All apps use the VPN» option from the same menu as above.
Method #4: Through Router Firmware Settings
Want to share a VPN connection with devices that don’t natively support it (such as a smart TV or game console)? Then take a look at our guide on how to set up VPN on your router, provided you have a compatible router to work with.
Enabling VPN split tunneling on a router will allow you to:
- Route traffic from specific devices through the VPN tunnel (policy-based routing)
- Tunnel traffic to specific destination IP addresses (IP routing)
- Tunnel traffic from individual apps or port numbers (say, port numbers for multiplayer games)
Note that the process of installing and setting up VPN split tunneling on your router can be tricky. We only recommend this process to advanced users.
Final Thoughts
As you can see, there are several ways to split your traffic and use VPN tunneling only where necessary. If you have a manual VPN setup on Windows 10, PowerShell and your network adapter settings are your friends. Alternatively, you can use a compatible VPN router and use interfaces like DD-WRT to change tunneling policies by device, IP, app, or port.
Of course, the easiest way is to just skip all the complicated setup and enable split tunneling on a third-party VPN. You can easily exclude individual apps from the VPN tunnel, or select specific apps you want to use the VPN.
A Virtual Private Network, or VPN, can be integral to accessing business resources. Using proprietary software and protecting private information are common reasons people use a VPN. A VPN provides access to programs not installed and information not stored locally. Enabling split tunneling allows network traffic to utilize two different types of connections. One connection uses the local network connection to access the Internet while the other uses the VPN to access resources otherwise unavailable.
Enabling VPN split tunneling in Windows 10 can be done using a simple PowerShell command, unlike Windows 7 where the option for the VPN connection is normally set by navigating through network settings.
How a VPN Works
Simply put, a VPN is used to create a direct secure connection between two different networks. When using a VPN, a virtual tunnel is created between two devices for the purpose of securely transferring data back and forth. This secure connection allows mobile employees encrypted access to systems in another location. There are other reasons to use a VPN, such as keeping critical data off of mobile devices (including laptops), to reduce data exposure due to theft and loss, and more.
The virtual tunnel created runs on top of the Internet. A VPN connection is a secondary network connection created in network settings. Once the connection has been established, it can be connected to at any time using the necessary credentials. When connected to a VPN, all Internet traffic is routed through the VPN by default. Split tunneling allows regular Internet traffic to pass through the on-board LAN / WAN connection while also passing access to necessary resources using the VPN connection.
Enabling VPN Split Tunneling in Windows 10
In Windows 10, split tunneling can be enabled by running a simple PowerShell command.
- Search for PowerShell and click on the result to open the Windows PowerShell application.

- If the name of the VPN connection is unknown, type «Get-VPNConnection». The name(s) of each VPN Connection will be displayed with their details.

- Type the command «Set-VPNConnection» -Name «Connection Name» -SplitTunneling $True» to enable split tunneling on the desired VPN Connection.

- To verify split tunneling has been enabled, retype the «Get-VPNConnection» command.


Another way to enable split tunneling, in both Windows 10 and Windows 7, consists of:
- Right clicking the VPN connection and selecting Properties.
- Clicking on the Networking tab.
- Selecting the TCP/IP version 4 connection then clicking Properties.

- In the Properties pop-up, click the Advanced button.
- In the Advanced TCP/IP settings window, uncheck the box next to «Use default gateway on remote network» to enable split tunneling.

- Click OK three times to save the setting.


Regardless of why a VPN is used, split tunneling can be helpful to keep different types of activities separate. Enabling split tunneling by navigating to the VPN settings has the same affect as using the PowerShell command, it simply comes down to familiarity with the processes and which options are available. Some Windows 10 devices may not provide access to the split tunneling setting under the network settings. In this case, changing the settings using the PowerShell command is the only option so knowing how to do this is critical.
As always, knowing two or three ways to accomplish the same thing saves time and maintains sanity!