Introduction
In this article we will explain how to set up L2TP/IPSec VPN on Windows Server 2019.
A VPN or Virtual Private Network is used to securely tunnel the data from a local computer to a remote server. You can visualize VPN as a private network distributed across the internet or public network. Using VPN, different devices can securely talk to each other as if they are connected over a private network.
There are various VPN tunneling protocols are available. In this tutorial, we will configure a fresh VPS running Windows Server 2019 as an L2TP over IPSec VPN. L2TP or Layer 2 Tunneling Protocol is a tunneling protocol but it does not provide strong encryption. IPSec comes into picture here, which provides very strong encryption to data exchanged between the remote server and client machine.
We will leverage on Remote and Remote Access Services (RRAS) which provides easy to use interface to configure networking features such as VPN, NAT, Dial-Up Access server, Lan Routing, etc.
Prerequisites
- Cloud VPS, Pure performance VPS or Dedicated Server with Windows Server 2019 installed.
- You must be logged in via Remote Desktop Protocol as an administrative user.
Step 1: Update System
Search for Windows Powershell and open it in Administrative mode by right-clicking and selecting Open as Administrator.
Install Windows update module for Powershell by running the command.
Install-Module PSWindowsUpdate
You may be prompted for confirmation, press Y and enter all the time.
Now get the list of latest updates by running.
Get-WindowsUpdate
Finally, install the updates by running the command.
Install-WindowsUpdate
Once updates are installed, restart the computer by running the command.
Restart-Computer
Step 2: Install Remote Access Role
Open Powershell again in administrative mode and run the following command to install the Remote Access feature with Direct Access and VPN (RAS) and Routing along with management tools.
Install-WindowsFeature RemoteAccess
Install-WindowsFeature DirectAccess-VPN -IncludeManagementTools
Install-WindowsFeature Routing -IncludeManagementTools
Step 3: Configure Routing and Remote Access
Open Server Manager and navigate to Tools >> Remote Access Management.
On the left pane, right-click on your local server and click Configure and Enable Routing and Remote Access.
In Configure and Enable Routing and Remote Access Wizard, select Custom Configuration radio button as we will manually configure the routing and access. Click Next button.
Next, select VPN Server and NAT checkboxes and click next to see a summary of the selection.
Finally, on clicking Finish button, you will see a prompt to start the Routing and Remote Access Services. Click on the Start Service button.
Step 4: Configure VPN Properties
Now that we have our VPN running, let’s go ahead and configure it. Under the Routing and Remote Access window, on the left pane, right-click on your local server and click Properties.
Navigate to the security tab and click on Allow custom IPSec policy for L2TP/IKEv2 connection and put a very long PSK(Pre-shared key). You can use any tool to generate a random key.
Make sure to note down the PSK as we will need to share the PSK with every user who wants to connect to the VPN server.
Now, go to IPv4 tab and under IPv4 address assignment select static address pool. Click Add button and you will get a pop up to put IP address ranges. Put the starting address and ending address of the IP address range you want the users to assign to.
Click the OK button to save the address range and finally click OK to save the changes. You may get a warning saying you need to restart the Routing and Remote Access for changes to apply, you can safely click OK and ignore it for now as we will restart the service after completing next step.
Step 5: Configure NAT
On the same left pane of Routing and Remote Access window, expand your local server and then expand IPv4. You will see the NAT object there. Right-click on NAT and then click on New Interface option.
Select Ethernet and click OK to proceed further. On NAT tab, select Public interface connected to Internet radio button and also select Enable NAT on this interface checkbox.
Now, go to Services and Ports tab and select VPN Server(L2TP/IPSec – running on this server) checkbox. It will open up a new interface for editing the service.
Change the private address from 0.0.0.0 to 127.0.0.1 and click OK to save.
Finally, Click OK to save the NAT interface.
Step 6: Restart Routing and Remote Access
On the left pane of Routing and Remote Access window, right-click on your local server and click on Restart under All Tasks.
This will restart the Routing and Remote Access services and all the changes we have made will be applied.
Step 7: Configure Windows Firewall
On the start menu, search for Windows defender firewall and open it. Click on Advanced settings on windows defender firewall.
Under Advanced setting, click on Inbound Rules on the left pane and then click on New Rule on right side pane.
Windows Server 2019 has predefined rules which we need to enable for VPN to work. In New Inbound Rule Wizard click on Predefined radio button and select the Routing and Remote Access from the drop-down.
Under Predefined Rules select Routing and Remote Access(L2TP-In) checkbox and click Next.
Under Action select, the option Allow the connection and click Finish.
The firewall is now configured to allow inbound traffic on UDP port 1701.
Step 8: Create VPN User
Search for Computer Management in the start menu and under Computer Management window expand Local users and group.
Right-click on Users and click on New User under Local users and group to create a new user.
On New User prompt, provide a username, full name, and strong password. Uncheck User must change the password on next login checkbox. Click Create to create a new user.
Once the user is created, return to Computer Management interface and you will find the user which you have just created in the list of users. Right-click on the user and click Properties option.
On your VPN users properties, navigate to Dial-in tab. Now, select Allow access option for Network Access Permissions setting. Click OK to save the properties.
Our L2TP/IPSec VPN server is now ready and can accept the connections.
Step 9: Connecting VPN Clients.
You will need to share the PSK and Windows username and password to the user who wishes to connect to the remote VPN server. You can also follow the tutorials on Snel website to learn how to connect to the remote server.
- How to connect L2TP/IPsec VPN on Mac OS X
- How to connect L2TP/IPsec VPN on Windows 10
Step 10: Monitoring VPN
Search for Remote Access Management Console in the start menu and open the console. You should see the status of the VPN. If you have followed the tutorial correctly, you will see all green checkmark on all services. You can also view the details of connected clients on this console.
Conclusion
In this tutorial, we have successfully configured a fresh Windows Server 2019 server as an L2TP/IPSec VPN servers. You can now use the VPN server to securely connect to the other connected devices. You can also use this VPN server as a proxy server to securely access the internet. You have now set up L2TP/IPSec VPN on Windows Server 2019.
VPN туннели являют эффективным механизмом, позволяющим объединить несколько удаленных сайтов в единую маршрутизируемую сеть, и передавать данные, используя защищенные каналы организованные поверх сети Интернет.
Неотъемлемой частью «облачных» инфраструктур, построенных на продуктах VMware vCloud, является VMware Edge, входящий в состав VMware vCloud Networkin & Security, также известный как VMware vShield).
VMware Edge предоставляет возможность организации IPSec Site-to-Site VPN туннелей как с другими серверами Edge, так и с программным обеспечением и оборудованием сторонних производителей, например, Cisco ASA или Microsoft TMG. Однако, в некоторых случаях, функции VPN сервера может взять на себя и обычный сервер с установленной ОС Windows Server.
В качестве примера рассмотрим настройку VPN туннеля между двумя сайтами (site1 и site2). В первом сайте используется подсеть 192.168.10.0 / 24 и установлен выделенный сервер Windows Server 2008 R2 с доступом в Интернет (в примере подсеть 192.168.1.0 / 24). Во втором сайте используется подсеть 192.168.20.0 / 24 и развернут сервер VMware Edge, у которого также есть прямой доступ в Интернет.

Настройка Edge сервера
При развертывании Edge сервера в виртуальном ЦОД организации все настройки VPN туннелей должны выполняется только из консоли vCloud Director, т.к. настройки, выполняемые из vShield Manager, не синхронизируются с БД vCloud Director и могут быть перезаписаны.
Откройте консоль управления vCloud Director. Войдите в систему в качестве системного администратора или администратора организации. Перейдите во вкладку администрирования (Administration), в списке слева выберите нужный виртуальный ЦОД (Virtual Datacenters) и перейдите на вкладку Edge Gateways.
Выберите нужный сервер Edge, щелкните правой кнопкой мыши и выберите Edge Gateway Services.

Перейдите на вкладку VPN и включите поддержку VPN на сервере, выбрав Enable VPN.

Нажмите кнопку Add для создания нового VPN туннеля.
В окне Add a Site-to-Site VPN configuration задайте имя (Name) туннеля, а также описание (Description).
В списке Establish VPN to выберите a remote network.
В списке Local Networks выберите локальную сеть, подключенную к серверу Edge, для которой требуется организовать VPN туннель.
В поле Peer Networks укажите в формате CIDR (например, 192.168.10.0/24) удаленную сеть, подключенную к Windows Server, до которой требуется организовать VPN туннель.
Если сервер Edge подключен к нескольким внешним (External) сетям, то в списке Local Endpoint выберите внешнюю сеть, через которую Edge будет подключаться к серверу Windows Server.
В поле Local ID укажите IP адрес внешнего интерфейса Edge сервера.
Примечание: В некоторых случаях Edge сервер может быть подключен к Интернет не напрямую, а находиться за NAT устройством, которое осуществляет проброс необходимых портов для организации VPN. В любом случае, в данном поле указывается IP адрес внешнего интерфейса Edge сервера, неважно, из публичного или из частного диапазона.
В поле Peer ID укажите IP адрес внешнего интерфейса Windows Server.
Примечание: В некоторых случаях удаленный Windows Server может быть подключен к Интернет не напрямую, а находиться за NAT устройством, которое осуществляет проброс необходимых портов для организации VPN. В любом случае, в данном поле указывается IP адрес внешнего интерфейса Windows Server’а сервера, неважно, из публичного или из частного диапазона.

В поле Peer IP задайте IP адрес внешнего интерфейса Windows Server.
Примечание: В случае, если удаленный сервер находится за NAT устройством, данном поле потребуется ввести IP адрес внешнего интерфейса NAT устройства.
В списке Encryption protocol выберите протокол шифрования. Edge сервер поддерживает протоколы шифрования AES-256 (256 бит), AES (128 бит) и 3DES (192 бита). В качестве примера здесь и далее используется протокол шифрования 3DES.
Выберите Show key для показа общего ключа. Скопируйте общий ключ, т.к. он потребуется при настройке Windows Server.
При необходимости измените значение MTU во избежание фрагментации пакетов из-за ограничений внешнего канала.
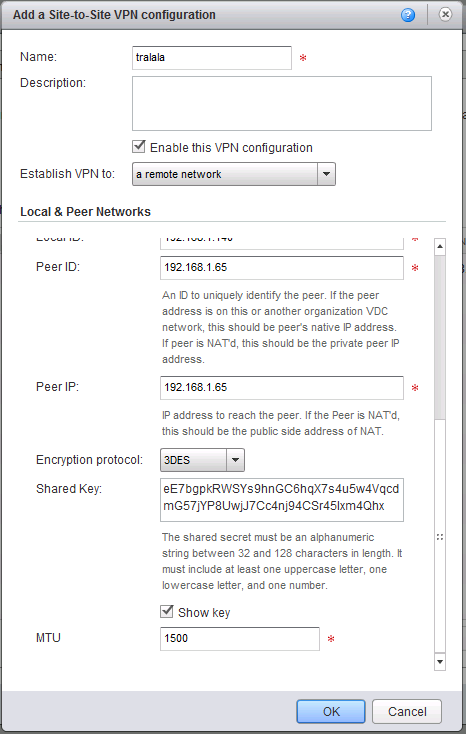
Нажмите OK для создания VPN туннеля.
Нажмите OK еще раз для сохранения настроек. Если все все было сделано правильно, то после повторного открытия окна Edge Gateway Services на вкладке VPN появится новый туннель.

Не забудьте настроить брандмауэр Edge на вкладке Firewall. Для тестовых целей вы можете разрешить весь входящий и исходящий трафик, выбрав Default action: Allow, или отключив брандмауэр.

На этом настройки со стороны Edge сервера закончены.
Для корректной маршрутизации трафика между внутренней сетью и виртуальным интерфейсом на сервере Windows Server должна быть установлена роль Network Policy and Access Services.

Сделать это можно из консоли Server Manager или из командной строки, выполнив команды:
dism /online /enable-feature /featurename:RasServerAll
dism /online /enable-feature /featurename:RasRoutingProtocols

Откройте оснастку управления Routing and Remote Access. Щелкните по имени сервера правой кнопкой мыши и выберите Configure and Enable Routing and Remote Access.

В мастере настройки в главном окне нажмите Next.
В окне Configuration выберите Custom configuration и нажмите Next.
В окне Custon Configuration выберите LAN routing и нажмите Next.
Нажмите Finish для применения настроек.
Запустите службу, нажав Start service.
Настройки IPsec VPN туннелей в Windows Server выполняются из оснастки Windows Firewall with Advanced Security или командной строки.
Запустите оснастку.

Щелкните по корню Windows Firewall with Advanced Security on Local Computer правой кнопкой мыши и в контекстном меню выберите Properties.

В открывшемся окне перейдите на вкладку IPsec Settings и в области IPsec defaults нажмите кнопку Customize.

В окне Customize IPsec Settings в области Key exchange (Main Mode) выберите Advanced и нажмите кнопку Customize.

С помощью кнопки Remove удалите все существующие варианты согласования, а затем с помощью кнопки Add добавьте режим со следующими настройками:
Integrity algorithm: SHA-1
Encryption algorithm: 3DES
Key exchange algorithm: Diffie-Hellman Group 2
Остальные настройки оставьте по умолчанию.

Примечание: Алгоритмы шифрования на Windows Server и сервере Edge должны совпадать.
Нажмите OK для сохранения настроек.
В окне Customize IPsec Settings в области Data Protection (Quick Mode) выберите Advanced и нажмите кнопку Customize.
В окне Customize Data Protection Settings выберите Require encryption for all connection security rules that use these settings.
С помощью кнопки Remove удалите все существующие варианты согласования, а затем с помощью кнопки Add добавьте режим со следующими настройками:
Protocol: ESP
Encryption algorithm: 3DES
Integrity algorithm: SHA-1
Остальные настройки оставьте по умолчанию.

Примечание: Алгоритмы шифрования на Windows Server и сервере Edge должны совпадать.
Нажмите OK для сохранения настроек.
Нажмите OK для сохранения настроек еще раз.
Нажмите OK в третий раз.
Щелкните правой кнопкой мыши по Connection Security Rules и в контекстном меню выберите New Rule.

В мастере создания правил на главной странице выберите Tunnel и нажмите Next.
На странице Tunnel Type выберите Custom configuration и No. Send all network traffic that matches this connection security rule through the tunnel. Нажмите Next.
На странице Requirements выберите Require authentication for inbound and outbound connections. Нажмите Next.
На странице Tunnel Endpoints в списке Which computers are in Endpoint 1 с помощью кнопки Add добавьте локальную сеть, подключенную к Windows Server, для которой требуется организовать VPN туннель.
Помните, что конфигурация Windows Server является зеркальным отражением конфигурации Edge и здесь локальные и удаленные IP адреса и подсети меняются местами.
В поле What is the local tunnel endpoint с помощью кнопки Edit укажите IP адрес внешнего интерфейса Windows Server.
В поле What is the remote tunnel endpoint с помощью кнопки Edit укажите IP адрес внешнего интерфейса сервера Edge.
в списке Which computers are in Endpoint 2 с помощью кнопки Add добавьте удаленную сеть, подключенную к серверу Edge, до которой требуется организовать VPN туннель.

Нажмите Next.
На странице Authentication Method выберите режим Advanced и нажмите кнопку Customize.
В окне Customize Advanced Authentication Methods с помощью кнопки Remove удалите все существующие варианты аутентификации, а затем с помощью кнопки Add добавьте режим со следующими настройками:
Select the credential to use for first authentication: Preshared key
Укажите общий ключ, сохраненный ранее при настройке сервера Edge.

Примечание: Общий ключ на Windows Server и сервере Edge должен совпадать.
Нажмите OK для сохранения настроек.
Нажмите Next.
На странице Profile нажмите Next.
На странице Name задайте имя (Name) и описание (Description) создаваемого правила.
Нажмите Finish для завершения создания правила.
Осталось сделать самую малость.
Для всех туннелей, создаваемых на сервере Edge, по умолчанию включен perfect forward secrecy. В свою очередь, для туннелей, создаваемых в Windows Server режим perfect forward secrecy выключен. По этой причине два сервера не могут согласовать настройки безопасности на второй фазе (Quick Mode). Исправить это можно, включив PFS на Windows Server.
Для этого откройте консоль CMD. Вам потребуется отредактировать созданное правило, используя команду netsh. Формат команды:
netsh advfirewall consec set rule name=»Tunnel to vCloud» new qmpfs=dhgroup2
, где «Tunnel to vCloud» — имя правила.
qmpfs=dhgroup2— включает режим PFS.

Посмотреть имя правила можно в оснастке Windows Firewall или с помощью команды:
netsh advfirewall consec show rule name=all
Настройки закончены, можно приступать к проверке.
Проверка работы
.Для проверки можно использовать клиентские машины, развернутые в каждом из сайтов и утилиту ping.
Перед проверкой, убедитесь, что на клиентах и на сервере Edge настроен брандмауэр и разрешен трафик ICMP.
Пропингуйте компьютер в удаленной подсети.

Все работает.
В оснастке управления Windows Firewall в Security Associations Main Mode и Quick Mode должны появиться записи о первой и второй фазах IPsec.

Примечание: Если на Windows Server в RRAS включить функцию NAT сервера, то перестает корректно работать маршрутизация трафика через VPN туннель.
VPN provides secure access to organizations’ internal data and applications to clients and devices that are using the Internet.
To properly implement and support a VPN environment within your organization, you must understand how to select a suitable tunnelling protocol, configure VPN authentication, and configure the server role to support your chosen configuration.
As in previous versions of Windows Server, there are two types of VPN connection available in Windows Server 2012 R2 :
• Remote access
• Site-to-site
Remote Access VPN Connections
Remote access VPN connections enable your users who are working offsite, such as at home, at a customer site, or from a public wireless access point, to access a server on your organization’s private network by using the infrastructure that a public network, such as the Internet, provides.
Site-to-Site VPN Connections
Site-to-site VPN connections, which are also known as router-to-router VPN connections, enable your organization to establish routed connections between separate offices or with other organizations over a public network while helping to maintain secure communications. A routed VPN connection across the Internet logically operates as a dedicated wide area network (WAN) link. When networks connect over the Internet, a router forwards packets to another router across a VPN connection. To the routers, the VPN
connection operates as a data-link layer link.
So in my post this time, lets go through a simple step how you can implement VPN in your infrastructure and for this demo purposes, i will continue using the same VM that i had for my DirectAccess implementation.
Please do refer to my previous DirectAccess post on what kind of VM’s that i use to implement this VPN.
Step by Step : Implementing Basic DirectAccess in Windows Server 2012 R2
For more information about VPN / Remote Access, please do log in to : http://technet.microsoft.com/en-us/library/dn383589.aspx
Lets get started with our VPN configuration.
1st, lets review some of the Routing & Remote Access settings and do dome some changes on the RRAS.
1 – Log in to LON-RTR server, open Server Manager, click Tools and then click Remote Access Management Console…

2 – In the Remote Access Management Console, click DirectAccess and VPN, and from the Actions pane, under the VPN section, click Enable VPN…

3 – In the Enable VPN box, click OK…

4 – Verify that the configuration was applied successfully and then click Close…

5 – Next, switch to Server Manager, click Tools and then click Routing and Remote Access…

6 – Next, in the Routing and Remote Access console, expand LON-RTR, right-click ports, click Properties…

7 – Verify that 128 ports exist for SSTP, IKEv2, PPTP, and L2TP, then double-click WAN Miniport (SSTP)…

8 – In the Maximum ports box, type 5, and then click OK…

9 – In the Routing and Remote Access message box, click Yes…

10 – Repeat the same step no.8 & 9 for IKEv2, PPTP, and L2TP, then click OK…

11 – Next, right-click LON-RTR (local), click Properties…

12 – In the General tab, verify that IPv4 Remote access server is selected…

13 – Next, click Security, and then verify that Certificate 131.107.0.10 is selected for SSL Certificate Binding, and then click Authentication Methods…

14 – In the Authentication Methods box, verify that EAP is selected as the authentication protocol and then click OK…

15 – Next, click the IPv4 tab, and then verify that the VPN server is configured to assign IPv4 addressing by using Dynamic Host Configuration Protocol (DHCP), click OK to close the Properties interface…

2nd, before we proceed, please make sure that you verify the certificate requirements for IKEv2 and SSTP in LON-RTR Server…
1 – In LON-RTR Server, open MMC, click File and then click Add/Remove Snap-in…

2 – In the Add/Remove Snap-in interface, click Certificates, click Add, select Computer account, and then click Next…

3 – Click Local computer and then click Finish…

4 – To close the Add or Remove Snap-in, click OK…

5 – Next, expand Certificates (Local Computer), expand Personal, and then click Certificates.
— Notice that certificate 131.107.0.10, this certificate is for Server Authentication (this is required for Secure Socket Tunneling Protocol (SSTP) and Internet Key Exchange version 2 (IKEv2) VPN connectivity).

3rd, its time now for us to configure the Remote Access Server…
1 – Still in the LON-RTR server, open Server Manager, on the Tools menu, click Network Policy Server. ..

2 – In the Network Policy Server console, expand Policies, and then click Network Policies.
– Right-click the policy at the top & bottom of the list, and then click Disable…

3 – Next, in the navigation pane, right-click Network Policies, and then click New…

4 – In the New Network Policy wizard, in the Policy name box, type Adatum VPN Policy, then in the Type of network access server list, click Remote Access Server(VPN-Dial up), and then click Next…

5 – On the Specify Conditions interface, click Add…

6 – In the Select condition interface, click Windows Groups, and then click Add…

7 – In the Windows Groups interface, click Add Groups…

8 – Type IT, and then click OK (you can choose your own group that you prefer)…

9 – In the Windows Groups interface, verify that ADATUM\IT is listed, and then click OK…

10 – In the Specify Conditions interface, click Next…

11 – In the Specify Access Permission interface, click Access granted, and then click Next…

12 – On the Configure Authentication Methods interface, make sure that you clear the Microsoft Encrypted Authentication (MSCHAP)
check box, and then to add EAP Types, click Add…

13 – On the Add EAP Types interface, select Microsoft Secured password (EAP-MSCHAP v2), and then click OK…

14 – repeat the same step above but this time choose Microsoft: Smart Card or other certificate, then click Next…

15 – On the Configure Constraints interface, click Next…

16 – On the Configure Settings interface, click Next…

17 – On the Completing New Network Policy interface, click Finish…

Till this step, we’ve successful modified the remote access server configuration to provide VPN connectivity.
4th, so now lets verify our VPN connectivity in our Windows 8.1 client…
1 – On the Windows 8.1 client PC, open Network and Sharing Center, then click Set up a new connection or network…

2 – Next, on the Choose a connection option interface, click Connect to a workplace, and then click Next…

3 – On the How do you want to connect? interface, click Use my Internet connection (VPN)…

4 – On the Connect to a Workplace interface, click I’ll set up an Internet connection later…

5 – In the Internet address box, type 131.107.0.10 (LON-RTR IP Address)…
— In the Destination name box, type HQ VPN, select Allow other people to use this connection checkbox, and then click Create…

6 – Next, right-click HQ VPN connection and select Properties…

7 – In the HQ VPN Properties, click the Security tab, select Allow these protocols, ensure that Microsoft CHAP version 2 (MSCHAP
v2) is selected, and then click OK…

8 – Next, right click HQ VPN, and then click Connect…

9 – In the Network list, under HQ VPN, click connect…

10 – In the sign-in dialog box, type the domain user from IT department and then click OK…

11 – Verify that you are connected to Adatum by using a PPTP connection, right click HQ VPN and then click Status…


Orait, that all for now, we’ve connected to HQ VPN successfully…
box, type Pa$$w0rd, and then click OK.

Contents
- 1 How To Configure Ipsec Site To Site Vpn Tunnel Windows Server 2016
- 2 How To Configure Ipsec Site To Site Vpn Tunnel Windows Server 2016
- 2.1 Conclusion
- 2.1.1 Related image with how to configure ipsec site to site vpn tunnel windows server 2016
- 2.1.2 Related image with how to configure ipsec site to site vpn tunnel windows server 2016
- 2.1 Conclusion
Get ready to delve into a myriad of How To Configure Ipsec Site To Site Vpn Tunnel Windows Server 2016-related content that will ignite your curiosity, deepen your understanding, and perhaps even spark a newfound passion. Our goal is to be your go-to resource for all things How To Configure Ipsec Site To Site Vpn Tunnel Windows Server 2016, providing you with articles, insights, and discussions that cater to your every interest and question. Ipsec and static tunnel to back organizations to connect office the site traffic two so addresses resources networks- an to can public is used ipsec with in offices to two site connect commonly be site site site locations between network most branch ip site — access branch the this its vpns to users to main- main tunnel- routed allow
Configuring Ipsec Site To Site Vpn Tunnels
Configuring Ipsec Site To Site Vpn Tunnels
Step 1 – log in using rdp you must be logged in via rdp as an administrator or a user with administrator permission. please see this article for instructions if you don’t know how to connect. step 2 – update windows all windows updates needs to be installed before you start with installing and configuring l2tp ipsec. Add the routing and remote access snap in. this snap in allows the configuration of multi protocol lan to lan, lan to wan, virtual private network (vpn), and network address translation (nat) routing services. in the mmc console, right click on routing and remote access and choose to add server. choose the local machine.
How To Configure Ipsec Tunnel Configurations Between Two Routers Across
How To Configure Ipsec Tunnel Configurations Between Two Routers Across
Securing end to end ipsec connections by using ikev2 article 05 24 2023 2 contributors applies to: windows 11, windows 10, windows server 2022, windows server 2019, windows server 2016 feedback in this article prerequisites devices joined to a domain devices not joined to a domain troubleshooting see also ikev2 offers the following:. For server initiated push cases, like windows remote management (winrm), remote gpupdate, and remote configuration manager update scenarios – you must allow inbound traffic on the device tunnel, so traffic filters cannot be used. Configuration and deployment more information applies to: windows server 2022, windows server 2019, windows server 2016 windows server 2016 provides updates to generic routing encapsulation (gre) tunnel capability for the ras gateway. In this video, you will see how to configure ipsec site to site vpn tunnel in windows server 2016 and windows 10 client.

Sphos Xg How To Configure An Ipsec Vpn Connection Techbast
Sphos Xg How To Configure An Ipsec Vpn Connection Techbast
Configuration and deployment more information applies to: windows server 2022, windows server 2019, windows server 2016 windows server 2016 provides updates to generic routing encapsulation (gre) tunnel capability for the ras gateway. In this video, you will see how to configure ipsec site to site vpn tunnel in windows server 2016 and windows 10 client. Right click the vpn server, and then select configure and enable routing and remote access to open the routing and remote access server setup wizard. in the welcome to the routing and remote access server setup wizard, select next. in configuration, select custom configuration, and then select next. in custom configuration, select vpn access. Ipsec site to site tunnel ¶. ipsec site to site tunnel. site to site vpns connect two locations with static public ip addresses and allow traffic to be routed between the two networks. this is most commonly used to connect an organization’s branch offices back to its main office, so branch users can access network resources in the main.

Vyos Site To Site Ipsec Vpn Tunnel Datai Net
Vyos Site To Site Ipsec Vpn Tunnel Datai Net
Right click the vpn server, and then select configure and enable routing and remote access to open the routing and remote access server setup wizard. in the welcome to the routing and remote access server setup wizard, select next. in configuration, select custom configuration, and then select next. in custom configuration, select vpn access. Ipsec site to site tunnel ¶. ipsec site to site tunnel. site to site vpns connect two locations with static public ip addresses and allow traffic to be routed between the two networks. this is most commonly used to connect an organization’s branch offices back to its main office, so branch users can access network resources in the main.
Ipsec Vpn Howto Howto Techno
Ipsec Vpn Howto Howto Techno
How To Configure Ipsec Site To Site Vpn Tunnel Windows Server 2016
How To Configure Ipsec Site To Site Vpn Tunnel Windows Server 2016
in this video, you will see how to configure ipsec site to site vpn tunnel in windows server 2016 and windows 10 client. video series on advance networking with windows server 2019: this is step by step video guide on how to install and configure configuring site to site vpn using windows server 2016 2019 routing and remote access. this demo walks through the purpose and workings of an ipsec vpn tunnel, including implementation and verification of the video series on advance networking with windows server 2019: this is step by step video guide on how to install and configure video series on advance networking with windows server 2019: this video tutorial provide complete information to deploy and danscourses learn how to create an ipsec vpn tunnel on cisco routers using the cisco ios cli. ccna security topic. hello, welcome to pm networking my name is praphul mishra. i am a network security engineer by profession and a certified easy setting up a vpn l2tp ipsec windows server 2016 on hyper v vpn client to site we set up a private server with port forwarding to illustrate how quickly bots start to attack open ports. you will see how the attacks creating and using ipsec policies. applies to: windows 10, windows server 2016 . ipsec is a framework of open standards for
Conclusion
After exploring the topic in depth, it is evident that the article provides informative information concerning How To Configure Ipsec Site To Site Vpn Tunnel Windows Server 2016. From start to finish, the author presents an impressive level of expertise on the topic. In particular, the discussion of Y stands out as a highlight. Thanks for taking the time to this post. If you have any questions, please do not hesitate to contact me through the comments. I look forward to hearing from you. Additionally, here are some relevant posts that you may find helpful:
This article is written for home/office scenarios, it’s NOT recommended for production.
In this article, we will show you how to create a Site-to-Site VPN between Azure and Windows RRAS Server.
Table of Contents
Introduction
My home office started growing and I need to connect my on-premises environment to Azure. Now to build hybrid connectivity to Azure, you have a couple of options. You can read about all the options on Microsoft documentation here.
The most compelling option to me is to use the Azure Site-to-Site VPN connection. One of the required criteria to build a Site-to-Site VPN connection is to have a compatible VPN device and someone who can configure it. For more information about compatible VPN devices that Microsoft support and device configuration, please check the official list of VPN Devices here.
What if you don’t have a compatible VPN appliance such as Ubiquiti, Cisco, F5, Fortinet, etc.?
The good news is, that you can build a Site-to-Site VPN to Azure without having to purchase a VPN appliance.
In this article, we will go over deploying a new Routing and Remote Access (RRAS) server and connecting it to an Azure Gateway. The process is not limited to home labs, but it could be also used for a small office environment where a Site-to-Site VPN to Azure is required.
Prerequisites
To follow this article, you need to have the following:
1) Microsoft Azure subscription. If you don’t have an Azure subscription, you can create a free one here.
2) Azure Virtual Network
- One or more subnets
- Gateway Subnet
- Virtual Network Gateway
- Local Network Gateway
3) Router/firewall on-premises with the application forwarding option.
- Port Forwarding UDP 500 and 4500 => RRAS server.
- Static Public IP address (dynamic public IP will also work but make sure it’s not changing regularly). Please check more on how to update your public IP address if your ISP has changed it.
4) Windows Server (2016, 2019, or 2022) with Desktop Experience deployed on-premises with two NICs. The Internal NIC represents the local private network, and the External NIC represents the network of the router which is also private but on a different subnet.
- RRAS role installed which will act as the gateway for the home/office network.
- Do not join the server to the domain for security purposes.
Network Architecture
In this example, the network architecture for the Site-to-Site VPN in my configuration will look like this:

There are a lot of different options and scenarios, but I will use this architecture for the remainder of this guide.
Assuming you have all the prerequisites in place, take now the following steps:
Add the RRAS Role
The first step is to install the Routing and Remote Access (RRAS) role on Windows Server. To speed up the process, I will use PowerShell instead of UI.
On your RRAS server, open Windows PowerShell and run the following command:
# Add RRAS Role
Install-WindowsFeature -Name RemoteAccess, DirectAccess-VPN, Routing -IncludeManagementTools -Verbose
Once the role is installed, you can verify that the Routing and Remote Access console is installed by typing the following command: rrasmgmt.msc
The service will show stopped at this stage, we will complete the configuration in the next section (Configure Windows RRAS).

Create Azure-side resources
In this section, I will create all the Azure side resources that were mentioned in the prerequisites section. To speed up the process, I will be using the Azure CLI.
Open an Azure Cloud Shell session (https://shell.azure.com/) and specify the subscription that you want to use:
# Set Azure Subscription
az account set --subscription <replace_with_your_subscription_id>
And then create a resource group. You can update the resource group name and the location based on your needs.
# Creat Azure Resource Group
az group create --name rg-s2s-vpn-home --location WestEurope
Take now the following steps:
Create an Azure Virtual Network
To create a virtual network, run this command in Azure Cloud Shell named Hub-VNet virtual network and the HubSubnet01 for the first subnet. You can update the IP address prefix based on your needs.
az network vnet create --resource-group rg-s2s-vpn-home --name Hub-VNet-1 --address-prefix 10.1.0.0/16 --subnet-name HubSubnet01 --subnet-prefix 10.1.0.0/24
Then run this command in Cloud Shell to add the GatewaySubnet subnet to Hub-VNet-1.
az network vnet subnet create --resource-group rg-s2s-vpn-home --vnet-name Hub-VNet-1 --address-prefix 10.1.255.0/27 --name GatewaySubnet
Create an Azure Virtual Network Gateway
A virtual network gateway must have a Public IP address. You first create the IP address resource and then refer to it when creating your virtual network gateway.
Run the following command to request and create a Dynamic Public IP address. Please note that the only time the Public IP address changes is when the gateway is deleted and re-created. It doesn’t change across resizing, resetting, or other internal maintenance/upgrades of your VPN gateway.
az network public-ip create --name pip-hub-vpn-gw --resource-group rg-s2s-vpn-home --allocation-method Dynamic
Next, run this command in Cloud Shell to create the vng-hub-vnet-1 virtual network gateway:
If you run this command using the ‘–no-wait‘ parameter, you don’t see any feedback or output. This parameter allows the gateway to create in the background. It takes around 30 minutes to create a gateway.
az network vnet-gateway create --resource-group rg-s2s-vpn-home --name vng-hub-vnet-1 --public-ip-address pip-hub-vpn-gw --vnet Hub-VNet-1 --gateway-type Vpn --vpn-type RouteBased --sku VpnGw1 --no-wait
In this example, I am using the VPN type as ‘RoutedBased‘ since Route-based VPNs are the preferred connection method for on-premises devices, since they are more resilient to topology changes such as the creation of new subnets, for example. I used the Gateway SKU as ‘VpnGw1‘, you can choose the Gateway SKU that you want to use. There are configuration limitations for certain SKUs. For more information, please check Gateway SKUs.
Create Local Network Gateway
The local network gateway typically refers to the on-premises location. You give the site a name by which Azure can refer to it, then specify the public IP address of the on-premises VPN/Router device to which you will create a connection.
To check your current public IP address in your home/office, you can run the following PowerShell command:
(Invoke-RestMethod 'http://ipinfo.io/json').IP
You also need to specify the IP address prefixes that will be routed through the virtual network gateway to the RRAS VPN server. The address prefixes you specify here are the prefixes located on your on-premises (internal) network. If your on-premises network changes, you can easily update the prefixes.
Use the az network local-gateway create command in Cloud Shell to create a local network gateway with multiple local address prefixes representing your home/lab network:
az network local-gateway create --gateway-ip-address 23.99.221.164 --name lgw-s2s-home --resource-group rg-s2s-vpn-home --local-address-prefixes 172.16.20.0/24 172.16.21.0/24
Now that all Azure resources are created, let’s move to put all pieces together.
Configure Port Forwarding
In this step, you need to log in to your router/firewall device and then configure port forwarding rules for UDP ports 500 and 4500 pointing to your RRAS server.
Here is a screenshot of my port forwarding rules:

Configure Windows RRAS
Now it’s time to switch to the Routing and Remote Access Server console on-premises.
Right-click on the server name and select ‘Configure and Enable Routing and Remote Access‘.

Routing and Remote Access Server Setup Wizard will open. Click Next > on the Welcome page.
Select ‘Secure connection between two private networks‘. Click Next > to continue.

Leave the Demand-Dial Connections as default ‘Yes‘. Click Next > to continue.

For the IP Address Assignment, keep the default ‘Automatically‘ assigned. Click Next > to continue.

Then click ‘Finish‘ on the completing wizard ‘Created a secure connection between this network and a private network‘. When you press ‘Finish‘, the service for Routing and Remote Access will start which may take a couple of seconds to complete.
The Demand-Dial Interface Wizard will open. Click Next > on the Welcome page.
Enter a descriptive name for the Interface Name (i.e. AzureGW). This interface will connect to the VPN gateway in Azure.

For the Connection Type, make sure ‘Connect using virtual private networking (VPN)‘ is selected. Click Next > to continue.

For the VPN Type, select ‘IKEv2‘. Click Next > to continue.

In the ‘Destination Address, enter the Azure virtual network Gateway public IP address (Azure side). Click Next > to continue.

For the Protocols and Security, leave the default ‘Route IP packets on this interface‘. Click Next > to continue.

In the Static Routes for Remote Networks, click ‘Add‘ and enter the address space that you set on the virtual network (Azure side), and then set the ‘Metric‘ to 10. Click ‘OK‘ and then click Next > to continue.

In the Dial-Out Credentials leave the default blank. Click Next > to continue.

Then click ‘Finish‘ on completing the Demand-Dial Interface Wizard. When you press ‘Finish‘, you will see a new network interface called ‘AzureGW‘ with a Disconnected state which is expected as shown in the below figure:

Double-click the new interface you just created ‘AzureGW‘ and then select the Options tab. On the Options tab, set the ‘Redial attempts‘ to 3.

On the Security tab, select the preshared key radio button and enter your super-secret shared key here. Please take note of the preshared key here, since you need it in the next section to create the connection.

Then go over IPv4 and create a New Static route… What the Static Routes do, is tell the Routing and Remote Access server that anytime it gets an IP bound for a specific IP address send it out to the VPN interface.

Enter the address space that you set on the virtual network (Azure side) and set the ‘Metric‘ to 10, and make sure to select ‘Use this route to initiate demand-dial connections‘. Click ‘OK‘. This is a repeatable step of what we did before, but you need to add a static route here as well.

Here is the IPv4 Static Routes configuration in my example.

Create the VPN Connection in Azure
In the final step, we need to create a logical VPN connection in Azure.
Run the following command to create the Site-to-Site VPN connection between your virtual network gateway and your on-premises VPN device.
Pay particular attention to the shared key value, which must match the configured shared key value for the RRAS server that you set as described in the previous section.
<strong>az network vpn-connection create --name HubVNet1ToHome --resource-group rg-s2s-vpn-home --vnet-gateway1 vng-hub-vnet-1 --location westeurope --shared-key abc123 --local-gateway2 lgw-s2s-home</strong>
After a short while, the connection should be established as shown in the below figure.

Verify Connectivity
Now it’s time to switch to the Routing and Remote Access Server console on-premises and verify that the ‘AzureGW‘ is connected under Network Interfaces.

To test the connection to Azure, we have deployed a VM in the Azure virtual network (Hub-VNet-1). It got a private IP address 10.1.0.4 and without a public IP address.

Testing the connection from an on-premises server to Azure VM (10.1.0.4):

Testing the connection in the opposite direction from the VM in Azure to an on-premises server (172.16.20.153):

There’s more…
By completing all the steps described above, you will be able to connect from on-premises to Azure but nothing else. In other words, you can’t get to the Internet and browse any site from your home/office network.
There is still one more thing to do which is to enable NAT (Network Address Translation) on the Routing and Remote Access Server, so everything on the internal private subnet is going to be masked/NATed behind the external interface.
Switch back to the Routing and Remote Access Server on-premises and run the following PowerShell commands (assuming the name of the interfaces are External and Internal).
$ExternalInterface="External"
$InternalInterface="Internal"
cmd.exe /c "netsh routing ip nat add interface $ExternalInterface"
cmd.exe /c "netsh routing ip nat set interface $ExternalInterface mode=full"
cmd.exe /c "netsh routing ip nat add interface $InternalInterface"
Now verify that you can browse the Internet from your on-premises private network. As you can see that my (NextHop) is the RRAS server (172.16.20.2) and then to the Internet.

That’s it there you have it!
FAQs
What if your Public IP has changed?
Now, what happened if your ISP changed your Public IP address on-premises?
// The VPN connection will break of course!
To reconnect, you need to find out what is the new Public IP address using the following command:
(Invoke-RestMethod 'http://ipinfo.io/json').IPAnd then go back to the Azure portal and update the IP address in the Local network gateway under ‘Configuration‘ and hit Save as shown in the below figure (of course you can automate this with PowerShell).

Another option instead of updating the public IP address manually in Azure is, if you already own a domain name on Cloudflare for example, and would like to use it for a dynamic IP host, you can accomplish it by setting up a DDNS update client, such as ddclient. ddclient is a program that can run on your Linux server and automatically report your new IP to your domain name provider whenever your public IP changes.
Updated: As of November 20, 2020, Azure now supports FQDN configurations for its Site-to-Site VPN connections. If you have a dynamic public IP address that could change after a certain period, often determined by your Internet service provider (ISP), you can use a constant DNS name with a Dynamic DNS service to point to the current public IP address of your VPN device.
Just make sure to create the Local Network Gateway in Azure with the FQDN Endpoint as shown in the figure below. Your Azure VPN gateway will resolve the FQDN to determine the updated public IP address to connect to.

You need to take some extra steps to configure this, but it works as expected.
Can I deploy RRAS with a Single Network Interface?
Yes, deploying Windows Server RRAS with only one network interface is fully supported and functions seamlessly. There are no functional restrictions when opting for a single network interface.
All features are fully supported in this setup. The decision to use one or two network interfaces is solely a design consideration influenced by various factors, including the existing network configuration and security needs.
I would prefer the dual NIC deployment for security reasons and traffic segmentation.
__
Thank you for reading my blog.
If you have any questions or feedback, please leave a comment.
-Charbel Nemnom-