В этой статье мы покажем, как установить и настроить простейший VPN сервер на базе Windows Server 2012 R2, который можно эксплуатировать в небольшой организации или в случае использования отдельно-стоящего сервера (т.н. hosted-сценариях).
Примечание. Данный мануал не рекомендуется использовать в качестве справочника для организации VPN сервера в крупной корпоративной сети. В качестве enterprise-решения предпочтительнее развернуть Direct Access и использовать его для удаленного доступа (который, кстати говоря, настроить теперь намного проще, чем в Windows 2008 R2).
В первую очередь необходимо установить роль “Remote Access”. Сделать это можно через консоль Server Manager или PowerShell (немого ниже).
В роли Remote Access нас интересует служба “DirectAccess and VPN (RAS)” . Установим ее (установка службы тривиальна, на последующих шагах все настройки можно оставить по-умолчанию. Будут установлены веб сервер IIS, компоненты внутренней базы Windows — WID).


После окончания работы мастера нажмите ссылку “Open the Getting Started Wizard“, в результате чего запустится мастера настройки RAS-сервера.
Службу RAS с помощью Powershell можно установить командой:
Install-WindowsFeatures RemoteAccess -IncludeManagementTools
Так как нам не требуется разворачивать службу DirectAccess, укажем, что нам нужно установить только сервер VPN (пункт “Deploy VPN only“). 
После чего откроется знакомая MMC консоль Routing and Remote Access. В консоли щелкните правой кнопкой по имени сервера и выберите пункт “Configure and Enable Routing and Remote Access“.

Запустится мастер настройки RAS-сервера. В окне мастера выберем пункт “Custom configuration“, а затем отметим опцию “VPN Access”. 
После окончания работы мастера система предложит запустить службу Routing and Remote Access. Сделайте это.
В том случае, если между вашим VPN сервером и внешней сетью, откуда будут подключаться клиенты (обычно это Интернет), есть файервол, необходимо открыть следующие порты и перенаправить трафик на эти порты к вашему VPN серверу на базе Windows Server 2012 R2:
- Для PPTP: TCP — 1723 и Protocol 47 GRE (также называется PPTP Pass-through)
- Для SSTP: TCP 443
- Для L2TP over IPSEC: TCP 1701 и UDP 500
После установки сервера, необходимо в свойствах пользователя разрешить VPN доступ. Если сервер включен в домен Active Directory, сделать это нужно в свойствах пользователя в консоли ADUC, если же сервер локальный – в свойствах пользователя в консоли Computer Management (Network Access Permission – Allow access). 
Если вы не используете сторонний DHCP сервер, который раздает vpn-клиентам IP адреса, необходимо в свойствах VPN сервера на вкладке IPv4 включить “Static address pool” и указать диапазон раздаваемых адресов.

Примечание. Раздаваемые сервером IP адреса в целях корректной маршрутизации не должны пересекаться с ip адресацией на стороне VPN клиента.
Осталось настроить VPN клиент и протестировать (как настроить vpn-клиент в Windows 8).
Совет. VPN сервер также можно организовать и на базе клиентской ОС. Подробно это описано в статьях:
- VPN сервер на Windows 7
- VPN сервер встроенными средствами Widows 8
Данная статья представляет из себя ″Quick guide″ по настройке VPN сервера на базе Windows. Все описанные в статье действия производились на Windows Server 2012 R2, но инструкция подходит для любой более менее актуальной (на данный момент) серверной операционной системы Windows, начиная с Windows Server 2008 R2 и заканчивая Windows Server 2016.
Итак начнем. Первое, что нам необходимо сделать — это установить роль удаленного доступа. Для этого в оснастке Server Manager запускаем мастер добавления ролей и выбираем роль «Remote Access» со всеми дополнительными фичами.

И затем в списке сервисов для данной роли выбираем «DirectAccess and VPN (RAS)».

Кроме роли удаленного доступа и инструментов управления будут дополнительно установлены web-сервер IIS и внутренняя база данных Windows. Полный список устанавливаемых компонентов можно просмотреть в финальном окне мастера, перед подтверждением запуска установки.

Все то же самое, только гораздо быстрее, можно проделать с помощью PowerShell. Для этого надо открыть консоль и выполнить команду:
Install-WindowsFeature -Name Direct-Access-VPN -IncludeAllSubFeature -IncludeManagementTools

После установки роли нам потребуется включить и настроить службу с помощью оснастки «Routing and Remote Access». Для ее открытия жмем Win+R и вводим команду rrasmgmt.msc.

В оснастке выбираем имя сервера, жмем правой клавишей мыши и в открывшемся меню выбираем пункт «Configure and Enable Routing and Remote Access».

В окне мастера настройки выбираем пункт «Custom configuration».

И отмечаем сервис «VPN access».

В завершение настройки стартуем сервис удаленного доступа.

Сервис VPN установлен и включен, теперь необходимо сконфигурировать его нужным нам образом. Опять открываем меню и выбираем пункт «Properties».

Переходим на вкладку IPv4. Если у вас в сети нет DHCP сервера, то здесь надо задать диапазон IP адресов, которые будут получать клиенты при подключении к серверу.

Дополнительно на вкладке «Security» можно настроить параметры безопасности — выбрать тип аутентификации, задать предварительный ключ (preshared key) для L2TP или выбрать сертификат для SSTP.

И еще пара моментов, без которых подключение по VPN не сможет состояться.
Во первых, необходимо выбрать пользователей, которые имеют разрешения подключаться к данному серверу. Для отдельно стоящего сервера настройка производится локально, в оснастке «Computer Management». Для запуска оснастки надо выполнить команду compmgmt.msc, после чего перейти в раздел «Local Users and Groups». Затем надо выбрать пользователя, открыть его свойства и на вкладке «Dial-In» отметить пункт «Allow access». Если же компьютер является членом домена Active Directory, то эти же настройки можно произвести из консоли «Active Directory Users and Computers».

И во вторых, необходимо проверить, открыты ли нужные порты на файерволле. Теоретически при добавлении роли соответствующие правила включаются автоматически, но лишний раз проверить не помешает.

На этом все. Теперь VPN сервер настроен и к нему можно подключаться.
В данной статье представлена инструкция по развертыванию простейшего VPN-сервера на базе Windows Server 2012 R2. По моему личному мнению поднимать VPN на базе Windows можно в случае использования небольшой офисной сети с потребностью удаленного подключения для нескольких сотрудников. В случае же организации VPN между филиалами компании с достаточно обширной инфраструктурой, следует использовать технологию DirectAccess либо VPN на базе аппаратных решений (например Cisco).
Перейдем к установке и настройке:
- Открываем Server Manager — Dashboard, нажимаем «Add roles and features» (Рис.1):

Рис.1.
2. Выбираем «Role-based or feature-based installation» и нажимаем Next (Рис.2):

Рис.2.
3. Далее попадаем на страницу выбора сервера (в моем случае он один), выбираем сервер и нажимаем Next (Рис.3):

Рис.3.
4. Далее выбираем роль «Remote Access» и нажимаем Next (Рис.4):

Рис.4.
5. На последующий страницах мастера нажимаем два раза Next. В окне выбора служб ролей (Select role services) выбираем «DirectAcces and VPN (RAS)». Откроется окно «Add features», нажимаем кнопку «Add Features» (Рис.5 и 6):

Рис.5.

Рис.6.
6. Затем откроется окно «Web Server Role», нажимаем Next (Рис.7):

Рис.7.
7. В окне «Select role services» нажимаем Next (Рис.8):

Рис.8.
8. В окне подтверждения нажимаем Install (Рис.9):

Рис.9.
9. После окончания установки нажимаем «Open the Getting Started Wizzard» (Рис.10):

Рис.10.
10. Откроется окно «Configure Remote Access», нажимаем «Deploy VPN only» (Рис.11):

Рис.11.
11. Откроется консоль «Routing and Remote Access». Нажимаем правой кнопкой мыши на нашем сервер и выбираем «Configure and Enable Routing and Remote Access» (Рис.12):

Рис.12.
12. Откроется мастер настройки, нажимаем Next (Рис.13):

Рис.13.
13. В окне Configuration выбираем «Remote Access (dial-up orVPN)» и нажимаем Next (Рис.14):

Рис.14.
14. На следующей странице выбираем VPN и нажимаем Next (Рис.15):

Рис.15.
15. Далее выбираем сетевой адаптер, имеющий доступ в Интернет и нажимаем Next (Рис.16):
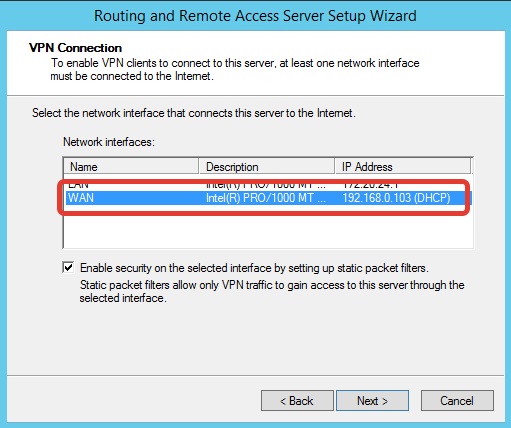
Рис.16.
16. В следующем окне можно выбрать, каким образом будут выдаваться IP-адреса vpn-клиентам: с помощью DHCP или из специального пула, выбираем второй вариант и нажимаем Next (Рис.17):

Рис.17.
18. В окне «Address Range Assignment» нажимаем кнопку New (Рис.18):

Рис.18.
19. Задаем начальный и конечный адреса диапазона и нажимаем Ок (возвращаемся на предыдущую страницу и нажимаем Next (Рис.19):

Рис.19.
20. Далее выбираем метод аутентификации клиентов: с помощью RRAS или RADIUS. Выбираем первый вариант и нажимаем Next (Рис.20):

Рис.20.
21. После успешной настройки нажимаем Finish (Рис.21):

Рис.21.
22. Если нам нужен VPN PPTP, то настройки на этом завершены. Если нам нужен VPN L2TP, в консоли «Routing and Remote Access» открываем свойства нашего сервера (Рис.22):

Рис.22.
23. На вкладке Securuty задаем «Preshared Key» (ставим галку «Allow custom IPsec policy for L2TP/IKEv2 connection») (Рис.23):

Рис.23.
24. Далее в консоли RRAS открываем свойства портов, выбираем «WAN miniport (L2TP)» и ограничиваем количество портов (Рис.24):

Рис.24.
25. Чтобы дать пользователю доступ к VPN, открываем свойства нужного нам пользователя и переходим на вкладку Dial-in, в разделе Network Access Permission выбираем «Allow Access» и нажимаем Apply (Рис.25):

Рис.25.
26. Также необходимо открыть следующие порты на фаерволе:
- PPTP TCP — 1723
- L2TP — UDP порт 1701
- IKE — UDP порт 500
- IPSec ESP — UDP порт 50
- IPSec NAT-T — UDP порт 4500
- SSTP — TCP 443
Успехов!
Если вы хотите установить и использовать VPN-сервер на базе семейства ОС Windows, то нужно понимать, что пользовательские версии для этой цели не подойдут. То есть «поднять» VPN-сервер на платформе Windows XP, Windows 7 или Windows 10 не получится. Для этой цели необходимо использовать серверные версии ОС: Windows Server 2003, Windows Server 2008 или же Windows 2012. Рассмотрим установку VPN-сервера на примере Windows 2012.
Как поднять vpn сервер на windows server 2012 r2
Для начала необходимо иметь сервер с лицензионной Windows 2012 и доступом к нему через удаленный рабочий стол – ведь хорошая практика размещать сервера в серверной стойке и соответственном помещении – потому и нужен удаленный доступ. Вводим в командную строку “mstsc”, и в открывшемся окне ip-адрес сервера:

Далее необходимо ввести учетные данные с административными правами и подтвердить соединение (несмотря на то, что сертификат, использующийся для подключения, считается не доверенным).


В открывшемся окне удаленного рабочего стола вам нужно выбрать Диспетчер серверов:

В открывшемся Диспетчере серверов через меню «Управление» выбираем «Добавить роли и компоненты».
Потом три раза нажимаем кнопку «Далее» (предложит выбрать текущий сервер) и в открывшихся ролях сервера ставим галочку напротив «Удаленный доступ», добавляя компоненты нажатием кнопки:

Еще два раза жмем кнопку «Далее», пока не появится выбор служб ролей, где галочкой отмечаем как показано на скриншоте:

Устанавливаем выбранные компоненты нажатием на кнопку и дожидаемся окончания процесса:

windows 2012 r2: настройка vpn сервера
Следующим пунктом будет настройка сервера с помощью мастера, который можно выбрать, как показано на скриншоте:

Выбирать нужно пункт «Развернуть только VPN» – DirectAccess нам не нужен. Откроется окно маршрутизации и удаленного доступа, где нужно указать текущий сервер и правой кнопкой мыши выбрать пункт, указанный на скриншоте:

Запустится мастер установки. Здесь один нюанс: если ваш сервер имеет только один сетевой интерфейс, в мастере нужно выбрать «Особая конфигурация»; если же более одного – то достаточно выбрать «Удаленный доступ» (VPN или модем):

Модемные подключения к серверу можно не отмечать, т.к. данные технологии морально устарели и все уважающие себя администраторы давно пользуются прямым доступом через интернет.

Выбираем сетевой интерфейс сервера, который подключен к интернету (или же является uplink’ом для доступа в интернет):

Далее будет предложено выбрать Ip-адресацию для удаленных клиентов. Можно оставить автоматически, если в вашей организации нет множества разных подсетей.
В противном случае лучше настроить вручную, чтобы не было пересечения с уже существующими подсетями.

Отказываемся от использования RADIUS-сервера и завершаем настройку сервера:

Следующим шагом необходимо убедиться, что нижеуказанные порты на фаерволе вашей организации открыты из внешней сети интернет и выполнить их проброс с внешнего ip-адреса на внутренний адрес сервера в вашей локальной сети:
- для протокола PPTP это tcp 1723 и протокол 47 GRE.
- для L2TP через IPSEC это tcp 1701 и udp 500
- для SSTP это tcp 443
Теперь вы можете из любого места, используя интернет, и зная внешний ip-адрес вашего VPN-сервера, подключиться по vpn в локальную сеть вашей организации. Например, для клиента с Windows 8 это делается с помощью создания нового сетевого подключения с указанными параметрами из «Центра управления сетями и общим доступом»

- Распечатать
Оцените статью:
- 5
- 4
- 3
- 2
- 1
(4 голоса, среднее: 2.8 из 5)
Поделитесь с друзьями!
This is a step-by-step guide on how to configure an Open VPN server on Windows Server 2008/2012 operating systems and connect clients to the created virtual private network.
Open VPN is an open implementation of VPN technology — the Virtual Private Network, which is designed to create virtual private networks between groups of geographically distant nodes on top of an open data transmission channel (Internet). Open VPN is suitable for tasks such as secure remote network connection to a server without opening Internet access to it, as if you are connecting to a host on your local network. Connection security is achieved by Open SSL encryption.
How it works?
When the Open VPN configuration is completed, the server will be able to accept external SSL-protected network connections to the virtual network adapter created at the start of the VPN service (tun / tap) without affecting the traffic processing rules of other interfaces (external Internet adapter, etc.). You can configure client sharing Open VPN to a specific network adapter from those present on the server. In the second part of the instruction, this tunneling of users’ Internet traffic is considered. With this method of forwarding, the host that handles VPN connections will also perform the function of a proxy server (Proxy) — to unify the rules of network activity of users and to route client Internet traffic on its own behalf.
Installing Open VPN on the server
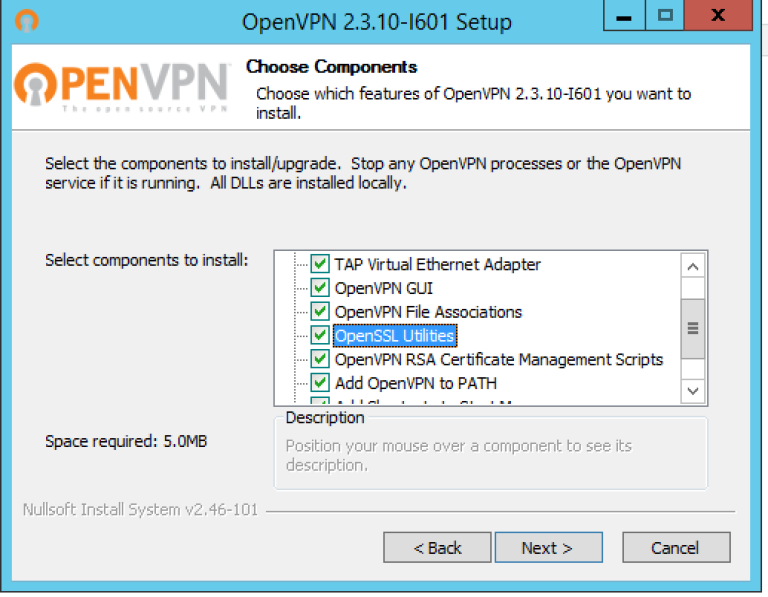
Download and install version of Open VPN that matches your operating system. Run the installer; make sure that all features are selected for installation in the third step of the installation wizard.
Please note that in this instruction further commands are based on the fact that Open VPN is installed in the default directory «C: \ Program Files \ OpenVPN».
We allow adding a virtual network adapter TAP in response to the corresponding request and wait until the installation is complete (it may take several minutes).
Key generation (PKI) of the certification center, server, client; Diffie-Hellman algorithm
To manage the key / certificate pairs of all nodes of the private network being created, use the easy-rsa utility, which works via the command line, by analogy with the Linux console. To work with it, open, run the command line (Keyboard shortcut Win + R, then type cmd and press Enter)
Configuration files.
Running init-config.bat script will generate a new vars.bat file in our easy-rsa directory, this file will contain our configuration:
cd "C:\Program Files\OpenVPN\easy-rsa"
init-config.bat
So now we need to open up the following directory using Windows Explorer: C:\Program Files\OpenVPN\easy-rsa
Now, using Notepad (or another text editor) edit the batch file named vars.bat, we need to configure some variables…
Change the following settings (nearer the bottom of the file) to meet your requirements:
set KEY_COUNTRY=US
set KEY_PROVINCE=CA
set KEY_CITY=SanFrancisco
set KEY_ORG=OpenVPN
set KEY_EMAIL=mail@host.domain
set KEY_CN=changeme
set KEY_NAME=changeme
Note: if the value of the variable contains a space, enclose it in quotes.
Next you should save the changes to the file and then using Command Prompt, run the following commands:
cd "C:\Program Files\OpenVPN\easy-rsa"
vars.bat
clean-all.bat
Certification Center and Server Key Generation
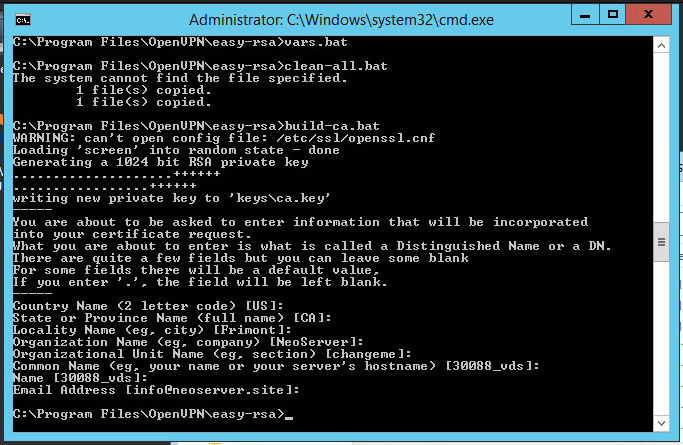
Let’s proceed to the creation of the key / certificate of the certification authority. Run the script:
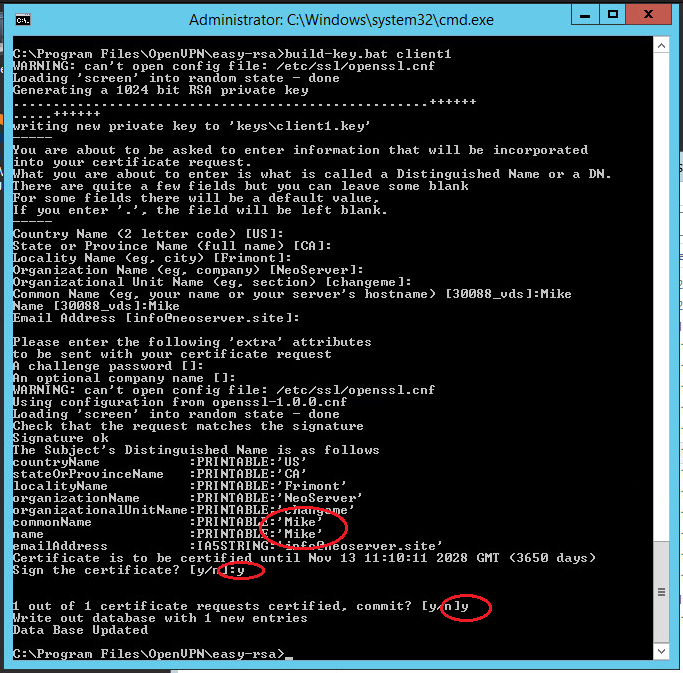
build-ca.batIn response to the prompts that appear, you can simply press Enter. The only exception is the KEY_CN (Common Name) field — be sure to specify a unique name and insert the same name in the Name field:
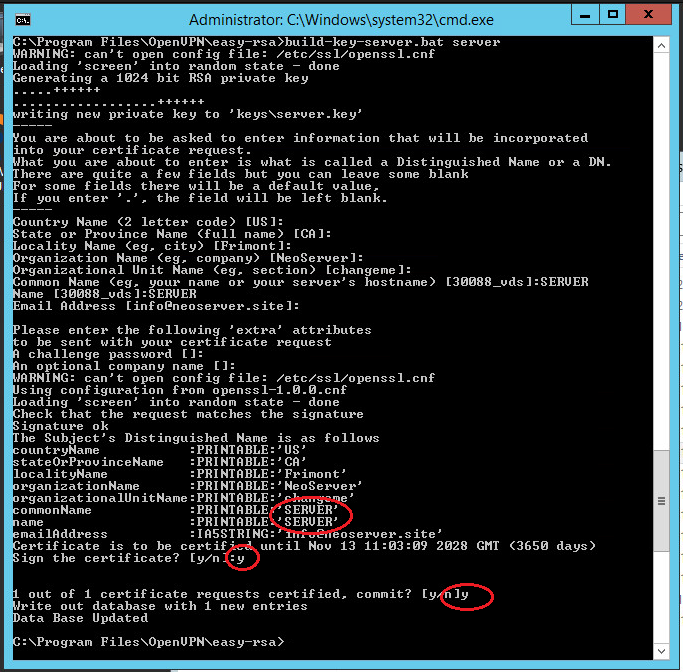
Similarly, we generate a server certificate. Here the value of the Common Name and Name fields is SERVER:
.\build-key-server.bat serverNote: the server argument is the name of the future file.
All generated keys will now be asked whether to sign the generated certificate (Sign the certificate) on behalf of the certification authority. Answer y (yes).
Generating client keys and certificates
For each VPN client, you need to generate a separate SSL certificate.
There is an option in the Open VPN configuration, by enabling which you can use one certificate for several clients (see the server.ovpn file -> «dublicate-cn» file), but this is not recommended from a security point of view. Certificates can be generated in the future, as new customers connect. Therefore, now we will create only one for client1:
Run the following commands to generate client keys:
cd \
cd "C:\Program Files\OpenVPN\easy-rsa"
.\build-key.bat client1
Note: client1 argument is the name of the future file.
In the Common Name field, specify the name of the client (in our case client1).
Diffie Hellman Parameters
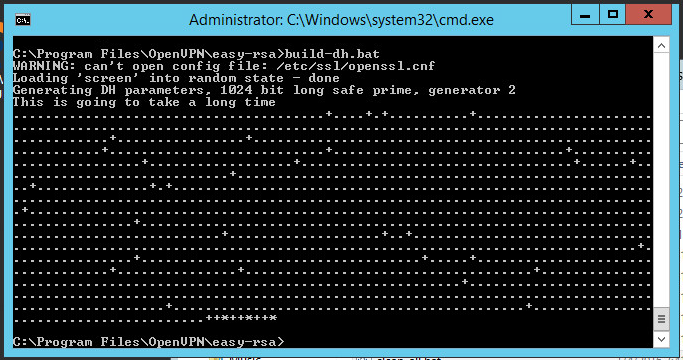
To complete the encryption setting, you need to run the Diffie-Hellman parameter generation script:
.\build-dh.batDisplaying information about creating parameters looks like this:
Transferring generated keys / certificates
The generated certificates are located in the C: \ Program Files \ OpenVPN \ easy-rsa \ keys directory. Copy the files listed below to the directory C:\Program Files\OpenVPN\config:
- ca.crt
- dh2048.pem/dh1048.pem
- server.crt
- server.key
Open VPN server configuration
Let’s proceed to the configuration of the VPN server directly, use our configuration file with the name server.ovpn and place it in the C: \ Program Files \ OpenVPN \ config directory.
copy "C:\Program Files\OpenVPN\sample-config\server.ovpn" "C:\Program Files\OpenVPN\config"
copy "C:\Program Files\OpenVPN\sample-config\client.ovpn" "C:\Program Files\OpenVPN\config"
Open the file; find the path to the keys (see below). Check the paths to the previously copied certificates ca.crt, dh1024.pem / dh2048.pem, server.key, server.crt and, if necessary, change:
port 1194
proto udp
dev tun
server 10.8.0.0 255.255.255.0
ca "C:\\Program Files\\OpenVPN\\config\\ca.crt"
cert "C:\\Program Files\\OpenVPN\\config\\server.crt"
key "C:\\Program Files\\OpenVPN\\config\\server.key"
dh "C:\\Program Files\\OpenVPN\\config\\dh2048.pem"
push "redirect-gateway def1"
push "dhcp-option DNS 8.8.8.8"
keepalive 10 120
comp-lzo
persist-key
persist-tun
verb 3
Save the file.
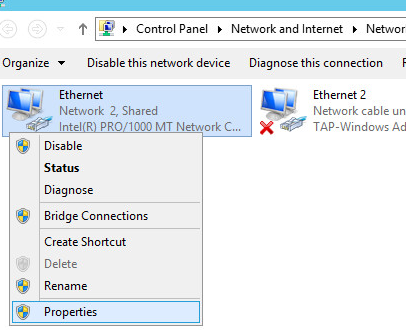
Now you need to allow traffic forwarding between adapters. Follow these steps: Control Panel -> Network and Internet -> Network and Sharing Center -> Change adapter settings. Choose an adapter that looks to the external Internet (TAP-adapter is responsible for the VPN connection). In our example, this is Ethernet 2.
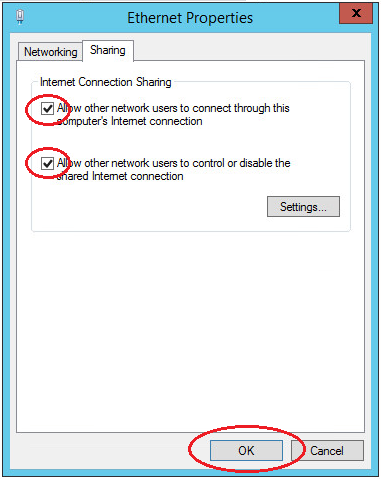
Double-click the adapter Properties and go to the Access tab, tick all the checkboxes. Save the changes.
Next you need to enable IP addressing.
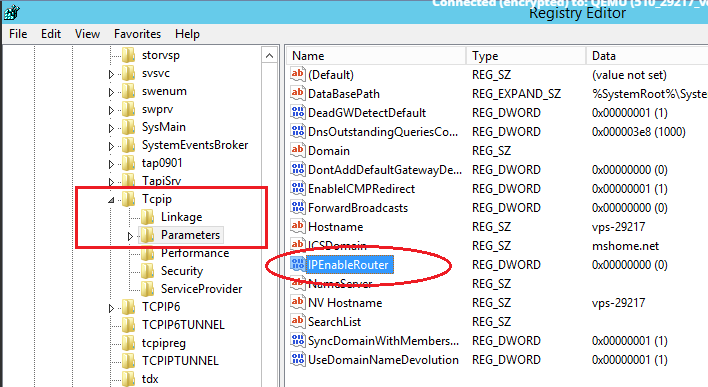
Using Windows Search, locate the REGEDIT.exe application.

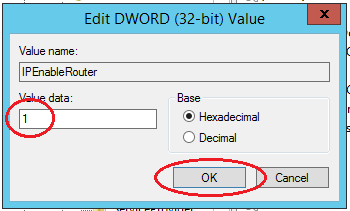
In the tree, find the directory HKEY_LOCAL_MACHINE \ SYSTEM \ CurrentControlSet \ Services \ Tcpip \ Parameters. In the right part of the window, find the IPEnableRouter variable, double-click into the value editing window and change it to 1, thereby allowing addressing on the VPS.
Autorun Open VPN
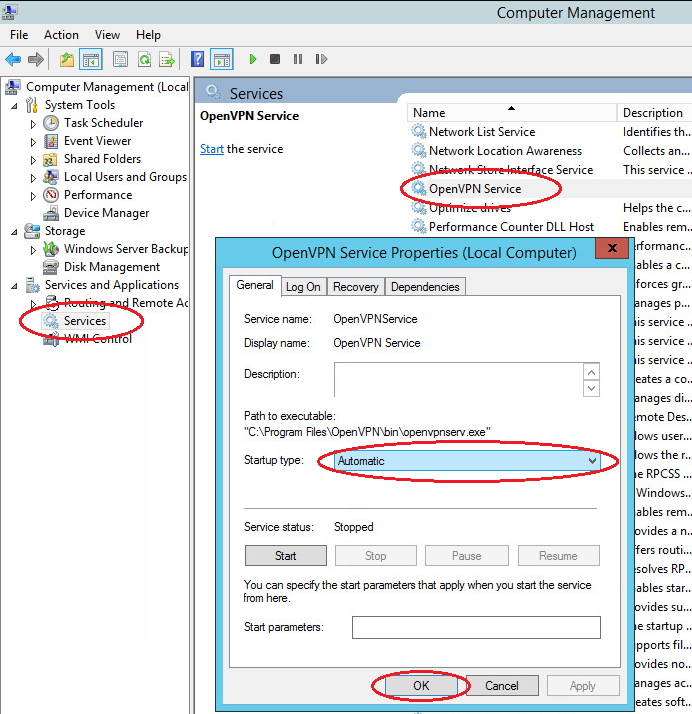
Immediately configure the Open VPN service to autorun at system startup.
Open the Windows Services. Find in the list Open VPN -> right-click -> Properties -> Start: Automatic
This completes the basic configuration of the virtual private network server. Find the file C: \ Program Files \ OpenVPN \ config \ server.ovpn -> right-click -> «Start OpenVPN on this config» to start the virtual private network server and the configuration file we prepared.
Open VPN Client Configuration
Open VPN client applications are available for all popular operating systems: Windows / Linux / iOS / Android. For MacOS, the Tunnelblick client is used. All of these applications work with the same configuration files. Only some differences of several options are possible. You can learn about them by examining the documentation for your Open VPN client. In this guide, we will look at connecting a Windows client using the same distribution package of the program that we installed on the server. When using applications for other operating systems, the setup logic is similar.
- Install the current version of Open VPN on the client computer.
- Copy to the directory C: \ Program Files \ OpenVPN \ config the client certificate files created earlier on the server (2 certificates with the .crt extension and the key with the .key extension) and use our client.ovpn client configuration file. After copying to the user’s device, the last file is deleted from the server or transferred from the config folder to avoid confusion in the future.
-
Open the client.ovpn file. Find the line remote my-server-1 1194 and specify the ip-address or domain name of the vpn-server in it:
remote <ip-address> 1194</ip-address>For example:
remote 83.166.241.155 1194 -
Find ways to certificates. Specify in it the paths to the ca.crt, client1.key, client1.crt certificates copied earlier as in the example below:
# See the server config file for more # description. It's best to use # a separate .crt/.key file pair # for each client. A single ca # file can be used for all clients. ca "C:\\Program Files\\OpenVPN\\config\\ca.crt" cert "C:\\Program Files\\OpenVPN\\config\\client1.crt" key "C:\\Program Files\\OpenVPN\\config\\client1.key" # This file should be kept secret - Save the file. Client setup complete.
Verify Windows Firewall Rules
Attention! For the correct operation of the OpenVPN service, it is required that the corresponding ports be opened on the server (by default UDP 1194). Check the relevant rule in your Firewall: Windows Firewall or third-party anti-virus software.
Check OpenVPN connections
Start the Open VPN server, to do this, go to the directory C: \ Program Files \ OpenVPN \ config and select the server configuration file (we have server.ovpn -> right-click -> «Start OpenVPN on this config file»).
Start the client, to do this, go to the directory C: \ Program Files \ OpenVPN \ config and select the client configuration file (we have client.ovpn -> right-click -> «Start Open VPN on this config file»).
The screen displays the connection status window. In a few seconds it will be minimized to tray. The green indicator of the Open VPN shortcut in the notification area indicates a successful connection.

Check the accessibility from the client device of the OpenVPN server using its internal private network address:
- Press the Win + R keys and type cmd in the window that appears to open the command line.
-
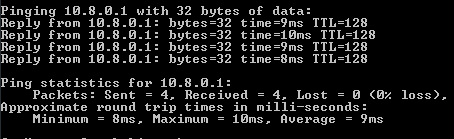
Execute the ping command to the address of our server in a virtual private network (10.8.0.1):
ping 10.8.0.1If the VPN is configured correctly, the packet exchange with the server will start.

- With the help of the tracert utility, we will check on which route the packets from the client go. In the console, enter the following command:
From the result of the utility, we see that the packets are first sent to the VPN server, and only then to the external network.
Now you have a ready-to-work virtual private network that allows you to make secure network connections between its clients and the server using open and geographically distant points of connection to the Internet.