I know this is a very old thread but I was looking for a solution to the same problem and I came across this before eventually finding the answer and I wanted to just post it here so somebody else in my shoes would have a shorter trek across the internet.
****Note that you probably have to run cmd.exe as an administrator for this to work**
So here we go, open up the prompt (as an adminstrator) and go to your System32 directory. Then run
C:\Windows\System32>cd ras
Now you’ll be in the ras directory. Now it’s time to create a temporary file with our connection info that we will then append onto the rasphone.pbk file that will allow us to use the rasdial command.
So to create our temp file run:
C:\Windows\System32\ras>copy con temp.txt
Now it will let you type the contents of the file, which should look like this:
[CONNECTION NAME]
MEDIA=rastapi
Port=VPN2-0
Device=WAN Miniport (IKEv2)
DEVICE=vpn
PhoneNumber=vpn.server.address.com
So replace CONNECTION NAME and vpn.server.address.com with the desired connection name and the vpn server address you want.
Make a new line and press Ctrl+Z to finish and save.
Now we will append this onto the rasphone.pbk file that may or may not exist depending on if you already have network connections configured or not. To do this we will run the following command:
C:\Windows\System32\ras>type temp.txt >> rasphone.pbk
This will append the contents of temp.txt to the end of rasphone.pbk, or if rasphone.pbk doesn’t exist it will be created. Now we might as well delete our temp file:
C:\Windows\System32\ras>del temp.txt
Now we can connect to our newly configured VPN server with the following command:
C:\Windows\System32\ras>rasdial «CONNECTION NAME» myUsername myPassword
When we want to disconnect we can run:
C:\Windows\System32\ras>rasdial /DISCONNECT
That should cover it! I’ve included a direct copy and past from the command line of me setting up a connection for and connecting to a canadian vpn server with this method:
Microsoft Windows [Version 6.2.9200]
(c) 2012 Microsoft Corporation. All rights reserved.

C:\Windows\system32>cd ras

C:\Windows\System32\ras>copy con temp.txt
[Canada VPN Connection]
MEDIA=rastapi
Port=VPN2-0
Device=WAN Miniport (IKEv2)
DEVICE=vpn
PhoneNumber=ca.justfreevpn.com
^Z
        1 file(s) copied.

C:\Windows\System32\ras>type temp.txt >> rasphone.pbk

C:\Windows\System32\ras>del temp.txt

C:\Windows\System32\ras>rasdial "Canada VPN Connection" justfreevpn 2932
Connecting to Canada VPN Connection...
Verifying username and password...
Connecting to Canada VPN Connection...
Connecting to Canada VPN Connection...
Verifying username and password...
Registering your computer on the network...
Successfully connected to Canada VPN Connection.
Command completed successfully.

C:\Windows\System32\ras>rasdial /DISCONNECT
Command completed successfully.

C:\Windows\System32\ras>
Hope this helps.
В последние несколько лет все более популярной становится технология организации удаленного рабочего места (будь то отдельный сотрудник и целый офис) за счет технологии VPN. Однако пользователю не очень удобно каждый раз при загрузке компьютера вручную инициировать VPN соединение. Как сделать так, чтобы VPN подключение поднималось автоматически при загрузке Windows или при входе пользователя в систему и не требовало бы от пользователя никаких дополнительных манипуляций? Попробуем в этом разобраться.
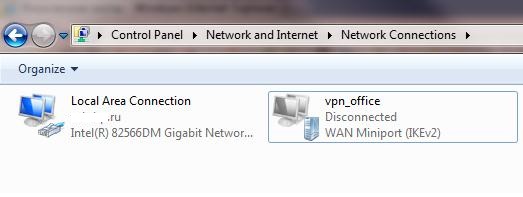
Предположим, что для подключения к VPN, вы используете специально созданное подключение с именем «vpn_office». В том случае, если новое VPN создавалось с настройками по-умолчанию, скорее всего его название будет содержать пробелы или русские символы (процесс создания VPN подключения в Windows 8). Для дальнейшей работы, лучше его переименовать, так, чтобы имя VPN подключения содержало только английский символы, а пробелы в названии отсутствовали (Правой клавишей по значку соединения и «Переименовать»).
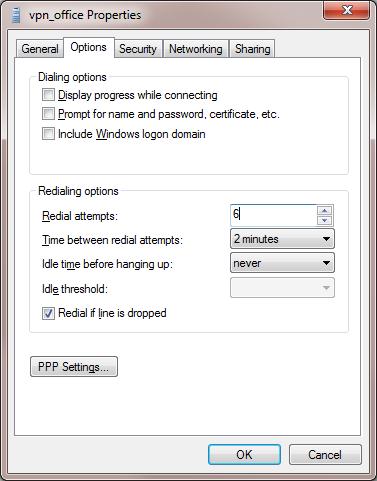
В параметрах VPN подключения снимите галочки у параметров:
- Отображать ход подключения (Display progress while connecting)
- Запрашивать имя, пароль и т.д. (Prompt for name and password, certificate, etc)
- Включать домен входа в Windows (Include Windows logon domain)
Существует несколько способов автоматической установки VPN соединения в Windows. Большинство из них работают корректно практически во всех версиях Windows и отличаются способами реализации автоматического запуска сценария инициации VPN подключения. В некоторых случаях какая-то конкретная методика может не заработать, и вам придется попробовать альтернативную. Также стоит отметить, что описанные методики автоматического подключения к VPN были протестированы в Windows 7, однако с небольшими модификациями и правками (или совсем без оных), их можно использовать и в других ОС семейства Windows
Для установки автоматического VPN соединения мы будем использовать встроенную в систему утилиты rasdial.
RASDIAL. Установка VPN подключения из командной строки
Утилита rasdial появилась еще в самых ранних версиях Windows и использовалась для управления удаленными подключениями. Найти утилиту rasdial.exe можно в системном каталоге C:\Windows\system32\.
Список текущих удаленных подключений можно отобразить, набрав команду rasdial без параметров.
Чтобы отключить удаленное соединение, нужно воспользоваться командой:
rasdial «имя_ VPN_подключения» /disconnect
Нас в данном случае интересует процесс как с помощь данной утилиты можно установить VPN подключение. Формат команды в этом случае будет такой:
rasdial [Имя_VPN_подключения] [имя_пользователя] [пароль]
[Имя_VPN_подключения] — название VPN подключения в системе
[имя_пользователя] [пароль] – информация, выданная вашим ISP или администратором.
В том случае, если название подключения или имя пользователя содержит пробел, служебные или русские символы, такой параметр нужно брать в кавычки.
В моем случае, команда подключения будет такой:
rasdial vpn_office winitpro_admin $ecretnaRFr@z@
В случае успешной установки VPN соединения и прохождения авторизации, отобразится строка «Command completed successfully», это означает, что соединение с VPN сервером установлено.
Следующий шаг – настройка автоматического запуска данной команды.
Автозапуск VPN подключения с помощью планировщика Windows
Попробуем настроить автозапуск VPN с помощью функций планировщика (Task Sheduller) Windows. Для этого запустите программу Start->All Programs-> Accessories-> System Tools->Task Scheduler, или же в командной строке выполните: taskschd.msc
Создадим новое простое задание планировщика с именем «AutoConnectVPN»
Далее нужно указать, когда необходимо выполнять задачу. В данном случае нас интересуют следующие возможности планировщика:
- When the computer starts (при загрузке компьютера)
- When I log on (при входе пользователя в систему)
Выбор в данном случае за вами, т.к. в зависимости от требования к организации системы иногда нужно, чтобы VPN автоматически подключался при загрузке компьютера (пользователь еще не вошел в систему). Это удобно использовать на серверах (для служб, работающих в фоновом режиме или для выполнения других автоматических операций). Если же требуется, чтобы VPN запускался только при входе пользователя (начало рабочего дня оператора или работника удаленного офиса), нужно выбрать второй вариант.
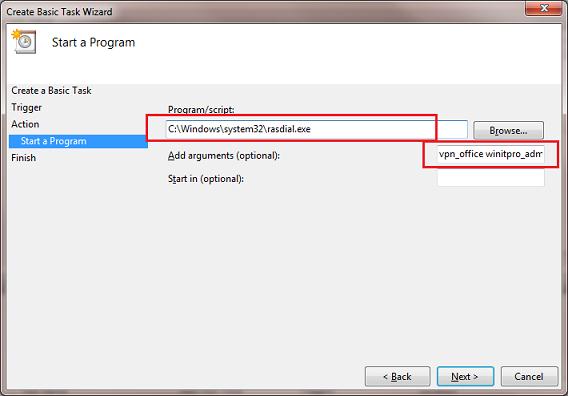
Затем указываем что планировщик должен запустить программу (Start a program).
В следующем окне нужно указать какую программу нужно запустить и с какими параметрами. Мы запускаем C:\Windows\system32\rasdial.exe с аргументами vpn_office winitpro_admin $ecretnaRFr@z@
После окончания работы мастера, в списке задач, выполняемых при загрузке Windows, появится еще одна с именем AutoConnectVPN. Теперь при следующей загрузке системы VPN соединение должно подняться автоматически.
Для Windows 7/ Win 8. В том случае, если соединение не установиться, попробуйте в планировщике задач найти созданное вами задание и в его свойствах на вкладке General укажите — Run with highest privileges (запускать с правами администратора), это должно помочь.
Автозапуск VPN с помощью реестра
VPN подключение можно устанавливать автоматически и с помощью реестра. В реестре существует специальная ветка, программы в которой Windows автоматически запускает каждый раз при загрузке.
- Запустите редактор реестра (regedit.exe) и перейдите в ветку HKEY_LOCAL_MACHINE\Software\Microsoft\Windows\CurrentVersion\Run
- Создайте новый строковый параметр именем vpnConnect и значением rasdial vpn_office winitpro_admin $ecretnaRFr@z@
- Закройте реестр и перезагрузите компьютер
Если нужно запускать подключение только для текущего пользователя, то эту операцию нужно произвести с разделом HKEY_CURRENT_USER\Software\Microsoft\Windows\CurrentVersion\Run
Автоматическое подключение VPN с помощью автозагрузки
Просто создать ярлык для нужного VPN подключения и скопируйте (перетяните) созданный ярлык в каталог Автозагрузка (C:\ProgramData\Microsoft\Windows\Start Menu\Programs\Startup) меню «Пуск».
Возможно, многие читатели будут возмущены, почему самый простой способ автоматизации установки VPN соединения идет последним. Однако поспешу сообщить, что такая методика почему-то в некоторых случаях не всегда работает, особенно в ОС с UAC.
Автостарт VPN с помощью системной службы
Данная методика предполагает, что мы создадим собственную службу Windows, которая отрабатывает процедуру VPN соединения до входа пользователя в систему.
В командной строке с правами администратора, создадим новую службу командой:
sc create autoVPN start= auto binPath= "rasdial vpn_office winitpro_admin $ecretnaRFr@z@" DisplayName= "AutoVPN" depend= lanmanworkstation obj= "NT AUTHORITY\LocalService"
Чтобы служба запускалась уже после запуска всех системных служб, поставим ее в зависимость от службы lanmanworkstation. В консоли services.msc должна появиться новая служба autoVPN, если она отсутствует, проверьте правильность введенной команды.
Учтите, что это псевдо-служба, и она не будет отображаться в процессах, отрабатывая один раз при запуске системы.
Удалить службу можно командой:
sc delete autoVPN
В этой статье мы разобрали наиболее популярные способы организации автоматического VPN подключения в Windows. Если что-то не заработало, или вы знаете собственный способ организации автозапуска VPN — описывайте все в комментариях. Указанную схему можно протестировав, подняв собственный VPN сервер на Windows 7 и отработать всю процедуру на нем.
I need to be able to CREATE a new VPN connection through the command line. I have seen things like rasdial but they are all for connecting to an existing VPN, not creating one, then joining it. The only way I know, is in the Create a VPN connection GUI. If anyone knows a way to do this out of the Windows CMD, or to make a batch file that creates, then connects to the VPN, that would be tremendously helpful. If it works in Windows 7, and Windows 10, that would be preferred, and I’m also okay with having a portable executable to complete the task if necessary. Thanks in advance!
asked Jun 23, 2016 at 18:55
2
Add-VpnConnection -Name $VPNConnectionName -ServerAddress $VPNServer -TunnelType Pptp -SplitTunneling -DnsSuffix $DNSSuffix -AllUserConnection -Force
answered Sep 17, 2018 at 19:17
0
Powershell can be used for this purpose.
Microsoft has a complete guide about this called:
Deploying VPN Connections by Using PowerShell and Group Policy
Note: Add-VpnConnection command is directly supported since windows 8.1, you may use this directly.
answered Jun 24, 2016 at 7:17
OvermindOvermind
9,9504 gold badges25 silver badges38 bronze badges
I managed to create using the following bat running as an administrator:
@echo off
cls
echo.
echo Wait a moment while the VPN is being configured…
PowerShell.exe -Command «Add-VpnConnection -Name LAB_RB -ServerAddress 191.1.1.1 -AllUserConnection -AuthenticationMethod Chap -EncryptionLevel Optional -Force -L2tpPsk PassWord@2021 -PassThru -RememberCredential -SplitTunneling -TunnelType L2tp» > config.log»
route add -p 172.16.5.0 mask 255.255.255.0 192.168.198.254 > null
echo.
pause
If you have already solved it is registered here for people like that until yesterday I was looking for this feature and through this topic I managed to solve my need.
answered Jun 24, 2021 at 16:41
1
You must log in to answer this question.
Not the answer you’re looking for? Browse other questions tagged
.
Not the answer you’re looking for? Browse other questions tagged
.
VPNs (virtual private networks) allow users to safely access the internet. However, they need a VPN client to do so. VPN clients are the end-user software that initiate the VPN connection by running a security protocol to establish a tunnel. This tunnel then connects the client to the VPN server. Afterward, the server authenticates the client based on credentials and permits a connection to the VPN network. These clients are versatile and can run on different platforms, especially consumer ones. In line with that, many VPN providers allow you to connect using cmd, better known as Command Prompt or more vaguely, a command-line interface.
This is not a preferred method, however. All major VPN vendors have products for plenty of operating systems out there. But sometimes, users don’t want to install a client to stay secure. In the case of Windows operating systems, users can employ Command Prompt to initiate a VPN connection. Hence, today’s article will focus on how to connect to a VPN from cmd. To expand on that, we also included three different methods for our readers, all permitting a manual VPN connection by integrating cmd.
What is a VPN?
Before we begin our write-up, you’ll need to know what a VPN is and how it works. Though we linked a detailed article, we ought to give you a breakdown if you’re in a hurry to connect. Like other networks, VPN relies on different nodes to establish an exchange of resources. They use servers (computer hosting server software) to relay incoming transmission and transfer data. User employs the client (end-user device software) to establish a connection, while VPNs use tunneling for their infrastructure. Tunneling also allows remote access to resources. Moreover, it protects data traffic from the prying of a third party by employing encryption based on security protocols.
These protocols dictate how data must travel and which encryption profile to use. Plus, they decide on key exchange and cipher. In short, VPNs are the forerunner for online safety and privacy. Although, there are alternate methods users can employ, such as SOCKS5 proxy or Tor (The Onion Router). However, VPNs are much more trustworthy. Having said that, they are also an integral part of the corporate world as they simplify remote workforce problems. Thus, it is paramount that users understand how to connect to a VPN with cmd.
The following steps will allow you to connect to a VPN using a rasphone (Remote Access Phonebook).
- First, open the Run box. You can do so by:
- Pressing the Windows and R keys together on the keyboard.
- Opening the Start menu and typing “run” in the search box.
- Type “rasphone” into the Run box and click on OK.
- Now the “Network connections” box will open.
- In the box, find the drop-down menu before selecting your desired VPN connection.
- Now click on Connect.
- Based on your configurations, you might need to enter your VPN credentials.
- Note. You can skip steps 3 to 5 by simply typing this command in step 2:
- rasphone -d “VPN connection name”
Establishing a VPN connection via a rasdial or a PowerShell command
Both techniques get right into the matter. Here’s the first one that includes rasdial alone:
- Open a Command prompt window. You can do so in two ways:
- Open the Run dialogue box, type “cmd”, and hit Enter.
- Launch the Start menu and enter “cmd” into the search box.
- In the Command Prompt window, enter the command: rasdial
- After that, to connect to a specific VPN, enter the command: rasdial “VPN Name” “Username” “Password”
You can also utilize PowerShell alongside the rasdial command to establish a VPN connection with cmd. Here’s what to do:
- Start by opening the Command prompt window as described above.
- Enter the command PowerShell Get -VpnConnection and hit Enter. This will list all the available VPN connections.
- Type the rasdial command from step 3 above.
This website uses cookies to serve you better. By continuing to use this website, you agree to our cookie and Privacy Policy.
Для установки или разрыва VPN-соединения через командную строку можно использовать утилиту rasdial.
Для того чтобы установить соединение, необходимо предварительно создать и настроить профиль VPN-соединения. Далее в командной строке необходимо дать команду:
- rasdial имя_профиля_VPN [имя_пользователя [пароль]]
Для разрыва VPN-соединения необходимо дать команду:
- rasdial имя_профиля_VPN /DISCONNECT
Для более полного набора ключей используйте rasdial /?
Дополнительное чтиво:
- Подключение к виртуальной частной сети (VPN) с использованием командной строки
- Разрыв подключения удаленного доступа или VPN-подключения с использованием командной строки


