В этом кратком руководстве мы опишем процесс установки и настройке VPN-сервера на базе Windows Server. Все действия, описанные в этой статье, были выполнены на Windows Server 2016, но эта инструкция подходит для любой современной серверной операционной системы Windows, начиная с Windows Server 2008 R2 и заканчивая Windows Server 2016.
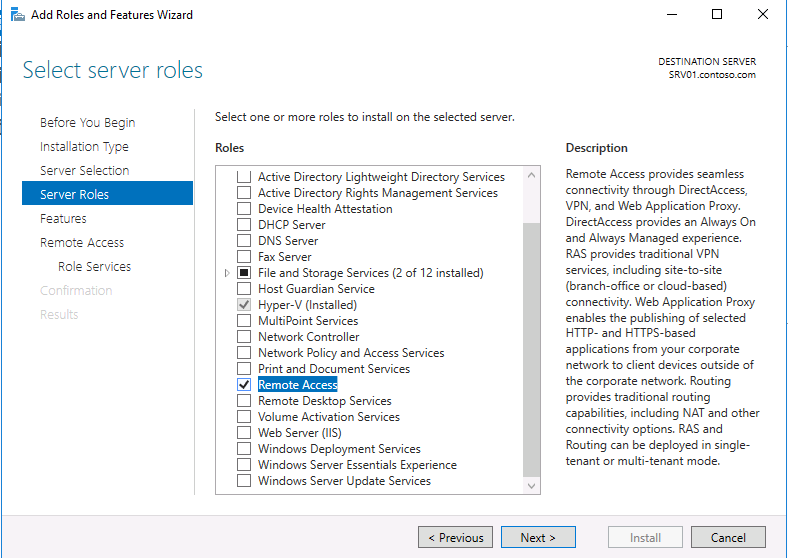
Итак, давайте начнем. Прежде всего нам нужно настроить роль удаленного доступа (Remote Access). Для этого в оснастке Server Manager запустите мастер добавления ролей и выберите роль Remote Access.
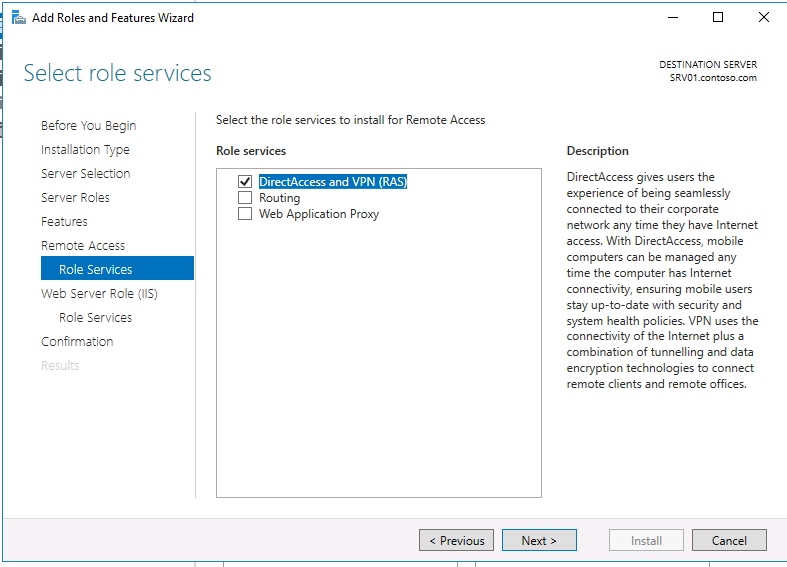
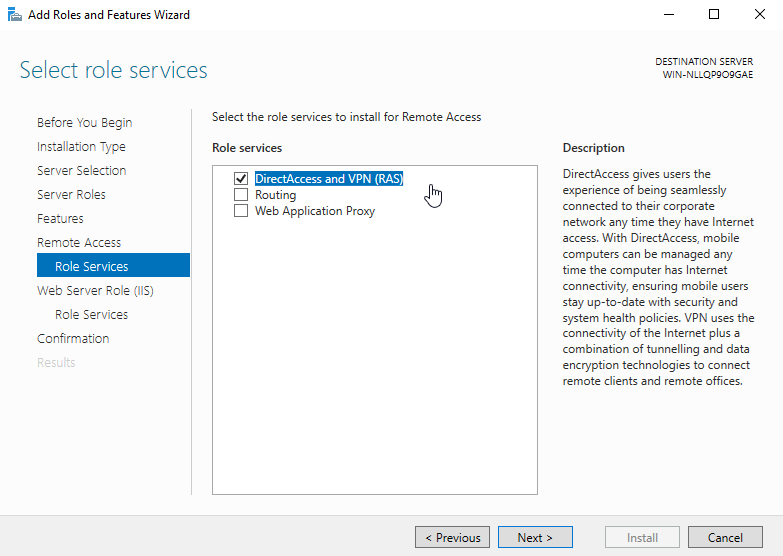
Затем, в списке служб роли выберите опцию «DirectAccess and VPN (RAS)«.
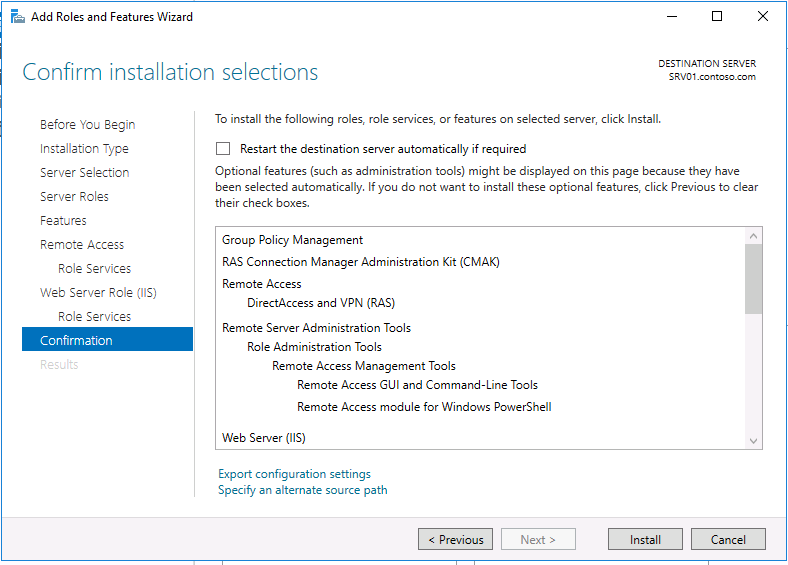
В дополнение к роли удаленного доступа и средствам управления, также автоматически будут установлены веб-сервер IIS и внутренняя база данных Windows (WID). Полный список установленных функций можно просмотреть в окончательном окне мастера, появляющимся перед тем, как вы подтвердите установку.
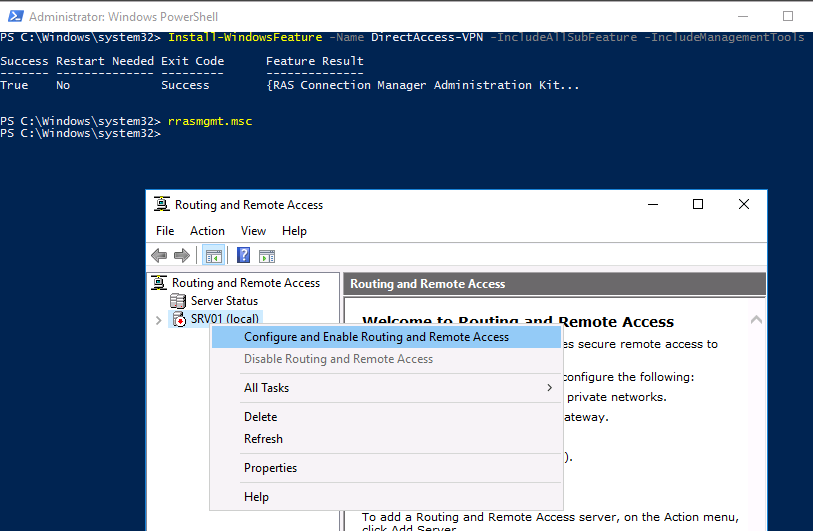
Установить роль Remote Access вместе со всеми необходимыми опциями можно всего одной командой PowerShell:
Install-WindowsFeature -Name DirectAccess-VPN -IncludeAllSubFeature -IncludeManagementTools
После установки роли вам необходимо включить и настроить службу с помощью оснастки «Маршрутизация и удаленный доступ» (Routing and Remote Access) — rrasmgmt.msc.
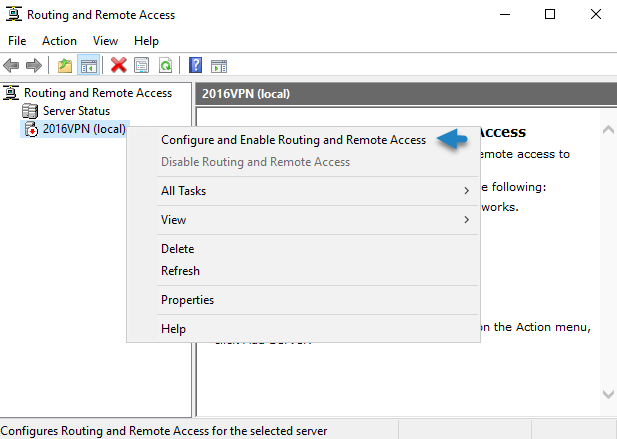
В оснастке RRAS выберите имя сервера, щелкните правой кнопкой мыши и выберите «Настроить и включить маршрутизацию и удаленный доступ» (Configure and Enable Routing and Remote Access) в открывшемся меню.
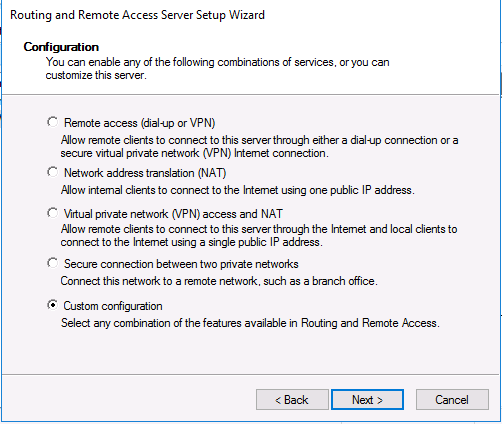
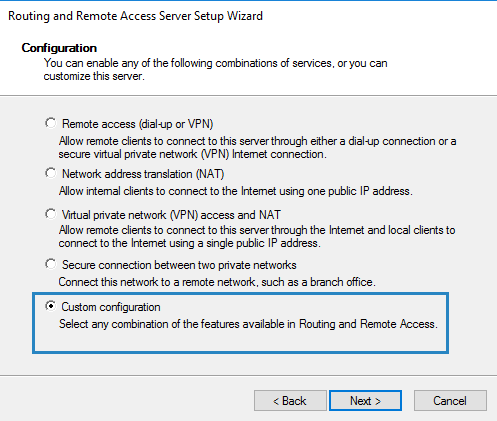
В мастере настройки выберите пункт Custom configuration.
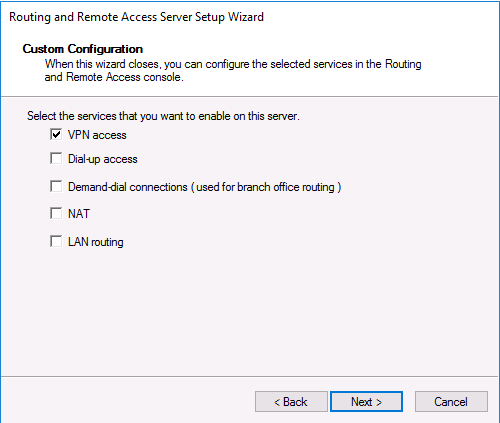
В списке служб выберите опцию VPN access.
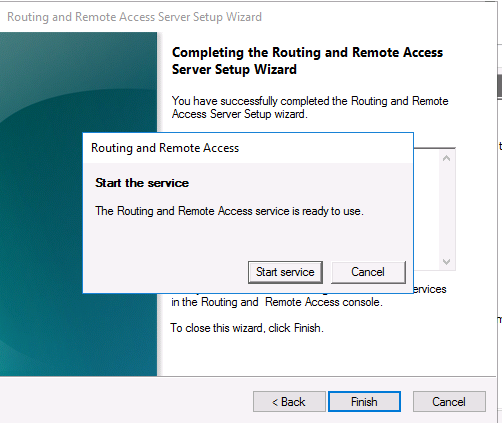
После этого система предложит вам запустить службу Маршрутизации и удаленного доступа.
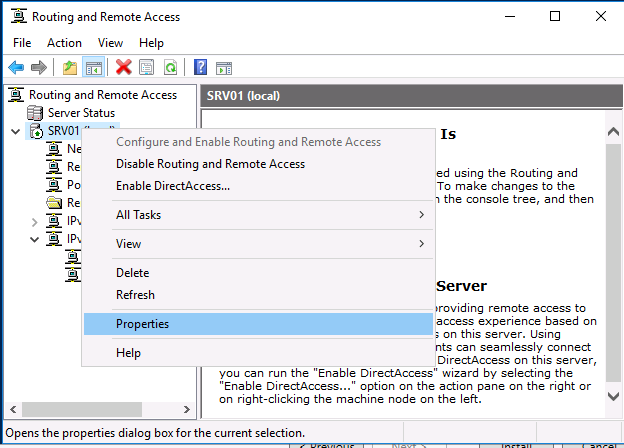
Служба VPN установлена и включена, теперь ее необходимо настроить. Снова откройте меню сервера и выберите пункт «Свойства».
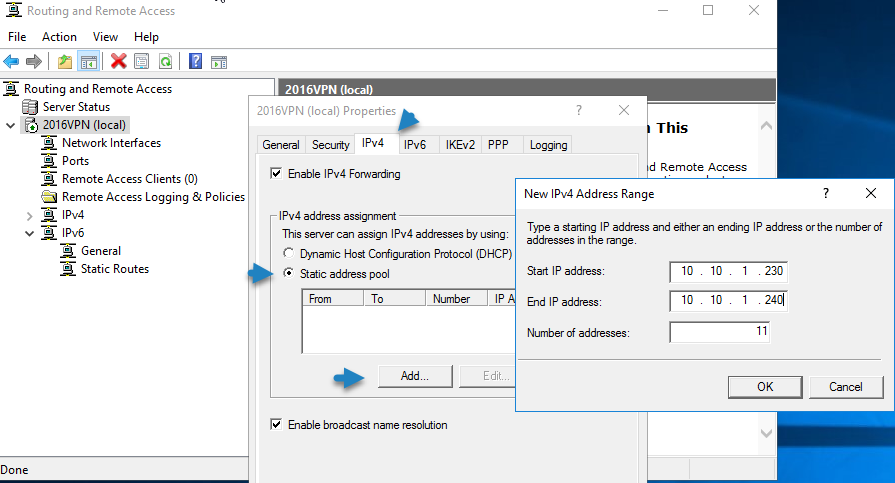
Перейдите на вкладку IPv4. Если у вас нет DHCP-серверов в сети, вам необходимо указать диапазон IP-адресов, которые будут получать клиенты при подключении к VPN-серверу.

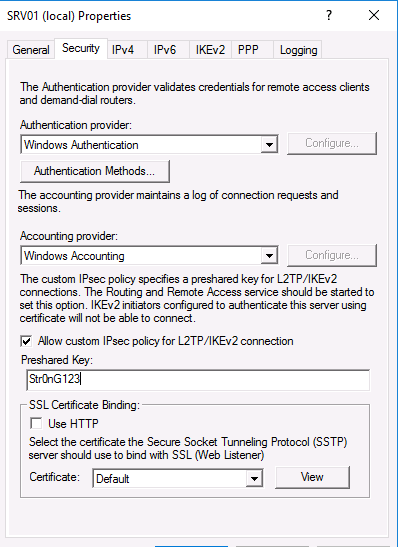
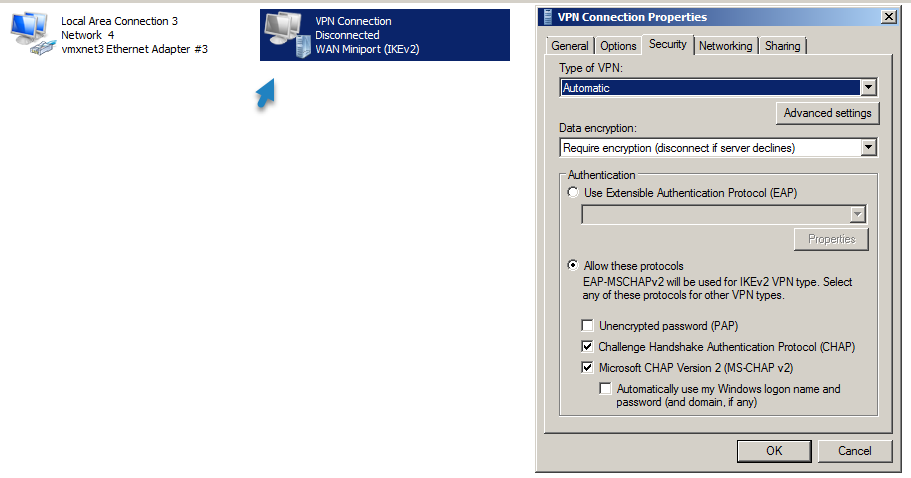
Кроме того, на вкладке Security вы можете настроить параметры безопасности — выбрать тип проверки подлинности, установить предварительный общий ключ для L2TP или выбрать сертификат для SSTP.
И еще пара нужных моментов, которые следует иметь в виду при настройке VPN-сервера.
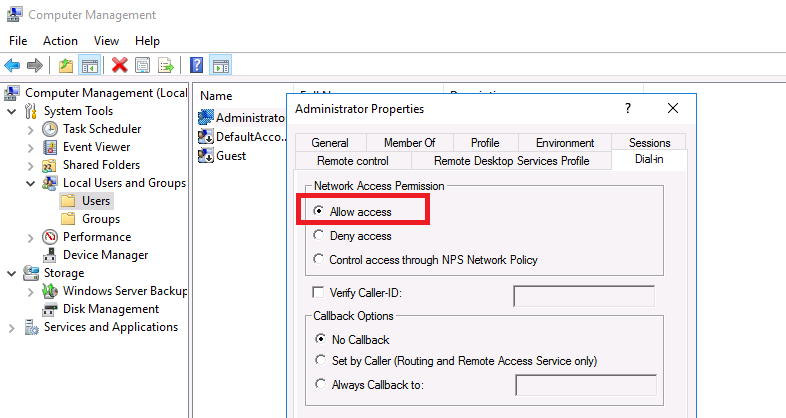
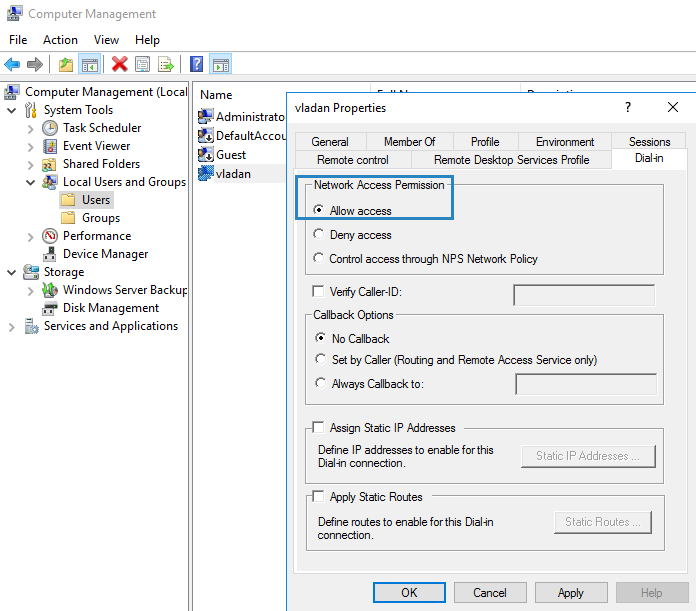
Во-первых, вам нужно указать пользователей, которых будет разрешено подключаться к этому VPN-серверу. Для автономного сервера настройка выполняется локально, в оснастке «Управление компьютером». Чтобы запустить оснастку, вам нужно выполнить команду compmgmt.msc, затем перейдите в раздел «Локальные пользователи и группы». Затем вам нужно выбрать пользователя, открыть его свойства, а на вкладке «Dial-In» отметьте пункт «Разрешить доступ» (Allow access). Если компьютер является членом домена Active Directory, те же настройки можно сделать из оснастки ADUC.
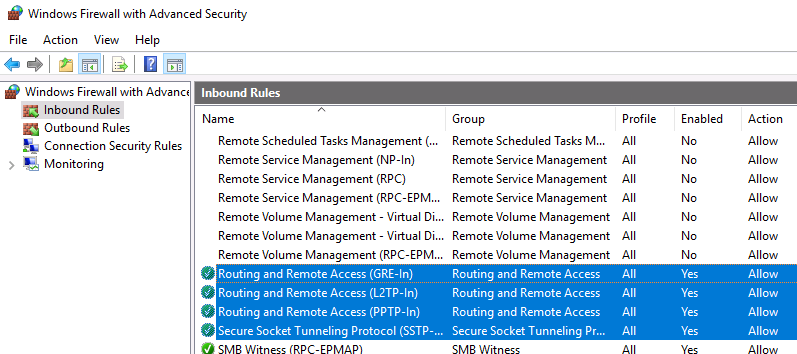
Во-вторых, проверьте, открыты ли все необходимые порты на брандмауэре Windows и межсетевом экране, осуществляющим NAT-трансляцию. Теоретически, когда вы устанавливаете роль RRAS, соответствующие правила автоматически включаются, но на всякий случай проверьте их самостоятельно. Список разрешенных правил для входящего трафика:
- Routing and Remote Access (GRE-In) — протокол 47 (GRE)
- Routing and Remote Access (L2TP-In) – TCP/1701, UDP/500, UDP/4500 и протокол 50 (ESP)
- Routing and Remote Access (PPTP-In) — TCP/1723
- Secure Socket Tunneling protocol (SSTP-in) – TCP/443
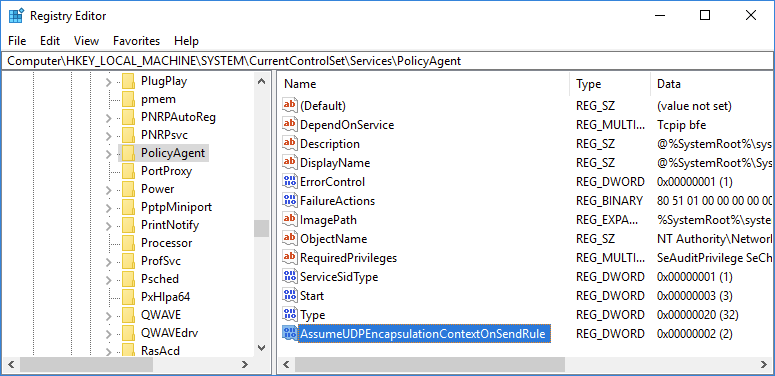
Если ваш VPN-сервер находится за NAT, для корректной установки VPN-соединения по протоколу L2TP/ipsec, на стороне клиента необходимо в ветке HKEY_LOCAL_MACHINE\SYSTEM\CurrentControlSet\Services\PolicyAgent создать ключ с именем AssumeUDPEncapsulationContextOnSendRule и значением 2.
На этом все. Теперь, когда у вас имеется настроенный VPN-сервер, вы можете подключиться к нему с помощью VPN-клиента.
1
В Мастере добавления ролей и компонентов необходимо отметить галочкой Удаленный доступ и нажать Далее.

2
Переходим на вкладку Службы ролей и отмечаем галочкой DirectAccess и VPN (RAS).

3
В появившемся окне нажимаем кнопку Добавить компоненты.

4
После того как окно закрылось нажимаем Далее.

5
Выбираем пункт Подтверждение и нажимаем Установить.

6
После завершения установки закрываем окно мастера.

7
Заходим в раздел Маршрутизация и удаленный доступ выбираем пункт Настроить и включить маршрутизацию и удаленный доступ.

8
В появившемся мастере жмем Далее.

9
Выбираем Особая конфигурация.

10
Ставим галочку напротив пункта Доступ к виртуальной частной сети (VPN) и жмем Далее.

11
Завершаем работу мастера — жмем Готово.

12
Появится окно с предложением запустить службу. Выбираем Запустить службу.

13
Снова заходим в Маршрутизация и удаленный доступ и выбираем Свойства.

14
Добавляем интервал адресов для VPN соединения — переходим на вкладку IPv4 и жмем Добавить.

15
В появившемся окне заполняем диапазон и жмем ОК.

16
Готово. Сервер настроен. Для того чтобы удаленные пользователи смогли подключиться, разрешаем доступ в свойствах пользователей или групп на вкладке Входящие звонки.

В начало статьи
Не нашли ответа на свой вопрос?
Закажите звонок специалиста!
Закажите звонок специалиста!
Following tutorial shows how to setup Windows Server 2016 (single NIC, behind NAT/Firewall) as a L2TP / IPSec VPN Server.
Install Remote Access Role
- Open Server Manager > Manage > Add Roles and Features and add Remote Access role.
- On Role Services screen choose only DirectAccess and VPN (RAS).


Enable and Configure Routing and Remote Access
- Open Server Manager > Tools > Routing and Remote Access
- Right click on server name and choose Configure Routing and Remote Access.
- Follow the wizard and choose options Custom Configuration and VPN Access.
- Right click on server name and choose Properties.
Create Active Directory VPN Group
- Open Active Directory Users and Computers.
- Create a new security group and add all users that will have permission to connect via VPN.


Create and Configure Remote Access Policy
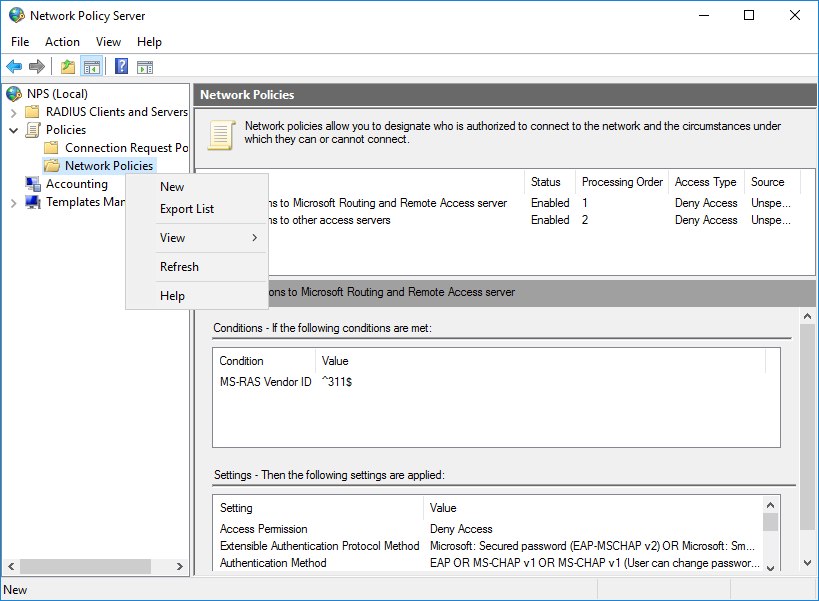
- Open Server Manager > Tools > Network Policy Server
- Open Policies, right click on Network Policies and click on New

- Configure as follows:
Make registry changes to allow L2TP behind NAT
This registry change needs to be done on the VPN server and all Windows VPN clients:
- Open regedit.exe
- Navigate to HKEY_LOCAL_MACHINE\SYSTEM\CurrentControlSet\Services\PolicyAgent
- Create a new DWORD 32 type value:
- Name: AssumeUDPEncapsulationContextOnSendRule
- Data: 2
0 — No connection to servers behind NAT (Default).
1 — Connection where VPN server is behind NAT.
2 — Connection where VPN server and client are behind NAT.
- Reboot computer for changes to take effect.

April 2018
Windows Server Standard 2016

IT and Virtualization consultant, owner of vladan.fr — ESX Virtualization — one of the top independent virtualization blogs. VCAP5-DCA/DCD, VCP4/5
I did previously setup during a few occasions, VPN access on Windows Server 2012 R2, but haven’t tested that on the newly released Windows Server 2016.
Remote access role is a VPN which protects the network connection or your remote connection from one side to another and protecting both sides from attacks or data sniffing as VPN protocol uses a tunnel inside of a standard data connection.

Conventional Disaster Recovery options for virtualized IT environments running on Microsoft Windows Server 2016
Learn from this video about:
- What you should prepare your IT environment for
- Storage Replica vs. Veeam Backup & Replication vs. Hyper-V Replica
- Demonstrating each disaster recovery site option in use
Free of Charge. No Registration.
Note: You’ll need to open a TCP port 1723 on your firewall as this port is used for the VPN access.
Also, I’d like to point out that this might not be a guide for enterprise deployment as there you’ll perhaps use a hardware VPN from your router or use a Direct Access feature which however relies on Internet Protocol version six (IPv6) technologies to establish client connections.
How to install VPN on Windows Server 2016 – The steps:
Install a Remote access role via the Add Roles and Features Wizard. Open Server Manager either locally on the server that will host the remote access role or on a computer that has Server Manager configured to connect to the server you’re deploying the role.
Then select Add Roles and Features Wizard from the Manage Menu. Click next on the before you begin page if it is displayed. Then select Role-Based or Feature-Based installation and click next.
On the Select Server Role page, scroll down and then select check box Remote Access. And then click next.

You’ll need to click two more times to get to the Remote access Role Services, where you’ll have to select Direct Access and VPN.
Accept the installation of sub-components, such as IIS… Accept all the defaults.
It will take some time to finish the installation of all components and sub-components.
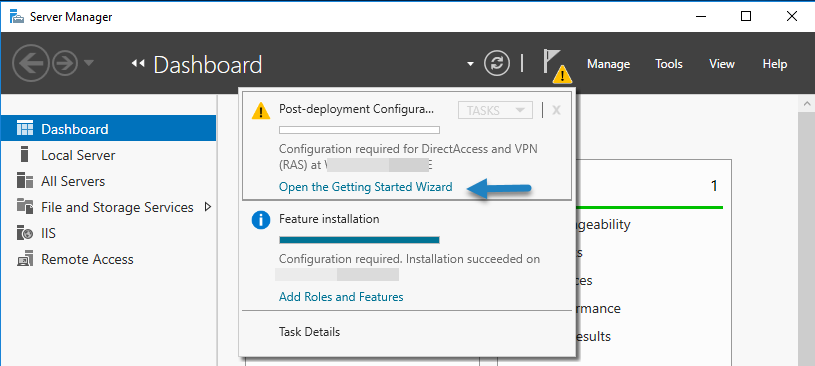
Then click on the link Open the Getting Started Wizard to open the configuration wizard.
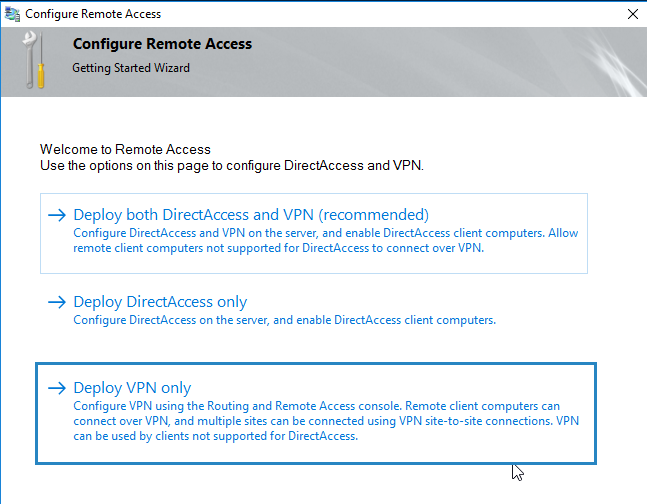
A new window will appear. You’ll need to click Deploy VPN only which will configure VPN by using the Routing and Remote Access console.
After you click on that part, you’ll open the Routing and Remote Access console. Right click on the Server name and click on Configure and Enable Routing and Remote Access.
Note: You can also launch this console via Control Panel > System and Security > Administrative tools.
Click Next and Select Custom Configuration.
So far, it’s been very simple. Let’s go and finish the configuration. All we need to do on the next screen is to tick the checkbox VPN access as we only want this feature to be active.

You’ll then have only one page which displays the summary of your selections. Confirm by clicking the Finish button. After few seconds, you’ll see a pop-up window asking you to start the Routing and Remote Access service. Click on Start Service button.
Next Step – Allow some users to connect to your newly configured VPN server
Usually this kind of small environment can be used for system administrators requiring access to remotely installed server, or for a small group of users within an organization. Depending on the architecture, the server can be part of a Microsoft Domain and have a central management of users through an Active Directory (AD) or it can be a standalone server which is just outside of any domain.
For the sake of simplicity, we consider this case, but in both cases, you’ll need to configure at least one user to access through the VPN and we’ll show you how.
So if you’re in “Workgroup” environment you can use a Computer Management Console (MMC), and if you’re in a domain environment this can be done in the user properties of an Active Directory user.
Usually, there is a DHCP server within a company environment. If that’s not the case, you’ll have to add a static address pool.
You can find the settings in the properties of your VPN server, where you can click on the IPv4 tab and enable and configure the Static address pool. Make sure to use the same subnet as your static address of your server.
Well, this is about.
From the client’s perspective. The client has to configure a VPN connection from the client’s end. So, depending on the Operating system the client is using, the setup might differ.
But basically, you’ll should set up new VPN connection.
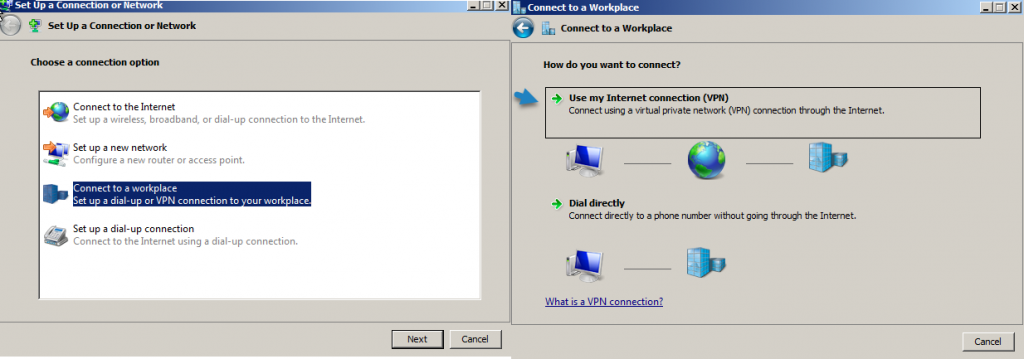
And then
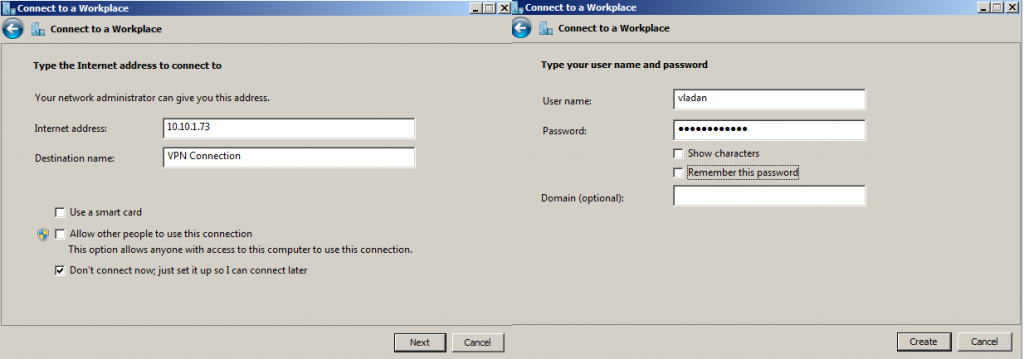
This will create a new connection within the network connection window there.
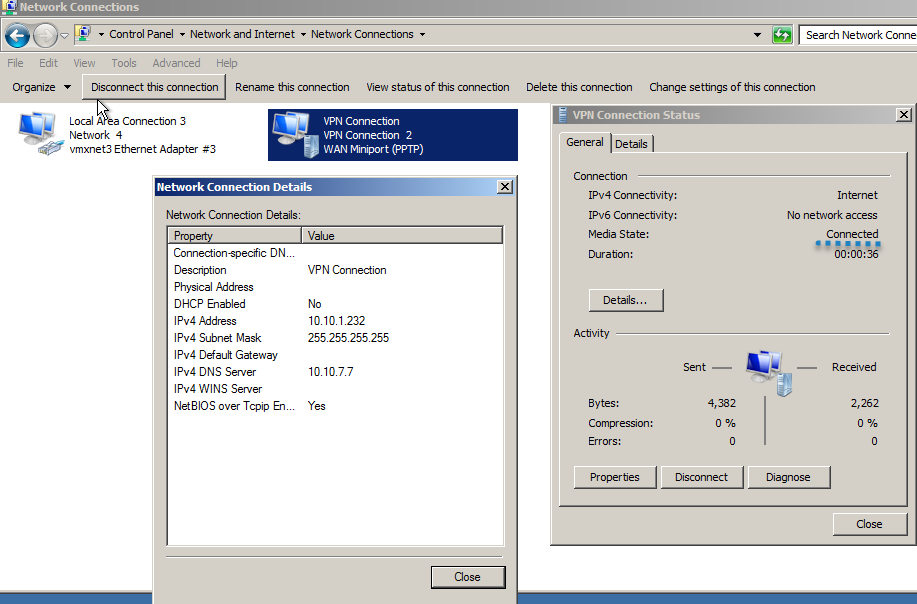
To finally get this screen after connecting and entering your password.
Wrap up: Windows Server VPN
This is the simplest way of doing it. It involves, however, opening the TCP 1723 port on the firewall. Note that another solution of remote access exists, but they usually involve installation of third party tools on the server side, and also on the client side.
You may want to avoid installing those tools on company servers and stick to traditional Built-in VPN from Microsoft, for remote administration.
You may also be limited with your budget as those tools usually cost money when used in the enterprise environment on server systems.
- How-to Create Bootable Windows Server 2016 USB Thumb Drive for Installing OS
- Why moving from Windows Server 2012 R2 to 2016 for Hyper-V
This post shows you how you can install a VPN Server on Windows Server 2016 Step-by-Step. It shows you how you can easily setup a VPN server for a small environment or for a hosted server scenario. This blog post covers how you can use Windows Server VPN.
This is definitely not a guide for an enterprise deployment, if you are thinking about a enterprise deployment you should definitely have a look at Direct Access.
I already did similar blog posts for Windows Server 2008 R2, Windows Server 2012 and Windows Server 2012 R2.
- How to Install VPN on Windows Server 2012 R2
- How to Install VPN on Windows Server 2012
- How to Install VPN on Windows Server 2008 R2
- How to Install VPN on Windows Server 2019
You can simply follow this step by step guide:
Install the Windows Server VPN Role
First install the “Remote Access” via Server Manager or Windows PowerShell.
Select the “DirectAccess and VPN (RAS)” role services and click next.
On the next steps just use the default settings. After that you can have a look at the overview screen and install the role.
After the features are installed, which can take a while to finish you see the link for the Getting Started Wizard. Click on “Open the Getting Started Wizard“.
Configure Windows Server VPN
This opens a new wizard which will help you to configure the server. On the first screen select “Deploy VPN only“.
This opens the Routing and Remote Access Management Console
Right click on the Server name and click on “Configure and Enable Routing and Remote Access“.
On the new wizard select “Custom configuration“.
Select “VPN Access“.
After you have click finish you can now start the Routing and Remote Access service.
If you have an other firewall between the internet and your Windows Server you have to open the following Firewall port sand forward them to your Windows Server:
For PPTP: 1723 TCP and Protocol 47 GRE (also known as PPTP Pass-through)
For L2TP over IPSEC: 1701 TCP and 500 UDP
For SSTP: 443 TCP
After the installation Users have to be enabled for Remote Access to connect to your VPN Server. On a standalone server this can be done in the Computer Management MMC, in a domain environment this can be done in the user properties of an Active Directory user.
If you don’t have a DHCP Server in your environment you have to add a static IP address pool. This is often needed if you have a single server hosted at a service provider. In the properties of your VPN server you can click on the IPv4 tab and enable and configure the “Static address pool”.
You now have to add a IP address from the same subnet as your static address pool to the network interface of your server, so users can access the server.
I hope this helps you to setup a VPN server in a small environment, lab or hosted server.
Tags: Direct Access, GRE, installation, L2TP, Microsoft, PPTP, RAS, Remote Access, routing, setup, SSTP, VPN, VPN Server, Windows, Windows Server, Windows Server 2016, Windows Server VPN Last modified: April 25, 2019
About the Author / Thomas Maurer

Thomas works as a Senior Cloud Advocate at Microsoft. He engages with the community and customers around the world to share his knowledge and collect feedback to improve the Azure cloud platform. Prior joining the Azure engineering team, Thomas was a Lead Architect and Microsoft MVP, to help architect, implement and promote Microsoft cloud technology.
If you want to know more about Thomas, check out his blog: www.thomasmaurer.ch and Twitter: www.twitter.com/thomasmaurer