 Если вам потребовалось восстановить Windows или Linux в заводском состоянии на ноутбуке Dell Inspiron, Vostro, Latitude, XPS или другом, для этого есть простые возможности: вы можете скачать образ восстановления системы с официального сайта Dell или использовать встроенный образ на самом ноутбуке.
В этой инструкции подробно о том, как скачать образ восстановления Dell для ноутбука с Windows 10, 8.1 и Windows 7 или Linux, а также о том, как запустить восстановление из встроенного образа при его наличии. См. также: Как восстановить заводские настройки ноутбука.
- Как скачать образ восстановления Dell
- Использование встроенного образа восстановления на ноутбуке Dell
- Дополнительная информация
Как скачать образ восстановления системы для ноутбука Dell
Dell — одна из компаний-производителей ноутбуков, которая позволяет в любой момент скачать образ восстановления Windows или Linux для вашего устройства даже в тех случаях, когда использование встроенного образа невозможно (например, после его удаления и замены жесткого диска или SSD).

Для загрузки вам потребуется сервисный код ноутбука, который расположен на наклейке в нижней части (на некоторых моделях скрыт под шторкой), обычно обозначен как «Service tag (S/N) и состоит из 7 букв и цифр, а вот Express Service Code, расположенный там же, нам не требуется.
Если на текущем компьютере у вас установлена Windows, вы можете выполнить следующие шаги для скачивания образа восстановления системы (флешку, на которую будет загружаться образ лучше подключить заранее, также учитывайте, что все данные с неё будут удалены):
- Зайдите на официальную страницу https://www.dell.com/support/home/ru/ru/rubsdc/drivers/osiso/recoverytool и скачайте с неё программу OS Recovery Tool.

- Установите и запустите Dell OS Recovery Tool. В главном окне требуется выбрать: текущий ли ноутбук будет восстанавливаться (тогда сервисный код будет введен автоматически) или вы хотите скачать образ для другого ноутбука (т.е. запустили утилиту не на Dell, требующем восстановления). Я использую второй вариант.

- После ввода 7-значного сервисного кода и короткого периода ожидания, вы увидите, какие образы Windows и Linux доступны для загрузки. Для некоторых моделей ноутбуков в списке также отобразится утилита SupportAssist OS Recovery, с помощью которой можно попробовать восстановить имеющуюся систему без загрузки образа.
- После нажатия «Загрузить» и загрузки образа восстановления системы выберите флешку, на которую он будет записан (флешка станет загрузочной с возможностью восстановить систему с её использованием) и дождитесь завершения записи.


Утилита Dell OS Recovery Tool доступна только для Windows, однако вы можете скачать образ восстановления в формате ISO из Linux или Mac OS (или даже из Windows, если сменить в браузере user-agent), после чего вручную записать его на USB-накопитель:
- Зайдите на страницу https://www.dell.com/support/home/ru/ru/rubsdc/drivers/osiso/win (если зайти на нее из под Windows, вас перенаправит на страницу загрузки OS Recovery Tool). Обратите внимание, если вам требуется образ Linux, вверху нажмите по соответствующей ссылке для перехода на нужную страницу.

- Введите сервисный код ноутбука и проверочный код, а затем нажмите кнопку «Проверить доступность».
- При наличии образов вы увидите их в списке и сможете скачать ISO с образом восстановления к себе на компьютер (не забудьте снять отметки с ненужных образов). А затем использовать любые программы создания загрузочной флешки для записи образа на USB.


К сожалению, для некоторых ноутбуков, как правило, с предустановленной Linux, при попытке скачать образ восстановления сообщается «Образ восстановления сейчас недоступен» или «Нет образов ОС для этого кода». Тогда, восстановление возможно из встроенного образа, если вы его не удалили (например, при ручной установке системы).
Использование встроенного образа восстановления на ноутбуке Dell
На старых ноутбуках Dell с предустановленной Windows 7 для запуска восстановления из встроенного образа нужно было выполнить такой порядок действий: при включении нажимать клавишу F8, пока не откроется меню, а затем выбрать пункт «Repair your computer».
На новых ноутбуках с заводской Windows 10 и 8.1 можно зайти в особые варианты загрузки (в Windows 10 — Пуск — Параметры — Обновление и безопасность — Восстановление — Перезагрузить сейчас, либо на экране блокировки, удерживая Shift нажать по кнопке питания и пункту «Перезагрузка»), а затем найти пункт «Восстановление из образа» в дополнительных параметрах восстановления. Однако, после переустановки ОС или обновлений системы пункт может пропадать.
В случаях, когда нужного пункта нет или если компьютер не запускается и ни один из способов не помогает, вы можете использовать официальную утилиту Dell Recovery & Restore, доступную на странице https://www.dell.com/support/home/ru/ru/rudhs1/drivers/keyincloud. Для загрузки Dell Recovery & Restore также ввести сервисный код устройства.

После скачивания:
- Подключите USB флешку (данные с нее будут удалены) и запустите утилиту. Сделать это можно и на другом компьютере.
- Выберите флешку в списке и нажмите кнопку для записи. В моем тесте Dell Recovery and Restore отображалась странно (как на скриншоте), но отработала исправно. Если вы тоже столкнетесь с таким отображением, убедитесь, что не подключены другие съемные накопители (потому как могут быть затронуты данные на них).

- По завершении работы вы получите загрузочную флешку со средствами восстановления Dell. После загрузки ноутбука с неё и выбора языка появится следующий экран.

- После нажатия «Continue» будет выполнена попытка восстановления уже имеющейся системы на диске, а при неудаче — предложено и начато восстановление из встроенного образа, если он присутствует на жестком диске.


Дополнительная информация
Некоторые дополнительные сведения, которые могут оказаться полезными в контексте восстановления ноутбука Dell к заводским настройкам из образа:
- Для использования флешки в обоих способах вам нужно будет поставить загрузку с флешки в БИОС или использовать Boot Menu (на Dell обычно вызывается по F12). Для современных систем с предустановленной Windows 10 или 8 используйте загрузку в UEFI режиме.
- Образы восстановления содержат все драйверы для вашего ноутбука, а на сайте Dell их даже обновляет, но все равно обычно там не последние версии, обновитесь после восстановления (особенно если использовали встроенный образ).
- Windows 10 содержит встроенные средства для восстановления системы и её переустановки, которые применимы независимо от марки вашего компьютера, подробнее: Автоматическая чистая установка Windows 10, Как сбросить Windows 10.
- Если ни один из методов не помогает, а образ восстановления не удается скачать, вы можете скачать Windows 10 с официального сайта Майкрософт и вручную выполнить чистую установку. Какой-либо ключ при установке вводить не нужно (при условии, что на ноутбуке была предустановлена Windows 10, 8 или 8.1), система будет активирована после подключения к Интернету. Останется вручную или с помощью Dell Support Assist установить все оригинальные драйверы.
Надеюсь, что-то из описанного в руководстве окажется полезным в вашей ситуации. Если же проблемы сохраняются, подробно опишите их в комментариях, я постараюсь помочь.
Reset your Dell laptop with these easy methods
by Claire Moraa
Claire likes to think she’s got a knack for solving problems and improving the quality of life for those around her. Driven by the forces of rationality, curiosity,… read more
Updated on
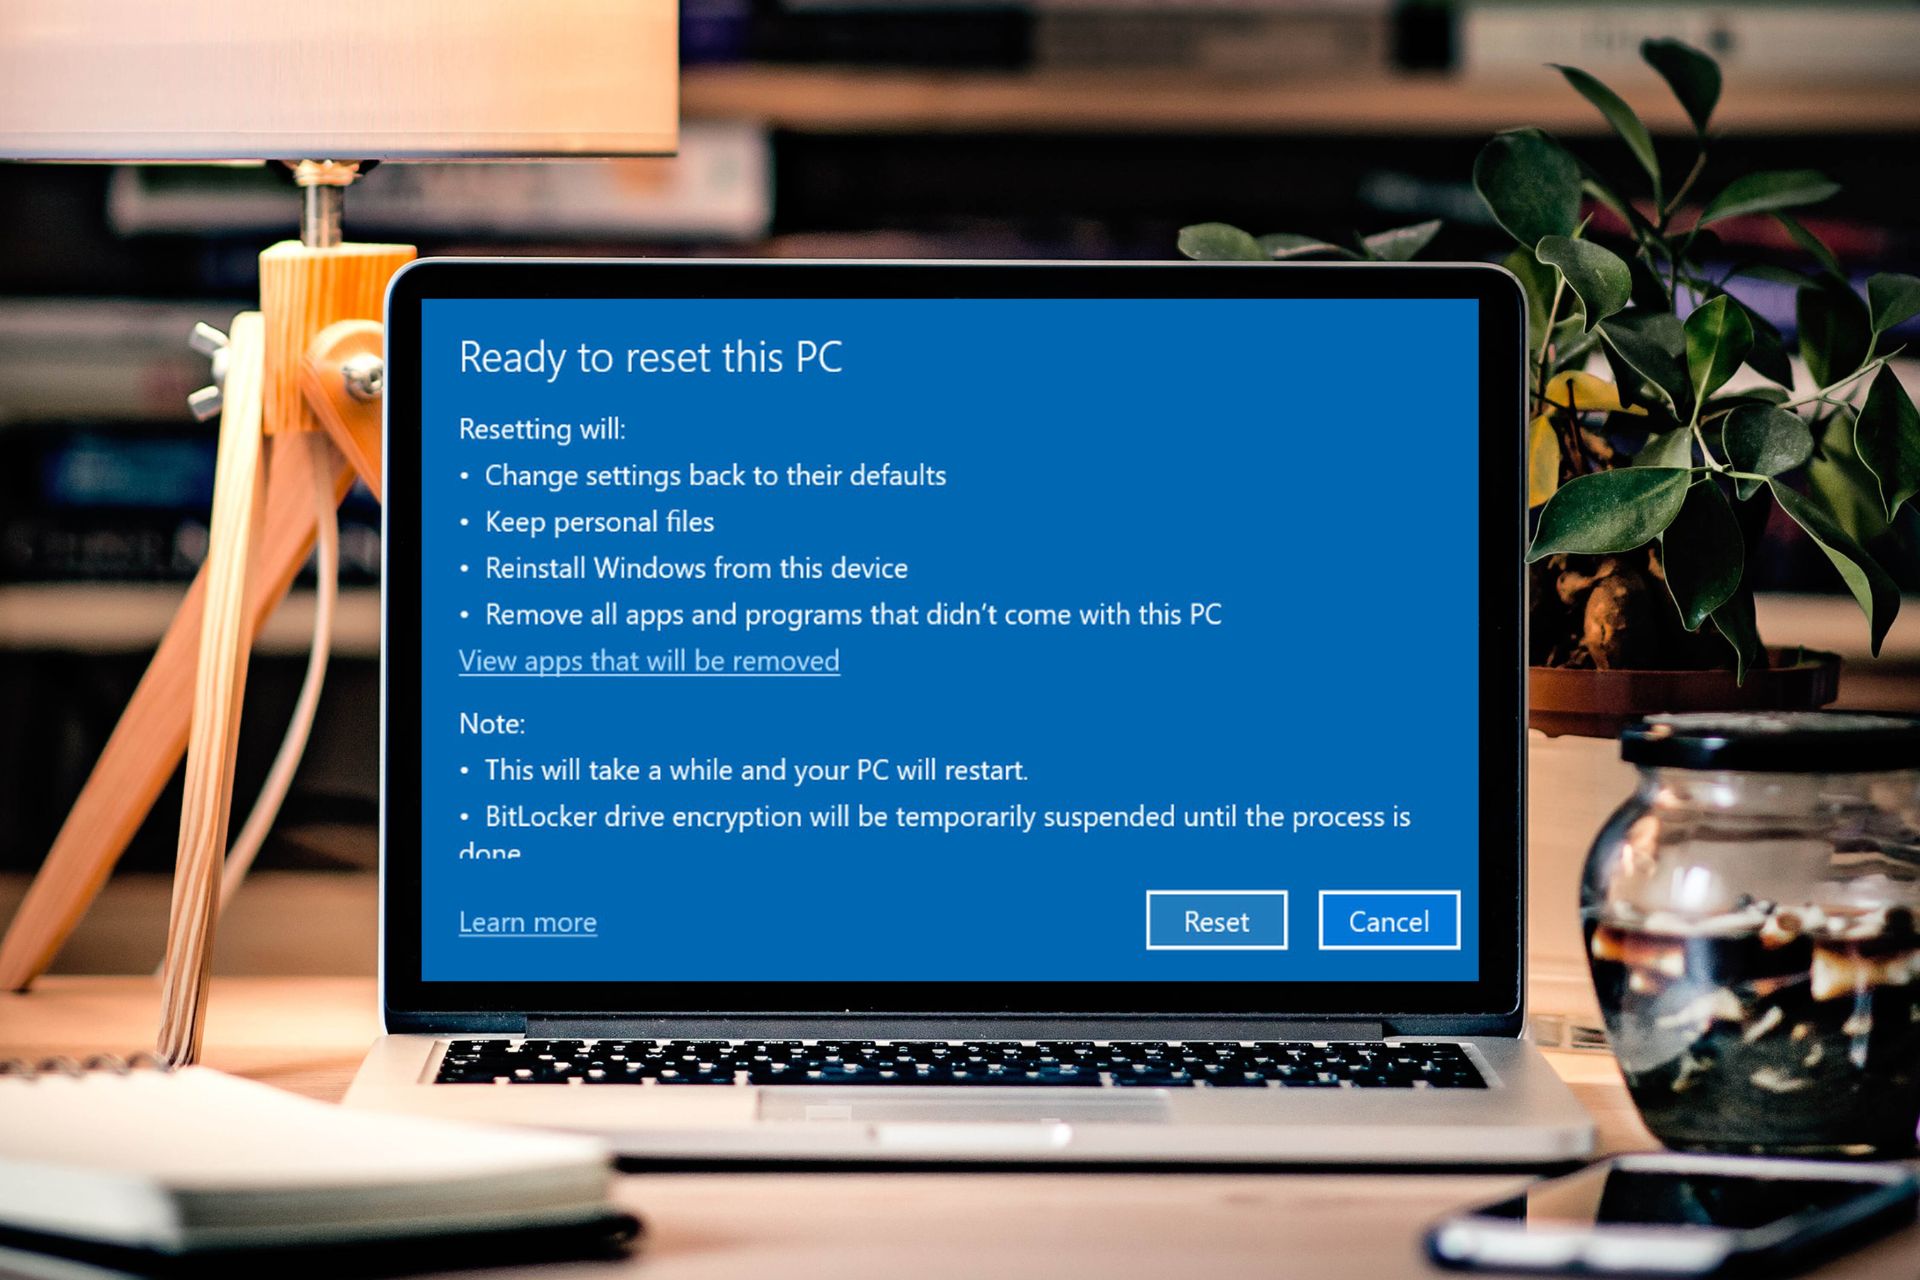
- Factory resetting is a great way to clean up your laptop. It deletes all the files and settings from the hard drive and returns it to the factory default condition.
- Wiping everything from your laptop’s hard drive is a drastic step, so make sure you’ve backed up any important files before proceeding.
Ever find yourself in a situation where you want to remove all your files from your laptop or computer? You’re not alone. There are many reasons why you might want to do this.
Perhaps you’re selling the computer or want your old data erased for security reasons. Unfortunately, many people don’t know how to factory reset a Dell laptop on Windows 10. Thankfully, we have those answers.
Why should I factory reset my PC?
If you’re having trouble deciding whether or not to factory reset your PC, there are a few other reasons why this procedure might be beneficial for you:
- Malware – You should factory reset your PC if you suspect it has been infected with malware. It can be tough to remove malware manually, so we recommend you factory reset your PC.
- Fixing problems on your PC – A factory reset often fixes problems that you might have with your computer. For example, a factory reset could fix a corrupted operating system.
- Makes it easier to sell or give away your PC – If you’re selling or giving away your computer, then a factory reset is one of the best ways to clean up your hard drive so that no personal information remains on it.
- Revert settings to their original state – If you’ve made changes to how Windows works, such as changing the default apps for certain tasks or adding new fonts for text display, a factory reset will restore these settings back to their original state.
- Improve performance – If your PC is slow to start up, slow to load programs and other apps, or if it’s constantly freezing, a factory reset could fix these issues.
Factory resetting won’t solve every problem with your PC, but it’s certainly worth trying if nothing else has worked.
How we test, review and rate?
We have worked for the past 6 months on building a new review system on how we produce content. Using it, we have subsequently redone most of our articles to provide actual hands-on expertise on the guides we made.
For more details you can read how we test, review, and rate at WindowsReport.
How can I factory reset my Dell laptop?
1. Use Settings
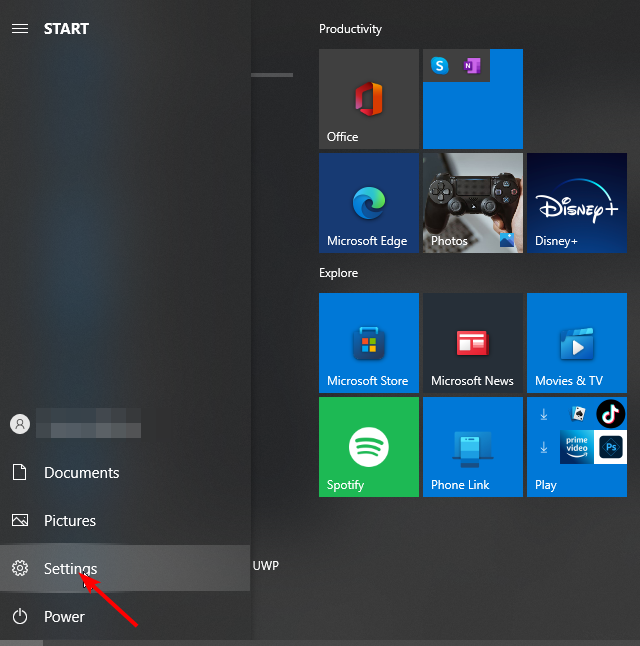
- Click on the Windows button and select Settings.

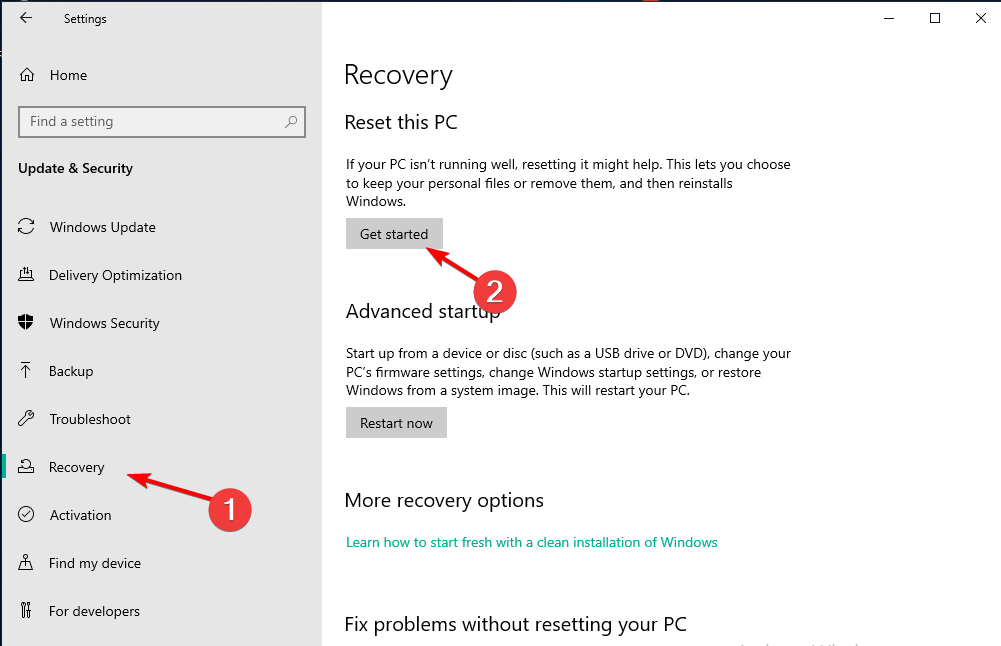
- Select Update & Security.

- Click on Recovery on the left pane, then under Reset this PC, click Get started.

- Select the Remove everything option.

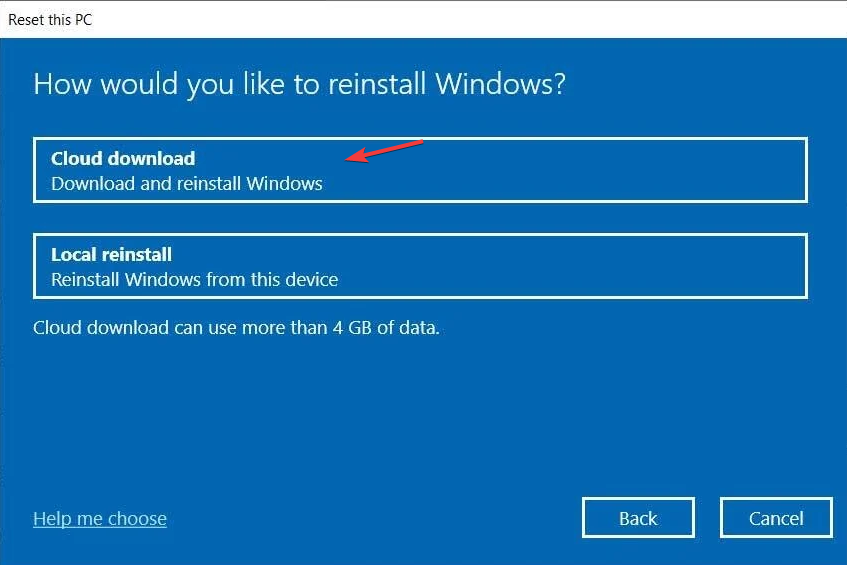
- Choose a Cloud download or Local reinstall.

- Click Reset and wait for the process to complete.


2. Reset from Startup
- Power on your Dell laptop and the login screen; don’t enter the password.
- Click on the Power button and select Restart while holding the Shift key.

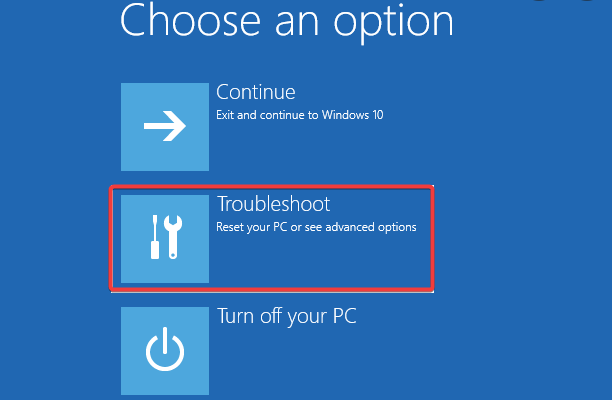
- Once the Windows Recovery page pops up, release the Shift key and select Troubleshoot.

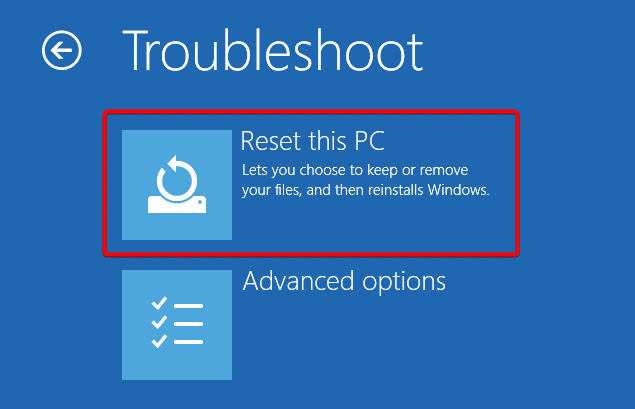
- Select Reset this PC.

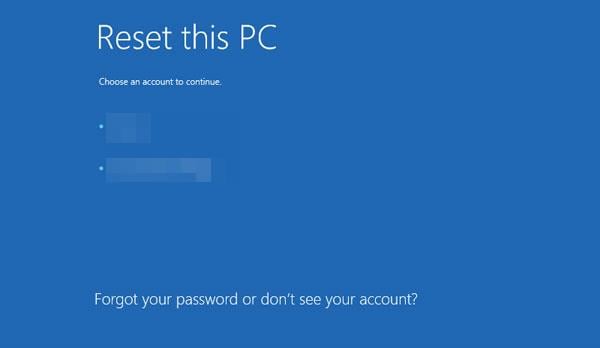
- Click on Keep my files or Remove everything.
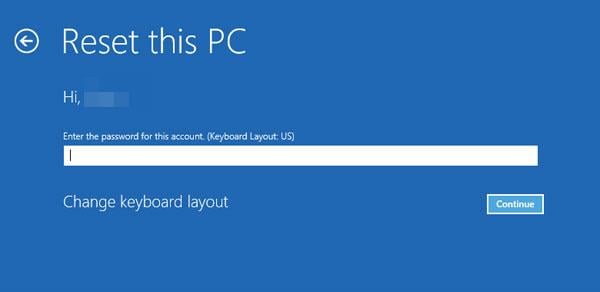
- Select an account.

- Enter your password.

- Click on Reset.


3. Use Windows Recovery Environment
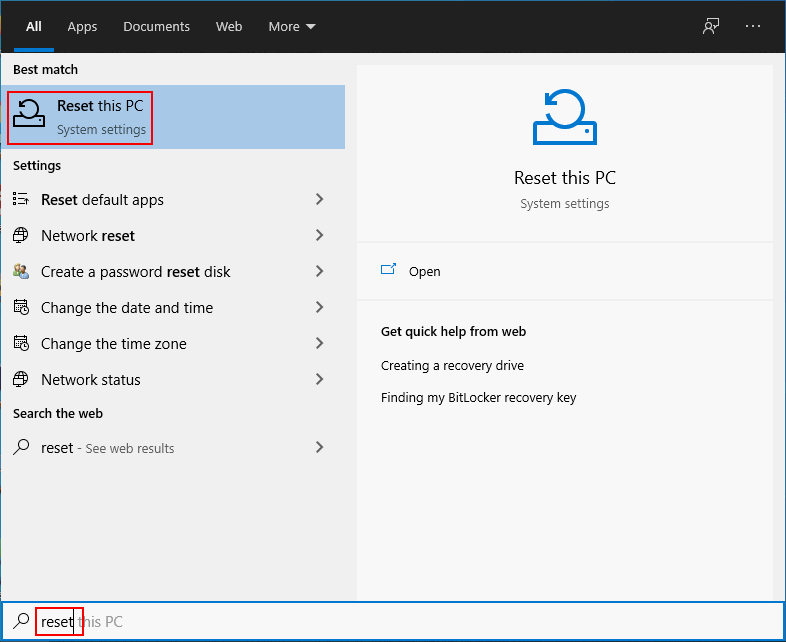
- Click the search icon on the taskbar, type reset, and select Reset this PC.

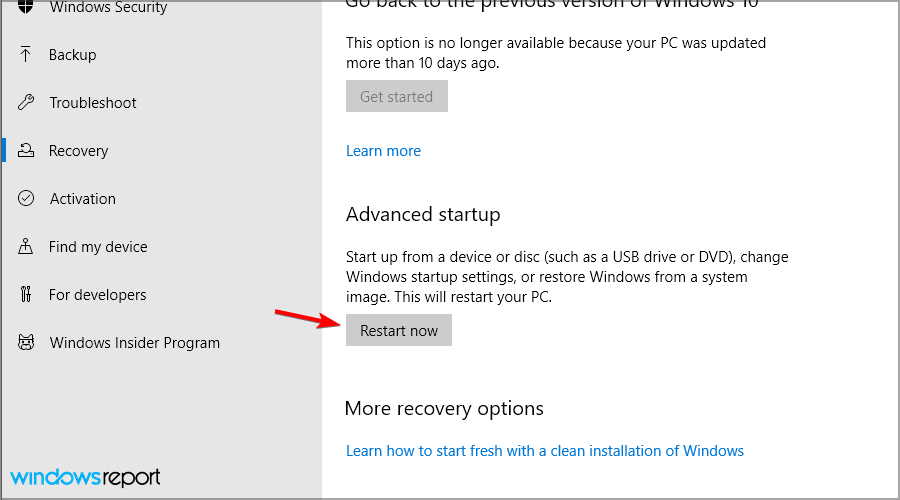
- Locate the Advanced startup option and click Restart now under it.

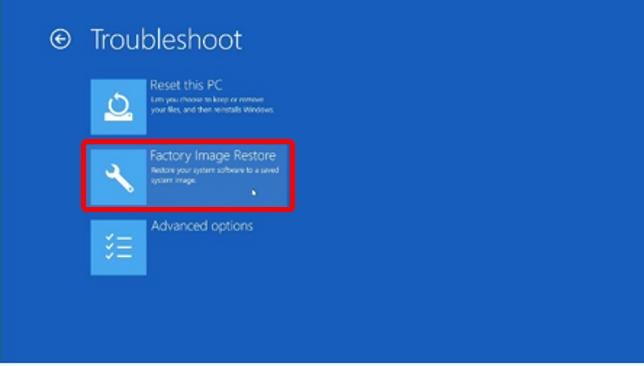
- Click on Troubleshoot.
- Select Factory Image Restore.

- Follow the instructions on the screen to complete the rest of the steps.
4. Reset from Boot
- Power on your Dell PC, and when the Dell logo appears, hold down F8 until the Advanced Boot Options appear.
- Select Repair Your Computer.

- Choose your preferred keyboard and input language.

- Enter the username of the Administrator account you are using and leave the password section empty.

- Select Dell Datasafe Restore and Emergency Backup.

- Next, click on Restore My Computer.

Factory resetting your Dell laptop on Windows 10 from boot is more suitable for users who forgot their password.
- Is Windows 11 Faster Than Windows 10?
- How to Change the Icon Size on Windows 10
- Are Windows 11 Product Keys Backward Compatible?
- Microsoft Store Apps vs Desktop Apps: Which Ones to Use?
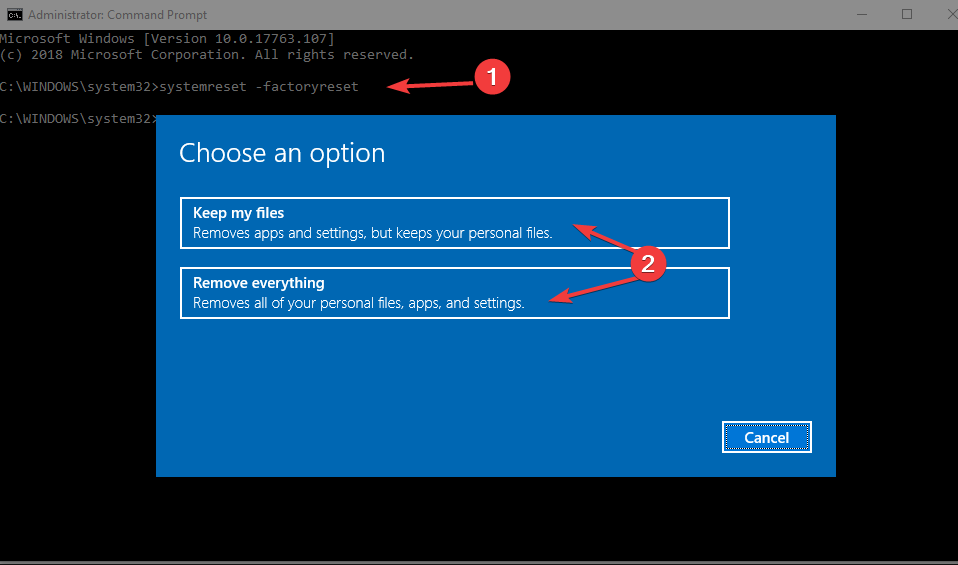
5. Use the Command prompt
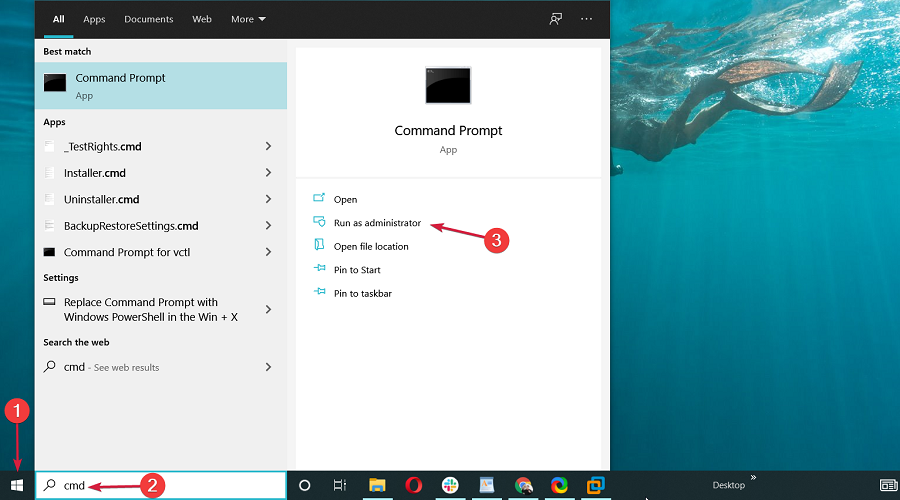
- Press the Windows + S keys, type cmd, and then click Run as administrator.
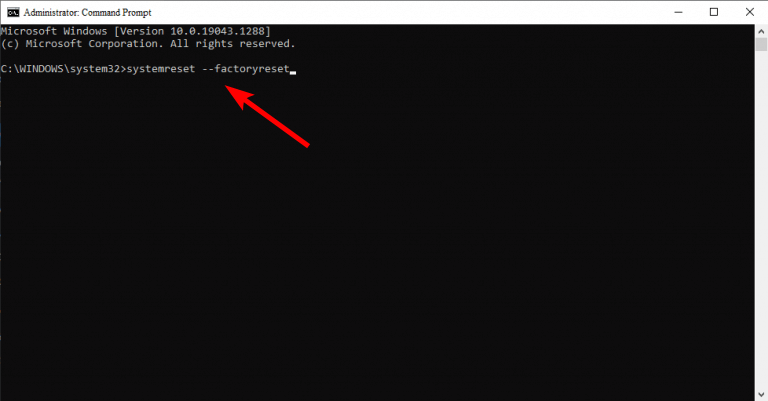
- Copy and paste the following command and press Enter:
systemreset –factoryreset
- Select Keep my files or Remove everything and follow the on-screen instructions to complete the process.

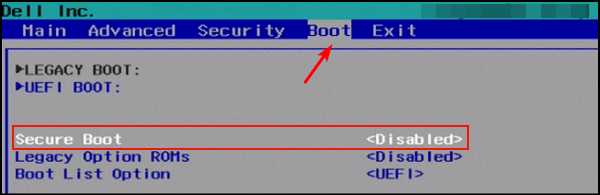
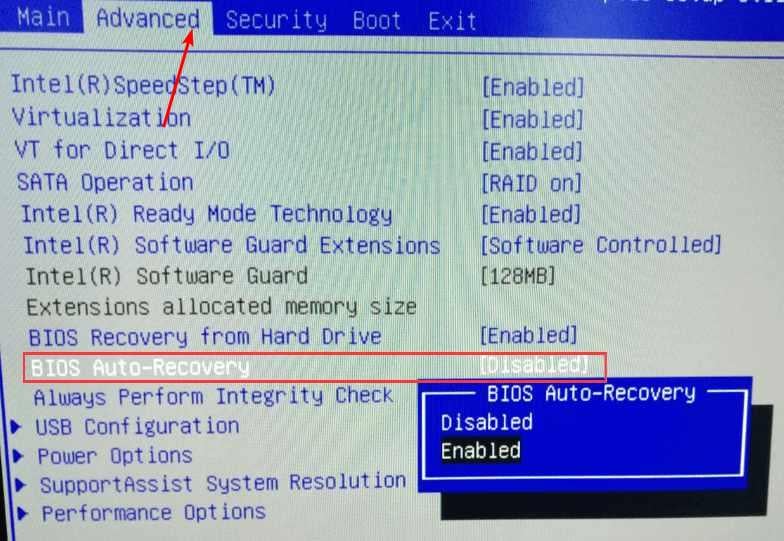
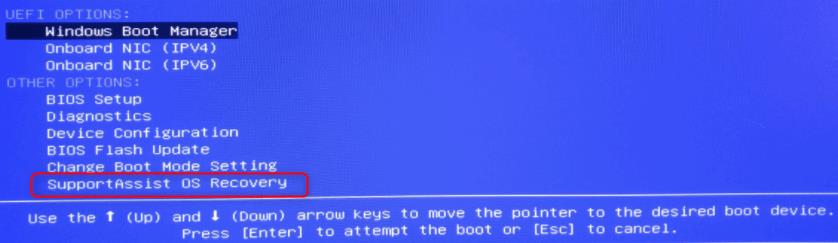
6. Reset from BIOS
- Power on your Dell PC, and when the Dell logo appears, hold down F2 until the BIOS setup appears.
- Use the arrow keys to navigate the Boot tab, scroll down to the Secure Boot option, select Disabled, and hit Enter.

- Navigate to the Advanced tab, select the BIOS Auto-Recovery option, select Enabled, and press Enter.

- Hit F10 to save settings and restart the PC.
- Wait for the Dell logo to appear and hold down F12.
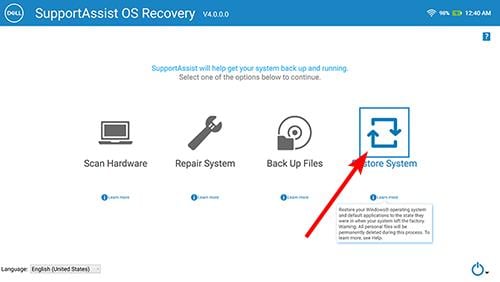
- Select the SupportAssist OS Recovery option and hit Enter.

- Click on Restore System.

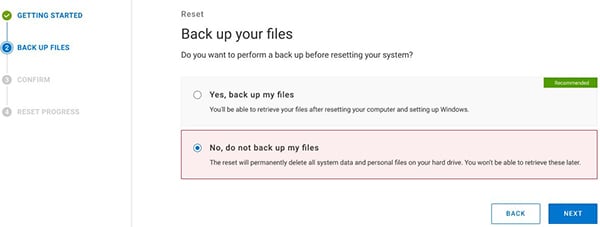
- The Factory Image Restore window will pop up. Click Next.
- Choose whether to back up files or skip them.

- Agree to the factory reset.


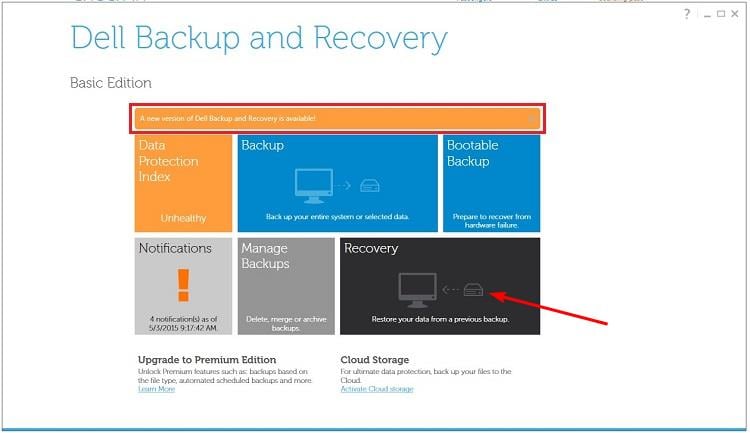
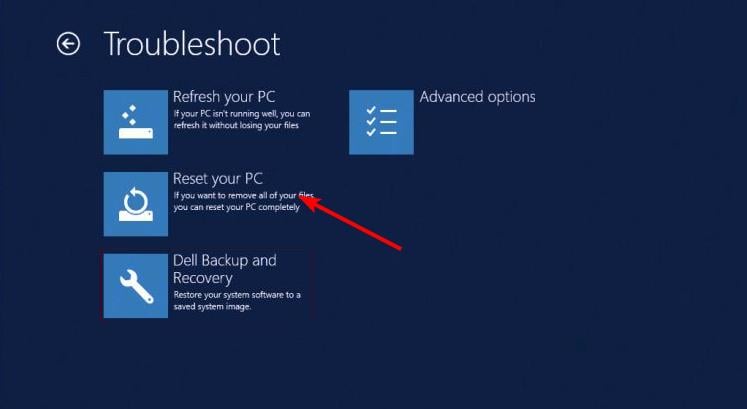
7. Use Dell Backup and Recovery Application
- Navigate to your browser and download the Dell Backup and Recovery Application.
- Install and run it.
- Click on Recovery.

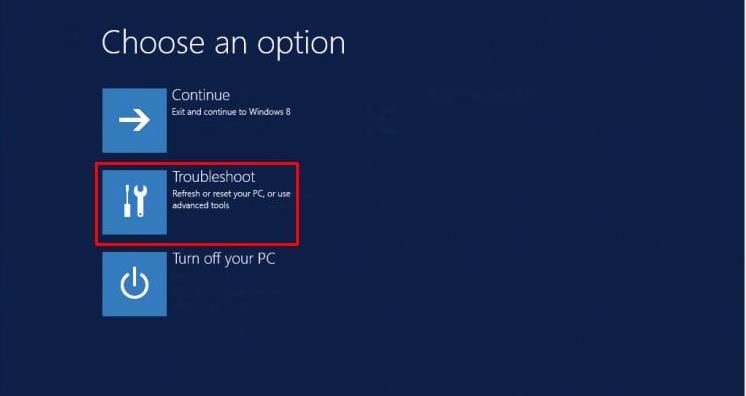
- Restart your Dell PC and press CTRL + F8 while it boots to enter Advanced options.
- Select Troubleshoot.

- Click on Reset your PC.

- Now follow the on-screen instructions to complete the reset.
Does factory reset delete everything on a Dell laptop?
Factory resetting a Dell laptop allows you to remove all personal information from your device and return it to its original state when you first bought it. This can be useful if you’re selling or giving away your laptop since it doesn’t contain any sensitive data anymore.
Factory resetting your computer will allow you to keep your files or delete all the data on your hard drive, including any installed applications and files. The last option erases all user data and settings on your laptop, but it doesn’t delete Windows or other software that came with your computer.
Nevertheless, it is essential to back up any important files before performing the factory reset.
And that’s how to factory reset your Windows 10 Dell laptop. If you are using a more recent version of Windows, we also have a guide on factory resetting Windows 11.
In case you run into a hurdle and, for some reason, you can’t reset your Windows 10, we have a dedicated article on how to bypass this issue.
Do let us know of any other issues you may have encountered in the comment section below.
![]()
Skip to content

При серьезных сбоях работы системы, ее можно восстановить. По умолчанию, всегда имеется стандартная заводская точка восстановления, но Вы можете создавать свои резервные копии, к которым можно будет откатить систему в случае чего.
Теперь же рассмотрим, как можно восстановить систему ноутбука на базе Windows:
- При запуске компьютера, во время отображения логотипа производителя Dell, зажмите клавишу F8;
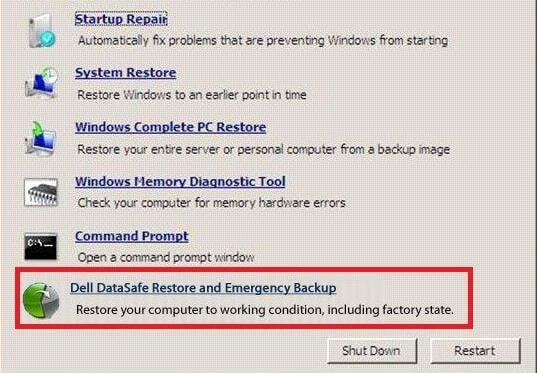
- После того, как откроется окно расширенного запуска системы, выберите пункт Устранение неполадок компьютера или Восстановление системы;
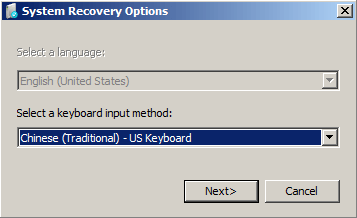
- Выберите язык интерфейса и нажмите Далее;
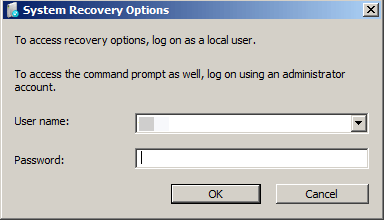
- При наличии логина и пароля для входа в Windows, введите их;
- Теперь нажимаем на Dell DataSafe Restore и Emergency Backup, жмем Далее;
- Далее выбираем пункт Восстановить мой компьютер и вновь жмем Далее;
- Теперь выбираем нужную копию. Если же Вы не делали резервного копирования, то будет заводская копия;
- Выберите Восстановить без сохранения новых или измененных файлов (это вернет все заводские настройки), жмем Далее;
- Подтверждаем путем нажатия Да, продолжить. Начнется инициализация процедуры восстановления системы (занимает обычно 15-30 минут);
- Жмем Закончить;
- Теперь компьютер будет запущен с предыдущей точки восстановления или с чистыми заводскими настройками.
Напоследок совет: все же стоит время от времени делать резервные копии системы, что бы не откатывать систему слишком далеко.
Загрузка…
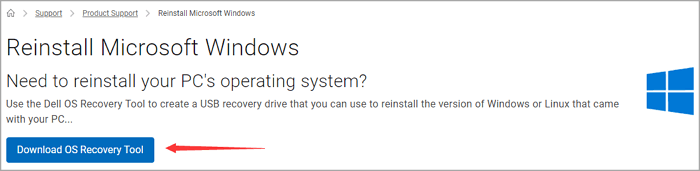
Do you want to reinstall Windows operating system while encountering computer or hard drive crashes or other unexpected software failures on your Dell computer? Dell recommends its free Dell OS Recovery Tool to restore a system image. Is it works smoothly? We’ll walk you through its features, download process, and existing problems.
What Is Dell OS Recovery Tool?
The Dell OS recovery tool provides an easy interface to quickly download and create a bootable USB drive to reinstall the operating system. — Dell.com
The Dell OS Recovery Tool is a handy application that allows you to create a bootable USB drive that can reinstall the operating system on your Dell computer.
Dell OS Recovery Tool VS Dell SupportAssist OS Recovery
Dell OS Recovery Tool and Dell SupportAssist OS Recovery are two tools that can be used to restore a Dell computer to its factory settings. Dell OS Recovery Tool is a software program that can be downloaded from the Dell website. Dell SupportAssist OS Recovery is a factory-installed tool that is included with Dell support services. It is free to troubleshoot and restore to the normal system state. However, some Dell computers don’t support Dell SupportAssist OS Recovery. (Check whether your device is supported or not — Dell SupportAssist OS Recovery Support Matrix.)
If not, go ahead and create a Dell recovery media.
Dell OS Recovery Tool Download
The recovery tool can be downloaded from the Dell Support website and is designed for use with Dell laptops and desktops running Windows 10.
To create a USB recovery drive:
Preparations:
- The targeted Dell’s Service Tag.
- A minimum 16 GB blank USB drive (Backup up all essential data as Dell OS Recovery Tool will erase it permanently).
- At least Microsoft .Net Framework 4.5.2 or higher. (Read on to check .net version.)
Once ready, navigate to create a bootable USB drive using the provided instructions.
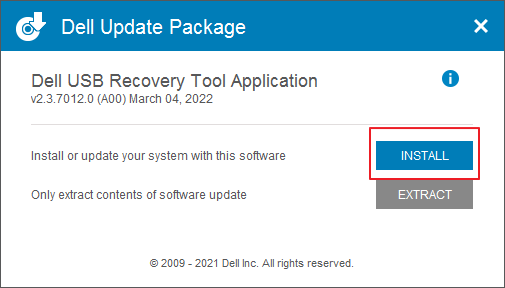
Step 1. Download OS Recovery Tool (21.1MB) from the official website.
- Click the Install button.
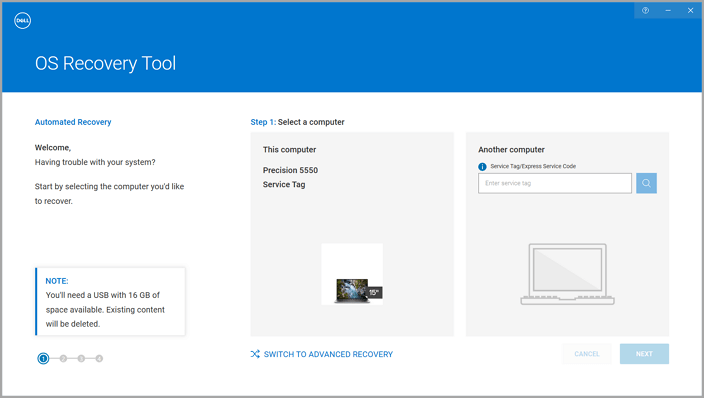
Step 2. Identify the Dell computer and click Next.
Downloading the image on the same Dell computer — Click This computer.
Change to another working Dell laptop: Click Another computer and type Service Tag or Express Service Code.
- Notice:
- Service Tag of Dell is often located on the bottom or side of the devices. It looks like a sticker. Find it. If nothing there, use other methods to locate Service Tag.
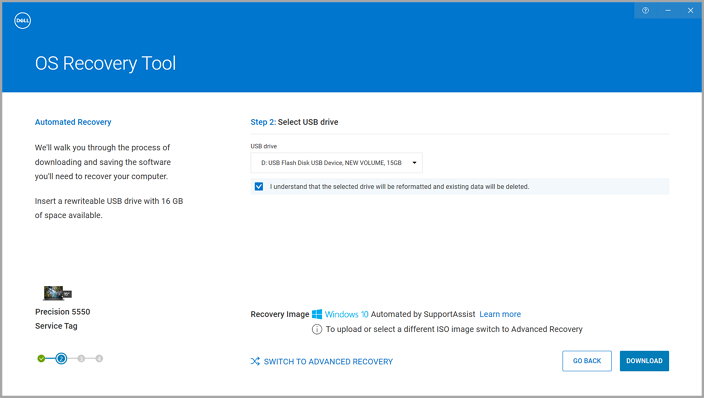
Step 3. Connect and select the USB drive.
Check I understand that the selected drive will be reformatted and existing data will be deleted.
Click DOWNLOAD.
Step 4. Download and save the recovery image.
Wait until the system recovery image is downloaded and click Close.

Step 5. Click Close and insert the USB drive into the computer you want to repair the operating system.
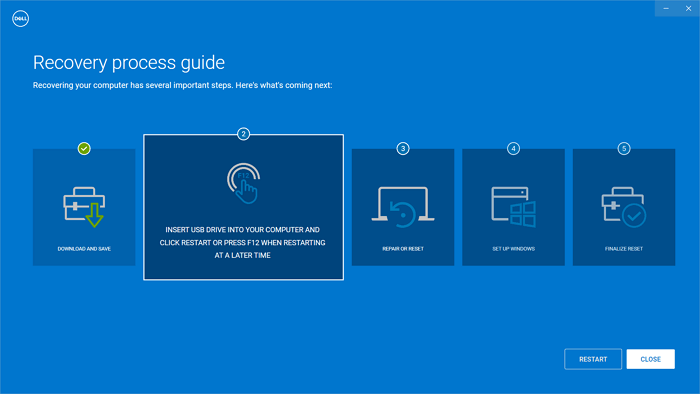
Once the USB drive has been created, you can then use it to boot your Dell computer and begin the process of reinstalling the operating system. The Dell OS Recovery Tool is essential for any Dell user who needs to perform a clean install of the operating system.
Video Guide — How to use the Dell OS Recovery Tool to build a Windows 11 recovery drive
- This video guide records to create a Windows 11 recovery drive with the Dell OS Recovery Tool.
- How to launch and use Dell OS Recovery Tool — 5:22~6:25
Dell OS Recovery Tool Not Working
Does your Dell media creation tool go well? Some users post their questions on the Dell Community to fix the Dell OS Recovery Tool not working problem. If you encounter it, try to troubleshoot the following advice or go to launch another free backup and recovery software to create a Windows recovery USB.
The Dell OS Recovery Tool will not work if your Dell PC does not have a qualifying Dell operating system installed. Suppose you see a «No compatible Dell operating system detected» error message. In that case, this means that the Dell OS Recovery Tool is not compatible with your Dell PC and cannot be used to create a USB recovery drive. You can resolve this error by installing a qualifying Dell operating system on your Dell PC. Once you have installed a qualifying Dell operating system, you can use the Dell OS Recovery Tool to create a USB recovery drive.
Alternative of Dell Recovery Media — EaseUS Todo Backup Free
EaseUS Todo Backup is a free backup software that can backup and restore system image. It is an essential tool for users to protect their computers from system crashes or data loss. In the event of a system failure, EaseUS Todo Backup can restore the computer to its original state or a previous state.
- Recommend
- Its free version has all the features we need to accomplish the task in front of us, so download the free version and install it like you would any other Windows program. — Howtogeek.com
Phrase 1. Create a Windows System Image
Step 1. Launch EaseUS Todo Backup and choose «Create Backup» on the home page, click «Select backup contents«.

Step 2. Among the four available categories, click «OS» to start back up.

Step 3. The system partition will be automatically selected, you only need to select the location.

Step 4. Local Drive, Cloud, and NAS are available for you to save the backup file. You can also connect an external hard drive to preserve the system backup files.

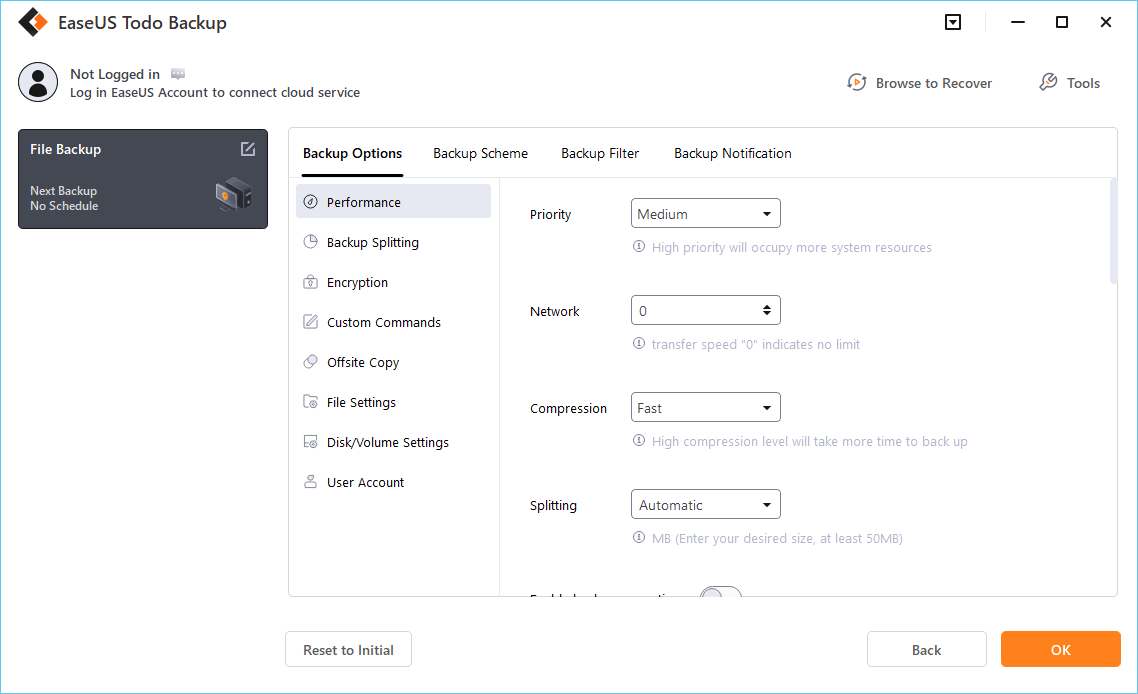
Step 5. You can customize the settings in «Options» at the left bottom. After that, click «Backup Now«, and the process will begin.
*After finishing the backup process, you can check the backup status, recover, open, or delete the backup by right-clicking the backup task on the left.
Phrase 2. Create A Recovery USB
1. Connect a USB to computer. Click «Tools» and select «Create Emergency Disk».
2. Choose the bootable disk location to create recovery USB.

Phrase 3. Restore OS
* To perform system recovery on a none-bootable machine, try to boot the computer through the EaseUS Todo Backup emergency disk.
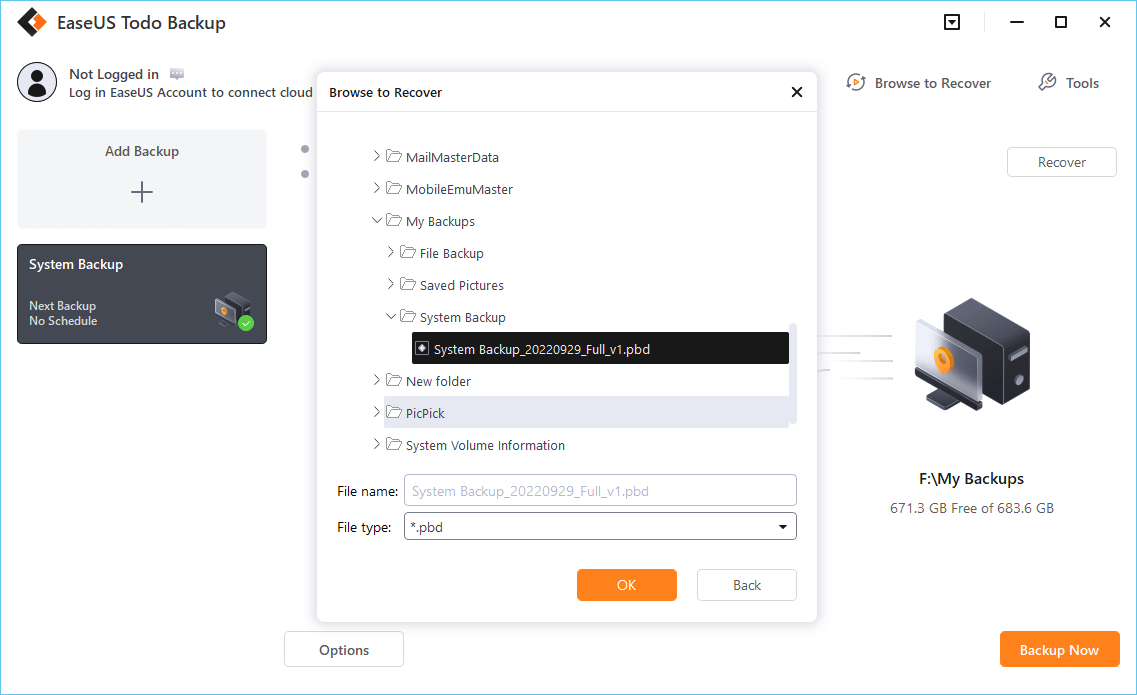
Step 1. Launch EaseUS Todo Backup, click «Browse to Recover«.

Step 2. Guide to your backup destination, choose the system backup file you need. (The backup file created by EaseUS Todo Backup is a pbd file.)
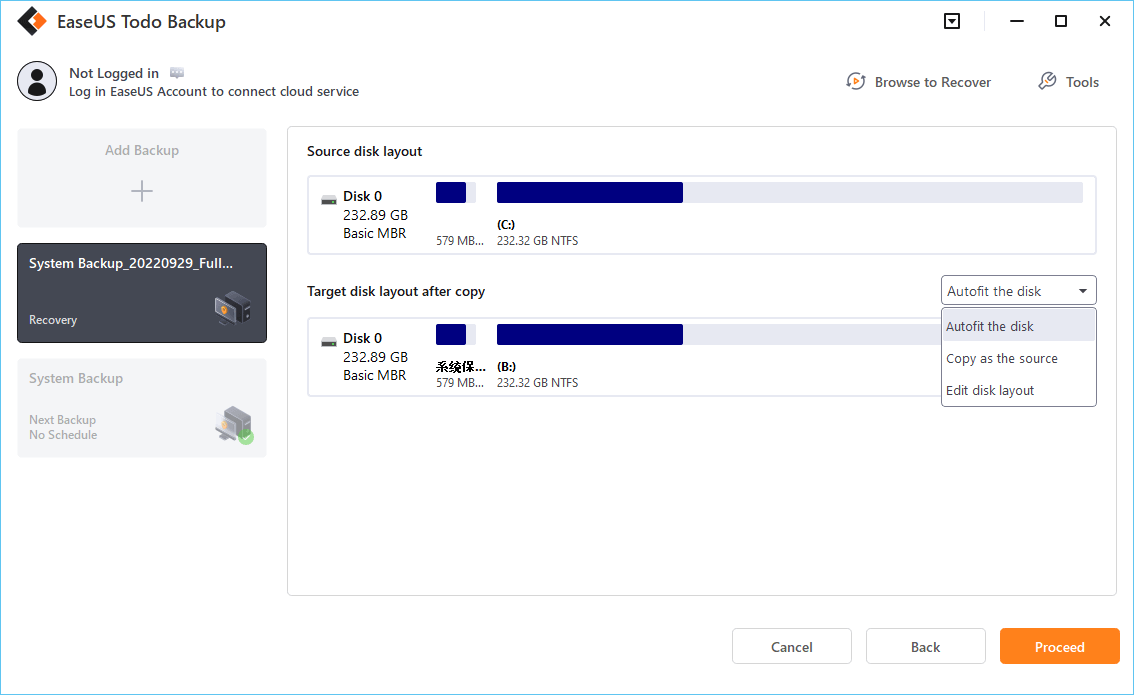
Step 3. Choose the recovery disk. Make sure that the partition style of the source disk and the recovery disk are the same.
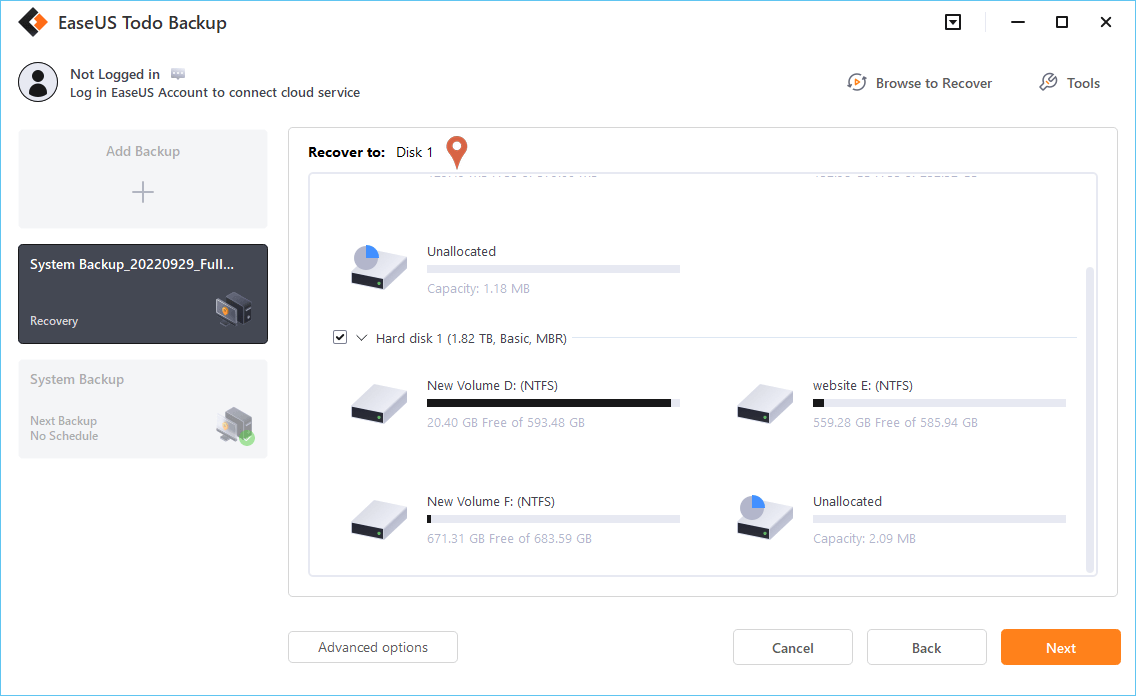
Step 4. You can customize the disk layout according to your needs. Then click «Proceed» to start system backup recovery.
Dell Recovery Tool FAQs
1. What should I choose between the Dell OS recovery tool and the Windows media creation tool?
The best choice depends on your individual needs and preferences. The Dell OS recovery tool is probably your best bet if you need a quick and easy solution. If you want more control over the process or use a non-Dell computer, the Windows media creation tool is a better option. Whichever tool you choose, you can be sure that you’ll be able to get your computer up and running again in no time.
2. How long does Dell backup and recovery take?
It needs to consider multiple factors: data size, the performance of the storage device, Network speed, backup tools, backup strategy (differential backup or incremental backup), etc.
The Bottom Line — Do You Need Dell USB Recovery Tool?
Dell OS Recovery Tool is a handy utility that can help you recover your Dell computer in case of a system crash or software failure. It can create a bootable USB drive or DVD that can be used to boot your Dell computer and repair any software issues. In addition, the Dell OS Recovery Tool can also be used to reinstall your operating system and all your applications. This can be a valuable tool if you are experiencing problems with your computer and need to start fresh. The Dell OS Recovery Tool is available for free on the Dell website.
If you are a Dell computer owner, you may want to know how to create a Dell recovery disk to perform a system restore or to perform a factory reset when there is a problem with your Dell computer. Hence, this post from MiniTool shows how to create the Dell recovery disk.
Computer system often goes wrong due to system crash, malware or virus attack, and some other reasons. In many cases, you need to restore your computer to factory settings or perform a system recovery. To do that, a recovery disk is required.
If you are an owner of a Dell computer or laptop and decide to replace your hard drive or start fresh, you need a Dell recovery disk. So, do you know how to create a Dell recovery disk? The following guide is reliable for you.
How to Create a Dell Recovery Disk?
Create a Dell Recovery Disk via Dell Backup & Recovery Software
To create a Dell recovery disk Windows 10, Dell provides a built-in tool – Dell Backup & Recovery Software.
Now, we will show you how to use Dell Backup & Recovery to create a Dell recovery disk.
- Download Dell Backup & Recovery from its official website. If you already have one, go to the next step.
- Install it and launch it.
- In the main interface, choose Reinstall Disk/Rescue Disk.
- Now, you can select either a USB flash drive or discs. After selecting it, click Continue. Make sure that your USB drive has enough space or you have sufficient DVDs. Please note that you can’t use CDs or any rewritable media.
- Then connect the USB flash drive or insert the disc.
- Click Start to continue.
- If you use a USB flash drive, you will be notified that the data on the USB flash drive will be lost. So, please back up them Then click Yes to continue.
- Then wait for the process to be finished.
Once all steps are finished, you have successfully created the Dell recovery disk and you can use it to boot your computer when the PC failed to boot, reset your computer to factory settings or perform a system recovery, and more.
Note: On the Dell Backup and Recovery software, besides the Reinstall Disk feature, you can also use the Recovery Media feature to create the Dell recovery disk and then follow the on-screen wizard to continue.
Create a Dell Recovery Disk via Windows 10 Built-in Tool
To create a Dell recovery USB, Microsoft also provides a built-in tool – Recovery Drive. It allows you to create the recovery drive so that you can use it to start your computer in case of a problem. This recovery drive contains Windows system recovery tools to restore the PC from a system image or recover Windows.
Now, we will show you how to create the Dell recovery disk Windows 10 via Recovery Drive.
1. Connect the USB drive or external disk to your computer. Please note that the USB drive should be larger than 8GB.
2. Type Recovery Drive in the search box of Windows and choose the best-matched one.
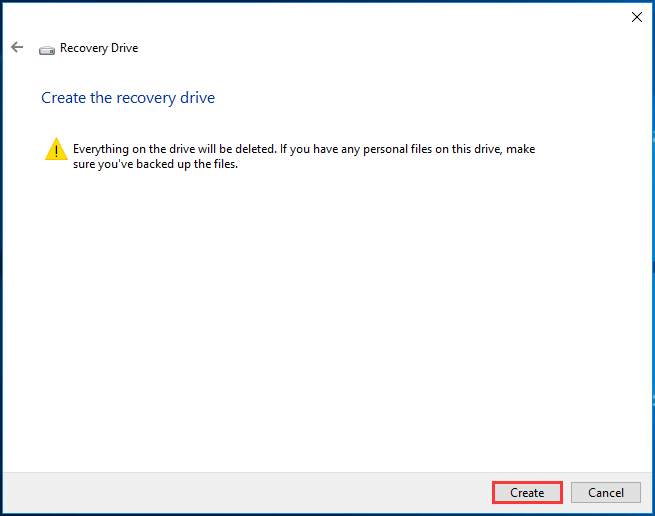
3. Then you will get a pop-up window that tells you that you can use the recovery drive to reset it or troubleshoot problems when the PC can’t start. If you back up system files to this drive, you can also use it to reinstall Windows. So, it is recommended to check the option Back up system files to the recovery drive. Then click Next to continue.

4. Then Windows 10 will detect your drives. Choose the one you inserted and click Next to continue. Please note everything on the drive will be deleted.

5. Then you will receive a warning message, read it carefully and click Create to continue.
6. Next, the Recovery Drive software will begin to create the recovery drive. You need to wait patiently until the process is finished. After that, you will see the message that the recovery drive is already and click Finish to close the window.
After all steps are finished, you have created the Dell recovery disk. This recovery drive created by Recovery Drive not only can be used on Dell PCs and laptops but also can be used on other brands’ computers.
When Windows 10 fails to boot, you can connect the drive to your computer, change the boot order and boot it from the Dell recovery disk. Then choose Recover from a drive or Advanced Options under the Troubleshoot window.
If you have backed up the system files to the recovery drive, you can use it to clean install the Windows system. Besides, the Advanced Options offers more options, such as system image recovery, system restore, command prompt, startup repair, and go back to the previous build. If your computer has some problems, you can choose one of the features to repair your PC.
Create the Dell Recovery Disk via MiniTool ShadowMaker
Apart from the above two methods to create the Dell recovery disk, here is another way for you. You can choose to create the Dell Recovery Disk via MiniTool ShadowMaker. The Dell Backup & Recovery Software only allows you to run it on a Dell computer, while MiniTool ShadowMaker does not have this limitation.
MiniTool ShadowMaker, PC backup software, allows you to create a bootable USB drive or CD/DVD disc so that you can use it to boot your computer when it is unbootable. Besides, MiniTool ShadowMaker is designed to back up partitions, disks, files, folders and the operating system.
MiniTool ShadowMaker can help you to create the system image. When your computer encountered some errors, you can boot the computer from the bootable disk and restore the system with the previously created system image.
Now, we will show you how to use MiniTool ShadowMaker to create the Dell recovery disk Windows 10.
1. Connect the USB drive, USB external drive or the CD/DVD to your computer.
2. Download MiniTool ShadowMaker from the following button, install it and launch it.
MiniTool ShadowMaker TrialClick to Download100%Clean & Safe
3. Click Keep Trial.
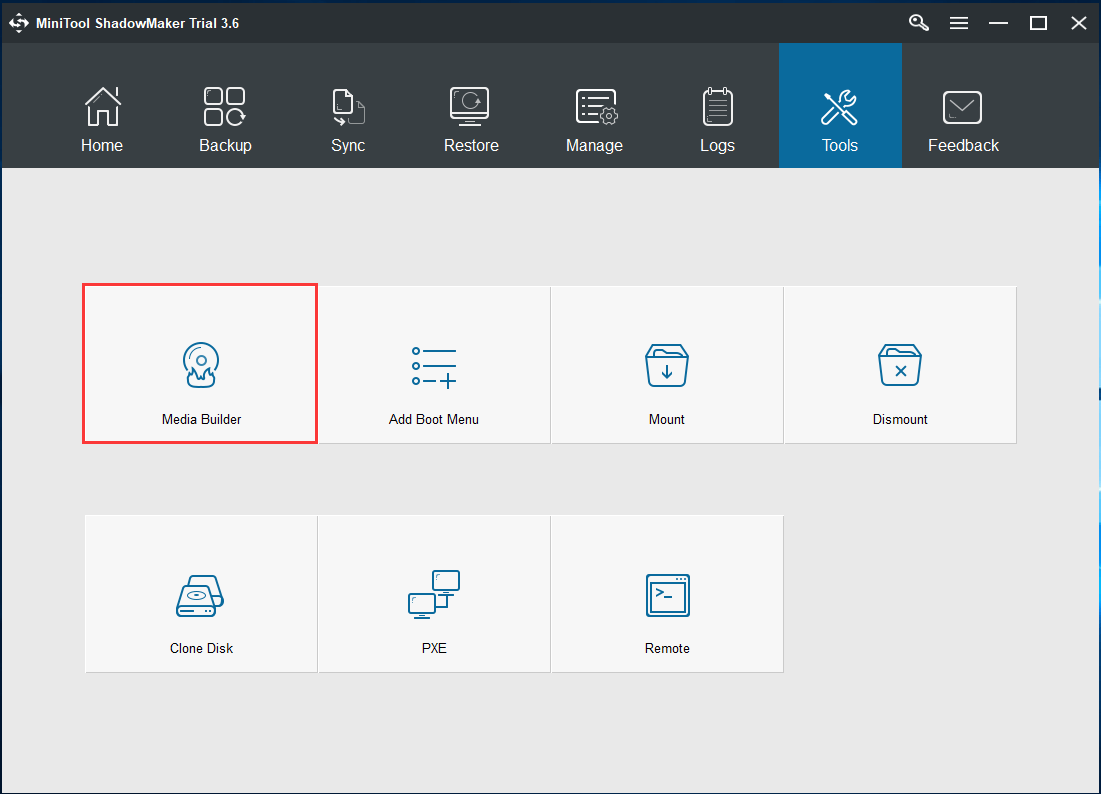
4. After entering the main interface, go to the Tools page.
5. Then click the Media Builder feature to continue.
6. Click the option WinPE-based media with MiniTool plug-in to continue.
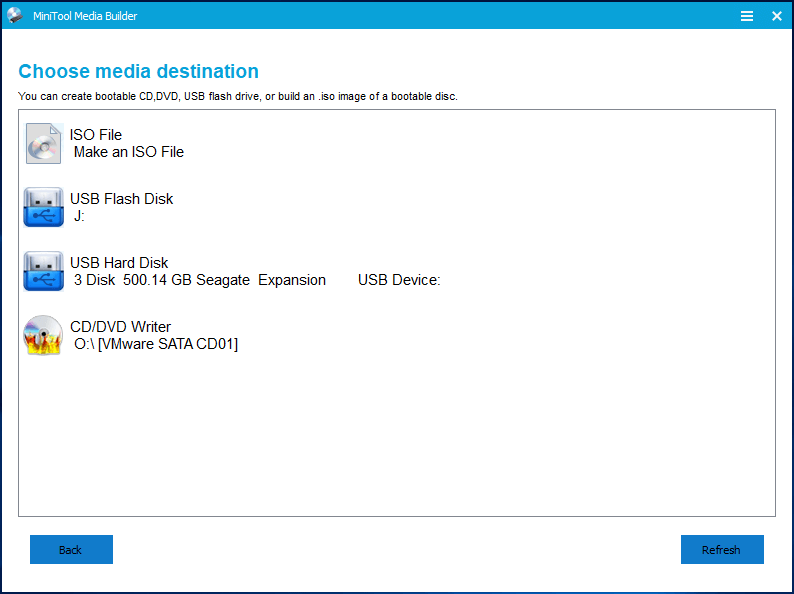
7. MiniTool ShadowMaker allows you to make an ISO file, create a bootable USB flash drive, create a bootable external hard disk, and build a bootable CD/DVD. But the USB hard disk option appears when the USB hard disk is connected to your computer.
8. Then choose a medium you have connected to your computer. To create the Dell recovery disk, you can choose the USB hard disk.
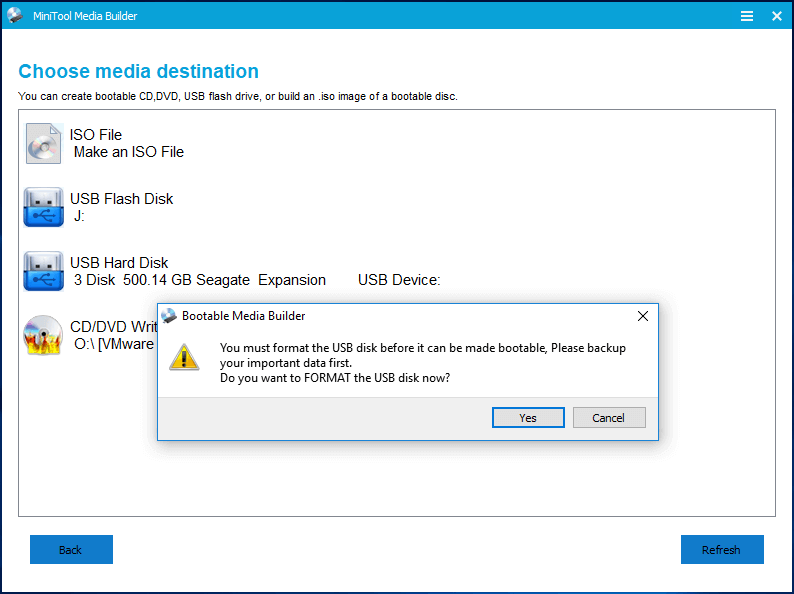
9. Then a warning message appears to tell you that your device will be formatted. To continue, click Yes. Actually, MiniTool ShadowMaker will format your USB external hard disk into two partitions. One is for Dell recovery disk and another one is for you to save data.
10. Then wait for the Media Builder to finish creating the Dell recovery disk. Click Finish to continue.

After creating the bootable disk, you need to back up the system so that you can restore the system when some accidents happen.
Back up system
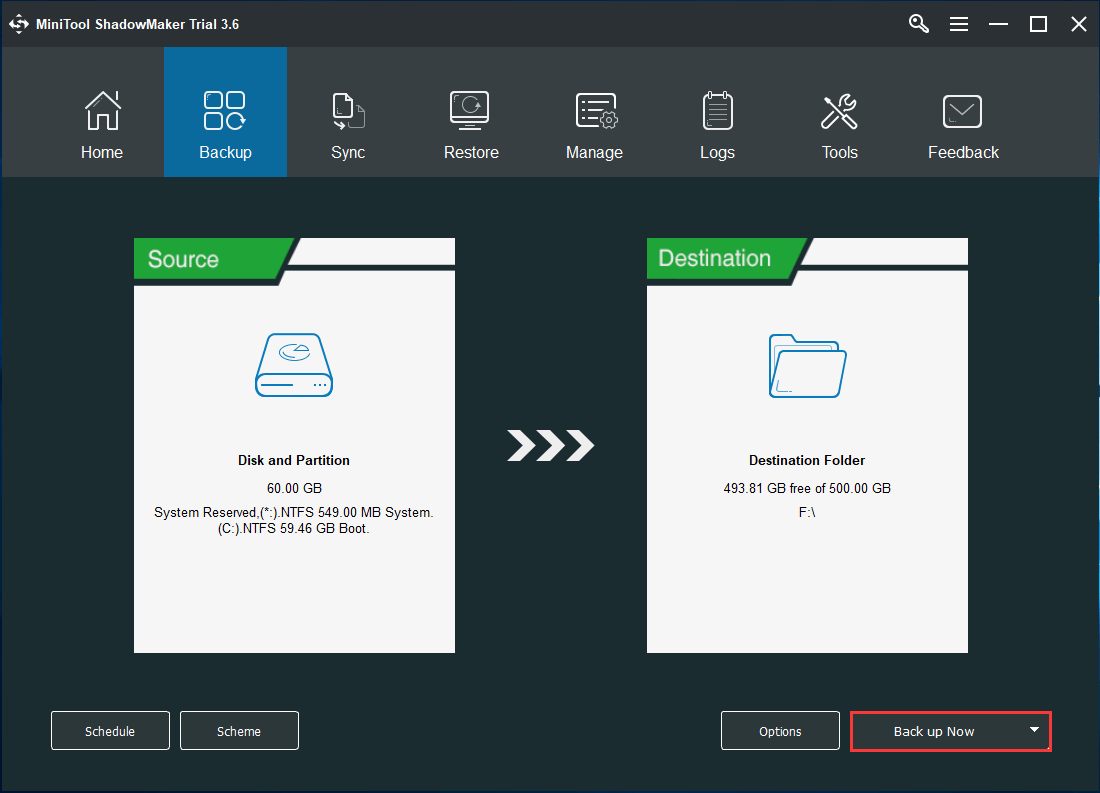
1. Go back to the Backup page of MiniTool ShadowMaker.
2. You can see MiniTool ShadowMaker selects the system-related partitions as a backup source by default. So, you do not have to change it any longer.
3. Then click the Destination module to choose a target disk to save the backup image. Here, you need to choose the other partition of the USB hard disk as the target disk. Then click OK to continue.

4. After selecting the backup source and destination, you can click Back up Now to continue and wait for the process to be finished.
After all steps are finished, you have created the Dell recovery disk containing the system image. When your computer fails to boot due to some unexpected errors, you can connect the Dell recovery USB to your computer and boot from it and then perform a system recovery.
To know much information on how to perform a system recovery, you can read the post: Restore System Image from External Hard Drive in Windows 10/8/7.
The above content has introduced 3 ways to create a Dell recovery disk. Apart from those methods, there are other ways available. You can choose to create a Dell recovery disk via the Dell Datasafe Local Backup software, or Dell Recovery Restore software.
This post introduced 3 ways to create the Dell recovery disk. Especially, MiniTool ShadowMaker is a powerful tool that not only can create a bootable drive, but also can back up the system.Click to Tweet
Bottom Line
A Dell recovery disk is essential for Dell computer users since it can help to boot the computer from it and perform some rescue actions when the computer is unbootable. As for how to create the Dell recovery disk, this post has shown 3 reliable ways. If you want to create a Dell recovery drive, try these solutions.
If you have any problem with MiniTool ShadowMaker or have any different ideas of how to create a Dell recovery disk, you can leave a message in the comment zone or feel free to contact us via email [email protected] and we will reply to you as soon as possible.
Dell Recovery Disk FAQ
How do I get a Dell recovery disk?
To get a Dell recovery disk, you need to create it by yourself. To create the Dell recovery drive, you can use the Dell Backup & Recovery software, Windows built-in tool – Recovery Drive, or third-party software – MiniTool ShadowMaker.
How do I restore my Dell computer without a disc?
To restore the Dell computer, you can use the Dell recovery disk. If you do not have a Dell recovery drive, go the Windows Settings, and then select Reset This PC. Under Advanced Startup, you’ll select Restart Now. You’ll be prompted to choose an option, at which point you should select Troubleshoot, then Factory Image Restore.
How do I download Dell OS Recovery Tool?
To download the Dell OS Recovery tool, you can go to the official website of the Dell.
How do I reinstall Windows 10 from Dell Recovery Partition?
- Plug in the AC adapter.
- At the Windows login screen, click the shutdown button, hold down the Shift key and click Restart.
- The system boots into WinPE. Click Troubleshoot to continue.
- Click the Dell Backup and Recovery option.
- The system restarts and comes back up. Then click Next on the Dell Backup and Recovery screen.
- The system would be checked to see if the smart repair option can fix the issue. Click Next once this is finished.
- You will be prompted to select the backup to be used, click the factory image option or select from one of the backups. Then click Next.
- You will be prompted to back up your files.
- The system goes ahead and completes the restoration of the operating system.
- Click Restart when prompted and follow the on-screen wizard to continue.