Если у вас возникли проблемы с компьютером, воспользуйтесь приведенной ниже таблицей, чтобы выбрать нужный вариант восстановления.
|
Проблема |
Раздел, который нужно просмотреть |
|---|---|
|
Компьютер работает не лучшим образом, и вы недавно установили обновление |
Удаление установленного обновления Windows |
|
Компьютер работает не лучшим образом, и вы уже давно не устанавливали приложения или меняли параметры системы |
Возврат компьютера в исходное состояние |
|
Компьютер не запускается или все еще загружается |
Использование функции восстановления при загрузке |
|
Компьютер не загружается, вы не создали диск восстановления, и возврат компьютера в исходное состояние не помог |
Переустановка Windows 11 с установочного носителя |
|
Компьютер не загружается, и вы не создали диск восстановления |
Выполните восстановление компьютера с помощью установочного носителя |
|
Компьютер не загружается, и вы создали диск восстановления |
Восстановление компьютера с помощью диска восстановления |
|
Вы хотите повторно установить предыдущую операционную систему |
Возврат к предыдущей версии Windows |
|
Компьютер работает не лучшим образом, и вы недавно установили приложение |
Восстановление из точки восстановления системы |
|
Вы подозреваете, что ваше устройство заражено |
Переустановка Windows 11 с установочного носителя |
Выберите один из следующих вариантов восстановления и следуйте инструкциям по устранению распространенных неисправностей.
Если вы недавно установили обновление Windows, удалите обновление, чтобы попытаться устранить проблему.
-
Выберите Пуск > Параметры > Центр обновления Windows > Журнал обновлений > Удалить обновления .
Просмотр журнала обновлений -
В отображенном списке выберите обновление, которое необходимо удалить, а затем нажмите кнопку Удалить.
Важно:
-
Если вы зашифровали устройство, вам потребуется ключ BitLocker для сброса компьютера. Если вы не знаете свой ключ BitLocker, см. раздел Поиск ключа восстановления BitLocker.
-
Во время сброса возможно, что экран может быть черным в течение длительного периода времени (иногда до 15 минут), а устройство может попытаться перезапустить себя в течение этого периода. Попытка вручную перезапустить устройство во время этого процесса может привести к сбою сброса. Пожалуйста, будьте терпеливы!
Возврат в исходное состояние переустанавливает Windows 11, но позволяет сохранить или удалить файлы, а затем переустановить Windows. Вы можете вернуть компьютер в исходное состояние в разделе «Параметры», на экране входа, с помощью диска восстановления или установочного носителя.
Возврат компьютера в исходное состояние через раздел «Параметры»
-
Выберите Пуск > Параметры > Система > Восстановление .
Открытие параметров восстановления -
Возле пункта Вернуть этот компьютер в исходное состояние выберите Вернуть компьютер в исходное состояние. Затем выберите один из параметров и/или настроек в таблице ниже.
|
Параметр |
Результат |
|---|---|
|
Сохранить файлы > Изменить параметры > Предустановленные приложения Вкл. |
|
|
Сохранить файлы > Изменить параметры > Предустановленные приложения Выкл. |
|
|
Удалить все |
Примечание. Параметр Удаление данных Вкл. — удаление файлов и очистка диска. Если вы планируете подарить, утилизировать или продать компьютер, используйте этот вариант. Очистка диска может занять час или два, но после этого другим людям будет сложнее восстановить удаленные файлы. Удаление данных Выкл. — просто удаление файлов. Это занимает меньше времени, но также менее безопасно. Функция удаления данных ориентирована на потребителей и не соответствует государственным и отраслевым стандартам удаления данных. |
Возврат компьютера в исходное состояние с экрана входа
Если вы не можете открыть раздел «Параметры», вернуть компьютер в исходное состояние можно с экрана входа. Вот как это сделать.
-
Нажмите клавишу Windows + L, чтобы перейти на экран входа. Затем перезапустите компьютер, удерживая нажатой клавишу SHIFT и нажав кнопку Выключение > Перезагрузка .
-
Компьютер перезапустится в среде восстановления Windows (WinRE).
-
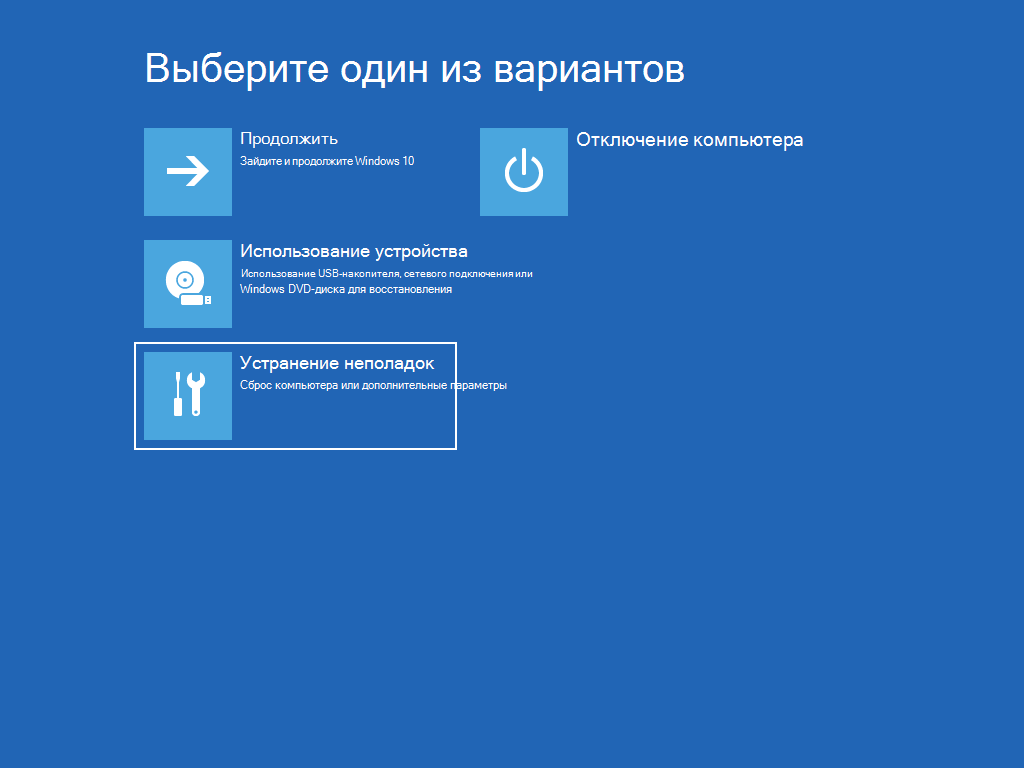
На экране Выберите вариант выберите Устранение неполадок > Вернуть этот компьютер в исходное состояние, а затем выберите один из вариантов в предыдущей таблице.
Восстановление при загрузке помогает устранить распространенные проблемы, которые могут помешать запуску Windows.
Примечание: Если вы зашифровали свое устройство, для запуска в безопасном режиме вам потребуется ключ BitLocker.
Сначала необходимо активировать среду восстановления Windows (Windows RE). Для этого вам потребуется повторно выключить устройство, затем выполнить следующие действия:
-
Нажмите кнопку питания на устройстве и удерживайте ее нажатой в течение 10 секунд, чтобы выключить устройство.
-
Снова нажмите кнопку питания, чтобы включить устройство.
-
После появления первого признака запуска Windows (например, на некоторых устройствах отображается логотип производителя при перезапуске) удерживайте нажатой кнопку питания в течение 10 секунд, чтобы отключить устройство.
-
Снова нажмите кнопку питания, чтобы включить устройство.
-
После повторной загрузки Windows удерживайте кнопку питания на устройстве нажатой в течение 10 секунд, чтобы выключить устройство.
-
Снова нажмите кнопку питания, чтобы включить устройство.
-
На этот раз дождитесь полного запуска устройства.
-
Выберите пункт Дополнительные параметры.
-
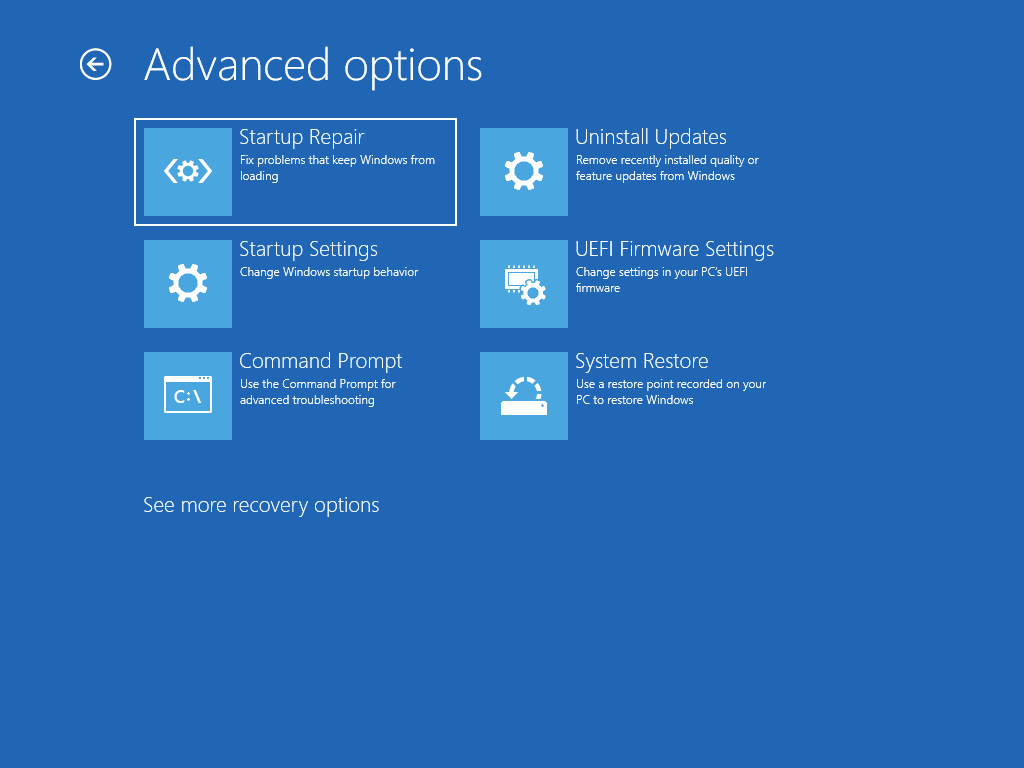
В Windows RE на экране Выбор действия нажмите Диагностика > Дополнительные параметры > Восстановление при загрузке > Перезапустить.
Важно: Если вы зашифровали свое устройство, для восстановления или возврата компьютера в исходное состояние с помощью диска восстановления потребуется ключ BitLocker. Если вы не знаете свой ключ BitLocker, см. раздел Поиск ключа восстановления BitLocker.
Если ваш компьютер не запускается, вы можете восстановить систему из контрольной точки или вернуть компьютер в исходное состояние с помощью диска восстановления. Сведения о том, как создать диск восстановления на рабочем компьютере, см. в разделе Создание диска восстановления.
Восстановление системы или возврат компьютера в исходное состояние с помощью диска восстановления:
-
Подключите диск восстановления и включите компьютер.
-
Нажмите клавишу с логотипом Windows + L, чтобы открыть экран входа, а затем перезапустите компьютер. Для этого удерживайте нажатой клавишу SHIFT и нажмите кнопку Выключение > Перезагрузка .
-
Компьютер перезапустится в среде восстановления Windows (WinRE).
-
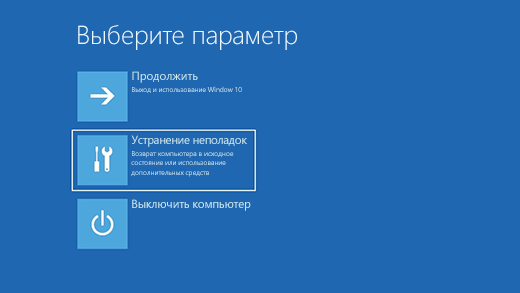
На экране Выберите вариант выберите Устранение неполадок, а затем один из следующих двух вариантов. (Если экран Выберите вариант не появляется, то на компьютере, возможно, не настроена загрузка с носителя. О том, как изменить порядок загрузки компьютера, читайте на веб-сайте изготовителя компьютера.)
-
Чтобы выполнить восстановление из точки восстановления системы, выберите пункты Дополнительные параметры > Восстановление системы. При этом не будут затронуты ваши личные файлы, но будут удалены недавно установленные приложения, драйверы и обновления, которые могут быть причиной проблем с компьютером.
-
Для переустановки Windows 11 выберите Дополнительные параметры > Восстановление с диска. При этом будут удалены все личные файлы, установленные приложения и драйверы, а также изменения, внесенные в параметры.
В течение ограниченного времени после перехода на Windows 11 вы можете вернуться к предыдущей версии Windows, выбрав Пуск > Параметры > Система > Восстановление . Рядом с пунктом Вернуться нажмите Вернуться. При этом личные файлы будут сохранены, но приложения или драйверы, установленные после обновления, а также изменения, внесенные в настройки, будут удалены. В большинстве случаев вы сможете вернуться к предыдущей версии в течение 10 дней.
Открытие параметров восстановления
Чтобы вернуться к предыдущей версии, необходимо:
-
Не удалять и не перемещать файлы в папках windows.old и $windows.~bt после обновления.
-
Удалить все учетные записи пользователей, добавленные после обновления.
-
Иметь USB-устройство, которое использовалось для обновления до Windows 11 (если такое было).
Примечания:
-
Возможность вернуться к предыдущей версии Windows доступна только в течение ограниченного времени после обновления. Этот параметр доступен в разделе Параметры .
-
Приложения, которые были добавлены, удалены или обновлены после обновления, могут быть недоступны или работать должным образом после возврата к предыдущей версии Windows.
Сведения для участников программы предварительной оценки Windows
Если вы являетесь участником программы предварительной оценки Windows и текущая предварительная сборка не работает надлежащим образом, нажмите Пуск > Параметры > Система > Восстановление . Рядом с пунктом Вернуться нажмите Вернуться. При этом личные файлы не будут удалены, но будут удалены недавно установленные приложения или драйверы и восстановлены значения настроек по умолчанию.
При возврате к предыдущей сборке вы не будете удалены из Программы предварительной оценки. Когда будет готова следующая предварительная сборка, она будет установлена на компьютере.
Этот параметр позволяет вернуть компьютер к состоянию на момент времени в прошлом, к так называемой точке восстановления системы. Точки восстановления создаются при установке новых приложений или драйверов, а также если вы вручную создаете точку восстановления. Восстановление не затронет личные файлы, но приложения, драйверы и обновления, установленные после создания точки восстановления, будут удалены.
-
В поле поиска на панели задач введите панель управления и выберите соответствующий пункт из списка результатов
-
В поле поиска на панели управления введите восстановление.
-
Выберите Восстановление > Запуск восстановления системы.
-
В окне Восстановление системных файлов и параметров нажмите кнопку Далее.
-
Выберите точку восстановления из списка результатов и нажмите Поиск затрагиваемых программ.
Примечания:
-
Если нужная точка восстановления не отображается, установите флажок Показать другие точки восстановления, чтобы увидеть больше точек восстановления.
-
Если вы не видите точек восстановления, это может означать, что защита системы не включена. Сделать это можно следующим образом:
-
В поле поиска на панели задач введите панель управления и выберите соответствующий пункт из списка результатов.
-
В поле поиска на панели управления введите восстановление.
-
Выберите Восстановление > Настройка восстановления системы > Настроить и проверьте, выбран ли параметр Включить защиту системы.
-
Если параметр Включить защиту системы не выбран, защита системы не включена, а точки восстановления отсутствуют. В таком случае вы не сможете восстановить компьютер с использованием точки восстановления системы, и вам придется воспользоваться одним из способов восстановления, указанных на этой странице.
-
Если параметр Включить защиту системы выбран, перейдите к шагу 6.
-
-
-
-
Вы увидите список элементов, которые будут удалены в случае удаления точки восстановления. Если вас все устраивает, нажмите Закрыть > Далее > Готово.
Если у вас возникли проблемы с компьютером, воспользуйтесь приведенной ниже таблицей, чтобы выбрать нужный вариант восстановления.
|
Проблема |
Раздел, который нужно просмотреть |
|---|---|
|
Компьютер работает не лучшим образом, и вы недавно установили обновление. |
Удаление установленного обновления Windows |
|
Компьютер работает не лучшим образом, и вы уже давно не устанавливали приложения или меняли параметры системы. |
Возврат компьютера в исходное состояние |
|
Компьютер не запускается или все еще загружается |
Использование функции восстановления при загрузке |
|
Компьютер не загружается, вы не создали диск восстановления, и возврат компьютера в исходное состояние не помог. |
Переустановка Windows 10 с установочного носителя |
|
Компьютер не загружается, и вы не создали диск восстановления. |
Выполните восстановление компьютера с помощью установочного носителя |
|
Компьютер не загружается, и вы создали диск восстановления. |
Восстановление компьютера с помощью диска восстановления |
|
Вы хотите повторно установить предыдущую операционную систему. |
Возврат к предыдущей версии Windows |
|
Компьютер работает не лучшим образом, и вы недавно установили приложение. |
Восстановление из точки восстановления системы |
|
Вы подозреваете, что ваше устройство заражено. |
Переустановка Windows 10 с установочного носителя |
Выберите один из следующих вариантов восстановления и следуйте инструкциям по устранению распространенных неисправностей.
Если вы недавно установили обновление Windows, удалите обновление, чтобы попытаться устранить проблему.
-
Нажмите кнопку Пуск и выберите Параметры > Обновление и безопасность > Центр обновления Windows >Просмотреть журнал обновлений > Удалить обновления.
Просмотр параметров журнала обновлений -
Щелкните правой кнопкой мыши обновление, которое необходимо удалить, а затем нажмите кнопку Удалить.
Важно:
-
Если вы зашифровали устройство, вам потребуется ключ BitLocker для сброса компьютера. Если вы не знаете свой ключ BitLocker, см. раздел Поиск ключа восстановления BitLocker.
-
Во время сброса возможно, что экран может быть черным в течение длительного периода времени (иногда до 15 минут), а устройство может попытаться перезапустить себя в течение этого периода. Попытка вручную перезапустить устройство во время этого процесса может привести к сбою сброса. Пожалуйста, будьте терпеливы!
Возврат в исходное состояние переустанавливает Windows 10, но позволяет сохранить или удалить файлы, а затем переустановить Windows. Вы можете вернуть компьютер в исходное состояние в разделе «Параметры», на экране входа, с помощью диска восстановления или установочного носителя.
Возврат компьютера в исходное состояние через раздел «Параметры»
-
Нажмите кнопку Пуск и выберите Параметры > Обновление и безопасность > Восстановление .
Открытие параметров восстановления -
В разделе Вернуть этот компьютер в исходное состояние, нажмите кнопку Начать, а затем выберите один из вариантов и/или параметров, представленных в таблице ниже.
|
Параметр |
Результат |
|---|---|
|
Сохранить файлы > Изменить параметры > Предустановленные приложения Вкл. |
|
|
Сохранить файлы > Изменить параметры > Предустановленные приложения Выкл. |
|
|
Удалить все |
Примечание. Параметр «Удалить все» > «Изменить параметры» предоставляет вам два варианта. Удаление данных Вкл. — удаление файлов и очистка диска. Если вы планируете подарить, утилизировать или продать компьютер, используйте этот вариант. Очистка диска может занять час или два, но после этого другим людям будет сложнее восстановить удаленные файлы. Удаление данных Выкл. — просто удаление файлов. Это занимает меньше времени, но также менее безопасно. |
Возврат компьютера в исходное состояние с экрана входа
Если вы не можете открыть раздел «Параметры», вернуть компьютер в исходное состояние можно с экрана входа. Вот как это сделать.
-
Нажмите клавишу с логотипом Windows + L, чтобы открыть экран входа, а затем перезапустите компьютер. Для этого удерживайте нажатой клавишу SHIFT и нажмите кнопку Выключение > Перезагрузка в нижнем правом углу экрана.
-
Компьютер перезапустится в среде восстановления Windows (WinRE).
-
На экране Выберите вариант выберите Устранение неполадок > Вернуть этот компьютер в исходное состояние, а затем выберите один из вариантов в предыдущей таблице.
Восстановление при загрузке помогает устранить распространенные проблемы, которые могут помешать запуску Windows.
Примечание: Если вы зашифровали свое устройство, для запуска в безопасном режиме вам потребуется ключ BitLocker.
Сначала необходимо активировать среду восстановления Windows (Windows RE). Для этого вам потребуется повторно выключить устройство, затем выполнить следующие действия:
-
Нажмите кнопку питания на устройстве и удерживайте ее нажатой в течение 10 секунд, чтобы выключить устройство.
-
Снова нажмите кнопку питания, чтобы включить устройство.
-
После появления первого признака запуска Windows (например, на некоторых устройствах отображается логотип производителя при перезапуске) удерживайте нажатой кнопку питания в течение 10 секунд, чтобы отключить устройство.
-
Снова нажмите кнопку питания, чтобы включить устройство.
-
После повторной загрузки Windows удерживайте кнопку питания на устройстве нажатой в течение 10 секунд, чтобы выключить устройство.
-
Снова нажмите кнопку питания, чтобы включить устройство.
-
На этот раз дождитесь полного запуска устройства.
-
Выберите пункт Дополнительные параметры.
-
В Windows RE на экране Выбор действия нажмите Диагностика > Дополнительные параметры > Восстановление при загрузке > Перезапустить.
Важно: Если вы зашифровали свое устройство, для восстановления или возврата компьютера в исходное состояние с помощью диска восстановления потребуется ключ BitLocker. Если вы не знаете свой ключ BitLocker, см. раздел Поиск ключа восстановления BitLocker.
Если ваш компьютер не запускается, вы можете восстановить систему из контрольной точки или вернуть компьютер в исходное состояние с помощью диска восстановления. Сведения о том, как создать диск восстановления на рабочем компьютере, см. в разделе Создание диска восстановления.
Восстановление системы или возврат компьютера в исходное состояние с помощью диска восстановления:
-
Подключите диск восстановления и включите компьютер.
-
Нажмите клавишу с логотипом Windows + L, чтобы открыть экран входа, а затем перезапустите компьютер. Для этого удерживайте нажатой клавишу SHIFT и нажмите кнопку Выключение > Перезагрузка в нижнем правом углу экрана.
-
Компьютер перезапустится в среде восстановления Windows (WinRE).
-
На экране Выберите вариант выберите Устранение неполадок, а затем один из следующих двух вариантов. (Если экран Выберите вариант не появляется, то на компьютере, возможно, не настроена загрузка с носителя. О том, как изменить порядок загрузки компьютера, читайте на веб-сайте изготовителя компьютера.)

-
Чтобы выполнить восстановление из точки восстановления системы, выберите пункты Дополнительные параметры > Восстановление системы. При этом не будут затронуты ваши личные файлы, но будут удалены недавно установленные приложения, драйверы и обновления, которые могут быть причиной проблем с компьютером.
-
Для переустановки Windows 10 выберите Дополнительные параметры > Восстановление с диска. При этом будут удалены все личные файлы, установленные приложения и драйверы, а также изменения, внесенные в параметры.
В течение ограниченного времени после обновления до Windows 10 можно вернуться к предыдущей версии Windows, нажав кнопку Пуск и выбрав Параметры > Обновление и безопасность > Восстановление , а затем — Начало работы в разделе Вернуться к предыдущей версии Windows 10. При этом личные файлы будут сохранены, но приложения или драйверы, установленные после обновления, а также изменения, внесенные в настройки, будут удалены. В большинстве случаев вы сможете вернуться к предыдущей версии в течение 10 дней.
Открытие параметров восстановления
Чтобы вернуться к предыдущей версии, необходимо:
-
Не удалять и не перемещать файлы в папках windows.old и $windows.~bt после обновления.
-
Удалить все учетные записи пользователей, добавленные после обновления.
-
Знать пароль для входа в Windows 7 или 8.1 (если вы его использовали).
-
Иметь USB-устройство, которое использовалось для обновления до Windows 10 (если такое было).
Примечания:
-
Возможность вернуться к предыдущей версии Windows доступна только в течение ограниченного времени после обновления. Этот параметр доступен в разделе Параметры.
-
Возможно, после возврата к Windows 8.1 некоторые приложения, которые входили в состав Windows, например «Почта» и «Люди», больше не будут работать. Чтобы исправить это, переустановите эти приложения из Microsoft Store.
-
Приложения, которые были добавлены, удалены или обновлены после обновления, могут быть недоступны или работать должным образом после возврата к предыдущей версии Windows.
Сведения для участников программы предварительной оценки Windows
Если вы участник программы предварительной оценки и текущая предварительная сборка работает не лучшим образом, нажмите кнопку Пуск и выберите Параметры > Обновление и безопасность > Восстановление . В разделе Вернуться к предыдущей версии Windows 10 нажмите Начать. При этом личные файлы не будут удалены, но будут удалены недавно установленные приложения или драйверы и восстановлены значения настроек по умолчанию.
При возврате к предыдущей сборке вы не будете удалены из Программы предварительной оценки. Когда будет готова следующая предварительная сборка, она будет установлена на компьютере.
Этот параметр позволяет вернуть компьютер к состоянию на момент времени в прошлом, к так называемой точке восстановления системы. Точки восстановления создаются при установке новых приложений или драйверов, а также если вы вручную создаете точку восстановления. Восстановление не затронет личные файлы, но приложения, драйверы и обновления, установленные после создания точки восстановления, будут удалены.
-
В поле поиска на панели задач введите панель управления и выберите соответствующий пункт из списка результатов
-
В поле поиска на панели управления введите восстановление.
-
Выберите Восстановление > Запуск восстановления системы.
-
В окне Восстановление системных файлов и параметров нажмите кнопку Далее.
-
Выберите точку восстановления из списка результатов и нажмите Поиск затрагиваемых программ.
Примечания:
-
Если нужная точка восстановления не отображается, установите флажок Показать другие точки восстановления, чтобы увидеть больше точек восстановления.
-
Если вы не видите точек восстановления, это может означать, что защита системы не включена. Сделать это можно следующим образом:
-
В поле поиска на панели задач введите панель управления и выберите соответствующий пункт из списка результатов.
-
В поле поиска на панели управления введите восстановление.
-
Выберите Восстановление > Настройка восстановления системы > Настроить и проверьте, выбран ли параметр Включить защиту системы.
-
Если параметр Включить защиту системы не выбран, защита системы не включена, а точки восстановления отсутствуют. В таком случае вы не сможете восстановить компьютер с использованием точки восстановления системы, и вам придется воспользоваться одним из способов восстановления, указанных на этой странице.
-
Если параметр Включить защиту системы выбран, перейдите к шагу 6.
-
-
-
-
Вы увидите список элементов, которые будут удалены в случае удаления точки восстановления. Если вас все устраивает, нажмите Закрыть > Далее > Готово.
Если у вас возникают проблемы с компьютером, вы можете устранить их следующим образом.
-
Восстановите компьютер, чтобы переустановить Windows и сохранить свои личные файлы и параметры. Также сохраняются приложения, которые были на компьютере изначально, и приложения, установленные из Microsoft Store.
-
Верните компьютер в исходное состояние, чтобы переустановить Windows, но удалить ваши файлы, параметры и приложения — за исключением тех, которые были на компьютере изначально.
-
Восстановите компьютер, чтобы отменить недавние изменения в системе.
Если возникают проблемы при запуске (загрузке) компьютера, см. раздел Параметры запуска Windows (включая безопасный режим) и перейдите в раздел «Открытие окна «Параметры скачивания Windows» в среде восстановления Windows». Обновить, вернуть в исходное состояние или восстановить компьютер можно из среды восстановления Windows.
Если вы хотите создать резервную копию и восстановить личные файлы, см. статью Резервное копирование компьютера с Windows.
Перед обновлением компьютера или его возвратом в исходное состояние
В большинстве случаев запущенные обновление компьютера или его возврат в исходное состояние завершаются автоматически. Однако если Windows потребуются отсутствующие файлы, вам будет предложено вставить носитель для восстановления системы. Обычно это DVD-диск или флэш-накопитель. В этом случае необходимые действия зависят от модели вашего компьютера.
Если компьютер поставлялся с Windows 8.1 или Windows RT 8.1, вам понадобится диск или флэш-накопитель, который входил в комплект поставки. Чтобы узнать, предоставил ли изготовитель вашего компьютера такие диски или иные носители, обратитесь к документации компьютера. В некоторых случаях носители создаются при первоначальной настройке компьютера.
Если у вас нет ни одного из указанных выше носителей, можно создать их при наличии USB-накопителя емкостью от 16 ГБ. Наличие диска для восстановления поможет устранять неполадки и решать проблемы с компьютером, даже если он не запускается. Дополнительные сведения см. в разделе Создание USB-диска восстановления.
Если вы обновили компьютер до Windows 8.1 или Windows RT 8.1 с помощью DVD-диска, используйте этот диск. Если у вас нет носителя с Windows 8.1 или Windows RT 8.1, обратитесь в службу поддержки Майкрософт.
Обновление, возврат в исходное состояние и восстановление
Выберите любой из указанных ниже вариантов для получения дополнительных сведений.
Если производительность компьютера снизилась и вы не знаете причины, можно восстановить его, сохранив все личные файлы и параметры.
Примечание: Если вы обновили компьютер с Windows 8 до Windows 8.1 и на вашем компьютере есть раздел восстановления Windows 8, восстановление компьютера приведет к восстановлению Windows 8. Вам будет необходимо установить версию Windows 8.1 после завершения обновления.
Предупреждение: Приложения, которые вы установили с веб-сайтов и DVD-дисков, будут удалены. Приложения, которые присутствовали на компьютере изначально или были установлены из Microsoft Store, будут переустановлены. После восстановления компьютера Windows сохранит список всех удаленных приложений на рабочем столе.
Восстановление компьютера
-
Проведите пальцем от правого края экрана и нажмите кнопку Параметры, а затем выберите пункт Изменение параметров компьютера.
(Если вы пользуетесь мышью, переместите указатель в правый нижний угол экрана, затем вверх и нажмите Параметры, а затем выберите Изменение параметров компьютера.) -
Выберите или нажмите элемент Обновление и восстановление, а затем — Восстановление.
-
В разделе Восстановление компьютера без удаления файлов выберите или нажмите кнопку Начать.
-
Следуйте указаниям на экране.
Если вы намерены отправить компьютер на переработку, отдать его кому-то или просто начать все заново, можно полностью вернуть его в исходное состояние. Это действие удалит все данные и переустановит Windows.
Примечание: Если вы обновили компьютер с Windows 8 до Windows 8.1 и на вашем компьютере есть раздел восстановления Windows 8, возврат компьютера в исходное состояние приведет к восстановлению Windows 8. Вам будет необходимо установить версию Windows 8.1 после завершения восстановления.
Предупреждение: Все ваши личные файлы и параметры будут потеряны. Все установленные вами приложения будут удалены. Переустановлены будут только приложения, которые были на компьютере изначально.
Возврат компьютера в исходное состояние
-
Проведите пальцем от правого края экрана и нажмите кнопку Параметры, а затем выберите пункт Изменение параметров компьютера.
(Если вы используете мышь, переместите указатель в правый верхний угол экрана, затем вниз и щелкните сначала Параметры, а затем Изменение параметров компьютера.) -
Выберите или нажмите элемент Обновление и восстановление, а затем — Восстановление.
-
В разделе Удаление всех данных и переустановка Windows выберите или нажмите Начать.
-
Следуйте указаниям на экране.
Примечание: Вам будет предложено выбрать между быстрой и полной очисткой данных. После быстрой очистки некоторые данные можно восстановить с помощью специального ПО. Полная очистка занимает больше времени, но восстановление данных после этого менее вероятно.
Если вы считаете, что причиной проблем с компьютером является недавно установленное приложение или драйвер, вы можете восстановить ранее сохраненное состояние Windows, называемое точкой восстановления. Средство восстановления системы не изменяет ваши личные файлы, но может удалить недавно установленные приложения и драйверы.
Примечания:
-
Восстановление системы недоступно для Windows RT 8.1.
-
Windows автоматически создает точку восстановления, когда устанавливаются классические приложения и новые обновления Windows, если последняя точка восстановления создавалась ранее чем 7 дней назад. Точку восстановления также можно создать вручную в любой момент времени.
Восстановление ранее сохраненного состояния компьютера
-
Выполните прокрутку от правого края экрана и нажмите кнопку Поиск.
(Если вы используете мышь, наведите указатель на правый верхний угол экрана, переместите указатель вниз, а затем выберите Поиск.) -
В поле поиска введите Панель управления, а затем выберите или нажмите Панель управления.
-
Введите восстановление в поле поиска на панели управления и выберите или нажмите Восстановление.
-
Выберите или нажмите кнопку Запуск восстановления системы и следуйте инструкциям.
Если вам нужна дополнительная справка по обновлению, восстановлению или возврату компьютера в исходное состояние, просмотрите страницы сообщества об исправлении и восстановлении на форуме Windows. Там вы сможете узнать о решениях, которые нашли другие пользователи, столкнувшись с похожими проблемами.
Нужна дополнительная помощь?
Нужны дополнительные параметры?
Изучите преимущества подписки, просмотрите учебные курсы, узнайте, как защитить свое устройство и т. д.
В сообществах можно задавать вопросы и отвечать на них, отправлять отзывы и консультироваться с экспертами разных профилей.
Найдите решения распространенных проблем или получите помощь от агента поддержки.
If you’re having problems with your PC, the following table can help you decide which recovery option to use.
|
Problem |
See this section |
|---|---|
|
Your PC isn’t working well and you recently installed an update |
Remove an installed Windows update |
|
Your PC isn’t working well and it’s been a while since you installed an app or changed system settings |
Reset your PC |
|
Your PC won’t start or is still loading |
Use the Startup Repair function |
|
Your PC won’t start, you haven’t created a recovery drive, and resetting your PC didn’t work |
Use installation media to reinstall Windows 11 |
|
Your PC won’t start and you haven’t created a recovery drive |
Use installation media to restore your PC |
|
Your PC won’t start and you’ve created a recovery drive |
Use a recovery drive to restore or recover your PC |
|
You want to reinstall your previous operating system |
Go back to your previous version of Windows |
|
Your PC isn’t working well and you recently installed an app |
Restore from a system restore point |
|
You suspect your device has been infected |
Use installation media to reinstall Windows 11 |
Click one of the recovery options below and follow the steps to try to get things working again.
If you’ve recently installed a Windows update, uninstall the update to try to resolve the issue.
-
Select Start > Settings > Windows Update > Update history > Uninstall updates .
View update history -
On the list that appears, select update you want to remove, and then select Uninstall.
Important:
-
If you’ve encrypted your device, you’ll need your BitLocker key to reset your PC. If you don’t know your BitLocker key, see Find my BitLocker recovery key.
-
During the resetting process, it is possible that your screen may go black for a long period of time (occasionally upwards of 15 minutes) and that your device may attempt to restart itself during this period. Manually attempting to restart the device yourself during this process could cause the reset to fail. Please be patient!
Resetting reinstalls Windows 11, but lets you choose whether to keep your files or remove them, and then reinstalls Windows. You can reset your PC from Settings, the sign-in screen, or by using a recovery drive or installation media.
Reset your PC from Settings
-
Select Start > Settings > System > Recovery .
Open Recovery settings -
Next to Reset this PC , select Reset PC. Then choose from the options and/or settings in the table below.
|
Option |
What it does |
|---|---|
|
Keep my files > Change settings > Preinstalled apps On |
|
|
Keep my files > Change settings > Preinstalled apps Off |
|
|
Remove everything |
Note: Data erasure On removes files and cleans the drive. If you’re planning to donate, recycle, or sell your PC, use this option. This might take an hour or two, but it makes it harder for other people to recover files you’ve removed. Data erasure Off just removes files. It takes less time, but is less secure. The data erasure functionality is targeted at consumers and does not meet government and industry data erasure standards. |
Reset your PC from the sign-in screen
If you can’t open Settings, you can reset your PC from the sign-in screen. Here’s how:
-
Press Windows logo key + L to get to the sign-in screen. Then restart your PC by pressing the Shift key while you select the Power button > Restart .
-
Your PC will restart in the Windows Recovery Environment (WinRE) environment.
-
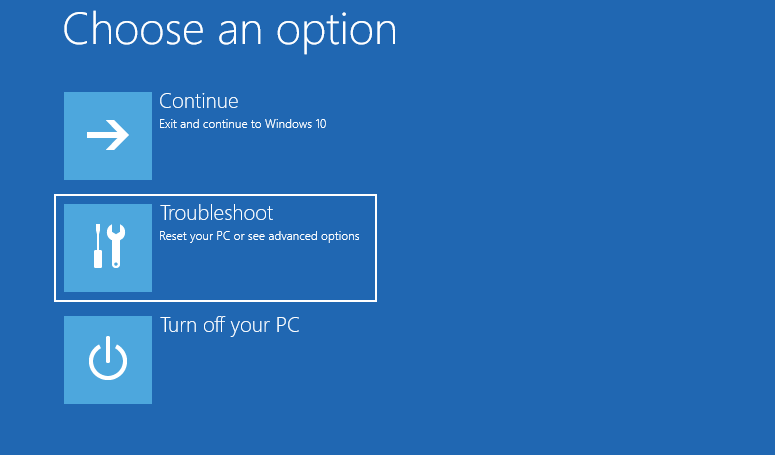
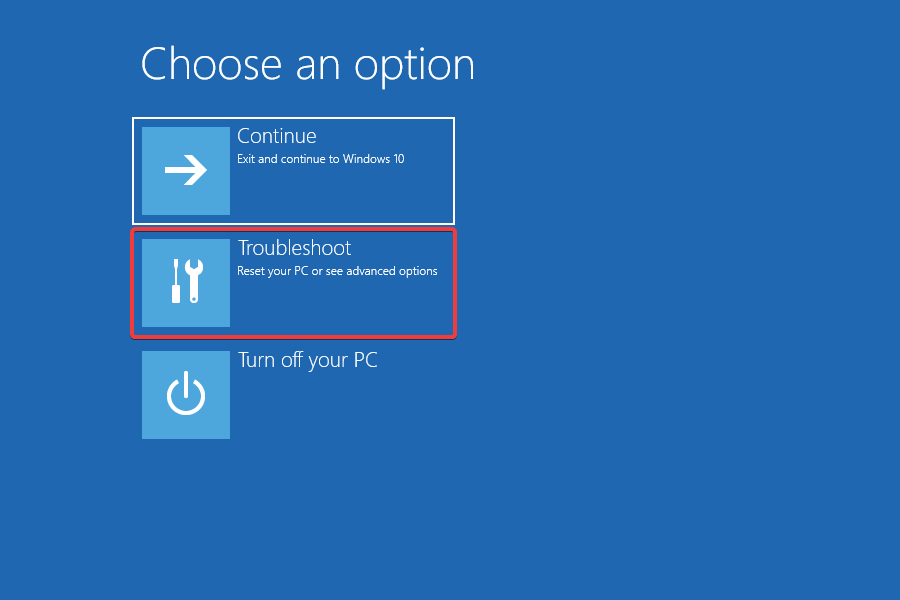
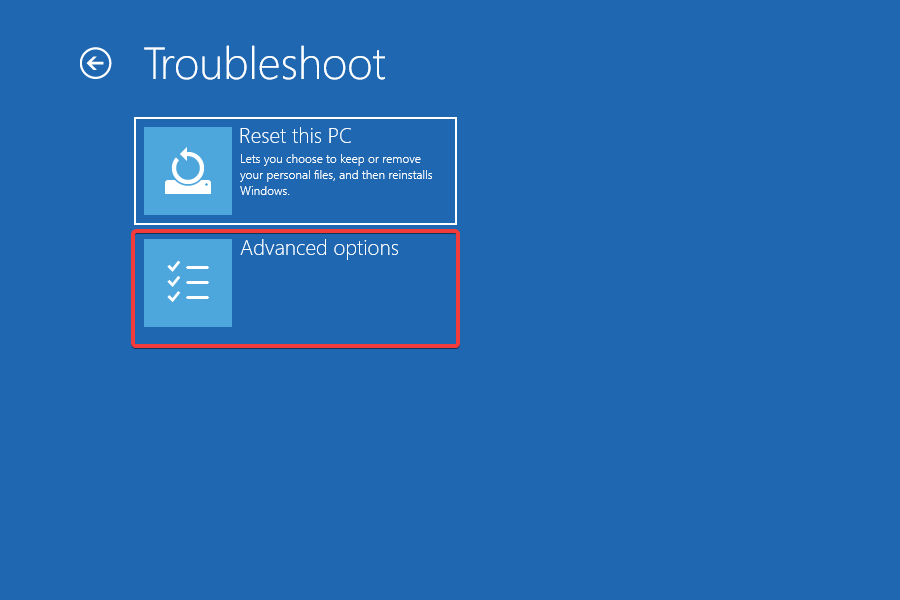
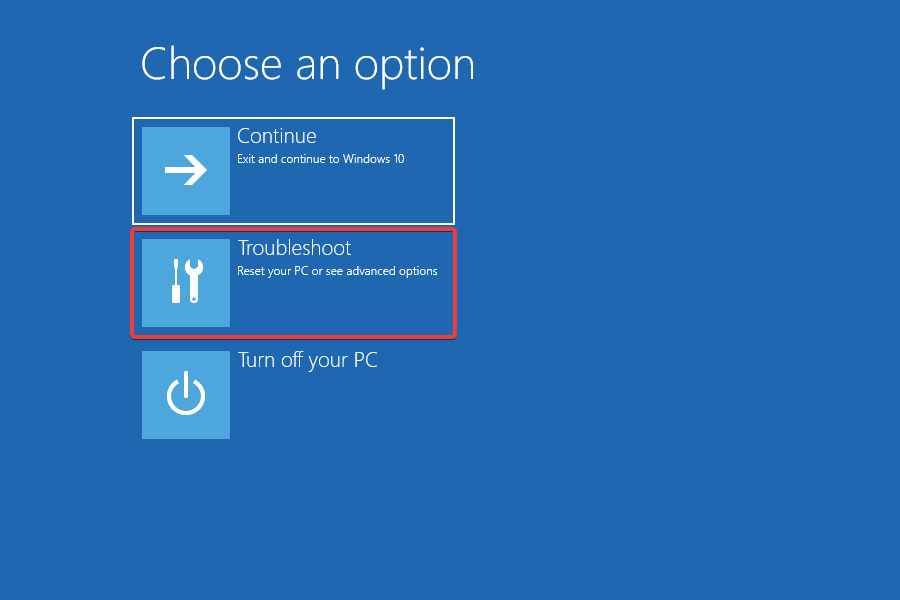
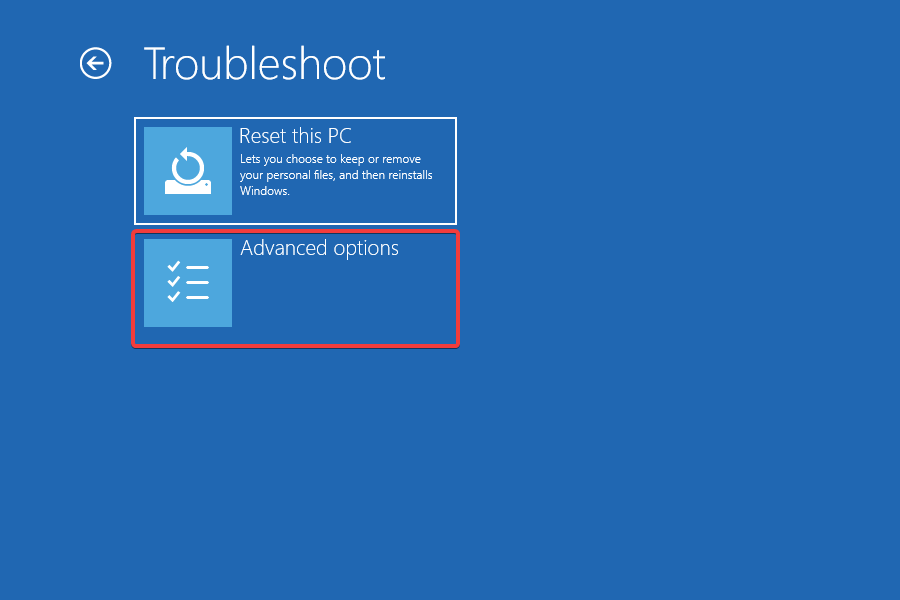
On the Choose an option screen, select Troubleshoot > Reset this PC, and then choose one of the options in the previous table.
Startup Repair helps you fix common problems that can prevent Windows from starting up.
Note: If you’ve encrypted your device, you’ll need your BitLocker key to start in safe mode.
First, you need to enter the Windows Recovery Environment (winRE). To do this, you will repeatedly turn your device off, then on:
-
Hold down the power button for 10 seconds to turn off your device.
-
Press the power button again to turn on your device.
-
On the first sign that Windows has started (for example, some devices show the manufacturer’s logo when restarting) hold down the power button for 10 seconds to turn off your device.
-
Press the power button again to turn on your device.
-
When Windows starts again, hold down the power button for 10 seconds to turn off your device.
-
Press the power button again to turn on your device.
-
This time, allow your device to fully start up.
-
Select Advanced options.
-
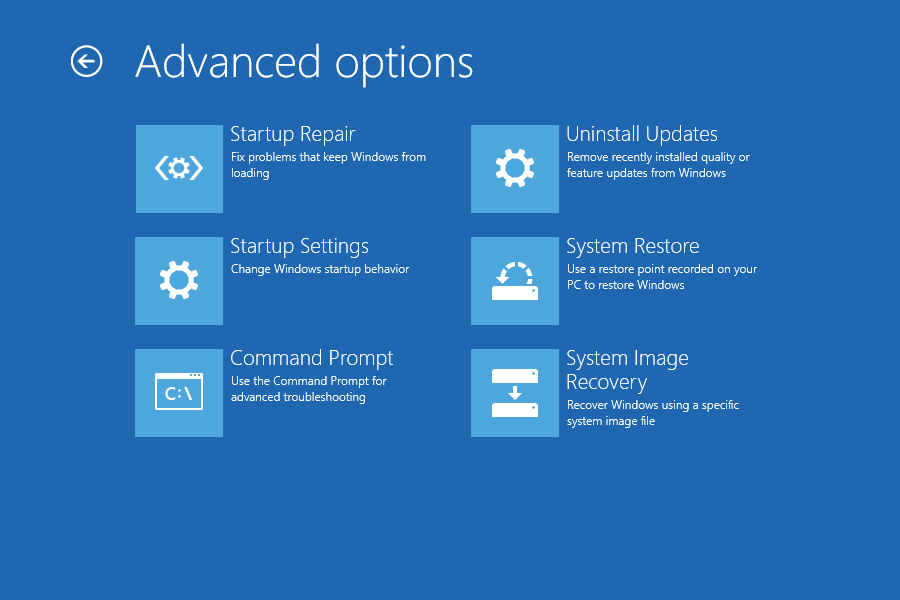
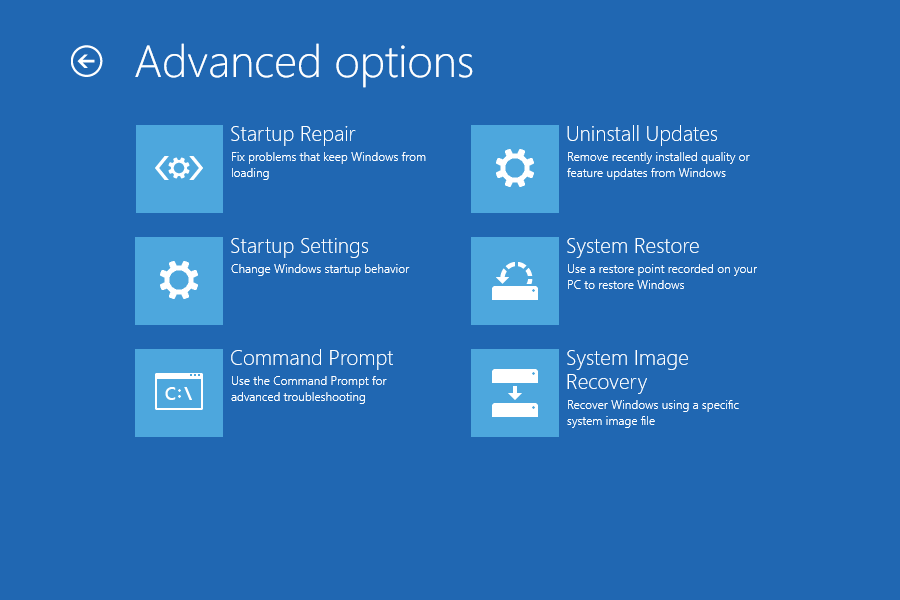
Now that you’re in winRE, on the Choose an option screen, select Troubleshoot > Advanced options > Startup Repair > Restart.
Important: If you’ve encrypted your device, you’ll need your BitLocker key to use a recovery drive to restore or reset your PC If you don’t know your BitLocker key, see Find my BitLocker recovery key.
If your PC won’t start, you can use a recovery drive to restore from a system restore point or recover your PC. For info on how to create a recovery drive on a working PC, see Create a recovery drive.
To restore or recover using the recovery drive:
-
Connect the recovery drive and turn on your PC.
-
Press Windows logo key + L to get to the sign-in screen, and then restart your PC by pressing the Shift key while you select the Power button > Restart .
-
Your PC will restart in the Windows Recovery Environment (WinRE) environment.
-
On the Choose an option screen, select Troubleshoot, and then select one of the following two options. (If you don’t see the Choose your option screen, your PC might not be set up to boot from a drive. Check your PC manufacturer’s website for info on how to change your PC’s boot order.)

-
To restore from a system restore point, select Advanced Options > System Restore. This won’t affect your personal files, but it will remove recently installed apps, drivers, and updates that might be causing your PC problems.
-
To reinstall Windows 11, select Advanced Options > Recover from a drive. This will remove your personal files, apps and drivers you installed, and changes you made to settings.
For a limited time after upgrading to Windows 11, you’ll be able to go back to your previous version of Windows by selecting Start > Settings > System > Recovery . Next to Go back , select Go back. This will keep your personal files, but it’ll remove apps and drivers installed after the upgrade, as well as any changes you made to settings. In most cases, you’ll have 10 days to go back.
Open Recovery settings
To go back, you’ll need to:
-
Keep everything in the windows.old and $windows.~bt folders after the upgrade.
-
Remove any user accounts you added after the upgrade.
-
Have the USB drive you used to upgrade to Windows 11 (if you used one).
Notes:
-
The option in Settings to go back to your previous version of Windows is only available for a limited time after upgrading.
-
Apps that have been added, removed, or updated after the upgrade might not be available or function properly after going back to the previous version of Windows.
Info for Windows Insiders
If you’re an Insider and the current preview build isn’t working for you, select Start > Settings > System > Recovery . Next to Go back , select Go back. This won’t remove your personal files, but it’ll remove recently installed apps and drivers, and change settings back to their defaults.
Going back to an earlier build won’t remove you from the Insider Program. When the next preview build is ready, it’ll be installed on your PC.
This option takes your PC back to an earlier point in time, called a system restore point. Restore points are generated when you install a new app or driver, and when you create a restore point manually. Restoring won’t affect your personal files, but it will remove apps, drivers, and updates installed after the restore point was made.
-
In the search box on the taskbar, type control panel, and then choose it from the list of results
-
In the Control Panel search box, type recovery.
-
Select Recovery > Open System Restore.
-
In the Restore system files and settings box, select Next.
-
Select the restore point that you want to use in the list of results, and then select Scan for affected programs.
Notes:
-
If you don’t see the restore point that you want to use, select the Show more restore points check box to see more restore points.
-
If you’re not seeing any restore points, it might be because system protection isn’t turned on. Here’s how to check:
-
In the search box on the taskbar, type control panel, and then choose it from the list of results.
-
In the Control Panel search box, type recovery.
-
Select Recovery > Configure System Restore > Configure and see if the Turn on system protection option is selected.
-
If the Turn on system protection option is not selected, system protection isn’t turned on and there aren’t any restore points. In this scenario, you won’t be able to recovery your PC using a system restore point and will need to use one of the other recovery options listed on this page.
-
If the Turn on system protection option is selected, continue with step 6.
-
-
-
-
You’ll see a list of items that will be deleted if you remove this restore point. If you’re OK with the deletions, select Close > Next > Finish.
If you’re having problems with your PC, the following table can help you decide which recovery option to use.
|
Problem |
See this section |
|---|---|
|
Your PC isn’t working well and you recently installed an update. |
Remove an installed Windows update |
|
Your PC isn’t working well and it’s been a while since you installed an app or changed system settings. |
Reset your PC |
|
Your PC won’t start or is still loading |
Use the Startup Repair function |
|
Your PC won’t start, you haven’t created a recovery drive, and resetting your PC didn’t work. |
Use installation media to reinstall Windows 10 |
|
Your PC won’t start and you haven’t created a recovery drive. |
Use installation media to restore your PC |
|
Your PC won’t start and you’ve created a recovery drive. |
Use a recovery drive to restore or recover your PC |
|
You want to reinstall your previous operating system. |
Go back to your previous version of Windows |
|
Your PC isn’t working well and you recently installed an app. |
Restore from a system restore point |
|
You suspect your device has been infected. |
Use installation media to reinstall Windows 10 |
Click one of the recovery options below and follow the steps to try to get things working again.
If you’ve recently installed a Windows update, uninstall the update to try to resolve the issue.
-
Select the Start button, then select Settings > Update & Security > Windows Update > View your update history > Uninstall updates.
View update history settings -
Right-click the update you want to remove, and then select Uninstall.
Important:
-
If you’ve encrypted your device, you’ll need your BitLocker key to reset your PC. If you don’t know your BitLocker key, see Find my BitLocker recovery key.
-
During the resetting process, it is possible that your screen may go black for a long period of time (occasionally upwards of 15 minutes) and that your device may attempt to restart itself during this period. Manually attempting to restart the device yourself during this process could cause the reset to fail. Please be patient!
Resetting reinstalls Windows 10, but lets you choose whether to keep your files or remove them, and then reinstalls Windows. You can reset your PC from Settings, the sign-in screen, or by using a recovery drive or installation media.
Reset your PC from Settings
-
Select the Start button, then select Settings > Update & Security > Recovery .
Open Recovery settings -
Under Reset this PC, select Get started and then choose from the options and/or settings in the table below.
|
Option |
What it does |
|---|---|
|
Keep my files > Change settings > Preinstalled apps On |
|
|
Keep my files > Change settings > Preinstalled apps Off |
|
|
Remove everything |
Note: Remove everything > Change settings gives you two options. Data erasure On removes files and cleans the drive. If you’re planning to donate, recycle, or sell your PC, use this option. This might take an hour or two, but it makes it harder for other people to recover files you’ve removed. Data erasure Off just removes files. It takes less time, but is less secure. |
Reset your PC from the sign-in screen
If you can’t open Settings, you can reset your PC from the sign-in screen. Here’s how:
-
Press Windows logo key + L to get to the sign-in screen, and then restart your PC by pressing the Shift key while you select the Power button > Restart in the lower-right corner of the screen.
-
Your PC will restart in the Windows Recovery Environment (WinRE) environment.
-
On the Choose an option screen, select Troubleshoot > Reset this PC, and then choose one of the options in the previous table.
Startup Repair helps you fix common problems that can prevent Windows from starting up.
Note: If you’ve encrypted your device, you’ll need your BitLocker key to start in safe mode.
First, you need to enter the Windows Recovery Environment (winRE). To do this, you will repeatedly turn your device off, then on:
-
Hold down the power button for 10 seconds to turn off your device.
-
Press the power button again to turn on your device.
-
On the first sign that Windows has started (for example, some devices show the manufacturer’s logo when restarting) hold down the power button for 10 seconds to turn off your device.
-
Press the power button again to turn on your device.
-
When Windows starts again, hold down the power button for 10 seconds to turn off your device.
-
Press the power button again to turn on your device.
-
This time, allow your device to fully start up.
-
Select Advanced options.
-
Now that you’re in winRE, on the Choose an option screen, select Troubleshoot > Advanced options > Startup Repair > Restart.
Important: If you’ve encrypted your device, you’ll need your BitLocker key to use a recovery drive to restore or reset your PC If you don’t know your BitLocker key, see Find my BitLocker recovery key.
If your PC won’t start, you can use a recovery drive to restore from a system restore point or recover your PC. For info on how to create a recovery drive on a working PC, see Create a recovery drive.
To restore or recover using the recovery drive:
-
Connect the recovery drive and turn on your PC.
-
Press Windows logo key + L to get to the sign-in screen, and then restart your PC by pressing the Shift key while you select the Power button> Restart in the lower-right corner of the screen.
-
Your PC will restart in the Windows Recovery Environment (WinRE) environment.
-
On the Choose an option screen, select Troubleshoot, and then select one of the following two options. (If you don’t see the Choose your option screen, your PC might not be set up to boot from a drive. Check your PC manufacturer’s website for info on how to change your PC’s boot order.)

-
To restore from a system restore point, select Advanced Options > System Restore. This won’t affect your personal files, but it will remove recently installed apps, drivers, and updates that might be causing your PC problems.
-
To reinstall Windows 10, select Advanced Options > Recover from a drive. This will remove your personal files, apps and drivers you installed, and changes you made to settings.
For a limited time after upgrading to Windows 10, you’ll be able to go back to your previous version of Windows by selecting the Start button, then select Settings > Update & Security > Recovery and then selecting Get started under Go back to the previous version of Windows 10. This will keep your personal files, but it’ll remove apps and drivers installed after the upgrade, as well as any changes you made to settings. In most cases, you’ll have 10 days to go back.
Open Recovery settings
To go back, you’ll need to:
-
Keep everything in the windows.old and $windows.~bt folders after the upgrade.
-
Remove any user accounts you added after the upgrade.
-
Know the password you used to sign in to Windows 7 or Windows 8.1 (if you used one).
-
Have the USB drive you used to upgrade to Windows 10 (if you used one).
Notes:
-
The option in Settings to go back to your previous version of Windows is only available for a limited time after upgrading.
-
If you go back to Windows 8.1, some apps that came with Windows, like Mail and People, might not work anymore. To fix the apps, reinstall them from the Microsoft Store.
-
Apps that have been added, removed, or updated after the upgrade might not be available or function properly after going back to the previous version of Windows.
Info for Windows Insiders
If you’re an Insider and the current preview build isn’t working for you, select the Start button, then select Settings > Update & Security > Recovery . Under Go back to the previous version of Windows 10, select Get Started. This won’t remove your personal files, but it’ll remove recently installed apps and drivers, and change settings back to their defaults.
Going back to an earlier build won’t remove you from the Insider Program. When the next preview build is ready, it’ll be installed on your PC.
This option takes your PC back to an earlier point in time, called a system restore point. Restore points are generated when you install a new app or driver, and when you create a restore point manually. Restoring won’t affect your personal files, but it will remove apps, drivers, and updates installed after the restore point was made.
-
In the search box on the taskbar, type control panel, and then choose it from the list of results
-
In the Control Panel search box, type recovery.
-
Select Recovery > Open System Restore.
-
In the Restore system files and setting box, select Next.
-
Select the restore point that you want to use in the list of results, and then select Scan for affected programs.
Notes:
-
If you don’t see the restore point that you want to use, select the Show more restore points check box to see more restore points.
-
If you’re not seeing any restore points, it might be because system protection isn’t turned on. Here’s how to check:
-
In the search box on the taskbar, type control panel, and then choose it from the list of results.
-
In the Control Panel search box, type recovery.
-
Select Recovery > Configure System Restore > Configure and see if the Turn on system protection option is selected.
-
If the Turn on system protection option is not selected, system protection isn’t turned on and there aren’t any restore points. In this scenario, you won’t be able to recovery your PC using a system restore point and will need to use one of the other recovery options listed on this page.
-
If the Turn on system protection option is selected, continue with step 6.
-
-
-
-
You’ll see a list of items that will be deleted if you remove this restore point. If you’re OK with the deletions, select Close > Next > Finish.
If you’re having problems with your PC, you can:
-
Refresh your PC to reinstall Windows and keep your personal files and settings. Refresh also keeps the apps that came with your PC and the apps you installed from the Microsoft Store.
-
Reset your PC to reinstall Windows but delete your files, settings, and apps—except for the apps that came with your PC.
-
Restore your PC to undo recent system changes you’ve made.
If you’re having trouble starting (booting) your PC, see Windows Startup Settings (including safe mode), and go to the “Get to Windows Startup Settings in the Windows Recovery Environment” section. You can refresh, reset, or restore your PC from the Windows Recovery Environment.
If you want to back up and restore your personal files, see Back up your Windows PC.
Before you start to refresh or reset your PC
In most cases, once you start to refresh or reset your PC, it’ll finish on its own. However, if Windows needs missing files, you’ll be asked to insert recovery media, which is typically on a DVD disc or thumb drive. If that happens, what you’ll need depends on your PC.
If your PC came with Windows 8.1 or Windows RT 8.1, you’ll need the discs or thumb drive that came with your PC. Check the info that came with your PC to see if your PC manufacturer provided these discs or media. In some cases, you might have created them when you first set up your PC.
If you don’t have either of those, you can make them if you have a USB thumb drive of 16 GB or larger. Having a recovery drive can help you troubleshoot and fix problems with your PC, even if it won’t start. For more info, see Create a USB recovery drive.
If you upgraded your PC to Windows 8.1 or Windows RT 8.1 with a DVD, use that disc. If you don’t have Windows 8.1 or Windows RT 8.1 media, contact Microsoft Support.
Refresh, reset, or restore
Select any of the following for more detailed info.
If your PC isn’t performing as well as it once did, and you don’t know why, you can refresh your PC without deleting any of your personal files or changing your settings.
Note: If you upgraded your PC from Windows 8 to Windows 8.1 and your PC has a Windows 8 recovery partition, refreshing your PC will restore Windows 8. You’ll need to upgrade to Windows 8.1 after the refresh has finished.
Warning: Apps you installed from websites and DVDs will be removed. Apps that came with your PC and apps you installed from Microsoft Store will be reinstalled. Windows puts a list of removed apps on your desktop after refreshing your PC.
To refresh your PC
-
Swipe in from the right edge of the screen, tap Settings, and then tap Change PC settings.
(If you’re using a mouse, point to the upper-right corner of the screen, move the mouse pointer down, select Settings, and then select Change PC settings.) -
Tap or select Update and recovery, and then tap or select Recovery.
-
Under Refresh your PC without affecting your files, tap or select Get started.
-
Follow the instructions on the screen.
If you want to recycle your PC, give it away, or start over with it, you can reset it completely. This removes everything and reinstalls Windows.
Note: If you upgraded your PC from Windows 8 to Windows 8.1 and your PC has a Windows 8 recovery partition, resetting your PC will restore Windows 8. You’ll need to upgrade to Windows 8.1 after the reset has finished.
Warning: All of your personal files will be deleted and your settings will be reset. All apps that you installed will be removed. Only apps that came with your PC will be reinstalled.
To reset your PC
-
Swipe in from the right edge of the screen, tap Settings, and then tap Change PC settings.
(If you’re using a mouse, point to the upper-right corner of the screen, move the mouse pointer down, select Settings, and then select Change PC settings.) -
Tap or select Update and recovery, and then tap or select Recovery.
-
Under Remove everything and reinstall Windows, tap or select Get started.
-
Follow the instructions on the screen.
Note: You’ll be asked to choose whether you want to erase data quickly or thoroughly. If you choose to erase data quickly, some data might be recoverable using special software. If you choose to erase data thoroughly, this will take longer but it makes recovering data less likely.
If you think an app or driver that you recently installed caused problems with your PC, you can restore Windows back to an earlier point in time, called a restore point. System Restore doesn’t change your personal files, but it might remove recently installed apps and drivers.
Notes:
-
System Restore isn’t available for Windows RT 8.1.
-
Windows automatically creates a restore point when you install desktop apps and new Windows updates, if the last restore point is older than 7 days. You can also create a restore point manually at any time.
To restore your PC to an earlier point in time
-
Swipe in from the right edge of the screen, and then tap Search.
(If you’re using a mouse, point to the upper-right corner of the screen, move the mouse pointer down, and then select Search.) -
Enter Control Panel in the search box, and tap or select Control Panel.
-
Enter Recovery in the Control Panel search box, and then tap or select Recovery.
-
Tap or select Open System Restore and then follow the instructions.
If you need additional help refreshing, resetting, or restoring your PC, check out the Repair and Recovery community pages in the Windows forum for solutions that other people have found for problems they’ve experienced.
Need more help?
Want more options?
Explore subscription benefits, browse training courses, learn how to secure your device, and more.
Communities help you ask and answer questions, give feedback, and hear from experts with rich knowledge.
Find solutions to common problems or get help from a support agent.
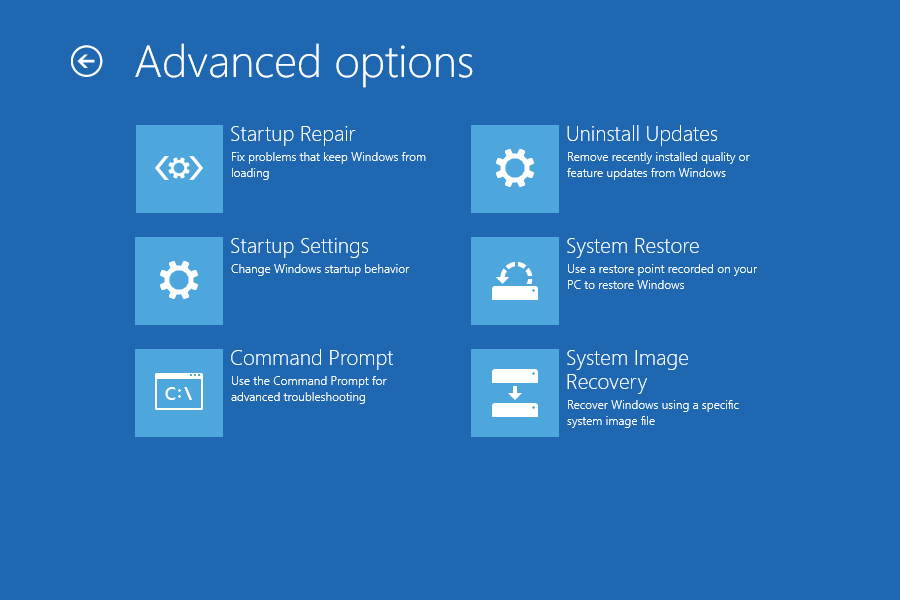
This post illustrates the usage of seven common recovery options in Windows 10: Startup Repair, Command Prompt, System Image Recovery, Go back to the previous version, System Restore, Reset this PC, and Uninstall update. It makes users fix computer problem easily.
About Windows Recovery Environment
If you recently installed an app, drive, or update in Windows 10, you possibly encounter computer problems such as black screen, blue screen, or other issues. Then, you need to repair it with Windows 10 recovery options.
Most of these options are tools in Windows Recovery Environment (WinRE), which can repair common causes of unbootable operating systems. Then, how to enter Windows Recovery Environment? We need consider two situations.
Situation One: How to Enter WinRE if You Can Enter Windows 10
In this situation, your computer can boot normally and enter Windows 10 operation interface. Here is a tutorial for it.
Step 1: Click the Start button and then select Settings.
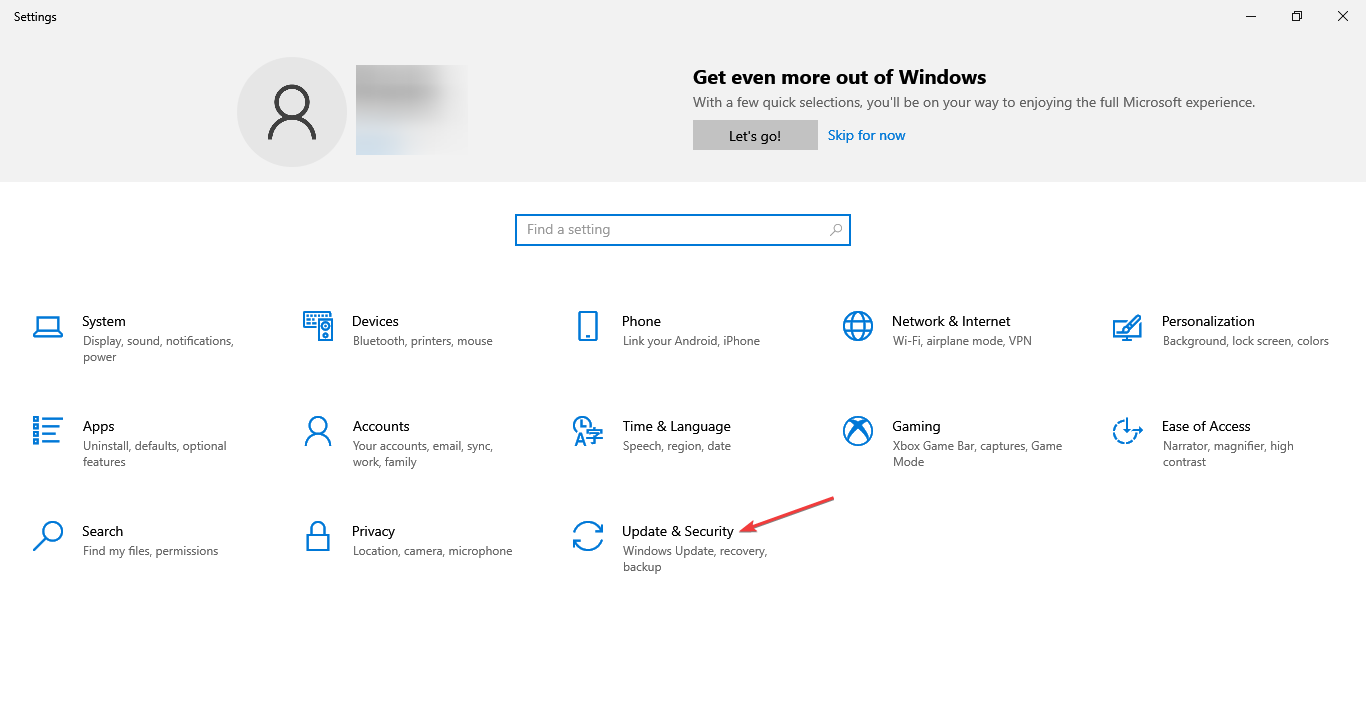
Step 2: Scroll down to the bottom of the pop-up interface and then select Update & Security.
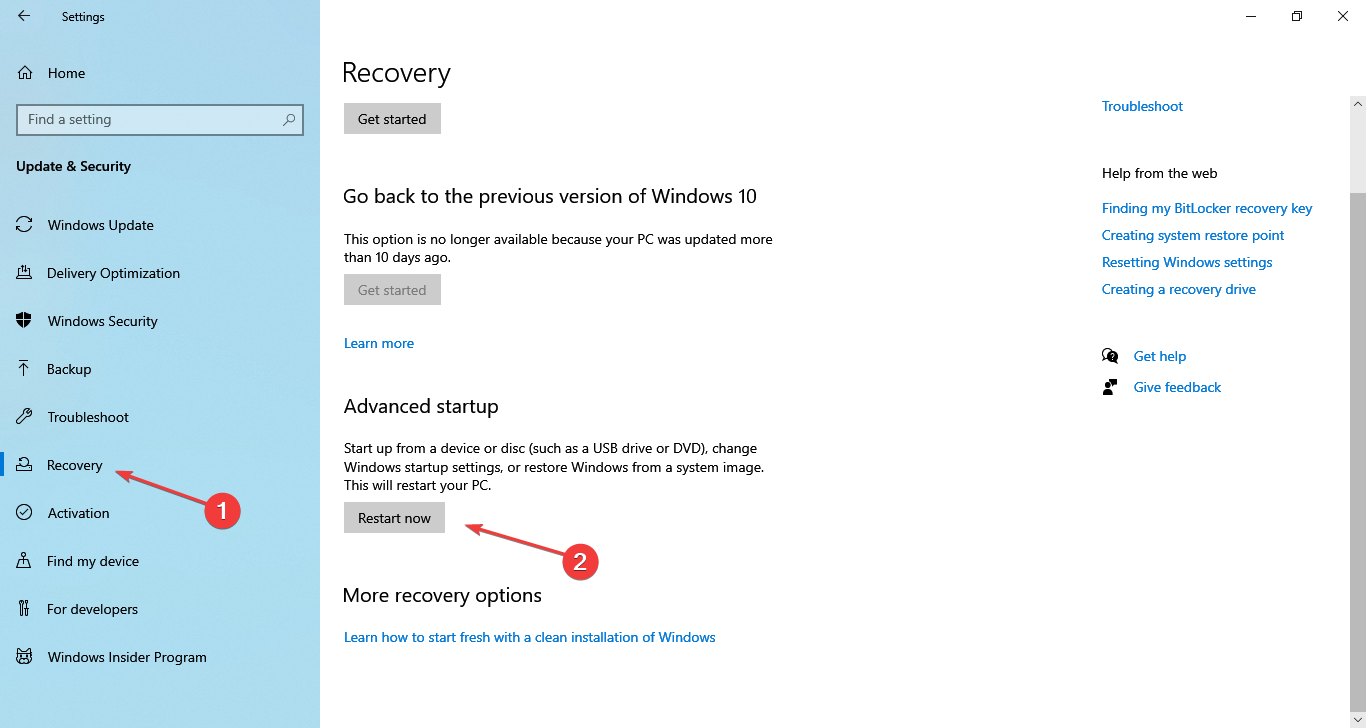
Step 3: Select Recoveryand click Restart now, and then you can enter WinRE after the restart.
Besides, you can enter WinRE more easily by pressing “Shift” key while you are clicking Power> Restart button.
Situation Two: How to Enter WinRE if You Can’t Boot Windows 10
If your Windows 10 won’t boot, you could manage to make WinRE start automatically.
Generally, WinRE will boot automatically if the following problems are detected.
- Two consecutive failed attempts to start Windows.
- Two consecutive unexpected shutdowns that occur within two minutes of boot completion.
- A Secure Boot error (except for issues related to Bootmgr.efi).
- A BitLocker error on touch-only devices.
Surely, you can also use Windows 10 install media to enter WinRE when Windows 10 fails to boot.
How to Use Windows 10 Recovery Options
Warning: Before you restore your PC, please make a backup of system disk in advance to avoid irrecoverable damage to data. Click here for backup tips when your computer can boot normally, and click here for backup tips when your computer won’t start.
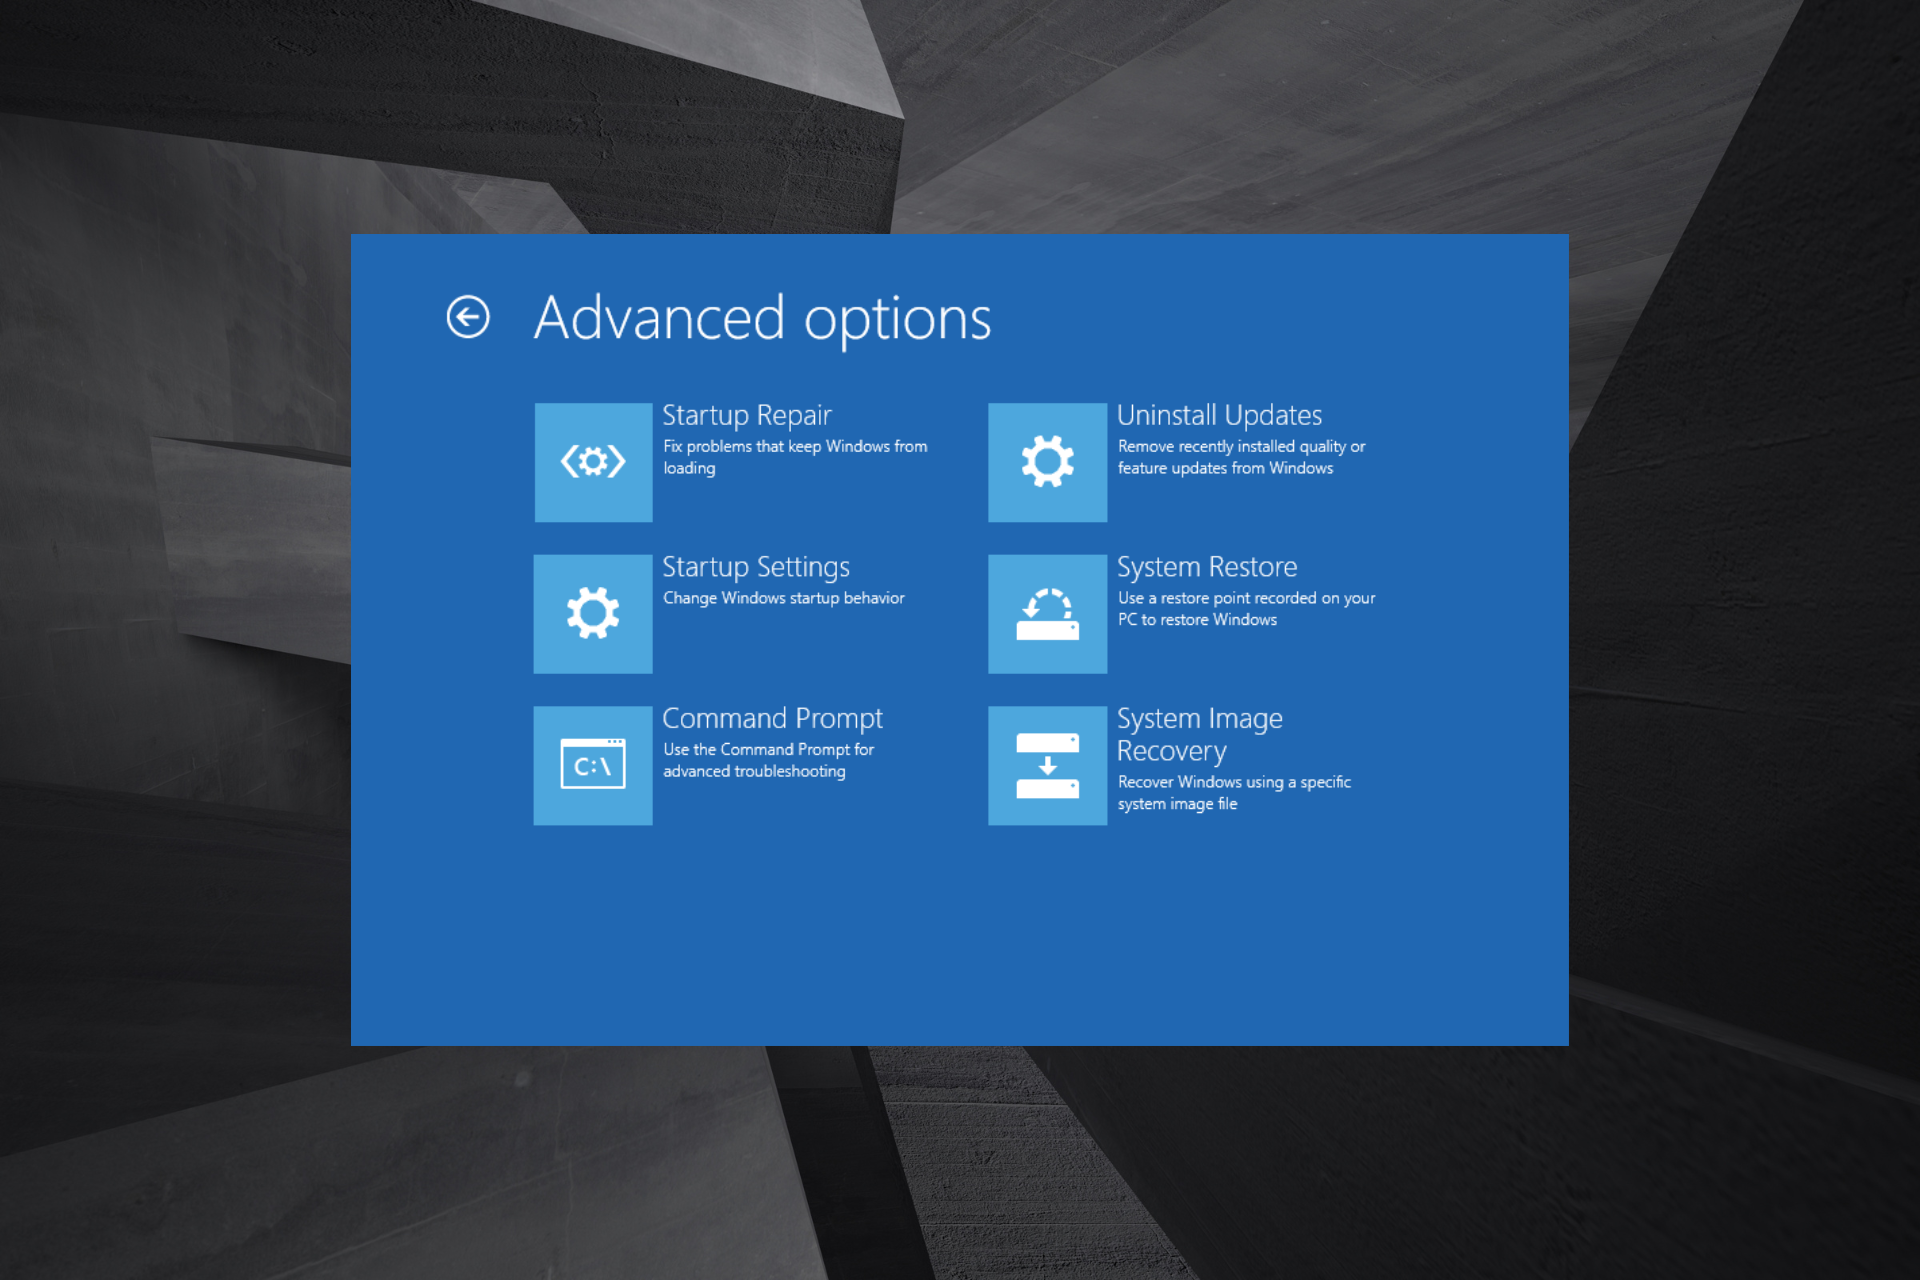
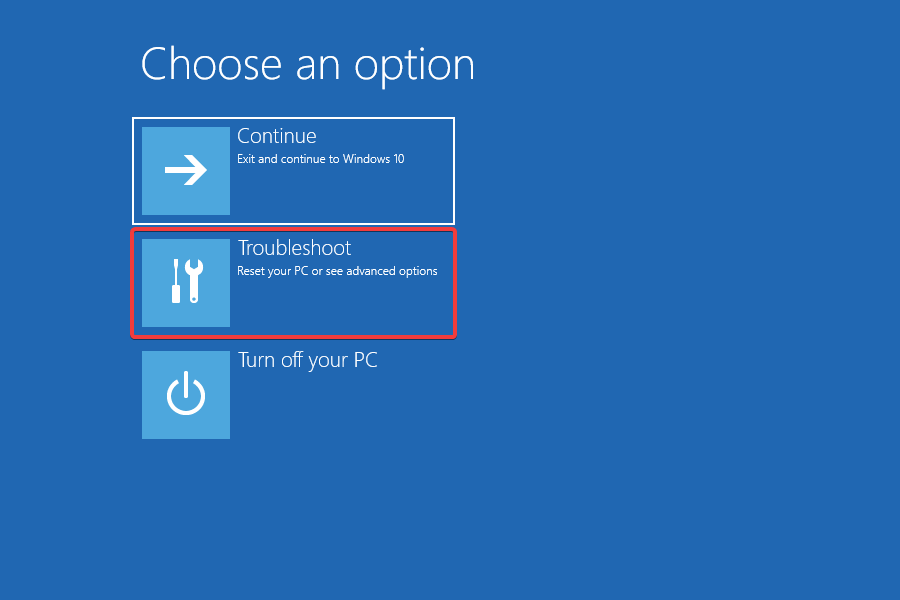
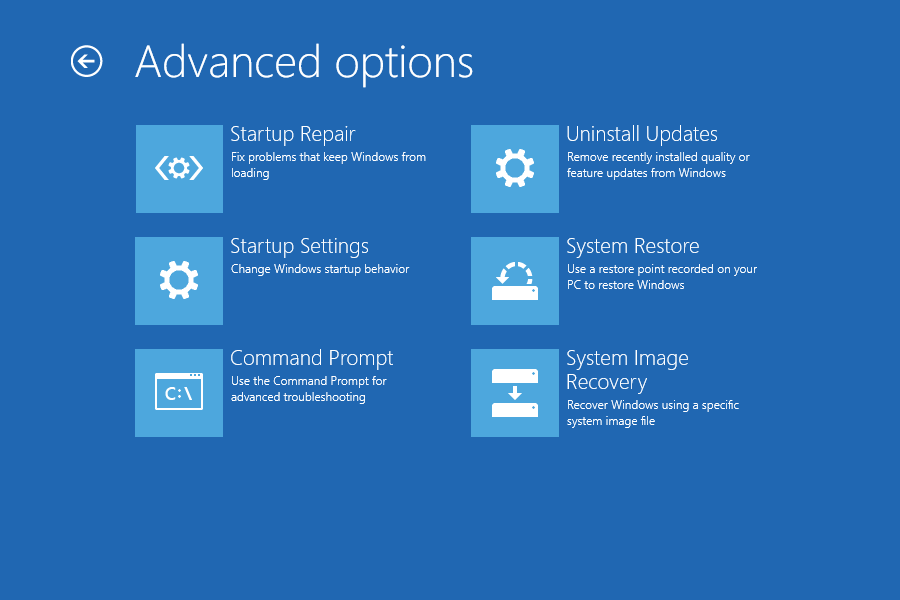
When you enter WinRE, you get an interface like the following picture. Click Troubleshoot for Windows 10 recovery options.
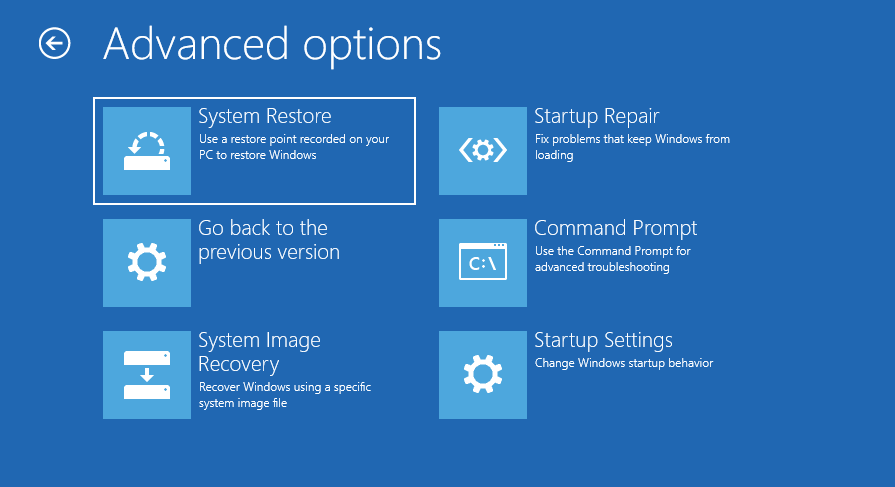
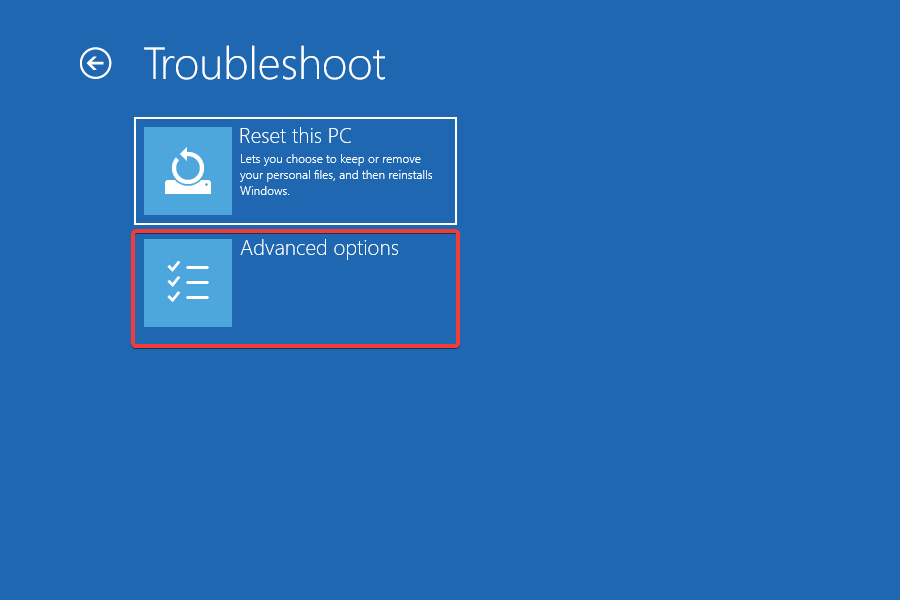
Under Troubleshoot, there are several options. As the picture shows, there is Reset this PC option under Troubleshoot, and System Restore, Startup Repair, Go back to the previous version, Command Prompt, System Image Recovery, as well as Startup Settings options under Advanced options.
Option One: Startup Repair
When you encounter computer problems, you should try startup repair option first. This option will fix most common issues that prevent your computer from loading correctly.
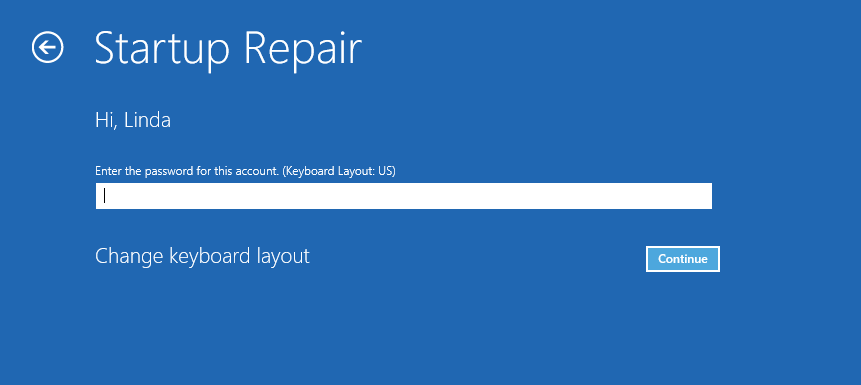
Select your account and type your password after you click Startup Repair in advanced options.And then click Continue. (You can click Continue directly if there is no password set for the account.)
In general, when the computer fails to boot, Windows 10 will detect and attempt to repair the problem automatically. And finally, Windows 10 will inform users about the repairing result.
Option Two: Command Prompt
If Startup Repair doesn’t work, you can try Command Prompt to fix the boot error. Here is a tutorial.
Step 1: Click Command Prompt and follow the computer guide to get an input window.
Step 2: Input commands to repair it. (Click Windows Commands for help.)
Option Three: System Image Recovery
If you have created a system image before your computer doesn’t work well, you can use system image recovery Windows 10 to repair your computer. A system image is a backup of the partition that contains Windows 10, applications, and data. The system image recovery Windows 10 can restore your computer completely. However, the system image can be only created by users.
How to create a system image? Here is a brief tutorial.
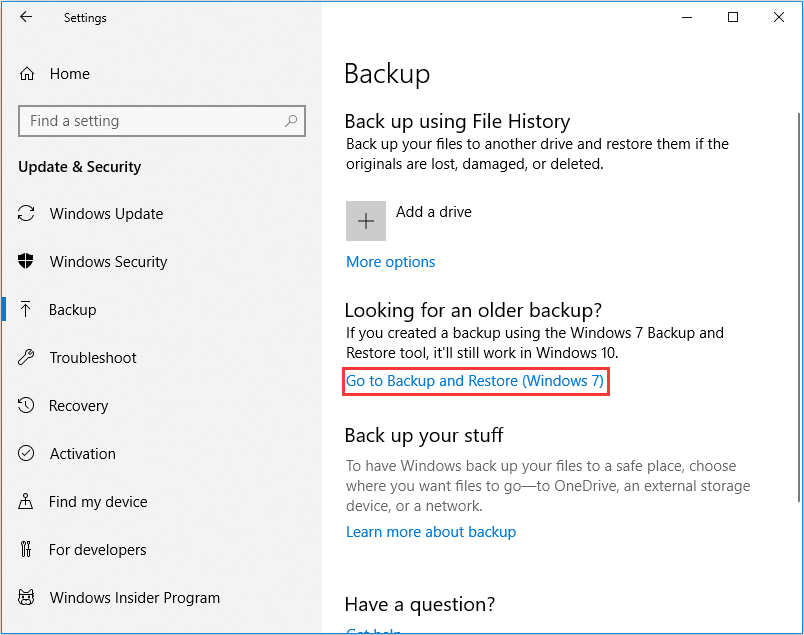
Step 1: Click Start button, and then navigate to Settings > Update & Security > Backup. And then click Go to Backup and Restore (Windows 7).
Step 2: Click Create a system image under backup and restore interface.
Step 3: Choose a place to save the system image backup and then click Next. (You can store it on a hard disk, a DVD, or on a network location.)
Note: The hard disk you select to save the system image backup should be on a physical disk different from the hard drive that is being backed up.
Step 4: Choose drives that you want to back up and click Next. And then confirm your backup settings and start backup.
If you have created system images, you can read below for guide to restoring the computer with the backup.
Step 1: Choose System Image Recovery in Advanced options to get a new window.
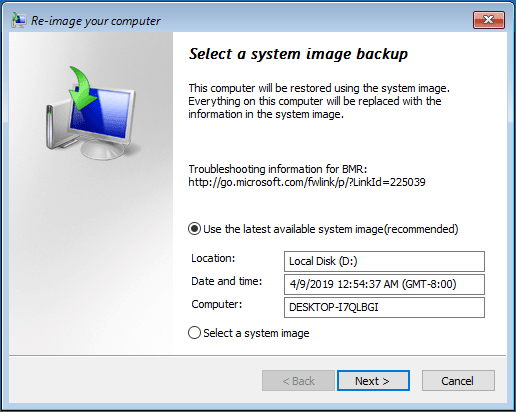
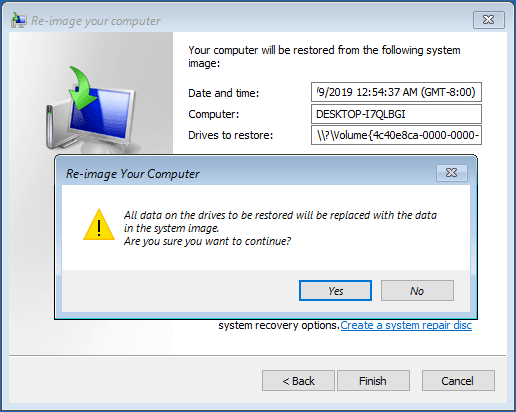
Step 2: Choose the latest system image or an image backup from the place where you save it in advance. And then click Next.
Step 3: Follow the guidance to restore your PC, but a warning window for formatting may pop up during the process. Just click Yes.
If the system image recovery fails to repair your PC, and you really want to use the image backup to restore your computer because of the data and applications on the drive, you can try Solutions to the System Image Restore Failed (3 common cases) for some help.
Option Four: Go Back to the Previous Version
If you upgraded your PC to Windows 10 in the past ten days, you can go back to the previous version of Windows to solve some computer problems that occur after Windows update. Click Should I Upgrade to Windows 10 to help you to make a decision.
This option will keep your personal files, but it’ll remove installed applications, drivers, and changes you made to settings after the upgrade.
Besides, this option has many other limitations.
- This option isavailable only for ten days after the installation of Windows 10.
- This option is not available if you do a disk cleanup, refresh, reset, or you delete the files in windows.old and $windows.~bt folders after the upgrade.
- In addition, if you used an USB drive to upgrade to Windows 10, you must use the same drive to go back.
Here is a tutorial for it.
Step 1: Click Go back to the previous version in advanced options, and then select an account to continue.
Step 2: Enter the password for your account, and then click the Go back to the previous version button to start the process.
However, many users may encounter “restoring your previous version of Windows” loop error in the restoring process. Then, you could wait for a moment to see whether it disappears or not. Or, you could try resetting your PC.
Option Five: System Restore
This feature can fix certain types of computer crashes or other computer problems. If your Windows 10 crashed after you installed an app, driver, or update, you can use system restore Windows 10 to revert your computer’s state to that of a previous point in time, called Windows 10 restore point.
Restore points contain Windows system files, installed applications, Windows Registry, and system settings. This feature won’t affect your personal files, but it will remove apps, drivers, and updates installed after the Windows 10 restore point was created.
The restore points can be created manually by users and automatically by Windows. But you need to ensure that you have enabled system protection feature, which could make restore points created automatically by Windows.
After the system protection is enabled, it is configured that the restore points are created automatically when you install a new app, driver, or update. So, you can use system restore Windows 10 for repair, even if you didn’t make a restore point manually before.
Here is a tutorial for how to use system restore Windows 10.
Step 1: After click System Restore under Advanced options, click Next in the Restore systemfiles and settings box.
Step 2: Select the restore point that you want to use in the list of results, and then click Scan for affected programs.
Tip: If you don’t see the restore point that you want to use, select Show more restore points to see more.
Step 3: View the upper list of items that will be deletedin this restoring. Click Close if you accept the deletions. (You can skip this step.)
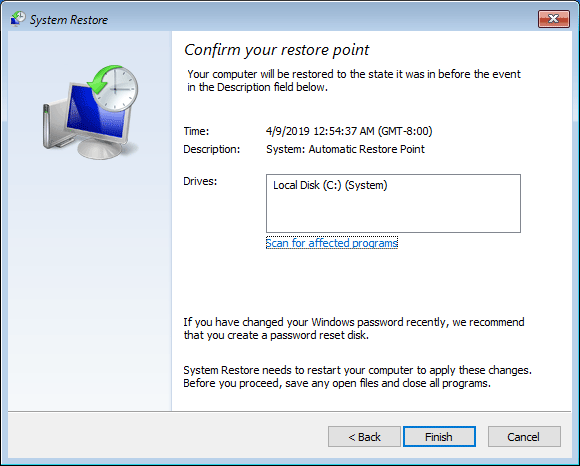
Step 4: Confirm disks to restore and click Next. Then click Finish.
Step 5: A pop-up window warns that the restore process can’t be interrupted once it starts. Click Yes to start it.
If you encounter problems in system restore process, click Easily Fix: Windows 10 System Restore Stuck (Focus on 2 Cases) for some help.
Option Six: Reset This PC
Note: If you’ve encrypted your computer, this option will need your BitLocker key to reset Windows 10.
This option will quickly restore Windows to its factory default configuration. If your computer has poor performance because of many installed applications, you could choose this option to reset Windows 10.
- Keep my files: This option attempts to fix software problem by reinstalling Windows 10. It will remove apps and drivers you installed and changes you made to settings while keeping your personal files.
- Remove everything: This option will reinstall Windows 10 and remove all your personal files, apps and drivers you installed and setting changes you made. If you decide to recycle or sell your computer, you should choose this one to avoid disclosure of personal information.
When you choose Remove everything, you will be asked whether you want to remove everything from all drives. If you want to resell your computer, clicking All drives is recommended.
If you encounter problems in resetting your computer, click 3 Ways to Fix Windows 10 Reset Stuck at 1/66/99% Black Screen for some help.
Option Seven: Uninstall Update
If your computer has poor performancebecause of the installation of Windows10 updateor a new app, you can use this option to uninstall Windows update or application update so as to fix the computer problems. Pay attention to that this option is available only when you can enter Windows 10.
The tutorial is as follows.
Step 1: Open Settings > Update & Security > Windows Update, and then click Update history.
Step 2: Click Uninstall updates.
Step 3: Right click the update and then click Uninstall to uninstall Windows update.
Windows 10 Recovery Options FAQ
How do I get to recovery options in Windows 10?
You can get to recovery options by the following ways:
- In Windows interface, click the Start button and then select Settings; then, navigate to Update & Security > Recovery to click Restart now.
- In Windows interface, press “Shift” key while you are clicking Power> Restart button.
- When your PC can’t boot, you can get to recovery options by forcibly shutting down your PC three times or through a Windows bootable drive.
Can I use a recovery disk on a different computer Windows 10?
As long as the system versions are same, for example they are Windows 10, you can use the recovery disk created in A computer on the B computer. But if the A computer’s Windows version is different from B computer’s, the recovery disk can’t be used on the B computer.
How do I restore my Windows 10 operating system?
If your computer can’t boot, you can restore the OS in WinRE through these steps:
- Enter WinRE.
- Click System Restore under Advanced options.
- Select a restore point.
- Confirm disks to restore.
- Start system restore process.
If your computer can boot up, you can restore OS from System Properties or restore PC from Command Prompt.
Here is the usage of common Windows 10 recovery options.Click to Tweet
Your Advice Is Needed
If you want to knowthe usage of any other recovery options, leave a comment below, we may adopt your advice in the next update. If you still can’t solve the computer problem, please email to [email protected] for help or leave a comment about the problem below.

В этой инструкции — несколько простых способов войти в среду восстановления Windows 10 в различных сценариях: как при полностью работающей системе, так и в тех случаях, когда запуск ОС невозможен. Также может быть полезно: Как исправить ошибку «Невозможно найти среду восстановления».
- Запуск среды восстановления в Параметрах Windows 10
- Как войти в среду восстановления с экрана блокировки
- Среда восстановления на загрузочной флешке или диске восстановления системы
Простой запуск среды восстановления Windows 10 в «Параметрах»
Стандартный способ входа в среду восстановления Windows 10 — использование параметров системы, шаги будут следующими:
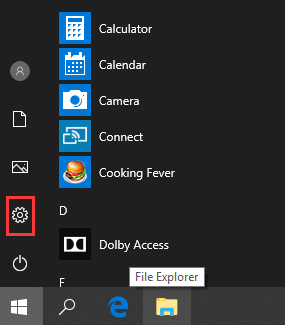
- Откройте параметры, нажав по кнопке «Пуск», а затем — по значку с изображением шестеренки (для этого также можно использовать сочетание клавиш Win+I).
- Перейдите в раздел «Обновление и безопасность» — «Восстановление».
- В разделе «Особые варианты загрузки» нажмите кнопку «Перезагрузить сейчас».
- Дождитесь завершения перезагрузки.
В результате, через короткое время после перезагрузки компьютера вы окажетесь в среде восстановления, где сможете использовать необходимые вам инструменты.
В редких случаях может оказаться, что в среде восстановления в разделе «Поиск и устранение неисправностей» — «Дополнительные параметры» отсутствуют ряд пунктов: восстановление образа системы, восстановление при загрузке, из точек восстановления и другие. Это говорит о том, что на компьютере отсутствует образ среды восстановления или он поврежден (решение проблемы в инструкции про «Невозможно найти среду восстановления», которая была приведена в начале статьи).
Способ зайти в среду восстановления с экрана блокировки
Если по какой-то причине вы не можете зайти в Windows 10 и требуется попасть в среду восстановления, сделать это можно на экране блокировки:
- На экране ввода пароля, внизу справа нажмите по изображению кнопки питания, а затем, удерживая «Shift», нажмите «Перезагрузка».
- На сообщение «Если вы перезагрузитесь, вы и другие люди, использующие этот компьютер, могут потерять несохраненные данные» нажмите «Все равно перезагрузить».
- Итогом станет запуск восстановления.
Учитывайте, что при использовании этого способа для большинства операций вам все равно потребуется ввод пароля пользователя с правами администратора на компьютере. Тут может оказаться полезным: Как сбросить пароль Windows 10.
Среда восстановления на загрузочной флешке Windows 10 или диске восстановления
Если у вас есть загрузочная флешка Windows 10, диск восстановления или возможность из создать (в том числе на другом компьютере), можно использовать их для того, чтобы открыть среду восстановления (необходимые файлы находятся на самом накопителе). Показываю пример для загрузочной установочной флешки Windows 10:
- Выполните загрузку компьютера с установочного накопителя Windows 10 (см. Как поставить загрузку с флешки в BIOS/UEFI).
- На первом экране установки нажмите «Далее».
- На следующем экране, внизу слева нажмите «Восстановление системы».
- В результате будет запущена среда восстановления Windows.
Учитывайте, что при использовании этого метода, некоторые возможности окажутся недоступными, из важного — возврат компьютера к исходным настройкам (сброс системы). Возможно, вам будет интересна подборка материалов на тему: Восстановление Windows 10.
Learn how to access Recovery Mode from every part of the OS
by Matthew Adams
Matthew is a freelancer who has produced a variety of articles on various topics related to technology. His main focus is the Windows OS and all the things… read more
Updated on
- The Recovery Mode in Windows 10 allows users access to many troubleshooting tools and the option to change startup settings.
- Sometimes, the OS automatically enters the RE when it encounters a critical error.
- There are various ways to enter the Recovery Mode, from Settings, Start menu, and login screen.
Windows 10 includes a Recovery Mode that enables users to access a range of diagnostic and repair utilities. While it usually appears after startup errors, users may sometimes need to access the Recovery Mode manually. So, let’s find out all there is.
What is PC recovery mode?
That Recovery Mode assists users in troubleshooting Windows when it doesn’t boot as expected. It offers many options, including the Command Prompt, UEFI settings, Startup Repair, System Restore, and Startup Setting (accessing Safe Mode).
Also, this mode in Windows 10 comes to aid when troubleshooting BSOD errors that appear as soon as the OS is about to load. While the RE appears automatically in some cases, users can always access it manually through a series of ways.
How can I boot into Recovery Mode on Windows 10?
1. Press F11 during the system startup
This is among the more straightforward methods for entering recovery mode. Users can press the F11 key shortly after turning on their PCs. You can enter Windows 10 Recovery Mode without going into BIOS.
Note, however, that this method might not work on all PCs. For example, some may have the F9 or F12 keys set by default, so verify that with the manufacturer.
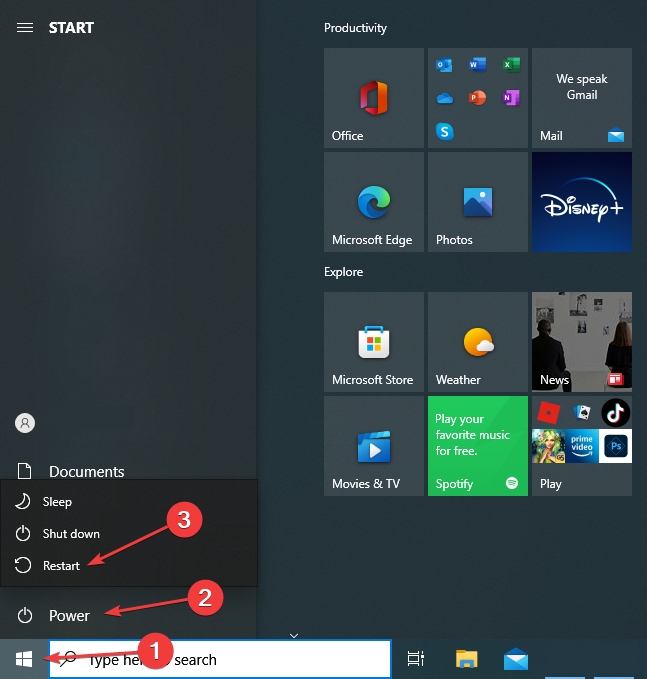
- Click on the Start icon, select the Power button, hold the Shift key, and click on Restart.
- Now, click on Troubleshoot.
- Next, click on Advanced options.
- You now have all the recovery options listed on the screen.
This is one of the most simple and seamless methods to enter the Recovery Mode in Windows 10 while working, with the OS actively running.
How we test, review and rate?
We have worked for the past 6 months on building a new review system on how we produce content. Using it, we have subsequently redone most of our articles to provide actual hands-on expertise on the guides we made.
For more details you can read how we test, review, and rate at WindowsReport.
You can similarly access Windows 10 Recovery Mode from the login screen by clicking the Power button and choosing Restart with the Shift key held.
3. Enter Recovery Mode with a bootable USB drive
- First, create a bootable USB drive for Windows 10.
- Now, turn off the computer, power it on, enter the BIOS, and choose the USB drive.
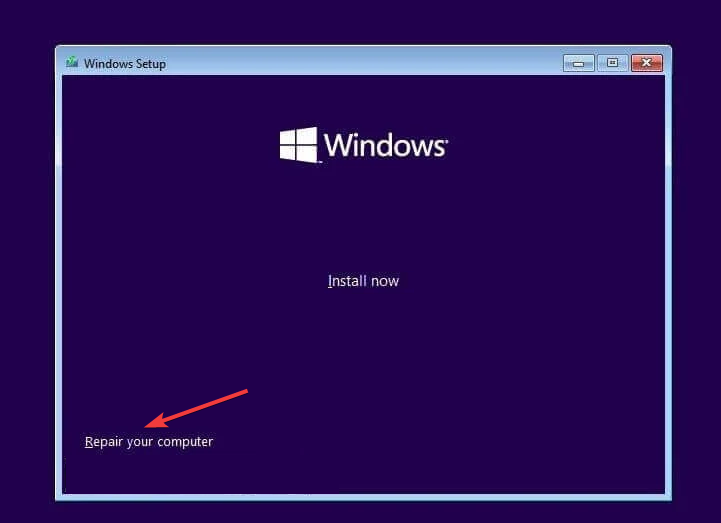
- Click Next on the Windows setup window.
- Select the Repair your computer option.
- Click on Troubleshoot.
- Now, choose Advanced options.
- You now have all the recovery options listed here.
If you can’t boot the OS due to errors or a corrupt state, download Windows 10, boot a USB drive, and access the Recovery Mode.
4. Select the Restart now option
- Press Windows + I to open Settings, and choose Update & Security.
- Now, navigate the Recovery tab, and click on Restart now under Advanced startup.
- Now, choose Troubleshoot.
- Click on Advanced options.
- The Recovery Mode options are all listed now.
This is another quick way to access the Recovery Mode in Windows 10 while the OS is still running.
- How to Use Steam Deck’s Keyboard in Desktop Mode
- How to Format an NVMe SSD on Windows 11
- How to Download & Install New Microsoft Office Fonts
5. Boot into Recovery Mode using Command Prompt
Command Prompt is a built-in command-line tool that helps you get out of almost any troubleshooting situation. Similarly, you can enter Recovery Mode on Windows 10 from Command Prompt.
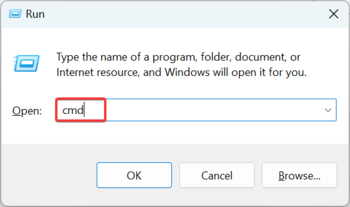
1. Press Windows + R open Run, type cmd in the text field, and hit Ctrl + Shift + Enter.
2. Click Yes in the UAC prompt.
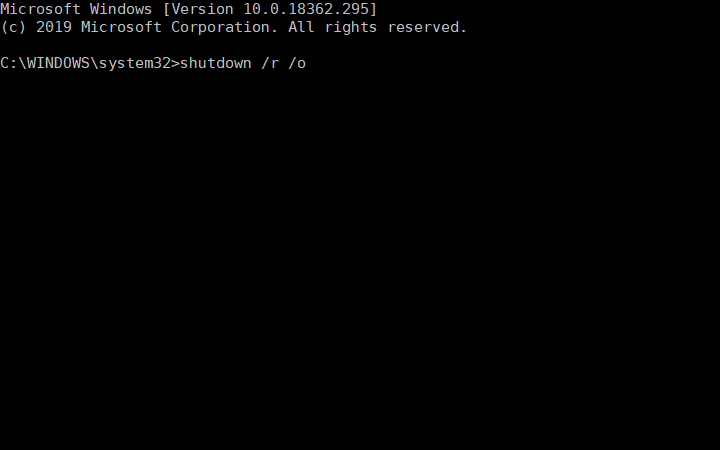
3. Input the following command and press Enter : shutdown /r /o
4. Click Close on the You’re about to be signed out a prompt that appears.
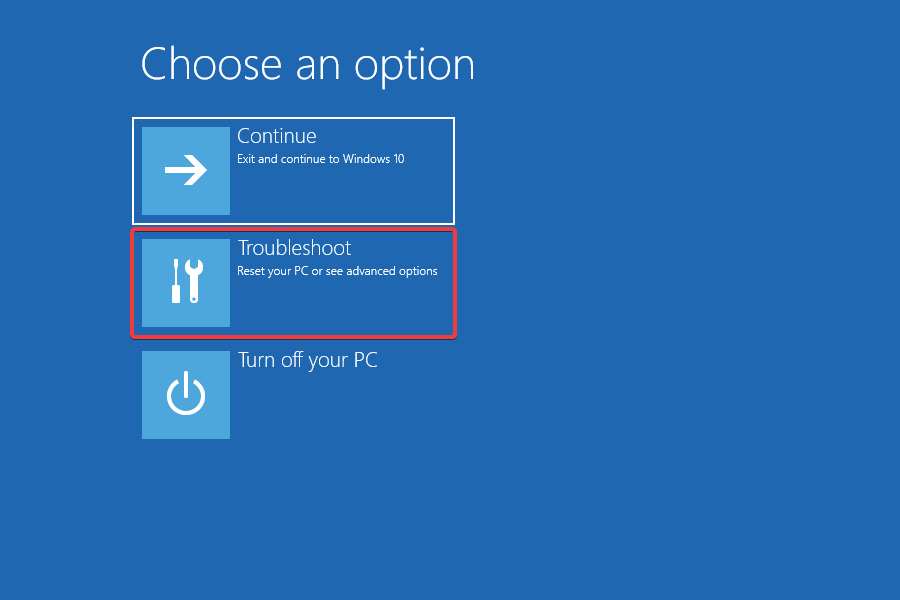
5. Thereafter, select Troubleshoot.
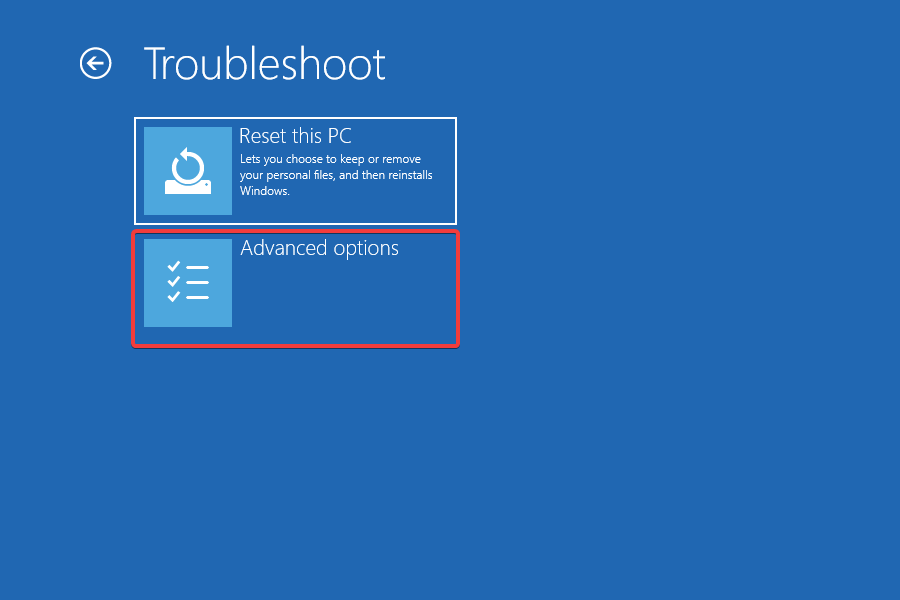
6. Now, select Advanced options.
7. All the advanced options in the Recovery Mode will now appear.
That’s it! And if you were wondering, there is no Windows 10 Recovery Mode key that you need to access it. Anyone with access to the computer can do it though specific changes require administrative privileges and the account password.
The solutions would help access Windows 10 Recovery Mode in Dell, Asus, HP, and most other devices. In case you face issues, find out how to perform a repair upgrade, one of the most effective troubleshooting methods.
Now that you know how to access it, why not check our guide on how to exit Windows Recovery Mode?
If you have any other queries or want us to cover a similar topic, drop a comment in the section below.

