В этой статье мы рассмотрим, как с помощью встроенных средств создать полную резервную копию образа системы Windows 10 на отдельном носителе (это может быть внешний диск, USB флешка или сетевая папка) и как правильно восстановить систему из этого образа. Резервная копия Windows включает в себя полный образ системы, системные и пользовательские разделы со всеми установленными программами, настройками и личными данными пользователя.
Содержание:
- Как создать полную резервную копию образа Windows 10?
- Управление резервными копиями Windows с помощью утилиты wbadmin
- Восстановление образа Windows 10 из резервной копии
В этой статье для резервного копирования образа Windows мы будем использовать классический инструмент System Image Backup. И хотя Microsoft перестала развивать его уже достаточно давно, он вполне пригоден для нашей задачи.
Как создать полную резервную копию образа Windows 10?
Для создания резервной копии образа Windows через System Image Backup можно воспользоваться консольной утилитой wbadmin.exe. Подключите к компьютеру внешний диск или USB флешку, на который будем сохранять образ.
Запустите консоль PowerShell с правами администратора.
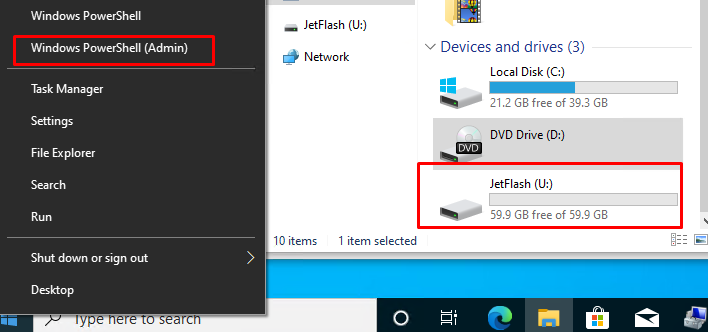
В нашем случае Windows 10 установлена на диск C:\, и мы будем сохранять образ системы на USB флешку U: (на флешке должно быть достаточно свободного места).
wbAdmin start backup -backupTarget:U: -include:C: -allCritical -quiet
Примечание. Для создания резервной копии образа Windows с помощью
Wbadmin.exe
ваша учетная запись должна состоять в локальных группах Backup Operators или Администраторы.
Если вам нужно включить в резервную копию не только системный раздел, на котором установлена Windows 10, но и другие разделы, используйте такую команду:
wbAdmin start backup -backupTarget:U: -include:C:,D:,F:,G: -allCritical -quiet
Если нужно сохранить образ системы в сетевую папку, необходимо указать UNC путь к ней (у вашей учетной записи должны быть права на запись в этот каталог):
wbAdmin start backup -backupTarget:\\homepc2\imagebackup -include:C: -allCritical –quiet
Вы можете указать учетную запись для доступа к SMB каталогу так:
wbAdmin start backup -backupTarget:\\homepc2\imagebackup -user:user1 -password:user1Password -include:C: -allCritical –quiet
Если вы хотите добавить в резервную копию определенные каталоги, укажите их так:
include:E:\docs
Создание резервной копии образа Windows займет некоторое время в зависимости от того, как много данных содержится на исходных дисках.
Для создания резервной копии образа используется механизм теневого копирования через службу Volume Shadow Copy (VSS). Это значит, что вы можете продолжать использовать Windows во время выполнения резервного копирования.
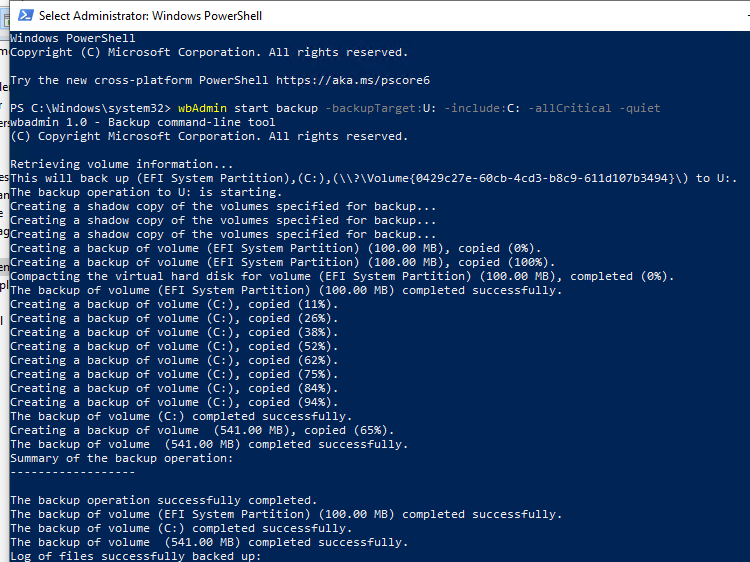
The backup operation successfully completed.
The backup of volume (EFI System Partition) (100.00 MB) completed successfully.
The backup of volume (C:) completed successfully.
The backup of volume (541.00 MB) completed successfully.
Как вы видите, в резервную копию образа был включен не только системный раздел, но и разделы EFI и System Reserved.
System Image Backup поддерживает как полное, так и инкрементальное резервное копирование (т.е. к первоначальному образу добавляются только изменившиеся блоки).
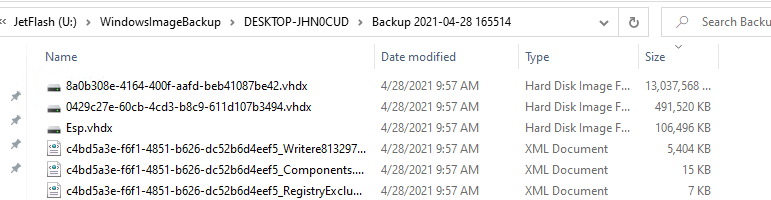
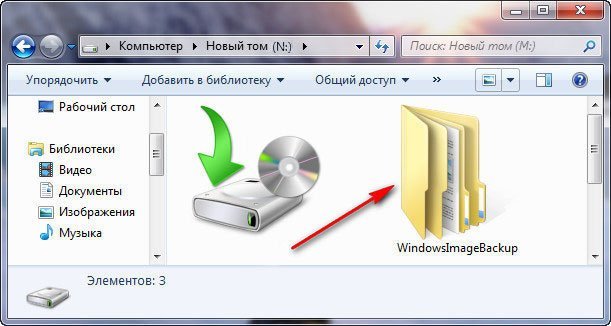
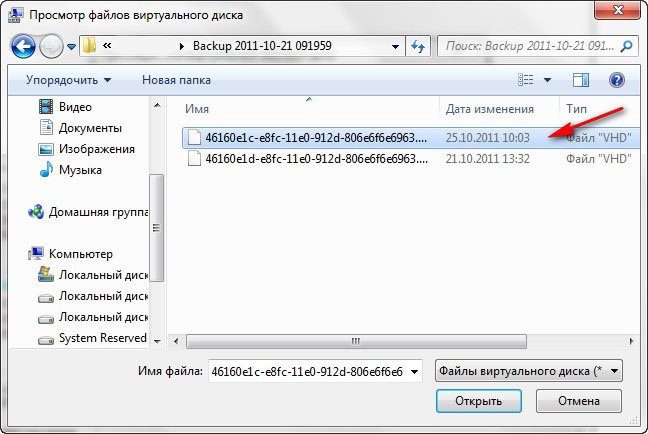
Проверьте, что на USB флешке появился каталог WindowsImageBackup, содержащий образ вашей Windows. Резервные копии разделов представляют собой vhdx файлы. При необходимости вы можете вручную смонтировать эти VHDX диски и получить доступ к их содержимому.
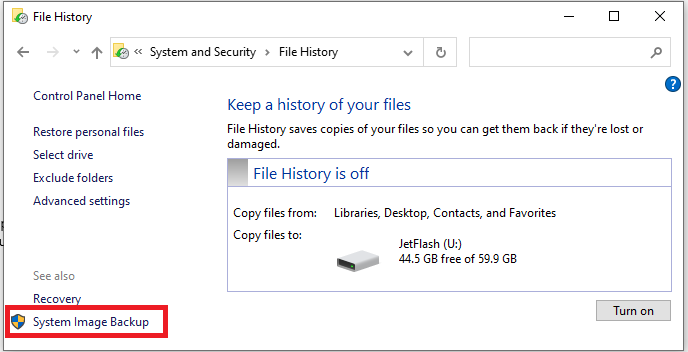
Вы можете создать резервной копии образа Windows 10 и из графического интерфейса Windows 10. Этот функционал доступен через панель управления (Control Panel\System and Security\File History). Нажмите на кнопку System Image Backup в нижнем левом углу.
Либо достаточно выполнить команду
Sdclt.exe
.
В следующем окне нажмите Setup backup и укажите диск, на который нужно сохранить резевную копию.
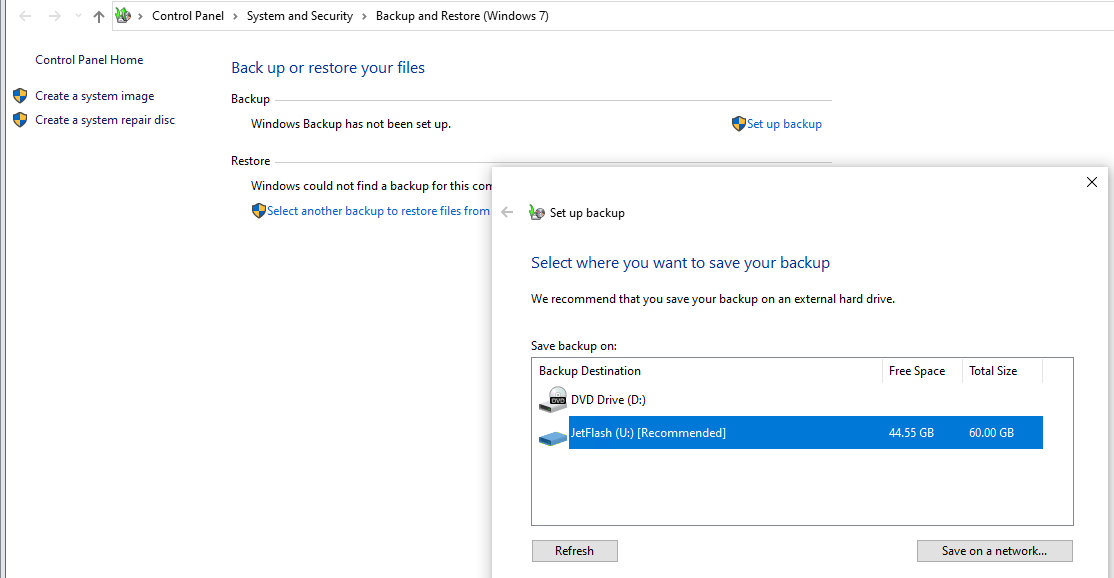
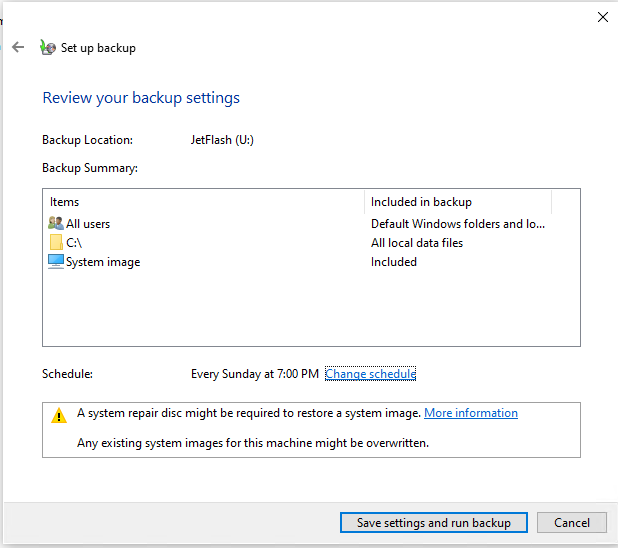
Выберите диски, которые нужно забэкапить. Убедитесь, что включена опция Include a system image of drives: EFI System Partition, C:, Windows Recovery Environment.

Далее можно настроить расписание автоматического резевного копирования. Чтобы начать бэкап, нажмите Save settings and run backup.
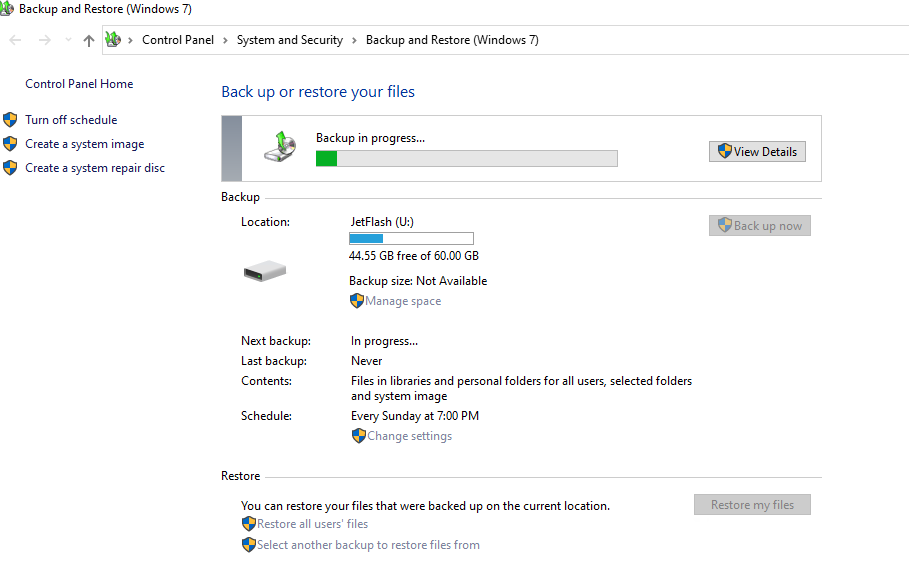
Статус резевного копирования указан в Панели Управления.
Управление резервными копиями Windows с помощью утилиты wbadmin
Рассмотрим несколько команд консольной утилиты wbadmin.exe для управления резервными копиями.
Вывести список зарегистрированных в системе резервных копий:
Wbadmin get versions
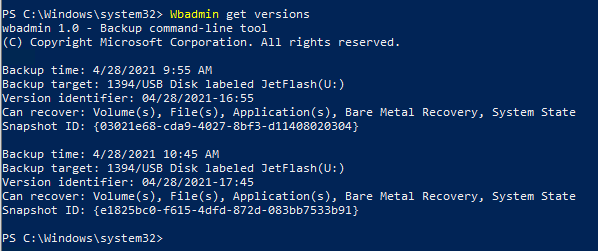
Backup time: 4/28/2021 9:55 AM
Backup target: 1394/USB Disk labeled JetFlash(U:)
Version identifier: 04/28/2021-16:55
Can recover: Volume(s), File(s), Application(s), Bare Metal Recovery, System State
Snapshot ID: {03021e68-cda9-4027-8bf3-d11408020304}
В данном случае у нас есть 2 резервных копии. Чтобы перечислить элементы, хранящиеся в определенной резервной копии, укажите ее Version identifier:
Wbadmin get items -version:04/28/2021-17:45

Чтобы удалить все резервные копии, кроме двух последних, выполните:
wbadmin delete backup -keepversions:2
Чтобы удалить только самую старую резервную копию образа:
Wbadmin delete backup –deleteOldest
Восстановление образа Windows 10 из резервной копии
Для восстановления Windows 10 из созданной ранее резервной копии образа, вам понадобится:
- Установочный образ Windows 10 DVD диске или USB флешке (как создать загрузочную USB флешку с Windows 10), диск восстановления системы, загрузочный образ восстановления MSDaRT или аналогичный LiveCD
- В настройках BIOS/UEFI измените порядок загрузки системы так, чтобы система загружалась cначала с загрузочного диска.
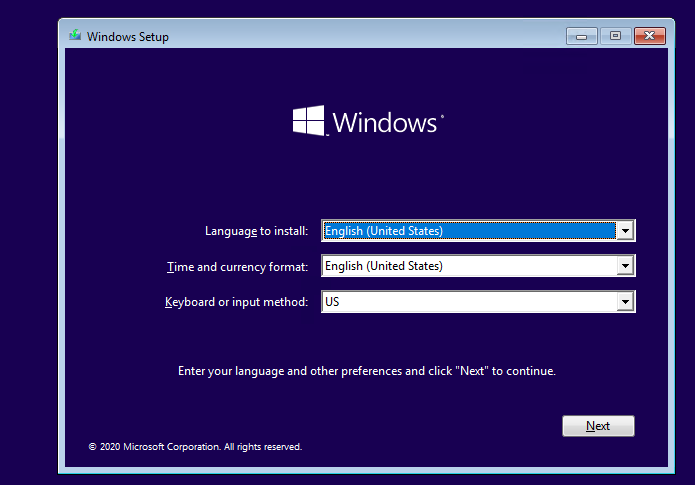
Загрузитесь с установочного/загрузочного диска. На первом экране Windows Setup нажмите Next.
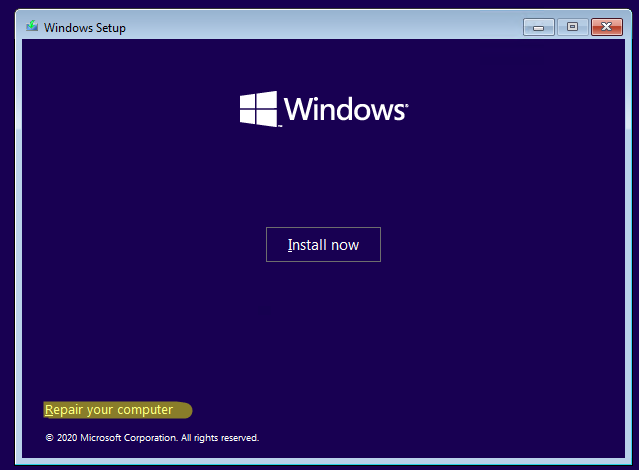
Нажмите на кнопку Repair your computer в левом нижнем углу.
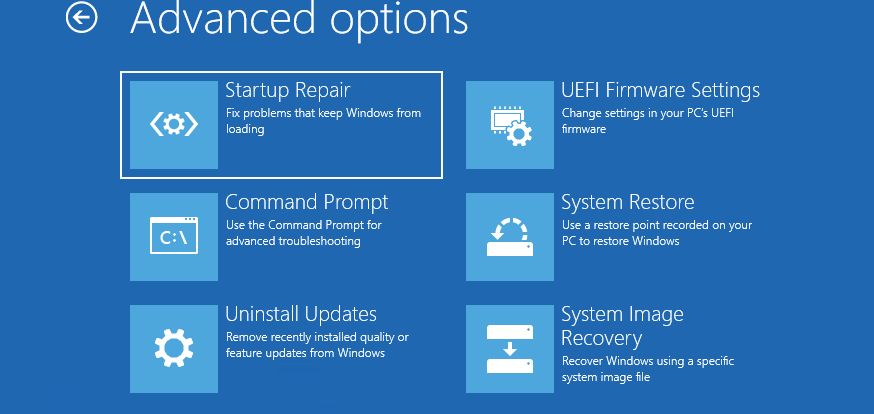
 Затем перейдите в раздел Troubleshoot -> Advanced Options -> System Image Recovery.
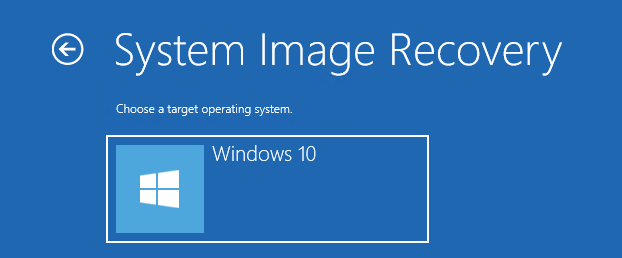
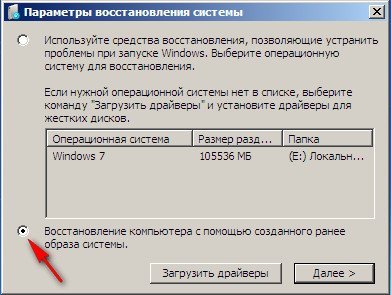
В списке целевых ОС нужно выбрать Windows 10.
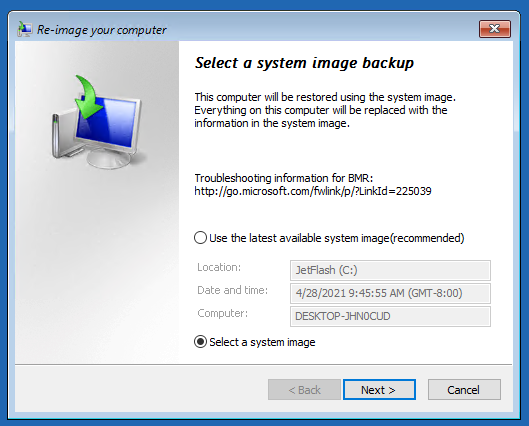
Мастер установки просканирует подключенные диски и обнаружит список ранее созданных резервных копий. Вы можете восстановить последний образ, либо выбрать более ранний.
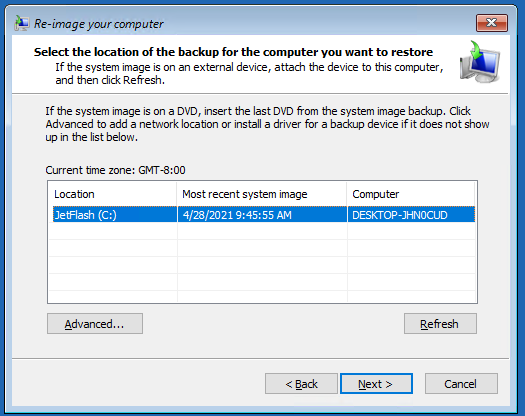
Совет. Т.к. система загрузилась с загрузочного диска, буквы дисков могут не соответствовать буквам дисков в Windows.
Из списка доступных образов выберите образ, который нужно восстановить.
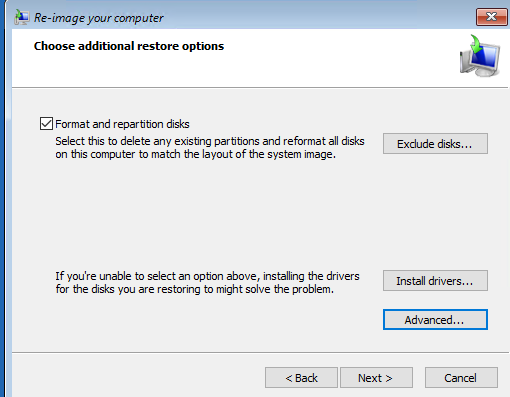
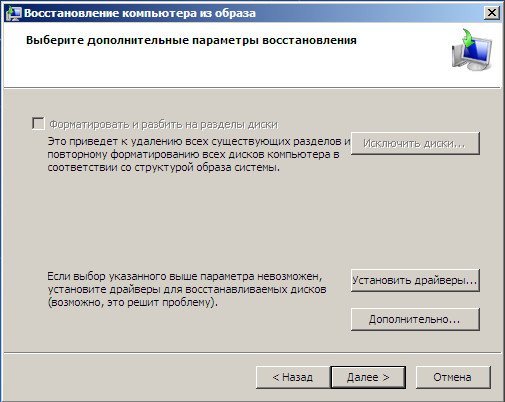
Отметьте опцию Format and repartition disks, если вы восстанавливаете образ на новый диск. В этом случае мастер восстановления удалит все имеющиеся разделы на диске и пересоздаст таблицу разделов в соответствии с разделами в образе.
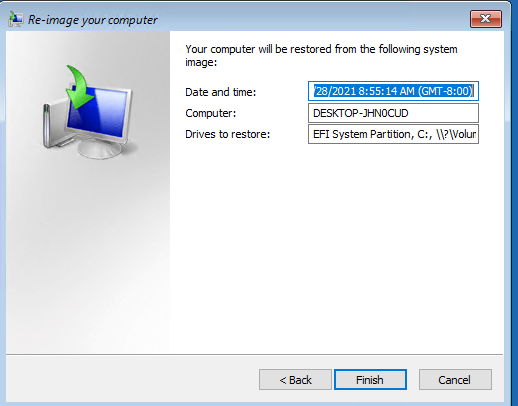
Осталось подтвердить восстановление системы из образа.
После завершения работы мастера восстановления, загрузитесь с жесткого диска (не забудьте поменять приоритет загрузочных устройств в BIOS) и убедитесь, что вы успешно восстановили Windows 10 из резервной копии образа, созданной ранее.
Если резервная копия образа хранится в сетевом каталоге, вам придется в WinPE сначала инициализировать и настроить сетевой адаптер. Нажмите сочетание клавиш Shift+F10 чтобы открыть командную строку.
Для инициализации сети выполните
startnet.cmd
или
wpeinit.exe
Текущие параметры сетевого адаптера можно получить так:
Ipconfig /all
Чтобы задать статический IP адрес и указать DNS сервера, используйте следующие команды:
netsh int ipv4 set addr "Ethernet" static 192.168.13.50 255.255.255.0 192.168.13.1 1
net start dnscache
netsh int ipv4 set dns "Ethernet" static 192.168.13.10 primary
Затем вернитесь в окно System Image Recovery и укажите путь к UNC каталогу.
Восстановление из образа подразумевает собой замену всех личных данных на вашем жёстком диске файлами из образа или другими словами, если вы с помощью средства Архивирования данных создали образ локального диска (C:), то развернув данный образ на место, вы замените все ваши существующие файлы на этом диске данными из образа. Статья пишется как продолжение Создание образа системы, где мы научились создавать Образ операционной системы Windows 7 на случай серьёзной неисправности, здесь же мы будем восстанавливать наши данные на место, даже тогда, когда наша Windows 7 совсем не будет загружаться.
Примечание: Если вам интересен процесс создания резервного образа Windows 8 на DVD-дисках и переносном жёстком диске USB, а также на старом жёстком диске интерфейса IDE (подключенном к ноутбуку через специальный переходник), переходите по ссылке и читайте.
Восстановление из образа резервной копии Windows, созданной её средством архивации
По моим наблюдениям серьёзные пользователи устанавливают Windows 7 и делят винчестер на два тома и обзывают их к примеру (C:) и (D:). На диске (C:) у них находится операционная система Windows 7, а на (D:) все личные данные. Далее они создают образ диска (C:) и сохраняют его на другом разделе винчестера, то есть на (D:). Диск (D:) архивации не подвергается, так как по мнению пользователей, с ним обычно редко, что случается и это на самом деле так. И вот случилась неполадка с ОС Windows 7, система долго загружается, зависает и работает нестабильно, наши пользователи на языке автомобилистов пинают некоторое время по колёсам, (применяют откат с помощью точек восстановления), но машина всё равно не едет, а Windows 7 не работает нормально, тогда они восстанавливают из образа диск (C:) и работоспособная Windows 7 из архива заменяет неработоспособную, вот и всё.
- Самые серьёзные создают образ как диска (C:) содержащего файлы операционной системы, так и диска (D:) с личными данными. Вы можете заметить, если у вас один жёсткий диск, где же тогда хранить образ двух разделов (C:) и (D:)? Для этого специально покупается дополнительный винчестер SATA или переносной жёсткий диск USB, который должен быть отформатирован в файловую систему NTFS. Восстанавливать ваши данные из образа в этом случае нужно осторожно, вместе с неисправной Windows 7 находящейся на диске (C:), вы можете заменить все ваши файлы и на диске (D:), значит предварительно нужно скопировать всё, что вам нужно например на тот же самый переносной винчестер USB. Всё это написано и показано, в статье Создание образа системы, теперь давайте восстанавливать.
Как происходит восстановление Windows 7 из созданного нами архивного образа
Windows 7 пока ещё работает и запускается, но со значительными ошибками (ниже мы рассмотрим случаи, когда операционка не загружается совсем), откат с помощью точек восстановления к успеху не привёл и мы решаем произвести восстановление всей операционной системы из образа диска (C:).
Пуск->Панель управления->Архивирование данных компьютера->

Восстановить системные параметры или компьютер->
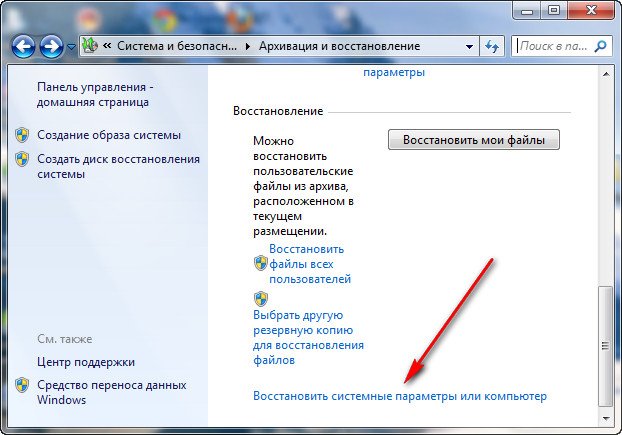
Расширенные методы восстановления->
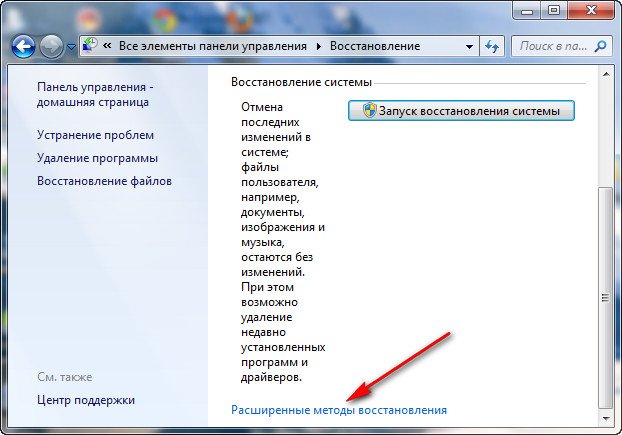
Используйте образ системы созданный ранее для восстановления компьютера,
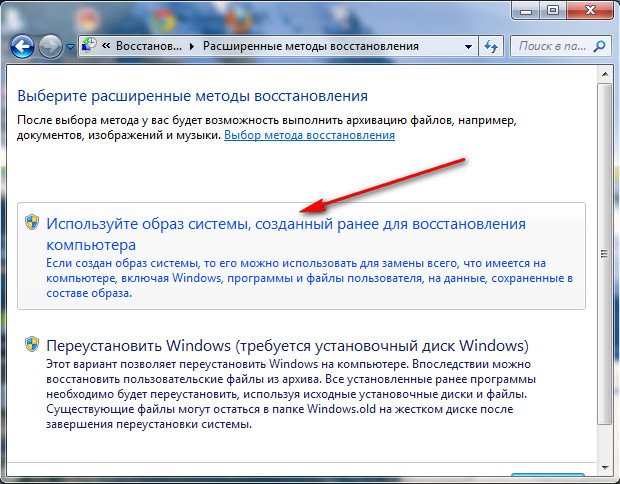
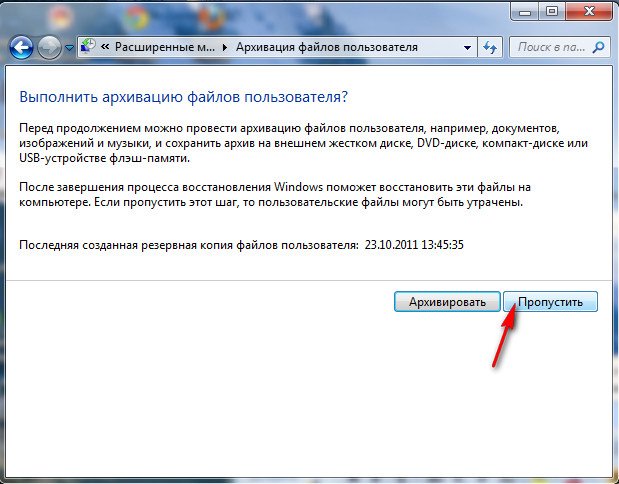
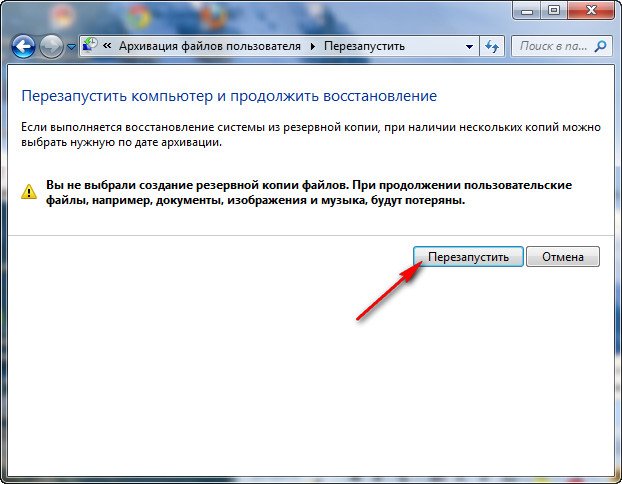
в данном диалоговом окне вы можете выбрать кнопку Архивировать и запустится настройка архивации, с помощью неё, вы сможете создать архив ваших данных с тех дисков на которые вы будете разворачивать образ системы, этим самым вы сбережёте их, читайте более подробно в нашей статье Архивирование данных компьютера. Если мы скопировали наши данные предварительно, нажимаем кнопку Пропустить.
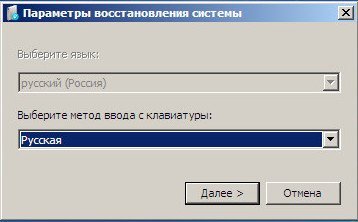
Перезапустить, произойдёт перезагрузка компьютера и возникнет данное окно выбора раскладки клавиатуры
Русская
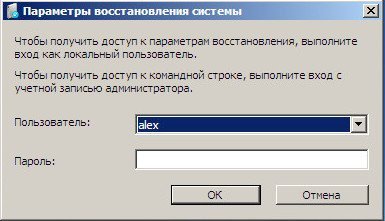
Выбираем пользователя
Восстановление образа системы
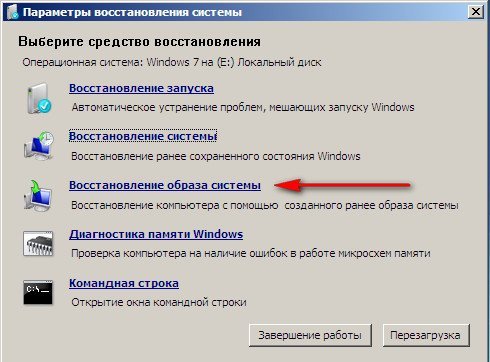
Использовать последний доступный образ системы
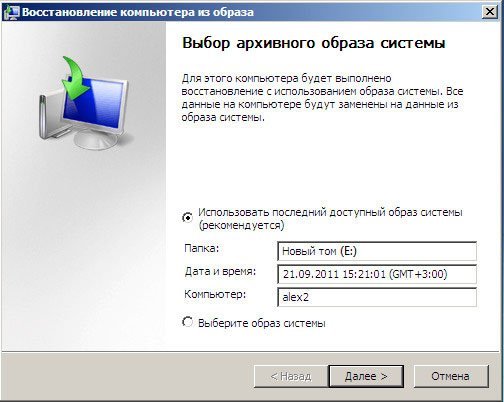
Нажимаем далее и восстанавливаем нашу Windows 7
Второй вариант, мы с вами вообще не можем загрузится в работающую Windows 7, как тогда запустить восстановление из образа?
Включаем компьютер и возникает к примеру чёрный экран или синий экран с критической ошибкой. Запускаем Средство восстановления Windows 7, нажимаем на F-8 в начальной фазе загрузки компьютера. Открывается меню Дополнительные варианты загрузки, выбираем Устранение неполадок компьютера.
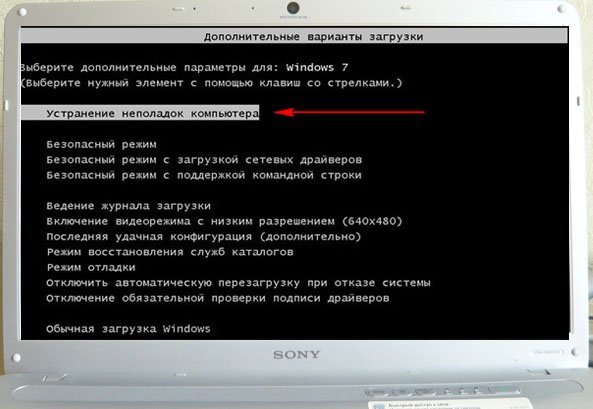
Восстановление образа системы, ну а далее мы уже знаем как действовать.
Третий вариант самый сложный, но вы с ним справитесь: экран чёрный, Средство восстановления Windows 7 запустить не получается, Дополнительные варианты загрузки недоступны, при нажатии кнопки F-8 ничего не происходит. Как добраться до созданного образа с работоспособной Windows 7. В этом случае нам поможет только Диск восстановления Windows 7, на котором находится Среда восстановления.
- Примечание: как создать, а так же как применить Диск восстановления, вы можете узнать из нашей статьи Как восстановить систему Windows 7. Так же в этом случае может помочь установочный диск Windows 7, на нём так же находится среда восстановления.
Итак я покажу как восстановить Windows 7 из образа с помощью диска восстановления. Вставляем его в дисковод, перезагрузка, в BIOS должна быть выставлена загрузка с дисковода, далее запускается программа Параметры восстановления системы.
Нажимаем быстро Enter, а то пропадёт предложение загрузиться с диска.
Запускается среда восстановления, опять нужно выбрать раскладку клавиатуры,
далее Восстановление образа системы.
Используем последний образ системы и наша Windows 7 восстановлена. Образ системы всегда создается с расширением VHD и находится в папке WindowsImageBackup.

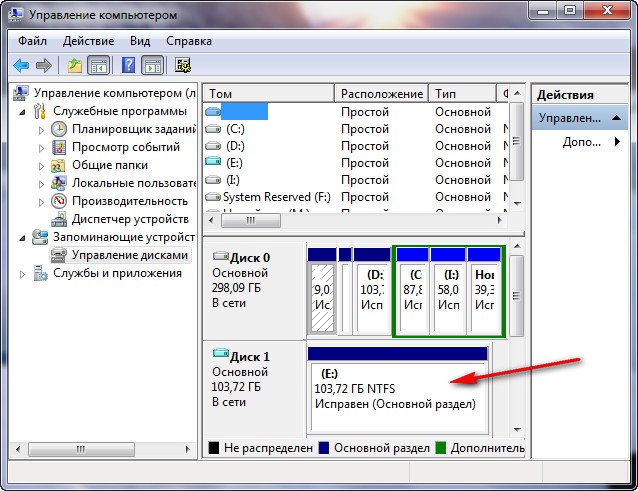
Используем образ системы, как дополнительный жёсткий диск
К примеру нам нужно извлечь какой-либо файл из образа, а не восстанавливать весь образ, нужно просто подключить наш образ, как виртуальный жесткий диск, в Управления дисками. Пуск->Компьютер->щёлкаем правой кнопкой мыши и в контекстом меню выбираем Управление->Управление дисками->Действие->Присоединить виртуальный жесткий диск
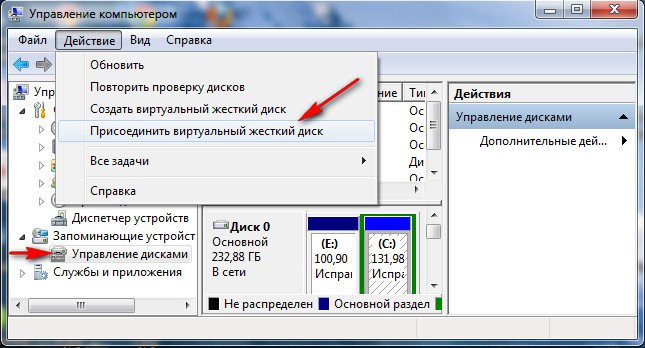
далее в Обзоре указываем нахождение нашего образа, находим папку WindowsImageBackup, заходим в неё и выделяем левой мышью файл формата VHD, далее жмём на кнопку Открыть.
Происходит превращение нашего образа в простой жёсткий диск, доступный в окне Компьютер. Копируем оттуда нужные нам файлы и всё.
Недостатки средства Создание образа системы: невозможно настроить автоматическую архивацию без помощи дополнительного программного обеспечения.
Steps below iterate how to manually recreate the disk partitions required by Windows and restore a Windows installation from a system image backup created with the «Backup and Restore (Windows 7)» feature, especially when the official steps fail.
These steps were tested with Windows 11, but should work with prior versions of Windows as well:
- Preface
- Restore Windows Partitions
- Restore from WindowsImageBackup
- Mount VHDX hard disk containing WindowsImageBackup
- Capture VHDX WindowsImageBackup to a Windows Image File
- Apply Captured Windows Image File to
C:Drive - Unmount VHDX hard disk containing WindowsImageBackup
- Configure the EFI Boot Partition
- Reboot Your Computer
Preface: Before the «how’s», here are the «why’s»:
I had my hand forced to be on Windows 11 because of being stuck on an expired insider build of Windows 10, my options were reinstalling Windows from scratch and reinstall / reconfigure all applications or buy a TPM 2.0 chip and try to update to Windows 11. I opted for the «easy» path of the TPM 2.0 install and upgrade Windows to version 11, especially given the time I had invested in getting my development workstation just the way I want it. Seemed to go well, except I was still stuck in the «Windows 11 Insider Preview» loop until the next «major» release — you must be patient with build releases to get out of the insider program — waiting for a major release. This didn’t seem too bad; I had been on the Windows 10 insider program for years with very few issues — certainly never had any update that «blocked» day-to-day work.
Everything was fine for a month or so, but as luck would have it, the latest Windows 11 Insider Preview 22523.1000 refused to install. The error was vague, the dreaded 0x80070422 type Windows error that truly means nothing useful. The thought of being «stuck» on an insider build again was not appealing — being stuck on any insider build means when it expires, you are back to the singular option of «reinstall Windows». <Day 1> I tried several things to «fix» this issue with no luck. Finally, I booted into a Windows recovery environment and tried some basic Windows recovery options — FYI, I felt comfortable performing these types of actions since I had a recent backup from the «Backup and Restore» option found in control panel which included a system image backup of my entire C: drive. I initially tried the restore option that sounded obvious, the «roll back the latest feature release» on Windows. That was the beginning of the end, it «uninstalled» fine — but my system would not even boot now. Note to self: do not try to «roll back» anything when you are an insider build. Best I could tell the system thought it was in the middle of an upgrade to the latest insider preview when I tried to roll it back, leaving the system in some kind of «very» poor state.
Next obvious thing, try to get back to where you were using your handy backup! Just so you know, even though Windows happily includes the «Backup and Restore (Windows 7)» feature in control panel, I discovered that it is apparently considered deprecated, perhaps that is why they go out of the way to label it Windows 7. I suppose the only reason it is still there is because there is really nothing else readily available to replace the «system image backup» feature that is built into the latest Windows versions –- sorry, having backups of my files using the «File History» feature is not the same, this was an OS issue. So, to continue my diatribe, I tried many times (in many different ways) to use the built-in recovery options to restore my latest system image. The UI recovery tools could find and detect the system image on my D: drive just fine, but the tools said I needed to boot off a recovery DVD to properly restore. Interestingly, I was booted off a USB, which to me should have been fine, but, against my instincts, I decided to «follow the prompts»: (1) «Insert a disc to burn a Windows Recovery DVD», OK, now (2) «Insert Windows Install media into DVD», yeah, into the same location where you are trying to burn a DVD (WTF) — reboot, rinse, tweak, repeat. <Day 2> Went to another computer to burn a DVD with an ISO downloaded for Windows 11 Insider Preview 22523.1000; well, it won’t «fit» onto a 4GB DVD, by just a few MBs. OK, I need a dual-layer DVD to give me 8GB; of course I don’t have one of those and I am not even sure my DVD burner will even burn dual layers (who even uses DVDs these days?). <Day 3> Went to Office Max, bought the very last pack of dual-layer DVDs; these were probably sitting there for the last 5 years. Back home again, sure enough, my DVD burner (in a second computer) will not properly burn a dual-layer DVD; it acted like it would, but not before I waste three DVDs trying. Went to another, newer computer, in the house that had a Blue Ray burner — this one worked, finally! And… wouldn’t you know it, the DVD reader in my broken computer refused to read the dual-layer DVD, ugh.
With that trial exhausted, time for other options. <Day 4> One Googled site basically said, «try expanding your EFI boot drive to give Windows more space»; the arguments made for this did sound convincing, however, this ultimately ended in utter disaster with all SSD partitions (where my C: drive / Windows install resided) gone in the end — don’t ask, but it involved booting into GParted, some user errors, and lots of cursing. Now I also needed to get my SSD back in order so that I could get back to my original step of trying to restore from the saved WindowSystemImage. At this point, I was sufficiently nervous about my «single» backup — so from the Windows Recovery command prompt (who would soon be my best friend), I made a backup of my backup. Luckily, I had plenty of space and two extra drives, so I copied my WindowSystemImage from my D: drive to what used to be my I: drive; my drives were now inconveniently labeled such that I: was now C: (although D: was still D:), all because my SSD was now just empty space.
<Days 5-10> What follows are my summarized «directions» to what ultimately restored my computer as gleaned from many days of Google research, lots of trial and error, multiple attempts and almost giving up several times. I provide here my gratitude and thanks 🖖 to those before me who had encountered similar issues, providing thoughts on resolution. FYI, a derivation of steps found in this article was the ultimate key to success. I condensed the resolution here in step-by-step form to provide (hopefully) all the detail needed to restore a system from a «Backup and Restore» system image, all in one spot – this being for me, next time, as much as the next desperate soul that happens upon this.
Restore Windows Partitions
FYI, if you found yourself here to simply to restore a Windows installation from a system image backup created with the «Backup and Restore (Windows 7)» feature, I recommend moving on to the next section. You should only need to follow these steps to restore Windows partitions if you have totally hosed your hard drive.
To get all the required Windows partitions back into proper shape from scratch, you must make DISKPART your friend. To manually make a bootable Windows drive, and all required partitions, here are the steps:
- Run
DISKPARTfrom a Windows Recovery command prompt - Run
list diskto get a feel for which disks are available — you need to find your original Windows disk, e.g., an SSD - You can also run
list volumeto show currently active volumes, hopefully your other drives (like those with the system image backup) are still around and visible - In my case, since what was originally my
I:drive was now labeledC:, I needed to relabel the drive —C:drive needs to be for Windows install - Disk 0, in my case, is what I want to be my
I:drive, so I followed these steps: select disk 0assign letter=I- Now I have a
D:drive and anI:drive, like my original configuration, and drive letterCis now available - Disk 3, in my case, is my SSD where I want my
C:drive, so I select it: select disk 3- Now for the «put things back in order» part. Note: before running next command, run
list diskand double-check that the correct disk is selected. clean<- This fully wipes everything from the disk and does not ask «are you sure», yikes! Scary commandconvert gpt<- This converts the disk to use Guid Partition Tables (as required by a standard UEFI Windows boot)create partition efi size=100<- This creates the EFI boot partition, yes 100MB is plenty, even for Windows 11format quick fs=fat32 label=System<- Formats the EFI partition as FAT32 (as required by a standard UEFI Windows boot)assign letter=S<- We give it drive letterSfor now, will need this later when we associate the boot partition with Windows installationcreate partition msr size=16<- This creates the Microsoft reserved partition (as required by a standard UEFI Windows boot)create partition primary<- This creates the partition that will hold Windows installation (takes up remainder of available disk space)shrink minimum=500<- Free up 500MB at the end of the disk to hold the Windows recovery partitionformat quick fs=ntfs label=Windows<- Formats the Windows partition as NTFSassign letter=C<- Finally, aC:drive back on the SSD!create partition primary<- This creates the Windows recovery partition on the last free 500MB of spaceformat quick fs=ntfs label=Recovery<- Formats the Windows recovery partition as NTFSassign letter=R<- Assigns the Windows partition as drive letterR(use this later to put back the needed recovery files)set id=de94bba4-06d1-4d40-a16a-bfd50179d6ac<- This is the specially defined Guid for the Windows recovery partitiongpt attributes=0x8000000000000001<- This is the specially defined GPT attribute for the Windows recovery partitionexit<- We are done with DISKPART for now
Now we should have the following:
- a 100MB empty EFI boot/system partition (
S:) - a 16MB reserved partition
- an empty partition (
C:) that will hold our Windows installation sized at all remaining available space - a 500MB empty Windows recovery partition (
R:)
Technically the EFI drive should now be «bootable», but there are no boot files on the drive yet and it is not associated with any Windows installation. We can only «fix» this when a valid Windows installation is available on the C: drive — so the next steps detail how to restore a Windows install from a WindowsImageBackup. The last step will setup the EFI drive boot files and associate it with the Windows install that gets restored on the C: drive.
Restore from WindowsImageBackup
All image operations from the command prompt use the DISM command. This is a powerful, if not often troublesome, tool for managing Windows disk images. Currently, the DISM tool can only use a .WIM file, i.e., a Windows Image File, to apply an image to a hard drive. The system image backup created with the «Backup and Restore (Windows 7)» feature is literally a .VHDX file, i.e., a virtual hard disk, exactly like the ones used in virtual machines. The goal then, is to convert from a .VHDX file to a .WIM file, but there is no direct feature for doing this. However, DISM can be used to mount the VHDX hard disk into a local folder.
Once a VHDX hard disk is mounted, all files are available, then you can use DISM to create a new WIM file. Sounds simple enough, but this is where I ran into trouble with Access Denied and other file access errors, reason being: Windows rights still apply. The place where I consistently ran into issues was my own local C:\Users\ritchie folder. For any files / folders where I had adjusted rights, I had issues.
You must remember, you are in a Windows recovery boot environment as some admin-type user, but file rights still apply. I had trouble creating an image from my mounted VHDX hard disk for any files where I manually adjusted file rights, and, with OneDrive folders where I assume file rights had been adjusted on my behalf. The primary issue here is that the process of creating a WIM file from a mounted VHDX hard disk takes many hours (around six for me), and sometimes it would be «hours» into the process before it crashed, unrecoverably.
To fix the issue I literally «deleted» the offending files from the mounted VHDX hard disk folder. Having a full backup of your WindowSystemImage is highly recommended before you go off deleing files, but the mounting process for a VHDX is interesting in the fact that no changes, including deletions, will be committed to the hard disk until you request it when unmounting — there is a feature on unmount which will allow you to «discard» all changes. Discarding deletions is super handy for this operation since you can remove offending files from the mounted VHDX hard disk folder so that the WIM can be successfully created, then undo the changes upon completion. For example, you can remove all potentially problematic files in the «Documents» and «OneDrive» folders from the mounted VHDX hard disk such that these files do not end up in the WIM, and consequently will not be restored. However, you can discard changes to the VHDX when the Windows Image File creation is complete –- then upon successful Windows restoration, you can remount your VHDX hard disk from within your active Windows session, using your original user rights, and restore the removed files, original file rights and all.
Mount VHDX hard disk containing WindowsImageBackup
- Create a folder to mount the virtual disk, e.g.,
D:\Mount - If it does not exist, also create a temporary folder, e.g.,
D:\Temp - Locate the VHDX file with the system image, typically in a folder like
WindowsImageBackup\{SYSTEMNAME}\Backup {YYYY-MM-DD} {HHmmss}\where the file name is a Guid with a «.vhdx» extension - Note that there may be multiple «.vhdx» files in this folder, but the largest one is the one that should be mounted — it will also likely be the only file that will successfully mount
- Run the following command, replacing the
/ImageFile:with the located VHDX file:
DISM /Mount-Image /ImageFile:"D:\WindowsImageBackup\RITCHIE-HOME\Backup 2021-12-21 070010\00985097-961c-471c-8a13-a55230708d3e.vhdx" /Index:1 /MountDir:D:\Mount\ /ScratchDir:D:\Temp /LogPath:D:\Temp\dism-mount-log.txt
Note that the /ScratchDir parameter is important, it needs to be on a drive with plenty of space. Otherwise, this defaults to a location on the Windows recovery environment, like the USB boot disk, which may run out of space.
Mounting a drive will should go quickly. If there are errors, check the log file. Even in this Windows recovery environment, you can still launch notepad.exe from command prompt.
Once mounted, you should be able to navigate (i.e., cd) into the D:\Mount folder from the command prompt and peruse all your backed up system files and get warm fuzzies that all is not lost.
Capture VHDX WindowsImageBackup to a Windows Image File
This next step is a crucial one, it is where the mounted VHDX gets converted to a WIM. This is also the most painful, prone to errors, and slow step – good luck!
BTW: You might think now that the VHDX is mounted, you should be able to just copy the files back to the
C:drive. I tried this as well, but with no luck. Perhaps you will have better luck than me, but the/Capture-Imageand/or/Apply-Imageprocess is doing something, perhaps rights related, that makes Windows look like Windows. Regardless, as painful as this step is, once you have a good WIM file, the/Apply-Imagedoes work.
- Create a folder to hold the captured Windows Image File, e.g.,
D:\Capture(if you have a separate HDD, it may be optimal use a different drive for the captured WIM from the source VHDX) - I would recommend going ahead and deleting files in the
D:\Mount\Users\{myuser}\Documentsand anyOneDrivefolders inD:\Mount\Users\{myuser}\that might cause you headaches, retries here are slow and annoying - Remember you can always restore any removed files manually when your Windows environment is back online later. That said, be careful to keep up with what was deleted and try not to remove anything that will cause Windows to have startup issues
- You may need to repeat the deletes for other users as well. Regardless, be prepared to execute this operation several times should the capture fail. Each time the capture fails, you will need to remove offending files
- Always check the log after a failure to determine which file is causing the issue (remember you can run
notepad.exefrom the command prompt to check the log file) - Run the following command, specifying the target WIM file to capture in the
/ImageFile:parameter:
DISM /Capture-Image /ImageFile:D:\Capture\Backup.wim /CaptureDir:D:\Mount /Name:Win11Backup /Description:"Windows 11 Backup" /Compress:none /Verify /ScratchDir:D:\Temp /LogPath:D:\Temp\dism-capture-log.txt
I ran this tool with no compression since I had disk space to spare and figured this would be faster. If you are low on disk space, see the other compression options.
Prepare yourself, this operation is extremely slow, be patient. On my system it took 20 minutes before it even showed any percent complete feedback — I was worried it was not doing anything and stopped it unnecessarily several times. Because I needed to keep deleting files when this process failed, the process was taking about 6-hours, and I was just leaving it to run, this step took me many days to finally complete.
If you are successful with this operation, you can proceed to next step.
Apply Captured Windows Image File to C: Drive
Hopefully, on your system, this step is as simple as running the DISM /Apply-Image command shown below. If you do run into trouble, this section details steps that may help bail you out. Regardless, this step tends to go quickly, at least as compared to the last one anyway.
- If your
C:drive is not freshly formatted from restoring Windows partitions, or you are retrying this step, format the drive now to clear things out:FORMAT C: /Q /FS:NTFS - For the first pass, start with step 10 below, then only come back to step 3 if needed
- You might be surprised to find that you can also have Access Denied type errors during this application phase that did not show up during the capture phase, go figure
- Should there be errors during this process, there is good news: you do not have to fully repeat the many hours-long last capture/conversion process — instead, you can directly mount your WIM file and remove the offending files
- Always check the log after a failure to determine which file is causing the issue then you can mount the WIM file
- The process for mounting the WIM file is identical to mounting the VHDX file, just use a different mount folder and specify the
D:\Capture\Backup.wimfor the/ImageFile:parameter - Like before, be careful to keep up with what was deleted and try not to remove anything that will cause Windows to have startup issues
- After deleting files in the mounted WIM, make sure to unmount the WIM file (see next section) after the deletes, with one caveat:
- Unlike using the
/Discardoption like you do on the VHDX, you instead need to use the/Commitoption to save the deletes, this makes sure the files are not in the WIM before attempting the application process again - Run the following command, specifying the captured WIM file:
DISM /Apply-Image /ImageFile:D:\Capture\Backup.wim /Index:1 /ApplyDir:C:\ /Verify /ScratchDir:D:\Temp /LogPath:D:\Temp\dism-apply-log.txt
Unmount VHDX hard disk containing WindowsImageBackup
- When the capture/apply steps are complete, do not forget to unmount the virtual hard disk that contains the WindowsImageBackup
- If you made deletes in the mounted VHDX, these will be discarded now (per the
/Discardparameter) so that these deletions can be restored after Windows comes back online - Run the following command, specifying the original mount folder:
DISM /Unmount-Image /MountDir:D:\Mount\ /Discard /ScratchDir:D:\Temp /LogPath:D:\Temp\dism-unmount-log.txt
Configure the EFI Boot Partition
Note: This is not a necessary step if you only restored the WindowsImageBackup.
If you followed the steps to restore Windows partitions, you will now need to fix the EFI boot partition.
Once the C: drive containing the Windows installation has been restored, run the following command (this assumes EFI drive is accessible as drive S:):
bcdboot C:\Windows /s S:
Reboot Your Computer
If everything went well, your computer should come back to life. Make sure to restore any files you manually removed to get to this point.
You can re-run the «mounting the VHDX file» steps from a Windows command prompt to get the original files back online.
Then you can run something like the robocopy command to restore deleted files, for example:
robocopy D:\Mount\Users\ritchie\Documents C:\Users\ritchie\Documents /ZB /E
Enjoy the peace, whilst you can.
Restore files from a file backup after restoring your computer from a system image backup
- Select the Start button, then select Control Panel > System and Maintenance >Backup and Restore.
- Choose Select another backup to restore files from.
Contents
- 1 How do I restore a system image in Windows 10?
- 2 Can I restore from a system image?
- 3 How do I restore Windows server image backup from an external hard drive?
- 4 How do I restore my server image backup?
- 5 How do I restore a backup in Windows 10?
- 6 How do I restore a Windows 10 backup to a new hard drive?
- 7 How do I do a Windows restore?
- 8 How do I restore a system image from a USB drive?
- 9 How do I restore a Windows 2012 system image?
- 10 How do I restore my backup files?
- 11 How do I restore a Windows server backup?
- 12 Does Server 2008 have System Restore?
- 13 How do I restore a Windows Server 2016?
- 14 Can I restore Windows server backup to a different computer?
- 15 Where are Windows 10 Backup files stored?
- 16 What is a Windows Restore Point?
- 17 Does Windows 10 have system image backup?
- 18 What is the difference between a backup and a system image?
- 19 How do I transfer everything from my old computer to my new computer Windows 10?
- 20 How do I restore system in Windows 10?
How do I restore a system image in Windows 10?
To use your system image to restore your PC, open up the new Windows 10 Settings menu and go to Update & recovery. Under Recovery, find the Advanced startup section, and click Restart now. When your PC restarts, go to Troubleshoot, Advanced Options, and then choose System image recovery.
Can I restore from a system image?
The only drawback is that you can’t restore individual files via System Image Backup, only the entire image. So you’ll want to create the image on a fairly regular basis to house the latest version of your Windows 10 environment.
How do I restore Windows server image backup from an external hard drive?
Connect the external hard drive to your computer.
- Open “Settings” > click “Update and Security” > “Backup” > “go to Backup and Restore (Windows 7)”.
- Choose to “Create a system image” on the left pane > check “On a hard disk” option under “Where do you want to save the backup?”.
- Click “Next” > “Start backup”.
How do I restore my server image backup?
How to Perform Windows Server Restore from Backup
- Boot Windows Server into WinRE with the installation disc if needed.
- In the next window, click “Repair your computer”, “Troubleshooting”, and then “System Recovery Options”.
- Select “Windows Complete PC Restore” to enter the Windows Recovery Environment.
How do I restore a backup in Windows 10?
How to restore backup on Windows 10
- Open Settings.
- Click on Update & Security.
- Click on Backup.
- Under the “Looking for an older backup” section, click the Go to Backup and Restore option.
- Under the “Restore” section, click the Restore my files button.
- Click the Browse for files button.
How do I restore a Windows 10 backup to a new hard drive?
Reinstall Windows 10 to a new hard drive
- Back up all of your files to OneDrive or similar.
- With your old hard drive still installed, go to Settings>Update & Security>Backup.
- Insert a USB with enough storage to hold Windows, and Back Up to the USB drive.
- Shut down your PC, and install the new drive.
How do I do a Windows restore?
Use System Restore
- Select the Start button, then type control panel in the search box next to the Start button on the taskbar and select Control Panel (Desktop app) from the results.
- Search Control Panel for Recovery, and select Recovery > Open System Restore > Next.
How do I restore a system image from a USB drive?
At the bottom under Restore, click-on Select another backup to restore files opens Restore Files (Advanced), Click-on the Browse network location and type in the USB shared path; \exampleh.
- Settings,
- Update & security,
- Recovery,
- Under the Advanced startup heading, click on the button for Restart now.
How do I restore a Windows 2012 system image?
Symptoms
- Boot the server with the OS media in the DVD drive and press any key when prompted.
- Choose the appropriate language options, time and currency format, and keyboard layout, and click Next.
- Click Repair your computer.
- Click Troubleshoot.
- Click System Image Recovery.
How do I restore my backup files?
Restore files with File History
- Connect the external storage device that contains your backup files.
- In the search box on the taskbar, type Control Panel, then select it from the list of results.
- In the search box in Control Panel, type File History.
- Follow the instructions to restore your files.
How do I restore a Windows server backup?
Start Windows Server Backup. Select Local Backup. In the Actions pane, click Recover… to start the Recovery Wizard.
Does Server 2008 have System Restore?
Windows Server 2008 does not include System Restore. Alternatively you can use the Windows Backup and/or Previous versions/Shadow Copies functionality.
How do I restore a Windows Server 2016?
Whichever case you are in, the operation to restore Windows Server 2016 system are roughly the same:
- Go to Restore tab and choose Select Task or Select Image File to locate the system image you want to restore.
- Choose Restore this system backup and click Next.
- Confirm the operation and click Start Restore.
Can I restore Windows server backup to a different computer?
You can restore a system state backup to the same physical computer from which the system state backup was created, or to a different physical computer that has the same make, model, and configuration (identical hardware).
Where are Windows 10 Backup files stored?
By default, File History backs up important folders in your user folder—stuff like Desktop, Documents, Downloads, Music, Pictures, Videos, and parts of the AppData folder. You can exclude folders you don’t want backed up and add folders from elsewhere on your PC that you do want backed up.
What is a Windows Restore Point?
A system restore point is an image of the system configuration and settings in the Windows Registry that helps in restoring the system to an earlier date when the system was running perfectly. You can create a system restore point manually from the System Protection tab of the System Properties window.
Does Windows 10 have system image backup?
Quick note: The System Image Backup tool for Windows 10 is no longer a maintained feature, but you can still use it for the foreseeable future.
What is the difference between a backup and a system image?
So what is the difference between common backup vs system image? And if you perform a regular backup before, you can choose to restore only one or two of these files, which saves time.The system image is a copy of the entire hard drive, so choosing to restore it all will take a lot of time.
How do I transfer everything from my old computer to my new computer Windows 10?
Jump to:
- Use OneDrive to transfer your data.
- Use an external hard drive to transfer your data.
- Use a transfer cable to transfer your data.
- Use PCmover to transfer your data.
- Use Macrium Reflect to clone your hard drive.
- Use Nearby sharing instead of HomeGroup.
- Use Flip Transfer for quick, free sharing.
How do I restore system in Windows 10?
To use System Restore from the Advanced startup environment on Windows 10, use these steps:
- Click the Advanced options button.
- Click on Troubleshoot.
- Click on Advanced options.
- Click on System Restore.
- Select your Windows 10 account.
- Confirm the account password.
- Click the Continue button.
- Click the Next button.
-
Что это за папка?
-
Можно ли удалить?
-
Создание и восстановление системы из образа
-
Настройка параметров архивации
-
Перемещение или удаление папки
Пользователи ОС “семейства Windows” могут столкнуться в постоянном уменьшением свободного места на системном диске. Это может случится по разным причинам, одной из которых станет наполнение тяжелыми файлами папки WindowsImageBackup. Что это за папка, какие файлы в ней хранятся и какие операции с ними можно сделать, рассмотрим в этой статье.
Что это за папка?
Папка WindowsImageBackup содержит файлы-образы копии вашей операционной системы, программ, системных файлов и параметров. Эти образы – Backup ОС, который настраивается с помощью утилиты архивации Windows.
Можно ли удалить?
Да, вы можете удалить файлы в папке если они занимают много места, но не стоит удалять их все. Удаляйте только старые образы для восстановления Windows. Также, вы можете настроить параметры резервного копирования для гибкого управления местом на дисковом пространстве.
Создание и восстановление системы из образа
Для создания образа:
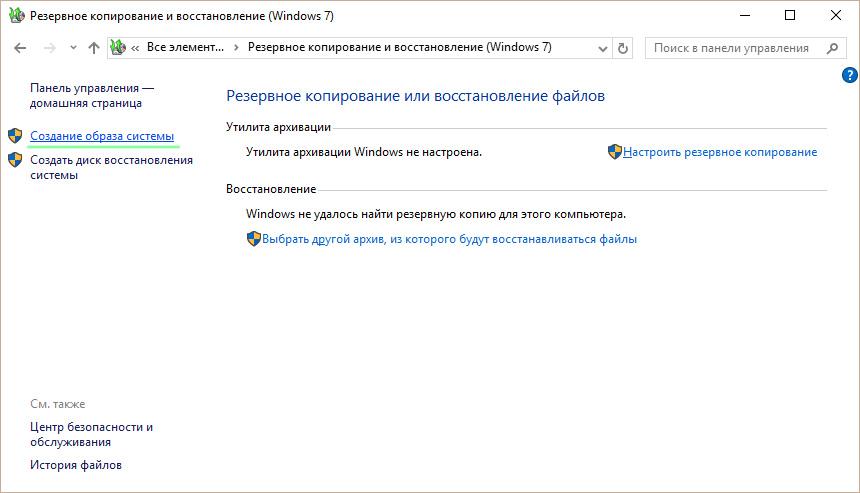
- ПКМ (правой кнопкой мыши) по Пуск → Панель управления → Резервное копирование и восстановление.

- Слева нажмите на “Создание образа системы”, выберите носитель (сетевой диск, гибкий диск или внешний накопитель). Начнется копирование.


Для восстановление ОС с образа папки WindowsImageBackup:
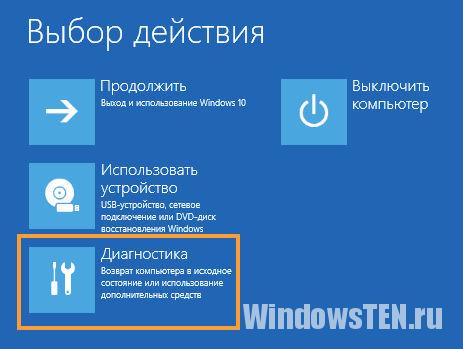
- ЛКМ по Пуск → Параметры → Обновление и безопасность → Восстановление → Особые варианты загрузки (перезагрузить сейчас).

- Выберите на экране загрузки «Диагностика».

- Перейдите в «Дополнительные параметры» → Восстановление образа системы.


Настройка параметров архивации
Перед тем как начать настраивать, вам следует знать, что:
- Резервные копии создаются сериями (их называют периодами архивации). Чтобы не занимать много места на жестких дисках, программа единожды создает копии всех файлов и папок, а далее делает архивы новых файлов, которые появляются на ПК.
- После прохождения определенного периода, Windows снова делает полную архивацию. На вашем ПК появляется вторая полная резервная копия образа системы.
- По умолчанию, Windows сохраняет архивы до тех пор, пока не займет 30% свободного дискового пространства. Когда диск будет переполнен, ОС автоматически будет удалять старые образы.
Для настройки архивации:
- ПКМ по Пуск → Панель управления → Резервное копирование и восстановление.
- Выберите Управление пространством → Архив файлов данных → Просмотреть архивы. Здесь вы можете просмотреть и удалить ненужные архивы.
- Для уменьшения объема дискового пространства, что используется под файлы для архивации, зайдите в раздел “Образ системы” → Изменить параметры.
- Также, здесь можно задать сохранение только последнего образа системы.
Важно! Если архивация не настроена, раздел “Управление пространством” не появится.
Перемещение или удаление папки
Переместить папку можно привычным способом: скопировав WindowsImageBackup и переместить в другую директорию. Для удаления, правой кнопкой вызовите контекстное меню и нажмите удалить (потребуются права администратора).
Для выключения архивации Windows зайдите в “Резервное копирование и восстановление” и нажмите отключение.