by Radu Tyrsina
Radu Tyrsina has been a Windows fan ever since he got his first PC, a Pentium III (a monster at that time). For most of the kids of… read more
Updated on
- If you’re looking for alternatives to the Cortana virtual assistant, make sure to check out our picks
- You might also be interested in other artificial intelligence software programs
- Windows users looking for a way to automate PC tasks can check out our favorite tools for the job
- Visit our Tools and Utilities section to read more awesome guides!

Talking PC software tools take your ordinary computer and give it Artificial Intelligence powers. There are a lot of AI programs that allow you to interact with your PC and transform the machine into your very own personal assistant.
Thankfully, we live in a time where interacting with your computer is not Sci-Fi anymore. And this possibility is right here at your fingertips, so it would be a shame not to try it for yourself.
We gathered the 6 best PC tools that can talk back to you, so make sure to check out their features. Some are unique.
After seeing what they’re capable of, you can make an informed decision for your needs. Become BFFs with your computer today!
Top 6 software programs that talk back
Jarvis

Jarvis is created by The Pennyworth Project, and it’s a great context-sensing software program with prediction support. It supports Learners, Predictions, Rules, and Sensors.
The automatic mode provides correction when a specific trigger is detected, and you will get the opportunity to configure the triggers via the configuration menu.
Here are the key features of Jarvis:
- After you install the Jarvis app, you can launch the software by finding and clicking the new Jarvis group entry in Windows’ Start Menu.
- When you first launch the tool, there’s a small icon that will appear in the system notification area, and this will be the main way that you will use to interact with JARVIS.
- If you right-click on the icon, there will appear a menu, and this will expose all the functionalities that this software is able to provide.
- You will be able to train the software and monitor its context predictions until it gets better and better.
- Over time, the software will become great at predicting your context automatically.
⇒ Get Jarvis
Looking for a language-learning software with speech recognition? Find the best ones in this article.
Braina

Braina is short for Brain Artificial, and it’s an intelligent virtual assistant that will allow you to interact with your PC via voice commands.
If you think that this sounds a lot like Siri or Cortana, we have to tell you that you’re wrong. Braina is not a search program, and it can do much more.
How we test, review and rate?
We have worked for the past 6 months on building a new review system on how we produce content. Using it, we have subsequently redone most of our articles to provide actual hands-on expertise on the guides we made.
For more details you can read how we test, review, and rate at WindowsReport.
Here are the key features of the Braina AI software:
- This is a human language interface, voice recognition and automation software for systems running Windows.
- This fantastic software allows users to accurately convert speech to text in more than 100 different languages.
- Using Braina, you will be able to control your computer using natural language commands.
- This is not a simple chat-bot, and its primary focus is to be extraordinarily functional and to help users in doing various tasks.
- You will be able to type all kinds of commands and even speak to it, and Braina will understand perfectly what you want from it.
- Braina is a result of intense research that was made in the field of AI.
- The software is a digital assistant that is able to understand, think and also learn from its experience just like a human brain.
- Braina can also learn from conversations.
This is a multi-functional AI software that provides a single-window environment to control your PC and perform a massive range of tasks such as dictation, searching data online, playing songs, opening and searching files on your PC, setting alarms and reminders, performing mathematical operations, remembering notes, automating various tasks, reading e-books and more.
⇒ Get Braina
Take a look at the best speech therapy software for Windows 10 in this useful article.
Talk for Me
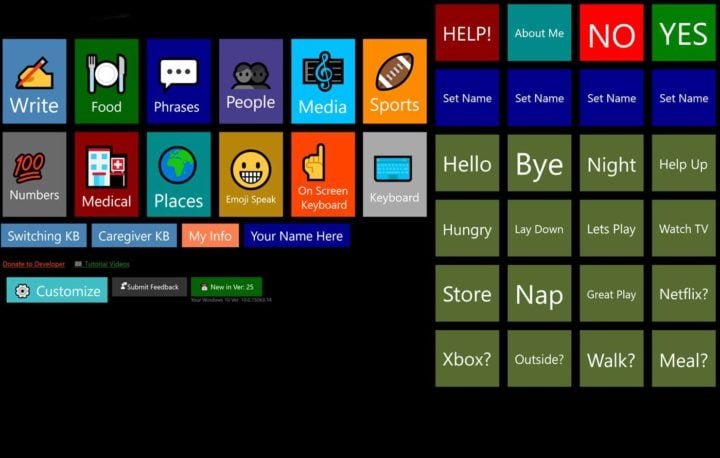
Talk for Me is an app that is designed to offer a voice to those without a voice.
It comes with a few sections with tiles that are designed to help users string together sentences in order to be able to communicate better with the ones around.
This tool also packs a dedicated keyboard function where a user will be able to type in a message and then have the computer speak on their behalf.
This tool is more than useful for people who have Autism, PSP, ALS, CBD, survived strokes and more.
Here are the key features of Talk for me:
- This is a text to speech designed app with massive touch points.
- The software comes with a customizable home screen that makes it easy to use even for people who are not really advanced or experts in this kind of software.
- The customizable sections include People, Food, Phrases, People, Sports, Entertainment, Medical, Numbers, and Persona Information.
- The app comes with a large on-screen keyboard.
- You will be able to adjust the rate of speech and the voice based on your computer’s installed voices.
- This software works flawlessly with mouse, touch, keyboard and also pen, but this depends on the device that you are using.
This app packs a lot of useful features and the fact that it’s highly customizable comes in handy every time.
There are lots of users who say that they use this app for patients who are not able to speak and via this app, the patients are able to communicate with others, and this is beyond amazing.
⇒ Get Talk to Me
If you’re interested in speech recognition apps for Windows 10, find our best picks in this article.
DataBot
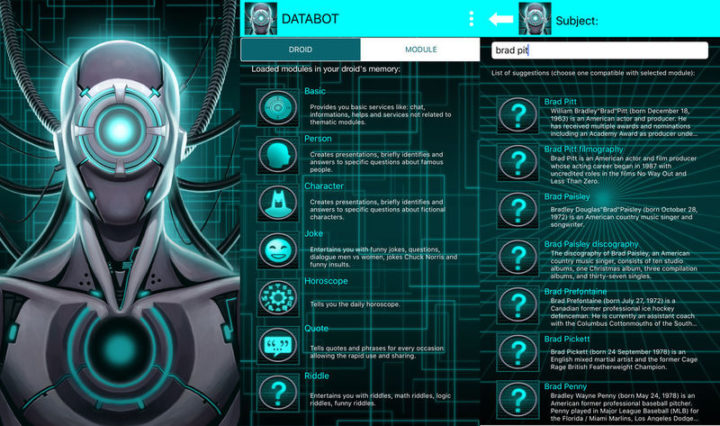
DataBot is a free virtual talking robot that you will be able to install on your computer running Windows. It answers to your question with its own voice, depending on the topic.
There are various apps and services that are integrated into this software to module in the bot’s memories, to give back to you images and to search all kinds of data.
You will be able to use DataBot whenever you travel, study, work, relax or play because it will search for you all that you need to listen or know in just a few seconds.
Here are the key features of DataBot:
- This software is able to quickly identify the subject that you required.
- DataBot can create customized multimedia presentations using text, images, and voice as well.
- This program is also able to answer various specific questions, and it will create reports that will include the answer, related details, search services, materials, links and more.
- DataBot allows you to share answers effortlessly using SMS, social networks, and emails.
- You can also enhance the bot’s abilities by using free or purchased upgrades.
- DataBot has the fantastic features of customizing itself based on your preferences that include voice, language, name, and behavior.
- The software will gain experience while you are using it and this can be considered as an alternative method to obtain upgrades that are available in the store or various exclusive rewards.
- The services and modules that are available in DataBot include some of the following: dictionary, horoscope, secretary, thematic, jokes, news, sounds, brain train, riddle, quotes, and more.
⇒ Get DataBot
Cortana
If you’re using Windows 10, you should already be familiarized with the Cortana virtual assistant. It’s a useful AI-powered tool you can use to set reminders, dictate emails to, find various information on the internet and so on.
Microsoft has added a series of new features to its virtual assistant in recent years. You can now use it on other operating systems as well, including Android.
Of course, in order to work properly, Cortana needs to access all the information on your computer. Some users may feel this affects their privacy, so keep this fact in mind when you turn on Cortana.
⇒ Get Cortana
Want to know how to install Cortana language packs on Windows 10? Check out this handy guide.
Computer Talker
Many people rely on text-to-speech programs since the PC does all the talking. Computer Talker is a free text-to-speech software for Windows, created by Point64.
It’s a simple tool that translates and converts anything you write to make the computer speak it out loud. Computer Talker has a built-in naturally sounding voice that can read your text out loud.
Here are the key features of Computer Talker:
- It comes with a straightforward user interface that makes it easier to be used even for beginners.
- The software is able to read or convert the text into speech using its naturally sounding female voice.
- This piece of software is effortless to use, and all you have to do is copy and paste the text that you want to convert into speech, and after you are done, you have to press the Talk button.
- The program can easily recognize English words, and it is able to pronounce them correctly.
⇒ Get Computer Talker
If you want to change your voice on Skype, check out this article with the best tool to do that.
Conclusion
These are six of the best programs that can make your computer talk to you and it’s recommended that you check out the whole set of their features before making your final decision.
If you have any other recommendations or questions, feel free to reach for the comments section below.
![]()
Хотя голосовые ассистенты уже давно не новость (они умеют управлять умным домом, колонками и даже автомобилями), на ПК функция находится в зачаточном состоянии уже много лет подряд и практически не развивается ни гигантами вроде Microsoft, ни сторонними разработчиками. Это странно, так как возможность управлять компьютером посредством голоса многим бы упростила жизнь, но, вероятно расширить голосовое управление на ПК или просто сделать его более глубоким слишком сложно. С другой стороны, при желании некоторые функции голосом выполнять всё же можно — нужно лишь немного потрудиться и скачать софт.
Алиса — полноценный ассистент с базовыми функциями
Алиса от Яндекса сама по себе очень умная и удобная в использовании — русский язык понимает отлично, может отвечать на вопросы, советовать фильмы и так далее. При желании это всё можно интегрировать в систему поиска Windows, дабы получать ответы в более удобном формате. Впрочем, стоит сразу отметить, что в 98% случаев Алиса на ПК предоставляет тот же набор функций, что и в браузере или мобильном приложении, тогда как на непосредственное управление ПК отведено всего 2% возможностей. Собственно, управление непосредственно компьютером сводится к возможности выключить систему, отправить её в сон или перезагрузить ПК.
Также пользователь может открыть Проводник, запросить быстрый доступ к какому-либо сайту (например, можно сказать «Алиса, открой Википедию»), просмотреть историю браузера (для браузера Яндекс) или включить/выключить звук. В теории, ассистент должен уметь открывать и приложения вроде Word или других офисных компонентов, но на текущий момент это не работает и помощник просто отправляет в поисковую выдачу. Естественно, в связке с умной колонкой функций будет гораздо больше, но все они завязаны на возможностях самой колонки, а не функциях компьютера.
Laitis — пожалуй, самый гибкий софт на рынке
Приложение Laitis не выделяется особо привлекательным интерфейсом, но при желании этот софт может существенно упростить вам множество процессов. Дело в том, что программа позволяет создавать специальные команды, выполнение которых активируется посредством голоса. Например, вы можете создать правило на закрытие окна или запуск приложения, после чего продиктовать голосом команду, чтобы софт распознал голос, и потом закрывать приложения короткой фразой «закрой Google Chrome» без мышки или клавиатуры. И таких функций у приложения огромное множество — оно даже умеет запускать .bat-файлы или JS-скрипты.
Список поддерживаемых функций на самом деле просто огромен — можно запускать любые приложения на ПК, отправлять курсор по нужным координатам, отображать окно поверх всех остальных, планировать события и многое другое. Но отдельно стоит упомянуть возможность взаимодействовать с веб-сайтами посредством голоса — например, направлять функцию фокуса на отдельный CSS-селектор или кликать по необходимому элементу на странице. Это очень удобно для людей с ограниченными возможностями, под нужды которых разработчики сайтов не спешат настраивать доступность.
Typle — динозавр, который до сих пор работает
Хотя софт, безусловно, достаточно старый (я его успешно протестирован на Windows 10), он всё равно способен выполнять поставленные перед ним задачи. Для этого достаточно создать пользователя и указать ему нужную базовую команду (например, «Открыть»), после чего перейти непосредственно к доступным командам для записи. В списке есть все установленные на компьютере приложения, также можно открывать системные утилиты, сайты и гибко настраивать параметры по отдельным параметрам. И после того, как команда сформирована и предварительные фразы записаны, можно приступать к управлению голосом — достаточно нажать на кнопку прослушивания и проговорить необходимую команду.
Для тех, кто часто запускает какие-либо приложения или открывает одни и те же сайты (на работе, к примеру), это очень удобное приложение, потому что можно назначить сразу несколько команд, после чего проговорить их, и все нужные ссылки будут открыты без лишних действий. Правда, нужно очень чётко проговаривать слова при первой записи и стараться потом при диктовке тоже проговаривать каждый звук, иначе программа собъётся и не поймёт, что вы хотели. И, конечно, основной недостаток софта в том, что из фона он не работает — нужно каждый раз открывать окно, нажимать на кнопку и проговаривать команду.
Встроенные голосовые команды Windows 11 — шикарный и недоступный инструмент
Пожалуй, наибольшей глубиной взаимодействия с функциями компьютера посредством голосовых команд может похвастаться операционная система Windows 11, которая в этом плане на три головы выше предшественника. Встроенные инструменты распознавания голоса, которые работают даже без подключения к интернету, позволяют переводить систему в сон или выключать её, открывать и закрывать приложения, создавать и переименовывать файлы или папки, открывать страницы в браузере и многое другое. Разработчики операционной системы действительно потрудились над этим вопросом и в Windows 11 компьютером можно полностью (практически) управлять только за счёт голоса.
Более того, встроенными же инструментами можно даже набирать текст — операционная система умеет правильно распознавать слова и ставить знаки препинания на основе интонации даже на русском языке, хотя, конечно, ошибки тоже встречаются и очень часто. Единственная проблема голосовых команд в Windows 11 заключается в том, что поддерживается исключительно английский язык — команды на русском не работают. Это не совсем удобно при полном отсутствии познаний в английском, но, с другой стороны, не нужно быть знатоком языков, чтобы сказать «open google chrome» или «close window».
- Теперь не боюсь за Windows: точки восстановления создаются каждый день. Вот как это настроить
- 7 функций, которые сделают Windows 12 лучшей системой. Если Microsoft пойдёт на это
- Эта бесплатная утилита от Microsoft в разы ускоряет работу. Она существует ещё с Windows 95
- Эта утилита показывает, где используется выбранный файл в Windows и что мешает удалить его
- Мод Windows 10 для игр: тестирую Atlas OS, из которого вырезали лишнее ради производительности
Вам может быть интересно: Как установить приложение Google Ассистент с графическим интерфейсом на ПК c Windows 11 \ 10
Google Assistant – это виртуальный личный помощник, выпущенный Google. Ассистент уже умеет разговаривать на русском языке. Он готов прийти на помощь в любом месте и в любое время. Следите за своим расписанием, решайте повседневные задачи, управляйте устройствами умного дома, развлекайтесь и делайте многое другое. На сегодняшний день существует ряд помощников AI, претендующих на звание лучшего — Siri, Amazon Alexa, Cortana и т. Д., Google Assistant один из лучших на рынке.
Google и Microsoft особо не заморачивались, поэтому нет простого способа установить Google Assistant (Google Ассистент) в Windows 10. Конечно Вы можете установить приложение Google Assistant (для Android или iOS ) на телефон или планшет, купить устройство Google Home и установить его рядом с компьютером под управлением Windows или macOS.
Хорошая новость заключается в том, что вы можете установить и настроить базовую версию Google Assistant на ПК с текущей версией Windows 10. В будущем Google может добавить Google Assistant в браузер Chrome для Windows. Чтобы получить Google Assistant на компьютер с Windows 10, вам нужно следовать инструкции ниже, в настоящее время это единственный способ установить его в Windows.
Для выполнения установки Google Ассистента в Windows вам потребуется:
- Аккаунт Google, чтобы создать проект Google Cloud Platform для Ассистента Google.
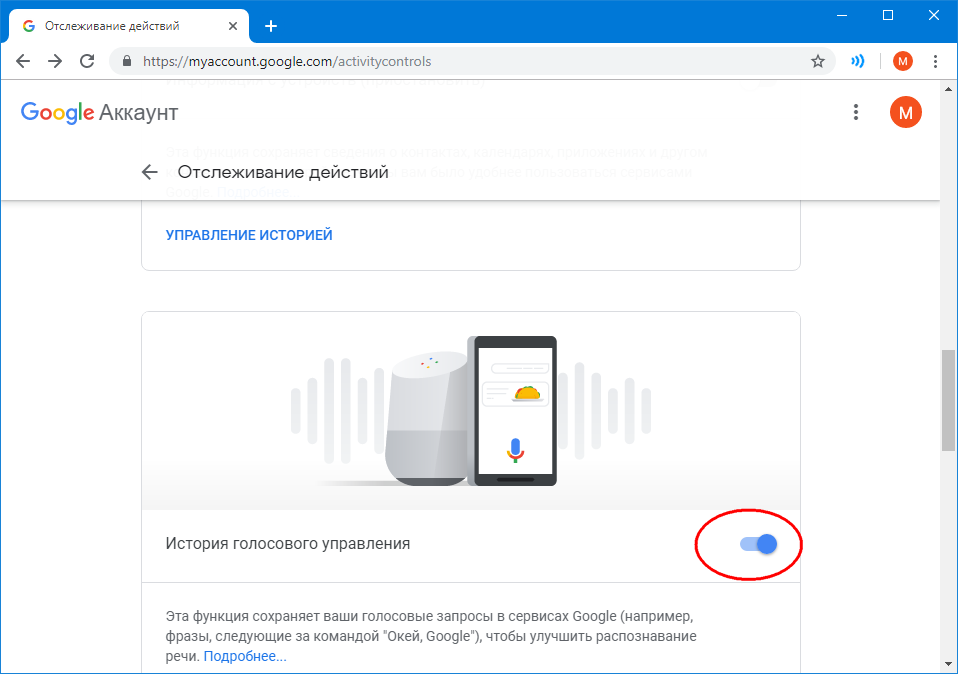
- Включить доступ к голосовой и звуковой активности для своей учетной записи Google. (Часто опция уже включена, но вы можете включить его вместе с другим доступом к информации по адресу https://myaccount.google.com/activitycontrols )
В любом случае, не будем терять время, приступим.
Установка Google Ассистента в Windows 10.
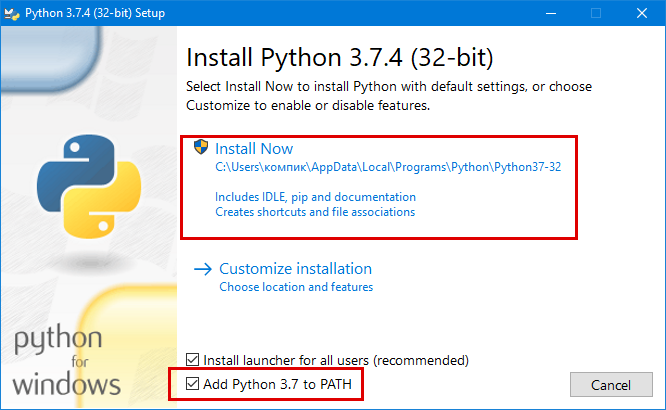
Шаг 1: Загрузите и установите Python версия -3.7.6 (Это важно). Дважды кликните загруженный файл, чтобы запустить его, затем установите флажок «Add Python 3.7 to PATH» и выберите «Install Now», установка может занять несколько минут.

Откройте командную строку от имени администратора, введите следующую команду:
Python
Если Python установлен, то приведенная выше команда вернет текущую версию Python, установленную на вашем компьютере.

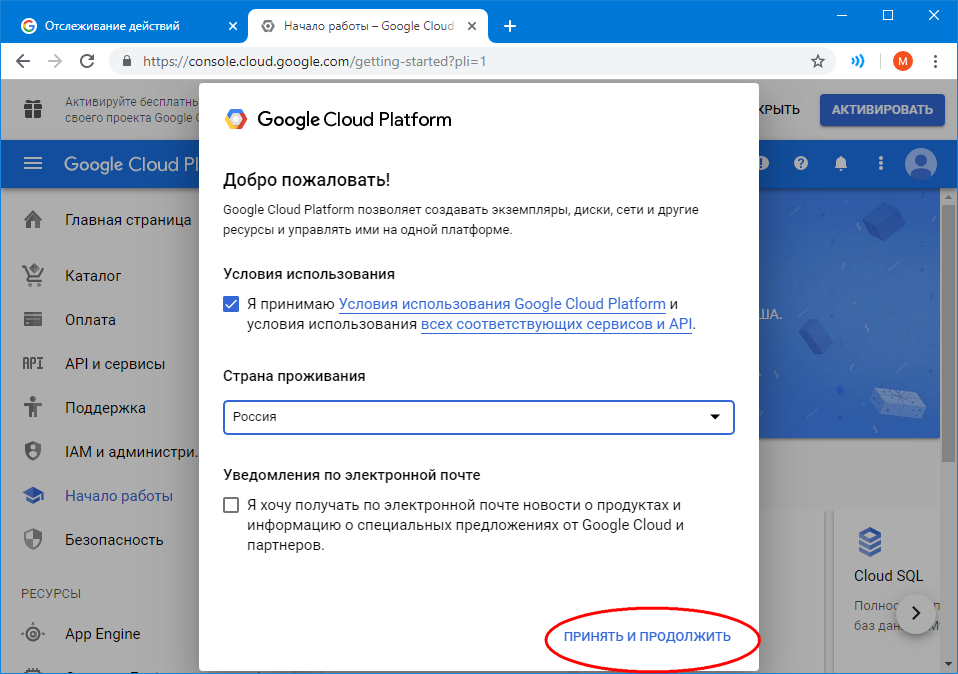
Шаг 2: В браузере (предпочтительно Chrome) откройте https://console.cloud.google.com. Если будет предложено, Войдите в свою учетную запись Google и примите условия.

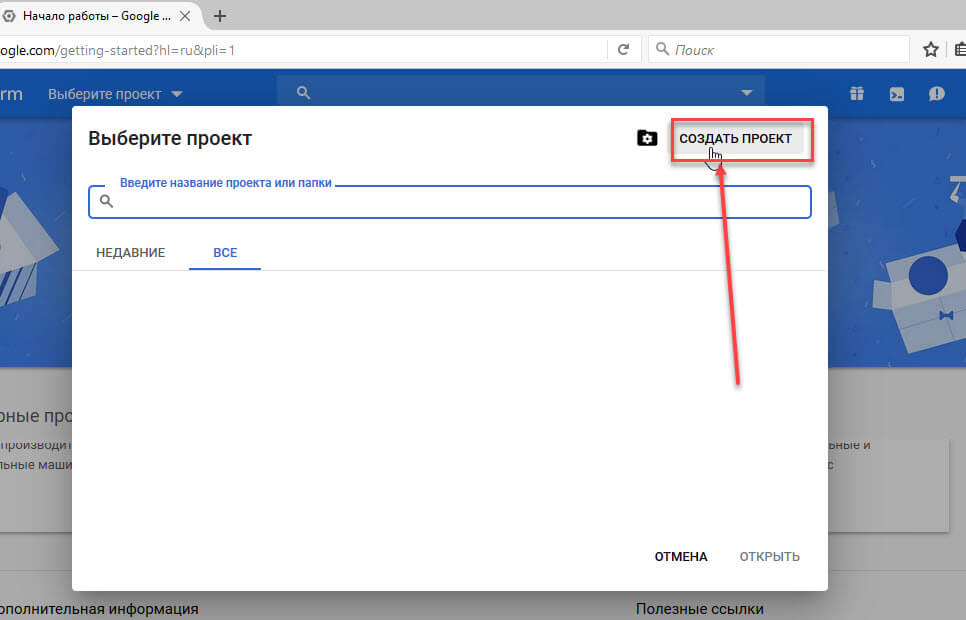
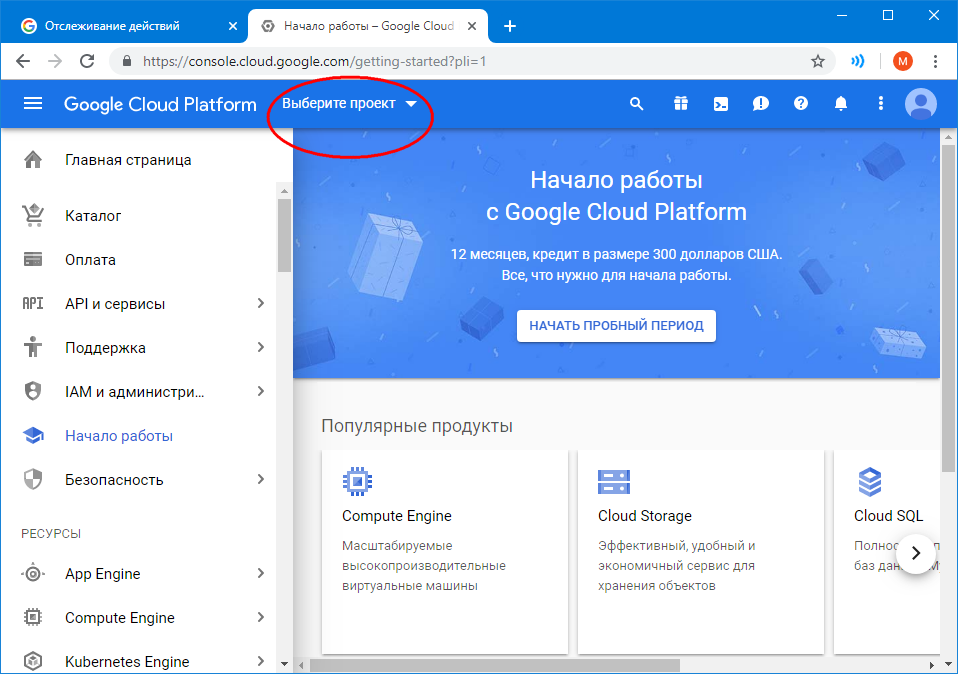
Шаг 3: В верху страницы сразу после заголовка Google Cloud Platform, кликните «Выберите Проект».
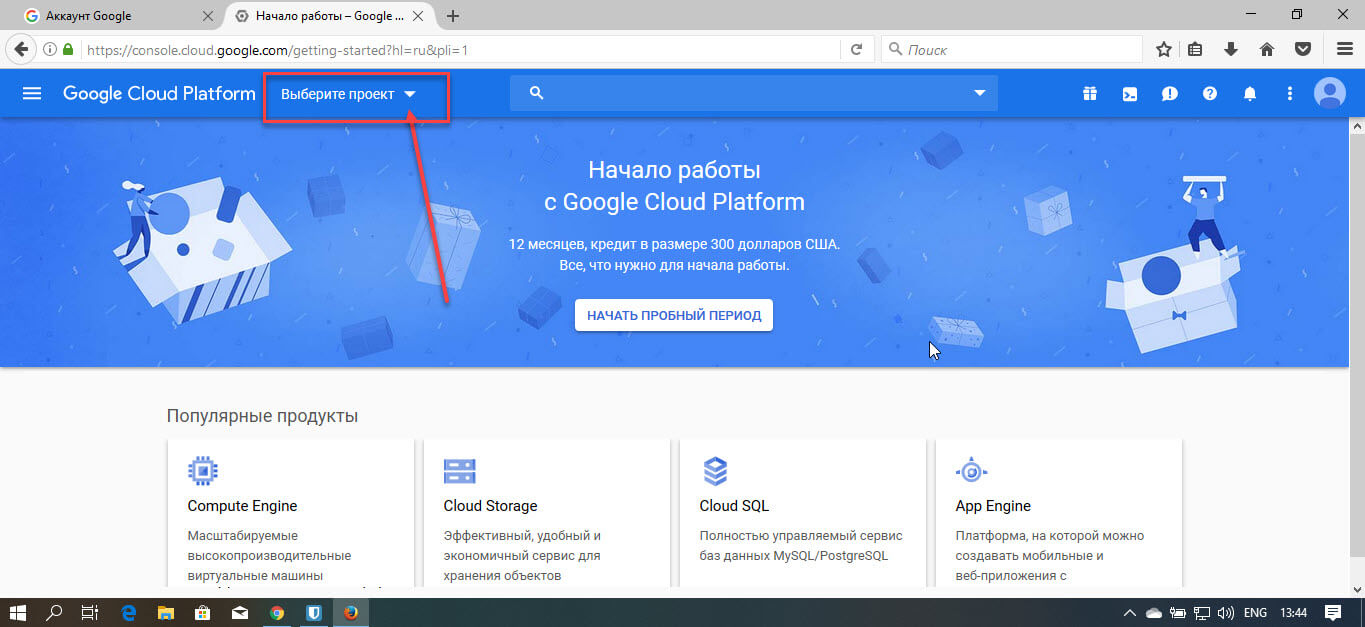
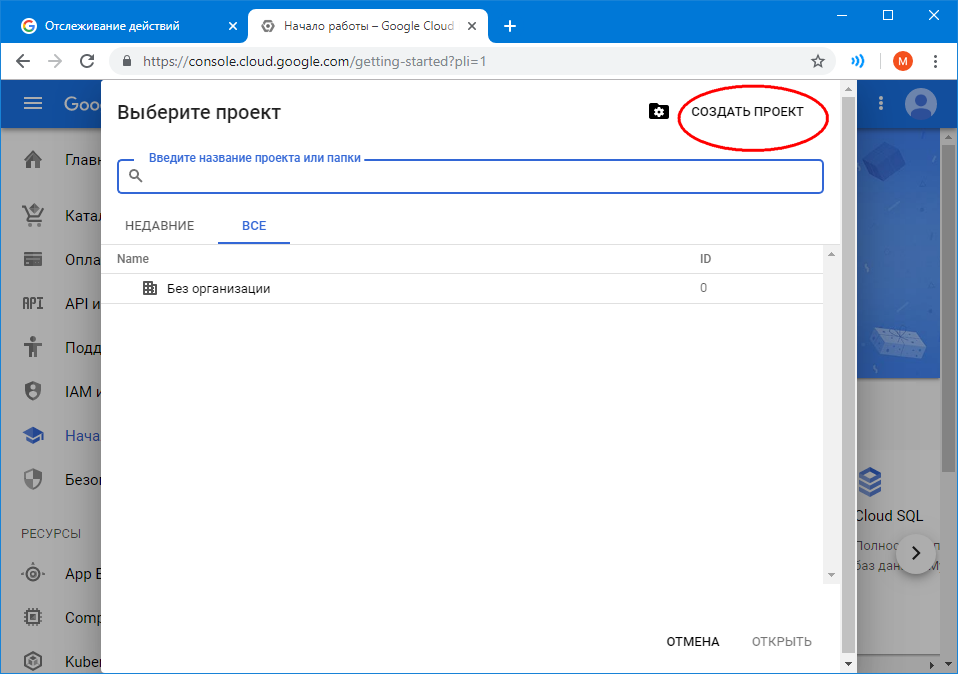
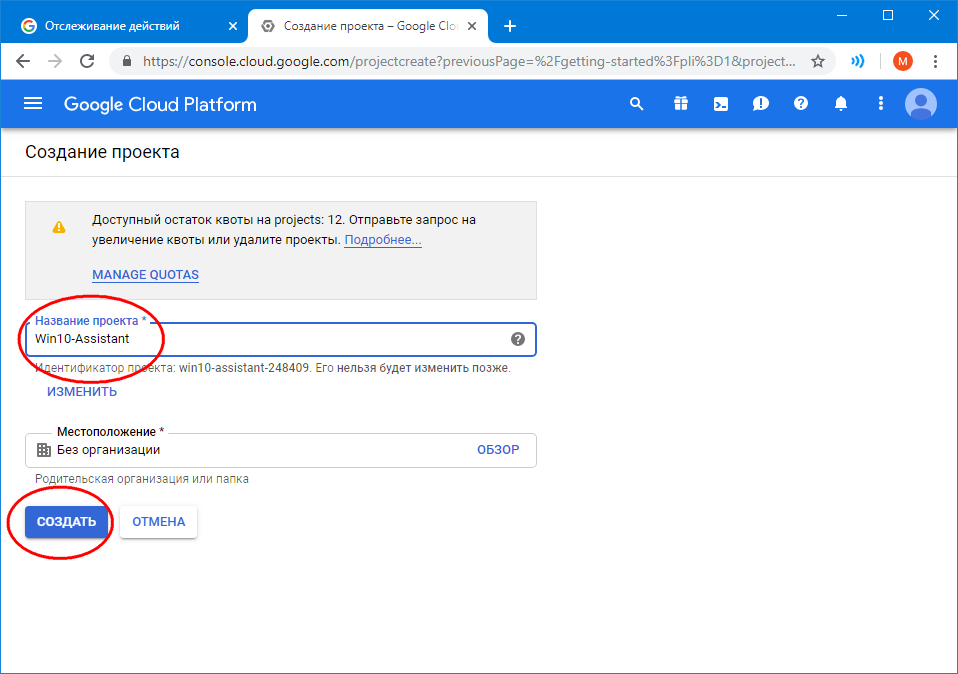
Шаг 4: В появившемся окне кликните «Создать проект», затем введите в качестве имени проекта «Mywin10-assistant», и нажмите кнопку «Создать». Подождите, пока система создаст проект.
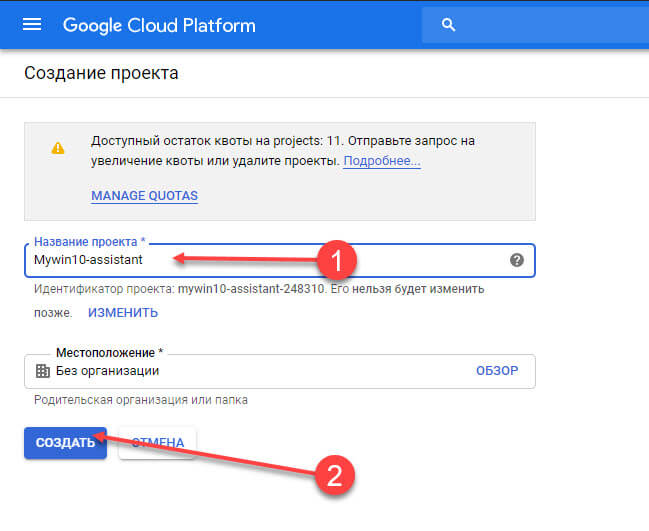
Примечание: вы можете использовать любое имя проекта.
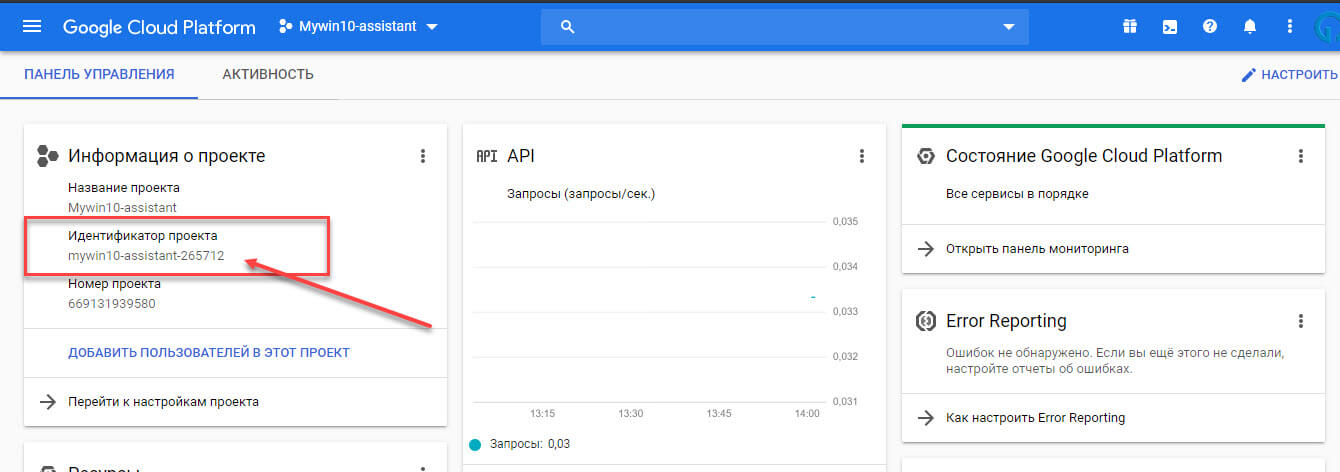
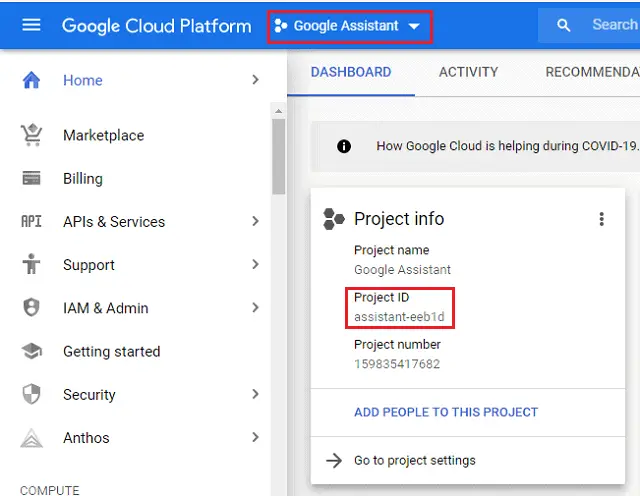
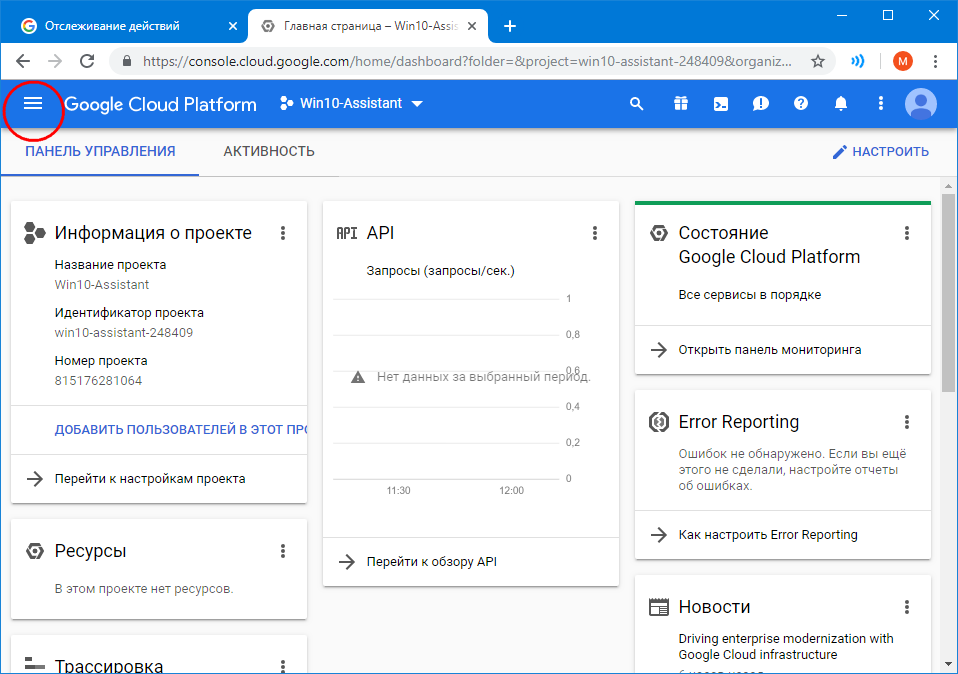
Шаг 5: После того, как вы успешно создали проект, запишите идентификатор проекта. Вам это понадобится позже. Как правило, идентификатор проекта может состоять из двух слов и строки чисел, разделенных чертой. Просто повторите Шаг 3: и запишите Идентификатор (см. картинку ниже)
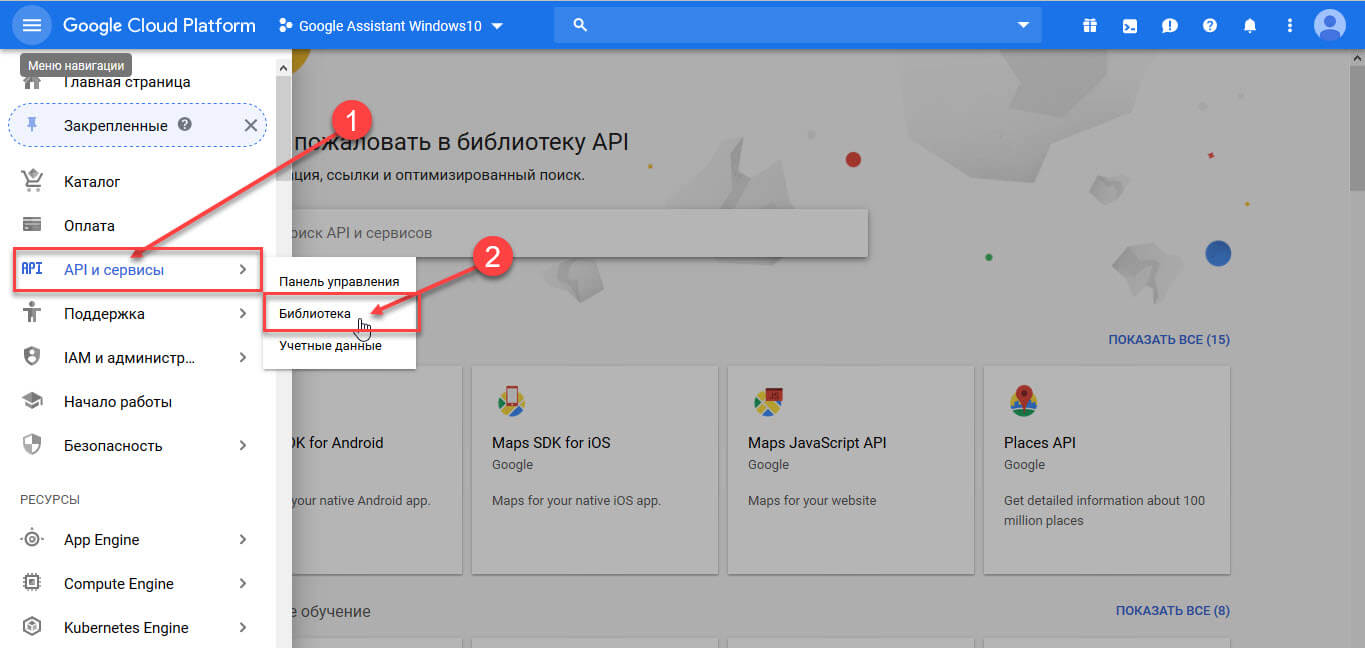
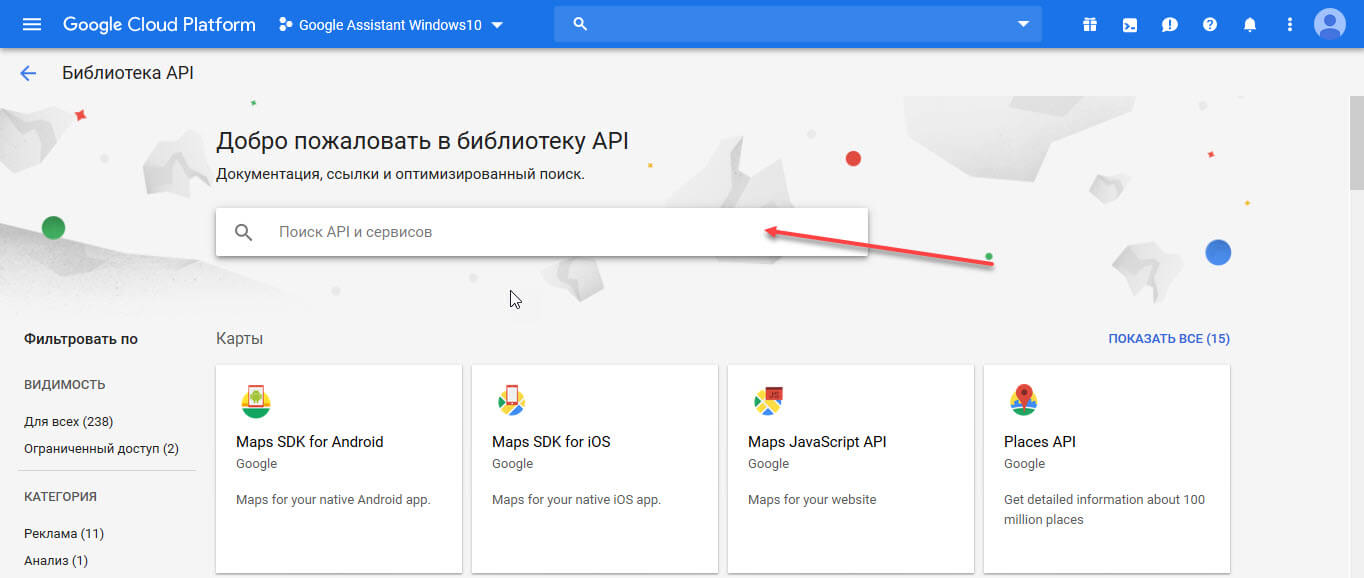
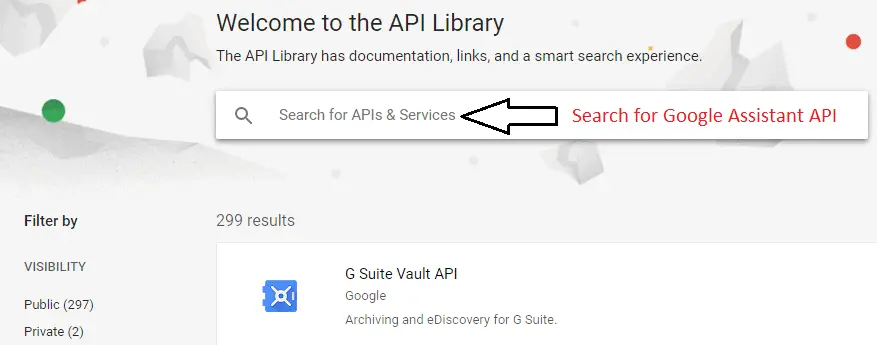
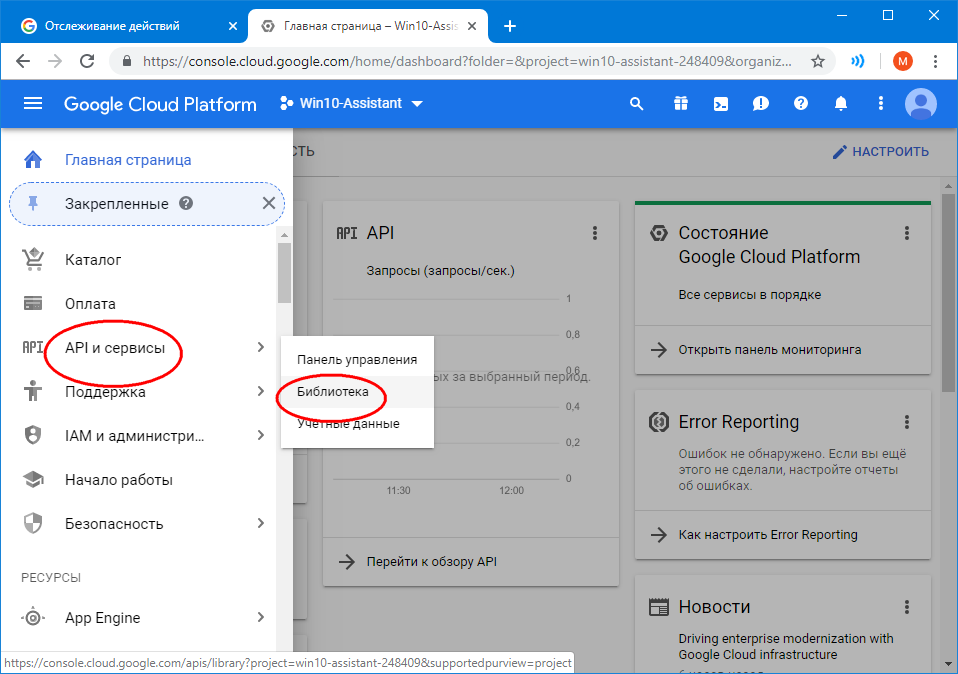
Шаг 6: На странице проекта из меню слева выберите «API и сервисы», затем выберите «Библиотека».
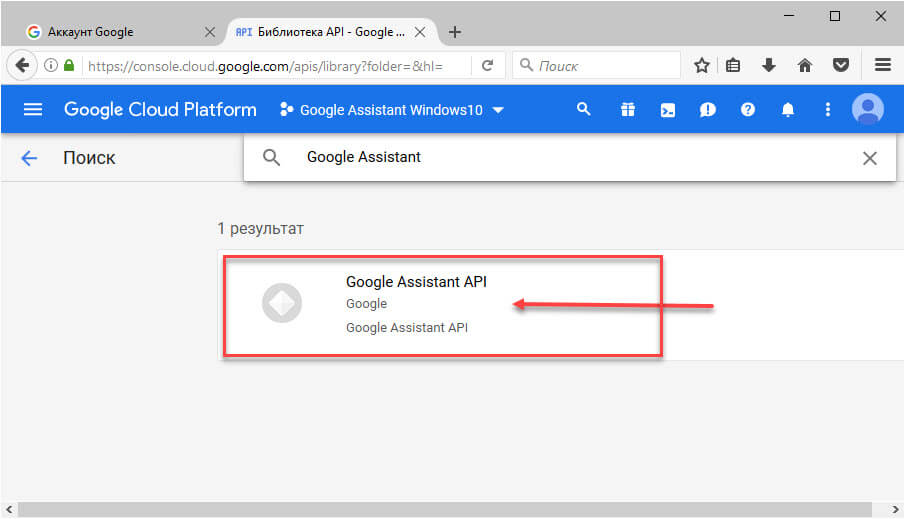
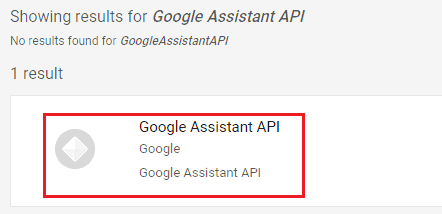
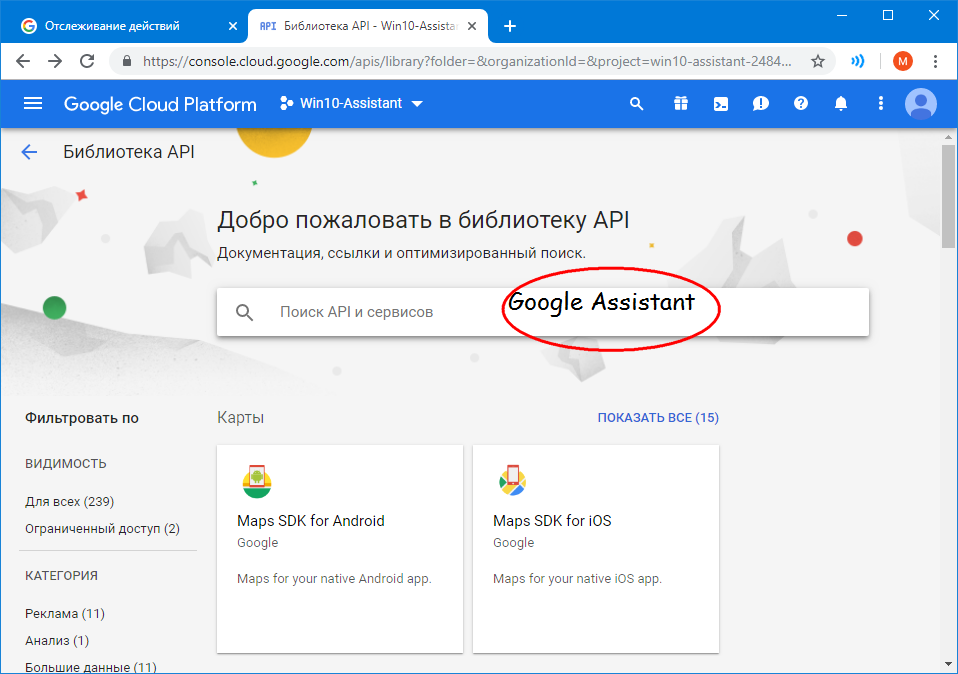
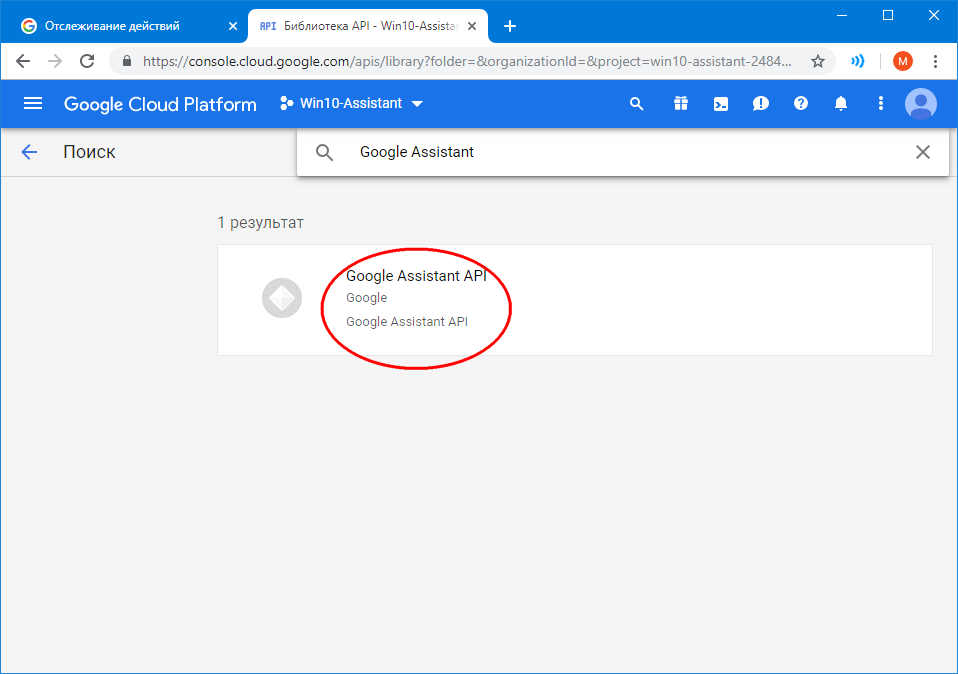
Шаг 7: На странице библиотеки в консоли поиска введите «Google Assistant » (без кавычек).
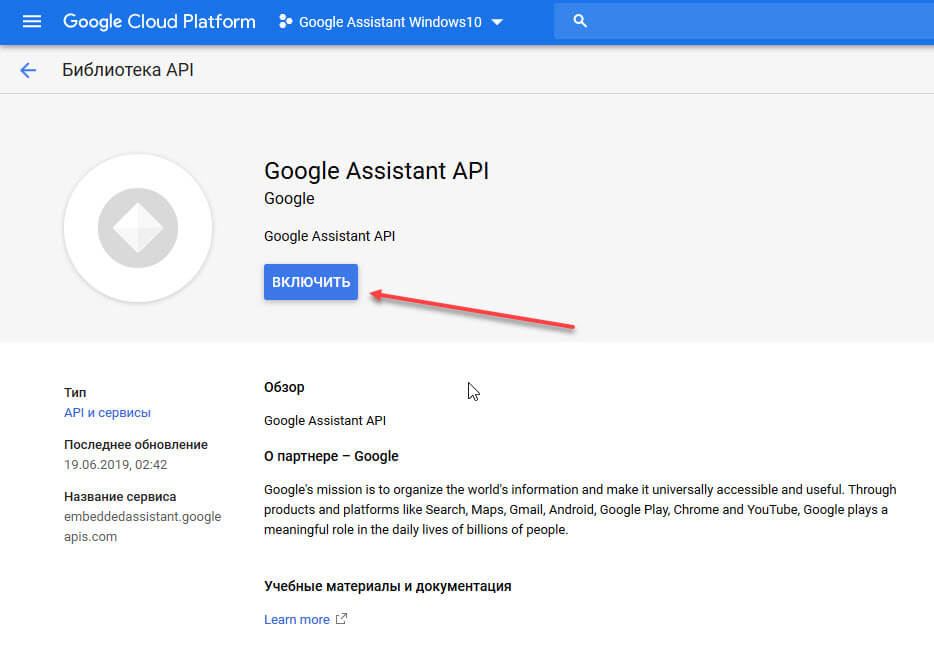
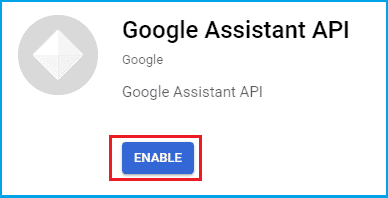
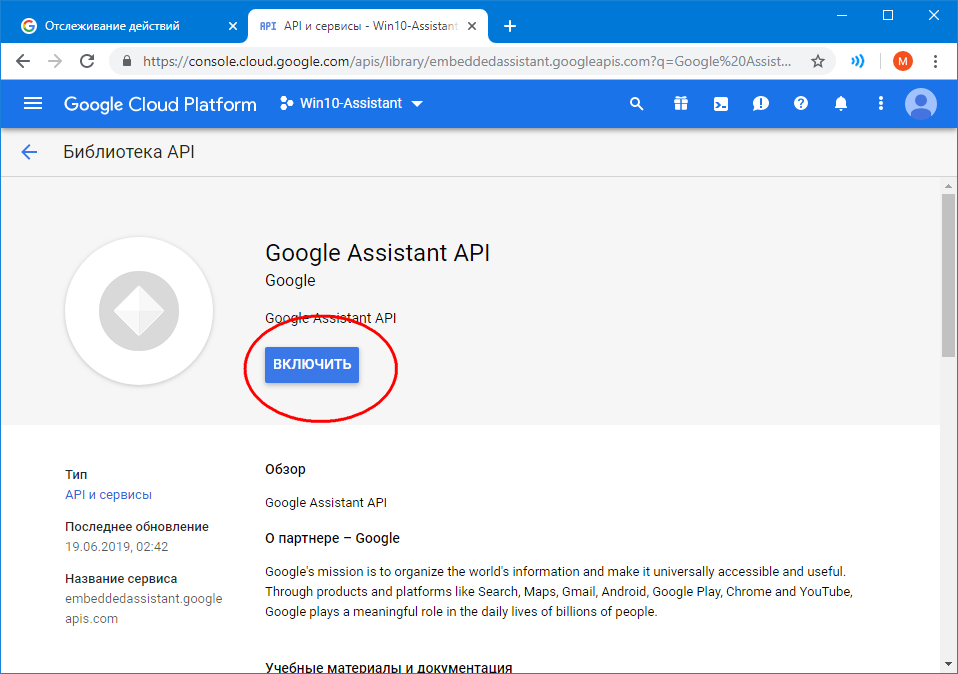
Шаг 8: Нажмите на Результат поиска «Google Assistant API» и нажмите кнопку «Включить».
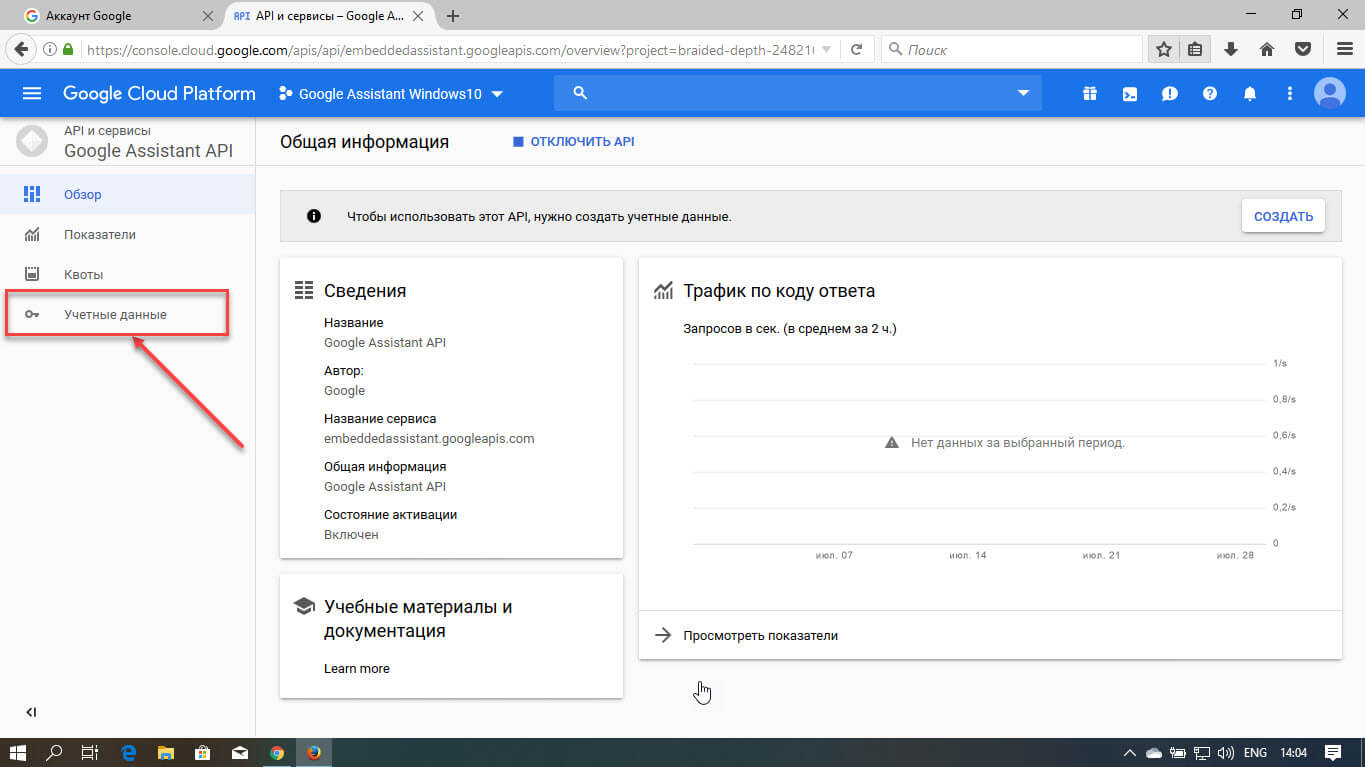
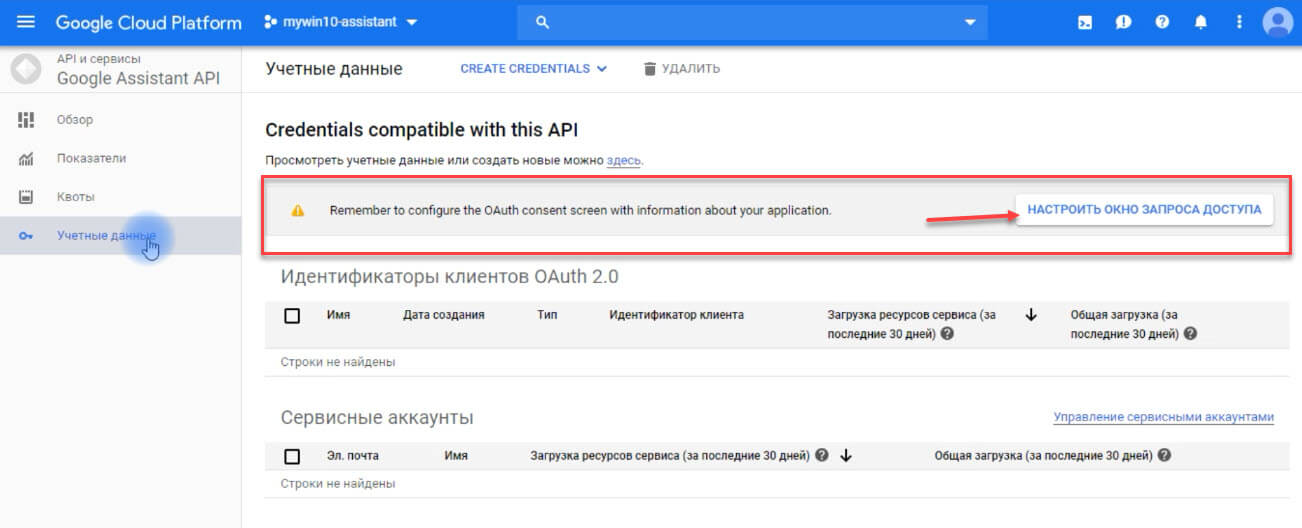
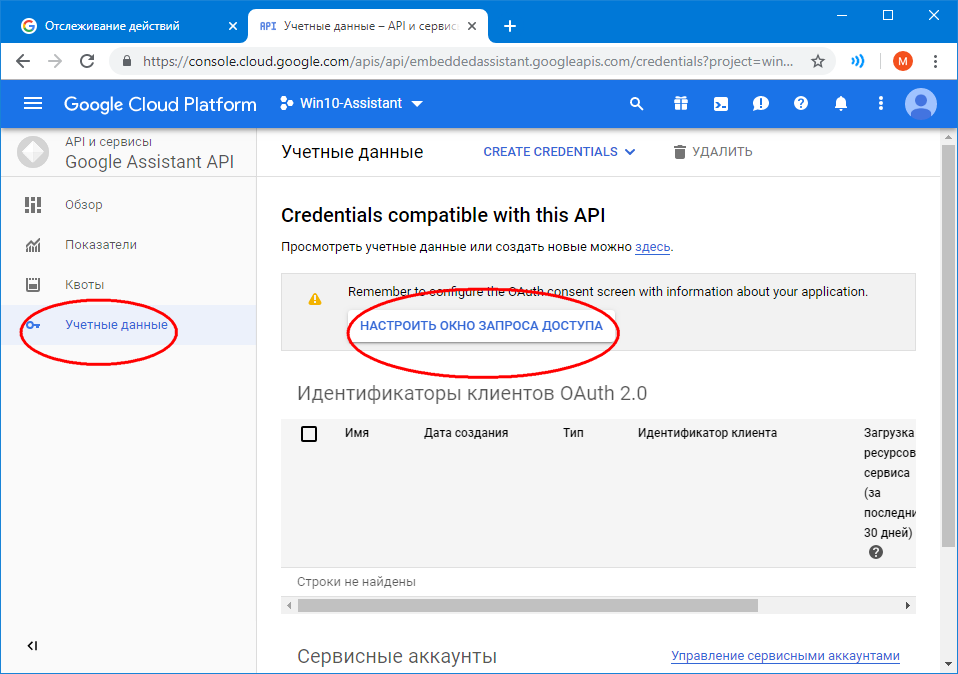
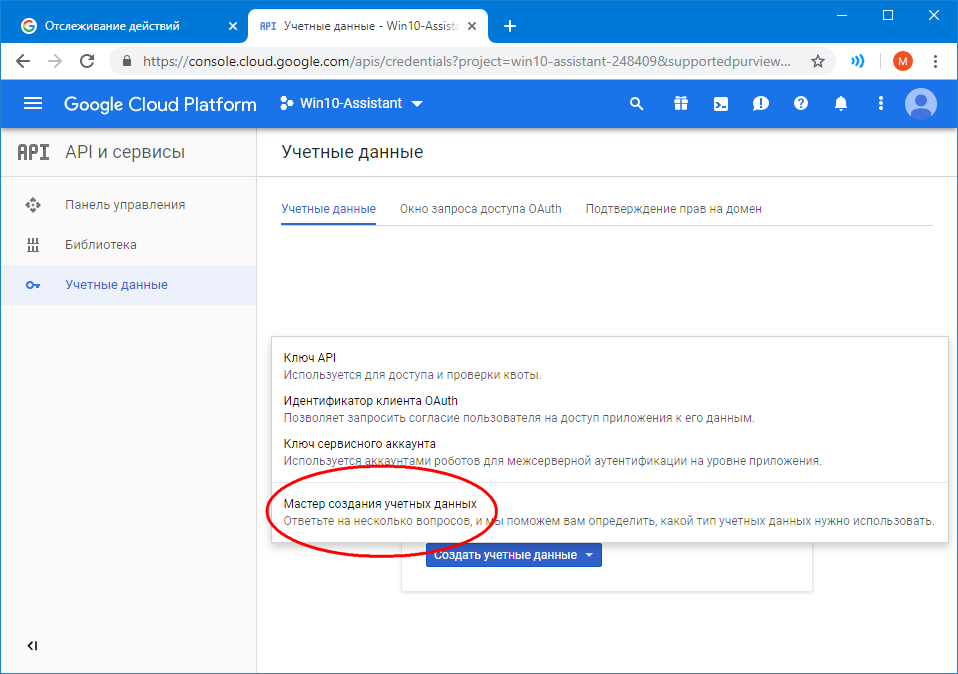
Шаг 9: Далее в меню слева выберите «Учетные данные».
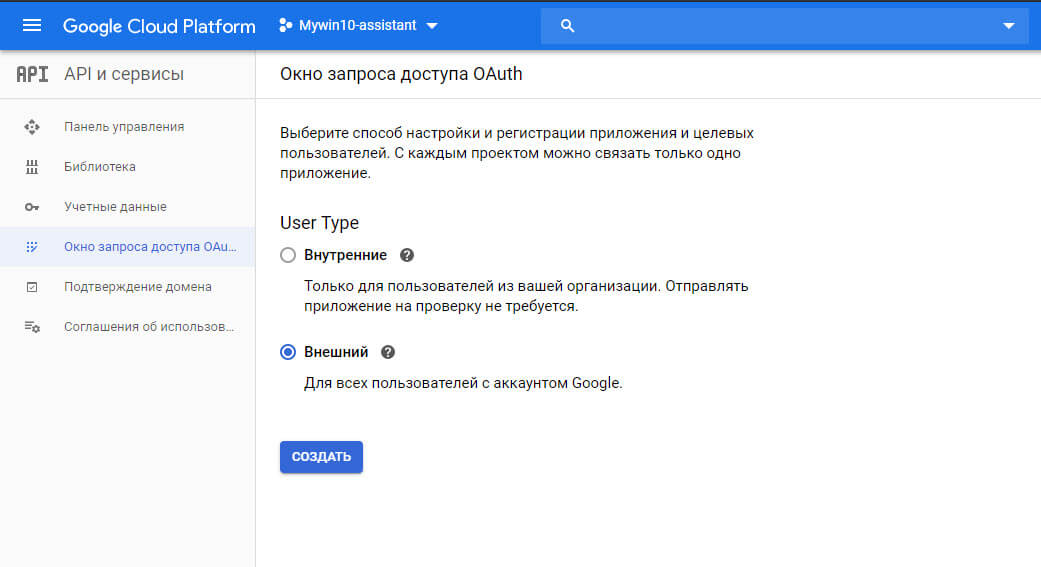
Шаг 10: Найдите и нажмите на странице кнопку «Настроить окно запроса доступа» выберите тип «Внешний» и нажмите «Создать».
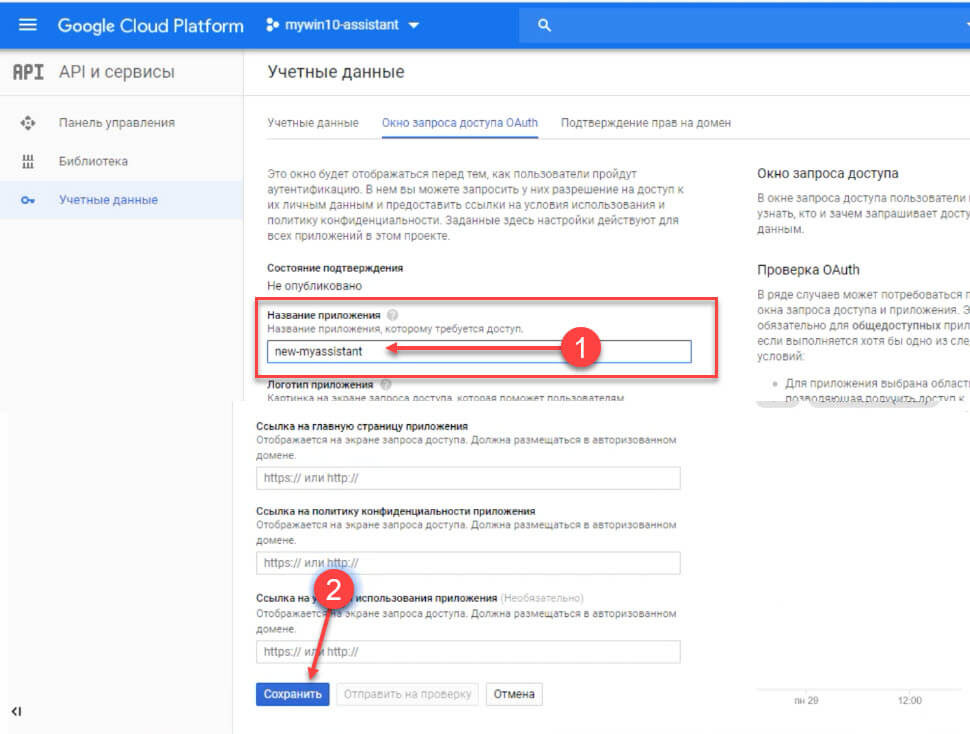
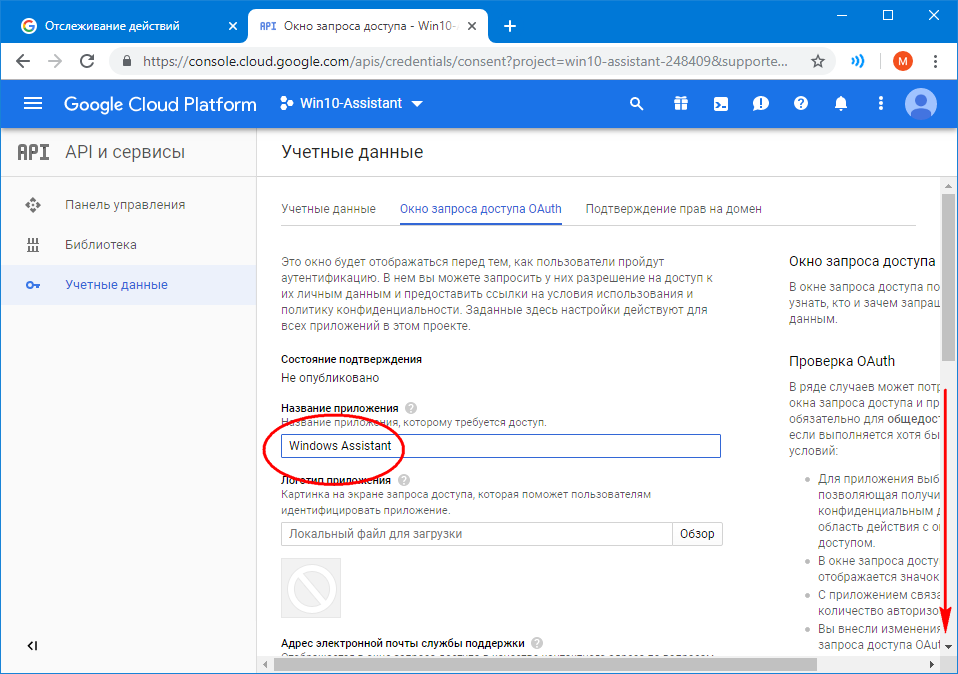
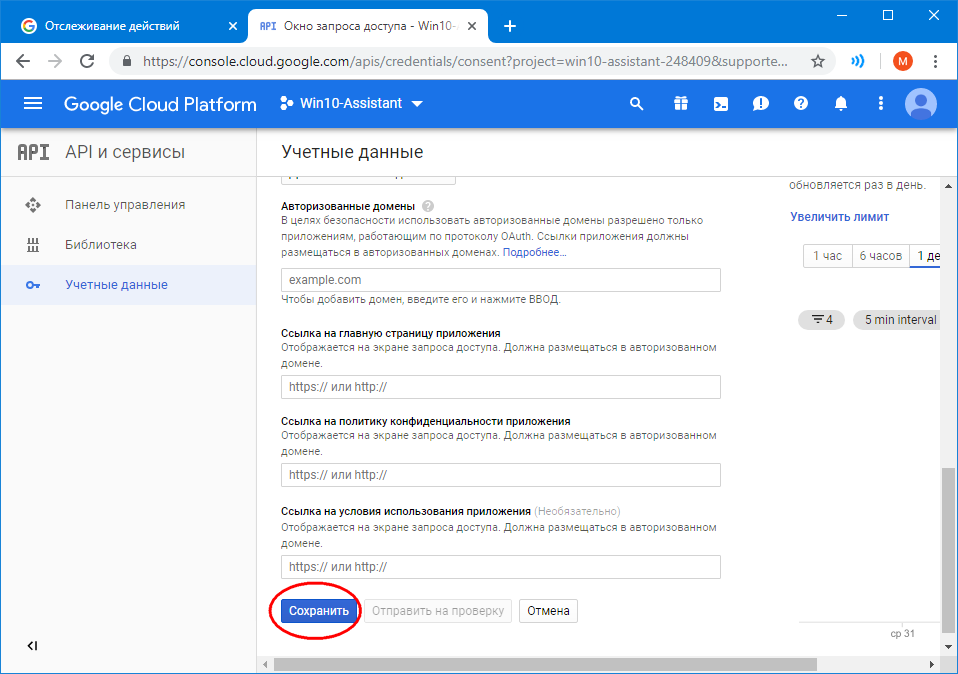
Шаг 11: Введите любое «Название приложения» которому требуется доступ и нажмите кнопку «Сохранить».
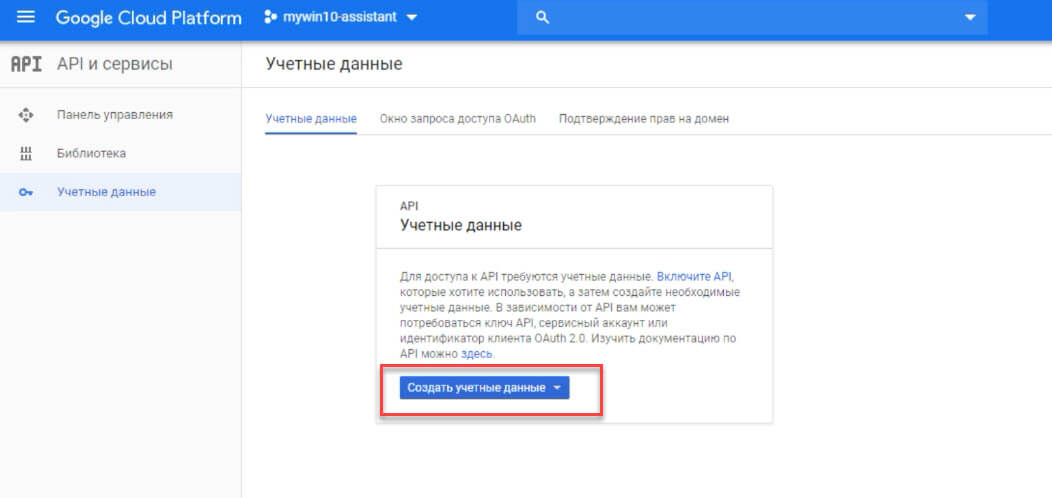
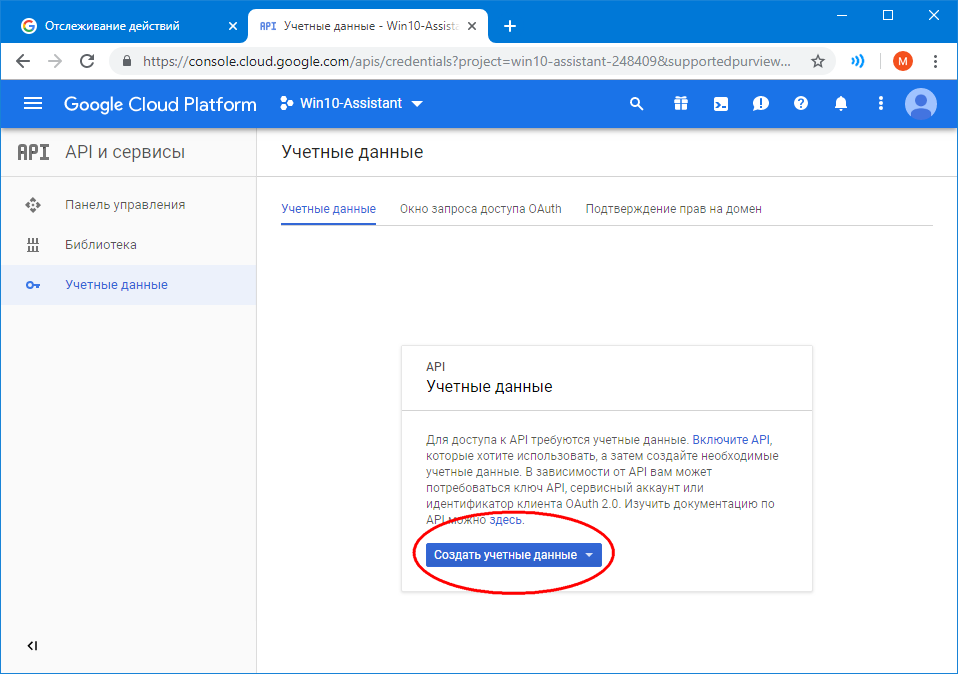
Шаг 12: Теперь нажмите кнопку «Создать учетные данные» в выпадающем меню выберите «Мастер создания учетных данных».
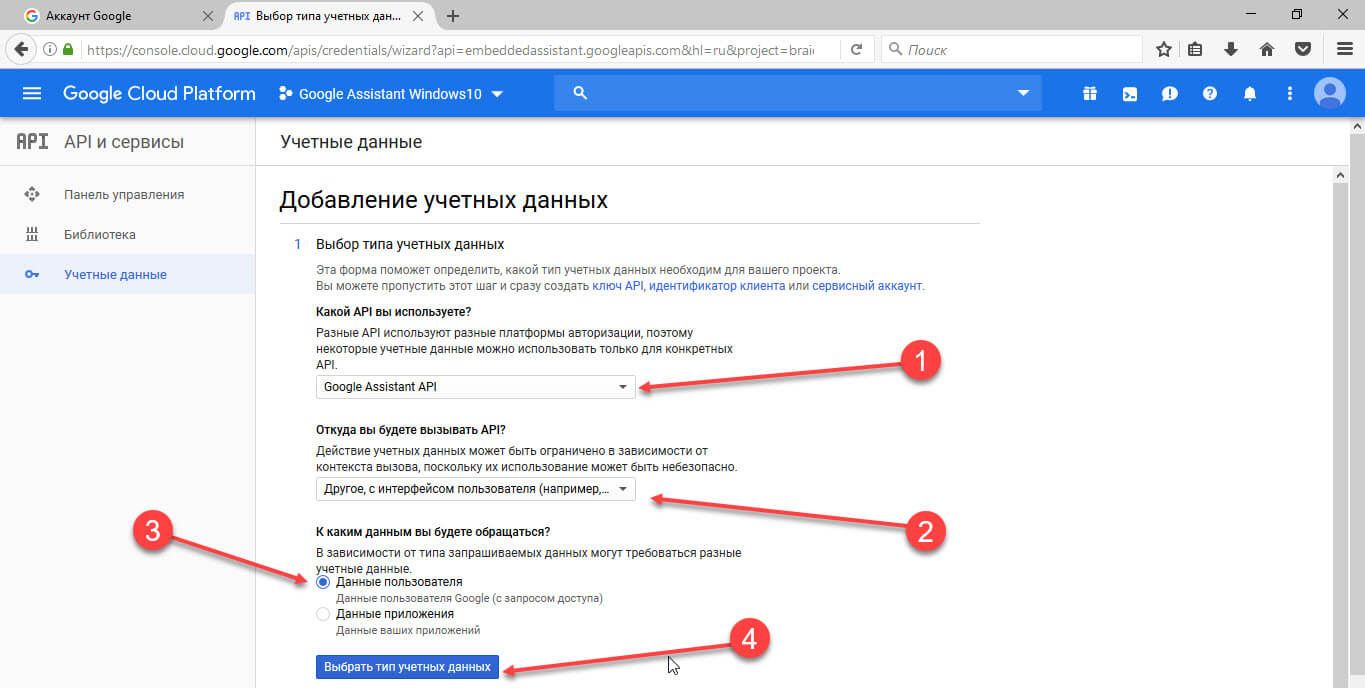
Шаг 13: На экране «Добавление учетных данных в свой проект» выберите следующие три ответа:
- «Какой API вы используете?» выберите — Google Assistant API.
- «Откуда вы будете вызывать API» выберите — Другое с интерфейсом пользователя (например, CLI).
- «К каким данным вы будете обращаться» выберите — «Данные пользователя».
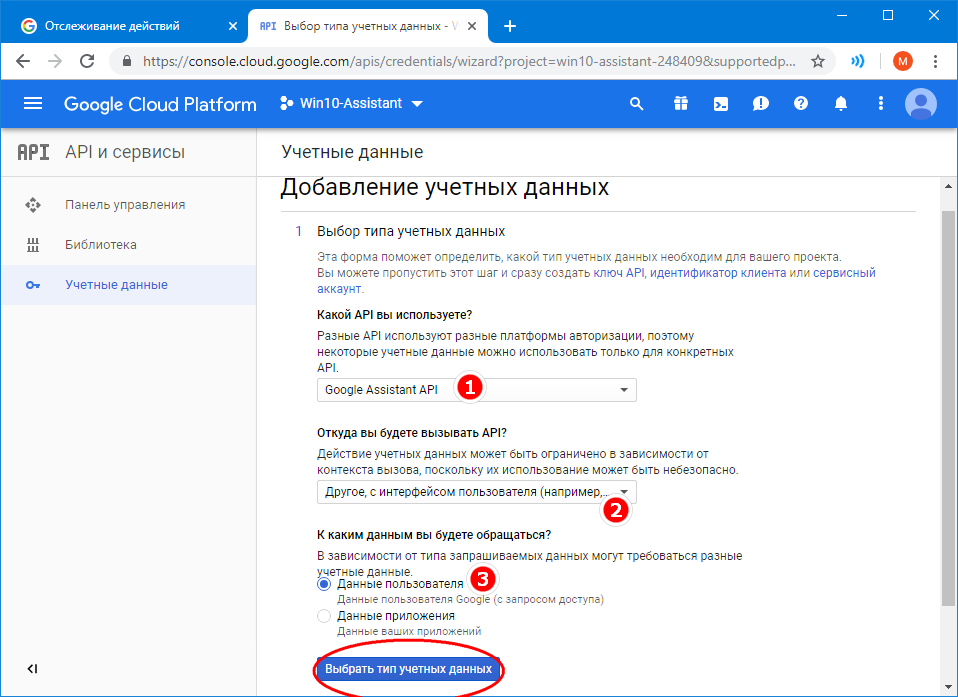
Шаг 14: Затем нажмите кнопку «Выбрать тип учетных данных».
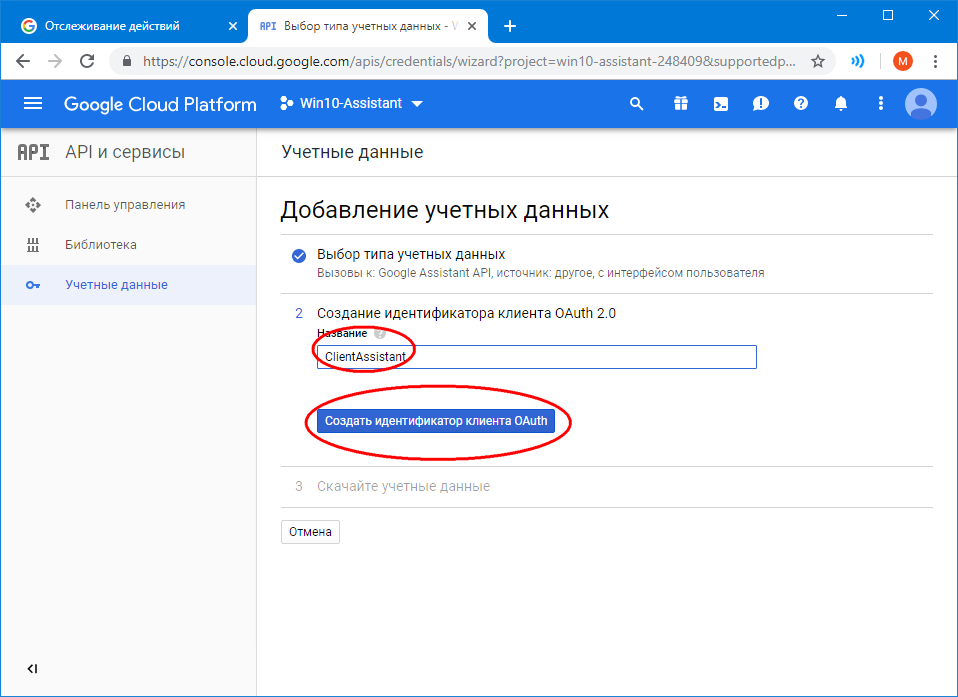
Шаг 15: В поле «Название» для «Создание идентификатора клиента OAuth 2.0» введите «new-myassistant-oauth», затем нажмите синюю кнопку «Создать идентификатор клиента OAuth».
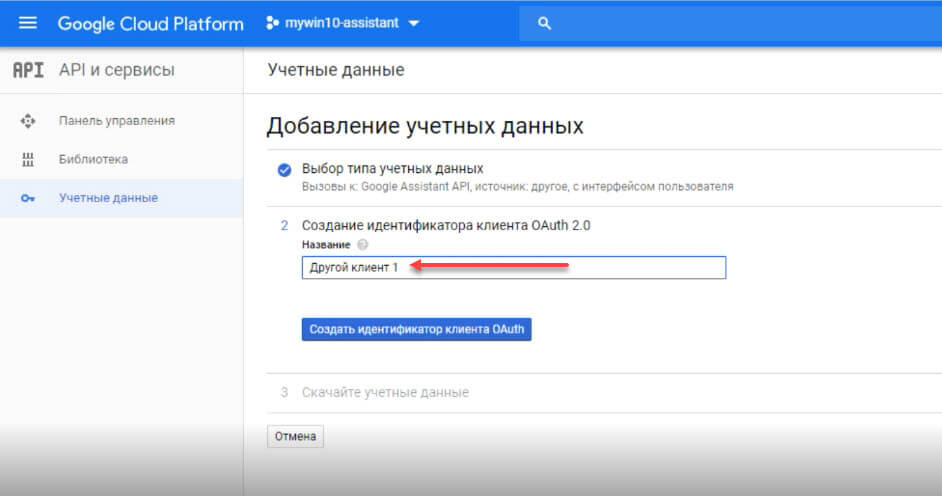
Примечание: вы можете использовать любое имя для идентификатора клиента OAuth.
Шаг 16: Нажмите «Готово» после того, как появится опция загрузки учетных данных.
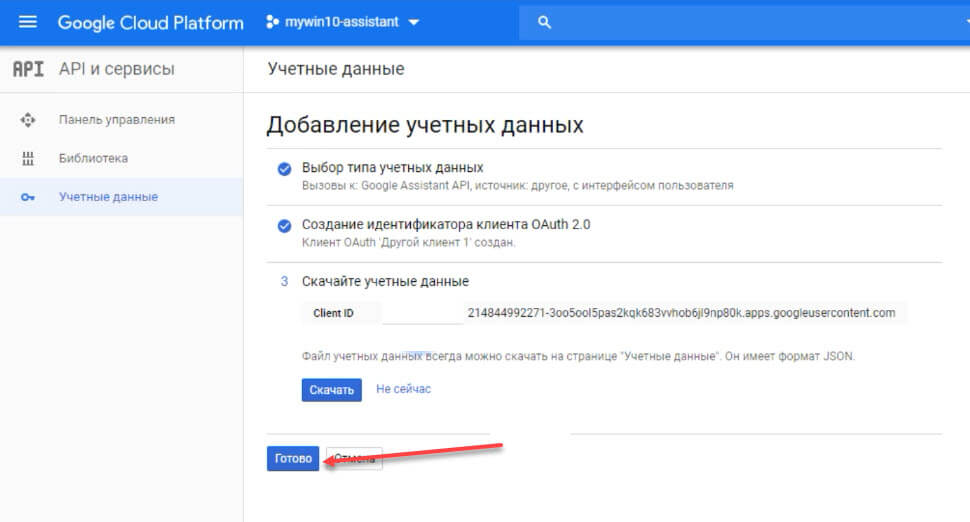
Шаг 17: Справа от только что созданных учетных данных выберите стрелку, указывающую вниз, которая должна при наведении указателя мыши на параметр, отображать подсказку, «Скачать файл JSON». Нажмите на нее, чтобы загрузить файл.
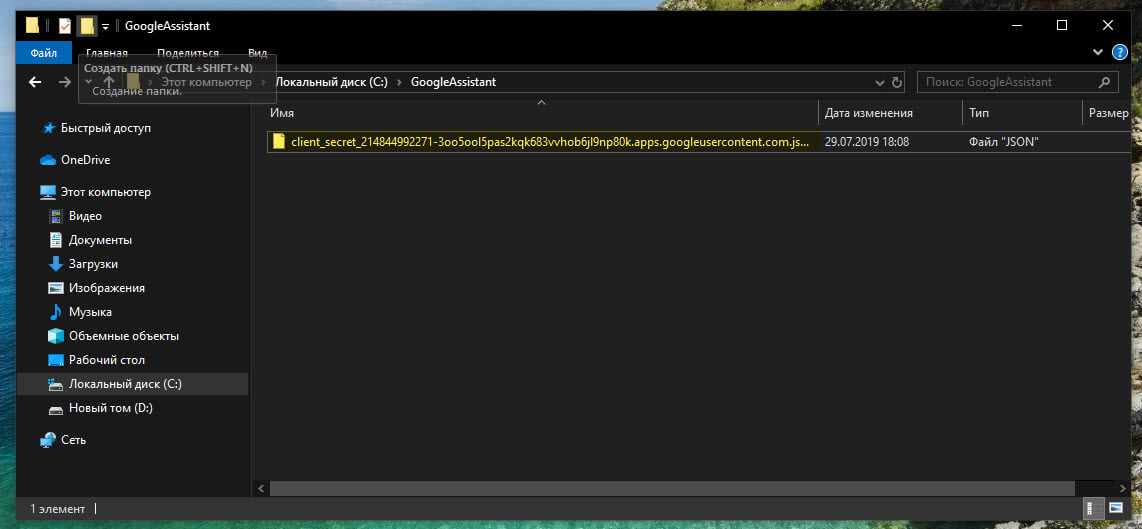
Шаг 18: В Windows откройте Проводник и перейдите в корневую директорию диска C:. Здесь создайте папку с именем «GoogleAssistant».
Шаг 19: Скопируйте в эту папку ранее загруженный файл JSON: client_secret_ххххххххххххххххххх.apps.googleusercontent.com.json
Для установки «Гугл Ассистента» можете на выбор использовать Командную строку или Windows PowerShell.
Шаг 20: Кликните правой кнопкой мыши на меню «Пуск» и выберите Windows PowerShell (администратор)
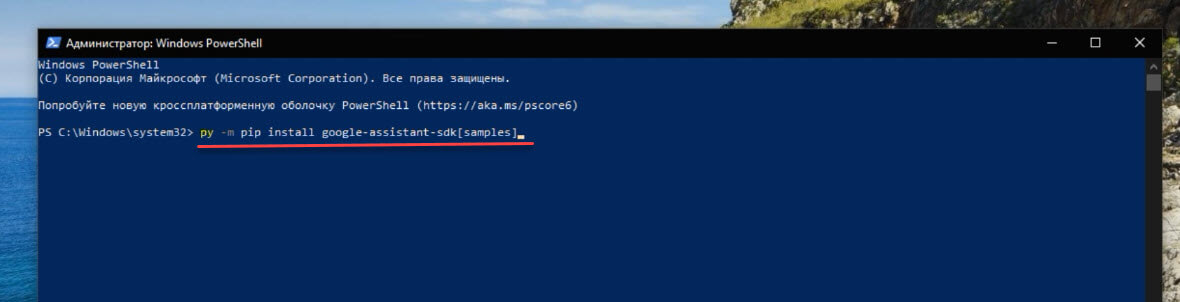
Шаг 21: Введите команду и нажимайте Enter:
py -m pip install google-assistant-sdk[samples]
Шаг 22: Введите команду и нажимайте Enter:
py -m pip install --upgrade google-auth-oauthlib[tool]

Шаг 23: Перейдите в созданную вами папку «GoogleAssistant» и скопируйте имя файла .json и вставьте его вместо «Имя_файла» в следующей команде и нажмите Enter.
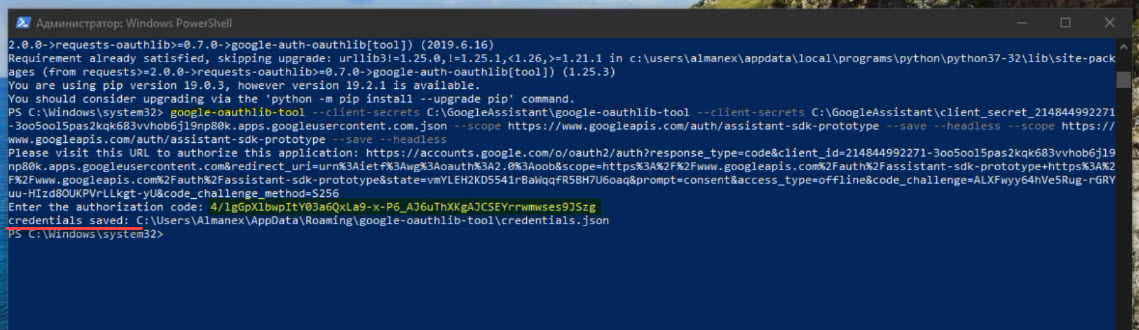
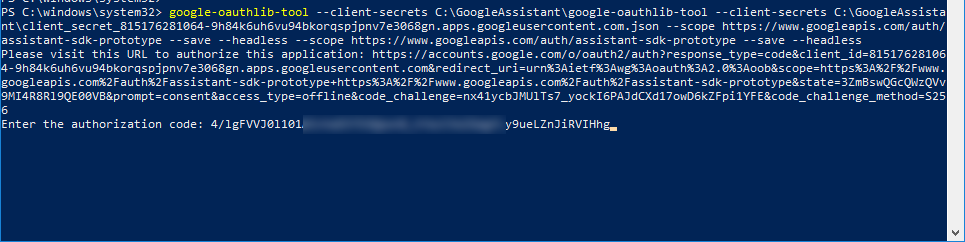
google-oauthlib-tool --client-secrets C:\GoogleAssistant\google-oauthlib-tool --client-secrets C:\GoogleAssistant\<Имя_файла>.json --scope https://www.googleapis.com/auth/assistant-sdk-prototype --save --headless --scope https://www.googleapis.com/auth/assistant-sdk-prototype --save --headless
 Шаг 24: Дождитесь выполнения, в выводе вы увидите отображаемый URL перед запросом «Enter the authorization code:». Выделите весь URL, начиная с «https://». Нажмите Ctrl—C, чтобы скопировать его.
Шаг 25: Откройте новую вкладку браузера и вставьте скопированный URL в адресную строку.
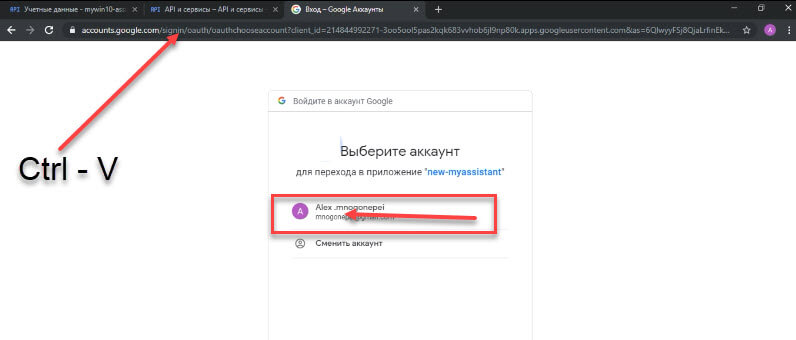
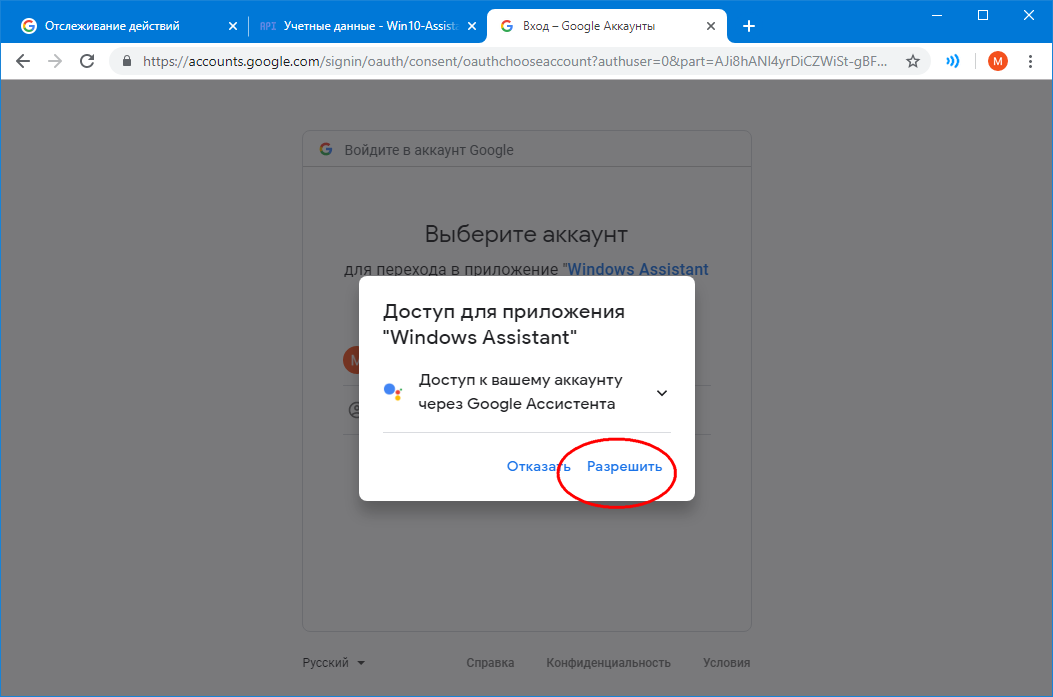
Шаг 26: Выберите ту же учетную запись Google, которую вы использовали ранее для создания проекта. Если появится запрос: «Доступ для вашего приложения ……..» нажмите «Разрешить».
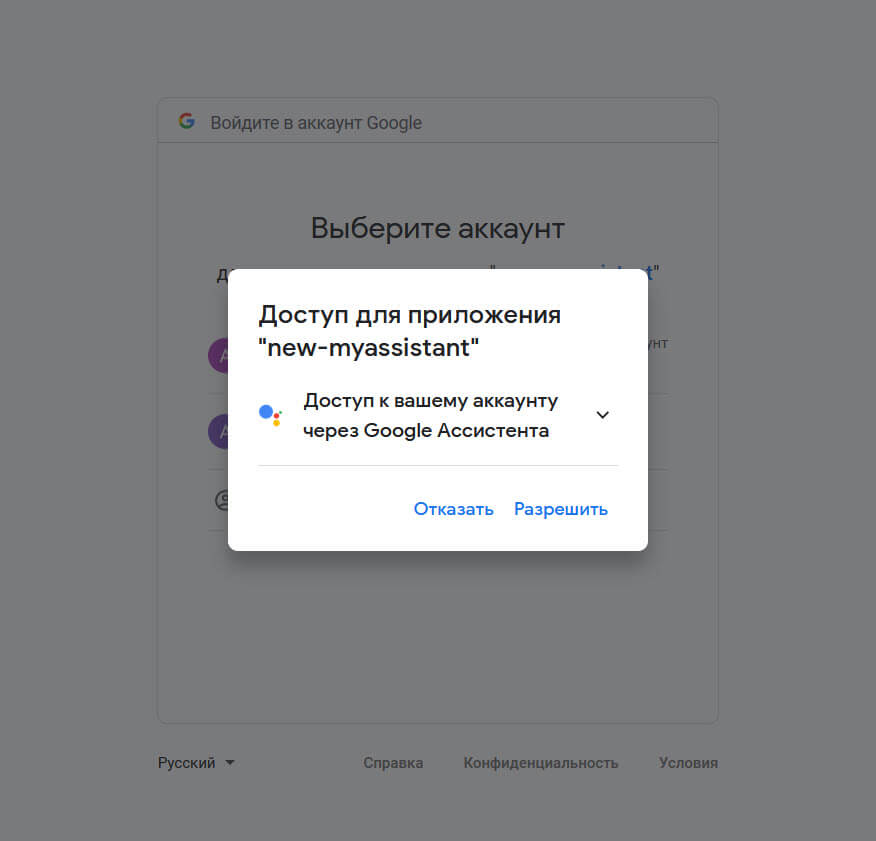
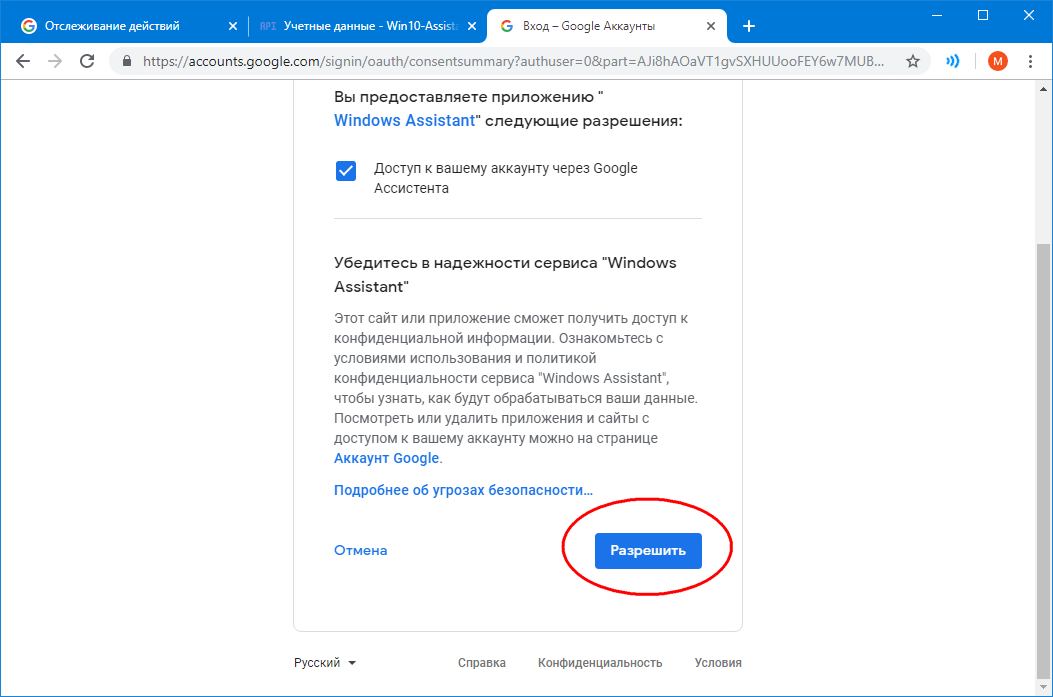
Шаг 27: Снова выберите «Разрешить», чтобы предоставить приложению доступ к Google Assistant.
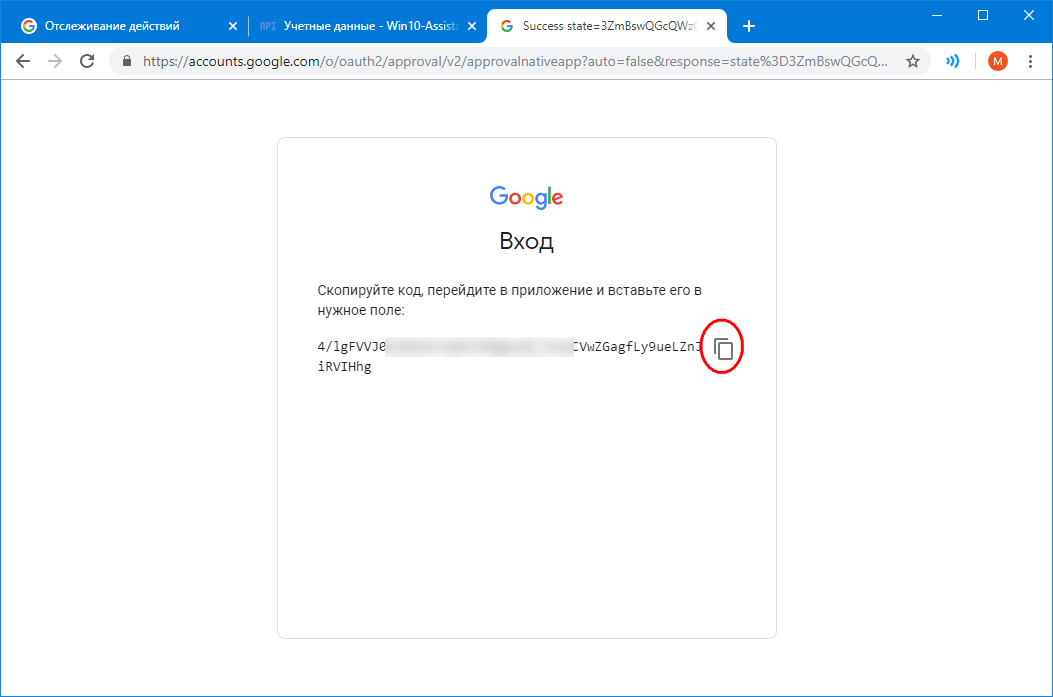
Шаг 28: Далее вы должны увидеть длинную строку, состоящую из букв и цифр. Нажмите на значок справа от них, чтобы скопировать символы.
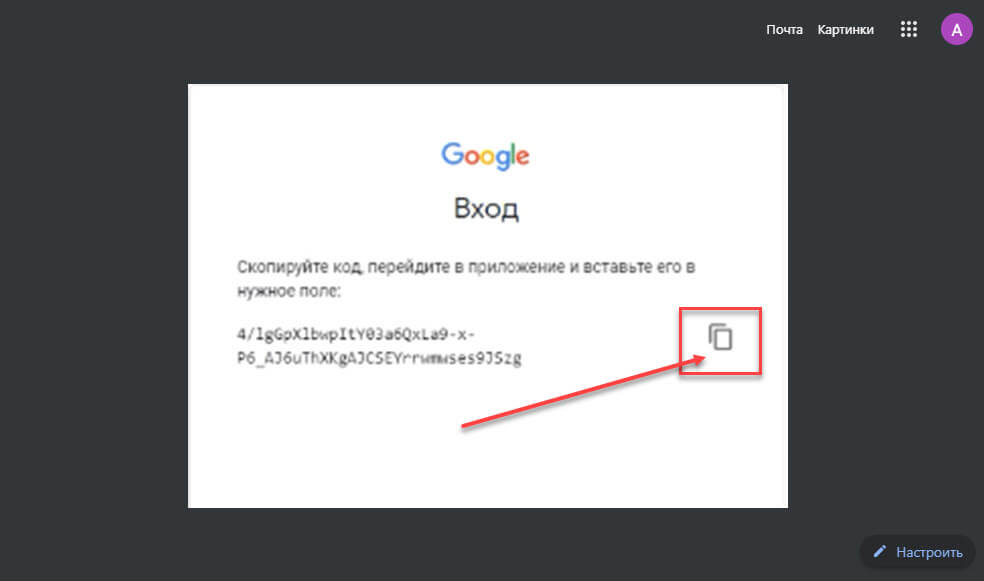
Шаг 29: Вернитесь в окно командной строки и нажмите Ctrl—V, чтобы вставить код авторизации. Нажмите Enter. Вы должны увидеть сообщение о том, что учетные данные сохранены (credentials saved).
Шаг 30: Далее введите следующее:
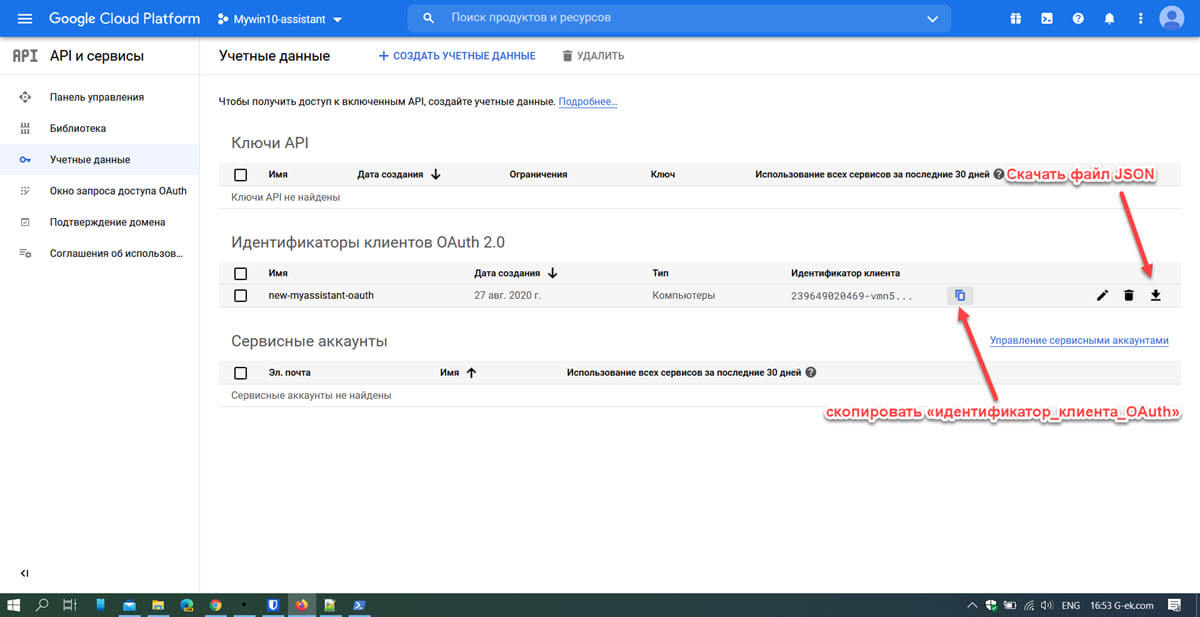
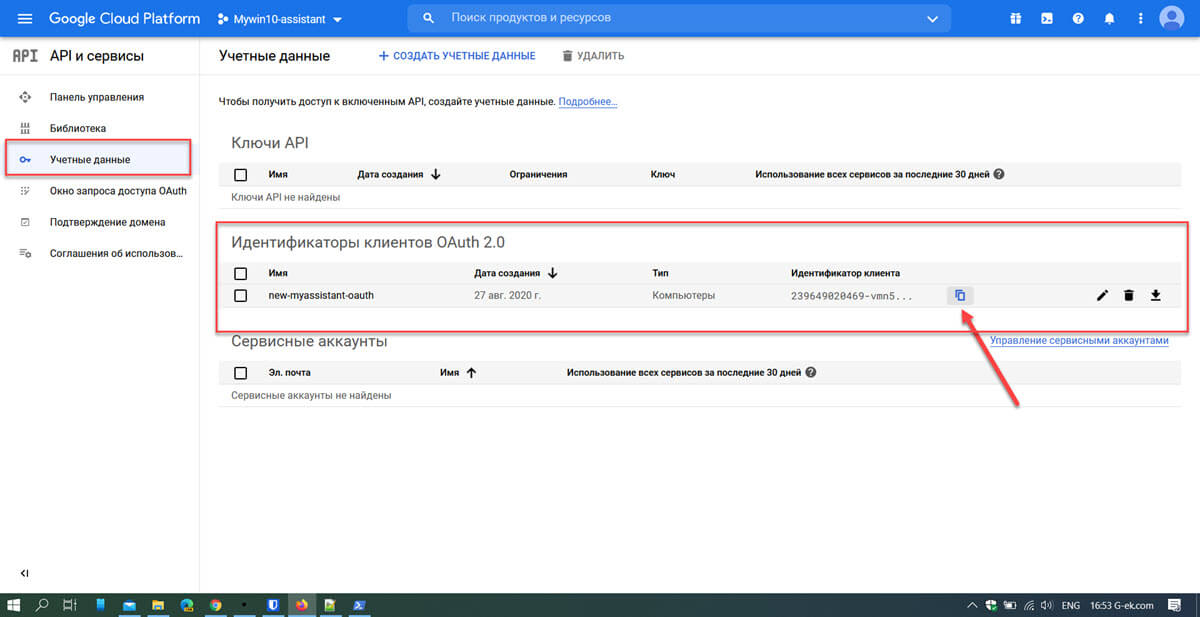
googlesamples-assistant-devicetool --project-idидентификатор_проектаregister-model --manufacturer "Assistant SDK developer" --product-name "Assistant SDK light" --type LIGHT --model "идентификатор_клиента_OAuth"
Обязательно замените «идентификатор_проекта» вашим название идентификатора проекта и «идентификатор_клиента_OAuth» на ваш идентификатор, посмотреть и скопировать «идентификатор_клиента_OAuth» можно перейдя в «API и сервисы» → «Учетные данные» (см. картинку ниже).
 Шаг 31: Чтобы проверить, что все работает как положено, введите:
py -m googlesamples.assistant.grpc.audio_helpers
Это должно записать 5 секунд аудио и воспроизвести его для вас. После успешного завершения теста аудио вы можете перейти к следующему шагу.
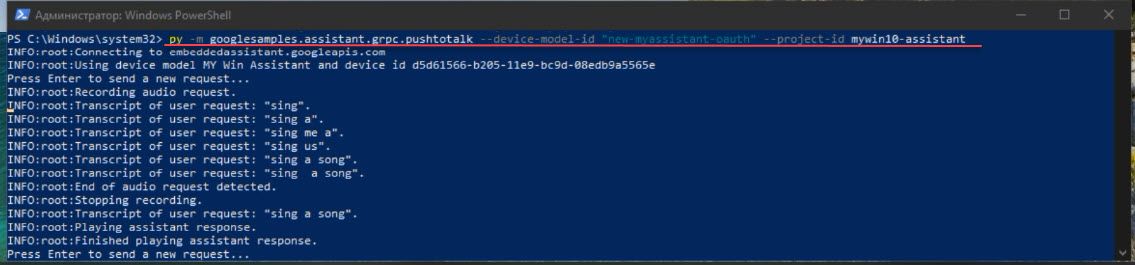
Чтобы запустить Google Ассистент в Windows 10, введите:
py -m googlesamples.assistant.grpc.pushtotalk --device-model-id "идентификатор_клиента_OAuth" --project-idидентификатор_проекта
Снова замените «идентификатор_проекта» вашим название идентификатора проекта и «идентификатор_клиента_OAuth» на ваш идентификатор.
Все!
Теперь у вас есть рабочая демонстрация Google Ассистента в Windows 10. В данной конфигурации, после того как вы нажмете Enter, вы сможете напрямую задавать вопросы Google Ассистенту. Вам не нужно говорить традиционную команду «ОК, Google». Вместо этого просто нажмите Enter, когда программа активна, а затем говорите. Надеемся, что в будущем выпуске программного обеспечения Chrome или Google доступ к Google Ассистенту в Windows 10 станет таким же легким, как в Chrome OS, Android или iOS.
Ну и конечно же, видео всего этого безобразия, осторожно на последних секундах есть звук ).
Windows 10 comes with Cortana, a voice assistant. Many users, including me, don’t satisfy with this feature. Android has Google Assistant, and almost every user likes it.
This is AI-based technology and will no longer be available for windows in the future. But I will guide you on how to get google assistant on Windows 10?
Since it is not available for Windows, therefore we have to follow a lengthy procedure to get this feature in Windows 10. Cortana is a Microsoft product, while Google Assistant is the product of Google. This assistant comes with a lot of features, tips, and tricks.
Moreover, it helps us to schedule our tasks. We can perform each and everything task with Google Assistant, and that’s why many users prefer this feature over Cortana.
Prerequisites
Before installing the Google Assistant on Windows 10, you must satisfy the given requirements:
- Python Software
- Windows 10 OS
- Gmail Account
Note: Make sure that you have use the same Gmail id throughout the process; otherwise, you will not be able to install Google Assistant on Windows 10.
Also Read: How to Change Drive Icon in Any Windows Operating System?
1) Download And Install Python Software
Now, we will fulfill our first requirement. I will teach you how to download, install, and configure the python software on your Windows 10. So, let’s get started:
1) Go to the official Python site.
2) Navigate to Download and click on Windows.
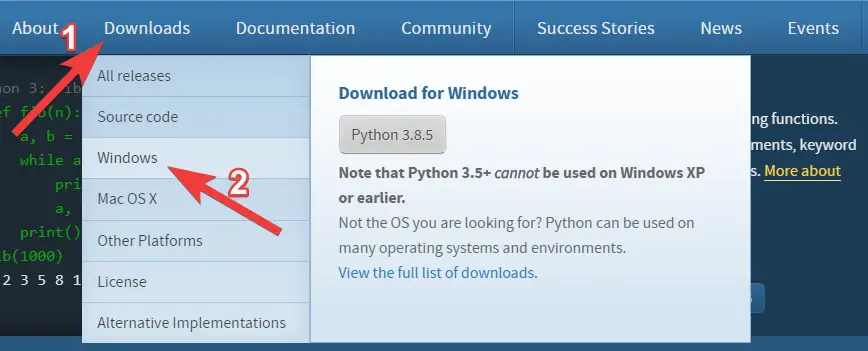
3) Look at the Latest version section and download the executable file according to your windows version (32 or 64 bit) as shown below:

4) After downloading Python, we are going to install it.
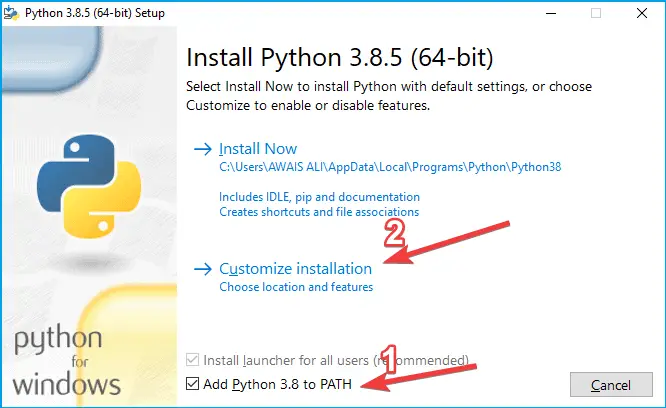
5) Open Python, check to Add python 3.8 to PATH box and choose Customize Installation.
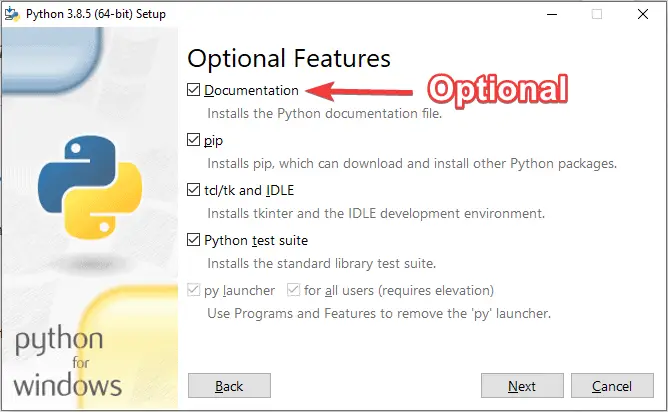
6) Click on Next in this window. You can uncheck documentation if you want since it is optional.
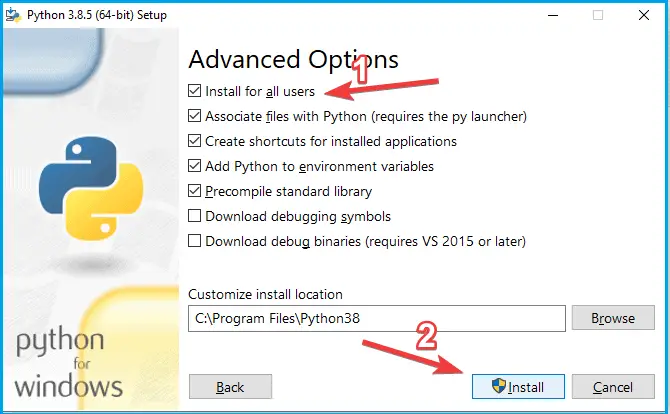
7) Hit on Next. Check the first box “Install for all Users” and click on Install.
 You have successfully installed Python on your Windows 10.
2) Windows 10 OS
We have fulfilled the first requirement, and the second is you must have Windows 10 installed on your system. You can easily download it legally from the Microsoft Office site.
Once you download Windows 10, the next thing is to Make a Bootable USB Drive. There are many ways to do it as well.
Also Read: How to Do Emojis on Windows 10?
If you have completed the requirements, then, you can follow the next and important procedure to get Google Assistant on Windows 10.
We will split the whole process into parts. You have to follow the instructions as it is if you want this fantastic feature in your operating system.
1) Setting environment variables
In this section, we will make some changes to our Windows 10 settings. These settings are essential for Google Assistant. Let’s dive into it:
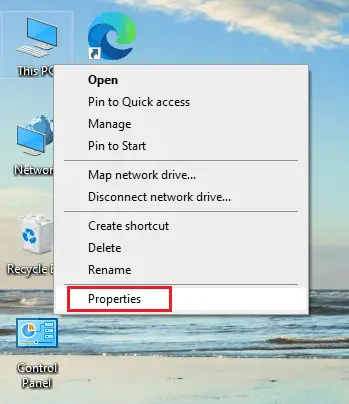
1) Right Click on This PC and choose Properties in the drop-down menu.
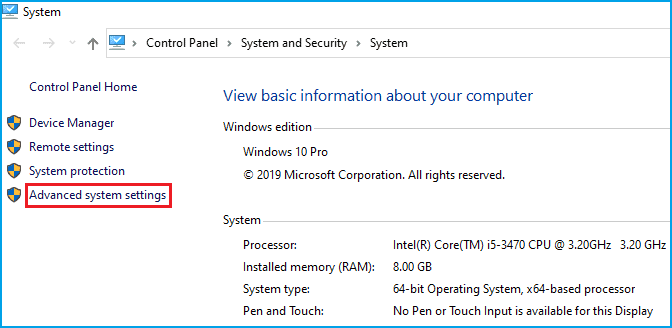
2) Navigate to Advanced system settings in the left menu like below:
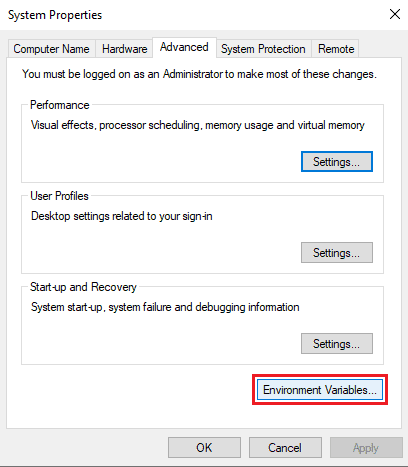
3) A new window will appear, click on Environment Variables.
4) Again a new window will pop up. Under System Variables, double-click on Path.
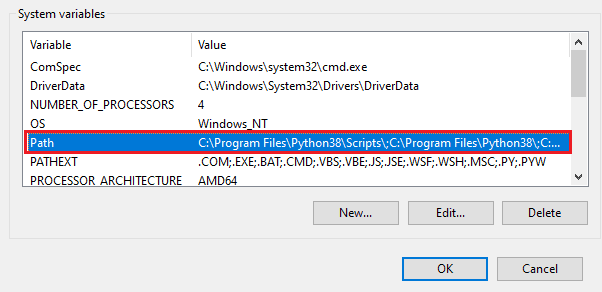
5) An edit environment variable window will appear. Here, you should see the Path of Python software, where you have installed the python software like below:
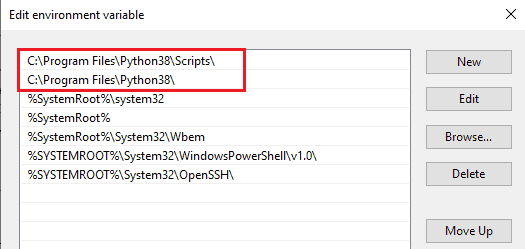
In my case, these are “C:\Program Files\Python38\Scripts\”, and “C:\Program Files\Python38”.
Note: These Paths are automatically created once you install the Python software.
If you can’t find these paths here then, you have to add them manually. Follow the given procedure only if you don’t find them otherwise skip this section and jump to the next:
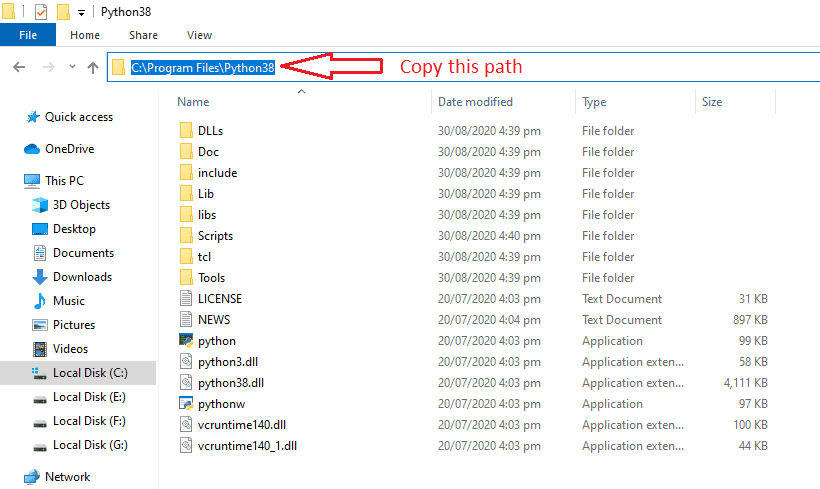
6) Navigate to the directory where you have installed the Python and copy the Path like below:
7) After copying, go to edit environment variables (as shown in step 5) and click on New like below:
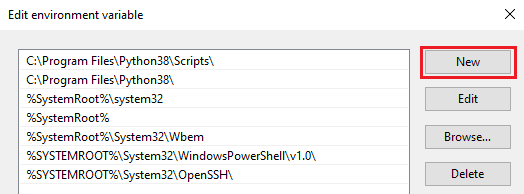
Now, paste the copied Path and hit enter.
9) Again go to the python directory and click on scripts like below:
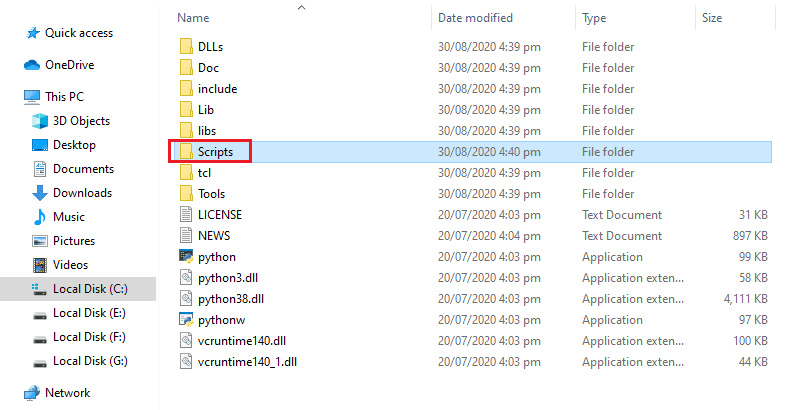
10) Copy the Path of this directory like below:
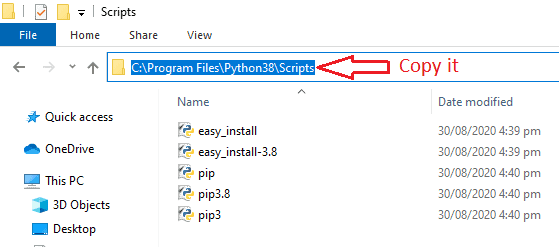
11) Go to edit environment variables > New > paste the copied Path as we have done above.
12) Now, you have done.
Also Read: How to Open The Task Manager on Windows 10? – 12 Ways
2) Setting up the project in Google Actions and Cloud Console
In this section, we will set up a project in Google Actions and Cloud Console. For this, the whole procedure is given below:
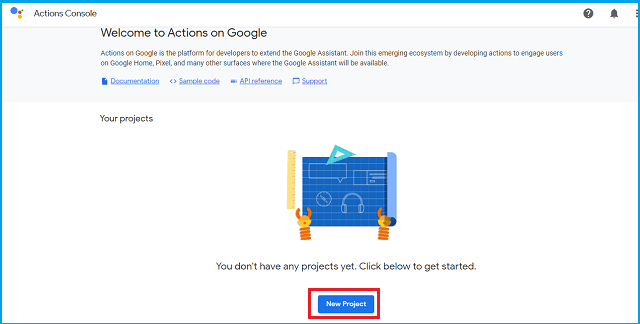
1) Go to Google Action Console. Sign in to your Gmail account if not.
2) Click on New Project like below:
3) A new window will appear. Agree to the terms of service, choose country and then, click on Agree and Continue.
4) Again a new tab will pop up. Type the Project Name and click on create a project.
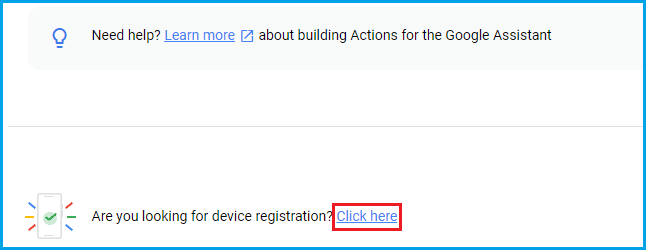
5) Now, scroll down to end and hit on Click Here like below:
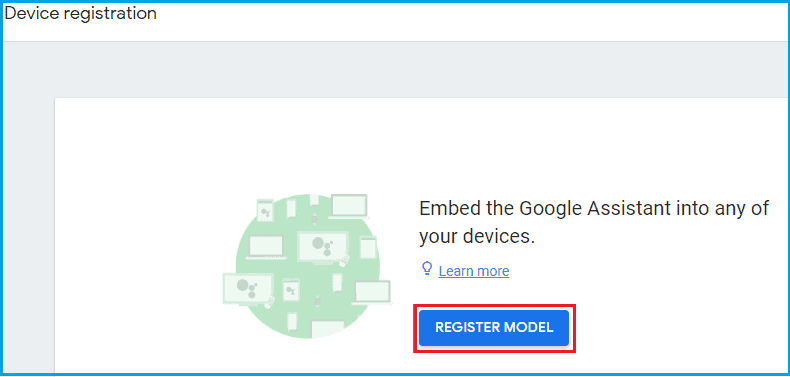
6) Now, wait for some time until a new window will appear. Click on Register Model like this:
7) The type product name, manufacturer name, device type, and click on Register Model.
Now, click on Download OAuth 2.0 credentials and click on Next.
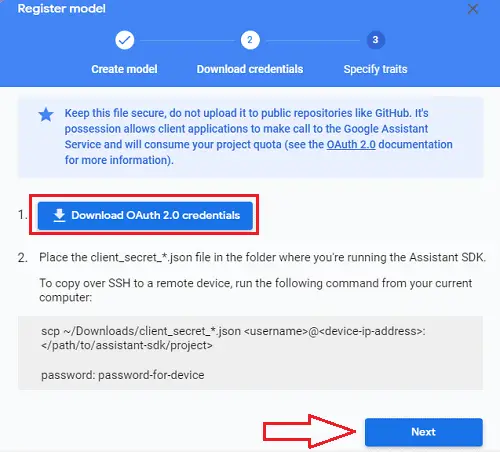
9) In the next tab (specify traits), click on skip.
10) We have done with Actions Console. You can close if you want to.
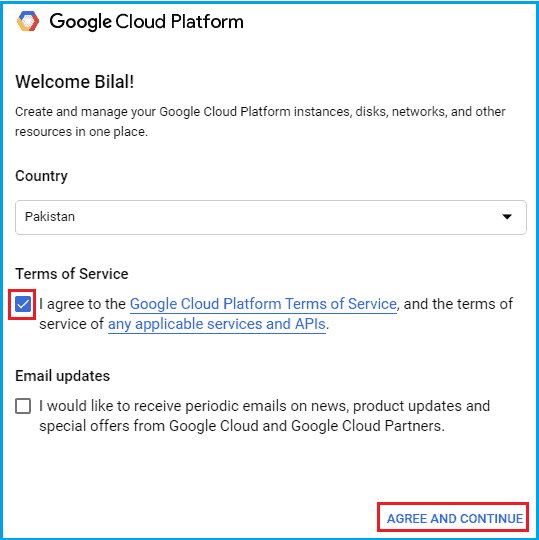
11) Now, go to Google Cloud Console.
12) Again select country, agree to Terms of Service and click on Agree and Continue like below:
13) Now, click on the drop-down arrow-like below:
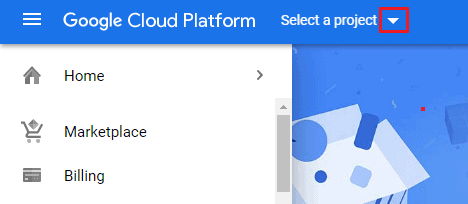
14) Select the project, you have just created in Actions Console.
15) In the left menu, Choose APIs and Services > Library and wait for a few seconds
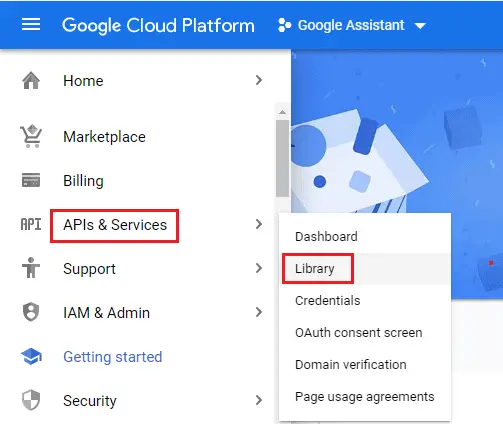
16) Now in the API library, search for Google Assistant API like this:
17) Click on Google Assistant API like below:
18) When Google Assistant API will open, click on Enable and wait for a few seconds like below:
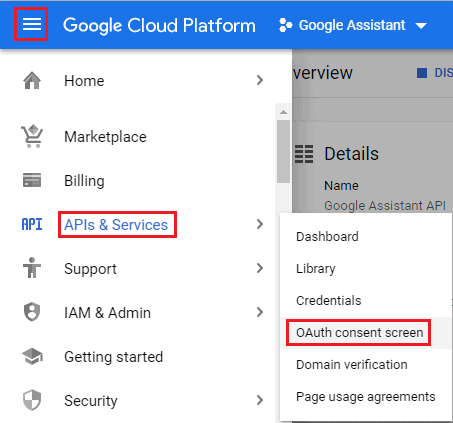
19) After enabling, click on horizontal lines on the top left corner, choose APIs and Services then click on the OAuth consent screen like this:
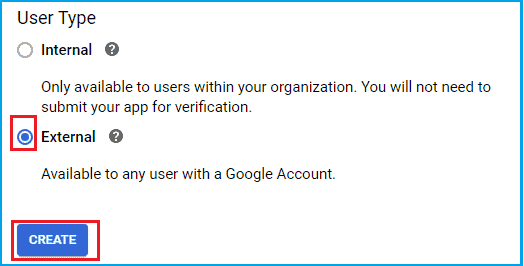
20) A new tab will appear. In User type, select External and click on Create.
21) Again a new window will open. Under the Support Email section, choose your email address.
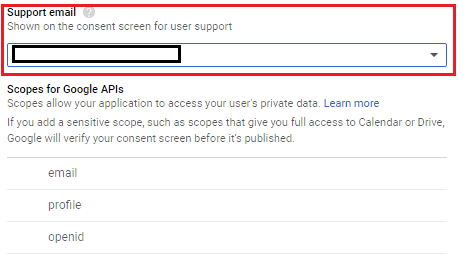
22) After selecting your email, scroll down and click on save.
23) You have done it.
Also Read: 5 Best Free Screenshot Software For Windows 10
3) Installing Google Assistant
In this section, we will install the Google Assistant by using the command prompt.
So, follow the given procedure very carefully.
1) Type cmd in the Windows search bar and run it as an administrator.
2) Now, we have to copy some commands and paste them into the command prompt one by one. You have to run cmd as an administrator.
3) Copy the following command and paste it in cmd and hit enter like below:
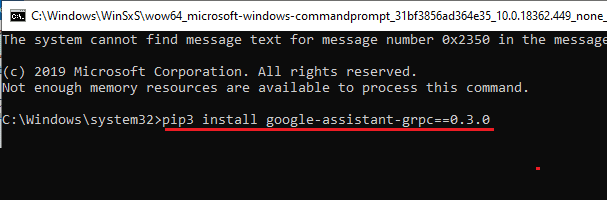
pip3 install google-assistant-grpc==0.3.0
Now, please wait for some time until it downloads some necessary files for Google Assistant.
4) Again, copy the code, paste in cmd, and hit enter.
pip3 install google-assistant-sdk==0.6.0
5) Once again, please copy the below code, paste it in cmd, and hit enter.
pip3 install google-assistant-sdk[samples]==0.6.0
6) Now, Navigate to the directory where you have downloaded the Assistant Credential File (Above section in step like below:
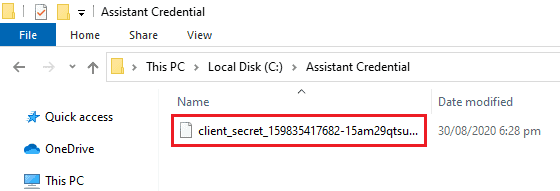
7) Now, copy the file name along with the extension which is .JSON
After copying the file name, click on the directory bar (Path) and put a backslash (\) at the end of the Path. Now, paste the name of the file along with an extension, you just copied like below:

9) After pasting the filename, copy the whole Path which includes Path and filename with an extension like below:
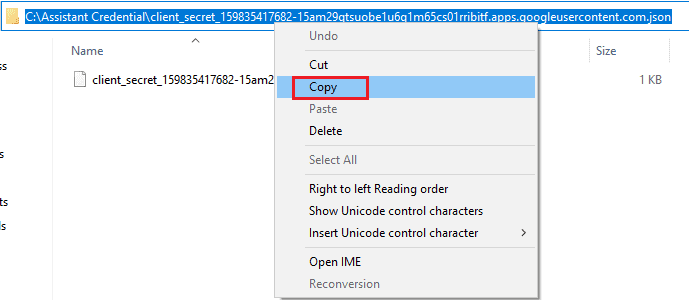
10) Now, put the double quotes around the entire Path, you copied right now, and again copy Path as a whole that includes double quotes, Path, and filename with extension.
11) Save this Path in notepad or anywhere else since we need it in the next step. In my case, the whole Path is this:
“C:\Assistant Credential\client_secret_159835417682-15am29qtsuobe1u6q1m65cs01rribitf.apps.googleusercontent.com.json.”
12) Now, copy the following command and paste it in the cmd. Do not hit enter.
google-oauthlib-tool --scope https://www.googleapis.com/auth/assistant-sdk-prototype --scope https://www.googleapis.com/auth/gcm --save --headless --client-secrets $credname
13) Replace $credname with the Path, you saved in notepad or anywhere else along with double-quotes, Path, and filename with extension. In my case, the whole command will look like this:

14) After replacing, hit enter.
15) Now, it will provide a link. Just copy that link, paste it in your browser, and hit enter.
16) Choose your Gmail account and give all permissions.
17) After Allowing everything, it will give you a code. Copy that code and enter in cmd and hit enter.
18) It will save your credentials.
19) Now, open Activity Control of your Google Account. Sign in if not.
20) Make sure both Web & App Activity and Location History are turned on. If not then, you have to turn them on. It is necessary for Google Assistant.
4) Setting up voice activation for the assistant
This is the last section, and we will be able to use Google Assistant after performing some steps. In this section, we are going to set up voice activation for the assistant. The whole procedure is given below:
1) Download the Voicemacro software.
Note: You must install .NET Framework version 3.5 to install this software in your windows 10.
2) When you begin the installation process, you have to click on Run Anyway and if this option doesn’t appear, click on More Info, and it will appear. The installation process is straightforward as we install other software.
3) Also, download a zip file. Click here
4) After downloading the file, extract that file. You need WinRAR or 7zip to extract that file.
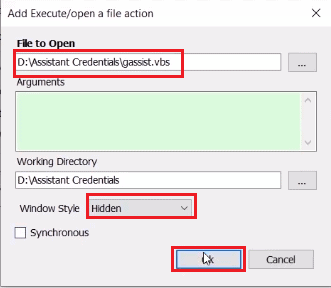
5) You will find two files when you will extract the zip file. Just open the gassist file with Wordpad or notepad. This file will look like this:
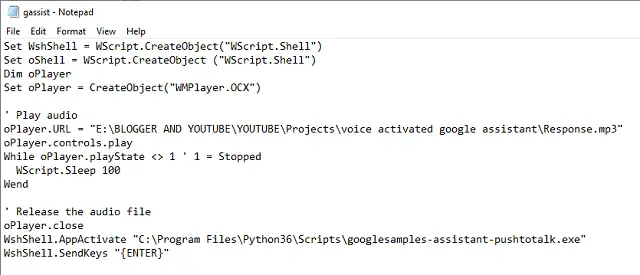
6) In this file (gassist), replace the Path of oPlayer.URL with Response.mp3 Path, you just extracted. In my case, it will become like this:
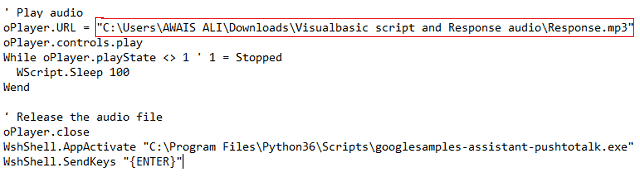
7) Now, press CTRL+S to save the file.
Go to the python folder and then, the script folder. Here, you will find the file named googlesamples-assistant-pushtotalk.exe like this:
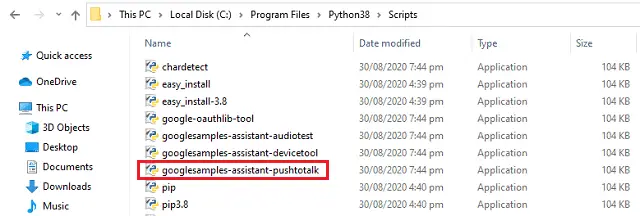
9) Just copy its Path. Open that file, you opened in notepad, and replace it in WshShell.AppActivate like below:

10) Again, save the file and close it.
11) Open the software voice macro, you just installed. Click on edit on the above menu.
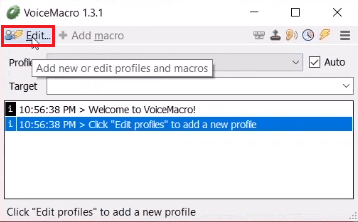
12) Click on Add new as below:
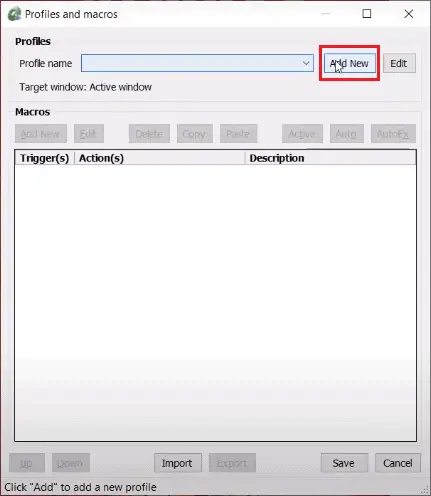
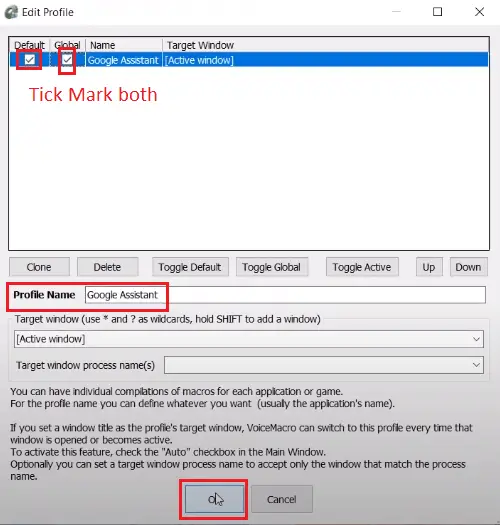
13) Give profile name and click on OK.
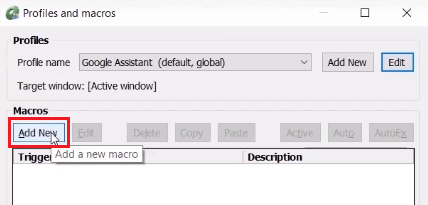
14) Under Macros, click on Add New.
15) Give the Macro Name like Hey Google, OK Google, etc. After that click on other > Execute/Open a file in the drop-down menu.
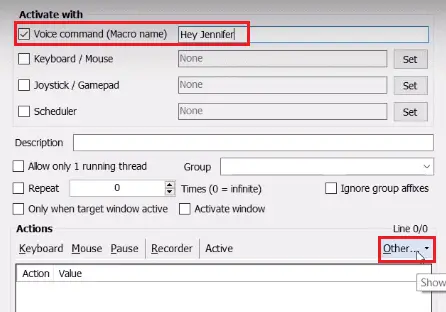
16) Now, Browse the gassist file, you just edited. In Windows Style, select Hidden and hit on OK.
17) Again Click on OK in the next window.
18) Now you have done everything, click on save.
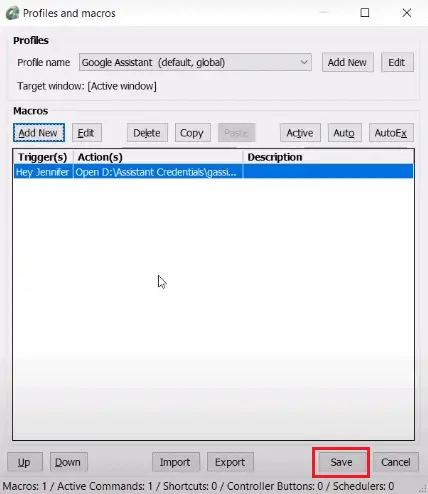
19) That’s it.
Also Read: How to Change WiFi Password in Windows 10?
How to Launch Google Assistant?
Finally, we have done everything. Now, will launch google assistant. Follow the given procedure to open the Google Assistant on your Windows 10 operating system.
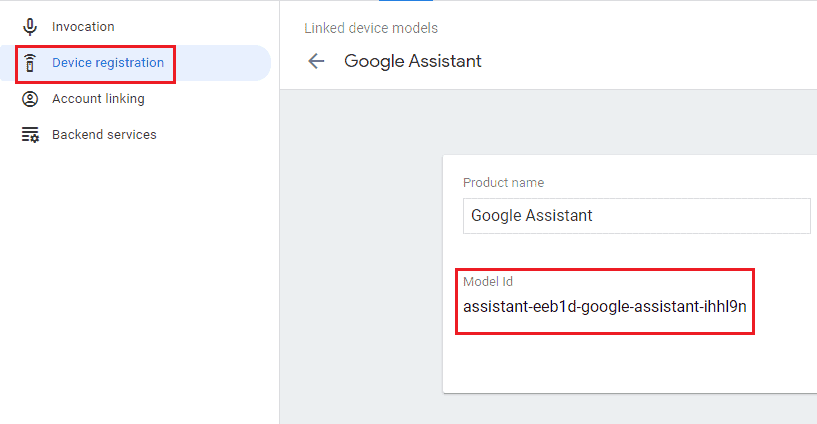
1) Go to your Actions Console screen and copy the Model ID of the project, you just created and saved it in notepad like below:
2) Now, go to Google Cloud Console and copy the Project ID, you just created and saved it in notepad like below:
3) Now, go to the python script folder and copy the path of the script folder.
4) Open cmd and type cd and give space and paste the Path you just copied and hit enter. In my case, the command will be:
cd C:\Program Files\Python38\Scripts
5) Now, the Path of cmd will be changed. Please copy the following command and paste it in cmd. Do not hit enter.
googlesamples-assistant-pushtotalk --device-model-id "Insert your model id here from actions console" --project-id "Insert your project id here from actions console"
6) Replace your Model ID and Project ID in the above code in cmd. In my case, this command will be:
googlesamples-assistant-pushtotalk –device-model-id “assistant-eec8d-google-assistant-ihhl9n” –project-id “assistant-eec8d”
7) After replacing codes, hit enter.
Your Google Assistant is ready.
How to use Google Assistant?
You are all done. Now, we can use google assistant easily. To use google assistant, follow the simple steps:
1) Open your voice macro software.
2) Go to Python directory > script > open googlesamples-assistant-pushtotalk file.
3) Now, say OK Google or whatever you set during profile creation in voice macro.
4) It will work the same as it does on Android phones.
Note: Your Microphone should be turned on to use Google Assistant.
Conclusion
I hope you have also installed Google Assistant in your Windows 10. I know the procedure is very lengthy, but the result is very fantastic. So, this is how to get Google Assistant on Windows 10.
If you face any issue during the installation, you can comment, and I will try to solve your problem as soon as possible. If you find this article helpful, then share it with your friends and dear ones.
Разрабатывая облачный сервис Google Assistant, компания Google ориентировалась прежде всего на пользователей мобильных устройств под управлением Android и iOS, однако это не означает, что вы не сможете пользоваться им на ноутбуках и десктопных компьютерах. Приложив немного усилий, вы можете установить базовую версию ассистента на ПК с Windows 10 прежде, чем Microsoft договорится об интеграции этого инструмента в свою ОС.
Итак, для этого вам понадобится учетка Гугл, в настройках которой необходимо активировать голосовую активность, компонент Python, специальный файл JSON, PowerShell или командная строка и немного свободного времени.
Первым делом перейдите по адресу myaccount.google.com/activitycontrols и активируйте историю голосового управления, если этого не было сделано ранее.
Затем скачайте со странички www.python.org/downloads компонент Python и поставьте его как обычную программу.

По завершении установки перейдите в браузере по адресу console.cloud.google.com, примите условия использования облачной платформы и выберите свою страну проживания.
Затем клацните кнопку «Выберите проект».
И нажмите в открывшемся окне «Создать проект».
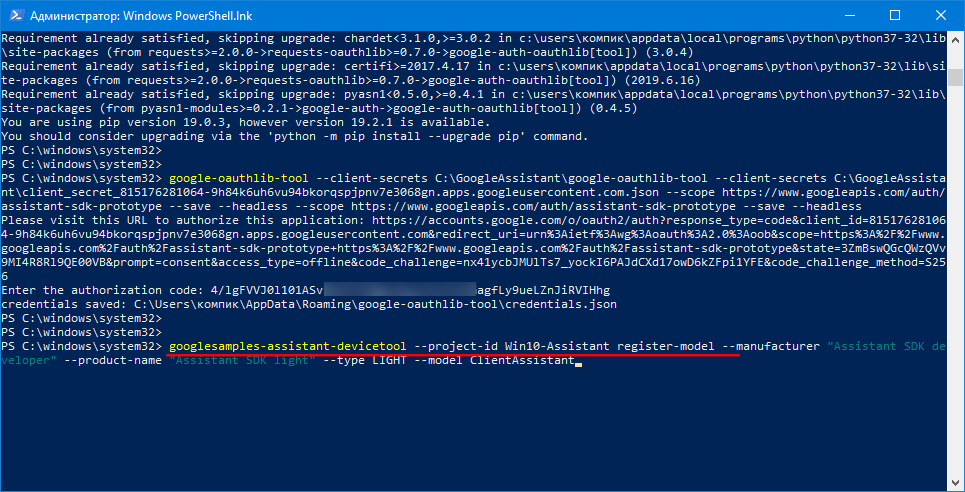
В качестве имени нового проекта укажите произвольное название на английском, например, Win10-Assistant и нажмите «Создать».
Имя проекта является его уникальным идентификатором, запишите его, оно вам еще пригодится.

После того как проект будет создан, откройте его, выберите в меню навигации слева,
API и сервисы — Библиотека.
Войдя в Библиотеку, введите в поисковое поле запрос «Google Assistant».
Кликните по полученному результату.
И нажмите кнопку «Включить».
На открывшейся странице сервиса в меню слева выберите «Учетные данные» и нажмите «Настроить окно запроса доступа».
В поле «Название приложения» вбейте любое запоминающее имя и сохраните результаты нажатием одноименной кнопки.
При этом откроется окошко с предложением создать учетные данные.
Жмем кнопку создания, запускаем мастер данных и последовательно отвечаем на три вопроса как показано на приложенных скриншотах.
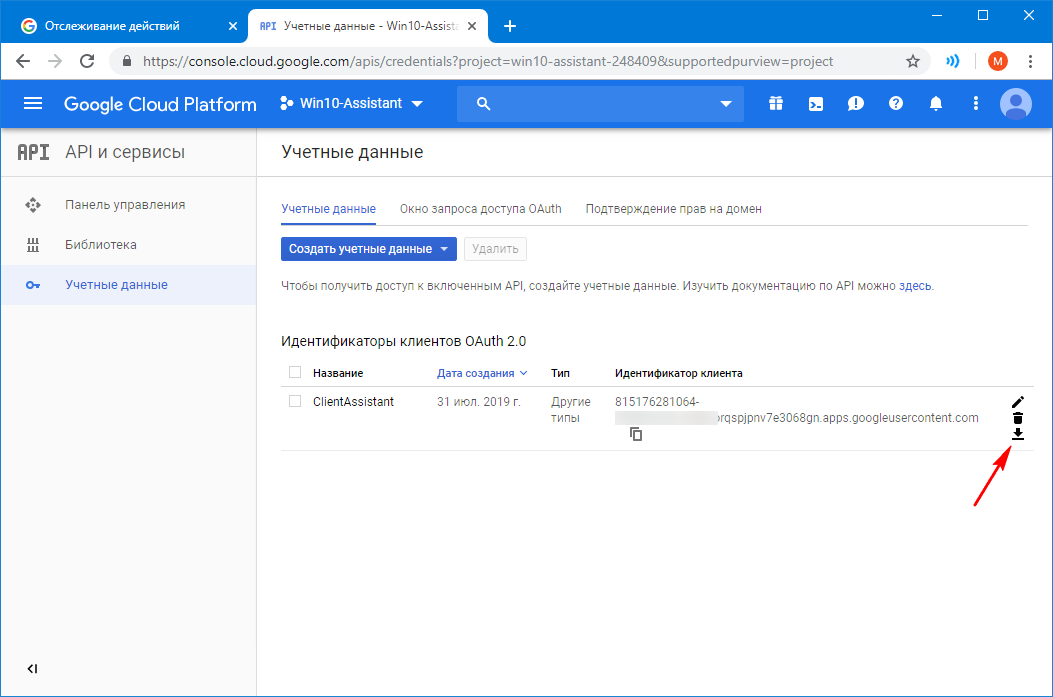
Выбрав указанные настройки, нажмите «Выбрать тип учетных данных». Введите в поле создания идентификатора клиента OAuth 2.0 произвольное название, к примеру, ClientAssistant и сохраните настройки нажатием «Создать идентификатор клиента OAuth».
Имя клиента OAuth также является идентификатором, и он должен отличаться от идентификатора названия приложения (см. выше новый проект). При этом вам будет предложено выгрузить JSON-файл учетных сохранить настройки нажатием кнопки «Готово», на что и даем согласие.
Загрузить файл JSON лучше позже на странице учетных данных, нажав иконку в виде направленной вниз стрелки.
Половина дела сделана, можно приступать к установке Ассистента.
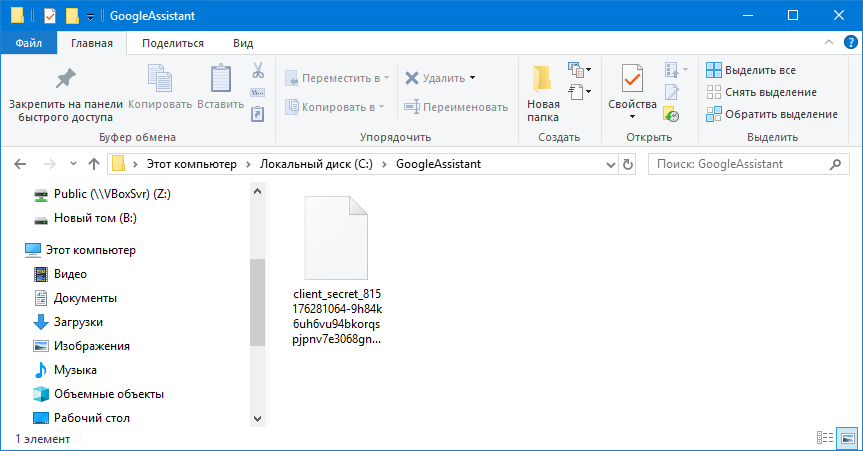
Для этого в корне системного раздела создаем папку «GoogleAssistant» и забрасываем в нее скачанный файл JSON.
А теперь будьте внимательны.
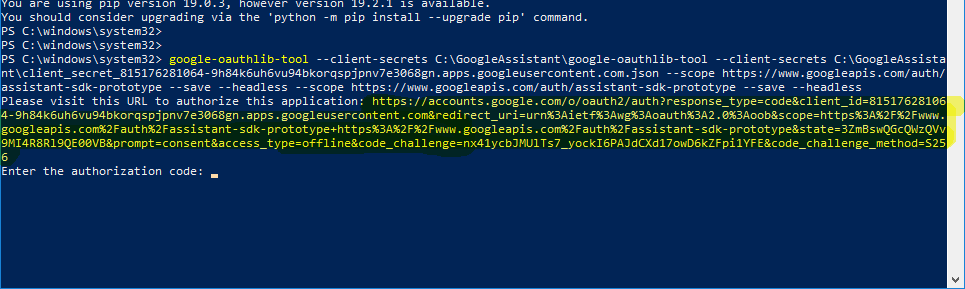
Запустите с админскими правами PowerShell и последовательно выполните в ней команды, указанные в приложенном по ссылке yadi.sk/d/vN2aDQVtslNSIQ файле-инструкции.
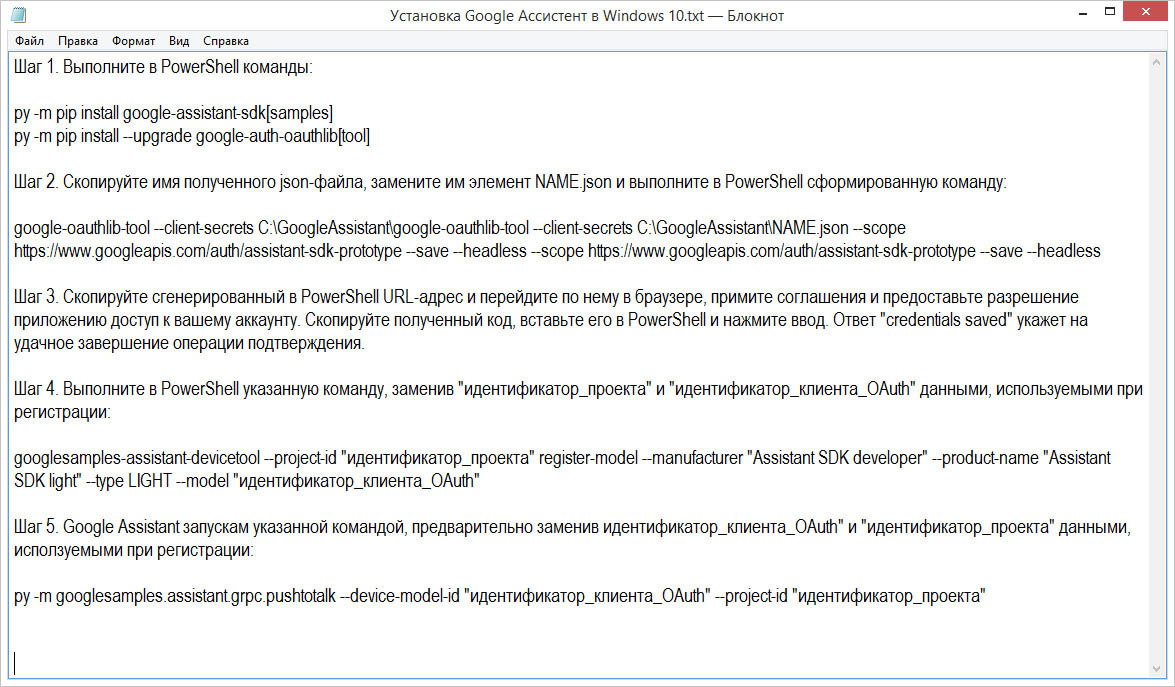
В общем, у вас всё должно получиться так, как показано на этих скриншотах. Установка и настройка Google Assistant заканчивается на четвертом шаге, пятый шаг — это, собственно, запуск Ассистента.
Как это работает? Каждый раз, когда вы нажимаете в PowerShell ввод, происходит активации программы, в этот момент вы как раз можете задавать Ассистенту свои вопросы. Выполнять действия из шагов 1-4 уже не нужно, достаточно будет команды из шага 5. Да, неудобно, но пока что это единственный вариант интеграции Google Assistant в Windows. В будущем, вероятно, Microsoft и Google реализуют более удобный доступ к Ассистенту, а пока имеем то, что имеем.


![]() Загрузка…
Загрузка…