В мире ИТ существует уже довольно широкий спектр операционных систем, начиная с серверных, заканчивая операционными системами для мобильных устройств. В обычных пользовательских компьютерах и в серверах довольно часто используются две ОС — Linux и Windows. Поэтому очень часто возникают ситуации, когда приходится подключаться по сети из одной операционной системы к другой для выполнения разнообразных операций.
В этой статье мы рассмотрим варианты подключения к Linux из Windows. Существуют бесплатные и условно бесплатные утилиты вроде AnyDesk или TeamViewer, но установка их довольно тривиальна и не нуждается в дополнительном пояснении. Утилиты подобного рода обладают рядом ограничений при бесплатном некоммерческом использовании, либо их функциональность не удовлетворяет тем или иным потребностям пользователя. Мы рассмотрим полностью бесплатные способы как подключится к Linux из Windows.
Удалённый доступ к Linux с помощью VNC
На сегодняшний день самое популярное удаленное подключение к Linux из Windows, с использованием привычный в Windows графического интерфейса, является VNC (Virtual Network Computing) — утилита, использующая протокол RFB (Remote FrameBuffer — удалённый кадровый буфер). Управление осуществляется путём передачи нажатий клавиш на клавиатуре и движений мыши с одного компьютера на другой и ретрансляции содержимого экрана через компьютерную сеть.
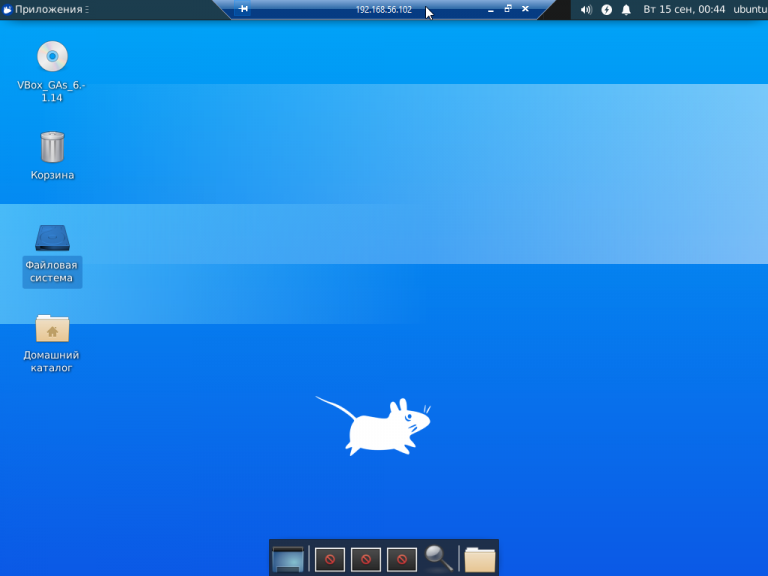
В качестве сервера VNC в данном примере будет использоваться TightVNC, установленный в Ubuntu 20.04. Для установки сервера VNC необходимо выполнить ряд действий:
Шаг 1. Установка рабочей среды XFCE
Xfce — одна из самых легковесных рабочих сред, используемых в Linux, она будет быстро работать даже при слабом и нестабильном сетевом подключении. Установите её с помощью команд:
sudo apt update
sudo apt install xfce4 xfce4-goodies
Шаг 2. Установка TightVNC
Далее установите TightVNC:
sudo apt install tightvncserver
Шаг 3. Настройка пароля
Перед началом выполнения всех действий необходимо задать пароль пользователя VNC. Выполните команду:
vncpasswd
Вам будет предложено создать новый пароль, а также пароль только для просмотра. Откажитесь от второй опции:
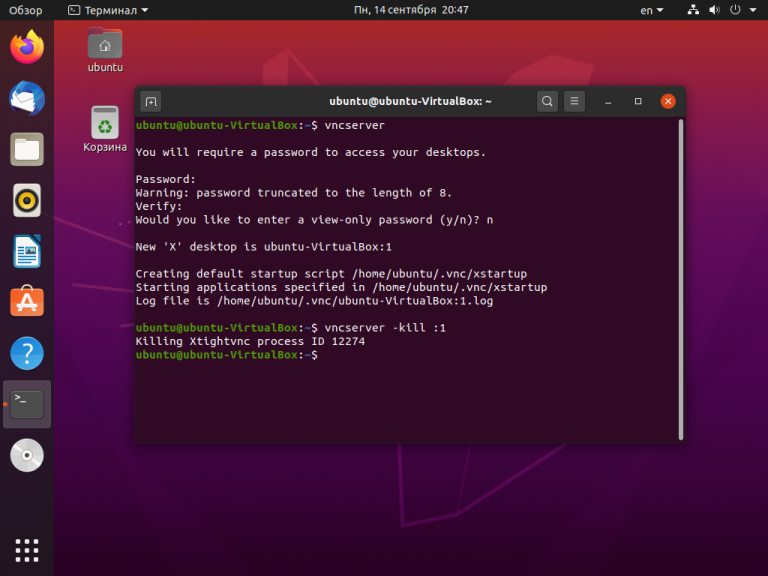
Завершите процесс vncserver:
vncserver -kill :1
Шаг 4. Настройка скрипта запуска
Отредактируйте скрипт, который выполняется после запуска VNC-сервера:
nano ~/.vnc/xstartup
Он должен содержать такой текст:
#!/bin/sh

unset SESSION_MANAGER

unset DBUS_SESSION_BUS_ADDRESS

startxfce4 &
Сделайте файл исполняемым:
chmod +x ~/.vnc/xstartup
Шаг 5. Запуск VNC сервера
На этом этапе уже можно запустить VNC-сервер с помощью команды:
vncserver
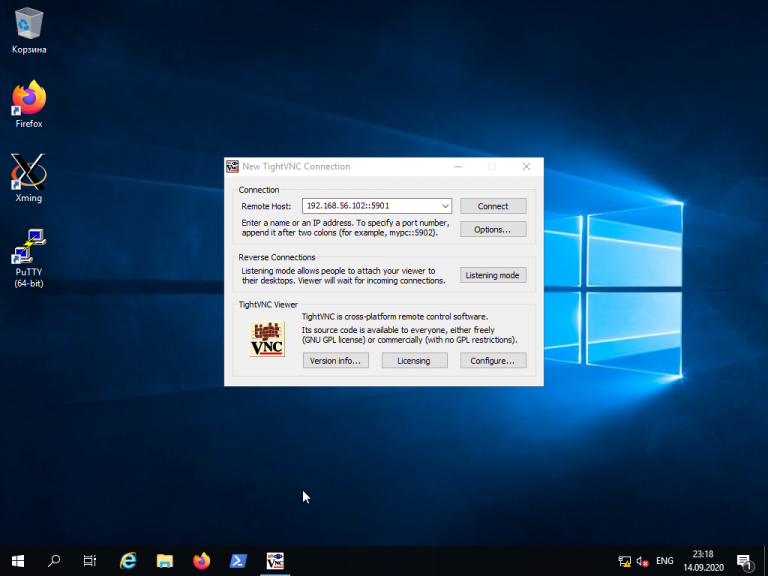
Шаг 6. Подключение из Windows
Для того, чтобы подключиться из Windows к вашему Linux-серверу, используйте TightVNC Viewer.
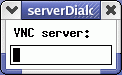
Укажите IP-адрес компьютера, к которому нужно подключиться, и номер порта в поле Remote Host. В данном примере — 192.168.56.102::5901:
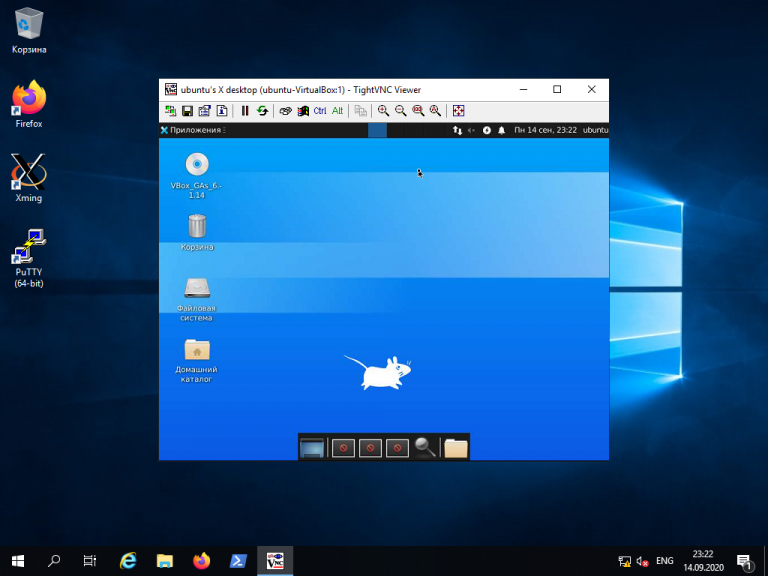
После того, как будет введён пароль, вы должны увидеть рабочий стол Xfce:
Шаг 8. Настройка systemd
Для того, чтобы запуск вашего VNC-сервера добавить в автозагрузку надо использовать systemd. Создайте новый файл сервиса systemd:
sudo nano /etc/systemd/system/vncserver@.service
Его содержимое должно быть следующим:
[Unit]

Description=Systemd VNC server startup script for Ubuntu 20.04

After=syslog.target network.target

[Service]

Type=forking

User=ubuntu

ExecStartPre=-/usr/bin/vncserver -kill :%i &> /dev/null

ExecStart=/usr/bin/vncserver -depth 24 -geometry 800x600 :%i

PIDFile=/home/ubuntu/.vnc/%H:%i.pid

ExecStop=/usr/bin/vncserver -kill :%i

[Install]

WantedBy=multi-user.target
Измените имя пользователя ubuntu и рабочего каталога ubuntu на нужные вам значения. Если у вас запущен VNC-сервер, остановите его:
vncserver -kill :1
Сообщите systemd о появлении нового сервиса:
sudo systemctl daemon-reload
Добавьте запуск вашего нового сервиса в список автозагрузки:
sudo systemctl enable vncserver@1.service
Запустите VNC-сервер:
sudo systemctl start vncserver@1
Использование RDP для удалённого подключения
Помимо VNC, для управления Linux-сервером из Windows можно воспользоваться RDP (Remote Desktop Protocol). Для этого на компьютере с Ubuntu 20.04 установите утилиту xrdp:
sudo apt install xrdp
Для корректной работы сервиса необходимо добавить пользователя xrdp в группу ssl-cert:
sudo adduser xrdp ssl-cert
Установите Xfce:
sudo apt-get install xfce4
Добавьте Xfce в сессии RDP в качестве рабочего стола по умолчанию:
echo xfce4-session >~/.xsession
Перезапустите сервис xrdp:
sudo systemctl restart xrdp.service
Процедура подключения из Windows к Linux-серверу по протоколу RDP почти ничем не отличается от подключения к удалённым Windows-серверам. Введите IP-адрес сервера, логин и пароль пользователя в Linux:
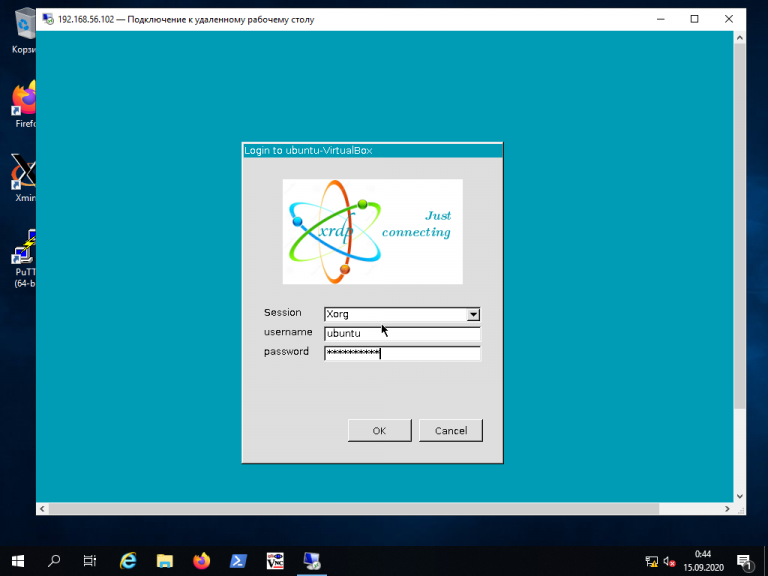
Если всё сделано правильно, вы увидите рабочий стол Xfce:
Для подключения к компьютеру под управлением Linux по протоколу SSH из Windows можно воспользоваться PowerShell. Сначала становите OpenSSH Client, если ещё не установлен. Запустите на вашем компьютере PowerShell от имени администратора системы и выполните следующую команду:
Get-WindowsCapability -Online | ? Name -like 'OpenSSH*'
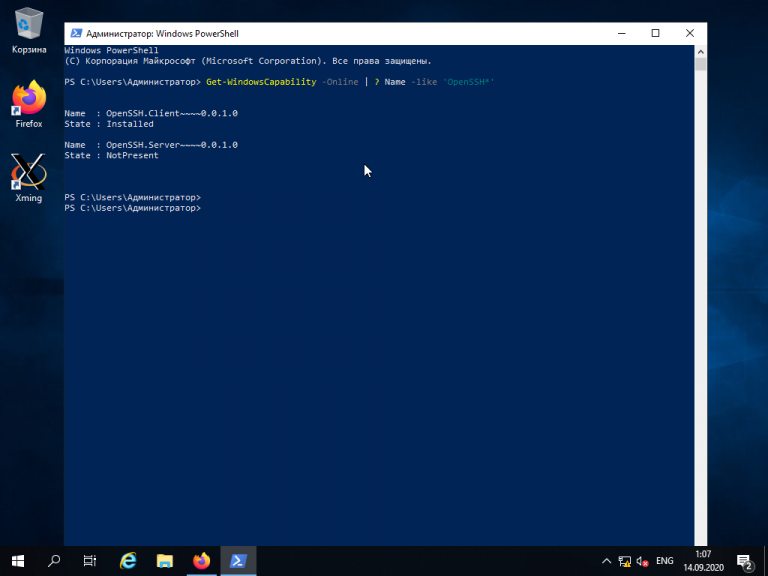
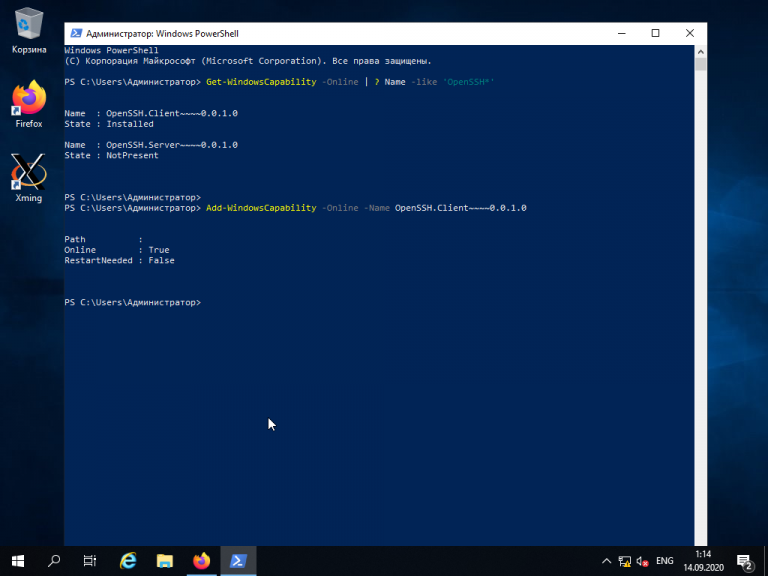
Это необходимо для того, чтобы узнать текущую версию SSH-клиента. В данном примере доступна версия OpenSSH.Client-0.0.1.0. Установите OpenSSH.Client с помощью команды:
Add-WindowsCapability -Online -Name OpenSSH.Client~~~~0.0.1.0
Для того, чтобы подключиться к устройству, на котором запущен SSH-сервер, необходимо ввести имя пользователя и IP-адрес. Команда для подключения по SSH используя PowerShell выглядит так:
ssh ubuntu@192.168.56.1
Здесь ubuntu — имя пользователя на удалённом компьютере, а 192.168.56.1 — IP-адрес Linux-сервера, на котором запущен демон SSH.
При первом подключении необходимо подтвердить использование специального персонального ключа для шифрованного соединения по SSH-протоколу (введите слово Yes), затем введите пароль пользователя (в данном случае для пользователя ubuntu):
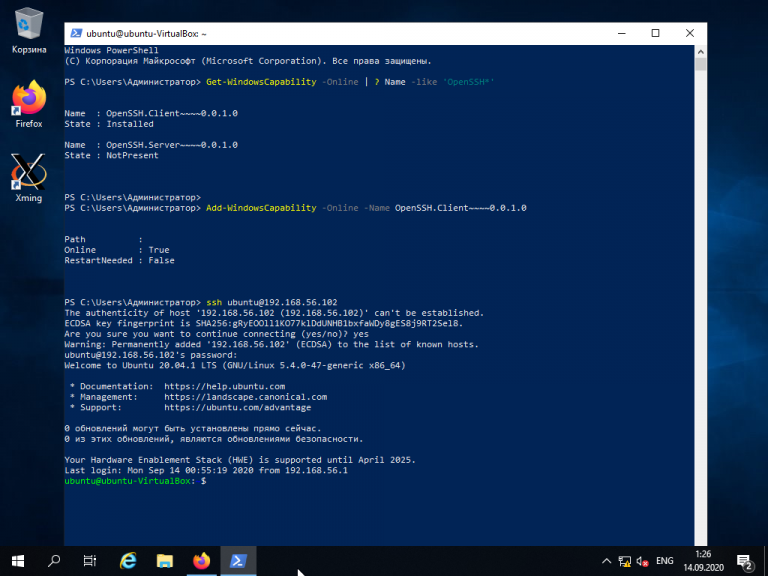
Как видите, соединение прошло успешно. Теперь можно выполнять все команды так же, как если бы вы их выполняли используя стандартный Linux SSH-клиент:
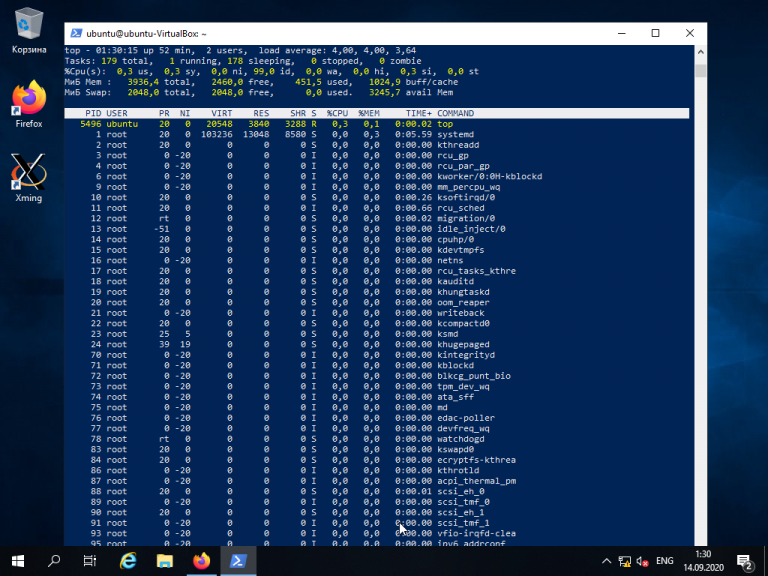
Для завершения терминальной сессии на удалённом компьютере введите команду exit. Теперь вы знаете как выполняется подключение к Linux из Windows по SSH.
Использование Putty для подключения к Linux
Пожалуй, одним из самых популярных способов подключения к Linux из Windows является кроссплатформенная утилита Putty — небольшая по размерам, но очень часто незаменима для подключения по таким протоколам как SSH, Telnet, rlogin и даже с помощью последовательных портов.
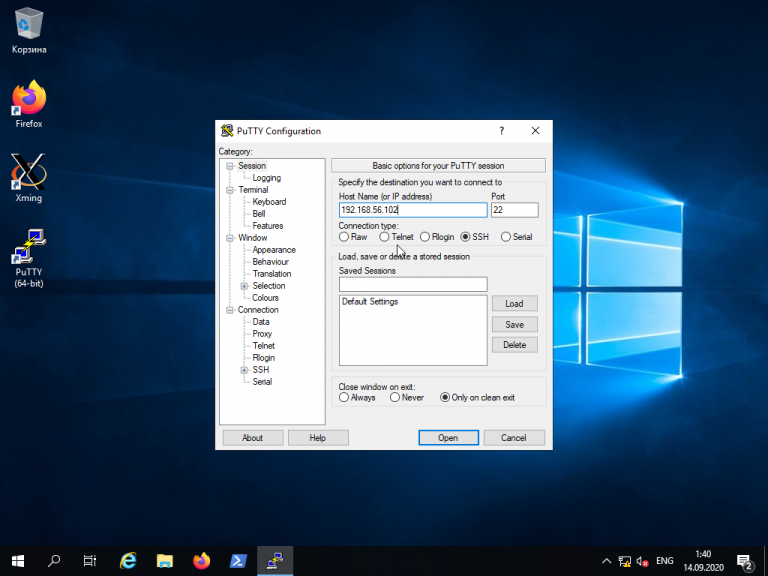
Для обычного подключения к Linux-серверу по протоколу SSH достаточно в поле Host Name (or IP—address) указать его IP-адрес и нажать кнопку Open (в данном примере Linux-сервер имеет IP-адрес: 192.168.56.102):
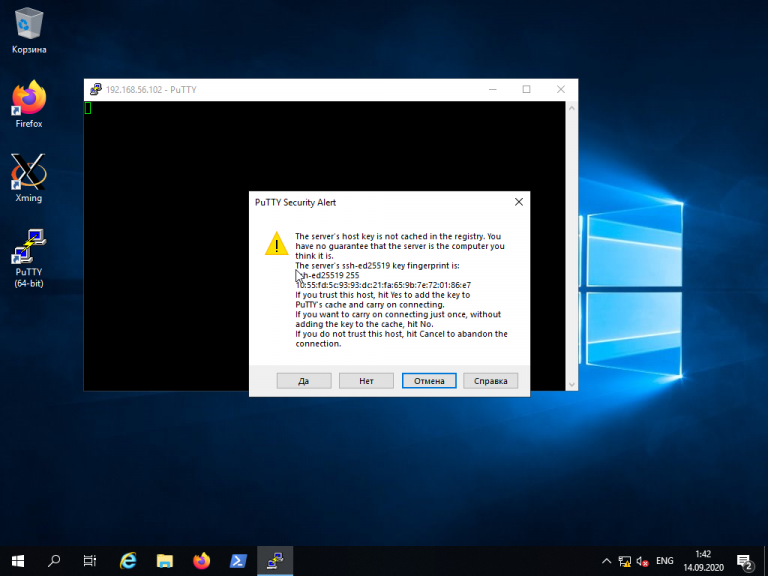
При первом подключении Putty предупредит, что используется специальный ключ безопасности и его нужно добавить в доверенные хосты. Нажмите кнопку Да:
Далее нужно будет ввести логин и пароль. Если всё сделано правильно, запустится удалённая сессия терминала Linux:

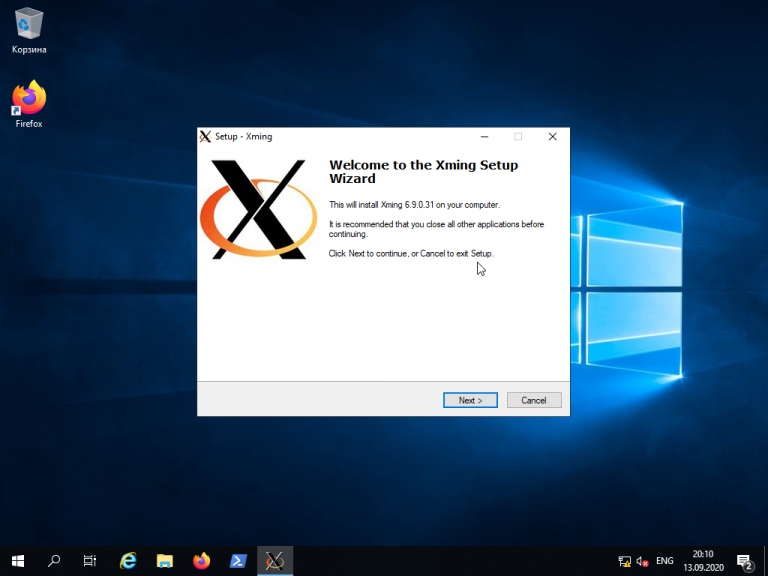
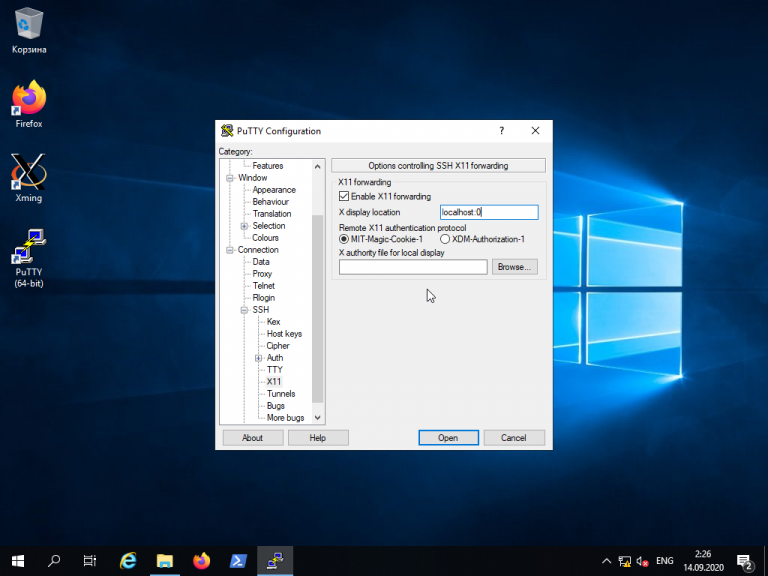
Мало кто знает, что Putty позволяет запустить почти любое приложение, установленное на компьютере с Linux, по сети в Windows. Для этого на компьютере с Windows нужно установить собственный X-сервер. В данном примере воспользуемся Xming.
Скачайте Xming с официального сайта. Установка довольно тривиальная, поэтому не будем на ней останавливаться. Ничего не меняйте в процессе установки. Просто нажимайте кнопку Next до тех пор, пока программа не установится и не запустится:
Когда установка Xming завершится, откройте Putty и в настройках сессии для вашего подключения в разделе SSH -> X11 включите флажок напротив опции Enable X11 forwarding, а также, в строке Отображение дисплея X впишите значение localhost:0, после чего откройте сессию подключения с помощью кнопки Open:
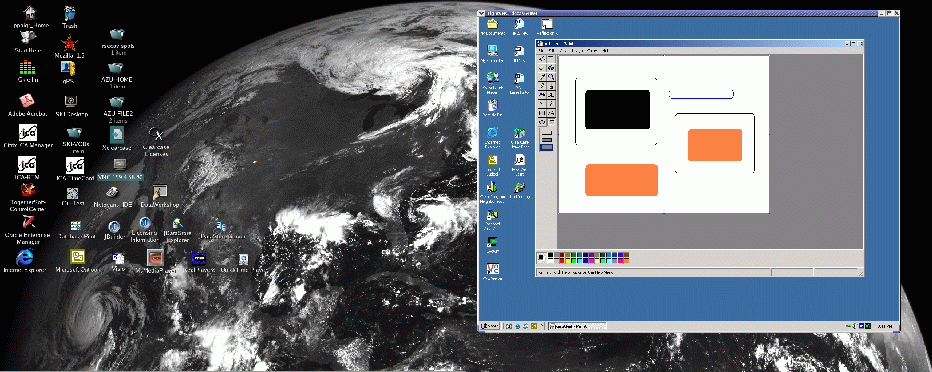
В открывшемся терминале Putty введите консольное название программы, обладающей графическим интерфейсом. В данном примере введено название графического редактора drawing:
drawing &
(Знак & позволит запустить программу в фоновом режиме, в этом случае в окне Putty можно будет выполнять и другие команды):
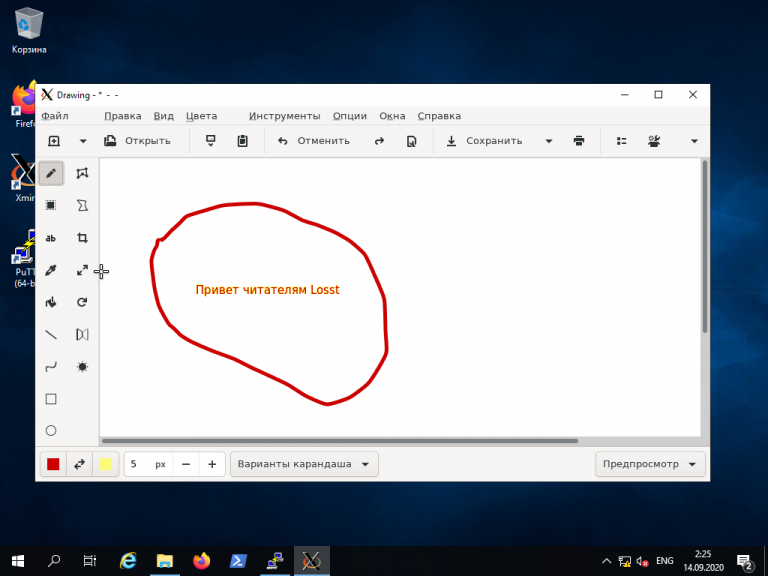
Как видите, Linux-приложение drawing успешно запустилось по сети на X-сервере, установленном в Windows. С ним можно работать так же, как и с локальным приложением.
Выводы
Сегодня не существует слишком уж больших проблем для подключения к Linux из Windows. Способов существует довольно много. Каждый из них обладает своими достоинствами и недостатками, например, скорость работы VNC, да и других тоже, существенно зависит от скорости сетевого соединения. Существуют также программные средства, позволяющие подключаться к Linux-серверам используя мессенджеры или браузеры.
Обнаружили ошибку в тексте? Сообщите мне об этом. Выделите текст с ошибкой и нажмите Ctrl+Enter.

Статья распространяется под лицензией Creative Commons ShareAlike 4.0 при копировании материала ссылка на источник обязательна .
Download VNC® Viewer to the device you want to control from.
For the best experience install VNC® Server on the computer you want to control.
-
Desktop
-
Mobile
iOS

Scan me for the App store
Android
![]()

Scan me for the App store
Thank you for downloading
Your download of VNC Viewer for has started.
Now create an account to manage your devices and get a 14-day free trial to access all VNC Connect features.
Get the full VNC® Connect experience
VNC Viewer and VNC Server are designed to work best together.
Use them both to experience enhanced security, more reliable connections, and access to exclusive features within VNC Connect.
Get started in three easy steps

1. Download
Download and install VNC Viewer on your desktop.

2. Sign in/up
Sign in or Create an account (and claim a free 14-day trial).

3. Setup and Connect
Add VNC Server to your remote devices and connect.
See how easy VNC Connect is to use
-
How to get started
How to get started with RealVNC Connect remote access
In this video, we’ll show you how quick and easy it is to get your first screen sharing session up and running using RealVNC Connect.
Tutorial: How to get started with RealVNC Connect remote access
Starting to use RealVNC Connect couldn’t be easier. You just need to create an account and get a free trial (no credit card required).
This video will show you how to provide unattended access to your Windows, Linux or Mac computer.
You will now be able to control your computer easily from anywhere in the world. If you want to continue to use the software after the 14-day trial, you can continue to do so seamlessly after buying a subscription.
Related downloads
Policy template files
Remotely configure and lock down programs using policy.
Policy template files
Remotely configure and lock down programs using policy.
Policy template files
Remotely configure and lock down programs using policy.
Policy template files
Remotely configure and lock down programs using policy.
Frequently asked questions
Didn’t find the answer you were after? Check out our Help Center for more FAQs, technical docs and how-to guides.
Just run the installer on the device you want to control from and follow the instructions, or there’s MSIs for remote deployment under Windows. If you don’t have permission to install VNC® Viewer on desktop platforms, choose the standalone option.
If you have a keyboard and mouse in front of you, use them as you would normally. If you’re on a mobile device, then your touchscreen acts as a mouse trackpad, with gestures mapped to mouse buttons. See the on-board help!
No. VNC® Viewer is always free to use. Just accept the EULA the first time you run.
Try VNC Connect today for free
VNC from Windows to Linux
Connecting using VNC from a Windows computer to a Linux system
Virtual Network Computing, or VNC, allows you to remotely control a Linux computer with another computer through a graphical interface. You will be able to observe a Linux desktop environment and interact with it using the mouse and keyboard from a different computer. This guide will walk you through how to start a VNC session and connect with it when using a Windows-based computer.
| Table of Contents |
|---|
|
Preliminary Notes
Software
For users looking to use VNC on their Windows computer, we recommend using MobaXterm. It is a free, all-in-one solution that we find is easiest to get up and running with VNC for users. This guide is intended for use with MobaXterm and may not be applicable with other terminal and VNC viewing software.
You can download MobaXterm using the following link:
https://mobaxterm.mobatek.net/download.html
VPN Requirements
Certain MCECS Linux systems, such as the Redhat/CentOS servers (e.g. auto.ece.pdx.edu and mo.ece.pdx.edu), require the use of a VPN when accessing from outside of the PSU campus.
For more information on how to set up OpenVPN on Windows, read our guide in the following link:
Important Terminology
Here are some key terms to remember when connecting with VNC
- VNC session password – this password is used only with VNC. This is not tied to your MCECS login. Because the encryption on this password is extremely weak, do not use a password that you want to keep private as your session password.
- Display Number – when you start a VNC session, it will be assigned a number between 1 and 99 that will identify it on the Linux system you are remotely connected to.
- Port Number – This is equal to your Display Number plus 5900. This number is used by the VNC viewer software to remotely connect with the VNC session running on MCECS Linux systems.
- Host Address – this is the full domain name of the system you want to remotely connect with. This is usually in the form of somecomputer.cs.pdx.edu, somecomputer.ece.pdx.edu, or somecomputer.cecs.pdx.edu
Starting the VNC session
Step 1 – Opening a terminal
Open MobaXterm and click on the Start local terminal button, as highlighted in the image below.

Step 2 – Connecting to Linux system with SSH
In the command line, enter the following command
ssh your_username@host_name
Replace your_username with your MCECS username and replace host_name with the address of the MCECS Linux machine or server you want to connect with (for example, mo.ece.pdx.edu or rita.cecs.pdx.edu).
Enter your MCECS account password when prompted, and log in to the host system.

Step 3 – Starting VNC session process
Start a VNC session by entering the command vncserver
NOTE: If you see the following message after entering vncserver, this means you have a VNC session already running on this system. Go to the end of this article for more information on how to check for existing VNC sessions and also how to terminate them.

Step 4 – Creating VNC session password
You should now see a prompt to enter a password like in the image below. This will be your VNC session password.
Be aware of the following:
- The session password needs to be at least 6 characters long.
- This password is only used to log in to your VNC session and is not tied to your MCECS account password.
- This password is stored with very poor encryption, so it is advised that you do not use a sensitive password for your VNC session password.
You will also be prompted to enter a view-only password, which can be used by other people to observe your VNC session. If you are unsure about this feature, enter n for “no” and avoid creating one.

NOTE: It is possible you may not see a password prompt. If you have previously used VNC, the new process will sometimes use your previous session password. If you have forgotten your previous session password, run the command vncpasswd to change it.
Step 5 – Getting Display/Port numbers
Your VNC session has been created, and you should see a message similar to the sample output below

The number that appears after the host address is the display number (it is underlined in red in the image above). By adding this number to 5900, this will give you the port number used to connect your VNC viewer to the VNC session.
For example, if your display number is 4, your port number is 5904. If your display number is 12, your port number is 5912.
NOTE: Your display number may not be the same as the sample image above. Make sure to read the output message in your terminal and look for the number after the semicolon for your true display number.
The VNC session is now running on the remote Linux host system and is ready to connect with your VNC viewing software. You can exit and close this terminal if you want, as the VNC session will continue to run in the background. Be aware that the CAT will kill any VNC session that has been idle for more than 48 hours.
Connecting with your VNC session with MobaXterm’s VNC viewer
Step 1 – Opening new VNC viewer session
In MobaXterm, click on the Session button in the upper left hand corner
Step 2 – VNC viewer setup
In the window that pops up, look for the VNC icon in the top row and click on it
- In the Remote hostname or IP address box, enter localhost
- In the Port box, enter your Port Number. Recall that this is 5900 plus the Display Number that appeared after running the vncserver command

Step 3 – SSH Gateway setup
In the lower area, click on the Network Settings tab, and then click on the SSH gateway (jumphost) button. The button is highlighted in the blue box in the image above.
In the window that pops up, enter the following
- In the Gateway host box, enter the address of the host machine that your VNC session is running on (e.g. ada.cs.pdx.edu, mo.ece.pdx.edu, etc).
- In the Username box, enter your MCECS username.
- In Port, leave it set at 22
- Do not check off the box for Use SSH key.
Afterwards, click the OK button with the green checkmark to save these settings and close this configuration window.

When you return to the previous menu, click the OK button again and connect MobaXterm’s VNC Viewer with the remote VNC session

Step 4 – VNC password guide
When you see the following window asking for the password for MCECS username on the host address, enter your MCECS login password. This window may or may not appear, depending on how recently you used MobaXterm to view a VNC session previously.

When you see the following window asking for the password for localhost, enter your VNC session password.

A new tab should now appear in MobaXterm with a Linux graphical interface. Congratulations! You are now remotely connected with a Linux system via VNC.

Disconnecting vs. Terminating your VNC session
It is possible to disconnect from your VNC session and reconnect with it later on to pick up where you left off. In MobaXterm, if you close the tab or click on the Disconnect button, your VNC session will not end and will continue to run on the host system. To reconnect with your session, simply follow the instructions above for Connecting with your VNC session with MobaXterm’s VNC viewer using the same session password and port number as before.
Be aware that on CAT-supported systems, VNC sessions are terminated if they have been idle for more than 48 hours.

If you want to kill the VNC session, you can use the Log Off or Shutdown option in the Linux graphical interface. The location of these options will vary depending on the version of Linux on the host system and your personal settings.

Alternatively, you can kill VNC sessions using the command vncserver -kill :X, where X is replaced with your session’s Display Number.
Checking for existing VNC sessions
If you want to check for existing VNC sessions or find its display number, run the command vncserver -list
If there is an existing session, you will see the following output

If there are no sessions running, you will see the following output

Changing your VNC password
If you want to change your VNC session password, run the command vncpasswd and follow the prompts. The session password can be changed even if you have VNC currently running, allowing you to use the new password even after starting a session.

Вам нужен удаленный доступ к настольному компьютеру Linux из Windows? Вот что вам нужно знать о RDP, VNC и SSH для Linux.
Установили сервер Linux? Возможно, вы настроили его как решение для сетевого хранения данных. А может быть, у вас есть рабочий ПК с Linux, медиацентр или вы просто держите дополнительный ПК в другой комнате.
Как бы то ни было, в какой-то момент вам понадобится удаленный доступ к устройству Linux с ПК или ноутбука под управлением Windows. Каково же решение?
У пользователей Windows есть несколько инструментов, которые обеспечивают простой удаленный рабочий стол с Windows на Linux. Хотите узнать, как сделать удаленный рабочий стол с Windows на Linux? Читайте дальше!
Вам понадобится IP-адрес устройства Linux
Перед тем как удаленно подключиться к Linux из Windows, вам понадобится IP-адрес устройства. Он нужен для всех вариантов удаленного подключения, хотя в некоторых случаях достаточно имени хоста (сетевого имени устройства).
Самый простой способ проверить IP-адрес – войти в систему на устройстве Linux и открыть терминал. Введите:
hostname -IНа экране появится IP-адрес устройства. Для получения более подробной информации вы также можете использовать
ip address
Если ваша система Linux имеет несколько соединений, они будут перечислены с префиксами. Например, подключение Ethernet будет перечислено как eth0. Если система подключена к беспроводной сети, ищите IP-адрес, указанный напротив wlan0.
Если это не так просто или неудобно, есть другой способ, который почти так же прост. В окне браузера подключитесь к маршрутизатору. Обычно это адрес 192.168.0.1 или 192.168.0.0. Посмотрите на самом маршрутизаторе или в документации, которая прилагается к нему.

Войдя в маршрутизатор, найдите опцию со списком подключенных устройств. Просмотрите IP-адреса, чтобы найти устройство Linux по имени хоста. Некоторые маршрутизаторы могут даже отображать операционную систему устройства. IP-адрес будет указан рядом, его следует записать на будущее.
Первый и самый простой вариант – это RDP, протокол удаленного рабочего стола, который встроен в Windows.
Перед началом работы вам необходимо установить программное обеспечение xrdp на ваш Linux-компьютер. Вы можете сделать это с помощью одной команды:
sudo apt install xrdpДля RDP в Linux запустите программу Remote Desktop на машине Windows. В Windows 8 и более поздних версиях ее можно найти через Поиск, просто введя буквы “rdp”.
Откройте окно “Подключение к удаленному рабочему столу”:
- Введите IP-адрес
- Используйте Показать параметры для любых дополнительных требований к подключению
- Нажмите кнопку Подключиться

Все очень просто.
Преимущества RDP: несмотря на то, что настройка может занять немного больше времени, использование RDP обеспечивает высокую надежность и удаленный доступ к рабочему столу Linux. Это делает его идеальным инструментом для удаленной работы с машинами Linux.
Если вы планируете использовать RDP на регулярной основе, вы можете сэкономить немного времени, создав эти пользовательские конфигурации для Windows RDP.
Подключение к Linux из Windows с помощью VNC
Виртуальное сетевое подключение (VNC) также позволяет получить удаленный доступ к рабочему столу Linux. Однако, как и в случае с RDP, вам потребуется установить специальное программное обеспечение.
Для Linux требуется серверное программное обеспечение VNC, для Windows – клиентское приложение.
Одним из самых популярных вариантов подключения к Linux через VNC является TightVNC. Клиентское программное обеспечение для Windows вы найдете на сайте, но убедитесь, что выбрали правильную версию.
Скачать: VNC для Windows
После этого установите tightvncserver на свой Linux-компьютер. Это можно сделать через SSH (см. следующий раздел) или с физическим доступом к компьютеру.
Сначала в Linux проверьте наличие обновлений:
sudo apt updateЗатем установите TightVNC Server:
sudo apt install tightvncserverПосле установки запустите tightvncserver и задайте пароль, когда появится запрос.
sudo tightvncserverДля паролей существует ограничение в восемь символов. После запуска tightvncserver вы увидите уведомление с номером порта – запишите его.
Как только вы это сделаете, вы сможете подключиться к машине Linux из Windows:
- Запустите приложение TightVNC Viewer в Windows.
- Введите IP-адрес и номер порта
- Нажмите кнопку Подключиться
- Введите установленный пароль, когда появится запрос

После этого откроется удаленный рабочий стол, и вы сможете начать использовать выбранное вами приложение – в пределах разумного. Некоторые приложения с высокими графическими требованиями вряд ли будут работать надежно, если вообще будут работать.
Преимущества VNC: предлагая быстрый доступ к удаленному ПК, TightVNC имеет свои ограничения. Вы можете выполнять стандартные вычислительные задачи, но деятельность, связанная с мультимедиа, сильно ограничена.
Удаленный доступ в Linux через SSH
SSH (Secure Shell) – это отличный способ получить удаленный доступ к вашему Linux-устройству. Этот способ не ограничивается Windows, так как SSH можно использовать практически с любого устройства. Он также очень безопасен.
У вас есть два варианта использования SSH в Windows:
- SSH в Windows PowerShell
- Скачать инструмент SSH PuTTY
Давайте рассмотрим оба варианта.
Удаленный доступ к Linux с помощью SSH в Windows PowerShell
Windows PowerShell – это новый инструмент командной строки в Windows 10, заменивший старое приложение Command Prompt. Найдите его, щелкнув правой кнопкой мыши “Пуск”, чтобы открыть меню “Питание”, и выберите Windows PowerShell. Чтобы подключиться по SSH, введите:
ssh [IP_ADDRESS].Так, если устройство Linux имеет IP-адрес 192.168.13.123, введите:
ssh 192.168.13.123- Когда появится запрос, примите сертификат
- Введите имя пользователя и пароль
Теперь у вас есть удаленный SSH-доступ к Linux.
Удаленное подключение к Linux с помощью SSH в PuTTY
Приложение PuTTY можно скачать, хотя оно и недоступно в Windows. Однако PuTTY не устанавливается. Вместо этого вы просто запускаете загруженный EXE-файл.
Скачать: PuTTY (бесплатно)
Для удобства рекомендуется создать ярлык на рабочем столе.
Чтобы использовать PuTTY для SSH:
- Выберите Сеанс > Имя хоста
- Введите сетевое имя компьютера Linux или введите IP-адрес, который вы указали ранее.
- Выберите SSH, затем Открыть
- Когда появится запрос на принятие сертификата для соединения, сделайте это.
- Введите имя пользователя и пароль для входа на устройство Linux.

Преимущества SSH: использование этого метода позволяет быстро вносить изменения в Linux, не пачкая рук. Особенно подходит для установки программного обеспечения и изменения администратора. Он также полезен для настройки следующего варианта, VNC! SSH также идеально подходит для серверов без установленной среды рабочего стола.
Однако если вам нужно удаленное подключение к рабочему столу Linux из Windows, попробуйте VNC или RDP.
Три метода удаленного рабочего стола Windows для подключения к Linux
Независимо от вашей цели, найдется подходящий вариант подключения к машине Linux из Windows. Эти методы работают независимо от того, является ли устройство сервером, настольным ПК на работе, медиацентром или даже Raspberry Pi.
От самого простого к самому сложному – удаленный доступ к Linux из Windows с помощью:
- RDP (протокол удаленного рабочего стола)
- VNC (виртуальное сетевое подключение)
- SSH (Secure Shell)
Если ваш дистрибутив Linux – Ubuntu, у вас уже есть встроенный инструмент удаленного рабочего стола, совместимый с VNC.
VNC:
Virtual Network Computing (VNC) allows one to view and operate the console of another computer remotely accross the network.
It is also known generically as RFB or Remote Frame Buffer.
This tutorial will cover the use of a VNC client running on Linux to view and
operate a Microsoft Windows desktop remotely.
Two versions of VNC are available:
- The original VNC developed by and available from AT&T (Britain)
Home page: http://www.realvnc.com/ - Tight VNC: Optimized and uses compression for use over slow networks.
Home page: http://www.tightvnc.com/
I noticed no speed advantage on a 100MBit/sec network. They seem to work identically.
I fould that «RealVNC» and «Tight VNC» servers seemed to work at the same
speed over a LAN (100MBps). The speed gain of Tight VNC is probably only noticeable over a low speed dial-up modem connection.
I found that Tight VNC failed to repaint portions of the screen more often. (but probably uses less bandwidth.)
It seems to be an annoying «feature» of both versions of VNC,
to NOT repaint the screen sometimes when it is necessary.
For this reason I find that Citrix Winframe
(See: YoLinux tutorial on using the Citrix Linux client)
or rDesktop
(See: YoLinux tutorial on connecting to a MS/Windows computer via rDesktop)
is a better solution for local high speed LANs.
The basic installation and configuration is so easy that this tutorial is
not required by most Linux and Microsoft administrators. It installs and works!!
This tutorial shows how to display a Microsoft Windows Desktop on Linux (or any Unix X-Windows based system)
If exporting an X-Windows desktop to another X-Windows based system,
over a high speen LAN one should use native X-Windows. X-Windows is far more
responsive. Use the X-Windows Xnest command to connect.
(i.e. /usr/bin/X11/Xnest -query computer-node-name -geometry 1280×1024 :1)
The story changes for a low speed connection where VNC’s compression and
low network resource load is preferable.
Installation:
Linux VNC client Installation: The Linux client is available in source form
(to be compiled), Red Hat RPM’s from Red Hat and from the VNC web sites.
Installed Red Hat client RPMs:
- vnc-3.3.3r2-39.i386.rpm
- vnc-doc-3.3.3r2-39.i386.rpm
Don’t need Linux vnc-server RPM unless exporting your Linux display using VNC.
Red Hat RPM’s use TightVNC client.
Microsoft Windows VNC Server Installation: I tried installing both RealVNC
and TightVNC. Installation is almost the same. The code base overlaps tremendously.
Choose one:
- Windows 2000 «Real» VNC 3.3.6 Server:
Download x86 Win32 Full installation (server and viewer) Zip archive will unzip to an executable vnc-3.3.6-x86_win32.exe
Install:- Double click on vnc-3.3.6-x86_win32.exe from the file explorer.
- Dialog Box: This will install VNC. Do you wish to continue? — Select Yes
- Install wizard defaults instalation to: C:\Program Files\RealVNC
- Full installation. VNC Server
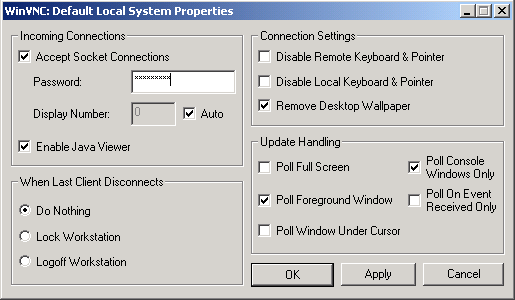
- Set up WinVNC: Default Local System Properties
Select a password.
Menu: «Start» + «RealVNC» + «VNC Server» + «Show Default Properties»

Stop VNC server: «Start» + «RealVNC» + «VNC Server» + «Unregister Service»
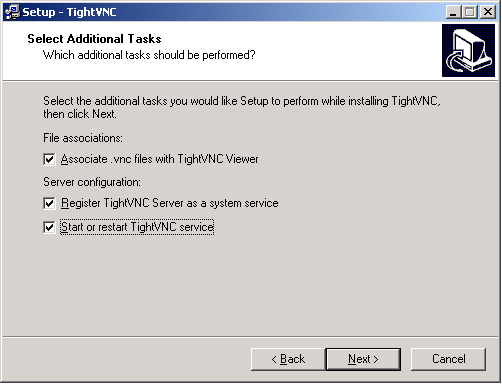
- Windows 2000 TightVNC Server installation:
- Double click on tightvnc-1.2.9-setup.exe
- Install wizard begins. Installs to c:\Program Files\TightVNC by default
- Choose full installation + Next
- Allows one to install to/select the menu heirarch.
- I selected the option to register TightVNC as a service and to start the service.
- «Start» + «Programs» + «TightVNC» + «Launch TightVNC Server»
Was already running due to installation wizard.

Tight VNC server uses a similar and compatable GUI configuration tool as VNC
and stores settings in the same place.
GUI Menu:
«Start» + «RealVNC» + «VNC Server» + «Show Default Properties»
Set up WinVNC: Default Local System Properties and select a password.
Stop TightVNC server: «Start» + «TightVNC» + «Administration» + «Remove VNC Service»
Using VNC to connect Linux to MS/Windows:
Linux Client menu RH 8.0: «Start» + «Extras» + «Accessories» + «VNC Viewer»
or use the command: /usr/bin/vncviewer
- Querries for server: Name or IP
- Querries for password: (as configured during server installation.)
Client works with VNC and TightVNC.
Use F8 to view VNC client menu.
Screenshot of a Microsoft Windows 2000 desktop displayed on Linux using VNC:
Notes:
- VNC uses port 5900 by default
- Specifying a different port:
- Server: vncserver -rfbport port-number-to-use
- Client: vncviewer serverIP:port-number-to-use
Note that if you use a port number less than 100 it will add 5900 to
the number. Thus to use a port number less than 100 use a negative
number. i.e. to specify port 80: vncviewer serverIP:-5820
VNC Links:
RealVNC:
- Online documentation
- Enterprise support
VNC Links:
- Tridia VNC
- Tight VNC
- X11 VNC
- VNC over ssh
Thin Client/Virtual Terminal Links:
- Linux Terminal Server Project: XDMCP query to server using standard X.
- Citrix
- rDesktop — Microsoft Windows RDP (Remote Desktop Protocol) Terminal Services client for Linux.
- Tarantella
- NX: Compressed (low bandwidth) X-Windows via an X proxy:
- FreeNX — free implementation of NX server
- NoMachine
- 2X.com:
- thinclient server
- terminal server
- PXES: Thin client Linux distro for VNC, ICA, NX and rDesktop.
- Thinstation: Thin client Linux distro for VNC, ICA, NX and rDesktop.