VMware Workstation — это программное обеспечение для виртуализации, которое позволяет запускать несколько операционных систем на одном компьютере. Оно предоставляет возможность создавать виртуальные машины, настраивать их и взаимодействовать с ними, а также эмулировать сетевое и аппаратное обеспечение. Windows Server 2019 — это операционная система для серверов, разработанная компанией Microsoft.
В этой статье мы подробно рассмотрим процесс установки VMware Workstation на операционную систему Windows Server 2019. Мы расскажем о требованиях к системе, дадим ссылку на официальный сайт для скачивания программы, приведем пошаговую инструкцию по установке и настройке.
Пожалуйста, имейте в виду, что перед установкой VMware Workstation на Windows Server 2019 вам потребуется 64-разрядная версия операционной системы, а также административные права на компьютере. Проверьте, соответствует ли ваша система этим требованиям, и убедитесь, что у вас есть необходимые права.
Содержание
- Подготовка к установке VMware Workstation на Windows Server 2019
- Системные требования
- Загрузка установочного файла
- Установка VMware Workstation на Windows Server 2019
- Запуск установки
Подготовка к установке VMware Workstation на Windows Server 2019
Перед тем, как приступить к установке VMware Workstation на Windows Server 2019, необходимо выполнить несколько предварительных шагов. В данном разделе рассмотрим, как подготовить операционную систему к установке и настроить необходимые параметры.
1. Обновление операционной системы
Перед установкой VMware Workstation рекомендуется обновить операционную систему Windows Server 2019 до последней версии. Это позволит исправить возможные ошибки и улучшить совместимость с VMware Workstation. Для обновления можно использовать Windows Update или загрузить последнюю версию с официального сайта Microsoft.
2. Проверка системных требований
Убедитесь, что ваша система соответствует минимальным требованиям для установки и работы VMware Workstation. В частности, проверьте, что у вас достаточно оперативной памяти, свободного места на жестком диске и поддерживается виртуализация на уровне процессора.
3. Отключение антивирусного программного обеспечения
В процессе установки и работы VMware Workstation возникают файлы и процессы, которые могут быть ложно интерпретированы антивирусным ПО как потенциально опасные. Чтобы избежать возможных проблем, рекомендуется временно отключить антивирусное программное обеспечение или добавить исключения для папок и файлов VMware Workstation.
4. Подготовка лицензионного ключа (при необходимости)
Если у вас есть лицензия на VMware Workstation, убедитесь, что у вас есть лицензионный ключ, который будет использован в процессе установки программы. Если у вас нет ключа, вы можете приобрести его на официальном сайте VMware.
После выполнения всех предварительных шагов, ваша система будет готова для установки VMware Workstation.
Системные требования
Перед установкой VMware Workstation на Windows Server 2019 важно убедиться, что система соответствует минимальным требованиям. Ниже приведены основные системные требования:
- Процессор: минимум 1 ГГц или более
- Оперативная память: минимум 2 ГБ или более
- Свободное место на жестком диске: минимум 1,5 ГБ
- Операционная система: Windows Server 2019 (64-разрядная версия)
Также, рекомендуется убедиться, что у вас есть достаточно ресурсов для запуска виртуальных машин, таких как процессорные ядра, оперативная память и свободное место на жестком диске.
Соблюдение этих системных требований обеспечит стабильную работу VMware Workstation на Windows Server 2019 и позволит вам использовать все его функции без каких-либо проблем.
Загрузка установочного файла
Перед установкой VMware Workstation на Windows Server 2019 необходимо загрузить установочный файл с официального веб-сайта VMware.
Для этого выполните следующие шаги:
- Откройте веб-браузер и перейдите на официальный веб-сайт VMware.
- На главной странице найдите раздел «Продукты» или «Скачать» и перейдите в него.
- В списке продуктов найдите VMware Workstation и нажмите на ссылку скачивания.
- Выберите версию VMware Workstation, соответствующую вашей операционной системе (в данном случае — Windows Server 2019).
- Нажмите на кнопку «Скачать», чтобы начать загрузку установочного файла.
После завершения загрузки установочного файла вы можете переходить к следующему шагу — установке VMware Workstation на Windows Server 2019.
Установка VMware Workstation на Windows Server 2019
- Скачайте установочный файл VMware Workstation с официального сайта.
- Запустите установку программы, щелкнув по загруженному файлу.
- Выберите язык установки и нажмите «Далее».
- Прочитайте и принимайте лицензионное соглашение, затем нажмите «Далее».
- Выберите путь установки, куда будет сохранен VMware Workstation, затем нажмите «Далее».
- Выберите компоненты, которые вы хотите установить, затем нажмите «Далее». Вы можете выбрать стандартную установку или настроить дополнительные параметры.
- Выберите путь каталога, где будут сохранены виртуальные машины, затем нажмите «Далее».
- Настройте сетевые параметры, если требуется, затем нажмите «Далее».
- Проверьте сводку установки, затем нажмите «Установить».
- Дождитесь завершения установки VMware Workstation.
После установки, вы можете запустить VMware Workstation и начать создавать и запускать виртуальные машины на вашем сервере с Windows Server 2019.
Примечание: перед установкой VMware Workstation, убедитесь, что ваш сервер соответствует системным требованиям программы и имеет достаточное количество ресурсов для работы с виртуальными машинами.
Запуск установки
Перед началом установки VMware Workstation на Windows Server 2019 необходимо скачать установочный файл программы. Вы можете найти его на официальном сайте VMware. На сайте найдите ссылку на загрузку последней версии VMware Workstation и сохраните установочный файл на ваш компьютер.
После скачивания файла установки, дважды щелкните на нем, чтобы начать процесс установки. В открывшемся окне установщика щелкните на кнопке «Далее» для продолжения установки.
Вам будет предложено прочитать и принять лицензионное соглашение. Прочтите его внимательно и, если вы согласны с условиями, поставьте флажок в поле «Я принимаю лицензионное соглашение» и щелкните на кнопке «Далее».
На следующем экране установщик предложит выбрать путь для установки программы. Если вы хотите оставить путь по умолчанию, просто нажмите кнопку «Далее». Если вы хотите выбрать другой путь, нажмите на кнопку «Обзор» и выберите нужную папку.
Затем установщик предложит создать ярлык для запуска программы. Определите, в каком месте вы хотите создать ярлык: на рабочем столе, в меню «Пуск» или оба. Поставьте соответствующие флажки и нажмите на кнопку «Далее».
На данный момент все готово для начала установки. Щелкните на кнопке «Установить», чтобы начать процесс. Пожалуйста, подождите, пока установщик завершит копирование файлов и настройку программы.
По окончании установки на экране появится сообщение о успешном завершении процесса установки. Вы можете поставить флажок в поле «Запустить VMware Workstation» и нажать на кнопку «Завершить», чтобы запустить программу сразу после установки.
Теперь вы можете использовать VMware Workstation на вашем сервере Windows Server 2019.
Microsoft Windows Server 2022 is the latest version of Microsoft’s server operating system. It was released in August 2021, and it comes with many new features and improvements. Windows Server 2022 is designed to help businesses and organizations of all sizes to improve their performance, security, and management of their IT infrastructure.
One of the major new features of Windows Server 2022 is the support for hybrid cloud environments. This means that businesses can easily integrate their on-premises data centers with cloud services such as Azure, AWS, and Google Cloud Platform. This makes it easier for businesses to manage their IT resources across multiple locations and platforms.
Another major new feature is the enhanced security capabilities of Windows Server 2022. It includes new security tools and features such as secured-core servers, which are designed to protect against firmware attacks, and advanced multi-layer security features for virtual machines.
Windows Server 2022 also includes improvements in performance and scalability, with faster data access and improved networking capabilities. It also supports the latest hardware technologies such as persistent memory, which can provide faster access to data and improve application performance.
Overall, Windows Server 2022 is a powerful and reliable server operating system that provides businesses with the tools they need to manage their IT infrastructure efficiently, securely, and with improved performance.
In this tutorial, we will learn How to Install Windows Server 2022 on VMware Workstation to experience its features.
Prerequisites
- VMware Workstation has been installed on your system
- Download Windows Server 2022 ISO image
Read more
- How to Convert Windows Server Evaluation to Full Version
- How to Disable Ctrl + Alt + Delete requirement on Windows Server 2022/2019/2016/2012
- How to Install VMware Tools for Windows Virtual Machine on VMware
Step 1 – Create a new Virtual machine for Windows Server 2022
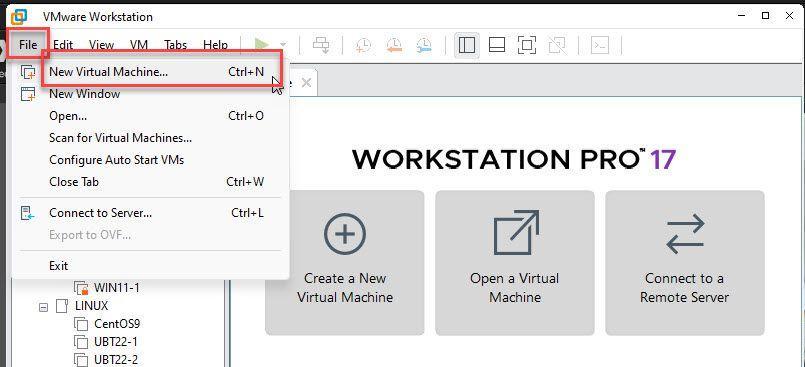
Open VMware Workstation app – click File – select New Virtual Machine…
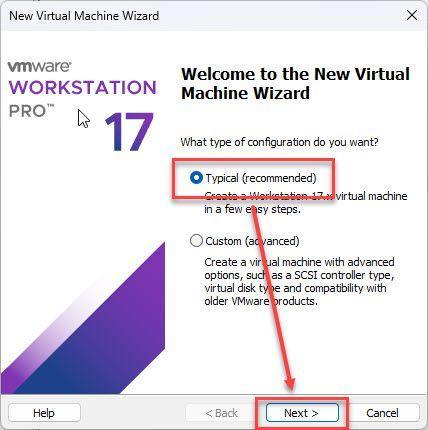
In the Welcome to the New Virtual Machine Wizard window, choose Typical then click Next
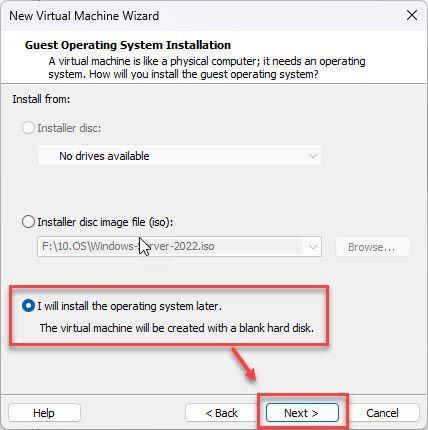
Next, In the Guest Operating System Install window, choose I will install the operating system later then click Next
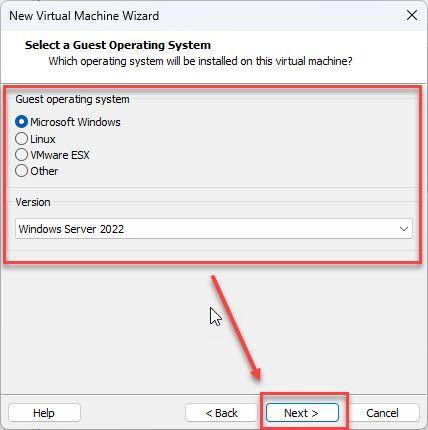
In the Select a Guest Operating System window:
- Guest operating system: Microsoft Windows
- Version: Windows Server 2022 ( or Windows Server 2019 )
then click Next
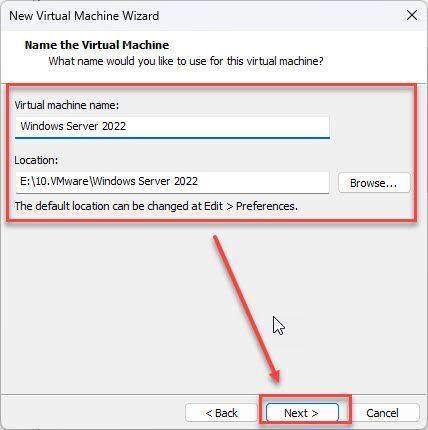
In the Name the Virtual Machine windows:
- Virtual machine name: set name for your virtual machine
- Location: select a storage location for your virtual machine
then click Next
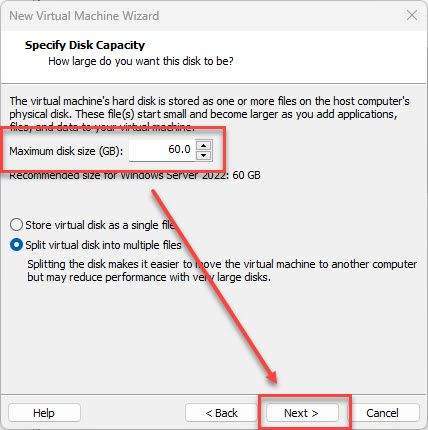
In the Specify Disk Capacity window, set disk size for your virtual machine ( recommend: keep default ) the click Next
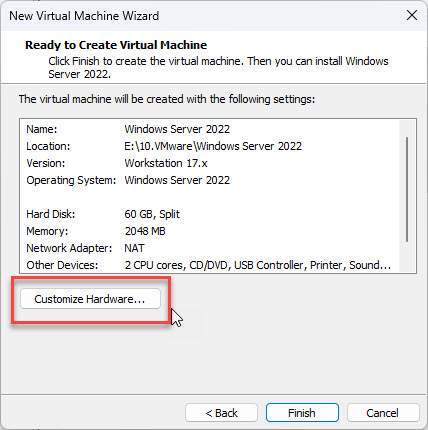
In the Ready to Create Virtual Machine window, click on Customize Hardware… button
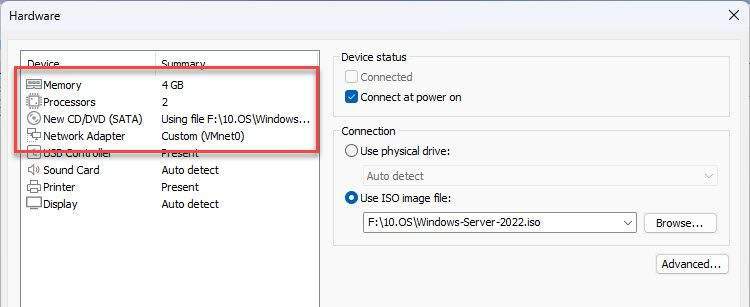
In the Hardware window:
- Memory (RAM) : RAM greater than or equal to 4GB
- New CD/DVD (SATA): browse to Windows Server 2022 ISO image
- Network Adapter: select your Virtual Network
after done, click Close
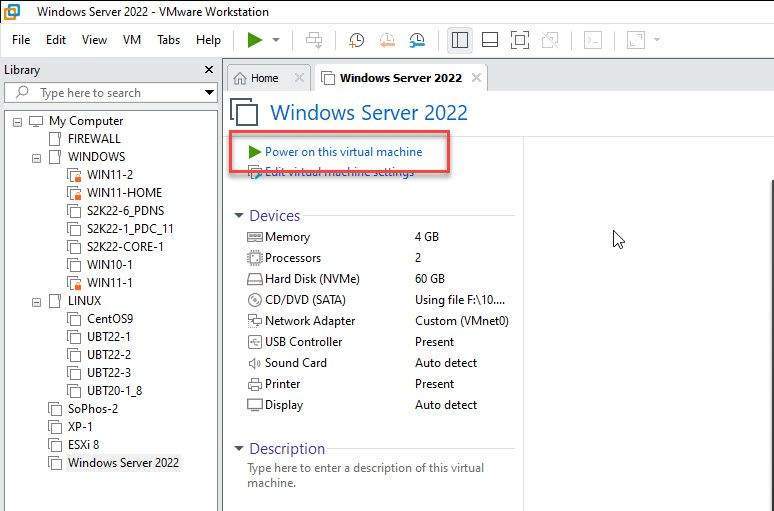
In step 1, we have created a Windows Server VM, now click on Power on this virtual machine to start installing Windows Server on VMware.
At the boot screen, please press any key to start the system boot from Windows Server 2022 ISO image

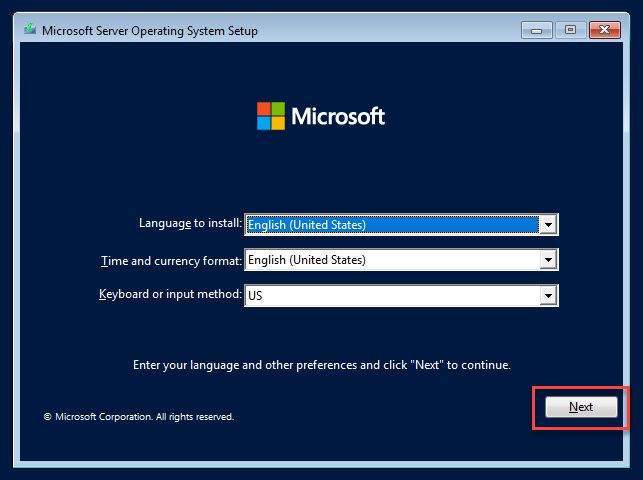
In the next window, please select Your-language and click Next
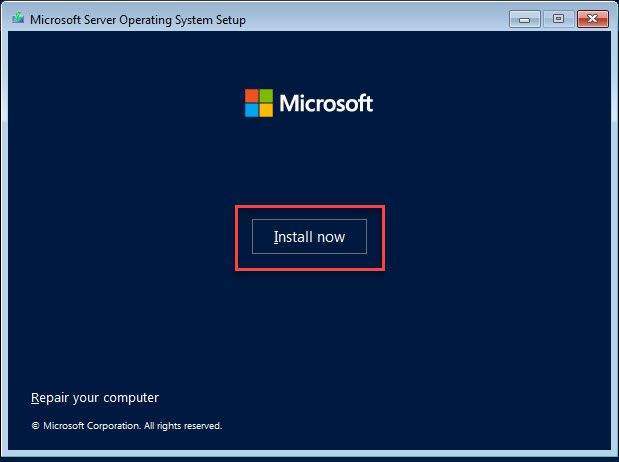
Click on Install now button
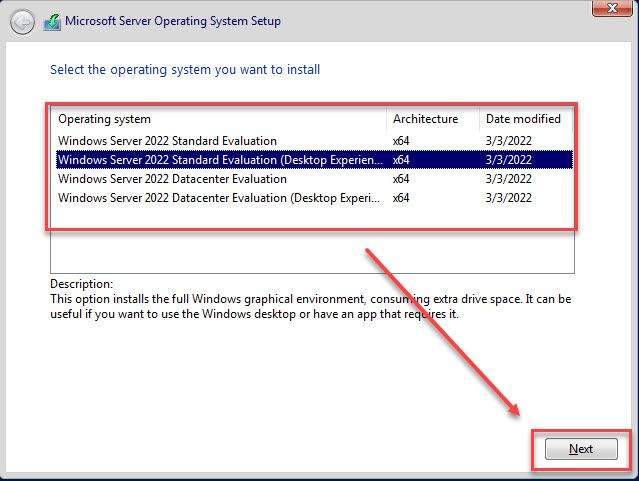
In the Select the operation system you want to install window, choose version you want to install (Recommend: choose the Desktop Experience version to have GUI ) and click Next
In the Applicable notices and license terms window, check to I accept the Microsoft Software License Terms. If an organization licensing it, I am authorized to bind the organization and click Next

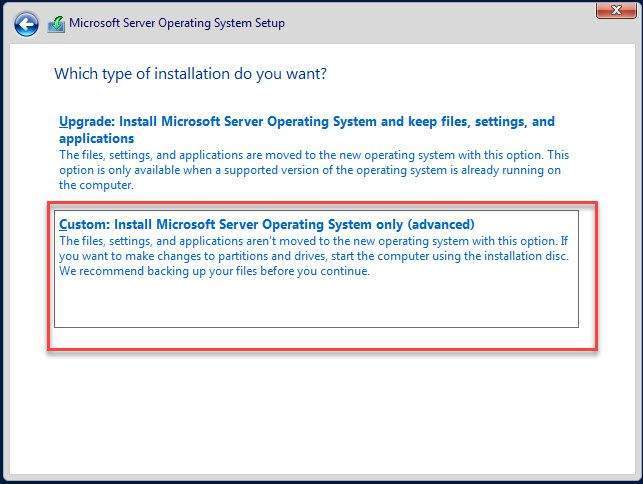
In the Which type of installation do you want? window, choose Custom: Install Microsoft Server Operating System only (advanced) to start a new installation.
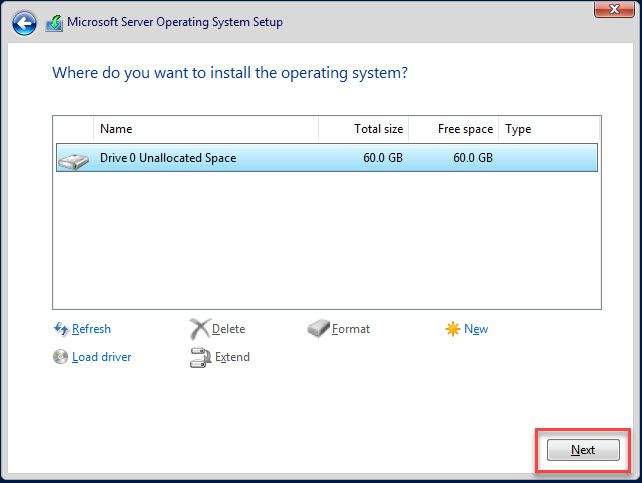
In the Where do you want to install the operating system? window keep default and click Next
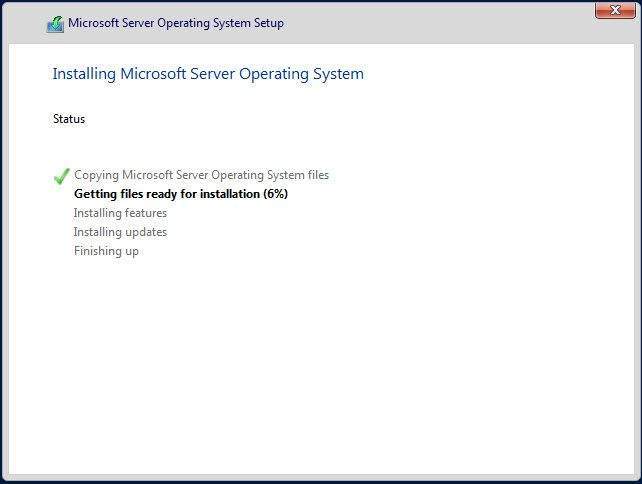
After that, the installation process will take place, please wait for a few minutes for the installation to complete.
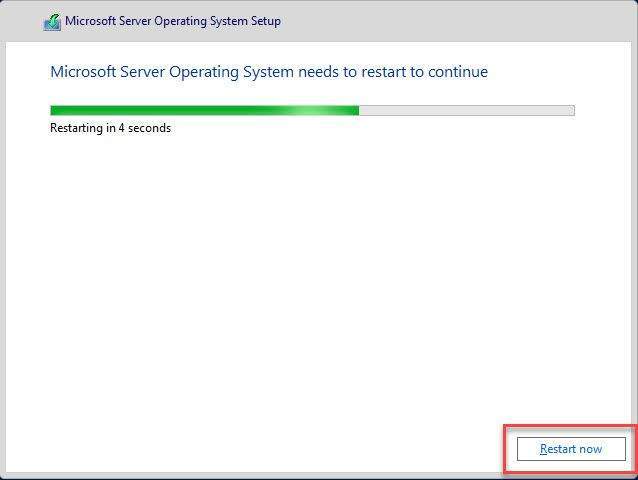
Click on Restart now to restart immediately or let it restart automatically after 10 seconds
Please wait for a few minutes…
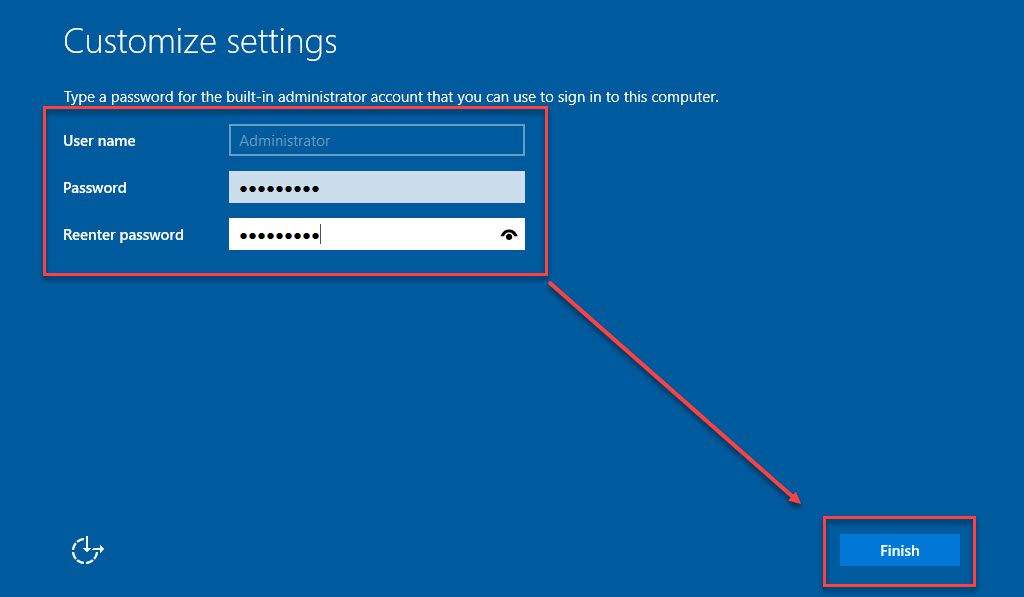
Set a password for your Administrator account and click Finish
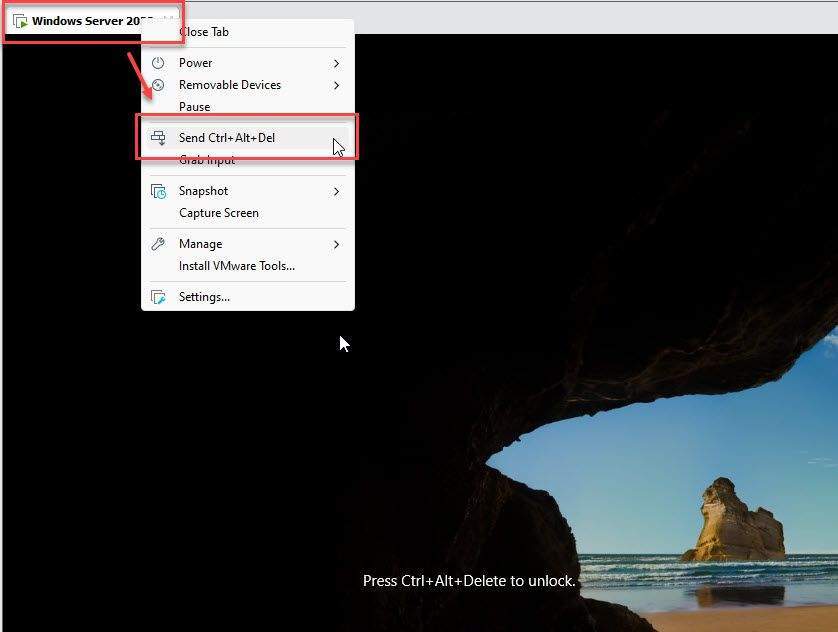
At the login screen, Windows Server requires you to press Ctrl + Alt + Delete to unlock the screen. Please right-click on your VM and select Send Ctrl + Alt + Del
Read more: How to Disable Ctrl + Alt + Delete on Windows Server 2022/2019/2016/2012 (updating)
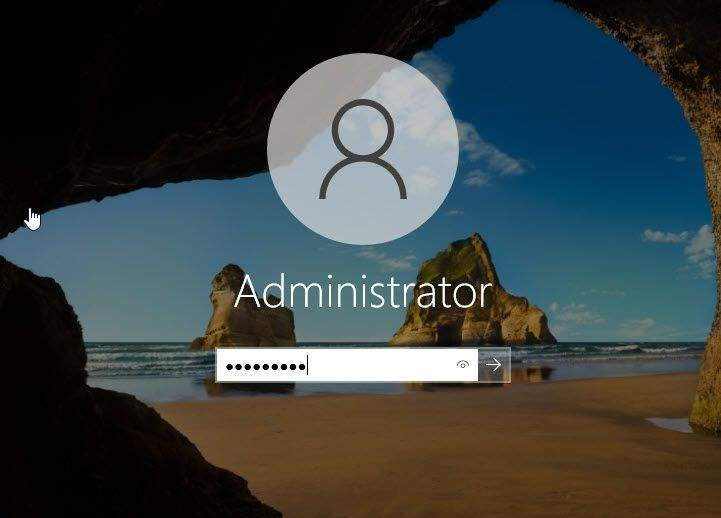
Enter the password you set in the previous step
Success !!!
Step 3 – Install VMware Tool for virtual machine
Read more: How to Install VMware Tools for Windows Machine on VMware Workstation
That’s it, you have successfully installed Windows Server 2022 on VMware Workstation
Thank for watching !!!

Windows Server 2022 Operating System builds on the existing Server 2019 and will become part of the long-term servicing channel program. Just like the predecessor “Windows Server 2019“, this operating system can also be installed locally without much focus on cloud integration. This allows classic (legacy) server roles such as WDS, DHCP, DNS, ADFS, Active Directory Domain Services (Domain Controller), and Internet Information Services (IIS) to be configured on the server. In this article, we shall learn how to install Windows Server 2022 on VMware Workstation.
This is a pre-release software. It is provided for use “as-is” and is not supported in production environments at the time of writing this article. Users are responsible for installing any updates made available from Windows Update.
If you would like to install Windows Server 2022 on a VirtualBox, please see the guide “How to install Windows Server 2019 on Virtualbox“. All you need is to select the Windows Server 2022 ISO instead of Windows Server 2019 ISO. What are the new capabilities in Windows Server 2022.
Windows Server 2022 Features and Installation
Windows Server 2022 brings a lot of innovations on IT security, portal integration, and Windows Containers support on Kubernetes. With the secured-core Server, the server should be protected at the hardware, firmware, and operating system level.
A Trusted Platform Module 2.0 is used for this. Also, see this guide on how to perform an in-place upgrade from Windows Server 2016 to Windows Server 2019. If you would like to install and test the features of Windows Server 2022, please follow the steps below.
There are various ways to create a New Virtual Machine on a VMware workstation. Launch the VMware console and on the menu, click on File and select New Virtual Machine.

VMware Workstation installation of Windows Server is pretty fast compared to VirtualBox. Select Typical and follow the installation steps as described below.

On the guest operating System window, please select the second option “Installer disk image file (iso) and browse to the location of your Windows Server 2022 Preview ISO. When selected, click on Next to continue.

In the next window, select next to continue. Currently, VMware have not updated the list of the various Windows Server versions. So I will be selecting Windows Server 2019.

Enter your desired Virtual machine name. Note: At this point, you can choose a different location to have your Virtual Machine files saved.

Enter your desired Maximum disk size and select how you would like your virtual disks to be saved. I selected the first option “Store virtual disk as a single file”.
See the following guides on how to perform Post OS Installation configuration of Windows Server 2019 Properties, how to install Windows Server 2016 Operating System, and how to install and configure Ubuntu Linux.
Specify the Disk capacity and the Virtual Disk Type

When you are done, click on Finish as shown in the figure below.

You may also want to see how to Install Windows 10 on VMware Workstation, The security database on the server does not have a computer account for this workstation trust relation [Part 1], How to extend a VM Hard Disk on VMware Workstation, and Taking ownership of a VM: How to fix this error.
Server Installation Activation
To proceed with the server installation, click on “Power on this Virtual Machine”. At this step, if you run into any issues relating to boot failure “EFI network timeout“.

This will launch the following windows below. In the Windows setup, select your desired input method, language to install and time format. When you are done, click on Next to continue.

Click on “Install now” to continue with the installation of Windows Server 2022.

Below, I entered I do not have a product key. Please refer to this link if you prefer unlimited activations

Below are the available Operation systems. Please select the one you would like to install. I will be installing Windows Server 2020 Datacenter (Desktop Experience) as shown in the figure below.

Accept the license Terms and click on next to continue

I will be selecting the Custom installation as I do not want to keep any existing settings.

You may also want to see how to fix VMware and HyperV are not compatible, and What Is the NTUSER.DAT File in Windows?
Format or create a new partition
I do not need to format or create a new partition. Therefore I will be selecting Next to continue.

Furthermore, As you can see below, Windows is currently being installed.

Enter your Password and click on Finish to complete your installation.

As you can see, the installation is complete. Now enter the newly created password


Note: Ensure you have VMware Tools installed after the setup of Windows server 2022 on VMware Workstation.

Let’s access Windows Server 2022 About (Properties). Launch the Windows Settings and click on Systems and then click on About as shown below.

Windows Server 2022 ISO can be downloaded as a preview. This requires a Microsoft account that is registered as a Windows Insider member. Refer to this guide for the Post OS Installation and configuration of Windows Server 2019 Properties (Configure TCP/IP Parameters). This hyperlink will guide you on configuring the Windows Server 2022 Properties such as TCP/IP.

I hope you found this blog post helpful. If you have any questions, please let me know in the comment session.
In this article from Windows Server Tutorials, we intend to show you to install Windows Server 2022 in VMware Workstation 17.
Before starting the installation steps, we will explain concepts like “VMware Workstation” to users who are not fully aware of them.
- How to install windows server 2022 in VMware Workstation 17 pro?
What is Vmware Workstation and what is its advantage?
In simple words, VMware Workstation is a virtualization software.
The VMware Workstation is installed on the local operating system like Windows 11 and provides the possibility of installing operating systems on it.
These types of virtualizers are slightly different from server-based virtualization and can be used mostly for running a laboratory or using several operating systems on a PC or laptop.
Workstation is a product of the great VMware, which has complete expertise in virtualization software and its related products.
This software has added many features in the new versions and provides users with good benefits.
How to install windows server 2022 in VMware Workstation 17 pro?
First, you need to download the Windows Server 2022 ISO file. To download the ISO, visit the Windows Server 2022 download page and download the item file.
After that, open the VMware workstation on your computer and follow the steps.
Step 1: Create a Virtual Machine on VMware Workstation
1-1. From the File menu, click New Virtual Machine. You can also use the keyboard shortcut Ctrl+N to create a new virtual machine.
1-2. In the first window, select the Typical option and click Next.
Point: You can choose the custom option and change the SCSI controller type and compatibility older version.
1-3. In this step, select the ISO file of Windows Server 2022 with click the browse button.
Once selected, you will notice that VMware Workstation will automatically detect the operating system.
1-4. Here you should see a window similar to the image below.
In this section, you do not need to enter all the fields and only enter a desired name in the full name section.
Point: With the name you enter here, a user with the same name will be created in Windows after installation but don’t worry, we will enable Administrator finally on the final steps.
1-5. After that, In the next window, enter the virtual machine name and choose where your Virtual Machine is stored.
1.6- On the next window, you can specify disk capacity and after that, click on next.
Point: 60 GB capacity is enough for Windows, but if you want to install other software inside the virtual machine or need more capacity, you can increase that.
Customize Virtual Machine Hardware
1.7- In the last window from the new virtual machine wizard, you can select finished or click on “customize hardware” for customizing RAM, CPU, or others.
In this tutorial, we select customize hardware for increasing RAM and CPU.
Recommendation: If you have enough RAM and CPU, choose more RAM and CPU for your virtual machine.
1.8- Next, you can select the hardware you want from the left panel and customize it from the right panel.
1.9- Click Close and Finish to build your virtual machine when the customization is completed.
So far, you have succeeded in creating a virtual machine for Installing Windows Server 2022 in VMware Workstation 17.
Wait a few moments for the virtual machine to turn on automatically to proceed with the installation process.
Step 2: Start the unattended Installing Windows Server 2022 in VMware Workstation 17
I have to tell you one thing here, in the new version of VMware Workstation, you will not see the Windows installation steps normally and all the steps will be done automatically.
So don’t be surprised if you don’t see some of the steps below. The workstation will proceed with the steps automatically.
2-1. After you click on the finish button on the last step, the virtual machine turns on and starts to install windows server 2022 in VMware Workstation.
2-2. After a few minutes, you will see a window like the one below. In this section, the files will start to be copied.
2-3. Depending on the speed of your system and your hard disk, the installation process will be finished after a few minutes and you will see a window similar to the below image.
At this stage, click on restart now or wait for the operating system to restart after 10 seconds.
Install VMware Workstation tools automatically
2.4- At this point, the virtual machine will be started the final installation process and will be restarted twice, and then the login window will be displayed to you.
Points: Same as the name you entered when creating the virtual machine A user will be created in your Windows.
The workstation will log in with the same user and start installing its tools.
2-5. After the VMware Workstation Tools process is completed, a window will appear asking you to restart the operating system. Click on Reboot.
OK! The installation of Windows Server 2022 in VMware Workstation is done.
Now you can work with it but if you want to enable Administrator user and work on the Windows server 2022 with Administrator User, follow the below steps.
Step 3: How to enable Administrator user on Windows Server 2022?
3-1. After login to your VM, right-click on the start menu and select run.
3-2. Enter lusrmgr.msc and click ok.
3-3. On this window, select Administrator and right-click on it and then “Set password“.
3-4. You will see a window like the below image, click on proceed.
3-5. Enter your password and click on Ok.
3-6. Now you need to sign out; right-click on the start menu, and select shutdown or sign out > sign out.
3-7. Once logging in to Windows Server, you must press the CTRL+ALT+DEL buttons from the keyboard at the same time to enter the username and password but in the VMware workstation, you must press the CTRL+ALT+INS.
3-8. After that, select Administrator user from the bottom left, type your Administrator password, and enter.
Well done, you have successfully created a new virtual machine on VMware Workstation and installed Windows Server 2022 in VMware Workstation 17 Pro. Now you can use the Windows VM for your purposes.
Conclusion
In this article, we tried to teach you to install Windows Server 2022 in VMware Workstation 17 Pro step by step.
At first, we created a new virtual machine in VMware Workstation step by step, then we proceeded with the automatic installation of the Windows server and finally, we made the final setup.
In the end, we enable the administrator user.
I hope you enjoy this tutorial, if you need any help or have any questions, you can comment for us.
HomeMicrosoft ServerHow to Install Windows Server 2019 on VMware Workstation 15/14/12
In this article, we will install Windows Server 2019 on Windows 10 PC using VM Workstation 15/14/12 virtualization program.

How to Setup Windows Server 2019 on VMware Workstation
Microsoft recently released Windows Server 2019 Preview version in the Windows Insider Program.
Although Windows Server 2019 is very similar to version 2016, it has many new features. If you are wondering what’s new in Windows Server 2019, visit https://cloudblogs.microsoft.com/windowsserver/2018/03/20/introducing-windows-server-2019-now-available-in-preview/.
As you know in the world of IT, the high-quality virtualization programs are used. Examples of these virtualization programs are VMware Workstation, Oracle VM VirtualBox, and Hyper-V.
In this article, we will use the Workstation 14 Pro virtualization program developed by VMware to install its Technical Preview.
As you all know, creating a virtual machine with VMware software is simple. If you have not created a virtual machine before, you can browse the How to Create VM in VMware Software. Before proceeding with the installation steps, download the Server 2019 ISO file here.
How to Run Windows Server 2019 in Virtual Machine
Follow the steps below to install it using the VMware virtualization program step by step.
You can download VMware Workstation 14/15 Pro from here.
Step 1
After you have opened VMware Workstation, click Create a New Virtual Machine to create a new virtual machine for installation.
In the virtual machine creation window, select Custom (Advanced) and click on the Next button.

Step 2
In the Virtual Machine Hardware Compatibility window, make sure that Workstation 14.x/15.x is selected and click Next.

Step 3
To add the Server ISO file to the virtual machine later, select I will install the operating system later and click Next.

Step 4
In the operating system selection window, select Microsoft Windows and click Next when you have selected Server 2016 version.

Step 5
Storing the virtual machine you created for installation on an external disk is important for performance. Save the location on a portable HDD and click Next.

Step 6
In the Firmware Type window, UEFI is selected by default. If you want, you can enable Secure Boot. Click Next to continue.

Step 7
In the Processor Configuration window, configure the processor according to the hardware specifications of your computer and click Next.

Step 8
Likewise, you can configure the virtual machine’s memory configuration to 4 GB (4096 MB). You can specify at a higher RAM value as well. Click the Next button to continue the Windows Server 2019 virtual machine configuration.

Step 9
In the VMware network configuration window, you can select the NAT network. Click Next to continue.

Step 10
LSI Logis SAS (Recommended) is selected by default and click Next to continue.

Step 11
Select SCSI for the disk type and click on the Next button.

Step 12
To create a new disk for the virtual machine, select Create a new virtual disk and click Next.

Step 13
It is recommended that you use all the free space of the disk. Configure the VMware virtual machine disk configuration as shown in the following illustration.

Step 14
Continue by clicking the Next button in the disk file specification window.

Step 15
You should activate the virtualization feature before completing the virtual computer. Open the Hardware settings and enable the Virtualize Intel VT-x/EPT or AMD-V/RVI option as shown below and close the window.

Step 16
Click the Finish button at the ready to create virtual machine window.

Step 17
After you click Finish, the virtual disk will start to be created. This may take some time…

Step 18
After you create the virtual machine, attach the ISO file that you downloaded to the virtual machine.

Step 19
Start the virtual machine and start the installation.

How to Install Windows Server 2019 Step by Step
After you run the virtual machine, follow these steps to install the operating system step by step.
Step 1
When you run the virtual machine on VMware 14/15, press any key when you see the “Press any key to boot from CD” message.
After the installation window is opened, make your language, time, and keyboard settings and click Next.

Step 2
Click the Install Now button to start the Server installation.

Step 3
In the Activate Windows window, click I do not have a product key.

Step 4
Select the operating system you want to install and click the Next button.

Step 5
Accept the Server license agreement and click Next.

Step 6
Select the “Custom: Install Windows only” option from the server installation types.

Step 7
Partition the disk of the virtual machine and select the partition you want to install and click Next.

Step 8
Wait while the setup is copying the files…

Step 9
Wait while the devices are being prepared…

Step 10
Set a complex password for Admin user and click Finish button.

Step 11
Once Windows Server 2019 is open, press Ctrl + Insert at the same time to switch to the user interface. Type the password you have specified and press ENTER.

Step 12
After completing the setup, proceed to the next step to install VMware Tools.

How to Install VMware Tools
It is necessary to install the VMware Tools while using the VMware virtualization program. Once you have installed VM Tools, you can use virtual machines more efficiently.
To install the VMware Tools, follow the steps below.
Step 1
On VMware program, click VM and then click Install VMware Tools.

Step 2
After the VMware Tools image file is added to the system, click Run setup64.exe.

Step 3
In the VMware Tools installation wizard window, click Next.

Step 4
Select Complete for the type of installation and click Next.

Step 5
And finally, click the Install button to start the VMware Tools installation.

Step 6
Restart your system for the changes to take effect.

Step 7
Configure the resolution setting of the virtual machine by clicking View / Fix Guest Now. After installing VMware Tools, you can now exchange files between your virtual machine and your physical computer.

How to Run Windows Server in PC ⇒ Video
You can follow the video below to install it step by step and you can also subscribe to our YouTube channel to support us…
How to Install Project Honolulu ⇒ Video
You can also watch the following video to install Microsoft’s Project Honolulu on your virtual server…
Final Word
In this article, we have discussed the steps to run Server 2019 step by step using the virtualization program. Thanks for following us!
Related Articles
♦ How to Download Microsoft Project Honolulu
♦ How to Run Server on Oracle VM VirtualBox
♦ How to Install Windows 7 on VMware ESXi 6.5
♦ How to Upload ISO Files to Datastore in VMware ESXi 6.5
♦ How to Configure Microsoft Project Honolulu