Месяц не пользовался VMware на своём компьютере. За это время моя Windows 10 обновлялась и судя по всему с одним из обновлений прилетела какая-то фигня, которая внесла определённые настройки в систему и VMware перестала запускать гостевые машины выдавая ошибку «VMware Workstation and Device/Credential Guard are not compatible. VMware Workstation can be run after disabling Device/Credential Guard»
Очередной привет от Microsoft.
На официальном сайте VMware есть решение этой проблемы. но оно на английском языке и немного запутанное, поэтому потренировавшись на своём компьютере и получив положительный результат (всё заработало) решил записать решение в свой блог, так как в будущем оно мне может снова пригодиться, ведь VMware я использую постоянно для различных целей.
Уверен, что данную статью читают грамотные ребята. Однако напомню, что, следуя советам, полученным из статьи, надо помнить, что выполнение описанных в статье операций может привести к неожиданным для вас последствиям. В связи с этим настоятельно рекомендую предварительно создать точку восстановления системы.
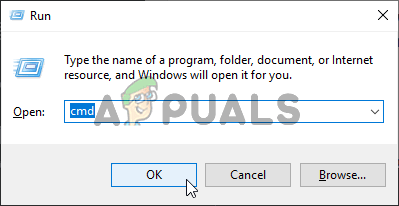
Решаем проблему. Открыть командную строку «WIN + R» и ввести команду «gpedit.msc», нажать «ОК».
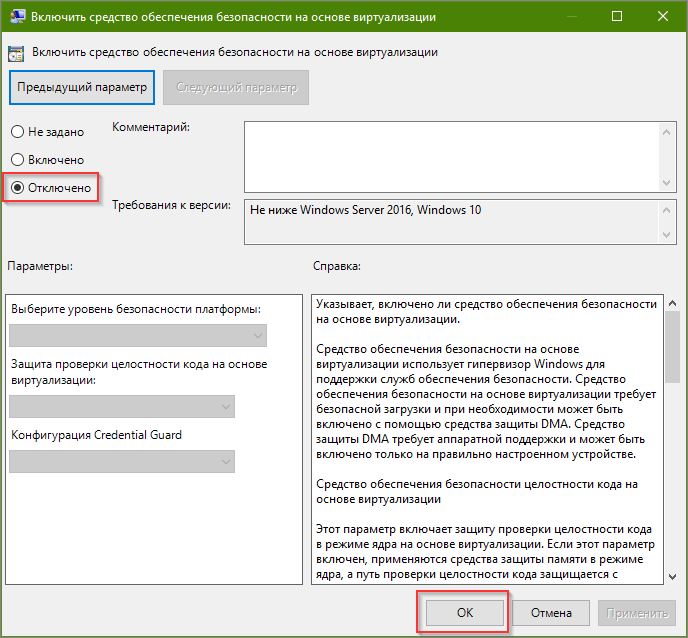
В открывшемся окне перейти в раздел «Политика Локальный компьютер => Конфигурация компьютера => Административные шаблоны => Система => Device Guard».
Здесь дважды кликаем по пункту «Включить средство обеспечения безопасности на основе виртуализации»:

В открывшемся окне выбираем пункт «Отключено» и нажимаем «ОК»:
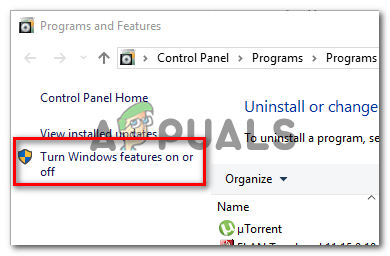
Далее перейти в «Панель управления => Программы и компоненты => Включение или отключение компонентов Windows» и отключаем Hyper-V и нажимаем «ОК»:
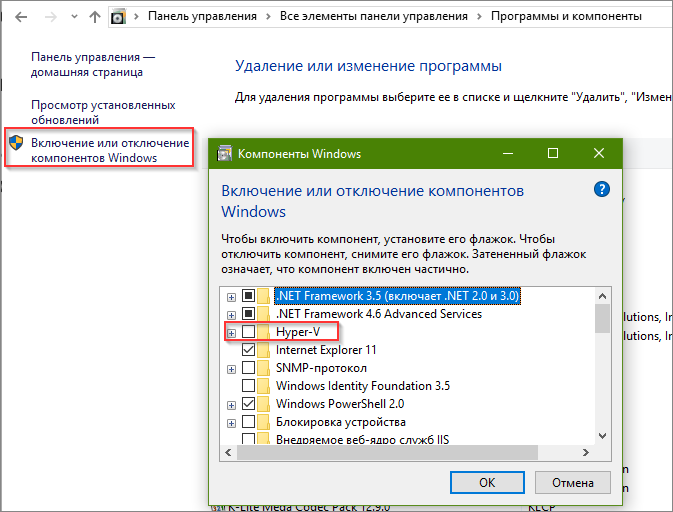
Компьютер предложит перезагрузиться => отказываемся (перезагрузимся позже).
Запускаем командную строку от имени администратора:
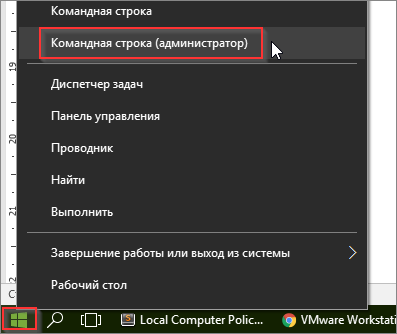
В командной строке выполняем подряд несколько команд:
bcdedit /create {0cb3b571-2f2e-4343-a879-d86a476d7215} /d "DebugTool" /application osloaderНажимаем «Ввод/Enter».
bcdedit /set {0cb3b571-2f2e-4343-a879-d86a476d7215} path "\EFI\Microsoft\Boot\SecConfig.efi"Нажимаем «Ввод/Enter».
bcdedit /set {bootmgr} bootsequence {0cb3b571-2f2e-4343-a879-d86a476d7215}Нажимаем «Ввод/Enter».
bcdedit /set {0cb3b571-2f2e-4343-a879-d86a476d7215} loadoptions DISABLE-LSA-ISO,DISABLE-VBSНажимаем «Ввод/Enter».
bcdedit /set hypervisorlaunchtype offНажимаем «Ввод/Enter».
Перезагружаем компьютер.
Теперь запускаем гостевую операционную систему в VMware и наслаждаемся работой.
Читатель «Аноним» от 06.12.2018
Кому не помог этот способ — отключите изоляцию ядра в центре безопасности защитника windowsЧитатель «ZZ» от 24.04.2019
Достаточно было выполнить следующую команду: bcdedit /set hypervisorlaunchtype offЧитатель «Аноним» от 09.01.2020
Для перехода назад на Hyper-V, к примеру для Docker, необходимо выполнить следующую команду: bcdedit /set hypervisorlaunchtype auto
В этой статье мы расскажем о возможных причинах, по которым не запускается виртуальная машина VMware Workstation. Мы рассмотрим самые распространённые ошибки, а также разберём, почему они возникают и как их исправить.
Ошибка VMware Workstation and Device/Credential Guard are not compatible
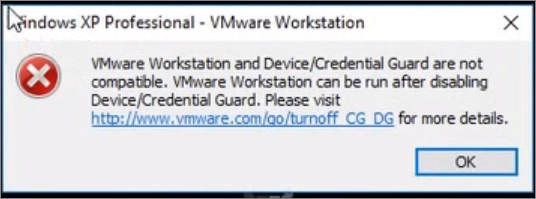
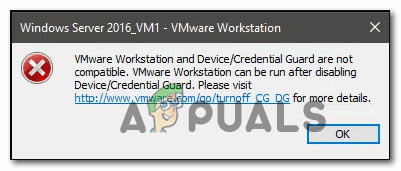
При включении VMware Workstation на Windows 10 может возникнуть ошибка со следующим текстом:
VMware Workstation and Device/Credential Guard are not compatible. VMware Workstation can be run after disabling Device/Credential Guard. Please visit http://www.vmware.com/go/turnoff_CG_DG/ for more detailsЧаще всего эта ошибка возникает из-за того, что включено ПО Device Guard — оно помогает защитить систему от вредоносных файлов. Device Guard позволяет настроить список файлов, которые Windows будет считать безопасными. Если на компьютер попадут файлы, которые не входят в список, система автоматически удалит их. Работе VMware в таких случаях мешает компонент Hyper-V.
Как исправить
Обратите внимание
Чтобы отключить Hyper-V, необходимо внести изменения в реестр Windows. Перед отключением Hyper-V обязательно создайте резервную копию ОС.
Чтобы исправить ошибку, отключите Hyper-V с помощью функционала «Выполнить».
-
1.
Нажмите сочетание клавиш Win + R.
-
2.
В поисковую строку введите «gpedit.msc» и нажмите Ок.
-
3.
Перейдите в раздел «Политика Локальный компьютер» — «Конфигурация компьютера» — «Административные шаблоны» — «Система» — «Device Guard». Дважды кликните на строку «Включить средство обеспечения безопасности на основе виртуализации».
-
4.
В новом окне выберите пункт «Отключено» и нажмите Ok.
-
5.
Перейдите в раздел «Панель управления» — «Программы и компоненты» — «Включение или отключение компонентов Windows». Отключите Hyper-V и нажмите Ок. Если система предложит перезагрузить компьютер, откажитесь от перезагрузки.
-
6.
Откройте командную строку от имени администратора. Поочередно выполните команды:
bcdedit /create {0cb3b571-2f2e-4343-a879-d86a476d7215} /d "DebugTool" /application osloader

bcdedit /set {0cb3b571-2f2e-4343-a879-d86a476d7215} path "\EFI\Microsoft\Boot\SecConfig.efi"

bcdedit /set {bootmgr} bootsequence {0cb3b571-2f2e-4343-a879-d86a476d7215}

bcdedit /set {0cb3b571-2f2e-4343-a879-d86a476d7215} loadoptions DISABLE-LSA-ISO,DISABLE-VBS

bcdedit /set hypervisorlaunchtype off
Затем перезагрузите компьютер.
Ошибка Cannot open the disk
Ещё одна распространенная ошибка при запуске виртуальной машины в VMware — Cannot open the disk. Её текст следующий:
An unexpected error was received from the ESX host while powering on VM.На следующей строке будет указана одна из причин этой ошибки. Разберём, что означает каждая:
1) Failed to lock the file. Это значит, что процесс, который вы используете, не может открыть файл. При этом файл используется другим процессом. Что может привести к ошибке:
- при работе с ВМ вы пытаетесь запустить вторую ВМ, используя тот же VMX-файл,
- вы запустили ВМ с подключенным диском при помощи утилиты vmware-mount,
- вы добавили виртуальный диск к ВМ, которая уже используется.
2) The parent virtual disk has been modified since the child was created. Эта ошибка возникает, если повреждён снимок ВМ.
3) The destination file system does not support large files означает, что на целевом хранилище невозможно открыть файл ВМ того же размера.
4) Could not open/create change tracking file. Эта проблема может возникнуть, если файл filename-ctk.vmdk создавался ранее и не очищался перед созданием новой ВМ. Здесь filename — это название вашего файла.
5) Cannot allocate memory. Тот случай, когда в модуле VMFS не хватает места.
6) The file specified is not a virtual disk возникает в случаях, если повреждён .VMDK-файл дескриптора.
7) Insufficient permission to access file. Такая проблема может возникнуть при использовании хранилищ типа NFS. Она сообщает о том, что экспорт NFS работает неправильно, так как права на чтение и запись файла не даны либо даны некорректно.
Как исправить
Единого решения для этого типа ошибки нет. Чаще всего причина связана с локальными настройками компьютера. Рекомендации по исправлению ошибки описаны в официальной документации.
Помогла ли вам статья?
Спасибо за оценку. Рады помочь 😊
👍
VMware Workstation является мощным инструментом для создания и управления виртуальными машинами, позволяющим пользователям запускать различные операционные системы на одном компьютере.
Однако даже при работе с таким надёжным инструментом, как VMware Workstation, возникают проблемы при запуске. Поэтому в этой статье мы ознакомимся с некоторыми распространёнными ошибками, с которыми можно столкнуться при запуске этого ПО.

VMware Workstation: всё, что важно знать перед началом работы
Системные требования:
- 64-разрядный процессор, выпущенный в 2011 или позже;
- Частота ядра 1.3 ГГц или выше;
- Минимум 2 ГБ ОЗУ/ рекомендуется 4 ГБ ОЗУ или больше.
Требования к ОС хоста:
VMware Workstation Pro работает в большинстве 64-битных операционных системах Windows или Linux:
- Windows 10;
- Windows Server 2019;
- Windows Server 2016;
- Windows Server 2012;
- Windows 8;
- Ubuntu;
- Red Hat Enterprise Linux;
- CentOS;
- Oracle Linux;
- openSUSE;
- SUSE Linux Enterprise Server.
В рамках своих услуг RU-CENTER предлагает хостинг на платформе Windows. С Windows VDS/VPS вы получите удобную и надёжную среду для размещения и развития своих веб-проектов!
Мы уверены, что вы обязательно сможете подобрать тариф для себя.

Почему не запускается виртуальная машина VMware WorkStation?
Существует несколько возможных причин, по которым виртуальная машина VMware Workstation может не запускаться.
Рассмотрим некоторые из наиболее распространенных проблем:
Нехватка системных ресурсов
Чтобы иметь возможность запускать тяжёлые виртуальные машины, VMware Workstation требует значительного объёма оперативной памяти, процессорных ресурсов и места на жёстком диске.
Убедитесь, что ваш компьютер соответствует минимальным требованиям системы.
Если ваша система не соответствует требованиям, попробуйте снизить количество потребляемых ресурсов, закрыв ненужные программы или увеличив объём оперативной памяти.
Ошибки при обновлении VMware Workstation
Если у вас возникли проблемы при обновлении VMware Workstation, это может привести к неполадкам в работе программы.
Убедитесь, что вы используете последнюю версию VMware Workstation, совместимую с вашей операционной системой, и что установка ПО прошла без ошибок.
Если проблема сохраняется, попробуйте переустановить программу с нуля.
Конфликты с антивирусными и прочими программами
Некоторые программы (а в особенности антивирусные ПО) могут блокировать работу VMware Workstation или влиять на её функциональность.
Попробуйте временно отключить антивирус или другие конфликтующие с VMware приложения и повторите попытку запуска виртуальной машины.
Повреждены файлы виртуальной машины
Если файлы виртуальной машины, используемой в VMware Workstation, повреждены или отсутствуют, это приведёт к невозможности их запуска.
Проверьте целостность файлов виртуальной машины и, если необходимо, восстановите их из резервной копии или создайте новую виртуальную машину.
Проблемы с драйверами или обновлениями ОС
Некоторые обновления операционной системы или конфликты с драйверами могут повлиять на работу VMware Workstation.
Убедитесь, что у вас установлены последние обновления операционной системы и драйверы, и проверьте, существуют ли известные проблемы совместимости между вашей операционной системой и VMware Workstation.
Неправильные настройки виртуальной машины
Неправильные настройки виртуальной машины также могут препятствовать её запуску.
Проверьте настройки виртуальной машины в VMware Workstation и убедитесь, что они соответствуют требованиям вашей ОС и аппаратному обеспечению.
Как исправить ошибку «VMware Workstation and Device/Credential Guard are not compatible» на Windows 10
Ошибка «VMware Workstation and Device/Credential Guard are not compatible» возникает, когда программа VMware Workstation не может запуститься на компьютере из-за конфликта с функциями безопасности Device Guard и Credential Guard.
Device Guard и Credential Guard – это функции безопасности, предназначенные для защиты операционной системы Windows от вредоносных программ и атак. Они используются для создания изолированного окружения, в котором работают только доверенные приложения и сервисы.
Когда Device Guard или Credential Guard включены на компьютере, они изменяют конфигурацию системы таким образом, что VMware Workstation не может корректно функционировать. В результате, при попытке запуска VMware Workstation появляется ошибка «VMware Workstation and Device/Credential Guard are not compatible».
Для исправления этой ошибки вам понадобится отключить Device Guard и Credential Guard в системе Windows, а также их важный компонент Hyper-V.
Шаг 1. Отключите Device Guard/Credential Guard
- Зажмите клавиши Win+R на клавиатуре, чтобы открыть окно «Выполнить».
- Пропишите:
gpedit.msc
- Нажмите Enter, чтобы открыть «Редактор локальной групповой политики».
- В левой панели разверните раздел Конфигурация компьютера.

- Откройте папку Административные шаблоны.
- Затем перейдите в папку Система.
- Уже в основной части окна откройте Device Guard.

- Найдите опцию «Включить средство обеспечения безопасности на основе виртуализации» и дважды щёлкните по ней.

- Нажмите Отключено, а затем – ОК.

- Перезагрузите компьютер.
Шаг 2. Проверьте статус Hyper-V (Инструкция по отключению Hyper-v для хоста Windows 10)
- Зажмите сочетание клавиш Win+R на клавиатуре, чтобы открыть окно «Выполнить».
- Введите команду:
appwiz.cpl
- Нажмите Enter, чтобы открыть окно «Программы и компоненты».
- В левой панели выберите вкладку Включение или отключение компонентов Windows.

- Убедитесь, что функция Hyper-V отключена.
Если она включена, снимите с неё флажок, нажмите OK и перезагрузите компьютер.

Шаг 3. Измените реестр Windows
Важно! Изменение реестра может повлиять на работу операционной системы. Перед внесением изменений рекомендуется создать резервную копию ОС.
- Откройте командную строку от имени администратора.
- Далее вам необходимо поочерёдно прописать следующие команды:
bcdedit /set {0cb3b571-2f2e-4343-a879-d86a476d7215} path «\EFI\Microsoft\Boot\SecConfig.efi»
bcdedit /set {bootmgr} bootsequence {0cb3b571-2f2e-4343-a879-d86a476d7215}
bcdedit /set {0cb3b571-2f2e-4343-a879-d86a476d7215} loadoptions DISABLE-LSA-ISO,DISABLE-VBS
bcdedit /set hypervisorlaunchtype off
- Когда каждая команда будет успешно обработана, перезагрузите компьютер.
После выполнения указанных шагов попробуйте снова запустить VMware Workstation.
Ошибка «VMware Workstation and Device/Credential Guard are not compatible» больше не должна возникать, и программа будет работать без проблем.
Как исправить ошибку «Cannot open the disk»?
Ошибка «Cannot open the disk» в VMware Workstation указывает на проблему с открытием виртуального диска, который вы пытаетесь загрузить или подключить в программе.
Она возникает по разным причинам, таким как повреждение файла диска, неправильные разрешения доступа к файлу или некорректные настройки программы.
В первую очередь о ней свидетельствует следующий текст:
«An unexpected error was received from the ESX host while powering on VM.»
Чтобы выяснить, как действовать дальше, обратите внимание на следующую строку, где будет указана причина данной ошибки. Ниже мы предлагаем вам ознакомиться с наиболее распространёнными из них.
Причина 1. Отсутствует файл диска (System cannot find the file specified)
Если файл диска, на который ссылается виртуальная машина, отсутствует или удалён, возникает ошибка «System cannot find the file specified».
Убедитесь, что файл диска существует в указанной директории.
Если файл был удалён или перемещён, вам может потребоваться восстановить его из резервной копии или создать новый диск.
Причина 2. Недостаточно разрешений доступа (Insufficient permission to access file)
Возможно, у вас нет необходимых разрешений для чтения или записи файла диска.
Убедитесь, что вы получили права доступа к файлу диска и что вы можете читать и записывать его. Проверьте права доступа к файлу и настройте их соответствующим образом.
Причина 3. Файл диска заблокирован другим процессом (Failed to lock the file)
Если другой процесс или виртуальная машина уже использует файл диска, VMware не сможет открыть его и выдаст ошибку Failed to lock the file.
Убедитесь, что другие экземпляры VMware или процессы, которые могут использовать файл диска, закрыты или приостановлены.
Перезапустите VMware и попробуйте снова открыть файл диска.
Причина 4. Повреждён файл диска (The file specified is not a virtual disk)
Если файл диска повреждён, VMware не сможет его открыть и выдаст ошибку The file specified is not a virtual disk.
В этом случае попробуйте восстановить файл диска из резервной копии, если таковая имеется. Если резервная копия отсутствует, попробуйте использовать инструменты VMware для восстановления или ремонта поврежденного файла диска.
Причина 5. Недостаточный размер хранилища данных (The destination file system does not support large files)
Эта проблема возникает, если размер целевого хранилища данных не поддерживает такой большой .vdmk, как источник.
Чтобы решить эту проблему, убедитесь, что целевое хранилище отформатировано и имеет достаточный размер для поддержки файла формата .vdmk.
Причина 6. Не открывается файл отслеживания изменений содержимого (Could not open/create change tracking file)
Эта проблема может возникнуть, если файл yourfile-ctk.vmdk был ранее создан и не очищен.
Важно! В yourfile-ctk.vmdk «yourfile» – это название вашего файла.
Чтобы решить эту проблему, очистите данный файл.
Причина 7. Повреждён снимок виртуальной машины (The file specified is not a virtual disk)
Эта проблема возникает, когда дескриптор диска .vmdk для загрузочного диска ВМ повреждён или отсутствует.
Чтобы решить эту проблему, создайте новый файл дескриптора .vmdk для этого диска.
Причина 8. Нехватка места в VMFS (Cannot allocate memory)
Эта проблема может возникнуть, если в модуле VMFS заканчивается или уже не хватает места.
Заключение
В данном руководстве мы рассмотрели различные ошибки, связанные с запуском VMware Workstation, а также предложили решения для их устранения.
Если вы так и не смогли решить свою проблему, то рекомендуем вам обратиться в техподдержку VMware для получения дальнейших инструкций.
Some VMware Workstation and Vmware Player users are seeing the “VMware and DeviceCredential Guard are not Compatible” error when attempting to launch the application or when attempting to start a virtual machine. Most affected users have confirmed that the problem only started occurring after installing a pending Windows update.
When troubleshooting this particular issue, you should start this troubleshooting guide by disabling Hyper-V conventionally. You can do this either by disabling it via CMD or by relying on the GUI interface.
Another potential problem that might end up causing this issue is a local group policy called Virtualization Based Security that ends up blocking certain virtualization technologies. In this case, you can either use the Local Group Policy Editor to disable this policy or you can rely on Registry Editor to enforce this change.
However, if you’re encountering this issue on Windows 10, it’s likely that the problem is caused by inconsistency with the Boot Configuration Data. If this scenario is applicable, you can fix this problem by modifying the BCD file to eliminate any reference of Hyper-V.
In the event that you’re using Windows Defender, keep in mind that this WMware error can also occur due to a security feature called Core isolation. In this case, you can fix the issue by disabling Core Isolation from the Settings app or you can do it using Registry Editor.
Method 1: Disabling Hyper-V
According to various user reports, one of the most common causes that will trigger the “VMware and DeviceCredential Guard are not Compatible” error is a conflict between Hyper-V (Microsoft’s proprietary virtualization technology) and VMware. Keep in mind that both VMware and VirtualBox will pick their own virtualization technologies by default.
However, there is one Windows Update (KB4515871) that is known to force certain 3rd party applications to use Hyper-V – in VMware, this will end up producing the “VMware and DeviceCredential Guard are not Compatible” error.
If this scenario is applicable and you recently installed a Windows update that you think might be responsible for the newly appeared error, follow one of the guides below to disable Hyper-V in order to clear the way for VMware to use its own virtualization technology.
A. Disabling Hyper-V via CMD
- Open up a Run dialog box by pressing Windows key + R. Next, type ‘cmd’ inside the text box and press Ctrl + Shift + Enter to open up an elevated Command Prompt.

Running the Command Prompt Note: Once you see the UAC (User Account Control), click Yes to grant admin access.
- Once you’re inside the elevated CMD prompt, type the following command and press Enter to disable the Hyper-V function on a system level:
dism.exe /Online /Disable-Feature:Microsoft-Hyper-V
- After the command is successfully processed, close the elevated Command Prompt window and reboot your computer.
- Once the next startup is complete, open VMware and repeat the action that was previously causing the error.
B. Disabling Hyper-V via Powershell
There is also another way to enable or disable Hyper-V in Windows 10. To do it, please run PowerShell as administrator and then type the following commands:
bcdedit /set hypervisorlaunchtype off (disable Hyper-V)

bcdedit /set hypervisorlaunchtype on (enable Hyper-V)
C. Disabling Hyper-V via GUI
- Press Windows key + R to open up a Run dialog box. Inside the text box, type ‘appwiz.cpl’ and press Enter to open up the Programs and Features menu.
Type appwiz.cpl and Press Enter to Open Installed Programs List - Once you’re inside the Programs and Files menu, use the menu on the left-hand side to click on Turn Windows features on or off.

Accessing the Windows features menu - When prompted by the UAC (User Account Control), click Yes to grant administrative privileges.
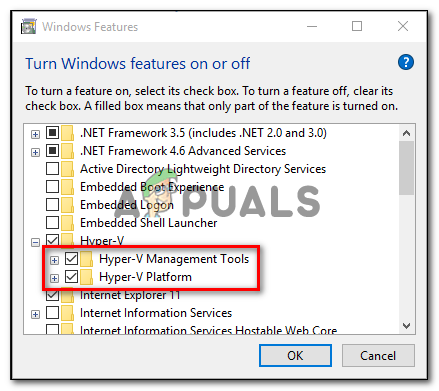
- From the insides of the Windows Features menu, expand the drop-down menu associated with the Hyper-V folder. Next, uncheck the box associated with Hyper-V Management tools and Hyper-V platform before clicking Ok to save the changes.

Disabling Hyper-V via the Windows Features screen - Once you manage to disable Hyper-V from the GUI menu, restart your computer and see if the issue is resolved at the next computer startup.

If you still end up seeing the “VMware and DeviceCredential Guard are not Compatible” error when launching WMware Player / WMware Workshatiaon or when trying to mount a virtual machine, move down to the next potential fix below.
Method 2: Disabling Virtualization Based Security
If you followed the instructions above and you already confirmed that you’re not actually dealing with a conflict between Hyper-V and Vmware, it’s possible that you’re seeing the “VMware and DeviceCredential Guard are not Compatible” error due to the fact that your machine is enforced with Virtualization Based Security -This is required with certain virtual machine types.
This Virtualization Based Security is enforced through a policy via the Local Group Policy Editor. But keep in mind that by default, this utility is only available for Windows 10 PRO and older PRO equivalents.
Note: If you have a Home version, you can manually install the gpedit utility on Windows 10 home.
If the Local Group Policy Editor (gpedit) is available on your Windows version and you want to deploy this potential fix, follow the instructions below (sub guide A) to disable Virtualization Based security on via it’s dedicated policy.
In case you’re using a Home version and you don’t want to side-load the Local Group Policy Editor, follow the second guide (sub guide B) to disable Virtualization Based Security via Registry Editor.
A. Disable Virtualization Based Security via Gpedit
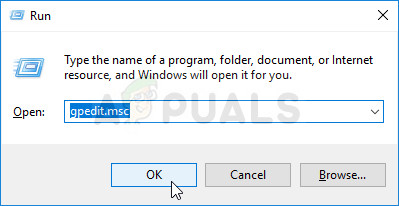
- Press Windows key + R to open up a Run dialog box. Next, type ‘gpedit.msc’ inside the text box and press Enter to open up the Local Group Policy Editor.
Running the Local Group Policy Editor Note: When you are prompted by the UAC (User Account Control) window, click on Yes to grant admin access.
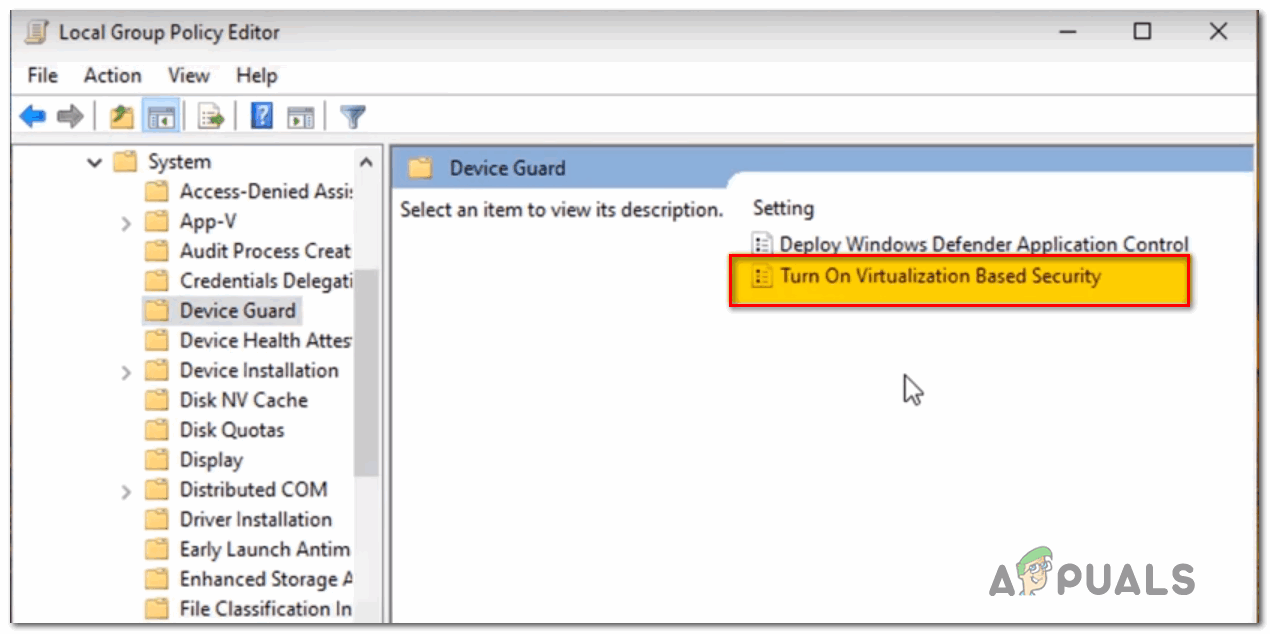
- Once you’re inside the Local Group Policy Editor, navigate to the following location using the menu on the left-hand side:
Computer Configuration - Administrative Templates - System - Device Guard
- After you get to this location, move over to the right-hand side menu and double-click on Turn on Virtualization Based Security.

Turning On Virtualization Based Security - Once you’re inside the settings menu of the Turn On Virtualization Based Security policy, set it’s a toggle to Disabled and click Ok to save the changes.
- Once this security has been enabled, restart your computer and see if the issue is resolved at the next computer startup.
B. Disable Virtualization Based Security via Registry Editor
- Press Windows key + R to open up a Run dialog box. Inside the text box type ‘regedit’ and press Enter to open up the Registry Editor. When prompted by the UAC (User Account Control), click Yes to grant admin access.
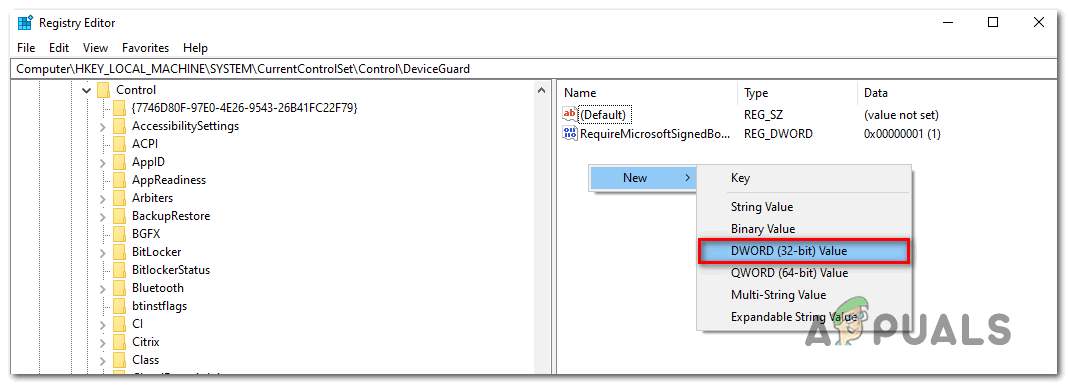
Running the Registry Editor - Once you’re inside the Registry Editor, use the left-hand menu to navigate to the following location:
HKEY_LOCAL_MACHINE\System\CurrentControlSet\Control\DeviceGuard
Note: You can either navigate here manually or you can paste the location directly into the navigation bar and press Enter to get there instantly.
- After you arrive at the correct location, move to the right-hand section, right-click on an empty space, and chose New > DWORD (32-bit) value from the newly appeared context menu.

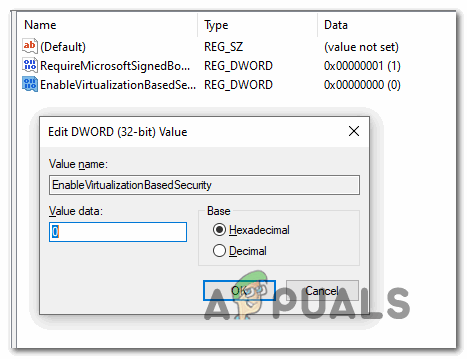
Creating a new DWORD (32) bit value - Name the newly created DWORD to EnableVirtualizationBasedSecurity, then double-click on it and set the Base to Hexadecimal and the value to 0 in order to disable Virtualization Based Security.

Configuring the EnableVirtualizationBasedSecurity value - Hit Ok to save the changes, then close the Registry Editor and restart your computer to see if the problem is now fixed.

In case you’re still encountering the same problem even after you’ve enabled virtualization-based security, move down to the next potential fix below.
Method 3: Modifying the BCD File
As it turns out, this particular issue can also be caused by inconsistency with the BCD (Boot Configuration Data) that ends up interfering with the 3rd party virtualization technology. Several affected users that were having the same problem have reported that the issue was suddenly resolved after they ran a couple of commands in an elevated command prompt.
These commands will ensure that the remnant of Hyper-V is not conflicting with the virtualization technology that VMware uses. Here’s what you need to do:
- Press Windows key + R to open up a Run dialog box. Next, type ‘cmd’ inside the text box and press Ctrl + Shift + Enter to open up an elevated Command Prompt.
Running the Command Prompt Note: When you are prompted by the UAC (User Account Control), click Yes to grant administrative privileges.
- Once you’re inside the elevated Command Prompt window, type the following command in this exact order, and press Enter after each command to delete Hyper-V references from your BCD data:
bcdedit /set {0cb3b571-2f2e-4343-a879-d86a476d7215} path "\EFI\Microsoft\Boot\SecConfig.efi" bcdedit /set {bootmgr} bootsequence {0cb3b571-2f2e-4343-a879-d86a476d7215} bcdedit /set {0cb3b571-2f2e-4343-a879-d86a476d7215} loadoptions DISABLE-LSA-ISO,DISABLE-VBS bcdedit /set hypervisorlaunchtype off - Once every command has been processed successfully, restart your computer and see if the problem is now fixed.
In case you’re still seeing the same “VMware and DeviceCredential Guard are not Compatible” error, move down to the final fix below.
Method 4: Disabling Core Isolation
If none of the fixes above have worked for you, there is one final potential culprit that we haven’t taken care of until now. If you’re using Windows Defender, it’s possible that a security feature called Core Isolation is actually triggering the “VMware and DeviceCredential Guard are not Compatible” error.
Core isolation is essentially an extra layer of security that Windows Defender deploys in order to protect against sophisticated malware attacks that operate at a Kernel level.
Several affected users that followed through with the disablement of this security feature have confirmed that the problem went away entirely. But there is a disadvantage – you will be leaving your system exposed to some security exploits.
If you want to give this method a try, follow the first guide below (sub guide A) to disable Core isolation from the settings menu of Windows Security. If the Core isolation entry is greyed out, you can also do this via Registry Editor (sub guide B).
A. Disabling Core Isolation via GUI
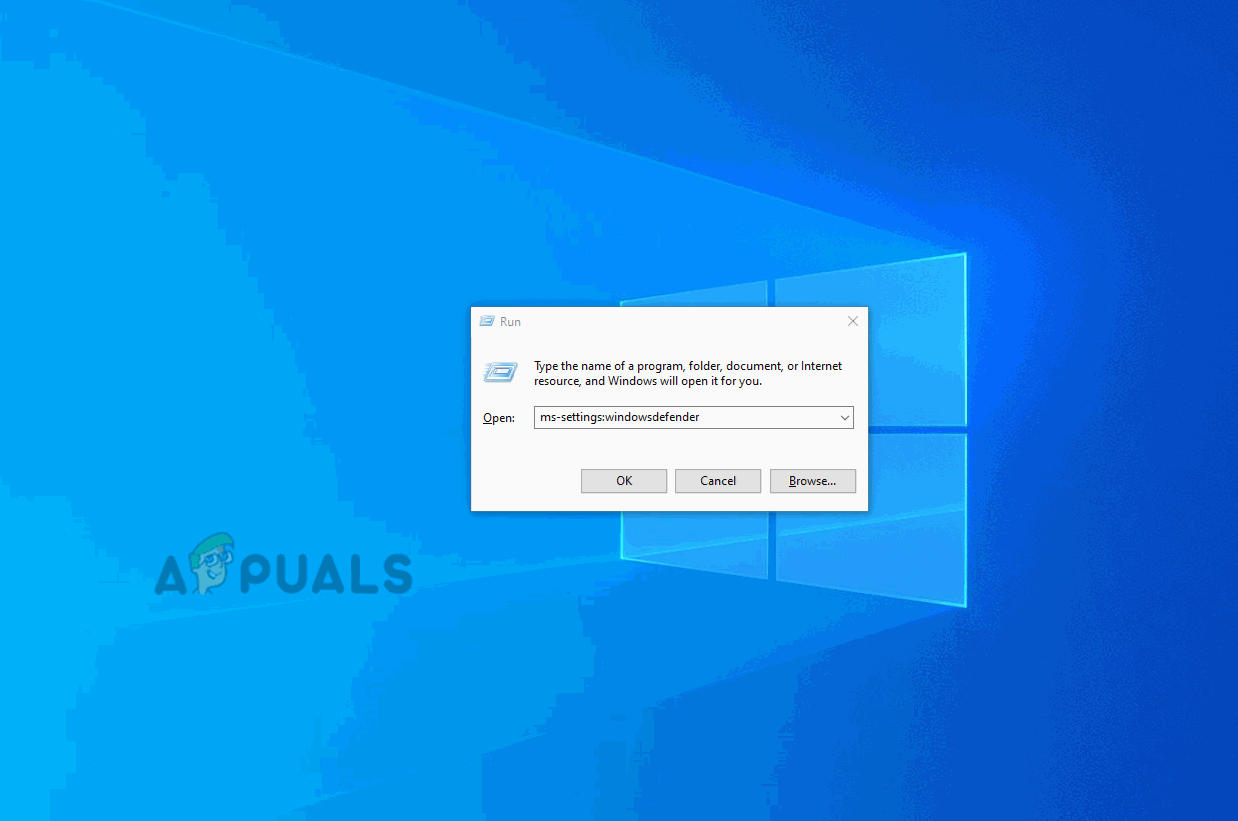
- Open up a Run dialog box by pressing Windows key + R. Next, type ‘ms-settings:windowsdefender’ inside the text box and press Enter to open up the Windows Security tab (from Windows Defender) of the Settings app.

Run dialog: ms-settings:windowsdefender - Once you finally arrive inside the Windows Security menu, move over to the right-hand section and click on Device Security (under Protection areas).
- Next, scroll down through the list of available options and click on Core isolation details (under Core isolation).
- Once you’re finally inside the Core isolation menu, disable the toggle associated with Memory integrity (set to Off).
- After this modification is established, reboot your computer and see if the problem is fixed at the next computer startup by launching a virtual VMware machine once again.

B. Disabling Core Isolation via Registry Editor
- Press Windows key + R to open up a Run dialog box. Next, type ‘regedit‘ inside the dialog box and press Enter to open up the Registry Editor. When you’re prompted by the UAC (User Account Control), click Yes to grant admin access.
Running the Registry Editor - Once you manage to get inside the Registry Editor, use the left-hand menu to navigate to the following location:
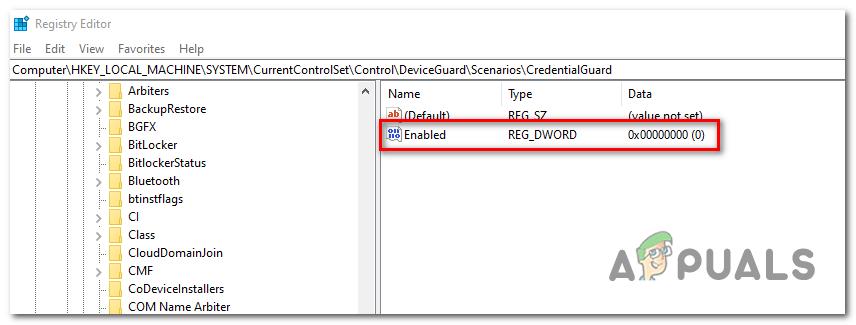
Computer\HKEY_LOCAL_MACHINE\SYSTEM\CurrentControlSet\Control\DeviceGuard\Scenarios\CredentialGuard
Note: If you want to save yourself some time, you can paste the entire location directly into the navigation bar and press Enter to get there instantly.
- When you arrive at the correct location, turn your attention to the right-hand menu and double-click on the Enabled key.

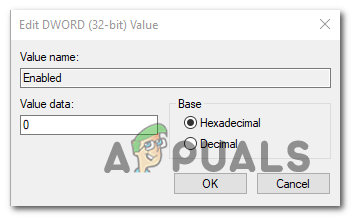
Accessing the Enabled key - Inside the Enabled value window, set the base to Hexadecimal and set the Value data to 0. Next, click Ok to save the changes.

Setting the value data of Enabled to 0 - Once this modification is enforced, restart your computer and see if the problem is fixed at the next system startup.

Download Windows Speedup Tool to fix errors and make PC run faster
If when you try to power on the VM (Virtual Machine) inside VMware Workstation Player on Windows 11/10, you receive the error message VMware Workstation and Device/Credential Guard not compatible, then this post is intended to help you. In this post, we will present the solution you can try to help you resolve this issue.

When you encounter this error, the following full error message is displayed;
VMware Player and Device/Credential Guard are not compatible. VMware Player can be run after disabling Device/Credential Guard. Please visit http://www.vmware.com/go/turnoff CG DG for more details.
In Windows 11/10, Device Guard and Credential Guard are the new security features that are only available on Windows 11/10 Enterprise today. Device Guard is a combination of enterprise-related hardware and software security features that, when configured together, will lock a device down so that it can only run trusted applications. If it is not a trusted application, it cannot run. Credential Guard uses virtualization-based security to isolate secrets (credentials) so that only privileged system software can access them. Unauthorized access to these secrets can lead to credential theft attacks. Credential Guard prevents these attacks by protecting NTLM password hashes and Kerberos Ticket Granting Tickets.
The Pro version of Windows 11/10 ships with Hyper-V, the in-house virtual machine solution from Microsoft built-into Windows. However, if you enable Hyper-V, it also enables the Credential Guard. Disabling the Hyper-V also disable the Credential Guard.
Based on the error message, you can see it indicates VMware Player can be run after disabling Device/Credential Guard. So, if you’re faced with this VMware Workstation and Device/Credential Guard not compatible issue on Windows 11/10, you can try the 2-step solution below to resolve the issue.
- Disable Hyper-V (if enabled)
- Disable the Device Guard Policy via Registry Editor
Let’s take a look at the description of each step.
1] Disable Hyper-V (if enabled)
To disable Hyper-V, do the following:
- Press Windows key + R to invoke the Run dialog.
- In the Run dialog box, type appwiz.cpl and hit Enter to open Programs and Features applet.
- In Programs and Features, on the left-hand side, click Turn Windows features on or off.
- In the Turn Windows features on or off popup that appears, uncheck Hyper-V.
- Click OK.
Hyper-V will now be disabled from your computer.
- Restart the computer and on boot, proceed with Step 2.
2] Disable the Device Guard Policy via Registry Editor
Since this is a registry operation, it is recommended that you back up the registry or create a system restore point in case the procedure goes wrong. Once you have taken the necessary precautionary measures, you can proceed as follows to resolve the VMware Workstation and Device/Credential Guard not compatible issue.
- Press Windows key + R to invoke the Run dialog.
- In the Run dialog box, type regedit and hit Enter to open Registry Editor.
- Navigate or jump to the registry key path below:
Computer\HKEY_LOCAL_MACHINE\SYSTEM\CurrentControlSet\Control\DeviceGuard
- On the right pane, double-click the EnableVirtualizationBasedSecurity key to edit its properties.
If you don’t see the key, create it by right-clicking on a blank space on the right pane and then select New > DWORD (32-bit) Value. Rename the value name as EnableVirtualizationBasedSecurity and hit Enter.
- Input 0 in the Value data field and hit Enter.
- Next, navigate or jump to the registry key path below:
Computer\HKEY_LOCAL_MACHINE\SYSTEM\CurrentControlSet\Control\Lsa
- On the right pane, double-click the LsaCfgFlags key to edit its properties.
- Input 0 in the Value data field and hit Enter.
You can now exit Registry Editor and restart your system.
You can be able to disable Device Guard policy using the Local Group Policy Editor, as well.
Once you have completed the procedure and restarted your computer, the VM should be running fine.
Read next: VMware Workstation and Hyper-V are not compatible.
Obinna has completed B.Tech in Information & Communication Technology. He has worked as a System Support Engineer, primarily on User Endpoint Administration, as well as a Technical Analyst, primarily on Server/System Administration. He also has experience as a Network and Communications Officer. He has been a Windows Insider MVP (2020) and currently owns and runs a Computer Clinic.