VMWare vCenter Server — это второй базовый элемент продукта vSphere. Он используется для объединения нескольких хостов ESXi в единое целое и идет в комплектах VMWare vSphere Essentials Kits. Для того чтобы его установить, нам в первую очередь необходимо скачать его установочный пакет.
Для этого переходим на страницу загрузок VMWare, и нажимаем Go to Downloads напротив VMWare vCenter Server. Попадете на страницу загрузки. Казалось бы что уже все. Осталось только скачать, но таки нет. Чтобы скачать продукт, необходимо иметь учетку VMWare. Имея учётку VMWare вы запускаете триал и уже тогда получаете доступ к файлам загрузки.
Так же для установки vCenter нам необходимо иметь уже работающий гипервизор ESXi. Если его у вас еще нету, то сперва надо установить ESXi
Относительно установленного ESXi, необходимо знать его IP адрес, логин (root) и пароль от него. Далее по пунктам.
Монтируем наш iso файл с vCenter.
Называться он будет как-то типа VMware-VCSA-all-6.7.0-8217866
Открываем виртуальный диск, переходим по пути \vcsa-ui-installer\win32 и запускаем файл installer.exe

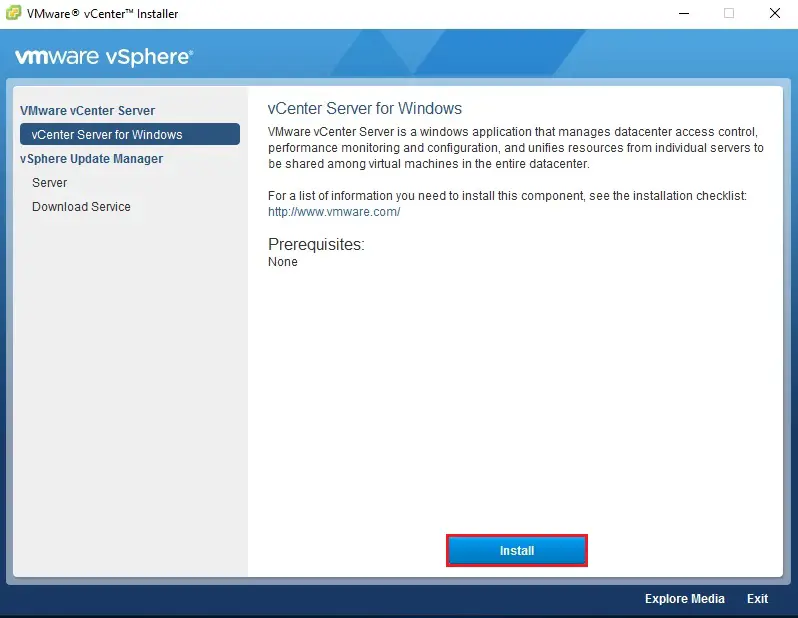
Выбираем Install
Так как инструкция подразумевает наше первое столкновение с vCentre, мы жмем на Install

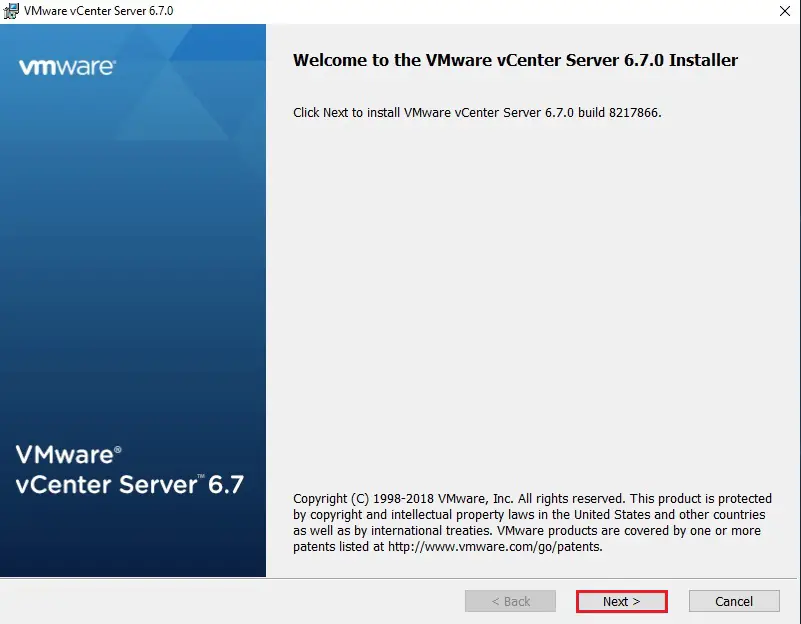
Приступаем к первому этапу установки
Следующее окно несет чисто информативную роль, и сообщает нам на каком из двух этапов установки мы сейчас находимся.
Первый этап это деплой, второй этап — настройка.

Читаем EULA
Ознакомившись с EULA, и согласившись с её условиями, нажимаем Next

Выбираем тип установки vCenter
Далее перед нами стоит выбор, что как будет установлен vCenter
— Как маленькая инсталляция, то есть vCenter в сети один и вместе с Platform Services Controller они представляют один апплаенс. Это как раз случай любого из китов и многих других спец решений VMWare
— Как крупная инсталяция. В прочем, в этой ситуации я думаю работодатель не пожалел бы полторы тыщщи баксов на спец курс подготовки. В случае такой инсталяции Platform Services Controller и vCenter Server разделяются на разные апплаенсы
Мы конечно же выбираем Embedded Platform Services Controller 🙂

Настраиваем подключение к ESXi
На этом этапе мы уазываем тот хост ESXi куда мы хотим залить образ vCentre. В поле ESXi host or vCenter Server name указываем IP нашего ESXi. В полях User name и Password указываем логин и пароль админской учетки этого хоста
 Оно может выдать запрос на подтверждение неизвестного ранее сертификата безопасности. Жмем YES
Настраиваем имя апплаенса и учетку рута
Указываем имя нашей устанавливаемой виртмашины с vCentre и пароль от учетки root этого хоста

Выбираем масштаб инсталяции.
Задача не тривиальная. Разработчики любезно позаботились о нас на этом этапе и избавили от необходимости курить маны. Нам показывают табличку, в которой уже описаны все шаблоны установки. Можно даже особо не вдумываться и выбирать Tiny. Такого хоста хватит чтобы обслуживать до 100 виртмашин на 10 ESXi хостах. Если у вас какой-то из Essentials паков, у вас физически хостов может быть всего 3. Упихать в 3 хоста 100 виртмашин будет проблемотично, но если вы считаете что что у вас получится это сделать, выберите установку small, на 100 ESXi гипервизоров :). Но вмварь как бы определяет что в среднем на 1 ESXi хост приходится 10 виртуальных хостов.

Выбираем хранилище куда будем ставить свой первый vCenter.
Если у вас еще не создано хранилище, вам необходимо открыть админку своего ESXi хоста. В админке перейти в Storage => New datastore => Create new VMFS datastore => Выбрать диск на котором хотите разместить первое хранилище и задать имя хранилища => потыкать Next пока не увидите Finish => Нажать Finish
 Я еще предпочитаю ставить опцию Enable Thin Disk Mode. Эта опция позволяет виртмашине отъедать дисковое пространство физической подсистемы постепенно. В зависимости от того сколько фактически её данные занимают места на диске. Без этой опции виртмашина займет у вас на диске сразу же все 300 гигов tiny инсталяции, и никогда за всю жизнь может не утилизировать этот объем на 100%
Настройка сети нашего апплаенса
 Относительно настройки сети апплаенса, нет желания долго и глубоко размышлять о том какой адрес ему выдать. Да и это не ESXi хост, у которого может не быть встроенных средств удаленного администрирования типа iLO, а физически вы с ним контактируете последний раз в жизни. Если вы ставите vCenter, значит у вас есть доступ к ESXi. А если у вас есть доступ к ESXi, значит вы в любой момент сможете попасть в консоль апплаенса и переделать там всё вручную. А так, я больше предпочитаю отдавать все на откуп DHCP серверу, через который потом уже и меняю настройки сети 🙂
Смотрим суммарную информацию по нашей инсталяции
Если всё устраивает — нажимаем Finish. Начинается непосредственно деплой апплаенса.
Завершение первого этапа установки
Если установка прошла успешно, вы увидите следующее окно:
 фыУстановщик проинформирует вас о результатах завершения первого этапа. Так же он уведомит вас о том, что если вдруг после успешного деплоя вы закроете инсталлятор, вы сможете продолжить процесс настройки перейдя по адресу http://ip_vcenter:5480.
Если мы придерживаемся стандартного сценария, жмем Continue
Начало 2-го этапа установки
 Жмем NEXT
Настройка времени и SSH
 Я сразу же включаю доступ по SSH
Настраиваем домен для сквозной авторизации
 Если у вас есть свой локальный домен, можно заделаться его поддоменом, для test.local было бы vsphere.test.local, если домена нет то можно назваться стандартным названием vsphere.local. Вместо vsphere можно написать что угодно, главное что имя домена должно состоять из двух частей и разделено точкой.
В любом случае, нужно запомнить и домен, и пароль и то что учетка называется administrator. Первое подключение вы будете делать именно с неё, вбивая в поле Username: administrator@vsphere.local, ну или какой домен вы там себе выберете.
Подключение к CEIP
CEIP — служба сбора инфы о пользователях которая по уверениям собирает различную анонимную информацию которая позволяет улучать продукт. Не знаю насколько сильно наличие или отсутствие галочки повлияет на то что вмварь будет отправлять определенную инфу разработчику, но если у вас стоит принципиальная цель недать вмвари отправлять что-либо наружу, лучше воспользоваться соответствующими правилами трафика на вашем шлюзе.
 По окончании установки оно выдаст вам адрес https://photon-machine:443, на который не попасть пока у вас на днс сервере не появится соответствующий алиас.
Чтобы попасть в только что установившийся vCenter, необходимо перейти по адресу который получил апплаенс https://vcenter_ip, подсмотреть его можно в пункте 12 данного мануала.
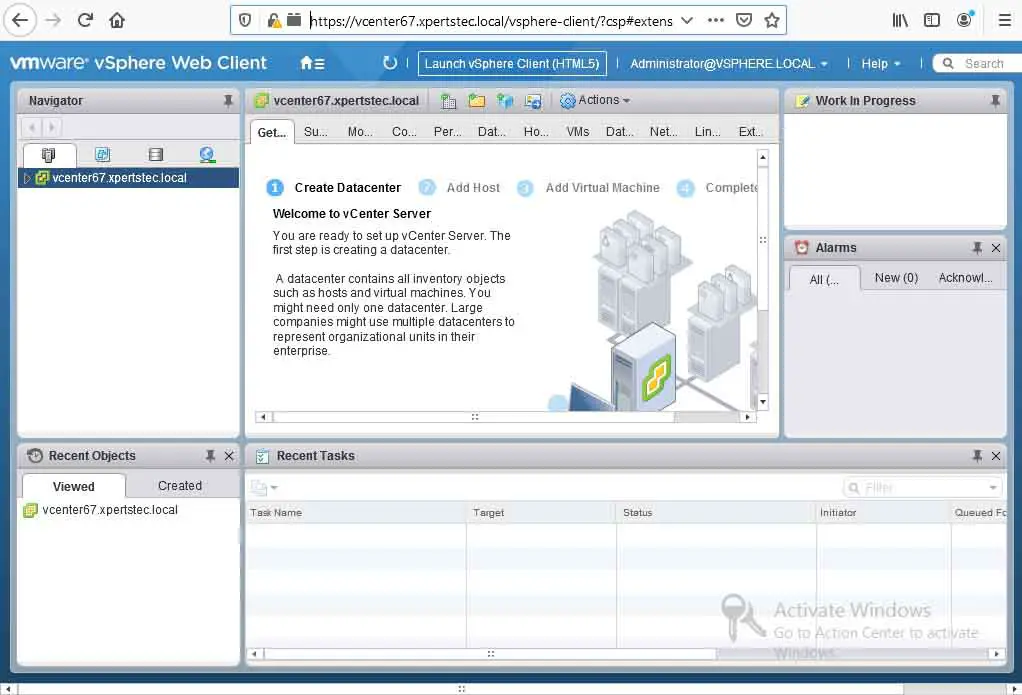
 Жмем на Launch vSphere Client (HTML5)
 И попадаем наконец-то в наш vCenter
 Simplified and Efficient Server Management

What is vCenter ?
Gain centralized visibility, simplified and efficient management at scale, and extensibility across the hybrid cloud—all from a single console. VMware vCenter is advanced server management software that provides a centralized platform for controlling your VMware vSphere environments, allowing you to automate and deliver a virtual infrastructure across the hybrid cloud with confidence.
VMware vCenter Features
![]()
Simple Deployment
Quickly deploy vCenter as a pre-packaged, optimized, and easy-to-maintain virtual appliance. Integration of vSphere Update Manager into vCenter Server Appliance makes patching and upgrading fast and easy. RESTful APIs allow for the easily repeatable deployment of vCenter Server Appliance from a template, speeding up deployment times as well as reducing human error.
![]()
Extensibility and Scalability Across Hybrid Cloud
Seamlessly extend your on-premises environment to vSphere-based public clouds, such as VMware Cloud on AWS, no matter which version of vCenter you are running. Large-scale management is now improved: Manage up to 2,000 hosts and 35,000 virtual machines with a single vCenter instance.
![]()
Centralized Control and Visibility
Administer your entire vSphere infrastructure from a single location. The HTML 5-based vSphere Client lets you manage the essential functions of vSphere from any browser, offering more responsiveness and usability than ever before. Assign users to custom roles, search vCenter inventory, or provision new virtual machines with the click of a button.
![]()
Proactive Optimization
Allocate and optimize resources for maximum efficiency with our server management software. Manage up to 70,000 virtual machines and 5,000 hosts across 15 vCenter instances. Use vSphere HA and DRS clusters to support up to 64 hosts and 8,000 virtual machines. Replicate roles, permissions, and licenses across the infrastructure so you can simultaneously log in, view, and search the inventories of all vCenter Servers. Link multiple vCenter Server Appliances and increase visibility without using costly load balancers.
![]()
Improved Management
Use powerful tools to simplify management and extend your control. Use web services APIs to achieve cost-effective and flexible integration with existing systems management products. And use different VMware vCenter versions while allowing cross-vCenter, mixed-version provisioning operations, such as vMotion, Full Clone, and cold migrate.
![]()
Plug-in Extensibility
vSphere Client Plug-ins from VMware partners allow IT admins to manage third-party elements in their data center directly from vCenter. Our server management software has the largest partner ecosystem in the industry, with our open vSphere Client Plug-in SDK. As a result, vCenter customers can implement back-up, data protection, server management, network management and security management, directly from vCenter.
VMware launched the vSphere Client Plug-in Certification Program in 2016 to ensure a better end-user experience for customers. Certified Plug-ins deliver optimal performance, better security model, client isolation against failures in one plug-in, and enhanced vCenter Server Appliance scalability. Customers will be able to distinguish certified vSphere Client Plug-ins because only certified Plug-ins will carry the «VMware-ready» logo.
Certified vSphere Web Client plug-ins:
— Dell EMC OpenManagement Integration for VMware vCenter
— Huawei Technologies Storage NGC (Flex and HTML 5)
— IBM Storage Enhancements for vSphere
— IBM Spectrum Protect vSphere Web Client
— Infinidat Powertools (HTML 5)
— Lenovo XClarity Integrator for VMware vCenter
— NimbleStorage vSphere Web Client
— StorMagic
![]()
Native Elements
Protect the vCenter Server Appliance and related services with native high availability (HA) and a recovery time objective of less than 10 minutes. vSphere provides native active-passive HA capability, certified for vCenter Server Appliance.
Back up your appliance to a set of files while vCenter is still up and running with native backup and restore. Restore by simply pointing a fresh appliance to the backup location and files will be downloaded to the new vCenter Server Appliance. No third-party products required.
Schedule your vCenter Server Appliance backups and control the number of backups retained via the native backup scheduler.
Despite VMware’s stride to push for the adoption of vCenter Server Appliance (vCSA) instead of its Windows-based twin, the latter is still an integral part of vSphere 6.5. In this short how-to post, I’ll guide you through the steps required to install the latest incarnation of vCenter. To keep matters simple, I went for an embedded Platform Services Controller and PostgreSQL database solution. This setup will suffice for most SMBs out there. Broadly speaking, most SMB VMware based environment will fall under the Tiny or Small categories as per VMware’s literature.
The table shows the different types of environments, their respective capacity in terms of the number of ESXi hosts and deployed VMs and the compute resources that need to be allocated to vCenter Server.
| Type | ESXi Hosts | VMs | VC RAM (GB) | VC CPUs |
| Tiny | 10 | 100 | 10 | 2 |
| Small | 100 | 1000 | 16 | 4 |
| Medium | 400 | 4000 | 24 | 8 |
| Large | 1000 | 10000 | 32 | 16 |
| X-Large | 2000 | 35,0000 | 48 | 24 |
Note: vCenter Server for Windows 6.5 runs on Windows Server 2008 SP2 or better. As per earlier versions, installing vCenter on an Active Directory Domain Controller IS NOT supported.
A complete list of requirements is available on the VMware vSphere 6.5 documentation site.
[thrive_leads id=’18673′]
Getting on with the installation
Step 1: Prepare a VM or physical server. The specifications should reflect the environment you expect to be managing. Remember to allocate at least 10GB of RAM, 2 CPUs and 17GB of disk space over and above what’s required for the Windows OS and other installed software. Also keep in mind that in time, the vCenter database will grow in size, so factor in this as well when allocating disk capacity.
Step 2: Decide on a hostname for vCenter (ex. vcw65). Create the corresponding A and PTR records on a DNS server and make sure that the records resolve correctly.
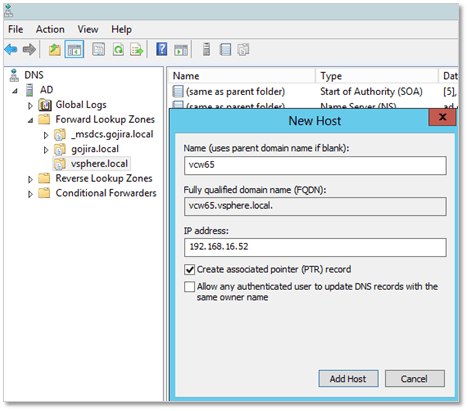
Figure 1 – Creating the DNS records for the vCenter Server for Windows instance
Step 3: Install Windows Server as you would normally do. After the install, apply all pending updates and patches.
Step 4: Make sure the Windows computer name matches the vCenter hostname i.e. vcw65. Reboot the server.
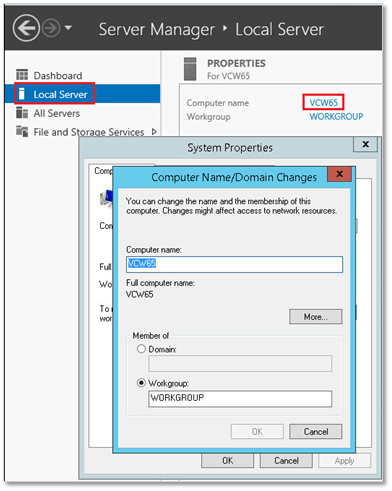
Figure 2 – Setting the vCenter Server Windows computer name
Step 5: Download the latest vCenter Server 6.5 ISO from my.vmware.com.
Step 6: When deploying vCenter to a VM, you can mount the ISO image as a DVD drive directly from a datastore or from local disk. If a physical machine is used instead, you can copy the ISO image to a folder on the Windows server and then mount it as a drive from the OS itself; right-click on the file and mount!
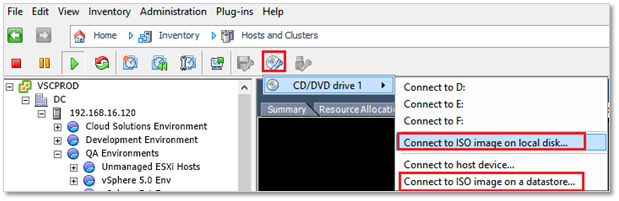
Figure 3 – Mount the ISO image on a VM from a local disk
Step 7: Login as administrator on the Windows box.
Step 8: Double-click on the DVD drive just mounted. This launches the VMware vCenter Installer.
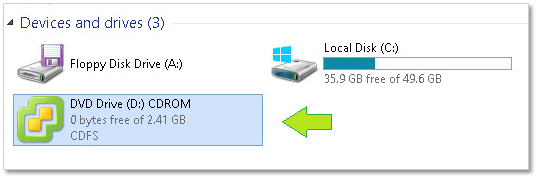
Figure 4 – The mounted ISO image in Windows Explorer
Step 9: From here on, the installer takes you through a series of screens and options, most of which are self-explanatory. Regardless, I listed the whole lot in a sequential order each accompanied by a brief note as follows.
The process is 100% identical to installing vCenter Server 6.0 for Windows as described in my somewhat old post How to set up a nested vSphere 6 nested environment. So really, very little has changed from an installation perspective. Under the hood, however, there have been some changes as explained here.
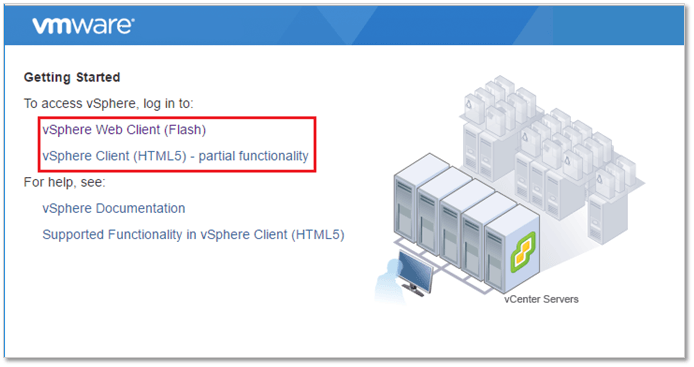
Figure 5 – The vCenter Server web landing page
Conclusion
Installing vCenter Server 6.5 for Windows is pretty straightforward provided you prepare the groundwork first. Compared to earlier versions, very little has changed except that vCenter is now a little bit more resource hungry. The thick (C#) vSphere client is, officially, no longer supported. This means that getting used to the vSphere Web client (or HTML5 client) is no longer optional.
I would also have loved to see the Web client laid to rest once and for all but since its new HTML5 alternative is still not up to par, I guess we will all have to wait until vSphere 7 is released!
UPDATE: vSphere 6.5 U1 has recently been released. It brings the HMTL5 client almost up to par with the vSphere Web client in terms of functionality. Read about it here.
[the_ad id=”4738″]
Free Download VMware vCenter Server for Windows PC is Simplified and Efficient Server Management Software. It is famous for Centralized visibility, simplified and efficient management at scale, and extensibility across the hybrid cloud—all from a single console.
VMware vCenter Server Overview
Quickly deploy VMware vCenter Server and manage vSphere using a Linux-based virtual appliance. Existing Windows vCenter Server deployments feature a single-step migration and upgrade tool. Deliver complete lifecycle management for your virtual infrastructure using vCenter Server.
VMware vCenter Server provides a centralized platform for managing your VMware vSphere environments, allowing you to confidently automate and deliver a virtual infrastructure across the hybrid cloud.
The VMware vCenter Server platform is the industry’s most robust virtualization management solution. Advanced capabilities provide your virtual environment’s greatest visibility, proactive management, and scalability. vCenter Server is a foundation you can easily extend for end-to-end integration with your physical environment and upon which you can build a private cloud infrastructure.
The HTML 5-based vSphere Client lets you manage the essential functions of vSphere from any browser, offering more responsiveness and usability than ever before. Assign users to custom roles, search vCenter inventory, or provision new virtual machines at the click of a button. Gain the visibility and control needed for your virtual machines, hosts, and datastores.
Back up your vCenter Appliance to file via industry-standard protocols while vCenter is still up and running. Restore by pointing a fresh appliance to the backup location, and files will be downloaded to the new vCenter Server Appliance. No third-party products are required.
Features of program
- Simple Deployment and Administration
- Native vCenter Server Backup and Restore
- Centralized Control and Visibility
- Native vCenter Server Backup Scheduler
- Scalable and Extensible Across Hybrid Cloud
- Plug-in Extensibility
- Native vCenter Server High Availability
- Native vCenter Server Backup Scheduler
Previous version
File Name:VMWARE VCENTER Server 7.0.0b Build 16386292 (x64)
Version:7.0.0b
File Name:VMware vCenter Server v6.5U1g
Version:6.5
File Name:VMware vCenter Server 6.0
Version:6.0
Comments
Install VMware vCenter Server 6.7 for Windows, VMware vCenter Server is a windows materiality that comports datacenter brings admission to control, performance monitoring, and configuration, and unifies resources from individual servers to be shared among virtual machines within the entire datacenter. we will manage all our vSphere products like ESXi and Virtual Machines. vCenter is that the windows application which is provided by VMware which may only be utilized in the windows servers. vSphere Installation and Setup is meant for knowledgeable administrators who want to put in and Configure vCenter Server and deploy and configure the vCenter Server Appliance.
Hardware Requirements Click vCenter 6.7 Hardware Requirements
Storage Requirements Click vCenter 6.7 Storage Requirments
Software Requirements Click vCenter Software Requirments
Database Requirements Click vCenter Database Requirments
Install vCenter Server 6.7 for Windows
Download the VMware vCenter Server 6.7 and Modules for Windows Download VMware vCenter Server 6.7
1- After downloading the vCenter Server ISO file, Mount your VMware vCenter Server 6.7 ISO and then double click on autorun.exe to start the installation.

2- The VMware vCenter Installer Windows will open, Select vCenter Server for Windows and then click on the Install button.
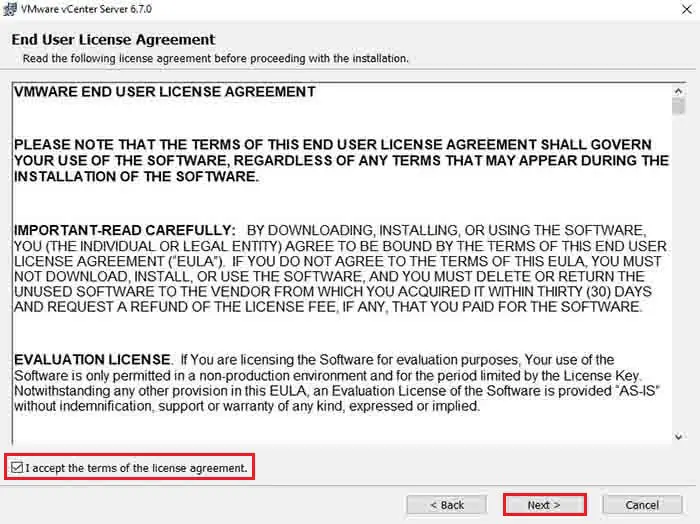
3- Welcome to the VMware vCenter Server 6.7 Installer, so click next.
3- Select I accept the end-user license agreement and then click on Next.
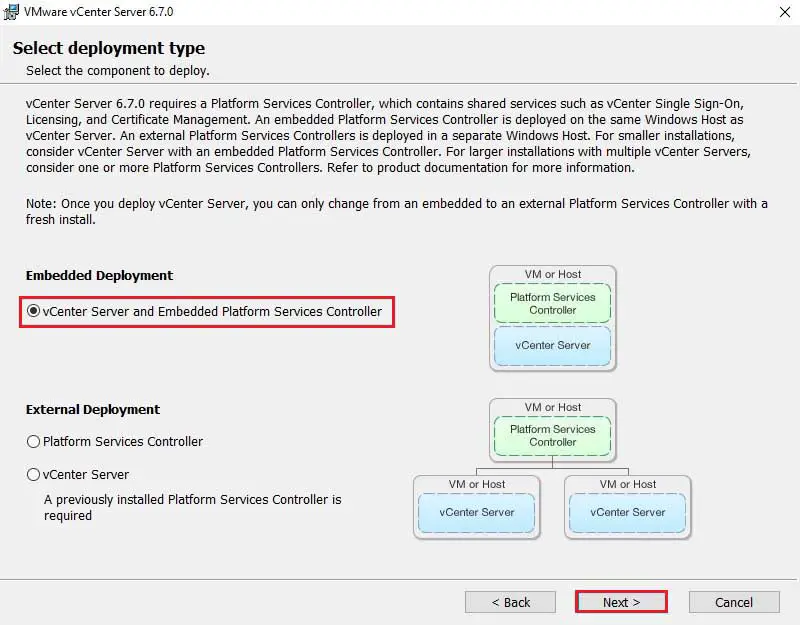
4- Now Under deployment type, Select the vCenter Server and Embedded platform services controller and then click on Next.
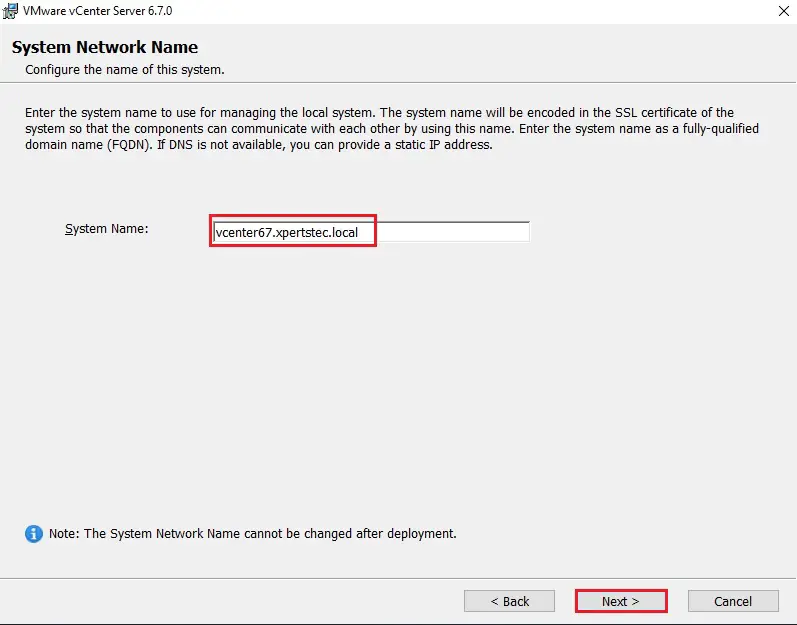
5- Type your fully qualified domain name in the System Name field and then click on Next.
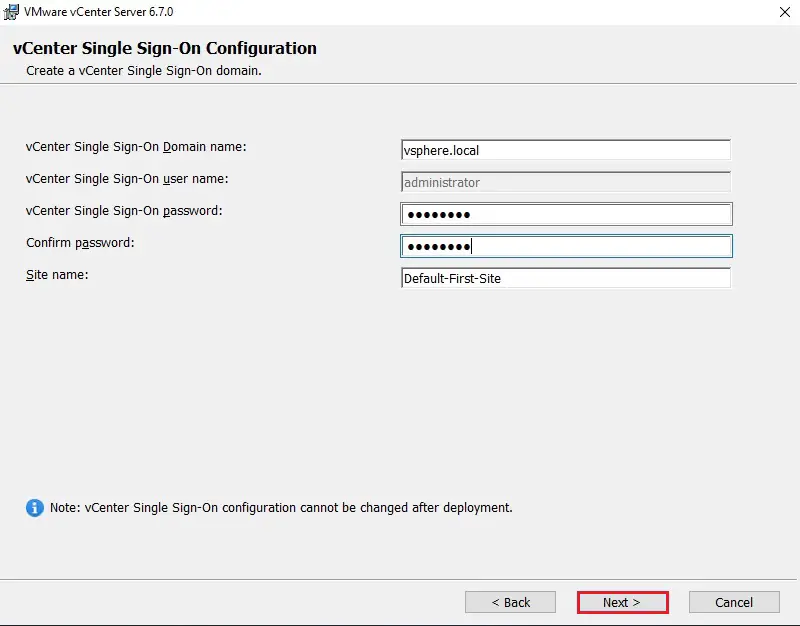
6- vCenter Single Sign-On configuration, Now Leaves it as the default vsphere.local (not the same as your Active Directory name). Type your password for the SSO administrator account and then click on Next.
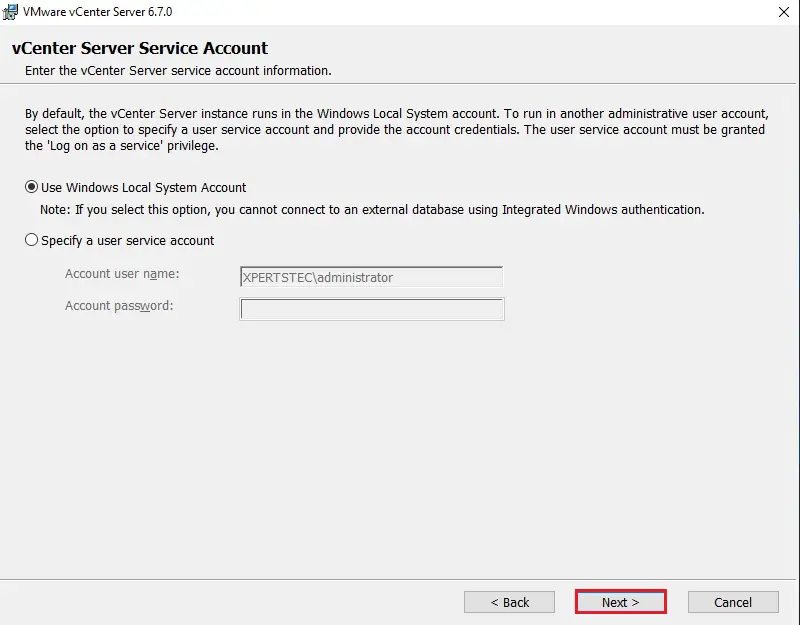
vCenter Server Service Account
7- vCenter Server Service Account, select use Windows local system account and then click on Next.
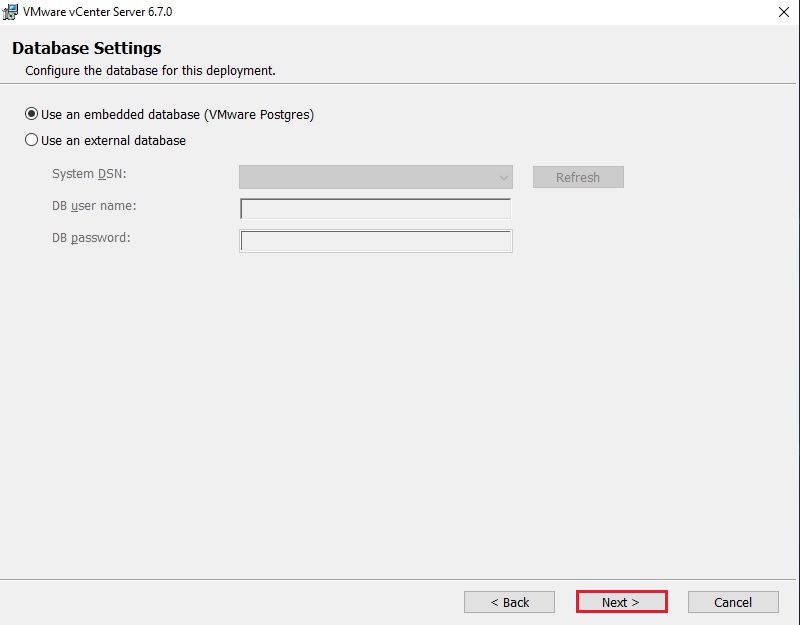
8- Select the use of an embedded database (VMware Postgres) and then click on Next.
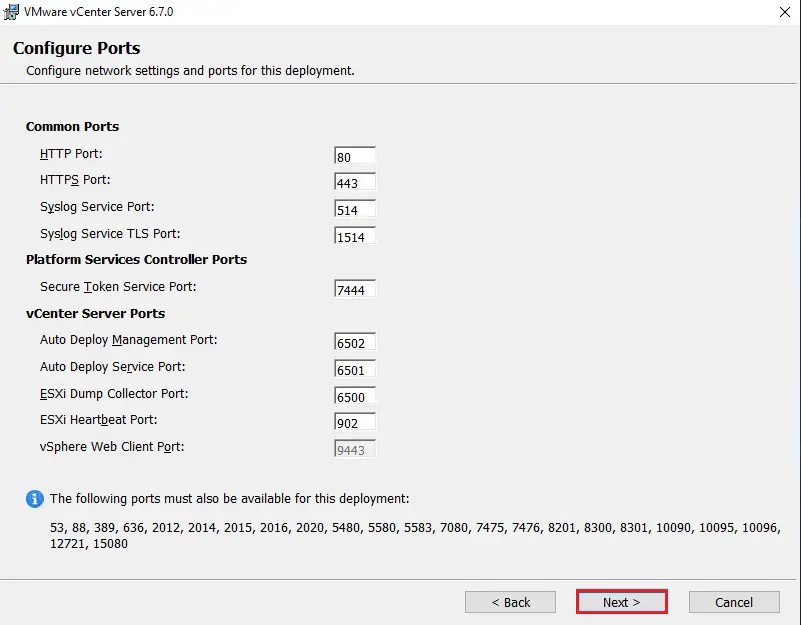
9- Leave the default port configuration and then click on Next.
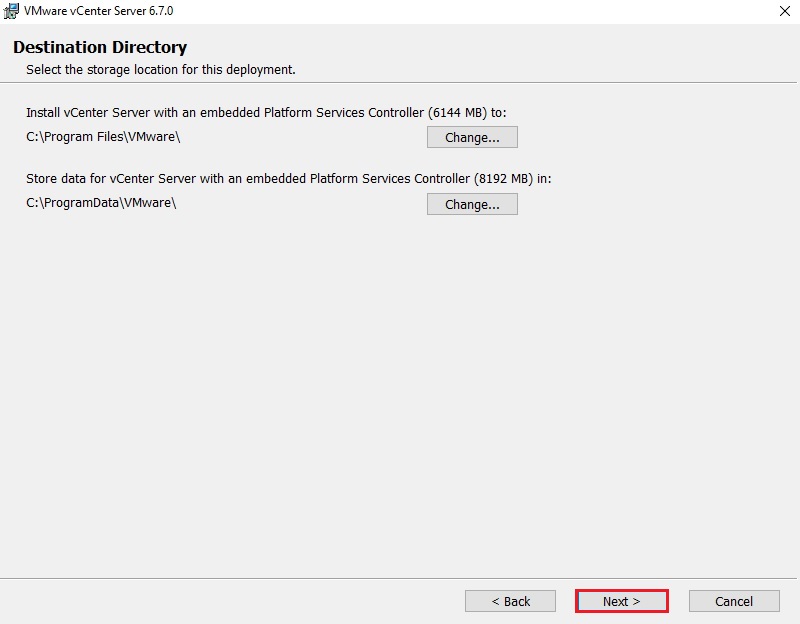
10- Select the destination directory where you want to install vCenter services and then click on Next.
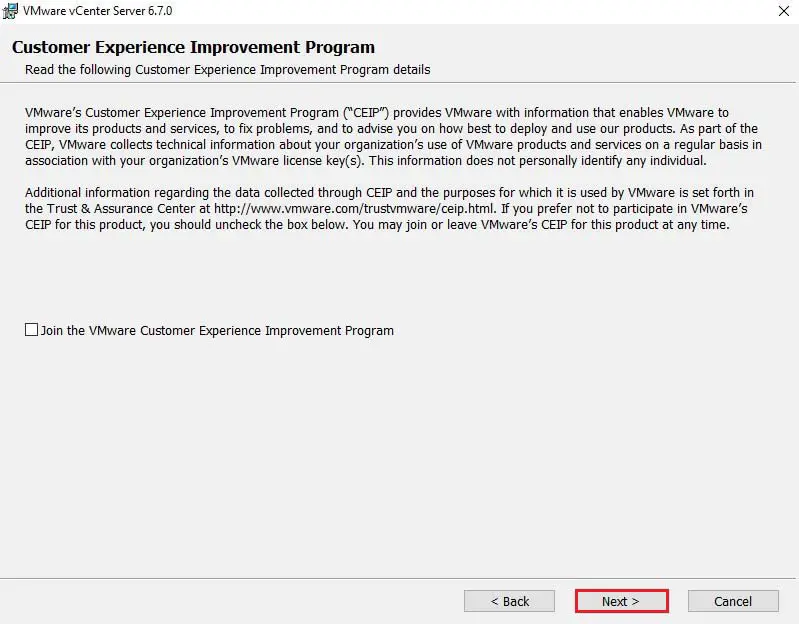
11- Now check or uncheck the VMware Customer Experience Improvement Program and then click on Next.
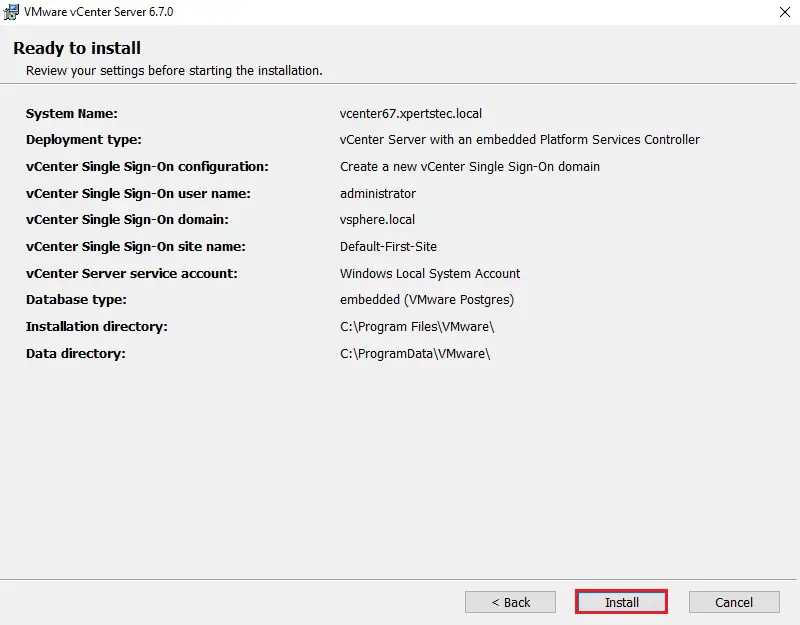
12- Review the VMware vCenter Server configuration and then click the Install button to start the installation process.
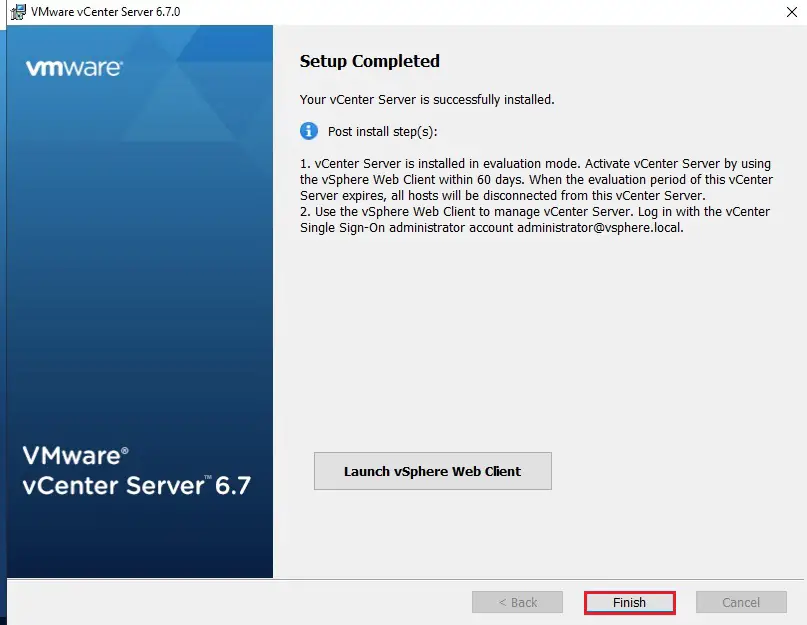
13- Your vCenter Server is successfully installed, so click on Finish.
VMware vCenter Server Post-Installation
14- Open your browser and type your vCenter IP address or FQDN. Now Connect your vSphere vCenter Server by clicking on Launch vSphere Client (HTML5) or Launch vSphere Web Client (FLEX).
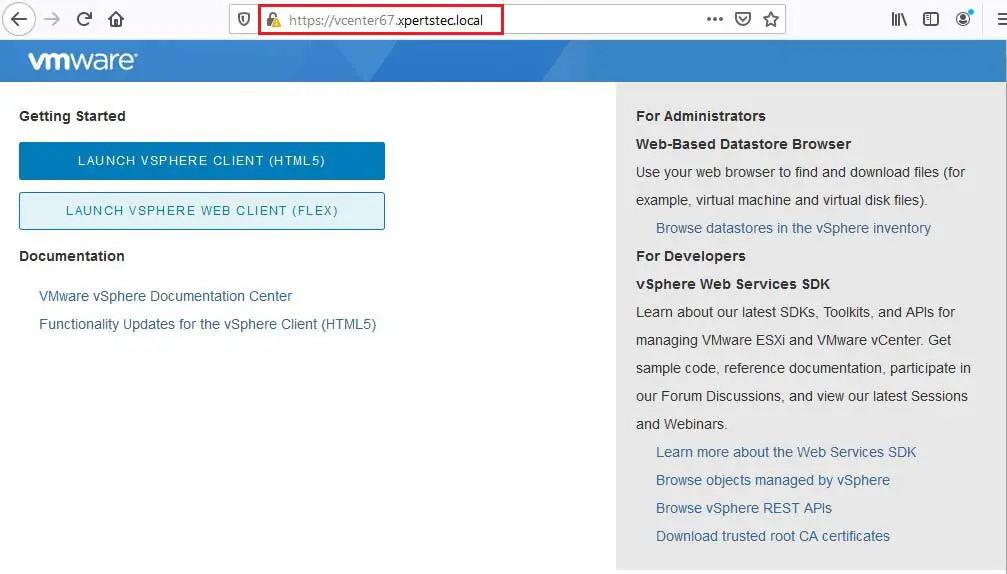
15- VMware vCenter Server 6.7 login with 60 days trial period.
Jamil Parvezhttps://www.xpertstec.com
Jamil Pervez works as a Network Administrator, based in Kuwait with a Primary focus on Microsoft technologies. Microsoft Certified MCSE, MCTP, MCITP, CCNP, CCIP, CCVP with 20 years of experience in administering Windows Servers, Exchange, VMWare, Veeam B&R, Veritas BackupExec.