Important notice! The VMWare tools provided here will work on x86 or x64 version of Windows 7, but provided windows update files are for x64 only! If you need them for x86 it’s your goal to find them.
VMware Tools 11.3.5 for Windows 7 x64 with 2 necessary updates!
Without installing the updates, this tools won’t work!!!
Install windows 7 x64 first
Load «vmware_tools_w7_x64.iso» to your vm
Install «windows6.1-kb4474419» update first, then reboot.
Install «windows6.1-kb4490628» then reboot.
Now you can install tools from «VMware-tools-windows-11.3.5» folder.
Congratulations! Now you are using the latest VMware tools supported by your Windows 7 x64 instance, i haven’t seen much advantages over VMware tools 9 that everyone is using, but whatever, the latest and greatest.
comment
Reviews
Reviewer:
Yarpopcat08
—
favoritefavoritefavoritefavoritefavorite —
August 31, 2023
Subject:
Works very good!
It works well on my VM, thankyou! Also it’s nice that You included the needed updates and instructions, special thanks for that!
Reviewer:
ItsIgnacioPortal
—
favoritefavoritefavoritefavoritefavorite —
August 17, 2023
Subject:
It just works 
Thanks for the instructions too
As of 12/11/2020, VMware no longer signs Tools for Windows Vista with SHA-1, so you need Windows 7 SP1 or later to use the latest version.
However, you can use an older version of VMware Tools, which is here: https://media.githubusercontent.com/media/thepwrtank18/thepwrtank18/master/VMware%20Tools%20for%20Windows%207%20RTM%20and%20Vista.iso
Link is dead. Instead, here’s a full on guide.
Step 0: Foreword
This is an unsupported operating system, with unsupported drivers. Use this at your own risk.
Step 1: Preparation
You will need:
- Either a:
- x64 Windows Vista ISO
- x64 Windows Vista Disc + Reader
- VMware Workstation (Pro or Player) 15.x, or Pro 16.x and higher.
- An old version of the VMware Tools ISO (10.3.5 to be precise), from here
Step 2: Creation
Note: Do not let VMware scan your ISO or disc, Easy Install may use the wrong version of Windows, whether a wrong edition or architecture.
Make a VM. If you have Pro or Player 15.x, do what you normally do. If you have Pro 16.x, make sure compatibility is set to Workstation 15.x (in Custom settings). After that, customize the settings you want. (Player does not support custom settings, so you either need to get 15.x, which is what you need anyway, or Pro 16.x and higher.)
Step 3: Modification
Make sure you have your ISO or disc selected in the VM options. If there’s a floppy disc or extra DVD drive with «autoinst» or the like on it, remove that drive.
Step 4: Installation
Install as usual. When it tells you to create a user profile, don’t do that for now. Go to the VM settings, then put in the VMware Tools ISO you got earlier. Don’t install VMware Tools via VM>Install VMware Tools. After that, press Shift+F10 in the VM. Put in D:\setup64.exe.
Step 5: Initialization
Do the VMware Tools installation as usual. When it says if it wants to restart the machine, say «Yes», then go to VM>Power>Reset. When it reboots, do the setup as normal. Let it monitor your computer’s performance, as drivers are installed.
In this article, we will build VMware Tools on Win 7 running on VMware Workstation virtual machine.
How to Setup VMware Tools on Windows 7
First, install Windows 7 on your Windows or Linux computer with VM Workstation, and then follow the steps in this article to install Guest Tools on your VM.
After installing a Windows virtual machine using the VMware software on Windows and Linux operating systems, the first thing you should do is install VMware Tools.
VMware Tools provides a variety of functionality for virtual computers. For example, the following are the changes that will occur on the VM after installing VMware Tools on Microsoft Win7;
- Guest machine graphics performance will increase.
- You will be able to share files between the host and the Guest machine.
- You will be able to copy and paste between host and Guest machine.
- The time between the host and the Gues will be synchronized.
- A better mouse function between guest and host.
How to Build VMware Tools on Guest Machine
Virtual machine software are not installed automatically when installing a Windows 7 system on a VMware Guest machine. Therefore, you will need to setup VMware Guest software manually.
Follow the stages below to setup guest sofware on Microsoft Win7.
Step 1
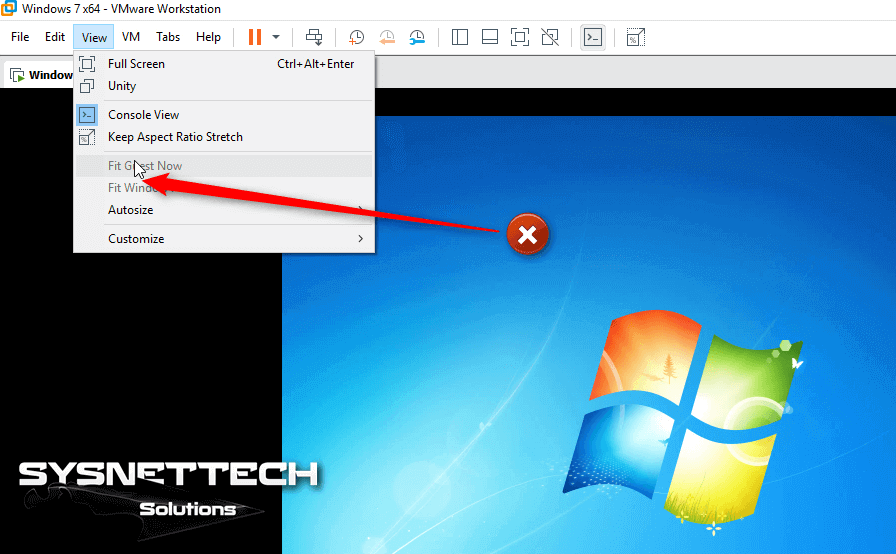
When you review the image below, you can understand if the VM program installed on the Windows 7 machine did not change the screen resolution.
Step 2
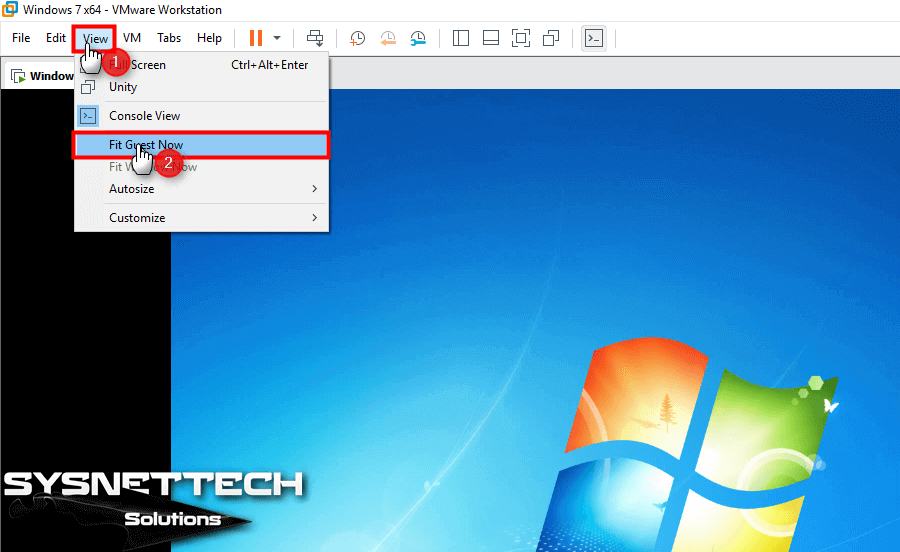
To automatically fix the screen resolution of the VM, you must click View / Fit Guest Now. However, this option is disabled because the Guest Tools is not installed.
Step 3
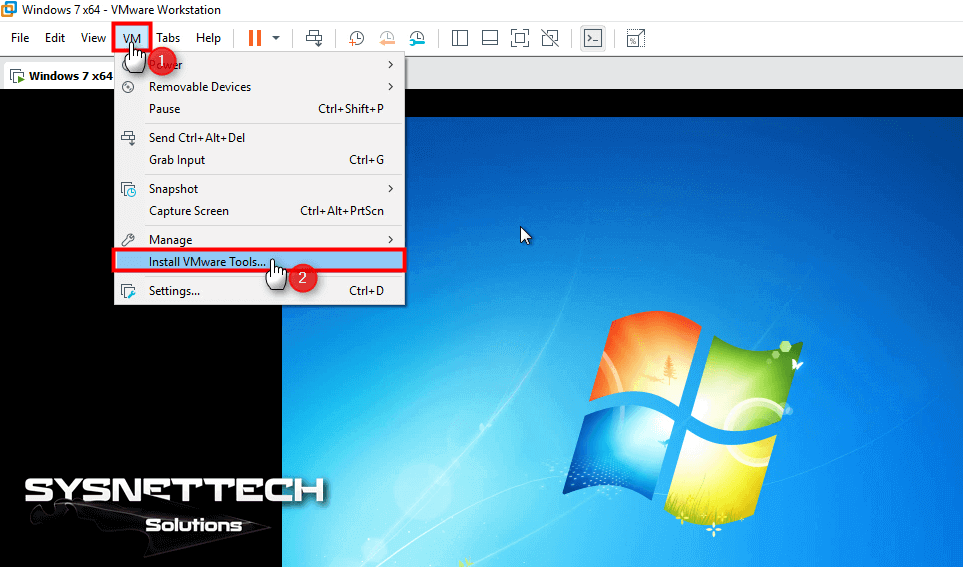
To setup Guest Tools in Win 7, click VM / Install VM Tools.
Step 4
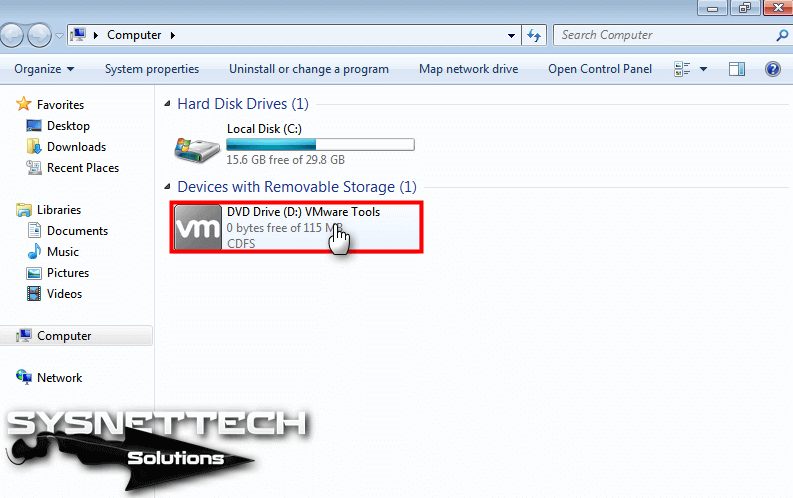
When the VM Tools image is automatically mounted on the system, open My Computer and double-click the drive to start the setup.
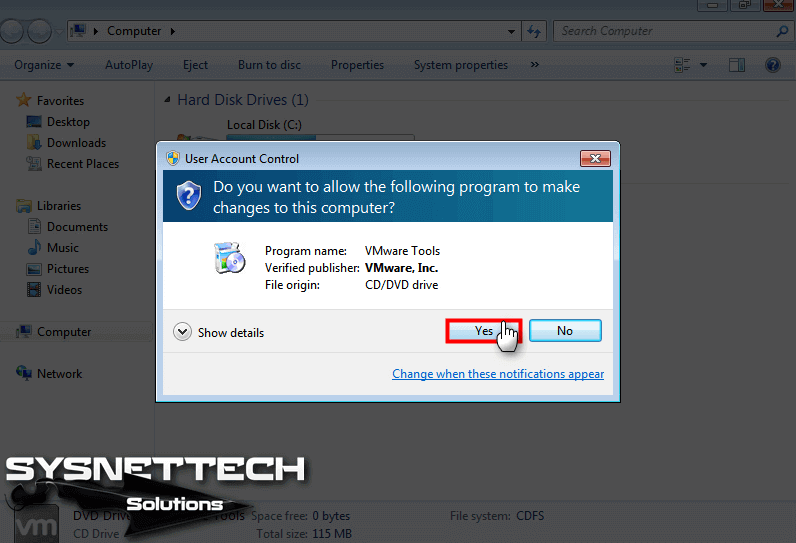
Step 5
Click Yes to continue the operation in the User Account Control window.
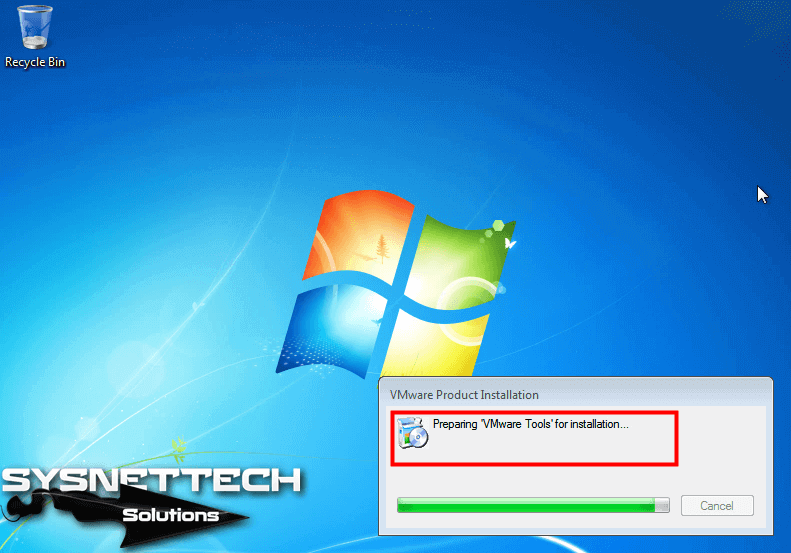
Step 6
VM tools installation is starting …
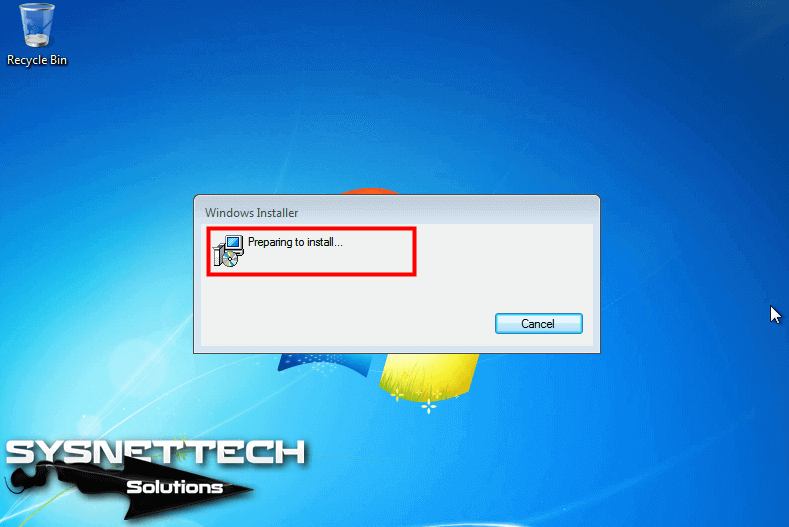
Step 7
Preparing the installation …
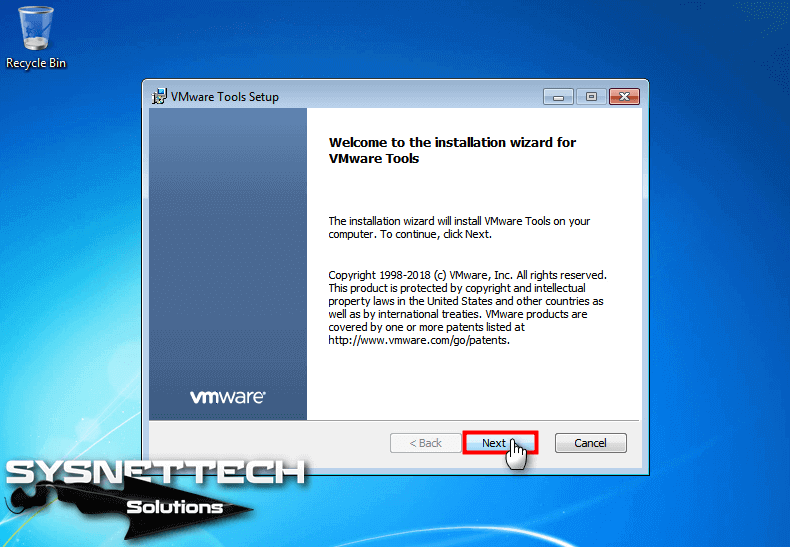
Step 8
In the VM Tools Setup window, click Next.
Step 9
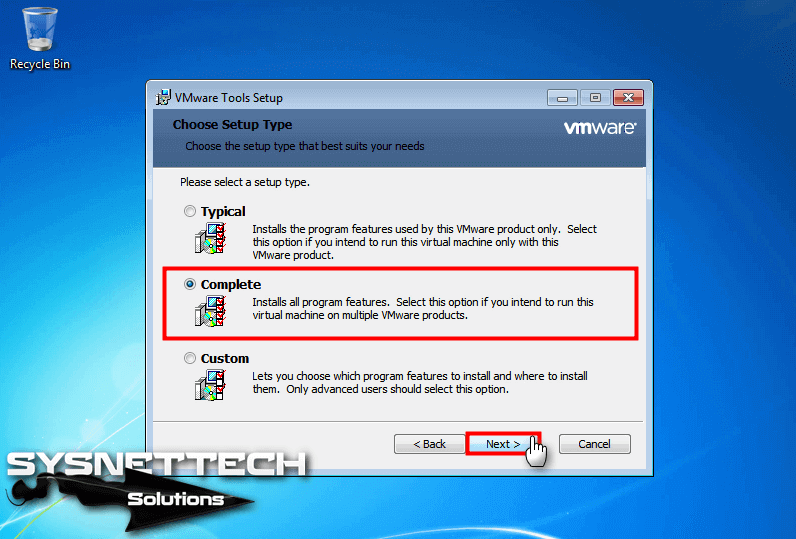
When installing VM program on a Windows Guest, select Complete. If you install all of the VM Tools, it means that you can run this VM on different VMware platforms in the future.
After selecting Complete, click Next to continue.
Step 10
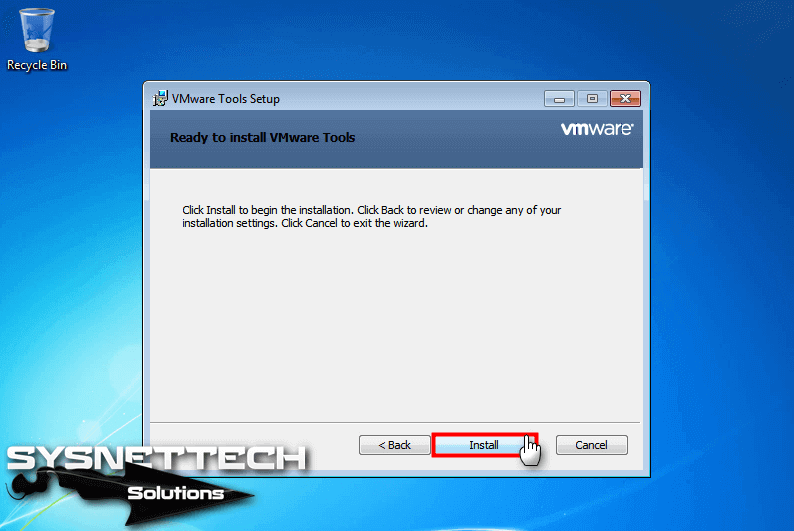
When VM software is ready for setup, click Install.
Step 11
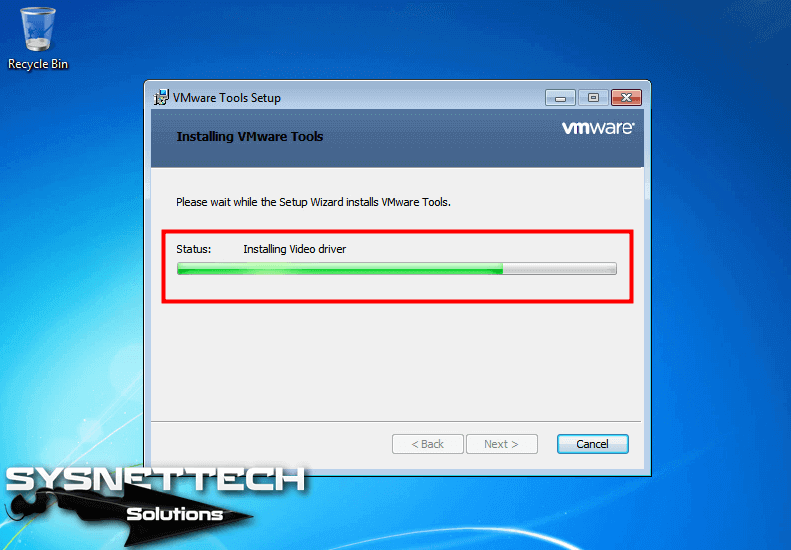
Wait while setting up VM software on a Win7 operating system.
Step 12
After the VM software installation is completed on the VM, click Finish.
Step 13
Restart your virtual computer for the changes to take effect. To do this, you can click Yes in the following window.
Step 14
When the Windows 7 virtual machine restarts, click on View / Fit Guest Now.
Step 15
As soon as you click Fit Guest Now, the screen resolution of the virtual machine will be changed as shown in the image below.
Step 16
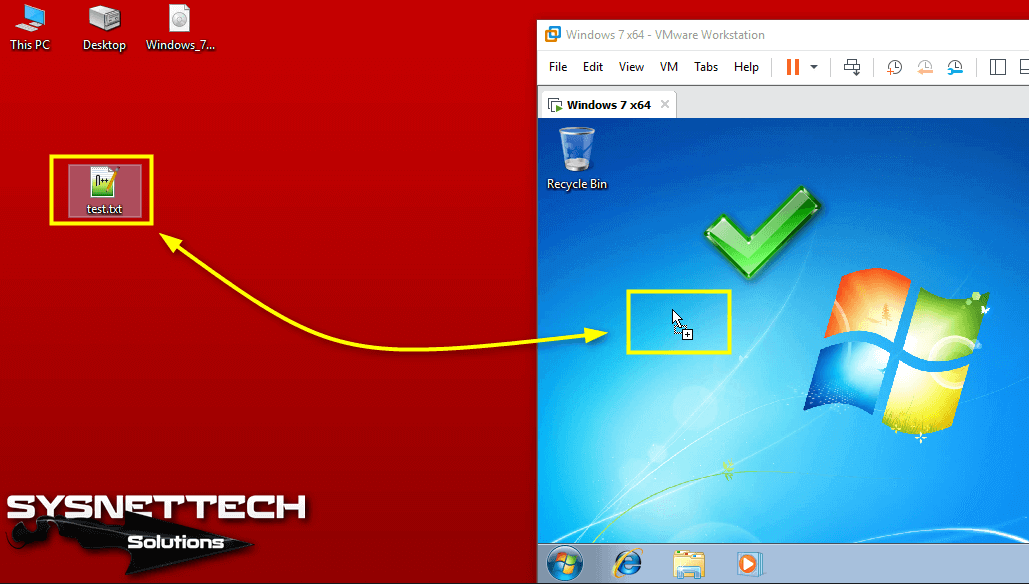
You can now transfer files between your physical computer and the virtual machine!
How to Setup Guest Software on Win 7 VM ⇒ Video
You can watch the video below to setup VM Tools step by step on a Guest virtual machine running on VMware Workstation, and you can also subscribe to our YouTube channel to support us!
Final Word
In this article, we have examined how to install VM Tools on Windows 7 operating system step by step. Installing VMware Tools on Win Guest machines is very important because it is useful for performance. Thanks for following us!
Related Articles
♦ What is VM Workstation?
♦ What is VMware Fusion?
♦ Download VMware Unlocker
♦ How to Increase HDD Space in VM Workstation
♦ How to Install VM Tools in Ubuntu
TolgaBagci
Hello, I’m Tolga! I am a computer specialist who has been specializing in computer technologies for about 20 years. I provide solutions to problems encountered in many areas such as hardware, system, network, virtualization, server systems, and operating systems, and create relevant content on my website by explaining how to solve these problems. My goal is to be a reliable source of expert, quality, and trustworthy solutions for your computer problems. By following innovations and using the latest technologies, I aim to be successful in my job and provide you with the best service. Don’t hesitate to contact me for any questions or curiosity about technology. Have a nice day, stay up to date 
В материале мы рассказали о ключевых особенностях VMware Tools, а также дали пошаговую инструкцию для установки VMware Tools на виртуальную машину с Windows или Linux.
Введение
VMware Tools представляет собой специализированный набор программ, который устанавливается и используется на виртуальных машинах (ВМ). Он играет важную роль в эффективном взаимодействии ВМ с физическим сервером, который дает ресурсы для ее работы. VMware Tools способствует тому, чтобы операционная система (ОС) виртуальной машины была более управляемой и производительной.
Особенности VMware Tools
Вот несколько основных примеров функций VMware Tools:
- Ускорение графики виртуальной машины.
VMware Tools устанавливают драйверы, которые позволяют использовать ускоренную 3D-графику на виртуальных машинах. Это повышает качество графики. - Управление устройствами.
VMware Tools устанавливают драйверы для устройств, которые используются в виртуальных машинах. Например, клавиатура, мышь и сетевые адаптеры. С помощью установки драйвера получится лучше управлять устройствами и оптимизирует их использование. - Автоматическая настройка размеров экрана.
VMware Tools автоматически меняют размеры экрана виртуальной машины, подстраивая их под текущие настройки хост-машины. - Интеграция между гостевой и хост-системой.
VMware Tools позволяют выполнять различные операции: копирование и перенос данных между виртуальной машиной и хост-системой, обмен файлами и т. д. - Клонирование и резервное копирование виртуальных машин.
VMware Tools позволяют клонировать виртуальные машины и создавать их резервные копии. Обычно это происходит таким образом: VMware Tools запускает процесс создания VSS snapshot внутри вашей гостевой ОС. Для этого используется VMware Snapshot Provider. В этот момент все VSS writers в гостевой операционной системе готовят нужные приложения к копированию и также записывают все данные из памяти на диск. По завершении своей работы, VSS writers передает службе VMware Tools информацию о том, что можно снимать снапшот. Все это происходит через VMware Snapshot Provider. Данная служба передает VMware о готовности снять снимок. Это позволяет легко делать снапшоты ВМ.
В состав VMware Tools включены следующие драйверы:
- VMware SVGA. Поддерживает ускоренную графику для виртуальных машин.
- VMware vShield. Обеспечивает безопасное соединение и защиту трафика при работе в сети.
- VMware VMXNET. Обеспечивает оптимизацию работы сетевых адаптеров в виртуальной машине.
- VMware Tools для клавиатуры и мыши. Позволяет лучше управлять этими устройствами в виртуальной машине.
- VMware Paravirtual SCSI. Позволяет увеличить производительность работы дисков на уровне I/O запросов.
Установка VMware Tools на виртуальную машину с Windows
Шаг 1: Выберите вашу виртуальную машину из списка Inventory (меню в левой верхней части экрана).
Шаг 2: А затем перейдите в меню Actions → Guest OS → Install VMware Tools.
Шаг 3: Подтвердите монтирование образа диска. Благодаря этому, вы сможете подключить к вашей виртуальной машине ISO-образ с необходимыми установочными файлами.
Шаг 4: Войдите в операционную систему Windows. Сделать это можно через консоль самой VMware или при помощи RDP.
Шаг 5. Запустите File Explorer, затем перейдите в This PC. Среди подключенных дисков, собранных в единый список, выберите VMware Tools и кликните по нему два раза (это запустит установщик).
Шаг 6. Для завершения установки потребуется сделать перезагрузку виртуальной машины.
Шаг 7: После того, как установка закончится, отключите диск с VMware Tools от виртуальной машины. Сделать это можно в меню Actions → Guest OS → Unmount VMware Tools.
Особенности пакета Open VM Tools
Open VM Tools (open-vm-tools) — это реализация VMware Tools с открытым исходным кодом. Пакет подходит для гостевых ОС Linux. Open-vm-tools поставляется в комплекте с некоторыми операционными системами Linux и обычно устанавливается вместе с ОС. Благодаря этому вам не нужно самостоятельно устанавливать этот пакет в операционную систему.
Все ведущие поставщики Linux поддерживают набор open-vm-tools для vSphere, Workstation и Fusion и объединяют open-vm-tools со своими выпусками продуктов. Проверить, совместима ли ваша ОС с пакетом open-vm-tools, можно в Руководстве по совместимости с VMware.
Операционные системы, в которых есть встроенный пакет с дистрибутивом open-vm-tools:
- Red Hat Enterprise Linux 7.0 и более поздние версии,
- SUSE Linux Enterprise 12 и более поздние версии,
- Ubuntu 14.04 и более поздние версии,
- CentOS 7 и более поздние версии,
- Oracle Linux 7 и более поздние версии,
- FreeBSD 10.3, 10.4 & 11.1,
- Fedora 19 и более поздние версии,
- Debian 7.x и более поздние версии,
- openSUSE 11.x и более поздние версии.
Для более эффективного управления гостевыми операционными системами набор open-vm-tools включает следующие пакеты:
- Core open-vm-tools package.
Он содержит основные утилиты open-vm-tools, прикладные программы и библиотеки, включая vmtoolsd, которые помогают эффективно взаимодействовать хосту с виртуальными машинами. Этот пакет включает такие функции как синхронизация часов гостевых ОС с платформой виртуализации, передача файлов между сервером и виртуальными машинами, отправка информации о состоянии гостевых ОС в vSphere для поддержки vSphere High Availability (HA), публикация информации об используемых ресурсах и сетевой информации гостевых ОС в платформу виртуализации и т. д. - Open-vm-tools-desktop package.
Можно подключить в зависимости от необходимости, так как пакет является опциональным и включает дополнительные пользовательские программы и библиотеки для улучшения интерактивной функциональности рабочих столов виртуальных машин. Пакет позволяет изменять размер дисплея в соответствии с окном консоли хоста или окном удаленной консоли VMware vSphere. Он также позволяет копировать и вставлять данные между хостовой и гостевой ОС. - Open-vm-tools-devel package.
Содержит библиотеки и всю необходимую дополнительную документацию, которая используется при разработке плагинов и приложений vmtoolsd. - Open-vm-tools-debuginfo package.
Содержит исходный код open-vm-tools и двоичные файлы. Последнюю копию исходного кода Open VM Tools можно найти на GitHub.
Методы установки Open VM Tools на Linux
Чтобы установить пакет open-vm-tools на Linux, нужно ввести такую команду в командной строке и нажать Enter:
# sudo apt install open-vm-toolsДля установки open-vm-tools на RPM based дистрибутивы, нужно выполнить команду:
# yum -y install open-vm-toolsХотим обратить ваше внимание на тот факт, что способ установки и удаления VMware Tools через ISO может быть не самым эффективным.
Во-первых, это требует вмешательства пользователя в каждую отдельную виртуальную машину — никакой возможности автозагрузки не предусмотрено. Это может быть весьма трудоемким при большом количестве ВМ.
Во-вторых, обновление и управление этими инструментами может быть затруднено, так как каждая виртуальная машина должна будет обновляться вручную.
В-третьих, при обновлении гипервизора, необходимо еще раз устанавливать все эти инструменты заново.
Для операционных систем на базе Linux команда VMware рекомендует использовать пакет open-vm-tools.
Заключение
В данном материале мы рассмотрели особенности VMware Tools для Windows и Open VM Tools для Linux. Также рассказали, как их установить на ВМ с соответствующими операционными системами. Надеемся, что этот материал поможет вам в работе с VMware Tools.

Join the Chocolatey Team on our regular monthly stream where we discuss all things Community, what we do, how you can get involved and answer your Chocolatey questions.

Join the Chocolatey Team on our regular monthly stream where we put a spotlight on the most recent Chocolatey product releases. You’ll have a chance to have your questions answered in a live Ask Me Anything format.

Livestream from
Thursday, 06 October 2022
We recently released our largest update to Chocolatey Central Management so far. Join Gary and Steph to find out more about Chocolatey Central Management and the new features and fixes we’ve added to this release.
Watch On-Demand

Webinar Replay from
Wednesday, 30 March 2022
At Chocolatey Software we strive for simple, and teaching others. Let us teach you just how simple it could be to keep your 3rd party applications updated across your devices, all with Intune!
Watch On-Demand

Livestream from
Thursday, 9 June 2022
Join James and Josh to show you how you can get the Chocolatey For Business recommended infrastructure and workflow, created, in Azure, in around 20 minutes.
Watch On-Demand

Livestream from
Thursday, 04 August 2022
Join Paul and Gary to hear more about the plans for the Chocolatey CLI in the not so distant future. We’ll talk about some cool new features, long term asks from Customers and Community and how you can get involved!
Watch On-Demand

Livestreams from
October 2022
For Hacktoberfest, Chocolatey ran a livestream every Tuesday! Re-watch Cory, James, Gary, and Rain as they share knowledge on how to contribute to open-source projects such as Chocolatey CLI.
Watch On-Demand

Livestream from
Thursday, 03 November 2022
Join Paul and Gary for this months Chocolatey product livestream where we look at the latest release of Chocolatey 1.2.0, Chocolatey Licensed Extension 5.0.0 and shine a spotlight on the new hook scripts functionality. This opens up so many possibilities for Chocolatey CLI users!
Watch On-Demand

Livestream from
Tuesday, 29 November 2022
Join Josh as he adds the ability to manage Chocolatey GUI config and features with the Chocolatey Ansible Collection.
Watch On-Demand

Webinar from
Tuesday, 13 December 2022
Join Gary, Paul, and Maurice as they introduce and demonstrate how to use Chocolatey! Questions will be answered live in an Ask Me Anything format.
Watch On-Demand
