![]() VMware server is the free virtualization product from the VMware Inc. This how to is only for the installation of VMware server 2.0 on the windows platform. You can download it from the website. it require registration for downloading and also for getting the license key.
VMware server is the free virtualization product from the VMware Inc. This how to is only for the installation of VMware server 2.0 on the windows platform. You can download it from the website. it require registration for downloading and also for getting the license key.
if you like know more about the VMware server go HERE. Before starting to install the VMware Server you need to have the machine with the proper requirement.
The requirement of the VMware server:
You can install the VMware Server software on a Windows or Linux server. You can store virtual machines on the server host or locate them on a network share.
- Standard x86‐compatible or x86‐64‐compatible server with up to 16 processors.Hosts with 32‐bit IA‐32 processors and IA‐32 processors with 64‐bit extensions are supported.
- 733MHz or faster CPU minimum.
- Minimum of 512MB of memory (2GB is recommended). The total amount of memory you can assign to all virtual machines running on a single host is limited only by the amount of memory on the host computer.
- IDE and SCSI hard drives are supported.
- At least 1.7GB free disk space is required for basic installation. You can delete the installer afterwards to reclaim approximately 600MB disk space.
- IDE and SCSI optical drives are supported. CD‐ROM and DVD‐ROM drives are supported. ISO disk image files are supported.
- Any Ethernet controller supported by the host operating system.
Windows Host Operating System Requirements:
You must use a Windows server operating system. 64‐bit host computers can run the following operating systems for 64‐bit extended
systems:
- Windows Server 2008 x64 Standard Edition
- Windows Server 2008 x64 Enterprise Edition
- Windows Server 2003 x64 Standard Edition, SP1, SP2, R2
- Windows Server 2003 x64 Web Edition, SP1, SP2
- Windows Server 2003 x64 Enterprise Edition, SP1, SP2, R2
32‐bit host computers can run the following operating systems:
- Windows Server 2008 Standard Edition
- Windows Server 2008 Enterprise Edition
NOTE Operating systems and service packs that are not listed are not supported for use as a host operating system for VMware Server.
NOTE Windows 2008 Server Core installations are not supported.
NOTE Windows 2008 Server Core installations are not supported.
- Windows Server 2003 Standard Edition, SP1, SP2, R2
- Windows Server 2003 Web Edition, SP1, SP2
- Windows Server 2003 Enterprise Edition, SP1, SP2, R2
- Windows Small Business Server 2003 Standard Edition, R2
- Windows Small Business Server 2003 Premium Edition, R2
- Windows 2000 Server SP3, SP4
- Windows 2000 Advanced Server, SP3, SP4.
If your machine meets the above requirement you can start to install VMware server.
Installation VMware Server on Windows Host:
Step 1: Download the VMware Server 2.0 from the website. Execute it by double clicking on the VMware-server-2.0.2-203138.exe file. you will get the following extracting window.

Step 2: Click Next on the VMware Server installation wizard.

Step 3: Click Yes, I accept the terms in the license agreement, then click Next to continue.

Step 4: Click Next on the Destination folder window.

Step 5: Click Next on the Server Configuration information window, just wait look the configuration one time. In my case all virtual machines virtual hard disk and other storage files will kept in the “D:Virtual Machine” directory. Look into the HTTP and HTTPS ports, you have to access the VMware server using the web browser only.
Web URL will be like this http://192.168.0.10:8222 or https://192.168.0.10:8333. if your machine ip address is 192.168.0.10.

Step 6: Click Next on the Configure Shortcuts.

Step 7: Click Install on the window to start the installation of VMware Server 2.0

Now the VMware server installation in under progress.

Step 9: Type your name, company and Serial No that you got during the download of VMware Server, then Click Enter.

Step 10: Click Finish.

Step 11: Open you IE or Mozilla and Type the URL like http://192.168.0.10:8222 or https://192.168.0.10:8333. if your machine ip address is 192.168.0.10.

Step 12: Type the Login Name and Password to access the VMware Server. The User Name & password are the login credential of the server where the VMware Server is installed. and The following image shows the Main Page of Vmware Server 2.0

That’s all! Now the VMware server is ready to install the guest operating system on it.
VMware Server Version 2.0 | 19 AUG 2008 | Release Candidate Build 110949
Last Document Update: 26 AUG 2008
Check frequently for additions and updates to these release notes.
These release notes cover the following topics:
- What’s New
- Known Issues
What’s New
VMware Server 2.0 is a free virtualization product for Microsoft Windows
and Linux servers that enables you to provision new server capacity by
partitioning a physical server into multiple virtual machines.
For more detailed information about the features included in VMware Server 2.0, see the
VMware Server Users Guide. Review the Known Issues section for additional information.
New Key Features
- VI Web Access: VI Web Access enables you to perform host and virtual machine configuration on VMware Server 2.0. This intuitive web-based interface provides a simple and flexible tool for virtual machine management.
- VMware Remote Console: VMware Remote Console enables you to interact with the guest operating system on the host or a remote system. After you install it as a Web browser add-on, it can run independently from VI Web Access. VMware Remote Console also allows you to connect and disconnect client CD/DVD and floppy devices.
- USB 2.0 Device Support: VMware Server now supports faster data transfer with USB devices plugged into the host system. If the guest operating system has appropriate USB 2.0 device drivers, you can use peripherals that require high-speed performance, such as speakers, webcams, next-generation printers and scanners, and fast storage devices.
- Increased RAM support: The maximum amount of memory that can be allocated per virtual machine has been raised from 3.6GB to 8GB. The amount of memory used by all virtual machines combined is limited only by the amount of the host computer’s RAM.
- Improved 64-bit guest support: 64-bit guest operating systems that run on Intel EM64T VT-capable or AMD64 revision D or later processors are fully supported.
- Native 64-bit host support on Linux: VMware Server now runs natively on 64-bit Linux host operating systems.
- Quiesced backups of virtual machines: On Windows hosts, you can enable the VMware VSS Writer, which uses snapshots to maintain the data integrity of applications running inside the virtual machine when you take backups.
- VMCI Sockets interface: This feature provides a sockets interface for the Virtual Machine Communication Interface, which provides a faster means of communication among applications running on the host and in virtual machines. For more information, see the VMCI Sockets Programming Guide.
- Hot add and remove for SCSI hard disks: You can now add and remove SCSI virtual hard disks while the virtual machine is running in hardware version 7 virtual machines.
VMware APIs included with VMware Server
The VIX API (formerly known as the Programming API) allows you to write scripts and programs to automate virtual machine operations. The API is high-level, easy to use, and practical for both script writers and application programmers.
This release of the API is available in the C language. API functions allow you to register, power on or off virtual machines, and run programs in the guest operating systems. There are additional language bindings for Perl, COM, and shell scripts (vmrun). For more information, see the VMware VIX API 1.5 Release Notes.
Known Issues
The following are known issues with VMware Server 2.0.
- When attempting to install VMware Server on a Windows host, you might see the message Please verify the md5 hash value of this executable and then press ‘Yes’ to continue.
Workaround: This message is sometimes displayed when the installer package size is large. You can check the md5 hash value to verify the package before you continue the installation. The md5 hash values are listed on the VMware Server 2.0 download page. -
When attempting to install VMware Server on a Windows 2003 Server host, you might see the error message Error 1718. File installer_name.msi was rejected by digital signature policy.
Workaround: For more information and possible workarounds, see http://support.microsoft.com/kb/925336. Make sure that your operating system has all the latest updates applied. -
When attempting to install VMware Server on a Windows 2003 Server host, you might see the error message System Administrator has set policies to prevent this installation.
Workaround: Right-click the installer file, choose Run as, and enter the Administrator username and password. Additional configuration steps might be required. See http://forums.microsoft.com/TechNet/ShowPost.aspx?PostID=590630&SiteID=17. - When upgrading on a Windows host, the installer might prompt you to reboot the system. After the system is rebooted, you might see the message This installation package could not be opened. Verify that the package exists and that you can access it, or contact the application vendor to verify that this is a valid Windows Installer Package.
Workaround: Manually restart the installation from the VMware Server installer executable. -
The default VI Web Access HTTP connection port is 8222 and the default HTTPS port is 8333. If you use these defaults, or any values other than 80 (HTTP) and 443 (HTTPS), you must specify the port number when you connect to VMware Server using VI Web Access. You must also allow connection to these ports through your firewall.
An example URL to connect to VI Web Access is http://server_host:8222
If you want to use ports 80 (HTTP) and 443 (HTTPS), override the default values during installation.
Note: If you are running IIS or Apache web server on the default ports, specify alternate HTTP and HTTP ports when prompted by the Windows installer or vmware-config.pl. Alternatively, stop IIS’s default Web site or any other Web site running on these ports. On Linux, shut down Apache or any other application using these ports and make sure they are not configured to restart automatically. - On Windows, the VMware Server desktop and Start menu shortcuts use the NetBIOS name in the connection URL. This might cause VI Web Access to fail to connect to VMware Server. VMware Remote Console connections might also fail, with the error Error opening the remote virtual machine machine_name: The host name could not be resolved.
Workaround: Enter the correct host name as the Fully Qualified Domain Name (FQDN) when prompted by the Windows installer. Or, if the URL specified in the shortcut does not work, use the correct host name, IP address, or localhost, as appropriate, in the connection URL. You can also manually enter the short name and the FQDN, or localhost, in the /etc/hosts file. - When you connect to VI Web Access using Firefox 3, a Security Connection Error is displayed, indicating that the VMware Server host is using an invalid security certificate. The certificate is not trusted because it is self signed.
Workaround:
To allow VI Web Access to connect to the host:- Click Or you can add an exception.
- Click Add Exception.
- Click Get Certificate.
- Verify that Permanently store this exception is selected.
- Click Confirm Security Exception.
-
The VMware Remote Console add-on is listed in the Manage Add-ons dialog box of Internet Explorer 7, but, unlike the RC1 and beta versions of the add-on, you can no longer delete the add-on from the Manage Add-ons dialog box.
Workaround: Install and uninstall the VMware Remote Console add-on using Add/Remove Programs. The add-on is now installed as a Windows executable. -
When you run vmware-config.pl or upgrade from RC1, custom bridged (mapped) network settings are not preserved.
Workaround: Write down the settings you used to map virtual networks to specific physical or virtual adapters.
To reconfigure the network adapters, edit the netmap.conf file as follows:- Stop the vmware processes by entering the command/etc/init.d/vmware stop
- Open the /etc/vmware/netmap.conf network mapping file in a text editor.
- Edit the settings and save your changes.
- Start the vmware processes by entering the command /etc/init.d/vmware start
- Automatic VMware Tools upgrade appears to hang in Linux guests.
Workaround: Upgrade VMware Tools interactively. Alternatively, if you upgrade VMware Tools automatically and the upgrade appears to hang, click Eject Installer after a few minutes and verify that VMware Tools installation is completed and the new version of VMware Tools is installed. - In RHEL 4.6 AS 64-bit guests, mouse behavior is not correct after VMware Tools is installed.
Workaround: Restart the guest or the Xsession after VMware Tools is installed. - In RHEL 4.x guests, the mouse and keyboard might freeze after VMware Tools is upgraded from RC1 in a hardware version 6 or 7 virtual machine.
Workaround: Restart the guest after VMware Tools is upgraded. - In Netware 6 guests with VMware Tools installed, it is not possible to transfer control of the mouse from VMware Remote Console back to your computer unless you press Ctrl+Alt.
- For a virtual CD-ROM device, if you have legacy (ATAPI) emulation enabled when you install a Solaris guest operating system from CD, you might see warning messages indicating that the medium is incompatible.
Workaround: You can safely ignore the warnings. If you edit the CD/DVD drive in VI Web Access and select Access the drive directly instead of Use ATAPI emulation, the warnings are not displayed. -
The vmnet-netifup daemons do not terminate when VMware Server is stopped.
Workaround: Disable IPv6 on your host. - If you create quiesced backups and you set overwrite.snapshots to TRUE in the VMware VSS Writer configuration file, existing snapshots for all virtual machines on that host are overwritten unless the snapshots are locked.
Workaround: Lock any snapshots that you don’t want to overwrite in the Configure VM Snapshots tab. -
On Red Hat Enterprise Linux 5 with SELinux enabled, the host agent will not start due to library loading errors.
Workaround: Use the chcon command to change the security context for any libraries that fail to load, for example:
chcon -t texrel_shlib_t /usr/lib/vmware/vmacore/libvmacore.so.1.0. - On Linux hosts, USB devices are not correctly released from a powered off virtual machine. It is possible to connect released devices to another virtual machine, but then neither virtual machine can successfully use the devices when both virtual machines are powered on.
Workaround: Do not attempt to share a USB device between virtual machines. Manually disconnect the USB device before you connect it to a different virtual machine. -
If you manually modified /etc/vmware/hostd/config.xml after installing VMware Server 2 Beta 1, you might see the error Web Service not available when you attempt to log in to VI Web Access after you upgrade to Beta 2, RC 1, or RC2.
Workaround: Edit the config.xml file to the correct settings. You can copy the correct settings from the file NEW_config.xml. - If you use Avira AntiVir antivirus software on Windows hosts, you might have problems running virtual machines.
-
If you have a legacy version of Neoteris Secure Application Manager installed on a client system where you are running VMware Remote Console, VMware Remote Console may fail to connect to a virtual machine on a Windows host.
Workaround: Uninstall Neoteris Secure Application Manager and upgrade to the most recent version, available through Juniper Networks. - When you attempt to install a new version of the VMware Remote Console add-on over an existing version in Internet Explorer version 7.0.5730.11, a message indicating that the installation was canceled is displayed, and the installation fails. It is not possible to delete the add-on.
Workaround: Upgrade Internet Explorer to a more recent version. - On some Linux guest systems, including Red Hat Enterprise Linux 4 and Suse 9.3, the guest operating system binds virtual network adapters to specific MAC addresses. When the MAC address changes (for example, when the virtual machine is cloned), you must update the associated guest operating system configuration.
- On Windows hosts, the sound drivers are not installed in some Windows guests. Sound does not work in these guests.
- If you are not using the default ports (8222/8333) for VI Web Access, clicking Help from the virtual network editor on the host displays a failure to load page error in the Web browser instead of the appropriate help page.
Workaround: Change port number in the help URL or access the virtual network editor help from VI Web Access.
— Advertisement —


Introduction
Installing VMware Server on a Windows Server 2003 Based Operating systems while nothing new is not exactly as straight forward as it should be. When I first installed VMware Server on a clients WHSV1 computer over a year go I ended up having to consult my Google crystal ball in order to make it work, something of course I never had a problem with before installing on my own personal Windows XP 32 bit laptop. So after I completed my WHS 2011 Article on Installing VMware Server I revisited an idea I originally had on documenting on what I had learned through my Google Crystal Ball into a how to article so other people could have an easier time than I did when initially installing VMware Server on a Windows Server 2003 based operating systems.
Who this Article is for
This How To article can be used for any Windows Server 2003 based Operating System which includes all Windows Server 2003 editions and platforms, Windows Home Server Version 1, and Windows XP Professional 64 bit edition (The Code used for the Windows XP Professional 64 bit Operating System is based on the Windows Server 2003 64 bit Operating System Platform).
Acknowledgements
I want to give a big thanks to the people over at the “We Got Served” forums for answering my Google Crystal Ball call over a year ago, through one particular thread entitled “Installing VMware Server on WHS Fails”. If it had not been for the hard work of the “We got served” forum members I may not have gotten through that hard spot over a year ago. This first Third of this article is based on that thread.
End of Support for VMware Server
As of June 30, 2011 VMware no longer supports the VMware Server application and the last version released was in October of 2009 with Version 2.0.2. so the only support you maybe able to find will maybe be in the VMware support forums. That being said this is still a very useful application that runs a variety of different Operating systems with virtually all of the Windows Operating Systems up to and including Windows 7, Windows Server 2008 R2, and Windows Home Server 2011. This can also support Linux, Solaris (Unix), and even unofficially the MAC OS 10.
Disclaimer
The How to information is intended as a guide or helping resource to those who are doing a VMware Server 2 Installation. There is no 100% guarantee that this will install correctly the 1st time installing the VMware Server Virtual appliance. I assume no responsibility for any consequences of the install and the user will assume the full risk of any adverse effects of a bad installation. I recommend backing up your system before proceeding (I know this is easier said than done with a Windows Home Server Version 1 system).
Guest Operating Systems Legality
It is the responsibility of the user to obtain the the legal licenses and genuine copies of any operating system that is used for the Virtual Machine on the Virtual Server. Yes, even if the OS is not being installed on a physical machine the same legal rights do apply.
Prerequisites Needed
– Keyboard, Mouse, and Monitor or Remote Desktop
– PC/Server that has a minimum of a Pentium Dual Core or AMD equivalent processor with at least 3GB of system memory
– VMware Server 2 Install Executable (This can be obtained at http://downloads.vmw…CpiZCVqdGJkZWRq , The Software is free however you will need to Register to Download it). Insure it is the Windows Installer and not the Linux install package.
– Download the following Windows Server 2003 Patch http://support.microsoft.com/kb/925336 (N/A for Windows XP Professional 64 Bit)
– Internal or External Hard Drive (Optional for any other Windows Server 2003 based Operating System)
– Insure your Windows Home Server has a Static IP
Installation Instructions
1) Install the Windows Server 2003 Patch (KB925336) that what called for in the Prerequisites (Skip to Step 4 if this is Windows XP Professional 64 bit).
2) Once the patch is applied reboot your home server (Even if it does not ask you to).
3) Once your Home Server has rebooted log back in either by Remote Desktop or Console.
4) Click on the “Start Menu”, Administrative Tools, and finally “Local Security Settings”.

5) Click on “Software Restriction Policies”


John Keller
John has been in the IT profession for over 20 years along with being certified in both Comptia Security + (2008 edition) and a MCP (Microsoft Certified Professional) on Both Windows XP & Server 2003 Administration, He currently works as an Windows System Administrator for Northrop Grumman in the Greater Los Angeles Area and manages 3 Windows Active Directory Private Networks (Two 2008 R2 and One 2012 R2) along With 2 VMware EXSI 5.5 Servers in the US. He has been an avid fan and follower of Windows Home Server (Now the Essentials Role of Windows Server) and Visualization Since 2009. He is currently trying to exploit the full potential of Microsoft’s Windows Server Operating System to the Home & Small to Medium Business Community along with the power of Visualization. When not being a Nerd and a Geek he likes to watch Movies, Read Comic Books, and most importantly spend time with his family.
| Previous | Table of Contents | Next |
| Installing VMware Server 2.0 on Linux Systems | A Guided Tour of the VMware Server 2.0 Infrastructure Web Access Interface |
| Purchase and download the full PDF and ePub editions of this VMware eBook for only $8.99 |

|
The objective of this chapter is to provide information on installing VMware Server 2.0 on the Microsoft Windows Server family of operating systems. For information on installing on Linux systems, refer to the chapter entitled Installing VMware Server 2.0 on Linux Systems.
Contents
|
||
Supported Windows Versions
VMware Server 2.0 is designed to run on Windows Server host operating systems and is not (according to VMware, Inc.) intended for use on desktop variants of Windows. That said, the official list of supported systems and the list systems on which the product will actually run are two very different things. In fact, testing performed for this book found VMware Server 2.0 to run without any problems on both Windows XP and Windows Vista even though these are not officially support platforms.
In addition, VMware Server 2.0 is not supported on Windows Server 2008 Core. That said, the list of supported Windows operating systems is quite extensive and provides support for both 32-bit and 64-bit platforms.
The following table lists 32-bit Windows operating systems which are officially supported as VMware Server 2.0 hosts:
|
32-bit Operating System |
Required Service Packs |
|---|---|
|
Windows Server 2008 Standard Edition |
|
| Windows Server 2008 Enterprise Edition | |
| Windows Server 2003 Standard Edition | SP1, SP2, R2 |
| Windows Server 2003 Enterprise Edition | SP1, SP2, R2 |
| Windows Server 2003 Web Edition | SP1, SP2, R2 |
| Windows Small Business Server 2003 Standard | R2 |
| Windows Small Business Server 2003 Premium | R2 |
| Windows 2000 Server | SP3, SP4 |
| Windows 2000 Advanced Server | SP3, SP4 |
The 64-bit Windows server operating systems officially supported as VMware Server 2.0 hosts are as follows:
|
64-bit Operating System |
Required Service Packs |
|---|---|
|
Windows Server 2008 x64 Standard Edition |
|
| Windows Server 2008 x64 Enterprise Edition | |
| Windows Server 2003 x64 Standard Edition | SP1, SP2, R2 |
| Windows Server 2003 x64 Enterprise Edition | SP1, SP2, R2 |
Downloading VMware Server 2.0 for Windows
VMware Server 2.0 for Windows may be downloaded free of charge from the VMware web site located at www.vmware.com. The download process involves locating VMware Server 2.0 from the products page and submitting a moderately detailed form. Once the form has been submitted and the subsequent license agreement agreed to, the VMware Server 2.0 download page is presented.
VMware, Inc. provides the VMware Server software distribution in both 32-bit and 64-bit versions so it will be important to identify the CPU architecture of the host computer before downloading the software.
Also displayed on the download page will be serial numbers for both Linux and Windows installations. These will be required to unlock the VMware Server software during the installation process so be sure to make a careful note of them before dismissing the browser window.
Installing VMware Server 2.0 on Windows using the Wizard
The downloaded Windows installation file will have a name similar to VMware-server-2.x.x-xxxxxx.exe where the ‘x’ characters represent the current VMware Server 2.0 release and build numbers. Installation may be performed either using a graphical wizard or by issuing commands at a command prompt. The disadvantage of the wizard approach is that it does not provide the ability to control which networking features are configured, instead installing them all by default. For more control over the installation of networking options, or to create an automated installation procedure, use the command prompt installation approach covered in the next section of this chapter.
To initiate the wizard based installation process, navigate to the location of the downloaded installer either using Windows Explorer or at the command prompt and execute the file. After a short delay while the installer unpacks the files necessary to proceed, the Installation Wizard for VMware Server welcome screen will appear. On this screen, click Next, read and accept the license agreement and click Next once again. On the Destination Folder screen either accept the default location into which VMware Server is to be installed (typically Program FilesVMwareVMware Server) or use the Change button to specify an alternate location. The next screen contains the server configuration settings as illustrated in the following figure:
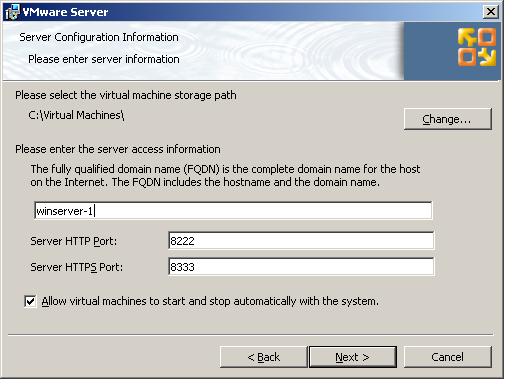
As illustrated above, this screen is preconfigured with the fully qualified domain name (FQDN) of the local server and also the default ports for accessing the VMware Infrastructure Web interface using a web browser. Unless there is a need to change these settings (perhaps because the ports are used by another application or firewall settings mandate use of different ports) leave these settings at their default values. Also present on this screen is a setting to enable the option for virtual machines to be started or stopped automatically when the Windows system starts up and shuts down.
Once the server settings are complete, click Next to proceed to the Configure Shortcuts screen. Options are available to place shortcuts to VMware on the desktop, start menu and quick launch bar. On the next screen, click Install to initiate the installation process. This process may take some time depending on the speed and current work load of the server on which the installation is taking place. Once the installation is complete, the Registration Information page will appear. On this page, enter the user name, company information and the serial number provided when the VMware Software was initially downloaded:
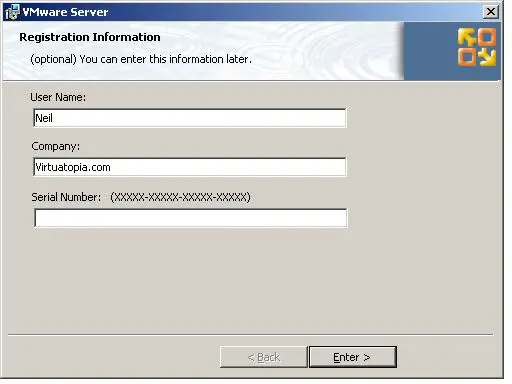
If the serial number is not entered at this point it will need to be configured through the VI Web Access interface before any virtual machines can be created. With the installation completed, click Finish to dismiss the installation wizard. Before VMware Server can be used it will likely be necessary to reboot the Windows system. When prompted to do so, exit all currently running applications and click on the Yes button. Alternatively, click No and perform the restart at a more convenient time.
Performing a Command Prompt VMware Server Installation
The preceding section of this chapter described the VMware Server 2.0 installation process using the graphical wizard. As previously mentioned, the wizard installs all networking options by default. For greater control over this aspect of the installation, it is necessary to resort to installing VMware Server from the command prompt. Before proceeding with the steps in this section, however, it is important to note that the installation process will perform an automatic and unprompted restart of the operating system once the installation is complete. For this reason, it is important to save all work and exit any running applications before beginning a command line based VMware Server installation.
The first step of this process is to unpack the installation image to a temporary location (for example C:tmpvmware). This is achieved using the following command line:
VMware-server-2.x.x-xxxxxx.exe /a /s /v TARGETDIR="C:tmpvmware" /qn
Once the installation files have been extracted the installation can be performed using the Windows msiexec tool. The syntax for this command is as follows:
msiexec /i «TempPathVMware Server.msi» [INSTALLDIR=»InstallPath«] ADDLOCAL=ALL [REMOVE=feature, feature] [property=»value«] /qn
In the above syntax outline, the command line arguments in square brackets are optional and TempPath is the temporary location into which the installation files were extracted in the preceding step (C:tmpvmware in the case of this example). If VMware Server is to be installed in a location other than the default (Program FilesVMwareVMware Server), specify the desired alternate location using the INSTALLDIR= directive.
The optional property=»value» directives allow options such as the serial number and whether a desktop shortcut should be created to be passed through to the installer. For example, the following command passes through the serial number and requests a desktop shortcut for access to the VI Web Access interface:
msiexec /i "c:tmpvmwareVMware Server.msi" ADDLOCAL=ALL SERIALNUMBER="XXXXX-XXXXX-XXXXX-XXXXX" DESKTOP_SHORTCUT="1" /qn
Of particular importance is the optional REMOVE= directive which is used to define which networking features are to be omitted during the installation process. Options available include Network, DHCP and NAT. If the virtual machines are to have no network access the REMOVE=Network directive should be specified. Similarly, to install VMware Server without the NAT support, but with host only and bridge support, the following command would need to be executed when installing VMware Server:
msiexec /i "c:tmpvmwareVMware Server.msi" ADDLOCAL=ALL REMOVE=NAT /qn
This form of installation is also referred to as silent installation. Do not be alarmed, therefore, if nothing appears to be happening once the command is executed. The installation is performed in the background without any user interaction. Once the installation is complete, the installer will automatically restart the computer, at which point VMware Server will be ready for use.
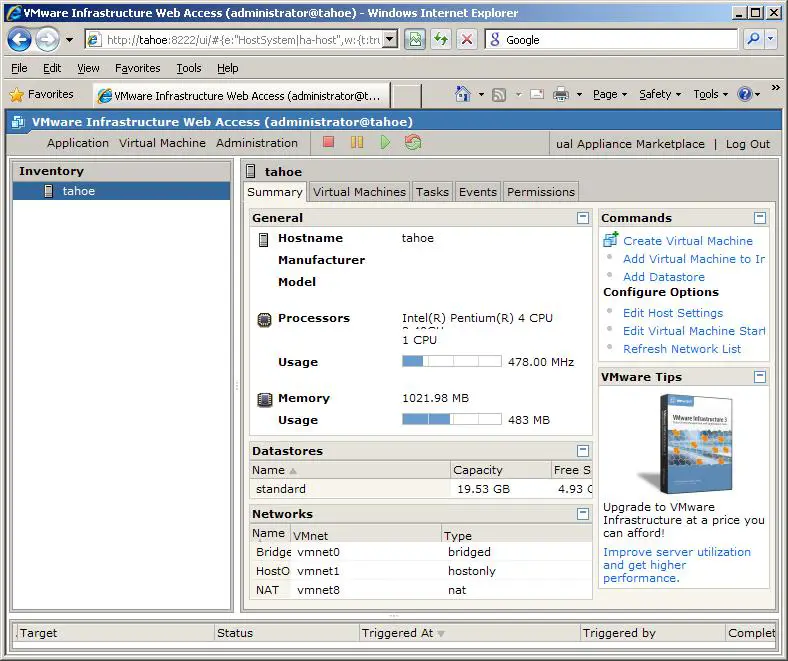
Accessing the VMware Infrastructure Web Access Interface
To access the VMware Infrastructure Web Access interface, either use one of the shortcuts configured during the installation process, or manually launch a browser and enter either http://hostname:8222 or https://hostname:8333 (where hostname is the name of the system running VMware Server). VI Web Access will load into the browser window and prompt for a user name and password. Enter an administrative username and password and click Log In to display a screen similar to the one shown in the following figure:

| Purchase and download the full PDF and ePub editions of this VMware eBook for only $8.99 |
|
Sometimes decommissioning old system is not easy as it looks, as this has a lots of dependency on business as well as on end users. As Microsoft had already made the announcement few years back about the End of Support for Microsoft Windows Server 2003 as well as some other old traditional legacy EUC OS. Microsoft Product Life Cycle . As last few weeks back at one of my customer site we got to know that one of the machine they had recently migrated from physical to Virtual (VMware vSphere 6.7U1) and are facing trouble to install the VMware Tools. Later at the time of troubleshooting I found out the machine is Windows 2003 which they need to up and running for at least 2 quarters as they are coming up with new solution for that particular project. Once the migration was done from physical to virtual which was successful one for the support teams once they trying to install the VMware tools they were getting errors stating that ” The required VMware Tools ISO image does not exist or is inaccessible.”

Installing and Using VMware Tools. As VMware Tools is a suite of utilities that enhances the performance of the virtual machine’s guest operating system and improves management of the virtual machine. Although the guest operating system can run without VMware Tools, you would lose important functionality and convenience. Whenever I design or deploy/implement VMware solution I generally go through the release notes of the product which is very important at the time of every vSphere Major Release VMware announces the release of Latest VMware tools,
These Notes clear stats that there is no iso or packages has been released for Windows 2003 or earlier OS. The list of the OS which support these latest VMware tools are below.
Windows OS level prerequisites
- Windows Server 2016
- Windows 10
- Windows Server 2012 R2
- Windows 8.1
- Windows Server 2012
- Windows 8
- Windows Server 2008 R2 Service Pack 1 (SP1)
- Windows 7 SP1
- Windows Server 2008 Service Pack 2 (SP2)
- Windows Vista SP2
- Windows Server 2012 R2 with Microsoft update KB2919355
- Windows 8.1 with Microsoft update KB2919355
But As we all know VMware tools comes with drivers and some other important metrics which will be helpful in future for troubleshooting and managing and planning the resources accordingly with the behavior of a virtual machine. As this newly migrated VM was running on vSphere 6.7 U1 and after several tries and getting the above mentioned error, I come up with an idea that lets install the Older Version of VMware tools which I downloaded from VMware, but that also resulted in a failure. After reading the release notes of vSphere 6.5 I found out that the VMware Tools Version 10.0.12 and after going through the release notes I found out that this contains a winprevista.iso “Bingo” here you go, I was fortunate enough that in one of my lab environment I was running vSphere 6.5U1 and now I need to extract the Winprevista.iso file from this host to my machine and need to extract using WinZip or 7Zip program. To get this file you can use the any SFTP client which works over port number 22, then you need to login to your host using root credentials and password, navigate to the location /usr/lib/vmware/isoimages/ and look for the desired mentioned image download it and extract it using the tools which you are comfortable with I used the 7zip program for this.
 Now you will be thinking why I didn’t copied this iso file directly to the host where my newly migrated VM was residing, So when we install the VMware tools a mount has been initiated and to get the mount we need to have the supportive Windows 2003 CD ROM driver on that machine which we didn’t had, So now I had Copy all the content to a folder in my machine for that first I used the WinSCP client to copy that iso than mount it using the default mount options which we are getting in Windows 2012 Servers. Copy all the content to your local media or other NTFS drive.

 As the machine neither had the CD ROM driver nor has the network connectivity, then I utilized the VMware Edit Virtual Machine Feature, for that.
Hope this have been informative for you. See you in the another blog post.

Published by sajag007
Experienced Delivery Lead with a demonstrated history of working in the IT industry. Strong operations professional skilled in IT Infrastructure Specially within Private Cloud Servers & Network Architecture, Engagement Management and Program Management.
View all posts by sajag007
Following are the guidelines/steps to create a Virtual Machine template for Windows Server 2003. Please note always start with minimum Specs and then extend later, whenever it required.
Please download below files by click on the file name. It will help you in later configuration.
- Naming_conventions.pdf
- W2k3-RegistrySettings.txt
- W2k3-ServicesSetting.txt
- WindowsEnablerv1.1.zip
- ntregopt.zip
- diskpart_setup.zip
- VM Check Alignment.zip
It’s time to start.
1-First create a new VM
- Right Click on Server and Choose “New Virtual Machine”
- Enter VM Name (according to defined naming convention) and Inventory Location
- Select Datastore
- Select Virtual Machine Version: select latest available
- Select “Microsoft Windows Server (32/64-bit)” as OS Version
- # of Virtual Processors: 1
- Amount of RAM: 1GB
- Network
- # of NICs: 1
- Adapter Type: VMXNET 3
- Select “Connect at Power On”
- SCSI Controller: Paravirtual
- Create New Virtual Disk: 15GB
- Disk Provisioning: Thin Provision
- Virtual Device Node: SCSI (0:0)
NOTE: Thin Provision is good practice to store templates files. because, it will save some storage space.
2-Now prepare the virtual hardware
- Right click on VM ->Hardware Upgrade(If Applicable)
- Edit VM Setting ->Select Floppy drive->
- Go to data store-> vmimages->floppies->Select “pvscsi-WindowsServer2003.flp”
- Select “Connect at Power On”
- Edit VM Settings > Options->VMWare Tools->Advanced->
- Check upgrade Tool during power cycling check box
- Check synchronize guest time with host check box
- Edit VM Settings->Memory /CPU Hot plug (enable, which is supported)
- Edit VM Settings->Advance->General Section ->Uncheck “Enable logging”
3-Virtual Machine Disk Alignment
Aligning the file system of a VM increase the I/O efficiency from the NTFS file system to the underlying storage, creating a VM within VCenter automatically aligns the VMFS but the guest file system must also be aligned.
Windows Server 2003 does not provide a method for creating aligned file system during installation. to work around this, the VM file system can be accessed using fdisk from the ESXi console, this goal is to set the beginning offset for the file system to sector 128, this has (128 sectors x 512 bytes/sector=64k), please follow the below steps to achieve this.
- Log in to the console using SSH of the ESXi Server hosting the Template virtual machine
- Go to the datastore where virtual machine resides
- Here in this example, in our case VM machine name is “Win_W2k3_32_temp_01” and he resides on “SAN 3TB” datastore, in your case it will be different and you will choose accordingly.
# Cd /vmfs/volumes/SAN-3TB/
# Cd Win_2k3_32_temp_01 (go to the VM directory, in our example it is “Win_2k3_32_temp_01”)
- View the VMDK file parameters by typing cat
#cat Win_2k3_32_temp_01.vmdk |grep -i ddb.geometry.cylinders
Note: the ddb.geometry.cylinders value. In this example it is 1044
- Edit the “–flat” virtual disk file of the VM using fdisk .
#fdisk ./ Win_2k3_32_temp_01-flat.vmdk
Enter in expert mode by typing “x” and then “c” to enter the number of cylinders equal to the value of “ddb.geometry.cylinders”, which was “1044” in this example.
value of “ddb.geometry.cylinders”, which was “1044” in this example.
Command (m for help): xExpert command (m for help): c
Number of cylinders (1-1048576, default 1044): 1044
The number of cylinders for this disk is set to 1044.
There is nothing wrong with that, but this is larger than 1024,
and could in certain setups cause problems with:
1) software that runs at boot time (e.g., old versions of LILO)
2) booting and partitioning software from other OSs
(e.g., DOS FDISK, OS/2 FDISK)
- Type “r” to return to normal mode
- Type “n” for new partition, select “p” and then type “1” to select the first partition and “1” to set the first cylinder and press enter
The default value for the last cylinder, which should be equal to the “ddb.geometry.cylinders”, appears
Expert command (m for help): rCommand (m for help): nCommand action e extended
p primary partition (1-4)pPartition number (1-4): 1
First cylinder (1-1044, default 1): Using default value 1
Last cylinder or +size or +sizeM or +sizeK (1-1044, default 1044): Using default value 1044
- While still in the expert mode , type “b” to specify the beginning offset for the disk and the type “1” to specify the first partition and set the new beginning of data to 128
- Type “p” to view the partition table and ensure the “start” has the correct value 128
Command (m for help): xExpert command (m for help): bPartition number (1-4): 1New beginning of data (0-16771859, default 63): 128Recalculate C/H/S values? (Y/N): YExpert command (m for help): pDisk ./WinTest-flat.vmdk: 255 heads, 63 sectors, 1044 cylindersNr AF Hd Sec Cyl Hd Sec Cyl Start Size ID 1 00 2 3 0 254 63 1023 128 16771732 83
2 00 0 0 0 0 0 0 0 0 00
3 00 0 0 0 0 0 0 0 0 00
4 00 0 0 0 0 0 0 0 0 00
- Type “r” to return to the normal mode
- Type “t” to specify the partition type.
- Type “7” to set the partition type to NTFS and then type “w” to write the partition table to disk
Expert command (m for help): rCommand (m for help): tSelected partition 1Hex code (type L to list codes): 7Changed system type of partition 1 to 7 (HPFS/NTFS) Command (m for help): wThe partition table has been altered.Calling ioctl() to re-read partition tablefdisk: WARNING: rereading partition table failed, kernel still uses old table: Inappropriate ioctl for device
4-OS Configuration
- Edit VM Settings->Remove Extra Hardware(USB & floppy etc)
- Power on the VM and Install Windows Server 32/64bit
- As it gets boot, while installation, if windows does not detect hard disk then reboot the VM and select “F6” at installation, follow the instructions and install “Paravirtual Controller” drivers.
- Once installed shutdown the VM and go to “Edit VM Settings”->Boot Options > Select “Check box to force going into the BIOS on next boot”
- Power on the VM (will go directly to BIOS) > Advanced > I/O Device Configuration:
- Disable Serial port A
- Disable Serial port B
- Disable Parallel port
- Disable floppy drive
- Disconnect Windows 2k3 ISO and set “device type” to “Client Device”
- Power on the VM and install VMware Tools-> While installation choose “Custom Install Type” and select all components
- Set Windows “Time Zone” and time configuration.
- Install any Windows Update and Service Pack
- add static route (if required). below is an example, edit it according to you needs)
- cmd: route add 172.17.0.0 mask 255.255.0.0 10.0.9.2 –p
- cmd: route print(to verify route)
- Enable “remote desktop”, uncheck “remote assistance”
- In Control Panal->Windows Firewall->Add “remote desktop” in exception list.
- Install .Net Framework and Java (if required)
5-Create Snapshot
- Create snapshot for safe side in case anything goes wrong in later configuration
- Snapshot name->(Win_2k3_32bit_Snap01_Date and Time) and add description(FRESH OS INSTALLATION with basic configuration)
6-Test VM Alignment
- After installation, copy the “VM Check Alignment.zip” (Save from the attachment of this document) file to “C” drive of the VM.
- Unzip it
- Run the “.exe” file and enter “localhost” in the computer name
- Press “check alignment” button to verify the alignment status of the disk.
7-Network Configuration
- From Control Panel-> Network Connections->Right click on “Local Area Connection” and select properties->Uninstall QoS Packet Scheduler
- ** We don’t do QOS at the server level, our switches do that.
- Control Panel->windows firewall->advanced->ICMP Settings->check “allow incoming echo request”->Click “OK”
8-Control Panel Settings
- Control Panel->windows firewall->advanced->ICMP Settings->check allow incoming echo request->ok (if firewall is on then perform this step)
- Power Options
- Change plan settings -> Turn off the harddisk -> Never
- Control Panel -> Sound and Audio Device-> Sound-> Sound Scheme: No Sounds
- Pop-up: “Select No”
- In volume tab->Uncheck “Place Volume Icon in the Taskbar”
- Control Panel -> Display ->
- Change screen saver ->set screen saver as none
- Internet option->
- general->set blank
- security->trusted sites->add sngpl.com.pk,sngpl.net
- uncheck “require server verification(https) for all sites in the zone”
- Connection->Lan Setting->uncheck autodetect setting
- Advanced->Security->
- EMPTTY Temporary internet file folder when browser is closed
- Check for server certificate revocation
- Control Panel -> Folder Option ->
- Select “Show hidden files, folders and drives”
- Uncheck “Hide extensions for known file types”
- Check “Display the full path in the title bar”
- Select “Offline files”
- Uncheck “enable offline files”
- Control Panel->Systems
- Advance->Adjust for best performance
- Advance->Error Reporting->Disable Error Reporting
- Advance->Startup and Recovery->
- Uncheck time to display list of operating systems
- Set 5 sec in time to display recovery options when needed
- Automatic Updated->Turn Off
- Control Panel->Taskbar and Start Menu
- Start Menu->Classic Start Menu->
- Check Show small icons in start menu
- Display logoff
- Control Panel->Add or Remove Programs->Add/Remove Windows Components Accessories ->uncheck communication
- Control Panel->Printer and Faxes->file menu->Server Properties->Advanced->uncheck all logs related options
9-System Performance
- Turn off indexing- >Go to “C:” Drive-> Properties -> General
- Uncheck “Allow indexing service to index this disk for fast file searching”
- Choose Apply -> Apply changes to C: only (or files and folders, to taste)
- Disable the language bar
- Cmd:regsvr32 /u msutb.dll
- Purge Windows File Protection DLL Cache(run these command through VM Console)
- Cmd: sfc /purgecache
- Cmd: sfc /cachesize=0
10-Create Snapshot
- Create snapshot for safe side in case anything goes wrong in later configuration
- Snapshot name->(Win_2K3_32bit_Snap02_Date and Time) and add description(Customization 1-ControlPanel, Network And system performance)
11-User Profile Settings
In Windows 2K3, Microsoft has disabled the Copy To.. Button on the User Profiles screen.
This issue is known to Microsoft but no fix has been released yet, but luckily there is an alternate way to achieve this.
- You can download a tool called ‘Windows Enabler ‘from the below link or save from attachment of this document at start.
- http://www.freewarefiles.com/downloads_counter.php?programid=980
- Save the file to your Template VM’s desktop and extract the file.
- Right click on “.exe“ file.
- Once you have started the Windows Enabler application you will notice a new icon in the system tray
- Make sure you click on it once to enable the application.
- In the ‘Run’ prompt type cpl and hit Enter
- Navigate to ‘Advanced’ tab -> User profiles -> Settings
- Click on the desired profile and you will notice that ‘Copy To‘button is disabled.
- Now, click on the disable button and it will become enabled thanks to ‘Win Enabler’ application.
- Now copy the profile (in our case, it would be the user which we are using for configuration in most case it is administrator) to “Default users”(C:/Documents and Settings-/Default Users) profile.
12-Create Snapshot
- Create snapshot for safe side in case anything goes wrong in later configuration
- Snapshot name->(Win_2K3_32bit_Snap03_Date and Time) and add description(Customization 2-After Profile Configuration)
13-Registry Settings
- Disable paging the executives
- Disable the windows prefetcher
- Launch windows Desktop as a separate process
- TCP/IP connections retransmission
- Disable system crash dump file
- Automatically reboot on the blue screen of death
NOTE: The downloaded attachment “2K3-RegistrySettings.txt” from this document at start. place in C Drive. Rename from .txt to .cmd, to automatically configure all registry settings, double click and execute .cmd file.
14-Create Snapshot
- Create snapshot for safe side in case anything goes wrong in later configuration
- Snapshot name->(Win_2K3_32bit_Snap04_Date and Time) and add description(Customization 3-After Registry Settings)
15-Disable Swapping & Disk Defragmentation
- From Control Panel select Change System Properties->Select Advanced Tab->performance->Advance->Virtual Memory->Change
- Select “No paging file”
- Click “Set” to disable swap file
- Select C Drive->properties->Tools->Disk Defragment->Defragment
16-Finalizing
- Enable Swap files
- Control Panel->System->Advance -> Performance -> Settings… ->
- Advanced -> virtual memory->change
- Custom(initially 1500, maximum2000->set)
- Save attached “ntregopt.zip” file and place in C Drive then unzip and run exe file.
- Place “2K3-ServicesSetting.txt” on “C” Drive, Rename with “2k3-ServicesSetting.cmd”.
- Delete any unused files/folders in the system
- Delete the contents of C:WindowsTemp Folder
- Control Panel->Internet Options->General
- Delete cookies
- Delete files
- Clear history
- Control Panel->Taskbar and Start Menu->Start Menu->Classic Start Menu->customize->clear->Click “ok”
- Control Panel->Administrative tools->Event Viewer(clear all events)
- Join Domain (optional), it is optional because windows customization wizard will automatically join domain to every vm.
- Empty Recycle Bin
- in cmd, run ipconfig /release
- Shutdown the VM.
17-Create Snapshot
- Create snapshot for safe side in case anything goes wrong in later configuration
- Snapshot name->(Win_2k3_32bit_Snap05_Date and Time) and add description(Customization 4-Final Configuration Except Antivirus)
18-Install Antivirus (optional)
- It is the time to install an antivirus security. It’s optional, if you may want to install one.
19-Convert VM to Template
Use the VMware Customization Wizard to create a re-usable script for cloning the template. Now’s a good time to test that your template will create a usable clone and make sure while creating a production VM from template choose “disk provision” method from “thin provision” to “thick provision”.

Add below setting in Run Once in Customization wizard (this step is optional. you may configure it according to you environment)
Run Once:
- c:2k3-ServicesSetting.cmd (which downloaded from this post at start)

————————————————————————————————————————–
Following service will be disabled in Run once script.
| Shell Hardware Detection | Computer Browser | Error Reporting |
| Distributed Transaction Coordinator | Help and Support | Automatic Updates |
| Network Location Awareness | Task Scheduler | IPSEC |
| Distributed Link tracking Client | Print Spooler | Wireless Configuration |
| Security Account Manager |
NOTE: It’s time you may deploy VM from the template.
20-Optional Steps ( align non-OS Disk)
This scenario is only apply, if you want to add another drive (D) in your existing VM. Then follow the below steps to align the partition
- Shutdown the VM->Edit VM Setting-> add another disk-> power on the VM.
- Go to Disk manager (Control panel->Administrative Tools-> Computer management->initialized the disk (Do not create any partition)
- Install the Diskpart on your VM (which you have download at the start of this post)
Example:
Here is an example in which the D: drive is created on disk 1, aligned with an offset of 1,024 KB, and formatted with a file allocation unit (cluster) size of 64 KB.
Make sure “D” drive latter is free.
Command syntax
- Diskpart
- list disk
- select disk <DiskNumber>
- create partition primary align=<Offset_in_KB>
- assign letter=<DriveLetter>
- format fs=ntfs unit=64K label=”<label>” nowait
Example
Open a command prompt, type diskpart
C:>diskpart
Microsoft DiskPart version 6.0.6001
Copyright (C) 1999-2007 Microsoft Corporation.
On computer: ASPIRINGGEEK
DISKPART> list disk
Disk ### Status Size Free Dyn GPT
——– ———- ——- ——- — —
Disk 0 Online 186 GB 0 B
Disk 1 Online 100 GB 0 B
DISKPART> select disk 1
Disk 1 is now the selected disk.
DISKPART> create partition primary align=1024
DiskPart succeeded in creating the specified partition.
DISKPART> assign letter=D
DiskPart successfully assigned the drive letter or mount point.
DISKPART> format fs=ntfs unit=64K label=”My Data Disk” nowait
NOTE: Diskpart default procedure as showed above only works for basic disks
— Advertisement —


Introduction
Installing VMware Server on a Windows Server 2003 Based Operating systems while nothing new is not exactly as straight forward as it should be. When I first installed VMware Server on a clients WHSV1 computer over a year go I ended up having to consult my Google crystal ball in order to make it work, something of course I never had a problem with before installing on my own personal Windows XP 32 bit laptop. So after I completed my WHS 2011 Article on Installing VMware Server I revisited an idea I originally had on documenting on what I had learned through my Google Crystal Ball into a how to article so other people could have an easier time than I did when initially installing VMware Server on a Windows Server 2003 based operating systems.
Who this Article is for
This How To article can be used for any Windows Server 2003 based Operating System which includes all Windows Server 2003 editions and platforms, Windows Home Server Version 1, and Windows XP Professional 64 bit edition (The Code used for the Windows XP Professional 64 bit Operating System is based on the Windows Server 2003 64 bit Operating System Platform).
Acknowledgements
I want to give a big thanks to the people over at the “We Got Served” forums for answering my Google Crystal Ball call over a year ago, through one particular thread entitled “Installing VMware Server on WHS Fails”. If it had not been for the hard work of the “We got served” forum members I may not have gotten through that hard spot over a year ago. This first Third of this article is based on that thread.
End of Support for VMware Server
As of June 30, 2011 VMware no longer supports the VMware Server application and the last version released was in October of 2009 with Version 2.0.2. so the only support you maybe able to find will maybe be in the VMware support forums. That being said this is still a very useful application that runs a variety of different Operating systems with virtually all of the Windows Operating Systems up to and including Windows 7, Windows Server 2008 R2, and Windows Home Server 2011. This can also support Linux, Solaris (Unix), and even unofficially the MAC OS 10.
Disclaimer
The How to information is intended as a guide or helping resource to those who are doing a VMware Server 2 Installation. There is no 100% guarantee that this will install correctly the 1st time installing the VMware Server Virtual appliance. I assume no responsibility for any consequences of the install and the user will assume the full risk of any adverse effects of a bad installation. I recommend backing up your system before proceeding (I know this is easier said than done with a Windows Home Server Version 1 system).
Guest Operating Systems Legality
It is the responsibility of the user to obtain the the legal licenses and genuine copies of any operating system that is used for the Virtual Machine on the Virtual Server. Yes, even if the OS is not being installed on a physical machine the same legal rights do apply.
Prerequisites Needed
– Keyboard, Mouse, and Monitor or Remote Desktop
– PC/Server that has a minimum of a Pentium Dual Core or AMD equivalent processor with at least 3GB of system memory
– VMware Server 2 Install Executable (This can be obtained at http://downloads.vmw…CpiZCVqdGJkZWRq , The Software is free however you will need to Register to Download it). Insure it is the Windows Installer and not the Linux install package.
– Download the following Windows Server 2003 Patch http://support.microsoft.com/kb/925336 (N/A for Windows XP Professional 64 Bit)
– Internal or External Hard Drive (Optional for any other Windows Server 2003 based Operating System)
– Insure your Windows Home Server has a Static IP
Installation Instructions
1) Install the Windows Server 2003 Patch (KB925336) that what called for in the Prerequisites (Skip to Step 4 if this is Windows XP Professional 64 bit).
2) Once the patch is applied reboot your home server (Even if it does not ask you to).
3) Once your Home Server has rebooted log back in either by Remote Desktop or Console.
4) Click on the “Start Menu”, Administrative Tools, and finally “Local Security Settings”.

5) Click on “Software Restriction Policies”


John Keller
John has been in the IT profession for over 20 years along with being certified in both Comptia Security + (2008 edition) and a MCP (Microsoft Certified Professional) on Both Windows XP & Server 2003 Administration, He currently works as an Windows System Administrator for Northrop Grumman in the Greater Los Angeles Area and manages 3 Windows Active Directory Private Networks (Two 2008 R2 and One 2012 R2) along With 2 VMware EXSI 5.5 Servers in the US. He has been an avid fan and follower of Windows Home Server (Now the Essentials Role of Windows Server) and Visualization Since 2009. He is currently trying to exploit the full potential of Microsoft’s Windows Server Operating System to the Home & Small to Medium Business Community along with the power of Visualization. When not being a Nerd and a Geek he likes to watch Movies, Read Comic Books, and most importantly spend time with his family.
- Publication date
-
2007-03-13
- Topics
- Windows, Windows Server, Windows Server 2003, Windows Server 2003 Enterprise Edition, SP2, Service Pack 2, English, x86, 32-bit, Microsoft, VMWare, VMDK, Virtual Machine
- Language
- English
VMDK File of Windows Server 2003 Enterprise Edition SP2 x86.
Password: unnecessary
HDD Size: 4.7GB
VM’s TimeZone is set to a Russian TimeZone / Settings changed to Russian in International Settings (Not the OS Language).
- Addeddate
- 2019-07-10 03:40:51
- Identifier
- WinSrv2003EnterpriseSP2VMDK
- Scanner
- Internet Archive HTML5 Uploader 1.6.4
comment
Reviews
Reviewer:
VinTech
—
favoritefavoritefavoritefavorite —
July 1, 2023
Subject:
Working good VM but…
why do people set passwords in these old vms? The password is not helping anything as one can use hirens boot cd to remove the password from the registry. Please guys, stop setting passwords in virtual machines.
Reviewer:
Windows123865415
—
—
February 14, 2023
Subject:
To dimitrisramos
Password is: unnecessary
Reviewer:
TheRealToriel2011
—
—
March 25, 2022
Subject:
Password
Password is «unnecessary»
Reviewer:
dimitrisramos
—
—
April 23, 2021
Subject:
Password for vm
Hello,
Can you tell me the administrator password please?
Reviewer:
martingarcia
—
favoritefavorite —
March 23, 2021
Subject:
password please
¿Password?
6,565
Views
6
Favorites
5
Reviews
DOWNLOAD OPTIONS
Uploaded by
shermanzuki
on
Windows Server 2003 on VMware server
today we will install windows server 2003 in that virtual machine to setup our domain controller in our testing network.
Once you login to the VMware server console, you should be able to see the virtual machine in the right top corner

Click on the “Windows Server 2003″ virtual machine, and then click on the console tab:

Then click on the white arrow to turn on the virtual machine on. once you have turned the virtual machine on, the Windows Server 2003 installation wizard should come up:

Make sure the Windows Server 2003 CD is inserted in the CD-ROM and press ENTER to continue the installation of Windows Server 2003.
The Windows License agreement will come up next, press F8 to accept the agreement.
Next, the setup will ask you where you want to install the server, and the 10 GB of un-partitioned space will show up:

Press “Enter” to continue the install. In the following window, you need to format the drive with NTFS file system:

The formatting should start. quick after, setup will start copying the system files to the hard drive:

That will take awhile. Then the computer will restart. The Windows Server 2003 setup will continue.

Next, the regional and language settings will come up:

Next, choose the name and organization. Next you will need to Enter the product key. if you downloaded Windows Server 2003 from the internet, make sure the Product key was included.
After you have entered the product key, click next. On the next window, you need to choose between per server or device mode. Choose per server mode, and increase the concurrent connections to 10:

Click Next. On the next window, name the computer, and choose an administrator password.
Click next. On the next screen, you need to specify the time and time zone you are at. And that will be the information windows 2003 server will need for now, the installation should continue:

Next, Windows setup will ask you for network settings. choose typical and click next. Next, setup will ask you if you want to join a domain or leave it as workgroup. leave as Workgroup because later we will make this computer a domain controller. click next.
Setup should continue. The installation of Windows Server 2003 should now be completed.
Popular posts from this blog
How To Add Print Button to Blogger Posts
This tutorial explains how to add a small print button below the post titles to print It is really necessary to Add Print Button to Blogger Posts, if there were any visitors or viewers want to print one or more posts in a blog. Like this below : Click Here to See the Example (scroll at the end of post to find printer button icon) How to Add Print Button to Blogger Posts ? … First Step 1. Go to Dashboard, click Design, click Edit HTML 2. Click Expand Widget Templates 3. Find code of HTML below : </head> you can use (Ctrl+F) to find easily
Internet Connection Sharing has been disabled by the Network Administrator. (Solved)

Problem: Logged in to computer with domain account has administrator privileges, and wanted to share my computer’s wifi to my mobile phone. When open the network sharing dialog, the dialog says: Internet Connection Sharing has been disabled by the Network Administrator.
How to Fix Error Unable to Qualify My own Domain name
ERROR: # Oct 6 14:11:06 nibappsun08 sendmail[9825]: [ID 702911 mail.alert] unable to qualify my own domain name (nibappsun08) — using short name Solution: The error is being caused because ‘sendmail’ is not configured properly to function as a bonafide mail server. You will see this message every time you reboot the server and it will eventually time out.
Following are the guidelines/steps to create a Virtual Machine template for Windows Server 2003. Please note always start with minimum Specs and then extend later, whenever it required.
Please download below files by click on the file name. It will help you in later configuration.
- Naming_conventions.pdf
- W2k3-RegistrySettings.txt
- W2k3-ServicesSetting.txt
- WindowsEnablerv1.1.zip
- ntregopt.zip
- diskpart_setup.zip
- VM Check Alignment.zip
It’s time to start.
1-First create a new VM
- Right Click on Server and Choose “New Virtual Machine”
- Enter VM Name (according to defined naming convention) and Inventory Location
- Select Datastore
- Select Virtual Machine Version: select latest available
- Select “Microsoft Windows Server (32/64-bit)” as OS Version
- # of Virtual Processors: 1
- Amount of RAM: 1GB
- Network
- # of NICs: 1
- Adapter Type: VMXNET 3
- Select “Connect at Power On”
- SCSI Controller: Paravirtual
- Create New Virtual Disk: 15GB
- Disk Provisioning: Thin Provision
- Virtual Device Node: SCSI (0:0)
NOTE: Thin Provision is good practice to store templates files. because, it will save some storage space.
2-Now prepare the virtual hardware
- Right click on VM ->Hardware Upgrade(If Applicable)
- Edit VM Setting ->Select Floppy drive->
- Go to data store-> vmimages->floppies->Select “pvscsi-WindowsServer2003.flp”
- Select “Connect at Power On”
- Edit VM Settings > Options->VMWare Tools->Advanced->
- Check upgrade Tool during power cycling check box
- Check synchronize guest time with host check box
- Edit VM Settings->Memory /CPU Hot plug (enable, which is supported)
- Edit VM Settings->Advance->General Section ->Uncheck “Enable logging”
3-Virtual Machine Disk Alignment
Aligning the file system of a VM increase the I/O efficiency from the NTFS file system to the underlying storage, creating a VM within VCenter automatically aligns the VMFS but the guest file system must also be aligned.
Windows Server 2003 does not provide a method for creating aligned file system during installation. to work around this, the VM file system can be accessed using fdisk from the ESXi console, this goal is to set the beginning offset for the file system to sector 128, this has (128 sectors x 512 bytes/sector=64k), please follow the below steps to achieve this.
- Log in to the console using SSH of the ESXi Server hosting the Template virtual machine
- Go to the datastore where virtual machine resides
- Here in this example, in our case VM machine name is “Win_W2k3_32_temp_01” and he resides on “SAN 3TB” datastore, in your case it will be different and you will choose accordingly.
# Cd /vmfs/volumes/SAN-3TB/
# Cd Win_2k3_32_temp_01 (go to the VM directory, in our example it is “Win_2k3_32_temp_01”)
- View the VMDK file parameters by typing cat
#cat Win_2k3_32_temp_01.vmdk |grep -i ddb.geometry.cylinders
Note: the ddb.geometry.cylinders value. In this example it is 1044
- Edit the “–flat” virtual disk file of the VM using fdisk .
#fdisk ./ Win_2k3_32_temp_01-flat.vmdk
Enter in expert mode by typing “x” and then “c” to enter the number of cylinders equal to the value of “ddb.geometry.cylinders”, which was “1044” in this example.
value of “ddb.geometry.cylinders”, which was “1044” in this example.
Command (m for help): xExpert command (m for help): c
Number of cylinders (1-1048576, default 1044): 1044
The number of cylinders for this disk is set to 1044.
There is nothing wrong with that, but this is larger than 1024,
and could in certain setups cause problems with:
1) software that runs at boot time (e.g., old versions of LILO)
2) booting and partitioning software from other OSs
(e.g., DOS FDISK, OS/2 FDISK)
- Type “r” to return to normal mode
- Type “n” for new partition, select “p” and then type “1” to select the first partition and “1” to set the first cylinder and press enter
The default value for the last cylinder, which should be equal to the “ddb.geometry.cylinders”, appears
Expert command (m for help): rCommand (m for help): nCommand action e extended
p primary partition (1-4)pPartition number (1-4): 1
First cylinder (1-1044, default 1): Using default value 1
Last cylinder or +size or +sizeM or +sizeK (1-1044, default 1044): Using default value 1044
- While still in the expert mode , type “b” to specify the beginning offset for the disk and the type “1” to specify the first partition and set the new beginning of data to 128
- Type “p” to view the partition table and ensure the “start” has the correct value 128
Command (m for help): xExpert command (m for help): bPartition number (1-4): 1New beginning of data (0-16771859, default 63): 128Recalculate C/H/S values? (Y/N): YExpert command (m for help): pDisk ./WinTest-flat.vmdk: 255 heads, 63 sectors, 1044 cylindersNr AF Hd Sec Cyl Hd Sec Cyl Start Size ID 1 00 2 3 0 254 63 1023 128 16771732 83
2 00 0 0 0 0 0 0 0 0 00
3 00 0 0 0 0 0 0 0 0 00
4 00 0 0 0 0 0 0 0 0 00
- Type “r” to return to the normal mode
- Type “t” to specify the partition type.
- Type “7” to set the partition type to NTFS and then type “w” to write the partition table to disk
Expert command (m for help): rCommand (m for help): tSelected partition 1Hex code (type L to list codes): 7Changed system type of partition 1 to 7 (HPFS/NTFS) Command (m for help): wThe partition table has been altered.Calling ioctl() to re-read partition tablefdisk: WARNING: rereading partition table failed, kernel still uses old table: Inappropriate ioctl for device
4-OS Configuration
- Edit VM Settings->Remove Extra Hardware(USB & floppy etc)
- Power on the VM and Install Windows Server 32/64bit
- As it gets boot, while installation, if windows does not detect hard disk then reboot the VM and select “F6” at installation, follow the instructions and install “Paravirtual Controller” drivers.
- Once installed shutdown the VM and go to “Edit VM Settings”->Boot Options > Select “Check box to force going into the BIOS on next boot”
- Power on the VM (will go directly to BIOS) > Advanced > I/O Device Configuration:
- Disable Serial port A
- Disable Serial port B
- Disable Parallel port
- Disable floppy drive
- Disconnect Windows 2k3 ISO and set “device type” to “Client Device”
- Power on the VM and install VMware Tools-> While installation choose “Custom Install Type” and select all components
- Set Windows “Time Zone” and time configuration.
- Install any Windows Update and Service Pack
- add static route (if required). below is an example, edit it according to you needs)
- cmd: route add 172.17.0.0 mask 255.255.0.0 10.0.9.2 –p
- cmd: route print(to verify route)
- Enable “remote desktop”, uncheck “remote assistance”
- In Control Panal->Windows Firewall->Add “remote desktop” in exception list.
- Install .Net Framework and Java (if required)
5-Create Snapshot
- Create snapshot for safe side in case anything goes wrong in later configuration
- Snapshot name->(Win_2k3_32bit_Snap01_Date and Time) and add description(FRESH OS INSTALLATION with basic configuration)
6-Test VM Alignment
- After installation, copy the “VM Check Alignment.zip” (Save from the attachment of this document) file to “C” drive of the VM.
- Unzip it
- Run the “.exe” file and enter “localhost” in the computer name
- Press “check alignment” button to verify the alignment status of the disk.
7-Network Configuration
- From Control Panel-> Network Connections->Right click on “Local Area Connection” and select properties->Uninstall QoS Packet Scheduler
- ** We don’t do QOS at the server level, our switches do that.
- Control Panel->windows firewall->advanced->ICMP Settings->check “allow incoming echo request”->Click “OK”
8-Control Panel Settings
- Control Panel->windows firewall->advanced->ICMP Settings->check allow incoming echo request->ok (if firewall is on then perform this step)
- Power Options
- Change plan settings -> Turn off the harddisk -> Never
- Control Panel -> Sound and Audio Device-> Sound-> Sound Scheme: No Sounds
- Pop-up: “Select No”
- In volume tab->Uncheck “Place Volume Icon in the Taskbar”
- Control Panel -> Display ->
- Change screen saver ->set screen saver as none
- Internet option->
- general->set blank
- security->trusted sites->add sngpl.com.pk,sngpl.net
- uncheck “require server verification(https) for all sites in the zone”
- Connection->Lan Setting->uncheck autodetect setting
- Advanced->Security->
- EMPTTY Temporary internet file folder when browser is closed
- Check for server certificate revocation
- Control Panel -> Folder Option ->
- Select “Show hidden files, folders and drives”
- Uncheck “Hide extensions for known file types”
- Check “Display the full path in the title bar”
- Select “Offline files”
- Uncheck “enable offline files”
- Control Panel->Systems
- Advance->Adjust for best performance
- Advance->Error Reporting->Disable Error Reporting
- Advance->Startup and Recovery->
- Uncheck time to display list of operating systems
- Set 5 sec in time to display recovery options when needed
- Automatic Updated->Turn Off
- Control Panel->Taskbar and Start Menu
- Start Menu->Classic Start Menu->
- Check Show small icons in start menu
- Display logoff
- Control Panel->Add or Remove Programs->Add/Remove Windows Components Accessories ->uncheck communication
- Control Panel->Printer and Faxes->file menu->Server Properties->Advanced->uncheck all logs related options
9-System Performance
- Turn off indexing- >Go to “C:” Drive-> Properties -> General
- Uncheck “Allow indexing service to index this disk for fast file searching”
- Choose Apply -> Apply changes to C:\ only (or files and folders, to taste)
- Disable the language bar
- Cmd:regsvr32 /u msutb.dll
- Purge Windows File Protection DLL Cache(run these command through VM Console)
- Cmd: sfc /purgecache
- Cmd: sfc /cachesize=0
10-Create Snapshot
- Create snapshot for safe side in case anything goes wrong in later configuration
- Snapshot name->(Win_2K3_32bit_Snap02_Date and Time) and add description(Customization 1-ControlPanel, Network And system performance)
11-User Profile Settings
In Windows 2K3, Microsoft has disabled the Copy To.. Button on the User Profiles screen.
This issue is known to Microsoft but no fix has been released yet, but luckily there is an alternate way to achieve this.
- You can download a tool called ‘Windows Enabler ‘from the below link or save from attachment of this document at start.
- http://www.freewarefiles.com/downloads_counter.php?programid=980
- Save the file to your Template VM’s desktop and extract the file.
- Right click on “.exe“ file.
- Once you have started the Windows Enabler application you will notice a new icon in the system tray
- Make sure you click on it once to enable the application.
- In the ‘Run’ prompt type cpl and hit Enter
- Navigate to ‘Advanced’ tab -> User profiles -> Settings
- Click on the desired profile and you will notice that ‘Copy To‘button is disabled.
- Now, click on the disable button and it will become enabled thanks to ‘Win Enabler’ application.
- Now copy the profile (in our case, it would be the user which we are using for configuration in most case it is administrator) to “Default users”(C:/Documents and Settings-/Default Users) profile.
12-Create Snapshot
- Create snapshot for safe side in case anything goes wrong in later configuration
- Snapshot name->(Win_2K3_32bit_Snap03_Date and Time) and add description(Customization 2-After Profile Configuration)
13-Registry Settings
- Disable paging the executives
- Disable the windows prefetcher
- Launch windows Desktop as a separate process
- TCP/IP connections retransmission
- Disable system crash dump file
- Automatically reboot on the blue screen of death
NOTE: The downloaded attachment “2K3-RegistrySettings.txt” from this document at start. place in C Drive. Rename from .txt to .cmd, to automatically configure all registry settings, double click and execute .cmd file.
14-Create Snapshot
- Create snapshot for safe side in case anything goes wrong in later configuration
- Snapshot name->(Win_2K3_32bit_Snap04_Date and Time) and add description(Customization 3-After Registry Settings)
15-Disable Swapping & Disk Defragmentation
- From Control Panel select Change System Properties->Select Advanced Tab->performance->Advance->Virtual Memory->Change
- Select “No paging file”
- Click “Set” to disable swap file
- Select C Drive->properties->Tools->Disk Defragment->Defragment
16-Finalizing
- Enable Swap files
- Control Panel->System->Advance -> Performance -> Settings… ->
- Advanced -> virtual memory->change
- Custom(initially 1500, maximum2000->set)
- Save attached “ntregopt.zip” file and place in C Drive then unzip and run exe file.
- Place “2K3-ServicesSetting.txt” on “C” Drive, Rename with “2k3-ServicesSetting.cmd”.
- Delete any unused files/folders in the system
- Delete the contents of C:\Windows\Temp Folder
- Control Panel->Internet Options->General
- Delete cookies
- Delete files
- Clear history
- Control Panel->Taskbar and Start Menu->Start Menu->Classic Start Menu->customize->clear->Click “ok”
- Control Panel->Administrative tools->Event Viewer(clear all events)
- Join Domain (optional), it is optional because windows customization wizard will automatically join domain to every vm.
- Empty Recycle Bin
- in cmd, run ipconfig /release
- Shutdown the VM.
17-Create Snapshot
- Create snapshot for safe side in case anything goes wrong in later configuration
- Snapshot name->(Win_2k3_32bit_Snap05_Date and Time) and add description(Customization 4-Final Configuration Except Antivirus)
18-Install Antivirus (optional)
- It is the time to install an antivirus security. It’s optional, if you may want to install one.
19-Convert VM to Template
Use the VMware Customization Wizard to create a re-usable script for cloning the template. Now’s a good time to test that your template will create a usable clone and make sure while creating a production VM from template choose “disk provision” method from “thin provision” to “thick provision”.
Add below setting in Run Once in Customization wizard (this step is optional. you may configure it according to you environment)
Run Once:
- c:\2k3-ServicesSetting.cmd (which downloaded from this post at start)
————————————————————————————————————————–
Following service will be disabled in Run once script.
| Shell Hardware Detection | Computer Browser | Error Reporting |
| Distributed Transaction Coordinator | Help and Support | Automatic Updates |
| Network Location Awareness | Task Scheduler | IPSEC |
| Distributed Link tracking Client | Print Spooler | Wireless Configuration |
| Security Account Manager |
NOTE: It’s time you may deploy VM from the template.
20-Optional Steps ( align non-OS Disk)
This scenario is only apply, if you want to add another drive (D) in your existing VM. Then follow the below steps to align the partition
- Shutdown the VM->Edit VM Setting-> add another disk-> power on the VM.
- Go to Disk manager (Control panel->Administrative Tools-> Computer management->initialized the disk (Do not create any partition)
- Install the Diskpart on your VM (which you have download at the start of this post)
Example:
Here is an example in which the D: drive is created on disk 1, aligned with an offset of 1,024 KB, and formatted with a file allocation unit (cluster) size of 64 KB.
Make sure “D” drive latter is free.
Command syntax
- Diskpart
- list disk
- select disk <DiskNumber>
- create partition primary align=<Offset_in_KB>
- assign letter=<DriveLetter>
- format fs=ntfs unit=64K label=”<label>” nowait
Example
Open a command prompt, type diskpart
C:\>diskpart
Microsoft DiskPart version 6.0.6001
Copyright (C) 1999-2007 Microsoft Corporation.
On computer: ASPIRINGGEEK
DISKPART> list disk
Disk ### Status Size Free Dyn GPT
——– ———- ——- ——- — —
Disk 0 Online 186 GB 0 B
Disk 1 Online 100 GB 0 B
DISKPART> select disk 1
Disk 1 is now the selected disk.
DISKPART> create partition primary align=1024
DiskPart succeeded in creating the specified partition.
DISKPART> assign letter=D
DiskPart successfully assigned the drive letter or mount point.
DISKPART> format fs=ntfs unit=64K label=”My Data Disk” nowait
NOTE: Diskpart default procedure as showed above only works for basic disks