This document will guide you on how to setup a macOS virtual machine on your Windows operating system. This guide has a lot of steps, but I promise it’s not hard. It’s mainly to provide all the context and information to make the setup easy to follow. I’ve also broken the steps down into multiple sections in order to make it easier to understand.
Make sure that your PC has Virtualization enabled in the BIOS. If you do not know if you have virtualization enabled, open Task Manager’s Performance tab:

If virtualization is disabled, you need to boot into your PC’s BIOS and enable it. Now, enabling it will be different per-vendor, however, here are 2 YouTube videos that may help:
Downloading a Fresh Copy of macOS
Downloading a Fresh Copy of macOS
The first step in setting up a virtual machine is getting an image that is compatible with our virtualization software, in this case, VMWare. To do this, we will use OpenCore. The following instructions are a shortened form of the full OpenCore Install Guide:
Note: This method is preferred over downloading an existing ISO from the internet because you never know when the integrity of an ISO from the internet might be compromised.
-
1.
Download the latest release of OpenCore.
-
Choose the
zipfile labeled withRELEASE.
-
-
2.
Extract the OpenCore ZIP file, and open the extracted folder.
-
3.
Navigate into
Utilities\macrecovery. -
4.
Holding
Shifton your keyboard, right-click your explorer window and selectOpen PowerShell window here. -
5.
Run the python command corresponding to the macOS version you want to download, found in the OpenCore Install Guide.
-
Running the command will download the
BaseSystem.dmgimage from Apple’s servers
If you’d like to download macOS Ventura, use the command below:
This is not recommended for inexperienced users!
python ./macrecovery.py -b Mac-27AD2F918AE68F61 -m 00000000000000000 download
-
-
6.
Next, cut/copy the
BaseSystem.dmgfile (generated in themacrecoveryfolder), to your user profile’sDocumentsfolder
Converting the macOS System Image to a VMWare Disk
Converting the macOS System Image to a VMWare Disk
Now that you have the BaseSystem.dmg file, we will now need to convert it into a format that VMWare can understand and load. In order to do that, we need to use yet another open-source tool called QEMU. Follow the steps below to learn how to use it.
This is a short guide to show you how to install QEMU, an open-source tool for working with disk images.
-
1.
Download
QEMUfor Windows.-
You will see a bunch of folders with years on them. Ignore those. Download the
qemu-w64-setup-XXXXXXXX.exeinstaller.
-
-
2.
Run the installer once the download completes.
-
If you get a Windows SmartScreen alert, allow the installer to
Run Anyways. -
If you get an error during installation saying a file cannot be written, just click the
Retrybutton in the prompt. -
The installer will install files to
C:\Program Files\qemu
-
-
3.
(Optional). You may want to add the
C:\Program Files\qemupath to your Windows System Environment Variables-
This is optional because I will be using the full path to
qemu-imgin the rest of the guide. -
If you are non-technical or a beginner, I would skip this step.
-
Now that we’ve installed QEMU, we need to use it to convert the BaseSystem.dmg to a VMWare .vmdk disk image.
-
1.
Open
Explorerand navigate into yourDocumentsfolder (where yourBaseSystem.dmgis located). -
2.
Holding
Shifton your keyboard, right-click your explorer window and selectOpen PowerShell window here. -
3.
Run the following command to use
QEMUto convert the image to a.vmdk.-
& "C:\Program Files\qemu\qemu-img.exe" convert -O vmdk -o compat6 BaseSystem.dmg recovery.vmdk
-
-
4.
You will now have a
recovery.vmdkfile in yourDocumentsfolder that you can use with VMWare.
Preparing & Unlocking VMWare
Preparing & Unlocking VMWare
In order for you to even be able to load a macOS system into VMWare, you will need to use a third-party program called Auto-Unlocker to patch your VMWare installation.
-
You should have either VMWare Workstation Player (free), or VMWare Workstation Pro (paid) installed
-
2.
Extract the downloaded
zipfile. -
3.
Run the
Unlocker.exefile.-
This will bring up a GUI to patch your VMWare installation
-
The app will attempt to auto-fill the install locations. However, if they are empty, please locate and select your VMWare installation folder.
-
-
5.
Once the patching is complete, you may close the Unlocker app.
Instructions (VMWare 15 or Older)
Instructions (VMWare 15 or Older)
-
2.
Extract the downloaded
zipfile. -
3.
Run the
win-install.cmdfile as an Administrator
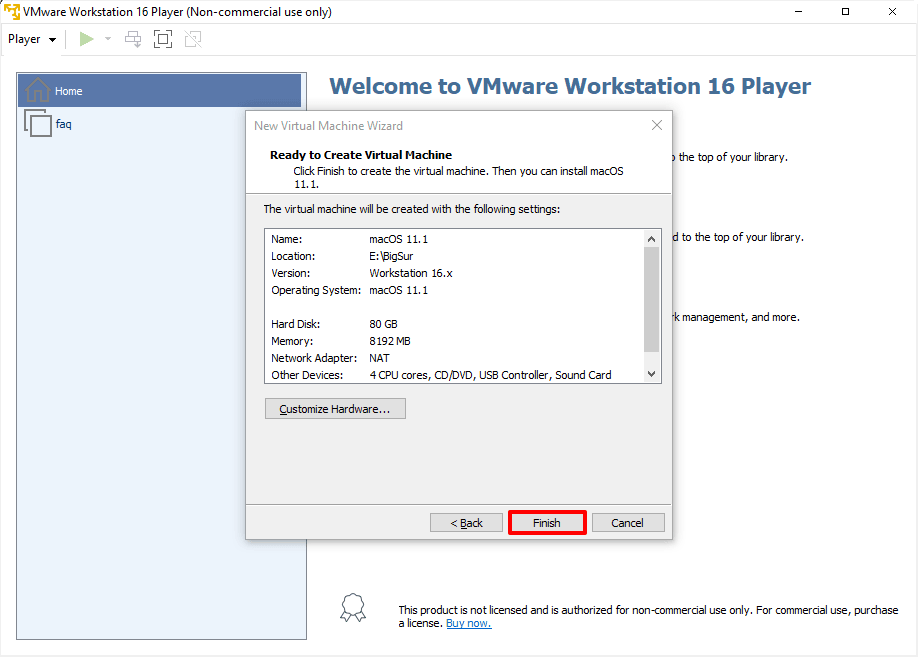
Setting up the Virtual Machine
Setting up the Virtual Machine
Creating the Virtual Machine
Creating the Virtual Machine
This section will detail how to create the base virtual machine using the recovery disk we created earlier.
-
You should have either VMWare Workstation Player (free), or VMWare Workstation Pro (paid) installed
-
You should have patched your VMWare installation using the Unlocker app
-
1.
Open VMWare and click
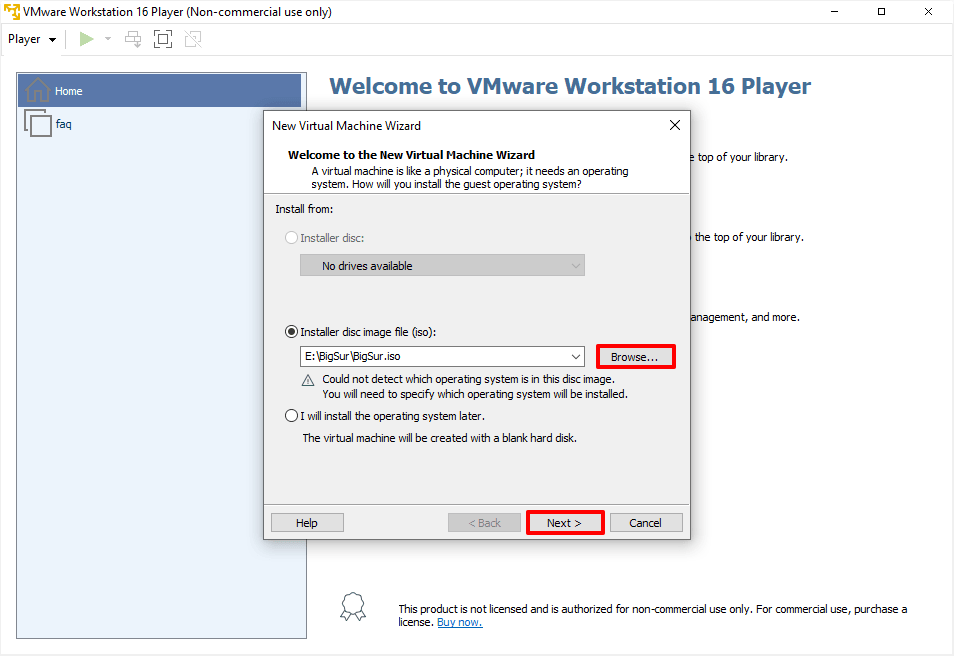
File -> New Virtual Machine -
2.
Select
Custom Installationand start navigating through the New Virtual Machine setup screens. -
3.
On the
Guest Operating System Installationpage, select,I will install the operating system later. -
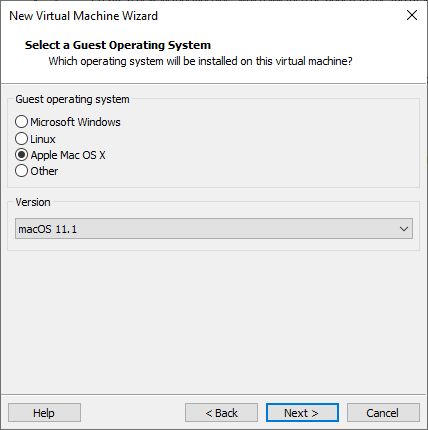
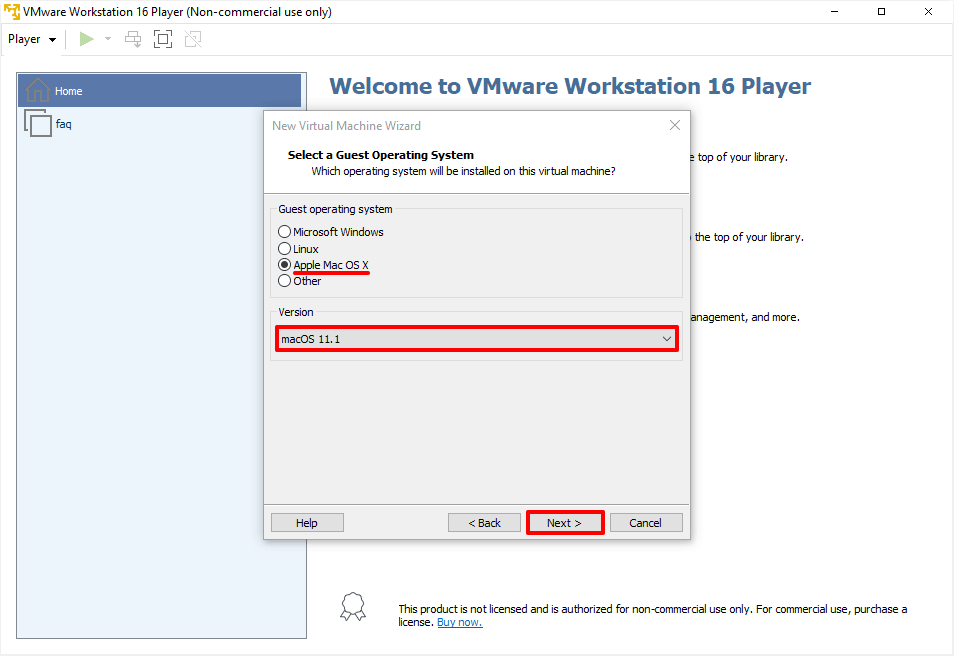
4.
On the
Select a Guest Operating Systempage, selectApple Mac OS X, as well as the corresponding macOS version. -
5.
On the
Processor Configurationpage, select1for theNumber of processors.-
For the
Number of cores per processor, select a number that is within your computer’s resource constraints.
-
-
6.
On the
Memory for the Virtual Machinepage, we recommend the following: -
7.
On the
Network Typepage, selectUse network address translation (NAT). -
8.
On the
Select a Diskpage, selectUse an existing virtual disk. -
9.
On the
Select an Existing Diskpage, browse & select therecovery.vmdkdisk we created earlier. -
11.
Edit your Virtual Machine’s settings.
-
12.
Add a new piece of hardware.
-
On the
Hardware Typepage, selectHard Disk. -
On the
Disk Typepage, selectSATA. -
On the
Select a Diskpage, selectCreate a new virtual disk -
On the
Specify Disk Capacitypage, enter an amount that makes sense -
Complete the Hard Disk setup.
-
Patching the Virtual Machine (iServices)
Patching the Virtual Machine (iServices)
This section will detail how to patch your virtual machine in order to properly run macOS and get iServices setup.
-
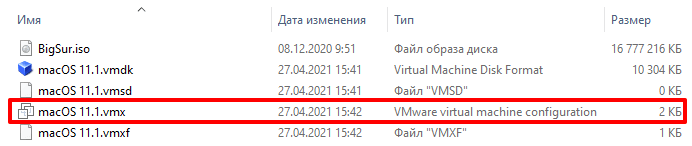
1.
Navigate to your virtual machine’s files
-
The virtual machine’s files are located here:
C:\Users\<username>\Documents\Virtual Machines\
-
-
2.
Create a backup of your virtual machine’s
.vmxfile-
You can just copy and paste it into the same directory, appending
.bakto the filename.
-
-
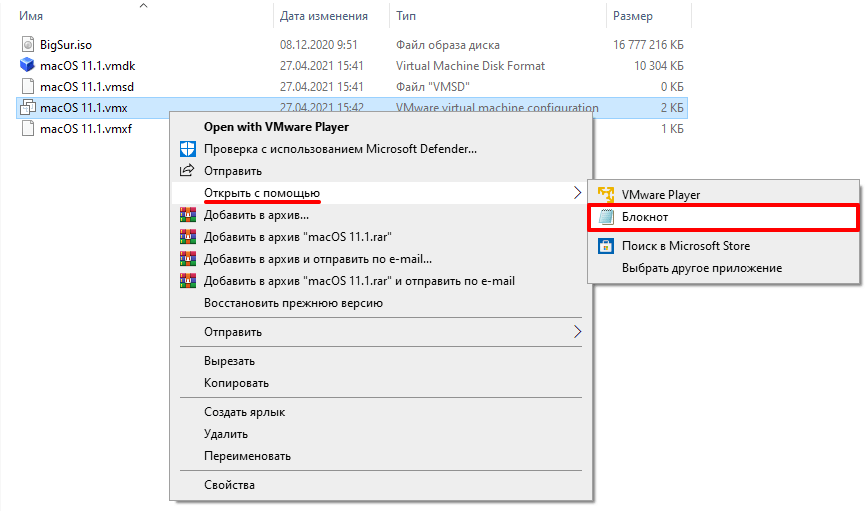
3.
Open your virtual machine’s original
Configuration File(.vmx) in a text editor (i.e. Notepad) -
4.
Paste the following line into the
.vmxfile and save it.
-
If you have an AMD CPU, also add the following to your
.vmxfile.
cpuid.0.eax = «0000:0000:0000:0000:0000:0000:0000:1011»
cpuid.0.ebx = «0111:0101:0110:1110:0110:0101:0100:0111»
cpuid.0.ecx = «0110:1100:0110:0101:0111:0100:0110:1110»
cpuid.0.edx = «0100:1001:0110:0101:0110:1110:0110:1001»
cpuid.1.eax = «0000:0000:0000:0001:0000:0110:0111:0001»
cpuid.1.ebx = «0000:0010:0000:0001:0000:1000:0000:0000»
cpuid.1.ecx = «1000:0010:1001:1000:0010:0010:0000:0011»
cpuid.1.edx = «0000:0111:1000:1011:1111:1011:1111:1111»
If your VM is macOS Ventura, you may need to add (or edit) the following to enable internet connectivity:
ethernet0.virtualDev = «vmxnet3»
Booting the Virtual Machine
Booting the Virtual Machine
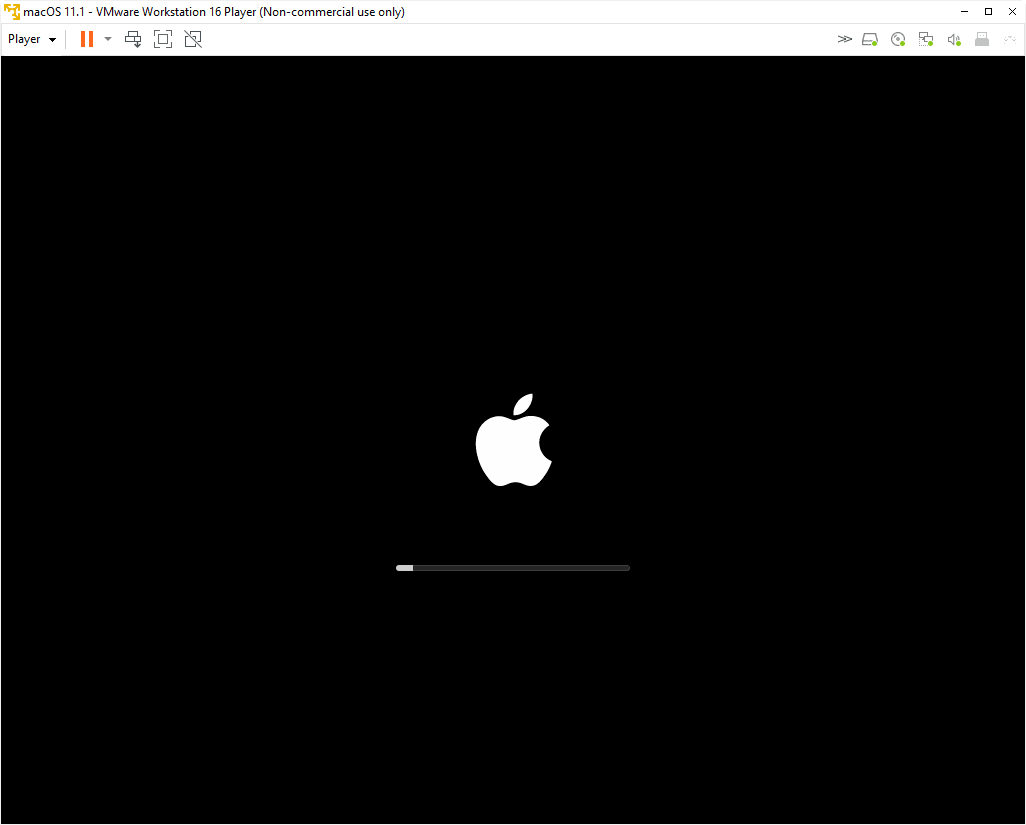
Once you’ve edited the .vmx file, you should be able to boot the virtual machine normally.
If you are having issues performing the initial boot for the virtual machine, take a look at the most common issues below.
-
Stuck on Apple Boot Logo: If you attempt to boot your virtual machine and it’s stuck on the Apple Boot Logo, do the following to fix the issue. Power off the Virtual Machine, then open the virtual machine’s settings. Once the settings window opened beside the
Hardwaretab click onOptions. Change theApple Mac OS Xselection toMicrosoft Windowsthen click OK. Power on the virtual machine again. Once all installed then go back to settings and set it back toApple Mac OS X -
The CPU has been disabled by the guest operating system: Enable virtualization in your computer’s BIOS
-
There are guides on YouTube describing how to do this.
-
-
Feature ‘cpuid.ds’ was absent, but must be present: This is due to a corrupted vmx file. Try using a backup of your
.vmxfile and edit the.vmxfile carefully this time.-
Make sure that your editor is not converting the quotes (
") to «greek» quotes
-
-
This virtual machine requires AVX2 but AVX is not present. This virtual machine cannot be powered on: This is due to a corrupted vmx file. Try using a backup of your
.vmxfile and edit the.vmxfile carefully this time.-
Make sure that your editor is not converting the quotes (
") to «greek» quotes
-
-
Module ‘featurecompat’ power on failed: In your
.vmxfile, make sure that your editor is not converting the quotes (") to «greek» quotes
Once you’re able to boot into the recovery setup, follow these steps to properly install macOS.
Note: You may want to power off your virtual machine and take a snapshot before continuing. If anything goes wrong during setup, you can always revert back to your snapshot.
-
1.
Select
Disk Utilityand hitContinue. -
2.
On the
Disk Utilitypage, select the Hard Disk you created.-
This is not the one labeled,
macOS Base System
-
-
3.
With the Hard Disk selected, click
Erasein the top right of Disk Utility.-
This will format the hard disk into a format that macOS can use.
-
-
5.
On the recovery page, select
Reinstall macOS <version>and hitContinue. -
6.
Continue through the setup, accepting the license agreement(s).
-
7.
When prompted to select the disk to install macOS, select the disk you just formatted.
-
8.
Wait for the operating system to be installed.
-
9.
Once the operating system is installed, navigate through the macOS setup.
-
You do not need to sign into an Apple ID when prompted.
-
-
10.
Create your macOS computer account, finish the setup, and login.
Note: Once everything is setup, you may edit the Virtual Machine’s settings and remove the recovery.vmdk Hard Disk. Do not delete the Hard Disk you created manually (to store the install). Note 2: You may want to power off your virtual machine and take another snapshot before continuing.
By default, your macOS deployment will not support iServices such as iMessage. In order to support iServices, additional configurations must be done. We will accomplish this by utilizing a tool called Clover Configurator.
-
1.
Boot up your macOS virtual machine and login.
-
2.
Open Safari and download
Clover Configurator. -
3.
Open
Clover Configurator.-
You may need to allow it to run via
System Preferences -> Security & Privacy.
-
-
4.
Once opened, navigate to the
SMBIOStab in the sidebar. -
5.
Find the up/down arrow button under the large «question mark» image, and to the right of the
Update Firmware Onlycheckbox. -
6.
Click on the up/down arrow button and select any product made in 2019 or newer.
-
We recommend
MacPro7,1orMacBookPro16,1
-
-
7.
Copy the following configuration to an editor (i.e. Notepad), on your host computer (Windows).
hw.model.reflectHost = «FALSE»
serialNumber.reflectHost = «FALSE»
smbios.reflectHost = «FALSE»
efi.nvram.var.ROM.reflectHost = «FALSE»
efi.nvram.var.MLB.reflectHost = «FALSE»
efi.nvram.var.ROM = «DDD»
efi.nvram.var.MLB = «EEE»
-
1.
In Clover Configurator, click the
Generate Newbutton next to theSerial Numberfield to generate a new serial number. -
2.
Copy & paste the following Clover Configurator SMBIOS fields into the configuration from above:
-
AAA: Replace with yourBoard ID(i.e.Mac-XXXXXXXXXXXXXX) -
BBB: Replace with yourProduct Name(i.e.MacPro7,1) -
CCC: Replace with your generatedSerial Number
-
-
3.
In Clover Configurator, click on the
Rt Variablestab in the sidebar. -
4.
Click on the
Generatebutton next to theROMtext. -
5.
Copy & paste the following Clover Configurator Rt Variable fields into the configuration from above:
-
DDD: Replace with your generatedROM -
EEE: Replace with your generatedMLB
-
-
6.
Close Clover Configurator & shut down your macOS virtual machine
-
7.
Open your virtual machine’s
.vmxfile. The same one you edited earlier in the setup guide.-
The virtual machine’s files are located here:
C:\Users\<username>\Documents\Virtual Machines\
-
-
8.
Paste your completed configuration above into the
.vmxfile. -
9.
Find the
board-id.reflectHostconfiguration and verify that it is set to"TRUE". -
10.
Find the
ethernet0.addressTypeconfiguration and change it from"generated"to"static" -
11.
In your browser, go to the following link to grab an «OUI» for the configuration:
-
The OUI contains 3 segments, each containing 2 characters.
-
It does not matter which OUI you choose. Choose any.
-
-
12.
Find the
ethernet0.generatedAddressconfiguration and change the first 3 segments to match the 3 segments of your chosen OUI.-
Example: If my current
generatedAddressis00:0c:29:bb:91:7f, and I’ve selected the OUI,00-1F-F3, my newgeneratedAddresswill be00:1f:f3:bb:91:7f -
It’s recommended to use lower-case characters for the alphabetical letters.
-
-
13.
Rename the
ethernet0.generatedAddressconfiguration to justethernet0.Address -
14.
Replace the
ethernet0.generatedAddressOffset = "0"configuration withethernet0.checkMACAddress = "FALSE" -
15.
Save and close the
.vmxfile.
Your macOS virtual machine should be good to go! You now should be able to sign into iMessage and use the other iServices. Boot up your virtual machine and sign into iMessage to verify everything is working correctly.
Note: If something failed during setup and your macOS virtual machine will not boot, restore from an earlier snapshot and redo part of the setup!
Here are a few final checks to make sure that your macOS virtual machine is setup correctly.
-
When the macOS virtual machine is booted & running, click on the
Apple Logoand selectAbout this Mac. Verify that the serial number listed matches the serial number you configured in the steps above. -
Open
System Preferencesand open yourDate & Timesettings. Verify that your timezone is set correctly and your time is properly synced.-
If you are unsure, you can open Safari and go to
https://time.is
to see if your time synchronization is misaligned.
-
If your time synchronization is misaligned, you can synchronize it by opening
Terminaland running this command:sudo ntpdate -vu time.apple.com
-
В этой статье мы расскажем, как проходит установка macOS на компьютер через VMware Workstation Player. Для работы вам понадобится готовый ISO-образ операционной системы. На VMware mac OS устанавливается в 4 этапа:
- Установка патча для разблокировки возможностей работы VMware с macOS.
- Создание виртуальной машины.
- Редактирование конфигурационного файла для запуска на процессорах Intel или AMD.
- Установка macOS на виртуальную машину.
Обратите внимание
Официально VMware Workstation не поддерживает MacOS в качестве гостевой ОС. Поэтому производительность системы будет гораздо ниже, чем на устройствах от компании Apple. Повысить производительность можно при помощи VMware Tools. Это набор ПО, который оптимизирует взаимодействие между основной и гостевой ОС. Поздние версии macOS могут не поддерживать VMware Tools.
Как разблокировать VMware для macOS
Поскольку VMware Workstation официально не поддерживает MacOS в качестве гостевой ОС, для запуска macOS нужно установить неофициальный патч. Он подойдет как для Workstation Player, так и для Workstation Pro.
Чтобы установить патч для разблокировки macOS:
-
1.
Закройте Workstation Player.
-
2.
Скачайте архив «Unlocker-x64.zip».
-
3.
Распакуйте архив и запустите файл «Unlocker.exe». Дождитесь окончания установки.
Готово, при создании виртуальной машины в списке поддерживаемых гостевых ОС появится Apple Mac OS X:
Список поддерживаемых ОС в VMware после установки патча
Как создать виртуальную машину для macOS
После установки патча можно приступить к установке macOS. Для работы вам понадобится готовый ISO-образ операционной системы.
-
1.
Запустите VMware Workstation Player.
-
2.
Нажмите Create a New Virtual Machine, чтобы создать новую виртуальную машину:

Главное меню VMware -
3.
Нажмите Browse и в локальной папке компьютера выберите ISO-образ Mac OS. После этого кликните Next:
Меню выбора образа ОС для установки на виртуальную машину в VMware -
4.
Выберите «Apple Mac OS X». Выбор версии зависит от того, какую ОС вы хотите установить:
- Big Sur — macOS 11.1,
- Catalina — macOS 10.15,
- Mojave — macOS 10.14.
Затем нажмите Next:
Меню выбора версии ОС для установки на виртуальную машину в VMware -
5.
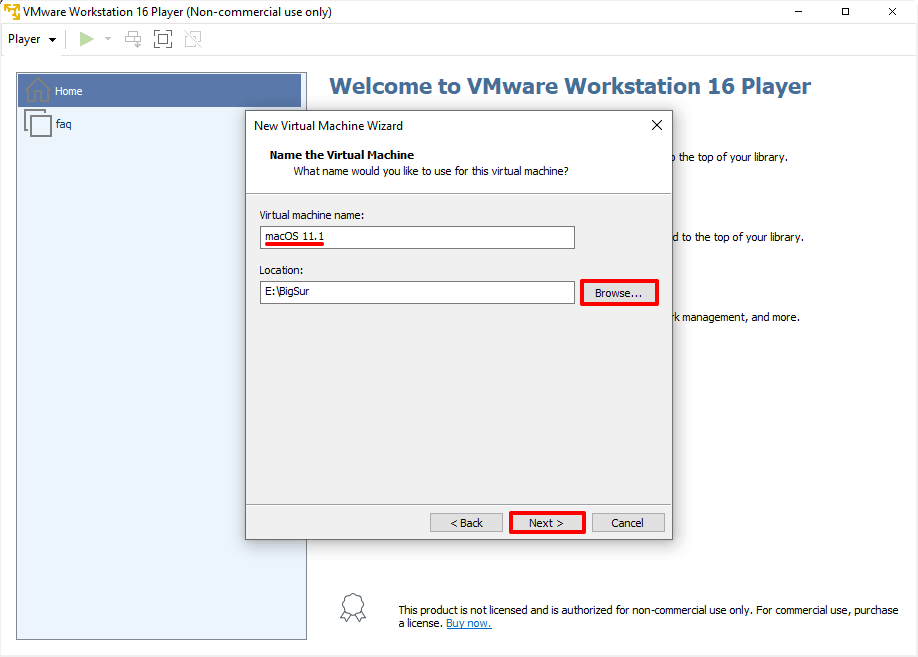
Если вы хотите оставить название и директорию по умолчанию, нажмите Next. Если вы хотите изменить их, в поле «Virtual machine name» введите имя новой виртуальной машины. Затем нажмите Browse, чтобы выбрать папку, в которой будет храниться виртуальная машина. После этого нажмите Next:
Меню выбора директории для установки ОС на виртуальную машину в VMware -
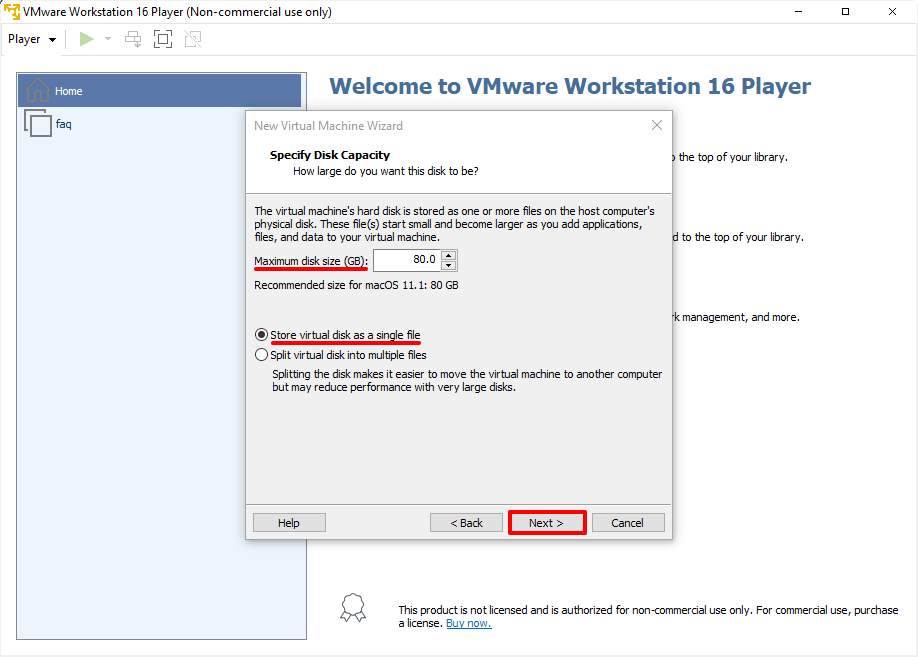
6.
«Maximum disk size» — это максимальный размер дискового пространства, которое будет выделено для гостевой операционной системы. Мы рекомендуем выбрать объем — 80 ГБ.
Если хотите, чтобы виртуальный диск хранился в одном файле, выберите Store virtual disk as a single file. Это не повлияет на производительность операционной системы.
Нажмите Next:
Меню выбора дискового пространства для установки ОС на виртуальную машину в VMware -
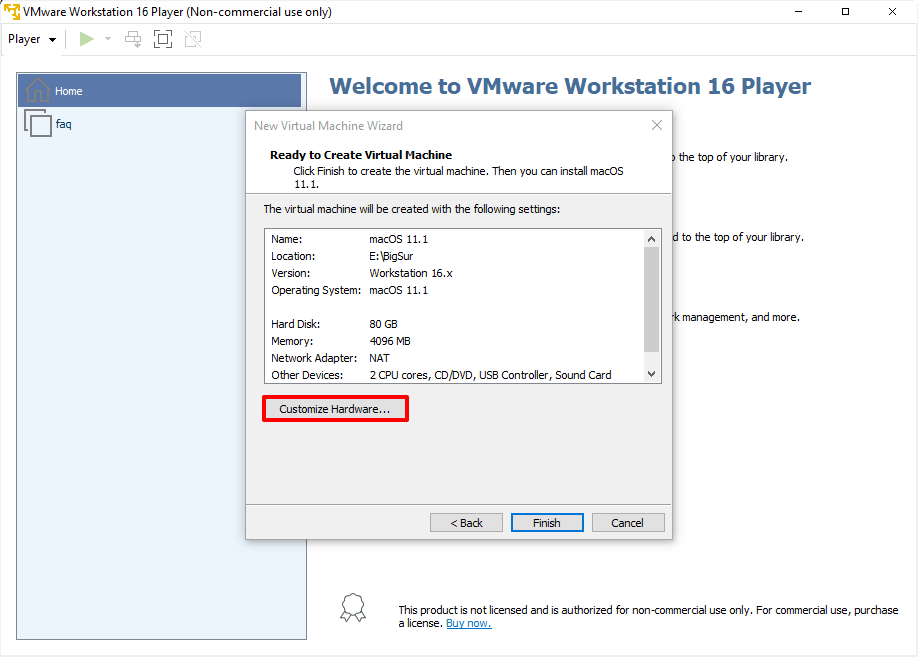
7.
Проверьте количество выделенных ресурсов. Для этого нажмите Customize hardware:
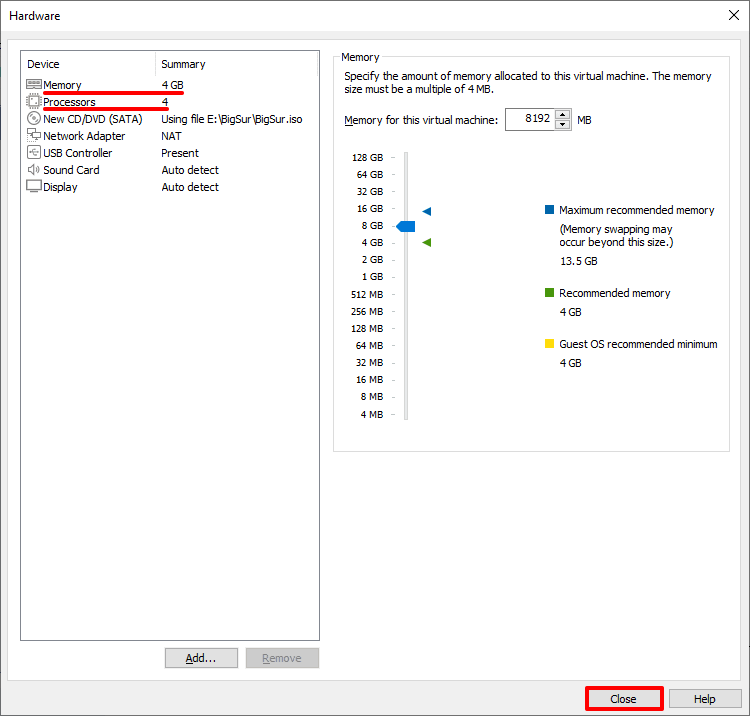
Переход к управлению выделяемыми ресурсами для виртуальной машины в VMwareНазначьте параметры:
- Memory (оперативная память) — рекомендуемый объем составляет 4 ГБ. Если у вашего компьютера установлено 16 ГБ оперативной памяти, выделите 8 ГБ.
- Number of processor cores (количество ядер процессора) — минимальное рекомендуемое количество — 2. Если процессор вашего компьютера имеет 8 и более ядер, выделите минимум 4 ядра.
Управление выделяемыми ресурсами для виртуальной машины в VMwareКроме оперативной памяти и ядер процессора необходимо включить виртуализацию. Для этого нажмите Processors, отметьте галочкой пункт «Virtualize Intel VT-x/EPT or AMD-V/RVI» и кликните Close:
Включить дополнительную виртуализацию для ОС в VMware -
8.
Нажмите Finish:
Завершение процедуры создания виртуальной машины в VMware

Готово, виртуальная машина создана.
Как отредактировать файл .VMX
Перед запуском гостевой ОС нужно внести изменения в файл с расширением .VMX.
Важно
Не запускайте гостевую систему MacOS, пока не внесёте изменения в файл .VMX.
-
1.
Откройте директорию, в которой хранятся файлы виртуальной машины. Это директория, которую вы выбирали на 5 шаге. Если вы выбрали директорию по умолчанию, перейдите в Документы — Virtual Machine. Вам нужен файл с расширением .VMX:
Список файлов виртуальной машины VMware -
2.
Кликните по файлу правой кнопкой мыши и выберите Открыть с помощью — Блокнот.
-
3.
В зависимости от процессора вашего компьютера вставьте в конец файла нужный текст:
- для Intel:
smc.version = "0" smbios.reflectHost = "TRUE" hw.model = "MacBookPro14,3" board-id = "Mac-551B86E5744E2388"- для AMD:
smc.version = "0"
cpuid.0.eax = "0000:0000:0000:0000:0000:0000:0000:1011"
cpuid.0.ebx = "0111:0101:0110:1110:0110:0101:0100:0111"
cpuid.0.ecx = "0110:1100:0110:0101:0111:0100:0110:1110"
cpuid.0.edx = "0100:1001:0110:0101:0110:1110:0110:1001"
cpuid.1.eax = "0000:0000:0000:0001:0000:0110:0111:0001"
cpuid.1.ebx = "0000:0010:0000:0001:0000:1000:0000:0000"
cpuid.1.ecx = "1000:0010:1001:1000:0010:0010:0000:0011"
cpuid.1.edx = "0000:0111:1000:1011:1111:1011:1111:1111"
smbios.reflectHost = "TRUE"
hw.model = "MacBookPro14,3"
board-id = "Mac-551B86E5744E2388"
4
Сохраните файл.
Готово, виртуальная машина готова к запуску.
Теперь запустим виртуальную машину и установим операционную систему macOS.
Как установить macOS на VMware Workstation
В инструкции мы устанавливаем версию macOS Big Sur. Процедура установки версий macOS Mojave и Catalina практически не отличается.
Чтобы установить macOS на VMware Workstation:
-
1.
Запустите созданную ранее виртуальную машину:
Запуск виртуальной машины из главного меню VMware Workstation -
2.
Дождитесь загрузки операционной системы с установочного диска:
Загрузочный экран macOS -
3.
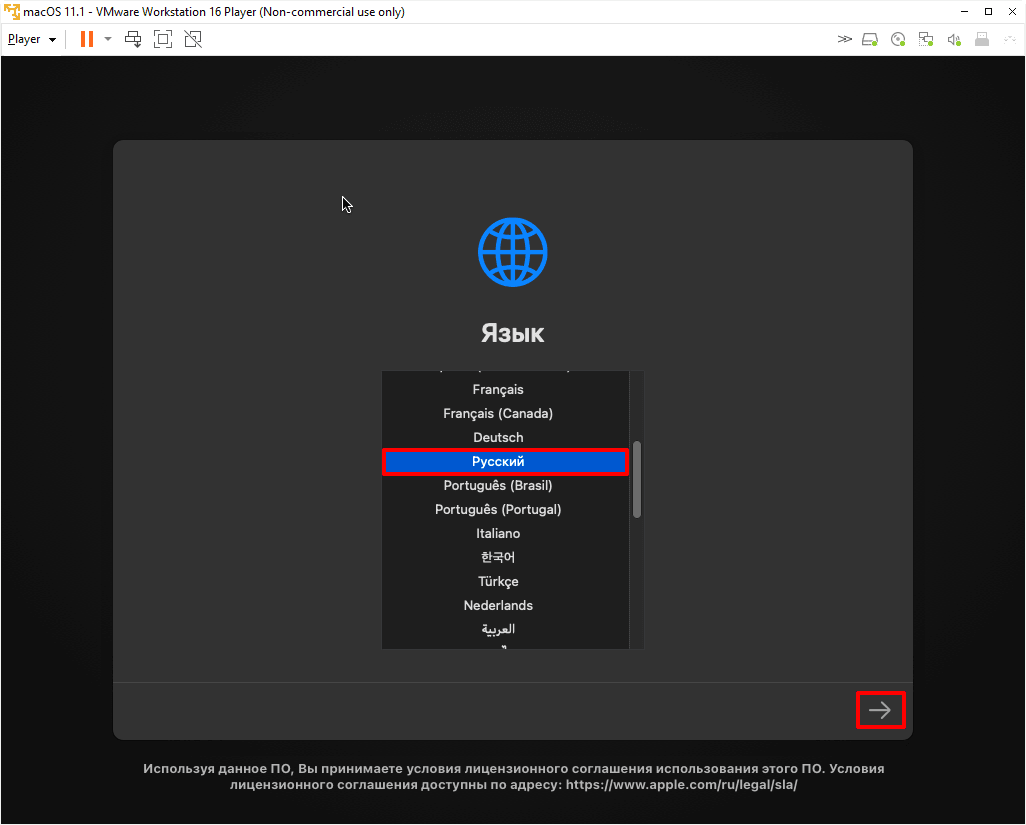
Выберите язык и нажмите на стрелку в правом нижнем углу:
Выбор языка macOS -
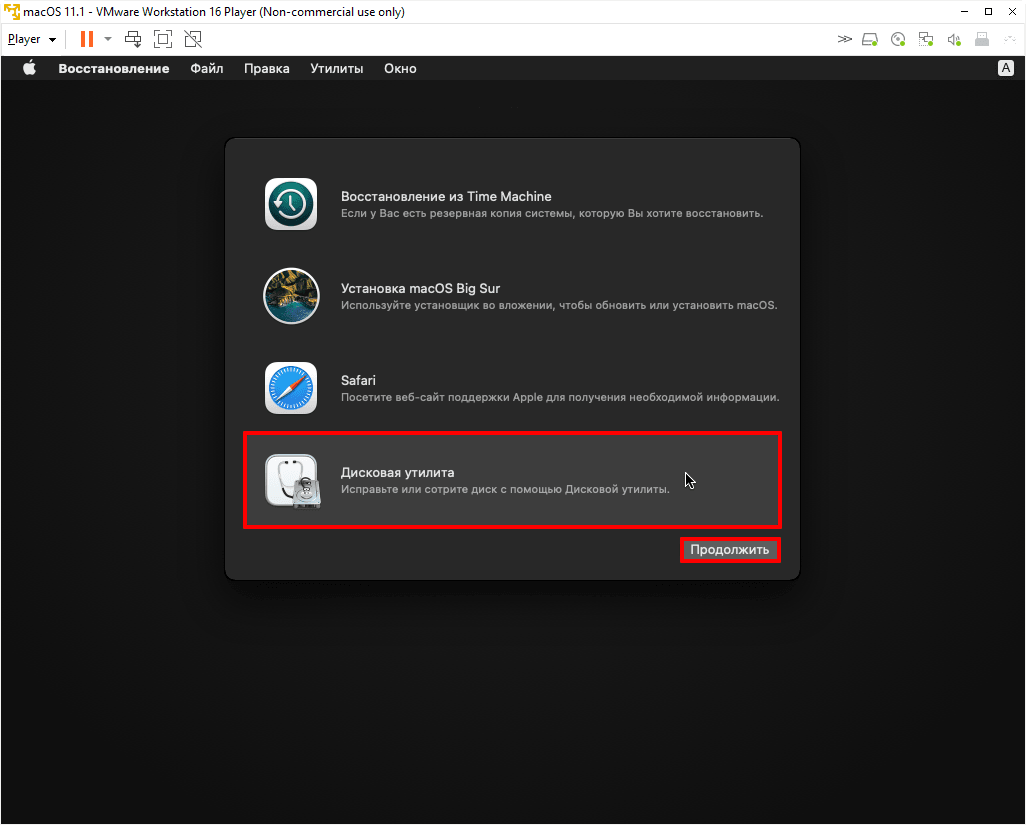
4.
Отформатируйте виртуальный диск. Для этого выберите Дисковая утилита и нажмите Продолжить:
Дисковая утилита для форматирования диска macOS -
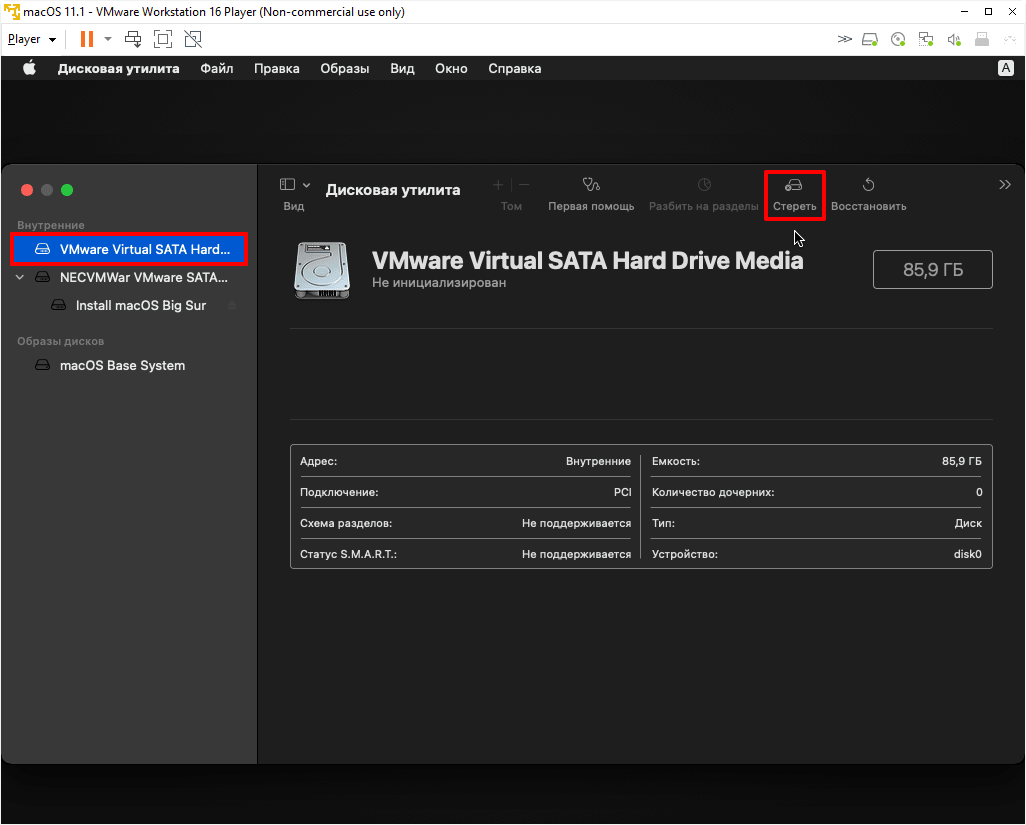
5.
Выберите виртуальный жесткий диск VMware Virtual SATA Hard Drive Media и нажмите Стереть:
-
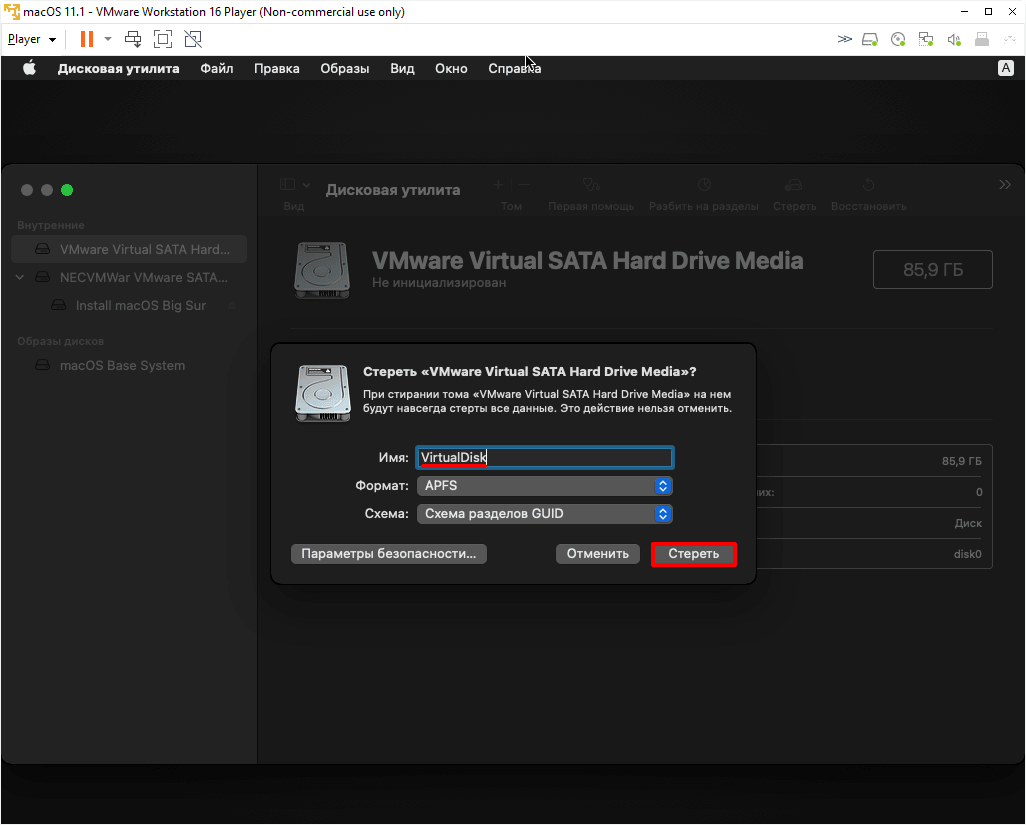
6.
Введите название диска и нажмите Стереть:
Запуск форматирования дискаДождитесь завершения процедуры и нажмите Готово.
-
7.
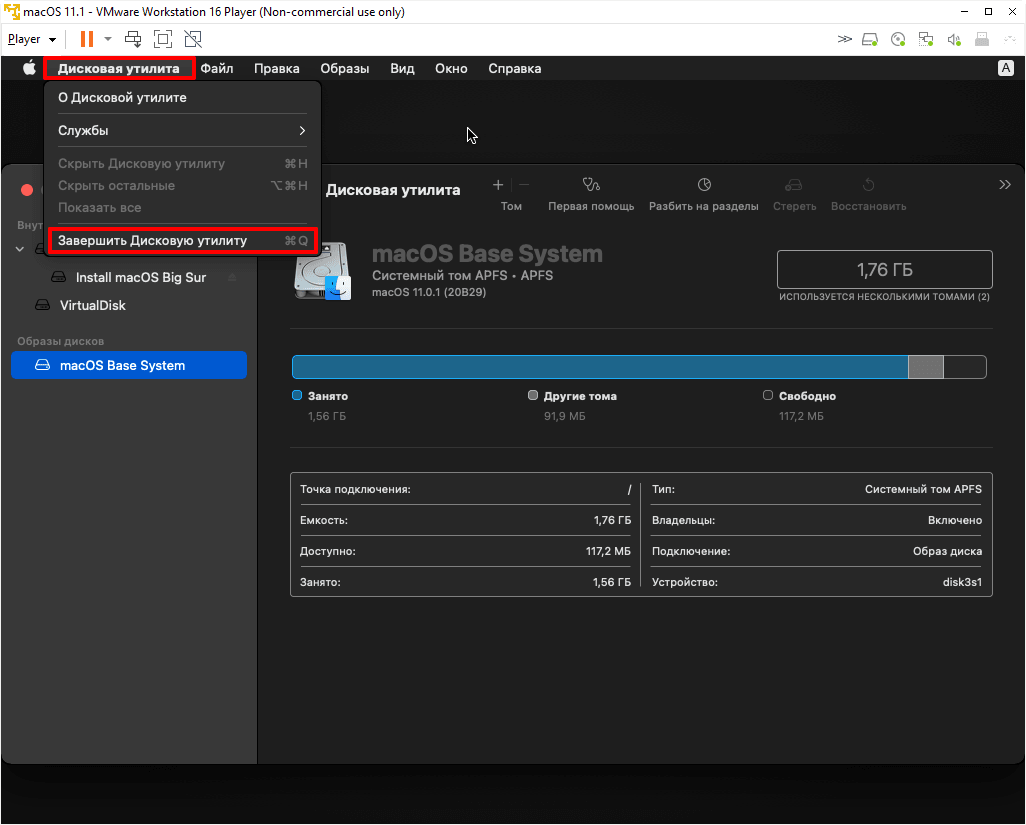
После этого вверху страницы нажмите Дисковая утилита — Завершить дисковую утилиту:
-
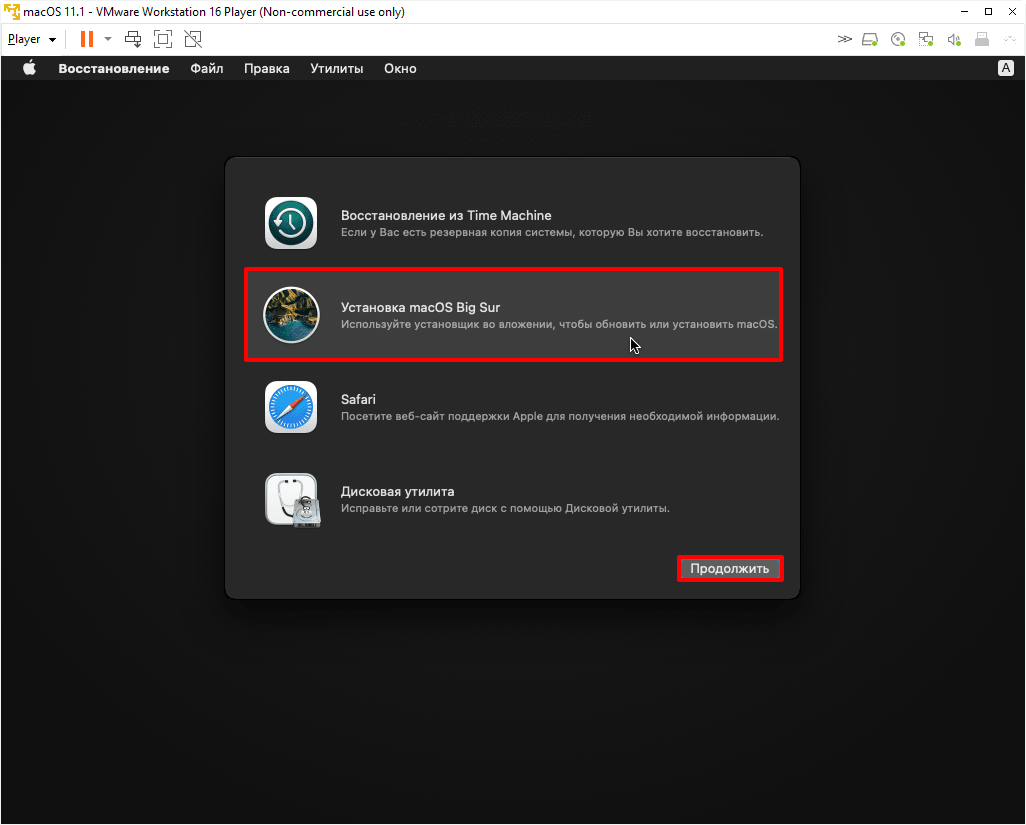
8.
Выберите Установка macOS Big Sur и кликните Продолжить:
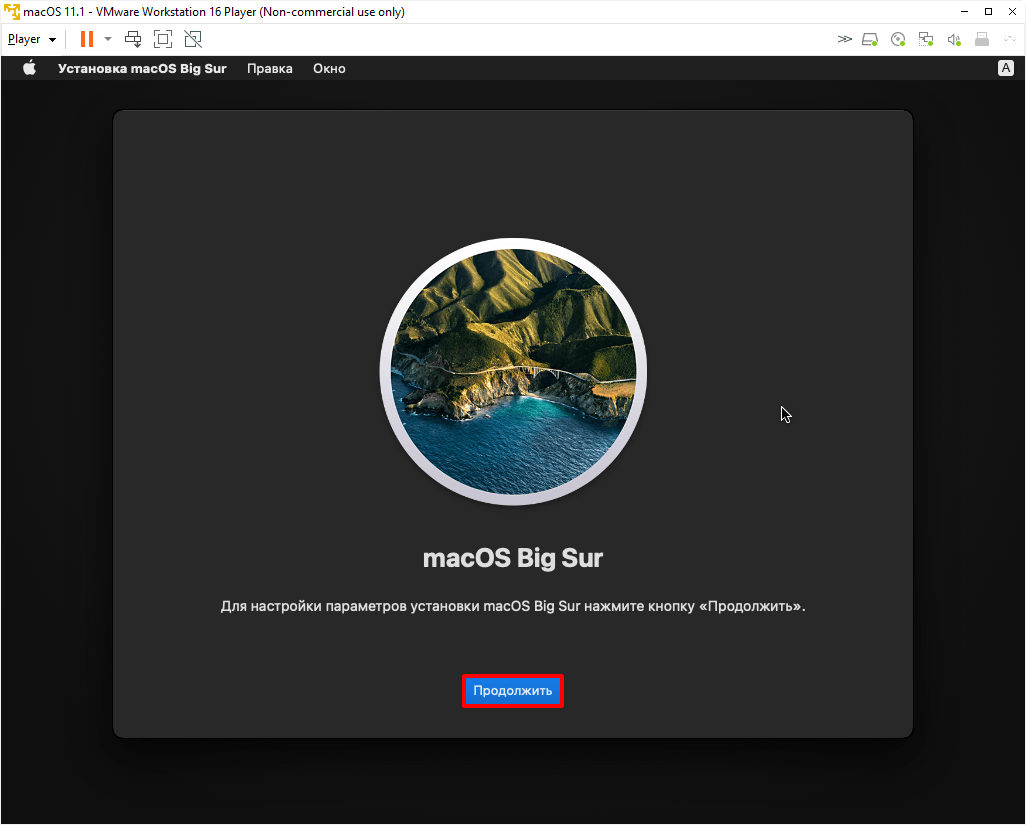
-
9.
Нажмите Продолжить:
-
10.
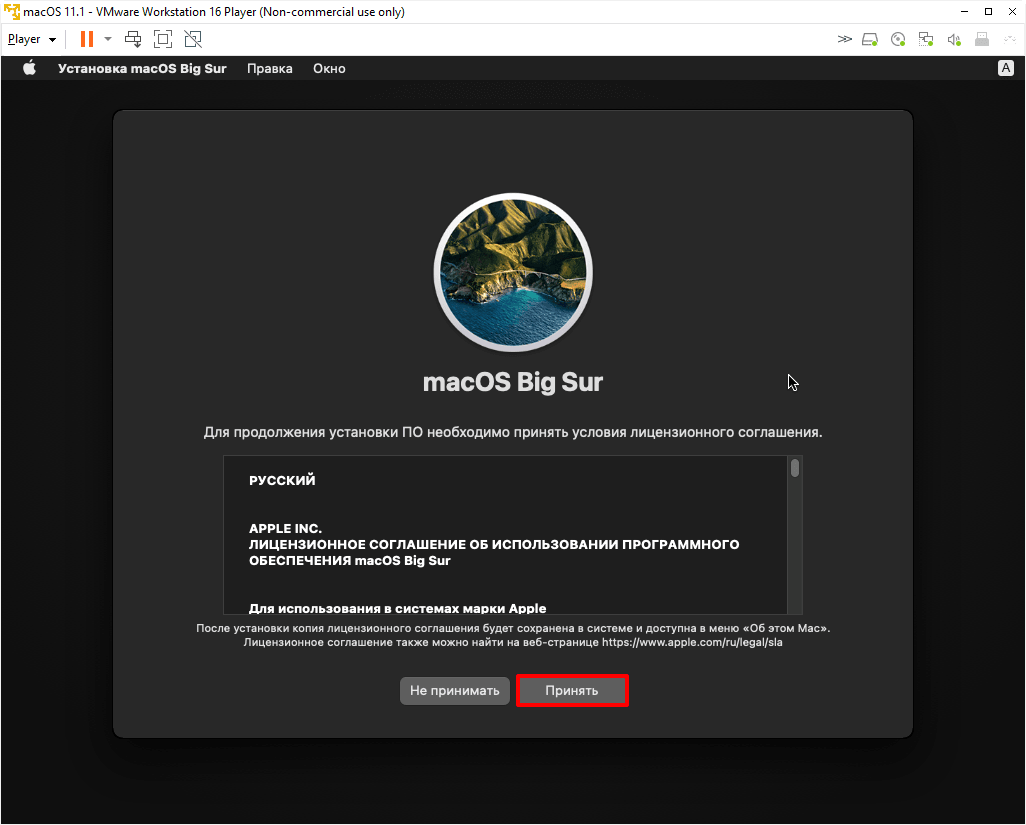
Примите условия лицензионного соглашения:
Условия лицензионного соглашения macOS -
11.
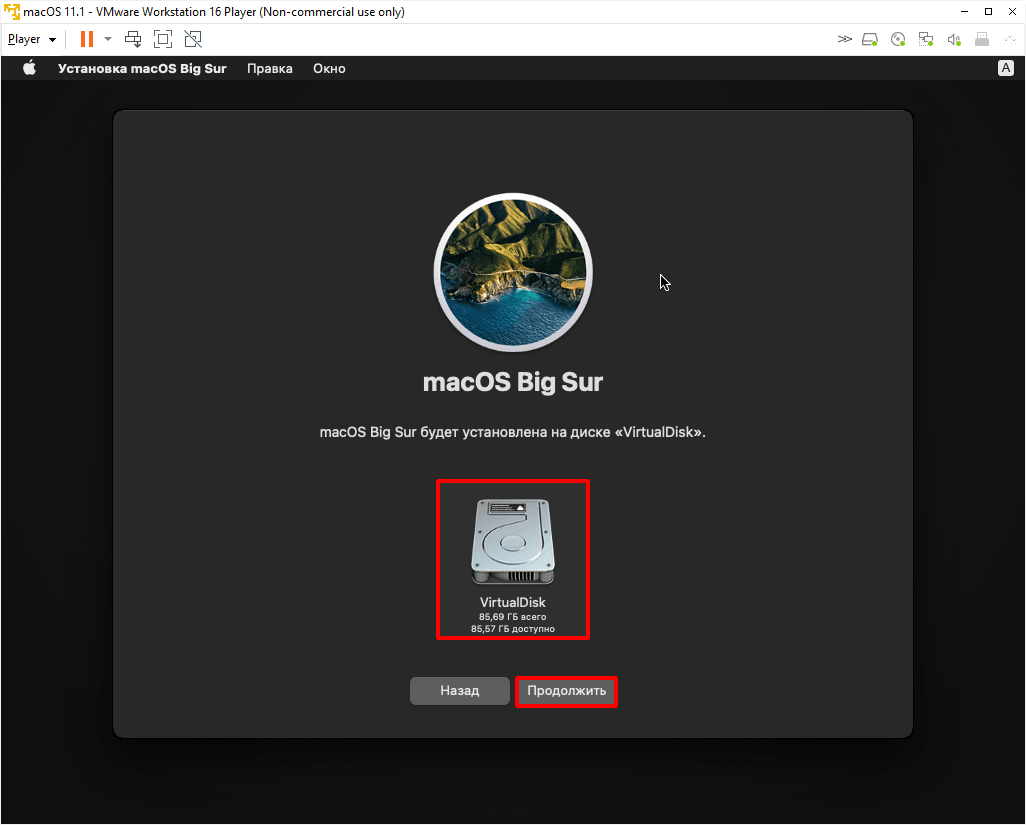
Выберите диск, название которого вы указывали на 6 шаге, и нажмите Продолжить. На этот диск будет установлена ОС.
Выбор диска для установки macOS -
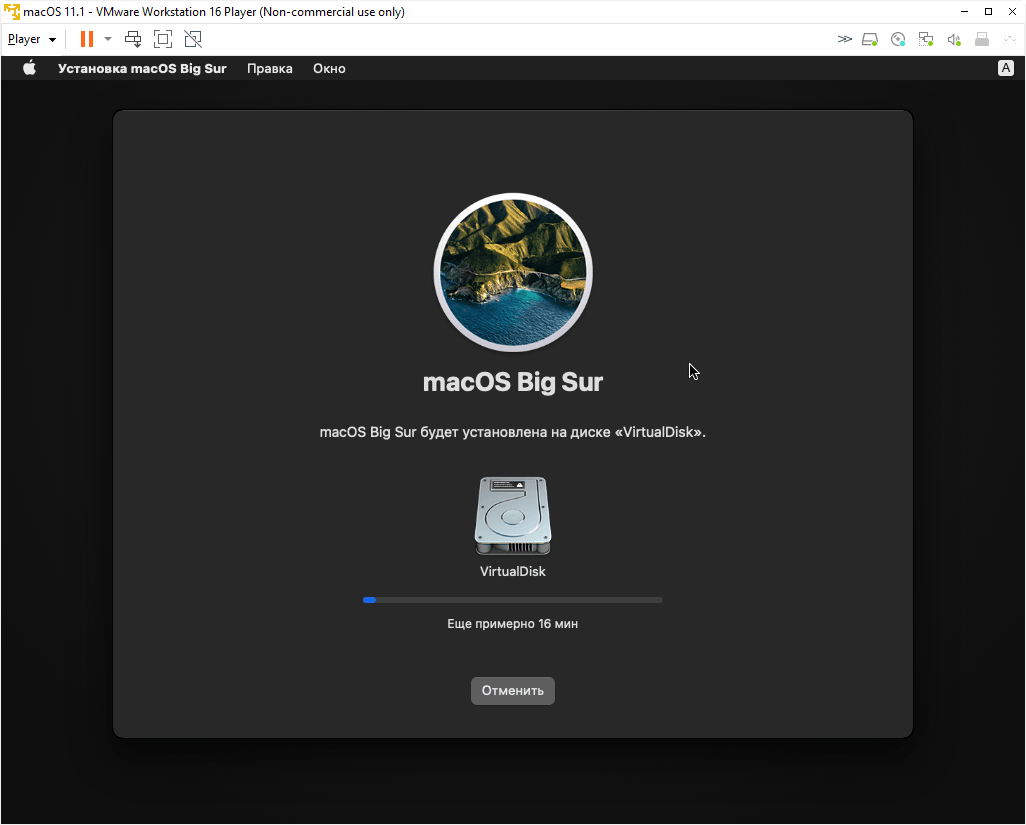
12.
Дождитесь окончания установки. Гостевая операционная система перезагрузится несколько раз:
-
13.
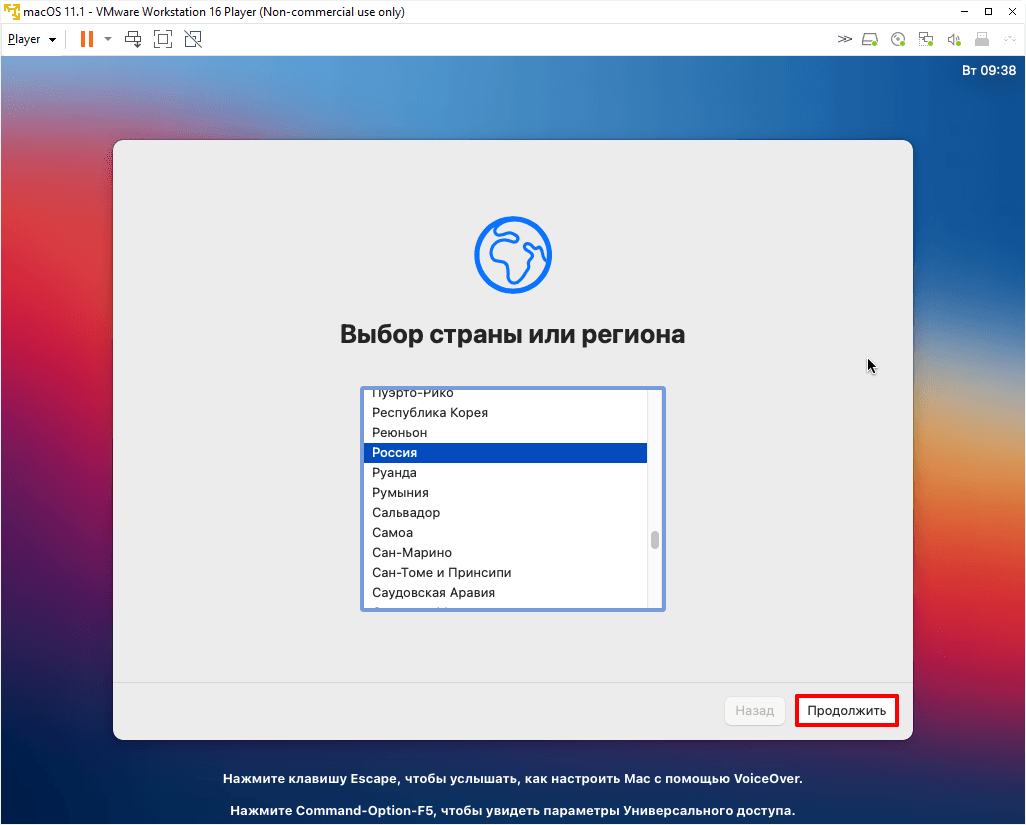
Выберите регион и продолжите установку. Следуйте подсказкам системы:
-
14.
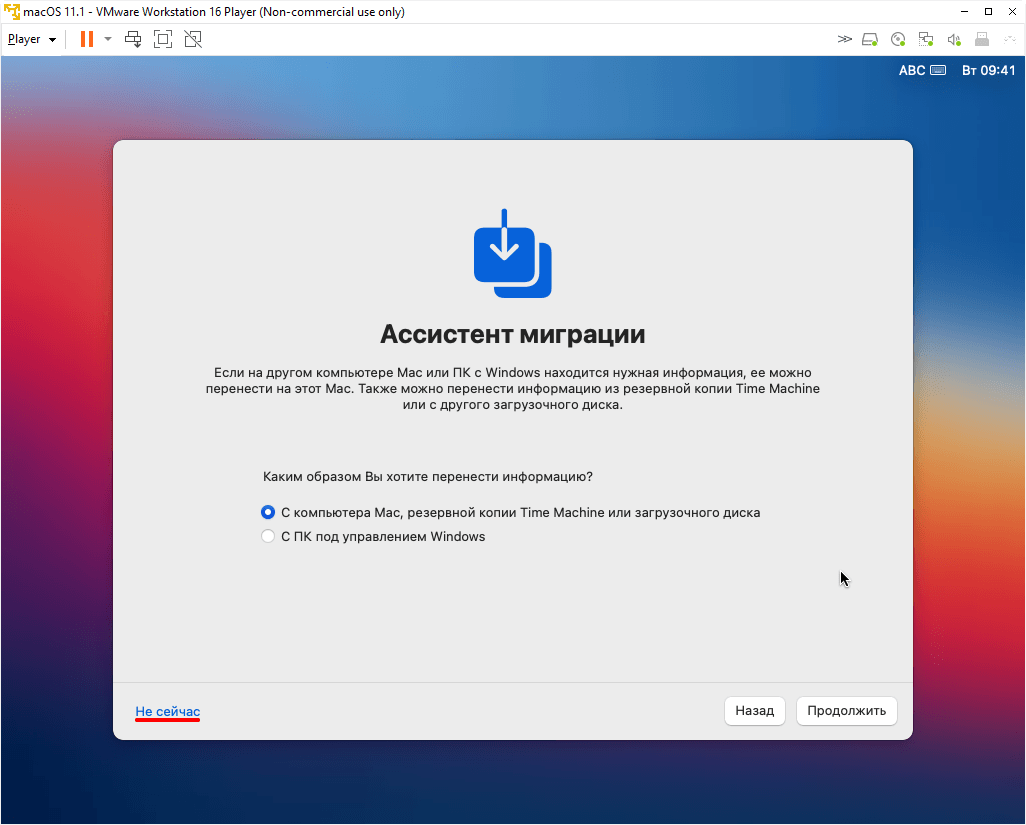
На этапе «Ассистент миграции» в левом нижнем углу нажмите Не сейчас:
-
15.
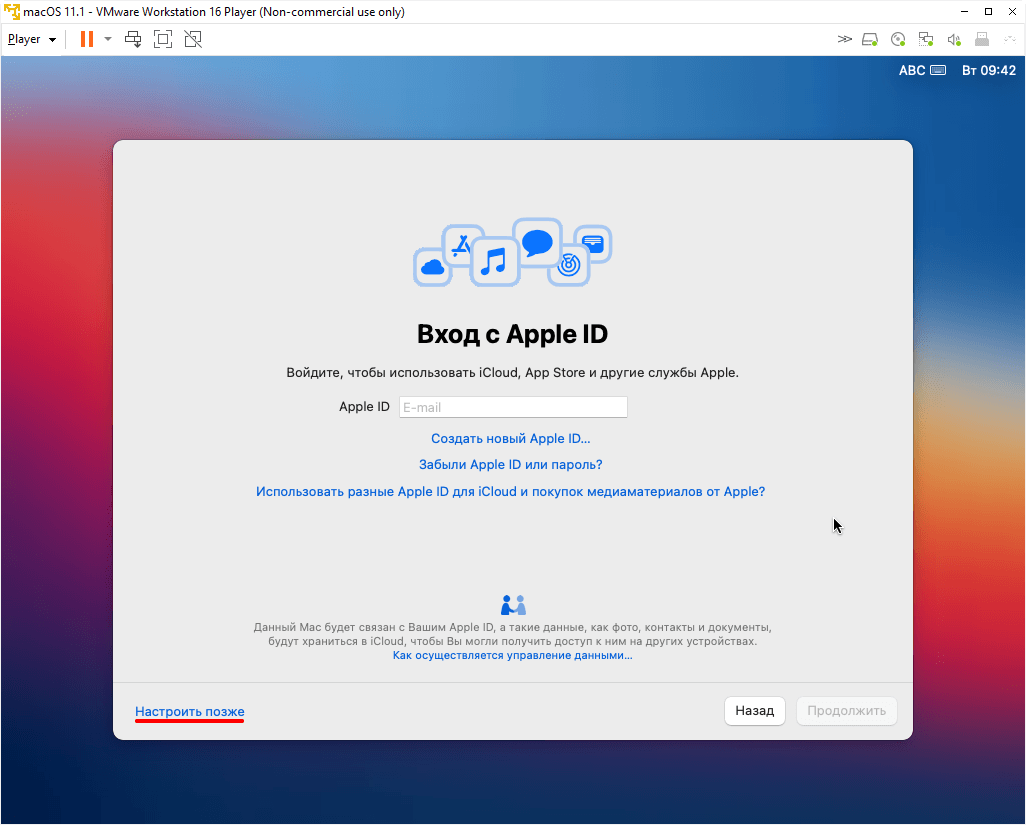
Чтобы пропустить «Вход с Apple ID» нажмите Настроить позже в левом нижнем углу:
-
16.
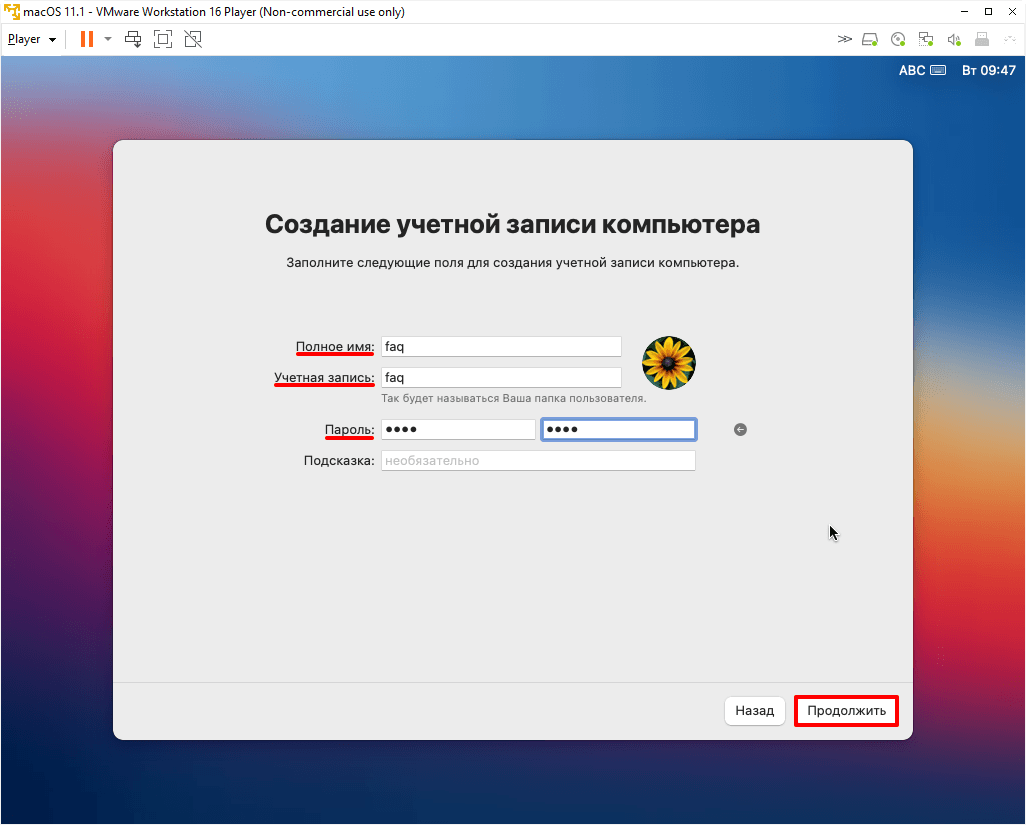
Заполните поля, задайте пароль и нажмите Продолжить:
-
17.
Завершите настройку macOS, следуя указаниям на экране.

Готово, вы установили macOS на виртуальную машину VMware Workstation Player.
Помогла ли вам статья?
Спасибо за оценку. Рады помочь 😊
👍
Which is the best Mac emulator for Windows? How to install a macOS virtual machine on PC? In this post, MiniTool Partition Wizard gives you a step-by-step guide on how to install a macOS virtual machine on PC via VMware.
Best Mac Emulator for Windows
For many years, Mac and Windows PC have been two incompatible camps. Apple Mac series computers have always been niche products, and fewer people use them. In general, under the same configuration, Mac computers are almost twice as expensive as Windows computers.
However, comparing Windows PCs, the Mac PCs have a more beautiful design and are easier to use. If you don’t want to buy an Apple computer but want to try this operating system, you can choose to either use hackintoshes or install a macOS virtual machine on Windows.
However, installing hackintoshes is very complicated. If your PC’s specs are not very bad, installing a macOS virtual machine is recommended. Then, which is the best Mac emulator for Windows? Most people will choose between VirtualBox and VMware. I am of no exception.
Tip: If you want a Windows emulator for Mac PC, you can directly download one from Apple store and the Windows VM installation process is very easy. But if you want to install MacOS on Windows, the installation process is slightly difficult, because you need to use some tools to break the limit of MacOS.
At first, my choice is VirtualBox, because many people recommend using this software. I follow steps in these posts to install the macOS virtual machine, but the installation fails with no exception.
The reason may be that installing a macOS virtual machine on VirtualBox needs a file named “VirtualBox Boot.vmdk“. I see this process in many videos but unfortunately many posts don’t mention this step. In addition, if you want to get this file, you must download it from some posts that are some private websites full of ads. I don’t like that, so I choose to try VMware.
Fortunately, my colleague in technical department has ever succeeded in installing a macOS virtual machine with VMware. Thanks to him, this post can be completed smoothly. So, in my mind, VMware is the best Mac emulator for Windows, although this judgment is a little subjective.
Preparatory Work
To run Mac on Windows smoothly, you should make sure your PC meets the following requirements:
- CPU: 4th Intel i5 or higher (if you AMD CPU, you will encounter more errors and bugs)
- RAM: at least 8GB
- Storage: more than 100 GB free space
- OS: 64-bit Windows 7 or later
How to Check PC Full Specs Windows 10 in 5 Ways
If your PC doesn’t meet the above system requirements, the macOS VM will freeze frequently. Then, you should get the following thing prepared:
- VMware software and unlocker file.
- A partition specialized for the macOS virtual machine (optional).
- A macOS image in .cdr format.
1. Install VMware and Download Unlocker
Both VMware Workstations Pro and VMware Workstation Player (the free version) are OK. You just need to install one of them. The installation process is very simple. You just need to download this software from its official website and install it normally. If you have VMware installed already, you can skip this step.
Then, you need to download the unlocker file that is the key file making VMware allow you to install macOS virtual machine. The unlocker file is released on GitHub, an open-source project hosting platform. On this platform, the developer will publish the source code of the unlocker file. Therefore, in my mind, the unlocker file is reliable. Please follow the steps below:
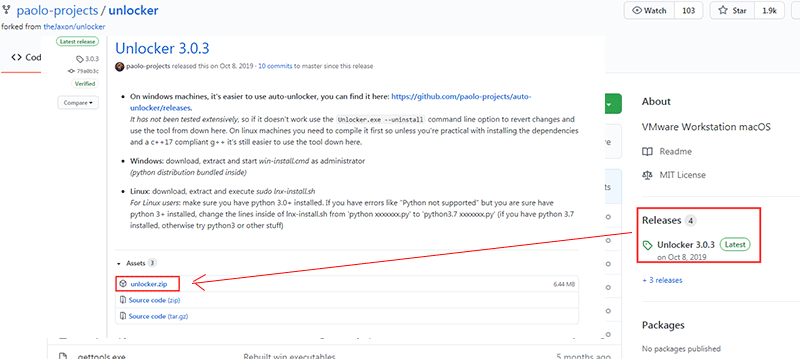
Step 1: Go to the website: https://github.com/paolo-projects/unlocker and click Release. Then, download the latest unlocker.zip file.
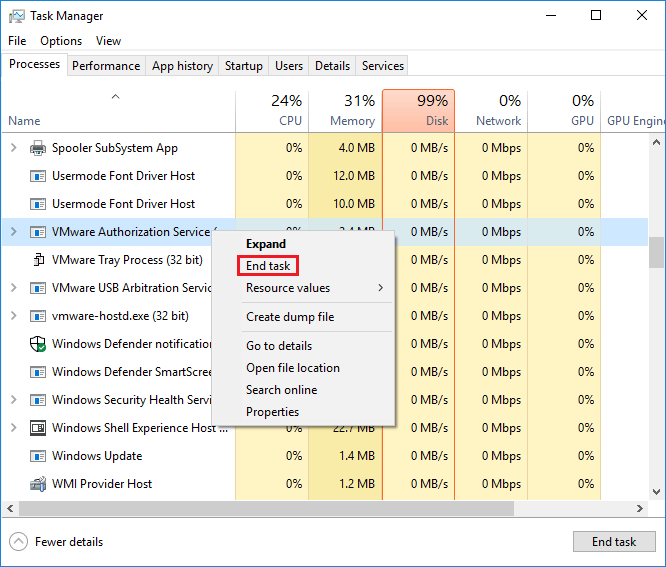
Step 2: Close VMware software. Then, right click blank area of the Taskbar and choose Task Manager. In the Processes tab, right-click and end any tasks related to VMware.
Step 3: Extract the unlocker.zip file. Open the extracted folder to find win-install.cmd file. Right click this file and choose Run as administrator. Then, this file will run to get some tools for VMware. All you need do is to wait for the window to shut down automatically.
2. Make a Partition
This step is recommended, because the virtual machine file will become larger and larger. Placing all virtual machine files into one partition is in favor of centralized management. To make a partition, you can use the shrink volume feature in Disk Management. But MiniTool Partition Wizard can help you make a partition more easily.
MiniTool Partition Wizard DemoClick to Download100%Clean & Safe
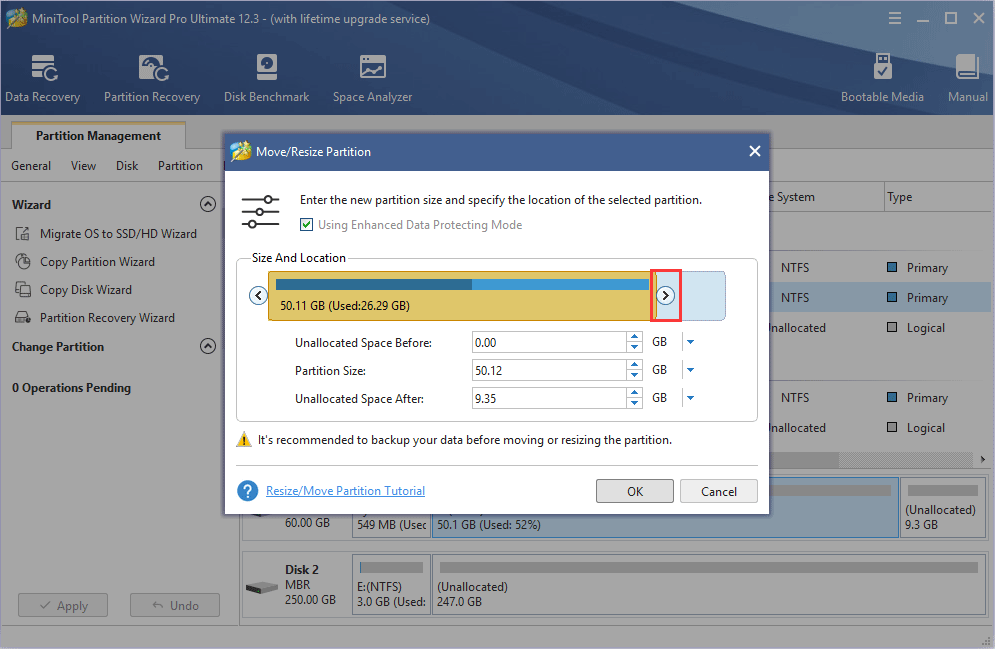
Step 1: Launch MiniTool Partition Wizard (free edition) and go to its main interface. Right click a partition and choose Move/Resize. This will open a window.

Step 2: In the window, drag the arrow to resize the partition. If you drag the whole partition block, you can change the location of the partition. Through this way, you can make unallocated space on the location you want. Click the OK button to continue.
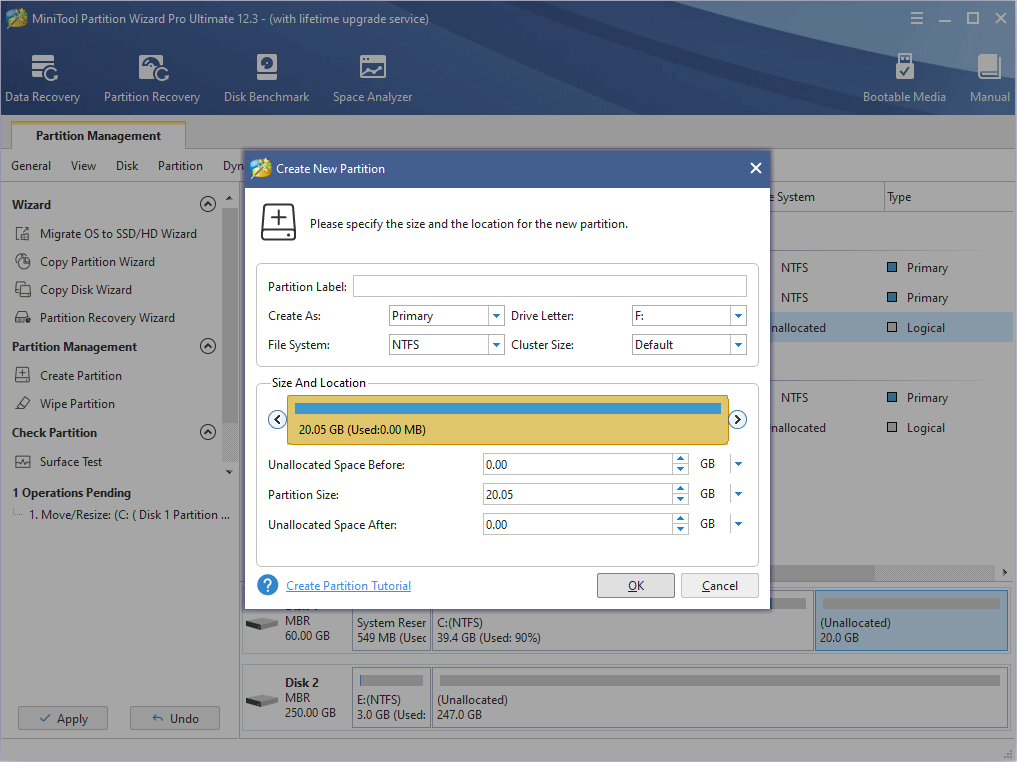
Step 3: Right click the unallocated space and choose Create. Just keep everything in default and click the OK button.
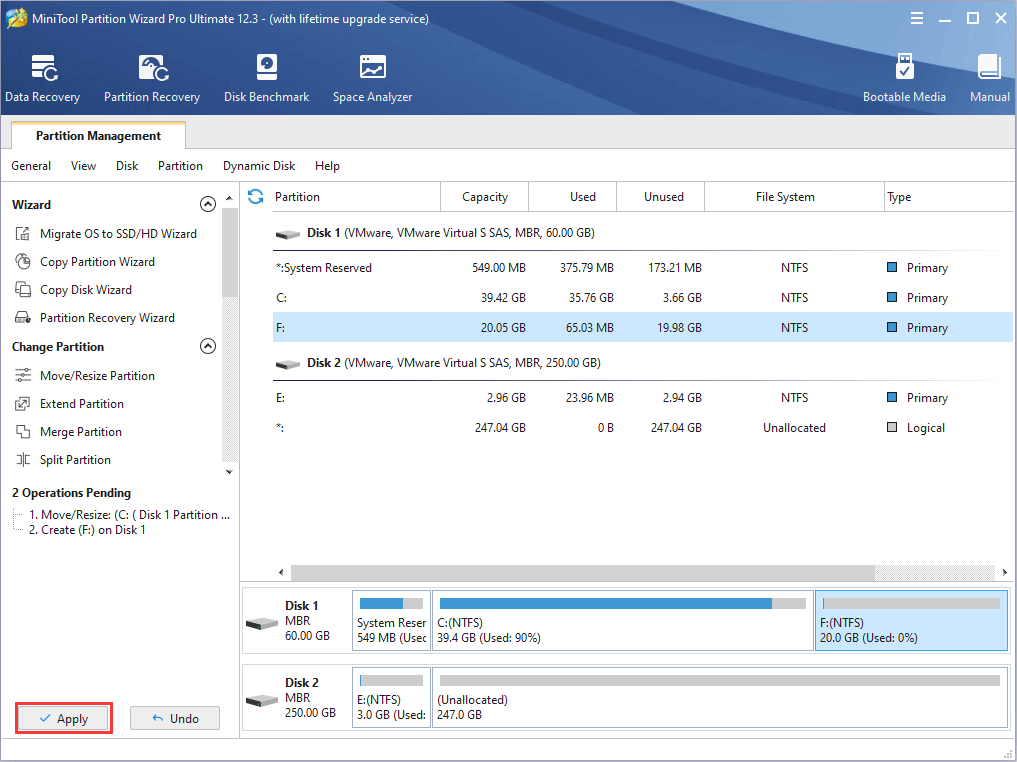
Step 4: Click Apply button to execute the pending operations.
3. Get a MacOS Image in .cdr Format
Where to get macOS .cdr image? You can create it by yourself or download it online. If you want to create by yourself, here is the guide:
Step 1: Download a macOS installation package (for example, Install macOS Catalina. app) from the Apple Store into the apps directory.
Tip: All of these operations are performed in macOS system. Therefore, if you have no macOS product, downloading macOS .cdr image online directly is recommended.
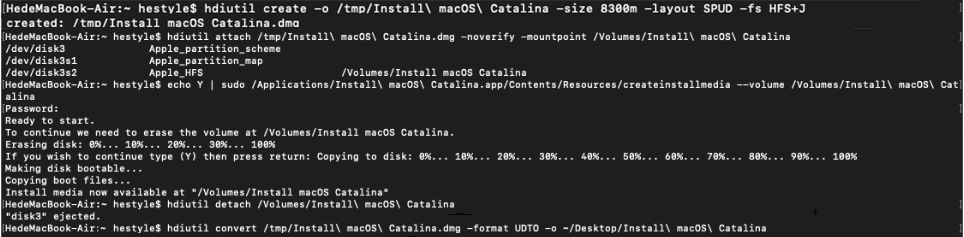
Step 2: Open the terminal and perform the following commands:
- hdiutil create -o /tmp/Install macOS Catalina -size 8300m -layout SPUD -fs HFS+J (* This command will create an empty .dmg disk image with a size of 8300m under /tmp The .dmg image should be at least 500M larger than the macOS app file. In addition, Install macOS Catalina is the name of the .dmg disk image, you can replace it accordingly.)
- hdiutil attach /tmp/Install macOS Catalina.dmg -noverify -mountpoint /Volumes/Install macOS Catalina (* This command will mount the .dmg image that you created just now to directory /Volumes/Install macOS Catalina.)
- sudo /Applications/Install macOS Catalina.app/Contents/Resources/createinstallmedia –volume /Volumes/Install macOS Catalina (* This command will write the macOS app file into the .dmg disk image you mounted just now. Then, you need to enter password and wait for the writing process to complete.)
- hdiutil detach /Volumes/Install macOS Catalina (* This command will unmount .dmg disk image.)
- hdiutil convert /tmp/Install macOS Catalina.dmg -format UDTO -o ~/Desktop/Install macOS Catalina (* This command will convert the .dmg image into .cdr image and save it into desktop with the name “Install macOS Catalina“. Wait until the process to complete and then you can find the .cdr file on your desktop.)
- rm /tmp/Install macOS Catalina.dmg (* This command will delete the .dmg image in the tmp folder to free up space.)
Note: Don’t convert the .dmg image into .iso image with UltraISO or dmg2iso tool, because I read a post saying the converted iso file can’t be read by VMware.
How to Create a MacOS Virtual Machine with VMware
Now you can install Mac on Windows with VMware, the best Mac emulator for Windows. Here is the guide:
Step 1: Open VMware and click File > New Virtual Machine. Choose Typical and click Next.
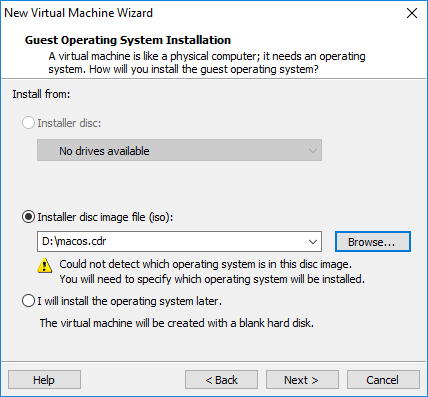
Step 2: Choose Installer disc image file (iso) and click Browse. This will allow you to choose the macOS image file. But please note that you can see the .cdr image only if you modify the file type to All files. Then, click Next.
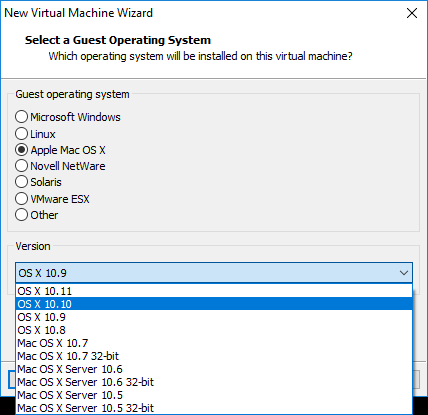
Step 3: Choose Apple Mac OS X and pick the right version. Then, click Next.
Note: My VMware can only support macOS version up to 10.11. The reason may be that my VMware version is 12, not the latest version. If you want to install slightly newer macOS versions, please install more recent VMware versions.
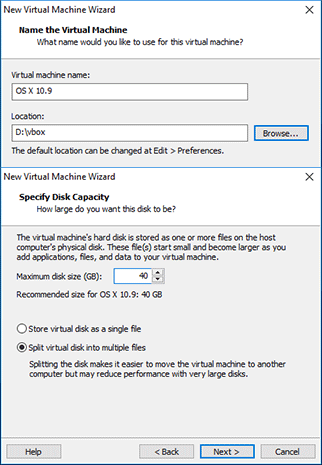
Step 4: Check the name and the location of the macOS virtual machine. Then, click Next. Specify disk capacity. Please make sure the max size is at least 40 GB and then click Next. Then, click Finish.
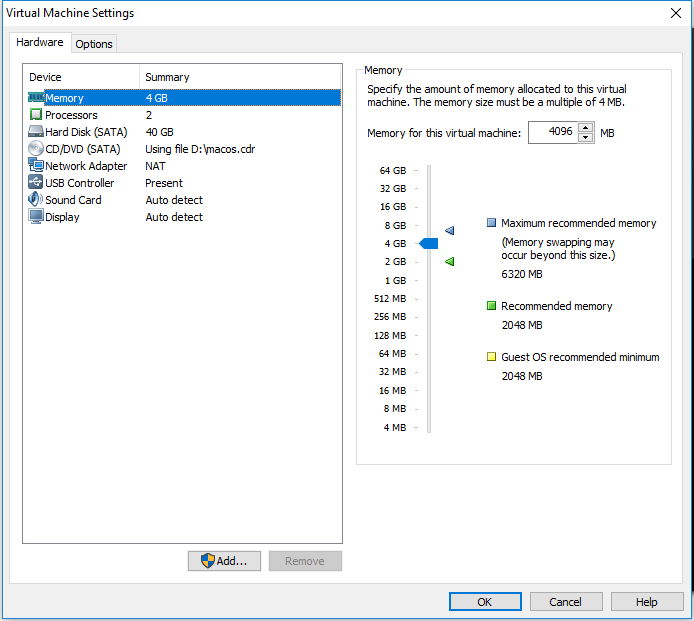
Step 5: Go to VM > Settings. In the Virtual Machine Settings window, you can change the macOS hardware settings. I recommend you to change the Memory to at least 4GB, otherwise the macOS virtual machine will not run smoothly. Click OK to save changes.
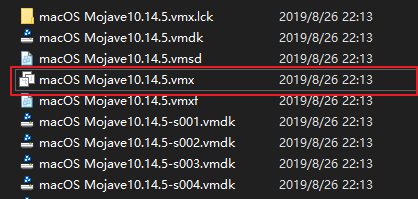
Step 6: Then, you need to modify the configuration file, otherwise you will get VMware unrecoverable error when booting the macOS. First, please navigate to the location of the macOS virtual machine in your PC. Right click the macOS virtual machine configuration file (.vmx) and open it with notepad.
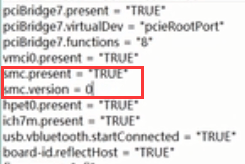
Step 7: In the notepad, scroll down to find the code line: smc.present = “TRUE”. Under this code line, add the following code line: smc.version = “0”. Then, save and exit. Now, you can start the macOS virtual machine and it should open smoothly.
Step 8: Follow the on-screen wizard until you are asked to choose a disk for installing the macOS. In this case, go to Utilities > Disk Utility. Click the VMware Virtual SATA Hard Drive Media in the left panel and click Erase. Follow the wizard to rename and erase the disk. After completing this process, exit Utilities tool and choose the disk you just renamed to install macOS on it.
Step 9: Follow the wizard to customize settings and then you can use the macOS on your PC.
Do you want to run Mac on Windows? Installing hackintoshes on PC may be complicated. You can try using a Mac emulator for Windows. This post gives you a step-by-step guide on how to install a macOS virtual machine on Windows PC via VMware.Click to Tweet
Bottom Line
Is this post useful to you? Have you encountered problem when following the above steps to install macOS virtual machine? Do you know other good Mac emulators for Windows? Please leave a comment in the following zone.
In addition, if you have difficulty in moving/resizing partition, please contact us via [email protected]. We will get back to you as soon as possible.
Mac Emulator for Windows FAQ
Can you emulate Mac on Windows?
Yes, you can. As I know, you can emulate Mac on Windows with VMware and VirtualBox. But to make the macOS run smoothly, your PC needs to meet some requirements.
Is it legal to run macOS on PC?
Apple doesn’t authorize any end user to run Mac OS on non-Apple machines. It’s illegal to install macOS on anything but a genuine Macintosh computer.
How do I emulate a Mac in Windows 10?
- Install VMware and download unlocker file from GitHub.
- Get a macOS image in .cdr format.
- Create a macOS virtual machine in VMware with the macOS image.
- Modify the macOS configuration file.
- Perform macOS installation process.
macOS Big Sur is the latest operating system released by Apple for their Mac computers, first introduced in June 2020. It is the successor to macOS Catalina and features several new updates and improvements, including a redesigned user interface, enhanced privacy features, and improved compatibility with iOS devices. One of the most notable changes in Big Sur is the redesigned user interface. The icons, menus, and windows have been updated with a fresh and modern look, with translucent backgrounds and rounded corners. The Dock has also been updated with a new design and features, such as the ability to see recently used apps.
Another critical feature of macOS Big Sur is its improved privacy protection. It now requires apps to ask for permission before accessing sensitive information, such as your location, camera, or microphone. Additionally, Safari has been updated with new privacy features, including a Privacy Report that shows which trackers have been blocked.
Regarding compatibility, Big Sur is designed to work seamlessly with Apple’s other devices. It supports new features like Continuity, which allows you to use your iPad or iPhone as a second display or input device for your Mac. It also includes support for Universal apps, which run natively on both Macs with Apple silicon and Intel-based Macs.
Other new features in macOS Big Sur include enhancements to Messages and Maps, improvements to the Photos app, and new widgets to the Notification Center. Additionally, the Control Center has been redesigned and now includes quick access to commonly used settings and controls. Overall, macOS Big Sur is a significant update to Apple’s operating system, offering users a more modern and streamlined experience while also improving privacy and compatibility with other Apple devices.
Also, macOS Big Sur is compatible with the following MacBook Machines:
- iMac (Mid 2014 or later)
- iMac Pro
- MacBook (Early 2015 or later)
- MacBook Air (Mid 2013 or later)
- MacBook Pro (Late 2013 or later)
- Mac Mini (Late 2014 or later)
- Mac Pro (Late 2013 or later)
- Developer Transition Kit (only up to Big Sur 11.3 beta
By using the patch tools you can install macOS Big Sur on the earlier Mac that doesn’t supports it. Such as iMac 2012, and MacBook Pro 2012. Using the patch tools you can install macOS Big Sur on the old version of MacBook Pro 2008, and iMac Minin 2009.
To install macOS Big Sur on VMware on Windows PC, first, you need to download and install some required files. Such as downloading and installing the VMware Workstation Pro 17/Player on your Windows PC. Download the macOS Big Sur ISO image or VMDK file.
- Download the macOS Big Sur ISO image file
- Download the macOS Big Sur VMDK file
- Download & Install VMware Workstation on your Windows PC
- Edit the macOS VMX file
- Start installing macOS, Big Sur
- Complete the basic settings of macOS Big Sur on VMware
- Install the VMware tools (Full-screen mode, Drag & Drop)
What is VMware?
VMware is an open-source platforms virtualization software application for Windows, Linux, and macOS. VMware is one of the advanced virtualization software that allows you to test several and multiple operating systems at the same time on a single physical machine. For example, you can install Windows, macOS, Windows, Linux, & Android OS on VMware on your Windows PC. So, VMware Workstation comes with two different versions, such as VMware Workstation/Player. If you want to test the VMware Workstation Pro on your Windows PC, then you have to purchase it. And if you want to use the VMware Player, it’s completely free of cost. So, there are differences between Workstations and Players. As the VMware Workstation comes with full features, and VMware Player features are limited.
And currently, the latest version of VMware Workstation is VMware Pro 17, the VMware Workstation Pro 17 features are excluded more than VMware Workstation Pro 16. And here is the free version in the below down guide.
- How to Install VMware Workstation Pro 17 on Windows 11 PC?
Create A New Virtual Machine on VMware on Windows PC For macOS Big Sur
To create a new virtual machine for macOS Big Sur on VMware on Windows PC, simply open up the VMware Workstation on the first window and click on create a new virtual machine.

When this window opened select the typical recommended then click next, Select the option “I will install the operating system later” and click next.

Select the guest operating system, Mac OS X, and version macOS 11 then click next. Type the name of the virtual machine, then specify the location, and click next.

Select the maximum disk size for macOS Big Sur, then select “Store virtual disk a single file” and click next. Now you are ready to create the virtual machine so click finish to finalize.

Edit the macOS Big Sur Virtual Machine Settings
Once you have created the macOS Big Sur Virtual Machine on VMware on Windows PC. So, there are a few settings to edit for better performance, simply select the virtual machine and click on Edit virtual machine settings.

When the settings window opened, on the first step, from the left-handed window side select the hardware tab. Then select the Memory tab, and increase the memory size.

Select the processor tab, and increase the number of processors.

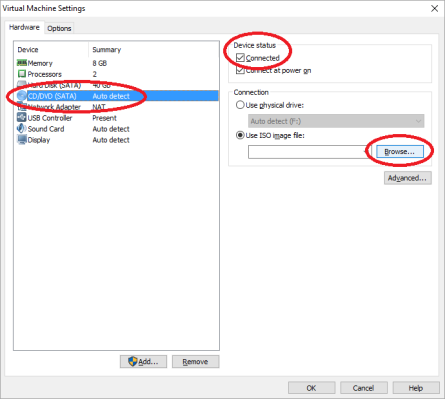
Select the CD/DVD SATA tab, then select the Use ISO image file option, and click on browse.

Now select the macOS Big Sur ISO Image file and click open.

Choose the USB Controller tab, then select USB 3.1 and click on OK to save the changes.

Edit the VMX file of macOS Big Sur
You might see lots of changes to the vmx file of other macOS, and macOS Big Sur. Don’t worry there are some extra commands which configure the macOS Big Sur vmx file on VMware on Windows PC. So, to edit the macOS Big Sur vmx file simply close the VMware Workstation.

Now go to the virtual machines folder, find the macOS Big Sur Virtual Machine, right-click on vmx file>and open with notepad.

Once the vmx file is opened, scroll down copy and paste the below down commands, and press and hold ctrl+s to save changes.
smbios.reflectHost = "TRUE"
hw.model = "MacBookPro14,3"
board-id = "Mac-551B86E5744E2388"
smc.version = "0"
Perform a Clean Install of macOS Big Sur on VMware on Windows PC
Once the virtual machine is successfully created for macOS Big Sur on VMware on Windows. And the vmx files are configured, so now it’s time to install macOS Big Sur on VMware on Windows PC. Simply, navigate to VMware Workstation and open then click on “Power on this virtual machine” to start installing macOS, Big Sur.

When the installation is launched on the first window select your language and click on the arrow option.

On the recovery window, selects the disk utility and click continue.

From the left-handed window side, select the VMware Virtual Sata option, then click on erase option. And format the disk with the following parameters.
- Name optional
- Format Mac OS X Extended (journaled)
- Scheme GUID Partition Map

Once the disk is formatted simply click on the done option.

Now simply close the disk utility window.

Now again on the recovery window, select the “Instal macOS” option and click continue.

To set up the installation of macOS Big Sur on VMware simply click continue.

Agree with the terms and conditions of macOS Big Sur.

Select the disk where you want to install macOS Big Sur on it, as this disk is formatted in the previous step on the Disk Utility window.

And now the macOS Big Sur starts installing on VMware on Windows PC. So, the installation may take time, and during the installation, it will start several times.

Complete the Basic Settings of macOS Big Sur
While the installation of macOS Big Sur successfully completed on VMware on Windows PC. There are only a few steps that you have to complete the basic settings in order to use the macOS Big Sur on VMware on Windows PC.
- Select your country and click continue
- Choose a keyboard layout and click continue. If you want to customize the keyboard layout, to add any other language you can add that by clicking on customize settings.
- You can turn on the accessibility options feature on macOS Big Sur. There are multiple options for accessibility such as Vision, Motor, Hearing, and Cognitive. So if you don’t want to use this feature click on the Not now option.
- Read the Data & Privacy then click continue.
- On the migration assistant page simply click on the not now option.
- You can enter the Apple ID on this window, So, there is no need to enter the Apple ID simply continue by clicking on the Set up later option.
- Click agree to agree with the terms and conditions of macOS Big Sur.
- If you want to use the express setup, so if you don’t want simply click continue.
- On the Analytics window simply click continue.
- On the Screen-time window click to set up later.
- Select the look for macOS Big Sur on VMware on Windows PC.
- And finally, the macOS Big Su is successfully installed on VMware on Windows PC.
There is a related guide to installing macOS Ventura, and macOS Monterey, on VirtualBox & VMware on Windows PC. In the below down guide links.
- How to Install macOS Big Sur Final on VirtualBox on Windows PC?
- How to Install macOS Ventura 13 on VMware on Windows PC?
- How to Install macOS Ventura 13 on VirtualBox on Windows PC?
- How to Install macOS Monterey Final on VirtualBox on Windows PC?
- How to Install macOS Monterey Final on VMware on Windows PC?
Fix macOS Big Sur screen resolution on VMware on Windows PC
- Fix macOS Big Sur Screen Resolution on VMware on Windows PC
Conclusion
Finally, macOS Big Sur is successfully installed on VMware on Windows PC. And the only thing just remains in this part is to use macOS Big Sur full-screen mode. And the next thing is to have the access to drag & drop feature between Windows and macOS on VMware. You can fix this issue by installing VMware Tools on macOS Big Sur.

I’ve never been a Mac fan, but I do have to say that our family does have several Apple products in our home, 2 iPads and an iPhone… for the kids and my wife. Whether I like to admit it or not they do make a highly polished quality product.
It had been an interest of mine recently to run Mac OS X on my powerhouse PC at home, but I wanted it to run as virtual machine. I raked over some sites that stated it was not possible, I found that rather funny I mean how is it not possible doesn’t Mac run on Intel hardware nowadays anyhow? Then I stumbled on this video.
It does a good job at showing the basic steps, however it doesn’t explain much along the way, I figured it would be good to break this down and explain it.
- Download this file (approx. 6 GB), within this file is a file called Yosemite 10.10 Retail VMware.rar, this needs to be extracted to a location of your choice, preferably onto a SSD. This rar file contains VMware prepped OS X files (vmx, vmdk) for use with VMware products.
- Install VMware Workstation or VMware Player, I chose the Workstation route since I already had it installed.
- Confirm VMware Workstation or VMware Player is installed correctly, and close the program.
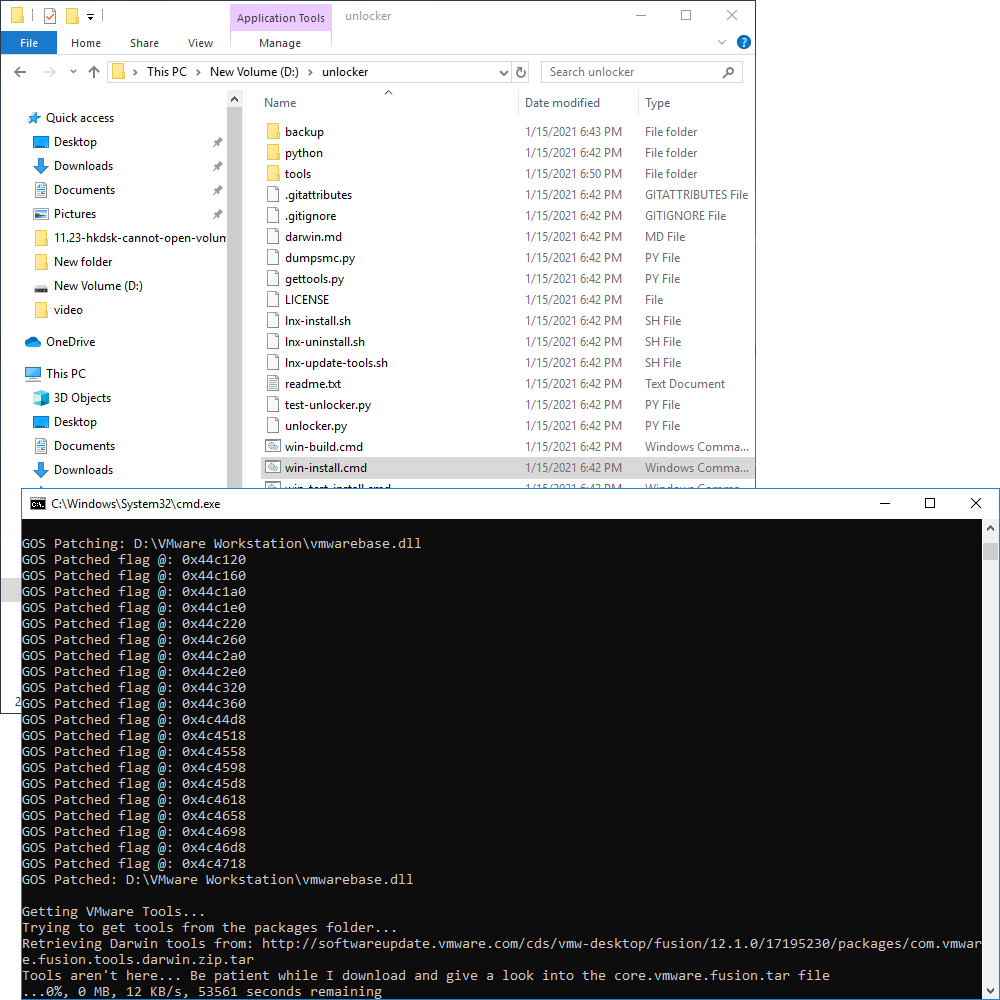
- Download the latest OS X Unlocker, at the time of writing it is version 2.0.8.
- Extract the contents of OS X Unlocker onto your computer. OS X Unlocker essentially patches the installed VMware product so Mac OS X can be installed. It does this modifying some core VMware system files.
- Browse to the folder where you extracted OS X Unlocker and Run the following files As Administrator (win-install.cmd and win-update-tools.cmd)
Note: if something goes wrong or you’d like to restore the original files for your VMware application you can run win-uninstall.cmd. - Run VMware Workstation or VMware Player and select Open a Virtual Machine.

- Select the Mac OS X 10.9.vmx file and select Open.

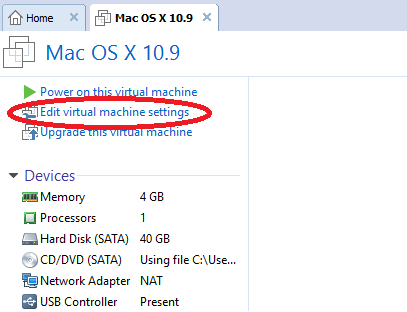
- Go to Edit virtual machine settings. Either by right clicking on the Mac OS X 10.9 object on the left side panel or via the tabbed window.
- You can keep the default resources if you prefer or bump them up, I personally bumped them up to 8 GB and 2 vCPU. The important option here is Version which is on the Options tab. This needs to be set to Mac OS X 10.7. This option is not available by default, the OS X Unlocker we ran earlier has exposed this option. If for some reason you don’t see this option, look at re-running the OS X Unlocker steps, it needs to be Run as Administrator.

- Now power on the Virtual Machine using Power on this virtual machine or by right clicking and going to Power > Start Up Guest.
- The machine will boot up and take you through the OS X setup process, it’s very quick and painless. Once complete it’s now time to install the latest VMware Tools onto the newly created OS X VM. You may have picked up on it when we ran win-update-tools.cmd for OS X Unlocker… it pulled down the latest and greatest for us to mount and install.
- Right click on the Mac OS X 10.9 VM on the left side and go to Settings.
- Go to CD/DVD and go to Browse and mount the darwin.iso file. Make sure Connected is checked!


- The VMware Tools installer should pop right up, just click Install VMware Tools and then reboot upon completion.
- If you want to take it a step further to improve the VM performance there is tool called BeamOff which is included in this file we downloaded in step 1. This tool disables beam synchronization which in turn improves OS X VM performance.
- At the time of this writing OS X El Capitan is now available, if you want to apply it, go fetch the update from the App Store and install it!


Hopefully you found this informative, I found it interesting and thought I should share my experience.