-
Becca1985
- Posts: 4058
- Joined: Fri Jun 12, 2009 1:17 am
Windows Server 2019 Vmware Paravirtual Driver
Please help me find the driver downloads to the devices windows server 2019 vmware paravirtual, thx!
-
Detective
- Site Admin
- Posts: 291425
- Joined: Sat Jan 31, 2009 3:19 pm
Re: Windows Server 2019 Vmware Paravirtual Driver
Post
by Detective » Tue Mar 23, 2021 2:13 am
Below you can download windows server 2019 vmware paravirtual driver for Windows.
File name: _win-server2019-vmware-paravirtual.exe
Version: 1.894
File size: 22282 MB
Upload source: original install disk
Antivirus software passed: G Data ver. 5.92
Windows Server 2019 Vmware Paravirtual Driver
(click above to download)
-
Для скачивания ресурсов Форума пользователь должен написать не менее 5 полезных сообщений и получить 5 симпатий.
Если Вы не хотите выполнять условия, Вы должны купить переход в группу «Работяга» и сможете скачивать ресурсы, перевод происходит по email, который указывается при оплате.

-
#1
По умолчанию драйвер адаптера Paravirtual SCSI не включается в дистрибутивы Microsoft Windows, поэтому уже после установки ОС и VMware Tools имеет смысл на него перейти с целью улучшения производительности виртуального железа.
Следующие шаги позволят переключиться на VMware Paravirtual:
- Создаем снапшот виртуальной машины в качестве бэкапа.
- Проверяем, что VMware Tools установлены, в противном случае устанавливаем.
- Выключаем виртуальную машину и заходим в её настройки через vSphere Web Client.
- Добавляем новое устройство: «SCSI Controller«. В поле «Change Type» выбираем «VMware Paravirtual«.

5. Применяем изменения и загружаем ОС.
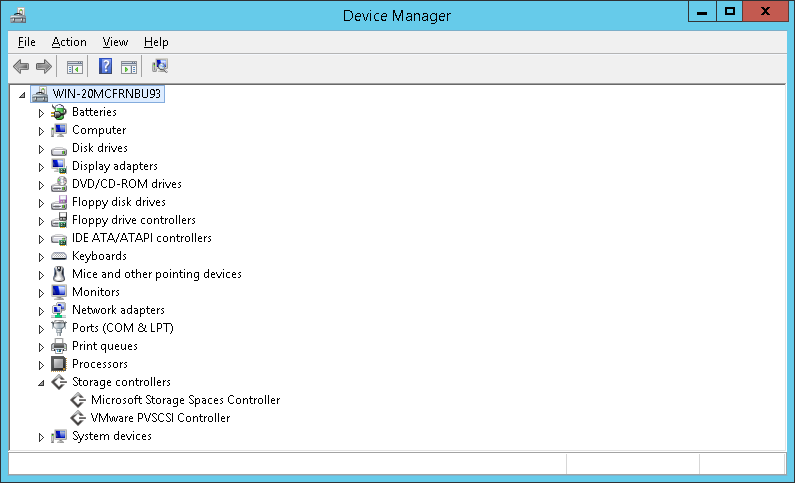
6. В диспетчере задач убеждаемся, что драйвер на добавленный адаптер установился корректно.

7. Затем опять делаем завершение работы.
8. Заходим в настройки через vSphere Web Client и в свойствах каждого из Hard disk изменяем значение параметра «Virtual Device Node» на добавленный нами SCSI контроллер.
9. Не выходя из настроек сразу же удаляем первоначальный SCSI адаптер, тип которого не является Paravirtual. Больше он нам не понадобится.
10. После применения настроек загружаем ОС и проверяем в диспетчере задач, что «VMware PVSCSI Controller» является единственным адаптером и его драйвер работает корректно.

11. Не забываем после окончания всей процедуры удалить сделанный ранее снапшот.
-
На данном сайте используются cookie-файлы, чтобы персонализировать контент и сохранить Ваш вход в систему, если Вы зарегистрируетесь.
Продолжая использовать этот сайт, Вы соглашаетесь на использование наших cookie-файлов.
-
#1
По умолчанию драйвер адаптера Paravirtual SCSI не включается в дистрибутивы Microsoft Windows, поэтому уже после установки ОС и VMware Tools имеет смысл на него перейти с целью улучшения производительности виртуального железа.
Следующие шаги позволят переключиться на VMware Paravirtual:
- Создаем снапшот виртуальной машины в качестве бэкапа.
- Проверяем, что VMware Tools установлены, в противном случае устанавливаем.
- Выключаем виртуальную машину и заходим в её настройки через vSphere Web Client.
- Добавляем новое устройство: «SCSI Controller«. В поле «Change Type» выбираем «VMware Paravirtual«.
5. Применяем изменения и загружаем ОС.
6. В диспетчере задач убеждаемся, что драйвер на добавленный адаптер установился корректно.
7. Затем опять делаем завершение работы.
8. Заходим в настройки через vSphere Web Client и в свойствах каждого из Hard disk изменяем значение параметра «Virtual Device Node» на добавленный нами SCSI контроллер.
9. Не выходя из настроек сразу же удаляем первоначальный SCSI адаптер, тип которого не является Paravirtual. Больше он нам не понадобится.
10. После применения настроек загружаем ОС и проверяем в диспетчере задач, что «VMware PVSCSI Controller» является единственным адаптером и его драйвер работает корректно.
11. Не забываем после окончания всей процедуры удалить сделанный ранее снапшот.
WHAT:
When you are creating a new Virtual Machine, there are four SCSI controller adapters available. The default adapter is the LSI Logic SAS, which is good enough for most VMware environments. However, for solutions where Virtual Machines require maximum performance, VMware offers the VMware Paravirtual adapter, aka PVSCSI.
“VMware Paravirtual (PVSCSI) adapters are high-performance storage adapters that can provide greater throughput and lower CPU utilization. They are best suited for environments where hardware or applications drive a very high amount of I/O throughput, such as SAN environments. PVSCSI adapters are not suited for DAS environments.”
To configure and install the PVSCSI Adapter for a fresh Windows installation, you need to use specific drivers, but don’t worry, VMware provides these drivers…
@Virtual Machine Creation
During the creation of a New Virtual Machine, you need to configure the virtual hardware to use the PVSCSI adapter.
- Wait until you get to Customize hardware section.
- Under Virtual Hardware, expand New SCSI controller.
- Under the Change Type drop-down list, select VMware Paravirtual.

— Advertisement —
Besides the default CD/DVD Driver that you’ll use to the Windows Installation, you’d need a second unit to mount the PVSCSI drivers.
@Still under Virtual Hardware.
- Click ADD NEW DEVICE, and select CD/DVD Driver
- Select the prior added New CD/DVD Driver.
- Under the Client Device drop-down list, select Datastore ISO File.

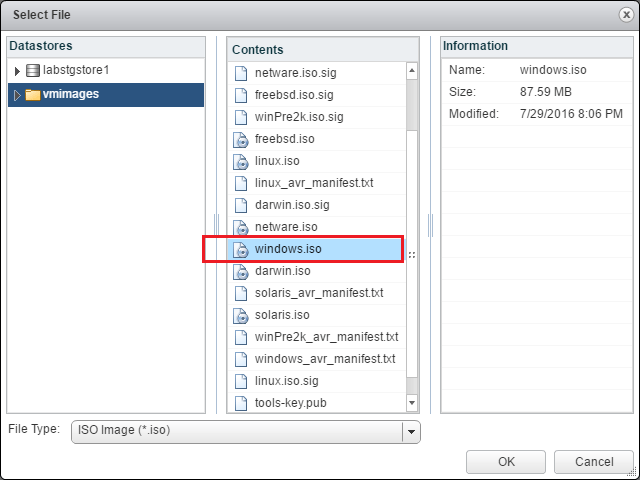
From Select Files / Datastores:
- Under the vmimages folder, select tools-isoimages.
- Select Windows.iso and click OK.

Note: If the vmimages folder doesn’t load the files. Finish the VM creation, then come back to these settings with the Edit option. Try to load the files one more time.
@During Windows Installation
- Boot the Virtual Machine from the Windows (OS) drivers. During the Windows Setup, wait until you reach Type of Installation and select Custom.

- Click Load driver.

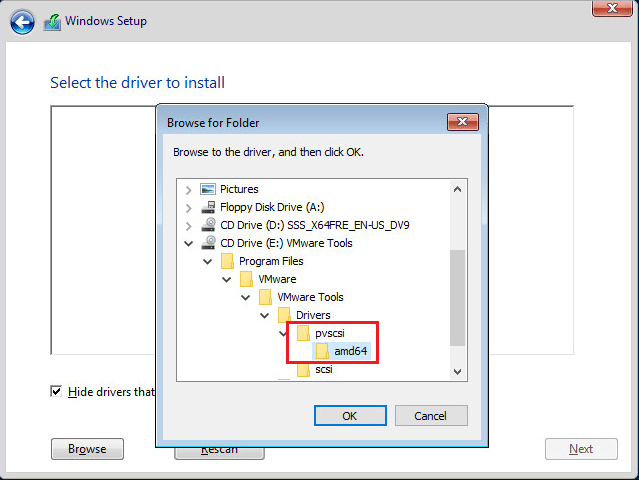
- Click Browse.

- From the New CD/DVD Driver, browse: Program Files / VMware / VMware Tools / Drivers / pvscsi / Win8 / amd64.
- Click OK.

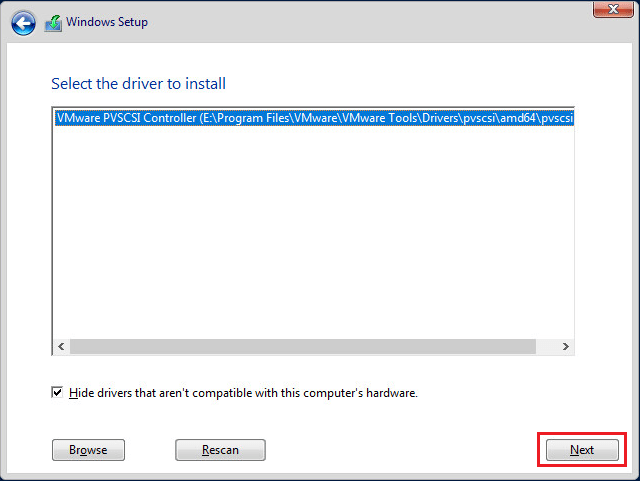
- The new driver is ready to be installed, select it and click Next to Install it.

- Wait until de driver is loaded, select your hard disk (Driver) and click OK.

- Windows installation will start under the PVSCSI controller.

— Advertisement —
For more information about PVSCSI or if you want to know to change an existing LSI Logical SAS Driver to PVSCSI, see KB1010398.

Juan Mulford
I have been active in IT for over fourteen years now. I am a solutions architect, working with storage, virtualization, and VDI solutions. For the past ten years, I have been living and working in Taiwan.
- Remove From My Forums
-
Question
-
We have just rolled out our first Windows 2019 Datacenter install on an ESXi 6.5.0.
Everything went well, the server installed cleanly and everything runs stable. Cool.
Then, after 10 — 12 hours the server starts saying it needs to reboot to finish configuring the disk controller.
Initially we were running with the default LSI-SAS controller. Looking at the VMWare KB they actually recommend that you use the VMWare PVSCSI Paravirtual driver with Server 2019. So after jumping through a few hoops to get the controller swapped, it came
back up and seemed to run fine. Then the next morning, it again said it needed to reboot to finish configuration. I rebooted. The next morning, the same message.After some more rooting around, I stumbled across an unrelated post about a physical mouse driver on Windows 10. I tried the solution provided, which was to open Device Manager and right click on the controller and check for an updated driver. Lo-and-behold,
Windows Update found a new driver and installed it. Reboot. Peace…Or not. This morning, the same message, that Windows needs to reboot to finish configuration of the controller!
I’ve been running Windows Server 2003/2008R3/2012R2/2016 on VMWare for years and this is the first time I’ve seen this behaviour. My initial thought, before the driver update, was that maybe the VMWare drivers were out of date and not 100% compatible with
Server 2019, but now that the latest drivers from Windows Update have been installed, I would have thought that they should be compatible.Does anyone have an idea why this problem is cropping up? Or a way to work around it?
Answers
-
Still no official response from VMWare or MS.
But after tests, it looks like it is a problem between ESXi 6.5 and Server 2019.
The VMs are stable and don’t cause any problems, it is just annoying that the server keeps saying it needs to reboot to complete configuration.
I tried the latest drivers from VMWare and I set up a machine on 6.7 as well, using the same driver release. On the 6.7 machine everything worked without any problems, but on the 6.5 server, even with the latest drivers, it cause the same issue.
According to VMWare, 2019 is supported on 6.5u3.
-
Edited by
Tuesday, April 2, 2019 1:11 PM
Toned down first sentence. -
Marked as answer by
David_C_W
Tuesday, April 2, 2019 1:12 PM
-
Edited by
November 25, 2014 updated by
Leave a reply »
When VMware released ESXi 4.0, they officially supported booting your OS drive from a paravirtual SCSI controller. Comparing to BusLogic and LSI Logic, Paravirtual SCSI (PVSCSI) controllers are high-performance storage controllers that can result in greater throughput and lower CPU utilization. However, since Windows doesn’t have native driver for the VMware PVSCSI adapter, you will find that a paravirtualized hard disk can’t be recognized during Windows installation or booting from WinPE.
To fix this problem you need to grab the pvscsi driver and add it to your WinPE bootdisk, or load the driver on the fly. But it’s not easy to extract pvscsi boot floppy images from VMware ESXi. Lucikly I came across a floppy disk image called pvscsi_windows2008.flp under my VMware Workstation installation directory: C:Program Files (x86)VMwareVMware WorkstationResources.
For your convenience, we load the pvscsi-Windows2008.flp image in our virtual floppy drive and then archive the setup files in both .iso and .zip formats. Below you can download pvscsi driver for VMware Paravirtual SCSI in different formats:
- Floppy disk image: Click here
- ZIP archive: Click here
- ISO image: Click here
- Previous Post: How to Install Windows 8.1 on VMware Boot Disk Based on PVSCSI Adapter
- Next Post: Display My Computer Icon on Desktop in Windows 10
VMware offers multiple types of virtual SCSI-adapters to use in your virtual machines. Based on your choice of operating system VMware will offer a Buslogic or LSI logic adapter. There is however a Paravirtual SCSI-controller that can improve performance for your virtual machines, especially in environments with high IO-loads. This controller will provide greater throughput and lower CPU utilization for your VMkernel. This adapter is not selected by default because your operating system (Windows) installation disc doesn’t contain the driver for this VMware-adapter. All operating systems support a Buslogic or LSI Logic adapter so that is the reason VMware uses that as these as the default.
To use the Paravirtual SCSI-adapter (PVSCSI) you need to install the driver, which is automatically installed with the VMware tools so you can easily switch to this controller after installation. It is also possible to use a PVSCSI-disk during OS-installation because it is located on a virtual floppy available on your host that you can select at the start of the Windows-installation by pressing F6 in the setup-screen. Since many administrators will have installed their servers with the regular adapter I will be explaining in this article how to modify an existing adapter to PVSCSI.
 Always first check if the PVSCSI-adapter is supported for your guest operating system and version and your ESXi-version. And check this VMware knowledge base article for limitations and requirements: Configuring disks to use VMware Paravirtual SCSI (PVSCSI) adapters (1010398) (MSCS clusters are not supported for VMware Paravirtual SCSI Controllers KB 1037959.)
More information about using the PVSCSI-adapter and what the performance benefits are can be found in these documents:
Performance Best Practices for VMware vSphere® 5.5
Oracle Databases on VMware Best Practices Guide
 You could do this in all your virtual machines after installing Windows but you probably are going to use a template to deploy Windows-servers. Therefor I suggest that you perform the tasks described here in your master virtual machine that will become your template.
Add a second SCSI-controller to your virtual machine
You can not simply change the SCSI-controller type for your virtual machine to PVSCSI. The problem is that Windows contains the driver but it is not loaded (why should it, there is no PVSCSI-adapter present). And therefor when you would just change the adapter type Windows would find an unsupported storage controller during the boot process and stop with a blue screen. Therefor we first need to add a PVSCSI-adapter in the virtual machine and start the machine to have Windows load the driver. Open the virtual machine settings in the vSphere Web Client and add a SCSI Controller. Don’t forget to change the type of this new controller to VMware Paravirtual. You can do this while the virtual machine is powered on.

When the virtual machine is running you will see a message that informs you that the new hardware is installed. If your virtual machine was powered off you first need to boot it once to load the driver for the new adapter.

If you want to double check you can open Device Manager and look at the list of installed Storage controllers. It should list the VMware PVSCSI Controller.

Change the type of the currently installed adapter
Now that the new controller is installed it is time to change the adapter type of the currently installed adapter. For this task the virtual machine must be powered off. Open the virtual machine settings in the vSphere Web Client, expand the settings of the SCSI controller and change the type to VMware Paravirtual. This will bring up the warning message displayed in the next image.

Do this for all present Buslogic or LSI logic SCSI controllers but make sure that you have verified that the PVSCSI-adapter can be used for both the OS-disk and the data disk.
VMware recommends that you create a primary adapter for use with a disk that will host the system software (boot disk) and a separate PVSCSI adapter for the disk that will store the data files. If you look at the screen shot below you can see that hard disk 1 is the first disk (0) on SCSI Controller 0 and disk 2 is the first disk (0) on SCSI Controller 1.

When you now power on the virtual machine Windows will use the new controller type for your hard disks. At this time you are ready, but it’s best to remove the old adapter because the driver will be loaded for this non-present device. And don’t forget to also remove the unnecessary extra PVSCSI controller from the virtual machine hardware that we have added in the beginning of this procedure. But remove it after the operating system is completely started.
You will however have to enable Windows to show nonpresent devices. I have found that you can do this from Device Manager in Windows Server 2012 without any extra settings, but for older Windows versions you might first need to set an environment variable:
set devmgr_show_nonpresent_devices=1
Then start Device Manager and from the View-menu select Show hidden devices. You can then see and uninstall the old adapter.

If you look closely at the image you can see that there is also a light-gray PVSCSI Controller. This is because this screen shot is from a server that only has one disk and one storage controller. But because we added a new controller in the first step of this procedure there will now be a non-present device for that storage controller. The best is to also remove the light-gray and non-present controller.
One of the most common oversights in vSphere deployments is a failure to use the Paravirtual drivers that VMware has provided us for networking and storage.
On a physical platform, one chooses supported device(s) for networking and storage, and then installs the correct driver(s) to support those devices. For example; on a physical system, you might specify LSI SAS for storage and Intel E1000 NIC’s for network. That particular combination is, in fact, so common that Operating Systems like Windows have the drivers for those devices pre-installed so they will be recognized both during and after installation. The ‘during’ part is particularly important too, because if the storage driver is not present at the time of install, the hard disk will not be recognized, and the installation fails!
On a virtual platform, it’s a completely different story. Even if the host ESXi server actually has LSI SAS storage adapters and Intel E1000E NIC’s, there is no correlation to the network and storage device for Virtual Machines. In fact, if you choose LSI or Intel (they are the default choices for Windows Server VM builds), the only potential benefit will be that Windows includes those drivers by default. You will, in fact, be emulating the corresponding physical devices by LSI and Intel, with resulting loss of performance!
The only true native storage and network devices for vSphere VMs are the VMware Paravirtual SCSI ( pvscsi ) and Network ( vmxnet3 ) device types and corresponding drivers. Problem is; while Linux distros (most all of them) will include support for Paravirtual devices by default, Microsoft is not so magnanimous. Users choosing to use either (or both) of the VMware Paravirtual device types, will have to install the corresponding drivers.
In most cases, VMware Paravirtual devices are supported for installation in Windows Family 5 (Server 2003, XP) and later, and natively supported by most Linux OS.
Benefits of using VMware Paravirtual SCSI and Network devices include:
- Better data integrity[1] as compared to Intel E1000e
- Reduced CPU Usage within the Guest
- Increased Throughput
- Less Overhead
- Better overall performance
I have created an example Windows Server 2012 R2 VM using only the default E100e and LSI SAS device types and I am going to show you how easy it is to convert from the default (emulated physical) to VMware Paravirtual drivers. For the following steps to work, the VMware Tools must be installed in the VM which is being updated.
Upgrading a VM to vmxnet3 Paravirtual Network Adapter
During the following procedures, it is important to use the Virtual Machine Remote Console (as opposed to RDP) because we will be causing a momentary disconnection from the network.
The biggest challenge is that the static IP address, if assigned, is associated with the device and not with the VM. Therefore, when you upgrade to the vmxnet3 adapter, your challenge will be un-installing and eliminating any trace of the “old” NIC to avoid seeing the dreaded message: “The IP address XXX.XXX.XXX.XXX you have entered for this network adapter is already assigned to another adapter[2]”
Using the VMRC, log in to your Windows VM and run the device manager with: devmgmt.msc
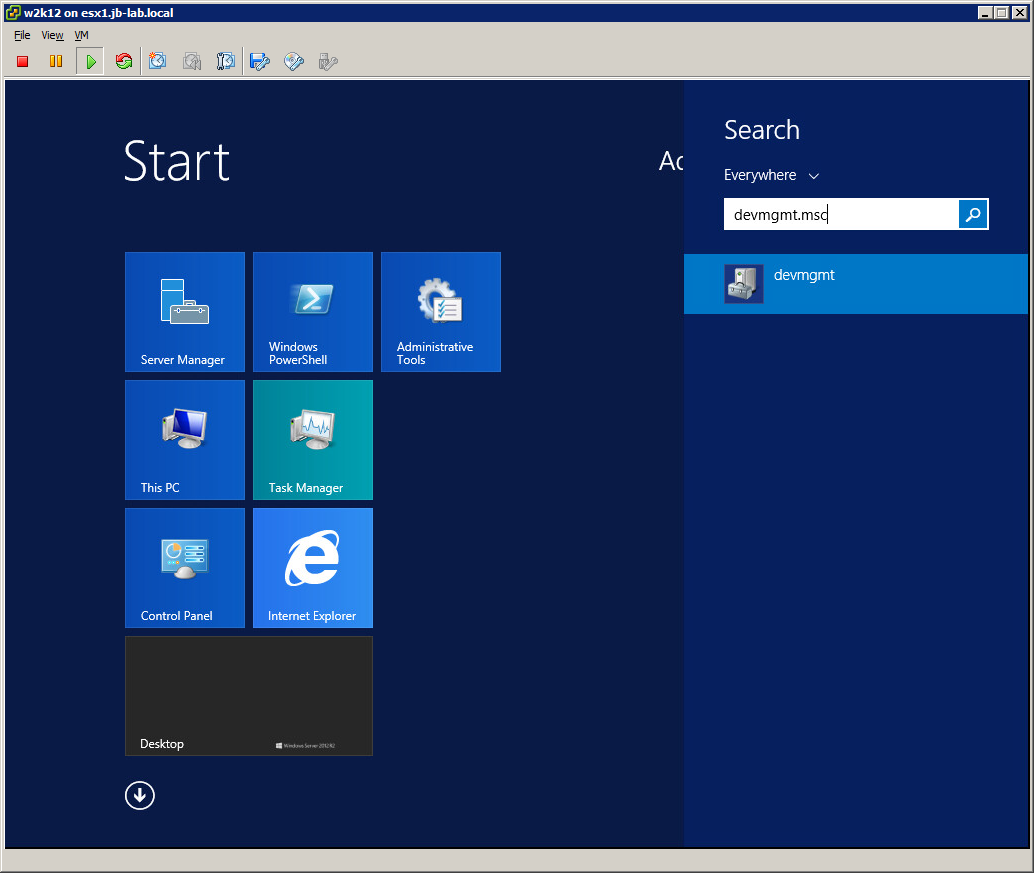
You will see that the Network adapter is clearly listed as an Intel
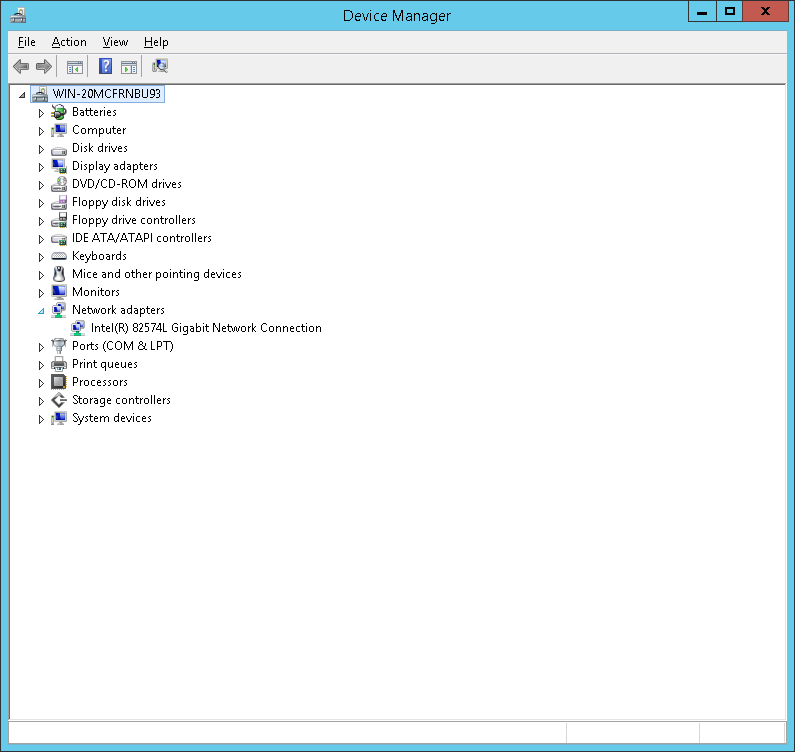
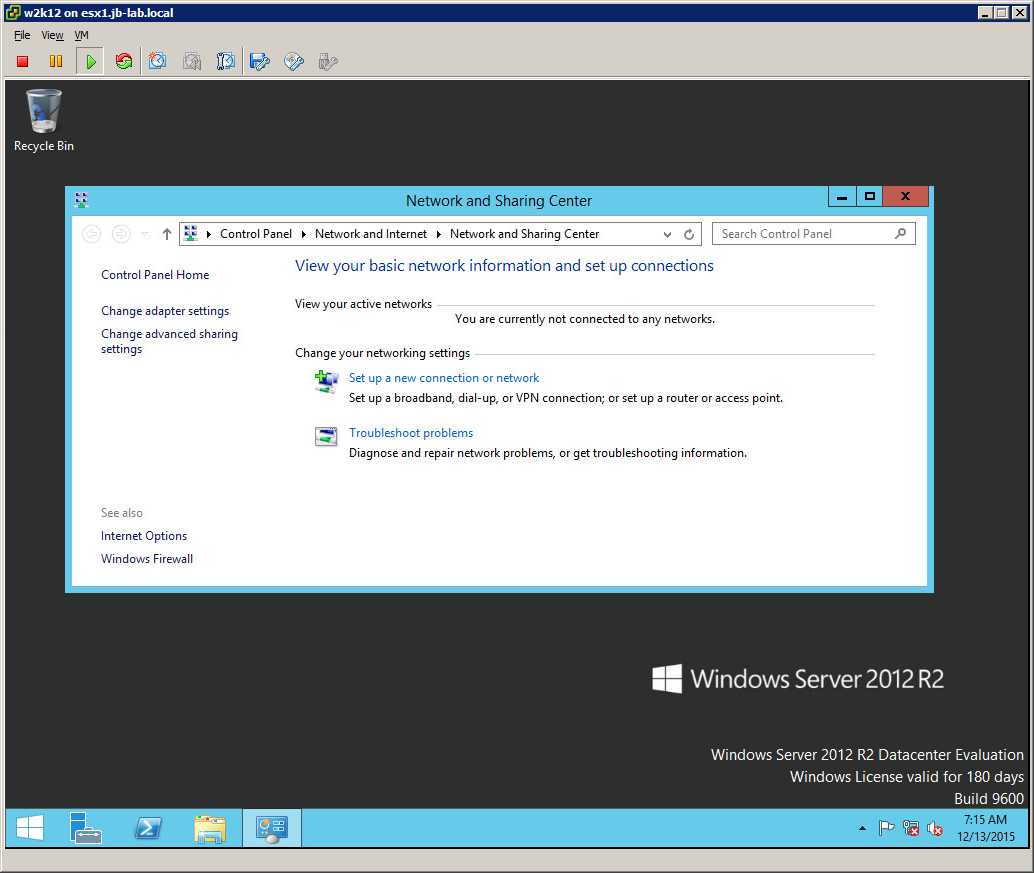
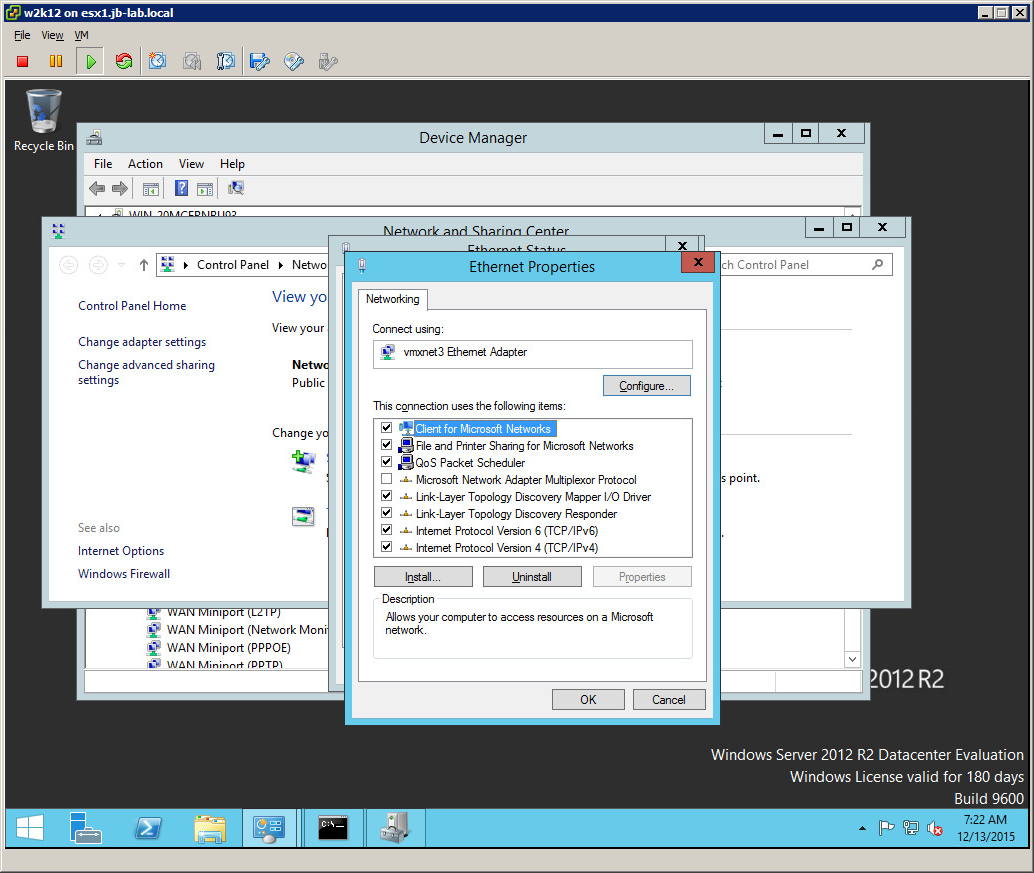
Now go to the Network and Sharing Center and click on any (all) of the active Networks to observe their settings
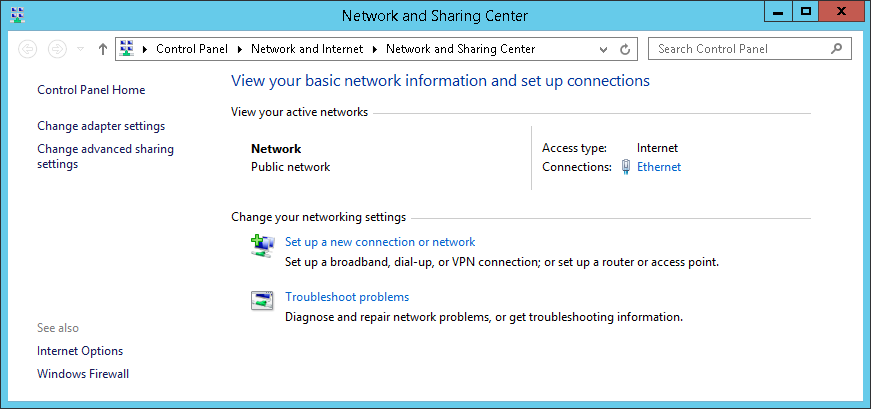
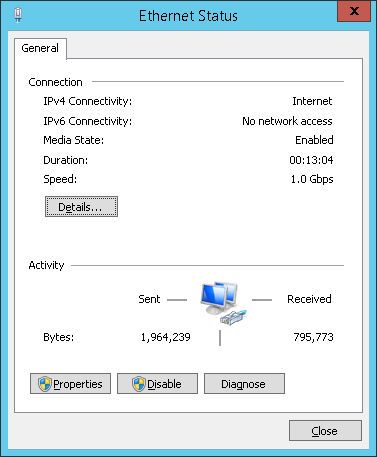
You will notice that the speed is clearly 1.0 Gbps
Click on: Properties
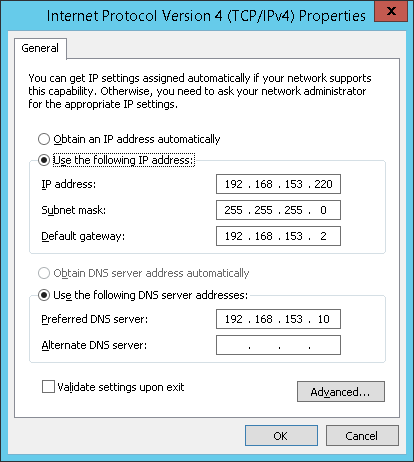
Choose TPC/IPv4 and then click: Properties
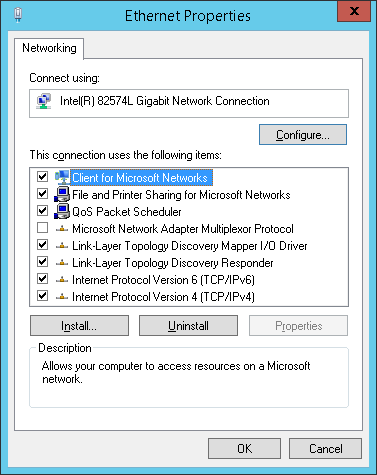
Take note of the IP Address, Subnet Mask, Gateway, and DNS
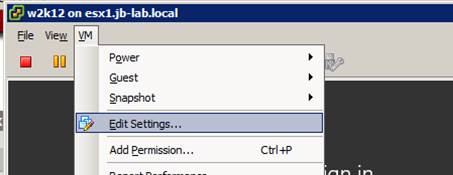
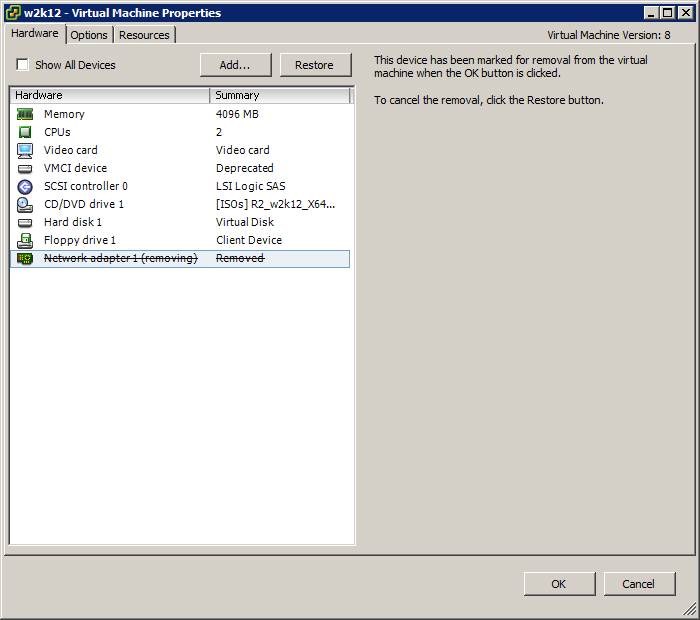
Go to: VM > Edit Settings
Remove the Network Adapter(s) from the VM and click OK. In truth, you could both remove the old adapter and add the new vmxnet3 adapter simultaneously, but we will do it in separate steps for clarity.
Notice, the active networks list is empty
Although we have removed the device from the VM, we have not removed its configuration from the system. Therefore, the IP address we saw earlier is still assigned to the E1000e Virtual NIC we just removed. In order to cleanly install a Paravirtual NIC, we need to remove the Intel NIC completely.
Open a command window (this must be done first from the command window) and run the following commands:
set devmgr_show_nonpresent_devices
start devmgmt.msc
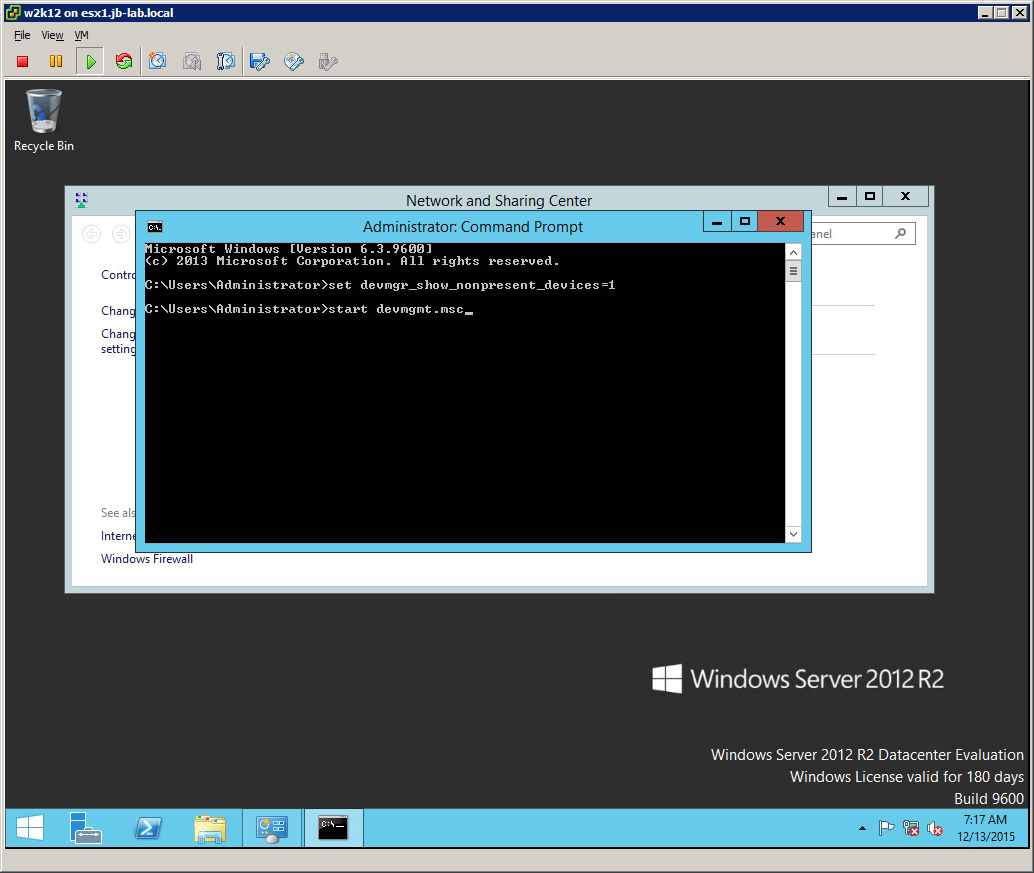
After the device Manager window is open, select: View > Show Hidden Devices
Many admins falsely believe that is is simply enough to show hidden devices, but this is not true. It is absolutely necessary to “show_nonpresent_devices” at the command line first!
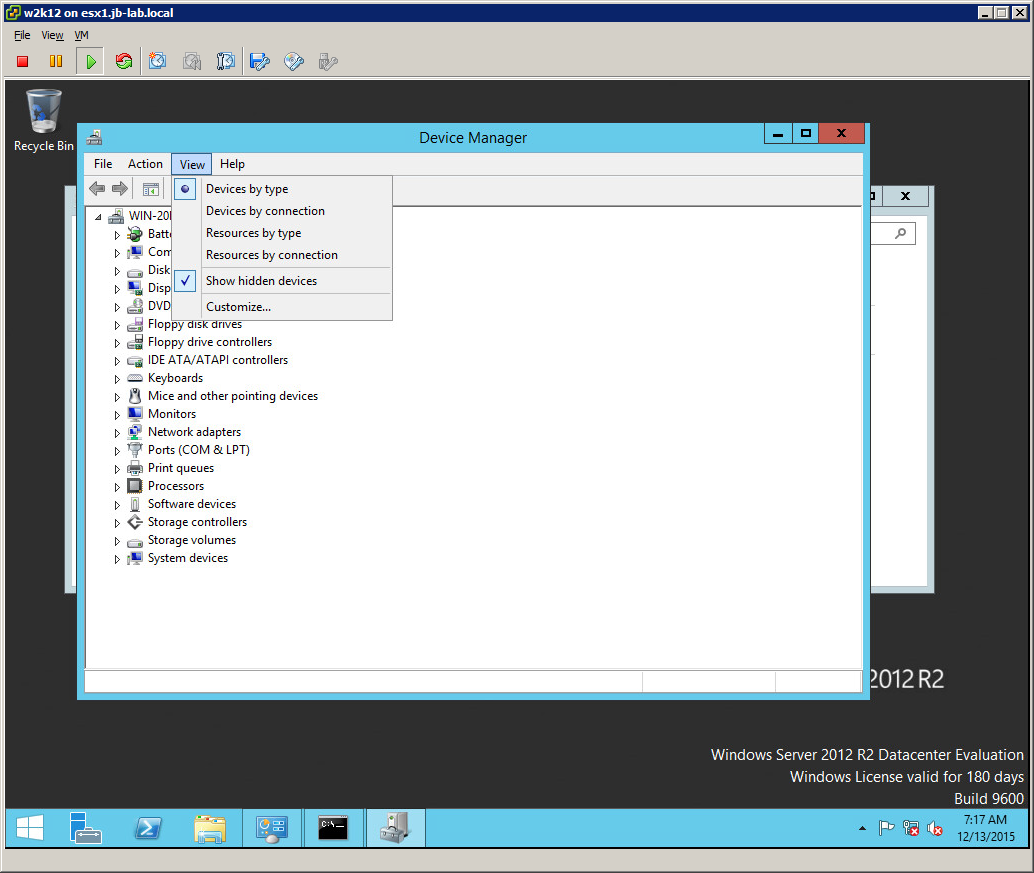
You should now be able to find the (now removed) Intel NIC listed in lighter text than the devices which remain resent.
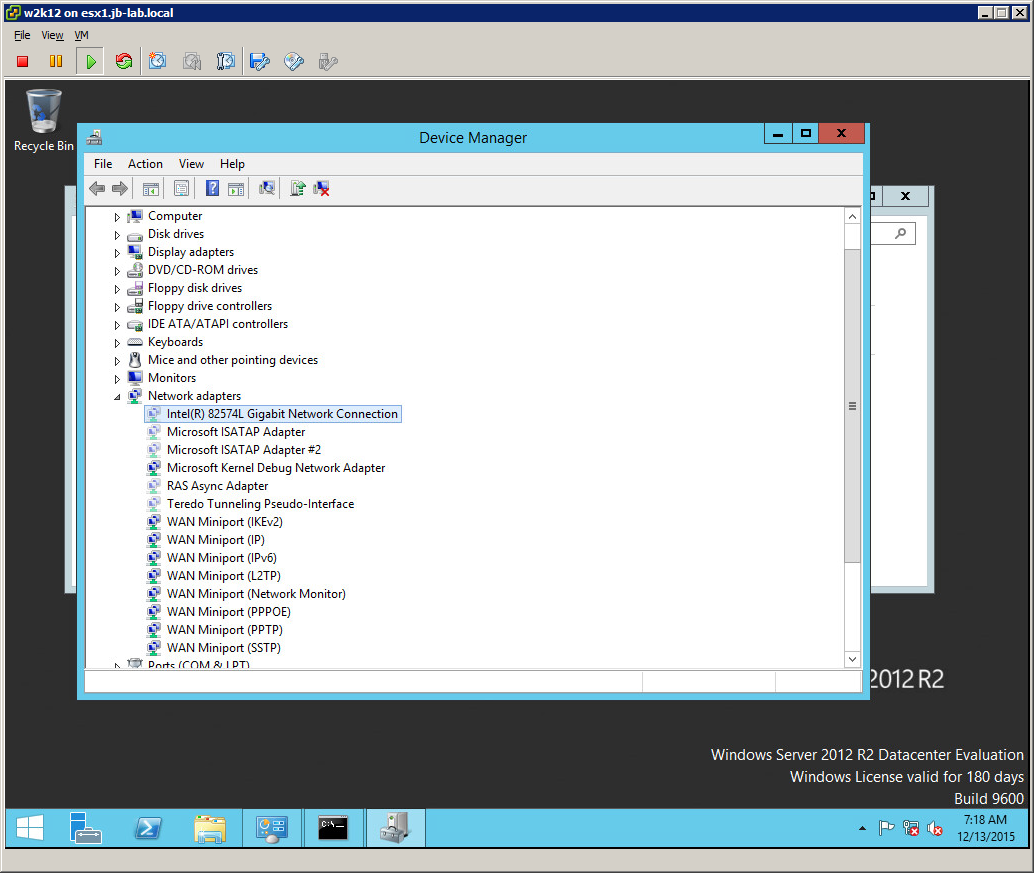
Right-click and select: Uninstall
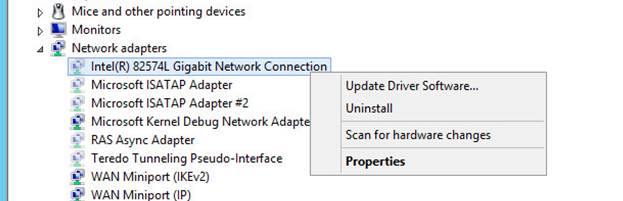
OK
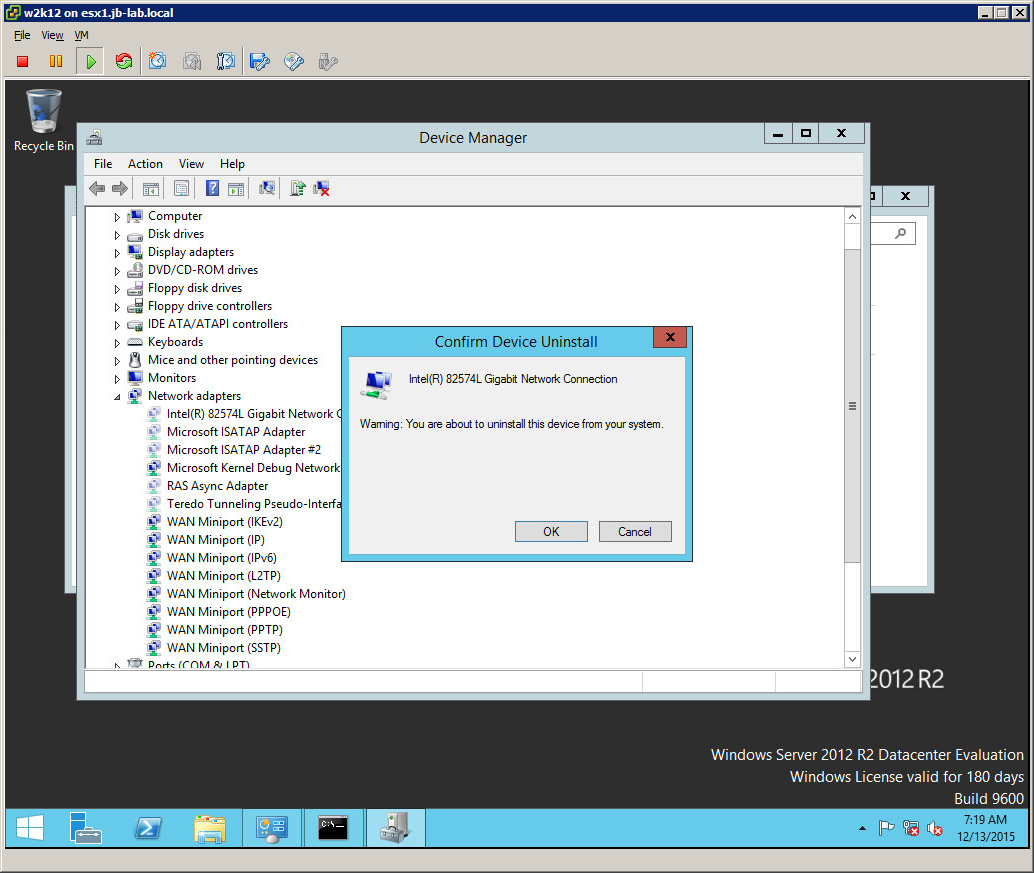
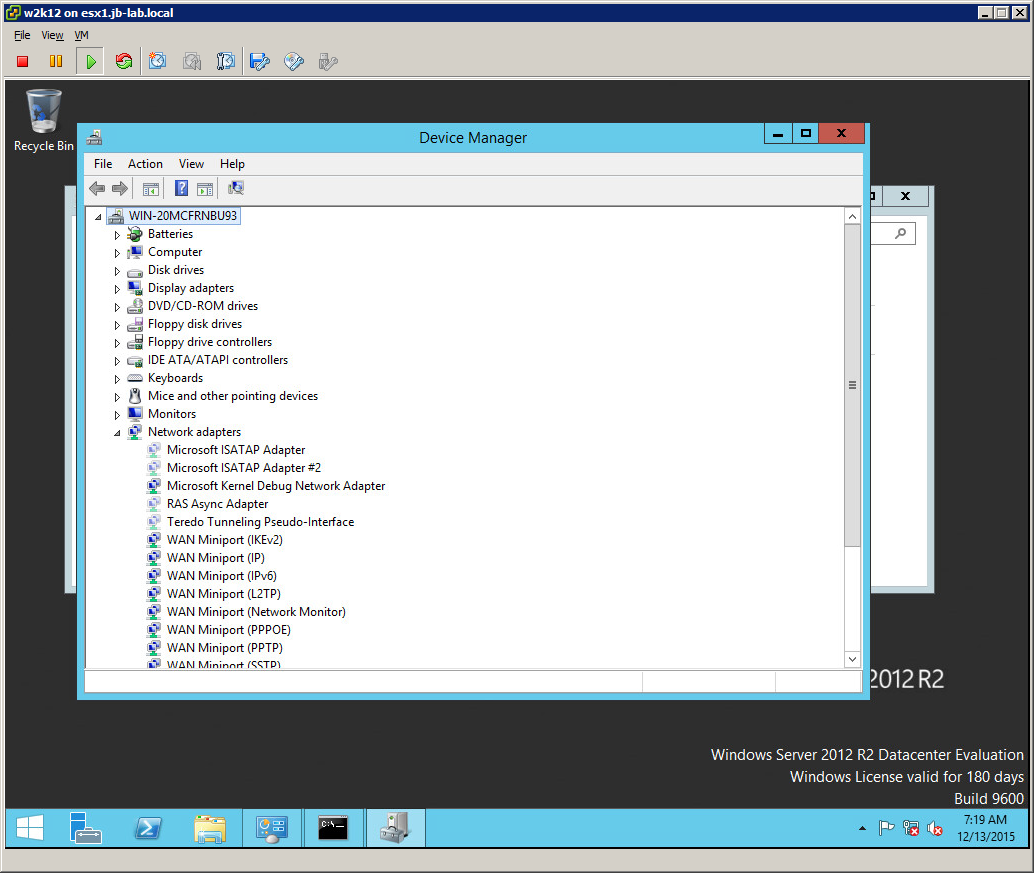
And it’s gone!
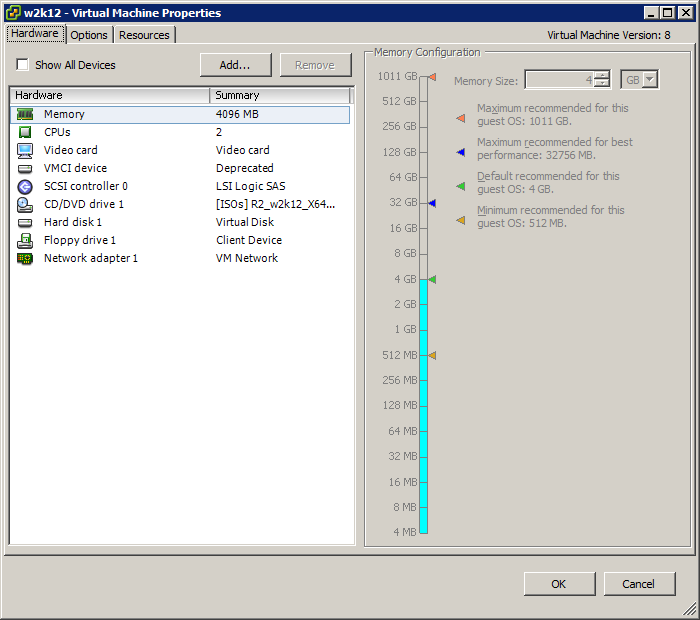
Go to: VM > Edit Settings
Click: Add
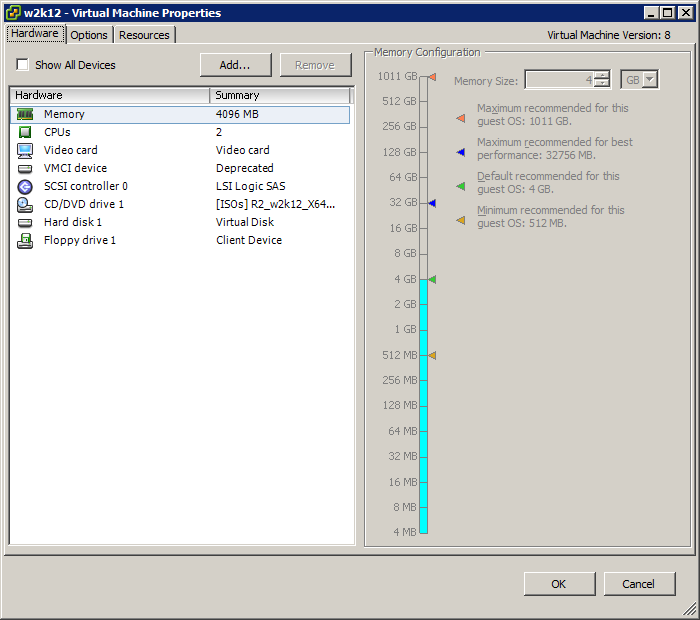
Choose: Ethernet Adapter
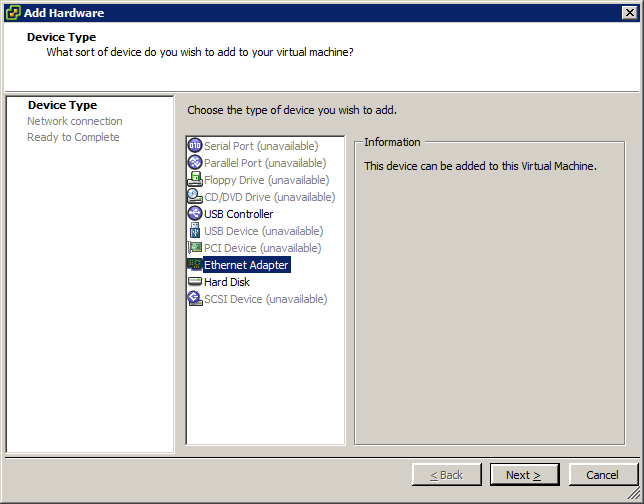
Set the Type to: VMXNET 3 and then choose the appropriate Network Connection (usually VM Network), then click: Next
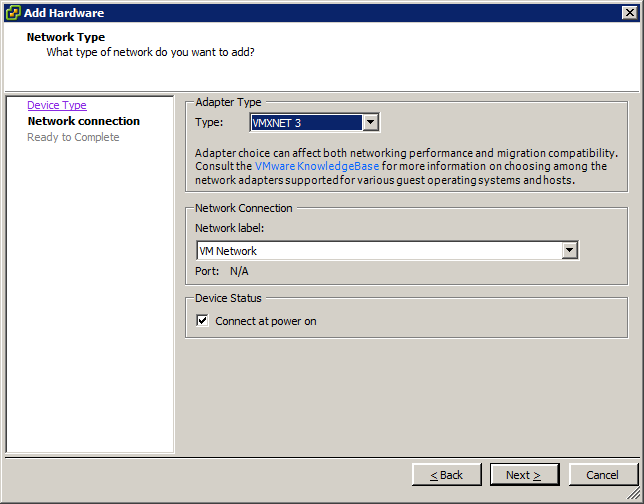
Click: Finish

Now click: OK
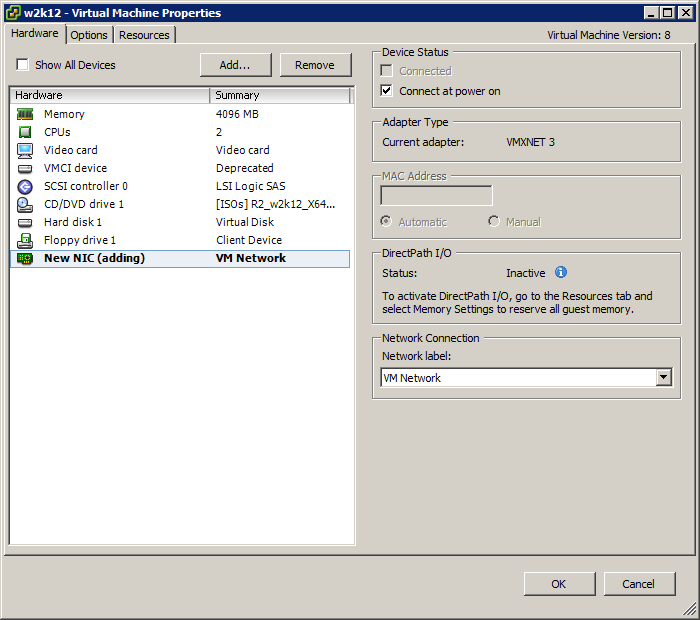
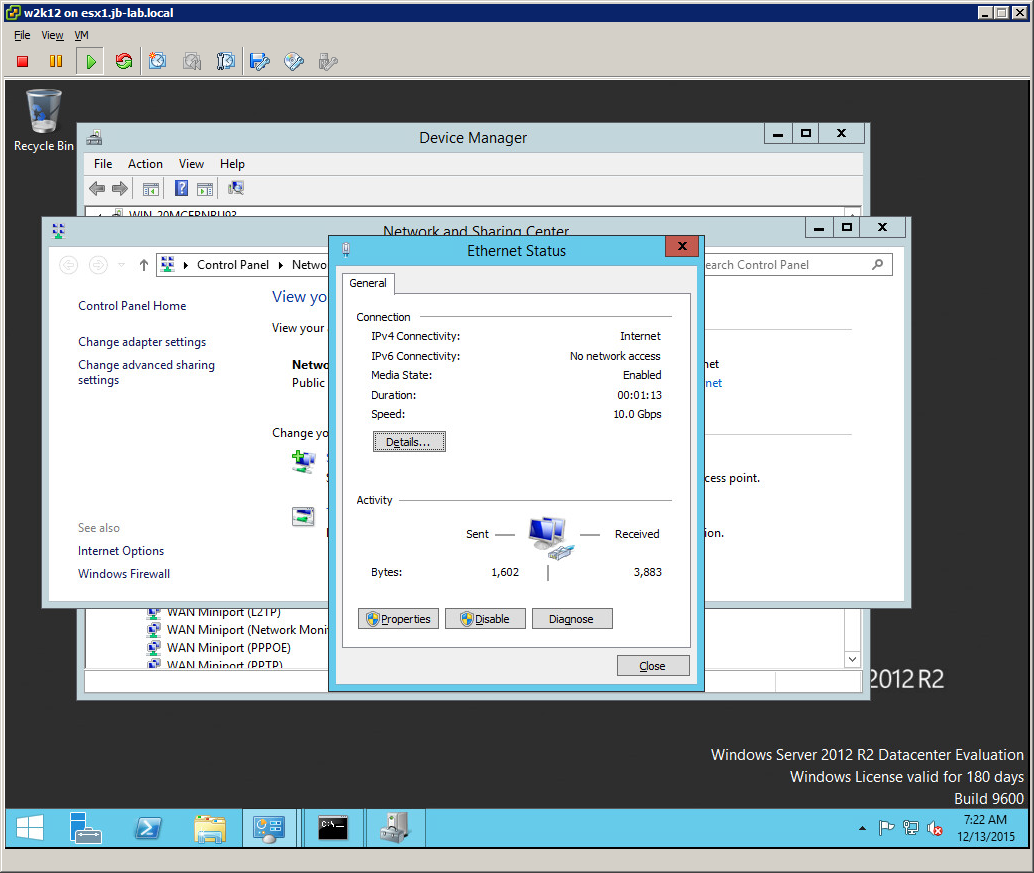
You will see the vmxnet3 Ethernet Adapter added to the Device Manager

Now click the active network, in this case “Ehternet”

Notice the speed listed as 10 Gbps. This does not mean that there are 10 Gbps NICs in the ESXi host merely that the observed speed of the network for this VM is 10 Gbps.
Click on: Properties
Now choose: TCP/IPv4 and select: Properties
Re-assign all of the IP addresses and subnet mask you observed earlier
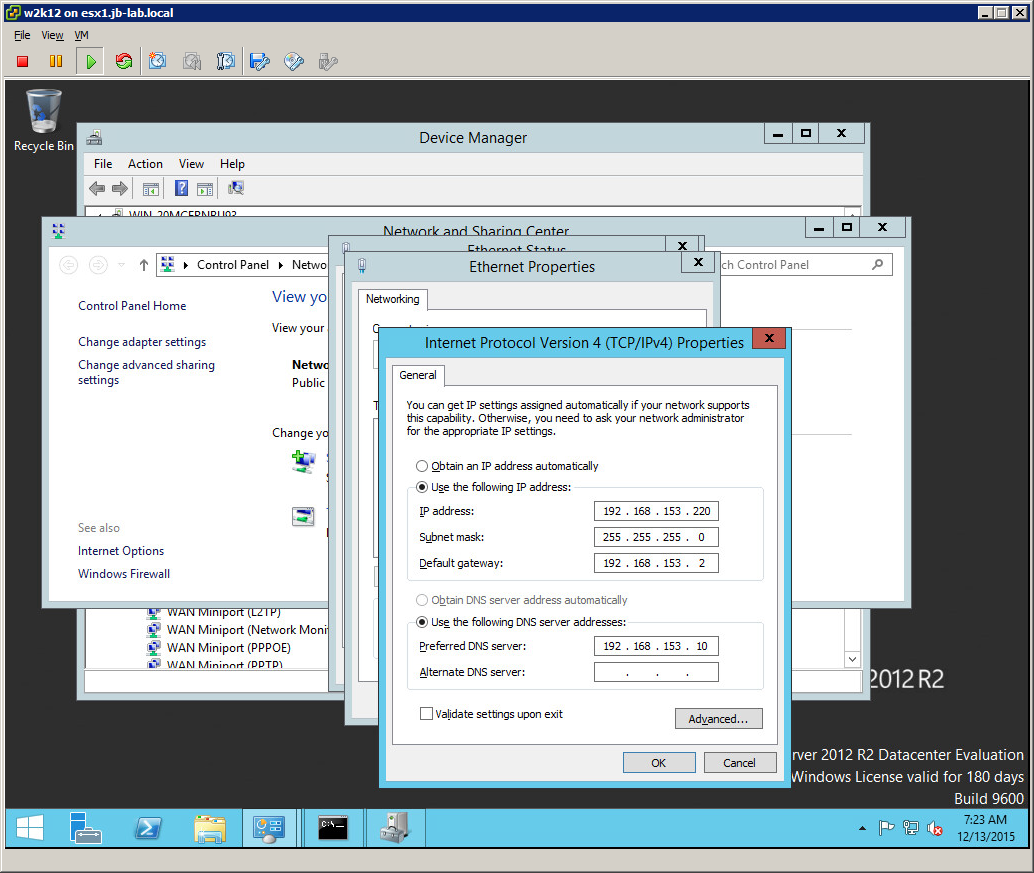
And you have upgraded to the VMware Paravirtual device VMXNET 3
Upgrading a VM to pvscsi VMware Paravirtual SCSI Adapter
The trick in switching to the VMware Paravirtual SCSI adapter is in adding a dummy disk to the VM, which will force Windows to install the pvscsi driver, included with the VMware Tools package you have installed as part of a separate process.
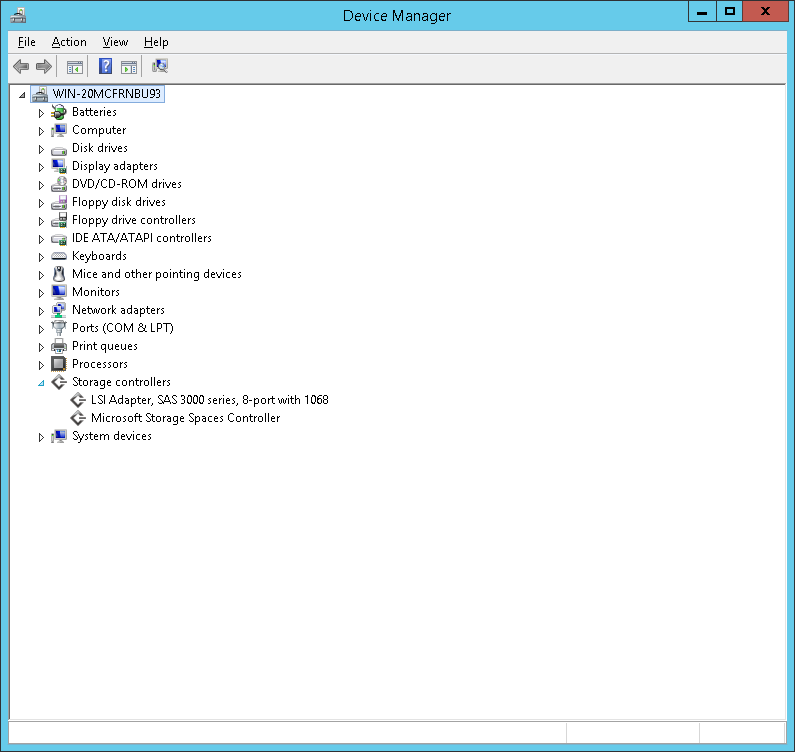
Start the device manager with devmgmt.msc

Observe the LSI Adapter listed under Storage Controllers
Go to: VM > Edit Settings
Choose: Add
Select: Hard Disk and then: Next
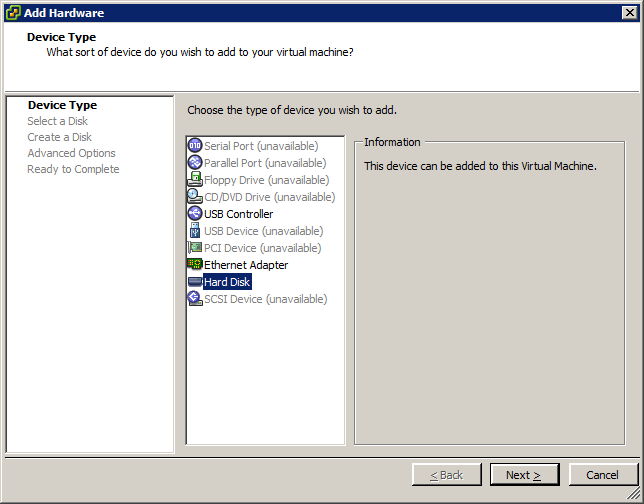
Choose: Create a new virtual disk and then: Next
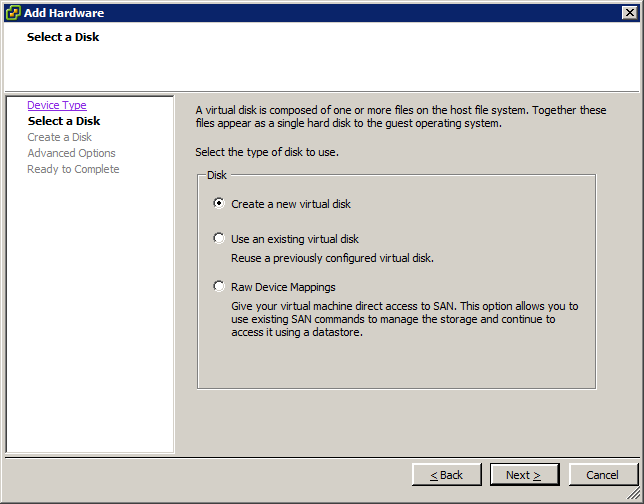
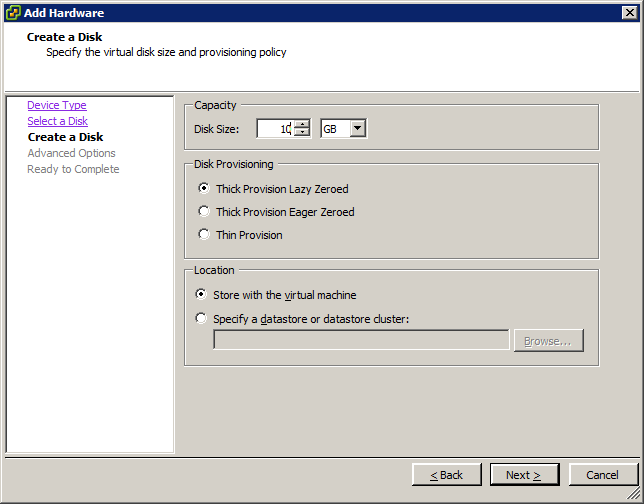
The disk you create can be most any size and provisioning. We choose 10 GB Click: Next
In this step, it is critical that you place the new disk on an unique SCSI Node. That is to say, if the existing disk is on 0:0, then plane the new disk on 1:0 (you must not combine it with any LSI nodes, such as 0:1 or the process will not work)
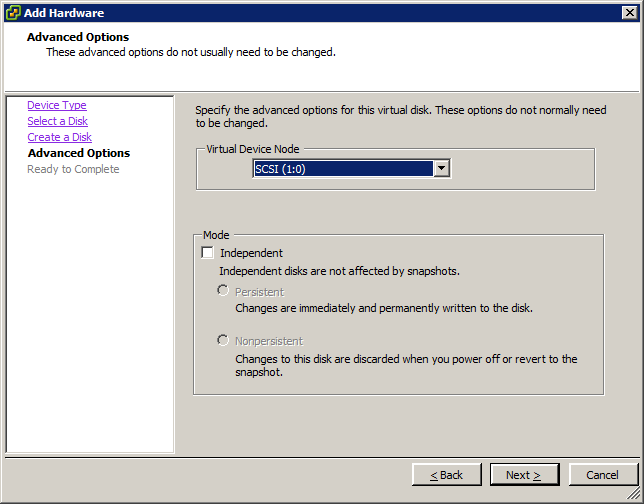
Now click: Finish
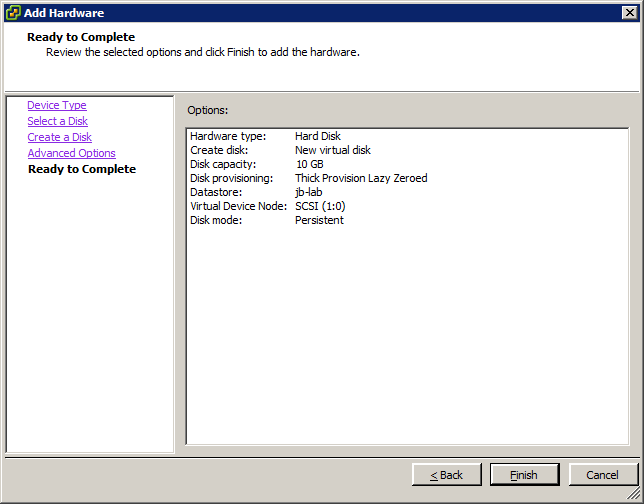
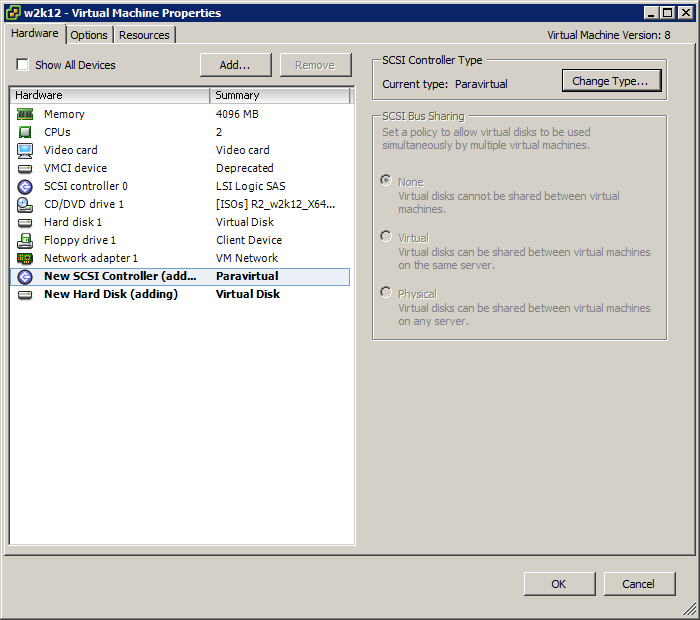
Notice, you have added, not just a disk, but also a New SCSI Controller.
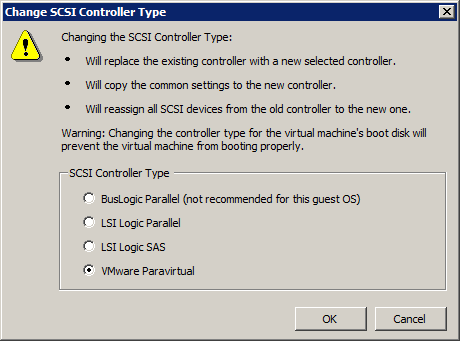
Now click: Change Type

Select: VMware Paravirtual

Now click: OK
Once the disk is added, look again in the Windows Device Manger and make sure that you can see the VMware PVSCSI Controller. If you can, that means the PVSCSI drivers have successfully loaded, and you can proceed.

Now we have to shut down the VM.
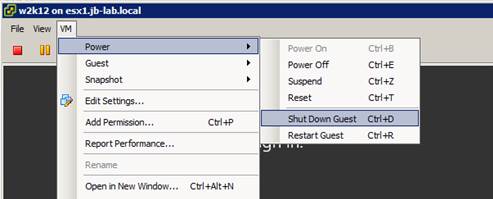
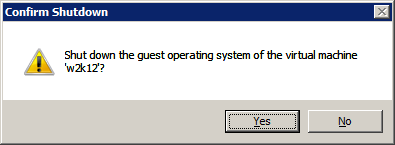
Once the VM is off, Go to: VM > Edit Settings
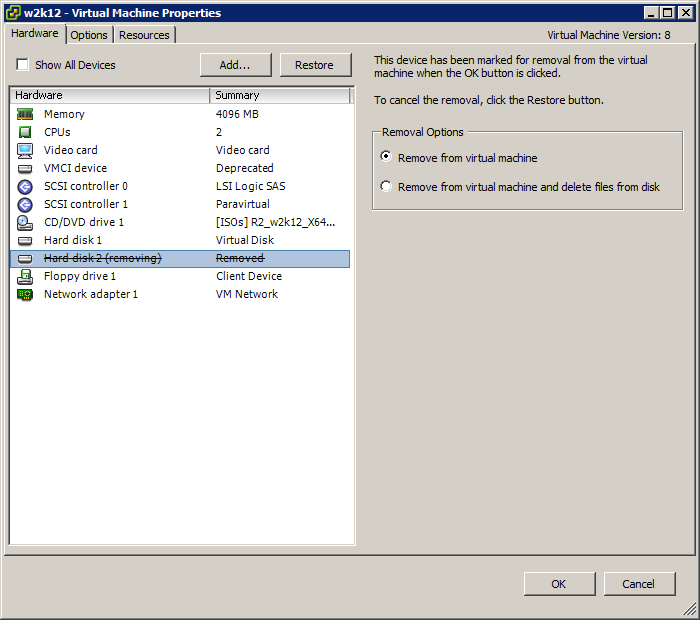
Choose the dummy disk (whichever one it was, BE CAREFUL HERE! and click: Remove
Although I failed to do so in creating this demo, you probably want to choose “Remove from virtual machine and delete files from disk,” to avoid leaving orphan files around.
Now select the SCSI controller(s) which are not already Paravirtual and choose: Change Type
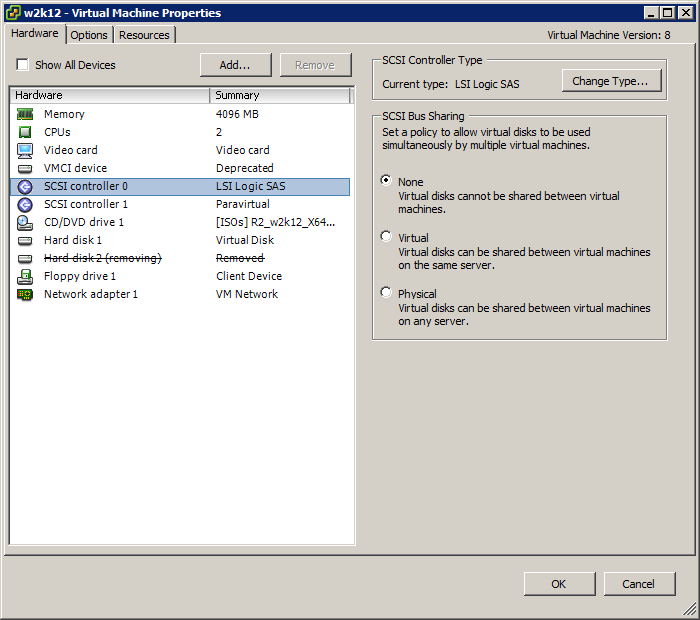
Select: VMware Paravirtual
Now click: OK
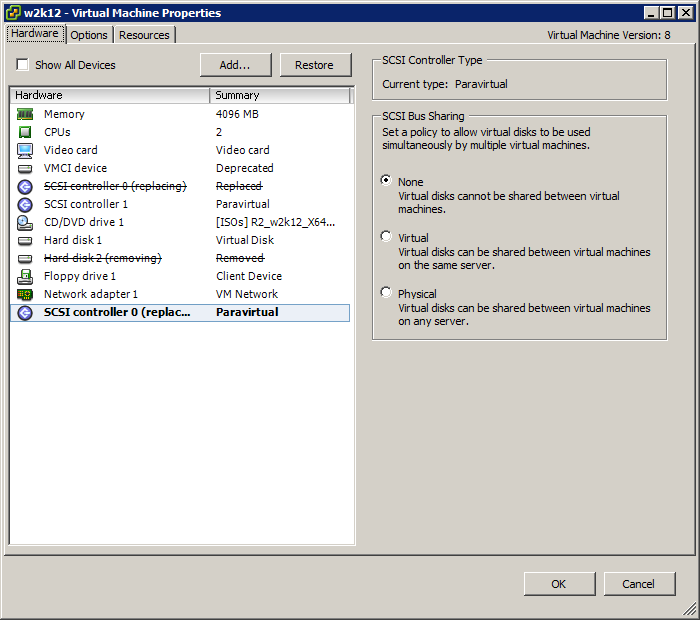
Power your VM back on and observe that only the VMware Paravirtual device remains!
It should be noted; just as with the Intel NIC, the LSI device remains as a “nonpresent” device. If you feel like going the extra mile, repeat the steps to show nonpresent devices and uninstall the LSI device!
- http://kb.vmware.com/selfservice/microsites/search.do?language=en_US&cmd=displayKC&externalId=2058692 ↑
- http://kb.vmware.com/selfservice/microsites/search.do?language=en_US&cmd=displayKC&externalId=1179 ↑
Моя первая виртуальная машина: как не накосячить
Время на прочтение
5 мин
Количество просмотров 17K
Итак, вот перед вами свеженькая организация в vCloud Director, и вам только предстоит создать свою первую виртуальную машину. Сегодня расскажу, какие настройки выбирать при создании виртуальной машины, чтобы она работала и не просила есть. Поехали!

Источник: drive2.ru
Операционная система. Выбирайте современные дистрибутивы. Если берете Windows 2008 R2 и более старую или Linux до ядра 4.19.x, ждите проблем. Каких? Ну, например, вендор уже перестал поддерживать актуальное состояние Windows 2008 R2 аж в 2013 году (EOL). Это означает, что он больше не разрабатывает драйвера под вышедшее с тех пор железо, не модифицирует ОС под новое что угодно. С древними операционками вы точно не сможете использовать все возможности, которые предоставляет современный гипервизор. А уже в эти новогодние праздники остро встанет проблема с безопасностью, так как 14 января 2020 года заканчивается расширенная поддержка Windows Server 2008 R2 и перестанут выходить Security Update.
Cores per socket. Оставляйте 1 ядро на сокет, ставьте столько сокетов, сколько вам нужно виртуальных процессоров. Да, логично наоборот, но правильно так. Если у вас нет специализированных лицензионных требований. Например, вы платите за сокет, а больше сокетов означает больше лицензий. Не ставьте 2/2, чтобы получить 4. Сделайте 4/1. Такую машину гипервизор будет обслуживать оптимальным образом. Scheduler гипервизора будет меньше пенализировать такие ВМ.
Объясню на пальцах. Представьте, что проводник рассаживает пассажиров по вагону, вагон – как в Сапсане. В роли проводника scheduler, пассажиры – это ВМ. Пассажиров, которые едут в одиночку (однопроцессорные ВМ), ему распределить проще всего: их можно посадить на любое место. Семью из 4 человек (4-процессорные ВМ) уже сложнее. Им нужно найти 4 места в одном вагоне. А теперь представим, что все в семье хотят ехать только лицом друг другу, а таких групп мест – 4 вокруг стола – в вагоне только 2. С большой вероятностью такой семье придется пройти в следующий вагон (на следующий тик планирования). Это как раз та ситуация, как если бы вы выбрали 2 сокета по 2 ядра, чтобы получить 4. Скорее всего, придется подождать, чтобы нашлись подходящие места. Так же и с ВМ: ей придется ждать дольше, чем менее “прихотливым” ВМ с 1 сокетом и кучкой процессоров.
Хотя эта история актуальнее для старых версий ESXi. Начиная с 6.5 (но не ранее!) механизм vNUMA отвязан от количества виртуальных сокетов, и старая рекомендация “не плодить сокеты” не так категорична. Но все еще зависит от приложения внутри гостевой ОС.

Hot Add для CPU и Memory. Это опция добавления памяти CPU для работающей виртуальной машины. Казалось бы, прекрасная функция: не нужно гасить машину, чтобы докинуть ей ресурсов. Так вот, не все так просто, и не зря они по дефолту отключены. Лучше и не включать, если вы не знаете, что такое NUMA-топология. Допустим, под капотом облака у нас двухсокетный сервер. На каждом сокете 4 ядра. Работает это именно как 4+4, а не 8 ядер. Такая же тема с памятью: если на каждом сокете 128 ГБ, это не дает в сумме 256 ГБ. Каждый процессорный сокет имеет прямой доступ только к определенным слотам памяти. Каждый сокет вместе с причитающейся ему процессором и памятью – это физическая NUMA-нода.

Если виртуальная машина влезает в размер физической NUMA-ноды, то она исполняется внутри этой ноды. Если виртуалка не умещается в NUMA-ноду, например по памяти, то она будет использовать память из соседней NUMA-ноды. Путь к удаленной памяти будет извилист – через межпроцессорную шину. Работать это будет не так быстро, как если бы виртуалка использовала ресурсы одной ноды.

Когда вы включаете добавления виртуальных процессоров и памяти на горячую, все это идет только в нулевую NUMA-ноду. Например, добавилось еще 4 процессора, и на NUMA-ноде 0 стало 6, а на NUMA-ноде 1 – 2 процессора. Машину немного перекосило, и работает она также косо. Это связано с тем, что при включении vCPU Hot-Plug перестает работать vNUMA, через которую vSphere старается оптимизировать топологию NUMA для ВМ. Поэтому, принимая решение о включении CPU Hot-Add, учитывайте физическую топологию NUMA для обеспечения производительности ВМ. Это очень критично, если по каким-либо причинам в ВМ имеется несколько виртуальных сокетов. В этом случае несоответствие физической топологии вызовет сильное падение производительности: CPU Scheduler сойдет с ума, пытаясь предоставить процессорное время такой ВМ, что вызовет рост CPU Ready и Co-Stop.
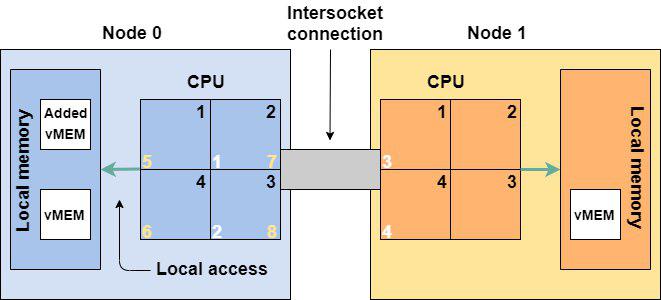
Все добавленные виртуальные процессоры (5-8) и память попали на NUMA-ноду 0.
Отдельная история в том, что будет происходить внутри ОС и приложения после таких “добавок”. Поэтому если уж решили пользоваться этой опцией, то проверьте, поддерживает ли ваша ОС такое. Non-NUMA-Aware приложения могут сильно просесть по производительности при расположении на нескольких NUMA-нодах.
Если вы все-таки добавили процессоры или память на горячую, сразу планируйте перезагрузку ВМ (не только ОС) на ближайший запланированный даунтайм.

Галочки не ставим.
Дисковый контроллер (Bus type). Для дисков выбирайте дисковый контроллер Paravirtual. Этот тип контроллера требует установки драйверов в ОС VMware Tools. Paravirtual – это специальное виртуальное устройство, которое создавалось для работы в виртуализации и не эмулирует работу какого-то другого аппаратного устройства. Любая эмуляция аппаратного устройства всегда работает медленнее.
Если вы не хотите использовать Paravirtual (но почему?), выбирайте LSI Logic SAS. Если ОС не поддерживает и его — LSI Logic Parallel. Никогда не используйте SATA и IDE. ВМ будет медленно работать, в итоге вы не получите производительности, за которой идут в облако.
При инсталляции ОС даже свежая версия Windows может не найти драйвер для Paravirtual адаптера. В этом случае примонтируйте к ВМ два ISO файла — ваш загрузочный образ Windows и диск с VMware tools. На последнем есть необходимый драйвер.

Сетевой адаптер. Правильный выбор – VMXNet3. VMXNet3, как и дисковый адаптер Paravirtual, это паравиртуальное устройство. Оно также требует драйверов, которые входят в VMware Tools.
Если вдруг VMXNet3 не подходит (проявляется какая-то несовместимость), то на крайний случай используйте E1000E. Но не ожидайте от адаптера E1000E производительности больше, чем 1 Гбит.
В общем, E1000E без прямых указаний вендоров не используйте. Казалось бы, оно новее, но сделано для обеспечения еще большей совместимости c legacy.

Вот не надо E1000E.
VMware Tools. Следите, чтобы они были установлены в ОС, запущены и актуальны. В VMware Tools входят драйвера устройств и разные другие компоненты, которые позволяют общаться ОС виртуальной машины с гипервизором, и наоборот. Через них происходит синхронизация времени ОС с хостом виртуализации (отключаемо), ходят heartbeat’ы, которые показывают гипервизору, что виртуалка жива, и прочее. Для работы ОС на виртуальной машине нужны как минимум драйверы сетевой карточки, дискового адаптера. Свежие версии всего вот этого входят в VMware Tools.
По умолчанию актуальные версии Windows и Linux имеют драйвера для работы с виртуальными устройствами VMware, но если у вас будут VMware Tools, то эти драйвера будут всегда свежими. Для Linux рекомендуется использовать open-vm-tools. Это не просто лучшая интеграция с ОС, но и обновление драйверов вместе с системой.

Отдельные диски для данных. Используйте разные виртуальные диски под данные и операционную систему. Да и на физических серверах стоит так делать. Вы сможете отдельно бекапить эти диски (с разным расписанием, например), сможете переключить диск с данными или его клон на другую ВМ и прочее.
Кроме того, новый виртуальный диск также получит дополнительную квоту на дисковую производительность.

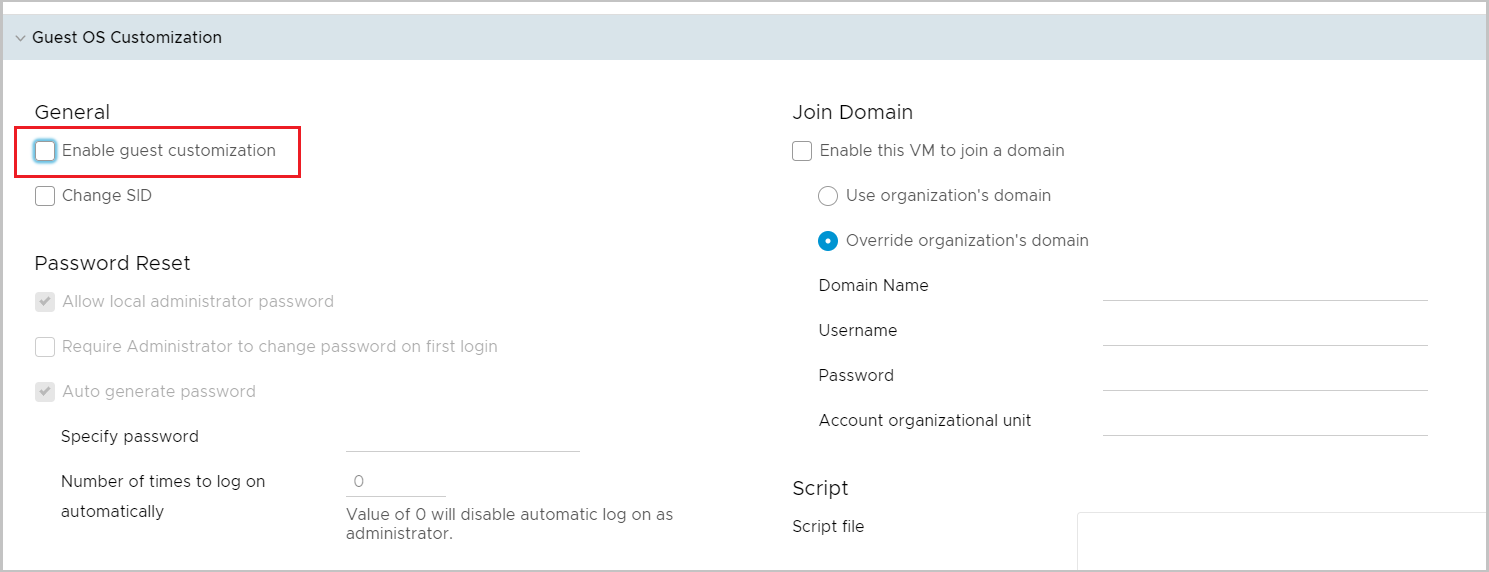
Кастомизация. При первом включении ВМ нужно кастомизировать, чтобы все настройки из облака (например выданный облаком IP-адрес) применились к ОС. После уберите эту галку от греха подальше, чтобы нечаянно не сбросить настройки ОС: SID, пароль администратора и т. п.
Конечно, все вышесказанное – упрощенная картина, слова “капитана О” и, вообще, “все же это знают”. Но, как показывает практика, более 70% ВМ в облаке содержат одну или сразу несколько описанных ошибок.
1 January
2021
If you haven’t already upgraded your Windows servers to Windows 2019, then you will probably be doing so soon enough. That means that it’s time to review the steps you take in building out your virtual machines (VMs). Are you running your VMs from a SAN? Then during this refresh, you should really take the time to consider using the VMware Paravirtual SCSI (PVSCSI) driver.
VMware Paravirtual (PVSCSI) adapters are high-performance storage adapters that can provide greater throughput and lower CPU utilization. They are best suited for environments where hardware or applications drive a very high amount of I/O throughput, such as SAN environments. PVSCSI adapters are not suited for DAS environments.“
VMware, https://kb.vmware.com/s/article/1010398
When building new VMs there are four options you can choose from for their SCSI controller. The default LSI Logic SAS driver that is automatically selected for you will work just fine in most environments. That said, when you want to guarantee maximum performance from your VMs you will need to use the PVSCSI. Why wouldn’t you want to allow your VMs their max performance? It’s simple enough to do. Heck, do it and make a “golden image” template so you can easily redeploy it if you don’t want to repeat the steps on each VM everytime. It’s just a couple of clicks now for better performance later. Here we go…
- Launch the vSphere Client and log in to an ESXi host or vCenter Server.
- Select create a new virtual machine.
- In the vSphere Client, right-click on the virtual machine and click Edit Settings.
- Click the Hardware tab.
- Click Add.
- Select Hard Disk.
- Click Next.
- Choose any one of the available options.
- Click Next.
- Specify the options you require. Options vary depending on which type of disk you chose.
- Choose a Virtual Device Node and specify whether you want to use Independent mode. For data disks, choose a Virtual Device Node between SCSI (1:0)to SCSI (3:15). For a boot disk, choose Virtual Device Node SCSI (0:0) or choose the Virtual Device Node that boots in the order you require.
Note: To set a disk to use Independent mode there must be no snapshots associated to the virtual disk, if there are existing snapshots commit them before changing the disk type.
- Click Next.
- Click Finish to complete the process and exit the Add Hardware wizard. A new disk and controller are created.
- Select the newly created controller and click Change Type.
- Click VMware Paravirtual and click OK.
- Click OK to exit the Virtual Machine Properties dialog.
- Power on the virtual machine.
- Install VMware Tools. VMware Tools includes the PVSCSI driver.
- If it is a new virtual disk, scan and format the hard disk within the guest operating system.
Tags: Paravirtual, Paravirtual SCSI, PVSCSI, SCSI, storage adapters, VMWare, VMware Tools, Windows
Copyright 2022. All rights reserved.
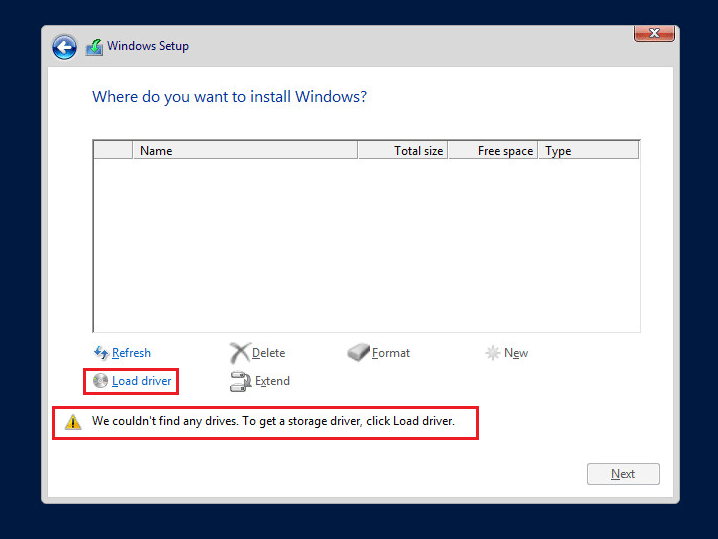
Для лучшей производительности дисков виртуальных машин VMware рекомендует использовать для виртуальных дисков контроллер VMware Paravirtual SCSI. Однако, при попытке установить на чистую ВМ с адаптером VMware Paravirtual SCSI операционную систему Windows Server 2016, вы будете удивлены, т.к. установщик Windows не увидит в системе ни одного диска, в дистрибутиве просто нет подходящего драйвера для контроллера. В этой статье мы рассмотрим, как установить Windows Server 2016 на ВМ с контроллером VMware Paravirtual SCSI.
Как вы видите, установщик Windows Server 2016 не увидел на ВМ с контроллером VMware Paravirtual SCSI controller ни одного диска (We couldn’t find any drives. To get a storage driver, click Load Driver) из за отсутствующего драйвера. Однако драйвер можно установить вручную, для этого нужно нажать на кнопку Load Driver.
Драйвер SCSI можно установить с ISO образа VMware tools. Самый простой способ подключить данный образ к ВМ — воспользоваться возможностью подключения дополнительных CD/DVD дисков в настройках виртуальной машины. Добавьте в настройках новый виртуальный CD/DVD драйв (в первом у вас скорее всего подключен установочный образ Windows Server).

В настройках второго привода нам нужно смонтировать образ windows.iso (находится в корне в папке vmimages).
Теперь нужно найти на диске нужный драйвер. Нажмите кнопку Browse. 
Теперь нужно указать путь к каталогу: VMware Tools -> Program Files -> VMware -> VMware Tools -> Drivers -> pvscsi -> amd64.
Убедитесь, что VMware PVSCSI контроллер определен как совместимый драйвер.
После установки драйвера, установщик Windows увидит все подключенные виртуальные диски.
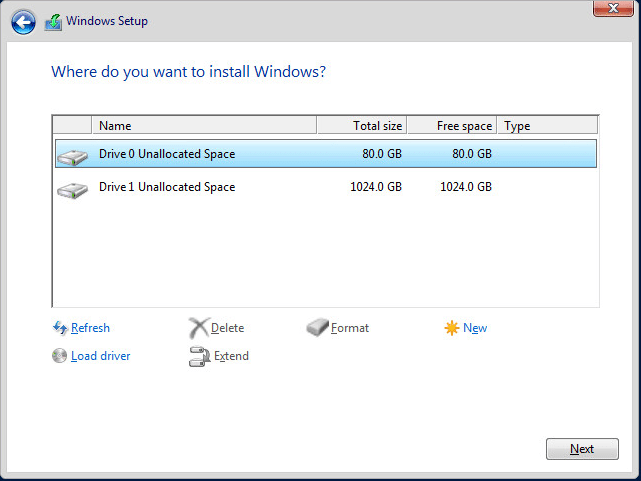
Можно продолжить обычную установку Windows Server 2016.