August 8, 2013 updated by
Leave a reply »
Once you’ve installed VMware ESXi Server and vSphere client, you can create many virtual machines for your own purposes. It’s a good habit to use different password for every VM but the downside is that you have to remember many passwords. What to do if you forgot Windows password to one of your virtual machine in VMware ESXi / vSphere?
PCUnlocker is a powerful Windows password recovery tool that can successfully reset lost Windows password in a simple and easy way. It can be used to unlock passwords for both physical machine and virtual machine. Here’s a step-by-step tutorial to reset lost Windows password of virtual machine in VMware ESXi / vSphere.
How to Reset Lost Windows Password of Virtual Machine in VMware ESXi / vSphere?
- Download the zipped ISO image of PCUnlocker and save it on your physical machine. Unzip the download file and you’ll get a bootable ISO image file: pcunlocker.iso.
- Open up your VMWare vSphere Client and log into your ESXi server. Turn off the virtual machine that you want to reset password for if it is running. Right-click the virtual machine and select “Edit Settings”.
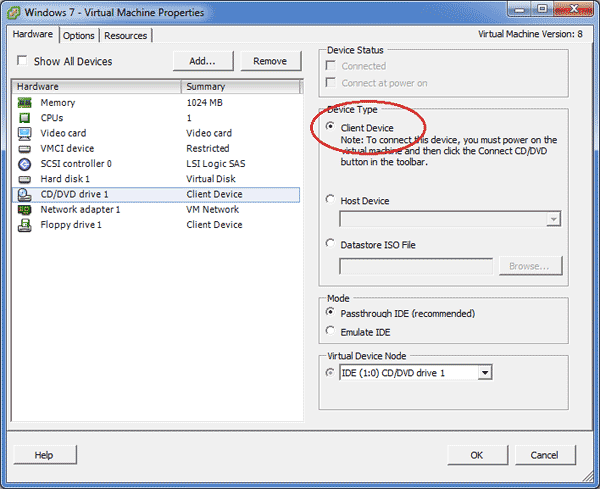
- In the Hardware tab, select the “CD/DVD drive 1”. Under Device Type, check the “Client Device” to enable remote CD drive.

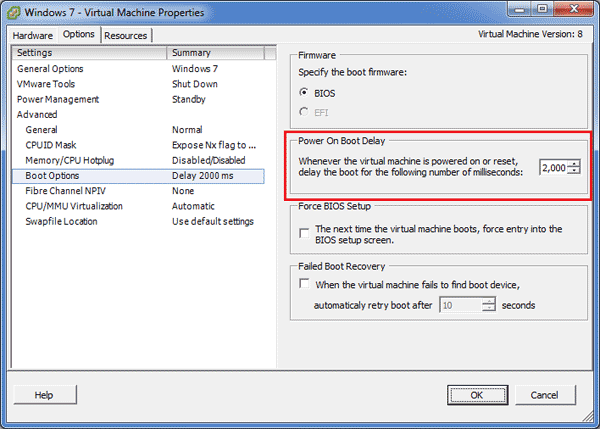
- Switch to the Options tab, then select the “Boot Options”. Under the “Power-on Boot Delay” you can specify how long the delay will be when you start / restart a VM. I’ve set 2s delay on booting to give myself time to press the Esc key to access the Boot Menu.

- Power on your virtual machine, it should display a BIOS screen with options at the bottom and a counter. press Esc key to access the Boot Menu.

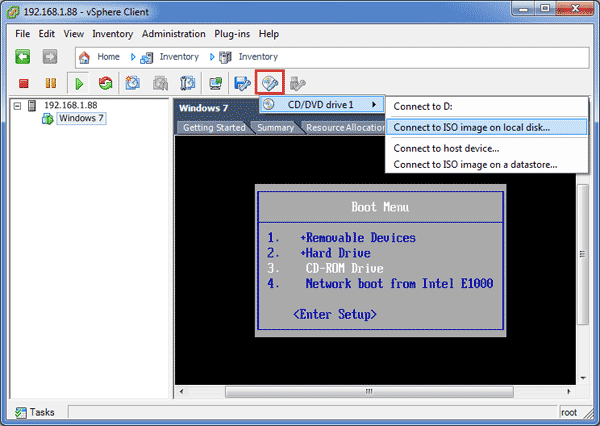
- In the top menu of vSphere client, click on the CD-ROM icon and select “CD/DVD Drive 1” -> “Connect to ISO image on local disk”. Browse to the pcunlocker.iso file you’ve downloaded and click Open. The image is now mounted.

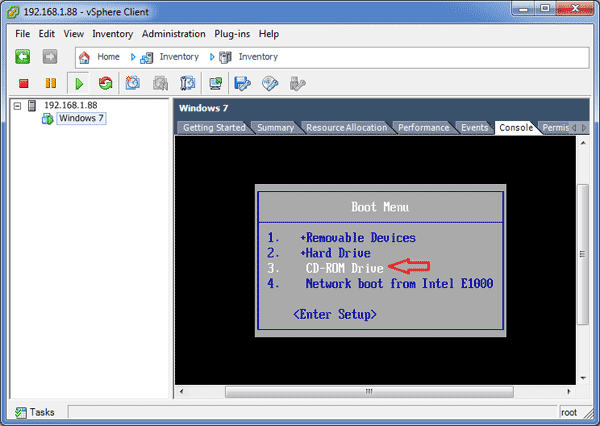
- Choose the CD-ROM Drive from the Boot Menu and press Enter. It will boot off of the CD image.
- In less than one minute, PCUnlocker program will start and it displays a list of Windows local accounts existing in your virtual machine. Choose a user account and click on “Reset Password” button. It will unlock / reset your forgotten Windows password instantly.

- Restart the virtual machine. you can then log back in to your VMware vSphere virtual machine without a password! It’s that simple!


- Previous Post: Forgot Windows Password of Virtual Machine Running in VMware Player
- Next Post: Reset Forgotten Root Password on VMware ESXi 5 and ESXi 4

If you forgot Windows 10 user login password on a VMware virtual machine, what will you do? Delete this virtual machine and then create a new one? This is OK, but you don’t have to do this, because this not only wastes time but also makes you lose all the data on this virtual machine. In fact, you can reset Windows 10 password on VMware virtual machine quickly and easily by using any of the two ways as follows.
- Way 1: using Windows Password Refixer
- Way 2: using Windows 10 ISO image file
Way 1: Reset Windows 10 password in VMware by Windows Password Refixer
Follow the three steps.
Step 1: Create a password reset disk using Windows Password Refixer.
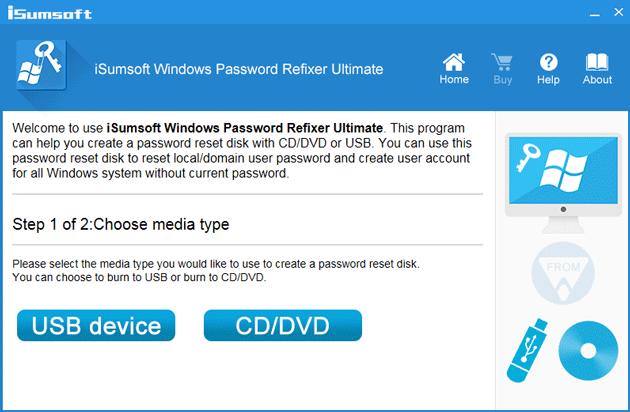
Download the Windows Password Refixer program on any available computer, for example, your physical Windows machine or another virtual machine, and install it on this computer. Run this program and then follow the on-screen instruction to burn it to a USB (or CD/DVD) drive to create a password reset disk.
Step 2: Boot the virtual machine from the USB drive.
Firstly, power off the Windows 10 virtual machine in VMware whose password you need to reset, if you haven’t done so. Secondly, connect the USB drive to the virtual machine. Finally, power on this virtual machine to the BIOS firmware and set the virtual machine to boot from the USB drive.
Step 3: Reset Windows 10 password on VMware virtual machine.
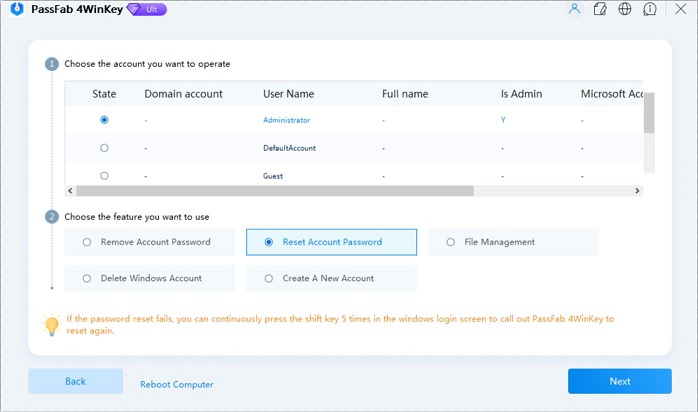
If you have everything done correctly, the Windows Password Refixer screen will appear after the virtual machine boots from the USB drive.
1. Select the Windows 10 you use in this virtual machine. Generally, this action is already done by default.
2. Select the user on this virtual machine, whose password you need to reset.
3. Reset the password using the Reset Password button.
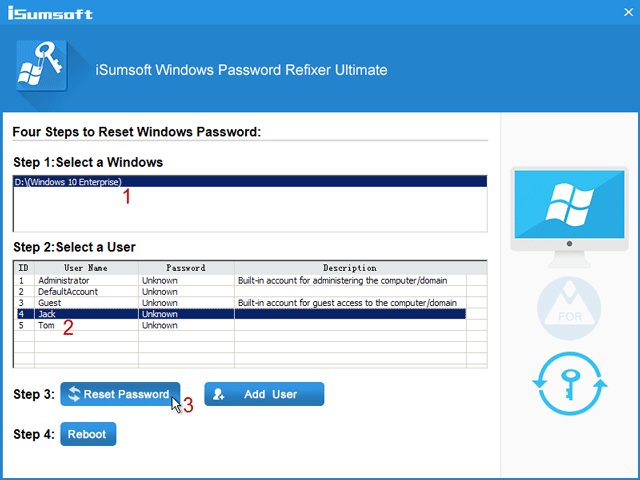
4. After the password is reset, restart the virtual machine using the Reboot button. This time, you need to remove the USB drive from the virtual machine so that the virtual machine will boot normally into Windows 10 and you can log in to Windows 10 with the password that is reset.
Way 2: Reset Windows 10 password in VMware using an ISO image file
Here are the steps.
Step 1: Have a Windows 10 ISO image file on your physical machine.
Make sure you have a Windows 10 ISO image file on your physical computer. If you don’t have one, download it.
Step 2: Boot the VMware virtual machine from the ISO image file.
Firstly, power off the Windows 10 virtual machine whose password you need to reset, if you haven’t done so. Secondly, connect the Windows 10 ISO image file to the virtual machine. Finally, power on this virtual machine to the BIOS firmware and set the virtual machine to boot from the ISO image.
Step 3: Reset Windows 10 password on VMware virtual machine.
1. If you have everything done correctly, the Windows Setup screen will appear after the virtual machine boots from the ISO image. Press Shift + F10 on your physical keyboard.
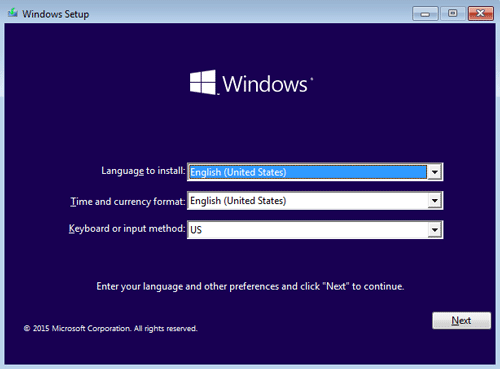
2. An Administrator command prompt window will open, as follows. Type the following commands in the window. When finishing typing each command, press Enter key.
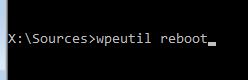
3. Type wpeutil reboot in the command prompt window, and quickly press F2 to enter the BIOS firmware of this virtual machine.
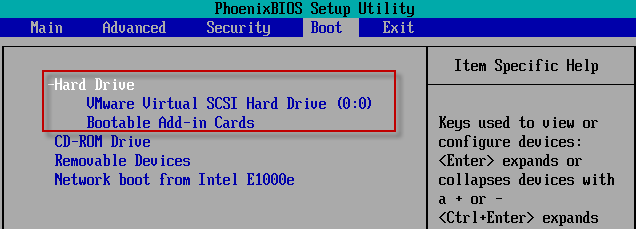
4. Set the Hard Drive as the first boot order, so that the virtual machine will reboot into Windows 10.
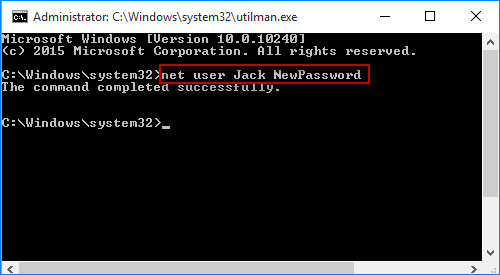
5. After the virtual machine boots to the Windows 10 login screen, click the Ease of Access button in the lower right corner. This will bring up a command prompt window.

6. Now in the command prompt window, you can reset Windows 10 user password on this VMware virtual machine, by typing in the command: net user <username> <password>.
Introduction
TL:DR: Load any required Storage/RAID controller drivers before attempting to reset Windows password via the installation media in a VMware environment.
I recently found myself in the position of having to reset the Windows (2012 R2) domain admin password in a virtual (VMware) lab environment. This process involves temporarily replacing the Utilman.exe executable on the system install drive with a copy of the cmd.exe file. However, my domain controller was a VM on ESXi that required a 3rd party SCSi driver be loaded in order to view the OS drive/install.
The easiest method of loading this driver is to copy your drivers to a virtual floppy disk or .iso image and mount it on an additional virtual CD/DVD drive then boot the VM from your Windows installation media .iso to proceed with the password reset process.
Instructions
Using the following steps you can reset the admin password on the Windows 2012 R2 domain controller:
-
Boot from the Microsoft Windows Server 2012 DVD
-
From the Windows Setup menu, click “Next”.
-
Select “Repair your computer”
-
Under Choose and option, click on “Troubleshoot”.
-
Under Advanced options, click “Command Prompt”.
-
At the command prompt, run the following command to determine the drive letters in use on the server:
wmic logicaldisk get caption, description,filesystemX:\Sources> wmic logicaldisk get caption,description,filesystem Caption Description Filesystem A: 3 1/2 Inch Floppy Drive D: CD-ROM Disc UDF X: Local Fixed Disk NTFS -
Use the
drvloadcommand in order to load the paravirtual SCSi driver from the disk/image mounted via your additional drive (in my case A: floppy drive):X:\Sources> drvload A:\AMD64\PVSCSI.INF DrvLoad: Successfully loaded A:\AMD64\PVSCSI.INF. -
Run the
wmic logicaldisk get caption,description,filesystemcommand again and you should be able to see the local installation disk now (in my case this was E:):X:\Sources> wmic logicaldisk get caption,description,filesystem Caption Description Filesystem A: 3 1/2 Inch Floppy Drive C: Local Fixed Disk NTFS D: CD-ROM Disc UDF E: Local Fixed Disk NTFS X: Local Fixed Disk NTFSNote: Because your server is started with bootable media, the System Reserved partition of your hard drive is temporarily marked as C: and therefore the C: drive that you see from within Windows 2012 is marked as E: drive (since the CD-ROM Disc is marked as D:). This is a temporary modification. Things will revert to normal as soon as you boot Windows 2012 normally.
The X:\Sources directory is a temporary container that is created when Windows 2012 is booted externally, it allows you to run a host of commands to manage your install.
-
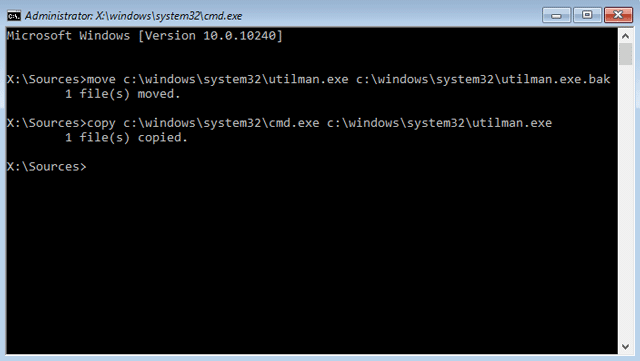
Now switch to your local installation disk (E:) and run the commands to replace the
Utilman.exefile with a copy ofcmd.exe:X:\Sources>E: E:\>cd Windows\System32 E:\Windows\System32>ren Utilman.exe Utilman.bak E:\Windows\System32>copy cmd.exe Utilman.exe 1 file(s) copied E:\Windows\System32> -
Now use the
wpeutilcommand to reboot your Windows VM:E:\Windows\System32>wpeutil reboot -
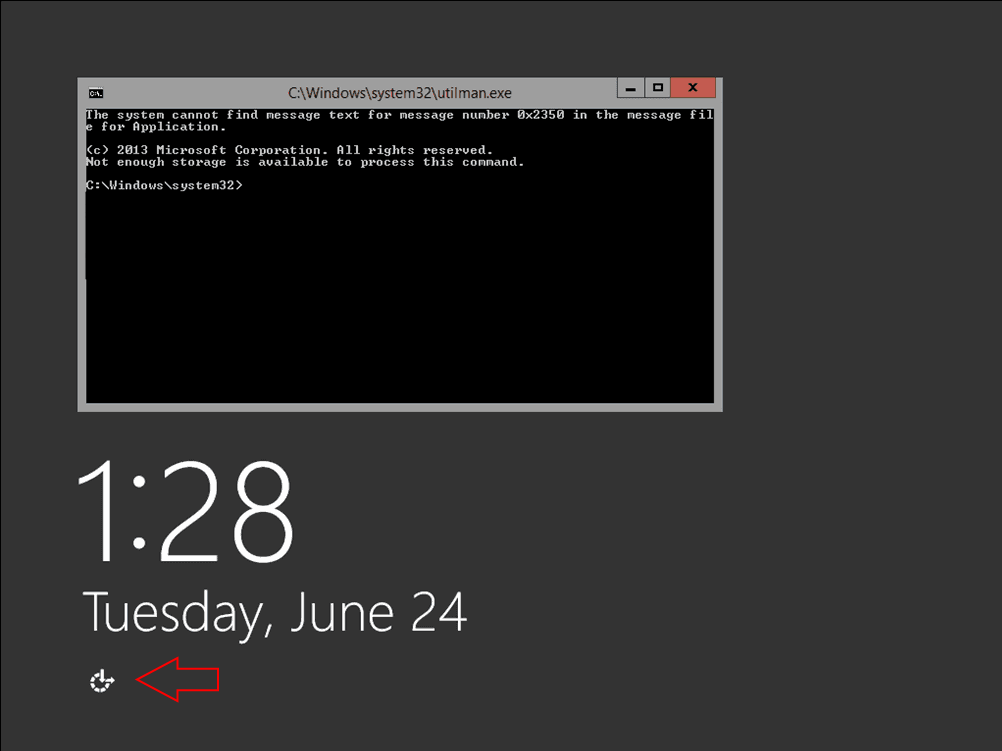
Once the VM has rebooted, click the Utility Manager icon to load a command prompt:

Reset Windows 2012 password (Click Utility Manager Icon) | Windows 2012 R2 -
Run the following command to reset your Windows 2012 password (e.g. ‘Password123’ case sensitive):
net user administrator Password123C:\Windows\System32>net user administrator Password123 The command completed successfully C:\Windows\System32> -
Closing the command prompt, you should now be able to log back onto the server using the password you have provided in the last step.
Revert Changes
Once you’ve confirmed that you can logon to the server you should restore the Utilman.exe from the earlier backup.
-
Follow steps 1 to 9 in the Installation section above.
-
Run the following commands to restore the
Utilman.exefromUtilman.bakE:\Windows\System32>del Utilman.exe E:\Windows\System32>copy Utilman.bak Utilman.exe 1 file(s) copied E:\Windows\System32>
You can now logout and reboot. Your admin password has now been reset.
Sources:
http://www.kieranlane.com/2013/09/18/resetting-administrator-password-windows-2012/
Hello. I purchased Parallels for my Windows 7 computer so I could run Windows 8.1 on it. I forgot my Windows 8.1 password and I am now locked out. I’ve searched the web for how to reset the password, but they don’t seem to work because I’m running Windows7 via Parallels and not as a standalone machine. So how do I reset in Parallels?
— Stanley from Yahoo answer
Virtual machines allow you to run one operating system emulated within another operating system. Your primary OS can be Windows 7 64-bit, for example, but with enough memory and processing power, you can run Windows 7 and Windows 8.1 side-by-side within it. If you’re the unlucky guy like Stanley, you need to find a way to recover the forgotten Windows password.
This tutorial will take you step by step through resetting a Windows login password inside a virtual machine. Here we take VMWare, Parallels and Hyper-V which are the most popular virtual machine applications for example.
Step 1. Change Virtual Machine Settings to Boot from ISO
The steps of settings for different virtual machine vary. For any one, firstly you should download Windows Password Key firstly. The ISO file is saved in the following folder by default:
C:\Program Files\Windows Password Key Enterprise\Windows_Password_Key_ Enterprise _Demo.iso
For WMWare:
- Launch VMWare Workstation, Click on the «File» menu, select Open to «open» your existing virtual machine.
- Double-click on the CD/DVD device, and you will see the «Connection» properties for this device. Click on «Use ISO Image», then browse to the ISO image file on your computer.


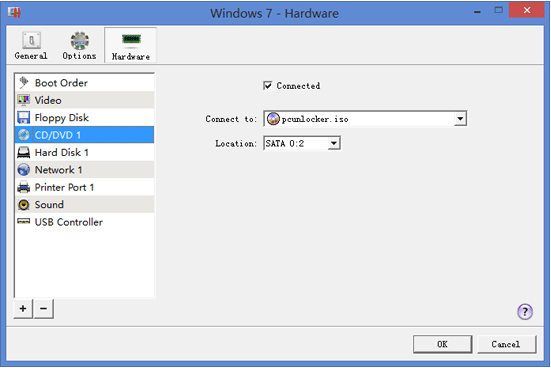
For Parallels:
- Open the configuration of your Parallels virtual machine.
- Under «Hardware» section, click the «CD/DVD» to open its settings. Make sure that «Connected» option is checked and click the «Connect to» drop-down list to choose the ISO image that you’ve just downloaded.

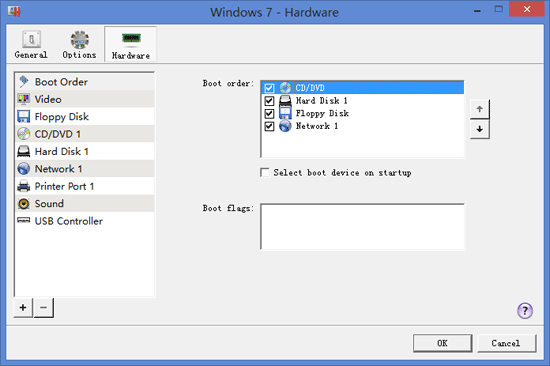
- Click the «Boot Order» under «Hardware» section, move the «CD/DVD» to the top of the boot device list.

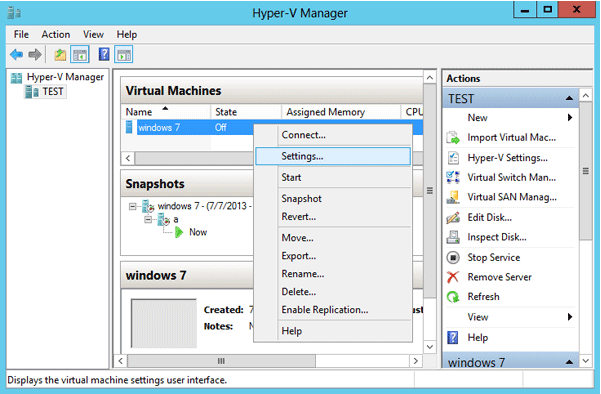
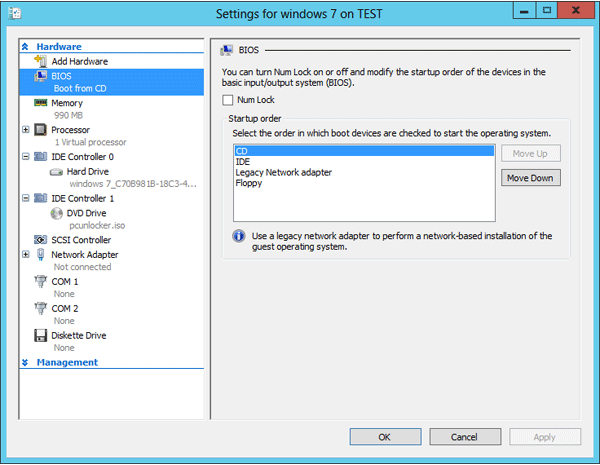
For Hyper-V:
- Launch Hyper-V Manager. Right-click on the existing virtual machine that you want to reset lost admin password for, then select «Settings…» from the drop-down menu.

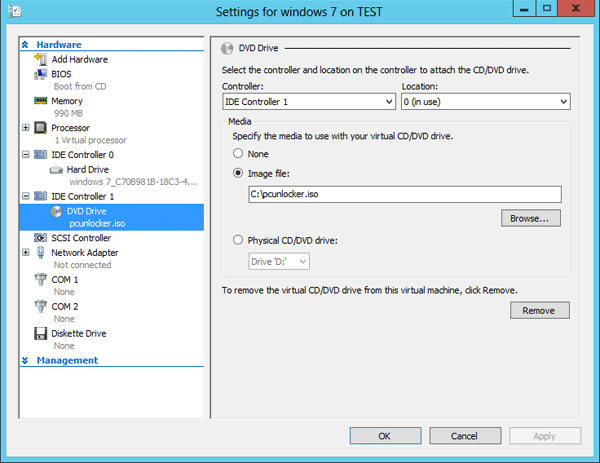
- When the Settings dialog box appears, click on the «DVD Drive» from the «Hardware» tab. Specify the DVD drive to use the ISO image file you’ve downloaded.

- Switch to the «BIOS» option under the «Hardware» tab. Move CD to the top of startup boot devices.

- Click on «Apply» to save your changes.
Step 2. Recover Lost, Forgotten Windows Password on VMWare, Parallels and Hyper-V
- Start the virtual machine. It will load to WinPE system from the bootable ISO image. After a while, you’ll see the Windows Password Recovery Software.
- Follow the wizard to reset Windows password in Virtual machine. It can recover password for any types of local account: administrator and standard user. It works well with Windows 8.1, 8, 7, XP, Vista and Windows Server 2012 (R2), 2008 (R2) and 2003 (R2).

Like this article? Just share it to your friends. Or you have any comment on this topic? just let us know.
- Related Articles
- how to crack laptop password on windows 8
- how to reset asus laptop password
- how to reset password on toshiba laptop windows 7
comments powered by
Recently, we had a need to reset a Windows Server’s local admin password on a machine that was a guest OS on a VMware cluster. I thought it would be really straightforward (load up ntpasswd and go!) but I ran in to issues. Mainly, the utility was not able to detect the hard drive. Here’s an easy guide on getting back in to your Windows server:
STANDARD DISCLAIMER: I am not responsible for your servers or your actions. If these instructions mess up your super important production server you probably shouldn’t have lost the password in the first place  Instructional purposes only.
Tools you’ll need:
— A Windows box that you can’t get in to (guest on VMware)
— VMware tools need to be previously installed on the Windows box.
— Emergency Boot CD ISO (EBCD061P.ISO) Direct Downloads: HTTP HTTP HTTP
— Administrative Privileges for your guest OS via VMware Infrastructure Client
— *You must be able to change the SCSI controller settings from ‘LSI Logic’ to ‘Bus Logic’
— Patience
1.) First things first:
You want to gracefully shutdown the Windows box from your VMWare console so the hard drive doesn’t lock for the password reset tool. This is where the VMWare tools being installed comes in handy. With the tools installed, you can right click on the guest OS and «Shut Down Guest» which will gracefully shut the machine down even if you have disabled power downs from the CTRL+ALT+DEL screen.

2.) Critical Step:
The problem with resetting the passwords on Windows boxes hosted by a VMWare cluster is really pretty simple — The hard drive by default is «LSI Logic» which is not supported by current password reset utilities. Fortunately, you can change the SCSI controller type by doing the following:
Edit Settings of Guest OS > SCSI Controller > Change Type
Make the SCSI controller type «BusLogic»

After this, press OK until you get back to the black console screen. At this point, if you are able to configure the ISO while the machine is off go ahead and set the EBCD ISO (listed above) for boot. Now skip to step 5. If you have problems loading the ISO while the machine is off (like I did) keep reading.
3.) Getting the ISO loaded:
My VIC is pretty laggy, so I had to do this a few times to get it to work. Mainly you want to be prepared for the screens that you’ll be presented with, so you’ll see them below. Take a look at the screenshots to prepare yourself:
4.) Turn the Guest back on.
After you turn it on, it will present you with a dialog box confirming the SCSI controller change before it actually turns the guest OS on.

Right after you click «ok», the guest will begin starting up. Make sure you are ready to click inside of the console to gain control of the VMWare BIOS. Keep clicking the black console until you see the BIOS. As soon as you see the BIOS screen hit the ESC key ONCE quickly! This should (hopefully) load the boot options.

If you didn’t catch the BIOS quick enough, Windows will begin loading and you’ll be greeted with this screen.

Dont panic, just hit escape when you get back to the VMware BIOS after the machine reboots. Load up the ISO and continue with the CD-ROM boot.
5.) The Reset
After the ISO is loaded, make sure you select «CD-ROM Drive» and hit Enter. This will start EBCD. Select option 5.
After you select option 5, you may get an error and hang:
» PCI: Cannot allocate resource region 4 of device 00:07.1 «

Dont worry about this, it’s likely not hung. Give it a minute to get past the error. You’ll be asked to «Swap to SCSI-Drivers disk now if needed (not needed on CD). Press return/enter to continue». Hit enter and when you are prompted to «Probe for SCSI-drivers: [n]» type «y» and hit enter. This should automatically find the BusLogic driver.

If everything goes well, you’ll eventually make it to the «What partition contains your NT installation?» screen. Select the right one (usually the default by hitting enter)
*NOTE: If you bluescreened and rebooted unclean, you’ll get an error «mount: wrong fs type, bad option, bad superblock on /dev/XXXX or too many mounted file systems». With this version of EBCD, it seems to be able to recover from unclean shutdowns and should eventually sucessfully load the drive. See below for the rest of the process:

At the end of the password reset, you may notice some errors such as
«NTFS-fs error (device 08:01) ntfs_prepare_nonresident_write(): Writing beyond initialized size is not supported yet. Sorry»
Dont worry about this, the password should still be reset. Power the machine down.
6.) Change SCSI settings back to LSI Logic.
Change the settings back to normal and reboot the Windows machine. Try and log in to your local administrator account. All should be well. If it did not work and you bluescreened in step 2, keep trying until you are able to mount the ISO without Windows attempting to load in the BusLogic mode.
Questions? Comments? dh@slack.net
Daniel Hoffman
Network Security Consultant/Analyst
Buffalo NY
www.slack.net/~dh