The VMware tool is a software package from VMware that you can install on your Virtual machine. You can think of VMware tools as software drivers that you would usually install on a PC.
Installing the VMware tools package will improve the VM’s overall performance and manageability.
We have covered the installation of Windows operating systems on VMware hypervisors such as Esxi and VMware workstations. In this blog, let’s look at how you can install VMware tools on Windows machines installed in ESXi and VMware workstations.
The VMware tool is a program that is available for all the hypervisors made by VMware, including ESXi, Workstation, and even fusion for MAC. After the virtual machine installation is complete, you will install these VMware tools inside the Virtual machine.
Even if you don’t have VMware tools installed in your virtual machine, you can still access your virtual machine just fine. However, it is recommended that you install VMware tools to improve the Virtual machine performance and ease of management. Also, during your virtual machine upgrade cycle, you should consider upgrading your VMware tools.
In this blog, we will install VMware Tools on a Windows machine in ESXi and VMware workstation environments.
Note: Though I am showing the Windows 11 version here, the steps mentioned are identical to Windows servers and other Windows versions. Also, the steps mentioned for the Vmware workstation are the same for VMware fusion for MAC as well.
Install VMware Tools on Windows in ESXi.
Install VMware Tools on Windows in VMware workstation.
We have already installed a windows virtual machine in ESXi, following the article here. And we will start from there.
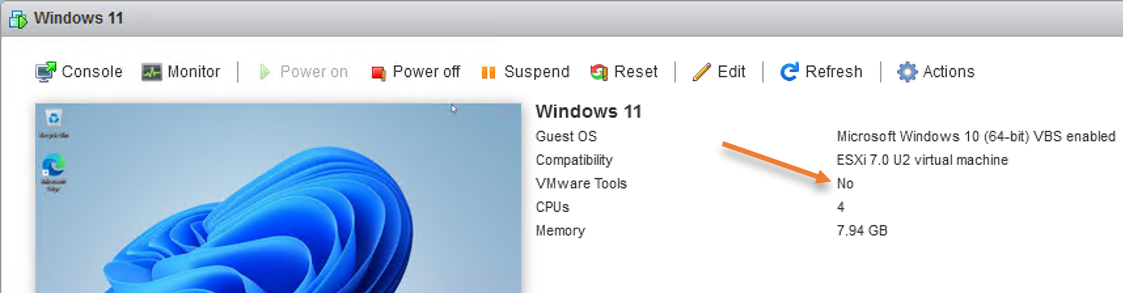
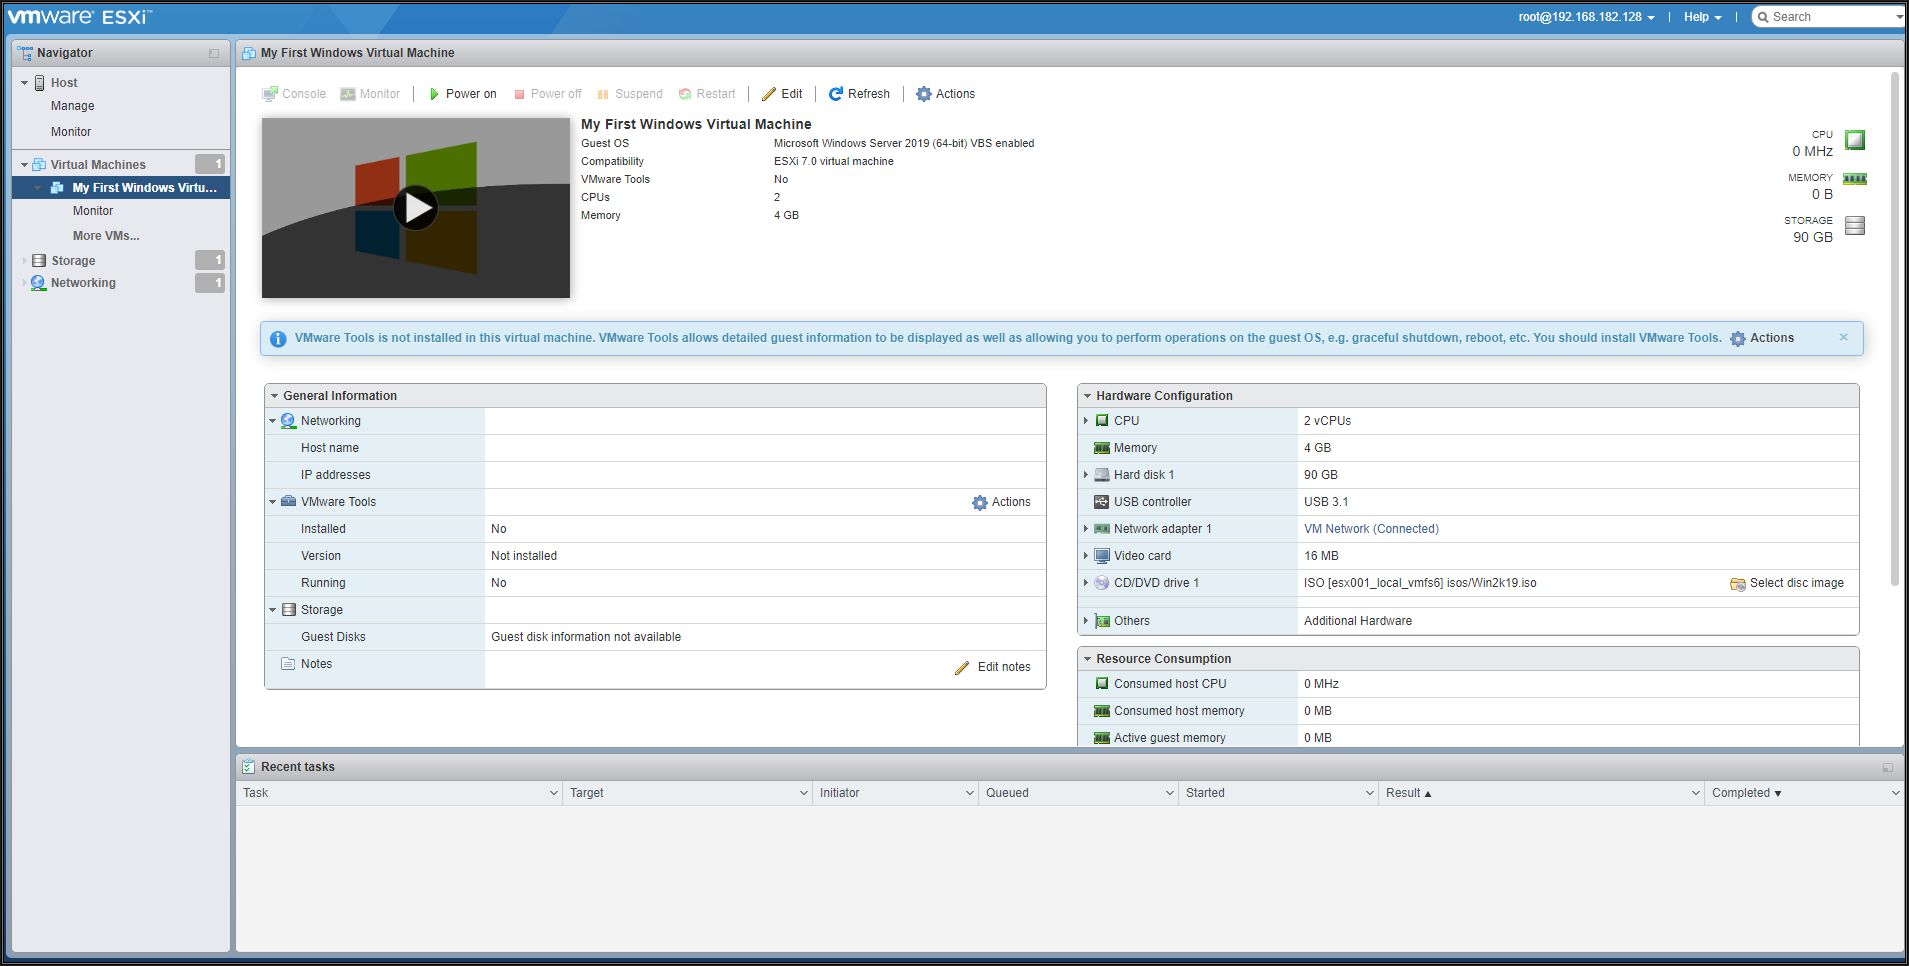
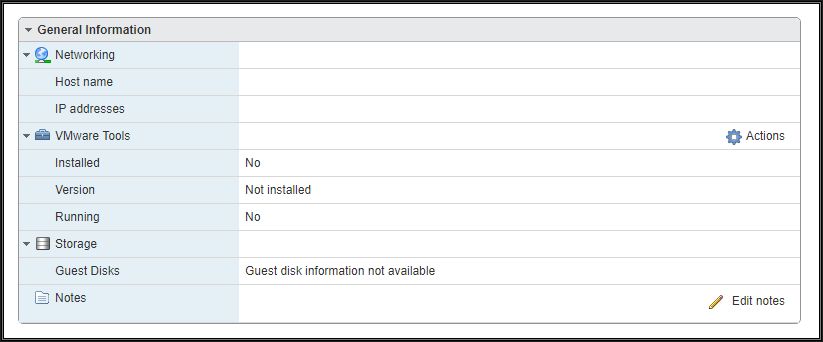
In the Windows virtual machine dashboard, you will see the status of VMware tools.
If you have already installed the VMware tools, you will see ‘Yes’ on the VMware tools section otherwise, it will show ‘No’.
Since we have not installed it, it says No.
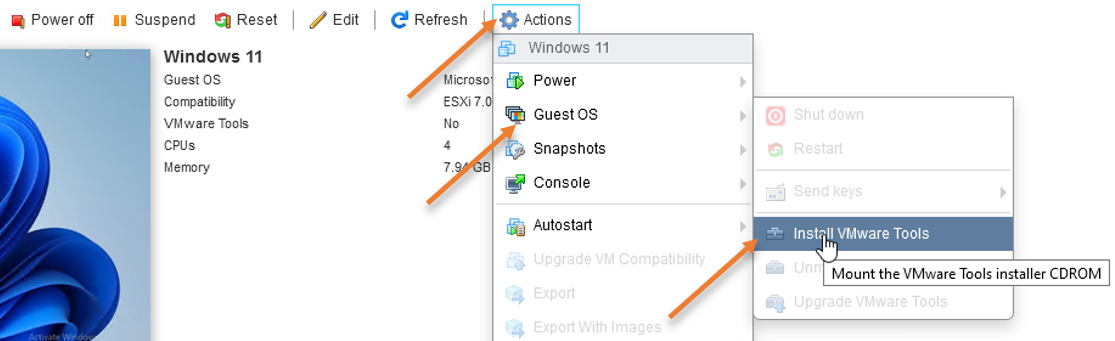
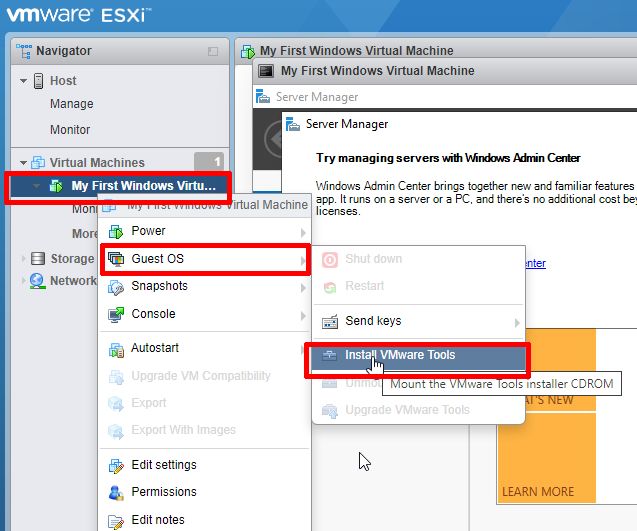
To install the VMware tools, in the same dashboard, click on Actions->Guest OS-> Install VMware tools.
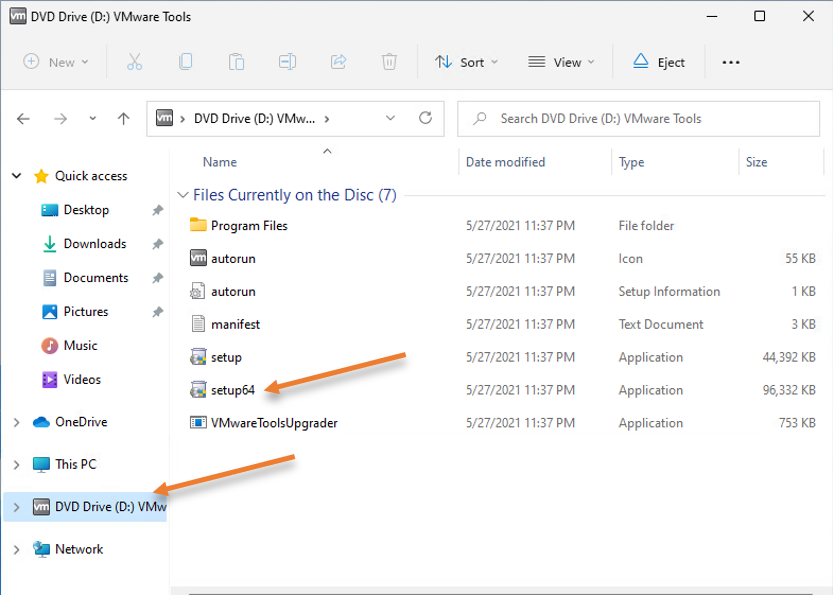
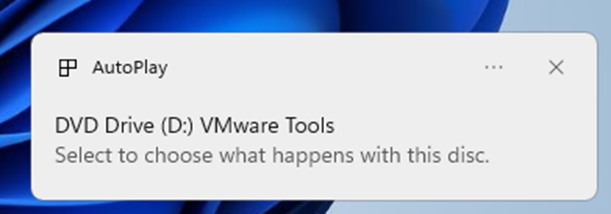
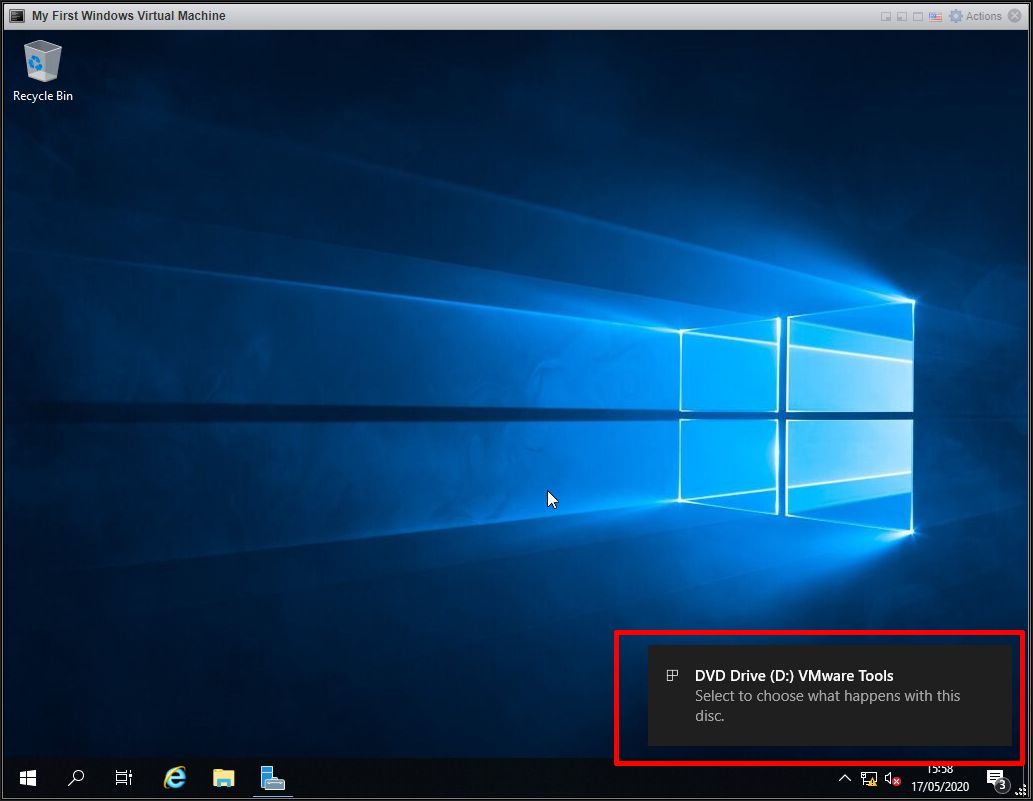
The VMware tools CD-ROM will now mount onto the Windows operating system.
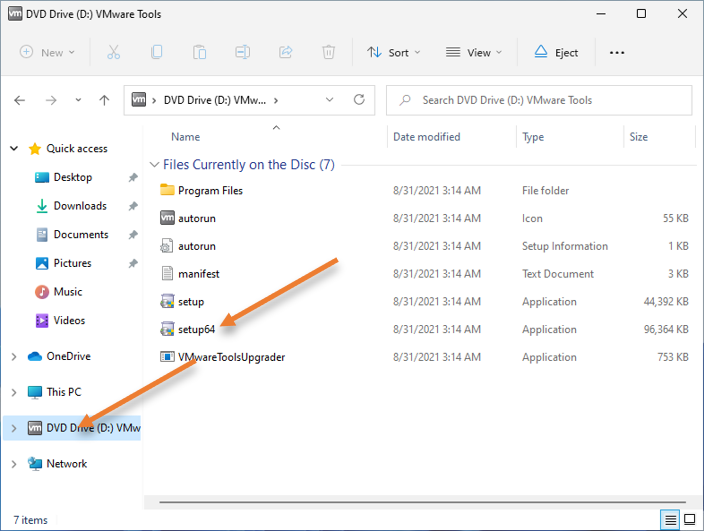
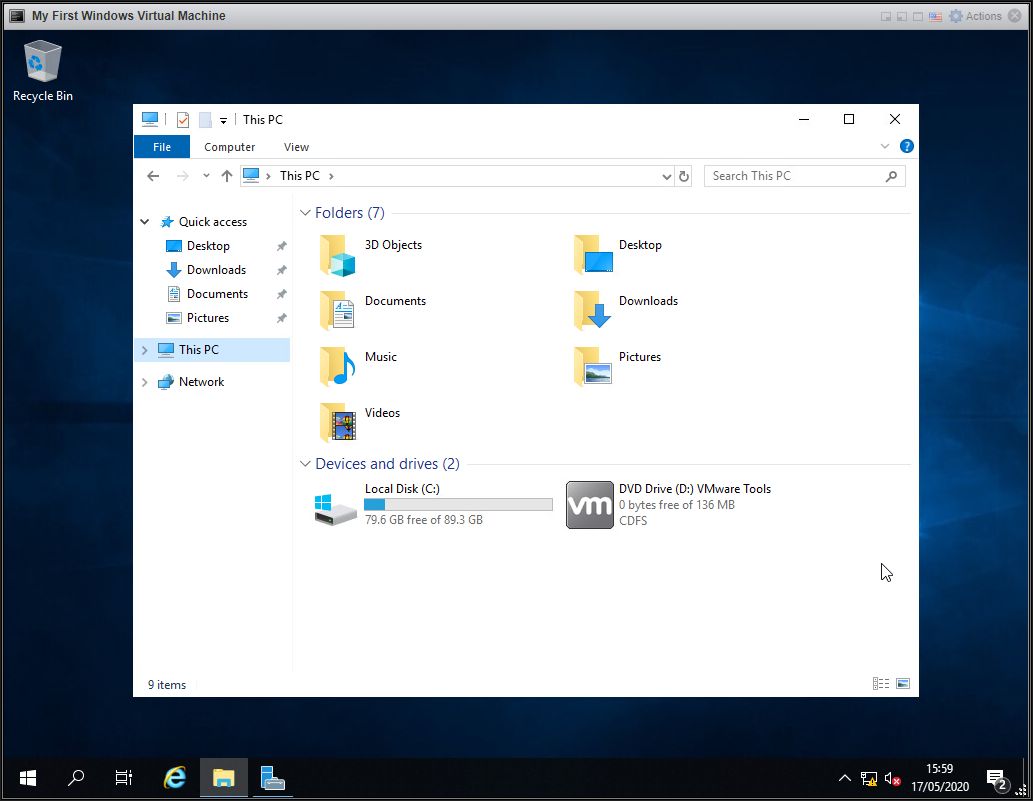
Open File Explorer, and you should see DVD Drive attached on the left side.
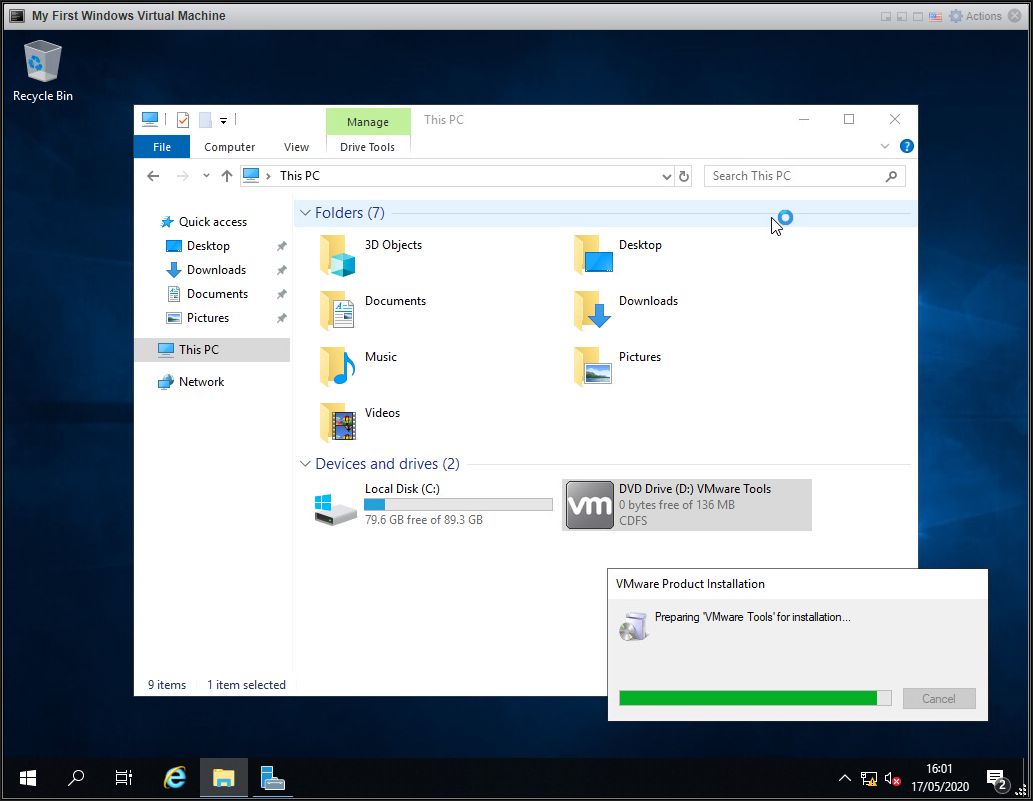
Open the DVD drive in that double-click on Setup64 to install the VMware Tools on the Windows 11 machine.
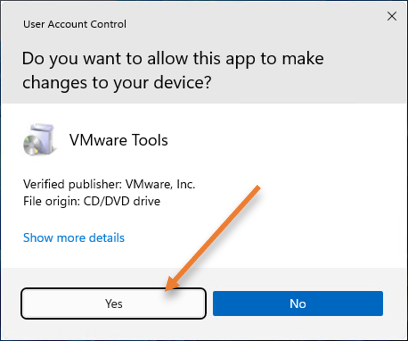
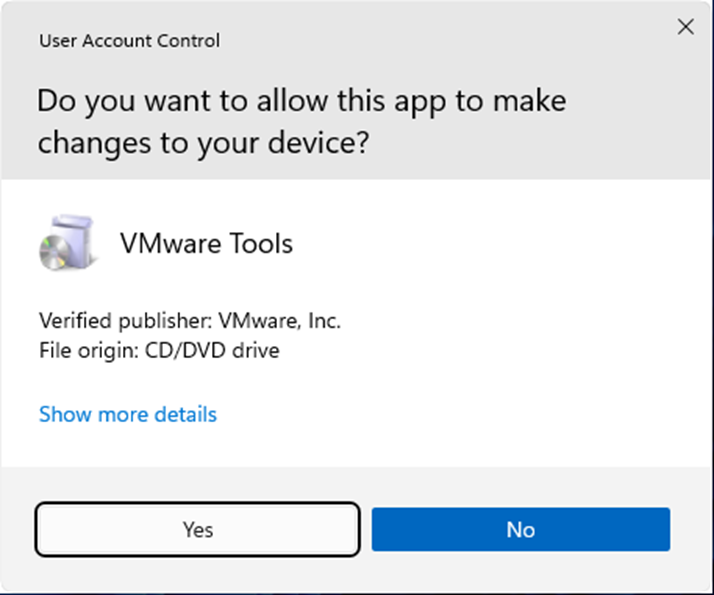
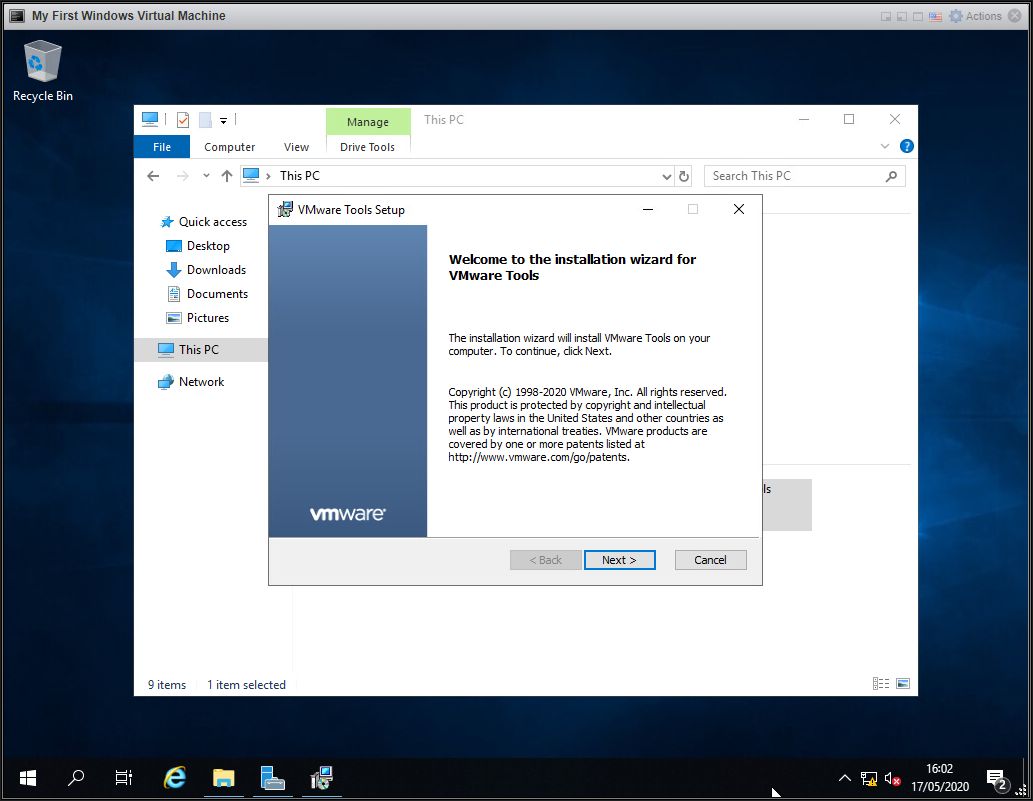
The installation wizard for the VMware tools would now open. Click on Yes.
Click on next.

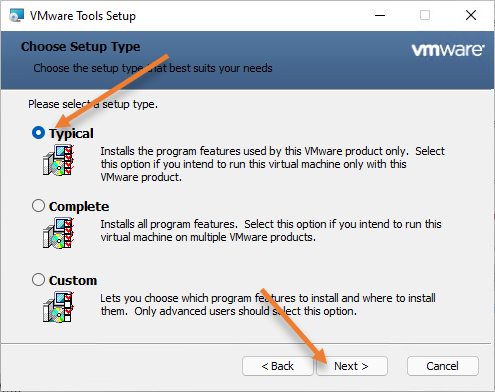
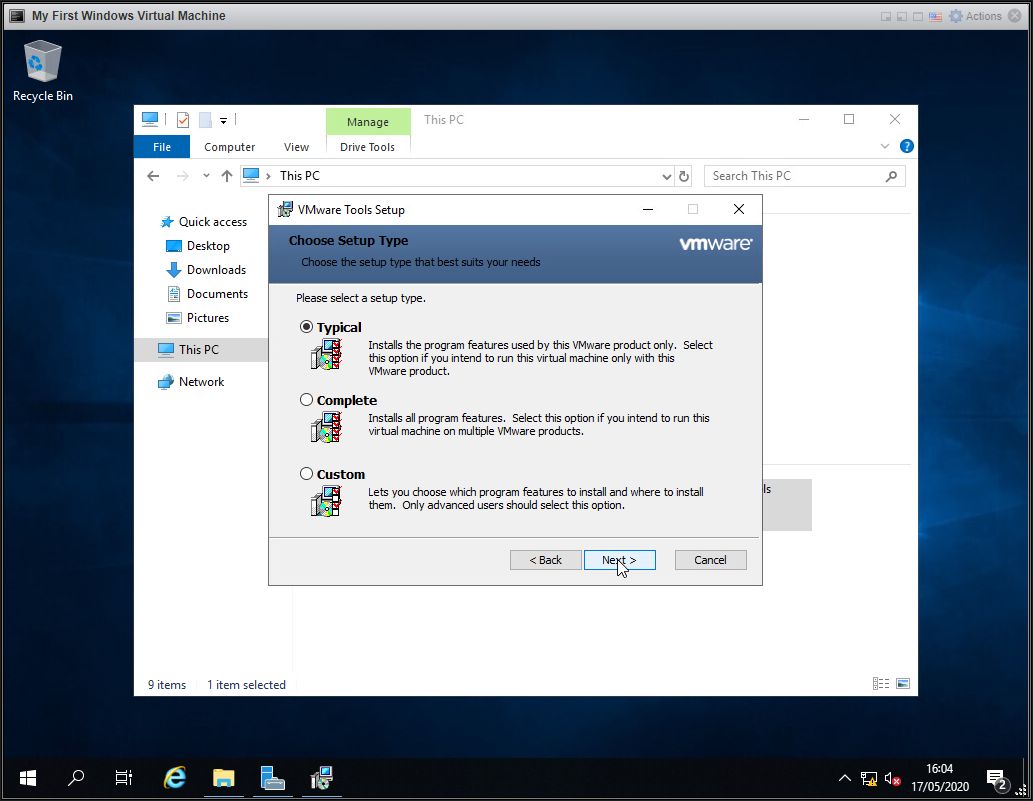
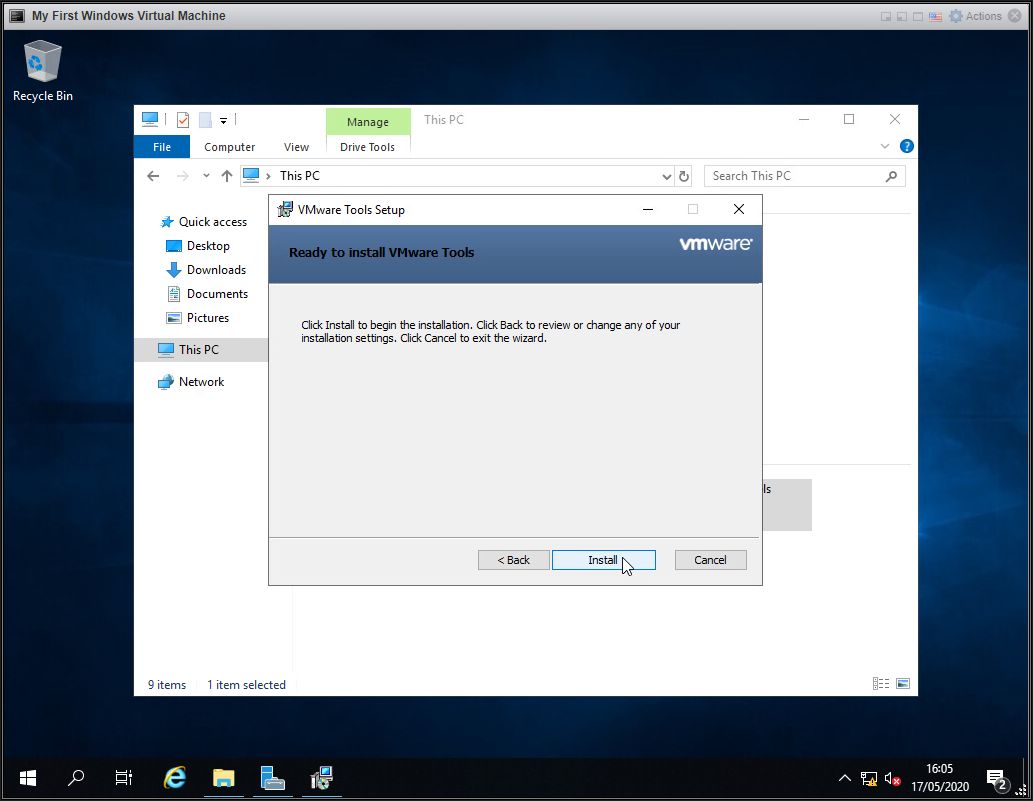
Choose Typical and click on Next, and click on next and install.
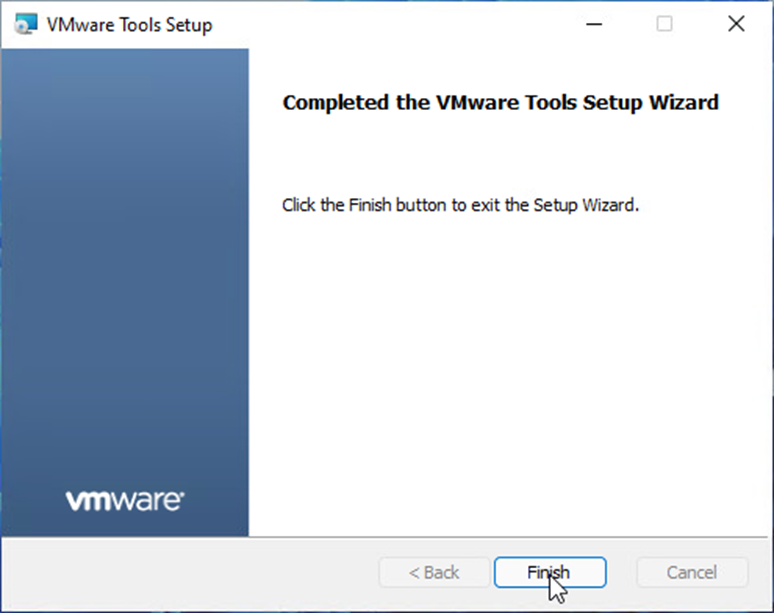
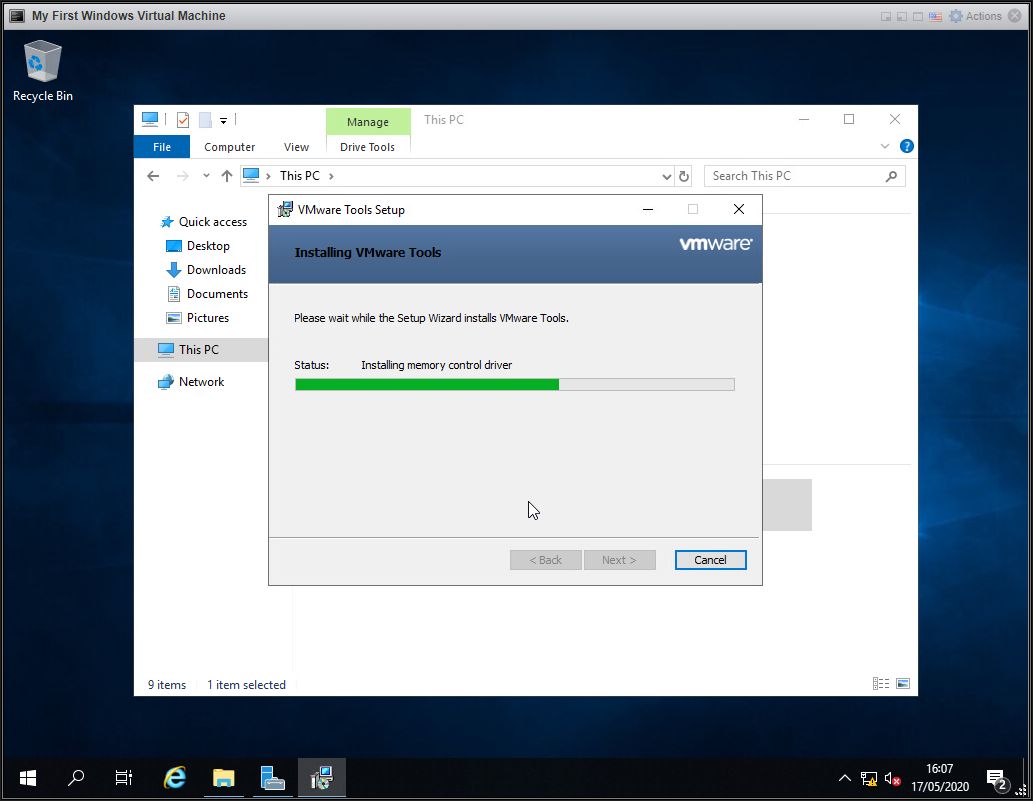
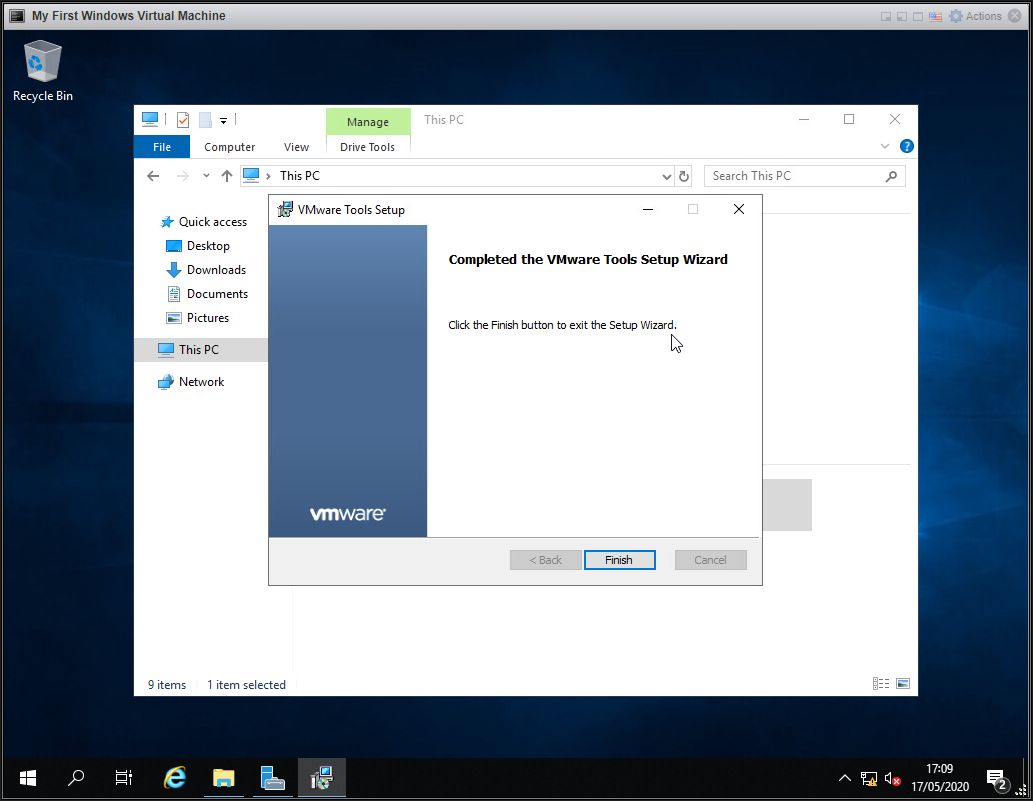
Once the installation is complete, you may click on Finish.
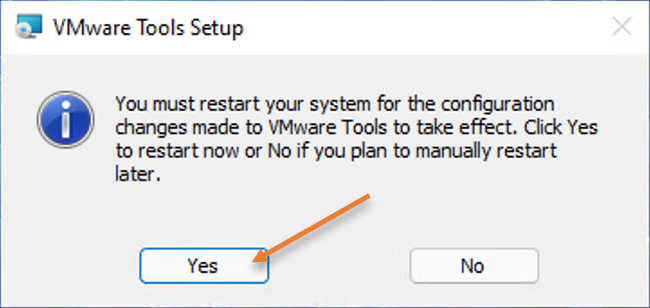
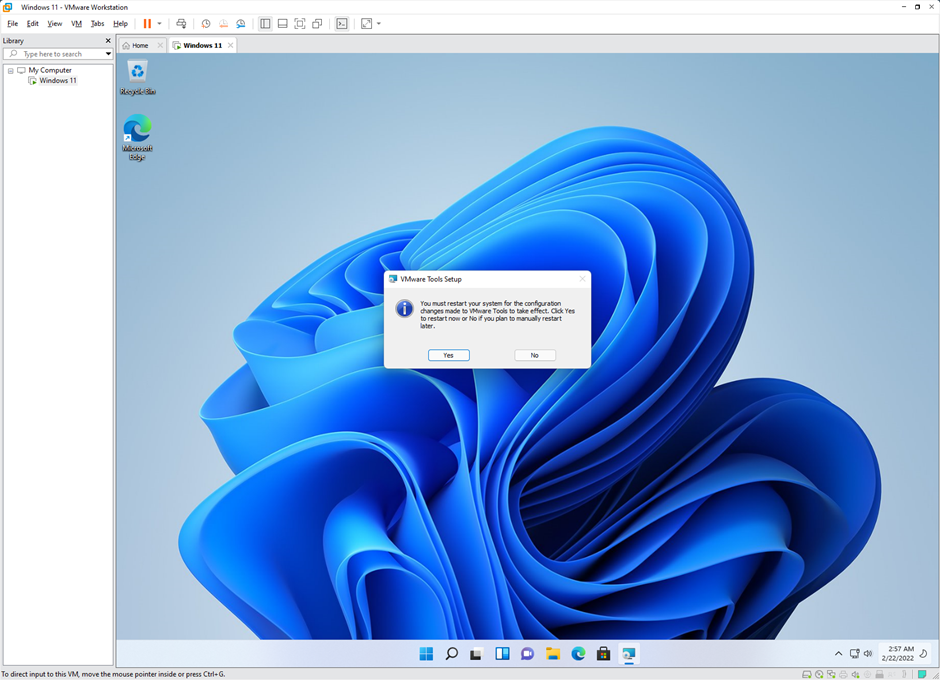
After the installation, you will be required to restart the machine click on Yes on the VMware Tools setup pop-up.
After the system is restarted, you will see the VMware tools shows yes, which means it is already installed.

We have taken a look at how you can install VMware tools on the ESXi host; next, let’s take a look at the same from the VMware workstation perspective.
As I mentioned before, the steps discussed here are identical to the VMware fusion.
It is assumed that you have already installed the Windows operating system in the VMware workstation. Any windows operating system would work. We are going to show you the example with the Windows 11 operating system. Which is covered in this article.
Before we proceed with the installation, let’s see how the Virtual machine behaves when you don’t have the VMware tools installed.
As you can see from the screenshot below, I have not installed the VMware Tools on the Windows 11 machine. Because of that reason, the operating system doesn’t resize when I resize the Vmware workstation window.
It just shows black borders.

Let’s go ahead and install the VMware Tools on the windows operating system and see how it behaves. To install the VMware tools in Windows, select the virtual machine.
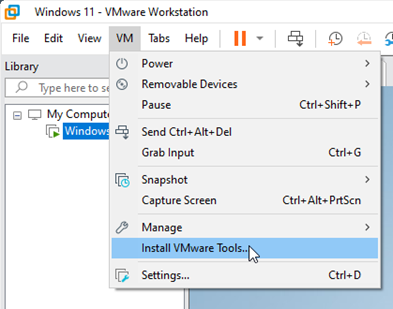
Click on VM->Install VMware tools.
You will get a notification on the bottom that says the DVD Drive with VMware tools has been inserted.
Open File Explorer.
You would see DVD Drive on the left pane. Click on that.
And double click on the setup64 to install the VMware Tools on the Windows 11 machine.
Click on yes on the installation prompt. And follow the onscreen instruction to install the VMware tools.
I just completed the installation of VMware tools on my Windows 11 virtual machine, and I can now go ahead and reboot the virtual machine. But before you reboot, you may resize the VMware workstation Windows, and you should see the Windows 11 resolution gets adjusted along with the Hypervisor window. This means you don’t have to manually adjust the screen resolution when you increase the window size. No longer does it show the black borders. That is not the only benefit, that is one among the benefit of installing the VMware tools.
In this article, I will show you HOW TO: Install VMware Tools for Windows on a VMware Windows virtual machine on a VMware vSphere Hypervisor 7.0 (ESXi 7.0) Host Server, using the VMware Host Client. The virtual machine has Windows Server 2019 installed.
In my previous Experts Exchange Articles, most have featured Basic and Intermediate VMware and Virtualisation Topics.
If you would like to read my Basic VMware articles, they are listed at the end of this article for your convenience.
In this series of basic VMware articles for the Novice, I’ll be showing you the basic VMware skills required to install, configure and deploy virtual machines using VMware’s FREE VMware vSphere Hypervisor (ESXi).
In this article we will show you HOW TO: Install VMware Tools for Windows on a VMware Windows virtual machine on a VMware vSphere Hypervisor 7.0 (ESXi 7.0) Host Server. This procedure can be followed to install VMware Tools on any Microsoft Windows operating system Virtual Machines provided they are supported by the version of VMware vSphere. You may want to consult the VMware Hardware Compatibility Lists or HCL, see here to check your operating system is compatible with VMware vSphere.
What is VMware Tools?
VMware Tools are a suite of utilities that enhances the performance of the virtual machine’s guest operating system and improves the management of the virtual machine. Installing the VMware Tools package will greatly enhance graphics and mouse performance in your virtual machine. Without VMware Tools installed in your guest operating system, guest performance lacks important functionality.
You can check if you have VMware Tools installed by checking the Summary of your virtual machine using the VMware Host Client if using VMware vSphere 6.7 or 7.0. If VMware Tools is installed VMware Tools will read VMware Tools version is compliant. (in previous versions it stated OK) , an IP Address and DNS hostname will appear in the Summary page. If VMware Tools is not installed, it will state No, and Not installed. VMware Tools is not optional and should be installed with all virtual machines.

Also, a warning message will be displayed as follows

1. Connect to the VMware vSphere Hypervisor 7.0 (ESXi 7.0) or vSphere vCenter Server using the VMware Host Client.
Please refer to my EE article on Part 2: HOW TO: Connect to the VMware vSphere Hypervisor 7.0 (ESXi 7.0) using the vSphere (HTML5 Web) Host Client 7.0
Click the icon of the virtual machine.

Click the virtual machine.
2. Checking if VMware Tools is installed in the Virtual Machine
Check the summary information for the virtual machine.
Under VMware Tools, if No is present next to Installed, VMware Tools is not currently installed.
If VMware Tools is installed and running, VMware Tools Running Status states Installed and Running, and an IP Address is displayed. Also, the VMware Tools Version Status states — Current. If VMware Tools is not installed, please continue with the following steps. ESXi 7.0 states — VMware Tools version is compliant.
As you can see from the above information VMware Tools has not been installed on any of our virtual machines, «My First Linux Virtual Machine» or «My First Windows Virtual Machibe». Please see my EE Article Part 10: HOW TO: Install VMware Tools for Linux on a VMware Linux virtual machine on a VMware vSphere Hypervisor 7.0 (ESXi 7.0) Host Server to install VMware Tools on «My First Linux Virtual Machine». To install VMware Tools on Windows, please continue with this tutorial.
3. Interacting with the Virtual Machine
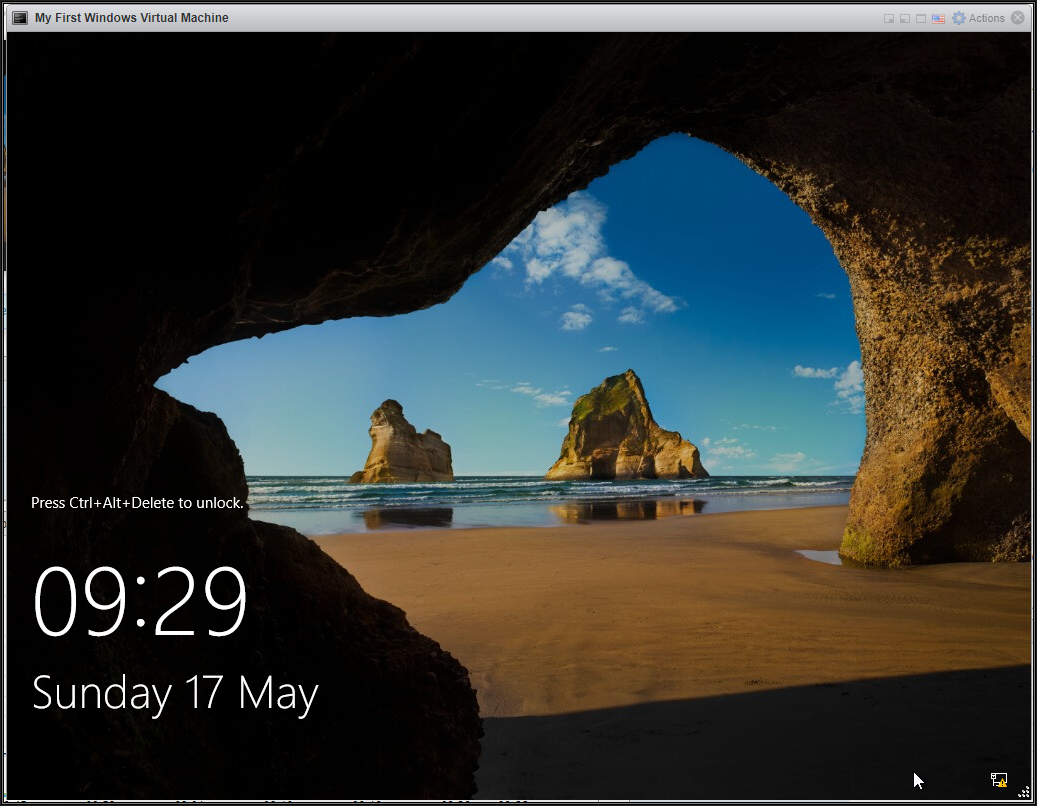
Right-click the virtual machine «My First Windows Virtual Machine» and Select Power On, the virtual machine should automatically boot the operating system. Then select the Open Console function so you can interact with the virtual machine. You may find it easier if you Right-Click the virtual machine «My First Windows VM» and Select Open Console.
The virtual machine should automatically boot the operating system. The Open Console function is similar to the Keyboard/Video Machine (KVM) function in a datacentre, which allows you to toggle between console screens of computers, it allows you to interact with the virtual machine, with keyboard and mouse movements, and displays the screen. The Microsoft Windows Server 2016 console screen will be displayed.
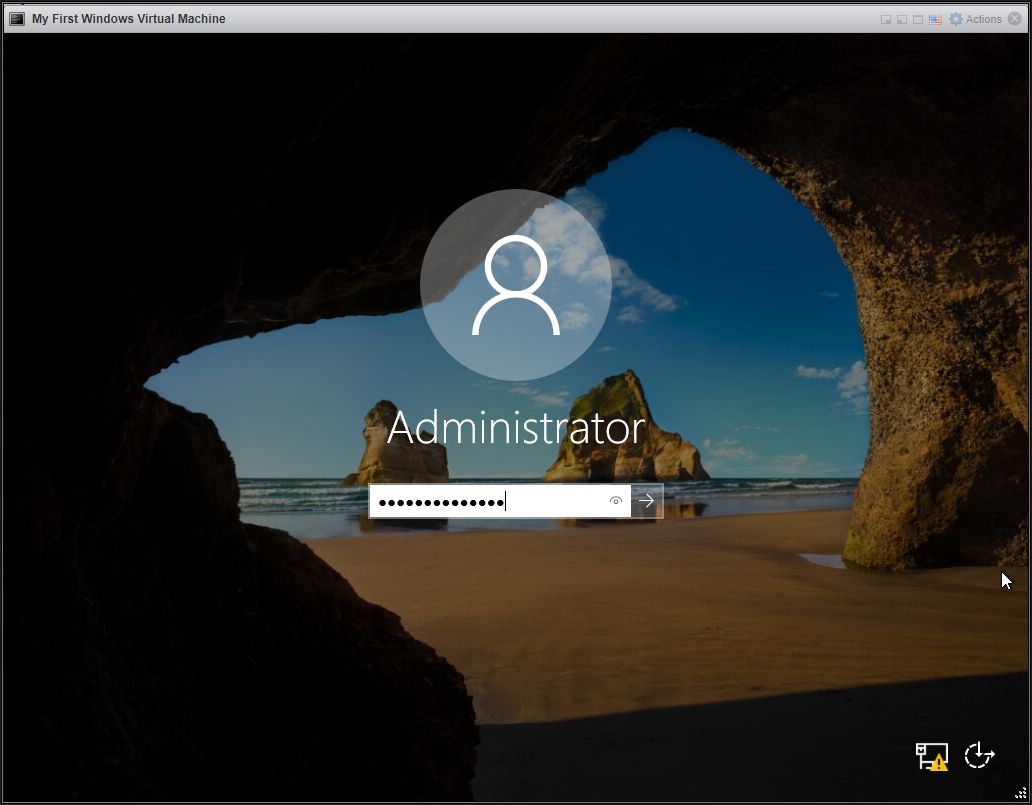
4. Log in to the virtual machine
Select Actions > Guest OS > Send Keys > CTRL-ALT-DEL

Password Entered
5. Installing Vmware Tools for Windows
Select Actions > Guest OS > Install VMware Tools
This process connects a VMware Tools for Windows (windows.iso) iso file image to the CD-ROM device in the virtual machine. If VMware Tools fails to run, ensure that your virtual machine has a CD-ROM device added. If Autorun for CD-ROM is enabled in the virtual machine operating system, the VMware Tools for Windows setup.exe installation program will start to run automatically. However, in later operating systems, it was discovered that enabling Autorun in the operating system, highlighted a security risk, so in modern operating systems it has been disabled. If Autorun has been disabled on your operating system, you will need to manually select the CD-ROM drive.
The windows.iso is stored in the following location on the ESXi server (/vmimages). It has been known, sometimes they are missing! VMware Tools updates are supplied with later versions of ESXi, but are also available for download from VMware — https://packages.vmware.com/tools.
Select the CD-ROM/DVD-DRIVE, this could be your D: drive.

Right, Click the CD-ROM/DVD-DRIVE and select Install or run program from your media, this statement could be different for your operating system.
The VMware Tools installation will start
At the Welcome to the installation wizard for VMware Tools click Next to continue with the installation
At the Setup Type select Typical and click Next to continue with the installation
At the Ready to Install the Program, click Install to continue the installation.
VMware Tools will start installing…

Click Finish.

At the VMware Tools, You must restart your system….» prompt select Yes to restart the virtual machine. When the virtual machine has restarted.
If you now repeat Step 2 above Checking if VMware Tools is installed in the Virtual Machine

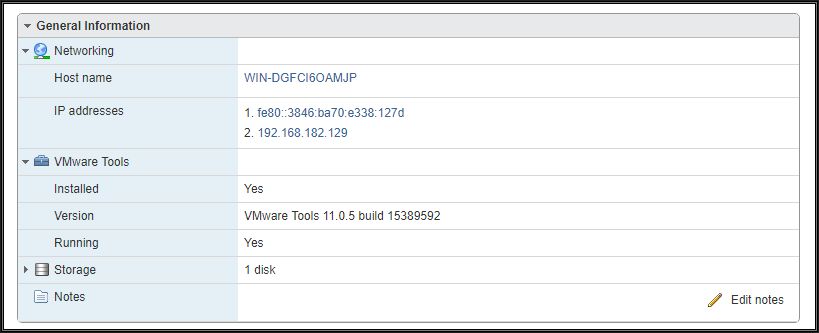
An IP address is now displayed, which is the IP address of the virtual machine, VMware Tools Status — Installed and Running, and VMware Tools Version Status — 11.0.5 build 15389592.
VMware Tools has come under much scrutiny in the last few years, with security issues and critical updates. Some of these updates are now provided by Microsoft as part of the monthly update cycle. So you may notice Windows updates also applying fixes for VMware drivers which are often included within VMware Tools.
Third-Party patching applications such as Ivanti Patch Manager for Windows also detect these vulnerabilities and applies VMware Tools updates.
In this tutorial ESXi 7.0, includes VMware Tools 11.0.5 Build 15389592. The release notes are here. But at the time of writing this article, VMware Tools 11.1.0 was released. Two releases of VMware Tools in less than 1 month!
Please note upgrading VMware Tools on a Production Server, may require a restart without warning!
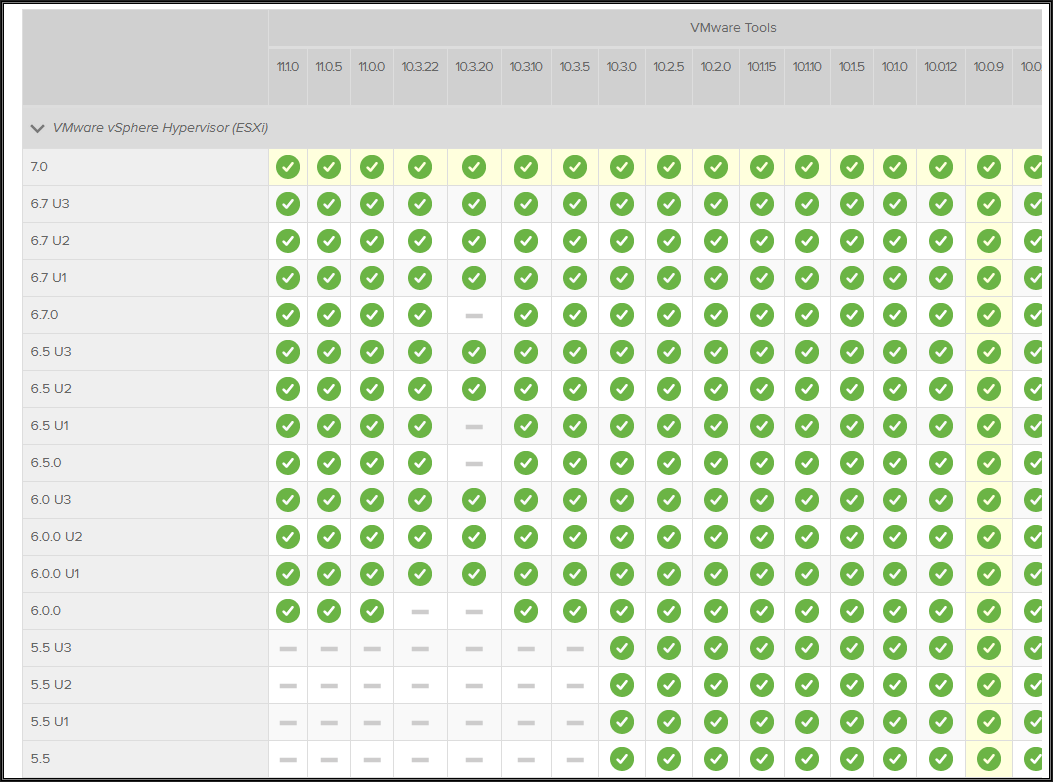
and the VMware Product Interoperability Matrices shows you which versions of VMware Tools are compatible with different ESXi versions.
Congratulations, you have successfully installed VMware Tools for Windows on a VMware Windows virtual machine on a VMware vSphere Hypervisor 7.0 (ESXi 7.0) Host Server
Please see my next article in this series Part 10: HOW TO: Install VMware Tools for Linux on a VMware Linux virtual machine on a VMware vSphere Hypervisor 7.0 (ESXi 7.0) Host Server
Basic VMware Articles Series:
These articles are also applicable to VMware vSphere Hypervisor ESXi 5.0, 5.5, 6.0.
- Part 1: HOW TO: Install and Configure VMware vSphere Hypervisor 5.1 (ESXi 5.1)
- Part 2: HOW TO: Connect to the VMware vSphere Hypervisor 5.1 (ESXi 5.1) using the vSphere Client
- Part 3: HOW TO: Create an ISO CD-ROM/DVD-ROM image (*.iso), and MD5 checksum signature, for use with VMware vSphere Hypervisor 5.1 (ESXi 5.1)
- Part 4: HOW TO: Upload an ISO CD-ROM/DVD-ROM image to a VMware datastore for use with VMware vSphere Hypervisor 5.1 (ESXi 5.1) using the vSphere Client, and checking its MD5 checksum signature is correct.
- Part 5: HOW TO: Enable SSH Remote Access on a VMware vSphere Hypervisor 5.1 (ESXi 5.1)
- Part 6: HOW TO: Create your first Linux Virtual Machine on a VMware vSphere Hypervisor 5.1 (ESXi 5.1) Host Server
- Part 7: HOW TO: Create your first Windows Virtual Machine on a VMware vSphere Hypervisor 5.1 (ESXi 5.1) Host Server
- Part 8: HOW TO: Install VMware Tools for Windows on a VMware Windows virtual machine on a VMware vSphere Hypervisor 5.1 (ESXi 5.1) Host Server
- Part 9: HOW TO: Install VMware Tools for Linux on a VMware Linux virtual machine on a VMware vSphere Hypervisor 5.1 (ESXi 5.1) Host Server
- Part 10: HOW TO: Backup (Export) and Restore (Import) virtual machines to VMware vSphere Hypervisor 5.1 for FREE
- Part 11: HOW TO: Suppress Configuration Issues System logs on the host are stored on non-persistent storage
- Part 12: HOW TO: Configure and Replace the SSL Certificate on a VMware vSphere Hypervisor 5.1 (ESXi 5.1) Host Server
- Part 13: HOW TO: Configure basic networking on a VMware vSphere Hypervisor 5.1 (ESXi 5.1) Host Server
These articles are applicable to VMware vSphere Hypervisor 6.5.
- Part 1: HOW TO: Install and Configure VMware vSphere Hypervisor 6.5 (ESXi 6.5)
- Part 2: HOW TO: Connect to the VMware vSphere Hypervisor 6.5 (ESXi 6.5) using the vSphere (HTML5 Web) Host Client 6.5
- Part 3: HOW TO: Create an ISO CD-ROM/DVD-ROM image (*.iso), and MD5 checksum signature, for use with VMware vSphere Hypervisor 6.5 (ESXi 6.5)
- Part 4: HOW TO: Upload an ISO image to a VMware datastore for use with VMware vSphere Hypervisor 6.5 (ESXi 6.5) using the vSphere Host Client, and checking its MD5 checksum signature is correct.
- Part 5: HOW TO: Enable SSH Remote Access on a VMware vSphere Hypervisor 6.5 (ESXi 6.5)
- Part 6: HOW TO: Suppress Configuration Issues and Warnings Alert displayed in Summary status for ESXi 6.5 after enabling SSH or ESXi Shell
- Part 7: HOW TO: Create your first Windows Virtual Machine on a VMware vSphere Hypervisor 6.5 (ESXi 6.5) Host Server
- Part 8: HOW TO: Install VMware Tools for Windows on a VMware Windows virtual machine on a VMware vSphere Hypervisor 6.5 (ESXi 6.5) Host Server
- HOW TO: Deploy and Install the VMware vCenter Server Appliance 6.5 (VCSA 6.5)
These articles are applicable to VMware vSphere Hypervisor 6.7.
- Part 1: HOW TO: Install and Configure VMware vSphere Hypervisor 6.7 (ESXi 6.7
- Part 2: HOW TO: Connect to the VMware vSphere Hypervisor 6.7 (ESXi 6.7) using the vSphere (HTML5 Web) Host Client 6.7
- Part 3: HOW TO: Create an ISO CD-ROM/DVD-ROM image (*.iso), and MD5 checksum signature, for use with VMware vSphere Hypervisor 6.7 (ESXi 6.7)
- Part 4: HOW TO: Upload an ISO image to a VMware datastore for use with VMware vSphere Hypervisor 6.7 (ESXi 6.7) using the vSphere Host Client, and checking its MD5 checksum signature is correct.
- Part 5: HOW TO: Enable SSH Remote Access on a VMware vSphere Hypervisor 6.7 (ESXi 6.7)
- Part 6: HOW TO: Suppress Configuration Issues and Warnings Alert displayed in Summary status for ESXi 6.7 after enabling SSH or ESXi Shell.
- HOW TO: Update VMware ESXi 6.7 GA to ESXi 6.7U3(a) in 5 easy steps.
- HOW TO: Update VMware ESXi 6.7 GA to ESXi 6.7U3(a) direct from VMware.
Previous articles in this VMware vSphere 7.0 series are here.
- Part 1: HOW TO: Install and Configure VMware vSphere Hypervisor 7.0 (ESXi 7.0)
- Part 2: HOW TO: Connect to the VMware vSphere Hypervisor 7.0 (ESXi 7.0) using the vSphere (HTML5 Web) Host Client 7.0
- Part 3: HOW TO: Create an ISO CD-ROM/DVD-ROM image (*.iso), and MD5 checksum signature, for use with VMware vSphere Hypervisor 7.0 (ESXi 7.0)
- Part 4: HOW TO: Upload and Check the MD5 signature of an ISO CD/DVD image to a VMware datastore using the VMware Host Client, for use with VMware vSphere Hypervisor 7.0 (ESXi 7.0)
- Part 5: HOW TO: Enable SSH Remote Access on a VMware vSphere Hypervisor 7.0 (ESXi 7.0)
- Part 6: HOW TO: Suppress Configuration Issues and Warnings Alert displayed in Summary status for ESXi 7.0 after enabling SSH or ESXi Shell.
- Part 7: HOW TO: Create your first Windows Virtual Machine on a VMware vSphere Hypervisor 7.0 (ESXi 7.0) Host Server
- Part 8: HOW TO: Install VMware Tools for Windows on a VMware Windows virtual machine on a VMware vSphere Hypervisor 7.0 (ESXi 7.0) Host Server
- Part 9: HOW TO: Create your first Linux Virtual Machine on a VMware vSphere Hypervisor 7.0 (ESXi 7.0) Host Server
- Part 10: HOW TO: Install VMware Tools for Linux on a VMware Linux virtual machine on a VMware vSphere Hypervisor 7.0 (ESXi 7.0) Host Server
- Part 11: HOW TO: Install open-vm-tools package for Linux on a VMware Linux virtual machine on a VMware vSphere Hypervisor 7.0 (ESXi 7.0) Host Server will show how to install open-vm-tools.
If you found this tutorial helpful, please do click the Thumbs-Up icon below. This lets me know what is valuable for EE members and provides direction for future articles. If you have a related question based on this article, please click here.
Thank you very much! Regards, Andy
If you have ever deployed a VMware VM on VMware ESXi, VMware Workstation, VMware Player, or VMware Fusion, you’ve probably noticed that after installing a guest operating system (OS), the VMware hypervisor asks you to install VMware Tools. Today’s blog post covers VMWare Tools and the VMware Tools installation process on different operating systems including Linux, Windows, macOS, FreeBSD, and Solaris.
What Is VMware Tools?
VMware Tools is a set of drivers and utilities that are installed on a guest operating system (OS) and can improve the performance of the guest OS, synchronize time between a host and guest, and improve the user experience. This is achieved through offering better mouse performance (no lags with a mouse pointer), higher graphics performance, shared clipboard, the ability to drag & drop files, in addition to scripting to automate tasks inside a VM. As you may recall, when you create a VM, you should select the hardware version. Each hardware version uses the appropriate emulated hardware, drivers which are installed with VMware Tools. A VM can work without VMware Tools, but most features and advantages of using VMs are not available without the VMware Tools functionality. It is highly recommended that you install VMware Tools on guest OSs running on VMware virtual machines (VMs).
A set of features available after installing VMware Tools is not the same for different operating systems. For example, some features enabled for Windows guests are not available for Linux guests. The Unity mode is not available for Linux guests in the latest versions of VMware desktop hypervisors. Shared clipboard is limited for VMs running on ESXi hosts. You also need to install VMware Tools after P2V migration (if you convert a physical server to a virtual machine).
Requirements
There are some requirements to install VMware Tools:
- A guest OS must be on the list of supported operating systems.
- A VM must be in the running state to start the VMware Tools installation, and a guest OS must be booted.
In some Linux distributions, you may need to manually install the packages required for VMware Tools installation (such as kernel headers and tools that are needed to compile VMware Tools during installation). In Debian-based distributions, you can install the necessary packages with the command:
apt-get install binutils cpp gcc make psmisc linux-headers-$(uname -r)
In other Linux distributions, use the appropriate package managers such as zypper in SUSE and yum in Red Hat based distributions.
The algorithm for installing VMware Tools is similar for VMs running on VMware ESXi, VMware Workstation, VMware Player and VMware Fusion. Let’s review how to install VMware Tools on a VM running Ubuntu 18; ESXi 6.5 and VMware Workstation 15 are used in our lab for writing today’s blog post.
The legacy method to install VMware Tools
The idea of this method is to insert a virtual ISO disk image that contains the VMware Tools installer to a virtual DVD drive of the VM, run the executable file of the standalone installer, and install VMware Tools. The legacy method can be useful when you need to install VMware Tools on older versions of Linux.
ISO images for different guest operating systems are stored in the following locations:
- /vmimages/tools-isoimages/ on ESXi.
- “C:\Program Files (x86)\VMware\VMware Workstation” is the default location on Windows. ISO images are stored in the installation directory of VMware Workstation on Windows.
- /usr/lib/vmware/isoimages/ on Linux.
If ISO images with VMware Tools are missing on the machine running a VMware hypervisor, you can download the necessary ISO image with VMware Tools from VMware’s web site.
In order to install VMware Tools on Linux, perform the following actions.
1. Insert the virtual DVD image that contains the VMware Tools installer.
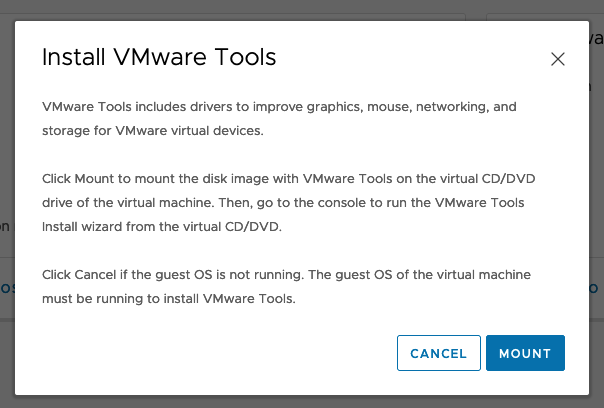
If your VM is running on VMware ESXi managed by vCenter, open VMware HTML5 vSphere Client, and select your VM in Host and Clusters. If VMware Tools are not installed on that VM, you can see a notification and a clickable button Install VMware Tools. You can also start the VMware Tools installation manually by clicking Actions > Guest OS > Install VMware Tools (see the screenshot below).

After that, VMware vSphere Client notifies you that a VM with a guest OS must be running in order to mount the ISO image and install VMware Tools on the guest OS. If a guest OS is not running, you should start a VM first, wait until a guest OS is booted, and then mount the ISO image with VMware Tools installed. Click Mount when ready.

If your VM is running on VMware Workstation or on an ESXi host, but you manage a VM running on ESXi by using VMware Workstation, insert the VMware Tools installation ISO disk image.
a) Select your running VM, on which VMware Tools must be installed.
b) Click VM > Install VMware Tools.

Note: if you have two guest operating systems installed on a VM, you should install VMware Tools on both operating systems.
2. Now the disk image that contains the VMware Tools installer is inserted in the virtual CD/DVD drive. In Ubuntu 18, the virtual DVD disc is mounted automatically and you can see its shortcut on the Desktop. Right click the shortcut and hit Open in Terminal.

Note: If the DVD disc is not mounted automatically on your Linux distribution, you can mount the disc manually.
Go to the /mnt/ directory:
cd /mnt/
Create the /mnt/cdrom/ directory if this directory doesn’t exist:
mkdir cdrom
Mount your CD-ROM to the /mnt/cdrom/ directory:
mount /dev/cdrom /mnt/cdrom
Go to the /tmp/ directory:
cd /tmp/
Extract files from the VMware Tools installation archive (the number of your version may be different):
tar zxvf /mnt/cdrom/VMwareTools-10.1.0-4449150.tar.gz
Unmount the CD-ROM device:
umount /dev/cdrom
3. Make sure that the ifconfig command is available in the console. Otherwise, install net-tools that include the ifconfig tool manually before installing VMware Tools on your Ubuntu guest.
apt-get install net-tools
4. After opening a shortcut in Terminal, you can see a directory of the virtual DVD disc image that is the current directory in the console now. In our case, the content of the VMware Tools installation virtual DVD disc is available in /media/user1/VMware Tools/.
Where user1 is the name of our user account in Linux.
You can list the content of this directory and see the archive with the VMware Tools installer for Linux.
ls -al
The archive’s name is VMwareTools-10.1.0-4449150.tar.gz in this case.
Copy the archive to the directory for which you have write permissions, for example, to the ~/Downloads/ directory. As an alternative, you can use the /tmp/ directory.
cp VMwareTools-10.1.0-4449150.tar.gz ~/Downloads
5. Go to the directory to which you have copied the archive with VMware Tools:
cd ~/Downloads
6. Unpack the installer files from the archive:
tar -zxvf VMwareTools-10.1.0-4449150.tar.gz

7. Go to the vmware-tools-distrib directory that contains the executable installer file.
cd vmware-tools-distrib/
8. Run the installer file as root:
sudo ./vmware-install.pl

The installer is written on Perl. After running the VMware Tools installer, you should answer the questions in the console. Press Enter to use the default value that is shown in brackets. You can use the default value for the majority of options. Be attentive when you see the questions about enabling shared folders and drag & drop (see the screenshot below). Enter Y (yes) to enable those features, as the default answer is [no].

If VMware Tools have been installed successfully, you can see a message like the message displayed on the screenshot. You may need to restart your guest Linux to apply all system changes after installing VMware Tools.

9. Once you have installed VMware Tools on Linux, you can check the version of VMware Tools installed with the command:
vmware-toolbox-cmd -v
Note: In OpenSuSE Linux, you can download the fresh VMware Tools (Open VM Tools) installation package in the ymp format (YaST meta package) or directly download the binary packages in the rpm format from the OpenSUSE web site.
Installing VMware Tools using software repositories (recommended)
VMware recommends you to install VMware Tools for Linux from online software repositories by using the Linux package manager. The advantage of this method is that you always get the latest version of VMware Tools and the installation process is faster and easier since you don’t need to copy installation files and perform configuration manually. VMware has made open-source VMware Tools for Linux that are called Open VM Tools (you can find source code here). Let’s review how to install VMware Tools on Linux from online repositories on an example of Ubuntu 18. The clear installation of Ubuntu 18.04 is used to explain the process of installing VMware Tools (Open VM Tools) in each example.
Note: The installation principle for other Linux distributions is the same.
1. Update the list of packages available in software repositories for your package manager.
apt-get update
2. If you use Linux without a graphical user interface (GUI) that has only the command line interface, then install VMware Tools with the command:
apt-get install open-vm-tools
If you use Linux with the GUI, then install VMware Tools that are optimized for desktop experience and provide features such as Shared Folders, Shared Clipboard and Drag & Drop.
apt-get install open-vm-tools-desktop
Note: There are also two alternative packages of Open VM Tools that can be installed from online software repositories.
open-vm-tools-devel is an extended package of open-vm-tools that contains additional user space libraries for applications development.
open-vm-tools-debuginfo is an alternative package with binaries and source code that can be used to debug open-vm-tools.
3. Now you can check the version of VMware Tools installed.
vmware-toolbox-cmd -v
Installing VMware Tools on Linux Automatically
VMware Tools can be installed automatically if you are installing Ubuntu 19. Even if you select Minimal installation in the Ubuntu installation wizard (Updates and other software), VMware Tools (open-vm-tools-desktop) will be downloaded and installed automatically from online software repositories (Internet connection is required). You may need to configure Drag & Drop after that. Thus, you can save time spent on installing VMware Tools and system updates. Ubuntu 19 becomes more user-friendly for VMware virtual environment. If you have already installed Linux on a VM, use one of the methods explained above and install VMware Tools or Open VM Tools.
Note: If you install the latest versions of OpenSUSE Linux with enabled Internet connection and activate online repositories, Open VM Tools are installed automatically.
If you use VMware Easy Install to create a Linux VM, VMware Tools are installed automatically, but manual Linux installation with the “installing updates” option is preferable as you can configure more parameters in this case.

Drag & Drop Troubleshooting
If you run a Linux VM with installed VMware Tools on VMware Workstation/Player, and Drag & Drop doesn’t work, check the following settings when a VM is powered off.
Go to VM > Settings, click the Options tab, then select Guest Isolation. Make sure that these two options are enabled:
- Enable drag and drop
- Enable copy and paste

If these settings don’t help you and Drag & Drop still doesn’t work, try to run the commands in your guest Linux as shown below.
1. Check the process related to VMware Tools (Open VM Tools are used in this example).
ps -ef | grep tools
Remember the process ID of the /usr/bin/vmtoolsd -n vmusr –blockFd 3
In this example, the PID is 1891.
2. List open files related to that process (1891).
lsof -p 1891 | grep -i plugins

3. Enable the VMware vmblock fuse mount service required to use drag and drop.
systemctl enable run-vmblock\\x2dfuse.mount
4. Check the status of the service.
systemctl status -l run-vmblock\\x2dfuse.mount

Be aware that Drag & Drop is disabled for VMs running on ESXi, but you can try to configure shared clipboard. See how to do this below.
How to Enable Shared Clipboard on ESXi VMs
By default, shared clipboard is disabled on VMs running on ESXi hosts even if VMware Tools are installed. This is for security reasons. You can enable shared clipboard for ESXi VMs manually.
To do this, you should edit the virtual machine configuration. You can do it in the interface of VMware vSphere Client or manually by editing the VMX file of the VM in the datastore. Let’s edit the VMX configuration file manually by using SSH access to the ESXi server on which our VM resides.
- Power off the VM which configuration you are going to edit.
- Connect to the ESXi host on which a VM is residing with an SSH client. SSH access must be enabled on your ESXi host. Go to the directory on a datastore where the files of your Linux virtual machine are stored. In this example, we go to the directory:
cd /vmfs/volumes/SSD2/Ubuntu-VMT/ - In our case, we have to edit the Ubuntu-VMT.vmx that is located in the virtual machine directory. You can make a backup of the VM configuration file before editing. Add the following two strings in the end of the file.
isolation.tools.copy.disable = “FALSE”
isolation.tools.paste.disable = “FALSE”
These settings override the settings made with VMware Tools inside a VM.
There are limitations to using shared clipboard for ESXi VMs: 64 KB of plain text is the limit for the Copy/Paste feature, and you cannot copy and paste images, audio, and other content copied to clipboard, or copy and paste files including text files.
How to Install VMware Tools on FreeBSD
Similarly to Linux, the latest versions of VMware Tools are distributed only as Open VM Tools, which is an open source implementation of VMware Tools intended to improve the installation process and make it possible to update VMware Tools when upgrading an operating system.
It is recommended that you install Open VM Tools from online software repositories (not VMware Tools from standalone installers included into the ISO images) on FreeBSD version 10.x and newer. The latest version of VMware Tools for FreeBSD to be distributed as the ISO image is 10.1.15. For this reason, only the modern method of installing VMware Tools (Open VM Tools) from repositories is explained in today’s blog post. If you want to install the latest version of Open VM Tools, but you have installed VMware Tools from the ISO image, you must uninstall that old version of VMware Tools before installing Open VM Tools.
Method 1 – using the package manager
You can install VMware Tools on FreeBSD with the VMware package manager.
1. First, search the packets that are available for your system.
# pkg search open-vm
In our case, these two packets are available:
open-vm-tools-10.3.0_1,2 Open VMware tools for FreeBSD VMware guests
open-vm-tools-nox11-10.3.0_1,2 Open VMware tools for FreeBSD VMware guests

2. As FreeBSD used in the current example doesn’t have the graphical user interface, the “nox” type of VMware Tools is installed.
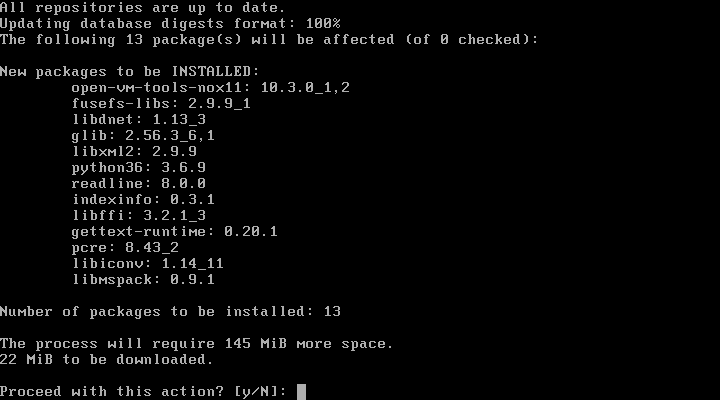
# pkg install open-vm-tools-nox11-10.3.0_1,2
The system notifies that some additional packages must be installed. Proceed with this action – type Y and press Enter to continue.
There is a message that a fuse kernel module must be installed to use fusefs-libs.
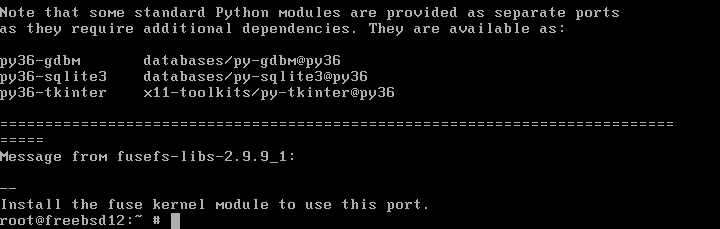
This kernel module can be installed with the commands:
Install the port: cd /usr/ports/sysutils/fusefs-libs3/ && make install clean
Install the package: pkg install fusefs-libs3
3. After installing VMware Tools (Open VM Tools), reboot the VM running FreeBSD.
shutdown -r now
Method 2 – installing VMware Tools from ports
You can also install VMware Tools on FreeBSD from ports.
1. Go to the ports directory:
cd /usr/ports/emulators/open-vm-tools
2. Install Open VM Tools:
make install clean
rehash
3. Reboot the VM running FreeBSD:
shutdown -r now
Note: If you are using FreeBSD without the X Window System (without a GUI), in step 1 go to the directory:
cd /usr/ports/emulators/open-vm-tools-nox11
How to Install VMware Tools on Solaris
Another operating system supported by VMware as a guest operating system is Oracle Solaris (also known as SunOS) and much like the operating systems considered above, it is highly recommended to install VMware Tools on Solaris. The process of installing VMware Tools on Solaris is similar to installing VMware Tools on Linux and FreeBSD from the ISO installation disk image. Let’s review how to install VMware Tools on Solaris 11.4.
1. Mount the ISO image with the installer of VMware Tools to the VM running Solaris similarly as shown for Linux VMs above. If the image cannot be mounted automatically, download and mount the installation ISO image for Solaris to the VM manually.
Wait a moment for the auto-mounting of the image to the CD-ROM in the guest operating system.
2. Once you have mounted the ISO image to the virtual CD/DVD drive of the VM, view the files on that disc.
ls -al /cdrom
Note: If the CD-ROM is not mounted under /cdrom/vmwaretools/, try to restart the volume manager:
/etc/init.d/volmgt stop
/etc/init.d/volmgt start
3. Copy the archive with the VMware Tools installer to the temporary directory, for example, to /tmp/
cp /cdrom/vmwaretools/vmware-solaris-tools.tar.gz /tmp
4. Go to the /tmp/ directory:
cd /tmp

5. Unzip files from the archive
gunzip vmware-solaris-tools.tar.gz
6. Untar files
tar xvf vmware-solaris-tools.tar
7. Check that files are extracted
ls -al
As you can see, the files are extracted to the vmware-tools-distrib subdirectory
8. Go to that subdirectory
cd vmware-tools-distrib/
Now you are in the /tmp/vmware-tools-distrib/ directory.
9. Run the vmware-install.pl file to run the installer and install VMware Tools on Solaris.
./vmware-install.pl
Note: The VMware Tools installer is written on Perl. Perl must be installed in your operating system to run the installer successfully.

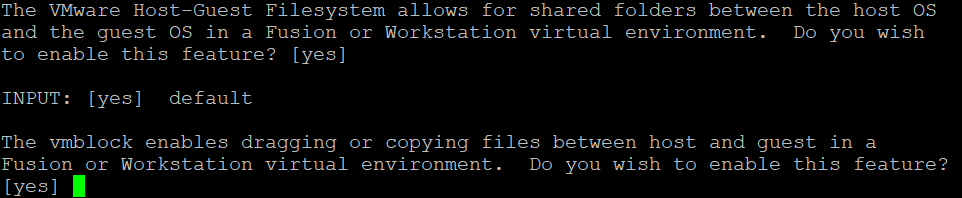
Answer the questions provided by the VMware Tools installer. You can use default settings in most cases. Pay close attention to questions about the VMware Host-Guest Filesystem and vmblock to enable shared folders, shared clipboard, and drag & drop features.
10. Reboot your Solaris VM to make changes take effect.
init 6
11. Check the status of VMware Tools after rebooting.
/etc/init.d/vmware-tools status
If everything is OK, the output should look like this:
vmtoolsd is running
How to Install VMware Tools on Windows
Installing VMware Tools on Windows is not a difficult task.
1. Insert a virtual ISO disk image that contains the VMware Tools installer into a virtual DVD drive of a VM. In the current example, Windows Server 2008 R2 (x64) is running on the VM on which VMware Tools will be installed.
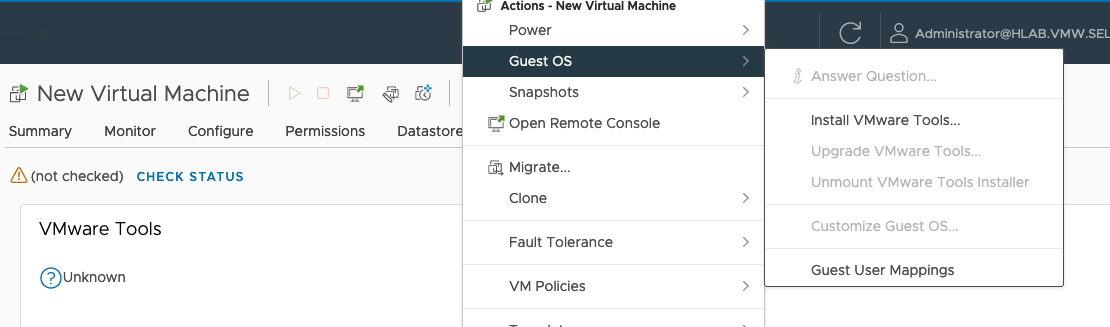
If your VM is running on an ESXi host and you use vCenter to manage ESXi hosts, open VMware vSphere Client, select your VM in the Hosts and Clusters menu, then click Actions > Guest OS > Install VMware Tools.

As you recall, ISO images with VMware Tools installers are located on an ESXi host in the /vmimages/tools-isoimages/ directory. If ISO images are missing on your ESXi host, you can download and install VMware Tools Offline VIB Bundle on your ESXi host. This bundle contains a new release of VMware Tools for supported guest operating systems. You can also copy ISO images from your local computer to that directory on the ESXi host by using an SCP client manually.
If you use VMware Workstation for managing a VM running on your local machine or on a remote ESXi host, click VM > Install VMware Tools.

After that, a virtual ISO disk image containing the VMware Tools installer is mounted to a guest operating system. By default, the VMware Tools installation ISO images are located in the directory where VMware Workstation is installed. In our case, this directory on a Windows computer is:
“C:\Program Files (x86)\VMware\VMware Workstation”
The names of ISO files are:
windows.iso – the image for the latest Windows versions since Vista.
winPre2k.iso – the image for old Windows versions released before Windows 2000.
winPreVista.iso – the image for Windows versions older than Windows Vista (Windows 2000, 2000 Server, XP, XP x64).
If, for some reason, these ISO images are missing, you can download the VMware Tools installer for Windows from the VMware’s web site.
2. If autorun is enabled on a guest Windows system, you will see the AutoPlay window with a suggestion to run setup64.exe (because a 64-bit version of Windows is used as a guest OS).
If autorun is disabled, open the optical disc drive to which the virtual ISO disk image is inserted in your Windows guest, then select the appropriate installer file – setup.exe for 32-bit operating systems or setup64.exe for 64-bit operating systems. Run the installer as Administrator.

3. The VMware Tools Setup Wizard is opened.
1) On the first screen, read the introduction. Click Next to continue.
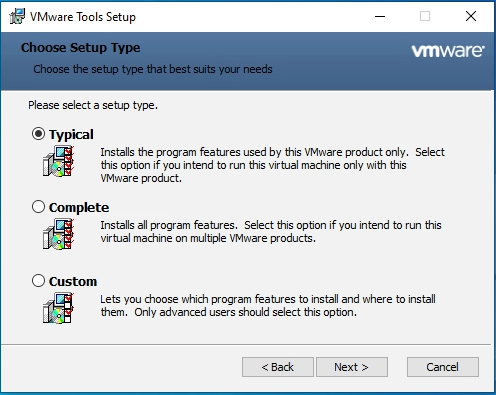
2) Choose Setup Type. Typical is enough in most cases. You can select this type and continue installation.

3) Ready to Install. If you want to change the installation type, hit Back. If everything is correct, hit Install to start the installation process. Wait for a while until VMware Tools are installed.
4) Completed the VMware Tools Setup Wizard. If VMware Tools have been installed successfully, you should see this screen. Hit Finish to close the window.
5) Once you have installed VMware Tools on your Windows guest, you must restart your system for the configuration changes made to VMware Tools to take effect. In the displayed window click Yes to restart now.
Now you can use features that became available after installing VMware Tools.
Installing VMware Tools on Windows Server Core in PowerShell
If you use Windows Server Core which has only the command line interface and doesn’t have the graphical user interface, the principle of VMware Tools installation is similar. You can run the VMware Tools installer in PowerShell.
1. Insert the virtual ISO disk image that contains the VMware Tools installer into a virtual DVD-ROM of the VM.
VM > Install VMware Tools
2. In PowerShell, run the command to see the letter of the optical drive assigned in your Windows running on the VM.
Get-Psdrive
3. Go to that drive (in this example, D: is the optical drive used by the Windows VM).
d:
4. Run the installer
.\setup64.exe
5. Follow the steps of the installation wizard to complete the VMware Tools installation.
6. Restart your Windows VM
shutdown -r -t 0
How to Install VMware Tools on MacOS
MacOS can be installed on VMs running on VMware Workstation/Player, VMware Fusion, and VMware ESXi. Installing macOS on VMware Workstation and ESXi needs some fine-tuning. Read how to install macOS on a VMware VM in the blog post. Installing VMware Tools on macOS is different from installing VMware Tools on other operating systems, but you must have the ISO image with the VMware Tools installer and mount the ISO image to a virtual DVD drive of the VM as a DVD disc. Let’s review how to install VMware Tools on macOS Mojave (Mac OS X 10.14).
1. Download the archive that contains the needed ISO image. Select VMware Tools packages for Solaris and OS X. You can download a zip or tar.gz archive. At the time of writing this blog post, the newest VMware Tools release is VMware Tools 10.3.2.
2. Extract the archive. You need the darwin.iso file. You can copy darwin.iso to the directory where other ISO images with VMware Tools are stored. If you use VMware Workstation, this directory is the VMware Workstation installation directory on Windows and /usr/lib/vmware/isoimages/ on Linux (Ubuntu). The directory to store ISO images with VMware Tools on ESXi is /vmimages/tools-isoimages/
3. Mount the ISO image with VMware Tools to the virtual DVD drive of the VM (if the VMware Tools image is copied to the standard VMware Tools directory and you manage the VM in VMware Workstation, you can click VM > Install VMware Tools when a VM is running). Don’t forget to eject the disc previously used from the virtual DVD drive (for example, the macOS installation medium).

However, you can always mount the ISO image with VMware Tools manually in the VM settings when a VM is powered off.

4. Now you can see the icon of DVD-ROM with the VMware Tools disc inserted in a running macOS. By default, autorun is enabled and you should see two options in the opened window – Install VMware Tools and Uninstall VMware Tools. Hit Install VMware Tools.

5. The VMware Tools Installation wizard for macOS is opened.
Introduction. Read the information and click Next to continue.
Destination select. If there are multiple macOS users in the guest operating system, you can opt to install VMware Tools for all users or only for you (the current user).
Installation Type. At this step, you can change the install location if need be. When all settings are configured, hit the Install button. In the popup notification window, click Continue Installation and enter your login and password to install software.

Installation. Wait for a while until all necessary packages are installed.
After unpacking VMware Tools files, you will see the System Extension Blocked warning in the popup window of macOS Mojave. Click Open Security Preferences and edit settings (do not click OK).

The Security & Privacy window is now opened. In the General tab, you can see a notification: System software from developer “VMware, Inc.” was blocked from loading.
Click the Allow button to unblock VMware Tools in macOS. After that, you can close the window.

If a popup system extension warning message is displayed, click OK.
Summary. In the Install VMware Tools wizard, you can now see that the installation has been successful. Hit the Restart button and restart the virtual machine running macOS.

6. Once macOS has been rebooted, a new pop-up window is opened and a notification is displayed: System Extension Blocked. You should recall seeing the same notification during the process of installing VMware Tools. Click Open Security Preferences as you have done before.

The notification in the Security & Privacy window is also the same: System software from developer “VMware, Inc.” was blocked from loading. Click Allow to unblock VMware extensions.

Click OK if the System Extension Warning message is displayed.
Now you can verify whether features related to VMware Tools are working properly. Try to copy and paste the text, drag and drop files, and enter a full screen mode. (Note that there may be limitations to drag and drop files if your VM with macOS is running on an ESXi host).
7. Once you try to drag and drop files from your host machine on which a VMware Workstation, VMware Player or VMware Fusion is installed, you will see the accessibility access warning: “vmware-tools-daemon” would like to control this computer using accessibility features. Hit the Open System Preferences button to edit settings.

The Security & Privacy window is opened again, but you see the Privacy tab now. You need to tick the checkbox at the vmware-tools-daemon string, but now this string is inactive. In the left bottom corner of the window, click the lock to make changes.

Enter your login and password to confirm. Now the settings are editable. Click the vmware-tools-daemon checkbox.

Now everything should be OK and the features depending on VMware Tools should work on your guest macOS. If the advanced features you require after installing VMware Tools don’t work on your macOS VM, try to reinstall VMware Tools.
Conclusion
The principle of installing VMware Tools is quite similar on Linux, Free BSD and Solaris. Moreover, you can install Open VM Tools, which is an open-source implementation of VMware Tools on Linux and FreeBSD from online repositories with a package manager available in your operating system. Open VM Tools allow you to always get the latest version from online repositories in addition to updating the current version of Open VM Tools installed on your guest OS when you update the operating system.
If you decide to use a standalone installer distributed in an ISO image, be aware that new versions of VMware Tools for Linux have not yet been released at the time of this writing, and Perl must be installed on a guest OS to run the installer script.
As for Windows, you should mount the ISO image with VMware Tools compatible with your version of Windows and run the EXE installer.
If you want to install VMware Tools on macOS, you also have to mount the ISO image (darwin.iso) to the VM and run the installer; don’t forget to unblock VMware Tools in security settings of the operating system if you use the latest versions of Mac OS X.
VMware Tools should be installed on a VM to take a snapshot of the running VM, quiesce the file system in the VM to make the state of the VM suitable for backups, and keep the VM data consistent. VM snapshots are also used to perform incremental backup and replication of VMs.
Now that you know the importance of VMware Tools, don’t forget to protect your data. NAKIVO Backup & Replication is an all-in-one data protection solution that supports incremental backup and replication of VMware vSphere VMs on a host level by using VMware APIs. Download NAKIVO Backup & Replication and try to back up running VMs with VMware Tools installed.
В материале мы рассказали о ключевых особенностях VMware Tools, а также дали пошаговую инструкцию для установки VMware Tools на виртуальную машину с Windows или Linux.
Введение
VMware Tools представляет собой специализированный набор программ, который устанавливается и используется на виртуальных машинах (ВМ). Он играет важную роль в эффективном взаимодействии ВМ с физическим сервером, который дает ресурсы для ее работы. VMware Tools способствует тому, чтобы операционная система (ОС) виртуальной машины была более управляемой и производительной.
Особенности VMware Tools
Вот несколько основных примеров функций VMware Tools:
- Ускорение графики виртуальной машины.
VMware Tools устанавливают драйверы, которые позволяют использовать ускоренную 3D-графику на виртуальных машинах. Это повышает качество графики. - Управление устройствами.
VMware Tools устанавливают драйверы для устройств, которые используются в виртуальных машинах. Например, клавиатура, мышь и сетевые адаптеры. С помощью установки драйвера получится лучше управлять устройствами и оптимизирует их использование. - Автоматическая настройка размеров экрана.
VMware Tools автоматически меняют размеры экрана виртуальной машины, подстраивая их под текущие настройки хост-машины. - Интеграция между гостевой и хост-системой.
VMware Tools позволяют выполнять различные операции: копирование и перенос данных между виртуальной машиной и хост-системой, обмен файлами и т. д. - Клонирование и резервное копирование виртуальных машин.
VMware Tools позволяют клонировать виртуальные машины и создавать их резервные копии. Обычно это происходит таким образом: VMware Tools запускает процесс создания VSS snapshot внутри вашей гостевой ОС. Для этого используется VMware Snapshot Provider. В этот момент все VSS writers в гостевой операционной системе готовят нужные приложения к копированию и также записывают все данные из памяти на диск. По завершении своей работы, VSS writers передает службе VMware Tools информацию о том, что можно снимать снапшот. Все это происходит через VMware Snapshot Provider. Данная служба передает VMware о готовности снять снимок. Это позволяет легко делать снапшоты ВМ.
В состав VMware Tools включены следующие драйверы:
- VMware SVGA. Поддерживает ускоренную графику для виртуальных машин.
- VMware vShield. Обеспечивает безопасное соединение и защиту трафика при работе в сети.
- VMware VMXNET. Обеспечивает оптимизацию работы сетевых адаптеров в виртуальной машине.
- VMware Tools для клавиатуры и мыши. Позволяет лучше управлять этими устройствами в виртуальной машине.
- VMware Paravirtual SCSI. Позволяет увеличить производительность работы дисков на уровне I/O запросов.
Установка VMware Tools на виртуальную машину с Windows
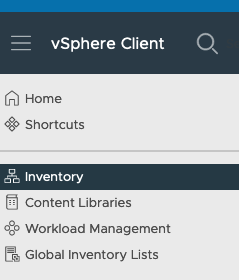
Шаг 1: Выберите вашу виртуальную машину из списка Inventory (меню в левой верхней части экрана).
Шаг 2: А затем перейдите в меню Actions → Guest OS → Install VMware Tools.
Шаг 3: Подтвердите монтирование образа диска. Благодаря этому, вы сможете подключить к вашей виртуальной машине ISO-образ с необходимыми установочными файлами.
Шаг 4: Войдите в операционную систему Windows. Сделать это можно через консоль самой VMware или при помощи RDP.
Шаг 5. Запустите File Explorer, затем перейдите в This PC. Среди подключенных дисков, собранных в единый список, выберите VMware Tools и кликните по нему два раза (это запустит установщик).
Шаг 6. Для завершения установки потребуется сделать перезагрузку виртуальной машины.
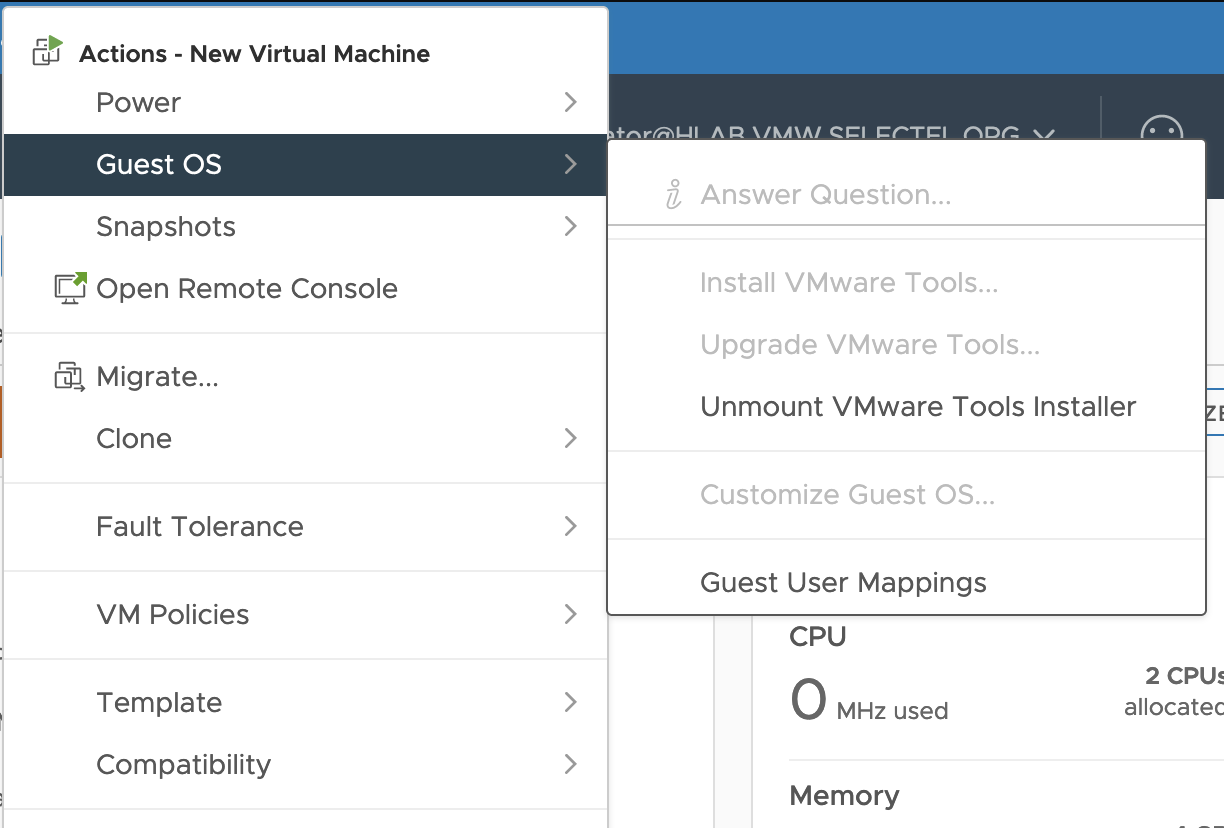
Шаг 7: После того, как установка закончится, отключите диск с VMware Tools от виртуальной машины. Сделать это можно в меню Actions → Guest OS → Unmount VMware Tools.
Особенности пакета Open VM Tools
Open VM Tools (open-vm-tools) — это реализация VMware Tools с открытым исходным кодом. Пакет подходит для гостевых ОС Linux. Open-vm-tools поставляется в комплекте с некоторыми операционными системами Linux и обычно устанавливается вместе с ОС. Благодаря этому вам не нужно самостоятельно устанавливать этот пакет в операционную систему.
Все ведущие поставщики Linux поддерживают набор open-vm-tools для vSphere, Workstation и Fusion и объединяют open-vm-tools со своими выпусками продуктов. Проверить, совместима ли ваша ОС с пакетом open-vm-tools, можно в Руководстве по совместимости с VMware.
Операционные системы, в которых есть встроенный пакет с дистрибутивом open-vm-tools:
- Red Hat Enterprise Linux 7.0 и более поздние версии,
- SUSE Linux Enterprise 12 и более поздние версии,
- Ubuntu 14.04 и более поздние версии,
- CentOS 7 и более поздние версии,
- Oracle Linux 7 и более поздние версии,
- FreeBSD 10.3, 10.4 & 11.1,
- Fedora 19 и более поздние версии,
- Debian 7.x и более поздние версии,
- openSUSE 11.x и более поздние версии.
Для более эффективного управления гостевыми операционными системами набор open-vm-tools включает следующие пакеты:
- Core open-vm-tools package.
Он содержит основные утилиты open-vm-tools, прикладные программы и библиотеки, включая vmtoolsd, которые помогают эффективно взаимодействовать хосту с виртуальными машинами. Этот пакет включает такие функции как синхронизация часов гостевых ОС с платформой виртуализации, передача файлов между сервером и виртуальными машинами, отправка информации о состоянии гостевых ОС в vSphere для поддержки vSphere High Availability (HA), публикация информации об используемых ресурсах и сетевой информации гостевых ОС в платформу виртуализации и т. д. - Open-vm-tools-desktop package.
Можно подключить в зависимости от необходимости, так как пакет является опциональным и включает дополнительные пользовательские программы и библиотеки для улучшения интерактивной функциональности рабочих столов виртуальных машин. Пакет позволяет изменять размер дисплея в соответствии с окном консоли хоста или окном удаленной консоли VMware vSphere. Он также позволяет копировать и вставлять данные между хостовой и гостевой ОС. - Open-vm-tools-devel package.
Содержит библиотеки и всю необходимую дополнительную документацию, которая используется при разработке плагинов и приложений vmtoolsd. - Open-vm-tools-debuginfo package.
Содержит исходный код open-vm-tools и двоичные файлы. Последнюю копию исходного кода Open VM Tools можно найти на GitHub.
Методы установки Open VM Tools на Linux
Чтобы установить пакет open-vm-tools на Linux, нужно ввести такую команду в командной строке и нажать Enter:
# sudo apt install open-vm-toolsДля установки open-vm-tools на RPM based дистрибутивы, нужно выполнить команду:
# yum -y install open-vm-toolsХотим обратить ваше внимание на тот факт, что способ установки и удаления VMware Tools через ISO может быть не самым эффективным.
Во-первых, это требует вмешательства пользователя в каждую отдельную виртуальную машину — никакой возможности автозагрузки не предусмотрено. Это может быть весьма трудоемким при большом количестве ВМ.
Во-вторых, обновление и управление этими инструментами может быть затруднено, так как каждая виртуальная машина должна будет обновляться вручную.
В-третьих, при обновлении гипервизора, необходимо еще раз устанавливать все эти инструменты заново.
Для операционных систем на базе Linux команда VMware рекомендует использовать пакет open-vm-tools.
Заключение
В данном материале мы рассмотрели особенности VMware Tools для Windows и Open VM Tools для Linux. Также рассказали, как их установить на ВМ с соответствующими операционными системами. Надеемся, что этот материал поможет вам в работе с VMware Tools.
VMware Tools is a software add-on inside the guest Operating System running in a Virtual Machine on a VMware based virtualization platform (vSphere, Workstation, Fusion). It is not mandatory to use it in order to run a VM, but it does provide notable improvements and extra features. For this reason, it is highly recommended by VMware to install it, usually after a fresh OS install for a master image.
VMware Tools is the same for VMware ESXi, VMware Workstation, VMware Player, and VMware Fusion. Only the features required differ. Note that other virtualization platforms have a similar concept: for example, Microsoft Hyper-V has the Integration Services, Nutanix AHV has the NGT (Nutanix Guest Tools).
As mentioned, VMware Tools is very useful because it provides a lot of improvements and features:
- New device drivers, also paravirtualized: VMXNet NIC drivers, Paravirtual SCSI driver, Audio driver
- Improved mouse (also in the HTML5 console) and video (with the SVGA driver)
- Memory management improvement: adding the memctl driver used by memory ballooning.
- Virtual machine monitoring: including new graph, VM heatbeat (used for example for vSphere HA VM), detailed guest information (including IP addresses, guest OS hostname, …)
- Guest time synchronization
- Guest Introspection useful for antirust and/or NSX integration
- Support for quiescing a file system
- Capability to run custom scripts
- Customize guest operating systems as a part of the vCenter Server and other VMware products
- Ability to gracefully shut down or restart the VM
- On Workstation, Player or Fusion there are other features like the possibility to share files with the host OS.
Is there any reason not to install VMware Tools?
Most paravirtualized device drivers are now included in Linux Kernels or even in Windows mainline driver updates. But VMware Tools is more than just the driver part.
Some state that it can reduce the security of your guest OS, but this is not true. Others prefer not to install it as it will disable some related features, for example not enabling memory ballooning into the VM. However, there are better options to disable specific features like this.
Note that there are also buggy (deprecated) versions of VMware Tools, like 10.3.0, due to a VMXNET3 driver related issue (for more information, see VMware KB 57796). Those versions should never be installed!
Installing VMware Tools should be part of the process of creating a new VM and upgrading them should be part of the VMs’ lifecycles.
This article will provide more details on how to perform those steps. For more information refer to the official documentation.
VMware Tools Formats
The VM Tools can be sources through three different channels to accommodate the vast majority of environments.
- Built-in: While VMware Tools is a common component across various VMware products, it is usually included with those referred to as the “built-in” format.
- Asynchronous: Historically, it has been included in VMware ESXi, VMware Workstation, VMware Player, and VMware Fusion. However, from September 3rd, 2015, it is also possible to download it independently. This is the “downloadable” (or asynchronous) format.
- VM Tools for Linux:
- Open VM Tools (OVT): It’s the Open Source implementation of VMware Tools for Linux guest OSes or other Unix OSes and VMware’s recommended implementation. Note that the OVT packages are bundled with most recent Linux distributions (RHEL 7 and above for Red Hat), making it easy to manage its lifecycle like all the other Linux packages. For more information refer to the original documentation.
- Operating System Specific Packages (OSP): Those are typically available for older Linux releases (RHEL 6 and under for Red Hat). OSPs are signed and hosted by VMware and can be installed in the OS with your package manager for example (deb, rpm…).
From now on, in the vast majority of cases and unless there are special environmental considerations, customers should use built-in VMware tools (be it the Windows version embedded in ESXi or Linux OVT).
VMware Tools versions
As mentioned, each VMware virtualization platform version comes with its own VMware Tools built-in version. Once the hypervisor has been upgraded, the VMware tools can, in turn, be updated.
Like every VMware product, VM tools have a version number and a build number for each iteration. Which are associated (bundled) with specific vSphere, Fusion and Workstation versions.
There is an official document from VMware to help keep this matching.
For example, for vSphere 6.5 and 6.7 those are the main built-in versions:
| VMware vSphere version | VMware Tools version | VMware Tools build |
| 6.5 | 10.1.0 | 10252 |
| 6.5U1 | 10.1.7 | 10279 |
| 6.5U2 | 10.2.1 | 10305 |
| 6.5U3 | 10.3.10 | 10346 |
| 6.7 | 10.2.0 | 10304 |
| 6.7U1 | 10.3.2 | 10338 |
| 6.7U2 | 10.3.10 | 10341 |
| 6.7U3 | 10.3.10 | 10346 |
Is it possible to verify your VMware Tools version?
- From inside the Windows guest
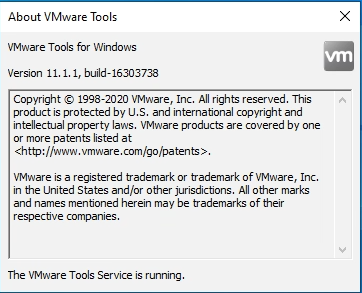
From inside a Windows guest OS, you can display the version and build of the installed package using the command line:
![]()
Or simply open the VMware Tools icon in the system tray (this does not apply if you have a Windows Server Core installation):
- From inside the Linux guest
For Linux distributions, you can either check the package information or query the “vmware-toolbox-cmd” command.
VMwareToolboxCmd.exe -v
- vSphere / vCenter
In the vSphere web client, display the details of a running VM to obtain the version. Note that the VM and the tools inside of it must be running for the VMware tools to be effectively queried by ESXi. You also get the status of the VMware tools which will tell you if the best version is running.

- PowerCLI
If you use PowerCLI for your reports, automation, or daily admin life, you can also get the VM Tools version and status of one or several virtual machines. You will find these details in the following properties of a VM object (once again, the VM must be running and not crashed):
Version : $VM.Guest.ExtensionData.ToolsVersion
Status : $VM.Guest.ExtensionData.ToolsVersion
How to Install VMware Tools
Which version and format should I use?
First of all, which version should I choose? Usually, for all supported guest OSes (see VMware KB 2015161), the latest version is best, considering that it is also backward (and forward) compatible with different versions of hypervisor. The suggested rule is to keep them updated at least with the build-in version. However, do make sure that your VMware Tools version is at least “newer” than the hardware level (compatibility) of the virtual machine as they contain the drivers for the new virtual hardware.
Note that there are also some “frozen” versions of VMware Tools for supporting legacy OSes. In that case, of course, the rule is to use the latest frozen version.
Then, which format should I use? Usually, for Windows OS you will use the built-in format and the OVT format for recent Linux distribution.
Refer to the VMware Compatibility Guide for more detailed information. Specify the Guest OS category, version and the VMware product.
For example, see the recommendations for Debian 10 running on ESXi 7.0:
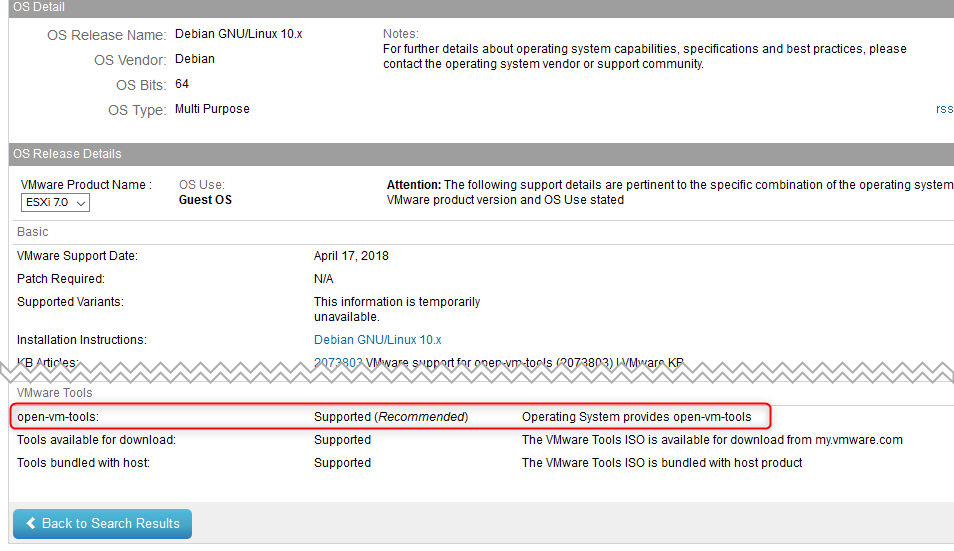
On ESXi the OVT is supported and the OSP is not.
For Windows Server 2019 both the built-in and downloadable formats are supported. Note that the guest OS compatibility guide will provide a lot of other useful information, including the support level, the recommended driver types, and specific notes for the installation or configuration of the guest OS.
Installing VMware Tools
Now we will discuss how to install VMware Tools on ESXi in four different cases:
- Built-in VMware Tools for Windows OS
- Downloadable VMware Tools Windows OS
- Unattended install Windows OS
- OVT for Linux OS
I will not consider OSP as it is specific to legacy Linux distributions which are bound to disappear and would require its own blog post. In some cases, it may also require the developer library and the compiler.
- Built-in VMware Tools for Windows OS
This is the easy way and for VMware Workstation, Player, Fusion can also be automated during the OS installation.
For VMware vSphere, using the vSphere (HTML5) client, right-click on the VM and select Guest OS > Install Tools.
This will not install VMware Tools as the hypervisor is not “guest aware” yet, it will simply mount a guest OS-specific ISO file to the VM virtual CD-ROM. To use this type of installation, having a virtual CD-ROM in your VM is mandatory!
Some ISOs are included and depending on the guest OS one of them will be used:
- windows.iso for all Windows OS NT 6.0 (Vista or Windows Server 2008) or later.
- winPreVista.iso for Windows guest OSes earlier than Windows Vista.
- linux.iso for Linux guest OSes glibc 2.5 or later.
Note that since the release of VMware Tools 10.1 (on 2015) only a subset of guest OSes is included in the built-in version, removing some legacy or uncommon OSes. In this case, the only solution is to use the downloadable format. It’s also possible to add new ISO in the built-in version, but this case will be considered later.
Now that the ISO is mounted in your VM, you can proceed with the real VMware Tools installation steps. For Windows, you can use the autorun or double-click the setup.exe file and the installation will start.
There are three different installation options:
- Typical: suitable for most ESXi use cases and should be selected as the default.
- Complete: Suitable in highly heterogeneous environments.
- Custom: Use it to install specific components such as Guest Introspection Thin Agent driver, App Defense or vShield. You may also want to remove some features in non-standard environments.
Essentially, the typical installation does not include specific options such as:
- Guest introspection and VMware AppDefense which may be needed with some antivirus for VMware vSphere or in some cases in an NSX deployment.
- Shared folders which are not supported on ESXi, so it should only be installed in VMs running on VMware Workstation, Player or Fusion.
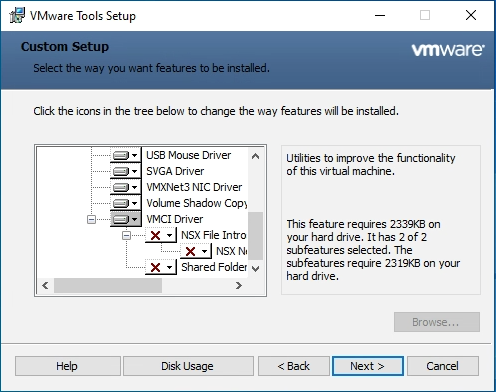
All other drivers and features should be installed. For that reason, the typical installation is usually the best option in ESXi environments.
After the installation, a Windows restart is needed even though most of the VMware Tools features are already running. Note that during the installation you may experience minor issues in your VM due to the driver installation and virtual hardware reconfiguration (for example you will see a temporary blank screen in your console).
Of course, the interactive installation is one possible way to add VMware Tools, but there is also a non-interactive way (unattended) that will be described later, which is useful for scripting or for Windows Server Core.
On Windows OS, VMware Tools installation will also install (if not present) the proper Microsoft Visual C++ library version and a certain service pack level of the OS may be needed to install them. The required Visual C++ version is specified in each VMware Tools release notes.
- Downloadable VMware Tools Windows OS
The first question is how do I download VMware tools? You can download it from the specific VMware product page choosing the Driver & Tools tab:
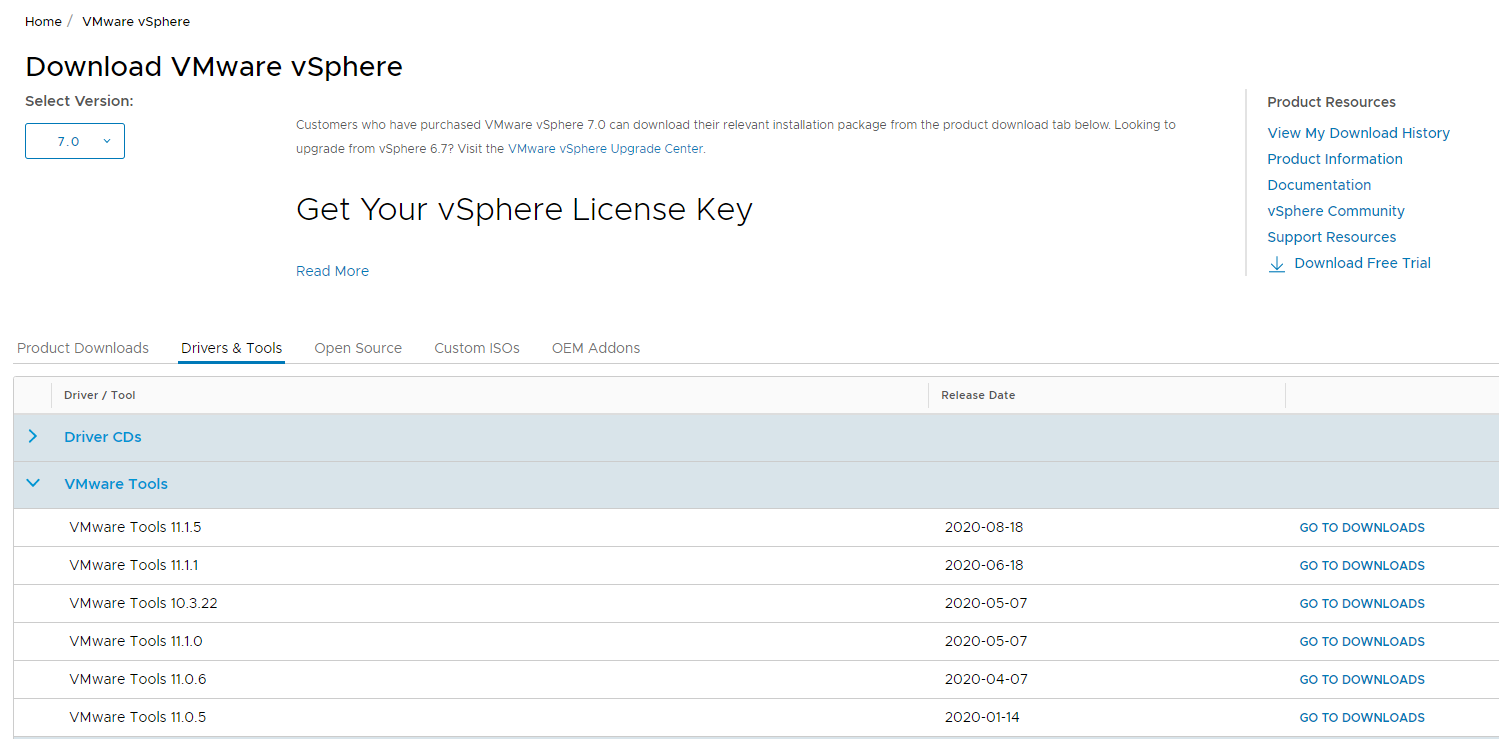
For each version you have different download options:
- Binary packages for Windows
- MSI packages for Windows
- Binary packages for Mac OS X
- Offline VIB package for ESXi
- For older versions, you may also have specific Linux binary packages
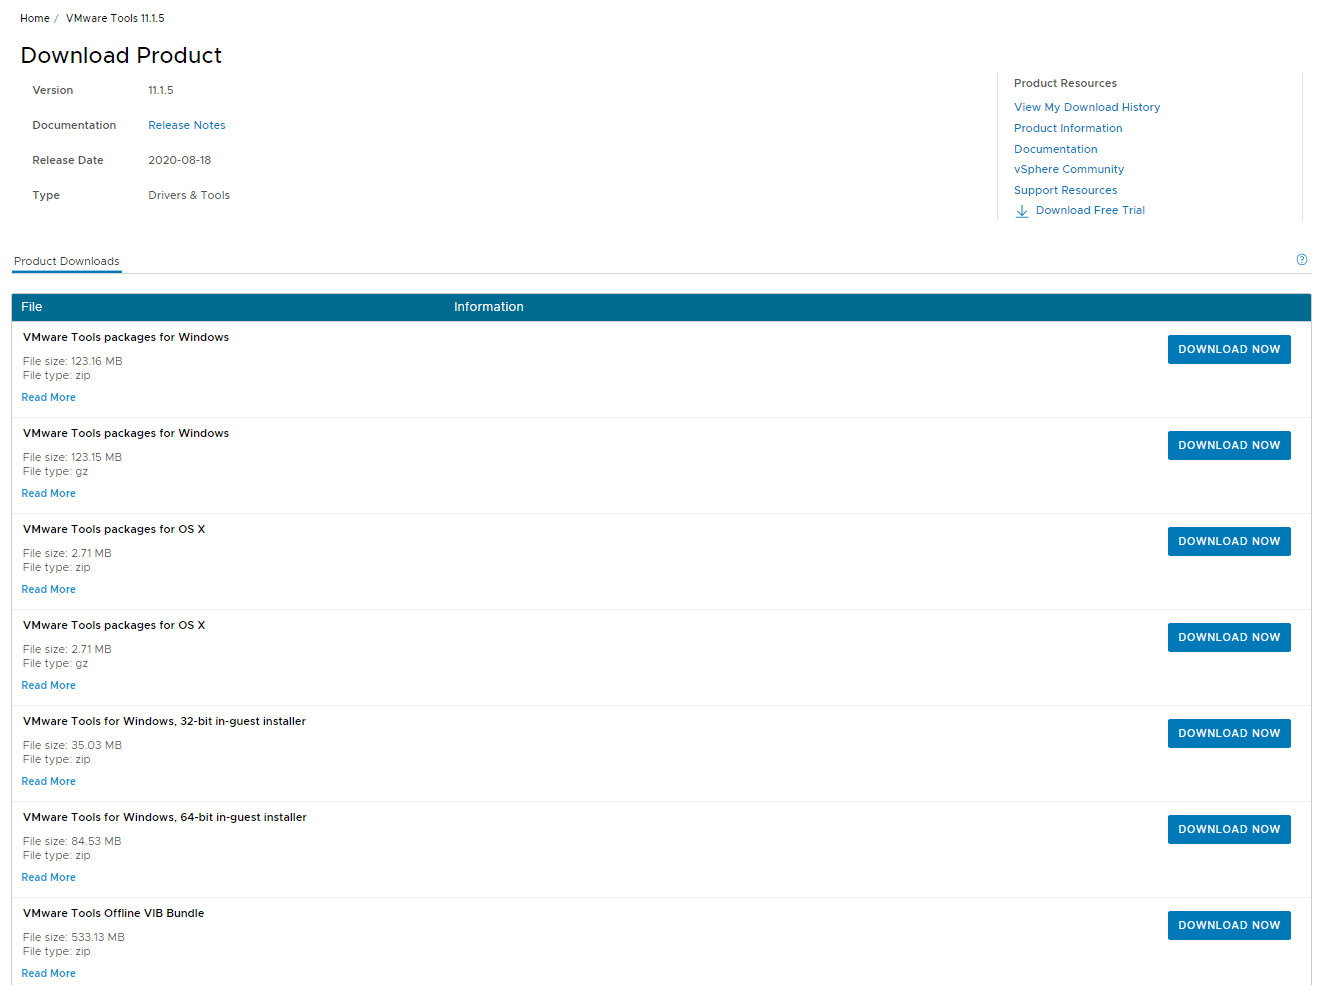
To access the different VMware Tools versions, you can also use this direct download link.
Let’s consider the Windows packages. The binary format is a ZIP or tar.gz file that contains the ISO file. Once you have downloaded the ISO you will need to mount it on the VM. You can do so interactively through the virtual console or upload it to a datastore. Once the ISO is mounted, refer to the previous chapter for the installation steps.
- Unattended install Windows OS
More interesting is how to perform a non-interactive installation on Windows using either the exe or msi file:
- Use setup.exe options to perform a silent installation (this also works with the built-in format discussed before)
- Use the MSI package to distribute and automate its installation with traditional deployment tools like Active Directory GPO, or Microsoft System Center.
Let’s see how to perform a silent installation using the proper setup.exe options. Below is an example of a typical installation with logging enabled.
setup.exe /s /v”/qn /l*v “”%TEMP%\vmmsi.log”””
Note that the approach also works for VMware Tools update/upgrade.
Of course, you can also specify which features should be installed. To exclude some components, use the ADDLOCAL and REMOVE options. The example below installs all components but the shared folder feature:
setup.exe /S /v “/qn REBOOT=R ADDLOCAL=ALL REMOVE=Hgfs”
- OVT for Linux OS
This operation depends on the Linux distribution type because different package managers are used in different types of distributions. Note that most main distributions include the OVT so you may not need to install it. Updating the package would be recommended, however.
For Debian/Ubuntu:
sudo apt-get install open-vm-tools
For RedHat/CentOS (using yum):
sudo yum install open-vm-tools
Note that an optional package named “open-vm-tools-desktop” can be installed to improve interaction with the VM, resize the display …
Unlike the Windows version, installing OVT (also OSP) on Linux does not require any reboot. Although consider that new device drivers may be added and the boot ramdisk image may change. A planned reboot would guarantee that the installation is correct and the Linux OS still boots properly.
How to update the built-in version on the ESXi host
As mentioned earlier, the built-in version depends on the host’s version. However, is it possible to use the downloadable version to update the built-in version? I ask this because the installation (and also the update/upgrade) of VMware Tools is very easy in this case and can be performed from the virtualization platform.
In the case of vSphere there are two different ways to update the built-in VMware Tools with a desired downloadable version:
- Using the offload VIB (vSphere Installation Bundle) package
The VIB package is a very interesting and easy way to update your ESXi built-in version. You can install a VIB package on ESXi using the esxcli (see KB 2008939) or VUM (now called LifeCycle Manager). Here is a complete guide on how to install a VIB package on ESXi.
- By manually updating the ISO file
Usually, all the bundled Tools ISO image files are located in the ESXi filesystem in the /locker/packages/ directory. However, the partition where /locker resides is limited and may not have enough free space to store all VMware Tools packages. Also, new ESXi patches or updates that include a new tools-light VIB package may overwrite or change the content of this directory.
For those reasons, you can specify a new repository using the UserVars.ProductLockerLocation variable.
You can download the VMware Tools packages from VMware site and then extract and copy the vmtools and floppies sub-directories to new productLocker destination.
One interesting approach is to configure a centralized repository for several ESXi hosts, as described in this guide.
How to Update an Installed Version in a Guest OS
- Linux OVT
In order to keep the OVT updated, keeping your Linux distribution updated will do just that. It is obviously also possible to update the tools using the OS’s package manager.
- Windows Built-in
In this case, the procedure may change a little between the different VMware product, the virtualization layer detects any outdated VMware Tools versions (compared with the built-in version, of course).
For instance, in a vSphere environment, you will notice that the status of the VMware Tools changes from “Current” to “Upgrade available”. Note that you can get this information in PowerCLI as described previously.
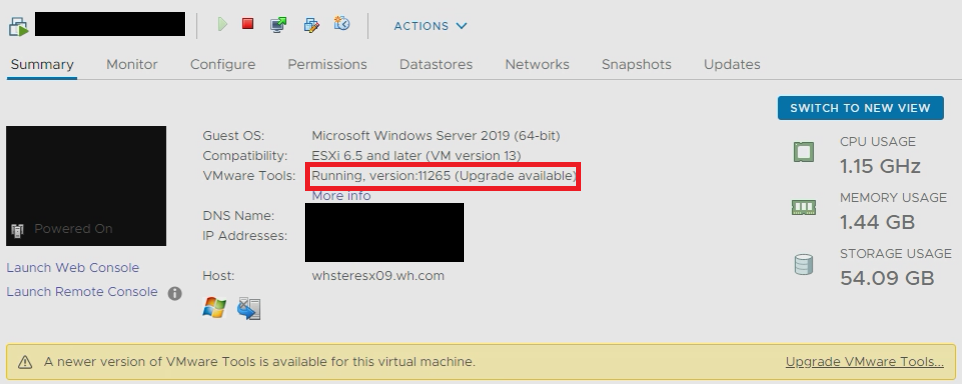
To update/upgrade the VMware Tools, click on “Upgrade VMware Tools…”, or using the vSphere (HTML5) client, right-click on the VM and select Guest OS > Upgrade VMware Tools.
A popup window will offer the choice of upgrade:
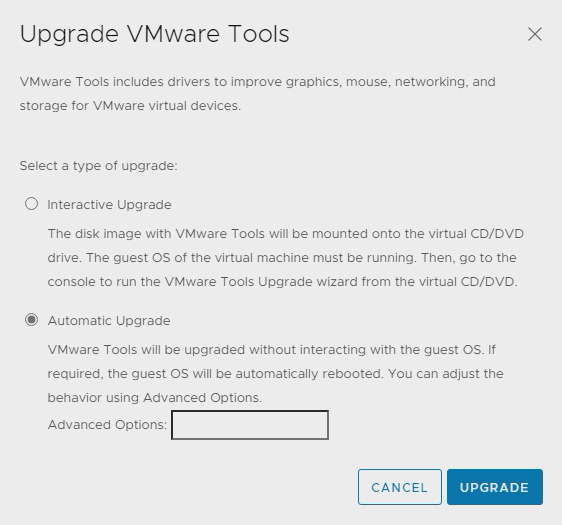
You can choose from the two different ways to update/upgrade the VMware Tools in the guest OS:
- Interactive upgrade: Similar to a fresh installation (as described before) and requires guest OS access with administrative credential to perform the operation.
- Automatic upgrade (default): Unattended operation which updates your VMware Tools and does not require any guest OS credential (remember that VMware Tools runs as a local service with high privileges).
Automatic VMware Tools upgrade is supported only for virtual machines with a Windows guest operating system.
- Other considerations
Is an OS reboot needed to complete an update/upgrade?
Starting with VMware Tools 9.x (with vSphere 5.1) no reboots will be required for subsequent VMware Tools upgrades on Windows OS. However note that there are many cases where a reboot will happen, for example on version 10.3.x if Visual C++ libraries must be updated (see this post). Be aware that the reboot will be automatically and silently performed if you have chosen the automatic upgrade option.
On Linux, a reboot is not needed either for the installation or for the update/upgrade.
Still, I suggest to always consider a VMware Tools update/upgrade as a change in your system and plan this operation outside production hours (at least for production systems). Also, driver upgrades may cause a short freeze of your VM. For those reasons I suggest planning a reboot after the VMware Tools update/upgrade and use this window to finalize another guest OSs update and then reboot the VM.
What about update/upgrade the VMware Tools if you are using the downloadable version?
In the case of a vSphere environment, I suggest to first update the built-in version using the offline VIB package (or use the centralized repository) as described before. This will take you to the previous situation on how to update VMware Tools using the built-in version.
Silent or batched updates could be performed as described in the installation process as well as with PowerCLI cmdlet.
For more information on the install/update/upgrade process see the VMware Tools documentation or also the VMware KB 2004754 – old but still valuable.
There is also a great post about how to keep the VMware Tools updated which describes a different way for VMware vSphere by embedding the VMware Tools check in the VM property settings.
How to check VMware Tools version for more VMs
In the VM lists of the vSphere client, add the column to display the Tools versions and status. VMware Tools Version Status is the field that reports the build number of the VMware Tools installed in your guest OSes:
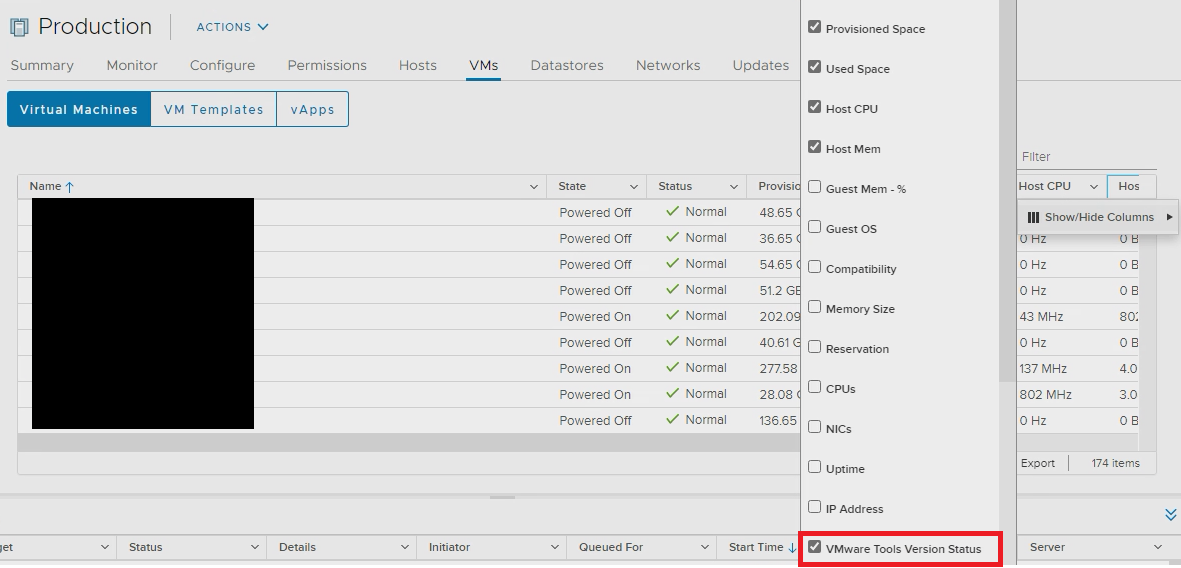
Note that you can also export the entire table in different formats, including the CSV format (that is the easiest way to import in a spreadsheet). As suggested previously it is also possible to get this information in PowerCLI.
How to update VMware Tools on several VMs
You can also start a massive VMware Tools update on a bunch of VMs and on specific timing. VUM (now called LifeCycle Manager) can not only perform ESXi patching but also automatically manage the VMware Tools update for a select list of VMs (for example all VMs in a VM folder).
There are different articles that describe this method, but it is the same process as the host patching. Large updates can also be performed with PowerCLI, like in the example of upgrading VMware Tools in all VMs while preventing the automatic reboot should there be one:
Get–VM * | Update–Tools -NoReboot
Why Can’t I Install/Update/Upgrade VMware Tools?
There can be several cases when the VMware Tools installation or update/upgrade will fail or will not complete successfully.
First, let’s start with some general recommendations:
- Be sure not to have a pending reboot in the guest OS: this may prevent a correct installation or update/upgrade for each software package, including of course VMware Tools
- Be sure to have enough free disk space in the guest OS: usually, during the installation/update/upgrade this check is performed automatically.
- Be sure to follow the right order during an update/upgrade: for all VMware products, there is the VMware Product Interoperability Matrices that can help you in a full-stack update.
- Be sure that no ISO is connected to your VM and, if present, umount it (on Linux/Unix) or eject if (on Windows) before starting the VMware Tools install or update. This is very important in the built-in version.
- Antivirus may block VMware installation or update.
If you are using the ProductLockerLocation variable as described before, attempts to upgrade or install without setting the variable properly will fail with a missing ISO error. For more information, see the VMware KB 2129825.
In case the VMware Tools installation remains pending you can try to stop the operation by selecting, in the vSphere Client, Guest > End VMware Tools Install. For more information, read this post.
Sometimes you need to reinstall VMware Tools after deleting it because the update/upgrade does not work at all.
To perform a full removal, for a Windows OS, just use the control panel and then verify that the C:\Program Files\VMware\VMware Tools and C:\ProgramData\VMware\VMware Tools folders are empty. If not delete them and reboot the virtual machine. After that try to re-install the new version.
If you face MSI missing error, you can run the following command to clean the Windows registry:
setup.exe /C
Conclusion
VMware Tools is often regarded as an optional component by a number of administrators who are not well versed in virtualization and don’t understand the purpose that well. However, ensuring that all virtual machines are equipped with it is crucial to ensure a stable and high-performing virtual environment. It not only improves the user experience when connecting through the virtual console and facilitates reporting, but also enables important memory reclamation mechanisms that could prevent VM crashes in case of memory contention on a host, or ensure that all the correct drivers are in use.