В этой статье мы покажем, как настроить тегированный сетевой интерфейс с VLAN в Windows 10/11 и Windows Server 2019 (2022/2016/2012R2). Стандарт VLAN (Virtual LAN) описан в 802.1Q и предполагает маркировку трафика с помощью тегов (vlanid), необходимую для отнесения сетевого пакета к той или иной виртуальной сети. VLAN используются для разделения и сегментирования сетей, ограничения широковещательных доменов и изоляции сегментов сети для повышения безопасности. В Windows вы можете настроить несколько логических сетевых интерфейсов с разными номерами VLAN на одном физическом интерфейсе несколькими способами.
Содержание:
- Настройка VLAN интерфейсов в Windows 10 и 11
- Добавить несколько VLAN ID в Windows Server 2019/2016
- Как создать несколько VLAN в Windows Hyper-V?
Для использования VLAN необходимо соответствующим образом перенастроить порт коммутатора, куда подключен ваш компьютер/сервер. Порт должен быть переведен из режима access в режим транк. По умолчанию на транк порту разрешены все VLAN, но вы можете указать список номеров разрешенных VLAN(от 1до 4094), которые доступны на данном порту коммутатора Ethernet.
Настройка VLAN интерфейсов в Windows 10 и 11
В десктопных версиях Windows нет встроенный поддержки VLAN. По умолчанию драйвера большинства сетевых адаптеров обрезают в пакетах все VLAN-тэги и внешние VLAN становиться недоступными.
Для некоторых сетевых адаптеров вы можете задать номер VLAN в настройках драйвера:
- Запустите консоль диспетчера устройств (
devmgmt.msc
); - Разверните секцию Network adapters и откройте свойства вашего сетевого адаптера;
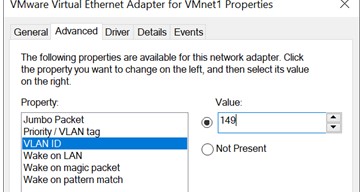
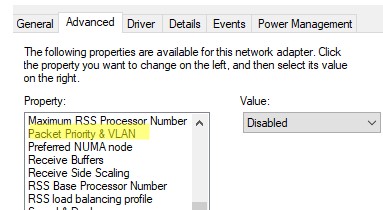
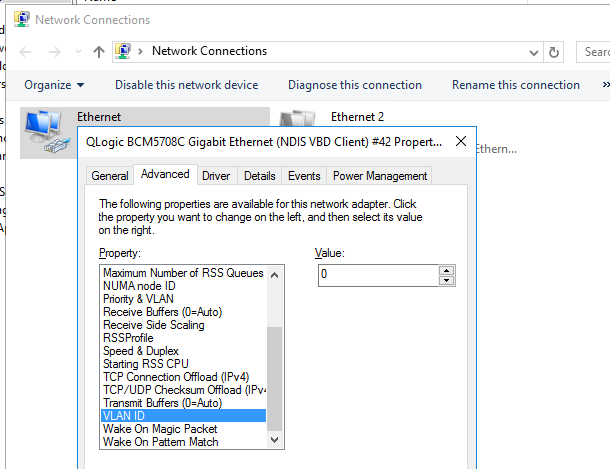
- Перейдите на вкладку Advanced и найдите опцию VLAN ID;
- Здесь вы можете задать номер VLAN;
- У некоторых сетевых карт сначала нужно включить опцию Packet Priority and VLAN.
В современных версиях Windows 10 и 11 вы можете задать один тег VLAN для вашего сетевого интерфейса. Для этого используется командлет PowerShell для управления сетевыми настройками. Например, вы хотите задать VLAN 50 для вашего сетевого интерфейса с именем Ethernet1:
Set-NetAdapter –Name "Ethernet1" -VlanID 50
Для некоторых сетевых карт (Intel, Broadcom, HP, Realtek) доступны специальные утилиты, позволяющие создать в Windows виртуальный сетевой интерфейс с VLAN ID. Для этого на компьютере нужно установить специальный драйвер с поддержкой тегированного трафика 802.1Q и официальную утилиту от вендора.
Создаем VLAN интерфейсы в Windows 10/11 на сетевой карте Realtek
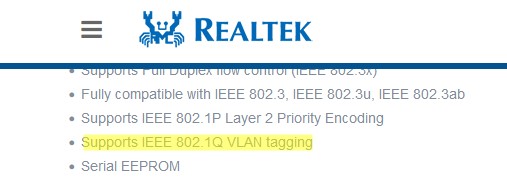
Для сетевых карт Realtek вы можете настроить несколько виртуальных сетевых адаптеров с различными VLAN с помощью утилиты Realtek Ethernet Diagnostic Utility. Найдите описание вашего сетевого контролера Realtek на сайте вендора, и проверьте что эта модель поддерживает VLAN. Например, в спецификации сетевого контроллера RTL8169SC(L) присутствует строка:
Supports IEEE 802.1Q VLAN tagging
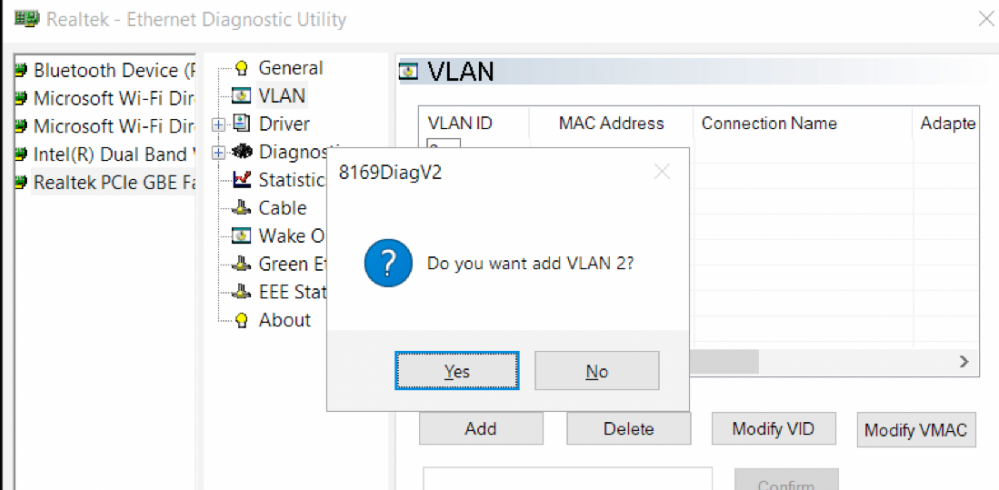
Скачайте и установите последнюю версию сетевого драйвера для вашего адаптера Realtek и запустите утилиту Realtec Ethernet Diagnostic Utility (Diagnostic Program for Win7/Win8/Win10/Win11).
Перейдите в раздел VLAN, нажмите кнопку Add и добавьте нужный VLAN ID. После этого в Windows появится новый сетевой интерфейс.
После того, как вы создали сетевые интерфейсы для ваших VLAN, вы можете задать на них нужный IP из соответствующей подсети.
Добавляем VLAN интерфейсы на сетевом адаптере Intel Ethernet
У Intel для настройки VLAN есть собственная утилита Intel Advanced Network Services (Intel® ANS) VLAN. Ваша модель сетевого адаптера, естественно, должна поддерживать технологию VLAN (например, VLAN не поддерживаются для карт Intel PRO/100 и PRO/1000). При установке драйвера выбейте опции Intel PROSet for Windows Device Manager и Advanced Network Services.
После этого в свойствах физического сетевого адаптера Intel появляется отдельная вкладка VLANs, где вы можете добавить несколько VLAN интерфейсов.
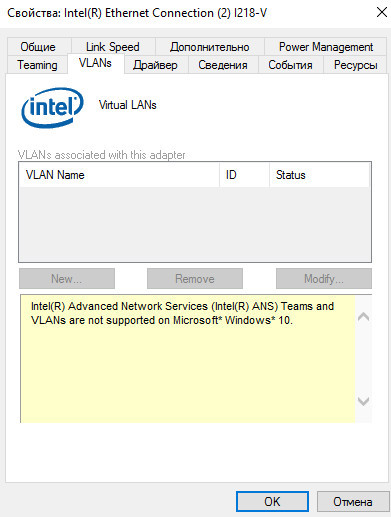
Однако этот способ работает во всех предыдущих версиях Windows (до Windows 10 1809). В последних версиях Windows на этой вкладке присутствует надпись:
Intel(R) Advanced Network (Intel(R) ANS) Teams and VLANs are not supported on Microsoft Windows 10.
Intel недавно выпустила обновленные драйвера сетевых адаптеров и утилиту Intel PROSet Adapter Configuration Utility для последних версий Windows 10 и 11. Скачайте и установите последнюю версию драйвера Intel и утилиту Intel PROset.
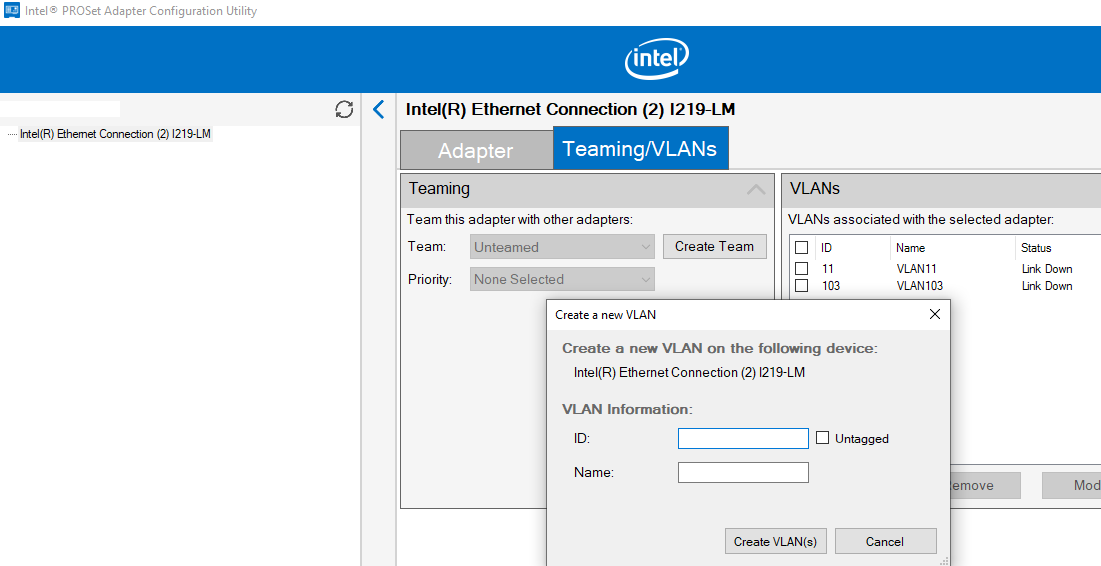
Запустите утилиту, перейдите на вкладку Teaming/VLANs, нажмите кнопку New, и укажите имя сетевого интерфейса и его VLANID.
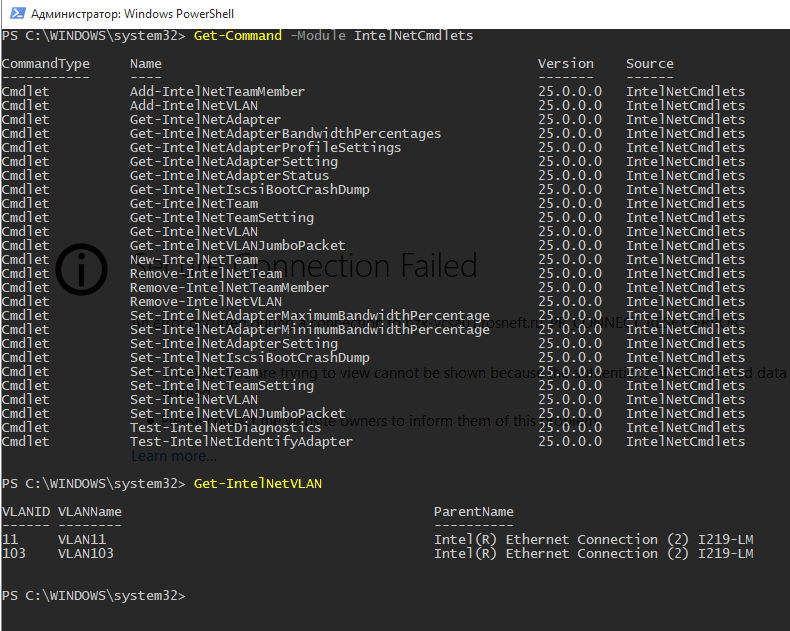
Кроме того, вы можете добавить/удалить/просмотреть список VLAN на сетевых картах Intel с помощью специальных PowerShell командлетов из модуля IntelNetCmdlets. Импортируйте модуль в свою PowerShell сессию:
Import-Module -Name "C:\Program Files\Intel\Wired Networking\IntelNetCmdlets\IntelNetCmdlets" -Scope Local
Вы можете создать нетегированный виртуальный сетевой адаптер (обычно используется с native-vlan-id):
Add-IntelNetVLAN -ParentName "Intel(R) Ethernet Connection I219-LM" -VLANID 0
Чтобы создать сетевой адаптер Intel с конкретным номером VLAN:
Add-IntelNetVLAN -ParentName "Intel(R) Ethernet Connection I219-LM" -VLANID 11
Чтобы вывести список всех виртуальных сетевых адаптеров Intel:
Get-NetAdapter
Удалить VLAN адаптер:
Remove-IntelNetVLAN -ParentName "Intel(R) Ethernet Connection I219-LM" -VLANID 11
Для сетевых карт Broadcom вы можете создавать группы виртуальных сетевых интерфейсов и назначать им VLAN ID с помощью утилиты Broadcom Advanced Control Suite.
Добавить несколько VLAN ID в Windows Server 2019/2016
В Windows Server 2022/2019/2016/2012R2 вы можете настроить несколько VLAN на одном сетевом интерфейсе с помощью встроенных средств (без установки специальных драйверов или утилит). Попробуем настроить несколько разных VLAN на одной физической сетевой карте в Windows Server 2019 с помощью NIC Teaming.
Обязательно убедитесь, что в настройках параметров дополнительных свойств сетевого адаптера не задана VLAN (значение VLAN ID = 0).
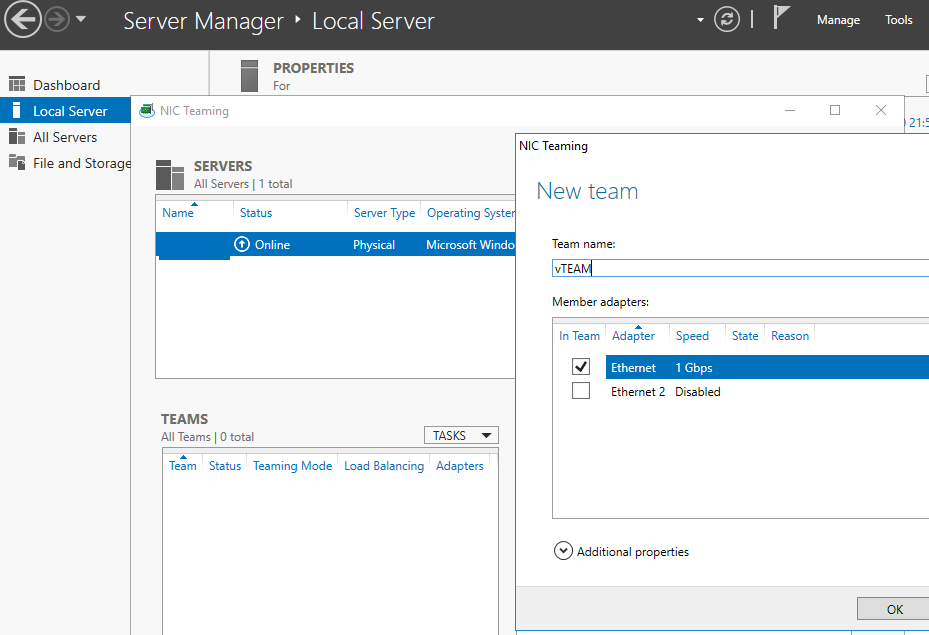
- Запустите Server Manager -> Local и нажмите на ссылку «NIC Teaming«;
- В секции Teams нажмите Task -> New Team. Укажите имя группы и выберите сетевые адаптеры, которые нужно в нее добавить;
Можно создать группу NIC Teaming с помощью PowerShell:
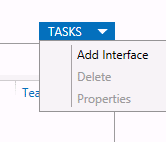
New-NetLbfoTeam -Name vTeam -TeamMembers "Ethernet1","Ethernet2" -TeamingMode SwitchIndependent -LoadBalancingAlgorithm Dynamic - Теперь в секции «Adapter and Interfaces» можно добавить виртуальные сетевые интерфейсы. Нажмите Tasks -> Add Interface;
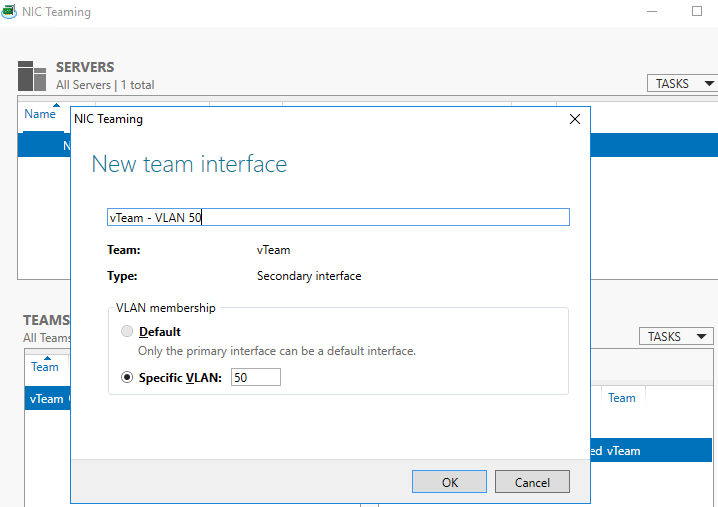
- Укажите имя создаваемого интерфейса и номер VLAN;
Из PowerShell добавить сетевой интерфейс и задать ему VLAN можно так:
Add-NetLbfoTeamNic -Team vTeam -VlanID 50 -Name VLAN50 - Аналогичным образом можно добавить столько сетевых интерфейсов VLAN, сколько нужно;
Обратите внимание, что в Windows Server 2022/2019/2016 поддерживает не более 32 сетевых адаптеров (и соответственно уникальных VLAN) для одной группы NIC Teaming.
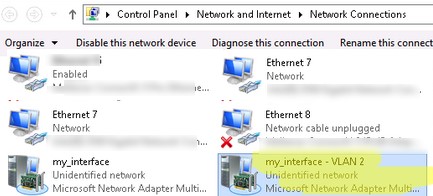
- Для каждого сетевого интерфейса в панели управления сетевыми адаптерами (ncpa.cpl) появится отдельная виртуальная сетевая карта;
- Теперь вы можете настроить IP параметры всех созданных виртуальных VALN сетевых интерфейсов вручную в свойствах адаптера или с помощью PowerShell командлетов New-NetIPAddress и Set-DnsClientServerAddress:
New-NetIPAddress -InterfaceAlias my_VLAN_interface -IPAddress 192.168.30.30 -PrefixLength 24 -DefaultGateway 192.168.30.1
Set-DnsClientServerAddress -InterfaceAlias my_VLAN_interface -ServerAddresses 192.168.1.10
Как создать несколько VLAN в Windows Hyper-V?
Вы можете программно обрабатывать VLANы в Windows через через подсистему Hyper-V (доступно как в Windows Server, так и десктопных Windows 10/11 Pro и Enterprise редакциях). Вы можете создать виртуальный свитч с сетевым адаптером в определённом VLAN.
Для этого нужно установить компоненты Hyper-V:
Enable-WindowsOptionalFeature -Online -FeatureName:Microsoft-Hyper-V -All
Создайте новый виртуальный коммутатор через Hyper-V Manager или с помощью команд PowerShell (см. пример в статье о настройке Hyper-V Server).
Затем для каждого VLAN, который нужно создать, выполнить команды:
Add-VMNetworkAdapter -ManagementOS -Name VLAN50 -StaticMacAddress "11-22-33-44-55-AA" -SwitchName VLAN50Switch
Set-VMNetworkAdapterVlan -ManagementOS -VMNetworkAdapterName VLAN50 -Access -VlanId 50
В результате у вас в системе появится сетевой адаптер с нужным тегом VLAN.
Если на вашем Hyper-V сервере запущены ВМ, вы можете поместить их в разные VALN. Чтобы переключить виртуальны сетевой адаптер ВМ на Hyper-V в режим Access и разрешить получать трафик только с определенным VLAN ID, используется команда:
Set-VMNetworkAdapterVlan -VMName Test1 -Access -VlanId 21
Вывести список ВМ и назначенных им VLAN:
Get-VMNetworkAdapterVLAN
В Windows Server 2022 с ролью Hyper-V вы не сможете привязать виртуальный свитч к такому тиминг-интерфейсу. Дело в том, что что LBFO NIC Teaming устарел (https://aka.ms/lbfodeprecation) и в Windows Server 2022 предлагается использовать Switch Embedded Teaming (SET).
Рассмотрим, как создать виртуальный адаптер и назначить ему VLAN в Windows Server 2022 Hyper-V с помощью SET.
Создайте виртуальный свитч, подключённый к сетевым адаптерам хоста:
New-VMSwitch -Name "HVSwitch1" -NetAdapterName "Ethernet3","Ethernet4" -EnableEmbeddedTeaming $true
Теперь создайте виртуальны адаптер, подключенный к виртуальному свитчу:
Add-VMNetworkAdapter -ManagementOS -Name "VLAN11" -StaticMacAddress "XX-XX-XX-XX-XX-XX" -SwitchName "HVSwitch1"
Назначьте тег VLAN для вашего виртуального адаптера:
Set-VMNetworkAdapterVlan -ManagementOS -VMNetworkAdapterName "VLAN11" -Access -VlanId 11
Если нужно, чтобы виртуальный адаптер Hyper-V мог принимать пакеты из нескольких VLAN, можно использовать такую команду:
Get-VMNetworkAdapter -Name youradaptername | Set-VMNetworkAdapterVlan -Trunk -AllowedVlanIdList 50-59 -NativeVlanId 0
Параметр -NativeVlanId 0 обязателен. В этом случае мы указываем Hyper-V, что VLAN:0 используется в качестве нативного для нетегированного трафика.
http://woshub.com/configure-multiple-vlan-on-windows/
Configuring Multiple VLAN Interfaces on Windows
In this article, we’ll show how to configure a tagged VLAN interface on Windows 10/11 and Windows Server 2019 (2022/2016/2012R2). The VLAN (Virtual LAN) specification is described in the IEEE 802.1Q standard and involves marking traffic with tags (vlanid) so that a network packet may be referred to a particular virtual network. VLANs are used to separate and segment networks, restrict broadcast domains, and isolate network segments to improve security. On Windows, you can configure multiple logical network interfaces with different VLAN ID on a single physical NIC using different tools.
Contents:
- Creating Multiple VLAN Interfaces on Windows 10 and 11
- How to Configure Multiple VLANs on Windows Server 2022/2019/2016?
- Create Multiple VLANs with Windows Hyper-V Role
In order to use VLAN on Windows, you need to reconfigure the physical switch port to which your computer/server is connected to. The port must be switched from access mode to trunk mode. By default, all VLANs are allowed on a trunk port, but you can set the list of allowed VLAN numbers (1 to 4094) available at this Ethernet switch port.
Creating Multiple VLAN Interfaces on Windows 10 and 11
Windows desktop editions don’t natively support VLAN tagging. By default, most network adapter drivers ignore all VLAN tags in network packets and external VLANs become inaccessible.
For some network adapters, you can set the VLAN number in the driver properties:
- Run the Device Manager (
devmgmt.msc); - Expand the Network adapters section and open the properties of your network adapter;
- Go to the Advanced tab and find the VLAN ID option;
- You can set the VLAN number here;
- For some NICs, you first need to enable the Packet Priority and VLANoption.
In modern versions of Windows 10 and 11, you can set one VLAN tag for a network interface adapter. You can use PowerShell to manage network settings. For example, you want to set VLAN ID 24 for your network interface named Ethernet0:
Set-NetAdapter –Name "Ethernet0" -VlanID 24
On Windows, you can assign multiple IP addresses (aliases) to the same network interface, but you cannot bind these IP addresses to different VLANs. You will have to create additional virtual network cards.
For some NICs (from Intel, Broadcom, HP, Realtek), special tools are available that allow you to create a virtual network interface in Windows with a VLAN ID. To do this, you need to install a special driver on your computer that supports 802.1Q tagged traffic and the official configuration tool from the vendor.
Create Multiple VLANs on a Realtek NIC in Windows 10 or 11
For Realtek NICs, you can configure multiple virtual NICs with different VLANs using the Realtek Ethernet Diagnostic Utility. Find the description of your Realtek network controller on the vendor’s website, and check that this model supports VLAN. For example, the specification for the RTL8169SC(L) network controller has this option:
Supports IEEE 802.1Q VLAN tagging
Download and install the latest network driver for your Realtek adapter and run the Realtek Ethernet Diagnostic Utility (Diagnostic Program for Win7/Win8/Win10/Win11).
Go to the VLAN section, click Add and add the required VLAN ID. After that, a new network interface will appear in Windows.
After creating network interfaces for your VLANs, you can assign the IP addresses from the corresponding IP network.
How to Setup VLAN on an Intel Ethernet Network Adapter?
Intel has its own Intel Advanced Network Services (Intel® ANS) tool for configuring VLAN interfaces. Your network adapter model, of course, must support VLAN (for example, VLAN is not supported for NICs such as Intel PRO/100 or PRO/1000). When installing the driver, select the Intel PROSet for Windows Device Manager and Advanced Network Services options.
Then a separate VLANs tab appears in the properties of your physical Intel network adapter, where you can create multiple VLAN interfaces.
However, this method works on all previous versions of Windows (up to Windows 10 1809). In modern Windows 10/11 builds, the following message is displayed in the VLANs tab:
Intel(R) Advanced Network (Intel(R) ANS) Teams and VLANs are not supported on Microsoft Windows 10.
Intel recently released new network adapter drivers and the Intel PROSet adapter configuration tool for the latest builds of Windows 10 and 11. Download and install the latest Intel driver and Intel PROset utility.
Run the configuration tool, go to the Teaming/VLANs tab, click the New button, and specify the name of the network interface and its VLANID.
In addition, you can add/remove/view the list of VLANs on Intel NICs using the PowerShell cmdlets from the IntelNetCmdlets module. Import the module into your PowerShell session:
Import-Module -Name "C:\Program Files\Intel\Wired Networking\IntelNetCmdlets\IntelNetCmdlets" -Scope Local
You can create an untagged virtual network adapter (usually used with native-vlan-id):
Add-IntelNetVLAN -ParentName "Intel(R) Ethernet Connection I219-LM" -VLANID 0
To create an Intel NIC with a specific VLAN number:
Add-IntelNetVLAN -ParentName "Intel(R) Ethernet Connection I219-LM" -VLANID 103
To list all virtual Intel network adapters:
Get-NetAdapter
Remove VLAN interface:
Remove-IntelNetVLAN -ParentName "Intel(R) Ethernet Connection I219-LM" -VLANID 103
For Broadcom NICs, you can create groups of virtual network interfaces and assign VLAN IDs using the Broadcom Advanced Control Suite tool.
How to Configure Multiple VLANs on Windows Server 2022/2019/2016?
In Windows Server 2022/2019/2016/2012R2, you can configure multiple VLANs on the same network interface using built-in tools (without installing third-party drivers and tools). Let’s try to configure multiple VLANs on the same physical NIC in Windows Server 2019 using NIC Teaming.
Make sure that no VLAN number is set in the network adapter advanced settings (VLAN ID = 0).
- Open the Server Manager -> Local and click the NIC Teaming link;
- In the Teams section, click Task -> New Team. Specify the group name and select network adapters to add;
You can create a NIC Teaming group using PowerShell:
New-NetLbfoTeam -Name vTeam -TeamMembers "Ethernet1","Ethernet2" -TeamingMode SwitchIndependent -LoadBalancingAlgorithm Dynamic - Then in the “Adapter and Interfaces” section, add virtual network interfaces. Click Tasks -> Add Interface;
- Enter the name of the interface you are going to create and a VLAN number;
You can add a network interface and set a VLAN for it in PowerShell:
Add-NetLbfoTeamNic -Team vTeam -VlanID 24 -Name VLAN24 - In the same way, you can add as many VLAN network interfaces as you need; Please note that Windows Server 2022/2019/2016 supports a maximum of 32 NICs (and unique VLANs) per NIC Teaming group.
- A separate virtual network adapter will appear in the list of network connections in
ncpa.cpl; - Now you can configure the IP settings for each VLAN interface in the properties of the network adapter or using PowerShell cmdlets:
New-NetIPAddress -InterfaceAlias your_VLAN_interface -IPAddress 192.168.10.10 -PrefixLength 24 -DefaultGateway 192.168.10.1
Set-DnsClientServerAddress -InterfaceAlias your_VLAN_interface -ServerAddresses 192.168.100.12
Create Multiple VLANs with Windows Hyper-V Role
You can programmatically handle multiple VLANs in Windows through the Hyper-V subsystem (available in both Windows Server and desktop Windows 10/11 Pro and Enterprise editions). You can create a virtual switch with a network adapter in a specific VLAN.
To do this, you need to install Hyper-V components:
Enable-WindowsOptionalFeature -Online -FeatureName:Microsoft-Hyper-V -All
Create a new virtual switch through Hyper-V Manager or using PowerShell commands (see an example in the article on how to configure Hyper-V Server).
Then run the following commands for each VLAN you want to create:
Add-VMNetworkAdapter -ManagementOS -Name VLAN24 -StaticMacAddress "11-11-AA-BB-CC-DD" -SwitchName vSwitch2
Set-VMNetworkAdapterVlan -ManagementOS -VMNetworkAdapterName VLAN24 -Access -VlanId 24
So a network adapter with the VLAN you want will appear in Windows.
If you have VMs running on your Hyper-V server, you can put them in different VLANs. To switch the virtual network adapter of a VM on Hyper-V to Access mode and allow it to receive traffic only with a specific VLAN ID, use the command:
Set-VMNetworkAdapterVlan -VMName MyVMName1 -Access -VlanId 30
Display a list of VMs and their assigned VLANs:
Get-VMNetworkAdapterVLAN
In Windows Server 2022 with the Hyper-V role, you won’t be able to bind a virtual switch to such a teaming interface. The fact is that LBFO NIC Teaming is a deprecated feature on Windows Server 2022 (https://aka.ms/lbfodeprecation). Instead of NIC Teaming, it is proposed to use Switch Embedded Teaming(SET).
Let’s create a virtual adapter and assign a VLAN to it on Windows Server 2022 Hyper-V using SET.
Create a virtual switch connected to the host’s physical adapters:
New-VMSwitch -Name HVVLANSwitch1 -NetAdapterName "Ethernet3","Ethernet4" -EnableEmbeddedTeaming $true
Now create a virtual adapter connected to the virtual switch:
Add-VMNetworkAdapter -ManagementOS -Name "VLAN22" -StaticMacAddress "XX-XX-XX-XX-XX-XX" -SwitchName HVVLANSwitch1
Assign a VLAN tag to your virtual adapter:
Set-VMNetworkAdapterVlan -ManagementOS -VMNetworkAdapterName "VLAN22" -Access -VlanId 22
Switch Embedded Teaming is not compatible with SR-IOV for Hyper-V virtual machines.
You can enable the virtual Hyper-V adapter to receive packets from multiple VLANs using the command:
Get-VMNetworkAdapter -Name youradaptername | Set-VMNetworkAdapterVlan -Trunk -AllowedVlanIdList 40-69 -NativeVlanId 0
The -NativeVlanId 0 parameter is required. In this case, we tell Hyper-V that VLAN:0 is used as native for untagged traffic.
!!! This article is mo-ta-mo copy/paste from http://woshub.com/configure-multiple-vlan-on-windows/ . Please contact us to remove article in case of copyright “something”. Thank you. !!!
As Intel recently deprecated their ProSet tool for Windows 11, I had to find a solution to continue operating some computers which have to connect to multiple VLAN interfaces.
Right now those computers use a single NIC, connecting to a switch which has enabled VLAN tagging. Unfortunately (of fortunately?) most of our computers are currently running a realtek NIC. VLANs are currently configured using their Diagnostic Utility.
Fortunately (or in this case unfortunately?) our latest generation of hardware now comes with an Intel network chip. This change was pushing me into this new issue: How do I configure multiple VLANS under Windows 11 on an Intel NIC?
The Issue
Intel used to have a quite easy configuration for multiple VLANs in their advanced driver settings but as I already noted: The ProSet tool including the advanced driver functions has been discontinued by Intel.
So now, I had to find a new way to solve that demand.
On Linux you can create virtual nics easily as the VLAN function is built into the network stack of the linux kernel but I knew that windows was not able to do similar – and I was wrong-ish.
Examining the advanced tab of my NIC, I’ve seen that setting a single VLAN ID is not hard, it can be done in advanced properties of the NIC or using powershell. In our case, as we need to operate on multiple VLANs things are different. There is no option to add a virtual NIC so I started tinkering.
The solution is Hyper-V
So after some research I found out, that Hyper-V is VLAN aware and you can use their network stack without installing and running the full hypervisor. Additionally you can create multiple virtual Host-NICs attached to a VLAN aware Hyper-V-Switch.
Sounds like Rocket science? It is actually quite straight-forward but you need to configure that using powershell.
Step 1: Installing the Windows components
In the windows feature installation dialog, we have to install the two components called “Hyper-V-Services” and “Hyper-V-Module for Windows powershell”

After the setup is done, you have to reboot the computer.
Step 2: Setting up the vSwitch
Hyper-V automatically creates a “Default vSwitch” that you can not delete and unfortunately it is not VLAN-Aware. We will have to keep this one as it is and go ahead creating a second vSwitch. For this, we need to open up powershell as an administrator and enter the following commands.
Your host will lose it’s network connection – Do not do that remotely or with apps running.
# This will return a list of network adapters, find your physical NIC and note its "Name" - In most cases "Ethernet"
Get-NetAdapter

# This creates a new vSwitch named VLAN-vSwitch and bridging our physical NIC called "Ethernet". Also we allow to add virtual Host-NICs to this switch.
New-VMSwitch -name VLAN-vSwitch -NetAdapterName Ethernet -AllowManagementOS $true

# Hyper-V automatically creates a virtual NIC without a VLAN tag to keep the host online - Remove it, except you are using a Untagged/Tagged combination.
Remove-VMNetworkAdapter -ManagementOS -Name VLAN-vSwitch
We do now have a clean new VLAN-Aware vSwitch
Step 3: Setting up VLAN interfaces
# Now we create a new virtual Host-NIC and assign a VLAN tag 123 to it. Please note, that the interface name can be chosen freely. One might want to name them by purpose.
Add-VMNetworkAdapter -ManagementOS -Name "VLAN123" -SwitchName "VLAN-vSwitch" -Passthru | Set-VMNetworkAdapterVlan -Access -VlanId 123

# You can now add as many virtual NICs as you need
Add-VMNetworkAdapter -ManagementOS -Name "VLAN456" -SwitchName "VLAN-vSwitch" -Passthru | Set-VMNetworkAdapterVlan -Access -VlanId 456

# Finally, verify that all adapter are in place
Get-NetAdapter
Done
Thats all you need to do. You do noe have replicated the VLAN feature of Realtek Diagnostic Utility or Intel ProSet with windows “onboard-tools” and this solution should be compatible with any available NIC.
What do you think? Is this a clean solution or do you still preferr using other tools, if so – which?
Title Photo by Taylor Vick on Unsplash
A virtual environment can consist of several physical servers, with multiple virtual machines (VMs) simultaneously running within each host. To ensure cooperation within such complex infrastructure, you need to enable communication between all of the system’s components. Previously, all communications between computers had been conducted using local area networks (LANs), which can span across only a limited area, or wide area networks (WANs), which can cover larger distances. Though effective, these types of networks can lack flexibility, scalability, and reliability.
However, achievements in server virtualization have triggered the development of network virtualization. As a result, virtual local area networks (VLANs) have been introduced, which can logically segment a physical LAN into different broadcast domains, thus allowing you to isolate network traffic in a secure and reliable way.
What Is a Hyper-V VLAN?
A virtual LAN (VLAN) is a group of computers, servers, and other network devices which are logically connected and appear to work as a single LAN, regardless of their physical location. Previously, we had to create separate networks (for example, LAN 1 and LAN 2), with each of them operating in the same geographical area and having an individual switch. Due to the fact that LAN 1 and LAN 2 are two separate physical networks, the host connected to LAN 1 could not communicate with the host connected to LAN 2 and vice versa as there was no physical connection between their switches.
A Hyper-V VLAN is a unique form of technology which can provide you with the following benefits:
- High performance. VLANs can decrease the latency and traffic load on the network and network devices.
- Using Hyper-V Manager or PowerShell cmdlets, you can easily create or delete virtual network adapters as well as virtual switches, thus allowing you to increase or decrease the scale of your virtual networks on demand.
- Using VLAN tags, you can easily isolate network traffic as well as restrict access to confidential information.
- VLANs can easily add, move, or change hosts on the network.
- With VLANs, you can access network services from any physical location, and an IT administrator can control the network traffic from a single pane of glass.
- Cost-efficiency. If your organization has multiple departments operating in various geographical locations, network virtualization eliminates the need for deploying expensive LANs for each geographical area.
So, how do networks actually work? For example, you have two different departments, and don’t want these departments to have access to one another’s traffic. Hence, we would need to separate those networks. It can be done either physically (through creating individual LANs for each department) or digitally (through creating several VLANs). In a nutshell, creating and deploying two physical LANs is the same as deploying two virtual LANs. The difference is that two physical LANs or more would require separate switches, whereas two virtual LANs or more can operate on a single switch.
Hyper-V VLAN technology enables logical segmentation of networks, meaning that you can take a single switch and divide it into multiple logical networks. Note that the traffic of each network runs in isolation. Therefore, even though all virtual networks share the same hardware, Hyper-V VLANs can identify and read only their own network traffic. In truth, each virtual network is unaware of other virtual networks and is disconnected from them.
Moreover, by creating multiple Hyper-V VLANs, you can improve security within your system. For example, if you create different virtual networks for various departments and assign each department employee to a corresponding network, you can ensure that only selected users are granted access to confidential information.
Requirements for Hyper-V VLANs
In order to create and deploy Hyper-V VLANs, you would need to follow these requirements:
- Ensure that all networking hardware, including switches, routers, and network adapters, support the 802.1q standard, which helps to assign a tag into each Ethernet frame.
- Devices connected to the same VLAN must be assigned the same VLAN ID so as to enable secure communications between them. The VLAN identifier specifies the virtual LAN that this VM can use for conducting network communications through this network adapter.
- The host must run Windows Server 2008 (or later) or Hyper-V Server.
How to Set Up a Hyper-V VLAN
Generally, the process of setting up a Hyper-V VLAN requires two steps. First, you need to configure the virtual switch to enable network traffic on the physical switch port. Second, you must configure the VM to use a unique VLAN identifier for future network communications.
Configuring the Hyper-V virtual switch
In order to configure a selected virtual switch, you should do the following:
- Open Hyper-V Manager.
- In the Actions pane, click Virtual Switch Manager.
- Here, you can create a new virtual switch (external, internal, or private) or you can configure the existing switches.
After selecting the required switch, you get access to configuring the virtual switch properties. In the VLAN ID section, check the Enable virtual LAN identification for management operating system Also, you must assign a unique VLAN identifier which will be used for network communications.
- Click OK to save changes.
Configuring the Hyper-V virtual machine
The next step is to configure the VM to use VLAN identification. For this purpose, you need to take the following steps:
- Open Hyper-V Manager.
- In the Virtual Machines section, right-click the VM you would like to configure and select Settings.
- Click Network Adapter to see network adapter properties. Check that the network adapter is connected to the right virtual switch.
- Next, check the Enable virtual LAN identification box and assign the same VLAN ID that you used earlier. As a result, all network traffic travelling through the physical network adapter connected to this virtual switch will be tagged with the VLAN ID you have just set.
- Click OK to save changes.
Your VM and a virtual switch have been properly configured and you can now ensure reliable traffic isolation using Hyper-V VLANs.
Once you have built a Hyper-V environment and made sure that it works as required, you need to take care of its security. NAKIVO Backup & Replication is a reliable, affordable, and powerful data protection solution, which can help you protect multiple environments using the following data protection options: backup, backup copy, backup to cloud, replication, and site recovery.

If you are like me, you may interact with multiple network segments and VLANS configured for different purposes. However, what if you have a workstation that is not configured with an Intel ProSet card with enterprise software that allows tagging multiple VLANs? Is all hope lost if you have just a generic card that is not of the Proset or Broadcom enterprise variety that lacks the software for VLAN tagging? Let’s take a look at VLAN tagging software for Windows 10 and see how you can effectively do this without an Intel Proset or Broadcom card with the enterprise driver set.
Why do you need to tag multiple VLANs?
You may wonder, in Windows 10 you will most likely see under the advanced settings for the adapter configuration you have the ability to populate a VLAN ID. Isn’t this all that is needed? Yes, you can tag a single VLAN. This means that you can tag your traffic for a specific VLAN. For many Windows 10 users, this may suffice and be all you need.
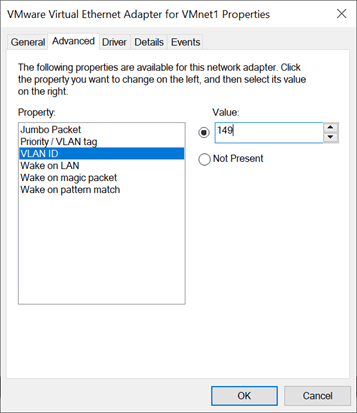
However, if you are like me, you may have multiple VLAN segments associated with your home lab environment and need to have the ability to place your workstation into those multiple VLAN segments at a Layer 2 level. You may wonder – why wouldn’t you just rely on a Layer 3 route to take care of connectivity between segments? You can do that and arguably it is more efficient and less problematic to route traffic at layer 3 for most use cases.
However, as a case in point, what if you are running an installation of VMware Workstation and you have multiple VMs that you want to be placed in different segments of your network and acquire a DHCP address from those various segments? For that, you need to be able to tag multiple VLANs.

In case you have a workstation running Windows 10 and need to be able to tag multiple VLANs, there is a way to do this without installing third-party software or a shady utility. You can do this by installing Hyper-V in Windows 10.
Even if you don’t plan on running any virtual machines on top of the Hyper-V platform, installing Hyper-V and the PowerShell cmdlets allows creating virtual network connections that CAN tag specific VLANs and tag multiple VLANs.
Run the optionalfeatures command to quickly get to the Windows Features. Be sure to install Hyper-V and Hyper-V module for Windows PowerShell.
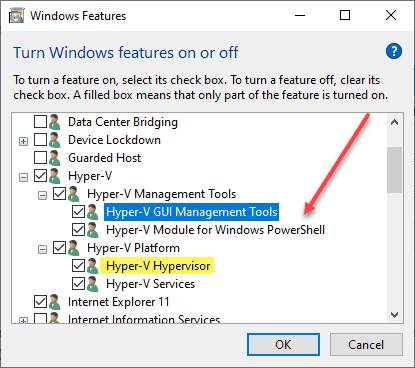
After installing Hyper-V, you will be prompted to reboot. After rebooting, you should be able to run the Hyper-V PowerShell cmdlets. Notice below, you can see the virtual switches installed by running the command:
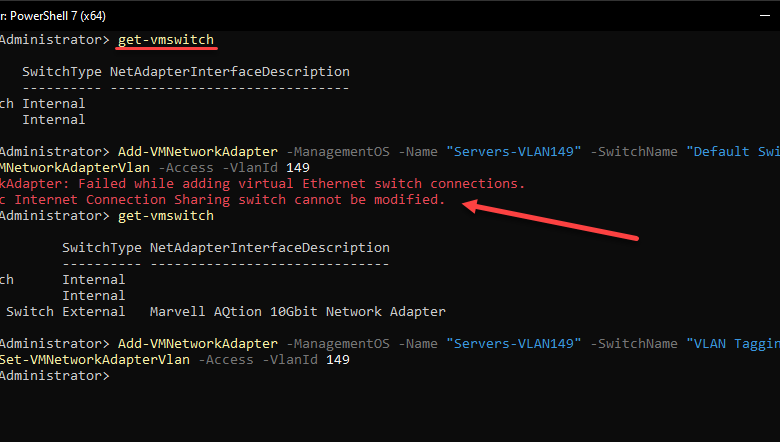
get-vmswitchWith the Hyper-V platform installed, you can add virtual switches and adapters that will allow tagging specific VLANs. As you see below, you can’t add this to the Default Switch. Rather, you need to add a new Hyper-V virtual switch and pass this into the Set-VMNetworkAdapterVlan command.
Add-VMNetworkAdapter -ManagementOS -Name "Servers-VLAN149" -SwitchName "VLAN Tagging Switch" -Passthru | Set-VMNetworkAdapterVlan -Access -VlanId 149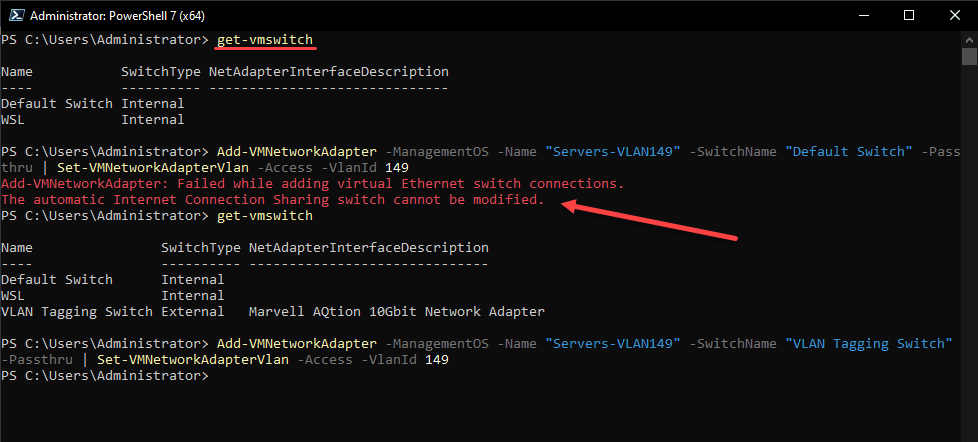
You can also use the Hyper-V Manager console and the Virtual Switch Manager to add a new virtual switch and then select to Enable virtual LAN identification for management operating system to define the VLAN tag for the virtual switch.
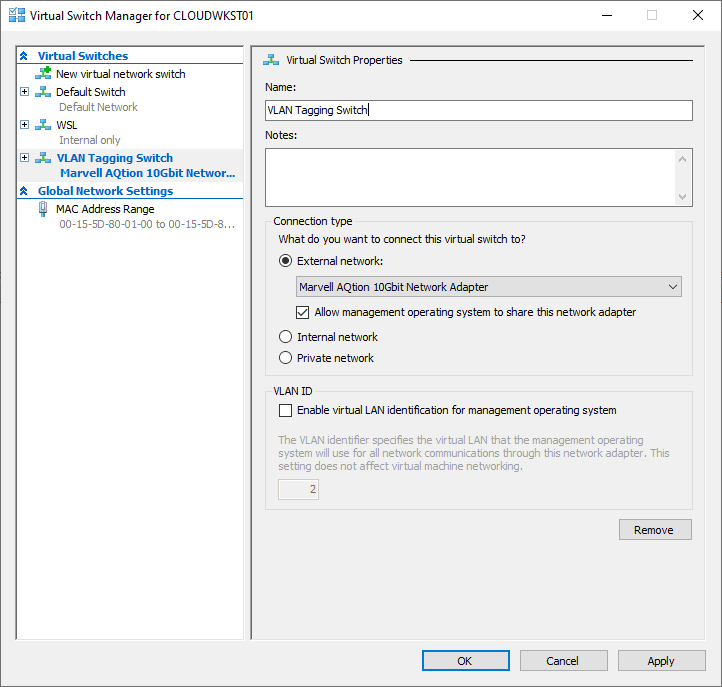
A bit of irony here, but to go along with the example I gave above with VMware Workstation, you can create a bridged connection in the Virtual Network Editor that is bound to one of the Hyper-V virtual switches tagged with a specific VLAN. In this way, your VMs running in VMware Workstation can be placed on the specific VLAN segments they need to communicate with easily.
Also, you can easily remove the virtual network adapter setup for this purpose by using the command:
Remove-VMNetworkAdapter -ManagementOS -Name "Servers-VLAN149" -SwitchName "VLAN Tagging Switch"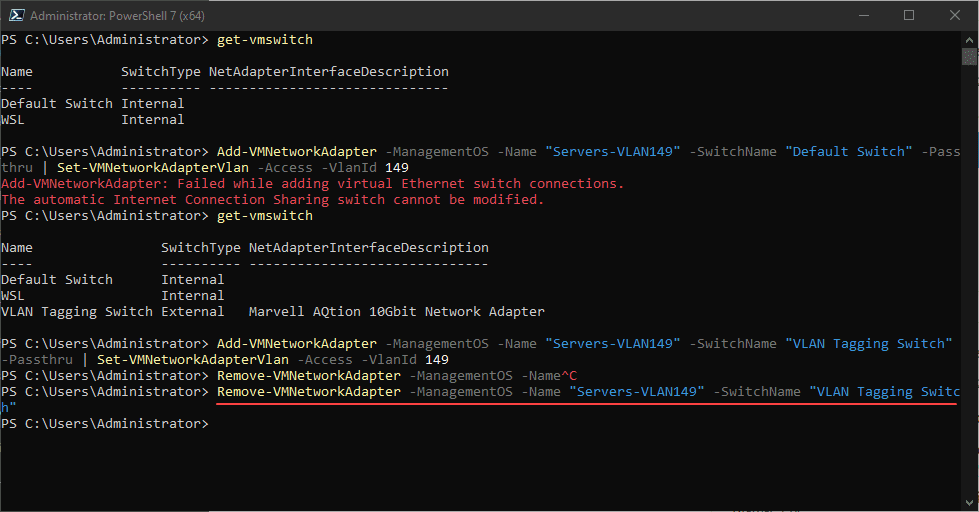
Adapter Precedence and routing
One little oddity I ran into when I added the new adapter via the Hyper-V virtual switch, I started having a few routing issues from my workstation. One thing I noticed, a subnet that I was able to ping before, was now unreachable. What gives? Adapter precedence. After a bit of troubleshooting, I figured out the traffic was now using a different adapter for the primary interface for communicating out.
You can tweak this behavior by setting interface precedence. In Windows 10, this is easily done using PowerShell. Before setting the precedence, you can get the information you need using the Get-NetIPInterface command. Using this cmdlet, you can see the ifIndex and the InterfaceMetric, both of which you will need to set the precedence.
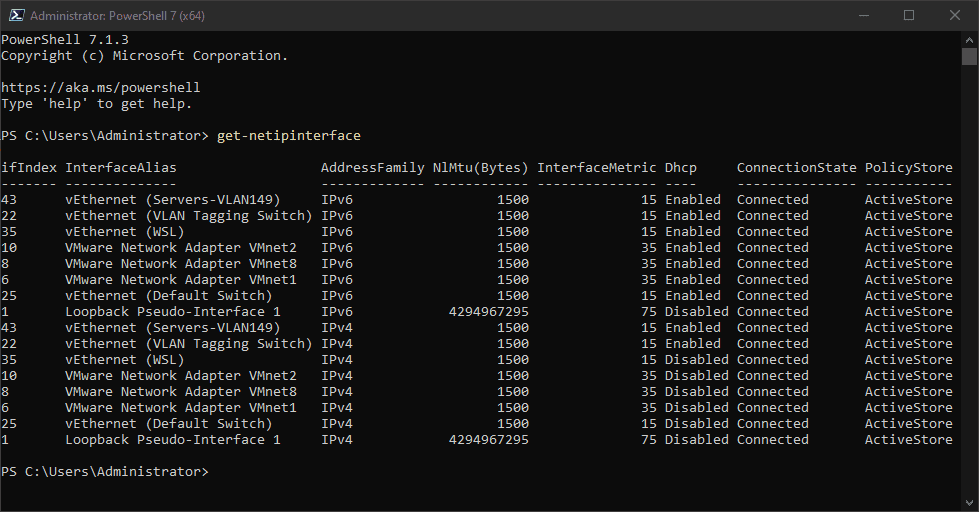
If like me, you lose connectivity after adding the Hyper-V virtual switch tagging a specific VLAN, there is a good chance the new adapter has become your primary interface and may be causing issues with your connectivity. Using the Set-NetIPInterface cmdlet allows easily setting the precedence of your adapters. Find the adapter you want to be the primary or the one that was primary before and use its InterfaceIndex to set the InterfaceMetric to a lower value than all the other adapters.
Set-NetIPInterface -InterfaceIndex 22 -InterfaceMetric 10 Wrapping Up
If you don’t have a fancy network adapter like an Intel ProSet or Broadcom card with the enterprise drivers and fully-featured capabilities such as VLAN tagging, you do have VLAN Tagging Software for Windows 10 with Hyper-V installed. Installing Hyper-V provides the virtual interfaces needed for Windows 10 to use these along with VLAN tagging. You can have multiple virtual adapters as a result of configuring these in Hyper-V using either PowerShell or the Hyper-V Manager that provides the multiple VLAN tagging capabilities missing in regular Windows 10 network adapter properties for VLAN tagging.


 You can create a NIC Teaming group using PowerShell:
 You can add a network interface and set a VLAN for it in PowerShell:


