Do you wish to enable RDP in Windows Server 2016? Need to establish remote connections but don’t know how to do so? Want to configure remote desktop using Command Prompt or PowerShell terminal? This how-to tutorial will answer your questions and help you with the configuration.
Why should you use Windows Server 2016?
In a previous article, we have explained how to enable RDP in Windows Server 2012. Now, it’s time to tell you about Windows Server 2016, and explain how you can enable Remote Desktop in Windows Server 2016. But let’s start with a brief history of Windows Server 2016.
Windows Server 2016 is the successor to Windows Server 2012 R2 released in October 2016. This is the seventh release of Windows Server families.

Need a Remote Desktop?
Reliable, high-performance RDP servers with 99.95 uptime. Take your desktop on the go to all the major cities in the US, Europe, and Asia.
Get an RDP Server
Main Features of Windows Server 2016
- Active Directory Federation Services
- Windows Defender (a pre-installed anti-malware)
- IIS 10, support for HTTP/2
- High-availability cluster (i.e. HA cluster, or Metro-clusters Active/Active, or even fail-over cluster)
- Web application proxy
- Windows PowerShell 5.1
- Windows Server Containers
- The feature of Nano-server
- Hyper-V cluster update
- Remote Desktop Services (like Support of Gen 2 VMs (virtual machines) with Remote Desktop, or Pen remoting support, or Edge support in RDSH, or even support of OpenGL applications and guest VMs in Remote Desktop)
- Windows Multipoint Services
- Personal session desktops
And client updates ( including Remote Desktop preview app for Windows 10, and Remote Desktop preview app for Mac)
As you see, Windows Server 2016 comes with brand new features that Allow Remote Desktop and better connections. Here, we will tell you how to enable RDP in Windows Server 2016.
Things to notice before configuring RDP in Windows Server 2016
- By default, Remote Desktop is disabled in all Windows Server 2016 editions (except Windows server 2016 Essential edition).
- RDP in Windows Server can be enabled through two environments including the PowerShell terminal, and logging into the GUI (Graphical User Interface).
- The main difference between these two installation options comes in the GUI shell package. Server Core 2016 does not have pre-installed GUI shell packages. In fact, the GUI is no longer an option in a default install in Windows Server 2016. If you wish to enable Remote Desktop on Windows Server 2016 using GUI, you should enable it.

Windows 10 VPS Hosting
Get yourself an efficient Windows 10 VPS for remote desktop, at the cheapest price out there. FREE Windows 10 running on NVMe SSD storage and high-speed internet.
Check Out Windows 10 VPS Plans
As you know, Graphic User Interface (GUI) allows for remote access to Windows Server 2016. So, when it comes to enabling RDP in Windows Server 2016 via Logging into the GUI, your first requirement is the installation of a Graphic User Interface. After installing the GUI, do the following steps:
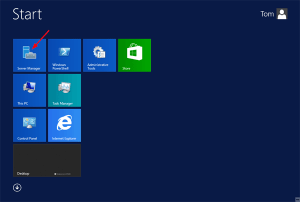
Step 1 : Find Server Manager option
Open Server Manager
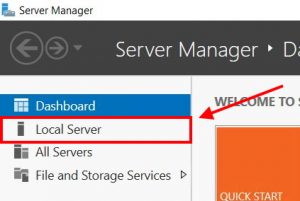
Step 2 : Select Local server
Click Local Server from the left panel
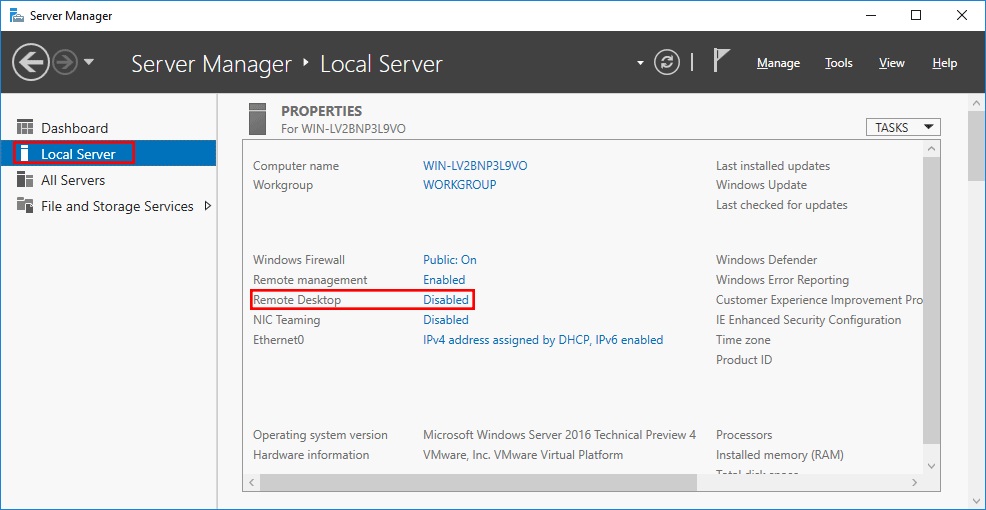
Step 3 : Disable Remote Desktop
Find the Remote Desktop option and click Disabled as shown in the following picture
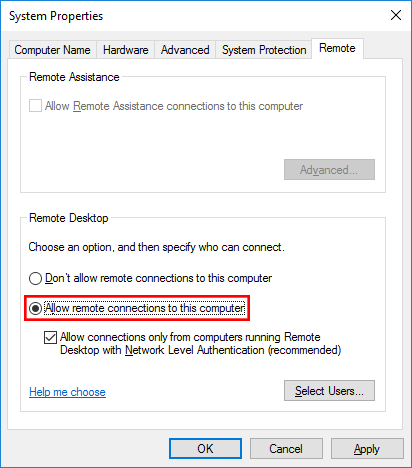
Step 4 : Enable the Allow remote connections to this computer
In this step, a new window will appear. In System Properties Window, enable the Allow remote connections to this computer In this part, you can decide whether to choose Network Level Authentication (NLA) or not. You can also, add more users here.
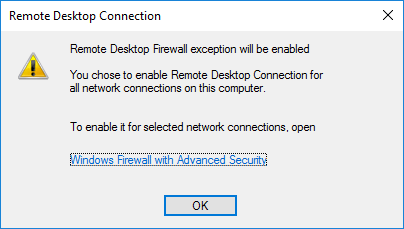
Step 5 : Confirm the configuration
Once, you configure all required settings, you will see a message to enable the corresponding Windows Firewall rule. The Remote Desktop Connection Window helps you to establish remote desktop connections, so click OK to confirm the configuration.
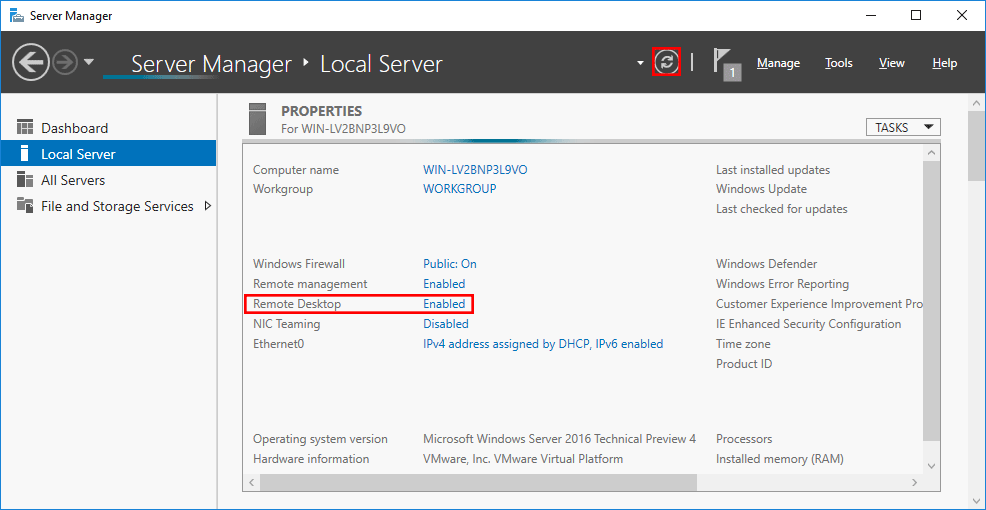
Step 6 : Select the Refresh button to set the changes
Now, move back to the Server Manager window. In this window, select the Refresh button as highlighted below to set the changes. Congratulation. You configured a remote desktop.
Enable RDP in Windows Server 2016 via Powershell
PowerShell is an object-oriented command environment that has new features in Windows Server 2016. It utilizes small programs called cmdlets to simplify the management, administration, and configuration of heterogeneous environments.
To enable Remote Desktop in Windows Server 2016 via PowerShell, we can use two cmdlets. The first will enable remote desktop and the second will open the Firewall. They are listed here:
- A code used to configure remote access:
Set-ItemProperty -Path "HKLM:SYSTEMCurrentControlSetControlTerminal Server" -Name "fdenyTSXonnections" -Value 0
- A code for opening the firewall:
Enable-NetFirewallRule -DisplayGroup "Remote Desktop"
As you see, PowerShell enables RDP with these commands. Notice that administrators can remote in by default, while to provide non-admin users permission to Remote Desktop access, you should add them to the Remote Desktop Users’ local group.
Need a Remote Desktop?
Reliable, high-performance RDP servers with 99.95 uptime. Take your desktop on the go to all the major cities in the US, Europe, and Asia.
Get an RDP Server
Enable RDP in Windows Server 2016 with command line
Well, one of the answers to the “How to Enable RDP in Windows Server 2016” question is using PowerShell Terminal. In order to do this, you should follow the instructions below.
1- Click Windows + R key to open Run Window;
2- In this window, type regedit.exe and press OK;
3- In Registry Editor, select File and then select Connect Network Registry;
4- Specify the IP address or hostname of the remote computer and press But remember that:
If the remote computer could not authorize you as a current user, then a credential is needed.
5- Now, the Registry Editor Panel appears. In this stage try to find “HKLMSYSTEMCurrentControlSetControlTerminal Server” and change the DWORD value of the fDenyTSConnections parameter from 1 to 0, and press OK;
6- Now, it’s time to add one of the firewall rules in the Windows Firewall. This rule allows remote connections. You can add it via PowerShell Remoting, using PS exec, or using a GPO (Group Policy Object). Go to the Command Prompt and type the following code:
PsExec.exe \server1 -u contosoadmin -p password cmdnetsh advfirewall firewall add rule name="allow RemoteDesktop" dir=in protocol=TCP localport=3389 action=allowshutdown –f –r –t
7- Reboot your system and try to connect to a remote computer.
Note:
8- For more information about how to set firewall rules in Windows firewall, run the following command:
netsh advfirewall firewall add rule ?
9- Make sure to run all these codes in administrator mode. To do so, do the following:
Click on Start, type CMD, then right-click on Command Prompt and choose Run as Administrator.
Windows 10 VPS Hosting
Get yourself an efficient Windows 10 VPS for remote desktop, at the cheapest price out there. FREE Windows 10 running on NVMe SSD storage and high-speed internet.
Check Out Windows 10 VPS Plans
Conclusion
In this article, we learned how to enable RDP in Windows Server 2016 using various methods. We can mention one extra method here. By default, windows server 2016 sets external Remote Desktop Access to disabled. We can easily enable it using Server Manager (as we explained in a previous article named “how to enable RDP in Windows Server 2012”). So you can also use server manager to enable remote connections via Windows Server 2016. Do you know any more methods? Please share with us.
Search code, repositories, users, issues, pull requests…
Provide feedback
Saved searches
Use saved searches to filter your results more quickly
Sign up
На чтение 3 мин Опубликовано Обновлено
Windows Server 2012 — операционная система, разработанная корпорацией Microsoft. Она предназначена для работы на серверах и позволяет эффективно управлять сетью и ресурсами компьютеров. Одной из важных функций Windows Server 2012 является удаленный доступ, который позволяет соединиться с сервером из любой точки мира.
Удаленный доступ позволяет администраторам производить различные операции на сервере, не находясь рядом с ним. Это может быть полезно в случае отсутствия физического доступа к серверу, необходимости в регулярном контроле или настройке операционной системы.
Включение удаленного доступа на Windows Server 2012 — процесс, который требует определенных действий и настроек. В данной статье мы рассмотрим подробную инструкцию, которая поможет вам включить удаленный доступ на вашем сервере и начать работать с ним удаленно.
Для начала необходимо убедиться, что удаленный доступ уже включен в операционной системе. Для этого откройте «Панель управления» и выберите «Система». Затем перейдите на вкладку «Дополнительные параметры системы» и выберите пункт «Удаленный доступ». Если удаленный доступ еще не включен, установите галочку возле пункта «Разрешить удаленные подключения к этому компьютеру».
Как включить удаленный доступ на Windows Server 2012
- Нажмите клавишу «Пуск» и выберите «Панель управления».
- В панели управления выберите «Система и безопасность».
- Далее выберите «Система».
- В левой части окна выберите «Удаленный доступ к компьютеру».
- Установите флажок напротив «Разрешить подключение к этому компьютеру».
- Выберите «Включить удаленный доступ к этому компьютеру».
- Нажмите кнопку «Применить» и затем «ОК».
Теперь удаленный доступ на Windows Server 2012 будет включен, и вы сможете подключаться к серверу с других устройств через программу удаленного рабочего стола (Remote Desktop). Убедитесь, что вы настроили права доступа для пользователей, которым вы разрешили удаленный доступ, чтобы они могли войти на сервер удаленно.
Подготовка сервера к удаленному доступу
Перед тем как включить удаленный доступ на Windows Server 2012, необходимо выполнить несколько предварительных действий.
1. Установите операционную систему Windows Server 2012 на сервер и выполните все необходимые обновления.
2. Проверьте, что сервер имеет статический IP-адрес. Для этого откройте «Панель управления» -> «Сеть и Интернет» -> «Центр управления сетями и общим доступом» -> «Изменение параметров адаптера». Выберите нужное сетевое подключение и откройте его свойства. В разделе «Протокол версии 4 (TCP/IPv4)» убедитесь, что выбран пункт «Использовать следующий адрес IP» и введите нужный статический IP-адрес, а также другие необходимые параметры сети.
3. Убедитесь, что на сервере установлены все необходимые роли и компоненты для удаленного доступа. Откройте «Панель управления» -> «Программы» -> «Включение или отключение компонентов Windows». В разделе «Серверные роли» установите галочку напротив пункта «Удалённый рабочий стол», а в разделе «Функции» установите галочки напротив пунктов «Удаленная администрирование» и «Управление удаленными серверами».
4. Убедитесь, что на сервере включена соответствующая настройка брандмауэра для пропуска удаленных подключений. Откройте «Панель управления» -> «Система и безопасность» -> «Система» -> «Дополнительные параметры системы» -> «Вкладка «Удаленный доступ»». Установите галочку на пункте «Разрешить подключение к этому компьютеру» и выберите вариант «Разрешить только подключения протокола входящего написания».
После выполнения этих действий сервер будет готов к включению удаленного доступа. В следующем разделе мы рассмотрим, как это сделать шаг за шагом.

Remote Desktop Protocol (RDP) is a Microsoft-proprietary remote access protocol that is used by Windows systems administrators to manage Windows Server systems remotely. What sets RDP apart from, say, Windows PowerShell or Secure Shell (SSH) remoting is the presence of the full graphical desktop, as shown in Figure 1.
MORE: Best Remote Access Software and Solutions
By default, the RDP server component listens for incoming connections on TCP port 3389 by default, although this can be changed by the administrator for security reasons.
To be sure, Microsoft’s current push is for admins to reduce their reliance upon RDP and instead (a) deploy Windows Servers in Server Core or Nano mode; and (b) employ Windows PowerShell command-line remote administration instead of RDP.
Microsoft’s justification for this advice is two-fold:
- A GUI layer consumes unnecessary system resources
- A GUI layer broadens the attack surface of your servers
Regardless, many admins are accustomed to RDP-based remote administration, and seek to do so even in the newly released Windows Server 2016 operating system. Let’s learn how to enable RDP in Server 2016 (tl;dr: the process is identical to Windows Server 2012 R2).
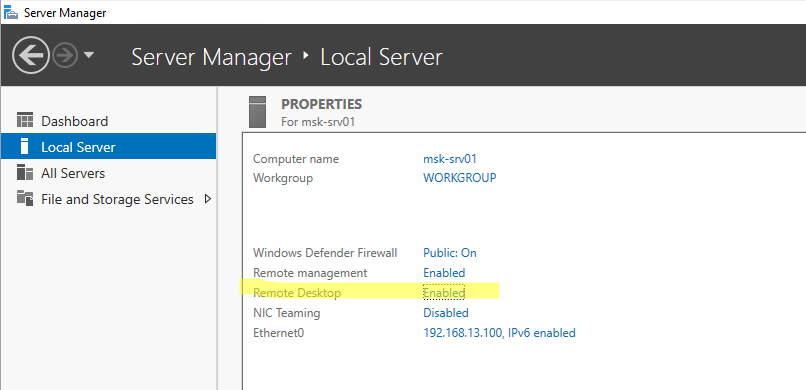
Server Manager
Open the Server Manager console, navigate to the Local Server node, and click the Remote Desktop hyperlink as shown in Figure 2.
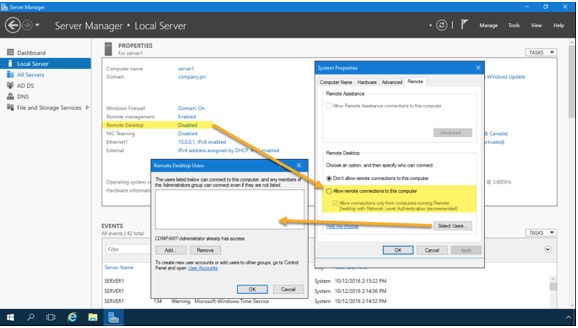
The Remote Desktop hyperlink is simply a shortcut to the System Properties sheet from the System Control Panel item. Select Allow remote connections to this computer, and optionally enable Allow connections only from computers running Remote Destkop with Network Level Authentication (recommended).
Network Level Authentication (NLA) protects Windows Server against denial-of-service (DoS) attacks by requiring authentication to take place before any graphical session is established by the server. NLA also conserves server system resources.
Windows PowerShell
From a lower-level perspective, incoming RDP connections are enabled on a server through two Registry values and a Windows Firewall rule.
Open an elevated Windows PowerShell session and run the following commands. This first one creates the fDenyTSConnections value and sets it to 0 (off). This makes sense, because we don’t want to deny Terminal Services (TS) connections.
New-ItemProperty -Path ‘HKLM:SystemCurrentControlSetControlTerminal Server’ -Name ‘fDenyTSConnections’ -Value 0 -PropertyType dword -Force
The next command creates and enables the UserAuthentication (Network Layer Authentication) value; NLA is a good idea and you should consider enabling it by default on your servers.
New-ItemProperty -Path ‘HKLM:SystemCurrentControlSetControlTerminal ServerWinStationsRDP-Tcp’ -Name ‘UserAuthentication’ -Value 1 -PropertyType dword -Force
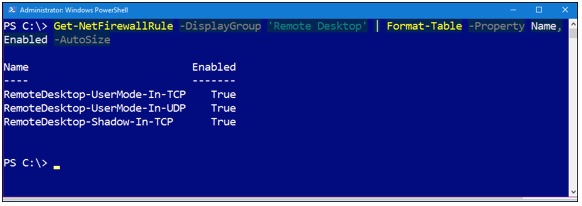
The next command enables the predefined «Remote Desktop» Windows Firewall rule. We can then invoke the Get-NetFirewallRule PowerShell cmdlet to verify as shown in Figure 3.
Enable-NetFirewallRule -DisplayGroup ‘Remote Desktop’
Group Policy
The chances are good that you want to standardize RDP behavior across all your infrastructure servers. Therefore, we turn to Group Policy to accomplish this goal.
Start by creating, linking and scoping a new Group Policy Object (GPO) that targets the servers that should share RDP server settings.
Next, navigate to the following Group Policy path and add a new Restricted Groups entry (shown in Figure 4):
Computer ConfigurationPoliciesWindows SettingsSecurity SettingsRestricted Groups
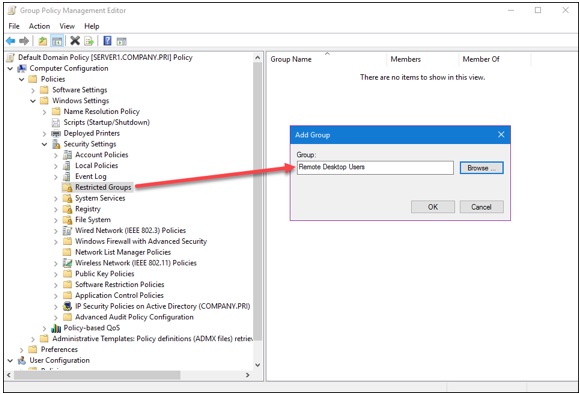
You can customize the membership in the servers’ built-in Remote Desktop Users group; members of this group can establish RDP sessions to the server. Note that the local Administrators group (and, by extension, the Domain Admins global group) is automatically granted this privilege in Active Directory.
The following three Group Policy settings govern:
- Windows Firewall incoming RDP exceptions
- User right to establish RDP sessions
- Requiring NLA
Computer ConfigurationAdministrative TemplatesNetworkNetwork ConnectionsWindows FirewallDomain ProfileWindows Firewall: Allow Inbound Remote Desktop exceptions
Computer ConfigurationAdministrative TemplatesWindows ComponentsRemote Desktop ServicesRemote Desktop Session HostConnectionsAllow user to connect remotely by using Remote Desktop Services
Computer ConfigurationAdministrative TemplatesWindows ComponentsRemote Desktop ServicesRemote Desktop Session HostSecurityRequire user authentication for remote connections by using NLA
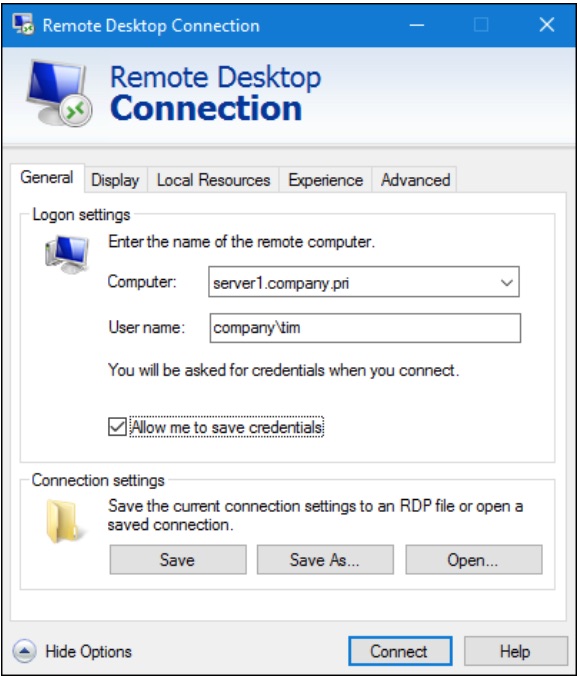
Creating the Client Connection
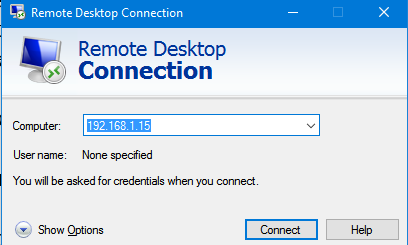
Windows Client and Windows Server both include the Microsoft RDP client, called Remote Desktop Connection. My favorite way to invoke this tool is to:
Press WINDOWS KEY+R
Type mstsc (which stands for «Microsoft Terminal Services Client»)
Press ENTER
I show you the Remote Desktop Connection user interface in Figure 5.
What’s cool about RDP clients is that they are available for just about every desktop or mobile operating system. Here is a representative list:
- Android: Microsoft Remote Desktop
- iOS: Microsoft Remote Desktop
- Linux: rdesktop
- macOS: Microsoft Remote Desktop
- Windows Phone: Microsoft Remote Desktop
Note that Windows Server supports only two simultaneous RDP sessions at once. If you need more than that, then you’ll have to install the Remote Desktop Services (RDS) Session Host server role and purchase additional RDS connection licenses from Microsoft.
Final Thoughts
If you’ve configured RDP on previous Windows Server versions, then you’ll find that Windows Server 2016 behaves the exact same way. Keep in mind, however, that Microsoft’s ever-widening embrace of «assume breach» security posture and the hybrid cloud scenario and its accompanying «manage herds, not pets» philosophy means the emphasis is on command-line automation rather than on-off RDP GUI sessions.
- 10 Best New Features in Windows Server 2016
- Windows 10 for IT Pros: Tutorials, Tips and Tricks
- Top 6 Windows 10 Apps for IT Pros
Get instant access to breaking news, in-depth reviews and helpful tips.
Remote Desktop Protocol (RDP) is a Microsoft-proprietary remote access protocol that is used by Windows systems administrators to manage Windows Server systems remotely. What sets RDP apart from, say, Windows PowerShell or Secure Shell (SSH) remoting is the presence of the full graphical desktop, as shown in Figure 1.
MORE: Best Remote Access Software and Solutions
By default, the RDP server component listens for incoming connections on TCP port 3389 by default, although this can be changed by the administrator for security reasons.
To be sure, Microsoft’s current push is for admins to reduce their reliance upon RDP and instead (a) deploy Windows Servers in Server Core or Nano mode; and (b) employ Windows PowerShell command-line remote administration instead of RDP.
Microsoft’s justification for this advice is two-fold:
- A GUI layer consumes unnecessary system resources
- A GUI layer broadens the attack surface of your servers
Regardless, many admins are accustomed to RDP-based remote administration, and seek to do so even in the newly released Windows Server 2016 operating system. Let’s learn how to enable RDP in Server 2016 (tl;dr: the process is identical to Windows Server 2012 R2).
Server Manager
Open the Server Manager console, navigate to the Local Server node, and click the Remote Desktop hyperlink as shown in Figure 2.
The Remote Desktop hyperlink is simply a shortcut to the System Properties sheet from the System Control Panel item. Select Allow remote connections to this computer, and optionally enable Allow connections only from computers running Remote Destkop with Network Level Authentication (recommended).
Network Level Authentication (NLA) protects Windows Server against denial-of-service (DoS) attacks by requiring authentication to take place before any graphical session is established by the server. NLA also conserves server system resources.
Windows PowerShell
From a lower-level perspective, incoming RDP connections are enabled on a server through two Registry values and a Windows Firewall rule.
Open an elevated Windows PowerShell session and run the following commands. This first one creates the fDenyTSConnections value and sets it to 0 (off). This makes sense, because we don’t want to deny Terminal Services (TS) connections.
New-ItemProperty -Path ‘HKLM:SystemCurrentControlSetControlTerminal Server’ -Name ‘fDenyTSConnections’ -Value 0 -PropertyType dword -Force
The next command creates and enables the UserAuthentication (Network Layer Authentication) value; NLA is a good idea and you should consider enabling it by default on your servers.
New-ItemProperty -Path ‘HKLM:SystemCurrentControlSetControlTerminal ServerWinStationsRDP-Tcp’ -Name ‘UserAuthentication’ -Value 1 -PropertyType dword -Force
The next command enables the predefined «Remote Desktop» Windows Firewall rule. We can then invoke the Get-NetFirewallRule PowerShell cmdlet to verify as shown in Figure 3.
Enable-NetFirewallRule -DisplayGroup ‘Remote Desktop’
Group Policy
The chances are good that you want to standardize RDP behavior across all your infrastructure servers. Therefore, we turn to Group Policy to accomplish this goal.
Start by creating, linking and scoping a new Group Policy Object (GPO) that targets the servers that should share RDP server settings.
Next, navigate to the following Group Policy path and add a new Restricted Groups entry (shown in Figure 4):
Computer ConfigurationPoliciesWindows SettingsSecurity SettingsRestricted Groups
You can customize the membership in the servers’ built-in Remote Desktop Users group; members of this group can establish RDP sessions to the server. Note that the local Administrators group (and, by extension, the Domain Admins global group) is automatically granted this privilege in Active Directory.
The following three Group Policy settings govern:
- Windows Firewall incoming RDP exceptions
- User right to establish RDP sessions
- Requiring NLA
Computer ConfigurationAdministrative TemplatesNetworkNetwork ConnectionsWindows FirewallDomain ProfileWindows Firewall: Allow Inbound Remote Desktop exceptions
Computer ConfigurationAdministrative TemplatesWindows ComponentsRemote Desktop ServicesRemote Desktop Session HostConnectionsAllow user to connect remotely by using Remote Desktop Services
Computer ConfigurationAdministrative TemplatesWindows ComponentsRemote Desktop ServicesRemote Desktop Session HostSecurityRequire user authentication for remote connections by using NLA
Creating the Client Connection
Windows Client and Windows Server both include the Microsoft RDP client, called Remote Desktop Connection. My favorite way to invoke this tool is to:
Press WINDOWS KEY+R
Type mstsc (which stands for «Microsoft Terminal Services Client»)
Press ENTER
I show you the Remote Desktop Connection user interface in Figure 5.
What’s cool about RDP clients is that they are available for just about every desktop or mobile operating system. Here is a representative list:
- Android: Microsoft Remote Desktop
- iOS: Microsoft Remote Desktop
- Linux: rdesktop
- macOS: Microsoft Remote Desktop
- Windows Phone: Microsoft Remote Desktop
Note that Windows Server supports only two simultaneous RDP sessions at once. If you need more than that, then you’ll have to install the Remote Desktop Services (RDS) Session Host server role and purchase additional RDS connection licenses from Microsoft.
Final Thoughts
If you’ve configured RDP on previous Windows Server versions, then you’ll find that Windows Server 2016 behaves the exact same way. Keep in mind, however, that Microsoft’s ever-widening embrace of «assume breach» security posture and the hybrid cloud scenario and its accompanying «manage herds, not pets» philosophy means the emphasis is on command-line automation rather than on-off RDP GUI sessions.
- 10 Best New Features in Windows Server 2016
- Windows 10 for IT Pros: Tutorials, Tips and Tricks
- Top 6 Windows 10 Apps for IT Pros
Get instant access to breaking news, in-depth reviews and helpful tips.
 Обновлено: 02.11.2017
Опубликовано: 13.09.2016
Удаленный рабочий стол применяется для дистанционного администрирования системы. Для его настройки нужно сделать, буквально, несколько шагов.
Как включить
Настройка доступа
Ограничения
Доступ из Интернет
Включение
1. Открываем сведения о системе. В Windows Server 2012 R2 / 2016 или 10 кликаем правой кнопкой мыши по Пуск и выбираем Система.

В Windows Server 2012 / 8 и ниже открываем проводник или меню Пуск. Кликаем правой кнопкой по Компьютер и выбираем Свойства.

2. Настраиваем удаленный рабочий стол. В меню слева кликаем по Настройка удаленного доступа.

В открывшемся окне ставим переключатель в положение Разрешить удаленные подключения к этому компьютеру.

* желательно, если будет установлен флажок Разрешить подключение только с компьютеров, на которых работает удаленный рабочий стол с проверкой подлинности на уровне сети. Но если компьютер, с которого мы будем заходить с устаревшей операционной системой, это может вызвать проблемы.
Предоставление доступа
Очень важно, чтобы у пользователя был установлен пароль. Без него зайти в систему с использованием RDP будет невозможно — это программное ограничение. Поэтому всем учетным записям ставим пароли.
У пользователей с правами администратора права на использование удаленного стола есть по умолчанию. Чтобы обычная учетная запись могла использоваться для удаленного входа в систему, добавьте ее в группу Пользователи удаленного рабочего стола. Для этого открываем консоль управления компьютером (команда compmgmt.msc) — переходим по разделам Служебные программы — Локальные пользователи и группы — Группы и кликаем дважды по Пользователи удаленного рабочего стола:

В открывшемся окне добавляем необходимых пользователей.
Для проверки правильности настроек, используйте программу Подключение к удаленному рабочему столу (находится в меню Пуск или вызывается командой mstsc) на любом другом компьютере в сети.
Ограничение по количеству пользователей
По умолчанию, в серверных операционных системах Windows разрешено подключение для одновременно двух пользователей. Чтобы несколько пользователей (больше 2-х) могли использовать удаленный стол, необходима установка роли удаленных рабочих столов (терминального сервера) и активации терминальных лицензий — подробнее, читайте в инструкции Установка и настройка терминального сервера на Windows Server.
В пользовательских системах (Windows 10 / 8 / 7) разрешено подключение только одному пользователю. Это лицензионное ограничение. В сети Интернет можно найти патчи для его снятия и предоставления возможности подключаться удаленным рабочим столом для нескольких пользователей. Однако, это нарушение лицензионного соглашения.
Доступ через глобальную сеть (Интернет)
Для возможности подключения по RDP из вне необходим статический внешний IP-адрес. Его можно заказать у Интернет провайдера, стоимость услуги, примерно, 150 рублей в месяц (некоторые поставщики могут предоставлять бесплатно). Для подключения нужно использовать полученный внешний IP.
Если компьютер подключен к Интернету напрямую, никаких дополнительных действий не потребуется. Если мы подключены через NAT (роутер), необходима настройка проброса портов. Пример того, как это можно сделать на Mikrotik.
![]()
Была ли полезна вам эта инструкция?
Да Нет
Протокол Remote Desktop Protocol (RDP) позволяет удаленно подключиться к рабочему столу компьютера с Windows и работать с ним, как будто это ваш локальный компьютер. По умолчанию RDP доступ в Windows запрещен. В этой статье, мы покажем, как включить и настроить RDP доступ в Windows 10 и Windows Server 2016/2019.
Содержание:
- Включаем удаленный рабочий стол в Windows 10
- Как включить RDP доступ с помощью PowerShell?
- RDP доступ к Windows Server 2016/2019
- Включение RDP с групповых политик в домене Active Direcrtory
- Как удаленно включить RDP на компьютере Windows?
Самый простой способ включить RDP доступ в Windows – воспользоваться графическим интерфейсом.
Откройте свойства системы через панель управления, или выполнив команду SystemPropertiesRemote.

Перейдите на вкладку Remote Settings (Удаленный доступ), включите опцию Allow remote connection to this computer (Разрешить удалённые подключения к этому компьютеру).
В целях безопасности желательно разрешить подключение только с клиентов RDP с поддержкой протокола NLA (Allow connections only from computers running Remote Desktop with Network Level Authentication/ Разрешить подключение только с компьютеров, на которых работает удаленный рабочий стол с проверкой подлинности на уровне сети).

Сохраните изменения, нажав ОК.
По умолчанию право на подключение к компьютеру через RDP есть только у членов группы локальных администраторов. Если вам нужно разрешить RDP доступ другим пользователям, нажмите кнопку Select Users.
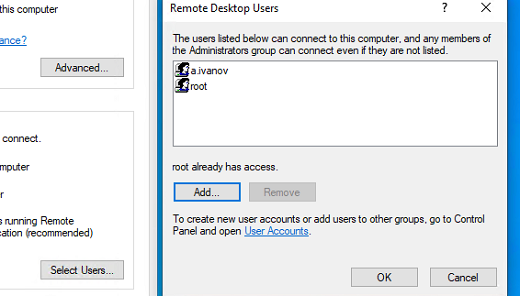
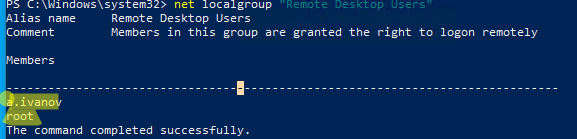
Все пользователи, которых вы укажете здесь будет добавлены в локальную группу Remote Desktop Users. Вы можете в командной строке вывести список пользователей в этой группе:
net localgroup "Remote Desktop Users"
или
net localgroup “Пользователи удаленного рабочего стола”
Чтобы добавить нового пользователя в группу доступа RDP, выполните:
net localgroup "Remote Desktop Users" /add publicuser
В русской версии Windows измените название группы на “Пользователи удаленного рабочего стола”.
В новых билдах Windows 10 классическая панель для включения RDP доступа теперь спрятана и Microsoft рекомендует пользоваться новой панелью Setting.
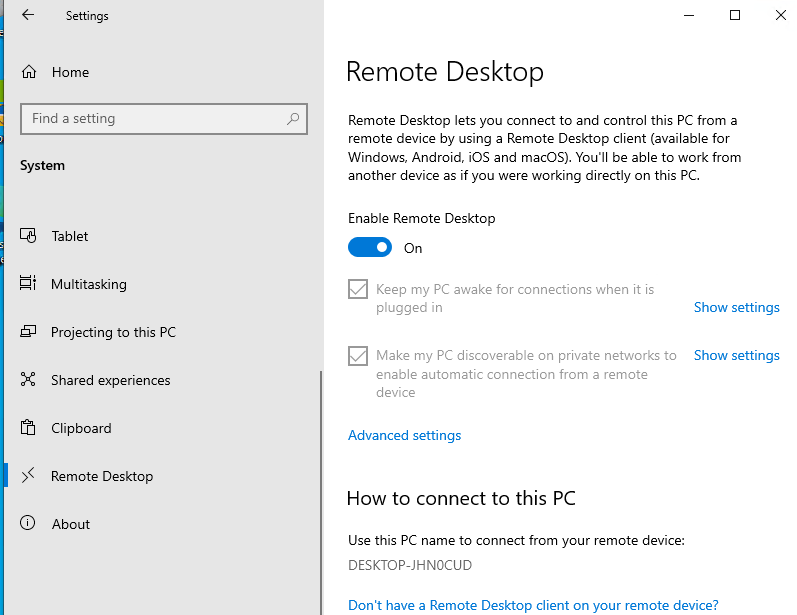
- Перейдите в Settings -> System —> Remote Desktop;
- Включите опцию Enable Remote Desktop;

- Подтвердите включение RDP на компьютере.
Обратите внимание, что вы не можете включить RDP доступ к редакции Windows 10 Home. RDP сервер работает только на Windows 10 Pro и Enterprise. Впрочем, есть обходное решение.
Обратите внимание, что по умолчанию при включении Remote Desktop, включаются две опции:
- Keep my PC awake for connection when it is plugged in ;
- Make my PC discoverable on private networks to enable automatic connection from a remote device
На жмите на ссылку “Advanced settings”. Здесь можно включить использование протокола “Network Level Authentication” для RDP подключений (рекомендуется).
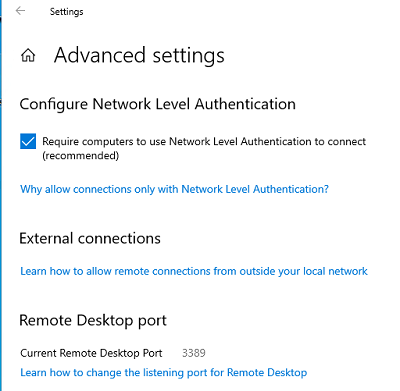
Если на компьютере включен Windows Defender Firewall (брандмауэр), то нужно проверить, что в нем разрешены входящие RDP подключения. По умолчанию для RDP подключений используется порт TCP
3389
, а в последних билдах Windows также используется
UDP 3389
( см. статью про кейс с черным экраном вместо рабочего стола при RDP доступе).
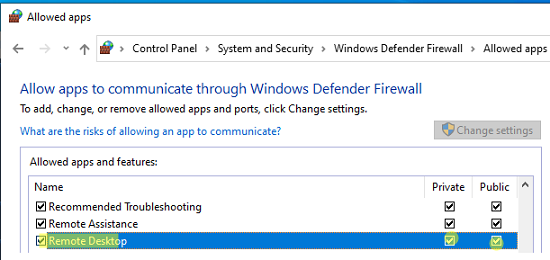
Перейдите в панель управления и выберите элемент Windows Defender Firewall. Откройте список стандартных правил брандмауэра Windows, щелкнув в левом столбце по ссылке Allow an app or feature through Windows Firewall.
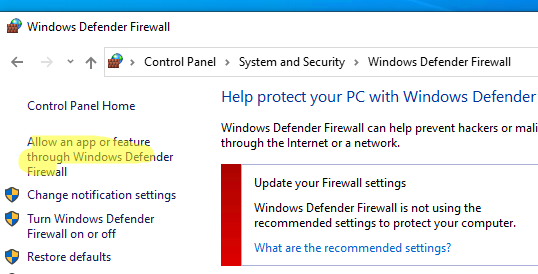
Проверьте, что правило Remote Desktop включено для профиля Private (домашняя или рабочая сеть) и, если необходимо, для профиля Public (общедоступные сети).
Подробнее про типы сетей и профили брандмауэра Windows здесь.
Если нужно, вы можете дополнительно ограничить длительность RDP сессий с помощью GPO.
Теперь к данному компьютеру можно подключится с помощью RDP клиента. Встроенный RDP клиент Windows –
mstsc.exe
. Он сохраняет всю историю RDP подключений с компьютера. Поддерживается копирование файлов между локальным и удаленным компьютером прямо через буфер обмена RDP.
Также вы можете использовать менеджеры RDP подключений, такие как RDCMan или mRemoteNG, или альтернативные клиенты.
Для удобства пользователей пароль для RDP подключения можно сохранить в Windows Credential Manager.
Как включить RDP доступ с помощью PowerShell?
Вы можете включить RDP доступ в Windows с помощью пары PowerShell команд. Это гораздо быстрее:
- Запустите консоль PowerShell.exe с правами администратора;
- Включите RDP доступ в реестре с помощью командлета Set-ItemProperty:
Set-ItemProperty -Path 'HKLM:SystemCurrentControlSetControlTerminal Server' -name "fDenyTSConnections" -value 0Чтобы закрыть RDP доступ, измените значение fDenyTSConnections на 1.
- Разрешите RDP подключения к компьютеру в Windows Defender Firewall. Для этого включите предустановленное правило :
Enable-NetFirewallRule -DisplayGroup "Remote Desktop"
- Если нужно добавить пользователя в группу в локальную группу RDP доступа, выполните:
Add-LocalGroupMember -Group "Remote Desktop Users" -Member 'a.petrov'

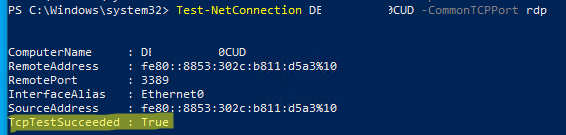
Чтобы проверить, что на компьютере открыт RDP порт, воспользуйтесь командлетом Test-NetConnection:
Test-NetConnection -ComputerName deskcomp323 -CommonTCPPort rdp
RDP доступ к Windows Server 2016/2019
В отличии от десктопной редакции Windows 10, в Windows Server по умолчанию поддерживается два одновременных RDP подключения. Эти подключения используются администраторами для управления сервером.
Включается RDP в Windows Server аналогично. Через SystemPropertiesRemote, через Server Manager или командами PowerShell, рассмотренными выше.
Вы можете использовать Windows Server в качестве терминального сервера. В этом случае множество пользователей могут одновременно подключаться к собственному рабочему столу на сервере. Для этого нужно установить и настроить на сервере роль Remote Desktop Session Host. Это требует приобретения специальных RDS лицензии (CAL). Подробнее о RDS лицензировании здесь.
Для дополнительно защиты RDP сессий можно использовать SSL/TLS сертификаты.
Включение RDP с групповых политик в домене Active Direcrtory
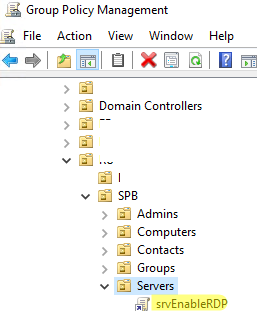
Если вам нужно включить RDP доступ сразу на большом количестве компьютеров, можно воспользоваться групповыми политиками (GPO). Мы подразумеваем, что все компьютеры включены в домен Windows.
- Запустите консоль управления доменными GPO
gpmc.msc
; - Создайте новую (или отредактируйте уже существующую) групповую политику и привяжите ее к целевой OU с компьютерами или серверами;
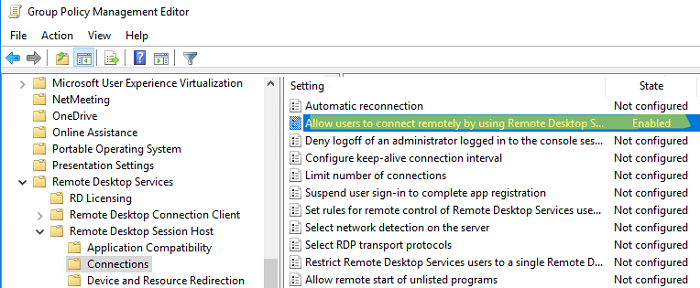
- Переключитесь в режим редактирования политики и перейдите в секцию GPO Computer Configuration -> Administrative Templates -> Windows Components -> Remote Desktop Services -> Remote Desktop Session Host -> Connections;
- Найдите и включите политику Allow Users to connect remotely by using Remote Desktop Services, установив ее в Enable;
- Обновите параметры групповых политик на клиентах;
- После применения данной политики вы сможете подключится ко всем компьютерам по RDP (политика применится как к десктопным клиентам с Windows 10, так и к Windows Server). Если нужно, вы можете более тонко нацелить политики на компьютеры с помощью WMI фильтров GPO.
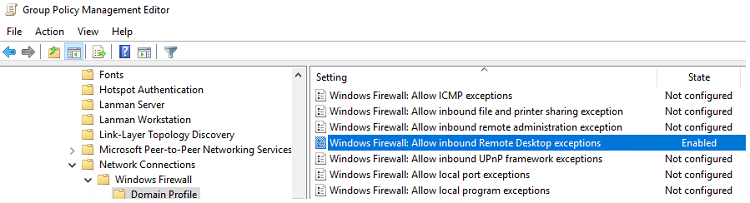
- Если на компьютерах включен Windows Defender Firewall, нужно в этой же GPO разрешить RDP-трафик для доменного профиля. Для этого нужно активировать правило Windows Firewall: Allow inbound Remote Desktop Exceptions (находится в разделе Computer Configuration -> Administrative Templates -> Network -> Network Connections -> Windows Firewall -> Domain Profile).
Подробнее о настройке правил брандмаура Windows через GPO рассказано здесь.
Как удаленно включить RDP на компьютере Windows?
Также вы можете удаленно включить RDP на любом компьютере Windows. Для этого у вас должен быть удаленный доступ к этому компьютеру (через PowerShell или WMI) и ваша учетная запись состоять в группе локальных администраторов на этом компьютере.
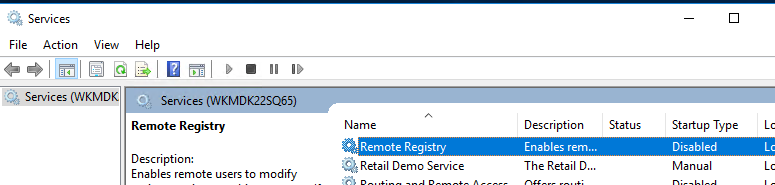
Вы можете удаленно включить RDP через реестр. Для этого на удаленном компьютере должна быть включена служба Remote Registry (по умолчанию она отключена). Чтобы запустить службу:
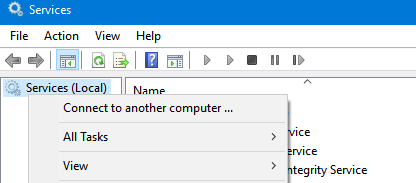
- Запустите консоль управления службами (
services.msc
); - Выберите Connect to another computer и укажите имя удаленного компьютера;
- Найдите в списке службу Remote Registry, измените тип запуска на Manual (ручной) и затем запустите службу – Start.
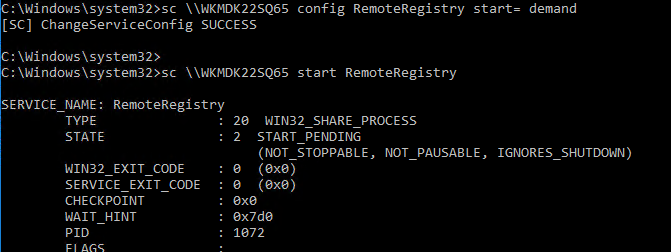
Тоже самое можно выполнить удаленно из командной строки с помощью встроенной утилиты
sc
(позволяет создавать, управлять или удалять службы Windows):
sc \WKMDK22SQ65 config RemoteRegistry start= demand
sc \WKMDK22SQ65 start RemoteRegistry
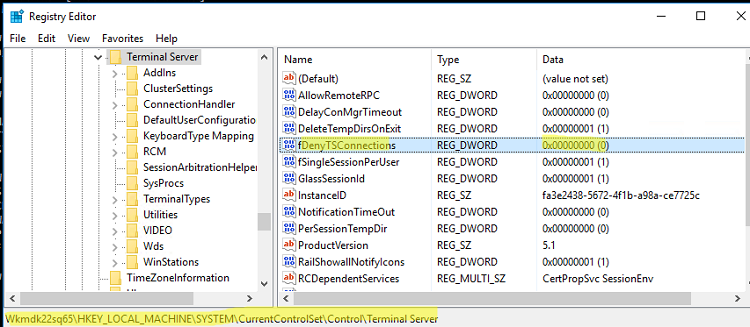
Затем на локальном компьютере
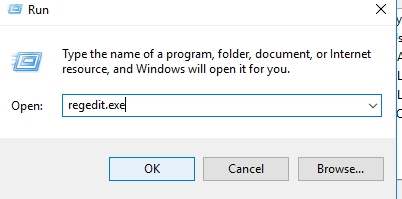
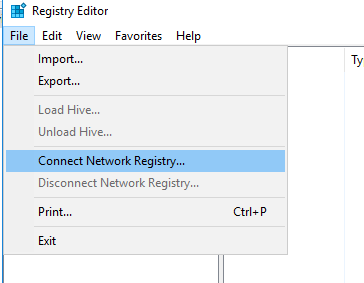
- Запустите редактор реестра
regedit.exe - Выберите в меню Файл пункт Connect Network Registry (Подключить сетевой реестр)
- Укажите имя или IP адрес удаленного компьютера, на котором нужно включить службу RDP;
- Перейдите в раздел
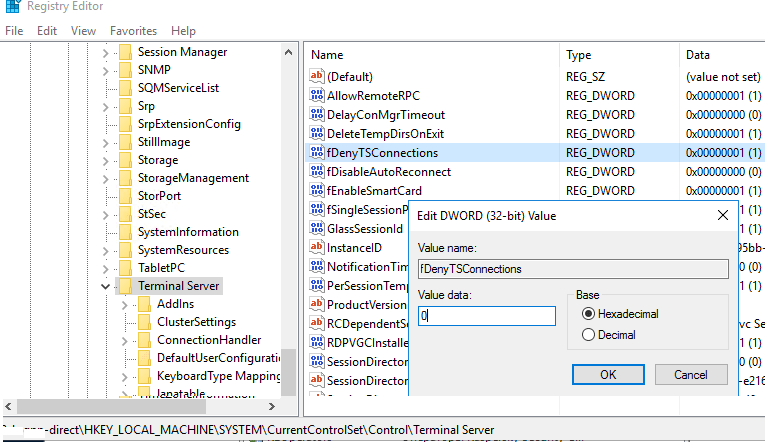
HKEY_LOCAL_MACHINESYSTEMCurrentControlSetControlTerminal Server
; - Найдите параметр fDenyTSConnections (тип REG_DWORD). Если данный ключ отсутствует – создайте его. Измените его значение на 0, чтобы включить RDP.
Для отключения RDP доступа нужно изменить значение fDenyTSConnections на 1.
Сразу после этого без перезагрузки удаленный компьютер должен стать доступным по RDP.
Но гораздо быстрее можно включить RDP в реестре удаленого компьютера через командную строку:
REG ADD "\WKMDK22SQ65HKLMSYSTEMCurrentControlSetControlTerminal Server" /v fDenyTSConnections /t REG_DWORD /d 0 /f
Если на удаленном компьютере настроен PowerShell remoting, вы можете выполнить на нем удаленную команду через Invoke-Command:
Invoke-Command -Computername WKMDK22SQ65 -ScriptBlock {Set-ItemProperty -Path "HKLM:SystemCurrentControlSetControlTerminal Server" -Name "fDenyTSConnections" –Value 0}
Если в Windows установлен OpenSSH сервер, вы можете подключиться к нему любым ssh клиентом и внести изменения в реестр в локальной ssh сессии.
Также вы можете подключиться к удаленному компьютеру и включить RDP через WMI:
$compname = “WKMDK22SQ65”
(Get-WmiObject -Class Win32_TerminalServiceSetting -Namespace rootCIMV2TerminalServices -Computer $compname -Authentication 6).SetAllowTSConnections(1,1)
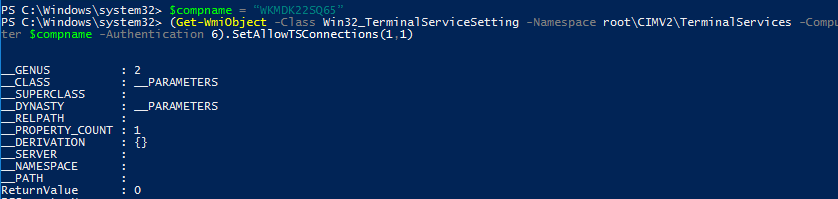
Table of Contents
- Introduction
- Prerequisites
- Install The Remote Desktop Roles
- Activate The RDS Licenses
- Activate Remote Desktop License Server
- RDS Rest Configuration
- See Also
Introduction
This is a comprehensive guide for installing RDS services to a Windows Server 2016. We will see in great detail how to enable the Remote Desktop Roles, Activate the RDS licenses and make the final configuration to make it work.
Prerequisites
- Remote Desktop Licensing
- Remote Desktop Session Host
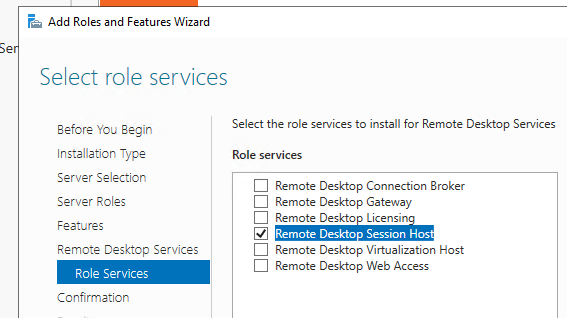
At the following steps we proceed with the installation of the required roles.
Install The Remote Desktop Roles
From the Server Manager, select Manage — Add Roles and Features, to start the roles installation.

1. The Add Roles and Features Wizard opens, and we click
Next > to begin

2. Next we have to choose the installation type, we leave the default type {Role-based or feature-based installation}, and click
Next >

3. In the next step, we select the destination server that the role will be installed, for the needs of the post we have only one server, named
test with IP Address 10.0.1.4. Leave the default server and click
Next >

4. In the fourth step, we need to select the server roles, that will be installed in the server, select the
Remote Desktop Services, and click Next >, to continue.

5. In the features form, click Next >

6. At the next step, we have to select Next >

7. In the Remote Desktop Role Services, select from the Role services list the
Remote Desktop Licensing and the Remote Desktop Session Host roles and click
Next >

8. In the Confirm installation selections form, we confirm the Remote Desktop Services that will be installed and select
Install.

9. The installation progress finished, so we need to select the Close button and restart the Server to apply the changes.

Activate The RDS Licenses
After the roles are installed, we need to activate the RDS licenses. To do this we follow the next steps.
1. From the Server Manager, select Tools — Remote Desktop Licensing Manager

2. In the RD Licensing Manager windows, we can see the server test which is Not yet activated.

3. Right click on the server test and select Activate Server.

Activate Remote Desktop License Server
1. A new Activate Server Wizard starts, and to continue click Next >

2. At the Connection Method form, select Automatic connection (recommended), and click
Next >

3. Provide the requested company information and click Next >.
 Note |
|---|
| This information are used by Microsoft if we need assistance. |

4. At the next form, we type some other optional information, like Email, OU, City, and click
Next >.

5. At the final step in the Activation Server Wizard, check the Start Install Licenses Wizard now
option and select Next >

6. Automatically the Install Licenses Wizard opens, and to proceed with the licenses installation we select
Next >
|
Note |
|---|
| In this part we must be sure that we have bought a valid RDS license. |

7. The next step is to select the license program that we will activate the RDS licenses.
| License Program | Format Of The License |
| License Pack (Retail Purchase) | The format of the license code is 5 sets of 5 alphanumeric digits, 25 |
| Open License | For this type of license we need an authorization number of 15 alphanumeric digits and a license number of 8 numeric digits. |
| Enterprise Agreement |
For all these six License Programs, the enrollment number is 7 number digits. |
| Campus Agreement | |
| School Agreement | |
| Services Provider License Agreement | |
| Other Agreement | |
| Select Plus License |

8. In this post, we activate an Open License, for that reason we selected on the previous step (7) as licensed program {Open License}, type the
Authorization and License numbers and click
Next > to continue.

9. In the Product Version and License Type form, select Windows Server 2016 and RDS Per User CAL and type into the Quantity field the number of the licenses that will be activated, and click
Next >

10. We have successfully installed the licenses, and we select Finish to close the Install Licenses Wizard.

RDS Rest Configuration
The last step for the RDS activation is to make two changes to the Windows Group Policies.
1. Open the Run -> type gpedit.msc and click OK.

2. Move to the path {Computer Configuration Administrative Templates Windows Components Remote Desktop Services Remote Desktop Session Host Licensing} and make the following changes :
2a. In the Use the specified Remote Desktop license servers setting

Select the value Enabled, type the local server IP, e.g.
10.0.1.4, and click OK

2b. The second change we must do is on the Set the Remote Desktop licensing mode setting

In this setting we select Enabled and also from the Options:, choose the
Per User licensing mode and click OK.

3. The final of all the steps is to confirm that the licenses are activated. We can do this from the
Server Manager — Tools —Remote Desktop Services —
Remote Desktop Licensing Diagnoser

4. The Remote Desktop Licensing Diagnoser opens and we can see that the licenses are activated.

See Also
- License your RDS deployment with client access licenses (CALs)
- Activate the Remote Desktop Services license server
- Install RDS client access licenses on the Remote Desktop license server
- Remote Desktop Services
- Remote Desktop Services Overview
This article contains step by step instructions on how to install and configure the Remote Desktop Services on a Windows Server 2016 or 2012. In Windows Server 2016 & 2012 the Terminal Services role has been replaced by the Remote Desktop Session Host (RDSH) role service and is part of Remote Desktop Services (RDS). A Remote Desktop Session Host (RDSH) server, provides to remote users the ability to access the applications on the RDS host server and the company resources from anywhere by using an RDP client.
In this tutorial you ‘ll learn how to setup and configure a Windows Server 2016 or 2012 as a Remote Desktop Session Host (Terminal) server, in order to provide remote desktop sessions, based on the number of Remote Desktop Services client access licenses (RDS CALs) installed on the RDSH server.
How to Setup and Configure a Windows Server 2016/2012 as a Remote Desktop Session Host Server (Terminal Server).
Notes:
1. The mentioned steps below, can be applied either on a Domain Controller or in a standalone server 2016/2012.
2. If the Terminal services are installed on a server that will act as a Domain Controller also, then first install the Active Directory Domain Service (AD DS) role service and promote the Server to a Domain Controller, before installing the Remote Desktop Session Host (RDSH) role service (Terminal Service).
3. Keep in mind that the below configuration does provide access to RemoteApp programs or the RDWeb site, because the Remote Desktop Connection Broker role service will not be installed.
Step 1. Install Remote Desktop Services on Server 2016/2012.
Step 2. Activate the Remote Desktop License Server.
Step 3. Install Licenses on the Remote Desktop License Server.
Step 4. Configure RD Session Host role to use the local Remote Desktop Licensing server & Set the Remote Desktop licensing mode.
Step 5. Add RD Clients (Users) to the Remote Desktop Users Group.
Step 6. Allow the log on through remote desktop Services.
Step 1. Install Remote Desktop Licensing and Remote Desktop Session Host role services.
1. Open ‘Server Manager’ and click on Add Roles and Features.

2. At the first screen of ‘Add Roles and Features wizard’ leave the Role-based or feature-based installation option and click Next.
 Server 2016/2012")
3. At the next screen, leave the default option «Select server from the server pool» and click Next.

4. Select the Remote Desktop Services and click Next.

5. Leave the default settings and click Next at Features and Remote Desktop Services screens.
6. At Role Services screen, select the Remote Desktop Licensing role service and then click Add Features.

7. Then select the Remote Desktop Session Host role service and click Add Features again.

8. When done, click Next to continue.

9. Finally click Install to install the Remote Desktop Services: Remote Desktop Licensing and Remote Desktop Session Host.

10. When the installation is completed close the ‘Add Roles and Features Wizard’ and restart your server.

Step 2. Activate the Remote Desktop License Server.
1. Simultaneously press the Windows ![]() + R keys to open run command box.
+ R keys to open run command box.
2. Type licmgr.exe and press Enter to open the RD Licensing Manager *
* Note: Alternately, you can launch the RD Licensing Manager, from Control Panel –> Administrative Tools –> Remote Desktop Services –> Remote Desktop Licensing Manager.

3. At the right pane, right click on the server name and select Activate Server.

4. Click Next at the Welcome screen and then click Next again at Connection method options.

5. At ‘Company Information’ window, fill the required fields and click Next twice to activate your License Server.

6. When the activation is completed, leave checked the ‘Start Install Licenses Wizard’ checkbox and click Next.

7. Continue to next step.
Step 3. Install Licenses on the Remote Desktop License Server.
1. At ‘Welcome to the install licenses wizard’, click Next

2. On the License Program page, select the appropriate program through which you purchased your RDS CALs, and then click Next.

3. According the License Program you selected on the previous page, type either the license code or the agreement number provided when you purchased your RDS CALs and then click Next.
4. On the Product Version and License Type page, select the appropriate product version, license type, and the quantity of the RDS CALs based on your RDS CAL purchase agreement, and then click Next.
5. When the RDS CALs installed on the server, click Finish. *
TIP: If you cannot activate the RDS Server automatically, then try to activate it using the Web Browser or via Telephone. To do that:
a. Right-click on the Server’s name and select Properties.
b. Change the Connection Method to Web Browser or to Telephone. When done, click OK.
c. Finally, right click on the server name, select Activate Server and follow the onscreen instructions to completed the activation.
Step 4. Configure RD Session Host role to use the local Remote Desktop Licensing server & Set the Remote Desktop licensing mode.
1. Open Group Policy Editor. To do that:
1. Simultaneously press the Windows
+ R keys to open run command box.
2. Type gpedit.msc and press Enter.

2. In Group Policy Editor navigate to:
- Computer ConfigurationAdministrative TemplatesWindows ComponentsRemote Desktop ServicesRemote Desktop Session Host Licensing
3. At the right pane, double click at Use the specified Remote License Servers.

4. Click Enabled, and then at ‘License server to use‘ field, type the RDS license server name and click OK.

5. Then open the Set the Remote Desktop licensing mode setting.

6. Click Enabled and then specify the licensing mode (Per User or Per Device) for the RDS host server and then click OK again.

7. Close Group Policy Editor.
8. Verify the RD Licensing configuration, by going to: Windows Control Panel –> Administrative Tools –> Remote Desktop Services –> RD Licensing Diagnoser.

Step 5. Add RD Clients (Users) to the Remote Desktop Users Group.
1. Open Server Manager.
2. From Tools menu, select Active Directory Users and Computers. *
* Note: If the RD Session Host Service is not installed on the Domain Controller, use the ‘Local Users and Groups’ snap-in or the ‘Remote’ tab in the ‘System Properties’ on the RDS host server, to add the remote desktop users.

3. Double click at your domain on the left and then select Builtin.
4. Open Remote Desktop Users on the right pane.

5. At Members tab, click Add.

6. Type the name(s) of the users that you want to give Remote access to the RDS Server and click OK.

7. After selecting the remote desktop users, click OK again to close the window.

8. Continue to step-6 below.
Step 6. Allow the log on through remote desktop Services.
1. Open the Local Group Policy Editor. To do that:
1. Simultaneously press the Windows
2. Type gpedit.msc and press Enter.
2. In Group Policy Editor navigate to: Computer Configuration > Windows Settings > Security Settings > Local Policies > User Rights Assignment.
3. At the right Pane: double click at Allow log on through Remote Desktop Services.

4. Click Add User or Group.

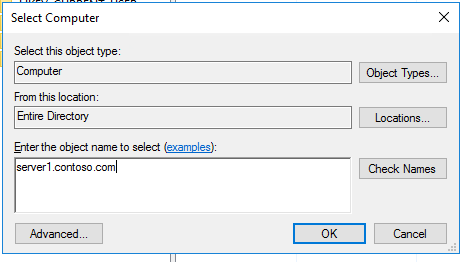
5. Click Object Types, check all the available objects (Users, Groups, & Built-in security principals) and then click OK.

6. Type remote desktop users and then click OK.

7. Finally click OK again and close Group Policy Editor.

8. Now you ‘re ready to connect to the Remote Desktop Session Host Server 2016/2012 from any Remote desktop client.
That’s it! Let me know if this guide has helped you by leaving your comment about your experience. Please like and share this guide to help others.
If this article was useful for you, please consider supporting us by making a donation. Even $1 can a make a huge difference for us in our effort to continue to help others while keeping this site free:

If you want to stay constantly protected from malware threats, existing and future ones, we recommend that you install Malwarebytes Anti-Malware PRO by clicking below (we
do earn a commision from sales generated from this link, but at no additional cost to you. We have experience with this software and we recommend it because it is helpful and useful):
Full household PC Protection — Protect up to 3 PCs with NEW Malwarebytes Anti-Malware Premium!
Если нужно создать удаленное подключение для нескольких пользователей, то сперва необходимо настроить терминальный сервер на Windows Server. Он позволит предоставлять ровно такое количество мощностей, которое требуется для решения конкретной задачи – например, для работы с 1С или CRM.
Настройка в версиях Windows Server 2012, 2016, 2019 выполняется по одному алгоритму.
Базовая настройка терминального сервера
Сначала проверим имя рабочей группы и описание компьютера.
- Открываем «Панель управления», переходим в раздел «Система».
- Нажимаем «Изменить параметры».
- На вкладке «Имя компьютера» смотрим, как он идентифицируется в сети. Если имя компьютера или рабочей группы слишком сложное, нажимаем «Изменить» и задаем другие идентификаторы. Для применения нужно перезагрузить систему.
После проверки имени смотрим и при необходимости меняем сетевые настройки. В «Панели управления» открываем раздел «Сетевые подключения».

Переходим в свойства используемого подключения, открываем свойства «IP версии 4». Указываем настройки своей сети. IP, маска и шлюз должны быть статичными.
Комьюнити теперь в Телеграм
Подпишитесь и будьте в курсе последних IT-новостей
Подписаться
Добавление ролей и компонентов
Открываем меню «Пуск» и запускаем «Диспетчер серверов». Далее:
- Нажимаем «Добавить роли и компоненты».
- Выбираем пункт «Установка ролей или компонентов».
- Выбираем сервер из пула серверов.
- В разделе «Роли сервера» отмечаем DHCP-сервер, DNS-сервер, доменные службы Active Directory, службы удаленных рабочих столов.
- В разделе «Службы ролей» отмечаем лицензирование удаленных рабочих столов, узел сеансов удаленных рабочих столов и шлюз удаленных рабочих столов.
- Нажимаем «Далее» до раздела «Подтверждение». Здесь нажимаем «Установить».


После завершения установки выбираем повышение роли этого сервера до уровня контроллера доменов.

Настройка конфигурации развертывания
Теперь нужно настроить корневой домен:
- В мастере настройки доменных служб Active Directory выбираем операцию добавления нового леса и указываем имя корневого домена. Оно может быть любым.
- В разделе «Параметры контроллера» придумываем и подтверждаем пароль.
- Проходим до раздела «Дополнительные параметры». Указываем имя NetBIOS, если его там нет.
- Проходим до раздела «Проверка предварительных требований». Если проверка готовности пройдена, нажимаем «Установить». Если нет, устраняем недостатки.

После завершения установки необходимо перезагрузиться.
Настройка зоны обратного просмотра
В «Диспетчере серверов» раскрываем список средств и выбираем DNS. Далее:
- Нажимаем «Зона обратного просмотра» – «Создать новую зону».
- Выделяем пункт «Основная зона».
- Выбираем режим «Для всех DNS-серверов, работающих на контроллере домена в этом домене».
- Выбираем зону обратного просмотра IPv4.
- Указываем идентификатор сети – часть IP адресов, которые принадлежат этой зоне.
- Нажимаем «Готово» для применения конфигурации.
Проверить, что все установилось, можно в «Диспетчере DNS».
Настройка DHCP
Возвращаемся в «Диспетчер серверов». Здесь нужно завершить настройку DHCP.
- Указываем данные для авторизации.
- Проверяем сводку и нажимаем «Закрыть».
- После завершения установки снова открываем «Диспетчер серверов» – «Средства» – DHCP.
- В окне DHCP проходим по пути «Имя сервера» – «IPv4» – «Создать область».
- Задаем любое имя DHCP.
- Указываем начальный и конечный IP-адреса для интервала, который будет раздавать сервер.
- Выбираем настройку этих параметров сейчас.
- В окне DHCP переходим по пути «Имя сервера» – «Область» – «Пул адресов». Проверяем, что в списке указан тот диапазон IP-адресов, который мы задали в настройках.

Установка служб удаленных рабочих столов
После настройки DHCP снова открываем «Диспетчер серверов».
- Нажимаем «Управление» – «Добавить роли и компоненты».
- Выбираем установку служб удаленных рабочих столов.
- В разделе «Тип развертывания» выбираем «Быстрый запуск».
- В разделе «Сценарий развертывания» выбираем развертывание рабочих столов на основе сеансов.
- Отмечаем пункт «Автоматически перезапускать конечный сервер, если это потребуется» и нажимаем «Развернуть».

Настройка лицензирования удаленных рабочих столов Windows
Чтобы сервер работал корректно, нужно настроить службу лицензирования.
- Открываем «Диспетчер серверов».
- Переходим по пути «Средства» – «Remote Desktop Services» – «Диспетчер лицензирования удаленных рабочих столов».
- Выбираем в списке сервер, кликаем по нему правой кнопкой и нажимаем «Активировать сервер».
- Нажимаем «Далее» несколько раз, снимаем отметку «Запустить мастер установки лицензий» и затем – «Готово».
- Снова открываем «Диспетчер серверов».
- Переходим в «Службы удаленных рабочих столов».
- В обзоре развертывания нажимаем на меню «Задачи» и выбираем «Изменить свойства развертывания».
- Переходим в раздел «Лицензирование».
- Выбираем тип лицензии.
- Прописываем имя сервера лицензирования – в данном случае это локальный сервер localhost. Нажимаем «Добавить».
- Нажимаем «ОК», чтобы применить настройки.


Добавление лицензий
Осталось добавить лицензии.
- Открываем «Диспетчер серверов».
- Переходим по пути «Средства» – «Remote Desktop Services» – «Диспетчер лицензирования удаленных рабочих столов».
- Кликаем по серверу правой кнопкой и выбираем пункт «Установить лицензии».
- В мастере установки лицензий выбираем программу, по которой были куплены лицензии.
- Указываем номер соглашения и данные лицензии.
- Применяем изменения.

Чтобы проверить статус лицензирования, открываем «Средства» – «Remote Desktop Services» – «Средство диагностики лицензирования удаленных рабочих столов».
На этом настройка терминального сервера на Windows Server завершена. Теперь к серверу могут подключаться удаленные пользователи для выполнения разных задач.
