Search code, repositories, users, issues, pull requests…
Provide feedback
Saved searches
Use saved searches to filter your results more quickly
Sign up
Windows Forms в C#: добавление элементов управления
Windows Forms – это графическая библиотека, которую можно использовать для создания приложений с графическим интерфейсом для операционной системы Windows. С помощью Windows Forms вы можете добавлять различные элементы управления на свою форму, которые помогут пользователям взаимодействовать с вашим приложением. В этой статье мы рассмотрим, как добавить элементы управления на форму в Windows Forms с помощью языка C#.
Шаг 1: Создание нового проекта Windows Forms
Прежде чем мы начнем создавать элементы управления, нам нужно создать новый проект Windows Forms в Visual Studio. Чтобы сделать это, выберите File -> New -> Project в меню Visual Studio и выберите шаблон Windows Forms App (.NET Framework). Назовите свой проект и нажмите OK.
Шаг 2: Добавление элементов управления на форму
Выберите форму, на которую вы хотите добавить элементы управления, и перейдите в режим редактирования дизайна формы. Откройте окно Toolbox, которое содержит множество элементов управления, доступных в Windows Forms. Вы можете найти его в меню View -> Toolbox или нажав на кнопку Toolbox на панели инструментов.
Чтобы добавить элементы управления на форму, просто перетащите необходимые элементы из окна Toolbox на форму. Вот несколько элементов управления, которые вы можете добавить на свою форму:
Button – кнопка, которую пользователь может нажать для выполнения какого-то действия.
TextBox – поле для ввода текста пользователем.
ComboBox – раскрывающийся список, из которого пользователь может выбрать один из предоставленных вариантов.
ListBox – список элементов, из которого пользователь может выбрать несколько элементов.
CheckBox – флажок, который пользователь может установить или снять.
RadioButton – опция, которую пользователь может выбрать из двух или более вариантов.
PictureBox – область, в которой можно отображать изображения.
DataGridView – таблица, которую можно использовать для отображения и редактирования данных.
Panel – контейнер, в котором можно разместить другие элементы управления.
Шаг 3: Настройка свойств элементов управления
После того, как вы добавили элементы управления на форму, вы можете настроить их свойства в режиме редактирования дизайна формы. Вы можете изменять свойства, такие как размер, положение, цвет фона, шрифт и многое другое.
Чтобы открыть окно свойств элемента управления, просто щелкните на элементе управления на форме, а затем выберите свойство, которое вы хотите изменить, из списка свойств в окне Properties. Вы можете изменить значение свойства, щелкнув на нем и вводя новое значение в поле.
Шаг 4: Обработка событий элементов управления
Когда пользователь взаимодействует с элементами управления, то происходят события. Например, когда пользователь нажимает кнопку, срабатывает событие Click. Вы можете написать обработчики событий элементов управления в вашем коде, чтобы выполнить определенные действия в вашем приложении при возникновении события.
Чтобы написать обработчик событий элемента управления, выберите этот элемент управления на форме, перейдите в режим кода и дважды щелкните на элементе управления, чтобы создать обработчик событий по умолчанию для этого элемента управления. Вы также можете создавать обработчики событий вручную, используя конструкцию событие -> обработчик событий.
Например, следующий код обработчика событий нажатия кнопки изменяет текст внутри TextBox:
private void button1_Click(object sender, EventArgs e)
{
textBox1.Text = «Кнопка нажата.»;
}
Вывод
Добавление элементов управления на форму в Windows Forms с помощью C# не так уж сложно, как может показаться на первый взгляд. С использованием графического интерфейса Visual Studio вы можете быстро и легко создавать пользовательский интерфейс для своих приложений. Не забывайте также настраивать свойства элементов управления и обрабатывать события, чтобы ваше приложение выглядело и функционировало так, как вам нужно.
В этой статье рассмотрим процесс программного добавления визуального элемента управления (Control) на форму.
Подготовительная работа
Открываем программу Visual Studio и создаем новое консольное приложение.
Хотя проект и создается на основе консольного приложения, это лишь возможность избавиться от написанного студией большого объема готового кода, при использовании стандартных шаблонов проектов. Не смотря на это, работать наше приложение будет по принципу Windows Forms, для этого в наш проект понадобиться добавить две дополнительных сборки.
Перейдите в окно Solution Explorer и нажмите правую кнопку мыши на папке References, после чего выберите пункт Add Reference.

Откроется новое окно. Перейдите на вкладку .NET, найдите в списке сборку System.Windows.Forms, выделите её и нажмите ОК. Точно так же найдите и добавьте сборку System.Drawing.

Результат
Так же добавьте две ссылки
using System.Windows.Forms;
using System.Drawing;
System.Windows.Forms, содержит различные типы для создания Windows Forms приложений с графическим пользовательским интерфейсом.
System.Drawing предоставляет возможность работы с API GDI+, которое применяется для создания двухмерной графики.
Создание формы
Для размещения контрола требуется, какая-та основа, в качестве неё чаще всего выступает стандартная форма, на которую мы обычно переносим кнопки, списки и другие элементы управления из панели инструментов (ToolBox) при создании наших приложений.
Для создания формы потребуется создать новый класс по имени MyForm,(имя класса может быть любым)который наследуется от класса Form.
class Program
{
static void Main (string [] args)
{
}
}
class MyForm : Form
{
}
Затем внутри нового класса создадим новый метод InitializeComponent, в котором будут устанавливаться различные значения свойств нашей формы и размещенных на ней элементов управления.
private void InitializeComponent()
{
//Установка свойств формы:
//имя формы
this.Name = "myForm";
//заголовок формы
this.Text = "Новая форма";
//выводим форму по центру экрана
this.CenterToScreen();
}
Затем опишем конструктор нашего класса, в который поместим ранее описанный метод.
public MyForm() : base()
{
InitializeComponent();
}
И в конце переопределим метод Dispose.
protected override void Dispose(bool disposing)
{
base.Dispose(disposing);
}
Теперь выведем нашу форму на экран. Переходим в класс Program, где для начала добавим перед методом Main, атрибут по имени STAThreadAttribute.
[STAThread]
static void Main(string [] args)
{
}
Данный атрибут устанавливает потоковую модель COM в однопоточный режим, если не указать данный атрибут, то будет использоваться многопоточный режим [MTAThread]. Здесь есть простое правило, если Вы создаете Windows Forms приложение, то используйте атрибут [STAThread], чтобы избежать проблем при взаимодействии с COM компонентами.
Если вам потребуется получить или узнать текущий режим потоковой модели COM, то можно использовать следующий код:
System.Threading.Thread.CurrentThread.GetApartmentState().ToString();
Затем в теле метода Main поместим всего одну строчку кода
Application.Run(new MyForm());
В качестве параметра передается объект — наша созданная форма, так же можно использовать и следующую запись:
MyForm myForm = new MyForm();
и уже в качестве параметра передать не сам объект, а ссылку на него.
Application.Run(myForm);
Метод Run делает нашу форму видимой и запускает стандартный цикл обработки сообщений. Так же, в данный метод могут вноситься изменения, если, к примеру, у вас есть две или более формы, и нужно указать какая из них будет выводиться первой при запуске приложения, тогда в качестве параметра вы передаете имя нужной формы (главной формы).
Всё готово к первому запуску, нажимаем кнопку F5.
На экране должно появиться стандартное консольное окно, если его отодвинуть, то за ним будет находиться наша созданная форма.
Чтобы консольное окно не мешало, отключим его. Перейдём в окно Solution Explorer и нажмём правую кнопку мыши на имени текущего проекта, после чего выберем в списке пункт Properties.
Открываем вкладку Application, находим надпись Output type и выпадающем списке выбираем пункт Windows Application.
Закрываем окно свойств и снова нажимаем F5. Консольное окно больше не мешает и отображается только созданная нами форма.
Полный листинг создания формы
namespace Example
{
class Program
{
[STAThread]
static void Main(string[] args)
{
Application.Run(new MyForm());
}
}
class MyForm : Form
{
public MyForm() : base()
{
InitializeComponent();
}
private void InitializeComponent()
{
//имя формы
this.Name = "myForm";
//заголовок
this.Text = "Новая форма";
//форма по центру экрана
this.CenterToScreen();
}
protected override void Dispose(bool disposing)
{
base.Dispose(disposing);
}
}
}
Результат
Форма создана, теперь научимся добавлять на неё визуальные пользовательские элементы управления или, проще говоря, контролы. В качестве примера программно добавим на нашу форму сontrol ListBox.
Добавление контрола на форму
Чтобы добавить визуальный элемент управления на форму понадобиться выполнить 3 действия:
1. Создать поле типа ListBox;
private ListBox lstBox;
2. Настроить внешний вид элемента управления, например, задав ему высоту, ширину, имя, координаты места расположения на форме и так далее. Установка значений свойств контрола будет, выполняется в ранее созданном методе InitializeComponent.
void InitializeComponent()
{
//Установка свойств формы
//...
//Установка свойств контрола listBox:
lstBox = new ListBox();
//имя
lstBox.Name = "MyListBox";
//ширина
lstBox.Width = 100;
//высота
lstBox.Height = 100;
//координаты расположения контрола на форме
lstBox.Location = new Point(10, 20);
}
3. Добавление контрола в коллекцию управляющих элементов.
Чтобы увидеть созданный control на форме, его надо поместить в коллекцию элементов управления, которая представлена свойством Controls.
Для добавления нового элемента в коллекцию используйте метод Add.
this.Controls.Add(lstBox);
В данном случае ключевое слово this является необязательным.
Полный листинг
namespace Example
{
class Program
{
[STAThread]
static void Main(string[] args)
{
Application.Run(new MyForm());
}
}
class MyForm : Form
{
private ListBox lstBox;
public MyForm() : base()
{
InitializeComponent();
}
private void InitializeComponent()
{
//Установка свойств формы:
//...
//имя формы
this.Name = "myForm";
//заголовок
this.Text = "Новая форма";
//выводим форму по центру экрана
this.CenterToScreen();
 //Установка свойств контрола listBox
lstBox = new ListBox();
//имя
lstBox.Name = "MyListBox";
//ширина
lstBox.Width = 100;
//высота
lstBox.Height =  100;
//координаты расположения контрола на форме
lstBox.Location = new Point(10, 20);
//Добавление контрола в коллекцию!
Controls.Add(lstBox);
}
protected override void Dispose(bool disposing)
{
base.Dispose(disposing);
}
}
}
Нажимаем на клавиатуре кнопку F5, после чего на форме должен появляется визуальный элемент управления ListBox.
В следующей статье рассмотрим создание собственных контролов.
Читайте также:
- Чтение csv файла с выводом данных в GridView
- Visual studio Insert snippet
- Как найти html элемент по его классу?
So far we have seen how to work with C# to create console based applications. But in a real-life scenario team normally use Visual Studio and C# to create either Windows Forms or Web-based applications.
A windows form application is an application, which is designed to run on a computer. It will not run on web browser because then it becomes a web application.
This Tutorial will focus on how we can create Windows-based applications. We will also learn some basics on how to work with the various elements of C# Windows application.
Windows Forms Basics
A Windows forms application is one that runs on the desktop computer. A Windows forms application will normally have a collection of controls such as labels, textboxes, list boxes, etc.
Below is an example of a simple Windows form application C#. It shows a simple Login screen, which is accessible by the user. The user will enter the required credentials and then will click the Login button to proceed.

So an example of the controls available in the above application
- This is a collection of label controls which are normally used to describe adjacent controls. So in our case, we have 2 textboxes, and the labels are used to tell the user that one textbox is for entering the user name and the other for the password.
- The 2 textboxes are used to hold the username and password which will be entered by the user.
- Finally, we have the button control. The button control will normally have some code attached to perform a certain set of actions. So for example in the above case, we could have the button perform an action of validating the user name and password which is entered by the user.
C# Hello World
Now let’s look at an example of how we can implement a simple ‘hello world’ application in Visual Studio. For this, we would need to implement the below-mentioned steps
Step 1) The first step involves the creation of a new project in Visual Studio. After launching Visual Studio, you need to choose the menu option New->Project.

Step 2) The next step is to choose the project type as a Windows Forms application. Here we also need to mention the name and location of our project.

- In the project dialog box, we can see various options for creating different types of projects in Visual Studio. Click the Windows option on the left-hand side.
- When we click the Windows options in the previous step, we will be able to see an option for Windows Forms Application. Click this option.
- We will give a name for the application. In our case, it is DemoApplication. We will also provide a location to store our application.
- Finally, we click the ‘OK’ button to let Visual Studio create our project.
If the above steps are followed, you will get the below output in Visual Studio.
Output:-

You will see a Form Designer displayed in Visual Studio. It’s in this Form Designer that you will start building your Windows Forms application.

In the Solution Explorer, you will also be able to see the DemoApplication Solution. This solution will contain the below 2 project files
- A Form application called Forms1.cs. This file will contain all of the code for the Windows Form application.
- The Main program called Program.cs is default code file which is created when a new application is created in Visual Studio. This code will contain the startup code for the application as a whole.
On the left-hand side of Visual Studio, you will also see a ToolBox. The toolbox contains all the controls which can be added to a Windows Forms. Controls like a text box or a label are just some of the controls which can be added to a Windows Forms.
Below is a screenshot of how the Toolbox looks like.

Step 3) In this step, we will now add a label to the Form which will display “Hello World.” From the toolbox, you will need to choose the Label control and simply drag it onto the Form.

Once you drag the label to the form, you can see the label embedded on the form as shown below.

Step 4) The next step is to go to the properties of the control and Change the text to ‘Hello World’.
To go to the properties of a control, you need to right-click the control and choose the Properties menu option

- The properties panel also shows up in Visual Studio. So for the label control, in the properties control, go to the Text section and enter “Hello World”.
- Each Control has a set of properties which describe the control.

If you follow all of the above steps and run your program in Visual Studio, you will get the following output
Output:-

In the output, you can see that the Windows Form is displayed. You can also see ‘Hello World’ is displayed on the form.
Adding Controls to a form
We had already seen how to add a control to a form when we added the label control in the earlier section to display “Hello World.”
Let’s look at the other controls available for Windows forms and see some of their common properties.
In our Windows form application in C# examples, we will create one form which will have the following functionality.
- The ability for the user to enter name and address.
- An option to choose the city in which the user resides in
- The ability for the user to enter an option for the gender.
- An option to choose a course which the user wants to learn. There will make choices for both C# and ASP.Net
So let’s look at each control in detail and add them to build the form with the above-mentioned functionality.
Group Box
A group box is used for logical grouping controls into a section. Let’s take an example if you had a collection of controls for entering details such as name and address of a person. Ideally, these are details of a person, so you would want to have these details in a separate section on the Form. For this purpose, you can have a group box. Let’s see how we can implement this with an example shown below
Step 1) The first step is to drag the Groupbox control onto the Windows Form from the toolbox as shown below

Step 2) Once the groupbox has been added, go to the properties window by clicking on the groupbox control. In the properties window, go to the Text property and change it to “User Details”.

Once you make the above changes, you will see the following output
Output:-

In the output, you can clearly see that the Groupbox was added to the form. You can also see that the text of the groupbox was changed to “User Details.”
Label Control
Next comes the Label Control. The label control is used to display a text or a message to the user on the form. The label control is normally used along with other controls. Common examples are wherein a label is added along with the textbox control.
The label indicates to the user on what is expected to fill up in the textbox. Let’s see how we can implement this with an example shown below. We will add 2 labels, one which will be called ‘name’ and the other called ‘address.’ They will be used in conjunction with the textbox controls which will be added in the later section.
Step 1) The first step is to drag the label control on to the Windows Form from the toolbox as shown below. Make sure you drag the label control 2 times so that you can have one for the ‘name’ and the other for the ‘address’.

Step 2) Once the label has been added, go to the properties window by clicking on the label control. In the properties window, go to the Text property of each label control.

Once you make the above changes, you will see the following output
Output:-

You can see the label controls added to the form.
Textbox
A textbox is used for allowing a user to enter some text on the Windows application in C#. Let’s see how we can implement this with an example shown below. We will add 2 textboxes to the form, one for the Name and the other for the address to be entered for the user
Step 1) The first step is to drag the textbox control onto the Windows Form from the toolbox as shown below

Step 2) Once the text boxes have been added, go to the properties window by clicking on the textbox control. In the properties window, go to the Name property and add a meaningful name to each textbox. For example, name the textbox for the user as txtName and that for the address as txtAddress. A naming convention and standard should be made for controls because it becomes easier to add extra functionality to these controls, which we will see later on.

Once you make the above changes, you will see the following output
Output:-

In the output, you can clearly see that the Textboxes was added to the form.
List box
A Listbox is used to showcase a list of items on the Windows form. Let’s see how we can implement this with an example shown below. We will add a list box to the form to store some city locations.
Step 1) The first step is to drag the list box control onto the Windows Form from the toolbox as shown below

Step 2) Once the list box has been added, go to the properties window by clicking on the list box control.

- First, change the property of the Listbox box control, in our case, we have changed this to lstCity
- Click on the Items property. This will allow you to add different items which can show up in the list box. In our case, we have selected items “collection”.
- In the String Collection Editor, which pops up, enter the city names. In our case, we have entered “Mumbai”, “Bangalore” and “Hyderabad”.
- Finally, click on the ‘OK’ button.
Once you make the above changes, you will see the following output
Output:-

In the output, you can see that the Listbox was added to the form. You can also see that the list box has been populated with the city values.
RadioButton
A Radiobutton is used to showcase a list of items out of which the user can choose one. Let’s see how we can implement this with an example shown below. We will add a radio button for a male/female option.
Step 1) The first step is to drag the ‘radiobutton’ control onto the Windows Form from the toolbox as shown below.

Step 2) Once the Radiobutton has been added, go to the properties window by clicking on the Radiobutton control.

- First, you need to change the text property of both Radio controls. Go the properties windows and change the text to a male of one radiobutton and the text of the other to female.
- Similarly, change the name property of both Radio controls. Go the properties windows and change the name to ‘rdMale’ of one radiobutton and to ‘rdfemale’ for the other one.
One you make the above changes, you will see the following output
Output:-

You will see the Radio buttons added to the Windows form.
Checkbox
A checkbox is used to provide a list of options in which the user can choose multiple choices. Let’s see how we can implement this with an example shown below. We will add 2 checkboxes to our Windows forms. These checkboxes will provide an option to the user on whether they want to learn C# or ASP.Net.
Step 1) The first step is to drag the checkbox control onto the Windows Form from the toolbox as shown below

Step 2) Once the checkbox has been added, go to the properties window by clicking on the Checkbox control.

In the properties window,
- First, you need to change the text property of both checkbox controls. Go the properties windows and change the text to C# and ASP.Net.
- Similarly, change the name property of both Radio controls. Go the properties windows and change the name to chkC of one checkbox and to chkASP for the other one.
Once you make the above changes, you will see the following output
Output:-

Button
A button is used to allow the user to click on a button which would then start the processing of the form. Let’s see how we can implement this with an example shown below. We will add a simple button called ‘Submit’ which will be used to submit all the information on the form.
Step 1) The first step is to drag the button control onto the Windows Form from the toolbox as shown below

Step 2) Once the Button has been added, go to the properties window by clicking on the Button control.

- First, you need to change the text property of the button control. Go the properties windows and change the text to ‘submit’.
- Similarly, change the name property of the control. Go the properties windows and change the name to ‘btnSubmit’.
Once you make the above changes, you will see the following output
Output:-

Congrats, you now have your first basic Windows Form in place. Let’s now go to the next topic to see how we can do Event handling for Controls.
C# Event Handling for Controls
When working with windows form, you can add events to controls. An event is something that happens when an action is performed. Probably the most common action is the clicking of a button on a form. In C# Windows Forms, you can add code which can be used to perform certain actions when a button is pressed on the form.
Normally when a button is pressed on a form, it means that some processing should take place.
Let’s take a look at one of the event and how it can be handled before we go to the button event scenario.
The below example will showcase an event for the Listbox control. So whenever an item is selected in the listbox control, a message box should pop up which shows the item selected. Let’s perform the following steps to achieve this.
Step 1) Double click on the Listbox in the form designer. By doing this, Visual Studio will automatically open up the code file for the form. And it will automatically add an event method to the code. This event method will be triggered, whenever any item in the listbox is selected.

Above is the snippet of code which is automatically added by Visual Studio, when you double-click the List box control on the form. Now let’s add the below section of code to this snippet of code, to add the required functionality to the listbox event.

- This is the event handler method which is automatically created by Visual Studio when you double-click the List box control. You don’t need to worry about the complexity of the method name or the parameters passed to the method.
- Here we are getting the SelectedItem through the lstCity.SelectedItem property. Remember that lstCity is the name of our Listbox control. We then use the GetItemText method to get the actual value of the selected item. We then assign this value to the text variable.
- Finally, we use the MessageBox method to display the text variable value to the user.
One you make the above changes, and run the program in Visual Studio you will see the following output
Output:-

From the output, you can see that when any item from the list box is selected, a message box will pops up. This will show the selected item from the listbox.
Now let’s look at the final control which is the button click Method. Again this follows the same philosophy. Just double click the button in the Forms Designer and it will automatically add the method for the button event handler. Then you just need to add the below code.

- This is the event handler method which is automatically created by Visual Studio when you double click the button control. You don’t need to worry on the complexity of the method name or the parameters passed to the method.
- Here we are getting values entered in the name and address textbox. The values can be taken from the text property of the textbox. We then assign the values to 2 variables, name, and address accordingly.
- Finally, we use the MessageBox method to display the name and address values to the user.
One you make the above changes, and run the program in Visual Studio you will see the following output
Output:-

- First, enter a value in the name and address field.
- Then click on the Submit button
Once you click the Submit button, a message box will pop, and it will correctly show you what you entered in the user details section.
Tree and PictureBox Control
There are 2 further controls we can look at, one is the ‘Tree Control’ and the other is the ‘Image control’. Let’s look at examples of how we can implement these controls
Tree Control
– The tree control is used to list down items in a tree like fashion. Probably the best example is when we see the Windows Explorer itself. The folder structure in Windows Explorer is like a tree-like structure.
Let’s see how we can implement this with an example shown below.
Step 1) The first step is to drag the Tree control onto the Windows Form from the toolbox as shown below

Step 2) The next step is to start adding nodes to the tree collection so that it can come up in the tree accordingly. First, let’s follow the below sub-steps to add a root node to the tree collection.

- Go to the properties toolbox for the tree view control. Click on the Node’s property. This will bring up the TreeNode Editor
- In the TreeNode Editor click on the Add Root button to add a root node to the tree collection.
- Next, change the text of the Root node and provide the text as Root and click ‘OK’ button. This will add Root node.
Step 3) The next step is to start adding the child nodes to the tree collection. Let’s follow the below sub-steps to add child root node to the tree collection.

- First, click on the Add child button. This will allow you to add child nodes to the Tree collection.
- For each child node, change the text property. Keep on repeating the previous step and this step and add 2 additional nodes. In the end, you will have 3 nodes as shown above, with the text as Label, Button, and Checkbox respectively.
- Click on the OK button
Once you have made the above changes, you will see the following output.
Output:-
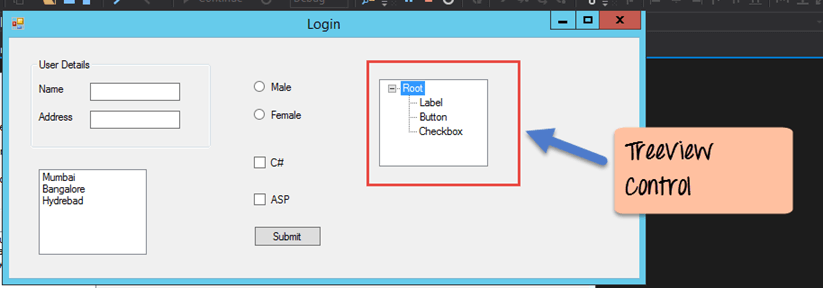
You will be able to see the Tree view added to the form. When you run the Windows form application, you can expand the root node and see the child nodes in the list.
PictureBox Control
This control is used to add images to the Winforms C#. Let’s see how we can implement this with an example shown below.
Step 1) The first step is to drag the PictureBox control onto the C# Windows Form from the toolbox as shown below

Step 2) The next step is to actually attach an image to the picture box control. This can be done by following the below steps.

- First, click on the Image property for the PictureBox control. A new window will pops out.
- In this window, click on the Import button. This will be used to attach an image to the picturebox control.
- A dialog box will pop up in which you will be able to choose the image to attach the picturebox
- Click on the OK button
One you make the above changes, you will see the following output
Output:-

From the output, you can see that an image is displayed on the form.
Summary
- A Windows form in C# application is one that runs on the desktop of a computer. Visual Studio Form along with C# can be used to create a Windows Forms application.
- Controls can be added to the Windows forms C# via the Toolbox in Visual Studio. Controls such as labels, checkboxes, radio buttons, etc. can be added to the form via the toolbox.
- One can also use advanced controls like the tree view control and the PictureBox control.
- Event handlers are used to respond to events generated from controls. The most common one is the one added for the button clicked event.
I have an existing library (not a Winforms application) that supplies some Winforms to a bona-fide Windows application. Within this library, I would like to create a User Control to group some controls together. To accomplish this, I right-clicked, Add, User Control and dragged some controls onto the new User Control.
So far, so good. The User Control even has the requisite User Control icon. But dragging the new User Control from the Solution Explorer to a new blank Winform does not work (I get a circle with a line through it), and dragging it over to the Toolbox doesn’t work either (even though I get a + sign when I drag it over the Toolbox).
Is there some sort of XML magic or something else I’m missing to make this work?
Note: I had some problems with Visual Studio 2008 that I managed to fix by following the workarounds that can be found here. I am now able to get User Controls I added to my existing project into the toolbox by simply rebuilding the project.