This article is intended for beginners and will demonstrate how to create a Windows Forms / WinForms project using Visual Studio 2019 Community Edition, which is a free version of Visual Studio. The WinForms application created by Visual Studio will contain only a main form with no controls. Then in the future article, we will make this application a bit more interesting and useful.
Before we start creating a Visual Studio project, we need to make sure that the Visual Studio we have installed in our system is able to create WinForms projects.
What about creating a WinForms Project using Visual Studio Code?
I’m a big fan of Visual Studio Code and I did wonder if it’s possible to create WinForms project with it. Visual Studio 2019 added the Windows Forms support to the .NET Core 3.0 Framework, so maybe it will be possible in the future, but at the moment, the answer is No as there is no VS Code extension available and there is no support for the WinForms designer.
Making sure the .NET desktop development workload is installed for Visual Studio
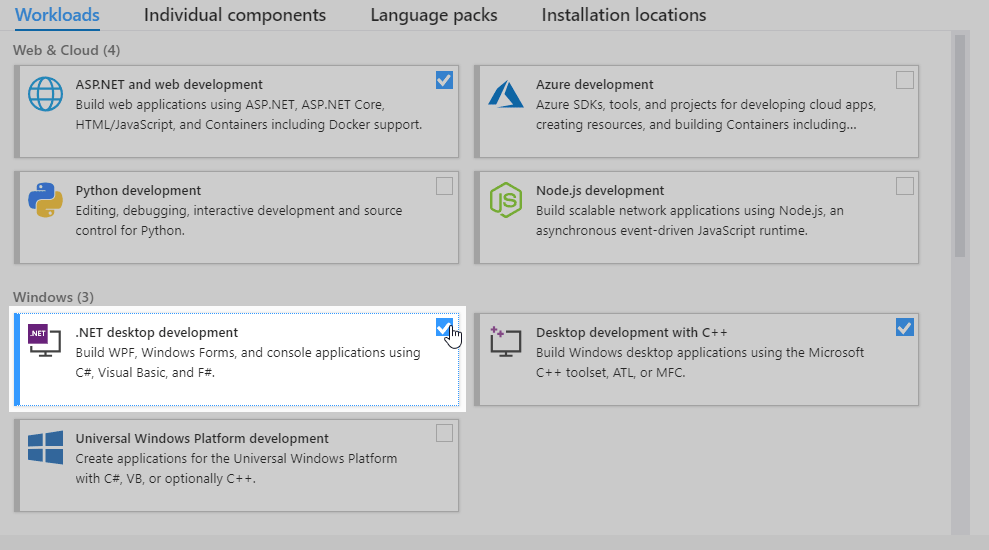
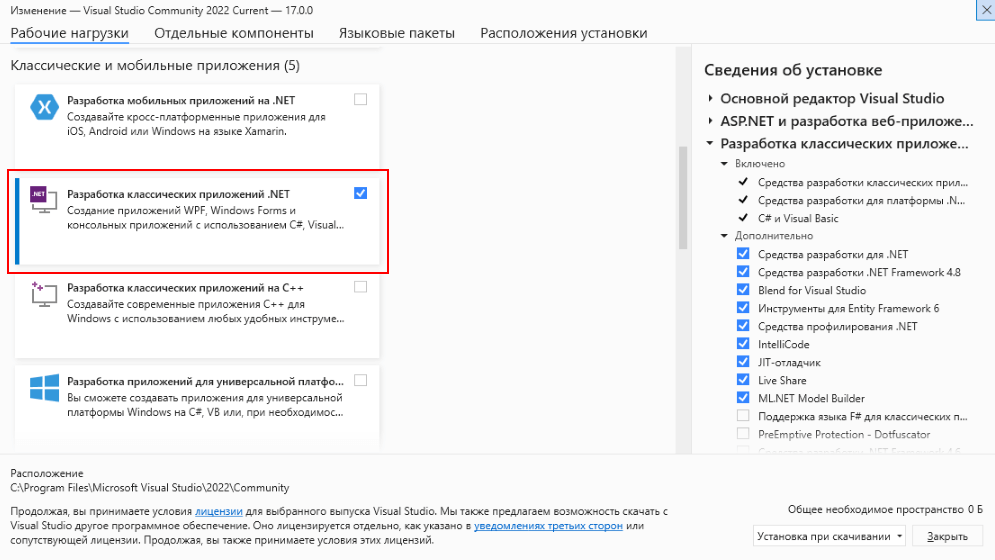
It is assumed you have installed the Visual Studio Community 2019 in your system and that you have selected the «.NET desktop development» workload during the installation.
If you need to install Visual Studio Community Edition, make sure that during the installation, you select the .NET desktop development workload as we are going to create a WinForms project using the standard .NET Framework.
Note: Starting by Visual Studio 2019, the WinForms support was added to the .NET Core 3.0, so if you have ASP.NET and Web development workload installed, you can make the Windows Forms projects using .NET Core framework. Be aware that there are some breaking changes from the classic WinForms .NET Framework.
Click image to enlarge
Modifying the existing Visual Studio installation
If you already have Visual Studio installed, but you are unsure if a desktop application workload is installed or not, go to the next step to create a new project in VS. If you will see WinForms templates available, you are good to go.
If WinForms templates are missing, no problem, you should be able to easily add them by modifying the Visual Studio installation using these steps:
- Go to Settings > Apps (in Windows 7, go to Control Panel > Programs & Features).
- From the list of apps, find the Visual Studio Community app.
- Click the Modify button.
- After clicking on Modify, the installation window should appear as shown on the image shown earlier. You need to add a checkbox for the «.NET desktop development» workload. Note that this workload might take up to 5GB of HDD space, depending on what is missing.
Now, let’s create a WinForms project in VS.
Creating a WinForms Project in the Visual Studio
The steps to create a new WinForms project are as follows:
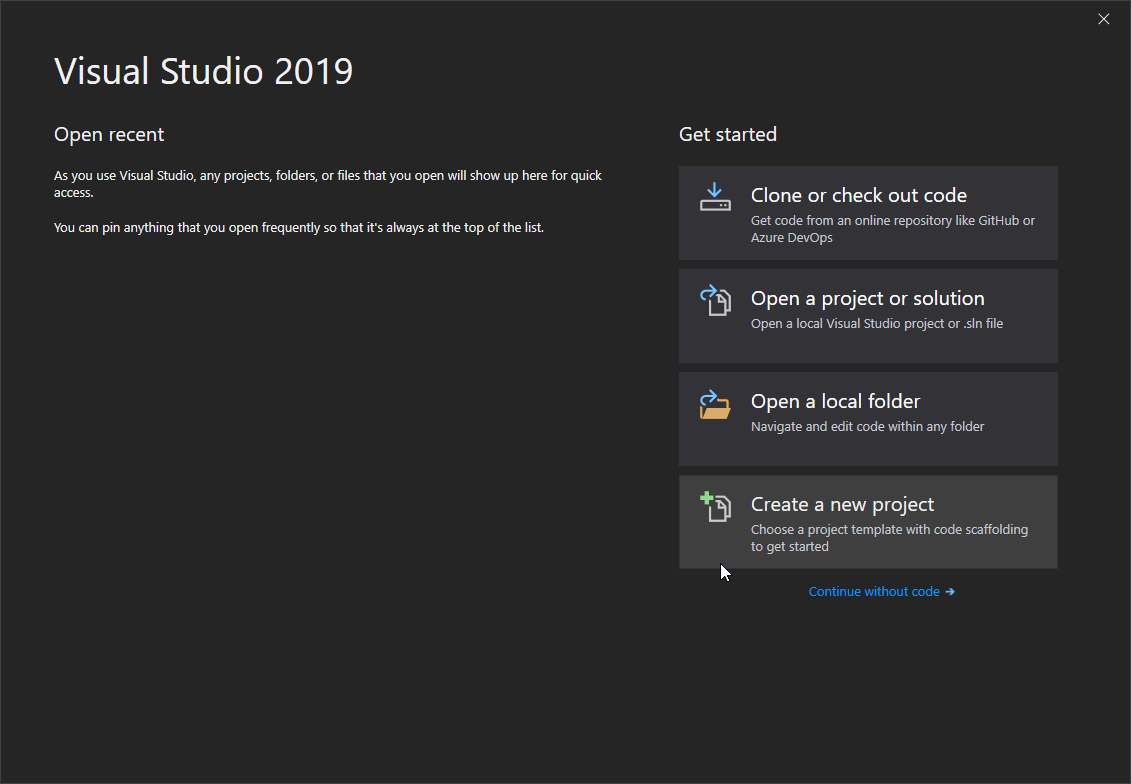
- Start the Visual Studio. After a while, the following window should show up:
Click image to enlarge
On the left side, you will have a list of the recently used project’s and on the right side, you will have several buttons to get started. Click on the «Create new project«.
-
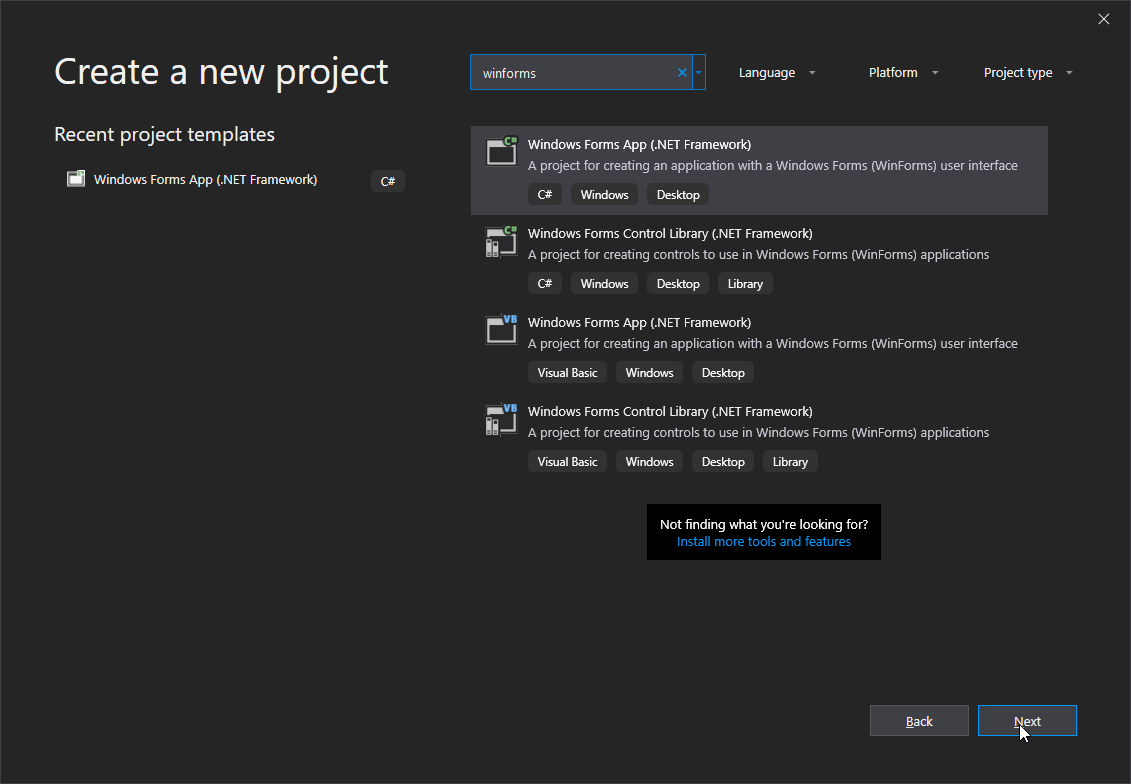
This brings us to the window shown below, where we choose the template we want to use for our new project. On the left side we will have a list of the recently used templates and on the right side, we will have a list of all available templates.
We want to create a WinForms project, so inside the search field, type «winforms«. Now, only the WinForms related templates should be listed:
Click image to enlarge
Select the «Windows Forms App (.NET Framework)» template. You might see two of them, one for C# and one for Visual Basic. We will use C#, so select that one and click «Next«.
Note: If you want to check out all the templates in your Visual Studio that are available for the the desktop projects, select «Desktop» under the «Project type» drop-down menu.
What if WinForms template is missing in Visual Studio?
if you are unable to find the WinForms template, it usually means that during the Visual Studio installation, the .NET desktop development workload was not selected. Not to worry though, we can easily add additional packages by modifying the existing installation. Just follow the steps in the first section of this article.
-
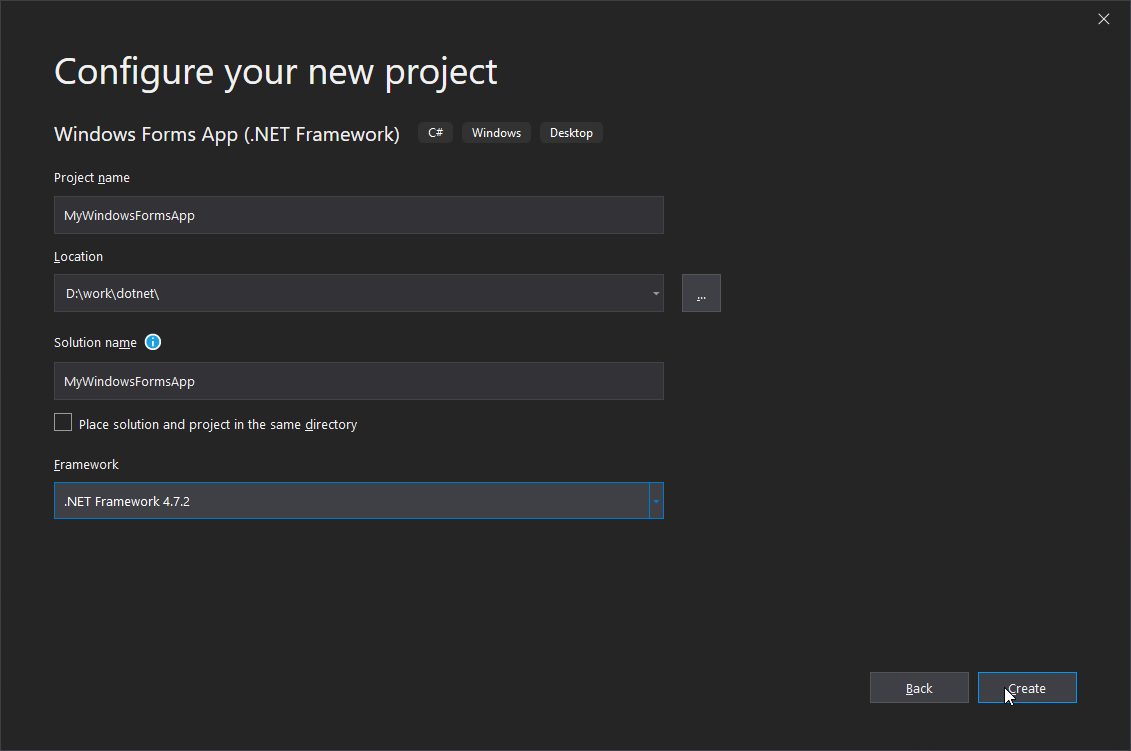
Now that we selected the WinForms template, the «Configure your new project» window will appear:
Click image to enlarge
Here, we can choose our Project name and Location of the project. I’ll name it «MyWindowsFormsApp«. Notice that your solution name will also be set to the same name. We can change the solution name to something different, but solutions are used to group different projects together and, in our case, we only have one, so we can leave it as it is.
Leave the .NET Framework as it is and click on «Create» button.
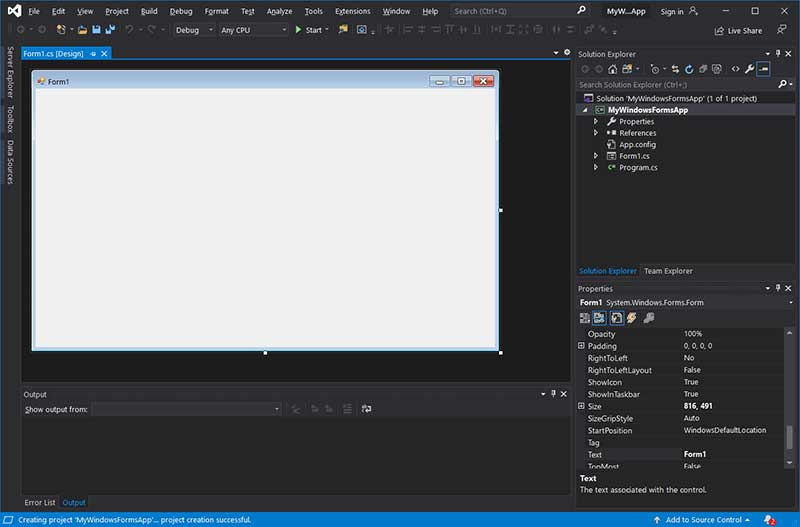
After some processing, the Visual Studio should create a new Windows Forms project and it should look something like this:
Click image to enlarge
Now, let’s quickly explore the opened project in VS.
Exploring the created WinForms project in Visual Studio
As you can see from the image above, we have an open tab named Form1.cs [Design] containing the main form of the project. The [Design] in the name tells us the Form1.cs is opened in «Designer mode», so we can drag & drop other controls to the Form and setting properties to those controls or the form itself.
The WinForms project created by Visual Studio auto-generates enough code for us to start the desktop application. We build and run the project in different ways:
- By clicking on the green «Start» button located in the Visual Studio Toolbar section.
- By pressing F5.
- From the menu by going to Debug > Start Debugging.
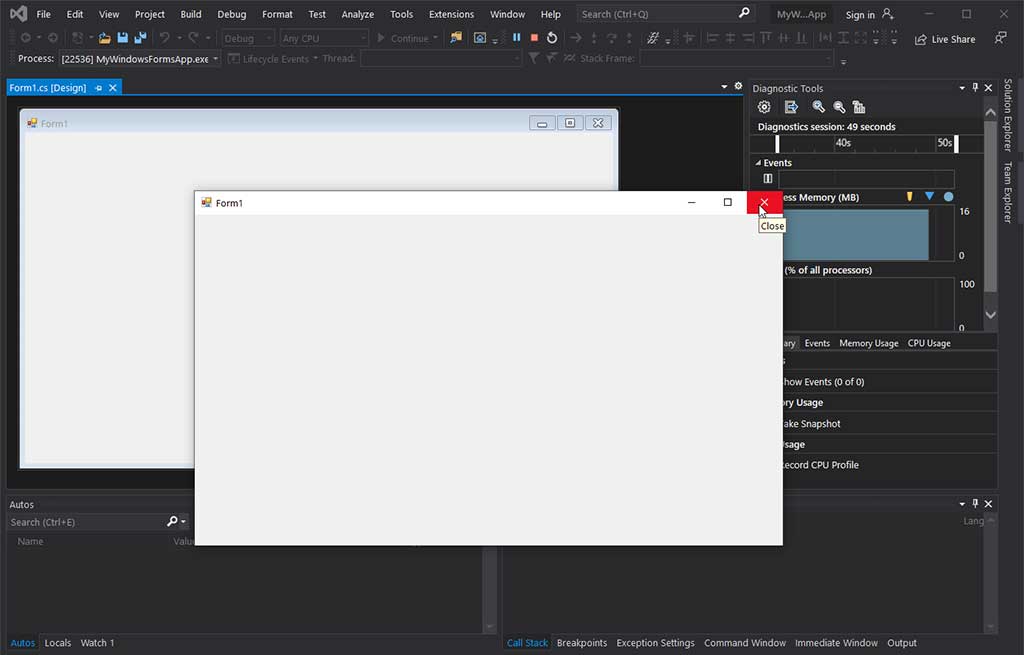
The running project will consist of our main form as shown below.
Click image to enlarge
By clicking on the red X close button on the top right corner of the Form1 windows, the application will close.
In the future article we will learn how to add additional WinForms controls into the main form and make the desktop application a bit more functional by adding a button to it that will display a pop-up window when clicked.
Conclusion
In this article we learned how to create WinForms project using Visual Studio and what to do when the WinForms templates are missing in Visual Studio. After the WinForms template was chosen, we configured a project by giving it a name and the location of the project. Finally, with the Windows Forms project in VS successfully created, we learned how to build and run it in three different ways.
Search code, repositories, users, issues, pull requests…
Provide feedback
Saved searches
Use saved searches to filter your results more quickly
Sign up
Последнее обновление: 11.11.2022
Для создания графических приложений на C# можно использовать .NET CLI, но также можно
использовать бесплатную и полнофункциональную среду разработки — Visual Studio Community 2022, которая в ряде случаев облегчает проектирование
приложения. Так, загрузим установщик Visual Studio по адресу:
https://www.visualstudio.com/en-us/downloads.
Чтобы добавить в Visual Studio поддержку проектов для Windows Forms и C# и .NET 7, в программе установки среди рабочих нагрузок нужно
выбрать только пункт Разработка классических приложений .NET. Можно выбрать и больше опций или вообще все опции, однако стоит
учитывать свободный размер на жестком диске — чем больше опций будет выбрано, соответственно тем больше места на диске будет занято.
После установки среды и всех ее компонентов, запустим Visual Studio и создадим проект графического приложения.
На стартовом экране выберем Create a new project (Создать новый проект)
На следующем окне в качестве типа проекта выберем Windows Forms App:
Стоит отметить, что среди шаблонов можно увидеть еще тип Windows Forms App (.NET Framework) — его НЕ надо выбирать, необходим именно тип
Windows Forms App.
Далее на следующем этапе нам будет предложено указать имя проекта и каталог, где будет располагаться проект.
В поле Project Name дадим проекту какое-либо название. В моем случае это HelloApp.
На следующем окне Visual Studio предложит нам выбрать версию .NET, которая будет использоваться для проекта. Выберем последнюю на данный момент версию — .NET 7.0 и нажмен на кнопку Create (Создать) для создания проекта.
После этого Visual Studio откроет наш проект с созданными по умолчанию файлами:
Справа находится окно Solution Explorer, в котором можно увидеть структуру нашего проекта. Практически этот тот же проект, который создается с
помощью .NET CLI:
-
Dependencies — это узел содержит сборки dll, которые добавлены в проект по умолчанию.
Эти сборки как раз содержат классы библиотеки .NET, которые будет использовать C# -
Form1.Designer.cs: он содержит определение компонентов формы, добавленных
на форму в графическом дизайнере -
Далее идет файл единственной в проекте формы — Form1.cs, который по умолчанию открыт в центральном окне.
-
Program.cs определяет точку входа в приложение
Запуск приложения
Чтобы запустить приложение в режиме отладки, нажмем на клавишу F5 или на зеленую стрелочку на панели Visual Studio.
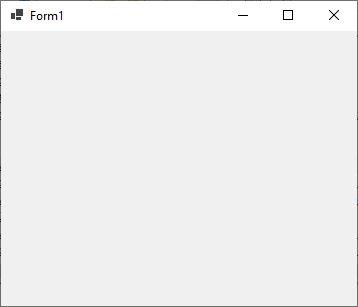
После этого запустится пустая форма Form1 по умолчанию.
После запуска приложения студия компилирует его в файл с расширением exe. Найти данный файл можно, зайдя в папку проекта и далее в каталог
\bin\Debug\net7.0-windows
Рассмотрев вкратце создание проекта графического приложения, мы можем перейти к обзору основных компонентов и начнем мы с форм.
Скорее всего вы не включили C++/CLI во время установки Visual Studio 2017
1. При создании проекта жмем «Открыть установщик Visual Studio»
2. В установщике под Visual Studio 2017 Community жмем кнопку Modify
3. В открывшемся окне выбираем вкладку «Individual Components» (Индивидуальные компоненты)
4. Мотаем в низ пока не увидим «Поддержка C++/CLI», затем слева ставим галочку
5. После в правом-нижнем углу жмем кнопку Modify, готово!
P.S. Если у вас установщик на русском, то названия могут отличаться.
Get to grips with Microsoft Visual Studio and develop your own apps with Windows Forms with almost no coding required.
Windows Forms is a framework available in Visual Studio that allows you to build desktop applications with the assistance of a graphical user interface. This allows you to click and drag widgets such as buttons or labels directly onto a canvas, and manipulate the properties of each widget such as its font-size, color or border.
In this article, a simple Celsius to Fahrenheit Converter will be used as an example to go through the basics of how to set up a Windows Form Application. Visual Studio 2019 Community Edition is the edition used for this tutorial.
How to Create the Windows Forms Project in Visual Studio
First, create the project in Visual Studio.
- Open Visual Studio and select Create a New Project.
- Visual Studio will provide you with a list of project templates you can choose from.
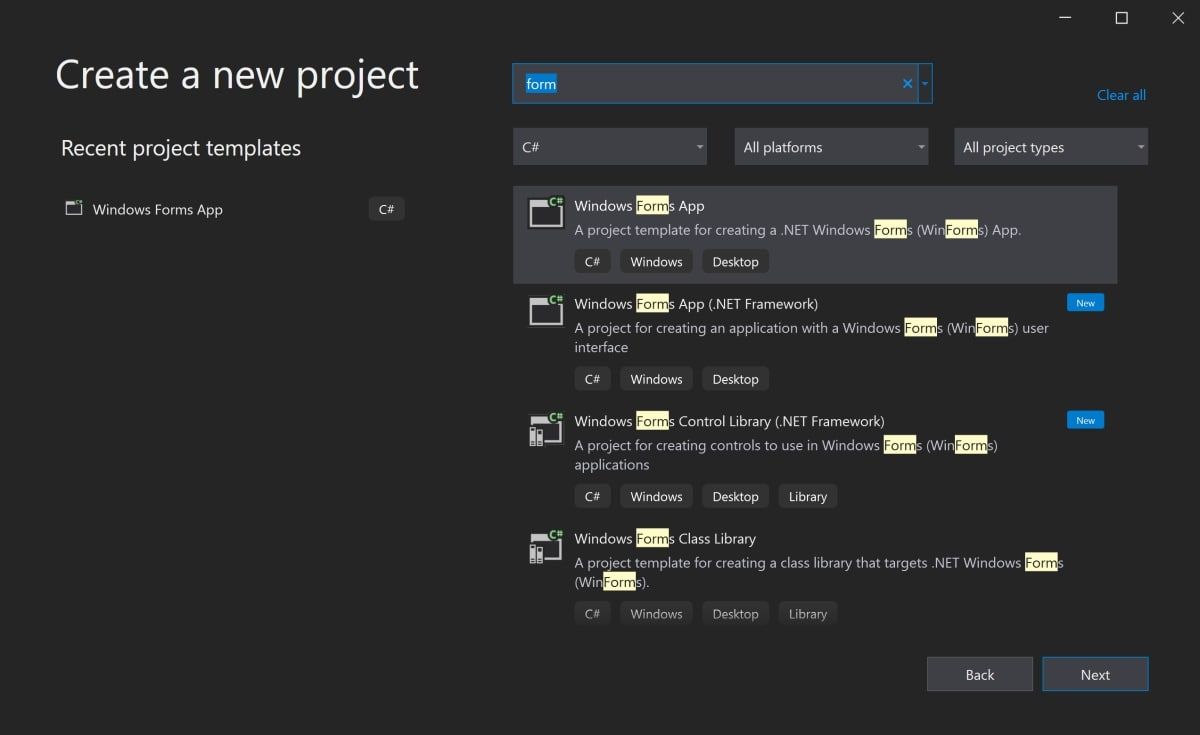
- To create a Windows Forms Application, search for Windows Form App and select it from the list of templates. Once this is selected, click on Next.
If the Windows Form App option is not available on the list, modify your installed version of Visual Studio. In Visual Studio Installer, add the .NET desktop development workload for Desktop and Mobile, and re-launch Visual Studio.
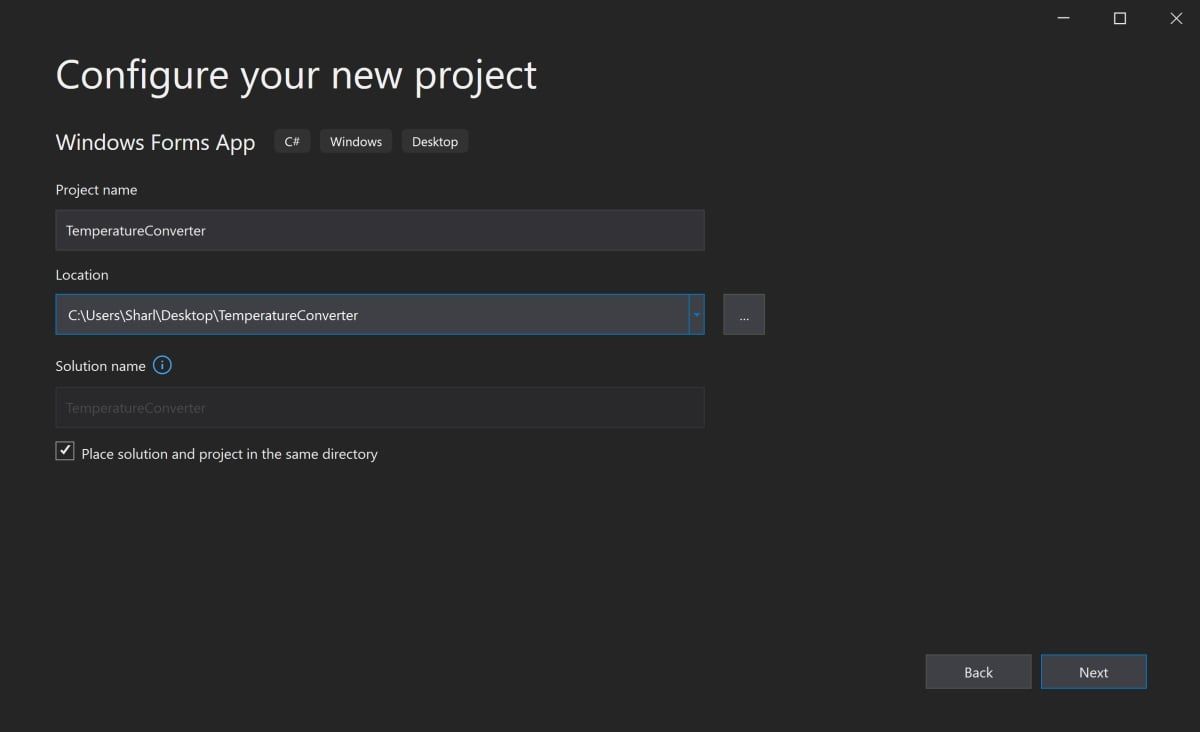
- Add a name and location for the project, and click on Next. The location is the directory where the code files will be stored.
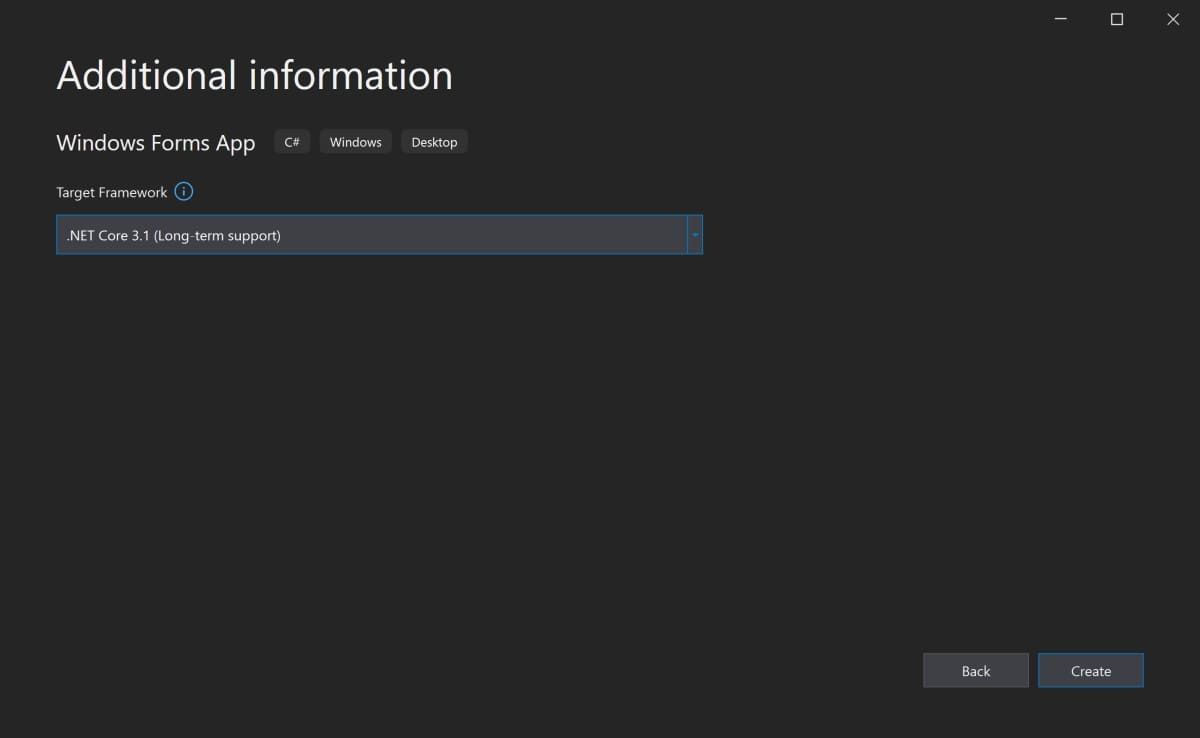
- On the next screen, keep the default selection of .NET Core 3.1.
- Click Create.
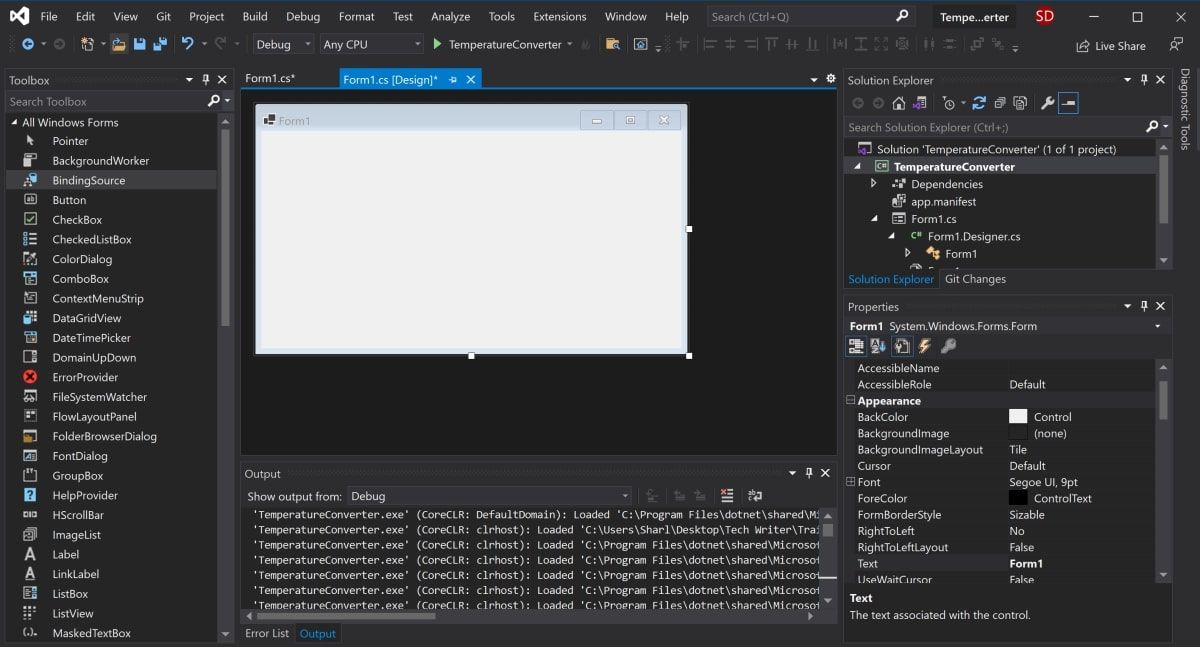
- Once Visual Studio has finished creating the project, the project will open.
How to Add Elements to the Project Canvas
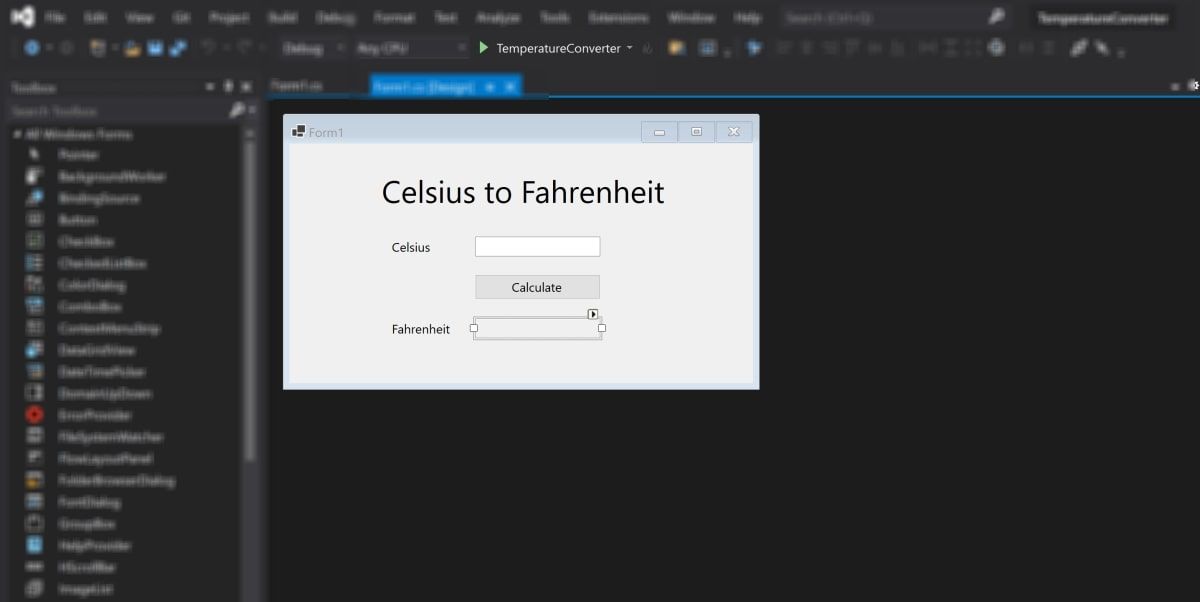
The canvas is the white area located at the top-left of the screen. Click and drag the points on the bottom, right, or bottom-right of the canvas to resize it if needed.
To create the UI of the application, add widgets such as buttons or text boxes onto the canvas.
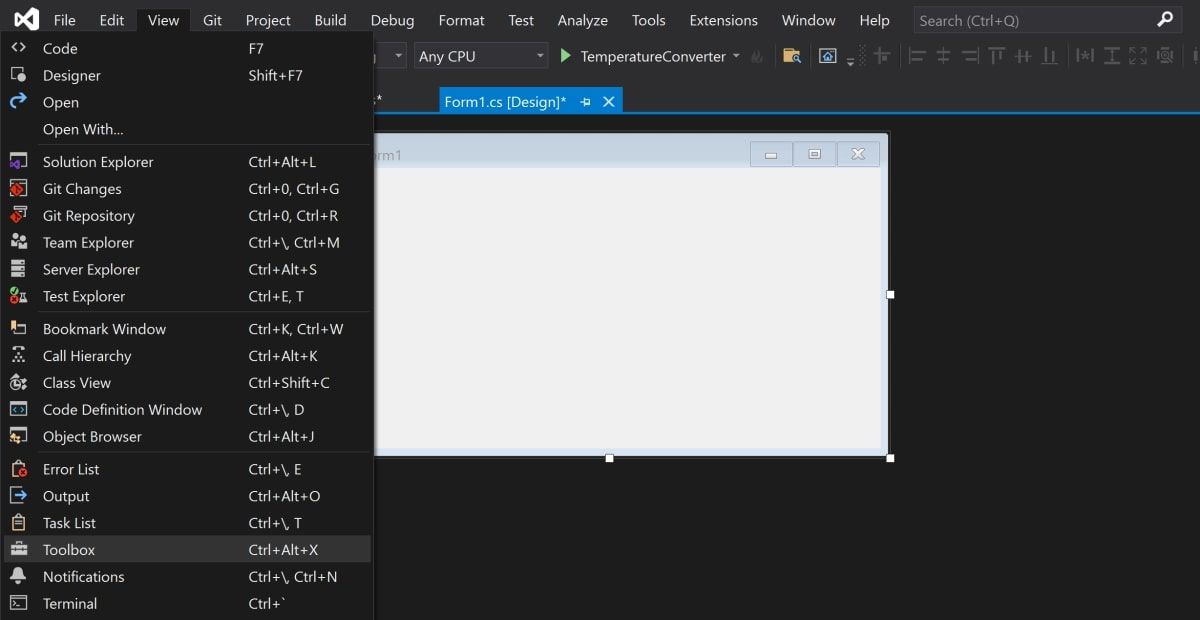
- Open the View Tab at the top of the window, and select Toolbox.
- This will add a toolbox to the left side of the application. Select the pin icon in the top-right of the toolbox to pin it there permanently.
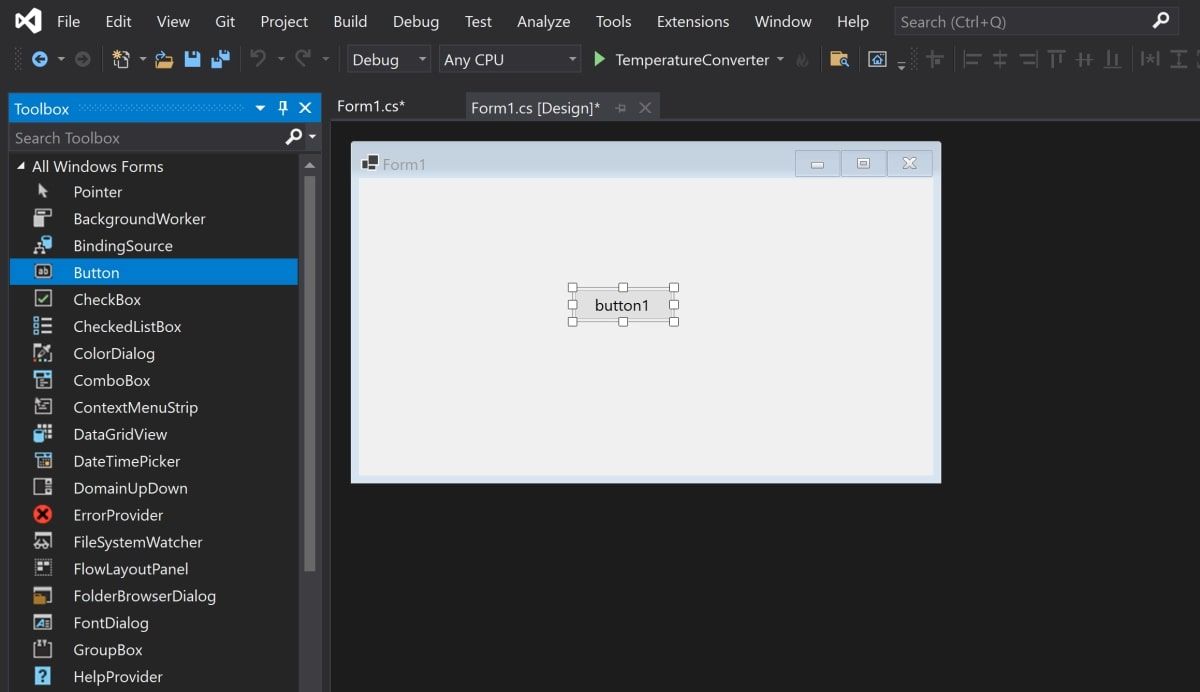
- This is where you can drag any widget from the toolbox onto the canvas. Highlight a button from the toolbox, and drag it onto the canvas.
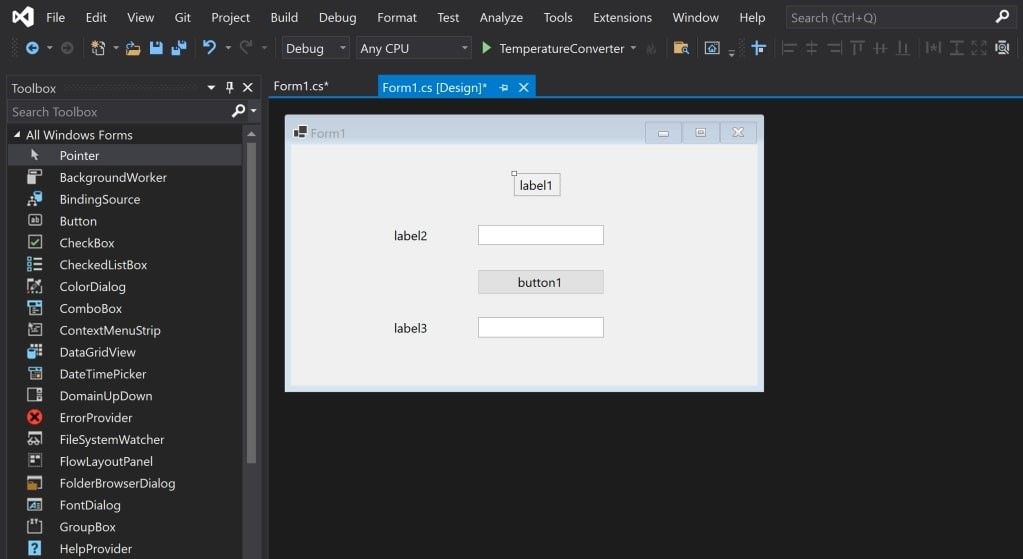
- Drag two more text boxes onto the canvas, along with three labels (two labels for each text box, and one label for the title at the top of the application).
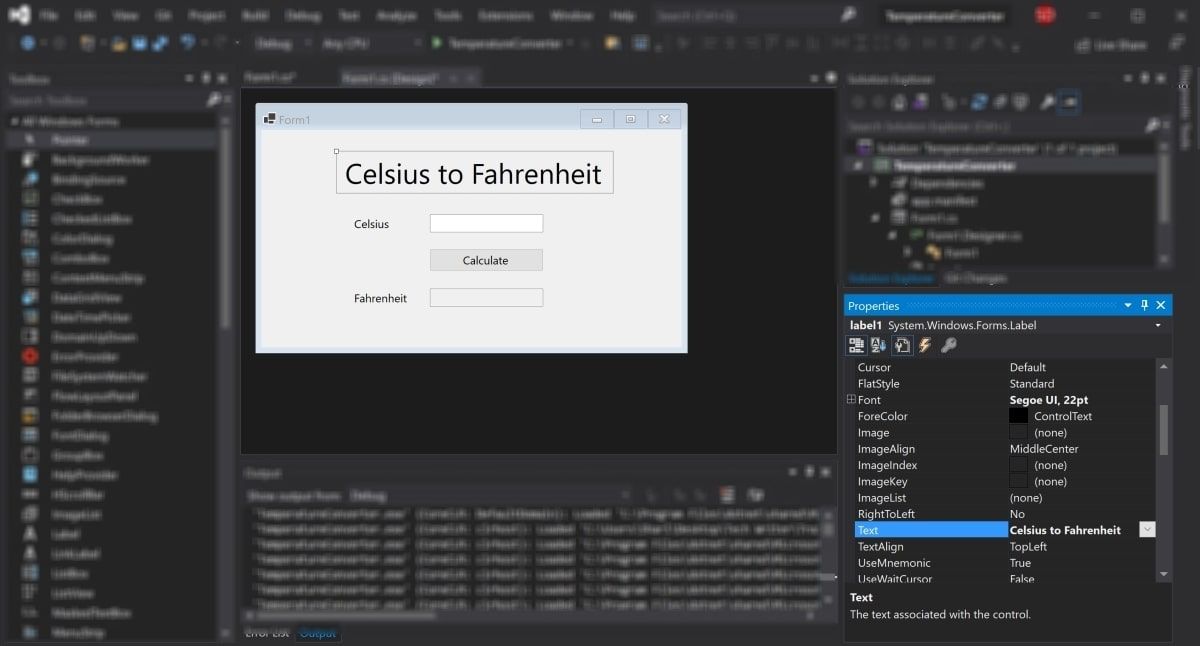
- Every widget on the canvas has properties associated with them. Highlight a widget to display the Properties window in the bottom-right of Visual Studio, which lists all the properties that widget has. These properties can include the text, name, font size, border, or alignment of the highlighted widget.
- At the moment, the text on these widgets still say label1, label2, or button1. Select the label1 widget and edit the Text property in the properties window to say «Celsius to Fahrenheit». Change the font size to be 22pt.
- Similarly, edit the properties of the other widgets on the canvas to be the following:
Widget
Property
New Value
label2
Text
Celsius
label3
Text
Fahrenheit
button
Text
Calculate
Fahrenheit text box
ReadOnly
True
How to Handle Events and Write Code in the Code-Behind
Widgets on the canvas can be tied to events. Events can include things like clicking on a button, changing the text inside a text box, or selecting a particular radio button. When these events happen, it can cause a section of code in the Code-Behind to trigger.
C# is the language used when creating Windows Forms. If you haven’t already used C#, there are many practical reasons to learn C# programming.
For this particular application, add an event to the Calculate button, to trigger a section of code to run when this button is pressed.
- Double-click the Calculate button to automatically open Form1.cs with a new Event method:
private void calculateButton_Click(object sender, EventArgs e) - This is where you will add the code that will perform the Celsius to Fahrenheit calculation, and display the result in the Fahrenheit text box. To do this, you need to be able to read the value from the Celsius text box, and modify the Fahrenheit text box to display the result.
- Go back to the canvas, and re-edit the properties as shown before. This time, edit the Name property for both the Celsius and Fahrenheit text boxes. These names can be used to reference the text boxes in the code.
Widget
Property
New Value
Celsius Text Box
Name
celsiusTextBox
Fahrenheit Text Box
Name
fahrenheitTextBox
- Go back to the calculateButton_Click function in Form1.cs.
- Now, the Celsius text box can be referred to in the code using the name «celsiusTextBox». The Celsius value the user entered is stored in its Text property. However, since it’s a string, parse this into a double in order to include it in the future Fahrenheit calculations.
 private void calculateButton_Click(object sender, EventArgs e)
{
    // Get the value that the user entered in the Celsius Text Box
   double celsiusValue = Double.Parse(celsiusTextBox.Text);
} - The celsiusValue variable now stores the value that the user entered in the Celsius Text Box. The formula for converting Celsius to Fahrenheit is (celsiusValue * 9 / 5) + 32. Therefore, the result can now be calculated and stored in the Fahrenheit Text Box.
private void calculateButton_Click(object sender, EventArgs e)
{
// Get the value that the user entered in the Celsius Text Box
double celsiusValue = Double.Parse(celsiusTextBox.Text);// Apply the calculation
double result = (celsiusValue * 9 / 5) + 32;// Store the result in the Fahrenheit Textbox
fahrenheitTextBox.Text = result.ToString();
}
How to Run and Debug the Windows Forms Program
Running the Windows Forms Program in Visual Studio
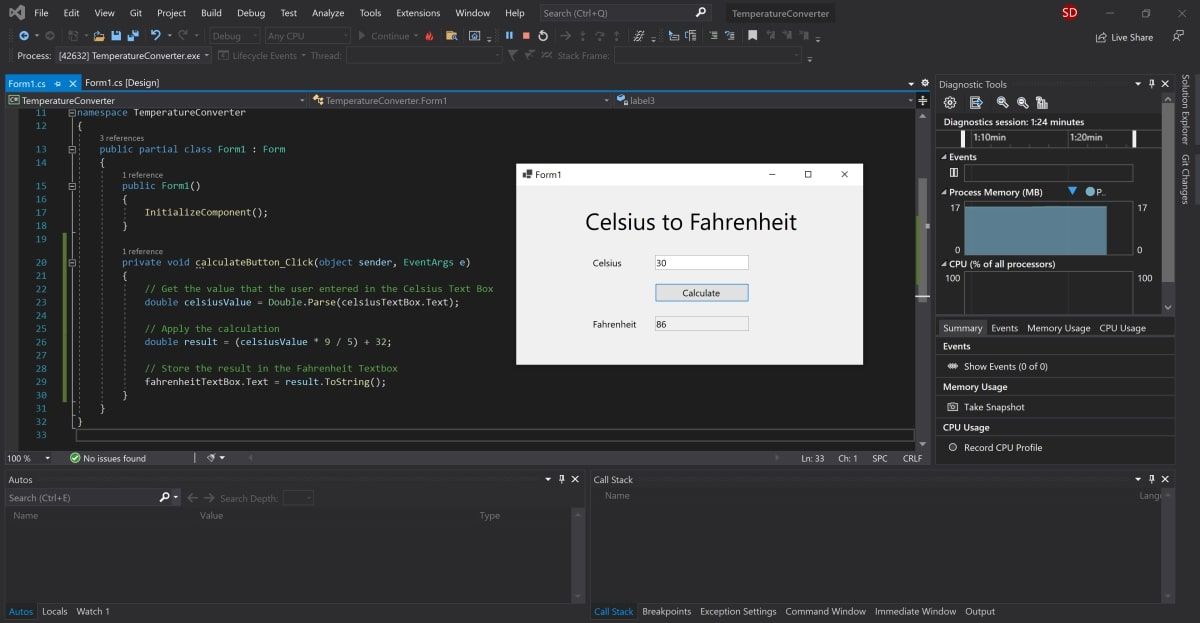
Now that the UI and code logic is set up, run the program to see it working.
- To run the program, select the green arrow at the top of the toolbar in Visual Studio.
- Once the project has loaded, add a value into the Celsius text box and press the Calculate button. This will add the result into the Fahrenheit text box.
- If the program is blurry at runtime, it is likely your application is not DPI aware. This can cause scaling and resolution issues, so this will need to be enabled. You can also read more about configuring display scaling on Windows 10 for High-DPI monitors.
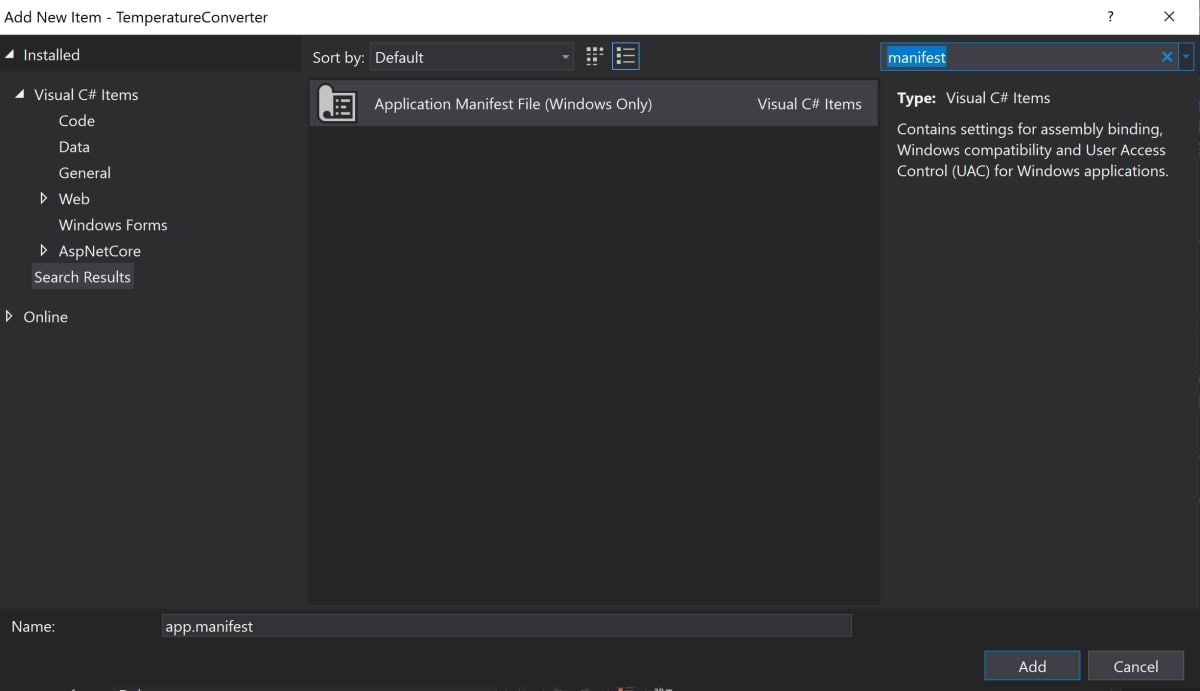
- Right-click on the TemperatureConverter Project in the Solutions Explorer. Select Add, then select New Item.
- Search for the Application Manifest File, and click Add.
- Copy the following code into the new app.manifest file, as a child of the assembly tag (if the code is already generated, just un-comment it).
 <application xmlns="urn:schemas-microsoft-com:asm.v3">
 <windowsSettings>
   <dpiAware xmlns="http://schemas.microsoft.com/SMI/2005/WindowsSettings">true</dpiAware>
   <longPathAware xmlns="http://schemas.microsoft.com/SMI/2016/WindowsSettings">true</longPathAware>
 </windowsSettings>
</application> - For this change to take effect, re-run the program. Select the red stop button at the top of the toolbar, then select the green play button again.
Debugging the Windows Forms Program
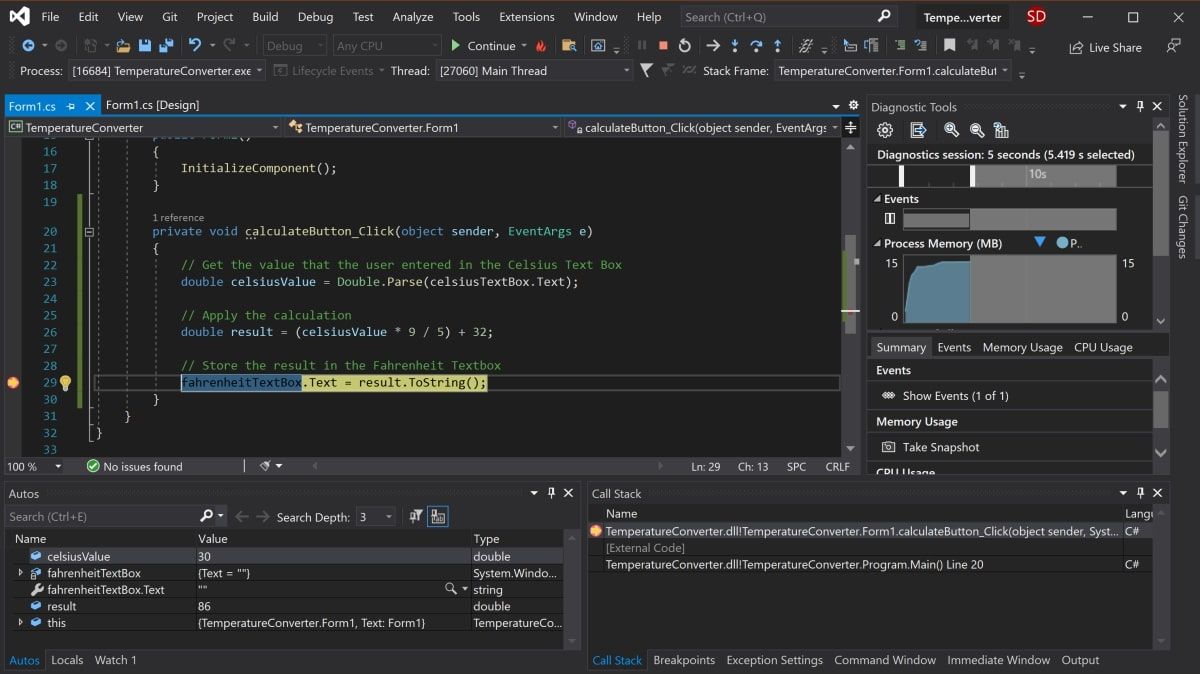
You may want to debug the program if the logic of your Windows Forms application is not working as expected.
- Navigate back to the calculateButton_Click function in Form1.cs and click anywhere on the gray bar in the far-left of the screen. This will add a breakpoint, which is indicated by a red circle.
- Press the «Calculate» button again to trigger this method to execute. The program will pause when it hits the breakpoint to show all the values stored in the variables at that point.
- To continue the program, click the green Continue arrow at the top of the toolbar.
Running the Program Using an Executable File
If you don’t want to run your program through Visual Studio, use the standalone executable file for the program. This is automatically generated.
- Navigate to the executable file, which can be found here:
<your-project-folder>/bin/Debug/netcoreapp3.1/TemperatureConverter.exe - Click on the executable file to directly run the program.
Adding More to Your Windows Form
Hopefully you now have a basic understanding of the basic structure of a Windows Form Application. You can continue exploring additional Windows Forms features by experimenting with new widgets, and taking a deeper dive into the other various events that can be handled.
Once you are more familiar with Windows Forms, you can start creating more complex applications. You can also explore many of the other ways you can create applications on Windows desktop.
