C# Windows Forms Application
In this tutorial will learn how to create windows-based application in visual studio 2012 with c# language.
We will learn step by step about C# windows Forms application.
We use vs2012 for creating windows application project. In our previous post we have already learnt about creating web application using visual studio 2010. In .net we can develop windows form application using c# or vb or c++ language same as we can develop Website application using c#, vb, c++.
Lets start with visual studio 2012 to create new windows application project.
For Create Windows Form application
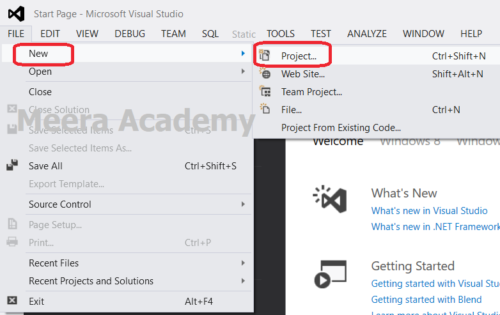
open visual studio 2012 –> File Menu –> New –> Project
Start to create a new C# Windows Forms Application Project
Open visual Studio 2012 and select New –> Project option from File Menu as shows in below figure.
When we create a new windows forms application in visual studio, at that time we have language selection option which we wish to use in our windows application as server side programming language.
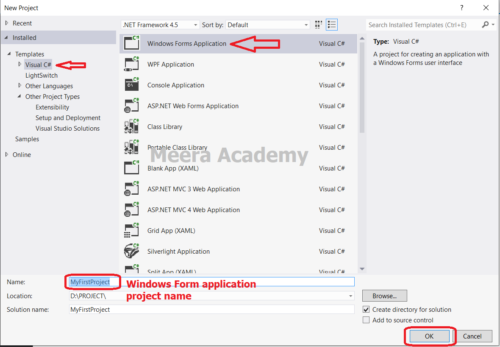
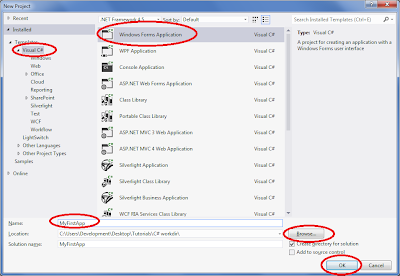
Here, we have selected c# language for our windows application as shows in below figure. As figure shows select Windows Forms Application option and at the bottom of figure there is Location portion for assign the path to store windows application. In Name portion, we write windows application project name.
Language –> Visual C#
File Menu –> New –> Project –> Windows Forms Application
Here, in above figure the location “D:\PROJECT\” is our windows application project location folder path where we store/save our project and the “MyFirstProject” is the windows application name which we created. After making this things click on OK button to create a new blank Windows Forms Application.
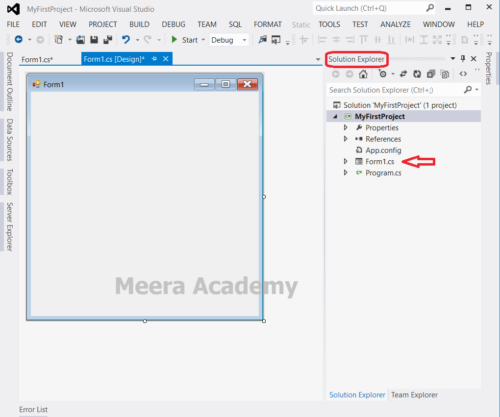
Here, we successfully created Windows forms Application with a windows form Form1. In below figure shows Solution Explorer which displays whole project details include Windows Forms, Settings files, Class files and Folders.
Here, windows application project forms known as Windows Form, and in web application it known as Web Form.
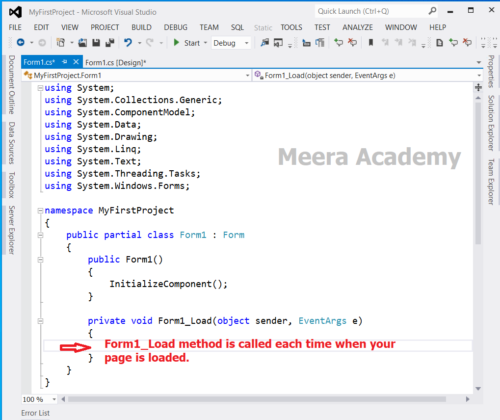
Below figure display the code behind page of windows forms where it allow programmer to write c# programming coding. We can see the Form1_Load method in below figure, the Form1_Load method is called each time when our page is loaded.
We hope that this c#.net post helped you to understand about how to create windows application.
Next, c# windows application tutorial we will understand about how to set .net framework.
В Visual Studio 2012 нет шаблона «Приложение Windows Forms» для Visual C++:
Разработчики из Microsoft решили убрать такую возможность. (А может это очередная попытка пересадить всех на C# для проектов WinForms… не знаю). Тем не менее решение существует. И даже 2.
Решение 1 (мне больше нравится)
Взято отсюда.
Шаг 1. Скачать архив VS2012CPPWinForms.zip (3 Кб) (оригинал)
Шаг 2. Разархивировать в «C:\Program Files (x86)\Microsoft Visual Studio 11.0\VC\vcprojects\vcNET\»
Шаг 3. (Пере-) запустить VS 2012 и создать проект «Visual C++» > «CLR» > «Приложение Windows Forms».
Решение 2 (мне, вообще, не нравится)
Шаг 1. Создать проект «Приложение Windows Forms» в Visual Studio 2010 (или другой более ранней версии). Выбор версии .NET на данном этапе несущественен.
Шаг 2. Открыть созданный проект в Visual Studio 2012. Потребуется обновить файлы до более поздней версии Visual Studio (2012):
Видим снизу:
Обновление проекта "WinForms_NET4"...
 Конфигурация "Debug|Win32": изменение набора инструментов платформы на "v110" (был набор "v100").
 Конфигурация "Release|Win32": изменение набора инструментов платформы на "v110" (был набор "v100").
 TargetFrameworkVersion = v4.5 (прежнее значение v4.0)

========== Обновление проектов VC++: успешно: 1, с ошибками: 0, не требуют обновления: 0 ==========
Шаг 3. Используя меню «ФАЙЛ» > «Экспорт шаблона…» запускаем мастер создания шаблона.
Если в имени шаблона задать русские буквы, то появится предупреждение. Нажимаем «Да».
На последнем этапе мастера указывалось местоположение выходных файлов. В этой папке будет находится копия файла шаблона. Сам файл шаблона будет в папке «%USERPROFILE%\Documents\Visual Studio 2012\Templates\ProjectTemplates»:
Файл «Приложение Windows Forms.zip» можно скачать по ссылке.
По организации файлов-шаблонов рекомендую почитать How to: Locate and Organize Project and Item Templates.
Теперь собственно можно создавать приложения на C++ с использованием Windows Forms:
Рекомендую почитать:
http://stackoverflow.com/questions/11130915/windows-form-clr-application-in-visual-studio-2012-rc
Создание приложения Windows Forms с помощью .NET Framework (C++)
Проблемы с SP1
Рекомендую установить последний пакет обновлений (service pack). Например, в SP3 устранена проблема с компиляцией проекта при использовании внешних графический файлов в PictureBox. Ссылка на видео.
In this tutorial, I will be showing you how to create a basic Windows Forms application using C# in Visual Studio 2012. If you have an earlier version of Visual Studio, or a different edition, don’t worry. Many of the steps are very similar and some are even identical.
Creating a New Windows Forms Application
Before we get started, a couple basic concepts if you’re new to Visual Studio:
- A project is a collection of source code files and resources (configuration files, images, etc.)
- A solution is a collection of one or more projects.
Thus, a project lives inside a solution, and source code and resources live inside a project. Simple enough for now? Ok let’s get going.
To create a new Windows Forms application:
- Open up Visual Studio
- Click on File
- Hover over New
- Click Project
When the New Project window is displayed, you should make sure you are under C# as the language. Then, you should do the following:
- Verify you have Windows Forms Application selected
- Change the name of the project to something meaningful
- [optional] Select the Browse button and move the location of the project to some location you want to keep your solution.
- Click the OK button
This will generate the configuration and setup files necessary for your solution. You should now see the basic Design View for a Windows Forms application as the largest area in the visible interface. Before we move on, I want you to add one more thing. You need the toolbox, so we can actually add items to the form. If you already see it, then ignore these steps:
- Go to View
- Click Toolbox
Usually, I like to dock my toolbox as a tab along with Solution Explorer. Visual Studio has kind of a strange docking mechanism that you have to get used to. Click and drag the Toolbox that appears over the Solution Explorer and then hover over the center docking control and release the mouse. It should look something like this (note I’ve moved my tabs around a bit.)
Now, there are four major «parts» I want you to be aware of are:
- The Design View
- The Solution Explorer
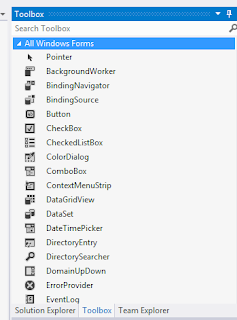
- The Toolbox
- The Properties Window
The Design View contains the area where you can place and select controls, such as buttons, text boxes, labels, and other user interface objects.
The Solution Explorer contains the projects in your solution. You’ll start out with one project, and it is often the case that you will only have one projects, even for many medium sized software applications you’ll work on.
The Toolbox, in the docking format I selected, is available by clicking on the botton tab to switch back and forth between our Solution Explorer and Toolbox. It contains the controls that we can add to our form.
The Properties Window contains various properties of a control, such as the programmatic name (the variable’s identifier), the display text, the color, styles, and many others. This window is also where you can view various events associated with the various user controls.
A Simple Example with a Button
Let’s create a very simple application that simply allows the user to click a button, and says «Hello!» to the user.
- From the Toolbox, drag a Button control (which is under All Windows Forms) onto the form in Design View.
- In the Properties Window, change the (Name) property to btnPressMe, which will be the name of the button used in the actual code we are about to write. It is a convention, but not required to start a button control identifier’s name with btn.
- Change the Text property to Click Me
Your form should now look something like the following:
Now we have our basic button ready.
Build and Run the application as follows:
- Go to Build
- Click Build Solution
- Go to Debug
- Click Start without Debugging
Now click the button. But wait. It doesn’t do anything. Why is this?
This is because you haven’t added an event handler to it. Close the executing Form1 application and go back into Visual Studio.
Adding an Event Handler to the Button
In Design View in Visual Studio, double click the button on the form. It will generate an event handler for the button and link it automatically. There are many different events to choose from. For buttons, the default event is Click. This code that you will write in this method is what will execute when a user of your application clicks the button.
So what can we do? Since we don’t know too much just yet, let’s just have a Message Box pop up and tell the user «Hello!»
Make your button’s event handler match the code inside the body of mine:
      private void btnPressMe_Click(object sender, EventArgs e)
        {
            MessageBox.Show("Hello!");
        }
Now build and run the application in the same manner you did before (Build —> Build Solution, then Debug —> Start without Debugging.)
See? If you click on the button, you now get a message!
The following is a simple step-by-step guide to creating a C++ Windows Form in Visual Studio 2012.
-
Add a new Project to the Solution
File > New > Project... > Visual C++ > CLR > CLR Empty Project -
Select the new Project in the Solution Explorer
-
Add a Windows Form to the Project
Project > Add New Item... > Visual C++ > UI > Windows Form -
Change the Project Subsystem
Project > Properties > Configuration Properties > Linker > System > SubSystemChange this value to
Windows (/SUBSYSTEM:WINDOWS) -
Change the Project Entry Point
Project > Properties > Configuration Properties > Linker > Advanced > Entry PointChange this value to
main. Apply these changes and close the Properties window. -
Open the
.cppfile associated with the Windows FormEnter the following code:
#include "MainWindow.h" using namespace System; using namespace System::Windows::Forms; [STAThread] void main() { Application::EnableVisualStyles(); Application::SetCompatibleTextRenderingDefault(false); Program::MainWindow mainWindow; Application::Run(%mainWindow); } -
Run the Application
You now have a very simple Windows Form in C++, ready to be built up with your other C++ projects.
Начиная с Visual Studio 2012, в Microsoft Visual C++ отсутствует возможность непосредственного создания проектов Windows Forms. Это доставляет немало неудобств разработчикам.
Однако сама возможность использования этой технологии не исключена и поэтому проект, для приложения Windows Forms, можно создать вручную.
Для этого необходимо вначале создать пустой проект CLR и настроить его параметры.
В свойствах проекта необходимо выбрать ветку «Компоновщик» – «Система» и в строке «Подсистема» выбрать Windows, как это показано на скриншоте ниже.
После этого в ветке «Дополнительно» в строке «Точка входа» следует указать названии функции, которая будет являться точкой входа в программу.
На этом настройка проекта завершена.
Теперь необходимо создать главное окно программы и описать в нём точку входа.
Для этого в контекстном меню обозревателя решения Visual Studio выберем «Добавить» – « Создать элемент» и в открывшемся окне в ветке UI выберем Форма Windows Forms.
После добавления формы в проекте появятся файлы с её исходным кодом. Файл залоговка (в данном примере MyForm.h) и файл исходного кода (в данном примере, MyForm.cpp), в котором и следует описать точку входа в программу.
Точка входа программу представляет собой простую функцию, состоящую всего из 4х строк кода.
Вначале подключаем необходимые для работы модули.
|
using namespace System; using namespace System::Windows::Forms; |
Указываем атрибут потока STAThread, в котором будет выполняться функция, которая является точкой входа. Атрибут означает, что стартовый поток будет работать в Single Threaded COM-Apartment. Это нужно для объектов Windows Forms, которые работают в этом потоке.
После этого уже можно приступать непосредственно к описанию точки в хода (функция main).
Вначале включаем визуальные стили с помощью метода EnableVisualStyles() ,и, используя метод SetCompatibleTextRenderingDefault,задаём технологию визуализации графического интерфейса.
Далее запускаем приложение с созданной формой в качестве главного окна.
|
Проект1::MyForm Form; Application::Run(%Form); |
В итоге файл исходного кода с функцией main выглядит следующим образом.
|
#include «MyForm.h» using namespace System; using namespace System::Windows::Forms; [STAThread] void main(array^ args) { Application::EnableVisualStyles(); Application::SetCompatibleTextRenderingDefault(false); Проект1::MyForm Form; Application::Run(%Form); } |
С помощью этого нехитрого способа можно разрабатывать приложения с использованием Windows Forms на C++ в Visual Studio 2012 и 2013.
Бесспорно, данный подход гораздо менее удобен по сравнению с непосредственным созданием проекта Windows Forms, которое было доступно вплоть до Visual Studio 2010 включительно. Но, к сожалению, новые версии пока не могут предложить разработчикам ничего другого. Остаётся надеяться, что в будущих версиях этот недостаток всё же будет устранён.
